*Applies to Windows Vista, Windows 7, Windows 8/8.1, and Windows 10
 Do you remember the old “Copy to” and “Move to” options which were once part of the Windows right-click context menu? For some reason, beginning with Vista, Microsoft decided to do away with these two options. I remember, years ago, using a freeware tweaking tool to add the “Copy to” and Move to” options back in.
Anyway, it’s something which I’ve always found useful and, while there are still freeware tweaking tools around that will add these options for you, it’s very easy to do manually via a simple registry hack.
Not that it’s overly complicated to copy and move files around using drag and drop. Simply open the two folders/locations, right-click the file and hold down the right-click button, drag the file from its original folder to the new folder/location and release the right-click button. This will then present options asking if you want to “Move” or “Copy” the file:
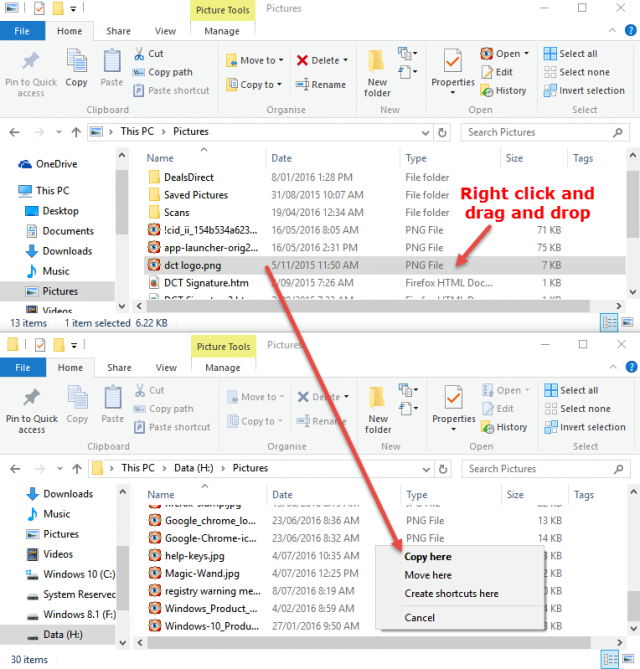
Select either Copy here or Move here and the job’s done.
Adding the “Copy to” and “Move to” options into the right-click menu provides an alternative method to achieve the same result. Whether or not this method is simpler than drag and drop is probably a matter of opinion but I’ve found it to be more convenient and, I guess, it’s something which I’ve simply become used to. So, if you would like to bring back these options in any version of Windows since Vista, including Windows 10, here’s how.
These are pretty straight forward registry changes but I’ve provided a download which will get the job done for you without needing to manually edit the registry keys. Simply click the download button below to download the less than 1KB zip folder:

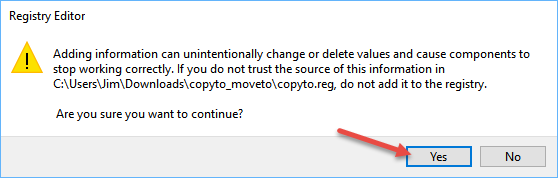
Once downloaded, you should see a file called copyto_moveto.zip in your default Downloads folder. Right click the file and select Extract All. Once the extraction is complete, you should now see 2 files in the extracted folder: copyto.reg and moveto.reg. Right click on one of the files and select Merge. You’ll receive a warning about changing registry values – this is a standard message, just click Yes to proceed:
Now go through the same process for the second file. Once you’ve finished merging both files you’ll now see the “Copy to” and “Move to” options included in the right-click menu.
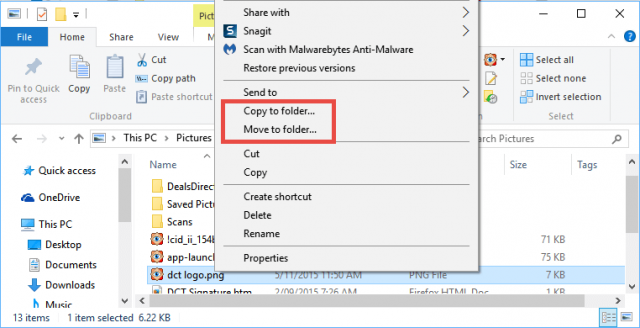
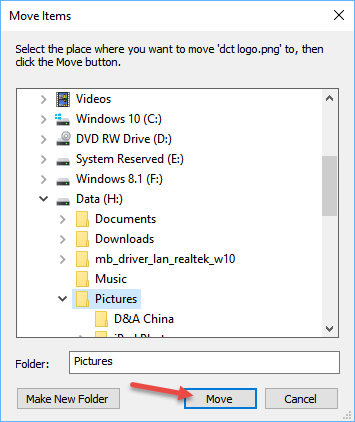
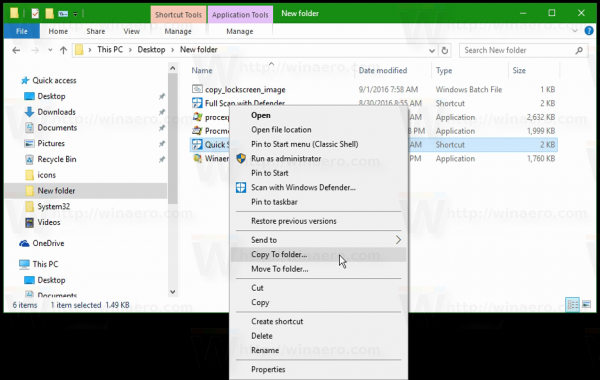
To copy or move a file to another folder/location, right click the file and select the appropriate option. This will open a browse window where you simply select your destination folder and then click either the Move or Copy button (depending on your chosen action):
*Copy or move multiple files by holding down the CTRL key while selecting each file, when all files you want to copy or move to another location are highlighted, right-click one of the selected files and choose “Copy to” or “Move to” from the right-click menu.
—
В данной статье показаны действия, с помощью которых можно добавить команды «Копировать в папку» и «Переместить в папку» в контекстное меню проводника Windows.
В операционных системах Windows 7, Windows 8, Windows 8.1, Windows 10, а также в предыдущих версиях Windows, таких как Windows Vista и Windows XP есть интересная функция, которая позволяет добавить в контекстное меню команды «Копировать в папку» и «Переместить в папку».
При выборе такой команды откроется новое окно, в котором можно выбрать соответствующее место для переноса или копирования файла или папки.

Как добавить команды «Копировать в папку» и «Переместить в папку» в контекстное меню
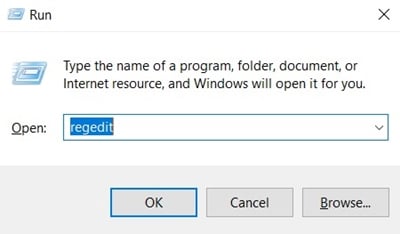
Для того чтобы добавить команду Копировать в папку. в контекстное меню, воспользуемся редактором системного реестра, для этого нажмите сочетание клавиш ![]() + R, в открывшемся окне «Выполнить» введите (скопируйте и вставьте) regedit, нажмите клавишу Enter↵.
+ R, в открывшемся окне «Выполнить» введите (скопируйте и вставьте) regedit, нажмите клавишу Enter↵.

В открывшемся окне редактора реестра перейдите в следующий раздел:
HKEY_CLASSES_ROOT\AllFilesystemObjects\shellex\ContextMenuHandlers
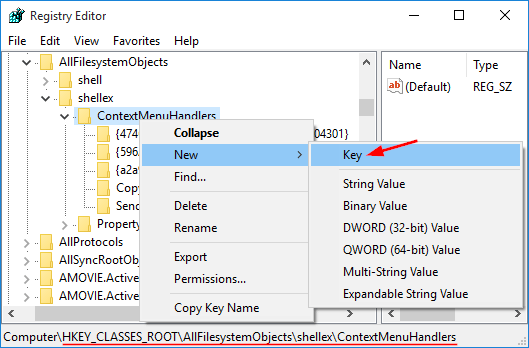
Нажмите правой кнопкой мыши на разделе ContextMenuHandler и в появившемся контекстном меню выберите Создать > Раздел. Присвойте созданному разделу имя Copy To.

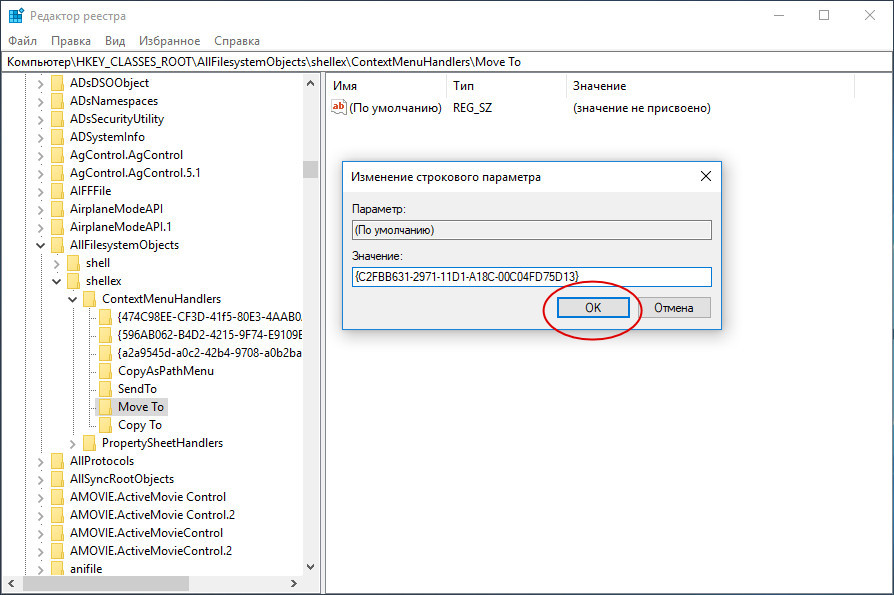
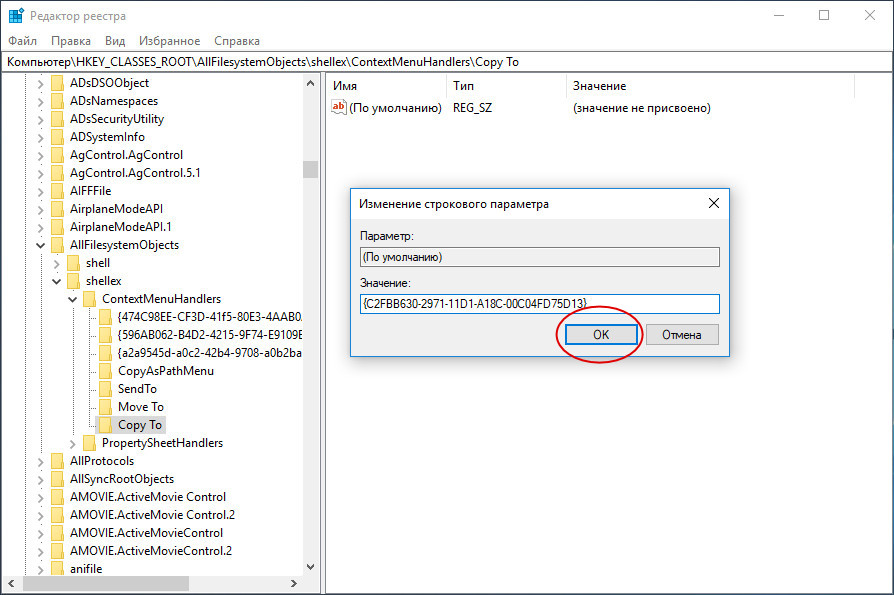
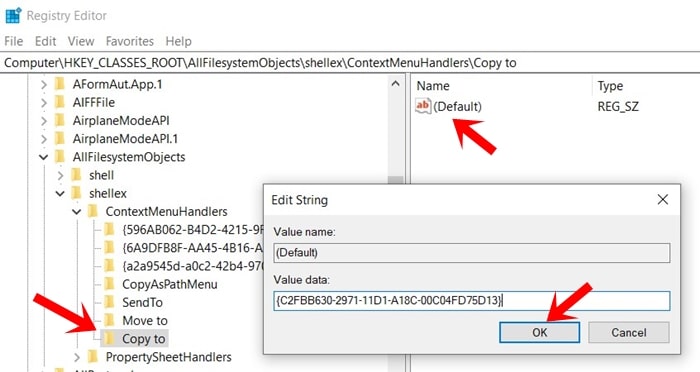
Далее дважды щелкните левой кнопкой мыши на параметре (По умолчанию) в созданном нами разделе Copy To, и в открывшемся окне «Изменение строкового параметра» в поле Значение: введите или скопируйте и вставьте следующее значение:
{C2FBB630-2971-11D1-A18C-00C04FD75D13}
После этого нажмите кнопку OK, изменения вступают в силу сразу.

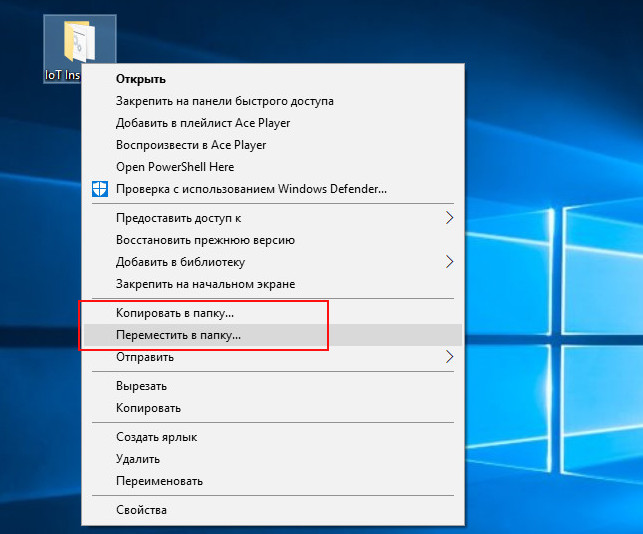
Проверим, теперь если щелкнуть на любом файле или папке правой кнопкой мыши, появится новая команда Копировать в папку.

.
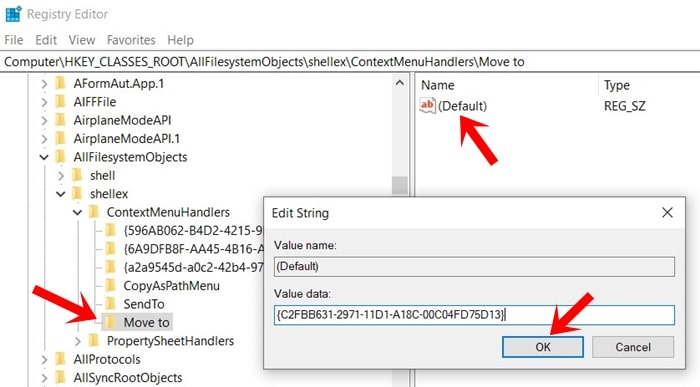
Для того чтобы добавить команду Переместить в папку в контекстное меню, выполните те же действия, только вместо раздела Copy To создайте раздел Move To и введите следующее значение:
{C2FBB631-2971-11D1-A18C-00C04FD75D13}
В результате, в контекстном меню будет уже две команды, Переместить в папку. и Копировать в папку.

Также для того чтобы добавить в контекстное меню команды Копировать в папку. и Переместить в папку., можно создать и применить файл реестра следующего содержания:
Windows Registry Editor Version 5.00.
;Команда Копировать в папку
[HKEY_CLASSES_ROOT\AllFilesystemObjects\shellex\ContextMenuHandlers\Copy To]
@=»{C2FBB630-2971-11D1-A18C-00C04FD75D13}»;Команда Переместить в папку
[HKEY_CLASSES_ROOT\AllFilesystemObjects\shellex\ContextMenuHandlers\Move To] @=»{C2FBB631-2971-11D1-A18C-00C04FD75D13}».
Для того чтобы удалить команды Копировать в папку. и Переместить в папку. из контекстного меню, создайте и примените файл реестра следующего содержания:
Windows Registry Editor Version 5.00.
;Удалить команду Копировать в папку
[-HKEY_CLASSES_ROOT\AllFilesystemObjects\shellex\ContextMenuHandlers\Copy To];Удалить команду Переместить в папку [-HKEY_CLASSES_ROOT\AllFilesystemObjects\shellex\ContextMenuHandlers\Move To].
- Вы также можете скачать zip-архив с файлом реестра для добавления в контекстное меню команд Копировать в папку и Переместить в папку.
- Также можно скачать zip-архив с файлом реестра для удаления команд Копировать в папку и Переместить в папку из контекстного меню.
In Windows 10, you can add the commands Copy To and Move To to the context menu of File Explorer. While these commands are available on the Ribbon, it is useful to have them directly in the right click menu for faster access. Let’s see how it can be done.
The Copy To context menu command is designed to copy selected files and folders to a destination folder which the user can choose.
The context menu command Move To has a similar behavior but it moves selected items from one location to another.
As noted earlier, these commands are accessible from the Ribbon in Windows 10’s File Explorer: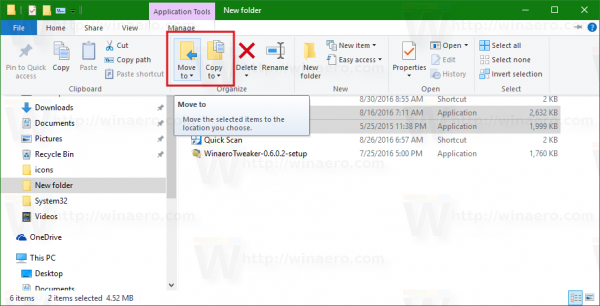
Having them in the context menu can speed up your daily file management tasks. They are especially useful for users who prefer to disable the Ribbon interface of Windows 10’s File Explorer. Here is what you have to do to add these commands to the context menu.
Add Copy To and Move To in the context menu of File Explorer
- Open Registry Editor.
- Go to the following key:
HKEY_CLASSES_ROOTAllFilesystemObjectsshellexContextMenuHandlers
Tip: see How to jump to the desired registry key with one click
- Here, create a new subkey using the following names:
 — for the Move To command, create a new subkey named {C2FBB631-2971-11d1-A18C-00C04FD75D13}.

— for the Copy To context menu command, create a new subkey named {C2FBB630-2971-11D1-A18C-00C04FD75D13}.
 — for the Move To command, create a new subkey named {C2FBB631-2971-11d1-A18C-00C04FD75D13}.
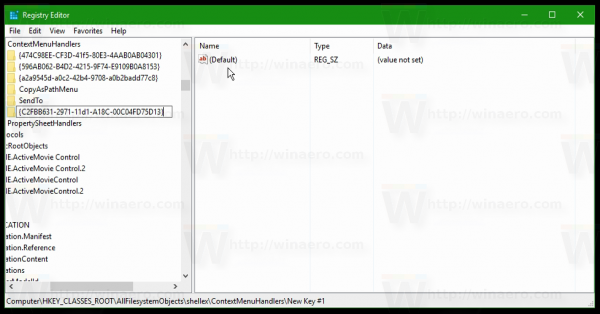
Now, you can select one or more files and folders in File Explorer and right click them. The commands will be accessible right in the context menu, as shown above.
To save your time, I prepared ready to use Registry files which you can download from here:
Download Registry Files
Watch the following video to see everything mentioned above in action:
Tip: you can subscribe to our YouTube channel HERE.
Note: This trick also works in Windows 7, Windows 8 and Windows 8.1.
Do you find these commands useful? Will you add them to the context menu? Tell us in the comments!
Support us
Winaero greatly relies on your support. You can help the site keep bringing you interesting and useful content and software by using these options:
If you like this article, please share it using the buttons below. It won’t take a lot from you, but it will help us grow. Thanks for your support!
-
MiniTool
-
MiniTool News Center
- How to Add ‘Move to’ and ‘Copy to’ to the Context Menu in Windows 10
By Vera | Follow |
Last Updated January 16, 2020
![]()
By default, Microsoft doesn’t include these two commands such as ‘Copy to’ and ‘Move to’ in the context menu of Windows Explorer. But here, you can make a few tweaks of Windows Registry to fix that oversight. Now, let’s see how to add ‘Move to’ and ‘Copy to’ to the context menu in Windows 10.
Need for Context Menu Commands: Copy to Move to Windows 10
In Windows 10, certain functions are used more frequently than others, for example, Cut and Copy & Paste. Although it strives to be the most flexible operating system, Microsoft Windows 10 still has a few quirks, especially power users, would like to change.
Some of you want to add some features to correct these quirks, for instance, copy or move files to a folder easily and quickly rather than Cut and Copy & Paste.
In the right-click menu of Windows Explorer, there are not ‘Copy to’ and ‘Move to’ commands. Since Windows XP, some versions of these tweaks have been around but Microsoft obstinately decides not to add them as the default OS functionality. As a result, you need to do it yourself.
And if you add these commands, faster access to file transfer will be enabled, which can help you save some time. So, how to add “Copy To” & “Move To” shortcut in Windows 10 File Explorer without wasting any time? Let’s go to the following part.
How to Add ‘Move to’ and ‘Copy to’ to the Context Menu
To add these context menu commands in Windows 10 Windows Explorer, you need to an edit of the Windows Registry file. The following is the step-by-step guide.
Warning: Editing Windows Registry is a serious undertaking. If you use the Editor incorrectly, serious problems may be caused like the inoperable system, requiring a reinstallation of Windows 10 OS and data loss. Thus, you had better back up Windows Registry file and create a valid restore point before proceeding.
After opening File Explorer in Windows 10 and right-click on a file or folder, you will see the ‘Send to’ command item. You may think it is the one you need. Actually, it is not the «Copy to» and «Move to» items you would like. To add your needed functionality, let’s run Windows Registry Editor.

Step 1: Hold down the Windows logo key and R key, input regedit in the Run dialog and click the OK button.
Step 2: Go to the following key:
HKEY_CLASSES_ROOTAllFilesystemObjectsshellexContextMenuHandlers
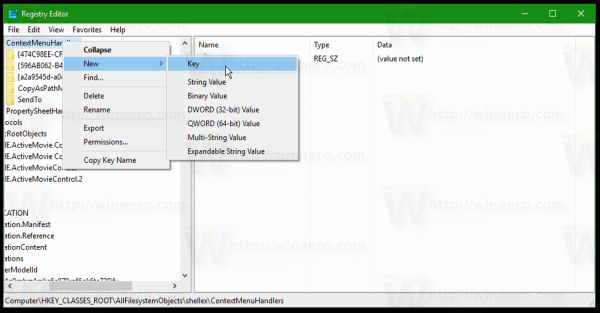
Step 3: Right-click on the ContextMenuHandlers folder and choose New > Key and name it Copy To.
Step 4: Double-click the new key’s default in the right navigation pane and change the data value to {C2FBB630-2971-11D1-A18C-00C04FD75D13}.

Step 5: To add ‘Move to’ item, you also need to right-click the ContextMenuHandlers folder and create a new key called Move To. And then, change its value data to {C2FBB631-2971-11D1-A18C-00C04FD75D13}.

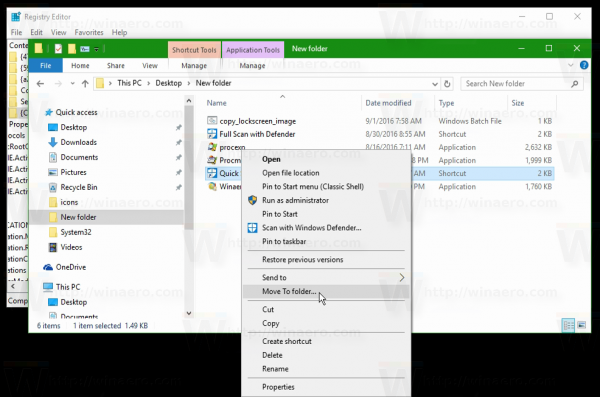
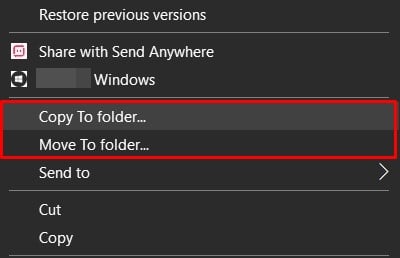
Step 6: Now you have added ‘Copy to’ command and ‘Move to’ command in Registry. Exit Registry Editor and then go to Windows Explorer, right-click on a file or folder, you will find these two items: Copy To folder and Move To folder.

Final Words
By adding these features directly to the context menu of Windows Explorer, you won’t use multiple mouse-clicks and keyboards shortcuts to move or copy files from one folder to another folder. All it takes is making a few simple edits of the Windows 10 registry file.
Tip: Mistaken operation to the registry files can cause the system to be unbootable. Thus, you should remember to back up your operating system with MiniTool ShadowMaker, professional Windows backup software or back up registry files (as mentioned above).
About The Author

Position: Columnist
Vera is an editor of the MiniTool Team since 2016 who has more than 5 years’ writing experiences in the field of technical articles. Her articles mainly focus on disk & partition management, PC data recovery, video conversion, as well as PC backup & restore, helping users to solve some errors and issues when using their computers. In her spare times, she likes shopping, playing games and reading some articles.

В Windows 10 Microsoft удалила из контекстного меню папок и файлов опции «Копировать в папку…» и «Переместить в папку…», посчитав их, очевидно, излишними в операционной системе, в которой операции копирования и перемещения можно выполнять простым перетаскиванием или нажатием «горячих» клавиш Ctrl + X, Ctrl + C и Ctrl + V. Пользователям, недавно перешедшим с более ранних версий системы на Windows 10 такое изменение может показаться не особо удачным.
Особенно если в процессе работы они часто прибегали к указанным опциям.
Так вот, при необходимости их легко восстановить, потратив всего пять минут времени.
Жмем Win + R, вводим команду regedit, открываем одноименный редактор реестра и переходим к ключу:
HKCRAllFilesystemObjectsShellExContextMenuHandlers
Кликнув по пустому месту в правой колонке, выбираем «Создать раздел».
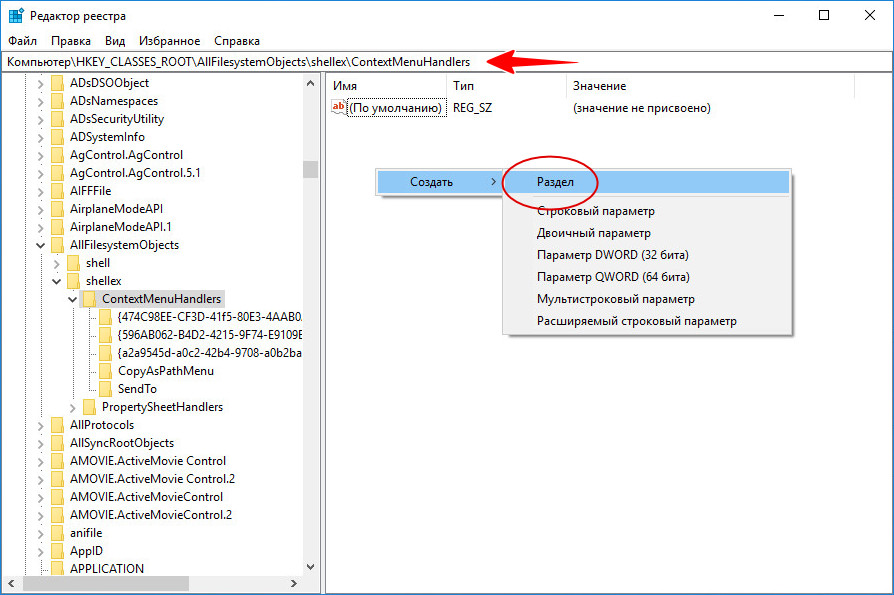
И создаем подраздел с именем Move To.
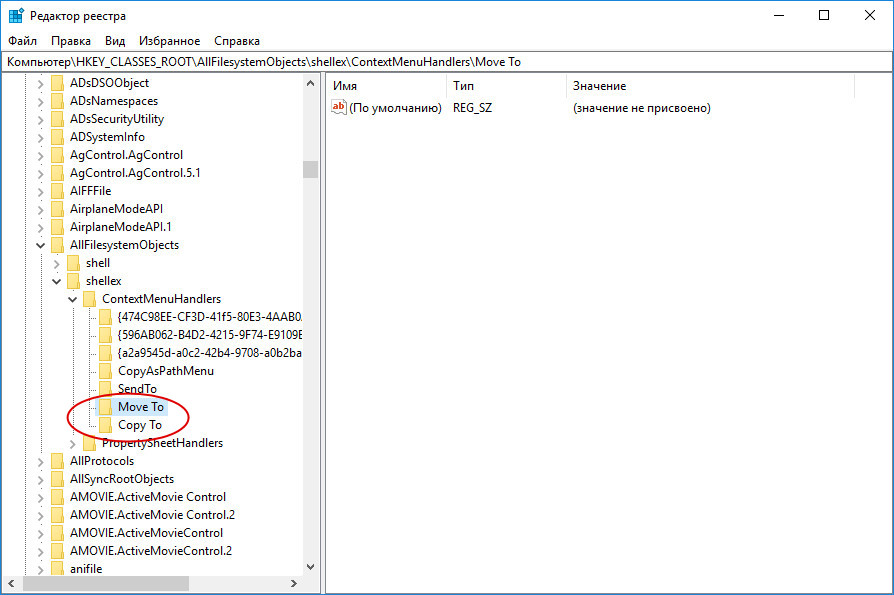
Затем точно так же создаем второй подраздел и даем имя Copy To.
За сим выделяем новосозданный раздел Move To, двойным кликом открываем окошко изменения параметра по умолчанию и присваиваем ему значение {C2FBB631-2971-11D1-A18C-00C04FD75D13}.
Аналогичную процедуру проделываем с параметром по умолчанию подраздела Copy To, но на этот раз в качестве значения указываем строку {C2FBB630-2971-11D1-A18C-00C04FD75D13}.
Изменения станут очевидными сразу же, перезапускать Проводник нет никакой необходимости.
Оцените Статью:
 (7 оценок, среднее: 5,00 из 5)
![]() Загрузка…
Загрузка…
Windows 10 context menu comes with some pretty useful functionalities. However, the ‘Copy to’ and ‘Move to’ features, among the most used options in Windows, are yet to make its way. The surprising thing is that there exists a hack to enable the same and is around since the launch of Windows XP. However, Microsft is yet to make it any decision regarding its incorporation as a default OS functionality. But with the help of a Registry Editor hack, you could easily add the ‘Move to’ and ‘Copy to’ features in the context menu of Windows 10.
Dealing with the Registry editor is often a dangerous task. Even the slightest mistake and you might mess up big time. Therefore, it is always recommended to have a backup and a restore point for your PC. Please follow each and every step very carefully. With that said, here are the instructions to add the ‘Move to’ and ‘Copy to’ features in the Windows 10 context menu. Also, have a look at our guide to accessing the WindowsApps folder in Windows 10.
- Launch the start menu and use the Windows+R shortcut to open the Run dialog box. Type regedit and hit OK.

- Now copy-paste the below location to the Registry Editor’s address bar.
HKEY_CLASSES_ROOTAllFilesystemObjectsshellexContextMenuHandlers

- Right-click on the ContextMenuHandlers and select New > Key.
- Name this key Move to and hit Enter.
- Now, open the (Default) file and type in the below command in the Value Data field:
{C2FBB631-2971-11D1-A18C-00C04FD75D13}

Finally, click OK and close the dialog box. ‘Move to‘ has now been added and we will now see how to add the ‘Copy to‘ option in the Context menu. On that note, also check out the steps to create custom shortcuts for various Windows applications.
Adding ‘Copy to’ Option
- Again open the Registry Editor via the Run dialog box (Win+R).
- Navigate to the below address in the Registry Editor. Or you could directly copy-paste it into its address box. Similar to where you have added the ‘Move to’ option, ‘Copy to’ is also to be added in the same location, i.e.:
HKEY_CLASSES_ROOTAllFilesystemObjectsshellexContextMenuHandlers
- Again, right-click on the ContextMenuHandlers and select New > Key.
- Name this key Copy to and press Enter.
- Double-click the (Default) file and enter the below string in the Value Data field:
{C2FBB630-2971-11D1-A18C-00C04FD75D13} - That’s it. Hit OK and close the dialog box. The said option would have been added to the right-click menu.
So with that, we conclude the guide on how to add the Move to and Copy to options in the Windows 10 context menu. What do you think of this trick? Do share your opinions in the comments section below.
Read next: 8 Mouse Tricks for Windows to Increase Your Productivity

Windows 10 has a hidden function that allows you to right-click a file and either move or copy it to a specific location of your choosing. This little registry hack will have you copying and moving your files with ease.
We have to preface this with a standard warning, however. The Registry Editor is a powerful tool and, if it’s misused, it can render your system unstable or even inoperable. This is a pretty simple hack, though. As long as you stick to the instructions, you shouldn’t have any problems.
If you’ve never worked with the Registry Editor before, though, you might want to read up on it a bit before you get started. And definitely back up the Registry (and your computer) before you make the following changes.
RELATED: How to Backup and Restore the Windows Registry
If you want to be extra safe, you can also create a System Restore point before you continue. That way, if something does go wrong, you can just roll back to before things went haywire.
To add “Move to” to the context menu, the first thing you have to do is open the Registry Editor. To do so, press Windows+R, type “regedit” in the text box, and then press Enter.

Navigate to the following key in the left sidebar or you can paste it directly into the address bar:
HKEY_CLASSES_ROOTAllFilesystemObjectsshellexContextMenuHandlers
Once you’re there, right-click “ContextMenuHandlers,” and then select New > Key from the pop-up menu.
Name the new key “Move to,” and then press Enter.
Now, double-click “(Default),” paste the following string into the “Value Data” field, and then press Enter:
{C2FBB631-2971-11D1-A18C-00C04FD75D13}
You can now safely close the Registry Editor. You don’t have to restart or sign out to start using this functionality.
Add “Copy to” to the Context Menu
The same as before, to add “Copy to” to the context menu, you first open the Registry Editor. Press Windows+R, type “regedit” in the text box, and then press Enter.
Navigate to the following key in the left sidebar or paste it directly into the address bar:
HKEY_CLASSES_ROOTAllFilesystemObjectsshellexContextMenuHandlers
Once you’re here, right-click “ContextMenuHandlers” and select New > Key from the pop-up menu.
Name the new key “Copy to” and press Enter.
Now, double-click “(Default),” paste the following string into the “Value data” field, and then press Enter:
{C2FBB630-2971-11D1-A18C-00C04FD75D13}
When you’re finished, you can safely close Registry Editor. Again, you don’t have to restart or sign out to start using this functionality.
Download Our One-Click Registry Hack
If you’d rather not edit the registry yourself, you can download our Add Move to/Copy to registry hack. Just open the ZIP file, double-click either “AddMoveTo.reg” or “AddCopyTo.reg,” and then click “Yes” to add the information to your registry.
These REG files add the same registry settings we covered above. If you’d like to see what this (or any other) REG file will do before you run it, right-click the file, and then select “Edit” to open it in Notepad.
You can also easily make your own Registry hacks.
Using “Move to” or “Copy to” From the Context Menu
After you add these tweaks to the Windows registry and you right-click a file or folder, the context menu appears as usual, but it will now also contain the “Move to” and/or “Copy to” options.
A nice little dialog pops up so you can choose a destination folder. After you do, just click “Copy” to send that file to the folder you specified.
READ NEXT
- › How to Copy or Move Files and Folders on Windows 10
- › Get PC Power With Tablet Portability in the Surface Pro 9 for $200 Off
- › This Huge Curved Ultrawide Monitor From LG Is $337 Today
- › What Is a Condenser Microphone, and How Do They Work?
- › How to Change Your Age on TikTok
- › The New HP Pro x360 Fortis Is a 2-In-1 Laptop Under $500
- › How to Screen Record on iPhone

on
March 19, 2019, 7:43 AM PDT
How to add ‘Move to’ and ‘Copy to’ to the context menu in Windows 10
Microsoft does not include «Copy to» and «Move to» by default in the Windows Explorer context menu, but a few tweaks of the Windows Registry file can fix that oversight.

Despite concerted efforts to be the most flexible operating system possible, Microsoft Windows 10 still has a few quirks that some of us, particularly power users, would like to change. Annoyingly, correcting many of these quirks by adding new and improved features often requires an edit of the Windows Registry file and more than a little esoteric knowledge.
One of the most common power-user additions made via Windows Registry tweak is the inserting of “Move to” and the “Copy to” into the Windows 10 File Explorer context menu. Some version of this tweak has been around since the days of Windows XP, but Microsoft obstinately decided not to add it as the default OS functionality. Consequently, we need to do it ourselves.
SEE: System update policy template download (Tech Pro Research)
This how-to tutorial shows you how to add the “Move to” and the “Copy to” functions to the File Explorer context menu by editing the Windows 10 Registry file.
Disclaimer: Editing the Windows Registry file is a serious undertaking. A corrupted Windows Registry file could render your computer inoperable, requiring a reinstallation of the Windows 10 operating system and loss of data. Back up the Windows 10 Registry file and create a valid restore point before you proceed.
Adding Move to and Copy to
This article is an update to Add Copy To and Move To to Windows Explorer with this registry hack, published in 2008. Adding these functions to the context menu can save a good bit of time, especially if moving or copying files is something you do as a normal part of your workday.
Figure A shows you the default File Explorer context menu in Windows 10. There is a “Send to” command item on the menu, but not the “Copy to” and “Move to” items we would like.

To add that functionality, start the Registry Editor application by typing “regedit” into the Cortana search box and then clicking or tapping the proper item in the search results. Once in the app (Figure B), navigate to this key:
HKEY_CLASSES_ROOTAllFilesystemObjectsshellexContextMenuHandlers

Right-click the ContextMenuHandlers folder and select New | Key. Give your new key the name “Copy to”. Double-click the new “Copy to” key’s Default setting in the right navigation pane and change its data value to this character string, including the curly brackets (Figure C):
{C2FBB630-2971-11D1-A18C-00C04FD75D13}

Right-click the ContextMenuHandlers folder again and select New | Key. Give your new key the name “Move to”. Double-click the new “Move to” key’s Default setting in the right navigation pane and change its data value to this character string, including the curly brackets (Figure D):
{C2FBB631-2971-11D1-A18C-00C04FD75D13}

When the process is complete, exit the Registry editor by clicking File | Exit.
Now, when you right-click a file in the Windows 10 File Explorer (Figure E) you will see entries in the context menu for “Copy to” and “Move to” that you can use to more easily manage files.

By adding these functions directly to the File Explorer context menu, you can avoid the multiple mouse-clicks and keyboard shortcuts most of us use to move or copy files from one folder to another folder. All it takes is a few simple edits of the Windows 10 Registry file.
Also See
-
Windows 10: A cheat sheet
(TechRepublic) -
How to find, use, and modify the Windows 10 Show Desktop button
(TechRepublic) -
How to activate the new clipboard functions in the Windows 10 October 2018 Update
(TechRepublic) -
The Windows 10 security guide: How to safeguard your business
(ZDNet) -
20 pro tips to make Windows 10 work the way you want
(TechRepublic download) -
Microsoft Office 365 for business: Everything you need to know
(ZDNet) -
The 10 most important iPhone apps of all time
(Download.com) -
It takes work to keep your data private online. These apps can help
(CNET) -
Programming languages and developer career resources coverage
(TechRepublic on Flipboard)
-
Microsoft
-
Software
September 23, 2016 updated by
Leave a reply »
How do you copy or move a file to another location in Windows? Most of us use the Copy or Cut command from the Context Menu, and then paste the file in the destination location. To speed up the file copying / moving operations, you can add the “Copy To” or “Move To” shortcuts to Windows right-click context menu. This is a hidden feature available in Windows 10/8.1/8/7, which can be enabled using a registry hack.
How to Add “Copy To” & “Move To” Shortcut to Windows Right-Click Menu?
- Open Registry Editor and navigate to the following key:
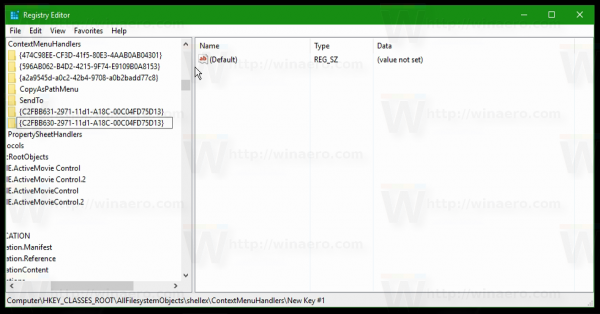
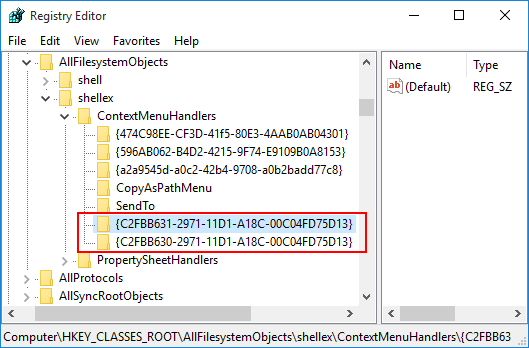
HKEY_CLASSES_ROOTAllFilesystemObjectsshellexContextMenuHandlers - Right-click on the ContextMenuHandlers key in the left pane, and then select New -> Key.

Rename the new subkey from “New Key #1” to {C2FBB630-2971-11D1-A18C-00C04FD75D13}. This will immediately add the “Copy To folder” shortcut to Explorer context menu.
- If you want to add the “Move To folder” shortcut to Explorer context menu as well, repeat the same steps to create a new subkey named {C2FBB631-2971-11D1-A18C-00C04FD75D13}.
- Now right-click on any folder or file on your computer, you’ll see two extra options (“Copy To folder” and “Move To folder“) have been added to the context menu.

- After selecting either “Copy To folder” or “Move To folder” from Windows right-click menu, a browse window will open. From there you can select your destination folder, click either the Copy or Move button (depending on your chosen action) and you’re done!


- Previous Post: How to Backup and Restore Device Drivers in Windows 10 / 8 / 7
- Next Post: How to Remove Shortcut Arrow from Desktop Icons in Windows 10 / 8 /7