1. Overview
With a bootable Ubuntu USB stick, you can:
- Install or upgrade Ubuntu
- Test out the Ubuntu desktop experience without touching your PC configuration
- Boot into Ubuntu on a borrowed machine or from an internet cafe
- Use tools installed by default on the USB stick to repair or fix a broken configuration
This tutorial will show you how to create a bootable USB stick on Microsoft Windows using Rufus.
For most users we recommend balenaEtcher instead of Rufus which is simpler to use and also available on MacOS and Ubuntu. Instructions are now included in the primary Install Ubuntu Desktop tutorial.
Creating a bootable Ubuntu USB stick from Microsoft Windows is very simple and we’re going to cover the process in the next few steps.
Alternatively, we also have tutorials to help you create a bootable USB stick from both Ubuntu and Apple macOS.

2. Requirements
You will need:
- A 4GB or larger USB stick/flash drive
- Microsoft Windows XP or later
- Rufus, a free and open source USB stick writing tool
- An Ubuntu ISO file. See Get Ubuntu for download links

Take note of where your browser saves downloads: this is normally a directory called ‘Downloads’ on your Windows PC. Don’t download the ISO image directly to the USB stick! If using Windows XP or Vista, download version 2.18 of Rufus.
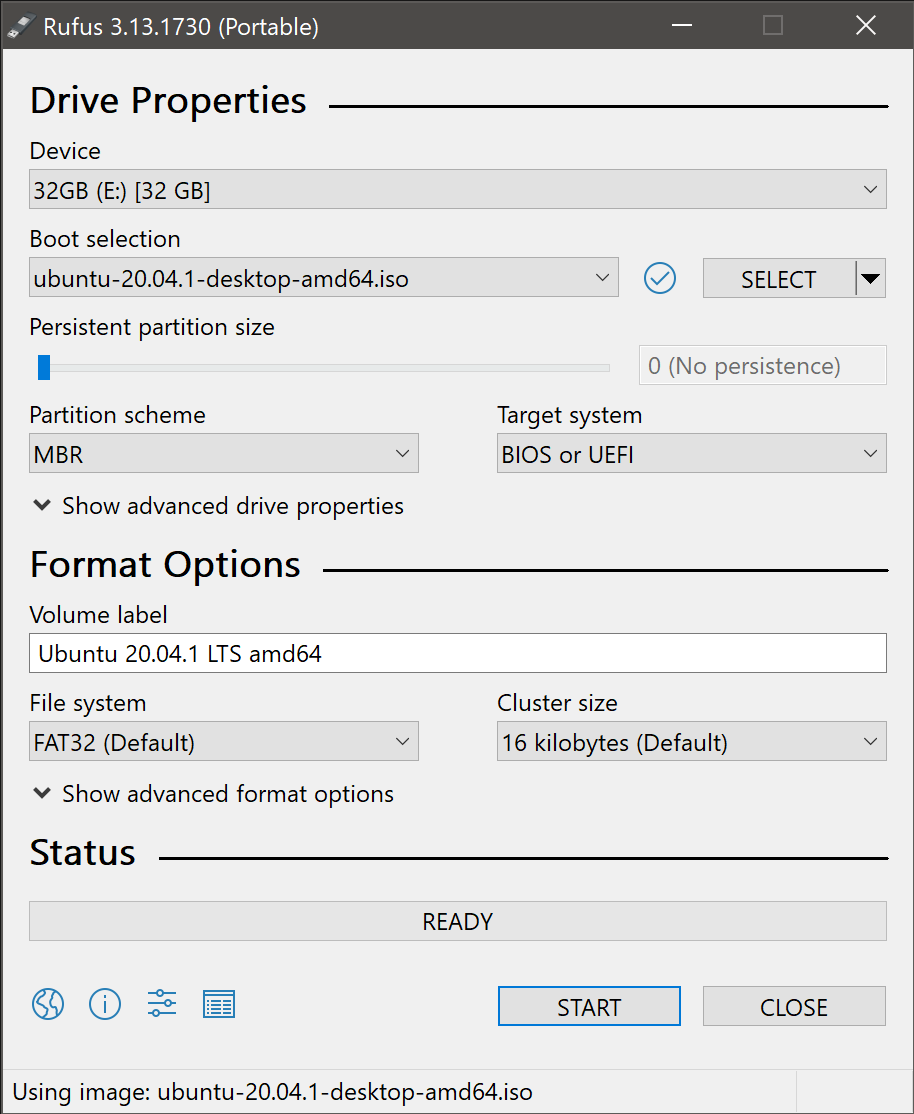
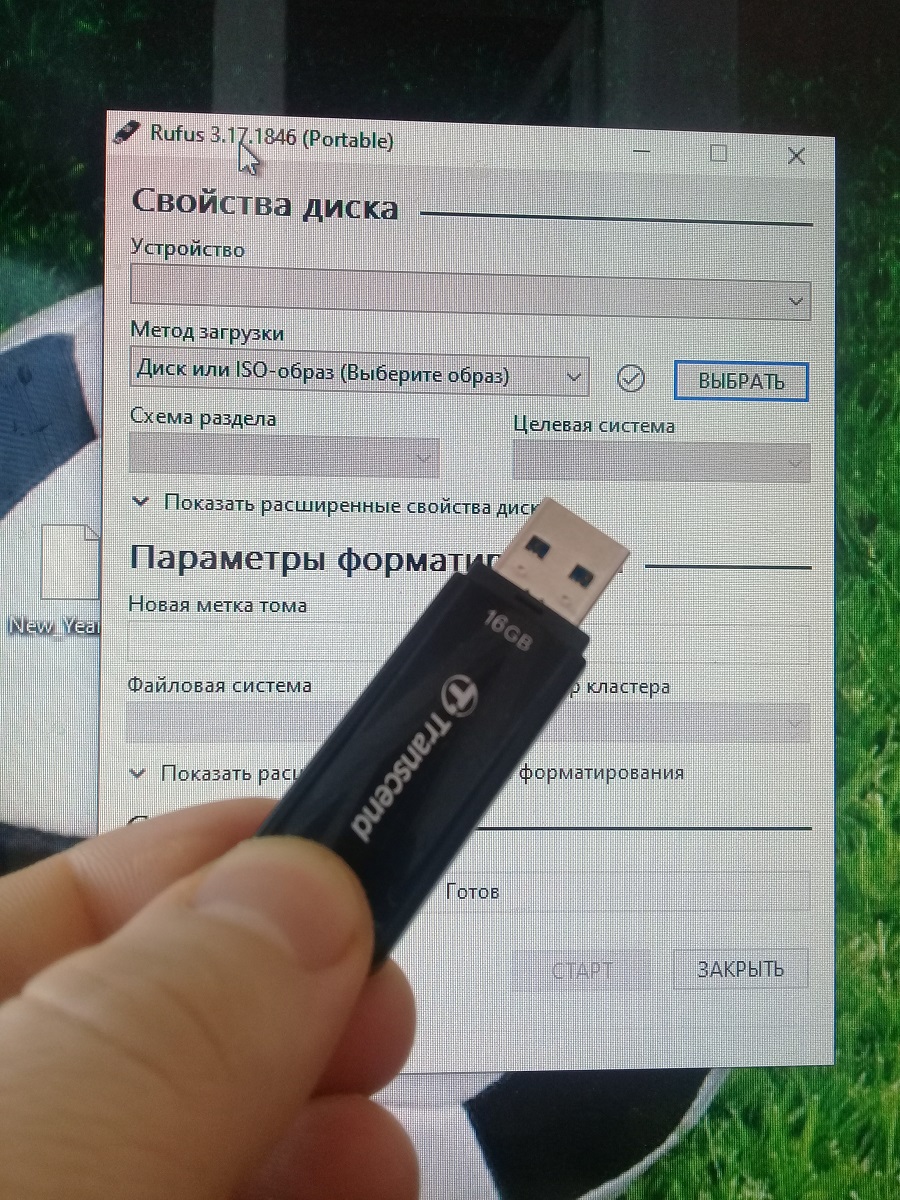
3. USB selection
Perform the following to configure your USB device in Rufus:
- Launch Rufus
- Insert your USB stick
- Rufus will update to set the device within the Device field
- If the Device selected is incorrect (perhaps you have multiple USB storage devices), select the correct one from the device field’s drop-down menu

You can avoid the hassle of selecting from a list of USB devices by ensuring no other devices are connected.
4. Select the Ubuntu ISO file
To select the Ubuntu ISO file you downloaded previously, click the SELECT to the right of “Boot selection”. If this is the only ISO file present in the Downloads folder you will only see one file listed.
Select the appropriate ISO file and click on Open.

5. Write the ISO
The Volume label will be updated to reflect the ISO selected.
Leave all other parameters with their default values and click START to initiate the write process.
6. Additional downloads
You may be alerted that Rufus requires additional files to complete writing the ISO. If this dialog box appears, select Yes to continue.

7. Write warnings
You will then be alerted that Rufus has detected that the Ubuntu ISO is an ISOHybrid image. This means the same image file can be used as the source for both a DVD and a USB stick without requiring conversion.
Keep Write in ISO Image mode selected and click on OK to continue.

Rufus will also warn you that all data on your selected USB device is about to be destroyed. This is a good moment to double check you’ve selected the correct device before clicking OK when you’re confident you have.
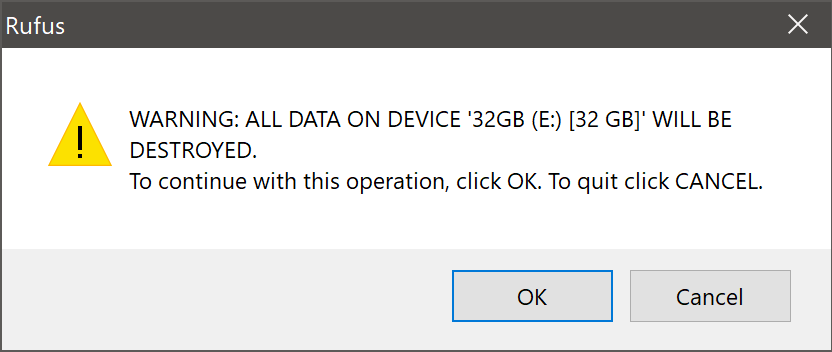
If your USB stick contains multiple partitions Rufus will warn you in a separate pane that these will also be destroyed.
8. Writing the ISO
The ISO will now be written to your USB stick, and the progress bar in Rufus will give you some indication of where you are in the process. With a reasonably modern machine, this should take around 10 minutes. Total elapsed time is shown in the lower right corner of the Rufus window.

9. Installation complete
When Rufus has finished writing the USB device, the Status bar will be filled green and the word READY will appear in the center. Select CLOSE to complete the write process.

Congratulations! You now have Ubuntu on a USB stick, bootable and ready to go.
To use it you need to insert the stick into your target PC or laptop and reboot the device. It should recognise the installation media automatically during startup but you may need to hold down a specific key (usually F12) to bring up the boot menu and choose to boot from USB.
For a full walkthrough of installing Ubuntu, take a look at our install Ubuntu desktop tutorial.
Finding help
If you get stuck, help is always at hand:
- Ask Ubuntu
- Ubuntu Forums
- IRC-based support
Was this tutorial useful?
Thank you for your feedback.

Create a bootable USB Drive
- Once the tool has been downloaded, you need to install & run it.
- Select the option “DISK IMAGE” and then browse & select the downloaded Ubuntu ISO path. In addition to this, also select the USB drive in which you want the Ubuntu setup to be installed. Once done, Click OK.
How do I boot Ubuntu from USB drive?
Run Ubuntu Live
- Make sure that your computer’s BIOS is set to boot from USB devices then insert the USB flash drive into a USB 2.0 port.
- At the installer boot menu, select “Run Ubuntu from this USB.”
- You’ll see Ubuntu start up and eventually get the Ubuntu desktop.
How do I boot from a USB drive in Windows 10?
How to Boot from USB Drive in Windows 10
- Plug your bootable USB drive to your computer.
- Open the Advanced Startup Options screen.
- Click on the item Use a device.
- Click on the USB drive that you want to use to boot from.
How do I boot Linux from USB?
Boot Linux Mint
- Insert your USB stick (or DVD) into the computer.
- Restart the computer.
- Before your computer boots your current operating system (Windows, Mac, Linux) you should see your BIOS loading screen. Check the screen or your computer’s documentation to know which key to press and instruct your computer to boot on USB (or DVD).
Boot from USB: Windows
- Press the Power button for your computer.
- During the initial startup screen, press ESC, F1, F2, F8 or F10.
- When you choose to enter BIOS Setup, the setup utility page will appear.
- Using the arrow keys on your keyboard, select the BOOT tab.
- Move USB to be first in the boot sequence.
How do I boot from USB in Ubuntu?
At boot time, press F2 or F10 or F12 (depending upon your system) to access boot menu. Once there, choose to boot from USB or removable media. That’s it. You can use Ubuntu without installing here.
How do I boot Ubuntu from USB on Chromebook?
Plug in your live Linux USB into the other USB port. Power on the Chromebook and press Ctrl + L to get to the BIOS screen. Press ESC when prompted and you will see 3 drives: the USB 3.0 drive, the live Linux USB drive (I am using Ubuntu) and the eMMC (the Chromebooks internal drive). Choose the live Linux USB drive.
How do I repair Windows 10 with bootable USB?
Step 1: Insert Windows 10/8/7 installation disk or installation USB into PC > Boot from the disk or USB. Step 2: Click Repair your computer or hit F8 at the Install now screen. Step 3: Click Troubleshoot > Advanced options > Command Prompt.
How do I create a bootable Windows 10 USB drive?
Just insert a USB flash drive with at least 4GB of storage to your computer, and then use these steps:
- Open the official Download Windows 10 page.
- Under “Create Windows 10 installation media,” click the Download tool now button.
- Click the Save button.
- Click the Open folder button.
Can I run Windows 10 from a USB drive?
Yes, you can load and run Windows 10 from a USB drive, a handy option when you’re using a computer saddled with an older version of Windows. You run Windows 10 on your own computer, but now you’re using another device outfitted with an older operating system.
How can I make a boot USB for Windows 10 on Ubuntu?
More videos on YouTube
- Step 1: Download Windows 10 ISO. Go to Microsoft website and download Windows 10 ISO:
- Step 2: Install WoeUSB application.
- Step 3: Format USB drive.
- Step 4: Using WoeUSB to create bootable Windows 10.
- Step 5: Using Windows 10 bootable USB.
Does not boot from USB?
1.Disable Safe boot and change Boot Mode to CSM/Legacy BIOS Mode. 2.Make a bootable USB Drive/CD that is acceptable/compatible to UEFI. 1st Option: Disable Safe boot and change Boot Mode to CSM/Legacy BIOS Mode. Load BIOS Settings page ((Head to BIOS Setting on your PC/Laptop which differs from different brands.
Can you install Ubuntu on a USB?
What we need to install Ubuntu to a USB drive is a computer, an Ubuntu live CD/USB, and a USB drive. It is recommended to partition your USB drive, but not necessary, assuming you have 2GB RAM or more. Partitioning can be done from the Ubuntu live CD/DVD using ‘disk utility’, or from the installation partitioning menu.
How long does it take to boot from USB?
When you start your computer normally, you’re running it with the operating system installed on your internal hard drive — Windows, Linux, etc. Time Required: Booting from a USB device usually takes 10–20 minutes but it depends a lot on if you have to make changes to how your computer starts up.
How do I create a bootable USB drive?
Create a bootable USB with external tools
- Open the program with a double-click.
- Select your USB drive in “Device”
- Select “Create a bootable disk using” and the option “ISO Image”
- Right-click on the CD-ROM symbol and select the ISO file.
- Under “New volume label”, you can enter whatever name you like for your USB drive.
How do I boot Windows from a USB drive?
Step 3 – Install Windows to the new PC
- Connect the USB flash drive to a new PC.
- Turn on the PC and press the key that opens the boot-device selection menu for the computer, such as the Esc/F10/F12 keys. Select the option that boots the PC from the USB flash drive. Windows Setup starts.
- Remove the USB flash drive.
How do I set my BIOS to boot from USB?
To specify the boot sequence:
- Start the computer and press ESC, F1, F2, F8 or F10 during the initial startup screen.
- Choose to enter BIOS setup.
- Use the arrow keys to select the BOOT tab.
- To give a CD or DVD drive boot sequence priority over the hard drive, move it to the first position in the list.
How do I make an ISO into a bootable USB?
Step1: Create Bootable USB Drive
- Start PowerISO (v6.5 or newer version, download here).
- Insert the USB drive you intend to boot from.
- Choose the menu “Tools > Create Bootable USB Drive”.
- In “Create Bootable USB Drive” dialog, click “” button to open the iso file of Windows operating system.
Can I install Ubuntu without CD or USB?
You can use UNetbootin to install Ubuntu 15.04 from Windows 7 into a dual boot system without the use of a cd/dvd or a USB drive.
Can you boot from a USB on a Chromebook?
Plug the USB drive into your Chromebook and power on your Chromebook. If it doesn’t automatically boot from the USB drive, press any key when “Select Boot Option” appears on your screen. You can then select “Boot Manager” and select your USB devices. Connect a USB mouse, a USB keyboard, or both to your Chromebook.
How do I install Linux on a Chromebook?
Here is a direct download for the latest release of Crouton–click on it from your Chromebook to get it. Once you have Crouton downloaded, press Ctrl+Alt+T in Chrome OS to open the crosh terminal. Type shell into the terminal and press Enter to enter Linux shell mode.
How do I install Seabios?
Installing Arch Linux
- Plug the USB drive to the ChromeOS device and start SeaBIOS with Ctrl + L at the white boot splash screen (if SeaBIOS is not set as default).
- Press Esc to get a boot menu and select the number corresponding to your USB drive.
How do I make a Windows 10 ISO bootable?
Preparing the .ISO file for installation.
- Launch it.
- Select ISO Image.
- Point to the Windows 10 ISO file.
- Check off Create a bootable disk using.
- Select GPT partitioning for EUFI firmware as the Partition scheme.
- Choose FAT32 NOT NTFS as the File system.
- Make sure your USB thumbdrive in the Device list box.
- Click Start.
How do I convert a bootable USB to normal?
Method 1 – Format Bootable USB to Normal Using Disk Management. 1) Click Start, in Run box, type “diskmgmt.msc” and press Enter to start Disk Management tool. 2) Right-click the bootable drive and select “Format”. And then follow the wizard to complete the process.
How can I tell if my USB is bootable?
Check if USB is bootable. To check if the USB is bootable, we can use a freeware called MobaLiveCD. It is a portable tool which you can run as soon as you download it and extract its contents. Connect the created bootable USB to your computer and then right-click on MobaLiveCD and select Run as Administrator.
How do I burn Windows 10 to a USB drive?
After installing it, here is what you need to do:
- Open the tool, click the Browse button and select the Windows 10 ISO file.
- Select the USB drive option.
- Select your USB drive from the dropdown menu.
- Hit the Begin Copying button to kick off the process.
Can I boot Windows 10 from an external hard drive?
You should now create your own bootable hard drive with EaseUS Todo Backup software. In the Boot option, select the external hard drive as the new boot drive and save all the changes. Exit BIOS and restart the computer, you should be able to see Windows 10 running on your new disk without any problem.
How do I install Windows 10 from a USB on a new computer?
Save your settings, reboot your computer and you should now be able to install Windows 10.
- Step 1 – Enter your computer’s BIOS.
- Step 2 – Set your computer to boot from DVD or USB.
- Step 3 – Choose the Windows 10 clean install option.
- Step 4 – How to find your Windows 10 license key.
- Step 5 – Select your hard disk or SSD.
Photo in the article by “小鑫的GNU/Linux学习网站- 小鑫博客” http://linux.xiazhengxin.name/index.php?m=05&y=12&entry=entry120508-161032
![]()
Download Article
![]()
Download Article
Whether you want to install Linux on your PC from a flash drive or just boot into a portable version of Linux, you can easily create a bootable Linux USB flash drive in Windows 10. We’ll show you how to download the software you’ll need to create your Linux USB drive, how to make the drive bootable, and how to make your PC boot from the flash drive instead of your hard drive.
-

1
Download an ISO image of Ubuntu (or your preferred Linux flavor). To boot into Linux from a USB drive, you’ll need to download a file that contains an «image» of the Linux installation media. You can download the ISO for any flavor of Linux you want to install, including Debian and Linux Mint, and the process to create a bootable USB drive will be similar.
- To download an ISO of Ubuntu, head over to https://ubuntu.com/download/desktop and click the Download link next to the latest stable version. Ubuntu is a good option if you want to try out Linux without installing it—once you boot from the flash drive, you’ll be able to choose an option to try before you install.[1]
- To download a Debian ISO, go to https://www.debian.org/download. The download will start automatically.
- You can get the Linux Mint ISO from https://linuxmint.com/download.php. Just click the Download button next to the version you want to install.
- If you just want to try out Linux without installing it on your hard drive, try Puppy Linux, which allows you to boot right into a functional Linux desktop. You can download a Puppy Linux ISO from https://puppylinux.com/index.html#download.
- To download an ISO of Ubuntu, head over to https://ubuntu.com/download/desktop and click the Download link next to the latest stable version. Ubuntu is a good option if you want to try out Linux without installing it—once you boot from the flash drive, you’ll be able to choose an option to try before you install.[1]
-
2
Install Rufus on your PC. Rufus is free software that allows you to create bootable USB drives from ISO images.[2]
Go to https://rufus.ie and click the Rufus link under «Download» toward the bottom of the page to download the installer.- When the download is complete, double-click the file that begins with «rufus» and ends with «exe» and follow the on-screen instructions to install.
- Once Rufus is installed, you’ll find it in your Windows menu. Launch Rufus if it doesn’t start automatically after the installation.
Advertisement
-
3
Insert your USB flash drive into an available USB port. You’ll want to use a blank USB drive, as everything on the drive will be deleted. Back the drive up before you continue if necessary.
-
4
Open Rufus and select your USB flash drive in Rufus. If multiple external drives are connected to your PC, Rufus may select the wrong drive. Click the proper drive in the «Device» menu if it’s not accurate.
-
5
Select FreeDOS from the «Boot selection» menu. It’s just under the Device selector. This tells Rufus to make the drive bootable.[3]
- The default options for «Partition scheme» and «Target system» are filled in automatically and you won’t need to change them.
-
6
Click the Select button and choose the ISO you downloaded. This button is to the right of the «Boot selection» menu. You should find the ISO in your default download folder, which is usually called Downloads.
-
7
Leave the other parameters in place and click START. This begins the process of writing the ISO image to the flash drive.
- If Rufus prompts you to download an additional file to write the ISO, click Yes to continue.[4]
- If Rufus prompts you to download an additional file to write the ISO, click Yes to continue.[4]
-
8
Select «Write in ISO image mode (Recommended)» and click OK. This option will appear when the «ISOHybrid image detected» window appears. This just means you can use the same ISO on a bootable DVD or USB drive as needed.
-
9
Click OK to create your bootable USB drive. This involves erasing the data on the drive and copying the necessary files for making the drive bootable. You’ll see a Status bar at the bottom of the window once the process begins.
- When the drive is ready, the status bar will say «READY.» At this point, you’ll have a bootable Linux USB drive.


Advertisement
-
1
Reboot your PC with the USB drive attached. If you’ve already set your PC to boot from USB, your computer will immediately boot into Linux once it comes back up.
- If your PC boots back into Windows 10 instead, continue with this method.
- skip to step 5. Otherwise, the steps to get to the BIOS are going to be different depending on your motherboard—you’ll usually press a key immediately after the PC restarts, which is usually F2, F10, or Del. Search for your PC model and «BIOS setup key» to find your key. Alternatively, try the following steps to boot into the BIOS from Windows 10:
- Press Windows key + i to open Settings.
- Click Update & Security.
- Click Recovery in the left panel.
- Click Restart now under «Advanced startup.»
- On the «Choose an option» screen, click Troubleshoot.
- Click UEFI Firmware Settings and then click Restart. The PC will boot into the BIOS or UEFI.
-
2
Locate the Boot menu. Once the computer boots into the BIOS, look for a menu called Boot, Boot Order, or Boot Options. You might have to enter a menu called Advanced, System, Storage, or Configuration to find it. What you’re looking for a list of boot devices, such as «Hard Drive» and «Removable Device» in order.
-
3
Set the USB drive or «Removable Storage» to be first in the boot order. You may have to select an item called «1st boot device» or similar to bring up a list of options. The goal is to make your USB drive or removable media the first item in the list so your PC tries to boot from devices that are connected to it.
-
4
Save and exit the BIOS. You’ll usually do this by pressing the F10 key or by selecting an option called Save & Exit. Once saved, your PC will reboot.
-
5
Install and run Linux. When your PC boots from the flash drive, you’ll be prompted to choose some regional and keyboard settings. If you made an Ubuntu drive, you can choose Try Ubuntu without installing to use the live version of Ubuntu, or install it on your hard drive. Regardless of the version of Linux you want to install, the remaining steps will be simple—follow the on-screen instructions to get started!
- If you’re installing Puppy Linux, you’ll boot right into a functional Linux desktop without having to install.


Advertisement
Ask a Question
200 characters left
Include your email address to get a message when this question is answered.
Submit
Advertisement
-
Any time the flash drive is connected to your PC upon reboot, your PC will try to boot from it before it boots from your hard drive. If you don’t want to boot from the USB drive the next time you reboot, remove the drive before rebooting.
Thanks for submitting a tip for review!
Advertisement
About This Article
Article SummaryX
1. Download the ISO image.
2. Install Rufus.
3. Insert a blank USB drive.
4. Use Rufus to flash the ISO to the drive.
5. Go into the BIOS and set the USB drive as first in the boot order.
6. Reboot into Linux.
Did this summary help you?
Thanks to all authors for creating a page that has been read 46,165 times.
Is this article up to date?


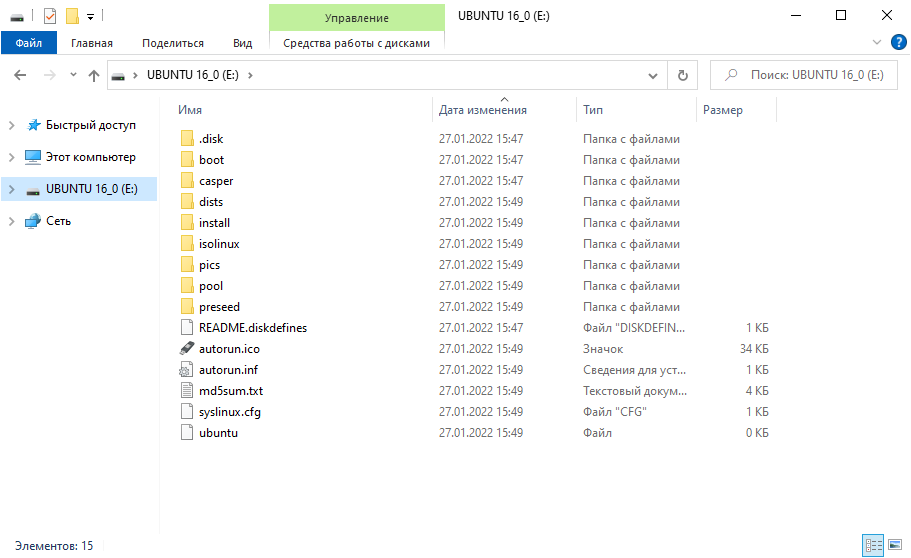
Иногда требуется создать загрузочную USB флешки с более старой операционной системой Ubuntu 16 Desktop.
С помощью такой флешки вы можете:
- Установить или обновить Ubuntu 16.
- Попробовать поработать в Ubuntu 16 не устанавливая её на компьютер.
- Загрузить Ubuntu 16 на чужом компьютере.
- Использовать загрузочный образ и встроенные утилиты для реанимации компьютера.
Создавать загрузочную USB флешку будем в Windows 10.
Дистрибутив Ubuntu Desktop
Скачиваем ISO образ Ubuntu с официального сайта. Нам потребуется страничка с устаревшими версиями.
https://ubuntu.com/download/alternative-downloads
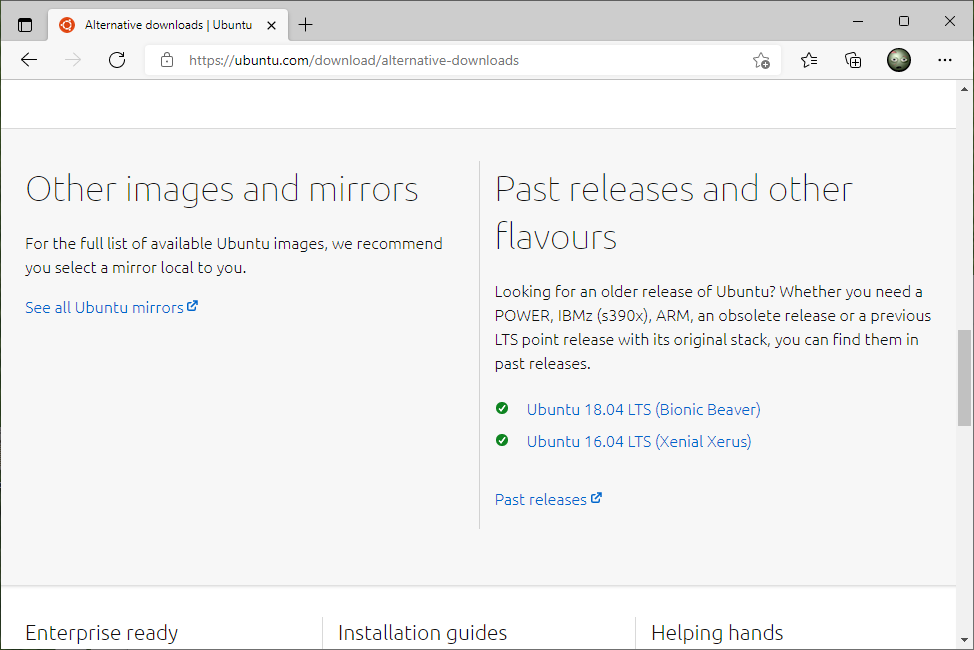
Переходим на страничку релиза Ubuntu 16.0.4 LTS (Xenial Xerus).
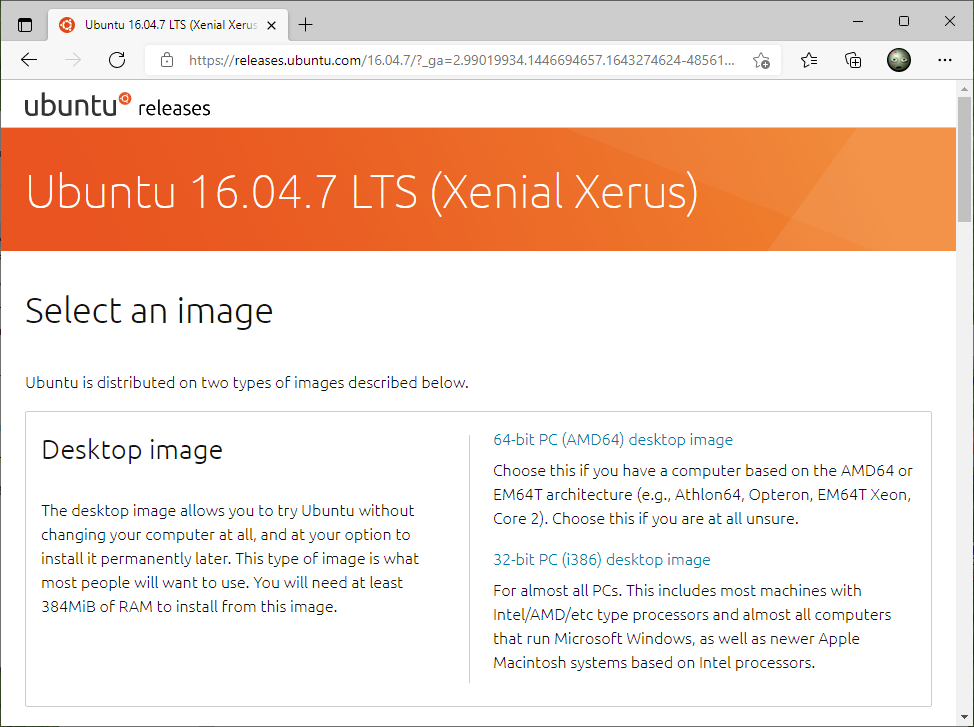
Я скачиваю ubuntu-16.04.6-desktop-i386.iso. Мне нужна 32-битная версия
Создание загрузочной USB флешки с помощью Rufus
Воспользуемся программой Rufus.

Создание загрузочной USB флешки
Устанавливаем USB флешку в компьютер. Объём флешки 4 Гб или больше.
Запускаем Rufus. В поле Устройство выбираем нужную USB флешку. Это установочная флешка от Ubuntu 18, кстати. Нажимаем кнопку ВЫБРАТЬ и выбираем ISO образ с Ubuntu. В поле Метод загрузки отобразится название ISO файла.
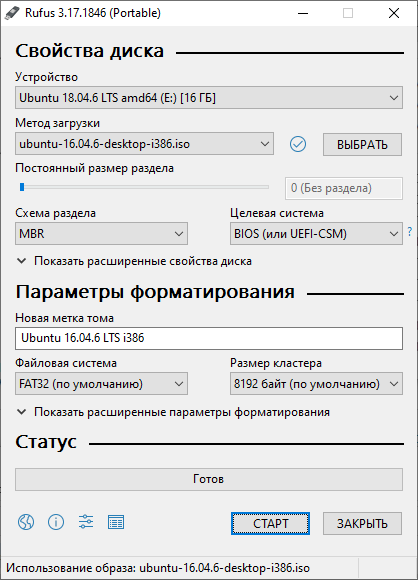
Остальные параметры устанавливаем как на картинке:
- Схема раздела — MBR.
- Целевая система — BIOS или UEFI-CMS.
- Файловая система — FAT32.
- Размер кластера — 8192 байт.
Нажимаем СТАРТ.
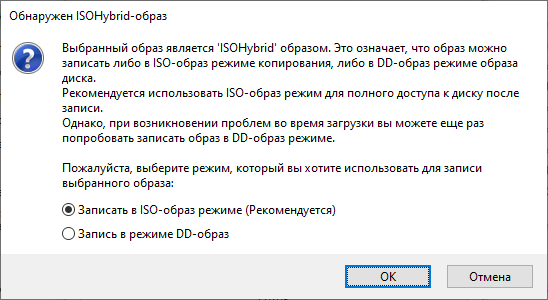
Нам сообщают о том, что выбранный ISO образ — ISOHybrid, его можно записывать двумя способами. Оставляем способ по умолчанию: Записать в ISO-образ режиме (Рекомендуется). OK.

Для записи образа программе Rufus потребуются дополнительные файлы, разрешаем скачать их из интернета. Да.
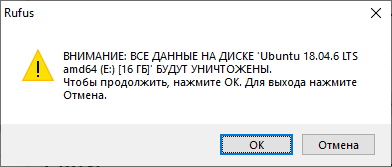
Все данные на USB флешке будут уничтожены. ОК.

Начинается создание загрузочной USB флешки. Rufus стирает все разделы на флешке, создаёт новые разделы и файловую систему. Прогресс отображается в виде зелёной полосы в разделе Статус. На создание образа уходит примерно 10 минут.

Статус — Готов. Нажимаем ЗАКРЫТЬ.
Поздравляем! Мы создали загрузочную USB флешку с операционной системой Ubuntu 16 Desktop.