Are you looking for disk imaging, disk cloning, or PC backup software?
Macrium Software trial software is the best way to try our feature-rich and powerful products for absolutely nothing. Backup and recovery software is a critical part of your data security plan, but making sure you have the right features for your unique setting is even more important. Explore our options below!
Backup and recovery software for business
Reflect 8 Free
Licensed for a commercial setting, basic backup and cloning capabilities.
- Removable media imaging and cloning
- Create images of running Windows OS
- Restore non-booting systems
- Scalable and navigable log view interface
- Instantly boot backups in Hyper-V / Oracle VirtualBox VM
- Direct disk cloning
- WinPE 11 rescue media
Workstation Trial
The complete backup solution for commercial use, designed for endpoint backup of business-critical PCs. Fast, reliable, scalable.
Everything in Free, plus:
- File and folder level backup and recovery
- Ultra-fast imaging of Windows systems, physical and virtual
- Incremental and differential imaging
- Technical support via email for the duration of the trial
Reflect 8 Workstation
Full protection in a
professional setting.
Everything in the 30-Day Trial, plus:
- Macrium ReDeploy — bare metal restore to dissimilar hardware
- 1 year technical support with renewable rapid-response phone support
- Lifetime license and free major version upgrades with current support
Reflect free trials — our promise to you
You will never be asked to input payment details.
You will have full access to our customer service team for the duration of your trial.
Once your trial ends, you will have the ability to restore previously created backup files,
but all other features will be blocked.
Backup and recovery software for home PCs
Reflect 8 Free
Perfect for limited backups and cloning. Capable of basic backup scheduling.
- Removable media imaging and cloning
- Create images of running Windows OS
- Restore non-booting systems
- Scalable and navigable log view interface
- Instantly boot backups in Hyper-V / Oracle VirtualBox VM
- Direct disk cloning
- WinPE 11 rescue media
Reflect 8 Trial
Get high performance backups combined with easy to configure backup plans, complete with ransomware protection and email support.
Everything in Free, plus:
- Technical support via email for the trial duration
- Rapid Delta Clone and Restore
- Intra-daily backup scheduling
- Ransomware protection and encryption
- Incremental imaging
Reflect 8 Home
Everything in the 30-Day Trial, plus:
- Bare metal restore to dissimilar hardware with ReDeploy
- 1 year technical support
- Lifetime license — no subscription or renewals
- Free minor version upgrades
What happens when you download a free trial?
Start an obligation-free trial of Macrium Reflect and experience the peace of mind quality data protection provides. Throughout the trial, we’ll send you information to ensure you learn the ins and outs of our software and make the most of your time! Day 20 we’ll send you an end-of-trial reminder with instructions on upgrading to a paid version and what happens if you choose not to. Need extra time? Get in touch and we’ll be happy to arrange it! And you can trust you’ll always have the ability to restore Macrium Reflect backup files.
What else does Macrium Software offer?
Ransomware protection
Macrium Image Guardian ensures that backup files created through the Reflect engine are always safe from unauthorized modifications — like ransomware encryption.
Backup at scale
Used by global enterprises and critical services alike, Macrium Site Manager enables users to manage multiple instances of Macrium Reflect from one powerful dashboard.
Disaster recovery
Save time, money, and stress with Macrium viBoot. Instant image virtualization with Oracle VirtualBox and Microsoft Hyper-V mean you can be back up and running in no time.
Enterprise solutions
Rapidly set up and configure PCs and servers with Macrium Deployment Kit, manage multiple instances of Site Manager with Macrium Multi-site, and carry the power of Reflect in your pocket with Macrium’s Technician’s License.
Copyright © Paramount Software UK Limited 2023 Macrium Reflect® is a registered trademark of Paramount Software UK Limited
Contact | Terms & Privacy Policy
Need a quick and easy way to back up and restore Windows without relying on backup tools or the cloud for your data?
Several third-party Windows backup and restore tools are available, but they can be complicated and time-consuming to use. So, why not learn how to make an ISO image of your Windows PC instead?
Why Choose a Windows Image Backup?
We all know that backing up our data is essential, especially when upgrading to a new Windows version. But rather than fiddle around with partitions for specific data or syncing to the cloud, why not simply back up your entire Windows installation?
You can add personal folders to an image backup but omit apps and games. Alternatively, you could opt to create an image of your entire system drive. Naturally, you would need a suitable volume of storage for such a backup.
Thanks to the ISO image format, it is possible to back up your entire PC. This essentially creates an exact copy of your entire drive or selected directories. In addition, you’ll be able to restore the image backup should disaster strike. You can also use ISO files to back up existing CDs and DVDs.
Creating a Windows 10 ISO System Image With DataNumen
One widespread use for disk images is creating a clone of your hard storage (hard disk drive or solid-state drive), which might be on its last legs.
DataNumen Disk Image (a.k.a. «DDKI») is one such solution, runs on all versions of Windows and is available as freeware. After downloading and installing the utility, use the Clone tab to select the drive you wish to make an image of; to clone multiple drives, use the Batch Clone tab.
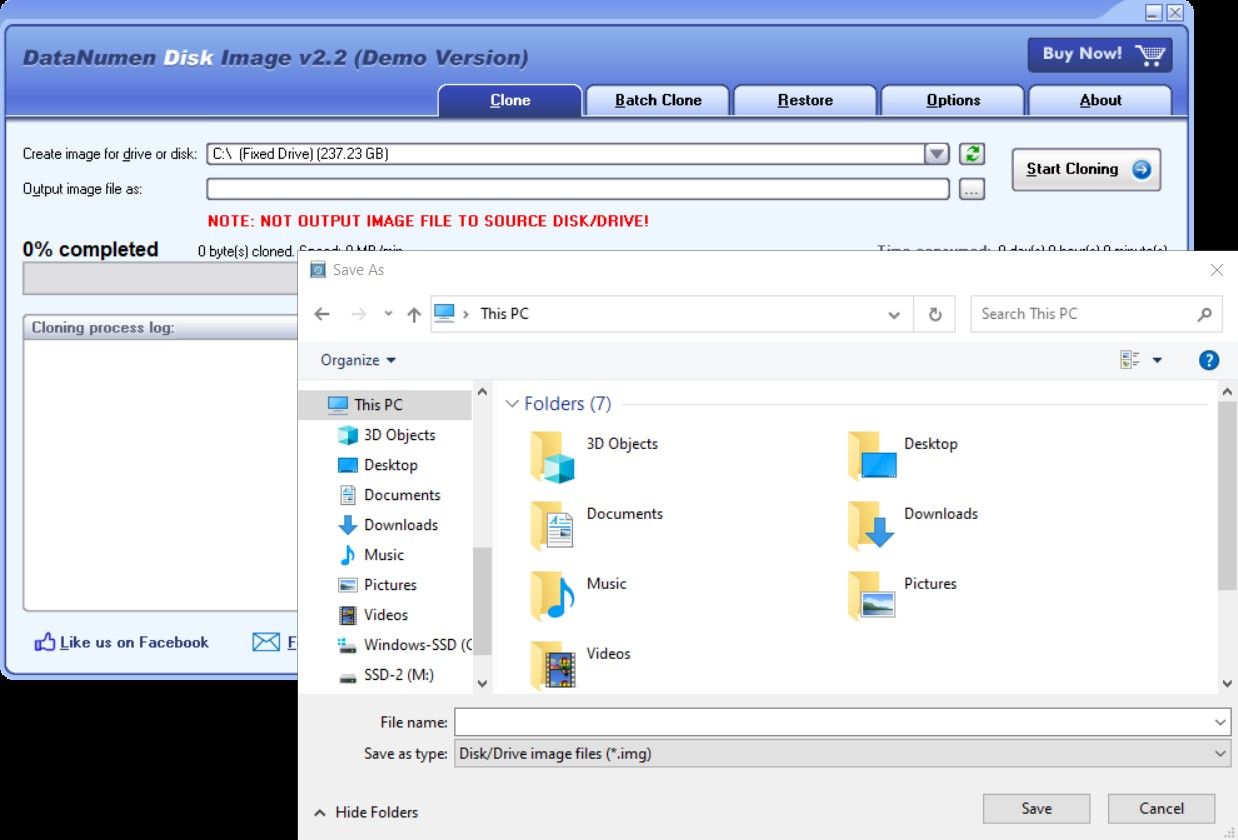
Select the destination location and assign a filename in the Output image file as a box, where you should select the target disk drive. This is the device you’re using to save the backup. It might be an existing external drive or an HDD you’ve recently purchased.
Once you click Start Cloning, it will copy your disk to its destination device, ready to use. Our look at HDD cloning covers this topic in greater depth.
Download: DataNumen Disk Image for Windows 10
How to Create an ISO File of Windows 7
Although cloud backups are straightforward, there’s no reason not to prepare an ISO disk image for disaster recovery scenarios. You might make an image of the system in its current state. You might alternatively create an image of a freshly installed operating system. Perhaps this will include some apps and games that you have installed.
If you’re using Windows 7, backing up to an ISO disk image is part of the Windows 7 backup and restore feature.
To create a system image in Windows 7, open Start > Getting Started > Back up your files. Then, in the left-hand pane, click Create a system image, and select the destination.
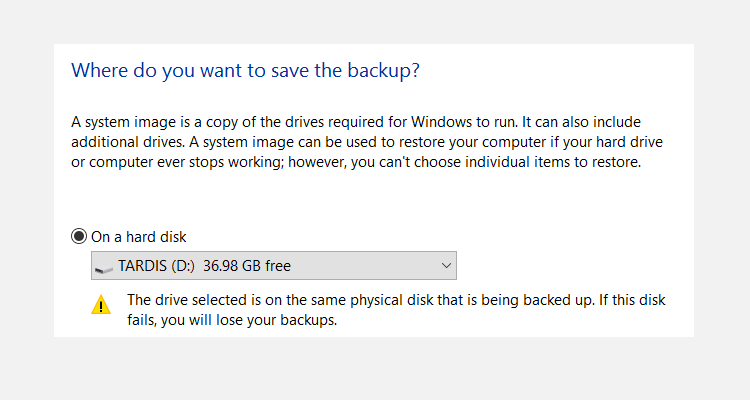
This might be an external hard disk drive or some other large volume. You can also write to DVDs (you’ll need more than one) or Blu-ray.
Do you have a home server or some ample storage on your network, perhaps in the shape of a purchased NAS? If so, you can use the On a network location option. If you want to use a USB flash device, connect this to your computer in advance and select it as the destination.
Also, ensure that the System drive (by default, the C: drive) is selected.
The confirmation screen will detail how much space will be taken up by the backup. Check this to ensure the figure matches the remaining space on the target device; then proceed with the backup and wait while it completes. The duration will depend on the size of the backup and the speed of the drive.
Restoring the Windows 7 Disk Image
Once complete, Windows will suggest you create a system restore disc. This is a good idea, so find a blank disc and follow the instructions. You can then use this to boot your PC and select the System Image Recovery option to restore the ISO Disk Image of your Windows installation following a disaster scenario.
Creating an ISO Disk Image in Windows 8.1
The same tool for creating a disk image is available in later versions of Windows. Therefore, you ideally need to have upgraded Windows 8 to Windows 8.1 (or even learn how to upgrade from Windows 8.1 to Windows 11) before proceeding here.
To find the system image creation tool, press Start and search for «file history.» The automatic search will display Restore your files with File History entry first, so click this to open the File History tool, then System Image Backup in the lower-left corner.
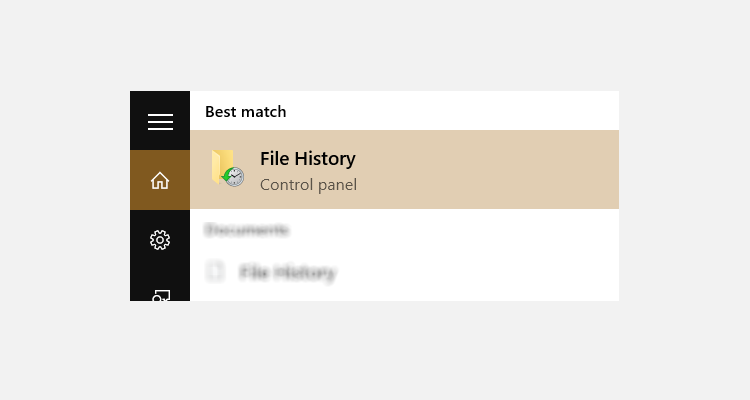
You can then proceed as detailed in the Windows 7 section above. With the ISO backup created, use the steps for Windows 8.1 below to restore the image in Windows 10.
In a disaster recovery scenario, you will need to boot into Windows 10’s Safe Mode to restore the image. See how to boot into Safe Mode on Windows 10 for more information.
Restoring Your Windows 8.1 Disk Image
If a Windows 10 upgrade doesn’t work out for you (perhaps you’ll experience a reboot loop), having an ISO image to fall back on is a massive advantage. You can restore the Windows 8.1 disk image in Windows’ Advanced options screen, which you will find by pressing F8 repeatedly when your PC boots up (or holding Shift as you click Restart).
In Advanced Startup Options, select Repair your Computer > System Image Recovery and follow the instructions, ensuring that Windows can find the ISO file.
Note that you can still restore the disk image even if you have the Windows 8.1 installation media. At the Install now screen, use the Repair your computer link and then Repair.
From here, you’ll be redirected to the Advanced Startup menu, navigate to Troubleshoot > Advanced options > System Image Recovery, and follow the on-screen instructions to restore your Windows ISO system image.
Microsoft recommends creating an ISO image of your Windows 10 using the Windows Media Creation tool. Windows 10 users can download the software for free from Microsoft. You can use the Windows Media Creation Tool to create a bootable Windows 10 USB stick quickly, update the PC to Windows 10, or create the Windows 10 ISO image.
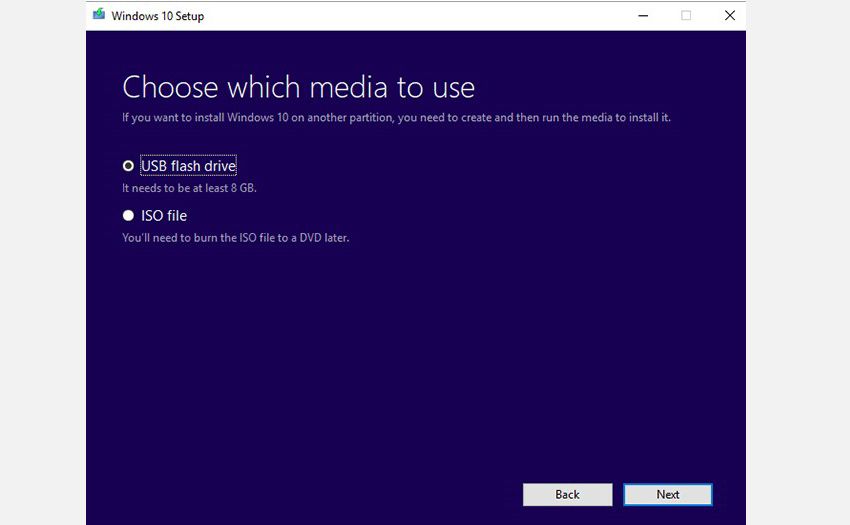
To create an ISO image with the Windows Media Creation Tool:
- Download and launch the Windows Media Creation tool
- Select Create installation media (USB flash drive, DVD, or ISO) for another PC and click on Next
- You now need to select the system architecture (you can choose to create a system image of either 64-bit, 32-bit, or both), language, and Windows edition. If these options confuse you, you can always rely on Use the recommended options for this PC. Click on Next to proceed.
- Select ISO file, and once you click Next, the Media Creation tool will create the ISO image.
It is recommended to have an 8GB USB stick at least to back up the ISO file.
Download: Windows 10 Media Creation Tool for Windows
Similar to Windows 10, you can easily create an ISO file on your Windows 11 thanks to the Media Creation Tool made available by Windows 11. Head to the official Windows 11 downloads page, and grab the Installation Media from there. Once you have the files, follow the steps below to get started:
- Launch the installation .exe file.
- On the next dialog box, click on Accept.
- Choose the Language and Edition and click on Next.
- Select the ISO file radio box and click on Next.
- Choose the path where you’d like to store the ISO file and click on Next.
That’s it. The ISO file will be successfully downloaded, and you can use it at any time in the future.
Download: Windows 11 Media Creation Tool
Backup Your Windows PC With an ISO File
As you can see, creating an ISO image backup of your entire Windows system is perfect for backing up in advance of a significant system upgrade. Additionally, the speed with which the ISO can be created and subsequently restored should make it a far more attractive option than just backing up your data and hoping for the best.
This is somewhat an evolution of my previous posts, such as;
Windows 10 (1803 1903) UEFI Autounattend.xml network installation.
In this one however you will customize several aspects of the Operating System. You will also capture the OS using nothing but hyper V. No external drives necessary.
All through out this process it is recommended that you take regular checkpoints just in case you need to revert to a previous state of the OS.

Install Windows ADK
Grab ADK from here: https://docs.microsoft.com/en-us/windows-hardware/get-started/adk-install
Use version 1809, version 1903 is broken an does not allow you to edit unattend.xml files, it throws up errors. Version 1809 works on 1809 and up. Also install the Windows-PE add on for ADK.
Both tools are necessary.
Install Windows 10 in Hyper-V
Create a Gen2 Virtual Machine and install Windows 10 1809+. When installing the OS create an account, we will remove this before we apply the out of box experience. Customize your os with software and install all and any pertaining software you would like.
Customize your Start Menu like so.
Be aware that the first row in the Productivity section on the Start menu is somewhat temperamental.
Even when specifying a customization it may be overwritten by the Operating System.
Your mileage may vary. I suggest creating a custom section and leaving Productivity alone.

Make sure when grouping Icons in the Start menu to give the groups names otherwise the groups will not export.
Once finished open Powershell and run the following command.
Export-StartLayout -Path c:start.xml
Customize Pinned Task Bar Icons
Open the start.xml file that you created for your custom Start Menu, use something the likes of Notepad++
Inside the top tag <LayoutModificationTemplate add the following
xmlns:taskbar="http://schemas.microsoft.com/Start/2014/TaskbarLayout"
…and in between the </DefaultLayoutOverride> and </LayoutModificationTemplate> tags add the following.
<CustomTaskbarLayoutCollection PinListPlacement="Replace">
    <defaultlayout:TaskbarLayout>
      <taskbar:TaskbarPinList>
        <taskbar:DesktopApp DesktopApplicationLinkPath="%ALLUSERSPROFILE%MicrosoftWindowsStart MenuProgramsFirefox.lnk" />
        <taskbar:DesktopApp DesktopApplicationLinkPath="%APPDATA%MicrosoftWindowsStart MenuProgramsSystem ToolsFile Explorer.lnk" />
        <taskbar:DesktopApp DesktopApplicationLinkPath="%ALLUSERSPROFILE%MicrosoftWindowsStart MenuProgramsOutlook.lnk" />
        <taskbar:DesktopApp DesktopApplicationLinkPath="%ALLUSERSPROFILE%MicrosoftWindowsStart MenuProgramsMicrosoft Teams.lnk" />
        <taskbar:DesktopApp DesktopApplicationLinkPath="%ALLUSERSPROFILE%MicrosoftWindowsStart MenuProgramsVisual Studio CodeVisual Studio Code.lnk" />
        <taskbar:DesktopApp DesktopApplicationLinkPath="%ALLUSERSPROFILE%MicrosoftWindowsStart MenuProgramsMobaXtermMobaXterm.lnk" />
        <taskbar:DesktopApp DesktopApplicationLinkPath="%ALLUSERSPROFILE%MicrosoftWindowsStart MenuProgramsCmder.lnk" />
      </taskbar:TaskbarPinList>
    </defaultlayout:TaskbarLayout>
  </CustomTaskbarLayoutCollection>
The above reflects the custom layout as displayed in the top image.
All *.lnk files should be located in %ALLUSERSPROFILE%MicrosoftWindowsStart MenuPrograms any that are located in %APPDATA%MicrosoftWindowsStart MenuPrograms should be copied in to the ALLUSERSPROFILE folder.
Note the abobe is only true for user installed applications, software deployed with Windows such as powershell, cmd, or any other features can remain in APPDATA.
If you are missing a link create one on the desktop and copy it into ALLUSERSPROFILE location.
Your final XML should look like the following.
<LayoutModificationTemplate xmlns:defaultlayout="http://schemas.microsoft.com/Start/2014/FullDefaultLayout" xmlns:start="http://schemas.microsoft.com/Start/2014/StartLayout" xmlns:taskbar="http://schemas.microsoft.com/Start/2014/TaskbarLayout" Version="1" xmlns="http://schemas.microsoft.com/Start/2014/LayoutModification">
  <LayoutOptions StartTileGroupCellWidth="6" />
  <DefaultLayoutOverride>
    <StartLayoutCollection>
      <defaultlayout:StartLayout GroupCellWidth="6">
        <start:Group Name="Productivity">
          <start:Folder Name="" Size="2x2" Column="2" Row="0">
            <start:DesktopApplicationTile Size="2x2" Column="2" Row="2" DesktopApplicationLinkPath="%ALLUSERSPROFILE%MicrosoftWindowsStart MenuProgramsAccess.lnk" />
            <start:DesktopApplicationTile Size="2x2" Column="2" Row="0" DesktopApplicationLinkPath="%ALLUSERSPROFILE%MicrosoftWindowsStart MenuProgramsExcel.lnk" />
            <start:DesktopApplicationTile Size="2x2" Column="0" Row="2" DesktopApplicationLinkPath="%ALLUSERSPROFILE%MicrosoftWindowsStart MenuProgramsOneDrive.lnk" />
            <start:Tile Size="2x2" Column="-1" Row="-1" AppUserModelID="Microsoft.Office.OneNote_8wekyb3d8bbwe!microsoft.onenoteim" />
            <start:DesktopApplicationTile Size="2x2" Column="0" Row="0" DesktopApplicationLinkPath="%ALLUSERSPROFILE%MicrosoftWindowsStart MenuProgramsWord.lnk" />
          </start:Folder>
          <start:DesktopApplicationTile Size="2x2" Column="4" Row="2" DesktopApplicationLinkPath="%ALLUSERSPROFILE%MicrosoftWindowsStart MenuProgramsMicrosoft Edge.lnk" />
          <start:DesktopApplicationTile Size="2x2" Column="0" Row="0" DesktopApplicationLinkPath="%ALLUSERSPROFILE%MicrosoftWindowsStart MenuProgramsOutlook.lnk" />
          <start:DesktopApplicationTile Size="2x2" Column="4" Row="0" DesktopApplicationLinkPath="%ALLUSERSPROFILE%MicrosoftWindowsStart MenuProgramsMicrosoft Teams.lnk" />
          <start:DesktopApplicationTile Size="2x2" Column="0" Row="2" DesktopApplicationLinkPath="%ALLUSERSPROFILE%MicrosoftWindowsStart MenuProgramsVivaldi.lnk" />
          <start:DesktopApplicationTile Size="2x2" Column="2" Row="2" DesktopApplicationLinkPath="%ALLUSERSPROFILE%MicrosoftWindowsStart MenuProgramsFirefox.lnk" />
        </start:Group>
        <start:Group Name="DevOps">
          <start:DesktopApplicationTile Size="1x1" Column="2" Row="1" DesktopApplicationLinkPath="%ALLUSERSPROFILE%MicrosoftWindowsStart MenuProgramsNotepad++.lnk" />
          <start:DesktopApplicationTile Size="2x2" Column="4" Row="0" DesktopApplicationLinkPath="%ALLUSERSPROFILE%MicrosoftWindowsStart MenuProgramsMobaXtermMobaXterm.lnk" />
          <start:DesktopApplicationTile Size="1x1" Column="3" Row="1" DesktopApplicationLinkPath="%ALLUSERSPROFILE%MicrosoftWindowsStart MenuProgramsOracle VM VirtualBoxOracle VM VirtualBox.lnk" />
          <start:DesktopApplicationTile Size="2x2" Column="2" Row="2" DesktopApplicationLinkPath="%ALLUSERSPROFILE%MicrosoftWindowsStart MenuProgramsCmder.lnk" />
          <start:DesktopApplicationTile Size="1x1" Column="5" Row="3" DesktopApplicationLinkPath="%APPDATA%MicrosoftWindowsStart MenuProgramsSystem ToolsControl Panel.lnk" />
          <start:DesktopApplicationTile Size="2x2" Column="0" Row="4" DesktopApplicationLinkPath="%ALLUSERSPROFILE%MicrosoftWindowsStart MenuProgramsOpenVPNOpenVPN GUI.lnk" />
          <start:DesktopApplicationTile Size="1x1" Column="2" Row="0" DesktopApplicationLinkPath="%APPDATA%MicrosoftWindowsStart MenuProgramsWindows PowerShellWindows PowerShell.lnk" />
          <start:DesktopApplicationTile Size="2x2" Column="0" Row="2" DesktopApplicationLinkPath="%ALLUSERSPROFILE%MicrosoftWindowsStart MenuProgramsSublime Text 3.lnk" />
          <start:DesktopApplicationTile Size="1x1" Column="4" Row="2" DesktopApplicationLinkPath="%ALLUSERSPROFILE%MicrosoftWindowsStart MenuProgramsDockerDocker Quickstart Terminal.lnk" />
          <start:DesktopApplicationTile Size="1x1" Column="5" Row="2" DesktopApplicationLinkPath="%ALLUSERSPROFILE%MicrosoftWindowsStart MenuProgramsPuTTY (64-bit)PuTTY.lnk" />
          <start:DesktopApplicationTile Size="1x1" Column="4" Row="3" DesktopApplicationLinkPath="%ALLUSERSPROFILE%MicrosoftWindowsStart MenuProgramsGitGit CMD.lnk" />
          <start:DesktopApplicationTile Size="1x1" Column="3" Row="0" DesktopApplicationLinkPath="%APPDATA%MicrosoftWindowsStart MenuProgramsSystem ToolsCommand Prompt.lnk" />
          <start:DesktopApplicationTile Size="2x2" Column="0" Row="0" DesktopApplicationLinkPath="%ALLUSERSPROFILE%MicrosoftWindowsStart MenuProgramsVisual Studio CodeVisual Studio Code.lnk" />
        </start:Group>
      </defaultlayout:StartLayout>
    </StartLayoutCollection>
  </DefaultLayoutOverride>
  <CustomTaskbarLayoutCollection PinListPlacement="Replace">
      <defaultlayout:TaskbarLayout>
        <taskbar:TaskbarPinList>
          <taskbar:DesktopApp DesktopApplicationLinkPath="%ALLUSERSPROFILE%MicrosoftWindowsStart MenuProgramsVivaldi.lnk" />
          <taskbar:DesktopApp DesktopApplicationLinkPath="%ALLUSERSPROFILE%MicrosoftWindowsStart MenuProgramsFirefox.lnk" />
          <taskbar:DesktopApp DesktopApplicationLinkPath="%APPDATA%MicrosoftWindowsStart MenuProgramsSystem ToolsFile Explorer.lnk" />
          <taskbar:DesktopApp DesktopApplicationLinkPath="%ALLUSERSPROFILE%MicrosoftWindowsStart MenuProgramsOutlook.lnk" />
          <taskbar:DesktopApp DesktopApplicationLinkPath="%ALLUSERSPROFILE%MicrosoftWindowsStart MenuProgramsMicrosoft Teams.lnk" />
          <taskbar:DesktopApp DesktopApplicationLinkPath="%ALLUSERSPROFILE%MicrosoftWindowsStart MenuProgramsVisual Studio CodeVisual Studio Code.lnk" />
          <taskbar:DesktopApp DesktopApplicationLinkPath="%ALLUSERSPROFILE%MicrosoftWindowsStart MenuProgramsMobaXtermMobaXterm.lnk" />
          <taskbar:DesktopApp DesktopApplicationLinkPath="%ALLUSERSPROFILE%MicrosoftWindowsStart MenuProgramsCmder.lnk" />
        </taskbar:TaskbarPinList>
      </defaultlayout:TaskbarLayout>
    </CustomTaskbarLayoutCollection>
</LayoutModificationTemplate>
Apply Custom Layout XML
Registry
Make a directory, c:windowsOEM and copy start.xml in PowerShell
mkdir -P c:WindowsOEM
cp c:start.xml C:WindowsOEMTaskbarLayoutModification.xml
Add registry entry to the system.
reg add HKLMSOFTWAREMicrosoftWindowsCurrentVersionExplorer /v LayoutXMLPath /d C:WindowsOEMTaskbarLayoutModification.xml
The registry method will allow you to make changes to the taskbar and start menu, while the Policy method locks this down.
This method also should be performed in Sysprep Audit Mode.
Group Policy
Copy the start.xml file to c:windowssystem32.
In your image run gpedit to Edit your Local Computer Policy.
Select Computer Configuration – Administrative Templates – Start Menu and Taskbar.

Right Click and select Edit on Start Layout in the right pane.

Enable the configuration and specify the location of the start.xml file. Click OK and close the Local Group Policy Editor.
On next boot the policy should be applied.
*Alternatively you can use domain policy with User Configuration for the xml file and item level targeting for specific departments to deploy custom layouts.
Checking for a malformed Layout xml
To check if the xml file is formatted correctly you can rung the following command in powershell.
Import-StartLayout –LayoutPath c:windowssystem32start.xml –MountPath c:
If formatted correctly it will jump to a blank input line, otherwise it will spit out errors in red.
Audit Mode and Local Account Removal
First we need to remove the user account that was created during the OS installation.
We’ll need to boot into Audit mode for that. Technically all software installations should occur in Audit mode, however some software requires reboots so we do this in regular mode.
You can boot into Audit mode and double check the installed software, additionally remove any user account you may have created during the setup process.
To boot into Audit mode navigate to C:WindowsSystem32Sysprep.
You can do this via GUI or command line.
Command Line Method
cd c:windowssystem32sysprep
sysprep /generalize /audit /shutdown
... or
sysprep /generalize /audit /reboot
Make sure you take a snapshot of the VM before you perform this step, or take one during this step.
This will allow you to make changes to the image in the future.
I captured it before going into Audit mode, that way I can update the image in the future.
You can only perform OOBE 8 times on an image, after that you have to create a new image.
You can boot into Audit Mode as many times as you’d like.
GUI Method

Same here, take a snapshot of the VM.
Remove Account
To remove the user account you created you need to be in Audit mode.
Note it will take a while to get into audit mode.
Also in audit mode you will see how your custom start layout get applied during deployment.
Once in there you can navigate to Start and Settings.
Select Accounts and Other users.
Then click remove on the account you wish to remove.

Other Customizations
Hide Cortana
reg add HKEY_CURRENT_USERSoftwareMicrosoftWindowsCurrentVersionExplorerAdvanced /v ShowCortanaButton /d 00000000 /f
Hide Search Bar
CMD /k reg add HKEY_CURRENT_USERSoftwareMicrosoftWindowsCurrentVersionSearch /v SearchboxTaskbarMode /d 0x00000000 /f
The Above can be added to a bash script that can run on first log on.
You can put this script in the C:WindowsOEM directory.
Shutdown into OOBE
Now that you have customized your image you can shutdown into the out of box exprience (OOBE).
sysprep.exe /generalize /shutdown /oobe
Navigate to C:WindowsSystem32Sysprep and execute the following command:
Now we’re ready to capture the image.
Capture OS with Dism
Full instructions are here; https://docs.microsoft.com/en-us/windows-hardware/manufacture/desktop/winpe-create-usb-bootable-drive
The idea is that we will export and mount the vhdx file inside Windows 10.
Then we will capture the image using dism on our system and move it to a bootable flash drive.
We will create the flash drive using a Windows 10 ISO and copy our wim file to it.
Finally we will create an unattended installation for all of this.
Export and Mount OOBE Chekpoint
Once the VM has shut down, create another VM checkpoint name it something the likes of OOBE.
Right click the Checkpoint and export it to a directory of your choosing.

This may take some time.
Once the Checkpoint has exported navigate to the folder location you selected.
In my case it was located in C:winpe_tempOOBE.
In there there is the VM name folder navigate to it and Virtual Hard Disks, right click the main VHDX and select Mount. Take note of the drive letter, in this instance we’ll be working with P:
Copy any drivers or packages you want inside the Operating system when you deploy it.

Capture your OS deployment
Now that the VHDX is mounted we can capture it.
Start Deployment Image Servicing and Management tool as Administrator and run the following command to capture the OS image.
Dism /Capture-Image /ImageFile:<path_to_image_file> /CaptureDir:<source_directory> /Name:<image_name>
ImageFile is going to be the location where the wim file gets saved to.
CaptureDir is the drive letter of the mounted VHDX.
Name is just the descriptor of the new image file.
Ex.

*Note that unless you have multiple drives, or SSD/nVME drive this is going to take some time. On a platter drive this process can take hours.
An alternative to this is to create a Windows PE bootable flash drive and capture the image on a laptop or desktop, but you will need an external drive for that.
Mount Image and Inject Drivers
Next step is to mount the wim file you just captured and inject hardware specific drivers so the OS deploys with up to date and current drivers.
You can get wim information by running the following command.
Dism /Get-ImageInfo /ImageFile:c:winpe_tempFlyht_Devops_XPS.wim
This is useful if you want to know the index of a specific image inside the wim file.
Run the DI tools environment as administrator and mount the image
Dism /Mount-Image /Imagefile:C:winpe_tempFlyht_Devops_XPS.wim /Index:1 /Mountdir:C:temp
This may take a while.
Locate your drivers that you want to add to the image.
Add the drivers to the image by running the following command.
Dism /Image:c:temp /Add-Driver /Driver:"C:UsersdspedziaDocumentsWinPE9750 Drivers" /Recurse
Wait for it to finish and unmount the image.
Dism /Unmount-Image /MountDir:c:temp /Commit
Now it’s time to create an installation disk.
Create a bootable Install Drive
Mount your Windows 10 iso and insert your flash drive into the system.
Take note of which drive letter the ISO and Flash Drive mounts to.
Your flash drive should be at least 4GB larger than your WIM file.
We will assume it mounts to drive letter T: and the flash drive is using drive letter P:.
Open up an administrative command prompt and run the following commands.
To locate the flash drive do the following;
C:>diskpart

Microsoft DiskPart version 10.0.18362.1

Copyright (C) Microsoft Corporation.
On computer: FLYHT10047

DISKPART> list disk

  Disk ###  Status         Size     Free     Dyn  Gpt
  --------  -------------  -------  -------  ---  ---
  Disk 0    Online          931 GB  1024 KB
  Disk 1    Online          298 GB  1024 KB
  Disk 2    Online           28 GB      0 B
Generally you can determine the flash drive by the size of the disk in this case it’s Disk 2.
Now we’ll create a bootable flash drive;
diskpart
select disc 2
clean
create partition primary
active
format quick fs=ntfs label="Windows 10 Devops"
exit
Now we copy the contents of the Win10 ISO to the Flash drive.
This can take a bit.
After this has been created you have 2 options depending on how you want to deploy your wim file.
You can either copy the Flyht_Devops_XPS.wim to the flash drive or a network location.
If you will be deploying this from a network location you need to make sure that your OS image has the proper network drivers and that it is connected to the network when you are deploying the OS.
You specify the location of the WIM file in the AutoUnattend.xml file.
Finally copy your custom WIM file into the same location as the install.wim, this is usually in the sources folder on the flash drive.

As previously stated alternatively copy your custom wim to a network location and share it with the domain join user.
Deployment
Copy the AutoUnattend.xml Answer File to the root of the flash drive.

Connect your desktop/laptop to a physical network, and boot from your flash drive.
Installation and domain join should be automatic, see below section to see how to do that.
Create AutoUnattend.xml Answer File
AutoUnattend.xml file allows you to deploy the OS with pre determined settings and automatically join the system to the domain.
Create AutoUnattend
To create the unattended installation file navigate to Windows Kits and select Windows System Image Manager.
Select FIle and Select Windows Image…

Locate and select your custom WIM file.
When Prompted select Yes to create a new catalog file.
This will take a little bit, once done it will load this file each subsequent time.
You will notice in the bottom left pane a Windows Image pane, it will populate with your Image name and a couple sub folders.
You will mostly be working with the Components sub folder.

After the catalog file is created click on new Answer file.

This will pop up in the middle top Answer File pane.
Note the numbers of the Components, they are Passes.
Pass 1 is windowsPE, Pass 2 is offline Servicing, Pass 3 is generalize, etc.

Pass 1 WindowsPE
amd64_Microsoft-Windows-International-Core-WinPE_neutral
Back to the Windows Image pane expand Components – Microsoft Windows International Core WinPE, right click StupUILanguage and add to Pass 1.

Back in the Answer File pane make the following changes.


Keep adding the components from the image to the Answer File for all the following components.
amd64_Microsoft–Windows-Setup_neutral
You will be adding the following sub components.

DiskConfiguration
Add the following sub components

You will add the above several times in this example 6 times. Same does for Modify Partition.

DiskID will be 0 and you will wipe it.
Create Partition
| Action | Extend | Order | Size | Type |
|---|---|---|---|---|
| AddListItem | false | 1 | 250 | Primary |
| AddListItem | false | 2 | 100 | EFI |
| AddListItem | false | 3 | 128 | MSR |
| AddListItem | false | 4 | 300000 | Primary |
| AddListItem | false | 5 | 100000 | Primary |
| AddListItem | true | 6 | Primary |
*Partition Order 5 will be used for Linux distro
Modify Partition
| Action | Active | Extend | Format | Label | Letter | Order | PartitionID | TypeID |
|---|---|---|---|---|---|---|---|---|
| AddListItem | NTFS | Recovery | 1 | 1 | de94bba4-06d1-4d40-a16a-bfd50179d6ac | |||
| AddListItem | FAT32 | System | 2 | 2 | ||||
| AddListItem | NTFS | Flyht | C | 3 | 4 | |||
| AddListItem | NTFS | Data | D | 4 | 6 |
*TypeID for Recovery partition must match example
Image Install
Add OSImage InstallFrom, Credentials and MetaData. Also add InstallTo.

Add and make the following changes to these components.
| Sub Component | Property | Value | Alternative Value |
|---|---|---|---|
| ImageInstall/OSImage | Compact | false | |
| WillShowUI | On Error | ||
| ImageInstall/OSImage/InstallFrom | Path | /Devops_XPS.wim | \servernameshareDevops_XPS.wim |
| ImageInstall/OSImage/InstallFrom/Credentials | Domain | domain.local | |
| Password | somedomainpassword | ||
| Username | domainjoin | ||
| ImageInstall/OSImage/InstallFrom/MetaData | Action | AddListItem | |
| Key | /IMAGE/INDEX | /IMAGE/NAME | |
| Value | 1 | Devops_XPS_Image | |
| ImageInstall/OSImage/InstallTo | DiskID | 0 | |
| PartitionID | 4 |
As you can see you can store your wim images on the network, this is particularly useful when the image exceeds the size of a flash drive.
You will only need the credentials component if you are deploying from a network share, otherwise you can remove it.
UserData
| Sub Component | Property | Value |
|---|---|---|
| UserData | AcceptEula | true |
| FullName | Nerd Drivel | |
| Organization | Nerd Drivel | |
| UserData/ProductKey | Key | VK7JG-NPHTM-C97JM-9MPGT-3V66T |
| WillShowUI | Never |
The above key is an RTM generic key used for OEM deployments, after installation Windows activates with the stored key inside the BIOS
Read More: https://www.tenforums.com/tutorials/95922-generic-product-keys-install-windows-10-editions.html
Pass 4 specialize
Add the following components.

amd64_Microsoft-Windows-Shell-Setup_neutral
Change the following values.
| Sub Component | Property | Value |
|---|---|---|
| ComputerName | COMPUTER10056 | |
| DisableAutoDaylightTimeSet | false | |
| DoNotCleanTaskBar | true | |
| ProductKey | VK7JG-NPHTM-C97JM-9MPGT-3V66T | |
| RegisteredOrganization | Nerd Drivel | |
| RegisteredOwner | Nerd Drivel | |
| ShowPowerButtonOnStartScreen | true | |
| TimeZone | Mountain Standard Time |
amd64_Microsoft-Windows-UnattendedJoin_neutral
| Sub Component | Property | Value |
|---|---|---|
| Identification | DebugJoin | false |
| DebugJoinOnlyOnThisError | 0 | |
| JoinDomain | domain.local | |
| MachineObjectOU | OU=Computers,OU=MyCity,OU=Sites,DC=domain,DC=local | |
| TimeoutPeriodInMinutes | 0 | |
| UnsecureJoin | false | |
| Identification/Credentials | Domain | domain.local |
| Password | somedomainpassword | |
| Username | domainjoin |
Pass 7 oobeSystem
Add the following components.

amd64_Microsoft-Windows-international-Core_neutral
| Sub Component | Property | Value |
|---|---|---|
| InputLocale | en-US | |
| SystemLocale | en-CA | |
| UILanguage | en-US | |
| UiLanguageFallback | en-CA | |
| UserLocale | en-CA |
amd64_Microsoft-Windows-Shell-Setup_neutral
| Sub Component | Property | Value |
|---|---|---|
| Sub Component | Property | Value |
| OOBE | HideEULAPage | true |
| HideLocalAccountScreen | true | |
| HideOEMRegistrationScreen | true | |
| HideOnlineAccountScreens | true | |
| HideWirelessSetupInOOBE | true | |
| ProtectYourPC | 2 | |
| OOBE/VMModeOptimizations | SkipAdministraorProfileRemoval | false |
| SkipNotifyUILanguageChange | true | |
| SkipWinREInitialization | true | |
| UserAccounts/LocalAccounts/LocalAccount | Action | AddListItem |
| Description | Local User Account | |
| DisplayName | User | |
| Group | Administrators | |
| Name | User | |
| UserAccounts/LocalAccounts/LocalAccount/Password | Value | mypassword |
Deployment Notes
Each subsequent deployment you only need to change the computer name in Pass 4.
Always edit the computer name in Windows System Image Manager otherwise the file can be malformed and the deployment will fail.
Autounattend.XML example
<?xml version="1.0" encoding="utf-8"?>
<unattend xmlns="urn:schemas-microsoft-com:unattend">
    <settings pass="windowsPE">
        <component name="Microsoft-Windows-International-Core-WinPE" processorArchitecture="amd64" publicKeyToken="31bf3856ad364e35" language="neutral" versionScope="nonSxS" xmlns:wcm="http://schemas.microsoft.com/WMIConfig/2002/State" xmlns:xsi="http://www.w3.org/2001/XMLSchema-instance">
            <SetupUILanguage>
                <UILanguage>en-US</UILanguage>
            </SetupUILanguage>
            <UserLocale>en-CA</UserLocale>
            <UILanguageFallback>en-CA</UILanguageFallback>
            <SystemLocale>en-CA</SystemLocale>
            <InputLocale>en-US</InputLocale>
            <UILanguage>en-US</UILanguage>
        </component>
        <component name="Microsoft-Windows-Setup" processorArchitecture="amd64" publicKeyToken="31bf3856ad364e35" language="neutral" versionScope="nonSxS" xmlns:wcm="http://schemas.microsoft.com/WMIConfig/2002/State" xmlns:xsi="http://www.w3.org/2001/XMLSchema-instance">
            <DiskConfiguration>
                <Disk wcm:action="add">
                    <CreatePartitions>
                        <CreatePartition wcm:action="add">
                            <Order>1</Order>
                            <Type>Primary</Type>
                            <Size>250</Size>
                        </CreatePartition>
                        <CreatePartition wcm:action="add">
                            <Order>2</Order>
                            <Type>EFI</Type>
                            <Size>100</Size>
                        </CreatePartition>
                        <CreatePartition wcm:action="add">
                            <Order>3</Order>
                            <Size>128</Size>
                            <Type>MSR</Type>
                        </CreatePartition>
                        <CreatePartition wcm:action="add">
                            <Order>4</Order>
                            <Extend>false</Extend>
                            <Type>Primary</Type>
                            <Size>300000</Size>
                        </CreatePartition>
                        <CreatePartition wcm:action="add">
                            <Order>5</Order>
                            <Type>Primary</Type>
                            <Size>100000</Size>
                        </CreatePartition>
                        <CreatePartition wcm:action="add">
                            <Order>6</Order>
                            <Extend>true</Extend>
                            <Type>Primary</Type>
                        </CreatePartition>
                    </CreatePartitions>
                    <ModifyPartitions>
                        <ModifyPartition wcm:action="add">
                            <Order>1</Order>
                            <PartitionID>1</PartitionID>
                            <Format>NTFS</Format>
                            <Label>Recovery</Label>
                            <TypeID>de94bba4-06d1-4d40-a16a-bfd50179d6ac</TypeID>
                        </ModifyPartition>
                        <ModifyPartition wcm:action="add">
                            <Order>2</Order>
                            <PartitionID>2</PartitionID>
                            <Label>System</Label>
                            <Format>FAT32</Format>
                        </ModifyPartition>
                        <ModifyPartition wcm:action="add">
                            <Order>3</Order>
                            <PartitionID>4</PartitionID>
                            <Label>Nerd Drivel</Label>
                            <Format>NTFS</Format>
                            <Letter>C</Letter>
                        </ModifyPartition>
                        <ModifyPartition wcm:action="add">
                            <Order>4</Order>
                            <Format>NTFS</Format>
                            <Label>Data</Label>
                            <Letter>D</Letter>
                            <PartitionID>6</PartitionID>
                        </ModifyPartition>
                    </ModifyPartitions>
                    <DiskID>0</DiskID>
                    <WillWipeDisk>true</WillWipeDisk>
                </Disk>
                <WillShowUI>OnError</WillShowUI>
            </DiskConfiguration>
            <UserData>
                <ProductKey>
                    <WillShowUI>Never</WillShowUI>
                    <Key>VK7JG-NPHTM-C97JM-9MPGT-3V66T</Key>
                </ProductKey>
                <AcceptEula>true</AcceptEula>
                <Organization>Nerd Drivel</Organization>
                <FullName>Nerd Drivel</FullName>
            </UserData>
            <EnableFirewall>false</EnableFirewall>
            <EnableNetwork>true</EnableNetwork>
            <ImageInstall>
                <OSImage>
                    <InstallTo>
                        <DiskID>0</DiskID>
                        <PartitionID>4</PartitionID>
                    </InstallTo>
                    <InstallFrom>
                        <Path>/Devops_XPS.wim</Path>
                        <MetaData wcm:action="add">
                            <Key>/IMAGE/INDEX</Key>
                            <Value>1</Value>
                        </MetaData>
                    </InstallFrom>
                    <WillShowUI>OnError</WillShowUI>
                </OSImage>
            </ImageInstall>
        </component>
    </settings>
    <settings pass="specialize">
        <component name="Microsoft-Windows-UnattendedJoin" processorArchitecture="amd64" publicKeyToken="31bf3856ad364e35" language="neutral" versionScope="nonSxS" xmlns:wcm="http://schemas.microsoft.com/WMIConfig/2002/State" xmlns:xsi="http://www.w3.org/2001/XMLSchema-instance">
            <Identification>
                <Credentials>
                    <Domain>domain.local</Domain>
                    <Username>domainjoin</Username>
                    <Password></Password>
                </Credentials>
                <JoinDomain>domain.local</JoinDomain>
                <MachineObjectOU>OU=Computers,OU=MyCity,OU=Sites,DC=domain,DC=local</MachineObjectOU>
            </Identification>
        </component>
        <component name="Microsoft-Windows-Shell-Setup" processorArchitecture="amd64" publicKeyToken="31bf3856ad364e35" language="neutral" versionScope="nonSxS" xmlns:wcm="http://schemas.microsoft.com/WMIConfig/2002/State" xmlns:xsi="http://www.w3.org/2001/XMLSchema-instance">
            <ComputerName>COMPUTER10056</ComputerName>
            <BluetoothTaskbarIconEnabled>true</BluetoothTaskbarIconEnabled>
            <DisableAutoDaylightTimeSet>false</DisableAutoDaylightTimeSet>
            <DoNotCleanTaskBar>true</DoNotCleanTaskBar>
            <RegisteredOrganization>Nerd Drivel</RegisteredOrganization>
            <ShowPowerButtonOnStartScreen>true</ShowPowerButtonOnStartScreen>
            <TimeZone>Mountain Standard Time</TimeZone>
            <ProductKey>VK7JG-NPHTM-C97JM-9MPGT-3V66T</ProductKey>
            <RegisteredOwner>Nerd Drivel</RegisteredOwner>
        </component>
    </settings>
    <settings pass="oobeSystem">
        <component name="Microsoft-Windows-Shell-Setup" processorArchitecture="amd64" publicKeyToken="31bf3856ad364e35" language="neutral" versionScope="nonSxS" xmlns:wcm="http://schemas.microsoft.com/WMIConfig/2002/State" xmlns:xsi="http://www.w3.org/2001/XMLSchema-instance">
            <OOBE>
                <VMModeOptimizations>
                    <SkipWinREInitialization>true</SkipWinREInitialization>
                    <SkipNotifyUILanguageChange>true</SkipNotifyUILanguageChange>
                    <SkipAdministratorProfileRemoval>false</SkipAdministratorProfileRemoval>
                </VMModeOptimizations>
                <HideEULAPage>true</HideEULAPage>
                <HideLocalAccountScreen>true</HideLocalAccountScreen>
                <HideWirelessSetupInOOBE>true</HideWirelessSetupInOOBE>
                <ProtectYourPC>2</ProtectYourPC>
                <HideOEMRegistrationScreen>true</HideOEMRegistrationScreen>
                <HideOnlineAccountScreens>true</HideOnlineAccountScreens>
            </OOBE>
            <UserAccounts>
                <LocalAccounts>
                    <LocalAccount wcm:action="add">
                        <Password>
                            <Value>LKJHDFLalkdjfhatiGKJLKalgeriouyklajdf=</Value>
                            <PlainText>false</PlainText>
                        </Password>
                        <Description>Local User Account</Description>
                        <DisplayName>User</DisplayName>
                        <Group>Administrators</Group>
                        <Name>User</Name>
                    </LocalAccount>
                </LocalAccounts>
            </UserAccounts>
            <TimeZone>Mountain Standard Time</TimeZone>
            <RegisteredOrganization>Nerd Drivel</RegisteredOrganization>
            <RegisteredOwner>Nerd Drivel</RegisteredOwner>
        </component>
        <component name="Microsoft-Windows-International-Core" processorArchitecture="amd64" publicKeyToken="31bf3856ad364e35" language="neutral" versionScope="nonSxS" xmlns:wcm="http://schemas.microsoft.com/WMIConfig/2002/State" xmlns:xsi="http://www.w3.org/2001/XMLSchema-instance">
            <InputLocale>en-US</InputLocale>
            <SystemLocale>en-CA</SystemLocale>
            <UILanguage>en-US</UILanguage>
            <UILanguageFallback>en-CA</UILanguageFallback>
            <UserLocale>en-CA</UserLocale>
        </component>
    </settings>
    <cpi:offlineImage cpi:source="wim://computer10047/cwinpe_temp/Devops_XPS.wim#Devops_XPS_Image" xmlns:cpi="urn:schemas-microsoft-com:cpi" />
</unattend>
Как создать резервную копию Windows 10 в Macrium Reflect
Программа Macrium Reflect позволяет быстро создавать копию для операционной системы Windows 10. Утилита ориентирована на домашнего пользователя. Рассмотрим, как создать резервную копию для ОС и процедуру восстановления. Добавим, что приложение позволяет также переносить образ системы на SDD или жесткий диск.
Создание реплики
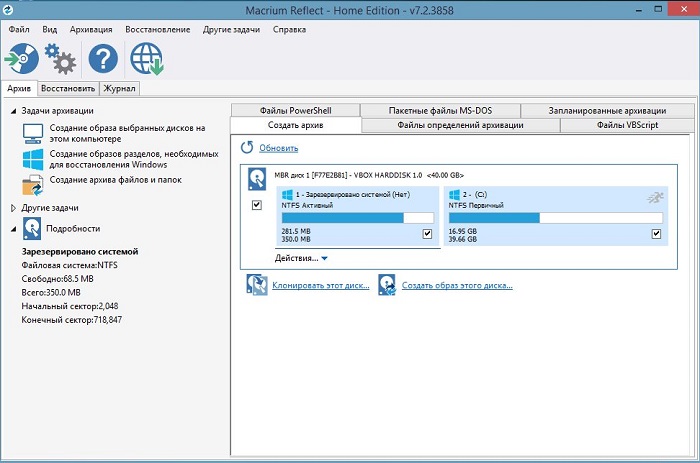
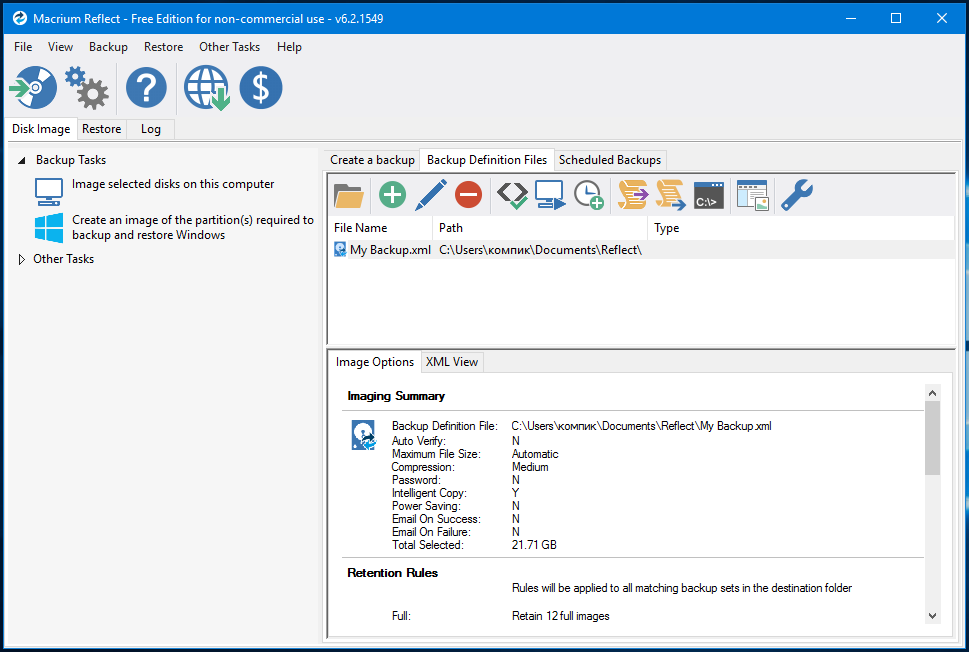
- Рассмотрим, как создать реплику Windows 10 с сохранением всех важных разделов. Интерфейс программы позволяет получить информацию обо всех физических накопителях и томах. Для генерации резервной копии сначала понадобится перейти в раздел Backup Tasks. Здесь находится пункт, с помощью которого можно создать образ разделов. Именно он послужит для создания резервной копии и восстановления операционной системы.
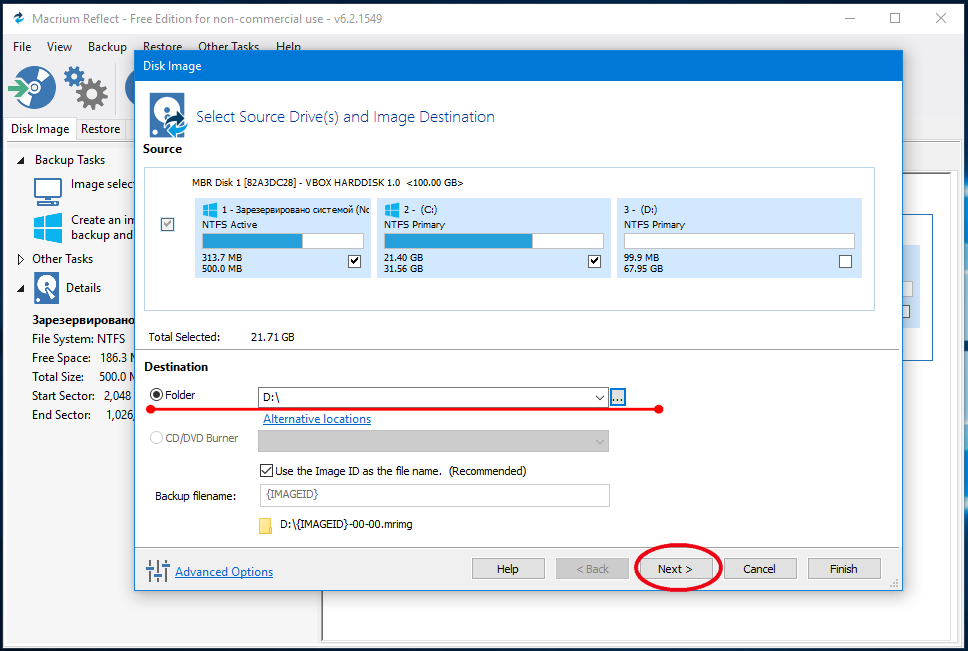
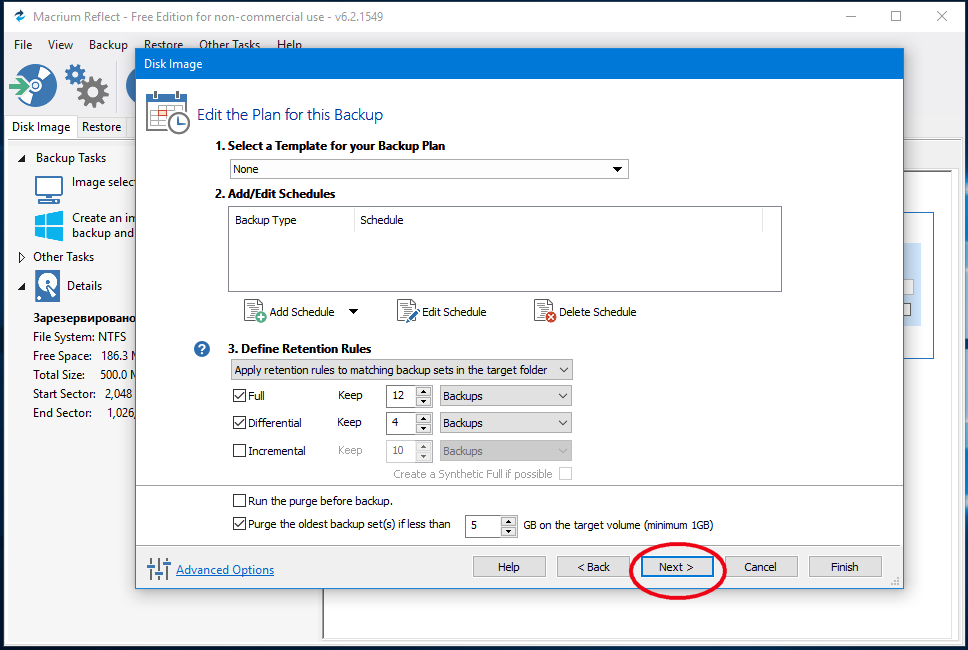
- Следующее окно обращает внимание пользователя на разделы, для которых могут быть созданы резервные копии. Пользователь может самостоятельно настроить место хранения реплики. Рекомендуется пользоваться отдельным накопителем. Для резервной копии есть опция создания пароля, изменение параметров сжатия. Доступно полное, раздельное и инкрементальное копирование. Также пользователь может выполнить настройку графика резервного копирования.
 Скриншот к Macrium Reflect
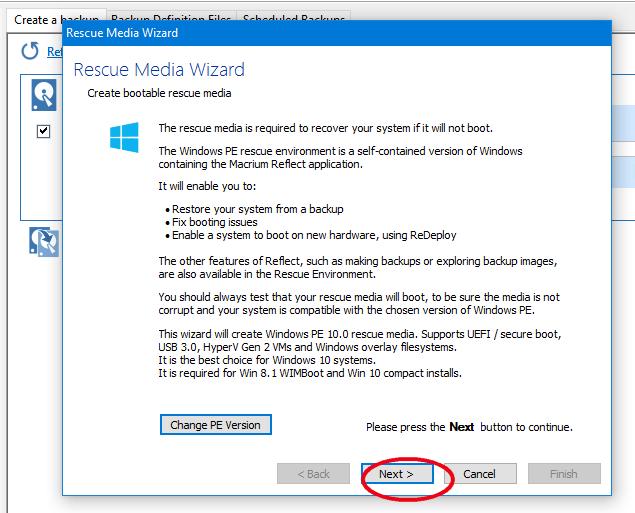
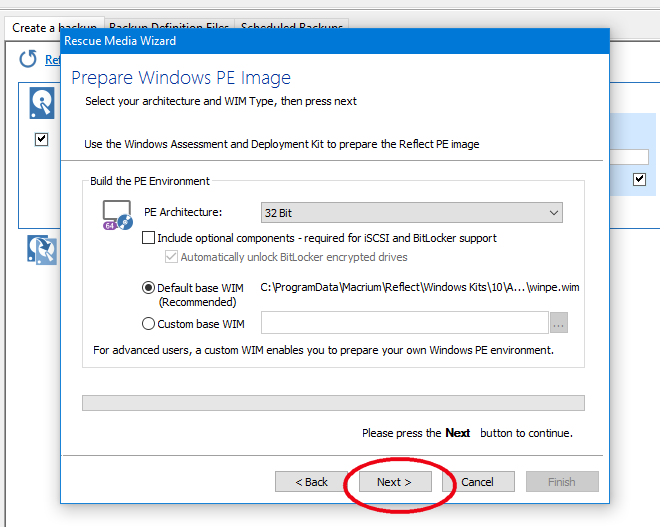
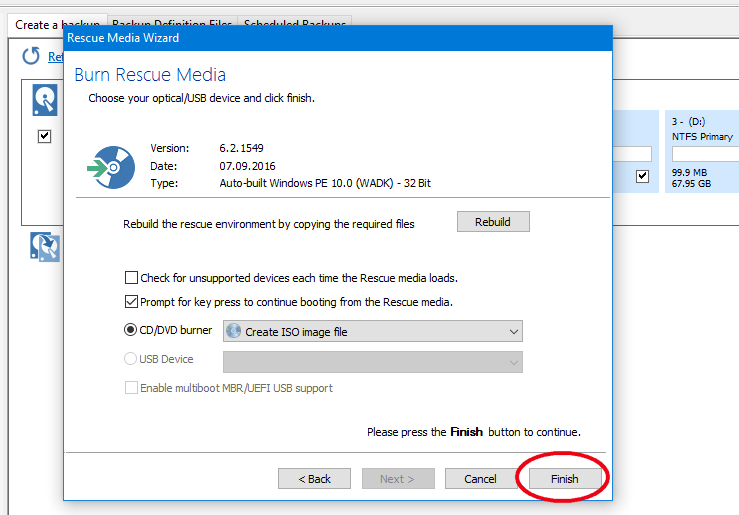
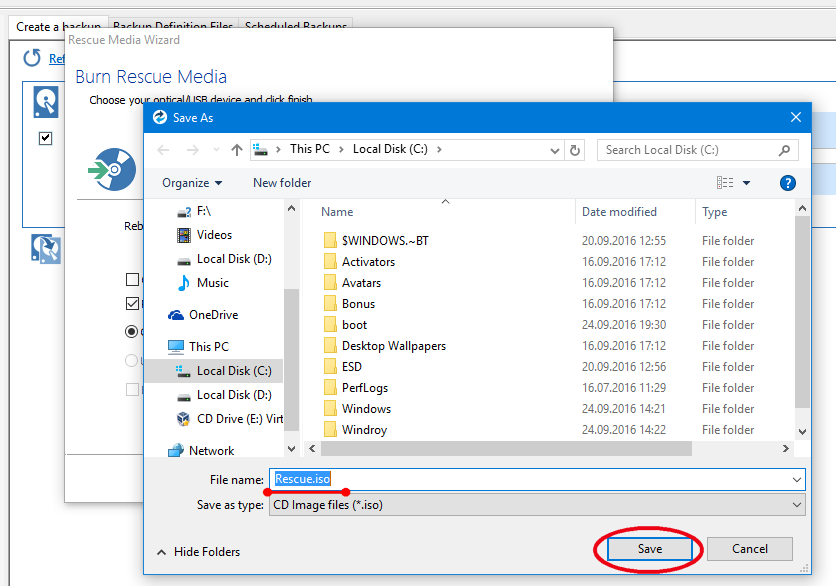
- На вкладке Backup есть раздел «Другие задачи». В нем можно выбрать пункт «Создание загрузочного диска восстановления».
- Далее выбираем загрузочное меню. Можно воспользоваться файлом-образом, тогда программа создаст ISO-файл. Его в дальнейшем можно разместить на диске или флеш-носителе.
- Нажимаем кнопку «Создать» («Build») и ждем окончания процесса.
5.Чтобы выполнить запуск восстановления, можно загрузиться с созданного образа. Впрочем, будет удобнее воспользоваться Macrium Reflect самой системе.
- Нужно перейти на вкладку «Восстановление» и найти нужную реплику.
- Далее выбрать пункт «Восстановить образ».
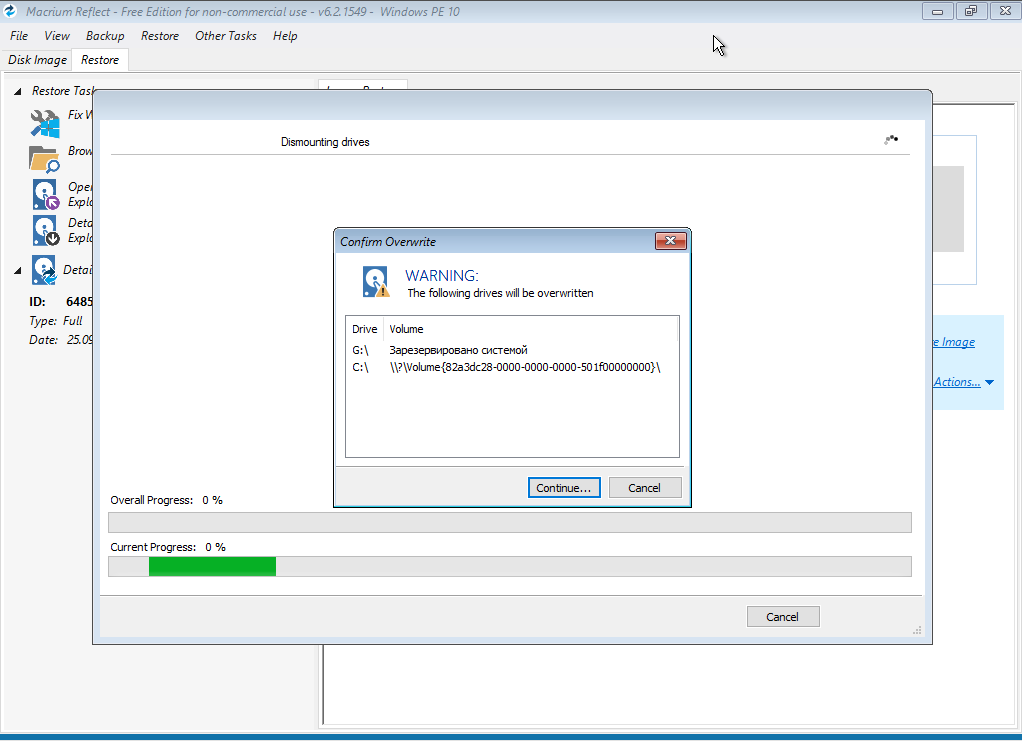
- Выбираем разделы, которые хранятся в резервной копии. Произойдет автоматическая перезагрузка, далее запустится восстановление.
6. С помощью Macrium Reflect можно не только проводить восстановление, но и планировать диски, пользоваться репликами в виртуальных машинах на базе Hyper-V (требуется viBoot). Также можно работать с сетевыми дисками и пользоваться командой TRIM.
Видео: Как сделать полный бэкап Windows и восстановить его за 20 минут с помощью Macrium Reflect
Резервная копия Windows 10 в Macrium Reflect
 Ранее на сайте уже описывались различные способы создания резервной копии Windows 10, в том числе и с помощью сторонних программ. Одна из таких программ, удобная и эффективно работающая — Macrium Reflect, которая доступна в том числе и в бесплатной версии без существенных ограничений для домашнего пользователя. Единственный возможный недостаток программы — отсутствие русского языка интерфейса.
В этой инструкции пошагово о том, как создать резервную копию Windows 10 (подойдет и для других версий ОС) в Macrium Reflect и восстановить компьютер из резервной копии, когда это потребуется. Также с её помощью вы можете перенести Windows на SSD или другой жесткий диск.
Создание резервной копии в Macrium Reflect
В инструкции будет рассматриваться создание простой резервной копии Windows 10 со всеми разделами, которые необходимы для загрузки и работы системы. При желании, вы можете включить в резервную копию и разделы с данными.
После запуска Macrium Reflect программа автоматически откроется на вкладке Backup (резервная копия), в правой части которой будут отображены подключенные физические накопители и разделы на них, в левой части — основные доступные действия.
Шаги по созданию резервной копии Windows 10 будут выглядеть следующим образом:
- В левой части в разделе «Backup tasks» нажмите по пункту «Create an image of the partitions required to backup and restore Windows» (Создать образ разделов, необходимых для резервного копирования и восстановления Windows).

- В следующем окне вы увидите отмеченные для резервного копирования разделы, а также возможность настроить место сохранения резервной копии (используйте отдельный раздел, а еще лучше — отдельный накопитель. Резервную копию можно записать и на компакт-диски CD или DVD (она будет разбита на несколько дисков). Пункт Advanced Options позволяет настроить некоторые дополнительные параметры, например, установить пароль на резервную копию, изменить параметры сжатия и другие. Нажмите «Next» (Далее).
- При создании резервной копии вам предложат настроить график и параметры автоматического резервного копирования с возможностью выполнять полное, инкрементальное или дифференциальное резервное копирование. В этой инструкции тема не затрагивается (но могу подсказать в комментариях, если необходимо). Нажимаем «Далее» (график без изменения параметров создан не будет).
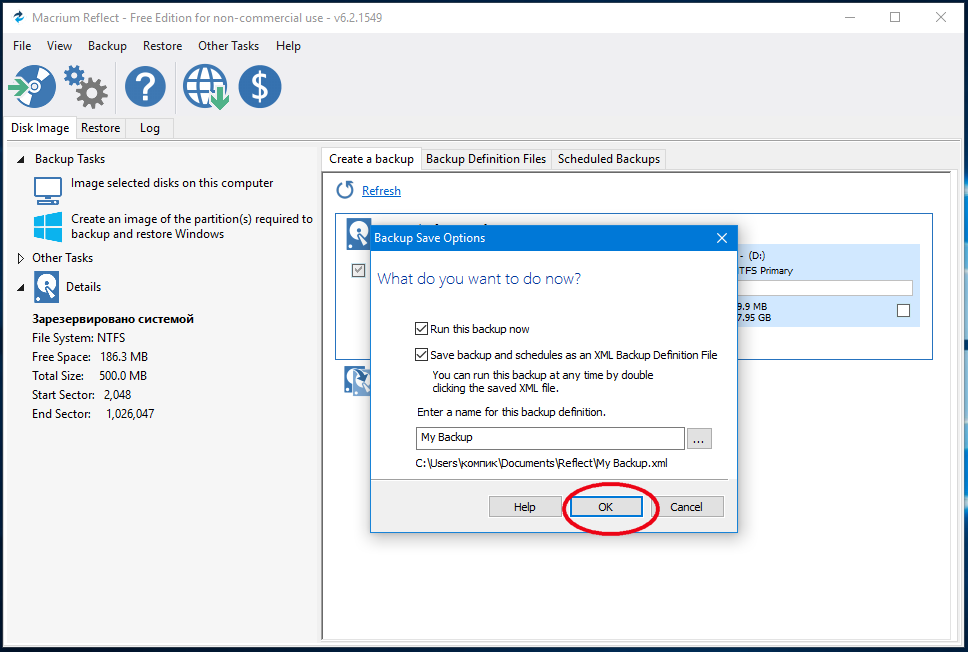
- В следующем окне вы увидите информацию о создаваемой резервной копии. Нажмите «Finish» для начала резервного копирования.
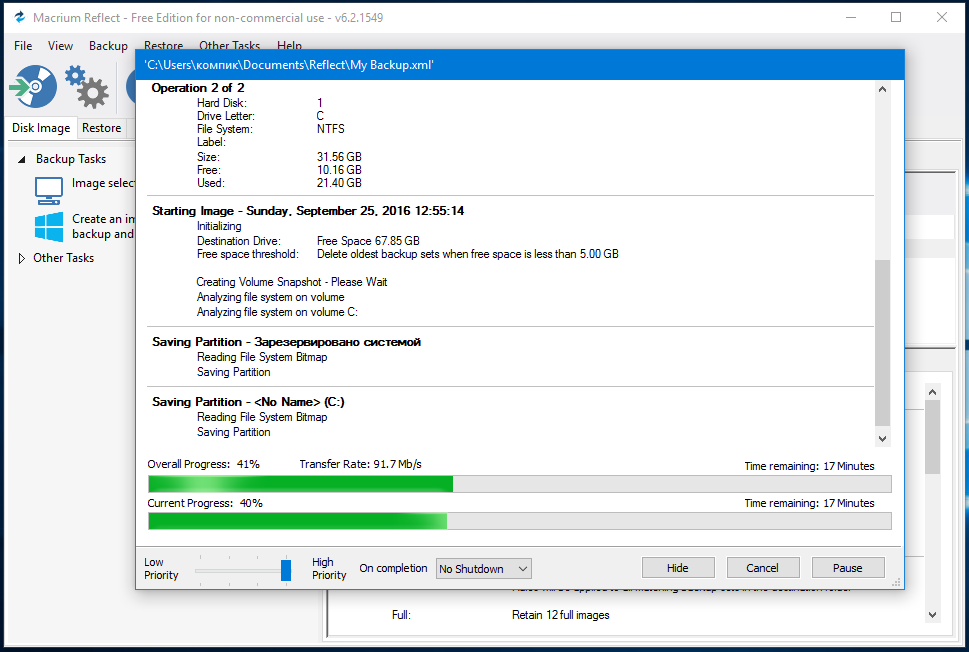
- Укажите имя бэкапа и подтвердите создание резервной копии. Дождитесь завершения процесса (может занять продолжительное время при наличии большого объема данных и при работе на HDD).
- По завершении вы получите резервную копию Windows 10 со всеми необходимыми разделами в одном сжатом файле с расширением .mrimg (в моем случае исходные данные занимали 18 Гб, резервная копия — 8 Гб). Также при настройках по умолчанию в резервную копию не сохраняются файлы подкачки и гибернации (на работоспособность не влияет).


Как видите, всё очень просто. Столь же просто и процесс восстановления компьютера из резервной копии.
Восстановление Windows 10 из резервной копии
Восстановить систему из резервной копии Macrium Reflect тоже не сложно. Единственное, на что следует обратить внимание: восстановление в то же расположение, где находится единственная Windows 10 на компьютере невозможно из запущенной системы (т.к. будут заменяться её файлы). Чтобы восстановить систему потребуется сначала либо создать диск восстановления, либо добавить пункт Macrium Reflect в меню загрузки для запуска программы в среде восстановления:
- В программе на вкладке Backup откройте раздел Other Tasks и выберите пункт Create bootable rescue media (создать загрузочный диск восстановления).
- Выберите один из пунктов — Windows Boot Menu (будет добавлен пункт Macrium Reflect в меню загрузки компьютера для запуска ПО в среде восстановления), либо ISO File (создается загрузочный ISO файл с программой, который можно записать на флешку или компакт-диск).
Далее, чтобы запустить восстановление из резервной копии вы можете загрузиться с созданного диска восстановления или же, если вы добавляли пункт в меню загрузки — загрузить его. В последнем случае также можно просто запустить Macrium Reflect в системе: если задача требует перезагрузки в среде восстановления, программа это сделает автоматически. Сам процесс восстановления будет выглядеть следующим образом:
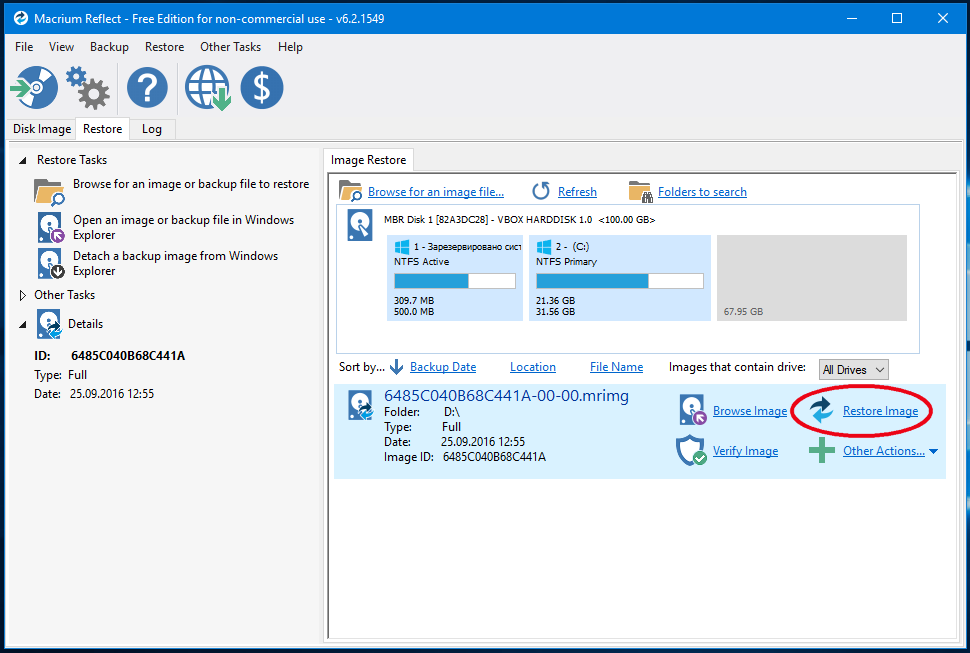
- Перейдите на вкладку «Restore» (восстановление) и, если список резервных копий в нижней части окна не отобразился автоматически, нажмите «Browse for an image file», а затем укажите путь к файлу резервной копии.
- Нажмите по пункту «Restore Image» справа от резервной копии.
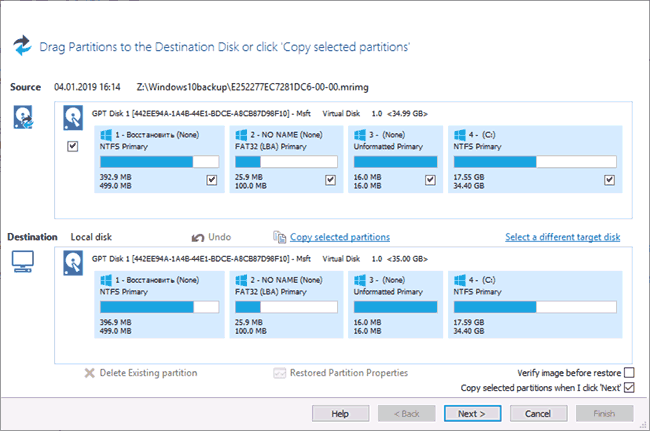
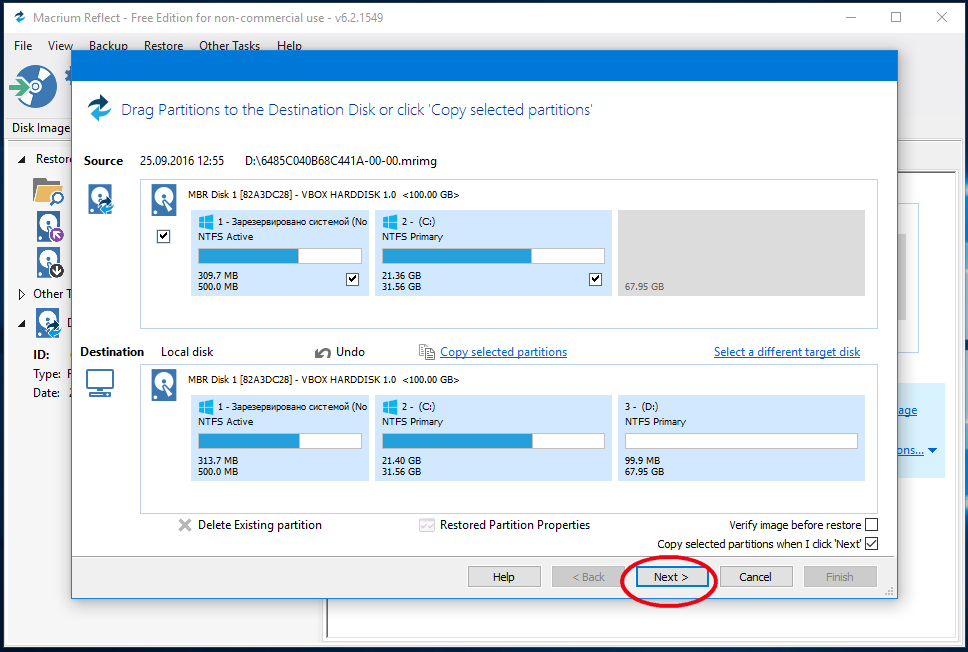
- В следующем окне в верхней части отобразятся разделы, хранящиеся в резервной копии, в нижней — на диске, с которого снималась резервная копия (в том виде, в котором они на нем находятся в настоящий момент времени). При желании, вы можете снять отметки с тех разделов, которые не нужно восстанавливать.
- Нажмите «Next», а затем — Finish.
- Если программа была запущена в Windows 10, которую вы восстанавливаете, вам будет предложено перезагрузить компьютер для завершения процесса восстановления, нажмите кнопку «Run from Windows PE» (только при условии, что вы добавили Macrium Reflect в среду восстановления, как это было описано выше).
- После перезагрузки процесс восстановления начнется автоматически.


Это только общие сведения о создании резервной копии в Macrium Reflect для наиболее востребованного домашними пользователями сценария использования. Помимо прочего программа в бесплатной версии умеет:
- Клонировать жесткие диски и SSD.
- Использовать созданные резервные копии в виртуальных машинах Hyper-V с помощью viBoot (дополнительное ПО от разработчика, которое при желании можно установить при установке Macrium Reflect).
- Работать с сетевыми дисками, в том числе в среде восстановления (также на диске восстановления в последней версии появилась поддержка Wi-FI).
- Показывать содержимое резервных копий через проводник Windows (если требуется извлечь лишь отдельные файлы).
- Использовать команду TRIM для неиспользуемых больше блоков на SSD после процесса восстановления (включено по умолчанию).
Как итог: если вас не смущает английский язык интерфейса, рекомендую к использованию. Программа исправно работает для UEFI и Legacy систем, делает это бесплатно (и не навязывает переход на платные версии), в достаточной мере функциональна.
Создание резервной копии системы в программе Macrium Reflect FREE Edition

Р езервное копирование — самый надёжный и эффективный способ застраховаться от потери или повреждения важных файлов. Даже если они будут полностью уничтожены, вы легко сможете их восстановить с другого носителя. Самым простым примером резервирования является обычное копирование файлов на съёмный носитель или облачный диск, несколько иначе дела обстоят с резервированием операционной системы, для этих целей вам понадобится специальное программное обеспечение.
Программа, которую мы предлагаем рассмотреть в этом небольшом обзоре, как раз предназначается для удобного быстрого резервного копирования и восстановления логических разделов и даже целых дисков. Называется она Macrium Reflect FREE Edition. От своих аналогов она отличается высокой скоростью работы и превосходной компрессией образа, возможностью создания бекапа в процессе использования Windows, при этом резервные копии можно сохранять на локальные, оптические и сетевые диски.
Будучи укомплектованной сравнительно простым интерфейсом, Macrium Reflect FREE Edition как для бесплатной программы обладает достаточно широким набором функций. Приложением поддерживается создание образа диска и отдельных его частей, монтирование виртуальных дисков в Проводнике, пакетная запись CD и DVD , резервирование по расписанию, использование при восстановлении Linux или BartPE , а при создании образа — сервиса копирования Microsoft Volume Shadow .
В настройках программы вы можете выбрать метод сжатия, задействовать разделение резервной копии на части, включить проверку её целостности, установить пароль, задать приоритет для основного процесса. Вы также можете выбрать метод копирования (полный, инкрементный и дифференциальный) , включить или отключить функцию SSD Trim . Для опытных пользователей в программе предусмотрены расширенные настройки.
Установка и режимы работы
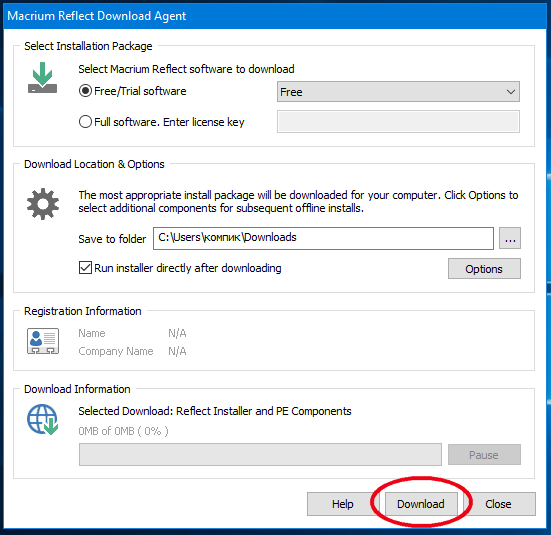
Установка Macrium Reflect FREE Edition не совсем стандартна. Инсталляция производится через веб-установщик, в окне которого пользователь может выбрать редакцию и указать путь для загрузки файлов программы.
После того как файлы будут скачаны, а это примерно 450 Мб, начнётся процедура установки. При первом запуске программа тут же предложит создать загрузочный спасательный диск.
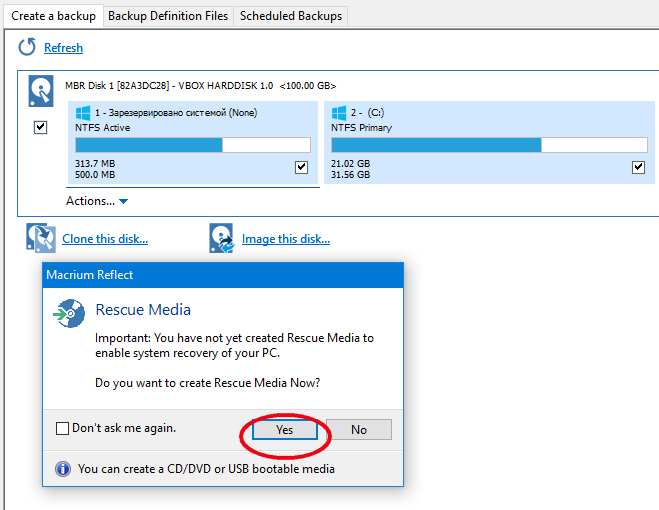
Сделать это лучше сразу, чтобы потом не забыть. Спасательный диск Macrium Reflect представляет собой записываемый на CD -диск ISO -образ размером порядка 200 Мб. Создаётся он с помощью пошагового мастера, так что особых вопросов на счёт этого у вас возникнуть не должно.
Основных режимов работы в Macrium Reflect FREE Edition два: клонирование диска и резервирование разделов.
Первый подразумевает создание образа целого физического диска, второй — создание образа системного и/или пользовательского раздела. В первом случае сохранение копии производится на другой физический диск, во втором резервирование может быть произведено на свободный раздел или диск. Создание резервных копий отдельных папок и файлов в редакции Free не поддерживается.
Резервирование системного раздела
Как и при создании загрузочного диска, резервирование системного раздела выполняется с помощью удобного пошагового мастера, вызываемого нажатием ссылки «Image this disk…».
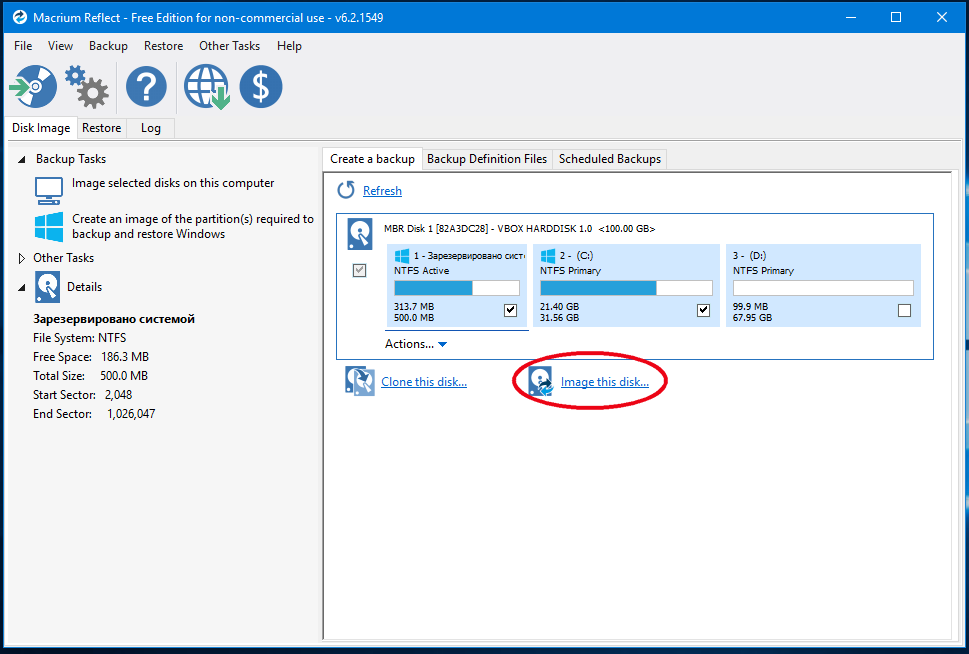
В открывшемся окне отметьте галочками копируемые разделы «Зарезервировано системой» и «С», а чуть ниже в блоке «Destination» укажите путь для сохранения резервной копии. Нажатием ссылки «Advanced Options» тут же можно вызвать окно настроек, впрочем, для создания резервной копии вполне будет достаточно параметров по умолчанию.
 Жмём «Next». Далее вам будет предложено определиться с шаблоном копирования (в версии Free только None ) , настроить планировщик, установить правила хранения. Эти настройки также можно будет оставить неизменными.
Жмём ещё раз «Next», затем «Finish», после чего начнётся процедура резервирования.
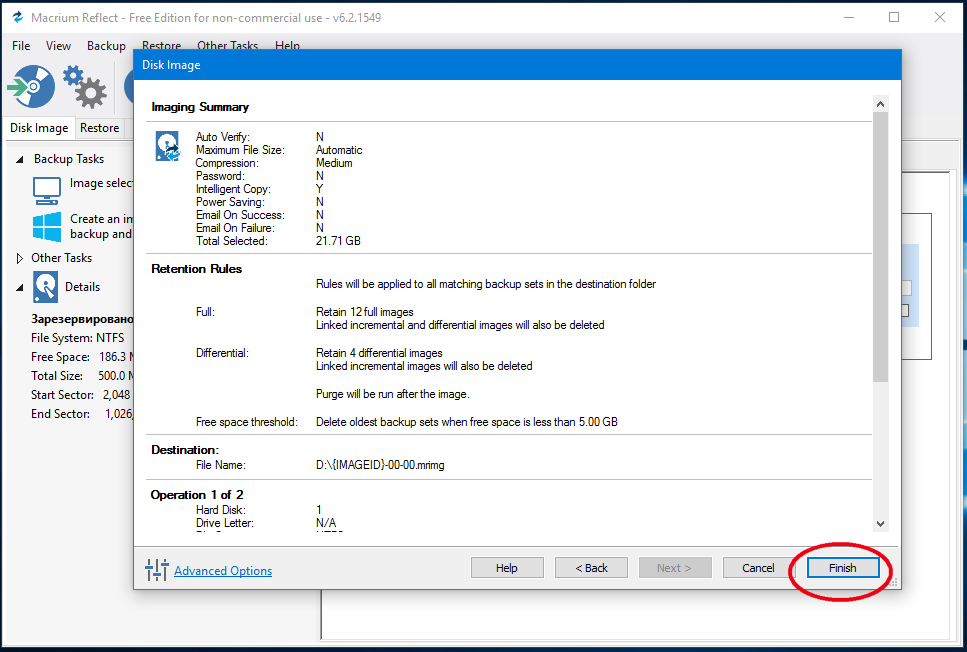
По её завершении программа уведомит вас соответствующим сообщением.
Схожим образом производится восстановление, только на этот раз нужно будет переключиться на вкладку «Restore» и нажать ссылку «Restore Image».
Далее следуем указаниям мастера. Если система повреждена настолько, что не может самостоятельно загрузиться, для восстановления следует использовать спасательный загрузочный диск. Загрузившись, вы сразу попадёте в среду Macrium Reflect , где сможете выбрать бекап и произвести восстановление.
Загрузить последнюю версию этой полезной программы можно с сайта разработчика www.macrium.com/reflectfree.aspx.
Помимо бесплатной версии, доступно ещё четыре редакции, отличающиеся расширенным функционалом. В отношении надёжности программа не уступает Acronis True Image, а в плане скорости и эффективности сжатия превосходит её. К сожалению, в Macrium Reflect отсутствует русский язык, с другой стороны, интерфейс её настолько прост, что с задачей создания бекапа в ней легко справится даже начинающий пользователь.
Macrium Reflect 7
Free Edition

Free backup, disk imaging and cloning solution for commercial and personal use.
Protect your data, upgrade your hard disk or try new operating systems in the safe knowledge that everything is securely saved in an easily recovered backup file. Macrium Reflect supports backup to local, network and USB drives.
Macrium Reflect 7 Free Edition is ready to download now and has a number of additional features not available in version 6. It is now licensed for both home and business use.
30-Day Trial Editions
To evaluate the commercial versions of Macrium Reflect, please download the 30-Day Trial editions which contain all the advanced features apart from ReDeploy.
- Faster Backups
with Incremental images and Rap >Protection from ransomware
with Macrium Image Guardian - 30 days of Technical Support
via email - Central management
using Macrium Site Manager
- Integrated viBoot 2
Instant virtualisation of Macrium backup images. - Task Scheduler 2
For compatibility with Windows 10 1607 (Anniversary Edition) and later. - New Rescue Media builder
includes Windows RE with WiFi Support - Licensed for Commercial Use *Covers making backups of single machines and restored to the same PC (or a replacement PC in the case of hardware failure). Rescue media must be created on the PC to be restored.
This specifically excludes the following:
Repair shop scenario, where Macrium Reflect is used to copy the contents of a hard disk to a new device.
Deployment scenario, where Macrium Reflect is used to copy a ‘golden image’ to multiple PCs.
«>
Macrium Reflect 7 Free Edition is now licensed for use in a business environment.
Download Macrium Reflect 7 Free Edition
Dedicated Disk Migration Tools
We are pleased to offer a dedicated disk migration tool for use with SK hynix SSDs.
You can download it here
| Key Feature | Free | Home | Workstation | Server | Server Plus | Technicians | Deployment Kit |
| Buy Now | Buy Now | Buy Now | Buy Now | Buy Now | Buy Now | ||
| Create images of a live/running Windows OS | |||||||
| Browse backup contents in Windows Explorer. | |||||||
| Differential Images | |||||||
| Restore non-booting systems | |||||||
| Direct disk cloning | |||||||
| Boot your backups instantly in a Hyper-V VM | |||||||
| Schedule your backups with flexible templates | |||||||
| Rapid delta cloning and restore for fast DR | |||||||
| Incremental backups | |||||||
| Backup set consolidation with synthetic full technology | |||||||
| Backup Files and Folders | |||||||
| Encrypt your backups | |||||||
| Bare metal restore to dissimilar hardware with ReDeploy | |||||||
| Ransomware protection | |||||||
| Log events in Windows | |||||||
| Central management using Macrium Site Manager | |||||||
| Server class OS backup and restore | |||||||
| MS Exchange and SQL granular backup | |||||||
| «Snapshot» image a PC without installing Reflect | |||||||
| Deploy a «golden image» to more than one PC | |||||||
| More Info | More Info | More Info | More Info | More Info | More Info |
| Support | Free | Home | Workstation | Server | Server Plus | Technicians | Deployment Kit |
| Support Period | No Support | 1 Year | 1 Year | 1 Year | 1 Year | 1 Year | 1 Year |
| Support Essentials | |||||||
| Standard Support | |||||||
| Premium Support |
Latest Blog Posts
How to avoid backup nightmares this Halloween
28/10/2019
From accidental deletion to hardware failure, theft and malware, there are many ways to lose your valuable data aside from.
Post migration Windows license considerations
22/10/2019
A common question we receive is ‘what happens to my Windows license when I restore to new hardware’? There is no easy answer to.
Cloning and imaging Linux file systems
08/10/2019
The following applies identically to image backups and clones. For brevity, though cloning is discussed, what follows applies.
Latest Videos
Webinar — Macrium Site Manager 7 Part 2 — Scheduling, Managing and Restoring
24/10/2019
In this webinar we show you how to configure backups, carry out restores and monitor performance across large numbers of.
Incrementals Forever and Synthetic Full Backup — Explained
17/10/2019
Incrementals Forever is the most efficient way to maintain a rolling series of recent backup points. Only a single full backup is.
Macrium Site Manager 7 Overview and Configuration — Part One
30/09/2019
Macrium Site Manager is a powerful integrated management tool for administering endpoint backups across the enterprise. This very.
Microsoft have some detailed instructions on capturing a VHD to move to Azure: https://docs.microsoft.com/en-us/azure/virtual-machines/windows/prepare-for-upload-vhd-image
Another way is to create a WIM file by booting from a Windows install ISO: https://docs.microsoft.com/en-us/windows-hardware/manufacture/desktop/capture-and-apply-windows-using-a-single-wim?view=windows-11
You should know that Microsoft doesn’t really want to make this easy, because it would also make piracy easier. Of course on Azure this is not a problem.
Personally I would boot any Linux from USB, and use dd, gz, and rsync:
$ lsblk # will show the block devices
$ mount -o ro /dev/sdb2 /mnt
$ cd /mnt
$ ls # to confirm that it's the right partition / installation
$ umount /mnt
$ dd if=/dev/sdb2 | gzip -9 > image.raw.gz
$ rsync image.raw.gz my.newhost.com:/
The snag with this approach is that you’d need double the space as you’re just copying a file which then still needs to be uncompressed and depending on your purpose, written to a block device, on the target:
# dd if=image.raw.gz | gunzip | dd of=/dev/sdg1
Perhaps better than dd:
$ qemu-img convert -f raw -O vhd /dev/sdb2 image.vhd
$ rsync image.vhd my.remote.host:~
Which you can run virtually on the remote host with QEMU/KVM:
$ qemu-system-x86_64 -m 2G -hda image.vhd
The benefit of this approach is that you can use any format such as qcow2. Just substitute vhd above for qcow2. You can read up more about qemu and virt-manager in their official documentation, there are some useful GUI tools available.
Alternatively, if you’re on the same LAN or don’t need to be able to resume the copy — which you can do above by just running the rsync command repeatedly until the whole copy is done, and you can copy directly to the new block device on the target machine.
First allow dd to run as root on the target machine, which would be required to write directly to a block device if you’re not logging in with the root user:
$ ssh 192.168.1.2
$ visudo
# Add:
myuser ALL = NOPASSWD: /bin/dd
# then type :w ENTER and :q ENTER
Then you can simply issue:
$ sudo dd if=/dev/sdb2 | gzip -9 - | ssh 192.168.1.2 "gunzip - | sudo dd of=/dev/sdg1"
Yet another option is this Python script that works similar to rsync, so if the copy is interrupted, it can be resumed, so best of both. It’s opinionated in that it uses ssh to the root account on the remote host, which does not allow password logins by default, so you have to add an ssh key. There are several ways to do this, here’s one:
$ ssh my.remotehost.com "echo `~/.ssh/id_rsa.pub` | sudo tee -a /root/.ssh/id_rsa.pub" # add your user ssh key to the remote root account
Then just get the script and run it:
$ git clone https://github.com/bscp-tool/bscp-tool.github.io.git
$ bscp /dev/sda1 my.remotehost.com:/dev/sdg1
If you want to image a lot of computers with a clean Windows 10 image, Microsoft has lots of built-in tools to help do this, but it’s easy to get lost and overwhelmed with their documentation. To alleviate that headache, I will explain step-by-step how to:
- create and use an Unattended.xml file that will:
- skip the initial setup screens
- create a local admin account
- activate Windows with a product key
- (optionally) configure other Window settings
- capture a deployable Windows 10
.wimfile usingsysprep - deploy the image to multiple computers using the
dismcommand line tool and WinPE - (optionally) add drivers to the
.wimfile
High-level Overview
I often found myself getting lost while trying to make a universal Windows 10 .wim image file, so in this section I will give a broad overview from start to finish of the steps needed to be completed. This will also lay out the structure of this article.
- Install the Windows Automated Deployment Kit (ADK)
- Acquire a Windows 10 installation disc or
.iso - Create an
Unattended.xmlanswer file - Install Windows 10 on a spare computer
- Copy the
Unattended.xmlfile to the spare computer - Run
sysprep.exeusing theUnattended.xmlfile - Create a WinPE disc or bootable USB drive
- Boot the computer to WinPE after it shuts down
- Capture the image to a
.wimfile usingdism - Deploy the image to a computer using
dism
Install The Windows Automated Deployment Kit
Download and install the Windows 10 ADK. You can just accept all the defaults the installer offers. You mainly need the Deployment Tools, but the other stuff that is pre-selected will be useful for some other projects, so keep them selected.

Acquire A Windows 10 Installation Disc Or .iso
You will need some form of a Windows 10 install media.
Create An Unattended.xml Answer File
You will need to create an answer file, which contains the settings you want to be applied at the time you deploy the image to a computer. There are many to choose from, but this article will walk though some basic ones that many organizations might use.
Copy install.wim To Your Desktop
Before you can make an answer file, Windows needs to know what sort of answers can be applied. It finds this information from install.wim, which is located at the root of the installation disc. Copy it to your Desktop since it cannot be read directly from the CD or .iso.
Use install.wim To Generate Some Categories To Answer
1. Open Windows System Image Manager as an administrator
2. Right-click in the lower-left corner
3. Choose Select Windows Image…

4. Navigate to your Desktop
5. Open install.wim

6. Choose Yes on the dialog that appears

7. Right-click in the top-right section
8. Choose New Answer File…

9. Stretch the windows and panes so they are easier to read

Begin Adding Answers To Your Answer File
Hard Drive Partitioning
Microsoft_Windows_Deployment
1. Right click amd64_Microsoft_Windows_Deployment_neutral
2. Choose Add Setting to Pass 4 Specialize…

3. Expand amd64_Microsoft-Windows-Deployment-neutral within the Answer File pane
4. Highlight ExtendOSPartition
5. Set Extend to true

Computer Name, Product Key, Time Zone
Microsoft-Windows-Shell-Setup
- Right-click
amd64_Microsoft-Windows-Shell-Setup_neutral - Choose Add Setting to Pass 4 Specialize…
- Highlight
amd64_Microsoft-Windows-Shell-Setupunder the Answer File pane - Set ComputerName to
%COMPUTERNAME% - Set ProductKey to your Windows 10 product code
- Set RegisteredOrganization to your company’s name
- Set TimeZone to
Central Standard Time(or whatever time zone you are in)

Join A Domain
Microsoft-Windows-UnattendedJoin
1. Right-click amd64_Microsoft-Windows-UnattendedJoin_neutral
2. Choose Add Setting to Pass 4 Specialize…

3. Expand amd64_Microsoft-Windows-UnattendedJoin_neutral in the Answer File pane
4. Expand Identification
5. Set JoinDomain to the name of your domain

6. Highlight Credentials
7. Set Domain to your domain
8. Set a username and password

Set System Locale
Microsoft-Windows-International-Core
1. Right-click wow64_Microsoft-Windows-International-Core
2. Choose Add Setting to Pass 7 oobeSystem…

3. Highlight wow64_Microsoft-Windows-International-Core in the Answer File pane
4. Set InputLocale to en-US (or your country code)
5. Set SystemLocale to en-US
6. Set UILanguage to en-US
7. Set UserLocale to en-US

Set The Out Of Box Experience (Bypass Setup Screens) And Create A Local Admin Account
Microsoft-Windows-Shell-Setup (again on a different Pass)
1. Right-click amd64_Microsoft-Windows-Shell-Setup_neutral
2. Choose Add Setting to Pass 7 oobeSystem…

3. Expand Microsoft-Windows-Shell-Setup_neutral in the Windows Image pane
4. Right-click OOBE
5. Choose Add Setting to Pass 7 oobeSystem…

6. Expand Microsoft-Windows-Shell-Setup_neutral in the Answer File pane
7. Highlight OOBE
8. Set HideEULAPage to true
9. Set HideLocalAccountScreen to true
10. Set HideOEMRegistrationScreen to true
11. Set HideOnlineAccountScreens to true
12. Set HideWirelessSetupInOOBE to true
13. Set NetworkLocation to Work
14. Set ProtectYourPC to 1
15. Set SkipMachineOOBE to true
16. Set SkipUserOOBE to true

17. Expand UserAccounts in the Answer File pane
18. Right-click LocalAccounts
19. Choose Insert New LocalAccount

20. Highlight LocalAccount
21. Set Description to Local admin account
22. Set DisplayName to a username of your choosing
23. Set Group to Administrators
24. Set Name to the same as the username

25. Expand LocalAccount
26. Highlight Password
27 Set Password to a password of your choosing

Save Your Answer File
Save your answer file somewhere safe (preferably on a network share). You will need to copy it to a different computer later on.
Install Windows 10 On A Spare Computer
Now you need a spare computer that you can install Windows 10 on. You can customize Windows after it is installed (the settings will be captured and applied when you deploy the image), but it’s usually safer and a better practice to apply any settings through the answer file.
It’s easier to add customizations to a clean image rather than one that has already been customized, so I recommend leaving everything at the default and just moving on to the next step.
Copy the Unattended.xml File to the spare computer
- Copy your
Unattended.xmlanswer file from the previous step intoC:WindowsSystem32Sysprep.
Run sysprep.exe using the Unattended.xml file
Open an administrator command prompt and enter these two commands:
cd C:WindowsSystem32Sysprep
sysprep.exe /generalize /oobe /unattend:Unattended.xml /shutdown
This will apply your answer file and shutdown the computer. The next time you start it up, it will be as if you just deployed it to a new computer so it will apply all your answers and do a fresh install. So it is important that you do not start the computer until you are ready to boot it into WinPE to capture the image (in a state before it has been booted).
Create A WinPE Disc Or Bootable USB Drive
Remember, the computer you just installed Windows on needs to stay powered off until this disc gets created. So you should be running these commands from the computer you installed the WADK on.
- Right-click the Deployment and Imaging Tools Environment
- Choose Run as administrator

Enter the following command:
copype amd64 C:WinPEThe command above will copy the WinPE files to the hard drive so you can (optionally) customize them, but for this guide, leave everything as it is.
Next you can do one of two things:
Make a bootable USB drive,
MakeWinPEMedia /UFD C:WinPE F:or, make an .iso file, which you can burn to a CD:
MakeWinPEMedia /ISO C:WinPE C:WinPEWinPE.isoIf you made the .iso, you will need to burn it to a physical disc. If you made the USB drive, you can move just move on to the next step.
Boot The Computer To WinPE After It Shuts Down
Now that you have either a bootable CD or USB drive that has WinPE installed on it, you need to boot the test computer to that.
Capture The Image To A .wim File Using dism
Insert the CD or USB stick into the computer you ran sysprep on. You will need to boot to one of these devices (instead of the hard drive). This can be adjusted in the BIOS, but there is also sometimes a function key you can press that lets you choose what device to boot to on-the-fly. It’s different for every machine, but if you are reading this far, you probably know how to do this.
Once booted into the WinPE environment, you will be presented with a command prompt. You will need to run the following commands to capture the image.
First, open the diskpart program:
diskpartYour prompt will change and the commands you enter now will be for assigning a drive letter to the partitions so you can capture them into an image file.
First, select the disk:
select disk 0Select the first partition (the small reserved partition Windows creates) and assign it a letter:
select partition 1
active
assign letter=r
Next, select the main Windows partition:
select partition 2
active
assign letter=c
exit
You will now return the regular command prompt. You can now use the dism tool to capture the images.
It’s most useful to save the image to a network share, but you can save it to another USB drive attached to the computer. So first, mount a network share and assign it a drive letter:
net use j: \servershare /user:username "password"Now, you can save both partitions to their own image file:
Dism /capture-image /imagefile:j:w10reserved.wim /index:1 /ApplyDir:r:
Dism /capture-image /imagefile:j:w10.wim /index:1 /ApplyDir:c:
Deploy The Image To A Computer Using dism
Deploying the images is a similar process, but you will be using diskpart to wipe the hard drive so you can deploy a fresh image.
Run these commands (once you are booted into WinPE) to deploy the image:
diskpart
select disk 0
clean
create partition primary size=500
select partition 1
active
format quick fs=ntfs
assign letter=r
create partition primary
select partition 2
active
format quick fs=ntfs
assign letter=c
select partition 1
active
exit
net use j: \servershare /user:username "password"
Dism /apply-image /imagefile:j:w10reserved.wim /index:1 /ApplyDir:r:
Dism /apply-image /imagefile:j:w10.wim /index:1 /ApplyDir:c:
copy /Y j:SetupComplete.cmd c:windowssetupscriptsSetupComplete.cmd
Notice the last two commands (these optional). You can create and store a file on the network share named SetupComplete.cmd, which will run when the computer is finished being imaged.
I typically just put one command in it, which removes the Unattended.xml file (sensitive information in this file is already obfuscated, but it’s nice to remove it anyway).
del /f %windir%system32sysprepunattended.xmlNote that you can build this file into the image, but this method is more useful if you want to change the commands that run at first boot.
Now, just type wpeutil reboot and your computer will start up to a fresh install of Windows!
(Optionally) Add Drivers To The .wim File
You may find that some computers need a special network driver or storage driver to complete the imaging successfully. If this is the case, you can add a driver to image. Be careful not to add too many or the image will get too big and won’t load since it runs from RAM.
Go back to the step where you copied the WinPE files to the C: drive. Now, instead of creating the install media (and .iso or USB drive), run this command instead to mount the image to the local filesystem:
Dism /Mount-Image /ImageFile:"C:WinPEmediasourcesboot.wim" /index:1 /MountDir:"C:WinPEmount"Then, add your driver (replace the file path with the path to your required driver):
Dism /Add-Driver /Image:"C:WinPEmount" /Driver:"C:Somefolderdriver.inf"Now, commit your changes and unmount the image:
Dism /Unmount-Image /MountDir:"C:WinPEmount" /commitYou should now be able to create your media same as before:
make a bootable USB drive:
MakeWinPEMedia /UFD C:WinPE F:make an .iso file, which you can burn to a CD:
MakeWinPEMedia /ISO C:WinPE C:WinPEWinPE.iso