Skip to content
While working with VirtualBox and VMWare Player for installing some of the older operating systems, I encountered a problem of creating a drive image file with IMG extension type. It is easy to create an ISO image file, but IMG is not easy and there aren’t many tools for creating such a file.
Fortunately, there is a freeware tool called ImgBurn that is used to create ISO image files, burn ISO to a blank CD or DVD and also to create IMG drive image file type. Here is how we can create a drive/disk image file with the IMG file extension:
- First of all download ImgBurn from https://www.imgburn.com/ and install it on your Windows PC.
- In the user interface of ImgBurn, select Create image file from disc or Create image file from files/folders depending on the source of files.

- On the next screen, you have to first add the files from somewhere on your computer. These files will be stored in the disk image file we are creating.
- For the destination, we click on the browse icon and when selecting a destination image file, choose the IMG file type in the save file dialog.
- Finally, we click on the large icon to create the disk image file. Depending on the number of the files selected, it may take a small or large time to create the image file.


When the ImgBurn completes creating the IMG disk image, it is going to play the sound to indicate it. Now you can load the IMG file in any of your virtual machines and it should be recognized easily. However the IMG disk image files created in this manner are not really recognized in some of the operating systems such as older versions of Mac OS IX, Mac OS VIII, Windows Me or Windows XP.
We use cookies on our website to give you the most relevant experience by remembering your preferences and repeat visits. By clicking “Accept”, you consent to the use of ALL the cookies.
You can convert files and folders to an ISO image using third-party ISO management utilities. These come in handy when you want to create a backup of files and folders in ISO format. You can also use it to add new files to an existing ISO image and repack it.
Windows, by default, does not offer an option to convert files and folders to an ISO image. But there are third-party Windows programs that can help you achieve this task. Here we show you the best apps to make an ISO file from files and folders.
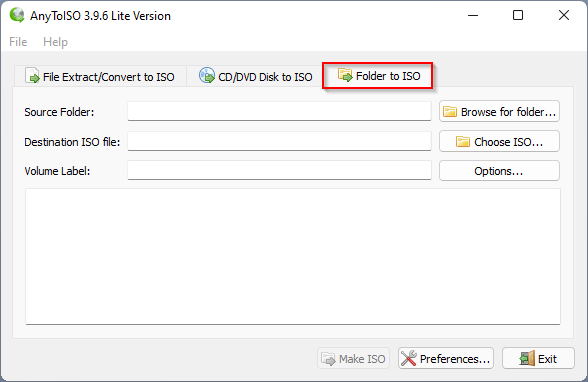
1. AnyToISO
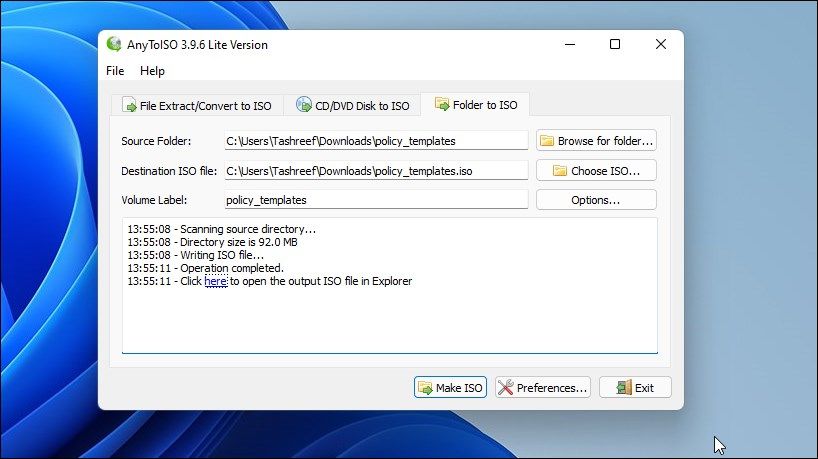
If you are looking for a free utility to create an ISO image not bigger than a regular CD, the AnyToISO Lite version is an excellent utility. It is easy to use and doesn’t come with tons of options.
It also supports the Windows Explorer shell extension. When enabled, it will add a create ISO option in the Windows Explorer context menu.
To convert a folder to an ISO image using AnyToISO:
-
Launch AnyToISO and open the
Folder to ISO
tab
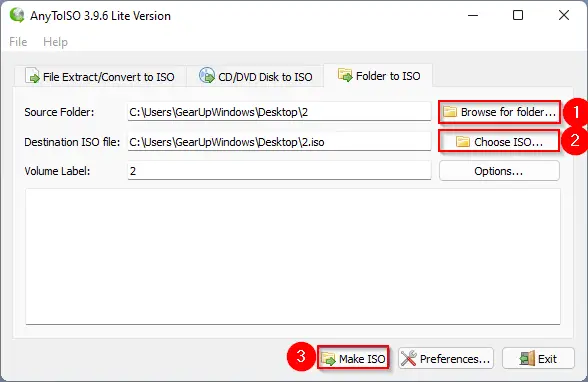
. -
Next, click on
Browse
for Folder
and select the folder you want to convert to an ISO image. -
Next, click on
Choose ISO
and select the save location for the ISO file. - You can change the volume label name or leave it as default.
-
Click on
Options
to customize the
File System
and
ISO Settings
. -
Next, click the
Make ISO
button to initiate the process. Depending on the size of the folder, the ISO writing process may take some time. - Once completed, you will have a new ISO file created out of the selected folder.
You can also right-click on any folder in File Explorer and select the Create ISO option to launch the app and convert the folder into an ISO image. However, if you are using Windows 11, you will first need to access the classic context menu to view the AnyToISO option.
If you want to create an ISO image with large folders (above 870 MB), you need to upgrade to the Pro version and shell $22.95 for the license.
Download: AnyToISO for Windows, Mac (Free Lite version, Premium $22.95)
2. AnyBurn
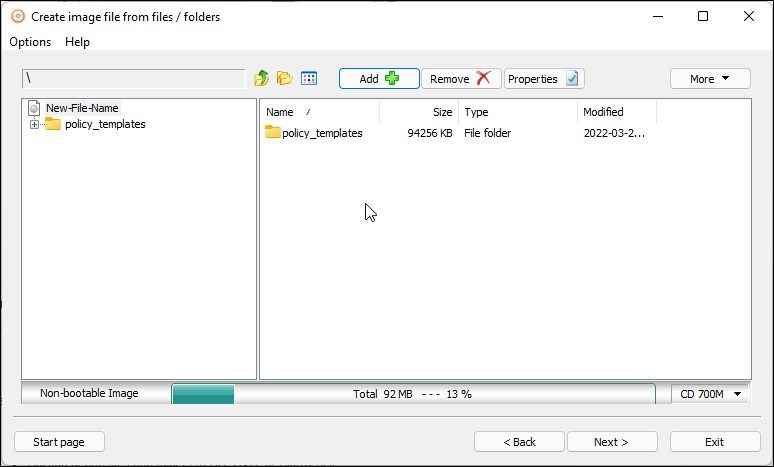
AnyBurn is a full-fledged CD-burning utility that is free to use for both home and commercial purposes. Apart from creating image files from files and folders, you can use it to create a bootable USB drive, perform disc surface tests, edit image files, and burn image files to disc.
Follow these steps to create an image file from files and folders using AnyBurn:
-
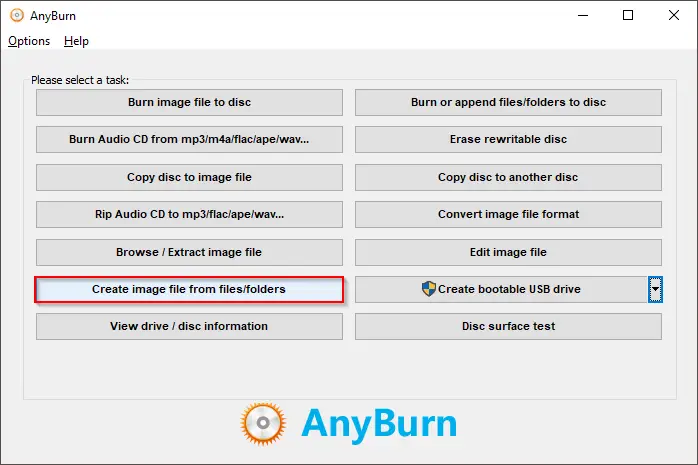
Launch AnyBurn and click on
Create image file from files/folders
. -
In the new dialog, click the
Add +
button on the toolbar.
-
Navigate to the location, select the files or folder to convert, and click
Add. -
Next, click the
Properties
button. Here, you can change the label name, file system, choose compression level, add comments, and modify time and date. Click
OK
to save the changes. -
Click
Next
. - Type a name for the new ISO image and select image file type.
-
Click on
Create Now
to begin the process. - AnyBurn will optimize the file layout and then promptly write the image file. The green progress bar indicates the process is completed successfully.

Download: AnyBurn (Free)
3. WinCDEmuI
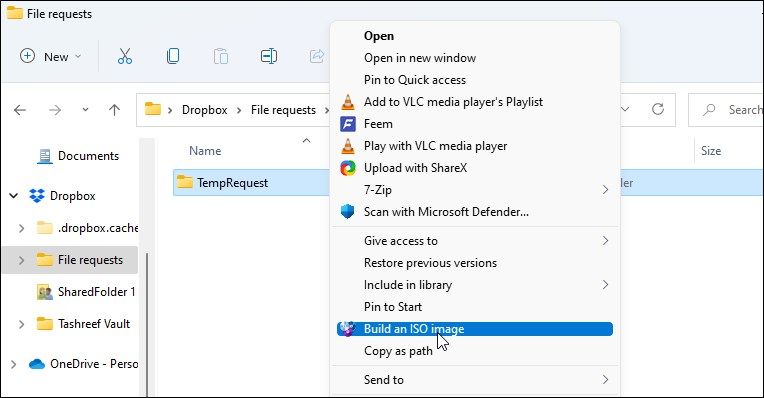
WinCDEmu is a simple yet effective disc utility for Windows. You can use it to mount an optical disc image or create an ISO image from folders.
WinCDEmu is also available in a special portable version. However, with the portable version, you don’t get the right-click to create an ISO image option.
To convert a folder to an ISO image using WinCDEmu:
- Download the app and complete the installation.
-
Once installed, open
File Explorer
and navigate to the folder you want to convert to an image. -
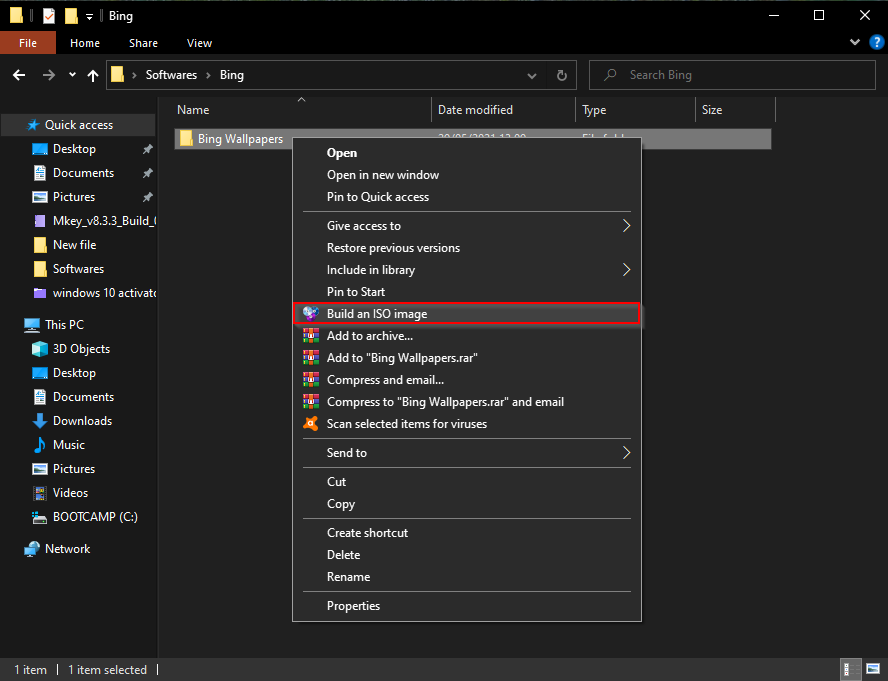
Right-click on the folder and select
Build an ISO Image
. On Windows 11, you need to click on
Show more options
to view the classic context menu. -
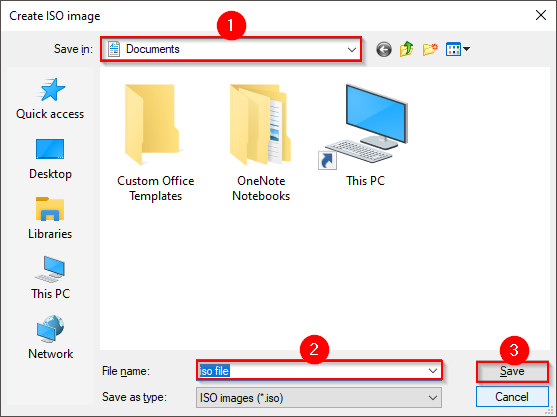
Type a name for your ISO image and click
Save
.
That’s it. WinCDEmu will start the image writing process. Depending on the folder size, this may take anywhere from a few seconds to a few minutes.
Download: WinCDEmu (Free)
4. ImgBurn
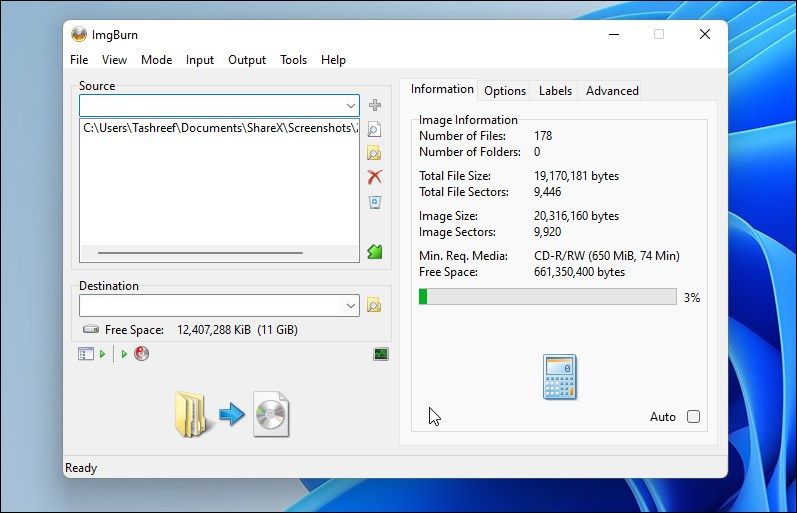
ImgBurn is another popular Windows utility to create ISO images from files and folders. It is a feature-rich disc burner utility with options to write image files to disc, create image files from disc, and disc verification.
Unlike WinCDEmu and AnyBurn, ImgBurn supports creating ISO images from both files and folders. Here’s how you can use it to create an ISO image from files.
- Download and install the app on your PC.
-
Next, launch
ImgBurn
. If you can’t find the desktop icon, or it doesn’t appear in Windows search, then navigate to the following location to launch the tool:C:Program Files (x86)ImgBurn -
On the main screen, click on
Create image file from files/folders
.
-
Next, you can browse for the files and folder or drag and drop the content onto
ImgBurn
to add the files. -
Next, click the
Calculator
icon on the right side to calculate the file size and view other information. -
Next, open the
Options
tab to customize image options, add hidden system files and other attributes.
-
Next, open the
Labels
tab and provide a volume label for the file. If you skip this step, ImgBurn will automatically add a label during the image writing process. -
Click the
Folder to Disc
icon, enter the ISO image’s name, and select the destination folder. -
Click
Save
to begin the process. Follow any on-screen instructions, if necessary, to complete the process.

Download: ImgBurn (Free)
5. ISO Workshop
ISO Workshop is a premium ISO image management app. It features a modern look and offers multiple disc management options. You can use it to make ISO, burn ISO, convert ISO, and extract files from disc images.
Here’s how to use ISO Workshop to make an ISO image from files and folders.
- Download and complete the installation. Once installed launch ISO Workshop.
-
In the main interface, click on
Make ISO.
-
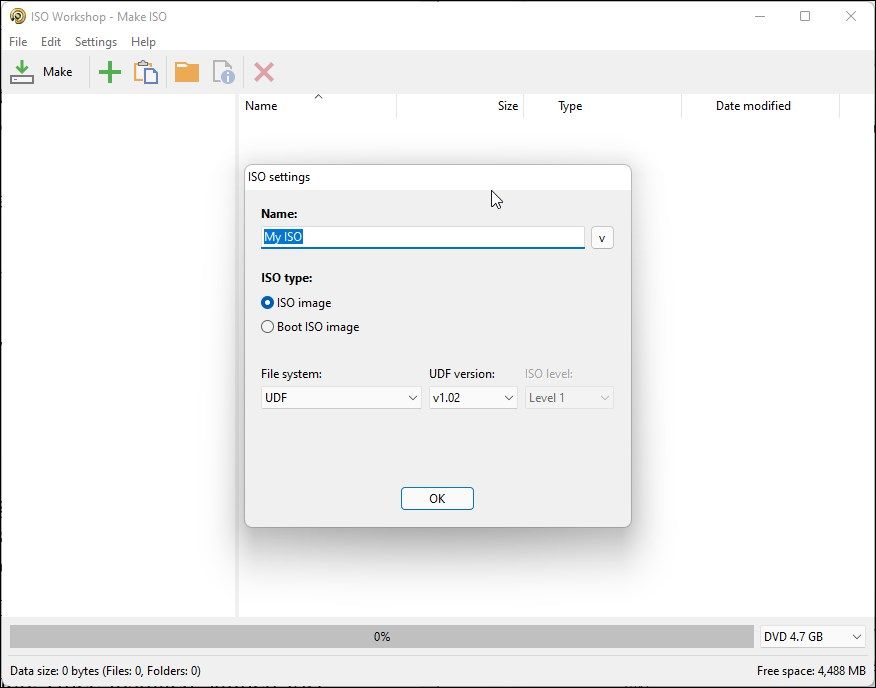
Next, type a name for the new ISO image and click
OK
. -
Click the
+
icon and select the files and folders to add. You can also drag and drop all the files and folders onto the app to add them. -
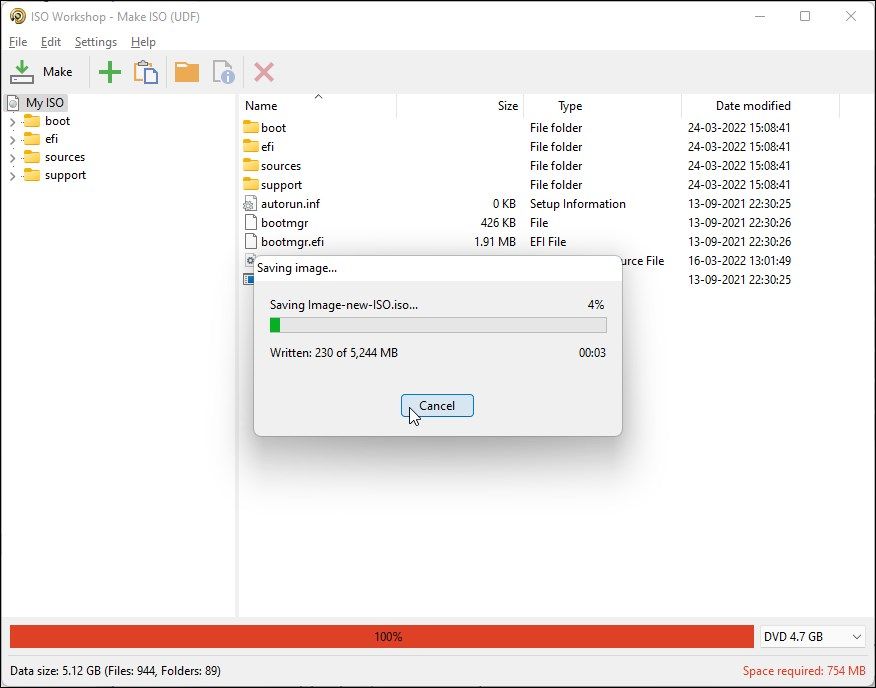
Click on
Make
, type a name for the file, and click
Save
. - ISO Workshop will start writing image files. Once complete, you can burn the ISO image to a disc or mount it on your PC.
ISO Workshop is a premium utility and comes with a 10-day free trial. After the trial ends, you will need to purchase one of the user licenses for continued use.
Download: ISO Workshop (Free trial, Premium $29.95)
If you frequently convert files and folders to an ISO Image, a tool like AnyToISO and WinCDemu are more beneficial due to the shell application support for the File Explorer context menu. If you need advanced ISO image options, opt for AnyBurn or ImgBurn. However, for occasional use, any of these utilities can help you convert your files and folders to an ISO image in no time.
I have a folder on my computer whose contents contain a program that originated from a floppy. The Windows computer I am currently running does not have a floppy drive.
Is there a program which can convert the contents of a given folder to a floppy IMG or IMA file? All of the programs that I see require the files to originate from a floppy before it will package them into a IMG file.
This file should not be bootable.
Thank you for your time.
![]()
asked Oct 6, 2012 at 4:17
![]()
1
You can try using Virtaul Floppy Drive.
However, you will need some efforts to install it on Windows 7 SP1 x64.
EDIT: It does not work on x64 machines since the driver is meant only for 32 bit machines.
answered Oct 6, 2012 at 6:39
![]()
Ganesh R.Ganesh R.
5,1191 gold badge25 silver badges28 bronze badges
Use WinImage (32/64-bit versions available, portable version as well, works fine on Win7 and probably Win8 too).
answered Oct 7, 2012 at 19:59
![]()
KaranKaran
55.5k20 gold badges117 silver badges188 bronze badges
1
Business owners that use Mac computers are generally familiar with the IMG format for archiving and compressing files. If you use only Windows computers in your business, you probably have little need to work with IMG image files. Nevertheless, from time to time, you may need to share files from your Windows PC with a customer or supplier that uses a Mac computer. Many CD-burning programs can burn IMG files to disc – even the built-in Disc Image Burner application in Windows 7. However, to create the IMG image file in Windows, you must use ImgBurn.
Create .IMG Image File
-
Open your Web browser and navigate to the ImgBurn.com website (link in Resources). Download ImgBurn and install it on your computer. Reboot your PC if prompted to do so.
-
Launch ImgBurn to display the main menu screen. Click “Create Image File from Files/Folders.”
-
Click the “Folder” icon beneath the Source drop-down list box to open a new file browser window. Navigate to the folder than contains the files you want to use in the .IMG image. Highlight the folder name, then click “Select Folder.” The selected folder appears in the Source box. Alternatively, you can double-click the folder in the browser window and select individual files if you choose. Add additional files or folders to the Source box as needed.
-
Click the “Labels” tab and enter the disc label name in the in ISO9660 field.
-
Click “File,” then “Build” on the menu bar. Alternatively, click the “Folder to Disc” icon beneath the Source box. ImgBurn opens the Save As window.
-
Enter a filename for the image file in the “File Name” field. Click the “Save as Type” drop-down list and select “IMG Files (*.img)» as the file type.
-
Select a folder in which to save the new image file, then click the “Save” button. ImgBurn writes the contents of the selected folder to the new IMG file.
Burn IMG to Disc
-
Click the Start button, then click “Computer.” Windows Explorer opens in a new window.
-
Browse to the folder that contains the IMG file you created. Double-click the folder name to open it in Windows Explorer and display its contents.
-
Highlight the IMG file name, then click the “Burn Disc Image” button on the Windows Explorer toolbar. A new Burn Disc Image window appears on the screen.
-
Insert a blank CD or DVD into the optical drive when prompted to do so, then click “Burn.” Wait for Windows to burn the image to the media and eject the disc from the drive. After you remove the disc from the drive, you can use the disc to copy the IMG file to a Mac computer.
Чем создать IMG файл? Программы для создания IMG файлов
IMG
Рассмотрим основные варианты, с помощью которых можно создать файл формата IMG (Disc Image Data File). Зачастую выполнение данной задачи не потребудет каких-либо особых хитростей, просто скачайте SlySoft CloneCD (для операционной системы Windows) — интерфейс программы не сложный, да и скачать ее вы можете бесплатно.
Вооружившись программой с правильным функционалом, вы наверняка не испытаете проблем с созданием файла IMG. Мы собрали в общий список все программы походящие под данную задачу для ОС Windows и сделали удобную таблицу:
Программы для создания IMG файлов
Чем создать IMG в Windows?
Общее описание расширения IMG
IMG файл представляет из себя образ диска, сформированный посредством программного комплекса CloneCD. Файлы расширением IMG, несут в себе точные копии данных с различных дисков CD, а также DVD, применяются при резервном копировании либо записи нового контента на требуемые дисковые носители.
Узнать подробнее что такое формат IMG
Знаете другие программы, которые могут создать IMG? Не смогли разобраться как создать файл? Пишите в комментариях — мы дополним статью и ответим на ваши вопросы.
Как создать файл .img и изменить его формат файловой системы в Ubuntu / Linux
В этом совете мы увидим, как использовать командную строку для создания файла .img в системе под управлением Ubuntu или любой другой системы на базе Linux. Мы также увидим, как отформатировать файл .img в любой из следующих форматов файловой системы:
- ntfs
- доб2 / доб3 / доб4
- vfat
- жир 32
- xfs
Откройте терминал и запустите эту команду, чтобы создать .img файл:
dd if = / dev / zero of = output.img bs = 1M count = 1024
output.img —> имя файла, который будет создан.
1024 —> размер файла .img в КБ, установите любой размер по вашему выбору.
Затем вы можете отформатировать этот файл изображения в любой из следующих форматов файловой системы:
EXT2 / EXT3 / EXT4:
mkfs.ext3 -F output.img
vFAT:
mkfs.vfat -F output.img
XFS:
mkfs.xfs -F output.img
FAT32:
mkfs.fat32 -F output.img
900 NTFS:
900 NTFS:
mkfs.ntfs -F output.img
.
Создайте изображение из ваших файлов и папок с помощью Imgburn
Последнее обновление , 4 августа 2020 г., 4:29 , автор: Aoife McCambridge .
В этой статье мы покажем вам, как создать изображение из ваших файлов и папок. ImgBurn позволяет легко создавать изображения из ваших файлов и папок, и мы изложили пошаговое руководство ниже.

Создание изображения из файлов и папок
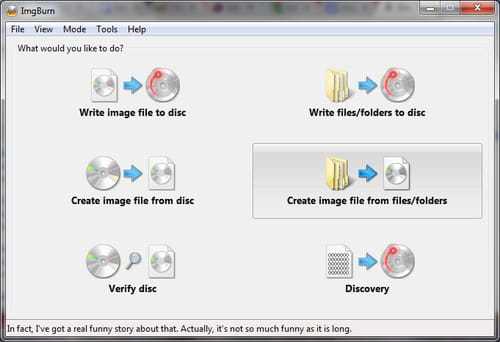
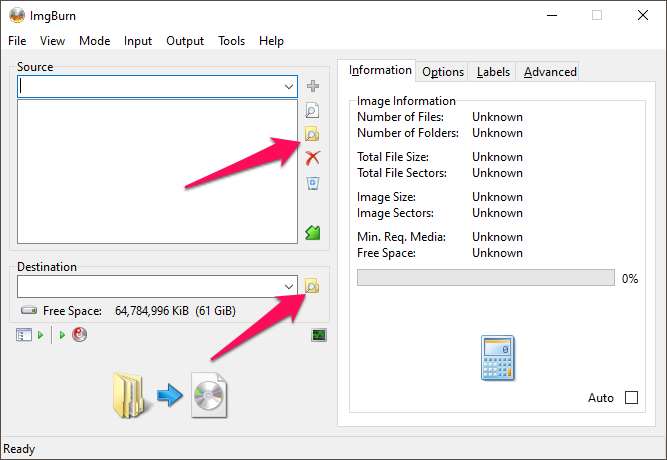
- Открыть ImgBurn
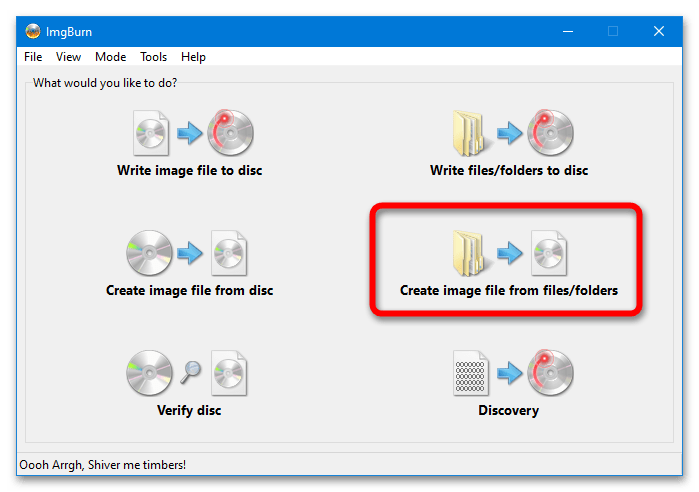
- Щелкните « Создать файл изображения из файлов / папок ».
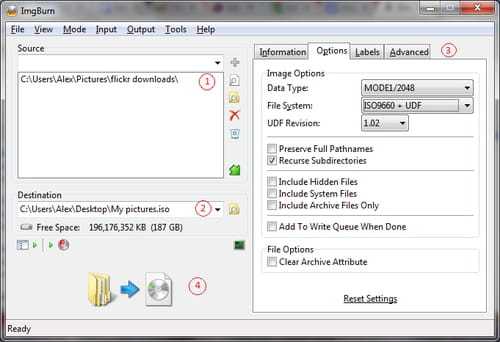
- (1) Используйте кнопки в разделе «Источник», чтобы выбрать файлы и папки, которые вы хотите включить в файл изображения.
- (2) Выберите место назначения для файла изображения (.iso)
- (3) Вы можете настроить параметры для файлов .iso.
- (4) Наконец, нажмите « Build button ».
Изображение: © 123RF.com
.
javascript — Создание файлового объекта из тега img
Переполнение стека
- Около
- Товары
- Для команд
- Переполнение стека Общественные вопросы и ответы
- Переполнение стека для команд Где разработчики и технологи делятся частными знаниями с коллегами
- Вакансии Программирование и связанные с ним технические возможности карьерного роста
- Талант Нанимайте технических специалистов и создавайте свой бренд работодателя
.
linux — Как создать образ .IMG диска (sd-карты) без включения свободного места?
Переполнение стека
- Около
- Товары
- Для команд
- Переполнение стека Общественные вопросы и ответы
.
Смотрите также
Basically, an ISO file is used to create backups of CDs and DVDs, and an ISO file may contain many folders. It is possible, however, to make an ISO from your Windows folders. There may be multiple reasons you want to keep your folder in an ISO image file. For instance, you may want to create an ISO to keep all of your folders together. You may also want to keep certain folders on hand so you can burn them.
Once you have created an ISO file, you can see the content by mounting them on a virtual CD-ROM. That means there is no need to extract ISO content again in a folder.
There are many free applications available in the market that help you create an ISO from a folder. Some of the good freeware are the following:-
- Folder2iso
- WinCDEmu
- AnyBurn
- ImgBurn
- AnyToISO
Folder2ISO
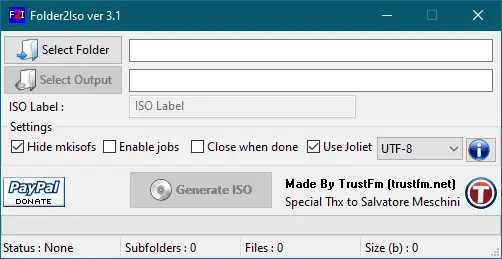
Folder2ISO is the best software to make an ISO file from a folder. It comes with a single function, i.e., it only converts a folder to ISo. If you intend to convert a folder to an ISO image, then Folder2iso may be the best choice.
Quite small in size but yet effective, Folder2iso is compatible with all versions of Windows, including Windows 11, 10, 8, 7, Vista, and XP. It is a portable tool and does not require installation on your PC. You can run it from a pen drive also. It is hardly 1.50MB in size.
To create an ISO image from a folder, run this free tool, click “Select Folder,” and select the folder from your PC that you want to convert as an ISO image. Choose the location of the output folder by clicking on the “Select Output” button. Finally, click on the button “Generate ISO,” and you have done it.
WinCDEmu
WinCDEmu is a free CD/DVD/BD emulator software that helps you mount optical disc images by just clicking on them in Windows Explorer. Double-click on an ISO, cue, raw, or IMG image file; this software mounts an image to a virtual CD-ROM. Apart from mounting an image file, it also allows you to create an ISO file from the folder.
To convert a folder into an ISO file, perform the following steps:-
Step 1. Install WinCDEmu on your PC.
Step 2. Select a folder that you would like to convert to an ISO image. Right-click on the folder and choose the “Build an ISO image” option.
Step 3. When the dialog box appears, specify a location on your PC where you want to save the ISO file. Name the ISO file and finally click on the Save button.
Executing the above steps, you can build an ISO file from a folder using WinCDEmu.
AnyBurn
AnyBurn is a multi-purpose software and is also available for free. Using this utility, you can burn the image file to disc, burn Audio CD, copy disc to an image file, browse/extract image file, create an image file from files/folders, create a multisession disc, erase re-writable disc, edit image file and build a bootable USB drive.
To create an ISO file from a folder using AnyBurn, you need to do the following actions:-
Step 1. Download, install and launch the AnyBurn app on your computer.
Step 2. Locate the button labeled “Create image file from files/folders” and click on it.
Step 3. In the following screen, click on the Add button to choose the folders you want to add to your ISO.

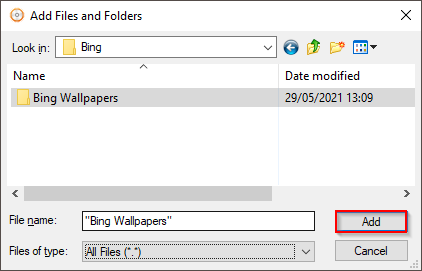
Step 4. In the “Add Files and Folder” window, select the folder from your PC and then click the Add button.
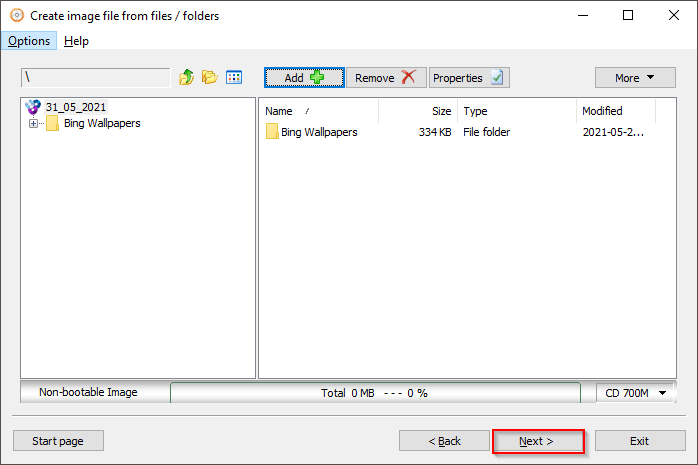
Step 5. Click Next.
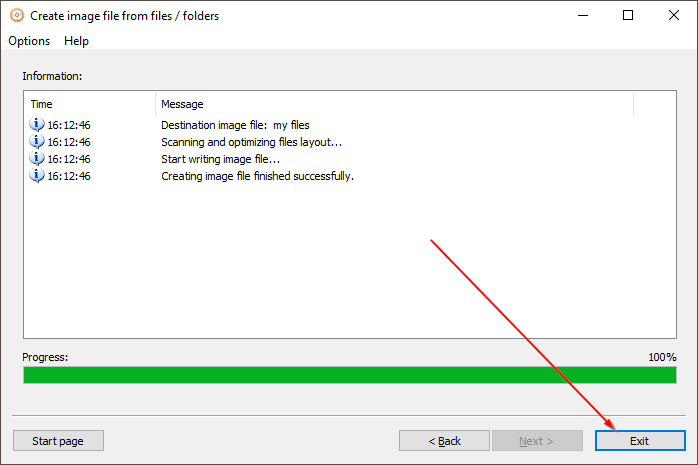
Step 6. Next to the “Select image file name,” write the name of your ISO file and then click on the “Create Now” button. It will create ISO on the same where your folder exists. If you wish to change the ISO file location, click on the folder location and select a different place on your PC.

Step 7. Depending upon the folder size, it takes a few minutes to create an ISO file. Once the ISO is created, click Exit.
ImgBurn
ImgBurn exists in the market for a long time. If you’ve ever built a backup of your discs or you’ve burned a disc, you’ll likely remember the app. This app also helps to create ISO files from your folders as well.
To generate an ISO file from a folder using ImgBurn, do the following:-
Step 1. Download, install and start the ImgBurn app on your PC.
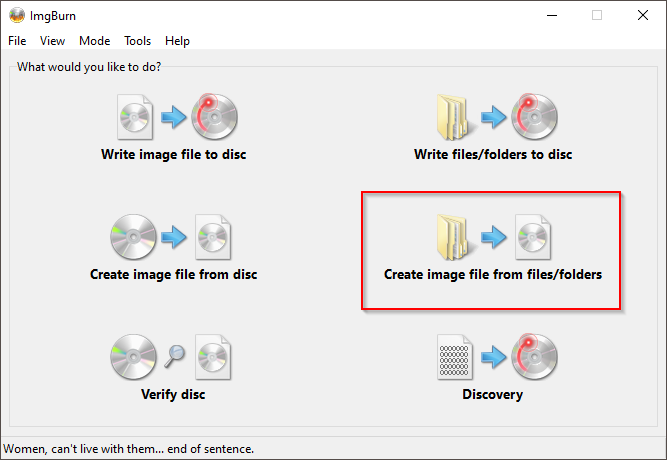
Step 2. From the home interface of this tool, click on the option that says “Create image file from files/folders.”
Step 3. Click on the folder icon of Source and choose the folder from your PC that you would like to convert into an image. Then click the folder icon to select the destination location to save your converted ISO file.
Step 4. Finally, click on the Build button to construct an ISO file in your desired location for your selected folder.
![]()
AnyToISO
AnyToISO is another freeware tool that lets you convert folders to ISO. Apart from the converting folder to ISO, this software can extract 7Z, BIN, DAA, DEB, DMG, IMG, ISO, ISZ, MDF, NRG, PKG, RAR, TAR.GZ, TAR.BZ2, XAR, ZIP, and more.
To generate an ISO file from a folder using AnyToISO, you need to perform the following:-
Step 1. Download, install and run AnyToISO on your computer.
Step 2. Navigate to Folder to ISO tab in the menu.
Step 3. Click on the Browse for folder button and choose the folder from your computer. Now, click on the Choose ISO button to select the destination where you want to save your file. Finally, click on the Make ISO button.
After executing the above steps, you will have an ISO file of the desired folder on your PC.
January 15, 2019
How to Make .ISO or .IMG File from CD/DVD
✅Software Download Link:
↪️https://bit.ly/2WuGpeH
How to Make ISO File from CD, DVD, or Blu-ray Disc? — PowerISO
Create ISO file — PowerISO
WinCDEmu — How to Create ISO Images
Using MagicISO to create ISO image files
4 Ways to Create an ISO File — wikiHow
How to Create ISO Files From Discs on Windows, Mac, and Linux
IsoCreator download | SourceForge
How to Create an ISO Image From a DVD, CD or BD Disc — Lifewire
ISO Creator — How do I create an ISO image file with WinISO?
how to make iso image of windows 7 from folder
Using MagicISO to create ISO image files
Video
✅How to install MTP Driver in Windows 10 May 2019
↪️https://youtu.be/ZeeUsfELGeU
✅How to download windows 10 ISO image from Microsoft
↪️https://youtu.be/bidP0GxxDjE
✅How to Life Time Activate Microsoft Office 2019
↪️https://youtu.be/nHcN7rHeDc8
✅How to Life Time Activate Windows 10
↪️https://youtu.be/unsP5UEYRyE
⏭DON’T FORGET TO SUBSCRIBE �️️
↪️https://bit.ly/3feeCYv
✅My Blog
↪️https://bit.ly/2Vkq1vG
If you have any questions?
Please feel free to post them in the comment section below.👇
✔️Stay connected :
▶️TWITTER : Twitter.com/Engrtechs
▶️INSTAGRAM : Instagram.com/engrtech
▶️GOOGLE+ : https://bit.ly/2BLEt71
—————————————————————————————-
DISCLAIMER: This Channel Does Not Promotes Any illegal content, all contents provided by This Channel is meant for EDUCATIONAL purpose only .
Copyright Disclaimer Under Section 107 of the Copyright Act 1976, allowance is made for «fair use» for purposes such as criticism, comment, news reporting, teaching, scholarship, and research.
Fair use is a use permitted by copyright statute that might otherwise be infringing.
create iso file windows 10,
7zip create iso,
create iso from dvd,
create bootable iso from folder,
power iso,
imgburn create iso,
imgburn iso,
file iso,
create iso file windows 10,
7zip create iso,
convert files to iso,
best iso creator,
free bootable iso creator,
create bootable iso from folder,
disk image file to iso,
Содержание
- Способ 1: UltraISO
- Способ 2: USB Image Tool
- Способ 3: ImageUSB by PassMark
- Способ 4: ImgBurn
- Вопросы и ответы

Способ 1: UltraISO
UltraISO предлагает множество инструментов для работы со съёмными накопителями. С помощью этой программы можно быстро создать образ флешки в форматах ISO и IMA.
Скачать UltraISO
- Найдите подключенный носитель в блоке «Локально» и перетащите его в пустую область, предназначенную для отображения файлов. Дайте согласие на перенос данных.
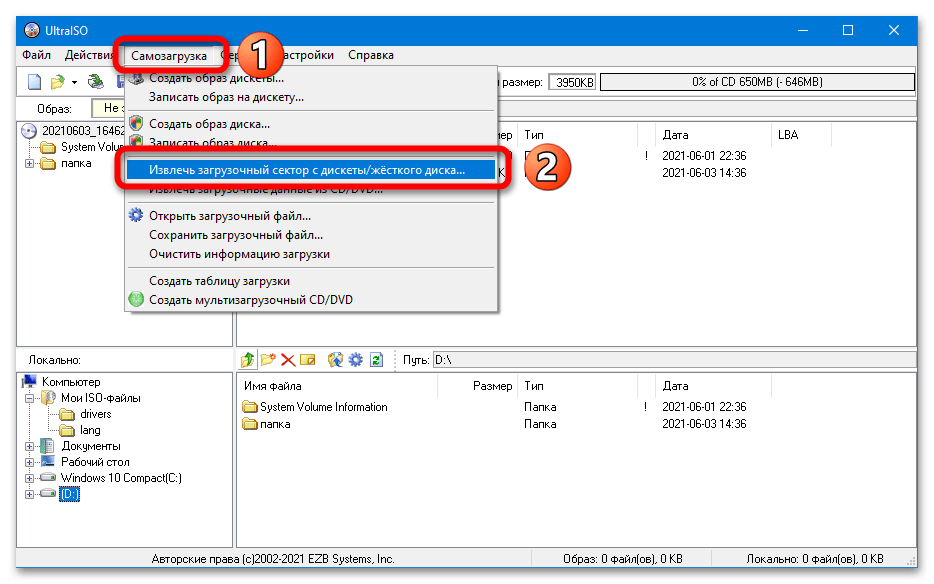
- Откройте меню «Самозагрузка», перейдите к пункту «Извлечь загрузочный сектор с дискеты/жёсткого диска». Выберите флешку, нажмите на «Создать».
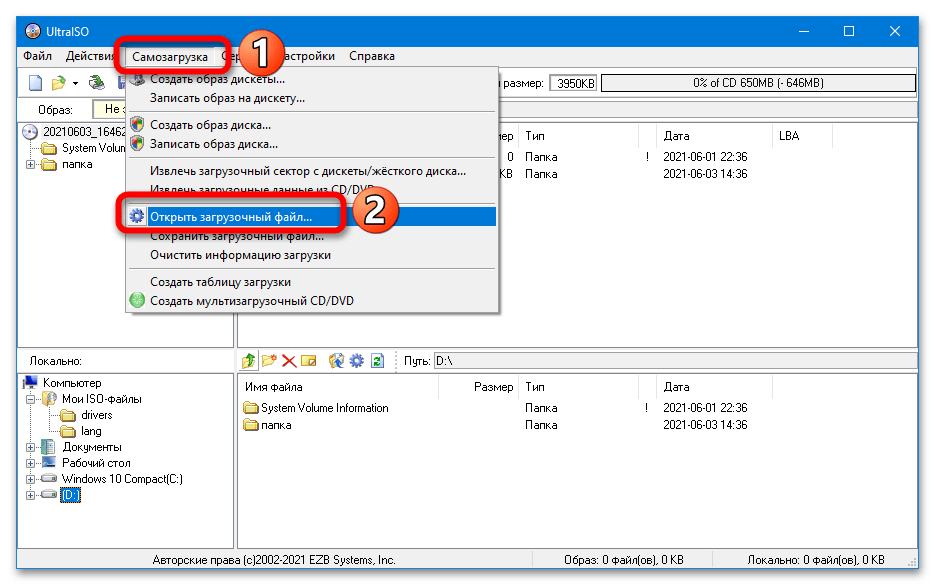
- Вновь откройте раздел «Самозагрузка», выберите «Открыть загрузочный файл» и укажите путь к сектору, извлечённому в предыдущем пункте.
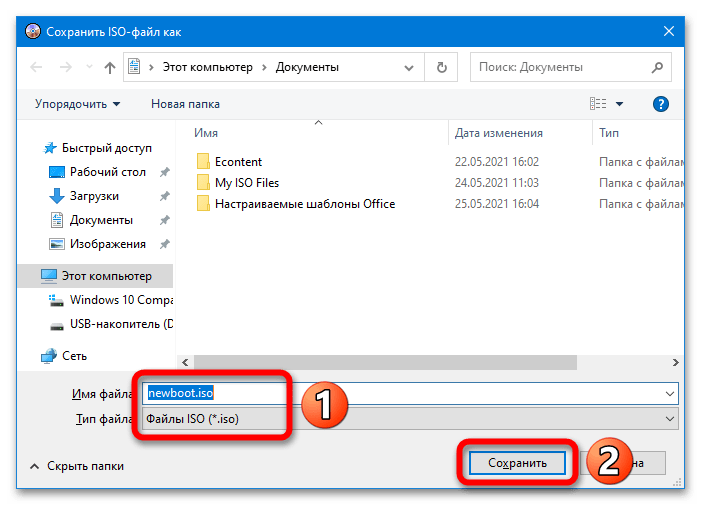
- Перейдите в меню «Файл», кликните на «Сохранить как», укажите название образа и в графе «Тип файла» выберите «Файлы ISO». После завершения короткой процедуры записи ISO-образ загрузочной флешки будет готов к использованию. Размер файла соответствует размеру данных, хранящихся на накопителе.

UltraISO позволяет создавать образы в формате IMA – их объём всегда равен максимальному объёму накопителя (образ пустой флешки на 16 Гб займёт 16 Гб). Чтобы создать такой файл, нужно выполнить простую последовательность действий:
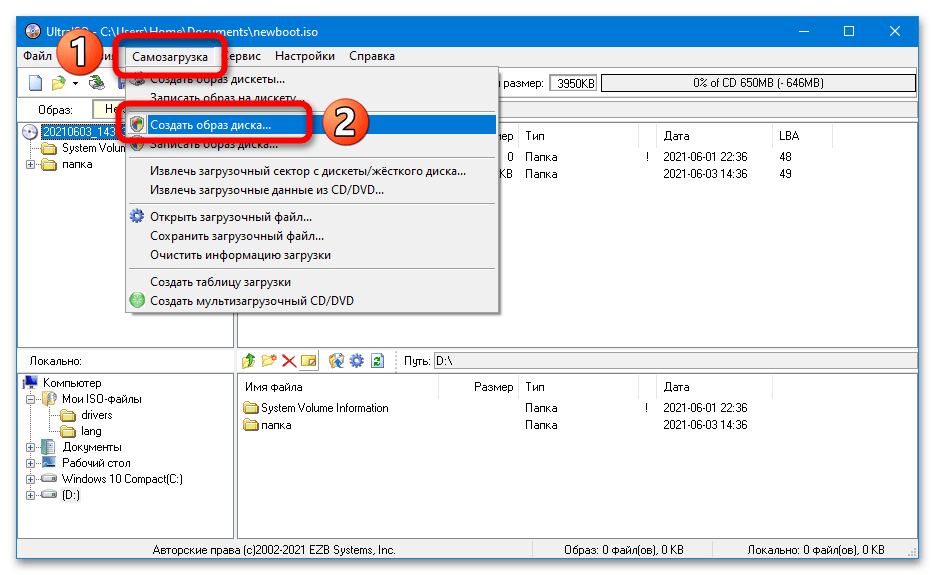
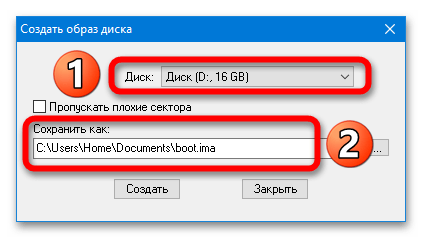
- Перейдите в раздел «Самозагрузка» и выберите вариант «Создать образ Жёсткого диска».
- Выделите флешку в списке «Диск», укажите место сохранения, нажмите на «Создать».
Образ IMA – это своеобразная резервная копия. С её записью на другой накопитель могут возникнуть трудности. ISO-образ запишется без проблем.
Если подключенная к ПК флешка не отображается в списке доступных, запустите UltraISO с правами администратора.
Способ 2: USB Image Tool
USB Image Tool – ещё один бесплатный инструмент, с помощью которого можно быстро создать IMG-образ (копию) флешки.
Скачать USB Image Tool с официального сайта
- Выделите подключенный USB-накопитель, укажите режим «Устройство», кликните по кнопке «Резервное копирование».
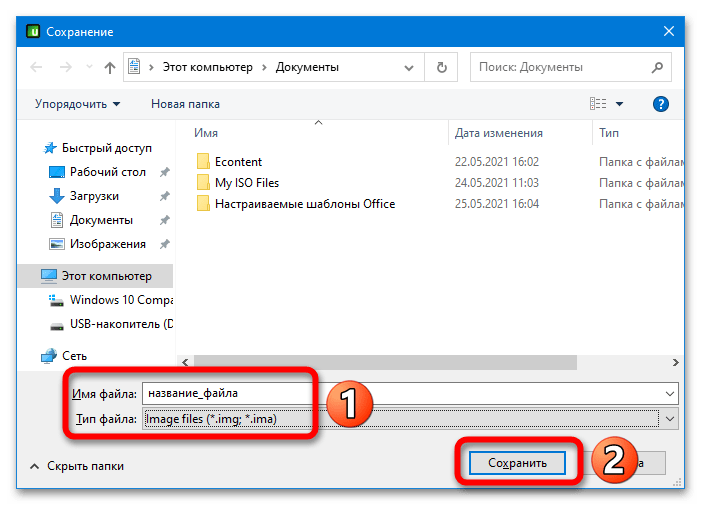
- Задайте название файла, выберите тип «Image files», нажмите на «Сохранить». Размер итогового образа будет равен полному объёму флешки.


Способ 3: ImageUSB by PassMark
С помощью ImageUSB можно создать образ флешки в формате BIN.
Скачать ImageUSB by PassMark Software с официального сайта
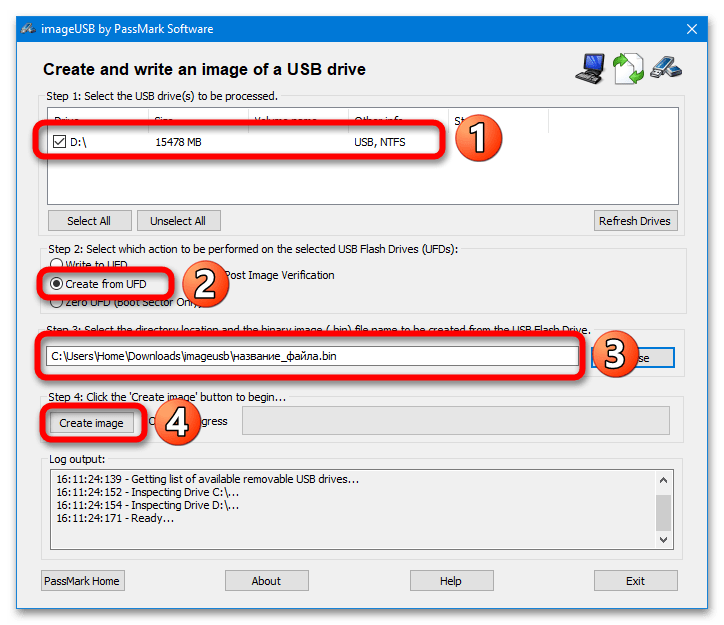
Чтобы создать BIN-образ накопителя, нужно отметить его галочкой в блоке «Step 1», выбрать вариант «Create from UFD» в блоке «Step 2», указать название и место сохранения в блоке «Step 3», нажать на кнопку «Create image» в блоке «Step 4».
Способ 4: ImgBurn
ImageBurn – простой инструмент, позволяющий создавать ISO-образы дисков и загрузочных USB-накопителей.
Скачать ImgBurn
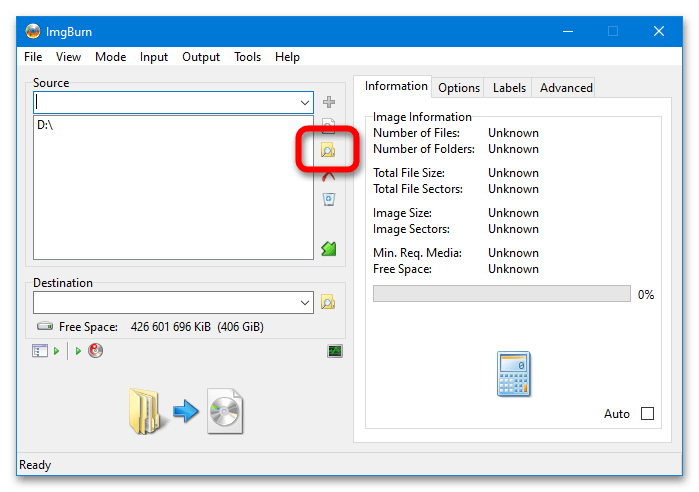
- Выберите опцию «Create image file from files/folders».
- Кликните по кнопке «Browse for a folder», укажите флешку.
- Перейдите в раздел «Advanced» и откройте вкладку «Bootable Disk». В графе «Extract Boot Image» выберите флешку, кликните по иконке сохранения и укажите любое удобное место. Программа извлечёт загрузочную запись.
- Активируйте функцию «Make Image Bootable», укажите путь к созданному в предыдущем пункте файлу в строке «Boot Image». Нажмите на кнопку для запуска процесса создания загрузочного образа с флешки.
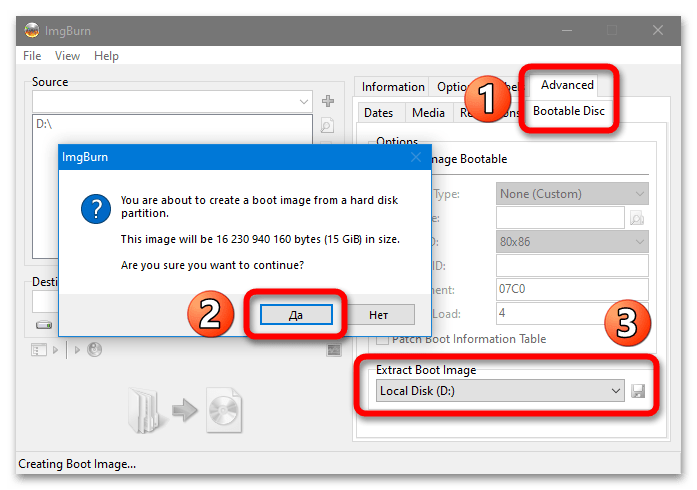
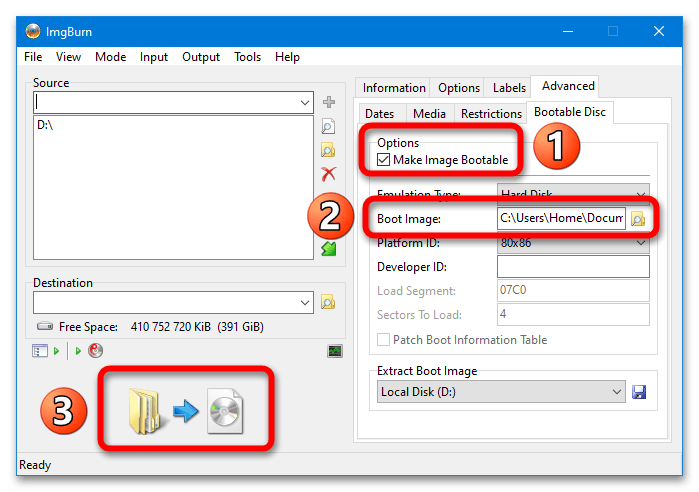
Если ImgBurn предложит воспользоваться созданной загрузочной записью, нужно согласиться – 4-й пункт выполнится автоматически.
Еще статьи по данной теме: