A Windows 11 bootable USB or CD/DVD is an important drive that can be used to install the new operating system on your computer. This post focuses on how to create Windows 11 installation media on Windows PC, Mac, or Linux for the system installation. Let’s see the details given by MiniTool here.
Nowadays many users have installed the brand new operating system to enjoy its brand new user interface design, improvements, new features, and more. If you are also curious about this system, you may choose to install it to have a good user experience.
Before you do, go to make a compatibility test to check if your PC can run on Windows 11. If the PC cannot meet the system requirements, you had better not install Windows 11 although you can take some measures to install Windows 11 on unsupported PCs (related article: How to Bypass Windows 11 Requirements — 2 Latest Ways).
If your PC meets the conditions, creating a bootable USB drive or CD/DVD and booting the machine from the drive for the installation is a choice. Well then, how to create Windows 11 installation media? Follow the details below now.
To do this work on your Windows computer, there are three ways for you – use Windows 11 Media Creation Tool, run Rufus, or use Command Prompt. Let’s see them one by one.
Windows 11 Installation Media Creation via Media Creation Tool
Microsoft offers a tool called Windows 11 Media Creation Tool to help you create a bootable USB drive or CD/DVD. See what you should do:
Tip: Before you do, make sure your PC has an internet connection and prepare a blank DVD or USB drive with at least 8GB.
Step 1: Visit the Download Windows 11 page from Microsoft.
Step 2: Move to the Create Windows 11 Installation Media section and click the Download Now button.
Step 3: Run this tool by double-clicking on the MediaCreationToolW11.exe file.
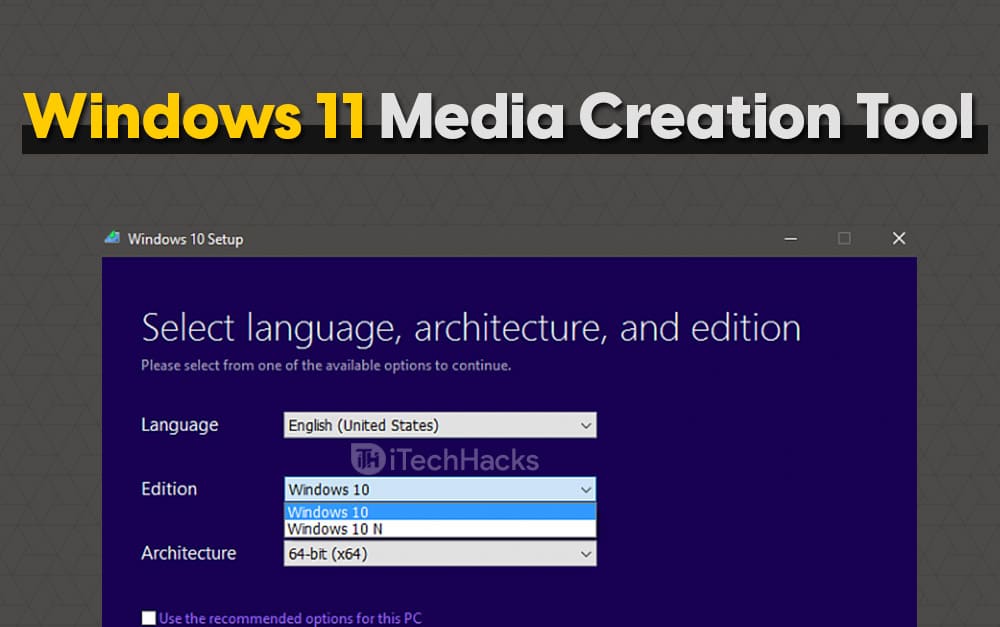
Step 4: After accepting the license terms, choose a language and edition.
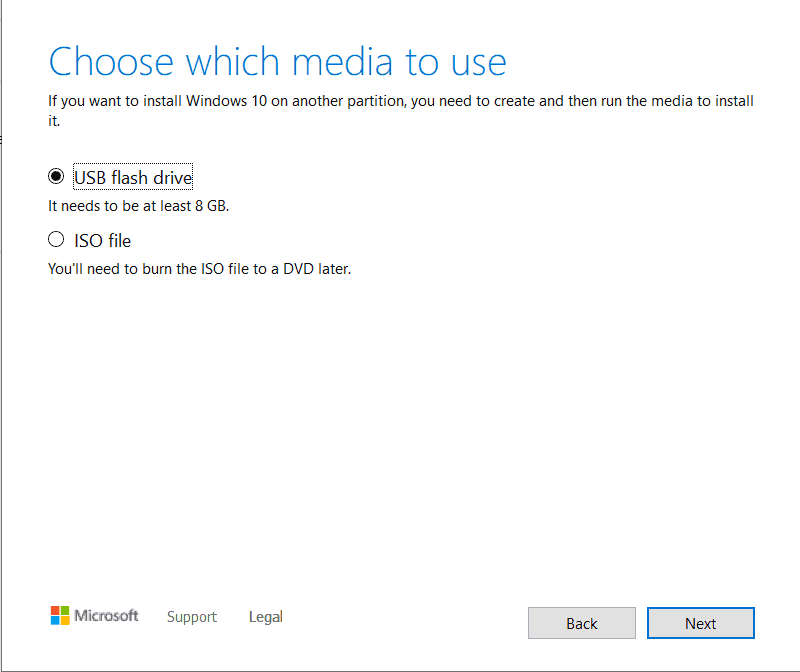
Step 5: Choose which media to use:
- USB flash drive: this can help you directly create a Windows 11 bootable USB after subsequently selecting a USB drive.
- ISO file: this can download an ISO file of Windows 11 and then you need to burn the ISO to a DVD or USB drive using a professional tool (directly go to method 2 to know much).

Step 6: Follow the on-screen instructions to finish all the operations.
Tip: Some of you are curious about this topic — Windows 11 installation media or disk image or Windows 11 installation media vs ISO. You can refer to tenforums to know some information.
Create Windows 11 Installation Media Rufus
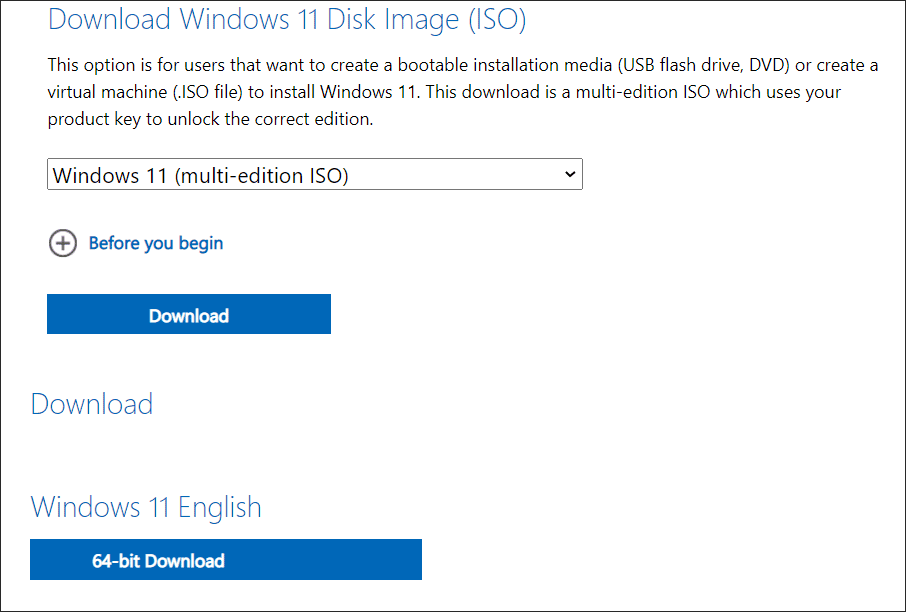
Microsoft gives you an option to directly download Windows 11 ISO from its website to create bootable installation media (USB flash drive, DVD) or create a virtual machine (.ISO file). See how to create Windows 11 installation media from ISO.
Step 1: On the Download Windows 11 page, navigate to the Download Windows 11 Disk Image (ISO) section.
Step 2: Choose Windows 11 ISO, select a language like English (United States), and click the 64-bit Download button to get the ISO image file. The ISO file size is about 5.18GB.
Step 3: Go to download Rufus, connect your USB drive, choose the ISO file you have downloaded, and then click START to create a Windows 11 bootable USB. To know more information, go to read our previous post — How to Make Windows 11 Bootable USB Drive [Step-by-Step Guide].
Tip: If you have a DVD, connect it to your Windows 10 PC, go to right-click on the ISO file, choose Burn disc image and click Burn to create a bootable DVD.
Make Windows 11 Installation Media via Command Prompt
Some of you are advanced users and there is another way for you – use Command Prompt. The operations are a bit complicated and carefully follow the steps below.
Step 1: Download an ISO file of Windows 11, as shown above, and connect your USB drive to your PC.
Step 2: Type cmd to the search box and run Command Prompt as administrator.
Step 3: In the CMD window, type the following commands and press Enter after each one:
diskpart
list disk
select disk N N means the driver letter of your USB drive
clean
create partition primary
active
format FS=NTFS label=”bootable USB” quick
assign letter=X X means the drive letter of the USB drive
exit

Step 4: Type the command — PowerShell Mount-DiskImage -ImagePath «pathfilename.iso». Replace the path of the ISO image you have downloaded, for example, PowerShell Mount-DiskImage -ImagePath “E:Win11_English_x64v1.iso” and press Enter.
Step 5: After that, run these commands below and press Enter after each one to determine the drive letter (in our situation, it is G) for the mounted Windows 11 ISO:
diskpart
list volume

Step 5: Run the exit command to exit Diskpart.
Step 6: Execute these commands and press Enter after each one:
G:
cd boot
bootsect /nt60 H: H is the driver letter of the USB drive
xcopy <mounted ISO volume letter>:*.* <USB drive letter>: /E /F /H Replace the drive letters with your own and here we type xcopy G:*.* H: /E /F /H.
Then, Windows is copying all the Windows 11 installation files to the USB flash drive. This can take several minutes and wait patiently.

Back up Your Important Files Before Windows 11 Clean Install
Using Windows 11 installation media to install the system can lead to data loss since you will run a clean install of this system. Thus, before you do, you had better create a backup of the critical files on your PC, especially the documents, files, or other data you have stored in the C drive.
How to keep the data safe via the backup? Here we recommend you to use a professional file backup software – MiniTool ShadowMaker. This program gives two modes to back up your data – imaging backup and file sync.
The former can help to compress your data to an image file and you need to restore them to use while the latter syncs files & folders to another location and you can directly locate the path to use them without restoration. To know more information, refer to our previous post — Backup vs Sync: What Are the Differences Between Them.
To back up your files, download its Trial Edition by clicking the following button to free use in 30 days. Then, double-click on the exe file to install it on your Windows 11/10/8/7 PC.
Free Download
Step 1: Run MiniTool ShadowMaker Trial Edition.
Step 2: Click Keep Trial to continue using this edition.
Step 3: Go to Backup or Sync and choose the backup source & destination.
Step 4: Click Back up Now or Sync Now to execute the backup task at once.

After creating Windows 11 installation media (bootable USB drive or DVD) and making a backup of your data, now it’s time to use the medium to clean install the new operating system. How to do this work? Follow the guide below.
Step 1: Connect the Windows 11 bootable USB drive or DVD to your computer.
Step 2: Press a specific key like F2, Del, F10, etc. to enter BIOS during the PC boot process. The key differs from different PCs. Next, change the boot order to let the PC run from the installation medium.
Step 3: Customize the language, time and currency format, and Keyboard or input method.
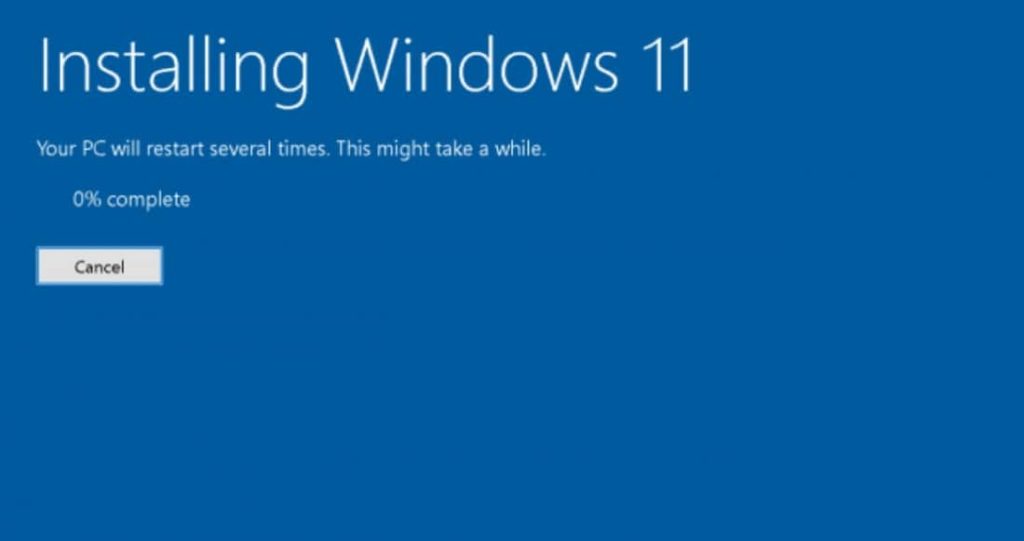
Step 4: Click the Install now button to go on.
Step 5: Then, follow the instructions on the screen to finish the installation of Windows 11.

Now we have shown you much information about how to create Windows 11 installation media on a PC and run a clean install. Sometimes you need to create Windows 11 installation media on Mac, for example, your working Windows 11 PC fails to boot into the desktop and you have a Mac. Here, we will show you some ways for the work.
Use Boot Camp to Make Windows 11 Installation Media
Boot Camp is a useful app that can be used to install Windows 11 on your Mac. Also, you can use it to create a bootable USB from Windows ISO. It is not available on Apple silicon Macs. If you are using an Intel-based Mac with Catalina or a previous version, it is useful here. Note that Boot Camp isn’t available on new macOS.
Step 1: Download an ISO file of Windows 11 by visiting the Windows 11 page, as shown above.
Step 2: Launch the Boot Camp Assistant app by going to Applications > Utilities in Finder.
Step 3: Check the box of Create a Windows 10 or later install disk. Here you only need to create a Windows 11 bootable USB drive, so untick the option for Install Windows 10 or later version.

Step 4: Choose the Windows 11 ISO file you have downloaded, select your USB flash drive and click Continue.
Step 5: Boot Camp Assistant will format your USB and start burning the ISO file to your USB drive.
Use a Third-Party App to Create a Windows 11 Bootable USB on Mac
Some tools like UUByte ISO Editor, WonderISO, etc. are useful for you to burn the ISO file to a USB drive or CD/DVD. Just connect the drive to your Mac, launch the tool, and do the work.

Tip: In addition, you can get Windows 11 installation media on Mac via Terminal. The operations are a little complicated. If you are not a professional, this is not recommended. If you are interested in it, search for the way online.
After making the Windows 11 installation media on Mac, you can use the DVD/CD or USB drive to install Windows 11 on your Windows PC by following the steps mentioned above.
Sometimes you are running a Linux and want to create a bootable drive on it for installing Windows 11 on your non-working Windows PC.
To do this work:
Step 1: Download a Windows 11 ISO image file.
Step 2: On Linux, launch the Ubuntu app, type in the sudo add-apt-repository ppa:tomtomtom/woeusb command, and press Enter.
Step 3: After typing the password, run this command — sudo apt install woeusb woeusb-frontend-wxgtk to finish installing the WoeUSB app.
Tip: If you are using Ubuntu 18.04, run the command — sudo apt update firstly.
Step 4: Connect the USB drive to your Linux and launch the WoeUSB program.
Step 5: In the From a disk image (iso) section, choose the Windows 11 ISO file you have got. Then, select FAT and a target device (USB drive), and next click Install.
Step 6: Search for Disks in the search box to open the app to unmount the USB device. Or else, an error will appear.
Step 7: Go back to the WoeUSB app, click Refresh, select the USB drive, and press Install. Then, the tool is cleaning the drive and burning the Windows 11 ISO to it.

That’s all the information about Windows 11 installation media creation. You can get a bootable USB drive or CD/DVD on a Windows PC, Mac, or Linux. Just follow the guide to easily do this task for installing Windows 11.
Windows 11 media creation tool allows users to upgrade their current version of Windows to Windows 11. They can also create a bootable drive that allows them to install Windows 11 on any other device they are using. Windows media creation tool is one of the most popular ways of upgrading Windows or installing a fresh version of Windows.
If you want to upgrade your system to Windows 11, then you can use Windows 11 Media Creation Tool to do so. The tool is easy to use, and following the correct guide, you will be able to upgrade to Windows 11 easily. If you don’t know how to use the tool, then you are at the right place. In this article, we will be discussing how you can use Windows 11 Media Creation Tool.
Contents:
- 1 What You Will Require?
- 2 How To Use Windows 11 Media Creation Tool
- 3 Download Media Creation Tool Windows 11
- 4 Upgrade This PC option: Install Windows 11
- 5 Create Installation Media For Another PC Option
- 6 Final Words |Windows 10/11 Media Creation Tool Not Working
What You Will Require?
Before we continue with the guide to using Windows 11 Media Creation Tool, let’s discuss a few things that you will need throughout the process. There are certain things that you require to continue with the process of upgrading Windows with the media creation tool.
- Ensure you have a computer to install Windows.
- Take a backup of your data before you continue with the process. In case of data loss, you can easily restore the data if you have a backup of it.
- Ensure you have a stable internet connection. You will need a good speed internet connection to download Windows and then upgrade your Windows or create a bootable USB drive.
- Ensure you have a USB drive with at least 8GB of storage. You will need this if you are not upgrading your Windows but creating a bootable USB drive from the Media Creation tool.
Once you have all the things you require, you can get ahead with upgrading your Windows through the Media Creation Tool. This part of the article will be discussing how you can use Windows 11 media creation tool to upgrade to Windows 11.
- First, click on the link that leads you to the official Microsoft website. Choose “Windows 11“.

- Now, There you will get all the information related to Windows 11. Click on “Download Now”

- After you have downloaded the media creation tool for Windows 11, run it on your PC. You will be asked to accept the license terms. Once you do that, you will see a screen stating ‘Getting a few things ready.’
- Next, you will see two options on the screen – ‘Upgrade this PC now,’ and ‘Create Installation Media (USB flash drive, DVD, or ISO file) for another PC.’

-
- Upgrade this PC- Choose this Option if you want to upgrade the PC on which you are running the Media Creation Tool.
- Create Installation Media for another PC- Select this option, if you want to create a bootable USB drive for another PC.
ALSO READ: How To Make Windows 11 USB Bootable
Download Media Creation Tool Windows 11
| Developer | Microsoft |
| Version | MediaCreationTool Windows 11 |
| Size | 9.4 MB |
| Price | Free |
| Architecture | 64 BIT |
| Download Link | Download here |
Upgrade This PC option: Install Windows 11
If you select, ‘upgrade this PC now option, then follow the steps given below-
- The Windows Media Creation will begin downloading Windows 11.

- Once the Windows has been successfully downloaded, you will be able to install it on your PC.
- Complete the installation process, and your PC will be prompted to complete the setup. Finish the setup for Windows 11, and you will be able to use Windows 11 on your system.
Create Installation Media For Another PC Option
If you select ‘Create installation media for another PC option’, then follow the steps given below-
- When you select the option, you will be asked to select the language, edition, and architecture of the Windows you want to install.
- You can click ‘Use the recommended options for this PC,’ if you want the Media creation tool to automatically select the options for the machine. Once done, click on next.

- Next, you will see two options on the window- ‘USB flash drive,’ and ‘ISO file.’
- USB flash drive- If you select this option, the Windows media creation tool will create a bootable USB drive for you.
- ISO file- If you select this option, the media creation tool will download the ISO file. You will be able to burn the ISO file later to create a bootable USB drive or a DVD.
- If you select the ‘USB flash drive’ option, ensure you connect a USB drive that is at least 8GB in storage. The media creation tool will begin downloading the Windows 11 and will burn it to the USB flash drive automatically.
- If you select the ‘ISO file’ option, the ISO file of Windows 11 will be downloaded. You can later burn it with the help of burning tools like Power ISO. You can use such tools to burn the ISO file to a USB drive.
- Once you have created the bootable USB drive of Windows 11, plug the USB drive into the computer which you want to upgrade to Windows 11.
- After plugging in the USB drive, boot into BIOS and install the Windows.
ALSO READ: How to Upgrade Windows 10 to Windows 11
Final Words |Windows 10/11 Media Creation Tool Not Working
That’s how you use Windows 11 media creation tool to upgrade your PC to Windows 11. Follow the steps mentioned in this article correctly to use Windows 11 media creation tool.
 При необходимости выполнить чистую установку системы на компьютер или ноутбук, вам потребуется загрузочный установочный USB-накопитель Windows 11 или загрузочная флешка. Она же может использоваться для задач восстановления системы.
В этой инструкции подробно описаны способы сделать загрузочную флешку Windows 11. Сначала официальный метод, предлагаемый Майкрософт, а затем — дополнительные способы, которые также могут быть удобны для рассматриваемой цели.
Способы сделать загрузочную флешку Windows 11
Для подготовки загрузочной установочной флешки с Windows 11 можно использовать набор разных способов: официальный, предлагаемый Майкрософт с помощью утилиты Media Creation Tool или сторонние инструменты, которые будут быстрее и удобнее, в случае, если у вас уже имеется загруженный ISO образ с системой.
Создание загрузочной флешки Windows 11 в Media Creation Tool
Первый метод — использование Media Creation Tool, официальной утилиты Майкрософт для записи установочного загрузочного USB накопителя. Чтобы сделать загрузочную флешку с её помощью, выполните следующие шаги:
- Подготовьте USB флешку размером не менее 8 Гб, подключите её к компьютеру. Учитывайте, что все данные с неё будут удалены. При использовании внешнего жесткого диска, с него будут удалены все разделы.
- Зайдите на официальную страницу Майкрософт https://www.microsoft.com/ru-ru/software-download/windows11 и, в разделе «Создание установочного носителя Windows 11» нажмите «Скачать», чтобы загрузить Media Creation Tool для Windows 11.
- Запустите утилиту и примите условия лицензионного соглашения.
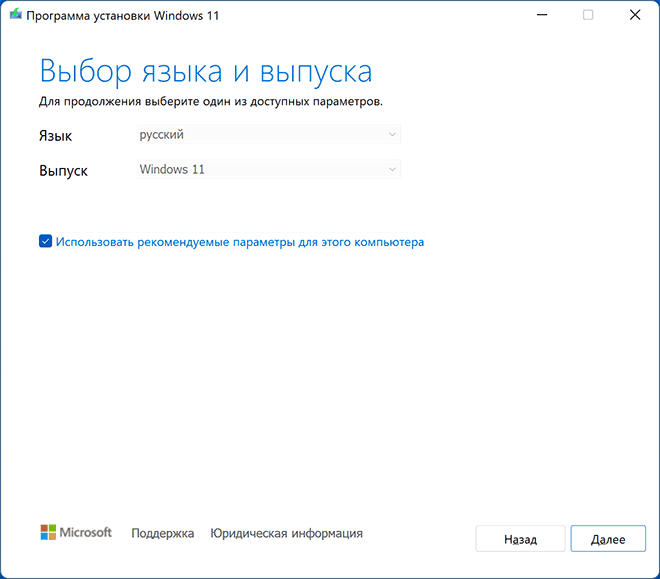
- На экране «Выбор языка и выпуска» по умолчанию установлены параметры, соответствующие текущей системе. При желании вы можете снять отметку «Использовать рекомендуемые параметры» и выбрать другой язык. Выпуск изменить нельзя — это будет Windows 11 64-бит, содержащая Pro и Home редакции системы. Нажмите «Далее».

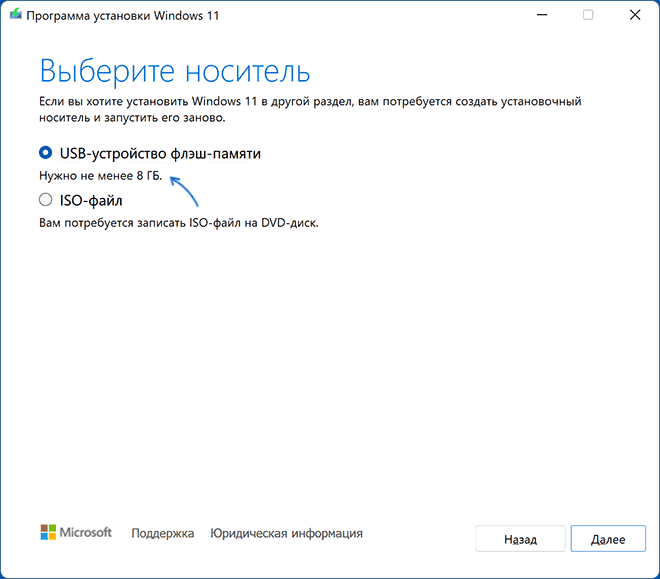
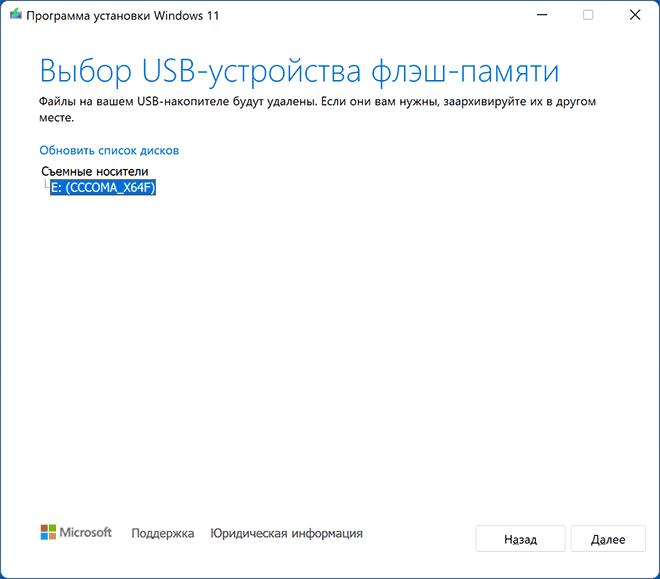
- На шаге «Выберите носитель» выберите пункт «USB-устройство флэш-памяти» и нажмите «Далее».
- Выберите нужную флешку в списке съемных накопителей, на которую будет производиться запись. Если в окне сообщается «Не удается найти USB-накопитель» несмотря на то, что флешка подключена, причиной может быть то, что подключенный накопитель определяется системой как локальный диск, а не съемный накопитель. Напоминаю, что после нажатия «Далее» все данные с выбранной флешки будут удалены.
- Дождитесь завершения процесса скачивания файлов Windows 11 и создания установочного носителя. В процессе могут сами открываться окна проводника, их достаточно просто закрыть.
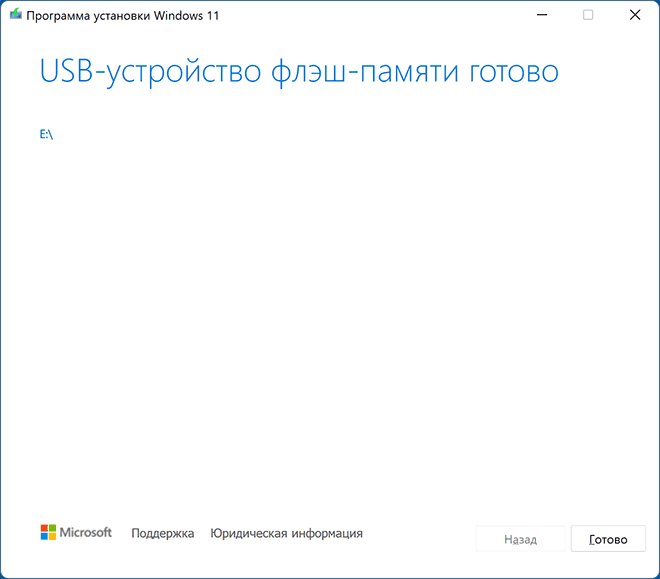
- По завершении процесса вы получите сообщение «USB-устройство флэш-памяти готово». Достаточно нажать кнопку «Готово» и использовать созданную флешку для установки Windows 11 или других задач.

Установочный носитель, создаваемый в Media Creation Tool, имеет файловую систему FAT32, работает с UEFI загрузкой, а данные установки хранятся в сжатом файле install.esd в папке sources размером менее 4 Гб, что позволяет разместить его в рамках этой файловой системы.
Для того, чтобы выполнить загрузку с созданного накопителя, достаточно поставить загрузку с флешки в БИОС/UEFI вашего компьютера или ноутбука, либо использовать Boot Menu. При возникновении проблем при загрузке рекомендую использовать поиск по сайту, описав ошибку или ситуацию: большинство распространенных проблем были рассмотрены, решение может быть в наличии.
Rufus
Бесплатная программа Rufus — один из самых популярных инструментов для создания загрузочной флешки с Windows. Для её использования в рамках рассматриваемой задачи, вам потребуется образ ISO с Windows 11, который при необходимости можно загрузить в самой программе. Подробнее: Как скачать Windows 11 64-bit ISO. При наличии образа подключаем флешку объёмом не менее 8 Гб и выполняем следующие шаги:
- Скачайте Rufus с официального сайта https://rufus.ie/ru/ и запустите программу.
- В поле «Устройство» выберите флешку, на которую будет производиться запись.

- Нажмите кнопку «Выбрать» и укажите путь к хранящемуся на компьютере образу ISO.
- Остальные параметры для задачи установки Windows 11 с флешки на компьютере с UEFI изменять не требуется.
- Нажмите кнопку «Старт», подтвердите очистку данных, имеющихся на USB накопителе и дождитесь завершения процесса создания. Если в процессе открываются окна или сообщения проводника о необходимости форматирования, игнорируйте их или просто закрывайте.
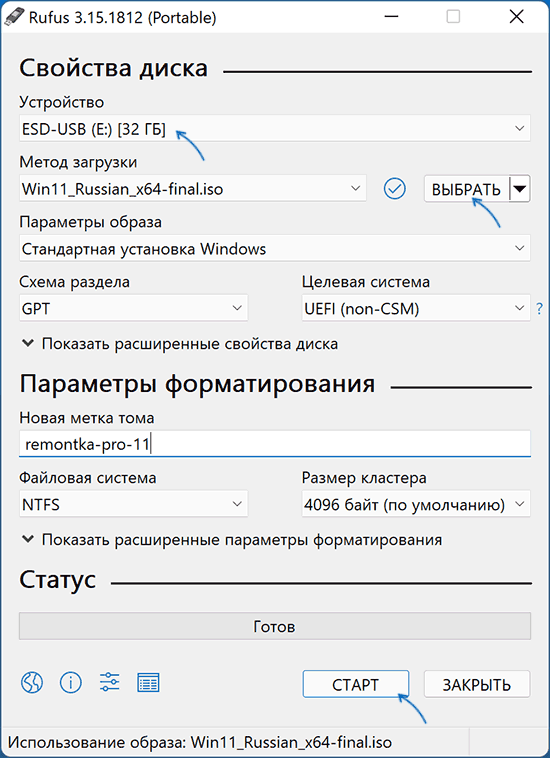
Обратите внимание: новая версия Rufus позволяет отключить проверку TPM 2.0 и Secure Boot для загрузочной флешки из оригинального ISO образа Windows 11.
Созданный в Rufus установочный накопитель для UEFI-загрузки имеет два раздела: один небольшой — FAT32 с соответствующим загрузчиком, второй — NTFS, на котором размещаются файлы установки Windows 11. Такой подход позволяет записывать образы, содержащие файлы, размер которых превышает ограничение в 4 Гб для файловой системы FAT32. Подробнее о параметрах и использовании Rufus.
Загрузочная флешка Windows 11 без программ
Если у вас имеется ISO образ Windows 11, содержащий в папке sources сжатый файл install.esd размером менее 4 Гб (такие образы создает Media Creation Tool), вместо несжатого install.wim, вы можете сделать установочный накопитель для UEFI загрузки, не используя какие-либо программы:
- Отформатируйте флешку в FAT32 стандартными средствами системы: нажатие правой кнопкой мыши по накопителю в проводнике — форматировать, выберите файловую систему FAT32, оставьте включенной опцию «Быстрое форматирование».
- После завершения форматирования, смонтируйте образ ISO в системе. Для этого в последних версиях Windows достаточно нажать по файлу образа правой кнопкой мыши и выбрать пункт «Подключить» в контекстном меню.
- Скопируйте всё содержимое из подключенного образа на флешку с файловой системой FAT32.
Такой накопитель будет исправно загружаться на системах с включенной загрузкой UEFI, в том числе с включенной безопасной загрузкой Secure Boot.
UltraISO
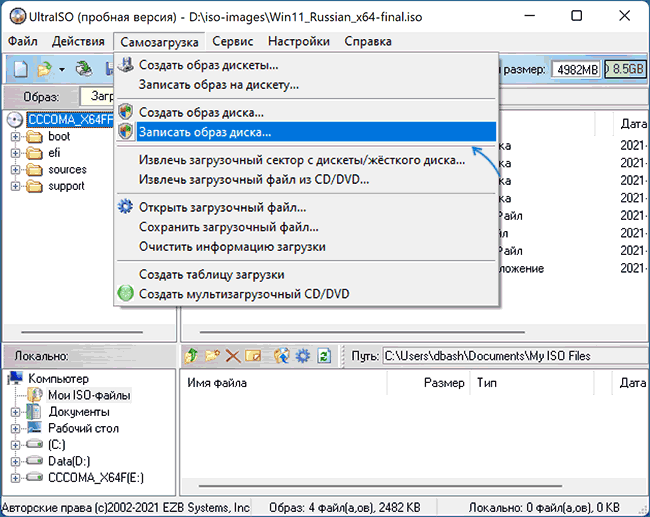
Программа UltraISO предназначена для разноплановой работы с образами ISO и не является полностью бесплатной. Однако, даже пробная версия позволяет записать загрузочный установочный USB-накопитель Windows 11:
- Скачайте пробную версию программы UltraISO с официального сайта https://www.ultraiso.com/ и установите её. После запуска нажмите по кнопке начала пробного периода.
- В главном меню программы нажмите «Файл» — «Открыть файл-образ» и укажите путь к ISO образу Windows 11.

- Откройте пункт «Самозагрузка» в главном окне программы и выберите пункт «Записать образ диска».
- В следующем окне в поле «Диск» укажите вашу флешку. Изменять остальные параметры не обязательно.
- Нажмите кнопу «Записать» и дождитесь завершения записи образа на накопитель, перед началом которого вас предупредят о том, что все данные с него будут удалены.


При записи установочного накопителя с помощью UltraISO для UEFI-систем на флешку FAT32, файлы install.wim размером более 4 Гб автоматически разделяются на части таким образом, чтобы разместиться в пределах ограничений этой файловой системы.
Мультизагрузочная флешка Windows 11
Если для ваших задач требуется загрузочный накопитель, имеющий возможность загрузки с более, чем одного образа, разместив на USB не только Windows 11, но и другие операционные системы, вы можете использовать специальные утилиты, которые позволяют сравнительно легко выполнить такую задачу. Я рекомендую использовать:
- Ventoy
- WinSetupFromUSB
Это самые простые в работе инструменты, обеспечивающие хорошую поддержку загрузки различных образов на системах с разными характеристиками и типами загрузки.
Если при установке с флешки вы получаете сообщение «Запуск Windows 11 на этом компьютере невозможен», при этом используется UEFI-загрузка, используйте Способ создания загрузочной флешки для чистой установки без проверки TPM 2.0 и TPM 1.2.
Непосредственно процесс установки описан в отдельной инструкции: Установка Windows 11 с флешки. А сам накопитель можно использовать не только для чистой установки системы, а для её восстановления: загрузившись с такого USB, на втором экране после выбора языка можно использовать пункт «Восстановление системы» для запуска соответствующих инструментов.
При возникновении дополнительных вопросов на тему, задавайте их в комментариях для поиска подходящего решения.
With this tool users are able to upgrade their current Windows 10 to Windows 11 for free. Also, create a bootable driver which allows installing this on any other device they are using. You will learn everything about Windows 11 Media Creation Tool and how to use it to your own advantage to upgrade your PC and give yourself a new desktop experience.
Table of Contents
- 1 About Windows 11 Media Creation Tool
- 2 (Guide) How to use Windows 11 Media Creation Tool
- 3 Upgrade Windows 10 to Windows 11 (Free Tip)
- 4 Create Installation Media using Media Creation Tool
- 5 Windows 11 Media Creation Tool FAQs
- 5.1 Downloading and Installing Windows 11 from this tool, Is it possible?
- 5.2 How to upgrade to Windows 11 for free?
- 5.3 Is it possible to create a bootable Windows 11 USB?
- 6 Concluding
This is a free utility that has been developed by Microsoft. With this users can create a Windows 11 installation USB drive or download its ISO image file which users can burn onto DVD with the purpose to get OS on a different system. With this one can upgrade their OS to the latest version or make a version 11 installation USB drive or DVD disc to repair their desktop. It happens with everyone so this is a must-have.
It is quite easy to use. By following the correct guide you can upgrade easily. You have landed at the right place if you do not know how to use this.
Below are the prerequisites:
- A PC or Laptop.
- Make sure to backup data.
- Have a stable internet connection. You need to have a good internet speed for downloading and then upgrade it or create a bootable USB drive.
- Make sure to have a USB drive with at least 8 GB of space. You shall need this if you are creating a USB drive from the tool.
- The product key which is a 25-digit code you get when you buy Windows 11, proves that one is using a copy of Windows.
- Blank flash with 5 GB free memory, this is recommended else you shall need to go through the process to determine if your system has the right drivers for the DVD.
(Guide) How to use Windows 11 Media Creation Tool
Once you have all the requirements, let’s move ahead.
- Click on the link which navigates you to Microsoft’s official site. Select “Windows 11”.
- You shall see information related to it, click on “download now”.
- Once downloaded, run it on your system. You shall be asked to accept license terms, once done you shall see a screen saying “getting a few things ready”.
- After this you shall see two options; “Upgrade this PC” and “Create Installation Media” (DVD, ISO file, USB flash drive) for another system.
- Select option “Upgrade this PC” if you wish to upgrade the system on which you are running this tool.
- Select option “Create Installation Media for another PC” if you wish to create a bootable USB drive for another system.
Upgrade Windows 10 to Windows 11 (Free Tip)
If you select this, then follow the steps below:
- The tool shall start to download “Windows 11”.
- Once done, you shall be able to get this on your system.
- Complete the process of installation, PC shall be prompted to complete setup. Finish it, and you shall be able to use this on your PC.
Create Installation Media using Media Creation Tool
On selecting this option, follow the steps below:
- On selection for this, you shall be asked to select the “language, editions and architecture” you wish to get. Select “use the recommended options for this PC” if you wish to use this tool to select options for the machine automatically. Hit “next” once done.
- After this, you shall see two options on the window.
- USB Flash Drive: If you hit this option, the tool shall create a bootable USB.
- ISO File: If you hit this option, you shall be able to burn the ISO file later to create a Bootable USB drive or DVD.
- If you select the option “USB Flash Drive”, then make sure to connect a USB which has at least 8 GB of storage. The tool shall start to download version 1 and burn it to a USB flash drive automatically.
- If you select option “ISO file”, then the ISO file of version 11 shall be downloaded, later on, burn it with burning tools such as Power ISO. Use these tools to also burn ISO to a USB Drive.
- Once a bootable USB drive for version 11 has been created, ply USB in the system which you want to upgrade.
- Once plugged in, boot into BIOS and continue with the procedure as you would normally.
READ ALSO: How To Enable TPM 2.0 in BIOS and Settings.
Windows 11 Media Creation Tool FAQs
Downloading and Installing Windows 11 from this tool, Is it possible?
Visit its website, and click on the “Download tool now” button on the webpage. Install and run it on your system. After this, select to create installation media for another system or upgrade version 11 with this tool.
How to upgrade to Windows 11 for free?
Visit the official website of Microsoft, and select the “Download tool now” button. Run it and click the accept button to agree with all the terms. Now, on what do you want to do page, click on “Upgrade this PC now” and hit “next”. After this follow the prompt to complete this.
Download Windows 11 ISO (Full Version)
Is it possible to create a bootable Windows 11 USB?
Yes, for this you need to make a blank USB drive with 8 GB storage, and connect it to your system. Get the free Windows 11 tool from the official site of Microsoft and run it. On the “what do you want to do page” choose “create an installation for another system”, then select “language, edition, architecture” for installation media. To choose which media to use page, you need to click on a USB drive and follow all the prompts to make a bootable USB drive.
Concluding
Windows 11 was one of the biggest releases and announcements from Microsoft in 2022. This is why we made this guide on how to use Windows 11 Media Creation Tool for various purposes including installation, upgrading, or creating a bootable USB.
Совсем недавно вышла новая Windows 11, в этой статье давайте разберем как сделать загрузочную флешку для установки Windows 11. Для ее создания можно использовать несколько разных способов: с помощью официальной утилиты Media Creation Tool или других инструментов, если у вас уже имеется загруженный ISO образ с системой.
Хочу отметить, что описанными способам можно создать загрузочную флешку Windows 11, как из-под Windows 10, так и с помощью Windows 11. И второе, не обязательно, чтобы компьютер, на котором создаётся загрузочная флешка, был совместим с Windows 11.
Способ 1. Используем Media Creation Tool от Microsoft
Возьмите USB флешку размером не менее 8 Гб. Учитывайте, что при записи образа все данные с неё будут удалены. Зайдите на официальную страницу Майкрософт по загрузке Windows 11.
Видим раздел «Создание установочного носителя Windows 11». Нажмите «Скачать», и загрузите Media Creation Tool – официальную программу установки Windows 11 от Microsoft. После этого, запускаем утилиту и принимаем соглашения.
На экране «Выбор языка и выпуска» по умолчанию установлены параметры, которые соответствуют текущей системе. При желании, их можно изменить. Подтвердите ваш выбор нажатием «Далее».
На данном этапе, программа установки предложит выбрать носитель. Выберите «USB-устройство флэш-памяти» и нажмите «Далее». Выберите флешку в списке съемных накопителей, на которую будете производить запись. Обратите внимание, что после нажатия «Далее» все данные с неё будут удалены.
После завершения создания установочной флешки вы увидите сообщение – «USB-устройство флэш-памяти готово». Нажмите «Готово» и ваша загрузочная флешка с Windows 11 готова к работе.
Способ 2. Используем Rufus.
Второй способ будет актуален в том случае, если у вас УЖЕ имеется образ ISO с Windows 11. Скачать его можно с той же страницы Microsoft, где и Media Creation Tool. Здесь указаны все предлагаемые Microsoft варианты.
Или создать с помощью Media Creation Tool. Для этого, на странице Media Creation Tool «Выберите носитель», укажите «ISO-файл» вместо «USB-устройство флеш-памяти». Укажите папку, куда его сохранить. И дождитесь окончания загрузки и создания образа системы. По окончанию ISO-файл Windows 11 будет сохранён в указанную папку.
Для создания загрузочной флешки я воспользуюсь программой Rufus. Но Rufus не единственная программа для записи образов на носители. Аналогичных есть много. В списке популярных можно выделить такие программы как: Win32 Disk Imager, UltraISO, UNetBootting, WinToFlash, Universal USB Installer, и им подобные.
И так, для начала, запустите программу. Далее, выбираем нужный нам файл образа системы и нажимаем “Выбрать”. Потом, выбираем нужный нам тип носителя, то есть устройство “USB”. Если важных файлов на данном накопителе у вас нет, нажимаем “Старт”.
Снова подтверждаем то, что программа удалит все файлы на носителе и ожидаем завершения копирования файлов на Вашу флешку. После завершения видим сообщение “Готово”, то есть, загрузочная флешка готова. Можно приступать к установке Windows 11.
Но имейте ввиду, что установить Windows 11 с загрузочной флешки, созданной этими двумя способами, получится только на совместимом устройстве: с TPM (не ниже версии 2.0) и SecureBoot.
Способ 3. Используем Rufus для компьютера без TPM 2.0 и SecureBoot.
Если же ваш компьютер не оборудован доверенным платформенным модулем и в нем нет режима безопасной загрузки, то при установке вы увидите ошибку о том, что ваше устройство не соответствует минимальными системными требованиям для установки Windows 11.
В таком случае, для установки Windows 11 на неподдерживаемый компьютер, нужно создать загрузочную флешку особым способом. Их также уже есть несколько, но мне понравилось, как данная функция реализована в Rufus. Тем более, что программа является абсолютно бесплатной и с открытым кодом.
Процесс создания загрузочной флешки для несовместимого с Windows 11 ПК такой же. Единственным отличием будет то, что в меню «Параметры образа» нужно выбрать «Extended Windows 11 Installation» (no TPM/no Secure Boot) – то есть «…для установки на устройство без TPM и Secure Boot…»
При установке Windows 11 с помощью такой флешки на ПК без TPM и Secure Boot, не будет ошибки о несовместимости устройства.
Полную версию статьи со всеми дополнительными видео уроками смотрите в источнике. А также зайдите на наш Youtube канал, там собраны более 400 обучающих видео.