
An ISO image can contain the entire contents of a CD, DVD, or any other external drive. An ISO image is like a box that contains all components of an element that can be used to remodel the original content.
An ISO image is even capable of keeping files of the installed operating system. With the availability of ISO images, we can make bootable USB flash drives and install any OS to our systems.
You may need to convert a folder to an ISO file if you need to share the contents of the folder in a single file or recompile an image after making modifications to it.
Want to convert a folder to an ISO image? Here’s how:
You can convert folders with video files to ISO images. If you want to compress the size of your ISO image which contains videos, check out how to compress video files without losing quality.
You can convert any file or folder into an ISO file so it can compress the actual size of the data and you can easily share it anywhere you want to.
TIP: You can also create a system backup/clone of your working PC using the image software.
Table of contents
- How to Convert Files and Folders to ISO Images
- AnyToISO
- ImgBurn
- Folder2ISO
- ISO Workshop
- WinCDEmu
- Closing Words
Here are a few tools to get the job done.
AnyToISO
AnyToISO freeware tool is available for Windows 10 and 11 that can easily convert any folder or file to ISO.
When it is installed, a window will appear. There are 3 options in the respective tabs:
- You can extract any files from the zip or archive folder
- You can make an ISO image of CD/DVD.
- You can create an ISO image of any file or folder.
Follow the steps below to convert a file or a folder into an ISO image using AnyToISO:
- Download AnyToISO and proceed with the installation wizard to install the tool.
- Switch to “Folder to ISO” tab and then click Browse for folder in front of Source folder.

- Now select the folder that you want to convert.
- AnyToISO will now fill in the other details automatically. Click Make ISO to begin creating an ISO image out of the selected folder.


The ISO image will now begin creating itself. This step may take a moment depending upon the size of the folder. Once done, you can find the ISO image in the destination directory as designated by the AnyToISO tool.

ImgBurn
ImgBurn is another great tool that will convert a file or a folder into an ISO image. Follow the steps below to download, install, and then use ImgBurn to create an ISO file:
- Open the ImgBurn download page, click on any of the mirror download links, and download the tool from there.

- Once the setup has been downloaded, double-click it to begin the installation process and then follow through with the installation wizard.
- Once installed, run the tool. From the main menu, click “Create image file from files/folders“.

- On the next screen, click on the Browse for a file or Browse for a folder button (depending upon whether you want to convert a file or folder).
- From the browsing window, navigate to and select the file/folder you want to convert.
- Now click the Browse button under Destination and select a location to save the converted ISO image.
- Click the Build button.
- From the popup confirmation window, click Yes.
- You will now be notified that a volume label has not been given and the tool will set one itself. Click Yes again.


The conversion process will now take place. Once converted, you will find the converted ISO file at the designated location.
Folder2ISO
Folder2ISO is a portable tool that does exactly what its name is – convert folders to ISO images! Proceed with the following steps to convert a folder into an ISO image:
- Download Folder2ISO and proceed with the extraction.
- As the tool is portable, it does not require installation. Execute the Folder2ISO tool.
- Click Select folder and navigate and select the folder that you wish to convert.

- Now click Select Output and choose a name and a destination for the converted ISO image.
- Click Generate ISO to begin the conversion.


The tool will now create an ISO file out of the selected folder.
ISO Workshop
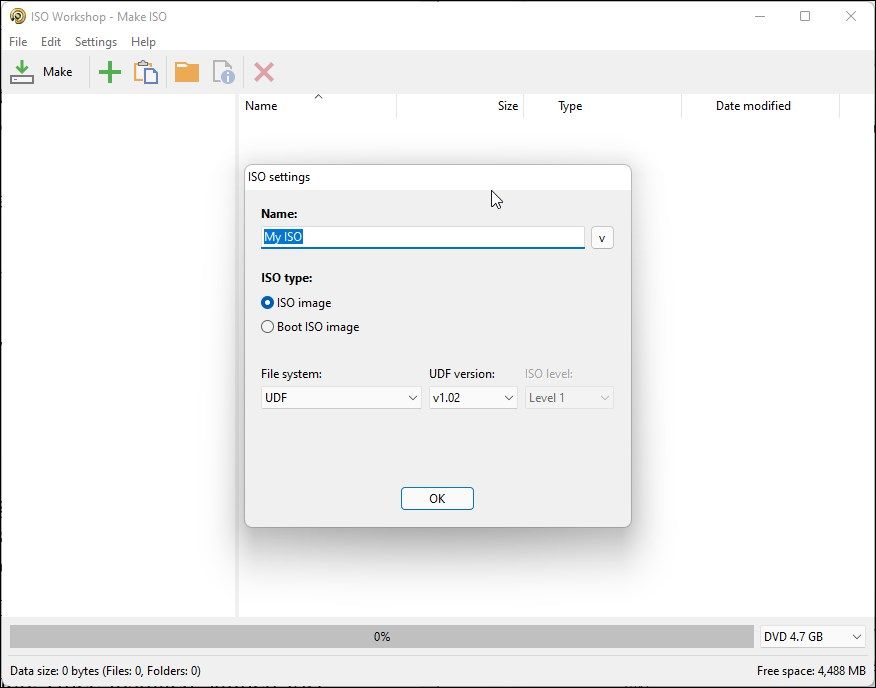
ISO Workshop is another freeware with a Graphical User Interface (GUI) that you can use to create an ISO image out of a folder. Here is how:
- Open the ISO Workshop download page and click Download in front of the said software.

- Run the downloaded .exe setup file and follow through with the installation wizard to install the software.
- Now run the ISO Workshop software and click Make ISO.

- A new window will now open. From the popup, click Ok.

- Now click the “+” (plus) sign from the top, navigate to the folder that you want to convert and click Add.
- (Optional) Repeat the last step to add more folders.
- When added, click Close.
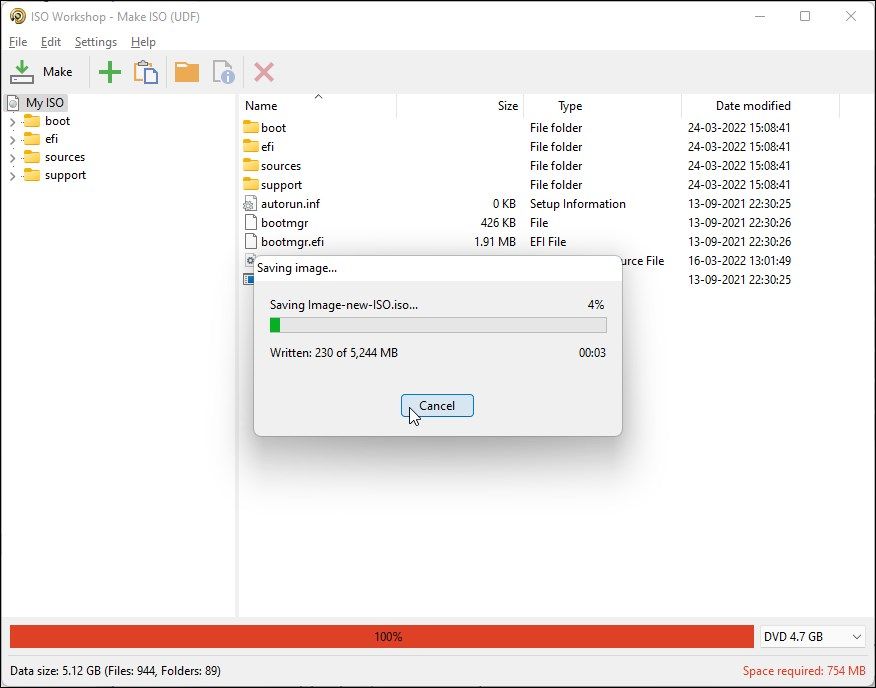
- Now click Make from the top menu in the tool.
- Now set a name and a destination for the converted ISO file and click Save.
- The tool will now begin creating the ISO file out of the selected folder(s). When done, click Ok.


You will find that the ISO image has been saved to the selected destination.
WinCDEmu
Perform the following steps to convert a folder into an ISO image directly from its context menu using WinCDEmu:
- Download WinCDEmu and install the tool.
- Once installed, right-click the folder that you want to make an ISO image out of, and click Build an ISO image from the context menu.

- From the popup window, enter a File Name and click Save.
- The tool will now begin the conversion.


It is that easy to convert any folder into an ISO file with WinCDEmu on a Windows computer.
Closing Words
Learn how to convert DMG to ISO images.
So, these are very convenient and simple ways to make any folder or file into an ISO image and share it with anybody, anywhere. Basic tasks can be done using any of the given tools discussed in this post.
Have fun and keep on making ISO images to transfer/share big programs over internet. What method do you use to convert a set of files and folders into an ISO image?
Also see:
Having done MPhil in Computer Sciences, I’m passionate about new IT technologies and eager to learn. I write about tech trends, new tools and software, and rapidly emerging technologies.
How do I turn a folder into an ISO?
Tutorial: Converting folders to ISO files
- Select a folder that you would like to convert to an ISO image, right-click on it and select “Build an ISO image”:
- WinCDEmu will ask where to save the created image. …
- WinCDEmu will start building the image:
How do I create an ISO image in Windows 10?
Creating ISO File
- Download and install Magic ISO.
- After installing the software, you will now have an option to highlight files, right click, and select “Add to image file…“.
- Once the software opens, you can choose “File” > “Save“, then save it as a Standard ISO Image file.
How do I convert files to ISO?
How to Create a Bootable ISO Image from Windows Extracted Files?
- Download & install ImgBurn.
- Now Click on create image file from files/folders.
- Now Select the Windows installation folder/files.
- Now Make ISO image bootable.
- Configure the bootable settings for ISO image.
How do I create an ISO image?
To create an ISO image using WinCDEmu, do the following:
- Insert the disc you want to convert into the optical drive.
- Open the “Computer” folder from the start menu.
- Right-click at the drive icon and select “Create ISO image”:
- Select a file name for the image. …
- Press “Save”.
- Wait until the image creation completes:
How do I make an ISO file from a USB?
1 Answer
- Download and Install Imgburn software.
- Now Open the Imgburn tool and Insert the USB.
- Now Locate the USB directory in the Imgburn tool.
- And Now Select the Output directory for ISO file.
- Now Advanced tab and then Bootable disc and select the boot image from USB.
- And Done!
How do I convert a file to a folder?
You would then need to:
- Select files and/or folders you would like to use.
- Right click in the highlighted area and choose Send Selected Files To New Zip File (from Selected Files)
- In the Send Selected Files dialog you can: …
- Click Send New Zip File.
- Select a target folder for the new Zip file.
- Click Select Folder.
Is a Windows 10 ISO free?
For installing Windows 10, Windows 10 ISO is officially and completely free and to download. The Windows 10 ISO file contains the installater files which can burned to a USB drive or a DVD which will make the drive bootable to install.
Can I make an ISO of my operating system?
You can create ISO image from your operating system or create custom system image backup with AOMEI Backupper. All in all, the usage of ISO image is wider, but you need much more effort to create one.
Is a disc image file the same as an ISO?
The Facts. ISO and IMG are both archival formats. Each file contains a copy of the contents of the original disc the archive was made from, plus information about the file structure of the disc. They are designed to make archiving the disc easier and make creating an exact duplicate copy easier.
Does burning an ISO make it bootable?
Once the ISO file is burned as an image, then the new CD is a clone of the original and bootable. Besides the bootable OS, the CD will also hold the various software applications like many Seagate utilities that are downloadable in .
In the tool, select Create installation media (USB flash drive, DVD, or ISO) for another PC > Next. Select the language, architecture, and edition of Windows, you need and select Next. Select ISO file > Next, and the tool will create your ISO file for you.
What is an ISO image used for?
An ISO file (often called an ISO image), is an archive file that contains an identical copy (or image) of data found on an optical disc, like a CD or DVD. They are often used for backing up optical discs, or for distributing large file sets that are intended to burned to an optical disc.
What is the best ISO software?
These are the known best ISO mounting software which can quickly enables virtual drive and mount an image file.
- DAEMON Tools Lite. DAEMON Tools Lite is one of the most well known free virtual drive and optical disc authoring program for Microsoft Windows and Mac OS. …
- Virtual CloneDrive. …
- PowerISO. …
- WinCDEmu. …
- MagicISO.
28 февр. 2020 г.
How do I install Windows 10 from an ISO file without burning it?
Step 3: Right-click on the Windows 10 ISO image file, and then click Mount option to mount the ISO image. Step 4: Open up This PC, and then open up the newly mounted drive (containing Windows 10 installation files) by right-clicking on the drive and then clicking Open in new window option.
You can convert files and folders to an ISO image using third-party ISO management utilities. These come in handy when you want to create a backup of files and folders in ISO format. You can also use it to add new files to an existing ISO image and repack it.
Windows, by default, does not offer an option to convert files and folders to an ISO image. But there are third-party Windows programs that can help you achieve this task. Here we show you the best apps to make an ISO file from files and folders.
1. AnyToISO
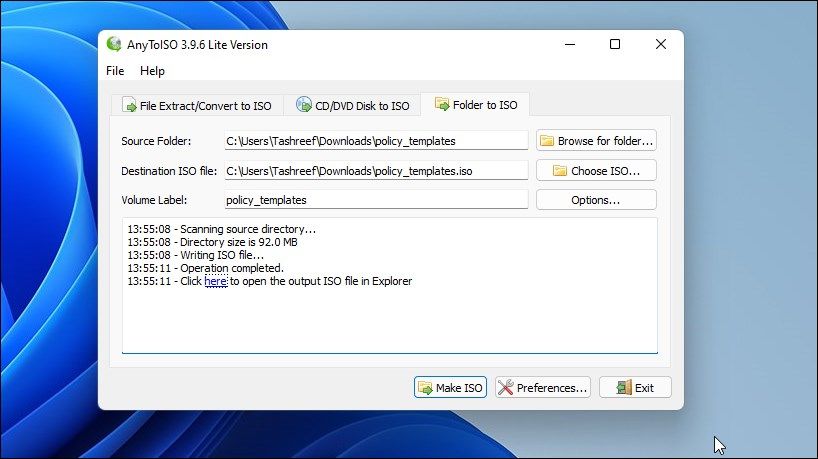
If you are looking for a free utility to create an ISO image not bigger than a regular CD, the AnyToISO Lite version is an excellent utility. It is easy to use and doesn’t come with tons of options.
It also supports the Windows Explorer shell extension. When enabled, it will add a create ISO option in the Windows Explorer context menu.
To convert a folder to an ISO image using AnyToISO:
-
Launch AnyToISO and open the
Folder to ISO
tab
. -
Next, click on
Browse
for Folder
and select the folder you want to convert to an ISO image. -
Next, click on
Choose ISO
and select the save location for the ISO file. - You can change the volume label name or leave it as default.
-
Click on
Options
to customize the
File System
and
ISO Settings
. -
Next, click the
Make ISO
button to initiate the process. Depending on the size of the folder, the ISO writing process may take some time. - Once completed, you will have a new ISO file created out of the selected folder.
You can also right-click on any folder in File Explorer and select the Create ISO option to launch the app and convert the folder into an ISO image. However, if you are using Windows 11, you will first need to access the classic context menu to view the AnyToISO option.
If you want to create an ISO image with large folders (above 870 MB), you need to upgrade to the Pro version and shell $22.95 for the license.
Download: AnyToISO for Windows, Mac (Free Lite version, Premium $22.95)
2. AnyBurn
AnyBurn is a full-fledged CD-burning utility that is free to use for both home and commercial purposes. Apart from creating image files from files and folders, you can use it to create a bootable USB drive, perform disc surface tests, edit image files, and burn image files to disc.
Follow these steps to create an image file from files and folders using AnyBurn:
-
Launch AnyBurn and click on
Create image file from files/folders
. -
In the new dialog, click the
Add +
button on the toolbar.
-
Navigate to the location, select the files or folder to convert, and click
Add. -
Next, click the
Properties
button. Here, you can change the label name, file system, choose compression level, add comments, and modify time and date. Click
OK
to save the changes. -
Click
Next
. - Type a name for the new ISO image and select image file type.
-
Click on
Create Now
to begin the process. - AnyBurn will optimize the file layout and then promptly write the image file. The green progress bar indicates the process is completed successfully.

Download: AnyBurn (Free)
3. WinCDEmuI
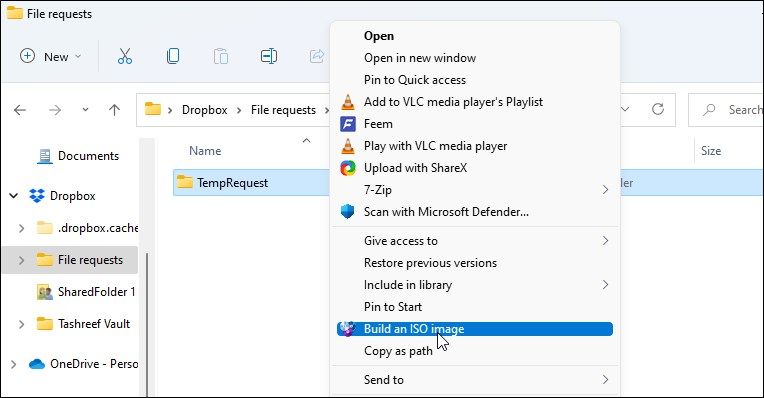
WinCDEmu is a simple yet effective disc utility for Windows. You can use it to mount an optical disc image or create an ISO image from folders.
WinCDEmu is also available in a special portable version. However, with the portable version, you don’t get the right-click to create an ISO image option.
To convert a folder to an ISO image using WinCDEmu:
- Download the app and complete the installation.
-
Once installed, open
File Explorer
and navigate to the folder you want to convert to an image. -
Right-click on the folder and select
Build an ISO Image
. On Windows 11, you need to click on
Show more options
to view the classic context menu. -
Type a name for your ISO image and click
Save
.
That’s it. WinCDEmu will start the image writing process. Depending on the folder size, this may take anywhere from a few seconds to a few minutes.
Download: WinCDEmu (Free)
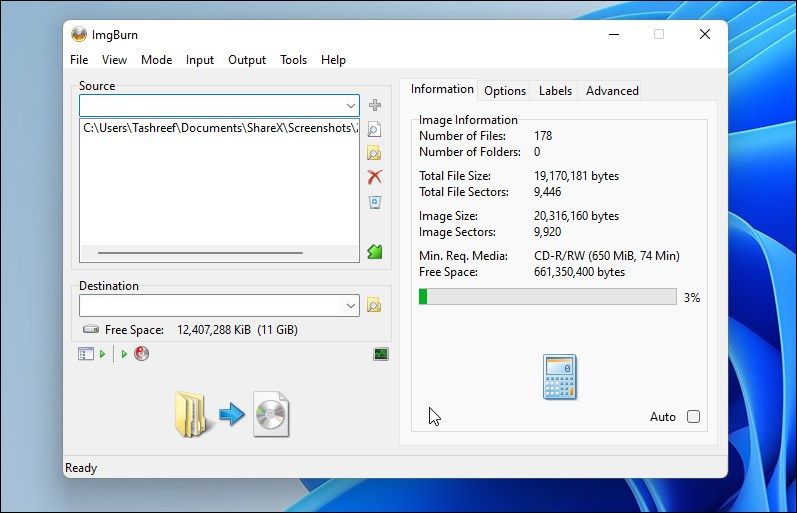
4. ImgBurn
ImgBurn is another popular Windows utility to create ISO images from files and folders. It is a feature-rich disc burner utility with options to write image files to disc, create image files from disc, and disc verification.
Unlike WinCDEmu and AnyBurn, ImgBurn supports creating ISO images from both files and folders. Here’s how you can use it to create an ISO image from files.
- Download and install the app on your PC.
-
Next, launch
ImgBurn
. If you can’t find the desktop icon, or it doesn’t appear in Windows search, then navigate to the following location to launch the tool:C:Program Files (x86)ImgBurn -
On the main screen, click on
Create image file from files/folders
.
-
Next, you can browse for the files and folder or drag and drop the content onto
ImgBurn
to add the files. -
Next, click the
Calculator
icon on the right side to calculate the file size and view other information. -
Next, open the
Options
tab to customize image options, add hidden system files and other attributes.
-
Next, open the
Labels
tab and provide a volume label for the file. If you skip this step, ImgBurn will automatically add a label during the image writing process. -
Click the
Folder to Disc
icon, enter the ISO image’s name, and select the destination folder. -
Click
Save
to begin the process. Follow any on-screen instructions, if necessary, to complete the process.

Download: ImgBurn (Free)
5. ISO Workshop
ISO Workshop is a premium ISO image management app. It features a modern look and offers multiple disc management options. You can use it to make ISO, burn ISO, convert ISO, and extract files from disc images.
Here’s how to use ISO Workshop to make an ISO image from files and folders.
- Download and complete the installation. Once installed launch ISO Workshop.
-
In the main interface, click on
Make ISO.
-
Next, type a name for the new ISO image and click
OK
. -
Click the
+
icon and select the files and folders to add. You can also drag and drop all the files and folders onto the app to add them. -
Click on
Make
, type a name for the file, and click
Save
. - ISO Workshop will start writing image files. Once complete, you can burn the ISO image to a disc or mount it on your PC.
ISO Workshop is a premium utility and comes with a 10-day free trial. After the trial ends, you will need to purchase one of the user licenses for continued use.
Download: ISO Workshop (Free trial, Premium $29.95)
If you frequently convert files and folders to an ISO Image, a tool like AnyToISO and WinCDemu are more beneficial due to the shell application support for the File Explorer context menu. If you need advanced ISO image options, opt for AnyBurn or ImgBurn. However, for occasional use, any of these utilities can help you convert your files and folders to an ISO image in no time.
I’ve downloaded a Windows 10 ISO, I’ve unpacked the ISO to a folder and added an AutoUnttend.xml file to the root folder.
Now I want to rebuild the ISO, I downloaded WinCDEmu and installed, right clicked on the root folder of where I unpacked the ISO and selected «Build an ISO image» from the context menu.
I chose a location and supplied a file name then clicked the Save button.
Also instantly I get an error message:
mkisofs.exe reported an error. Examine the output log for more details.
The output log contains:
C:Program Files (x86)WinCDEmumkisofs.exe: Warning: Cannot add inode hints with -no-cache-inodes.
Using TERMINALSERVICES_SESSION000.MAN;1 for  C:Usersu49100DownloadsCA20-4002-OperatingSystem-AIMB-216InstallerW10-LTSB/W10-LTSB/sources/dlmanifests/terminalservices-sessiondirectory-server-dl.man (terminalservices-sessiondirectory-client-dl.man)
Using TERMINALSERVICES_APPSERV000.MAN;1 for  C:Usersu49100DownloadsCA20-4002-OperatingSystem-AIMB-216InstallerW10-LTSB/W10-LTSB/sources/dlmanifests/terminalservices-appserver-licensing-dl.man (terminalservices-appserver-dl.man)
Using MICROSOFT_WINDOWS_IIS_RE000.MAN;1 for  C:Usersu49100DownloadsCA20-4002-OperatingSystem-AIMB-216InstallerW10-LTSB/W10-LTSB/sources/dlmanifests/microsoft-windows-iis-requestmonitor-deployment-dl.man (microsoft-windows-iis-requestfiltering-deployment-dl.man)
Using MICROSOFT_WINDOWS_IIS_NE000.MAN;1 for  C:Usersu49100DownloadsCA20-4002-OperatingSystem-AIMB-216InstallerW10-LTSB/W10-LTSB/sources/dlmanifests/microsoft-windows-iis-netfxextensibility45-deployment-dl.man (microsoft-windows-iis-netfxextensibility-deployment-dl.man)
Using MICROSOFT_WINDOWS_IIS_MA000.MAN;1 for  C:Usersu49100DownloadsCA20-4002-OperatingSystem-AIMB-216InstallerW10-LTSB/W10-LTSB/sources/dlmanifests/microsoft-windows-iis-managementservice-deployment-dl.man (microsoft-windows-iis-managementscriptingtools-deployment-dl.man)
Using MICROSOFT_WINDOWS_IIS_MA001.MAN;1 for  C:Usersu49100DownloadsCA20-4002-OperatingSystem-AIMB-216InstallerW10-LTSB/W10-LTSB/sources/dlmanifests/microsoft-windows-iis-managementscriptingtools-deployment-dl.man (microsoft-windows-iis-managementconsole-deployment-dl.man)
Using MICROSOFT_WINDOWS_IIS_LE000.MAN;1 for  C:Usersu49100DownloadsCA20-4002-OperatingSystem-AIMB-216InstallerW10-LTSB/W10-LTSB/sources/dlmanifests/microsoft-windows-iis-legacysnapin-deployment-dl.man (microsoft-windows-iis-legacyscripts-deployment-dl.man)
Using MICROSOFT_WINDOWS_IIS_IS000.MAN;1 for  C:Usersu49100DownloadsCA20-4002-OperatingSystem-AIMB-216InstallerW10-LTSB/W10-LTSB/sources/dlmanifests/microsoft-windows-iis-isapifilter-deployment-dl.man (microsoft-windows-iis-isapiextensions-deployment-dl.man)
Using MICROSOFT_WINDOWS_IIS_HT000.MAN;1 for  C:Usersu49100DownloadsCA20-4002-OperatingSystem-AIMB-216InstallerW10-LTSB/W10-LTSB/sources/dlmanifests/microsoft-windows-iis-httpcompressionstatic-deployment-dl.man (microsoft-windows-iis-httpcompressiondynamic-deployment-dl.man)
Using MICROSOFT_WINDOWS_IIS_AS000.MAN;1 for  C:Usersu49100DownloadsCA20-4002-OperatingSystem-AIMB-216InstallerW10-LTSB/W10-LTSB/sources/dlmanifests/microsoft-windows-iis-aspnet45-deployment-dl.man (microsoft-windows-iis-aspnet-deployment-dl.man)
Using MICROSOFT_WINDOWS_FAX_CL000.MAN;1 for  C:Usersu49100DownloadsCA20-4002-OperatingSystem-AIMB-216InstallerW10-LTSB/W10-LTSB/sources/dlmanifests/microsoft-windows-fax-client-proenterprise-dl.man (microsoft-windows-fax-client-applications-dl.man)
Using MICROSOFT_WINDOWS_ERRORR000.MAN;1 for  C:Usersu49100DownloadsCA20-4002-OperatingSystem-AIMB-216InstallerW10-LTSB/W10-LTSB/sources/dlmanifests/microsoft-windows-errorreportingfaults-dl.man (microsoft-windows-errorreportingcore-dl.man)
Using MICROSOFT_WINDOWS_CERTIF000.MAN;1 for  C:Usersu49100DownloadsCA20-4002-OperatingSystem-AIMB-216InstallerW10-LTSB/W10-LTSB/sources/dlmanifests/microsoft-windows-certificateservices-mscep-dl.man (microsoft-windows-certificateservices-camanagement-dl.man)
Using MICROSOFT_WINDOWS_CERTIF001.MAN;1 for  C:Usersu49100DownloadsCA20-4002-OperatingSystem-AIMB-216InstallerW10-LTSB/W10-LTSB/sources/dlmanifests/microsoft-windows-certificateservices-camanagement-dl.man (microsoft-windows-certificateservices-ca-dl.man)
Using TERMINALSERVICES_SESSION000.MAN;1 for  C:Usersu49100DownloadsCA20-4002-OperatingSystem-AIMB-216InstallerW10-LTSB/W10-LTSB/sources/replacementmanifests/terminalservices-sessiondirectory-server-replacement.man (terminalservices-sessiondirectory-client-replacement.man)
Using TERMINALSERVICES_ROLE_PA000.MAN;1 for  C:Usersu49100DownloadsCA20-4002-OperatingSystem-AIMB-216InstallerW10-LTSB/W10-LTSB/sources/replacementmanifests/terminalservices-role-package-replacement.man (terminalservices-role-package-r-replacement.man)
Using TERMINALSERVICES_GATEWAY000.MAN;1 for  C:Usersu49100DownloadsCA20-4002-OperatingSystem-AIMB-216InstallerW10-LTSB/W10-LTSB/sources/replacementmanifests/terminalservices-gateway-ui-package-replacement.man (terminalservices-gateway-ui-package-r-replacement.man)
Using TERMINALSERVICES_GATEWAY001.MAN;1 for  C:Usersu49100DownloadsCA20-4002-OperatingSystem-AIMB-216InstallerW10-LTSB/W10-LTSB/sources/replacementmanifests/terminalservices-gateway-package-replacement.man (terminalservices-gateway-package-r-replacement.man)
Using RIGHTS_MANAGEMENT_SERVIC000.MAN;1 for  C:Usersu49100DownloadsCA20-4002-OperatingSystem-AIMB-216InstallerW10-LTSB/W10-LTSB/sources/replacementmanifests/rights-management-services-role-replacement.man (rights-management-services-management-tools-replacement.man)
Using RIGHTS_MANAGEMENT_SERVIC001.MAN;1 for  C:Usersu49100DownloadsCA20-4002-OperatingSystem-AIMB-216InstallerW10-LTSB/W10-LTSB/sources/replacementmanifests/rights-management-services-management-tools-replacement.man (rights-management-services-admin-tools-replacement.man)
Using POWERMANAGEMENT_POWERPOL000.MAN;1 for  C:Usersu49100DownloadsCA20-4002-OperatingSystem-AIMB-216InstallerW10-LTSB/W10-LTSB/sources/replacementmanifests/powermanagement-powerpolicy-migration-replacement.man (powermanagement-powerpolicy-definitions-replacement-win8.man)
Using POWERMANAGEMENT_POWERPOL001.MAN;1 for  C:Usersu49100DownloadsCA20-4002-OperatingSystem-AIMB-216InstallerW10-LTSB/W10-LTSB/sources/replacementmanifests/powermanagement-powerpolicy-definitions-replacement-win8.man (powermanagement-powerpolicy-definitions-replacement-win7.man)
Using POWERMANAGEMENT_POWERPOL002.MAN;1 for  C:Usersu49100DownloadsCA20-4002-OperatingSystem-AIMB-216InstallerW10-LTSB/W10-LTSB/sources/replacementmanifests/powermanagement-powerpolicy-definitions-replacement-win7.man (powermanagement-powerpolicy-definitions-replacement-win10.man)
Using POWERMANAGEMENT_POWERPOL003.MAN;1 for  C:Usersu49100DownloadsCA20-4002-OperatingSystem-AIMB-216InstallerW10-LTSB/W10-LTSB/sources/replacementmanifests/powermanagement-powerpolicy-definitions-replacement-win10.man (powermanagement-powerpolicy-definitions-replacement-vista.man)
Using POWERMANAGEMENT_POWERPOL004.MAN;1 for  C:Usersu49100DownloadsCA20-4002-OperatingSystem-AIMB-216InstallerW10-LTSB/W10-LTSB/sources/replacementmanifests/powermanagement-powerpolicy-definitions-replacement-vista.man (powermanagement-powerpolicy-definitions-replacement-v9rs5.man)
Using POWERMANAGEMENT_POWERPOL005.MAN;1 for  C:Usersu49100DownloadsCA20-4002-OperatingSystem-AIMB-216InstallerW10-LTSB/W10-LTSB/sources/replacementmanifests/powermanagement-powerpolicy-definitions-replacement-v9rs5.man (powermanagement-powerpolicy-definitions-replacement-v8rs4.man)
Using POWERMANAGEMENT_POWERPOL006.MAN;1 for  C:Usersu49100DownloadsCA20-4002-OperatingSystem-AIMB-216InstallerW10-LTSB/W10-LTSB/sources/replacementmanifests/powermanagement-powerpolicy-definitions-replacement-v8rs4.man (powermanagement-powerpolicy-definitions-replacement-v7rs2.man)
Using POWERMANAGEMENT_POWERPOL007.MAN;1 for  C:Usersu49100DownloadsCA20-4002-OperatingSystem-AIMB-216InstallerW10-LTSB/W10-LTSB/sources/replacementmanifests/powermanagement-powerpolicy-definitions-replacement-v7rs2.man (powermanagement-powerpolicy-definitions-replacement-v6rs2.man)
Using POWERMANAGEMENT_POWERPOL008.MAN;1 for  C:Usersu49100DownloadsCA20-4002-OperatingSystem-AIMB-216InstallerW10-LTSB/W10-LTSB/sources/replacementmanifests/powermanagement-powerpolicy-definitions-replacement-v6rs2.man (powermanagement-powerpolicy-definitions-replacement-v5rs1.man)
Using POWERMANAGEMENT_POWERPOL009.MAN;1 for  C:Usersu49100DownloadsCA20-4002-OperatingSystem-AIMB-216InstallerW10-LTSB/W10-LTSB/sources/replacementmanifests/powermanagement-powerpolicy-definitions-replacement-v5rs1.man (powermanagement-powerpolicy-definitions-replacement-v4rs1.man)
Using POWERMANAGEMENT_POWERPOL00A.MAN;1 for  C:Usersu49100DownloadsCA20-4002-OperatingSystem-AIMB-216InstallerW10-LTSB/W10-LTSB/sources/replacementmanifests/powermanagement-powerpolicy-definitions-replacement-v4rs1.man (powermanagement-powerpolicy-definitions-replacement-v1019h1.man)
Using NETWORKLOADBALANCINGMANA000.MAN;1 for  C:Usersu49100DownloadsCA20-4002-OperatingSystem-AIMB-216InstallerW10-LTSB/W10-LTSB/sources/replacementmanifests/networkloadbalancingmanagementheadlessserver-replacement.man (networkloadbalancingmanagementclient-replacement.man)
Using MICROSOFT_WINDOWS_TERMINALSE000 for  C:Usersu49100DownloadsCA20-4002-OperatingSystem-AIMB-216InstallerW10-LTSB/W10-LTSB/sources/replacementmanifests/microsoft-windows-terminalservices-licenseserver (microsoft-windows-terminalservices-appserver-licensing)
Using MICROSOFT_WINDOWS_STORAG000.MAN;1 for  C:Usersu49100DownloadsCA20-4002-OperatingSystem-AIMB-216InstallerW10-LTSB/W10-LTSB/sources/replacementmanifests/microsoft-windows-storagemigration-replacement.man (microsoft-windows-storagemigration-od-replacement.man)
Using MICROSOFT_WINDOWS_SERVER000.MAN;1 for  C:Usersu49100DownloadsCA20-4002-OperatingSystem-AIMB-216InstallerW10-LTSB/W10-LTSB/sources/replacementmanifests/microsoft-windows-servermanager-shell-replacement.man (microsoft-windows-servermanager-rsat-roletools-replacement.man)
Using MICROSOFT_WINDOWS_SERVER001.MAN;1 for  C:Usersu49100DownloadsCA20-4002-OperatingSystem-AIMB-216InstallerW10-LTSB/W10-LTSB/sources/replacementmanifests/microsoft-windows-servermanager-rsat-roletools-replacement.man (microsoft-windows-servermanager-rsat-replacement.man)
Using MICROSOFT_WINDOWS_SERVER002.MAN;1 for  C:Usersu49100DownloadsCA20-4002-OperatingSystem-AIMB-216InstallerW10-LTSB/W10-LTSB/sources/replacementmanifests/microsoft-windows-servermanager-rsat-replacement.man (microsoft-windows-servermanager-rsat-featuretools-replacement.man)
Using MICROSOFT_WINDOWS_SECURI000.MAN;1 for  C:Usersu49100DownloadsCA20-4002-OperatingSystem-AIMB-216InstallerW10-LTSB/W10-LTSB/sources/replacementmanifests/microsoft-windows-security-ngc-ctnrsvc-repl.man (microsoft-windows-security-ngc-credprov-replacement.man)
Using MICROSOFT_WINDOWS_POWERS000.MAN;1 for  C:Usersu49100DownloadsCA20-4002-OperatingSystem-AIMB-216InstallerW10-LTSB/W10-LTSB/sources/replacementmanifests/microsoft-windows-powershellwebaccess-commands-powershell-migration-replacement.man (microsoft-windows-powershell-ws08-replacement.man)
Using MICROSOFT_WINDOWS_POWERS001.MAN;1 for  C:Usersu49100DownloadsCA20-4002-OperatingSystem-AIMB-216InstallerW10-LTSB/W10-LTSB/sources/replacementmanifests/microsoft-windows-powershell-ws08-replacement.man (microsoft-windows-powershell-replacement.man)
Using MICROSOFT_WINDOWS_IE_INT000.MAN;1 for  C:Usersu49100DownloadsCA20-4002-OperatingSystem-AIMB-216InstallerW10-LTSB/W10-LTSB/sources/replacementmanifests/microsoft-windows-ie-internetexplorer-repl.man (microsoft-windows-ie-internetexplorer-repl-2.man)
Using MICROSOFT_WINDOWS_CREDEN000.MAN;1 for  C:Usersu49100DownloadsCA20-4002-OperatingSystem-AIMB-216InstallerW10-LTSB/W10-LTSB/sources/replacementmanifests/microsoft-windows-credentialmanagementrole-tools-replacement.man (microsoft-windows-credentialmanagementrole-replacement.man)
Using MICROSOFT_CERTIFICATESER000.MAN;1 for  C:Usersu49100DownloadsCA20-4002-OperatingSystem-AIMB-216InstallerW10-LTSB/W10-LTSB/sources/replacementmanifests/microsoft-certificateservices-webenrollment-serverupgrade-replacement.man (microsoft-certificateservices-policy-serverupgrade-replacement.man)
Using MICROSOFT_CERTIFICATESER001.MAN;1 for  C:Usersu49100DownloadsCA20-4002-OperatingSystem-AIMB-216InstallerW10-LTSB/W10-LTSB/sources/replacementmanifests/microsoft-certificateservices-policy-serverupgrade-replacement.man (microsoft-certificateservices-ocsp-serverupgrade-replacement.man)
Using MICROSOFT_CERTIFICATESER002.MAN;1 for  C:Usersu49100DownloadsCA20-4002-OperatingSystem-AIMB-216InstallerW10-LTSB/W10-LTSB/sources/replacementmanifests/microsoft-certificateservices-ocsp-serverupgrade-replacement.man (microsoft-certificateservices-mscep-serverupgrade-replacement.man)
Using MICROSOFT_CERTIFICATESER003.MAN;1 for  C:Usersu49100DownloadsCA20-4002-OperatingSystem-AIMB-216InstallerW10-LTSB/W10-LTSB/sources/replacementmanifests/microsoft-certificateservices-mscep-serverupgrade-replacement.man (microsoft-certificateservices-ca-serverupgrade-replacement.man)
Using DIRECTORYSERVICES_DOMAIN000.MAN;1 for  C:Usersu49100DownloadsCA20-4002-OperatingSystem-AIMB-216InstallerW10-LTSB/W10-LTSB/sources/replacementmanifests/directoryservices-domaincontroller-tools-replacement.man (directoryservices-domaincontroller-servercoreupg-replacement.man)
Using MICROSOFT_WINDOWS_NETFX3000.CAB;1 for  C:Usersu49100DownloadsCA20-4002-OperatingSystem-AIMB-216InstallerW10-LTSB/W10-LTSB/sources/sxs/microsoft-windows-netfx3-ondemand-package~31bf3856ad364e35~amd64~~.cab (Microsoft-Windows-NetFx3-OnDemand-Package~31bf3856ad364e35~amd64~en-GB~.cab)
Using MICROSOFT_WINDOWS_INTERN000.CAB;1 for  C:Usersu49100DownloadsCA20-4002-OperatingSystem-AIMB-216InstallerW10-LTSB/W10-LTSB/sources/sxs/microsoft-windows-internetexplorer-optional-package~31bf3856ad364e35~amd64~~.cab (Microsoft-Windows-InternetExplorer-Optional-Package~31bf3856ad364e35~amd64~en-GB~.cab)
  0.00% done, estimate finish Mon Jun 08 07:12:24 2020
  0.00% done, estimate finish Mon Jun 08 07:12:24 2020
  0.00% done, estimate finish Mon Jun 08 07:12:24 2020
  0.00% done, estimate finish Mon Jun 08 07:12:24 2020
  0.00% done, estimate finish Mon Jun 08 07:12:24 2020
  0.00% done, estimate finish Mon Jun 08 07:12:24 2020
  0.00% done, estimate finish Mon Jun 08 07:12:24 2020
  0.00% done, estimate finish Mon Jun 08 07:12:24 2020
  0.00% done, estimate finish Mon Jun 08 07:12:24 2020
  0.00% done, estimate finish Mon Jun 08 07:12:24 2020
  0.00% done, estimate finish Mon Jun 08 07:12:24 2020
  0.00% done, estimate finish Mon Jun 08 07:12:24 2020
  0.00% done, estimate finish Mon Jun 08 07:12:24 2020
  0.00% done, estimate finish Mon Jun 08 07:12:24 2020
  0.00% done, estimate finish Mon Jun 08 07:12:24 2020
  0.00% done, estimate finish Mon Jun 08 07:12:24 2020
  0.00% done, estimate finish Mon Jun 08 07:12:24 2020
  0.00% done, estimate finish Mon Jun 08 07:12:24 2020
  0.00% done, estimate finish Mon Jun 08 07:12:24 2020
  0.00% done, estimate finish Mon Jun 08 07:12:24 2020
  0.00% done, estimate finish Mon Jun 08 07:12:24 2020
  0.00% done, estimate finish Mon Jun 08 07:12:24 2020
  0.00% done, estimate finish Mon Jun 08 07:12:24 2020
  0.00% done, estimate finish Mon Jun 08 07:12:24 2020
  0.00% done, estimate finish Mon Jun 08 07:12:24 2020
  0.00% done, estimate finish Mon Jun 08 07:12:24 2020
  0.00% done, estimate finish Mon Jun 08 07:12:24 2020
  0.00% done, estimate finish Mon Jun 08 07:12:24 2020
  0.00% done, estimate finish Mon Jun 08 07:12:24 2020
  0.00% done, estimate finish Mon Jun 08 15:09:33 2020
  0.00% done, estimate finish Mon Jun 08 14:54:11 2020
  0.00% done, estimate finish Mon Jun 08 14:39:46 2020
  0.00% done, estimate finish Mon Jun 08 14:26:09 2020
  0.00% done, estimate finish Mon Jun 08 14:13:25 2020
  0.00% done, estimate finish Mon Jun 08 14:01:24 2020
  0.00% done, estimate finish Mon Jun 08 13:50:04 2020
  0.00% done, estimate finish Mon Jun 08 13:39:16 2020
  0.00% done, estimate finish Mon Jun 08 13:29:06 2020
  0.00% done, estimate finish Mon Jun 08 13:19:27 2020
  0.00% done, estimate finish Mon Jun 08 13:10:18 2020
  0.00% done, estimate finish Mon Jun 08 13:01:32 2020
  0.00% done, estimate finish Mon Jun 08 12:53:14 2020
  0.01% done, estimate finish Mon Jun 08 12:45:19 2020
  0.01% done, estimate finish Mon Jun 08 12:37:46 2020
  0.01% done, estimate finish Mon Jun 08 12:30:32 2020
  0.01% done, estimate finish Mon Jun 08 12:23:37 2020
  0.01% done, estimate finish Mon Jun 08 12:17:00 2020
  0.01% done, estimate finish Mon Jun 08 12:10:37 2020
  0.01% done, estimate finish Mon Jun 08 12:04:34 2020
  0.01% done, estimate finish Mon Jun 08 11:58:43 2020
  0.01% done, estimate finish Mon Jun 08 11:53:05 2020
  0.01% done, estimate finish Mon Jun 08 11:47:41 2020
  0.01% done, estimate finish Mon Jun 08 11:42:30 2020
  0.01% done, estimate finish Mon Jun 08 11:37:31 2020
  0.01% done, estimate finish Mon Jun 08 11:32:41 2020
  0.01% done, estimate finish Mon Jun 08 11:28:02 2020
  0.01% done, estimate finish Mon Jun 08 11:23:32 2020
  0.01% done, estimate finish Mon Jun 08 11:19:14 2020
  0.01% done, estimate finish Mon Jun 08 11:15:03 2020
  0.01% done, estimate finish Mon Jun 08 11:10:59 2020
  0.01% done, estimate finish Mon Jun 08 11:07:04 2020
  0.01% done, estimate finish Mon Jun 08 11:03:18 2020
  0.01% done, estimate finish Mon Jun 08 10:59:38 2020
  0.01% done, estimate finish Mon Jun 08 10:56:04 2020
  0.01% done, estimate finish Mon Jun 08 10:52:38 2020
  0.01% done, estimate finish Mon Jun 08 10:49:18 2020
Total translation table size: 0
Total rockridge attributes bytes: 113516
Total directory bytes: 317932
Path table size(bytes): 2484
C:Program Files (x86)WinCDEmumkisofs.exe: Implementation botch: FS should end at 4294961215 but ends at 331559.
Если вы еще не знаете, файл ISO — это контейнер, в котором может храниться несколько файлов. Обычно он используется для создания резервных копий ваших CD и DVD дисков. Однако вы также можете создать ISO из папок на вашем ПК с Windows. Есть на самом деле несколько приложений, которые помогут вам сделать это на вашем компьютере.
Есть много причин, почему вы можете захотеть создать ISO на вашем ПК с Windows 10. Может быть, вы хотите хранить все свои папки в одном месте. Или, может быть, вы хотите, чтобы некоторые из ваших папок были готовы к записи на диски.
Независимо от причины, довольно легко создать ISO из папок на компьютере Windows.
Используйте AnyBurn для создания ISO из папок на вашем компьютере
AnyBurn — одно из бесплатных приложений, которое вы можете использовать для создания ISO из ваших папок. На самом деле это приложение, которое помогает вам записывать данные на диски, но вы также можете использовать его для создания файлов ISO. Он имеет опцию в главном интерфейсе, которая помогает добавлять выбранные вами папки в ISO, который затем можно сохранить в любом месте на вашем компьютере.
- Скачать, установить и запустить AnyBurn на твоем компьютере.
- Вы найдете несколько вариантов создания ISO на главном интерфейсе. Найдите тот, который говорит Создать файл изображения из файлов / папок и нажмите на него.
- Следующий экран позволит вам выбрать папки, которые вы хотите добавить в свой ISO. Нажмите на кнопку Добавить вверху, чтобы добавить свои папки.
- Если вы хотите указать какие-либо пользовательские настройки для вашего файла, нажмите кнопку Свойства в верхней части. Затем он позволит вам изменить параметры, такие как файловая система для вашего ISO, стандарт именования файлов, уровень сжатия и так далее. Нажмите OK, когда вы их настроили.
- Нажмите кнопку «Далее», чтобы перейти к следующему экрану процесса создания ISO.
- На следующем экране нажмите на значок папки, чтобы выбрать папку, в которую вы хотите сохранить ISO. Вы также можете ввести имя для вашего файла на том же экране.
- Наконец, нажмите «Создать сейчас», чтобы начать создание ISO из выбранных вами папок.
Создать ISO в Windows 10 с помощью WinCDEmu
WinCDEmu — это инструмент с открытым исходным кодом, который позволяет создавать виртуальные диски из файлов изображений различных форматов на вашем компьютере. Если вы загрузили файл ISO и хотите просмотреть его содержимое, это приложение может помочь вам смонтировать это как диск на твоей машине.
Вы также можете использовать приложение для создания файлов ISO из папок в Windows, и оно на самом деле предоставляет вам самый простой способ создать ISO из ваших папок. Все, что вам в основном нужно сделать, это установить приложение, и оно добавит опцию в ваше контекстное меню. Затем вы можете использовать эту опцию для создания ISO из ваших папок.
- Загрузите и установите WinCDEmu приложение на вашем компьютере.
- Щелкните правой кнопкой мыши на панели задач и выберите «Диспетчер задач».
- Щелкните правой кнопкой мыши процесс, который говорит Windows Explorer, и выберите Завершить задачу. Вам нужно закрыть Проводник, прежде чем вы сможете увидеть вновь добавленный элемент в контекстном меню.
- Нажмите на меню «Файл» в диспетчере задач и выберите «Запустить новую задачу».
- Введите explorer.exe и нажмите Enter. Он перезапустит Проводник Windows.
- Найдите папку, для которой вы хотите создать ISO, щелкните по ней правой кнопкой мыши и выберите «Создать ISO образ».
- Он попросит вас ввести имя для вашего ISO и место, где вы хотите сохранить его. Введите эти данные и нажмите Сохранить.
- Он быстро создаст ISO для вас и сообщит, когда он будет полностью построен.
Используйте ImgBurn для создания файлов ISO из папок в Windows
ImgBurn был популярным приложением для создавать и записывать файлы изображений надолго. Если вы когда-либо создавали резервную копию своих дисков или записывали диск, вы, вероятно, узнаете приложение.
Приложение также может быть использовано для создания файлов ISO из ваших папок.
- Загрузите, установите и откройте ImgBurn приложение на вашем компьютере.
- В главном интерфейсе найдите и щелкните параметр «Создать файл изображения из файлов / папок».
- Вы увидите экран, который позволяет вам добавлять папки, которые вы хотите включить в ваш ISO. Нажмите на маленький значок папки и добавьте папки для вашего файла ISO.
- Нажмите на крошечный значок папки рядом с тем, где написано «Назначение», и выберите имя и целевую папку для вашего ISO-файла.
- На правой панели вы найдете различные варианты настройки для вашего ISO. С помощью этих параметров вы можете изменить тип изображения, ввести метку для изображения, указать ограничения и сделать несколько других вещей.
- Наконец, нажмите на большую кнопку Build на вашем экране, чтобы начать создание ISO-файла из выбранных вами папок.
Если вы будете использовать только один ISO, и вы не думаете, что будете делать это снова в ближайшее время, вы можете предпочесть что-то, что не требует установки. Folder2Iso действительно может помочь вам, так как это бесплатный и портативный инструмент это помогает быстро создавать ISO без каких-либо хлопот.
Он работает во многих версиях Windows, включая Windows 7, 8, 10 и Linux.
- Скачать Folder2Iso приложение и дважды щелкните по нему, чтобы извлечь фактическое содержимое приложения.
- Запустите исполняемый файл, который вы извлекли из архива.
- Вы увидите простой интерфейс с несколькими опциями. Нажмите на опцию «Выбрать папку» и выберите папку, которую хотите добавить в ISO.
- Нажмите кнопку «Выбрать выход» и выберите папку, в которую вы хотите сохранить файл ISO. Помните, что вы не можете выбрать папку, которую выбрали для включения в ISO.
- Затем вы можете указать дополнительные параметры, доступные на вашем экране, если хотите.
- Нажмите кнопку «Создать ISO», чтобы создать ISO из выбранных вами папок.
- Индикатор выполнения станет зеленым после генерации ISO.
Рекомендуется создать ISO из ваших папок в Windows, чтобы вы могли смонтировать их все как один диск на вашем ПК. Если вы уже сделали это на своем компьютере, сообщите нам, какое приложение вы выбрали для этого и почему. Мы ждем вашего ответа в комментариях ниже!
Do you want to create a bootable ISO from folder or files extracted from Windows Cd or Dvd?
If yes then you are in right place.
But before we begin let’s see how this post helped me a lot.
A couple of months ago, accidentally my pc got infected from some viruses due to which my windows got corrupted.
And all my files got deleted so I decided to do a clean Windows 7 install.
But unfortunately, at that time I was not having any copy of the Windows 7 DVD to install it.
So I borrowed it from my friend and then install it on my Pc.
After the installation is done, I copied all the windows installation files from that DVD so that I can use it later.
And after a few weeks, I realized that instead of creating a bootable iso from Dvd I copied all the installation files like some normal file.
Even though I could easily get that Dvd again but I decided to create a bootable ISO from that folder or copied files.
And then I searched for this post and learned how to make bootable ISO from a folder or extracted files.
And you can also do so.
Also Read:- Copy file names from Windows folder as Text
Let’s see How…
In this tutorial, I will be using a Cd/Dvd burning tool called ImgBurn. ImgBurn is a simple Cd, Dvd, ISO burning Utility with lots of advanced features as compared to other tools.
Whenever I need to do any sort of bootable ISO burning work I always use ImgBurn. Download Link…
So Let’s get started with this tool and follow this step by step Guide
1. Download and Install ImgBurn
Download the Imgburn tool from the given link and Install it properly. And after installation is done Open this tool & Click on Create image file from files/folders.

2. Select Windows Installation folder/files
Now Click on Browse for a folder… in the source section and then select that folder which contains all the windows installation files copied from that Dvd.
After that Select the Destination path where you want to save & create bootable ISO from folder/files.

3. Make ISO Image Bootable
On the Right-hand side Click on the Advanced tab and then Click on the Bootable Disc tab. Now in the Options click on the Make Image Bootable checkbox & choose Emulation type as None (Custom).

Now Select the Boot Image File from the BOOT folder present in the Windows installation folder and from that folder select ETFSBOOT file. And in Sectors To Load field type 8.

4. Advanced bootable Settings
Finally, Click on Build and Now it will show some warnings for incorrect UDF settings. But you have to just click on Yes and it will automatically adjust the correct settings for you.
That’s it! Wait for 4-5 mins and your bootable ISO file is ready.
Bonus Tip:- You can also create bootable USB from ISO file that you have created.
That’s it for now…
Some FAQs
How do I make a bootable ISO from a folder?
If you want to make a bootable ISO from folder then you need to install the ImgBurn app and follow this article.
How do I create a Windows 10 ISO file from a folder?
It’s pretty to create an ISO file for Windows 10 from a folder using ImgBurn, just you need the copied installation files from DVD.
Can you create ISO image from files?
Yes, you can easily create an ISO image from Windows installation files and folders copied from the disc.
How do I create an ISO file from a bunch of files?
To create ISO file from a bunch of files:-
1. Download & Install the ImgBurn tool.
2. Select Installation files of Windows OS.
3. Configure Bootable ISO Settings and Done.
For a full step-by-step tutorial, you can check this article.
Conclusion
So that’s how you can easily convert folder or files to an ISO file copied from the Windows installation disc. And you can also follow the same procedure for Windows 8 & Windows 10. So what are you waiting for? Go ahead and Use this awesome method to make your own ISO file from the files extracted from the Dvd.
Feel free to comment below and also tell us if you know any better way to create bootable ISO from folder or files.
If you liked this post, Don’t forget to share this with your friends on your favorite social media platform.
You are here:
Home » Windows 10 » How To Create Bootable Windows 10/8.1/7 ISO From Files/Folders
Update: This method works perfectly with the newly released Windows 10 as well. That is, you can use this method to create bootable Windows 10 ISO from files and folders.
A couple of weeks ago, I downloaded Windows 7 SP1 Ultimate 64-bit ISO on my Windows 8.1 PC from Microsoft (using my MSDN subscription) and installed Windows 7 in dual-boot with Windows 8.1 using my USB flash drive as bootable media. The installation was uneventful and Windows 7 has been running as it should.
Two days back, I decided to free up some disk space on my Windows 8.1 drive and manually deleted all contents in the Downloads folder and also uninstalled tens of programs that I had installed over the last three months. After gaining GBs of disk space, I realized that the previously downloaded Windows 7 SP1 ISO, which was present in the Downloads folder, has also been deleted along with other files.
Even though I could easily download Windows 7 SP1 ISO pack again in a couple of minutes, I decided to create an ISO file from the bootable Windows 7 USB drive that I had prepared to install Windows 7. Preparing a bootable Windows ISO from installation files/folders is relatively easy and doesn’t take much time either. In short, if have Windows installation files and want to create an ISO image file out of it, you can do so in a few minutes.
Make bootable Windows ISO from installation files
NOTE: This method is applicable to Windows 10, 8.1 and 7 versions.
In this guide, I will show you how you can create a bootable Windows 7/8.1/10 ISO image file from Windows installation files.
Step 1: If all the installation files are in a folder on your PC, you can skip to the next step. And if the files and folders on a USB drive, connect the USB flash drive containing Windows installation files to a PC running Windows 7/8/10 and copy all the contents from the USB to a newly created folder on desktop or any other location.
Step 2: Visit this page and download ImgBurn software. ImgBurn is a free burning application but the setup offers you install Skype and Mobogenie during the installation. Make sure to select appropriate options to install the software without Skype and Mobogenie.
Step 3: Launch ImgBurn. Click on Create image file from files/folders option.
Step 4: In the resulting ImgBurn dialog, click on the small folder icon (see picture) next to the Source box to browse to the folder containing all copied files from the bootable Windows USB. Browse to the folder and then click Select folder.
Step 5: Next, click on the browse icon located next to the Destination box to select a location to save the bootable ISO image file that you’re preparing now. Select a location and click Save button.
Step 6: On the right side, switch to the Advanced tab (see picture) to see four tabs. Here, click on the tab labeled Bootable Disc.
Step 7: Now, select the option labeled Make Image Bootable, select Emulation type as None (custom), and type 8 in the Sectors to load box by removing the existing 4. Note that if you’re preparing a bootable Vista ISO, you need to keep the 4. For Windows 7, Windows 8 and Windows 10, you need to type 8 in the Sectors to load field.
Step 8: Click on the small folder icon next to Boot Image box (see picture) and then browse to the folder containing Windows installation files (the folder that contains files copied from the USB), open Boot folder, select etfsboot.com file, and then click Open button to select etfsboot.com as the boot image file. We are almost done!
Step 9: Finally, click on the Build button (see picture) to begin creating your bootable Windows ISO image file. Upon clicking the Build button, three dialog boxes will appear one after another. Simply click the Yes button when you see the first dialog, click the OK button when you see the second, and then, click the Yes button again when you see the last dialog.
Once the bootable ISO image is ready, you’ll see “Operation successfully completed” message.
That’s it! You can now use the ISO file anywhere to install Windows. How to test an ISO file to check if it’s really bootable guide might also interest you.