Windows 10 October 2018 release UEFI bootable USB drive on any Linux distribution.
Notice, that since Windows 10 October 2018 release the installation file sources/install.wim is larger than the maximum FAT32 file size, so we will format USB drive to NTFS. Windows installer also cannot work with an EFI partition (code ef00), so we will use Microsoft basic data partition type (code 0700).
Variant A (For PCs with NTFS support)
Steps for creating USB drive with name /dev/sdc (Replace all commands with YOUR device name!):
- Insert USB drive to computer and make sure it is unmounted. Some distributions like to automount USB drives, so make sure you unmount them. Mounted partitions can be found with
mount -l | grep '/dev/sdc', then unmount withsudo umount /dev/sdcX(whereXis partition number). - Open USB block device using
gdisk /dev/sdc, configure it asGPTand createMicrosoft basic datapartition (code0700), then write changes and quit (Next steps will destroy partition table in your USB drive!!!).
sudo gdisk /dev/sdc
o
> This option deletes all partitions and creates a new protective MBR.
> Proceed? (Y/N): y
n
> Partition number ... > hit Enter
> First sector ... : > hit Enter
> Last sector ... : > hit Enter
> Current type is 'Linux filesystem'
> Hex code or GUID (L to show codes, Enter = 8300): 0700
p
> Should print something like:
> Disk /dev/sdc: 15646720 sectors, 7.5 GiB
> Model: DataTraveler 160
> Sector size (logical/physical): 512/512 bytes
> Disk identifier (GUID): ...
> Partition table holds up to 128 entries
> Main partition table begins at sector 2 and ends at sector 33
> First usable sector is 34, last usable sector is 15646686
> Partitions will be aligned on 2048-sector boundaries
> Total free space is 2014 sectors (1007.0 KiB)
> Number  Start (sector)    End (sector)  Size       Code  Name
>    1            2048        15646686   7.5 GiB     0700  Microsoft basic data
w
> Final checks complete. About to write GPT data. THIS WILL OVERWRITE EXISTING PARTITIONS!!
> Do you want to proceed? (Y/N): y
q
- Format new partition as NTFS (thx @Alex for
-Qidea):
sudo mkfs.ntfs -Q /dev/sdc1
- Mount new USB partition to temporary directory in your home:
mkdir ~/tmp-win10-usb-drive
sudo mount /dev/sdc1 ~/tmp-win10-usb-drive
- Download Windows installation ISO, create new temporary directory in your home and mount it there:
mkdir ~/tmp-win10-iso-mnt
sudo mount Win10_1809Oct_English_x64.iso ~/tmp-win10-iso-mnt
- Copy all files from mounted ISO to USB drive (you can use
rsyncto see progress):
sudo cp -rT ~/tmp-win10-iso-mnt/ ~/tmp-win10-usb-drive/
- Unmount Windows ISO and USB drive and remove temporary directories:
sudo umount ~/tmp-win10-iso-mnt/ ~/tmp-win10-usb-drive/
rmdir ~/tmp-win10-iso-mnt/ ~/tmp-win10-usb-drive/
- Insert USB drive to new computer and boot from it.
Variant B (For PCs without NTFS support)
Steps for creating USB drive with name /dev/sdc (Replace all commands with YOUR device name!):
- Insert USB drive to computer and make sure it is unmounted. Some distributions like to automount USB drives, so make sure you unmount them. Mounted partitions can be found with
mount -l | grep '/dev/sdc', then unmount withsudo umount /dev/sdcX(whereXis partition number). - Open USB block device using
gdisk /dev/sdc - Configure it as
GPT - Create first partition of 1GB size and type
Microsoft basic data(code0700). - Create second partition of rest of the size and type
Microsoft basic data(code0700). - Write changes and quit (Next steps will destroy partition table in your USB drive!!!).
sudo gdisk /dev/sdc
> o
> This option deletes all partitions and creates a new protective MBR.
> Proceed? (Y/N): y
> n
> Partition Number: Enter
> First sector: Enter
> Last sector: 1G
> Type: 0700
> n
> Partition Number: Enter
> First sector: Enter
> Last sector: Enter
> Type: 0700
> p
# Should print something like:
> Disk /dev/sdc: 30031250 sectors, 14.3 GiB
> Model: Ultra USB 3.0
> Sector size (logical/physical): 512/512 bytes
> Disk identifier (GUID): C657C0AF-3FE2-4152-8BF1-CE3CCA9F3541
> Partition table holds up to 128 entries
> Main partition table begins at sector 2 and ends at sector 33
> First usable sector is 34, last usable sector is 30031216
> Partitions will be aligned on 2048-sector boundaries
> Total free space is 4061 sectors (2.0 MiB)

> Number  Start (sector)    End (sector)  Size       Code  Name
>    1            2048         2048000   999.0 MiB   0700  Microsoft basic data
>    2         2050048        30031216   13.3 GiB    0700  Microsoft basic data

w
> Final checks complete. About to write GPT data. THIS WILL OVERWRITE EXISTING PARTITIONS!!
> Do you want to proceed? (Y/N): y
q
- Format first partition as FAT32 and second as NTFS:
sudo mkfs.fat -F32 /dev/sdc1
sudo mkfs.ntfs -Q  /dev/sdc2
- Mount new USB partitions to temporary directories in your home:
mkdir ~/tmp-win10-fat-usb-drive
mkdir ~/tmp-win10-ntfs-usb-drive
sudo mount /dev/sdc1 ~/tmp-win10-fat-usb-drive
sudo mount /dev/sdc2 ~/tmp-win10-ntfs-usb-drive
- Download Windows installation ISO, create new temporary directory in your home and mount it there:
mkdir ~/tmp-win10-iso-mnt
sudo mount Win10_1809Oct_English_x64.iso ~/tmp-win10-iso-mnt
- Copy following files with from mounted ISO to FAT32 formatted USB drive (basically copy everything besides
sources/but includesources/boot.wim):
sudo cp ~/tmp-win10-iso-mnt/* ~/tmp-win10-fat-usb-drive/
sudo cp -r ~/tmp-win10-iso-mnt/boot ~/tmp-win10-fat-usb-drive/
sudo cp -r ~/tmp-win10-iso-mnt/efi ~/tmp-win10-fat-usb-drive/
sudo cp -r ~/tmp-win10-iso-mnt/support ~/tmp-win10-fat-usb-drive/
sudo mkdir ~/tmp-win10-iso-mnt/sources ~/tmp-win10-fat-usb-drive/
sudo cp ~/tmp-win10-iso-mnt/sources/boot.wim ~/tmp-win10-fat-usb-drive/sources
- Copy everything from mounted ISO to NTFS formatted USB drive:
sudo cp -rT ~/tmp-win10-iso-mnt/ ~/tmp-win10-ntfs-usb-drive/
- Unmount Windows ISO and both USB partitions and remove temporary directories:
sudo umount ~/tmp-win10-iso-mnt/ ~/tmp-win10-usb-fat-drive/ ~/tmp-win10-usb-ntfs-drive/
rmdir ~/tmp-win10-iso-mnt/ ~/tmp-win10-usb-drive/
- Insert USB drive to new computer and boot from it.
This tutorial is going to show you an easy way to create a Windows 10 bootable USB on Linux. I use Ubuntu 20.04 as an example. The method applies to any Linux distribution. I use Windows to do online banking because my bank doesn’t support Linux and sometimes play games that can’t run on Linux.
What you need
- A computer running Linux
- A USB flash drive at least 8GB
- Windows 10 ISO
Download Windows 10 ISO
First, you should download Windows 10 ISO from Microsoft official download link. Note that you might not be able to download the ISO from this link on a Windows computer. This download link is visible to users on Linux computer. Once downloaded, follow the instructions below.
Note: It’s recommended to download the Windows 10 April 2018 update ISO, because the October Update ISO contains a file that is larger than 4GB, which can not be copied to a FAT32 partition.
Update: Microsoft doesn’t allow you to download the Windows 10 April 2018 Update ISO from their website anymore. You can download the ISO via this link: Win10 1803 English x64 ISO
Creating a Windows 10 Bootable USB for UEFI Firmware
This method works for UEFI firmware and is very simple. You create a GUID partition table on your USB stick, create a FAT32 file system on it, and then mount Windows 10 ISO image and copy those Windows 10 files to your USB stick and you are done. The following is a step-by-step guide.
First, install GParted partition editor on your Linux distribution. Ubuntu users run the following command.
sudo apt install gparted
Then insert your USB stick to your computer. Make sure you back up important files in your USB stick if there’s any. Next, launch Gparted. You will need to enter your password in order to use GParted.
Select your USB stick from the drop-down menu on the upper-right corner. My USB stick is /dev/sdb. Yours may be different.
If there’s a key icon after the partition name, that means the partition is mounted. Make sure all partitions on your USB stick are unmounted. To unmount a partition, simply right-click on it and select unmount.
Next, on the menu bar, select Device > Create partition table.
Choose GPT as the partition table type and click Apply.
Then right-click on the unallocated space and select New to create a new partition.
Change file system type from ext4 to fat32 and click Add.
Note: The install.wim file in Windows 10 October 2018 update ISO is 4.1G, so if you downloaded this ISO image, you need to change ext4 to ntfs. If you downloaded Windows 10 April 2018 Update ISO, which contains a 3.9G size install.wim file, you can change ext4 to fat32
Update: It is my observation that my NTFS formatted USB stick isn’t bootable on my old laptop, which was bought in 2012. However, it is bootable on my desktop computer, which was bought in 2017. It has a graphical UEFI firware (I can use my mouse to configure firmware settings).
Next, click the green check button on the toolbar to apply this operation. Once that’s done, close GParted (This is important), then find your Windows 10 ISO in file manager. Open it with disk image mounter.
Open the mounted file system. Select all files and folders and copy them to your USB stick.
Sometimes the file manager on Ubuntu hangs and it seems that the copy operation has stopped. Actually it’s working, just be patient. When you see a check mark, it means the copy operation has finished.
If your file manager doesn’t have the Disk image mounter in the context menu, then you can use the following commands to mount. The first command will create a mount point for Windows 10 ISO and the second command will mount Windows 10 ISO under that mount point.
sudo mkdir /mnt/windows10/

sudo mount -t auto -o loop /path/to/window-10-iso /mnt/windows10/
Now in your file manager, go to /mnt/windows10/ and copy all files and folders to your USB stick.
Once the file and folders are copied, your windows 10 bootable USB is created! You can shut down your computer, boot it from this USB stick and install Windows 10 in UEFI mode. Keep in mind that you may need to disable compatibility support module (CSM) in the firmware in order to boot in UEFI mode. You may also need to remove USB stick from your computer and insert it back in order for the firmware to detect the boot loader on your USB stick.
Boot Windows 10 ISO Installer without USB (BIOS & UEFI)
Ever wondered if you can boot Windows 10 ISO installer without a USB flash drive? Yes, you can do it with GRUB2, which is the standard boot loader on Linux.
GRUB2 can not boot Windows 10 ISO directly. You need to create a separate NTFS partition on your hard disk or SSD with a partition editor like GParted and extract the Windows 10 ISO to that partition. Download the Windows 10 ISO file. The latest Windows 10 ISO file is 5.8G. The new NTFS partition should be at least 7G and it should not be used to store any other files.
Then find your Windows 10 ISO in file manager. Open it with disk image mounter.
Open the mounted file system. Select all files and folders and copy them to the NTFS partition.
Sometimes the file manager on Ubuntu hangs and it seems that the copy operation has stopped. Actually, it’s working. Just be patient. When you see a checkmark, it means the copy operation has finished.
Next, open up a terminal window and edit the /etc/grub.d/40_custom file with a text editor such as Nano.
sudo nano /etc/grub.d/40_custom
In this file, we can add custom entries to the GRUB boot menu. In this case, we want to add an entry to boot the Windows 10 installer. If your computer still uses the traditional BIOS firmware, then add the following lines in this file.
menuentry "Windows-10-Installer.iso" {
  set root=(hd0,6)
  insmod part_msdos
  insmod ntfs
  insmod ntldr
  #uncomment the following line if your computer has multiple hard drives.
  #drivemap -s (hd0) ${root}
  ntldr /bootmgr
}
My NTFS partition is the 6th partition on my first disk, so I use (hd0,6) as the root. You can run sudo parted -l command to check your NTFS partition number. If your computer has multiple hard drives, use the drivemap command to set the partition (hd0,6) as the first hard disk, so Windows will be able to boot.
If your computer uses UEFI firmware, then add the following text in this file.
menuentry "Windows-10-Installer.iso" {
  set root=(hd0,6)
  insmod part_gpt
  insmod ntfs
  insmod chain
  chainloader /efi/boot/bootx64.efi
}
Save and close the file. (Press Ctrl+O, then press Enter to save a file in Nano text editor. Press Ctrl+X to exit.)
Then update GRUB boot menu.
sudo grub-mkconfig -o /boot/grub/grub.cfg
or
sudo grub2-mkconfig -o /boot/grub2/grub.cfg
Next, set GRUB to boot the Windows 10 installer for the next boot with the following command.
sudo grub-reboot Windows-10-Installer.iso
or
sudo grub2-reboot Windows-10-Installer.iso
Unplug all your external USB storage devices, then reboot your computer. GRUB will choose the Windows 10 installer.
GRUB2 can also boot Linux ISO files stored on the hard drive, so you don’t need to create Linux live USB.
- How to Boot ISO Files From GRUB2 Boot Loader
Creating a Windows 10 Bootable USB for Legacy BIOS Using WoeUSB
WoeUSB is a fork of WinUSB. Both of them are open-source software (licensed in GPL) for making Windows bootable USB sticks on Linux platform, but the latter hasn’t been updated since 2012. You may be wondering why it’s named WoeUSB. The author said it’s a GNU convention to abbreviate software that support Windows to “woe”.
To install WoeUSB on Ubuntu 14.04/16.04/17.04, you can use the following PPA. Simply open up a terminal window and run the following commands one by one. Other Linux distro users can compile this software by following the instructions on the Github project page.
sudo add-apt-repository ppa:nilarimogard/webupd8

sudo apt update

sudo apt install woeusb
This PPA contains many other software. If you don’t need them, you can now remove this PPA from your system.
sudo add-apt-repository --remove ppa:nilarimogard/webupd8

sudo apt update
You can launch WoeUSB from Unity Dash or your application menu.
You can also start it from command line with:
woeusbgui
It’s very easy to use the WoeUSB GUI. Select Windows ISO image and your target USB device. Make sure your data on the USB device is backed up before hitting the Install button.
Then wait for the installation to complete.
Once done, you can use the bootable USB to install Windows 10 on your computer.
How to Use WoeUSB From the Command Line
First, find the device name of your USB stick using the following command.
lsblk
Mine is /dev/sdb. Make sure your USB is unmounted with the following command. Replace /dev/sdb1 with your own partition name.
sudo umount /dev/sdb1
Then create a bootable Windows 10 USB like below. Red texts shoudl be adapted to your own ISO file name and USB device name. The -v (--verbose) option will give more detailed output.
sudo woeusb -v --device windows-10.iso /dev/sdb
In my test, the Windows 10 USB created with WoeUSB can boot in both legacy and UEFI mode on my old computer. On my new computer, it can boot in legacy mode but failed in UEFI mode. I don’t know the exact reason, but it’s probably because of bug in this software.
That’s it! I hope this tutorial helped you create windows 10 bootable USB on Ubuntu or any Linux distribution. As always, if you found this post useful, then subscribe to our free newsletter to get new tutorials.
Rate this tutorial
[Total: 112 Average: 4.3]
Brief: This tutorial shows you how to create a bootable Windows 10 USB in Linux with and without a GUI tool called Ventoy.
I have talked a lot about creating bootable USB of Linux in Windows. How about the other way round? How about creating a bootable Windows 10 USB in Linux?
If you are uninstalling Linux from dual boot or if you want to reinstall Windows completely or you simply want to have a Windows installation disk ready, you’ll need a bootable Windows 10 USB or DVD.
In this tutorial, I am going to show you how to create a Windows 10 bootable USB in Linux. I am using Ubuntu for this tutorial but the steps should be valid for other Linux distributions as well.
There are two ways to do that and I have discussed both in this tutorial.
- The first method is mounting the ISO image of Windows to a USB disk formatted in ExFAT system. This works most of the times but there could be instances where it wouldn’t boot.
- The second method is to use a tool like Ventoy. It creates a UEFI compatible bootable disk.
Creating a Bootable Windows 10 USB in Linux
Prerequisite: Get Microsoft Windows 10 ISO and a USB of at least 8 GB in size
You can download Windows 10 ISO from Microsoft’s website. You have to specify the Windows 10 version, language and then you should see the link to download Windows 10.
Note that the Windows 10 ISO download link is valid for 24 hours only. So use a download manager in Linux to download the ~5-6 GB file and finish it within 24 hours.
Since the ISO and its content are more than 4 GB in size, I recommend a USB of at least 8 GB in size.
I have also made a video of this tutorial so that you can see the steps in action.
Step 2: Properly format the USB for creating bootable Windows USB
Insert your USB. You have to format it so make sure that you don’t have important data on the USB key.
In Ubuntu, press Super key (Windows key) and search for ‘Disks’. You have to use this tool to format the USB key.

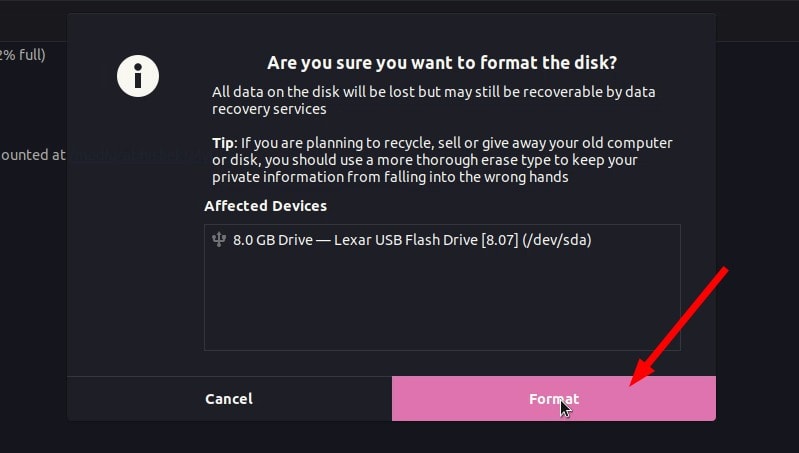
In the Disks tool, make sure to select your USB drive and hit format.
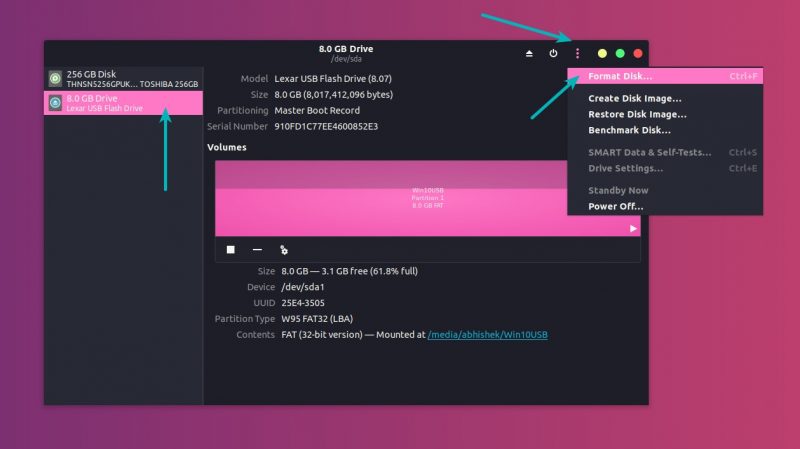
It will ask to choose a partitioning scheme. It could be either MBR or GPT. Select one of them and hit Format.
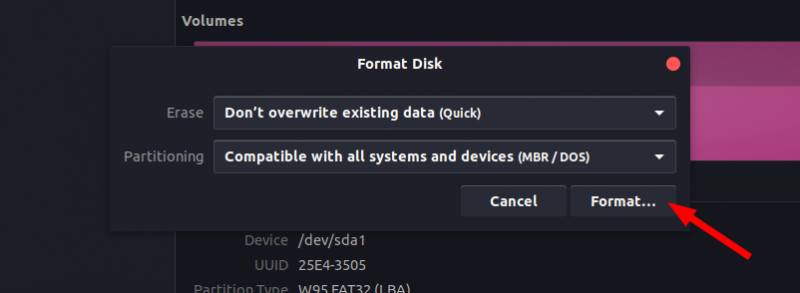
It will show you a warning that you data will be erased.
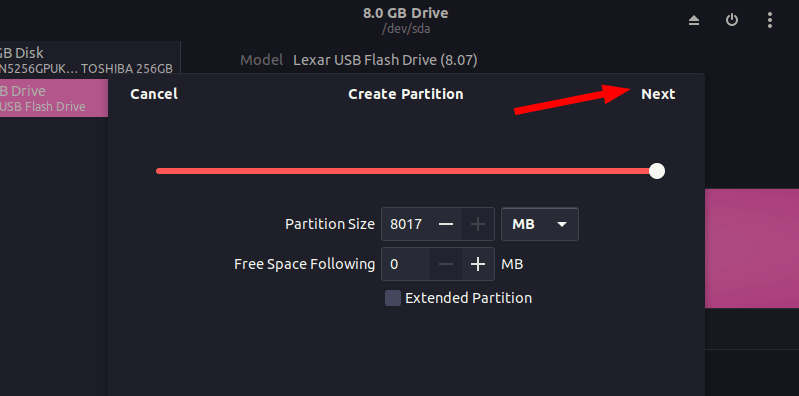
The formatting of USB is not over yet. Now, you need to create a partition on the newly formatted USB.
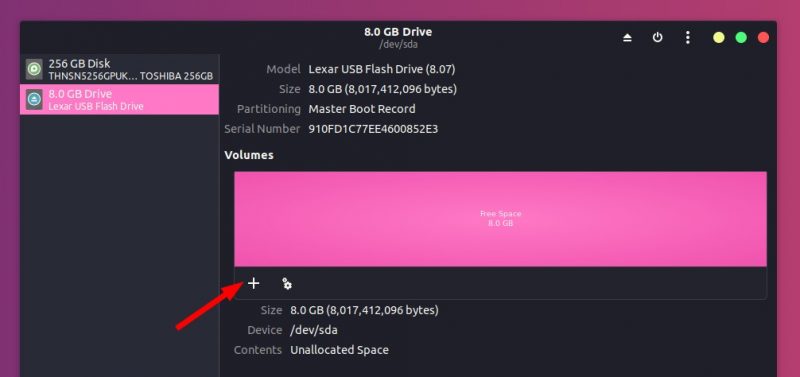
Select the entire USB disk as the partition size.
Give a name to your USB and hit Create button.
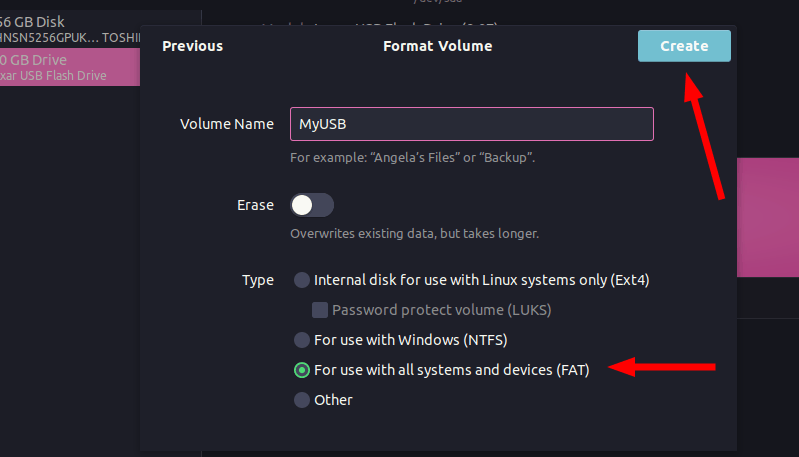
Once done, your USB should be automatically mounted. It is now ready for creating bootable Windows 10 USB disk.
Tip: Files larger than 4 GB?
Newer Windows 10 ISO might have files larger than 4 GB. In that case, FAT filesystem won’t work as it doesn’t allow a single file of size greater than 4 GB.You should then format the USB in ExFAT format.
This newer format allows files bigger than 4 GB. Use this tutorial to learn how to format a USB in ExFAT format in Linux.
Step 3: Copy the content of the ISO to USB
Now it’s time to copy the content of the Windows 10 ISO to the newly formatted USB.
You may ask, Abhishek, there is only one file and that is the ISO file itself. What are you talking about?
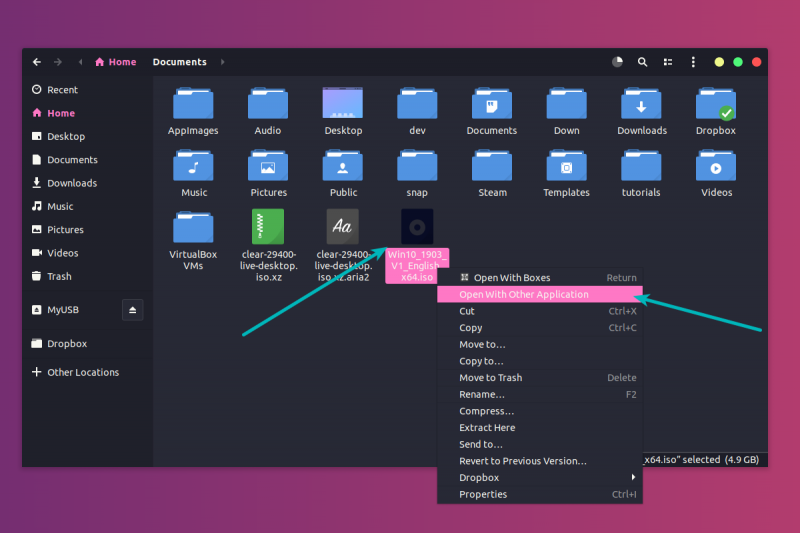
ISO is basically an archive format and you can see it’s content like any zip file in Linux. But to do that, you need to use ‘Disk Image Mounter’ tool that is installed by default in Ubuntu.
Go to your Windows 10 ISO, select it and right click on it. Now select ‘Open with other application’.
In the applications list, select Disk Image Mounter:
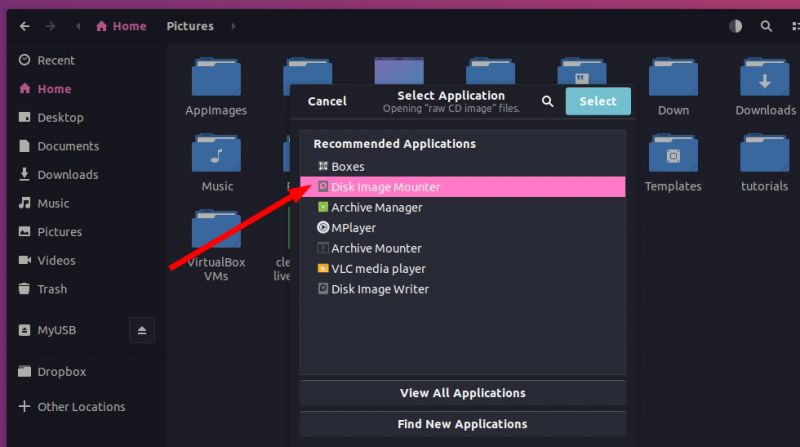
The ISO will be mounted. You may not see it in the left sidebar but if you click on the Other Locations, you should see it. Click on it to enter this mounted ISO folder.
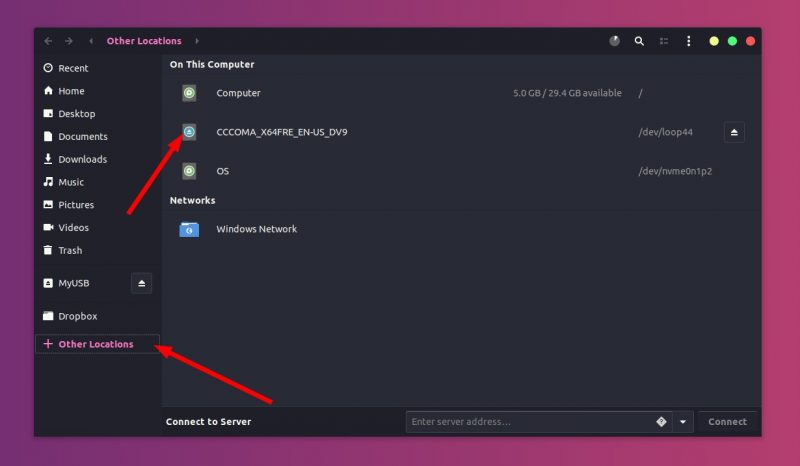
You’ll see its content. All you need to do is to select all the files (Ctrl+A), copy it (Ctrl+C) and paste it in the USB drive (Ctrl+V).
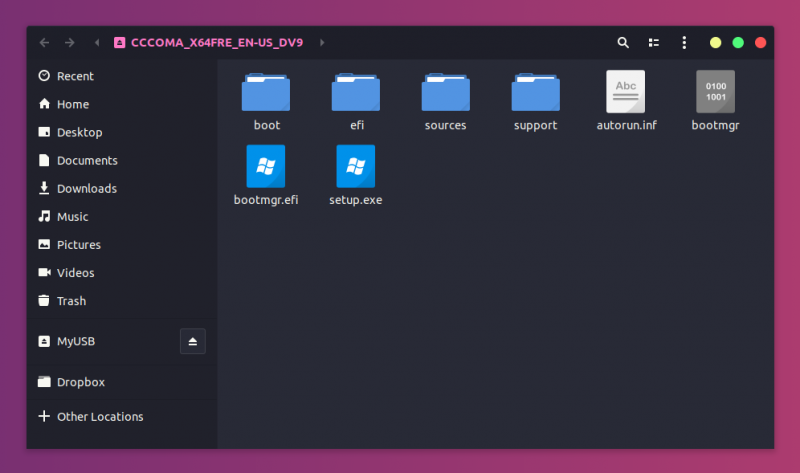
Wait for the copying process to finish as it may take some time in copying 4-5 GB of data. Once it’s done, you have a bootable Windows 10 USB in your hand. Take out the USB and use it to any system you want, restart the system and change the boot settings to boot from the USB.
Method 2: Create bootable Windows 10 USB using Ventoy
Ventoy is an open source tool for making live USBs. You can use it to create a multi-boot USB, persistent Linux live USB and bootable Windows USB.
I find Ventoy an unorthodox tool. It is slightly tricky to use and this is the reason I am writing this step-by-step tutorial.
Step 1: Prepare your USB drive
Ventoy formats the USB disk while creating the bootable disk. However, I noticed it failed to do so for an already bootable Linux disk. For this reason, I advise you to format the USB disk before you proceed further.
Plug in and then format the USB disk. You can do that by right-clicking on the mounted disk and then selecting the format option.
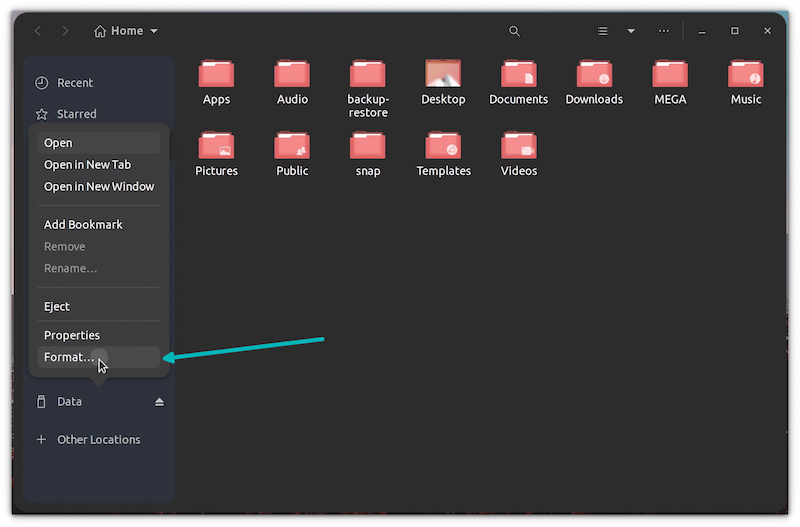
It doesn’t matter which filesystem you choose during formatting. It will be formatted again by Ventoy in the later steps.
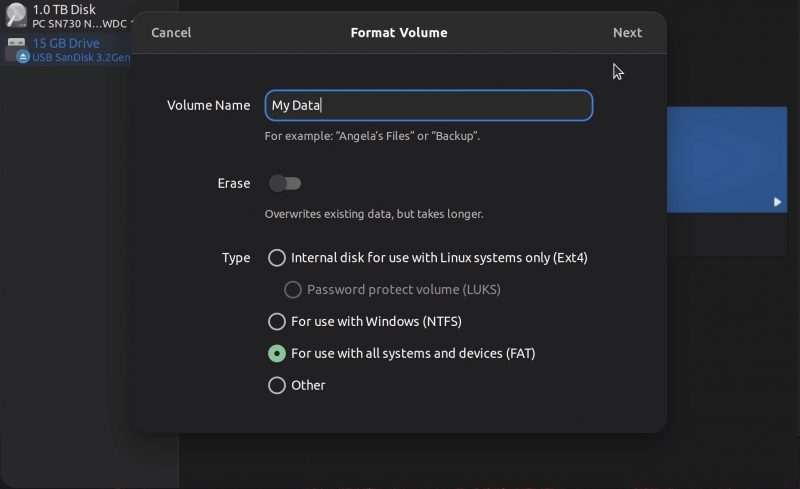
Once it is formatted, keep it plugged in and go on to the next step of installing Ventoy.
Step 2: Download and install Ventoy on Linux
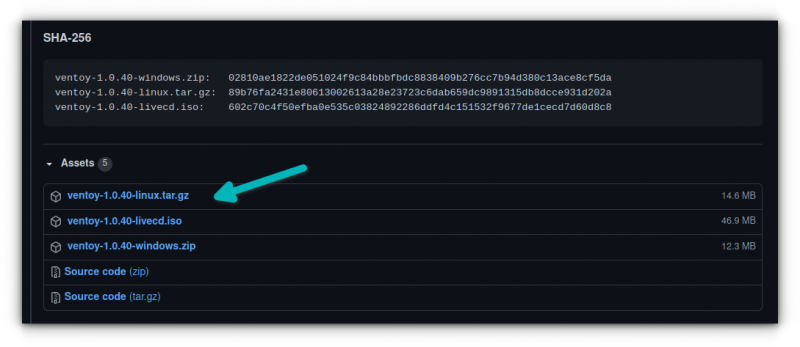
Ventoy is a mix of GUI and CLI tool. It can be used on any Linux distribution. Download Ventoy for Linux from the release page of its GitHub repository.
You’ll find the .tar.gz file with Linux in its name. This is the file you should download.
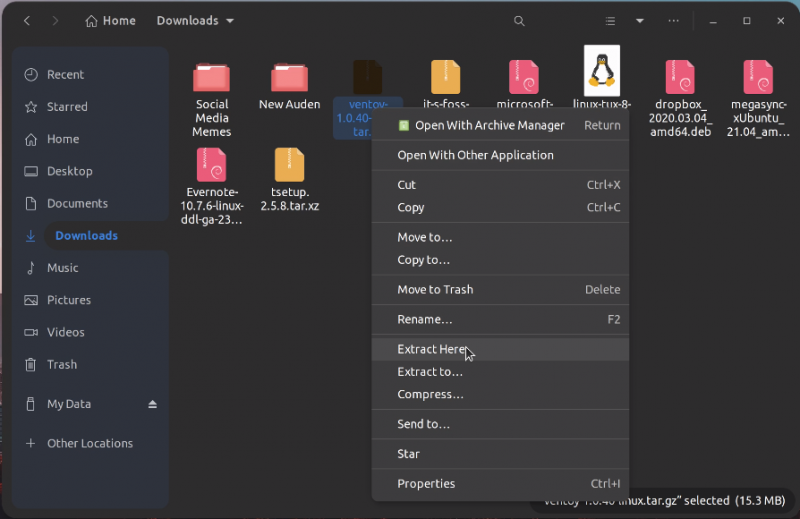
Once downloaded, extract the tar gz file. Simply right click on it and extract it.
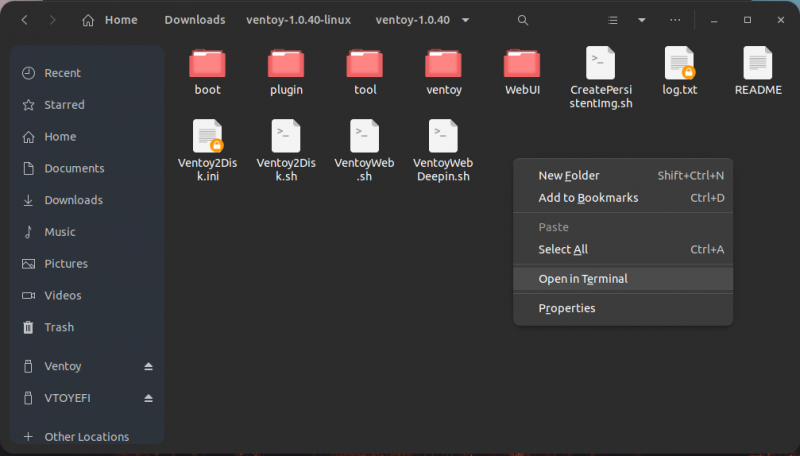
Go inside the extracted folder, and you’ll find a few scripts in it. You need to run one named VentoyWeb.sh. To do that, you’ll have to use the command line.
Now if you are familiar with Linux command line, I presume that you can easily find your way to the file by using the cd command.
Alternatively, you can use the “open in terminal” feature of the file manager to open the location in a terminal.
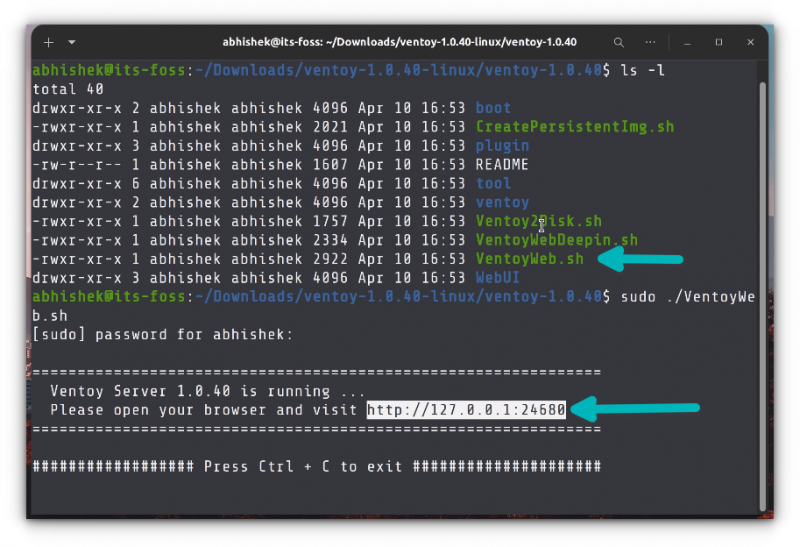
Once you are in the correct directory in the terminal, use the following command to run Ventoy:
sudo ./VentoyWeb.shVentoy runs inside a browser. It will give you the URL when you run it. Copy this URL and paste it in a browser.
It will open a web page with Ventoy running in it and if the USB is already plugged in, it should recognize it. If not, press the refresh button.
Step 3: Use Ventoy to create bootable Windows 10 USB disk
Though Ventoy has the option to create a bootable disk with secure boot, it is experimental and may not work.
Considering you are going for a UEFI installation, it will be wise use GPT for partitioning scheme.
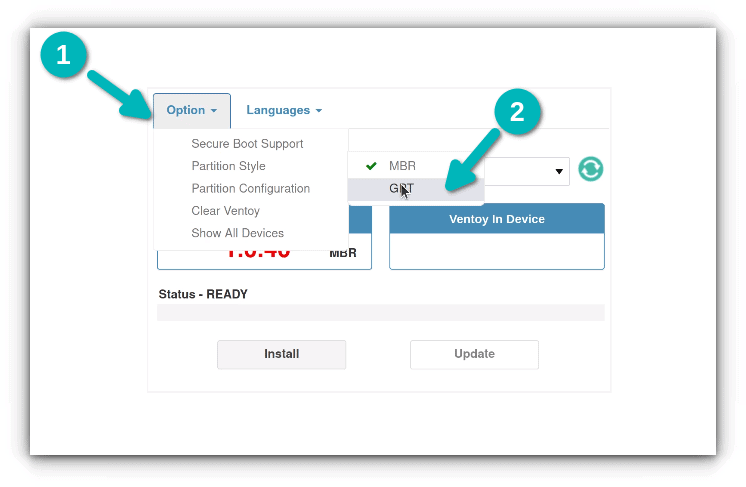
Once things are set, hit the install button. It will show you a couple of obligatory warnings. If the installation completes successfully, you should see a success message.
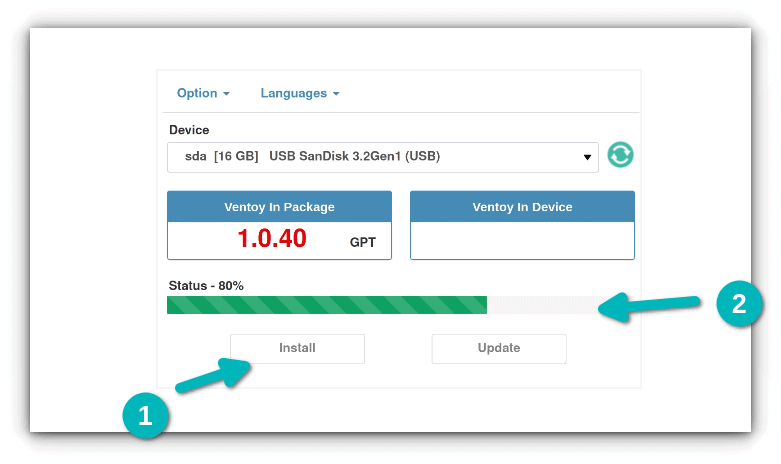
Note: If you do not see Ventoy disk mounted after the successful installation, please plug out the USB and then plug it in again.
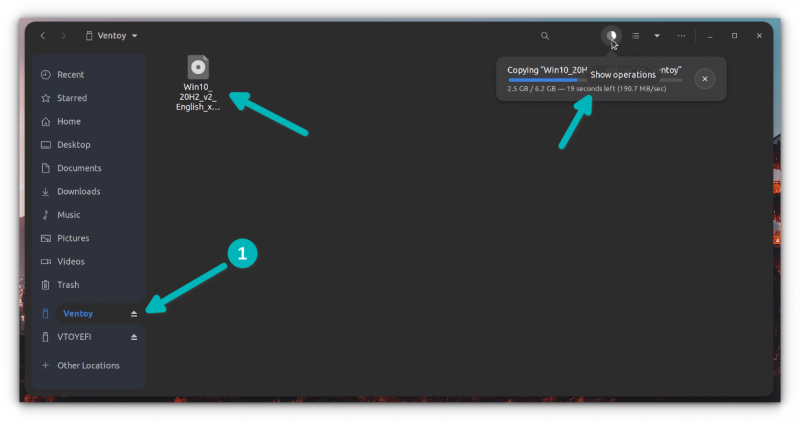
When you hit the install button, it creates two partitions on the USB disk.
- VTOYEFI: A small partition for the UEFI files.
- Ventoy: A big, empty partition in ExFAT format where you’ll copy the ISO image.
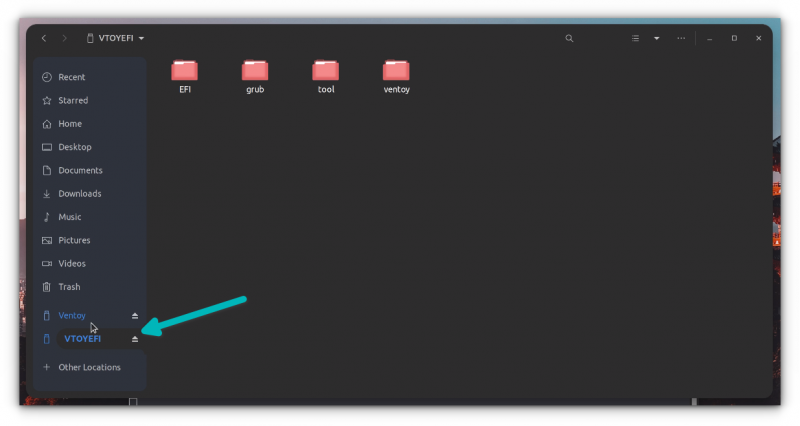
Yes. That’s what you need to do. Copy the ISO image of the Windows 10 into the bigger ExFAT partition on the USB disk.
Once the copying finishes, DO NOT RUSH to plug out the USB just yet. Click on the unmount option from the file manager. Chances are that some files are still being written and it may show an error message.

Wait for a few more minutes and you should see a message that it is safe to remove the disk. Now you can unplug it and use it on whichever system you want.
Step 4: Using the bootable Windows 10 disk
Alright! You are almost there. Plug in your bootable Windows USB you created in the previous section. Start the computer and go to the BIOS setting by using the F2/F10 or F12 key at the time you see the logo of your computer’s manufacturer.
In here, look for the secure boot settings and disable it. If the secure boot is enabled, chances are that your system won’t allow you to boot from the USB disk (to secure your system and data at boot time).
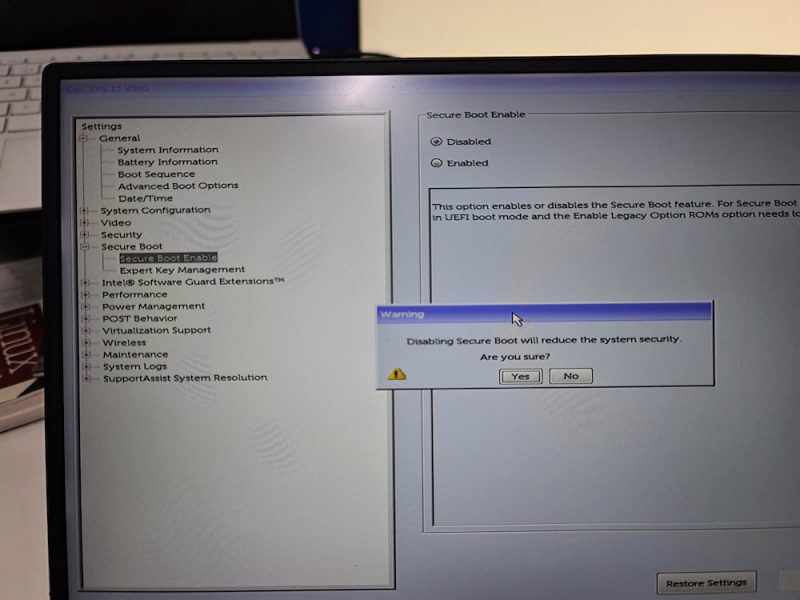
After disabling the secure boot, go into the boot order and then choose the UEFI USB Disk to boot from. Some systems will give this option after you press F12 or F10 button.
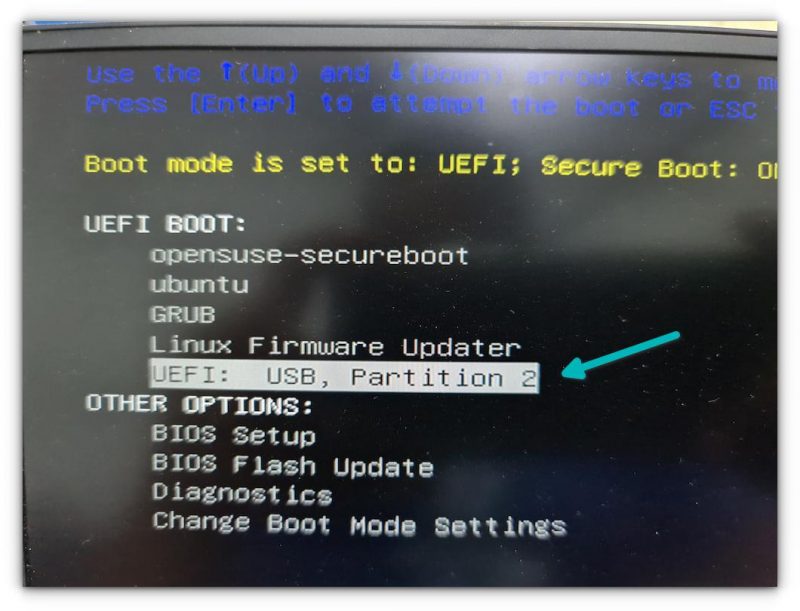
It takes a couple of minutes to start the Windows disk. You should see a screen like this and it will give you the option to repair boot or install Windows.
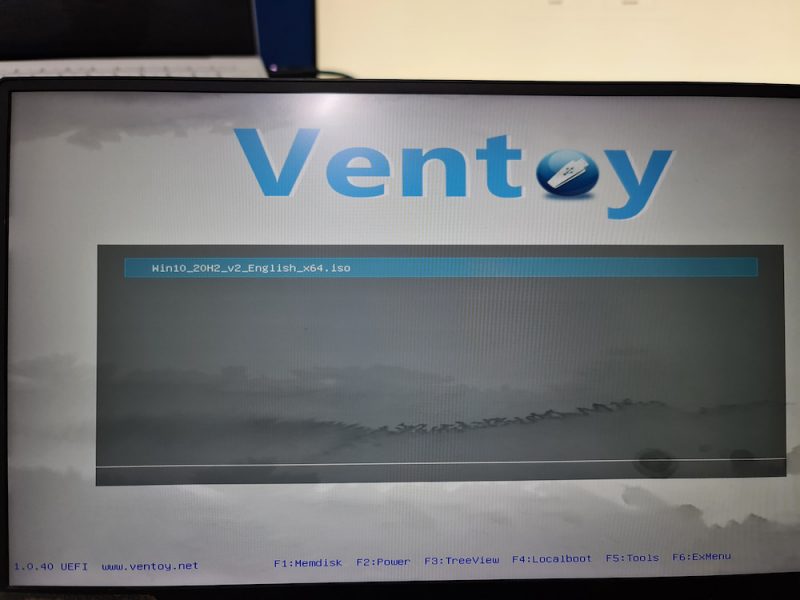
I think you can take things from here. Enjoy it 
There is another popular tool WoeUSB that can also be used for this purpose.
Step 4: Using Windows 10 bootable USB
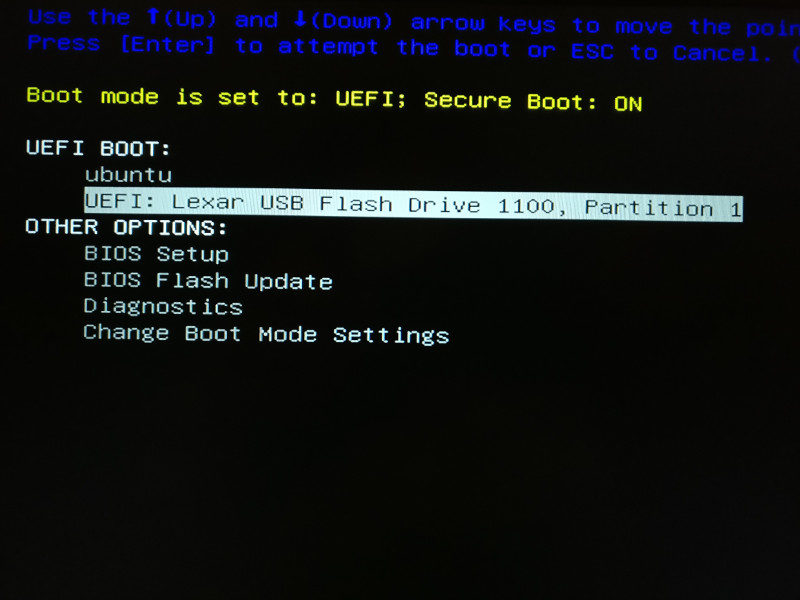
Once the bootable USB is ready, restart your system. At boot time, press F2 or F10 or F12 repeatedly to go to the boot settings. In here, select to boot from USB.
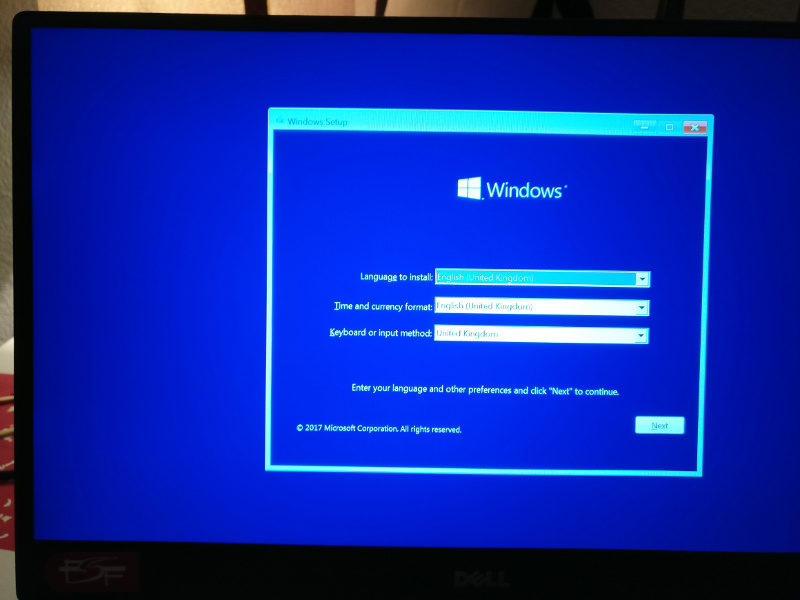
You’ll see that Windows 10 is being booted and it gives you the option to install or repair your system. You know what to do now from here.
I hope you find this tutorial useful for creating bootable USB of Windows 10 in Linux. If you have questions or suggestions, please feel free to leave a comment.
Бывают случаи, когда вам нужно записать Windows на флешку в Linux, например, когда вы хотите поставить эту систему второй для использования специализированных программ, или вам нужно переустановить операционку своим знакомым. Или же есть пользователи Linux, которые решили вернуться на Windows, но единственную флешку уже перезаписали под Linux LiveUSB.
Загрузочная флешка Windows в Linux создается достаточно просто. Я предлагаю несколько способов решения этой проблемы. Все их я перечислил ниже.
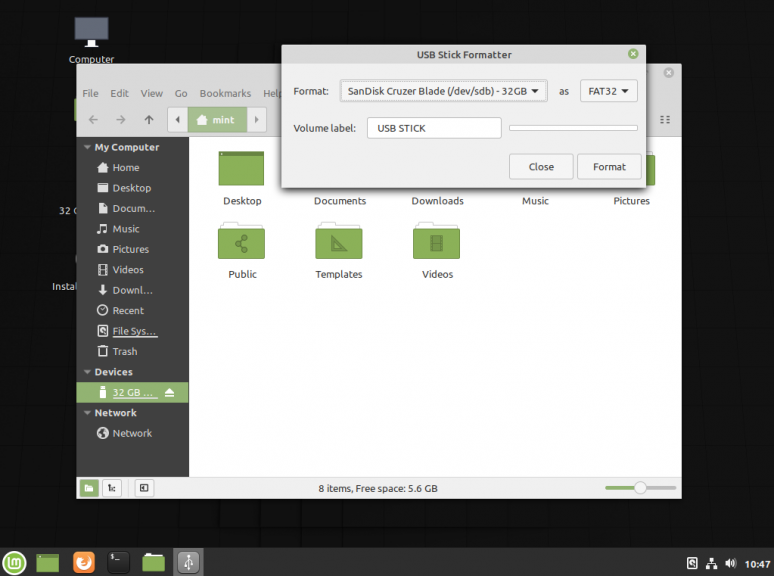
Загрузочную флешку можно создать с помощью терминала или специальных графических утилит. Настоятельно рекомендую отформатировать флешку в Fat32 (или Exfat) перед использованием любого из предложенных методов. Форматирование можно выполнить через Gparted, сfdisk+mkfs или через usb stick formatter (форматирование USB флеш накопителя).
Способ 1. Утилита USB Image Write
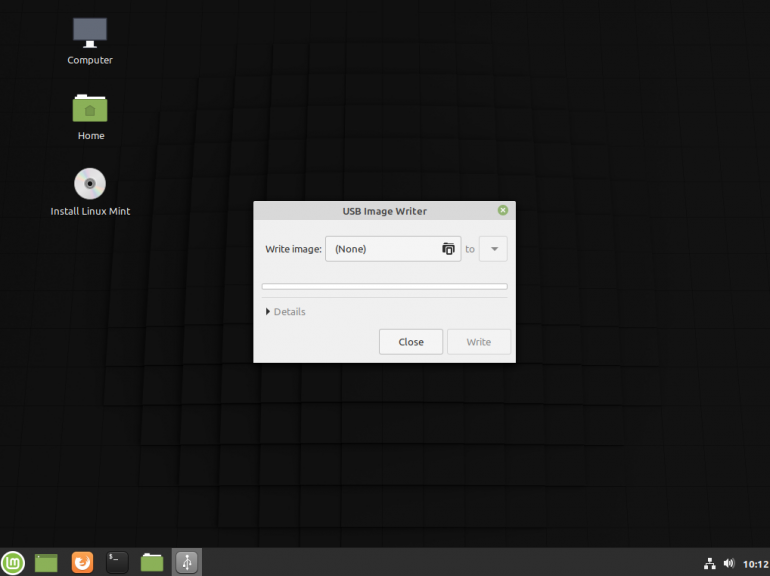
Для создания флешки можно воспользоваться утилитой Запись образа на USB. В некоторых дистрибутивах она уже предустановленна (Ubuntu, Mint и др.):
Выбрать образ в графе Write image образ и в поле to выбрать флешку. Далее нажимаем Write.
Способ 2. Утилита WoeUSB
Пожалуй, это самый простой способ создания. Установка в Ubuntu выполняется с помощью таких команд:
sudo add-apt-repository ppa:nilarimogard/webupd8
sudo apt update
sudo apt install woeusb
Откройте утилиту в меню приложений:
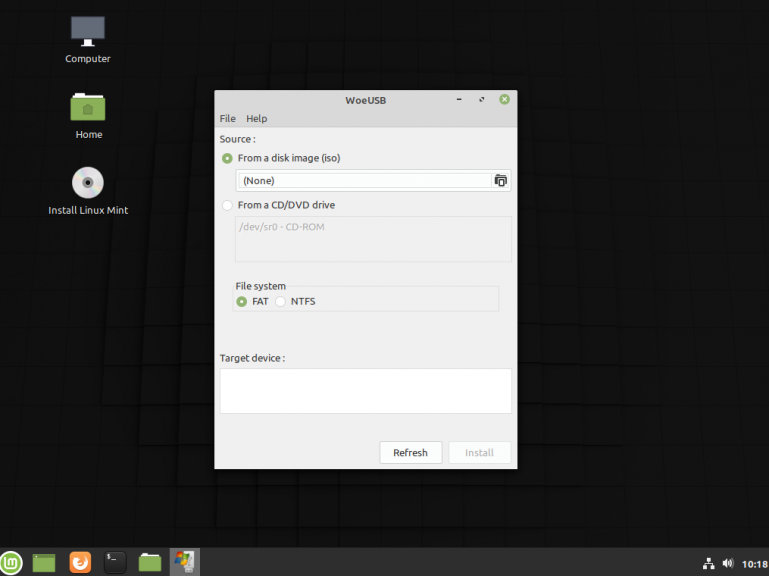
Интерфейс простой. Нажмите на кнопку Обзор со значком папки и выберите образ. Target device это флешка, на которую будет идти запись, если у вас их несколько выберите нужную. Ещё есть поле File system, где нужно выбрать какую файловую систему будете использовать. Рекомендую FAT. Затем нажмите Install и дождитесь окончания.
При появлении ошибки с кодом 256 Source media is currently mounted, размонтируйте образ ISO с Windows, если вы его смонтировали. При ошибке Target device is currently busy, извлеките флешку, затем снова подключите её. Если не сработало, попробуйте отформатировать её.
Способ 3. Терминал и Gparted
Положите образ в домашнюю папку и переименуйте его в windows.iso во избежание проблем с пробелами. Затем перейдите в терминале в домашнюю папку
cd ~
Запустите терминал через главное меню или с помощью сочетания клавиш Ctrl + Alt + T затем используйте команду dd для записи образа на флешку:
dd if=/windows.iso of=/dev/sdX
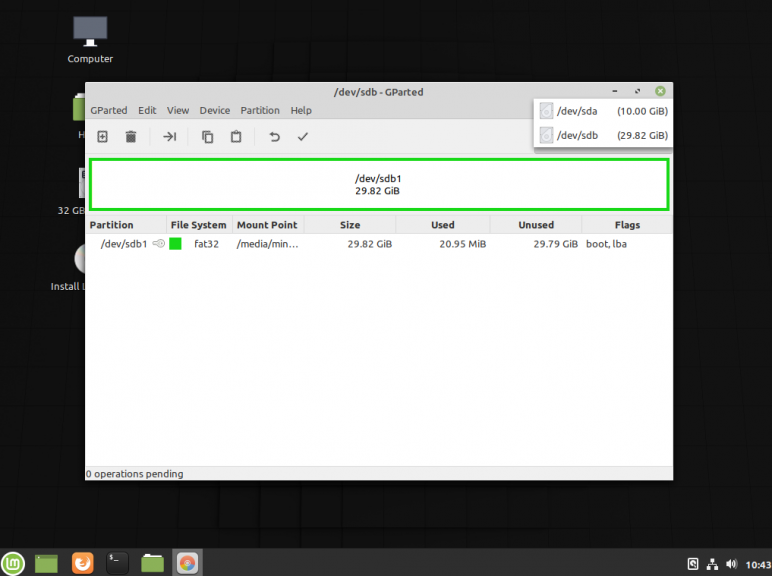
Замените X на букву вашей флешки! Узнать её можно через Gparted. В правом верхнем углу есть кнопка переключения дисков:
Тот диск который соответствует размеру вашей флешки и есть ваша флешка. В моем случае флешка на 32 гб это /dev/sdb. Значит команда будет иметь вид:
dd if=/windows.iso of=/dev/sdb
Дождитесь окончания записи и извлеките флешку.
Выводы
Как видите, создание загрузочной флешки Windows в Linux не представляет сложности. Это были все способы, которые я знаю. Если они вам помогли, напишите об этом. Если вы знаете еще способы, обязательно напишите о них в комментариях!
Статья распространяется под лицензией Creative Commons ShareAlike 4.0 при копировании материала ссылка на источник обязательна .
Об авторе
Здравствуйте, я изучаю Linux и обладаю хорошими знаниями английского.
1. Overview
With a bootable Ubuntu USB stick, you can:
- Install or upgrade Ubuntu
- Test out the Ubuntu desktop experience without touching your PC configuration
- Boot into Ubuntu on a borrowed machine or from an internet cafe
- Use tools installed by default on the USB stick to repair or fix a broken configuration
This tutorial will show you how to create a bootable USB stick on Microsoft Windows using Rufus.
For most users we recommend balenaEtcher instead of Rufus which is simpler to use and also available on MacOS and Ubuntu. Instructions are now included in the primary Install Ubuntu Desktop tutorial.
Creating a bootable Ubuntu USB stick from Microsoft Windows is very simple and we’re going to cover the process in the next few steps.
Alternatively, we also have tutorials to help you create a bootable USB stick from both Ubuntu and Apple macOS.
2. Requirements
You will need:
- A 4GB or larger USB stick/flash drive
- Microsoft Windows XP or later
- Rufus, a free and open source USB stick writing tool
- An Ubuntu ISO file. See Get Ubuntu for download links
Take note of where your browser saves downloads: this is normally a directory called ‘Downloads’ on your Windows PC. Don’t download the ISO image directly to the USB stick! If using Windows XP or Vista, download version 2.18 of Rufus.
3. USB selection
Perform the following to configure your USB device in Rufus:
- Launch Rufus
- Insert your USB stick
- Rufus will update to set the device within the Device field
- If the Device selected is incorrect (perhaps you have multiple USB storage devices), select the correct one from the device field’s drop-down menu
You can avoid the hassle of selecting from a list of USB devices by ensuring no other devices are connected.
4. Select the Ubuntu ISO file
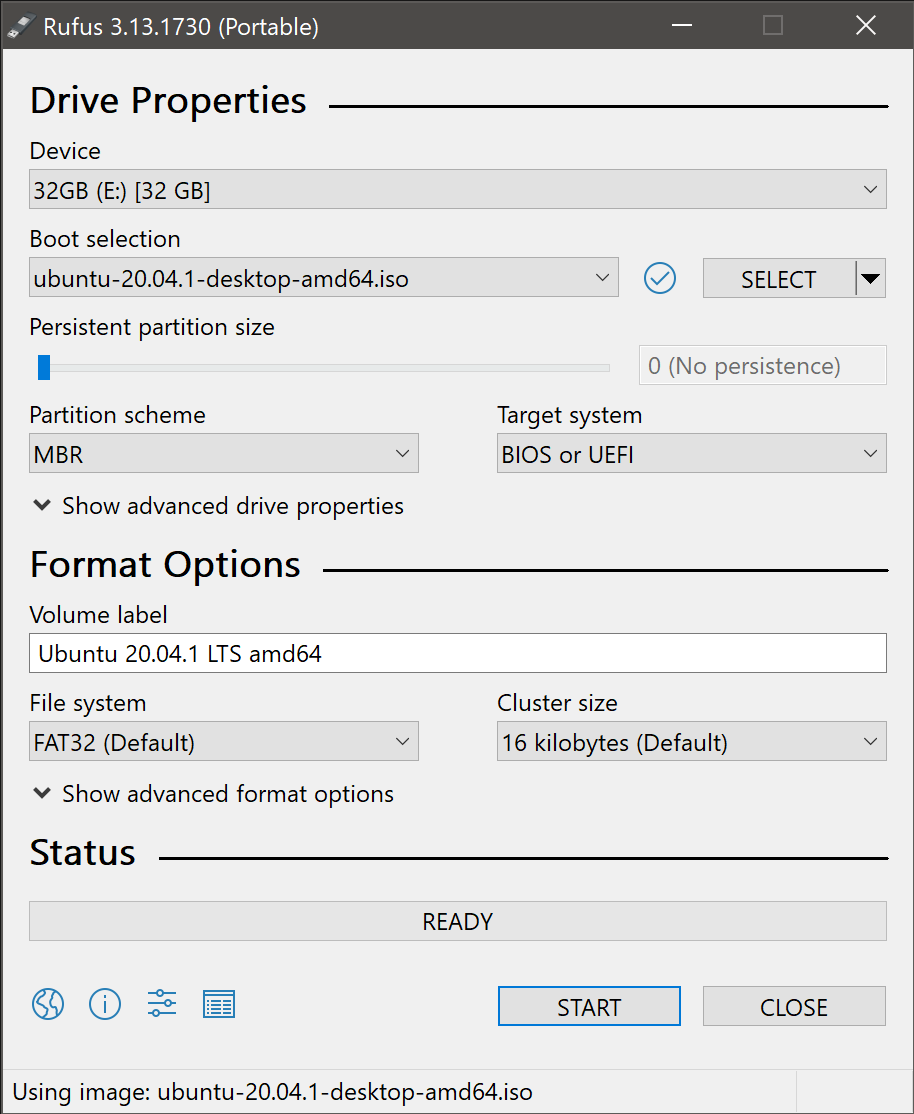
To select the Ubuntu ISO file you downloaded previously, click the SELECT to the right of “Boot selection”. If this is the only ISO file present in the Downloads folder you will only see one file listed.
Select the appropriate ISO file and click on Open.
5. Write the ISO
The Volume label will be updated to reflect the ISO selected.
Leave all other parameters with their default values and click START to initiate the write process.
6. Additional downloads
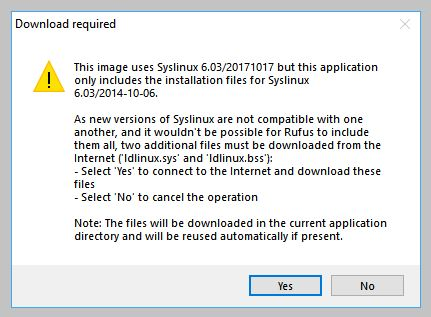
You may be alerted that Rufus requires additional files to complete writing the ISO. If this dialog box appears, select Yes to continue.
7. Write warnings
You will then be alerted that Rufus has detected that the Ubuntu ISO is an ISOHybrid image. This means the same image file can be used as the source for both a DVD and a USB stick without requiring conversion.
Keep Write in ISO Image mode selected and click on OK to continue.
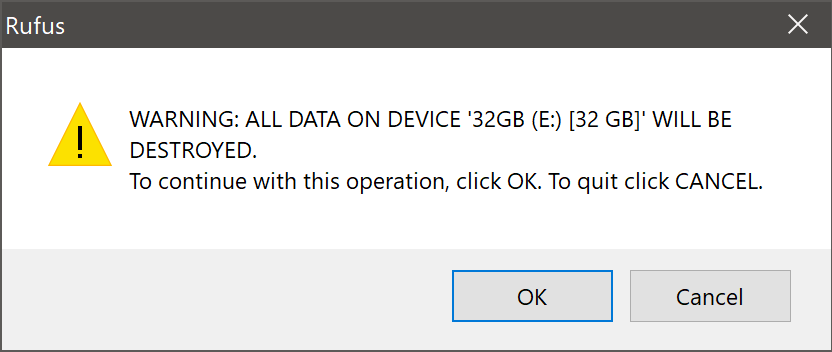
Rufus will also warn you that all data on your selected USB device is about to be destroyed. This is a good moment to double check you’ve selected the correct device before clicking OK when you’re confident you have.
If your USB stick contains multiple partitions Rufus will warn you in a separate pane that these will also be destroyed.
8. Writing the ISO
The ISO will now be written to your USB stick, and the progress bar in Rufus will give you some indication of where you are in the process. With a reasonably modern machine, this should take around 10 minutes. Total elapsed time is shown in the lower right corner of the Rufus window.
9. Installation complete
When Rufus has finished writing the USB device, the Status bar will be filled green and the word READY will appear in the center. Select CLOSE to complete the write process.
Congratulations! You now have Ubuntu on a USB stick, bootable and ready to go.
To use it you need to insert the stick into your target PC or laptop and reboot the device. It should recognise the installation media automatically during startup but you may need to hold down a specific key (usually F12) to bring up the boot menu and choose to boot from USB.
For a full walkthrough of installing Ubuntu, take a look at our install Ubuntu desktop tutorial.
Finding help
If you get stuck, help is always at hand:
- Ask Ubuntu
- Ubuntu Forums
- IRC-based support
Was this tutorial useful?
Thank you for your feedback.
Download Article
Download Article
Whether you want to install Linux on your PC from a flash drive or just boot into a portable version of Linux, you can easily create a bootable Linux USB flash drive in Windows 10. We’ll show you how to download the software you’ll need to create your Linux USB drive, how to make the drive bootable, and how to make your PC boot from the flash drive instead of your hard drive.
-
1
Download an ISO image of Ubuntu (or your preferred Linux flavor). To boot into Linux from a USB drive, you’ll need to download a file that contains an «image» of the Linux installation media. You can download the ISO for any flavor of Linux you want to install, including Debian and Linux Mint, and the process to create a bootable USB drive will be similar.
- To download an ISO of Ubuntu, head over to https://ubuntu.com/download/desktop and click the Download link next to the latest stable version. Ubuntu is a good option if you want to try out Linux without installing it—once you boot from the flash drive, you’ll be able to choose an option to try before you install.[1]
- To download a Debian ISO, go to https://www.debian.org/download. The download will start automatically.
- You can get the Linux Mint ISO from https://linuxmint.com/download.php. Just click the Download button next to the version you want to install.
- If you just want to try out Linux without installing it on your hard drive, try Puppy Linux, which allows you to boot right into a functional Linux desktop. You can download a Puppy Linux ISO from https://puppylinux.com/index.html#download.
- To download an ISO of Ubuntu, head over to https://ubuntu.com/download/desktop and click the Download link next to the latest stable version. Ubuntu is a good option if you want to try out Linux without installing it—once you boot from the flash drive, you’ll be able to choose an option to try before you install.[1]
-
2
Install Rufus on your PC. Rufus is free software that allows you to create bootable USB drives from ISO images.[2]
Go to https://rufus.ie and click the Rufus link under «Download» toward the bottom of the page to download the installer.- When the download is complete, double-click the file that begins with «rufus» and ends with «exe» and follow the on-screen instructions to install.
- Once Rufus is installed, you’ll find it in your Windows menu. Launch Rufus if it doesn’t start automatically after the installation.
Advertisement
-
3
Insert your USB flash drive into an available USB port. You’ll want to use a blank USB drive, as everything on the drive will be deleted. Back the drive up before you continue if necessary.
-
4
Open Rufus and select your USB flash drive in Rufus. If multiple external drives are connected to your PC, Rufus may select the wrong drive. Click the proper drive in the «Device» menu if it’s not accurate.
-
5
Select FreeDOS from the «Boot selection» menu. It’s just under the Device selector. This tells Rufus to make the drive bootable.[3]
- The default options for «Partition scheme» and «Target system» are filled in automatically and you won’t need to change them.
-
6
Click the Select button and choose the ISO you downloaded. This button is to the right of the «Boot selection» menu. You should find the ISO in your default download folder, which is usually called Downloads.
-
7
Leave the other parameters in place and click START. This begins the process of writing the ISO image to the flash drive.
- If Rufus prompts you to download an additional file to write the ISO, click Yes to continue.[4]
- If Rufus prompts you to download an additional file to write the ISO, click Yes to continue.[4]
-
8
Select «Write in ISO image mode (Recommended)» and click OK. This option will appear when the «ISOHybrid image detected» window appears. This just means you can use the same ISO on a bootable DVD or USB drive as needed.
-
9
Click OK to create your bootable USB drive. This involves erasing the data on the drive and copying the necessary files for making the drive bootable. You’ll see a Status bar at the bottom of the window once the process begins.
- When the drive is ready, the status bar will say «READY.» At this point, you’ll have a bootable Linux USB drive.
Advertisement
-
1
Reboot your PC with the USB drive attached. If you’ve already set your PC to boot from USB, your computer will immediately boot into Linux once it comes back up.
- If your PC boots back into Windows 10 instead, continue with this method.
- skip to step 5. Otherwise, the steps to get to the BIOS are going to be different depending on your motherboard—you’ll usually press a key immediately after the PC restarts, which is usually F2, F10, or Del. Search for your PC model and «BIOS setup key» to find your key. Alternatively, try the following steps to boot into the BIOS from Windows 10:
- Press Windows key + i to open Settings.
- Click Update & Security.
- Click Recovery in the left panel.
- Click Restart now under «Advanced startup.»
- On the «Choose an option» screen, click Troubleshoot.
- Click UEFI Firmware Settings and then click Restart. The PC will boot into the BIOS or UEFI.
-
2
Locate the Boot menu. Once the computer boots into the BIOS, look for a menu called Boot, Boot Order, or Boot Options. You might have to enter a menu called Advanced, System, Storage, or Configuration to find it. What you’re looking for a list of boot devices, such as «Hard Drive» and «Removable Device» in order.
-
3
Set the USB drive or «Removable Storage» to be first in the boot order. You may have to select an item called «1st boot device» or similar to bring up a list of options. The goal is to make your USB drive or removable media the first item in the list so your PC tries to boot from devices that are connected to it.
-
4
Save and exit the BIOS. You’ll usually do this by pressing the F10 key or by selecting an option called Save & Exit. Once saved, your PC will reboot.
-
5
Install and run Linux. When your PC boots from the flash drive, you’ll be prompted to choose some regional and keyboard settings. If you made an Ubuntu drive, you can choose Try Ubuntu without installing to use the live version of Ubuntu, or install it on your hard drive. Regardless of the version of Linux you want to install, the remaining steps will be simple—follow the on-screen instructions to get started!
- If you’re installing Puppy Linux, you’ll boot right into a functional Linux desktop without having to install.
Advertisement
Ask a Question
200 characters left
Include your email address to get a message when this question is answered.
Submit
Advertisement
-
Any time the flash drive is connected to your PC upon reboot, your PC will try to boot from it before it boots from your hard drive. If you don’t want to boot from the USB drive the next time you reboot, remove the drive before rebooting.
Thanks for submitting a tip for review!
Advertisement
About This Article
Article SummaryX
1. Download the ISO image.
2. Install Rufus.
3. Insert a blank USB drive.
4. Use Rufus to flash the ISO to the drive.
5. Go into the BIOS and set the USB drive as first in the boot order.
6. Reboot into Linux.
Did this summary help you?
Thanks to all authors for creating a page that has been read 46,165 times.
Is this article up to date?

Сегодня хочу рассмотреть довольно типичную ситуацию: на вашем ПК установлена ОС Windows (работает), но появилось желание (необходимость) попробовать также и Linux (так сказать, сравнить их собственноручно 😉).
Разумеется, одним из первых действий будет подготовка загрузочного носителя (как правило флешки). Однако, здесь могут быть «нюансы», т.к. не все утилиты для создания загрузочных флешек с Windows подойдут и для текущей задачи.
Собственно, именно поэтому в этой заметке я выделил несколько утилит (и показать скрины настроек записи), которые позволяют решить этот вопрос (также отмечу, что приложения я отобрал бесплатные, макс. простые в работе, и совместимые с большинством дистрибутивов Linux).
И так…
👉 В тему!
Установка Linux Mint «рядом» с Windows 10 (без потери данных!). Пошаговая инструкция для начинающих
*
Содержание статьи
- 1 Подготовка установочной флешки (с Linux)
- 1.1 Ventoy
- 1.2 Rufus
- 1.3 Etcher
→ Задать вопрос | дополнить
Подготовка установочной флешки (с Linux)
Ventoy
Офиц. сайт: https://www.ventoy.net/
Эта утилита хороша тем, что она позволяет легко и макс. быстро создавать универсальные мультизагрузочные флешки сразу с несколькими ISO-образами (на моей флешке, например, есть и Windows 10, и LiveCD, и Linux Mint, и пр.).
Как с ней работать:
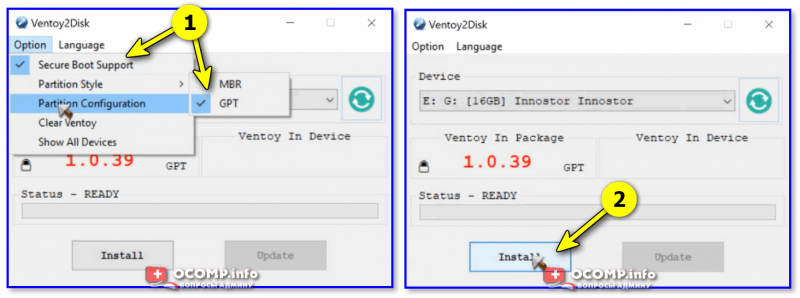
1) после ее загрузки и запуска, выберите тип разметки (для современных ПК*, обычно, GPT) и установите флажок на пункт «Secure Boot Support» (защищенная загрузка, актуально также для новых устройств). Вот здесь подробнее о GPT, MBR…
2) После нажмите по кнопке «Install» — через несколько минут флешка будет специальным образом подготовлена (все данные с нее будут удалены!).
Ventoy — подготовка флешки (настройки)
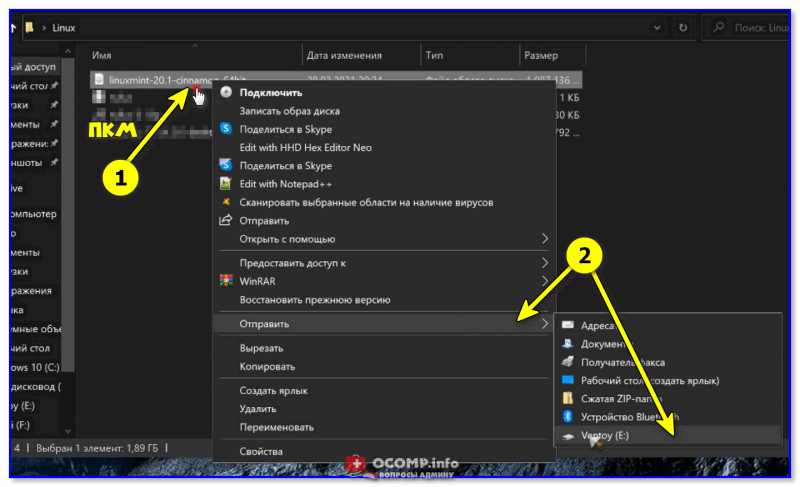
3) Ну и последний штрих: на эту флешку нужно просто скопировать все нужные ISO-образы (никак не меняя их и не извлекая!). В своем примере ниже — я через проводник «отправил» нужный ISO на флешку.
Примечание: разумеется, скопировать можно столько ISO, сколько поместиться на вашу флешку!
Отправить файл ISO на флешку (Ventoy)
Удобно?! 😉
Важно: флешки, подготовленные в Ventoy, могут не работать с некоторыми ноутбуками и моноблоками. Например, я с таким сталкивался на ноутбуках HP и Dell (само собой, не со всеми моделями…).
*
Rufus
Офиц. сайт: https://rufus.ie/ru/
Эта утилита отличается от предыдущей своей функциональностью: здесь гораздо больше настроек и всяких флажков (что может запутать). Однако с ее помощью можно подготовить загрузочный носитель для любого «капризного» ноутбука/ПК/моноблока!
Как пользоваться:
1) подключите флешку к USB-порту (предварительно скопировав всё нужное с неё) и запустите Rufus.
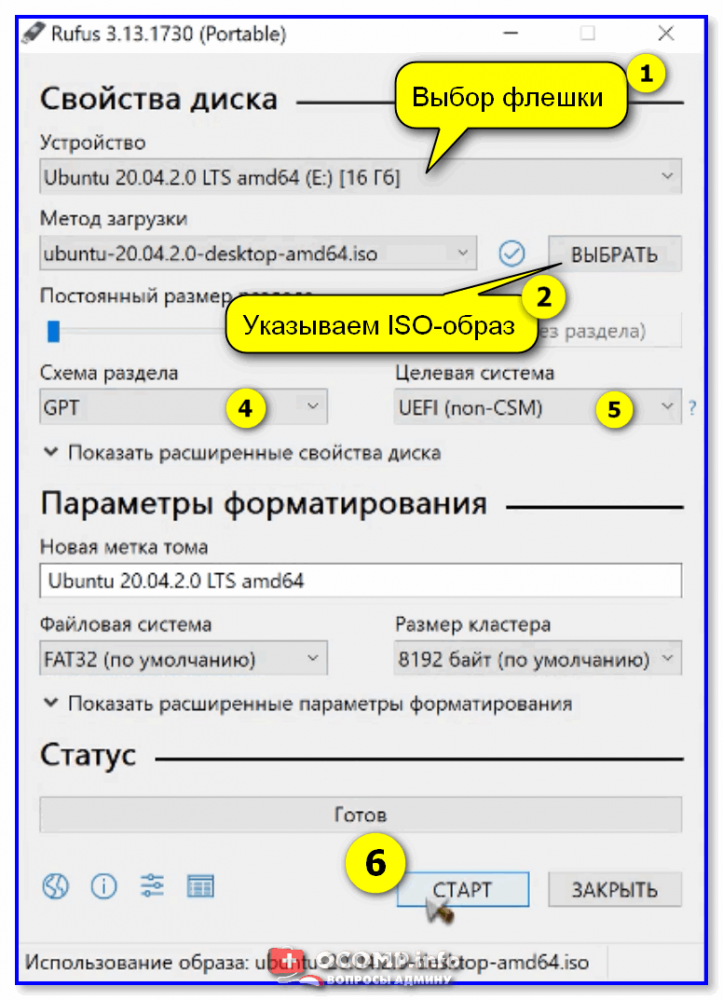
2) Далее в окне Rufus выберите флешку и образ ISO, который хотите записать (стрелки 1, 2 на скрине ниже 👇).
3) Задайте схему раздела и прошивку (GPT / UEFI для новых ПК*) и нажмите «Start».
Rufus — настройки записи Ubuntu
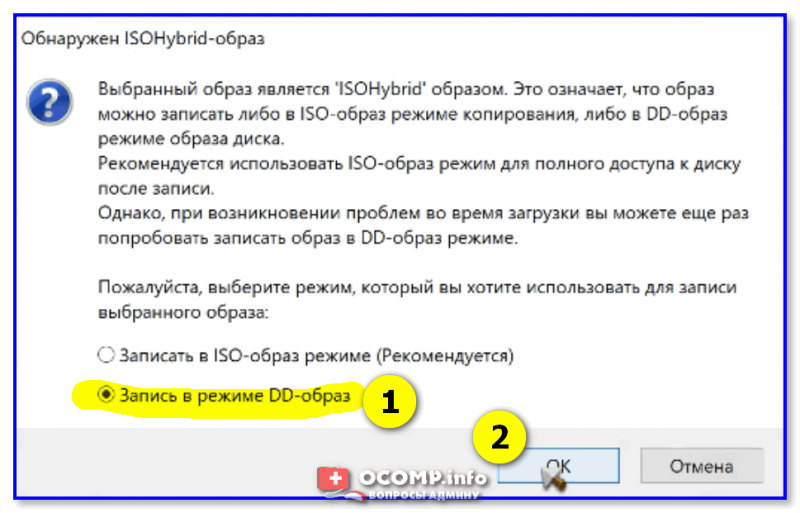
Если появится сообщение о «гибридном» ISO — рекомендую выбрать вариант «Записать в режим DD-образа». 👇
DD-образ
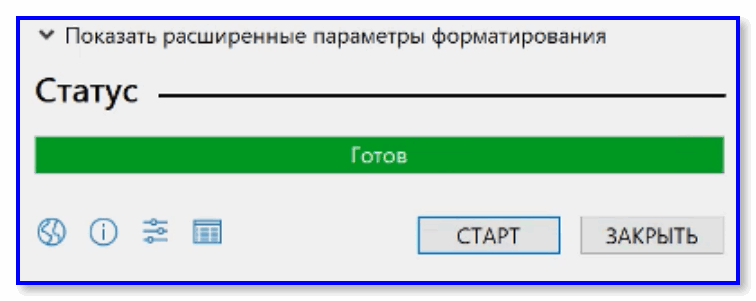
Когда статус записи дойдет до 100% и появится сообщение «Готов» — утилиту можно закрыть и приступить к использованию флешки…
Флешка готова!
*
Etcher
Офиц. сайт: https://www.balena.io/etcher/
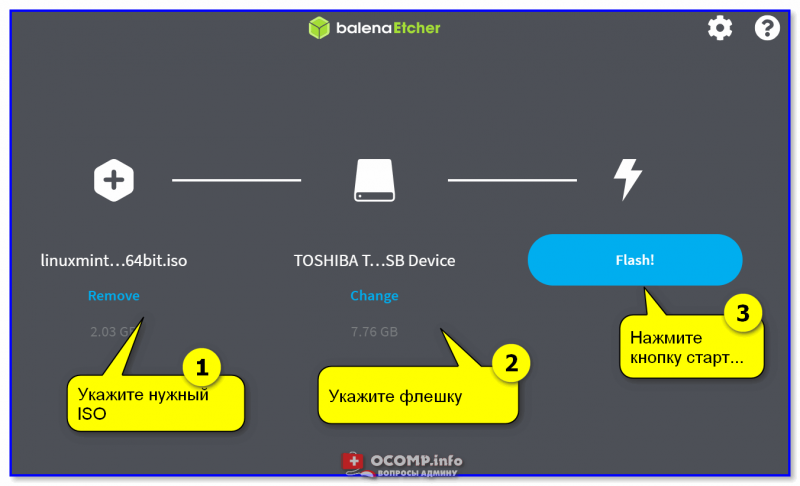
Etcher — приложение хорошо тем, что все «параметры» записи оно определяет автоматически (вам же останется только выбрать ISO, флешку и нажать «Старт»). С одной стороны — такой подход хорош, с другой — не дает гибкости…
Кстати, Etcher можно использовать в Windows, Linux, macOS.
Etcher — всего три действия!
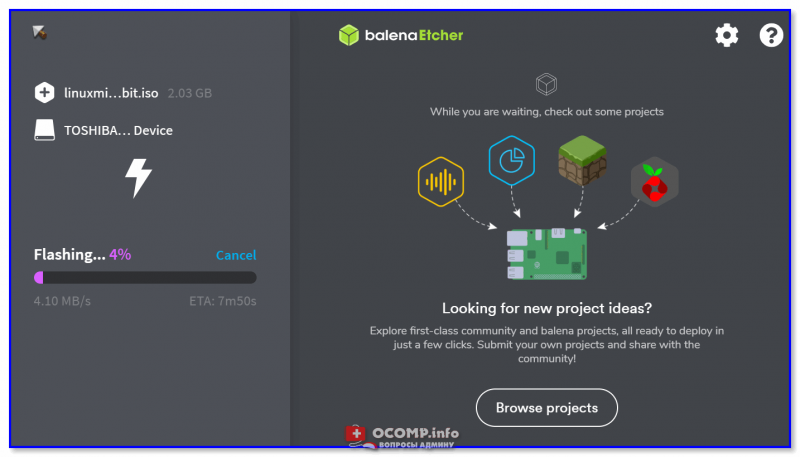
Процесс записи отображается в меню слева: при достижении 100% флешка будет готова!
Процесс подготовки флешки в Etcher
*
Дополнения по теме — приветствуются!
Всем успехов!
👋


Полезный софт:
-
- Видео-Монтаж
Отличное ПО для создания своих первых видеороликов (все действия идут по шагам!).
Видео сделает даже новичок!
-
- Ускоритель компьютера
Программа для очистки Windows от «мусора» (удаляет временные файлы, ускоряет систему, оптимизирует реестр).

В этой инструкции пошагово о двух способах создать загрузочную флешку Windows 10 из Linux, которые подойдут как для установки на UEFI-системе, так и для того, чтобы установить ОС в Legacy режиме. Также могут пригодиться материалы: Лучшие программы для создания загрузочной флешки, Загрузочная флешка Windows 10.
Загрузочная флешка Windows 10 с помощью WoeUSB
Первый способ создания загрузочной флешки Windows 10 в Linux — использование бесплатной программы WoeUSB. Созданный с её помощью накопитель работает и в UEFI и в Legacy режиме.
Для установки программы используйте следующие команды в терминале
sudo add-apt-repository ppa:nilarimogard/webupd8 sudo apt update sudo apt install woeusb
Если эти команды не сработали, попробуйте такой вариант:
wget mirrors.kernel.org/ubuntu/pool/universe/w/wxwidgets3.0/libwxgtk3.0-0v5_3.0.4+dfsg-3_amd64.deb
sudo dpkg -i libwxgtk*_amd64.deb
sudo apt update
sudo apt --fix-broken install
sudo apt install woeusb
После установки порядок действий будет следующим:
- Запустите программу.
- Выберите ISO образ диска в разделе «From a disk image» (также, при желании, можно сделать загрузочную флешку с оптического диска или смонтированного образа).
- В разделе «Target device» укажите флешку, на которую будет записан образ (данные с неё будут удалены).
- Нажмите кнопку Install и дождитесь завершения записи загрузочной флешки.
- При появлении ошибки с кодом 256 «Source media is currently mounted», размонтируйте образ ISO с Windows 10.
- При ошибке «Target device is currently busy», размонтируйте и отключите флешку, затем снова подключите её, обычно помогает. Если не сработало, попробуйте предварительно отформатировать её.
На этом процесс записи завершен, можно использовать созданный USB накопитель для установки системы.
Создание загрузочной флешки Windows 10 в Linux без программ
Этот способ, пожалуй, ещё проще, но подойдет только в том случае, если вы планируете загружаться с созданного накопителя на UEFI-системе и устанавливать Windows 10 на GPT диск.
- Отформатируйте флешку в FAT32, например, в приложении «Диски» в Ubuntu.
- Смонтируйте образ ISO с Windows 10 и просто скопируйте всё его содержимое на отформатированную флешку.
Загрузочная флешка Windows 10 для UEFI готова и с неё можно без проблем загрузиться в EFI-режиме.

Линукс как всегда удивляет своей «дружелюбностью». Если в винде, чтобы создать загрузочный диск, нужно просто скачать программу Rufus и запустить ее, то Линуксе пришлось потратить несколько часов на чтение и поиск, а если учесть тестирование, то целых два дня, чтобы найти верный способ.
Сналала о способах, которые НЕ работают.
Все действия выполнялось на Linux Mint Cinnamon.
Один индуский друг на сайте https://itsfoss.com/bootable-windows-usb-linux/ советует программу Disks для создания загруочной флешки. Так вот создания загруочной флешки Windows 10 через встроенную программу Disks НЕ работает.
Следующий способ через встроенную программу Usb Image Creator. Вердикт — Не работает. Вызвать эту программу можно выбрав iso образ -> нажть на ПКМ -> make bootable usb
Далее, через команду dd не работет. Советчики советуют запускать через
|
sudo dd if=«/home/zhandauletov/Downloads/Modding/windows_10.iso» of=/dev/sdb bs=4M |
И какой же способ работает?
Единственный рабочий способ через программу WoeUsb
Туториал можно найти на странице https://www.omgubuntu.co.uk/2017/06/create-bootable-windows-10-usb-ubuntu
Стоит добавить что программа потребует «отмонтировать» флешку. Это можно сделать через команду
/dev/sdb — название устройства(флешки).
Список устройств можно найти по команде
Как протестировать загрузочную флешку?
Протестировать загрузочную флешку можно через программу QEMU.
После установки проверить можно через команду
|
sudo qemu—system—x86_64 —hda /dev/sdb |
при правильно загрузке, можно увидеть стандартный фон Windows
Кстати, при установке Qemu он потребовал 350 мб места.


