Содержание
- Создаем загрузочную флешку с Windows 10 для UEFI
- Способ 1: Media Creation Tool
- Способ 2: Rufus
- Вопросы и ответы
Мы не раз упоминали ранее о том факте, что рано или поздно все пользователи компьютеров и ноутбуков сталкиваются с необходимостью установки операционной системы. Еще на начальном этапе данной процедуры может возникнуть проблема, когда ОС наотрез отказывается видеть накопитель. Вероятнее всего дело в том, что он был создан без поддержки UEFI. Поэтому в сегодняшней статье мы расскажем вам о том, как создать загрузочную флешку с UEFI для Windows 10.
UEFI – это интерфейс управления, который позволяет операционной системе и микропрограммам корректно взаимодействовать между собой. Он пришел на смену известному всем BIOS. Проблема в том, что для установки ОС на компьютер с UEFI приходится создавать накопитель с соответствующей поддержкой. В противном случае могут возникнуть сложности в процессе инсталляции. Есть два основных метода, которые позволят достичь нужно результата. О них мы и расскажем далее.
Способ 1: Media Creation Tool
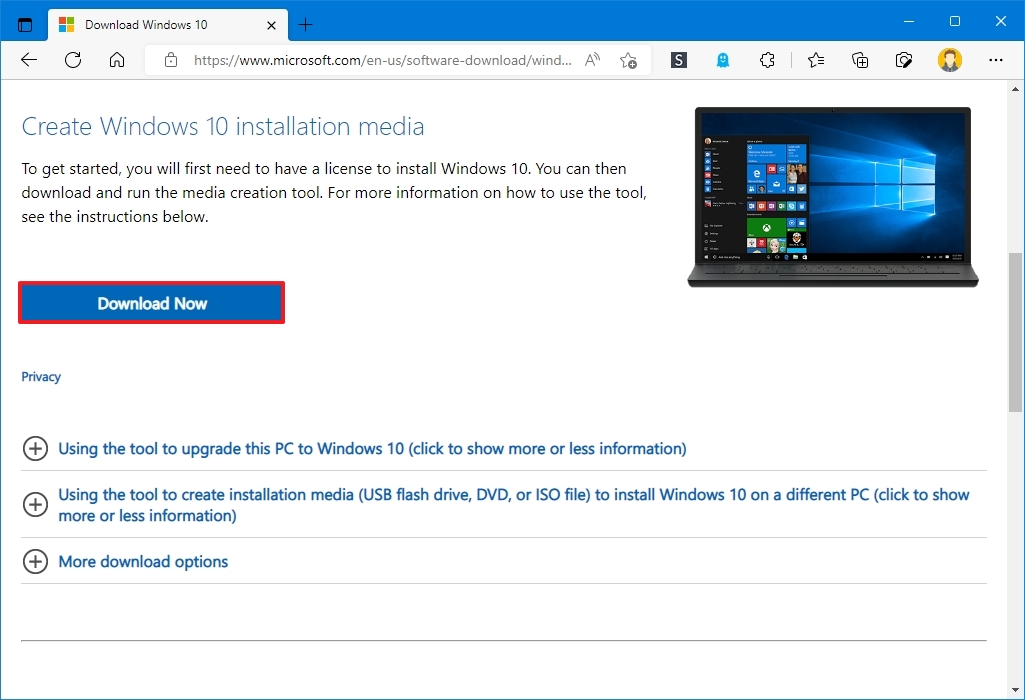
Мы сразу хотели бы обратить ваше внимание на тот факт, что этот способ подходит лишь в том случае, когда загрузочная флешка создается на компьютере или ноутбуке с UEFI. В ином случае накопитель будет создан с «заточкой» под BIOS. Для реализации задуманного вам понадобится утилита Media Creation Tool. Загрузить ее можно по ссылке ниже.
Скачать Media Creation Tool
Сам же процесс будет выглядеть следующим образом:
- Подготовьте флешку, на которую в дальнейшем будет загружена операционная система Windows 10. Объем памяти накопителя должен быть не менее 8 гб. Кроме того, стоит предварительно отформатировать ее.
Подробнее: Утилиты для форматирования флешек и дисков
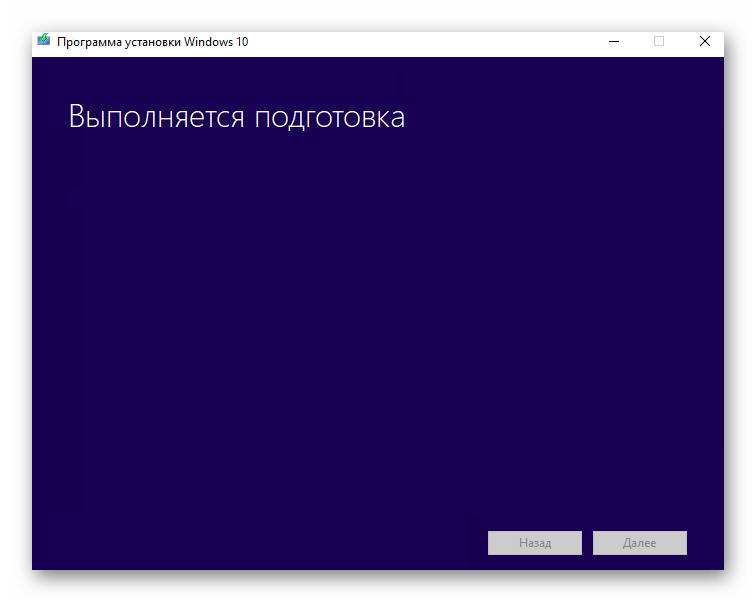
- Запустите Media Creation Tool. Необходимо будет немного подождать, пока завершится подготовка приложения и ОС. Как правило, это занимает от нескольких секунд до минут.
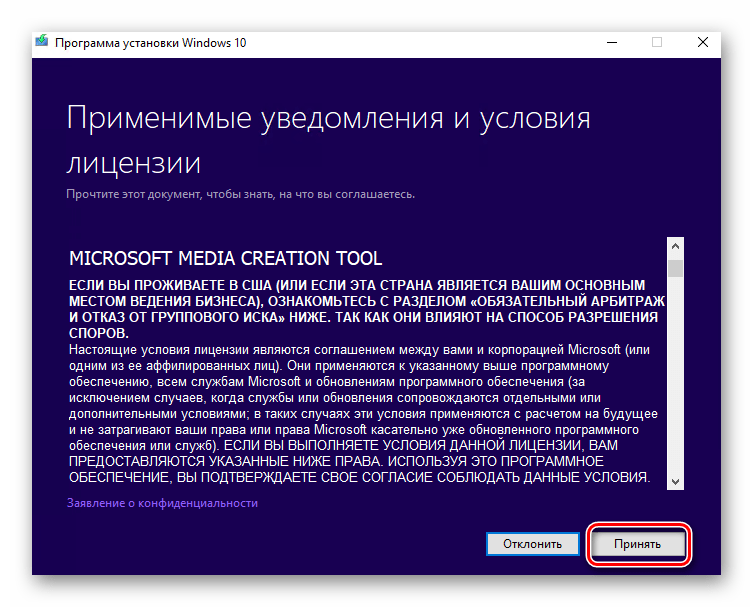
- Спустя некоторое время вы увидите на экране текст лицензионного соглашения. Ознакомьтесь с ним по желанию. В любом случае для продолжения необходимо принять все указанные условия. Для этого нажмите кнопку с одноименным названием.
- Далее вновь появится окно подготовки. Придется вновь немного подождать.
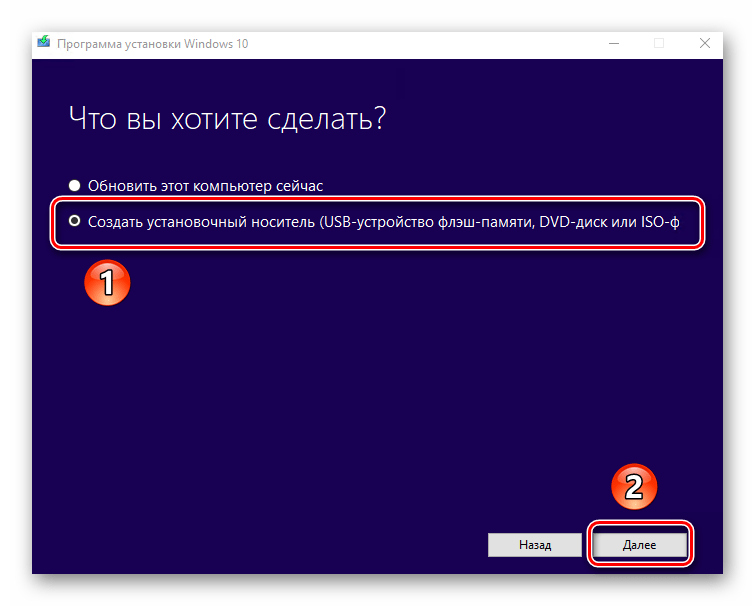
- На следующем этапе программа предложит выбор: обновить ваш компьютер или же создать установочный накопитель с операционной системой. Выбираем второй вариант и жмем кнопку «Далее».
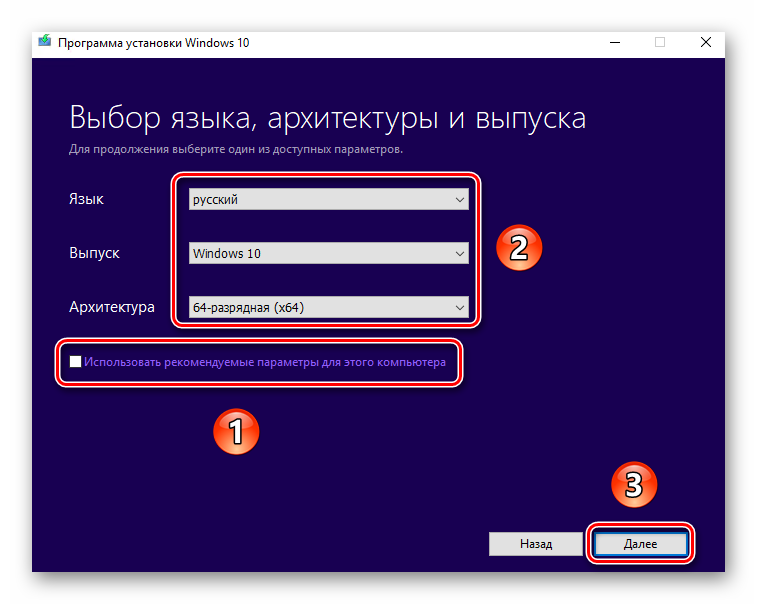
- Теперь нужно указать такие параметры, как язык Windows 10, выпуск и архитектуру. Предварительно не забудьте снять галочку напротив строки «Использовать рекомендованные параметры для этого компьютера». Затем нажмите кнопку «Далее».
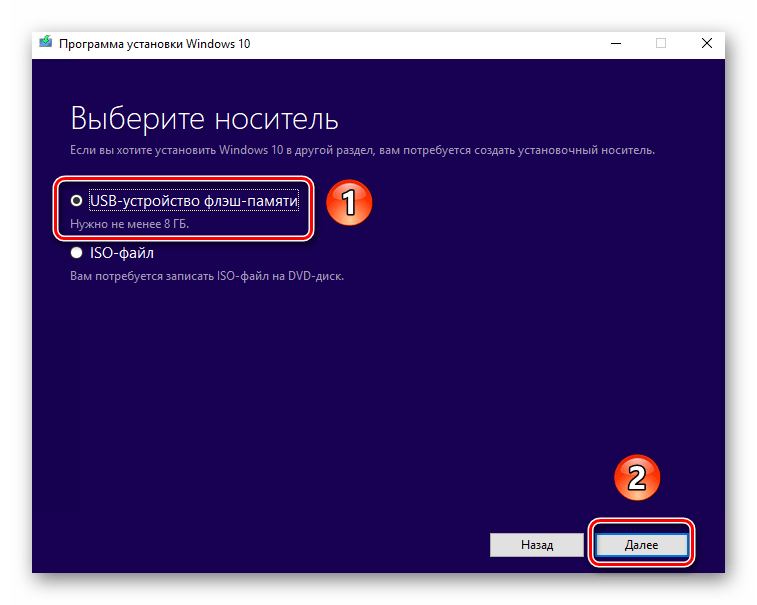
- Предпоследним шагом будет выбор носителя для будущей ОС. В данном случае необходимо выбрать пункт «USB-устройство флэш-памяти» и кликнуть по кнопке «Далее».
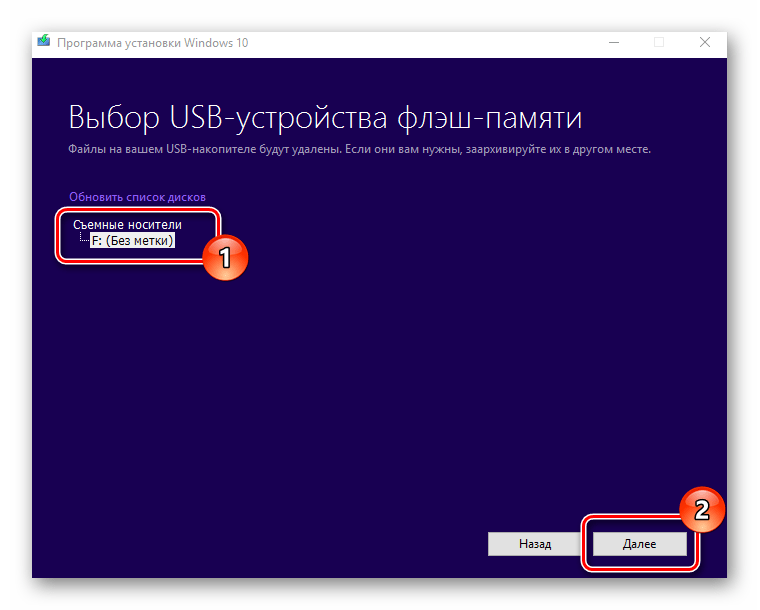
- Остается лишь выбрать из списка ту флешку, на которую в дальнейшем будет установлена Windows 10. Выделите в списке нужное устройство и в очередной раз нажмите «Далее».
- На этом ваше участие завершится. Далее необходимо подождать, пока программа загрузит образ. Время выполнения этой операции зависит от качества интернет-соединения.
- В завершении начнется процесс записи скачанной информации на выбранный ранее носитель. Снова придется подождать.
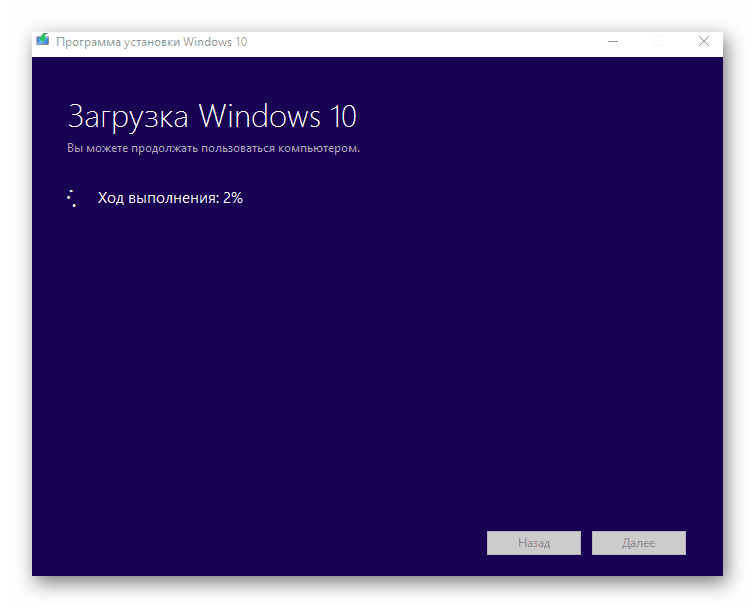
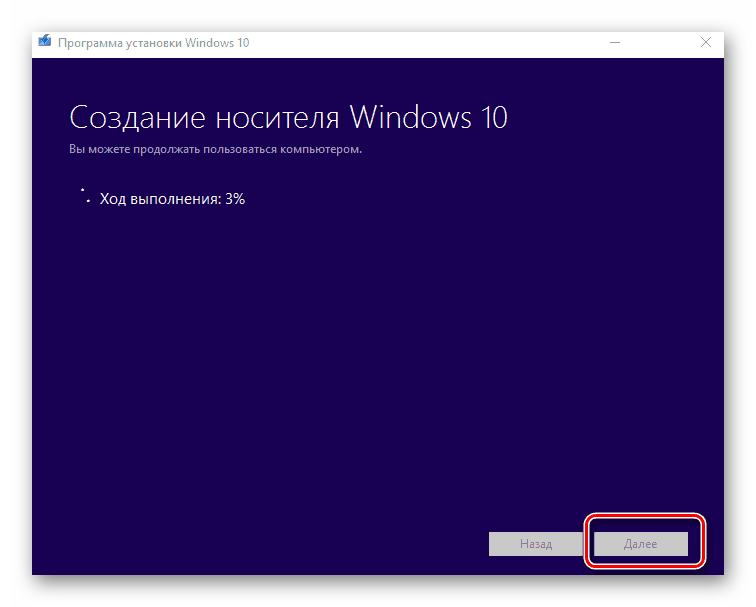

Через некоторое время на экране появится сообщение об удачном завершении выполняемой процедуры. Остается лишь закрыть окно программы и можно приступать к инсталляции Windows. Если вы не уверены в своих силах, рекомендуем ознакомиться с отдельной обучающей статьей.
Подробнее: Руководство по установке Windows 10 с флешки или диска
Способ 2: Rufus
Для использования данного метода нужно будет прибегнуть к помощи Rufus, наиболее удобного приложения для решения нашей сегодняшней задачи.
Читайте также: Программы для создания загрузочной флешки
От конкурентов Rufus отличается не только удобным интерфейсом, но и возможностью выбора целевой системы. А это именно то, что необходимо в данном случае.
Скачать Rufus
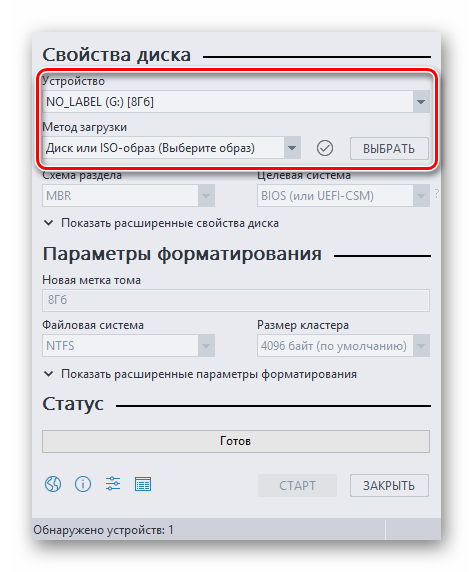
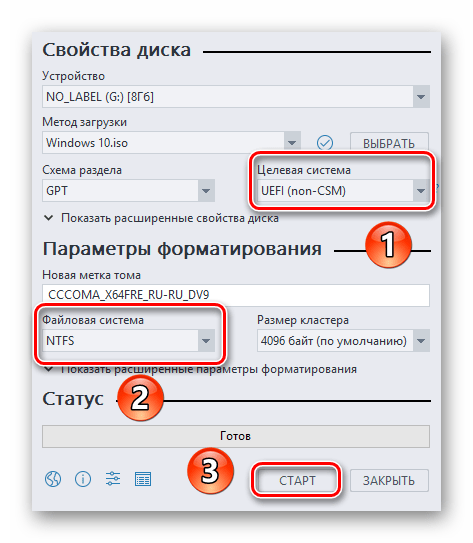
- Откройте окно программы. Первым делом нужно установить соответствующие параметры в верхней его части. В поле «Устройство» следует указать флешку, на которую в результате будет записан образ. В качестве метода загрузки выбираем параметр «Диск или ISO-образ». В завершении нужно будет указать путь к самому образу. Для этого нажмите кнопку «Выбрать».
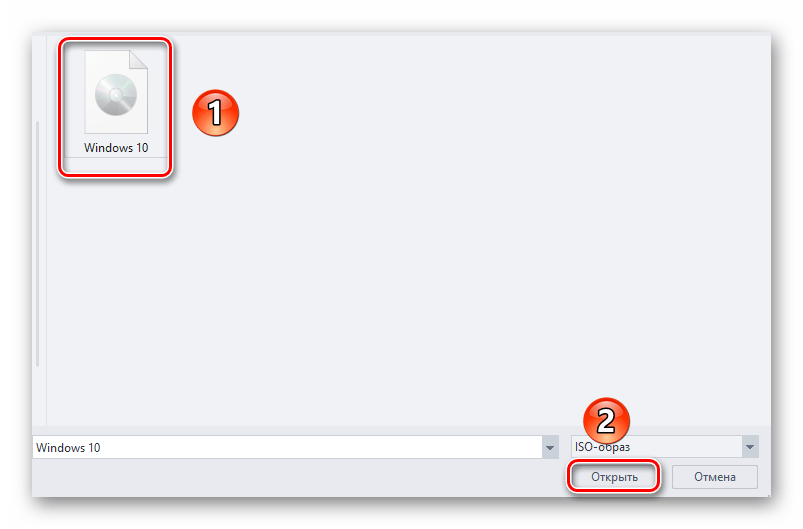
- В открывшемся окне перейдите в папку, в которой хранится необходимый образ. Выделите его и нажмите кнопку «Открыть».
- К слову, скачать образ вы можете самостоятельно из интернета, либо же вернуться к 7 пункту первого способа, выбрать пункт «ISO-образ» и следовать дальнейшим инструкциям.
- Далее следует выбрать из списка целевую и файловую систему для создания загрузочной флешки. В качестве первой укажите «UEFI (non-CSM)», а второй — «NTFS». После установки всех необходимых параметров нажмите кнопку «Старт».
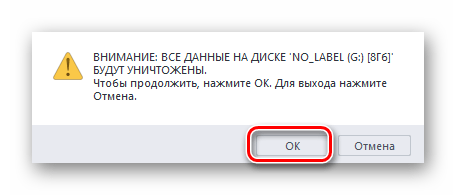
- Появится предупреждение о том, что в процессе с флешки будут стерты все имеющиеся данные. Жмем «OK».
- Начнется процесс подготовки и создания носителя, который займет буквально несколько минут. В самом конце вы увидите следующую картину:
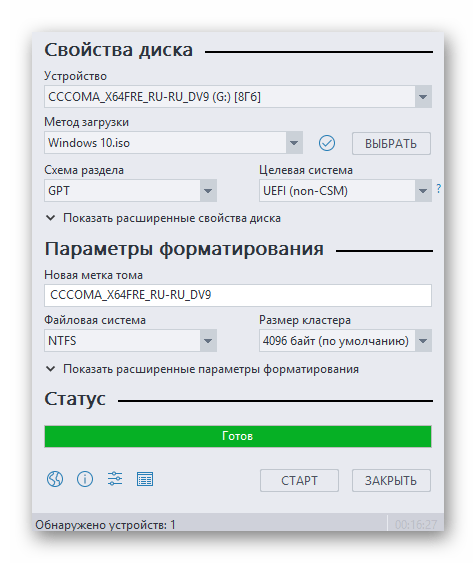
Это значит, что все прошло успешно. Можно извлекать устройство и приступать к инсталляции ОС.
Наша статья подошла к своему логическому завершению. Надеемся, что у вас не возникнет трудностей и проблем в процессе. Если же вам когда-то понадобится создать установочную флешку с Windows 10 под BIOS, рекомендуем ознакомиться с другой статьей, в которой подробно описаны все известные способы.
Подробнее: Руководство по созданию загрузочной флешки с Windows 10
Еще статьи по данной теме:
Помогла ли Вам статья?
PAGE CONTENT:
What Can You Do with a UEFI Bootable Disk
How to Create a UEFI Bootable USB Drive in 3 Ways
How to Boot Windows 10 Computer from UEFI Bootable USB Drive
Bonus Tip: How to Repair Hard Drive and Recover Data with a WinPE Bootable Disk
What Can You Do with a UEFI Bootable Disk
A UEFI bootable USB drive can be used to complete an in-place Windows upgrade or clean install of Windows 10. It’s also needed to start the system when your computer cannot be booted due to a virus attack, MBR damage, bad sectors, corrupted system files, etc. Once you can start your computer from the USB bootable drive, you can perform a disk check and repair. These are the two most important reasons to use a bootable USB disk. Other purposes include backing up systems, using portal operating systems on a foreign computer, and protecting computer data security.
But how to create a Windows 10 UEFI bootable USB drive?
We all know that there are two boot modes for computers: BIOS VS UEFI. If you have a computer with a Unified Extensible Firmware Interface (UEFI), instead of the legacy Basic Input/Output System (BIOS), you should know how to create a UEFI bootable USB drive on Windows 10.
There are several different ways to make a bootable disk in UEFI mode. Let’s learn together.
How to Create a UEFI Bootable USB Drive in 3 Ways
In this part, we will introduce three common ways to create a bootable USB drive by using Windows 10 Midea Creation tool, Diskpart, and third-party software — Refus.
1. Create a UEFI Bootable USB with Windows 10 Media Creation Tool
If you want to create a UEFI bootable USB media for an in-place upgrade or clean install of Windows 10, you can use the Microsoft Media Creation Tool.
To create a Windows 10 UEFI bootable USB, prepare a USB flash drive with at least 8GB of capacity. Then use these steps:
Step 1. Download Windows 10 installation media from the official website of Microsoft.
Step 2. Run the exe file of MediaCreationTool. Click «Accept» to agree to the license terms.
Step 3. On the Windows 10 Setup screen, select «Create installation media (USB flash drive, DVD, or ISO file) for another PC». Click the «Next» button.
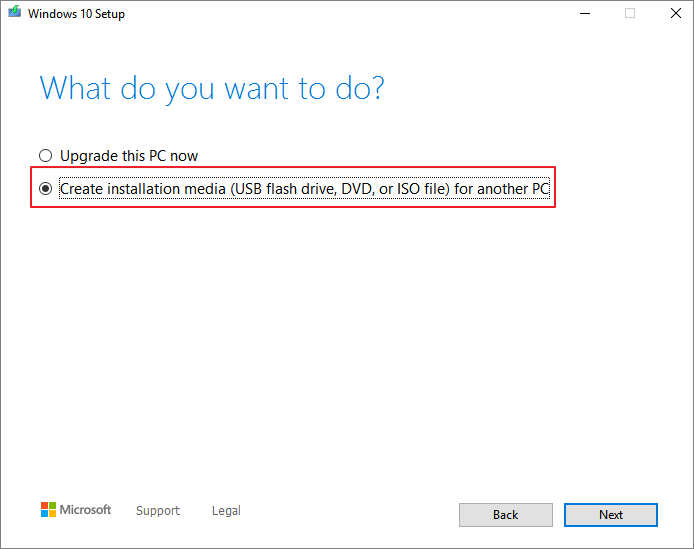
Step 4. Click «Next» on the language, edition, and architecture screen. Select the «USB flash drive» option, and click «Next».

Step 5. Select your connected USB flash drive from the list. And click «Next > Finish» to complete the process. Wait for the Media Creation Tool to download the files and create a bootable USB flash drive that you can use to install Windows 10 on devices with support for UEFI and BIOS.
2. Create a UEFI Bootable USB on Windows 10 with Diskpart
With the built-in Diskpart utility, you can also create a Windows 10 UEFI bootable USB drive. Note that this solution requires command-line operations, so if you’re not confident, you’d better choose a simpler graphical solution.
The process of making a USB bootable drive will erase all data on it. Remember to back up important files and data in advance.
Step 1. Connect your USB flash drive to the computer.
Step 2. Type CMD in the Search box, and right-click on the Command Prompt, and select Run as Administrator.
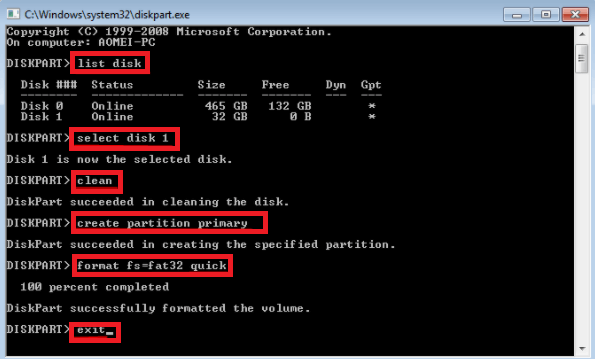
Step 3. In Command Prompt, type Diskpart and press Enter.
Step 4. Type the following commands in order, and press Enter after each one.
list disk
select disk #
clean
create partition primary
select partition 1
active
format fs=fat32 (it means you format the drive with fat32 file system)
assign
exit
Step 5. Copy the Windows installation files to the USB flash drive. You can do this by simply using copy-and-paste. Then, the process of creating a bootable UEFI flash drive with Windows 10 finishes.
3. Create UEFI Bootable USB Drive with Rufus
If you have difficulty in creating Windows 10 UEFI bootable USB with Diskpart, you can use Rufus, an open-source program that allows you to create a UEFI bootable disk on Windows 10/8/7.
Step 1. Download Rufus from the official website: https://rufus.ie/en/.
Step 2. Connect your USB flash drive to the computer.
Step 3. Run this program and make the following main settings:
- Device: Select your USB flash drive.
- Boot selection: Select DISK or ISO image. And click the SELECT button to choose the Windows 10 ISO file from the folder location.
- Partition scheme: Select GPT for UEFI.
- Target system: Select UEFI (non CSM).
- File system: Select NTFS.
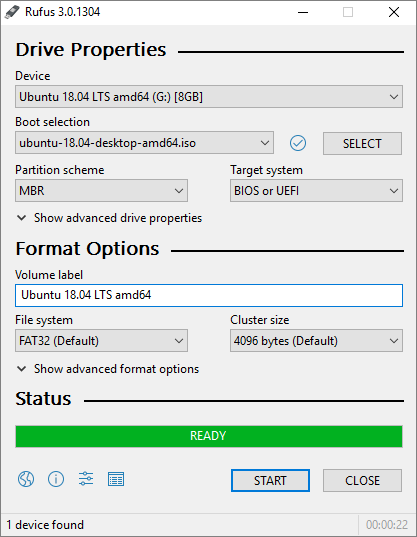
On other options and settings, choose based on the actual situation. Then, click the START button to let Rufus create a UEFI USB flash drive.
How to Boot Windows 10 Computer from UEFI Bootable USB Drive
You can create a UEFI bootable USB drive on Windows 10 by taking any of the methods above. After successfully creating the boot disk, you also need to know how to boot your computer from the bootable USB.
Follow the steps below to start your computer from Windows 10 UEFI bootable USB drive.
Step 1. Connect the UEFI bootable USB disk to a dead, unbootable, inaccessible Windows computer.
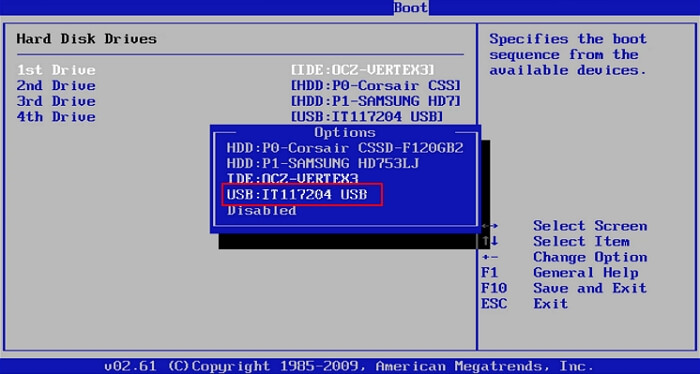
Step 2. Restart your computer, hold F2/F11/Del to enter BIOS.
Step 3. Go to the Boot Drive section and set the UEFI bootable USB as the boot drive.
Step 4. Save the changes and exit BIOS. Wait for your computer to boot up from the UEFI bootable USB disk.
Bonus Tip: How to Repair Hard Drive and Recover Data with a WinPE Bootable Disk
When your computer cannot start, besides using the BIOS or UEFI USB bootable drive, is there another way to access the computer to fix errors and manage hard drives? Yes, you can resort to a disk management WinPE bootable disk by using partitioning software — EaseUS Partition Master.
With simple clicks, you can create an EaseUS Partition Master WinPE bootable disk and run it on your computer without system boot partitions. Then, you can repair and manage your hard drives with advanced solutions, or restore data by cloning the hard drive.
Steps for creating a WinPE bootable USB drive with EaseUS partitioning software.
Step 1. To create a bootable disk of EaseUS Partition Master, you should prepare a storage media, like a USB drive, flash drive or a CD/DVD disc. Then, correctly connect the drive to your computer.
Step 2. Launch EaseUS Partition Master, and find the «Bootable Media» feature on the left. Click on it.
Step 3. You can choose the USB or CD/DVD when the drive is available. However, if you do not have a storage device at hand, you can also save the ISO file to a local drive, and later burn it to a storage media. Once made the option, click the «Create» button to begin.
- Check the Warning message and click «Yes».
When the process finishes, you have successfully created an EaseUS Partition Master WinPE bootable disk. Now, you can manage your hard disks and partitions through the bootable drive whenever the computer fails to boot normally.
If you have RAID drives, load the RAID driver first by clicking Add Driver from the menu bar, which can help you add the driver of your device under WinPE environment, as some specific device cannot be recognized under WinPE environment without drivers installed, such as RAID or some specific hard disk.
Once the Easeus Partition Master bootable disk has been created, you can access your computer and the disk from this USB bootable drive for subsequent disk repair and data recovery operations.
Wrapping Up
How to create a UEFI bootable USB on Windows 10? If you are still struggling with this question, you can find the answer here. You can create a UEFI bootable disk in four ways by using Windows 10 installation media, Diskpart, and Refus.
If you need to boot your computer from a USB bootable disk and manage or repair your disk in a WinPE environment, we strongly recommend you use EaseUS Partition Master, which enables you to clone failing hard drive to a new HDD/SSD.
Preparing a bootable USB of Windows 10 is as simple as making a bootable USB of Windows 8 or Windows 7. In fact, all the methods and tools out there to create Windows 7 bootable USB work great with Windows 10 as well.
To prepare the bootable UEFI USB drive of Windows 10, we recommend using a free tool called Rufus over the Microsoft USB/DVD Download Tool as Rufus is more reliable and offers more features when compared to other tools in the market.
But since there are many users who might want to use the official Windows USB/DVD Download Tool, we will be using the tool to prepare the bootable USB of Windows 10. And we will use the free Rufus tool to prepare bootable UEFI Windows 10 USB drive (method 1).
Method 1 of 2
Bootable UEFI USB of Windows 10 using Rufus
UPDATE on April 2nd, 2019: Rufus now supports downloading Windows 10 ISO from Microsoft. Refer to our how to download Windows 10 ISO using Rufus guide for directions.
Step 1: Visit this page and download the latest version of Rufus. Rufus is a portable utility and hence doesn’t require an installation.
Step 2: Connect your 8GB+ USB drive to your PC. Be sure to backup all data from your USB drive.
Step 3: Run the Rufus utility. Click the Yes button when you see the UAC prompt to launch the tool.
Step 4: Under the Device section, select the USB drive that you want to make bootable, select MBR partition scheme for BIOS or UEFI computers, or GPT partition scheme for UEFI computer depending the type of partition type on your PC.
Step 5: Next, select the File system as FAT32 (default) as it supports both BIOS and UEFI. But if you’re sure that your PC doesn’t support UEFI, you can choose NTFS for a faster installation.
Step 6: Enter a volume label, click on the CD/DVD drive icon to browse to the Windows 10 ISO image file. Select the file. To download the latest ISO, please go through download Windows 10 ISO from Microsoft guide.
Step 7: Finally, click the Start button, click the OK button when you see the warning dialog to continue its job.
Once Rufus completes its job, you’ll see the “Done” message. That’s it!
You can now open UEFI settings and make necessary changes to boot from USB drive.
Method 2 of 2
Windows 10 bootable USB using USB/DVD Download Tool
IMP: If you get “The selected file is not a valid ISO file” error, please follow the instructions mentioned in our how to fix the selected file is not a valid ISO file error guide.
WARNING: Before using this tool, please make sure that your PC doesn’t support UEFI as Windows USB/DVD Download Tool doesn’t help you prepare the bootable USB for UEFI PCs. To create a bootable USB of Windows 10 for UEFI supported PCs, please follow the instructions in Method 1.
Step 1: Click on this official link to download Windows USB/DVD Download Tool directly from Microsoft servers.
Step 2: Connect a USB flash or hard drive with 4GB+ capacity and backup data before continuing further. Please be sure to back up all data from your USB drive as the drive will be formatted in the coming steps.
Step 3: Run the downloaded USB/DVD Download Tool setup file and then follow the easy on-screen instructions to get it installed on your PC running Vista, Windows 7, Windows 8 or Windows 8.1.
Step 4: Launch Windows 7 USB/DVD Download Tool, click the Browse button to browse to the folder where Windows 10 ISO image file is located. After selecting the ISO image, click the Next button.
Step 5: In the following screen, you need to select the USB device as your media type. To do so, click on the USB device button. And if you want to prepare the bootable DVD, please click DVD instead.
Step 6: Next, you’ll be asked to select your USB drive. Please carefully select your USB drive from the drop-down list before clicking the Begin Copying button. Again, it’s important to note that a wrong selection of drive will cause data loss.
The Windows 7 USB/DVD Download Tool starts copying all the contents of the ISO image to the USB drive and will make it bootable in a couple of minutes.
Once done, you can connect bootable USB to the PC on which you want to install Windows 10, change BIOS settings to boot from USB, and start installing Windows 10.
Hope this helps!
Официальный релиз новейшей операционной системы Windows 10 от компании Microsoft, наконец, состоялся. 29 июля система, тестируемая на протяжении 9 месяцев, стала доступна в 190 странах мира. Решение познакомиться со всеми ее достоинствами и недостатками уже приняли для себя многие читатели нашего блога. Пошаговый мануал, который позволит вам самостоятельно подготовить флэш-накопитель для «чистой» установки Windows 10 с поддержкой технологии UEFI мы подробно опишем в этой статье.

Как получить обновление до Windows 10?
Получить обновление текущих версий лицензионных Windows 7, 8, 8.1 и Windows Phone 8.1 до Windows 10 вы сможете в течение всего года совершенно бесплатно. При этом если вы воспользуйтесь предложением в течение “бесплатного года”, то устройство на котором будет установлен пакет 10-ки, будет получать обновление до тех пор, пока будет осуществляться его поддержка производителем. Для этой цели можно использовать удобный инструмент Get Windows 10, уведомляющий о доступности новой версии и обеспечивающий автоматическую загрузку и установку всех необходимых компонентов.

Такая беспрецедентная щедрость привлекает многих, но все преимущества нового продукта, конечно же, будут доступны тем, кто установит у себя на компьютере свежую систему, не отягощенную уже имеющимися багами настроек и ошибок предыдущих версий. Установка “чистой” Windows 10 может заинтересовать и тех, кто устанавливает 10-ку в качестве второй ОС.
Создание загрузочного USB носителя для установки Windows 10
Для установки программного пакета понадобиться загрузить на сменный носитель образ ISO, загрузить с него устройство и выполнить установку, следуя простым рекомендациям. Создать установочный USB носитель вы можете непосредственно на официальном сайте. Образ ISO с Win 10 при выборе соответствующей опции в процессе создания загрузочной флэшки предоставляется Microsoft в автоматическом режиме.
Опишем последовательность действий:
Подсоединяем к нашему устройству флэшку, объемом не менее 4 Гб.

Переходим на страницу, на которой компания предлагает нам скачать дистрибутив Windows 10.
Жмем ”Начать”.

В открывшемся окне вводим свой логин и пароль к учетной записи, жмем подключиться (SIGN IN). За неимением учетной записи создаем новую (SIGN UP Now). На следующей странице жмем:

На следующей странице выбираем разрядность дистрибутива Win 10 (Download Tool Now (32-bit version или 64-bit version)).

Скачиваем утилиту MediaCreationToolх32/x64.exe которая поможет нам создать загрузочную флэшку Windows 10. Запускаем.

Выбираем опцию: Создать установочный носитель для другого компьютера.

В следующем окне настраиваем параметры:

Выбираем носитель:

Жмем далее, запуская процесс создания загрузочной флэшки.

Процесс окончен.

Создание загрузочного USB носителя Windows 10 с поддержкой UEFI
На новых системах, использующих в качестве альтернативы привычному BIOS прогрессивную технологию UEFI стандартная установка может повлечь за собой множество ошибок, а в ряде случаев не позволит загрузиться со сменного носителя. Почему, будет понятно ниже. Для тех, кто не знаком с технологией UEFI мы приведем краткий ознакомительный экскурс, который позволит представить себе базовые отличия технологий BIOS и UEFI. Те, кто уже активно пользуется UEFI, могут пропустить эту часть статьи и перейти к описанию процесса создания загрузочной флэшки Windows с поддержкой UEFI.
Почему важна поддержка UEFI BIOS?
Привычная для нас микросхема БИОС, размещенная на материнской плате проверяет жесткие диски на предмет главной загрузочной записи MBR (Master Boot Record) весом 512 байт в нулевом секторе. При ее обнаружении БИОС запускает код на выполнение, после чего загружается операционная система. Таким образом, БИОС запускается до старта операционной системы, проверяет (POST), задает требуемые параметры работы процессору, материнке и прочим элементам системы и, при обнаружении проблем подает соответствующий звуковой сигнал о неисправности.
Для того, чтобы представлять себе, зачем авторам потребовалось столь кардинально менять стереотипы и привычные концепции, разберемся, что же представляет собой UEFI BIOS в сравнении со знакомой нам системой ввода-вывода (BIOS).
BIOS vs UEFI BIOS
UEFI (Unified Extensible Firmware Interface — унифицированный расширяемый интерфейс прошивки) — технология от компании Intel, пришедшая на смену привычному нам BIOS, от которого она отличается целым рядом принципиальных решений.
- Объем максимального адресного пространства жесткого диска на компьютере под управлением стандартного БИОС с главной загрузочной записью MBR не превышает 2,2 ТБ. Другими словами, если на вашем компьютере будет установлен жесткий диск в 3 ТБ операционной системе будет доступно лишь 2 из них. UEFI BIOS не ограничивает полезный объем винчестера 2,2 терабайтами, открывая доступ к разделам с максимальным объемом 18 экзабайт (18 000 000 терабайт).
- На компьютере под управлением стандартного БИОС с главной загрузочной записью MBR жесткие диски имеют ограничение на создание первичных разделов в количестве 3-х основных и 1 дополнительного (всего до 4 разделов), в котором вы можете создавать логические диски с последующей установкой ОС. В свою очередь, операционная система не будет запускаться без соответствующего диспетчера загрузки на основном раздела. UEFI BIOS способна обеспечить работу винчестеров с таблицей разделов GUID (GPT), которых можно разбить на 128 первичных разделов.
- Микросхема БИОС подвержена атакам руткитов, коды которых способны загрузиться до операционной системы, получив, таким образом, полный контроль над компьютером пользователя. UEFI BIOS на этом этапе надежно защищена от описанной проблемы, поскольку загрузка стартует в безопасном режиме «Secure Boot».
- UEFI BIOS — своего рода самостоятельная мини-операционка между основной ОС и микропрограммами, обеспечивающими управление аппаратными низкоуровневыми функциями оборудования. UEFI — это удобный, гибкий и понятный графический интерфейс управления и, что немаловажно для комфортной работы, с поддержкой мыши и русскоязычной версии меню.

К перечисленным преимуществам UEFI BIOS нужно добавить:
- поддержку жесткими дисками с таблицей (GPT) прогрессивной адресации LBA (в отличие от устаревшей CHS);
- ощутимо возросшую скорость загрузки системы, что достигается благодаря ускоренному режиму чтения блоков EFI I/O до 1 Мб за раз, заранее определенного UEFI на этапе установки ОС загрузочного диска;
- сетевая аутентификация;
- простоту обновления, универсальные графические драйверы.
- поддержку 32-х и 64-х битных процессоров, возможность использования совместно с процессорами Itanium, x64, x86 и ARM;
- поддержку загрузочных и тестовых сервисов;
- реализацию стандартных протоколов взаимодействия (включая сетевые);
- наличие собственной EFI-оболочки с возможностями запуска собственных EFI-приложений и выхода в сеть Интернет на уровне UEFI и пр.
Заметим, что для возможности загрузки старых ОС, которые поддерживают только BIOS, в UEFI предусмотрен режим эмуляции BIOS CSM (Compatibility Support Module).
Код UEFI по своему размеру значительно превышает загрузочный код BIOS и располагается в специальном каталоге /EFI/, который, в свою очередь, может храниться в самых различных местах: от микросхемы системной платы — до раздела жесткого диска или сетевого хранилища.
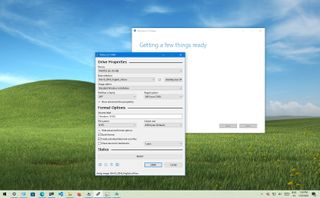
Чтобы создать установочную флэшку для компьютеров с обновленным BIOS UEFI нам понадобиться специальная компактная бесплатная программка, не требующая установки и именуемая Rufus. Поскольку Rufus поддерживает как MBR, так и GPT (см. описание UEFI выше), то установить Windows 10 с ее помощью вы сможете на любой компьютер, как с БИОС, так и с UEFI.

Последовательность действий:
- Скачиваем портативную версию Rufus. Запускаем программу.
- В меню ”Устройства” выбираем сменный накопитель, на который вы намерены записать образ системы.
- В меню “Схема раздела и тип системного интерфейса” отмечаем опцию “GPT для компьютеров с UEFI”.
- В меню “Файловая система” и “Размер кластера” ничего не меняем. Отмечаем флажком опцию “Создать загрузочный диск”.
- В выпадающем окне выбираем опцию “ISO-образ” и указываем на образ диска ОС.
- Жмем кнопку “Старт” и дожидаемся окончания операции.
После проделанных операций загружаемся с подготовленной флэшки и устанавливаем Win 10. Если вся последовательность операций соблюдена, то проблем при инсталляции возникнуть не должно.
Скачать образ Windows 10 Insider Preview ISO для работы с программой можно, опять-таки, пройдя по ссылке. Процесс, описанный выше, полностью повторяется за исключением пункта 9, где мы выбираем создать ”образ ISO” и двух последующих простейших ступеней.
Что ж, теперь вы знаете, как получить доступ к преимуществам нового продукта от Microsoft. В добрый путь!
Похожие материалы:
(Image credit: Future)
When installing a fresh copy of Windows 10, you typically use a USB flash drive to launch the «Windows Setup» wizard to continue the installation process. However, on a device that has a Unified Extensible Firmware Interface (UEFI) instead of the legacy Basic Input/Output System (BIOS), it is crucial to use the correct media for the firmware type to complete the installation successfully.
On Windows 10, you can use at least two tools to create a bootable USB flash drive. You can use the Microsoft Media Creation Tool to download the files onto a removable drive with support for both firmware types (UEFI and legacy BIOS). Or you can use Rufus, a third-party tool that makes it easy to create a flash drive to install Windows with support for UEFI.
This guide will walk you through creating a Windows 10 USB flash drive with support for UEFI using the Microsoft Media Creation Tool and Rufus.
How to create Windows 10 UEFI boot media with Media Creation Tool
The Media Creation Tool is the best option available for creating a bootable USB media to perform an in-place upgrade or clean installation of Windows 10.
To create a Windows 10 USB media, connect a flash drive of at least 8GB of space, and then use these steps:
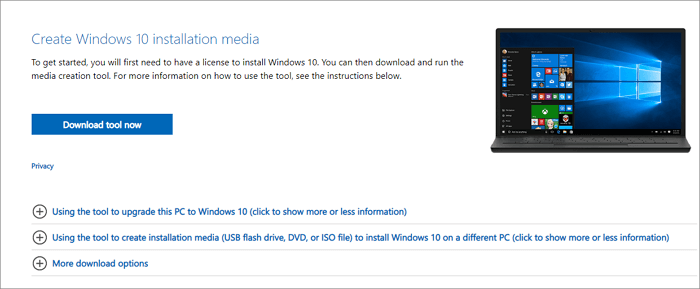
- Open the Windows 10 download page (opens in new tab).
- Under the «Create Windows 10 installation media» section, click the Download tool now button to save the file.
- Double-click the MediaCreationToolxxxx.exe file to launch the setup.
- Click the Accept button to agree to the licensing terms.
- Select the «Create installation media (USB flash drive, DVD, or ISO file) for another PC» option.

- Click the Next button.
- (Optional) Clear the «Use the recommended options for this PC» option.
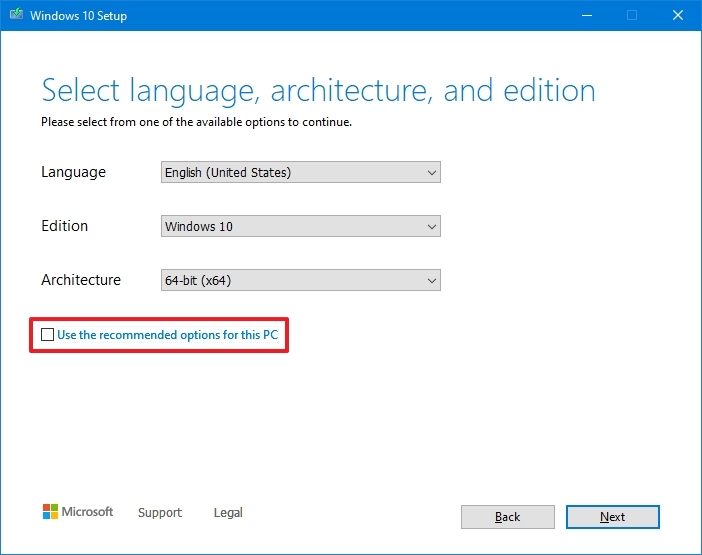
- Select the correct language, architecture, and edition of Windows 10 (if applicable).
- Quick tip: If you plan to install Windows on multiple computers running 32-bit and 64-bit architectures, use the «Architecture» drop-down menu and select the Both option to create a media that will work on both systems.
- Click the Next button.
- Select the USB flash drive option.
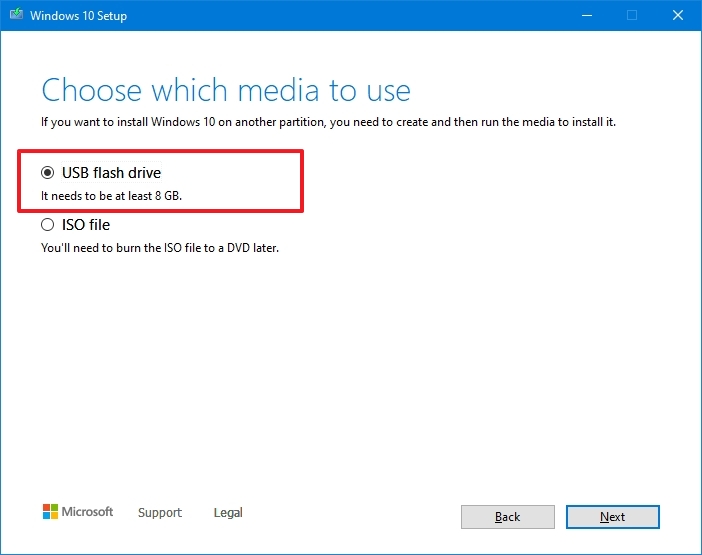
- Click the Next button
- Select the flash drive from the list. (If you do not see the device, click the «Refresh drive list» option.)

- Click the Next button.
- Click the Finish button.
Once you complete the steps, the Media Creation Tool will download the files and will create a bootable USB flash drive that you can use to install Windows 10 on computers with support for UEFI and BIOS.
How to create Windows 10 UEFI boot media with Rufus
If the Media Creation Tool does not work or you do not want to use it, then you can try Rufus, a popular free third-party tool that allows you to create an installation media with support for UEFI devices. The utility offers two ways to make the installation media, including using an existing ISO file or downloading the image from the Microsoft servers directly from the app.
Create flash drive with existing Windows 10 ISO
To create a USB media with an existing Windows 10 ISO file, connect a flash drive of at least 8GB of space, and use these steps:
- Open Rufus download page.
- Under the «Download» section, click the latest release (first link) and save the file.
- Double-click the Rufus-x.xx.exe file to launch the tool.
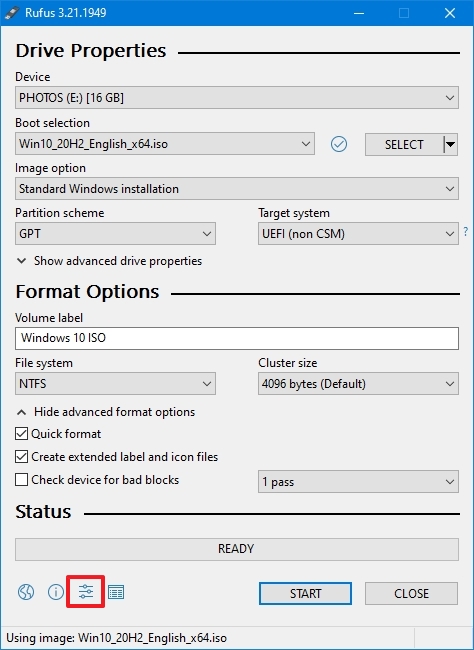
- Under the «Device» section, select the USB flash drive.
- Under the «Boot selection» section, click the Select button on the right.
- Select the Windows 10 ISO file from the folder location.
- Click the Open button.
- Use the «Image option» drop-down menu and select the «Standard Windows installation» option.
- Use the «Partition scheme» drop-down menu and select the GPT option.
- Use the «Target system» drop-down menu and select the UEFI (non CSM) option.
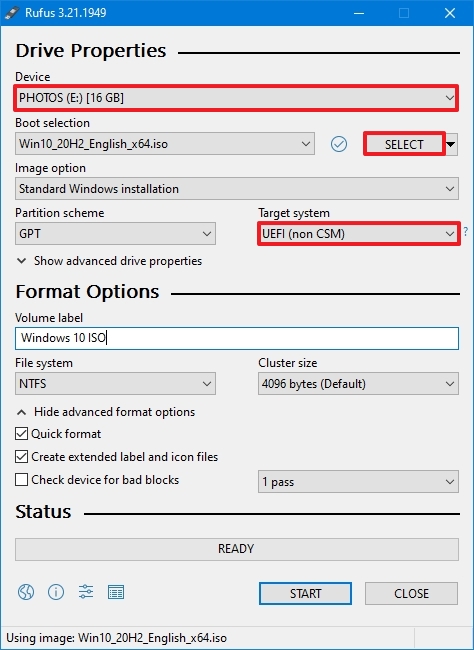
- Under the «Show Advanced drive properties» section, do not change the default settings (unless you know what you are doing).
- Under the «Volume label» field, confirm a name for the drive — for example, «Windows 10 USB.»
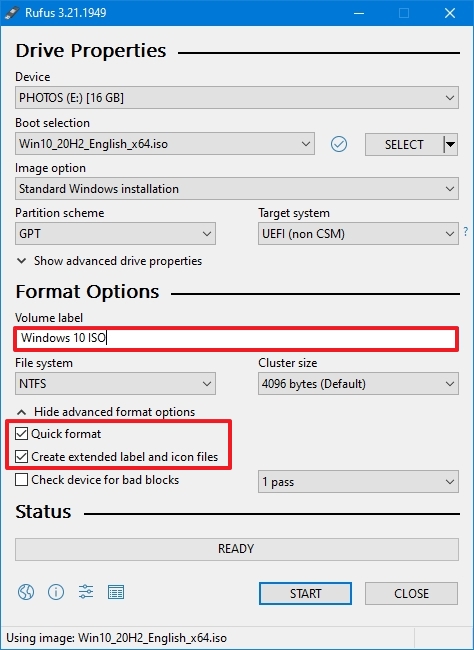
- Do not change the default settings in the «File system» and «Cluster size» options.
- Click the «Show advanced format options» setting.
- Check the Quick format option.
- Check the «Create extended label and icon files» option.
- Click the Start button.
- Leave the customization installation settings unchecked.
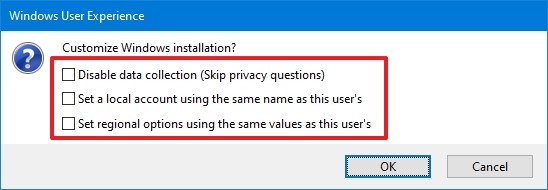
- Click the OK button to confirm.
- Click the Close button.
After you complete the steps, Rufus will create a USB flash drive to install Windows 10 on a device using UEFI.
Create flash drive downloading Windows 10 ISO
The tool also has a feature to download the Windows 10 ISO file, which you can then use to create a USB flash drive to install Windows 10.
To create an install media with UEFI support with Rufus, use these steps:
- Open Rufus download page.
- Under the «Download» section, click the latest release (first link) of the tool to save the file.
- Double-click the Rufus-x.xx.exe file to launch the tool.
- Click the Settings button at the bottom of the page.
- Under the «Settings» section, use the «Check for updates» drop-down menu and select the Daily option.

- Click the Close button.
- Close the Rufus tool.
- Double-click the Rufus-x.xx.exe file to reopen the utility.
- Under the «Device» section, select the USB flash drive from the list.
- Under the «Boot selection» section, click the arrow button next to the «Select» option and choose the Download option.
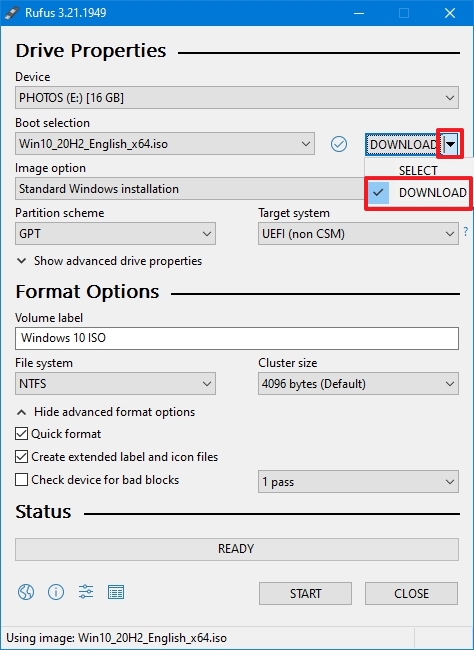
- Click the Download button.
- Use the «Version» drop-down menu and select the Windows 10 option.
- Click the Continue button.
- Select the 22H2 (Build 19045.xxx — xxxx.xx) option to download the Windows 10 November 2021 Update.
- Click the Continue button.
- Use the «Edition» drop-down menu and select the Windows 10 Home/Pro/Edu option.
- Click the Continue button.
- Use the «Language» drop-down menu and select your installation language.
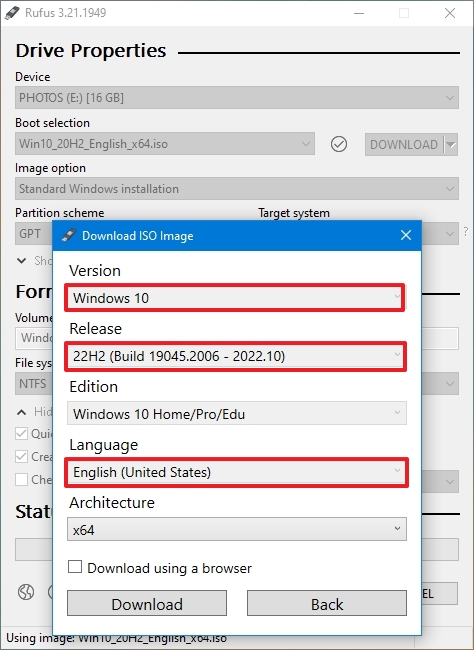
- Quick note: If you are located in the United States, select the «English» option. Otherwise, select the «English International» option or the language that applies to you.
- Click the Continue button.
- Use the «Architecture» drop-down menu and select the 32-bit or 64-bit option (recommended).
- Quick tip: You can check your computer’s architecture on Settings > System > About, and under the Device specifications section, confirm whether the «System type» is 64-bit or 32-bit.
- Click the Download button.
- Select a folder to save the ISO file.
- Click the Save button.
- Use the «Image option» drop-down menu and select the «Standard Windows installation» option.
- Use the «Partition scheme» drop-down menu and select the GPT option.
- Use the «Target system» drop-down menu and select the UEFI (non CSM) option.
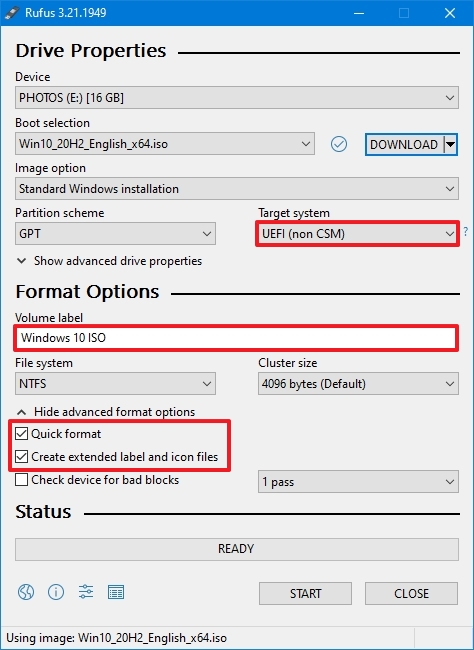
- Under the «Show Advanced drive properties» section, do not change the default settings.
- Under the «Volume label» field, confirm a name for the bootable drive — for example, «Windows 10 USB.»
- Under the «File system» and «Cluster size» sections, do not change the default settings.
- Click the «Show advanced format options» button.
- Check the Quick format option.
- Check the «Create extended label and icon files» option.
- Click the Start button.
- Leave the customization installation settings unchecked.
- Click the OK button.
- Click the Close button.
Once you complete the steps, Rufus will run the automated script to download the Windows 10 ISO file from the Microsoft servers and create a bootable media to install the operating system on a UEFI device without needing the Media Creation Tool.
When you have the USB boot media with support for UEFI systems, you can launch the «Windows Setup» wizard to perform a clean installation of Windows 10 or an in-place upgrade. However, since the «UEFI:NTFS bootloader» does not include a digital signature for secure boot, you must temporarily disable secure boot on the motherboard firmware before you can boot into the setup. Typically, you would do this from within the UEFI, which you can access by hitting one of the function keys (F1, F2, F3, F10, or F12), Esc, or the Delete key, as soon as you start the computer.
The firmware settings are different per manufacturer and even by device model. As a result, check your device manufacturer’s support website for more specific instructions. After the installation of Windows 10, you can enable secure boot again.
More resources
For more helpful articles, coverage, and answers to common questions about Windows 10, visit the following resources:
- Windows 11 on Windows Central — All you need to know
- Windows 10 on Windows Central — All you need to know
Get the best of Windows Central in in your inbox, every day!
Mauro Huculak is technical writer for WindowsCentral.com. His primary focus is to write comprehensive how-tos to help users get the most out of Windows 10 and its many related technologies. He has an IT background with professional certifications from Microsoft, Cisco, and CompTIA, and he’s a recognized member of the Microsoft MVP community.