The last release of Mac OS doesn’t have the option to create a bootable USB from Bootcamp like previous versions, and it is a problem because that require uses other tools.
I am updating this post today Dec 12, 2018. The reason is that I was only using UNetbootin to create the bootable USB, I will leave guide as a second method since it still working, and I will explain to you how you can create the bootable Windows USB without extra software.
The first step for both methods requires to format your USB device to NTFS, this is the default filesystem, alternative you can use ExFAT but the installation could fail.
Format USB to ExFAT (Under your own risk)
In order to boot from the USB, you need to format the USB to ExFAT, you can do it using Disk Utility (it comes with MacOS).
This step is the same for both methods. You need to show all the devices in Disk Utility» before to start the process.

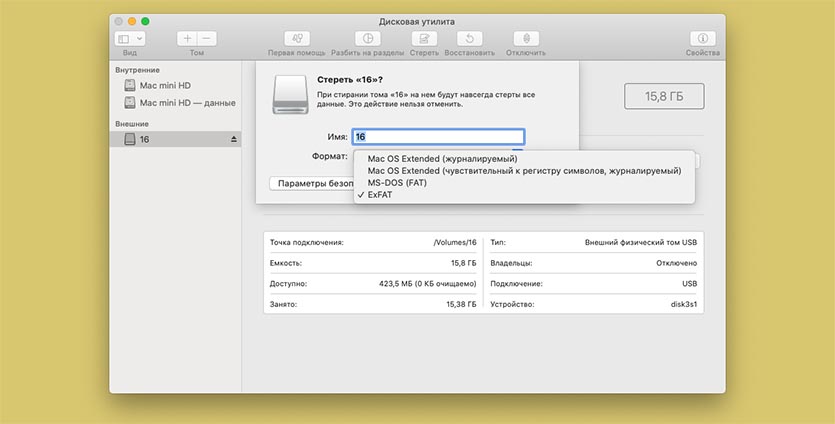
Select your USB device in the list (not the partition), right click and then click on the Erase option:

In the next screen make sure you select these two options:
- Format: ExFAT
- Scheme: Master Boot Record
Click the Erase button.

If for some reason it fails, probably is because MacOS still using the USB, just repeat the steps, but if you see a screen similar to above screen is because the operation is successful.

Format USB with the terminal
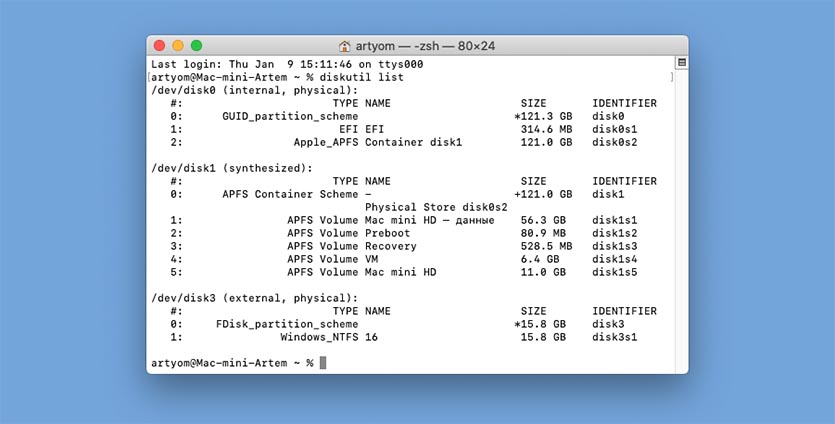
You also can format the USB from the terminal, but you have to take care to use the correct device because, if you use the wrong name you will lose everything.
With this command you can list the device on MacOS:
diskutil list
This is an example, my USB is the disk2:

This command is to format the USB, the last parameter is the the USB:
diskutil eraseDisk ExFAT "WINDOWS10" MBRFormat disk2

Copy Windows files to USB — Method 1
This process is very easy doesn’t require to install other software, and they are just a few steps:
Open Windows ISO
Just double click on the ISO image, MacOS mount the image automatically.

Copy files
Now you only need to copy the files and paste them to the USB.
Command + ASelect all files.Command + CCopy files.- Go to your USB
Command + Vpaste the files.

This process could fail if you are using a USB with FAT32 because the file install.win is over 4GB, if this is the case try to open the terminal and copy paste the files from there (no always works. Try to follow the instructions to format the USB in ExFAT, NTFS works for some BIOS).

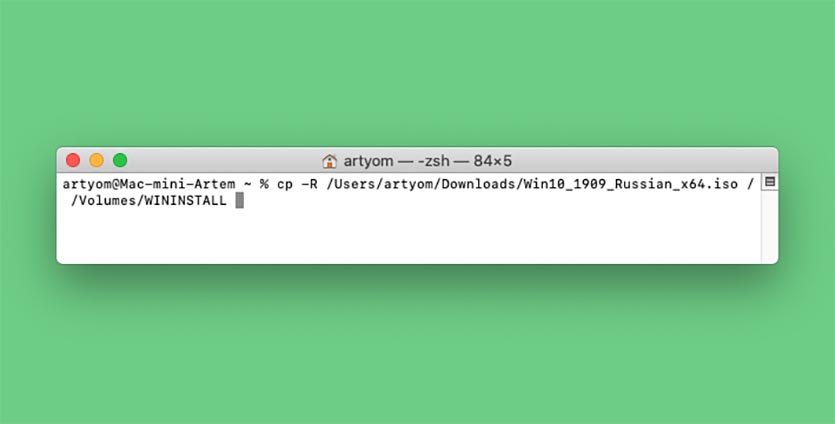
This is the command to copy the files from the ISO to the USB:
cp -rp /Volumes/CCCOMA_X64FRE_EN-US_DV9/* /Volumes/WINDOWS10/
And that is all, now you can try boot from the USB.
UNetbootin — Method 2
I will show you how you can use UNetbootin to create a bootable USB, it can be used no only for Mac but for Windows and Linux distributions too.
UNetbootin is free software and it is also available for Windows and Linux.
Check the path name of your USB Disk.
Always in Disk Utility, select the new partition that we created in the previous step, and click on the information button, it will give you the information about the new partition.

You also can use the terminal and the command diskutil to see the list of drives:
diskutil list
Download UNetbootin:
-
Download the
dmgdirectly from the Website.
And copy theappto the/Applicationfolder. -
I prefer to use homebrew to install applications, you can check this article for more information: Installing Applications on Mac with Homebrew:
brew cask install --appdir="/Applications" unetbootin
Makes the USB booteable
Open UNetbootin and you only need select 3 options:
- Diskimage and ISO
- Now we need open the ISO Windows image that is on our computer.
- Select your USB device on UNetbootin.
- Click on the OK, button and wait to the process end it will take a time.

NOTES:
- I tested other tools like
ddandEtcherbut they are not working because Windows requires extra steps, for the moment this is the only easy tool that I know that works if you are on Windows try Rufus. - Some users reported that UNetbootin is not working, if after to format the USB drive and change the block size is not working for you try another Drive with enough space.
Most new PCs don’t come with DVD drives anymore. So it can be a pain to install Windows on a new computer.
Luckily, Microsoft makes a tool that you can use to install Windows from a USB storage drive (or «thumbdrive» as they are often called).
But what if you don’t have a second PC for setting up that USB storage drive in the first place?
In this tutorial we’ll show you how you can set this up from a Mac.
Step 1: Download the Windows 10 ISO file
You can download the ISO file straight from Microsoft. That’s right — everything we’re going to do here is 100% legal and sanctioned by Microsoft.
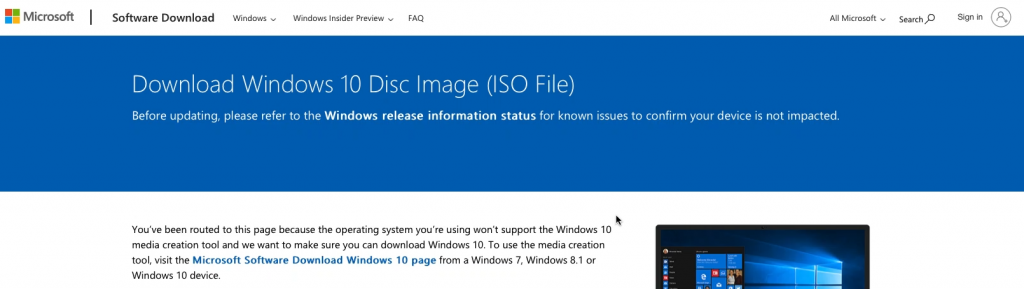
You can download Windows 10 directly from Microsoft for free using this link. If you visit the link using a Windows device, you’ll be redirected to the Windows Media Creation Tool like this:
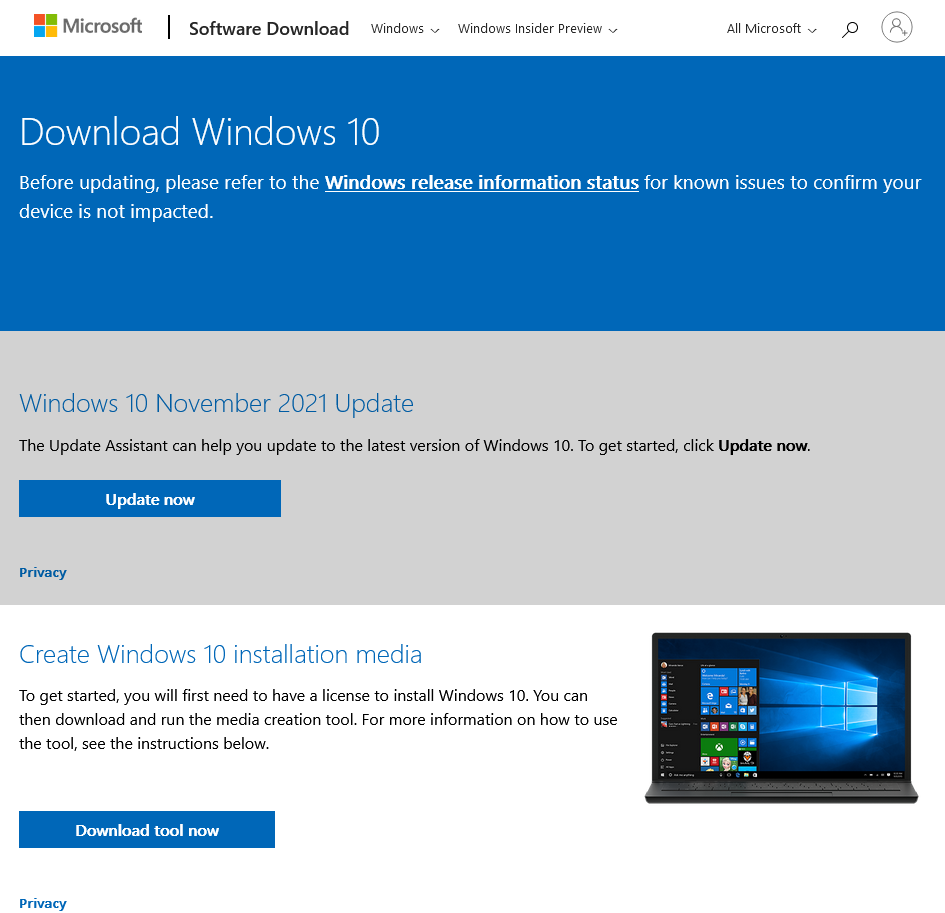
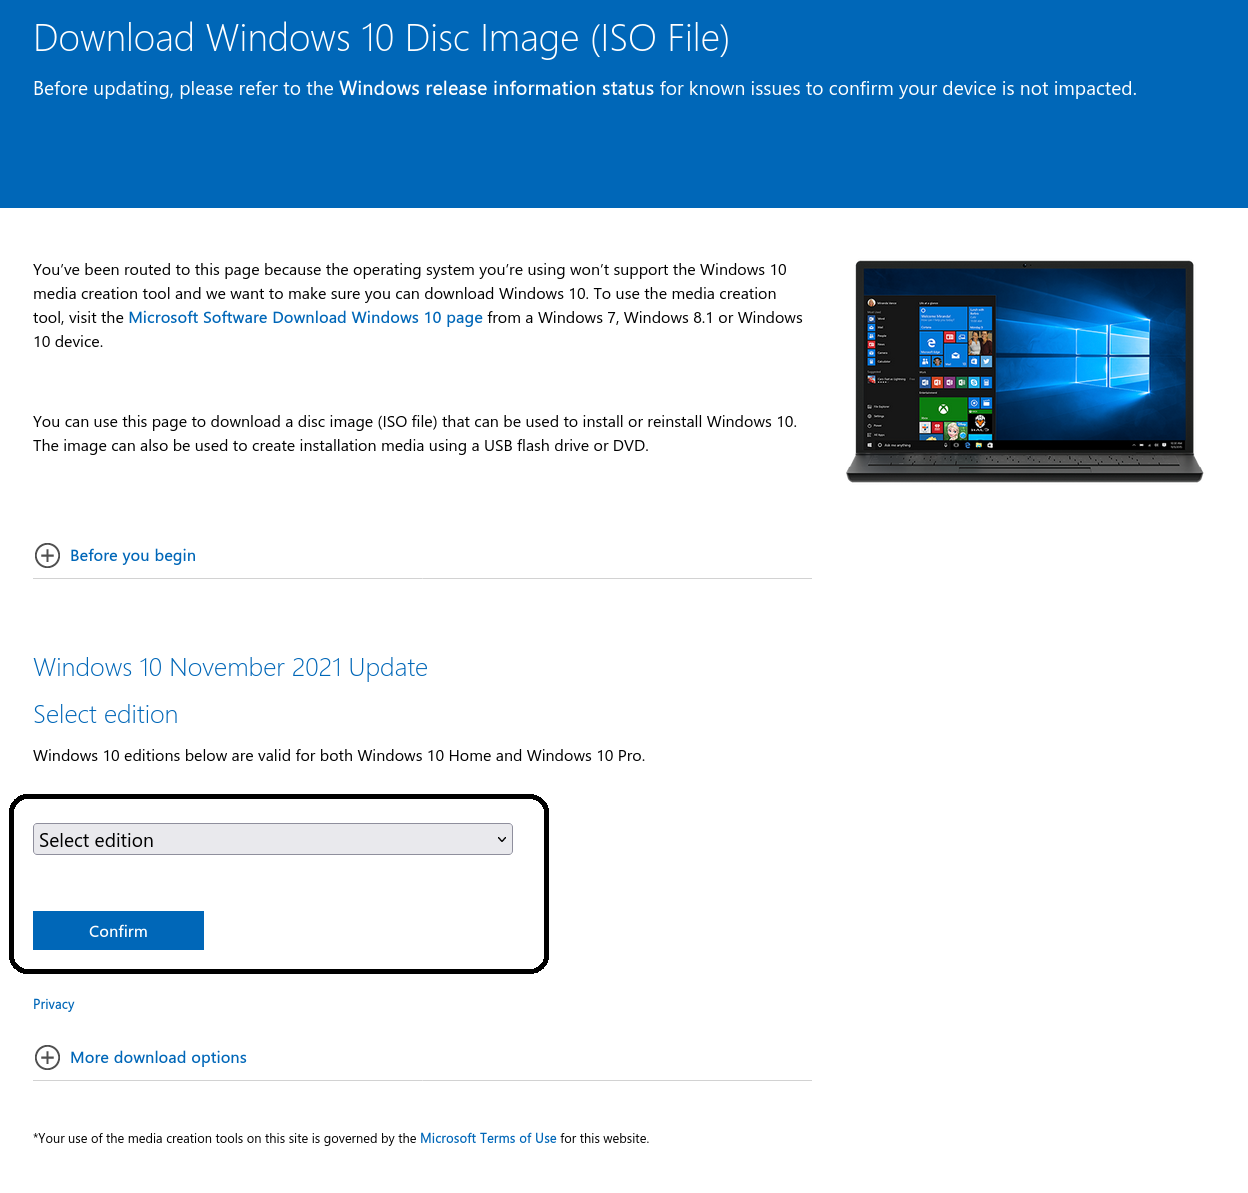
If you visit the same link from a non-Windows device, such as a Mac or a Linux device or any smartphone, you’ll land on the official ISO download page:
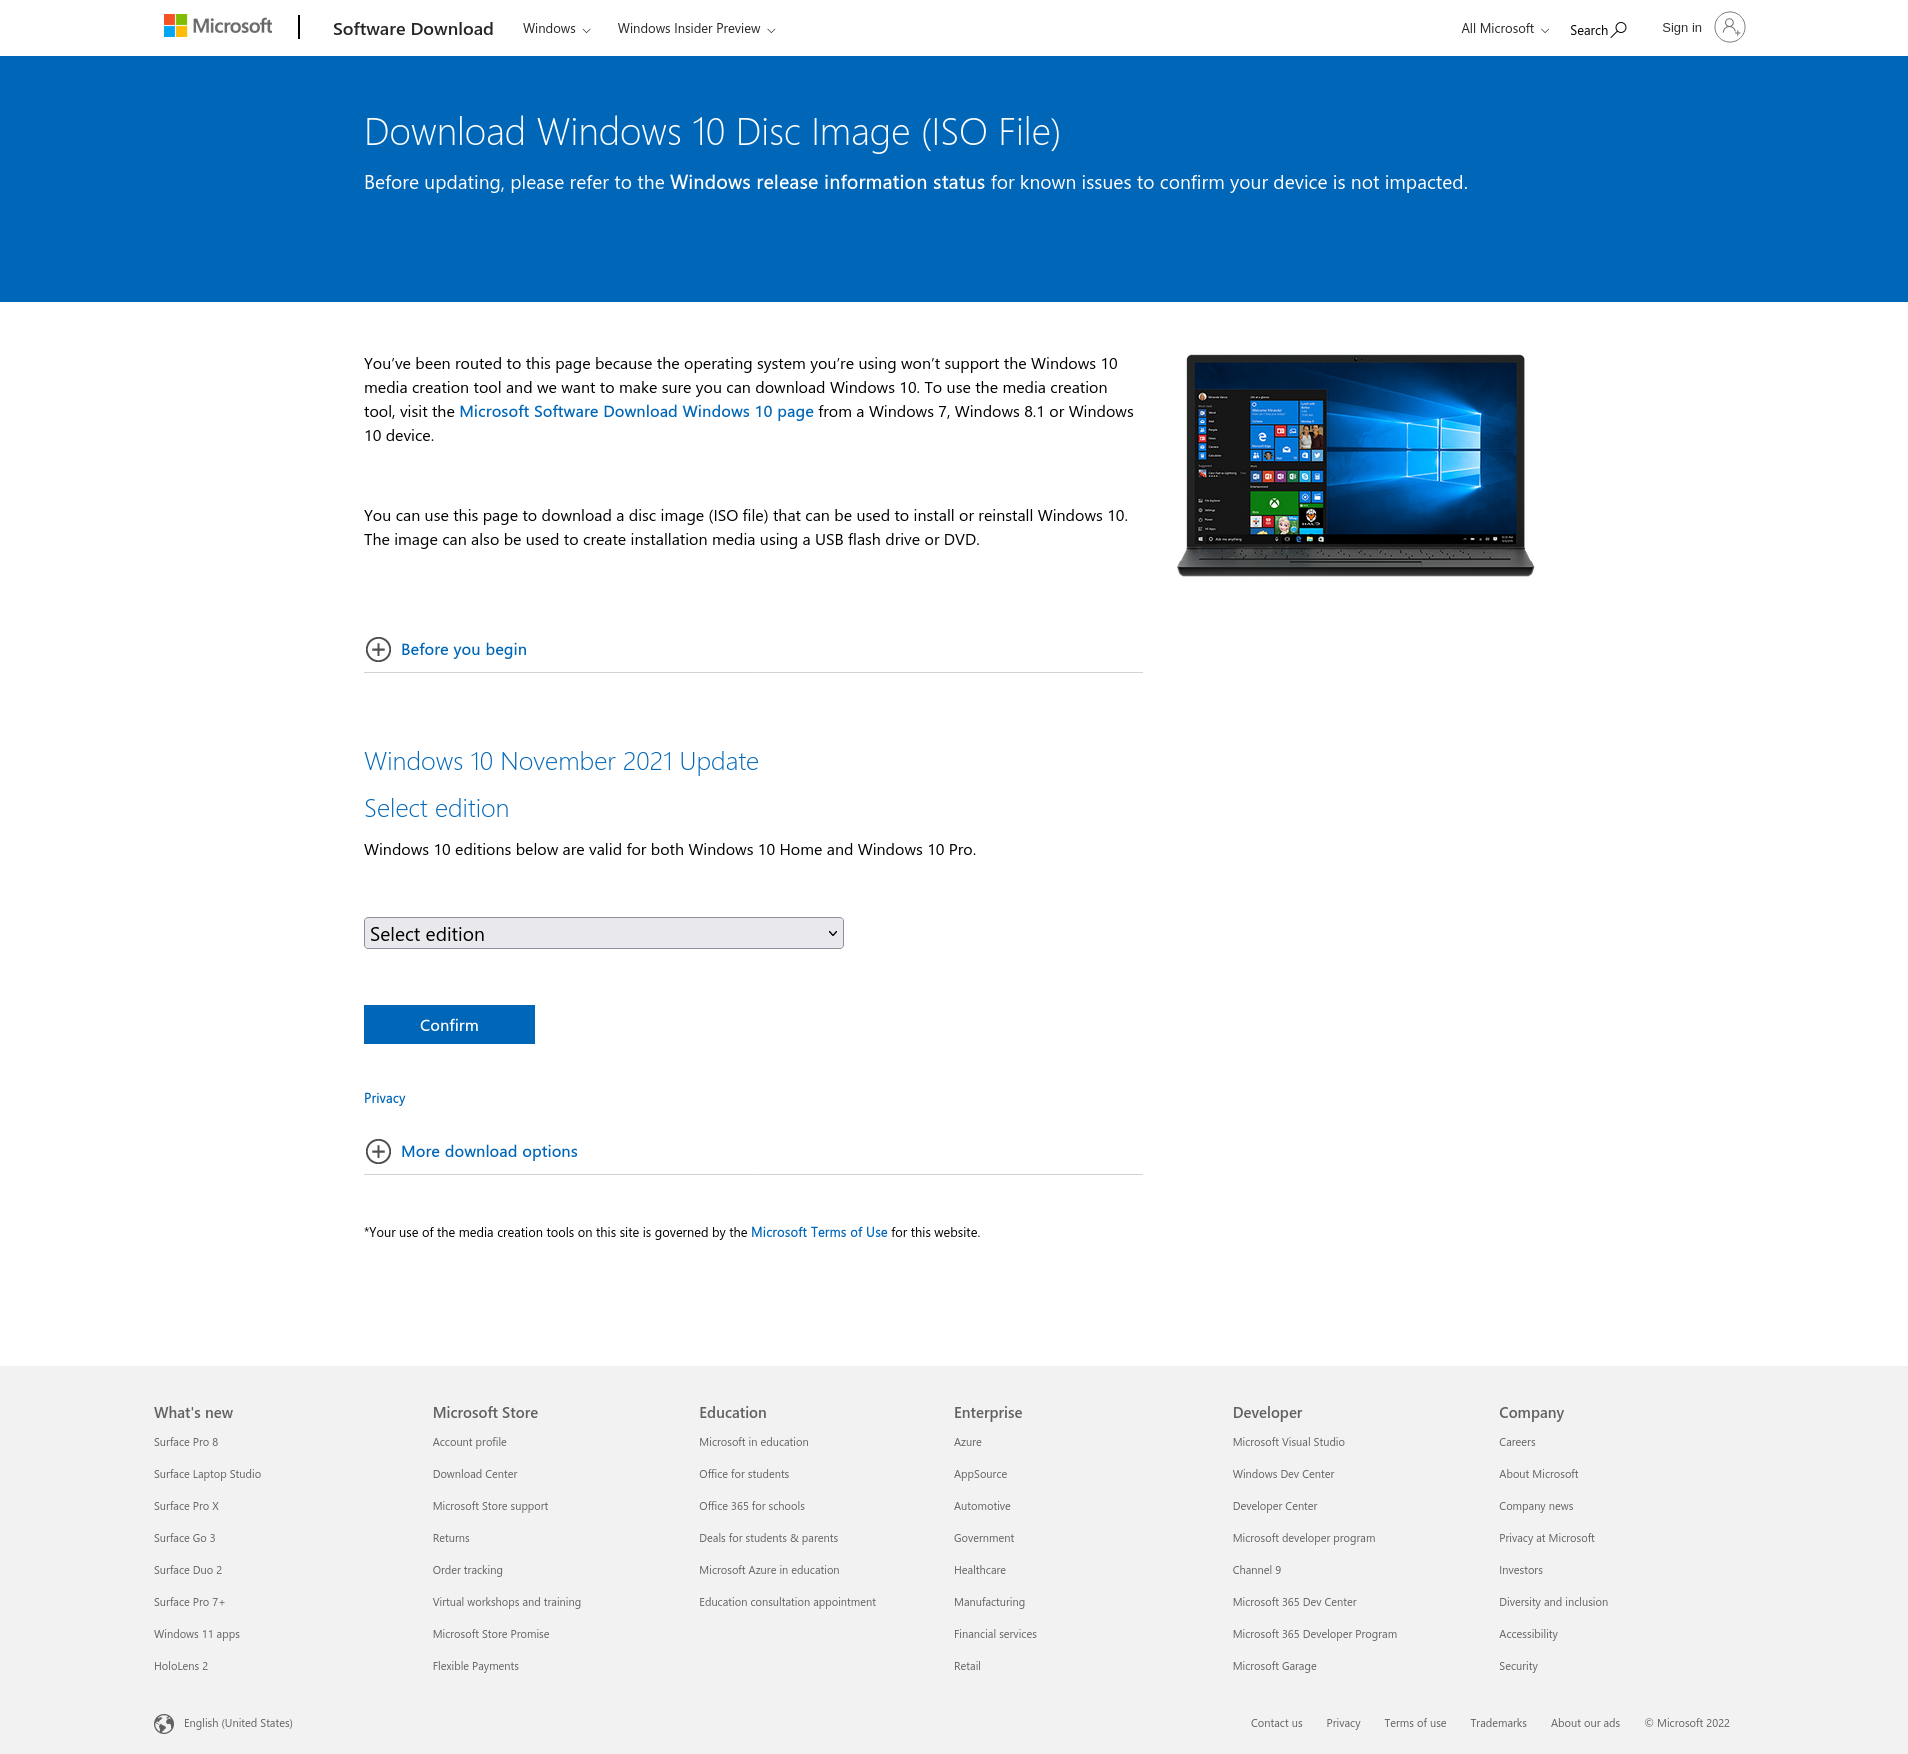
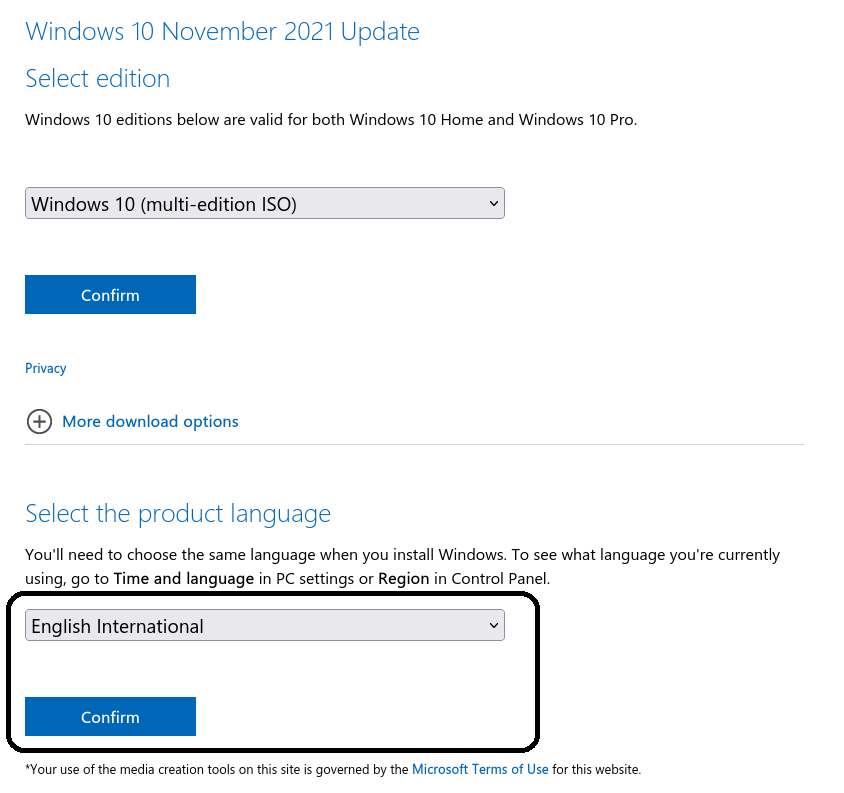
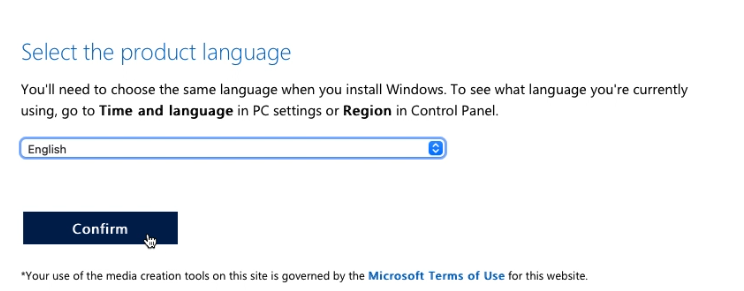
Select your desired edition from that drop-down and hit Confirm.
At this time, Windows 10 (multi-edition ISO) was the only one available. Once you’ve confirmed your edition, you’ll get another drop-down that lets you pick a language. Pick the one you want and hit the Confirm button.
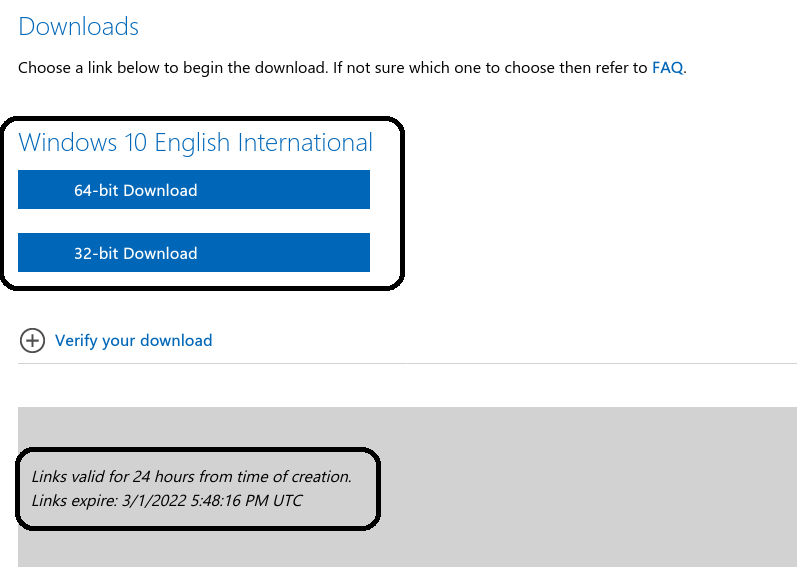
Once you’ve confirmed your language, you’ll get two download links, one for the 64-bit edition, and the other one for the 32-bit edition. Both links are valid for 24 hours and the page will also show when they expire.
If you don’t know how to decide between 64-bit and 32-bit, here’s what you should do. If you have a processor that supports 64-bit architecture and you have more than 4GB of RAM, go with the 64-bit one. 32-bit operating systems have a 4GB RAM limit.
To figure out whether your processor supports 64-bit architecture or not, head over to a website like WikiChip, and search for your processor model.
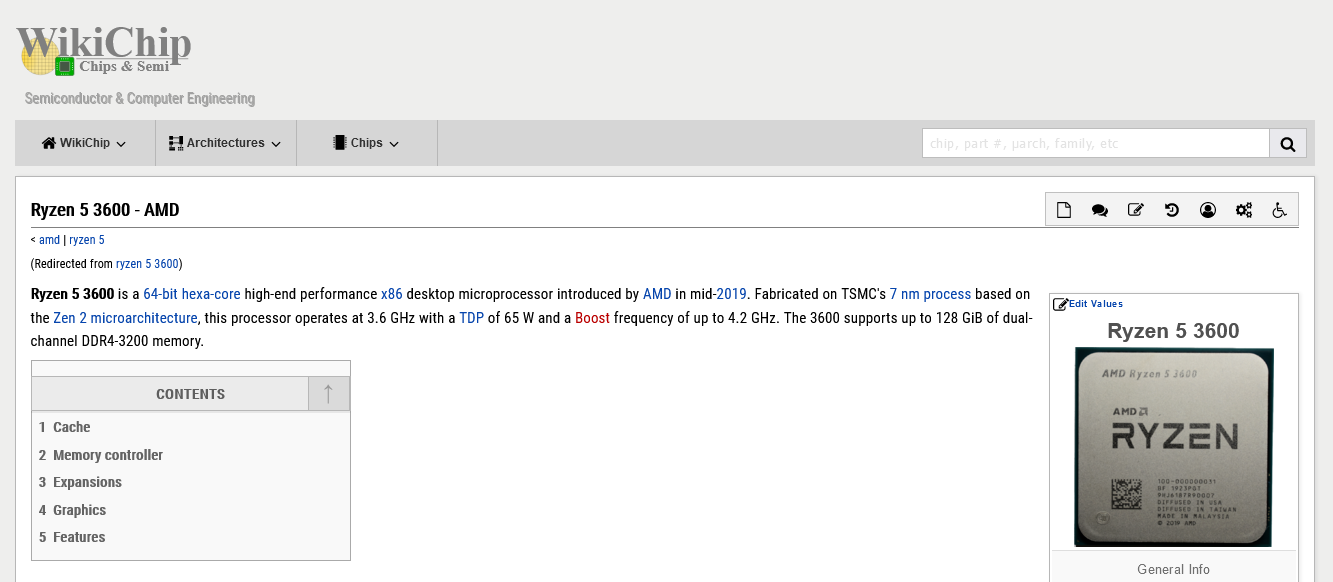
As you can see in the screenshot above, my Ryzen 5 3600 supports 64-bit architecture. I also have 16GB of RAM which is a lot more than 4GB, so I’ll go for the 64-bit edition.
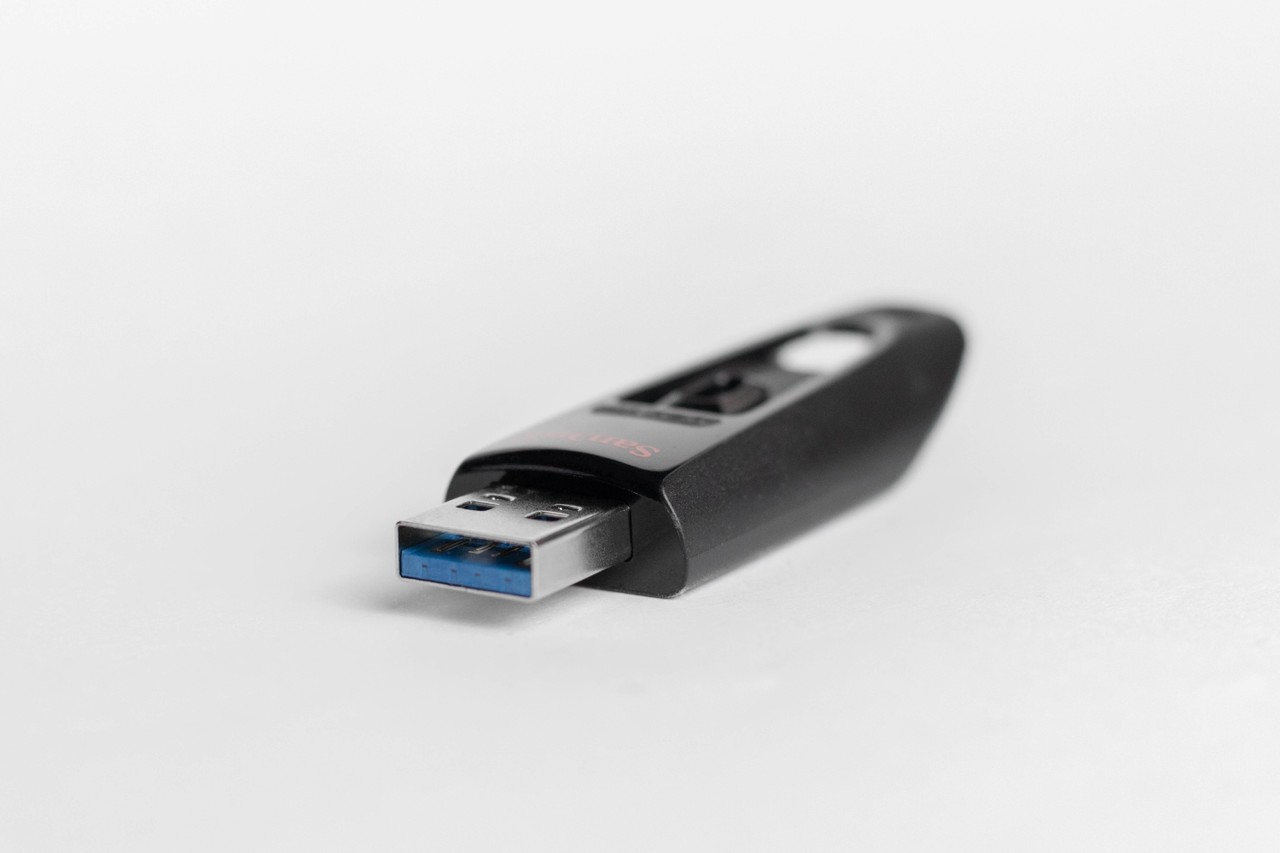
Step 2: Insert your USB storage drive into your Mac
The ISO file is only about 5 gigabytes, but I recommend you use a USB drive with at least 16 gigabytes of space just in case Windows needs more space during the installation process.
I bought a 32 gigabyte USB drive at Walmart for only $3, so this shouldn’t be very expensive.
Stick your USB drive into your Mac. Then open your terminal. You can do this using MacOS Spotlight by pressing both the ⌘ and Space bar at the same time, then typing «terminal» and hitting enter.
Don’t be intimidated by the command line interface. I’m going to tell you exactly which commands to enter.
Step 3: Use the diskutil command to identify which disk your USB drive is mounted on
Open Mac Spotlight using the ⌘ + space keyboard shortcut. Then type the word «terminal» and select Terminal from the dropdown list.
Paste the following command into your terminal and hit enter:
diskutil list
You will see output like this (note — your Mac’s terminal may be black text on a white background if you haven’t customized it).
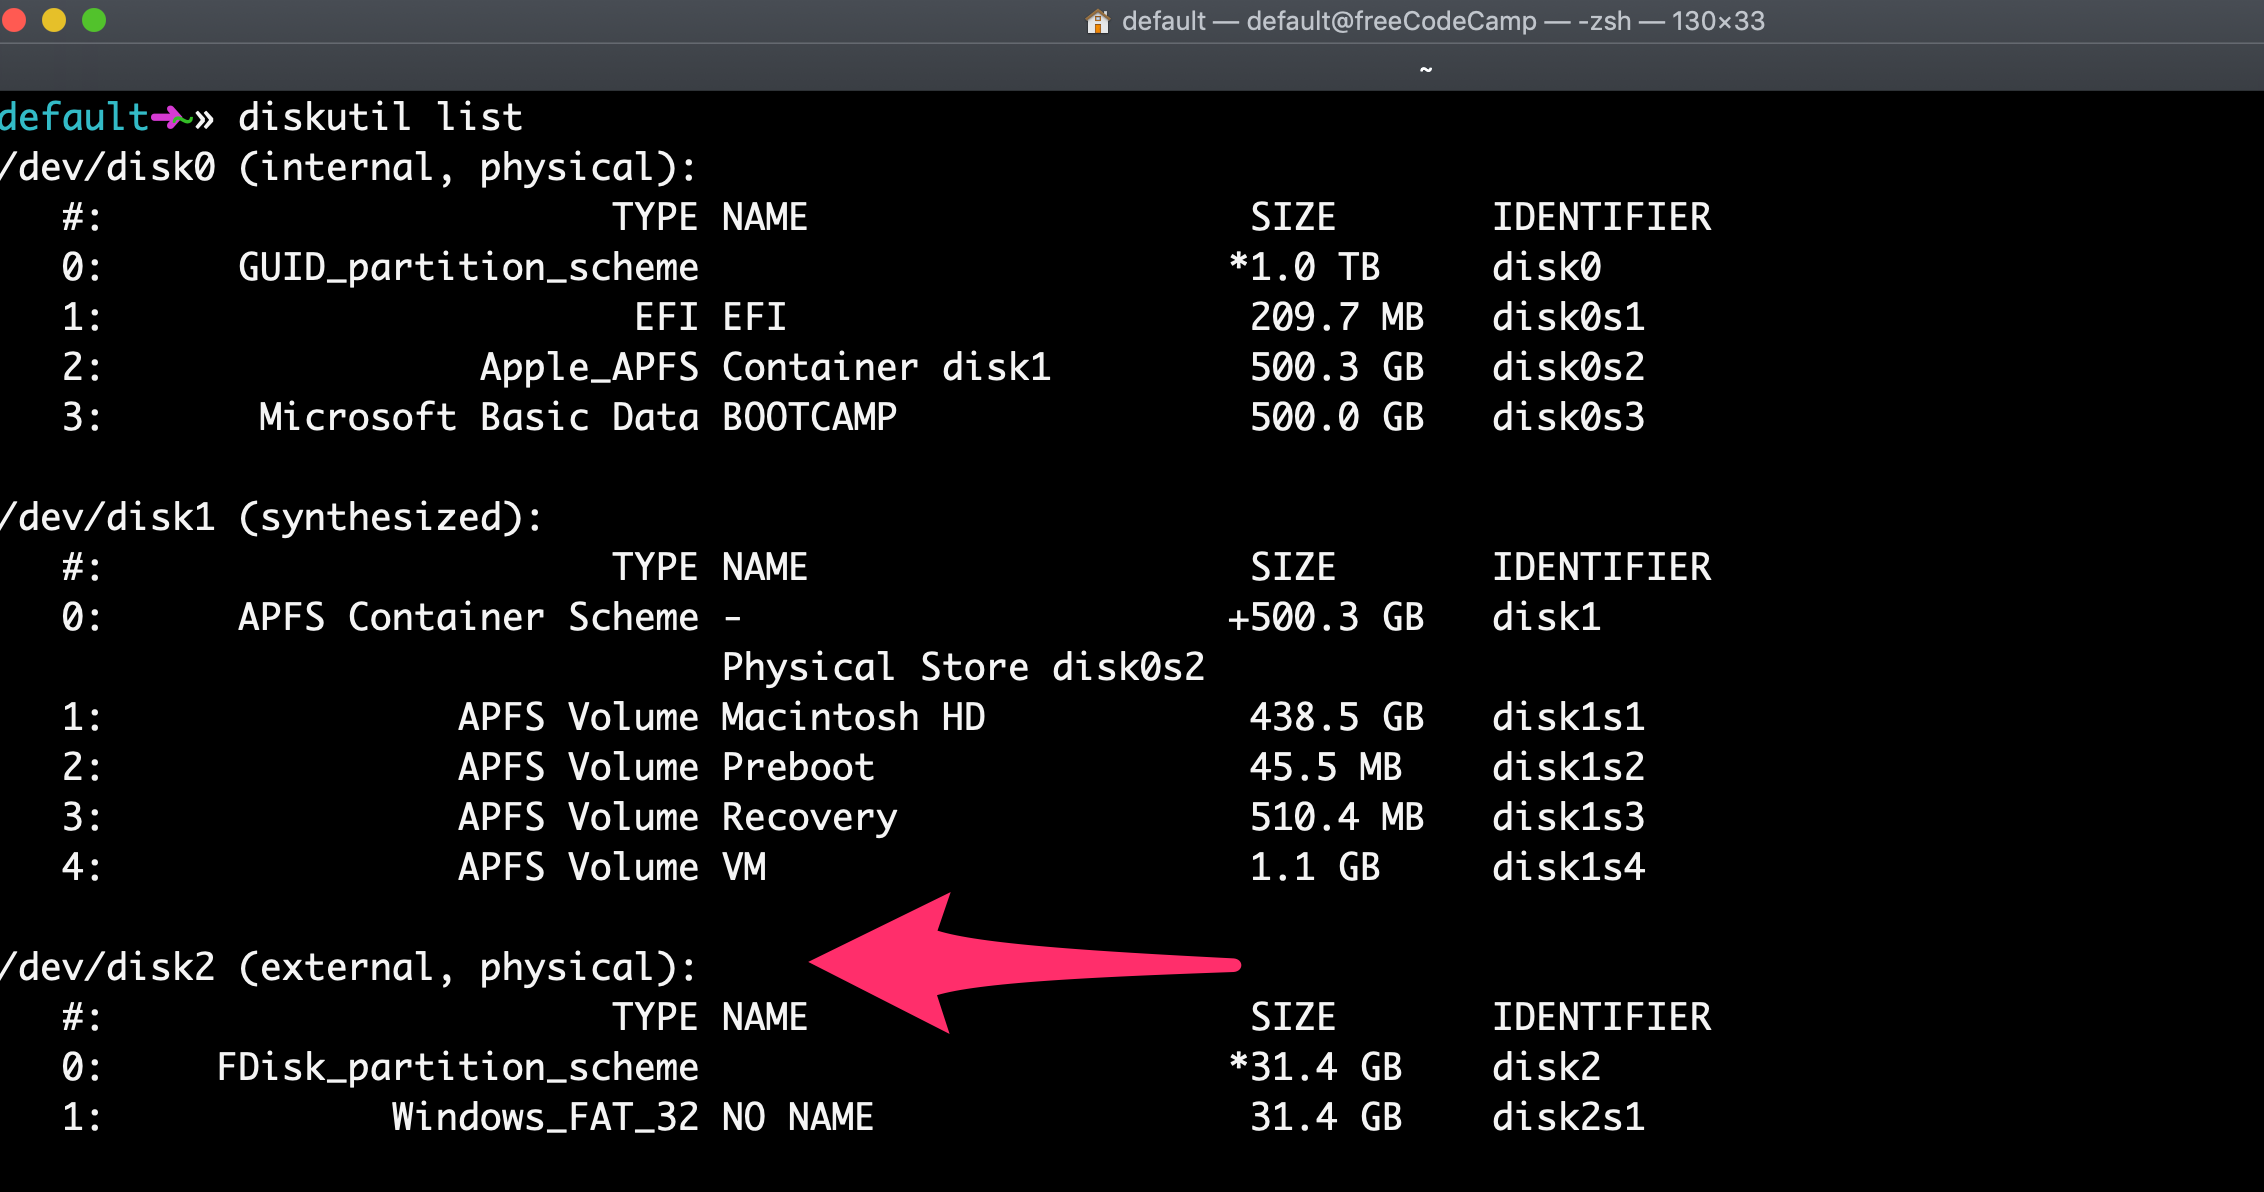
Copy the text I point to here. It will probably be something like
/dev/disk2.
Step 4: Format your USB Drive to work with Windows
Next format your USB drive to Windows FAT32 format. This is a format that Windows 10 will recognize.
Note that you should replace the disk2 with the name of the your drive from step 3 if it wasn’t disk2. (It may be disk3 or disk4).
Run this command using the correct disk number for your USB:
diskutil eraseDisk MS-DOS "WIN10" GPT /dev/disk2
Then you’ll see terminal output like this.
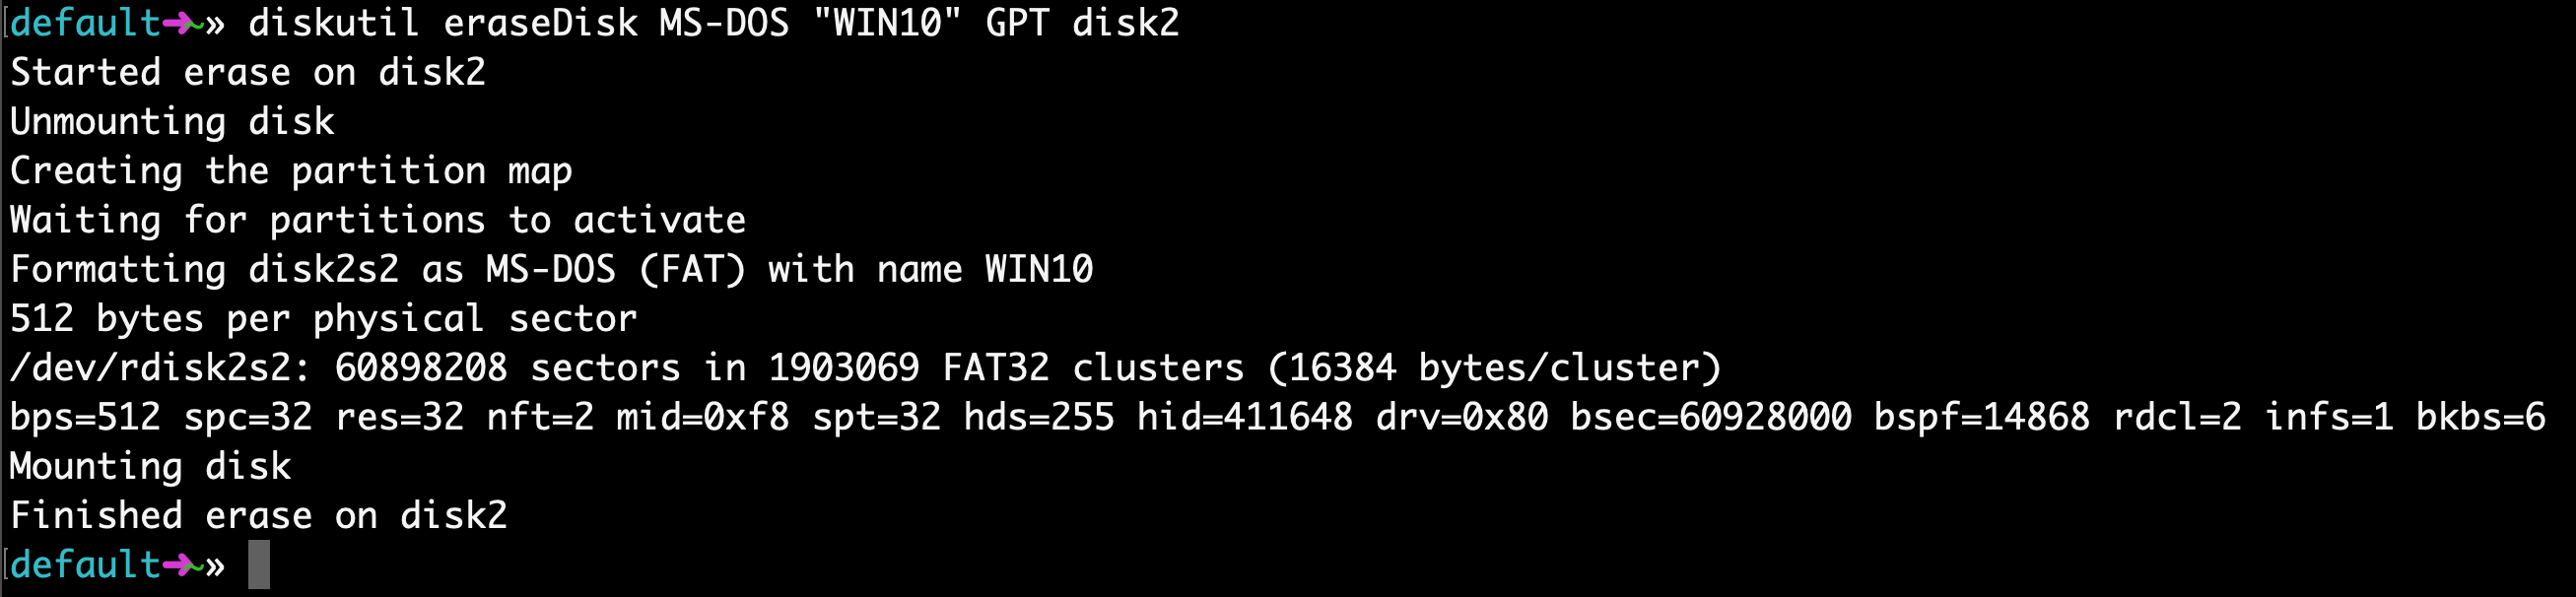
This will probably only take about 20 seconds on a newer computer, but may take longer on an older computer.
Note that for some hardware, you may instead need to run this command, which uses the MBR format for partitioning instead of GPT. Come back and try this command if step 7 fails, then redo steps 5, 6, and 7:
diskutil eraseDisk MS-DOS "WIN10" MBR /dev/disk2Step 5: Use hdiutil to mount the Windows 10 folder and prepare it for transfer.
Now we’re going to prep our downloaded ISO file so we can copy it over to our USB drive.
You will need to check where your downloaded Windows 10 ISO file is and use that. But your file is probably located in your ~/Downloads folder with a name of Win10_1903_V1_English_x64.iso.
hdiutil mount ~/Downloads/Win10_1903_V1_English_x64.iso
Step 6: Copy the Windows 10 ISO over to your USB Drive
Update April 2020: One of the files in the Windows 10 ISO – install.wim – is now too large to copy over to a FAT-32 formatted USB drive. So I’ll show you how to copy it over separately.
Thank you to @alexlubbock for coming up with this workaround.
First run this command to copy over everything but that file:
rsync -vha --exclude=sources/install.wim /Volumes/CCCOMA_X64FRE_EN-US_DV9/* /Volumes/WIN10
Then run this command to install Homebrew (if you don’t have it installed on your Mac yet):
/usr/bin/ruby -e "$(curl -fsSL https://raw.githubusercontent.com/Homebrew/install/master/install)"
Then use Homebrew to install a tool called wimlib with this terminal command:
brew install wimlib
Then go ahead and create the directory that you’re going to write the files into:
mkdir /Volumes/WIN10/sources
Then run this command. Note that this process may take several hours, you may see 0% progress until it finishes. Don’t abort it. It will use wimlib to split the install.wim file into 2 files less than 4 GB each (I use 3.8 GB in the following command), then copy them over to your USB:
wimlib-imagex split /Volumes/CCCOMA_X64FRE_EN-US_DV9/sources/install.wim /Volumes/WIN10/sources/install.swm 3800
Once that’s done, you can eject your USB from your Mac inside Finder. Note that Windows will automatically rejoin these files later when you’re installing.
Step 7: Put your USB into your new PC and start loading Windows
Congratulations — your computer now should boot directly from your USB drive. If it doesn’t, you may need to check your new PC’s BIOS and change the boot order to boot from your USB drive.
Windows will pop up a screen and start the installation process.
Enjoy your new PC, and your newly-installed copy of Windows.
Learn to code for free. freeCodeCamp’s open source curriculum has helped more than 40,000 people get jobs as developers. Get started
It’s fairly easy to create bootable USB installation media for Windows 10 when using Microsoft’s Media creation tool. Unfortunately this tool is not available for macOS. This post explains you how to do this without using a Windows-based PC or VM and without using BootCamp assistant. This can come in handy when trying to install Windows on your mac or when there is simply only an Apple Mac available and you need to boot the Windows installer for various reasons.
YouTube Video
If you are interested, I also created a YouTube video from this blogpost. If you prefer classic text, you can just follow the rest of this article:
Introduction
Unfortunately, since some time, it became a bit more complicated to create this USB drive from macOS. The main reason for this is because macOS supports only FAT32 as filesystem that is compatible with Windows (and ExFat but that causes issues to boot from). FAT32 has a file size limit of 4GB while the installation ISO now contains one file that is larger.
To overcome this, we will need to use a tool, Wimlib, which is able to split this file in two parts. More about this later.
In case you’re looking for the instructions to create a bootable USB drive to install Windows 11 instead, have a look at the following article: https://jensd.be/1740/windows/create-a-bootable-windows-11-installation-usb-on-macos
Download the Windows 10 ISO
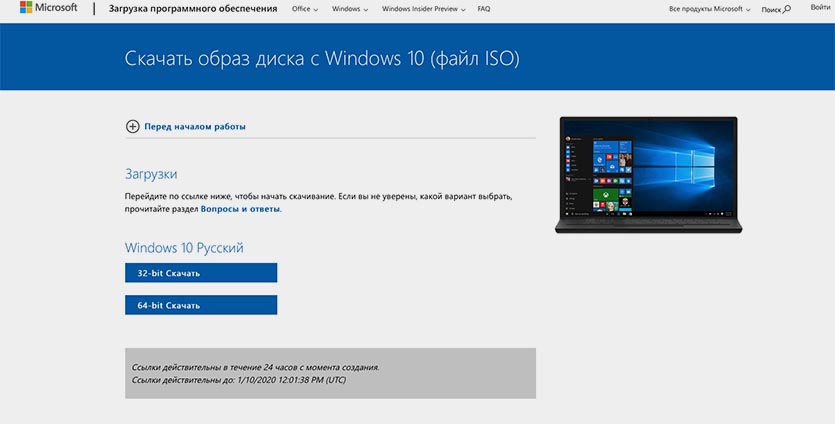
Let’s start by downloading the ISO from Microsoft. This can be done from: https://www.microsoft.com/en-us/software-download/Windows10ISO. When you open this link on macOS, it should show you the ability to download the ISO rather than the Media Creation tool, which is shown when opening the same on a Windows-based PC.
Choose for Windows 10, then select the preferred language, go for the “64-bit Download” and wait for the download to complete to get the .iso file on your Mac:
Prepare the USB drive
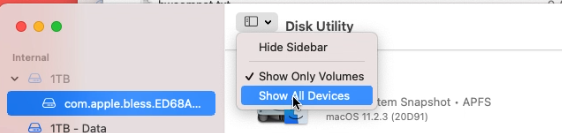
While the ISO is downloading, we can prepare our USB drive. You will need one that is at least 8GB. Insert the drive in your Mac and start Disk Utility.
In Disk Utility, choose to show all devices:
Then, on the left side, select your USB drive from the list and click Erase on the top right menu. In the dialog, enter a name for the drive (WINUSB here), choose to format as “MS-DOS (FAT)” and “Master Boot Record” as scheme. Finally click “Erase” to complete the process.

Copy all smaller files to the USB drive
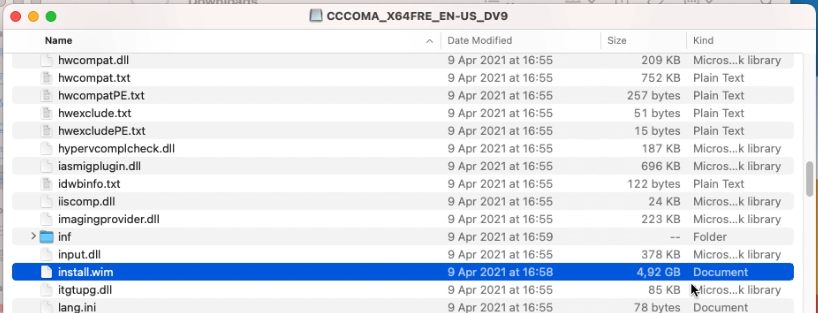
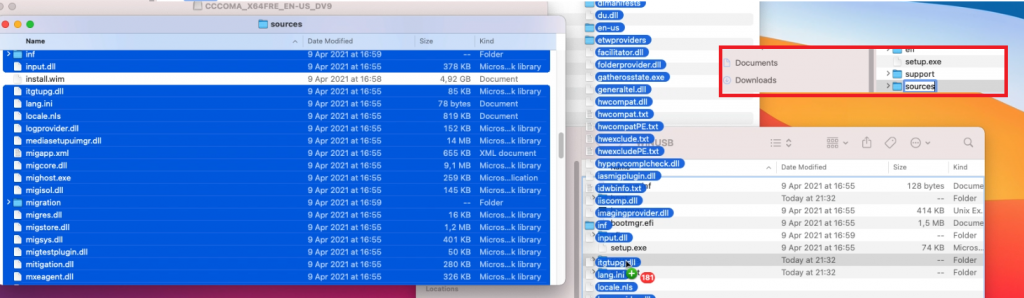
After the previous step, our USB drive is prepared. Once the ISO file is download as well, double click the ISO file to mount it. Then open it in Finder. As you can see, the sources folder contains one large file: install.wim which is over 4GB and will not fit on the FAT32-formatted USB drive:
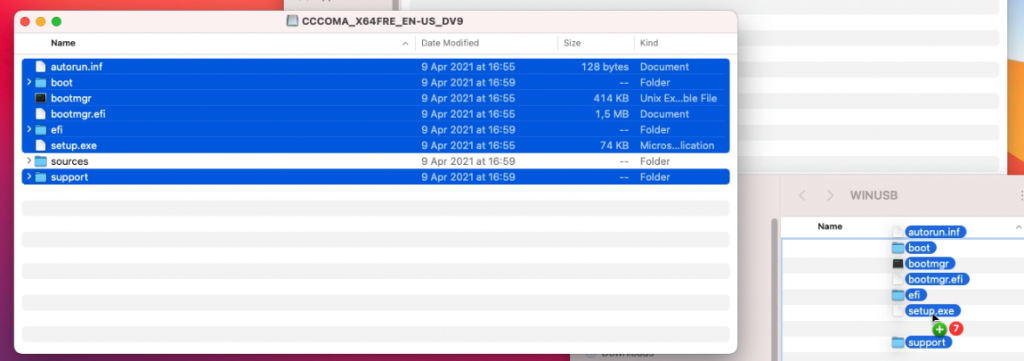
We will take care of that later so for now, copy all remaining files to the USB drive using Finder.
I typically start by copying all separate files and folders, except for the sources folder:
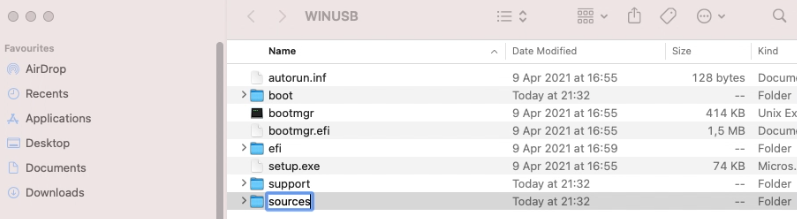
Then I create the sources folder and copy all files from sources with the exception of install.wim:
Prepare to split install.wim
So far things were pretty straightforward and if it wouldn’t be for that large file it would be a piece of cake. Unfortunately we have to work around that by splitting the file in two parts, smaller than the limit of our file system on the USB drive.
To accomplish this, we can use Wimlib (https://wimlib.net/). This is a tool that is developed to work with, and modify, .wim files. The easiest way to get this installed on your Mac is by using Brew (https://brew.sh/).
So, as just mentioned, we start by installing Brew. As is instructed on the Brew website, copy and paste the mentioned line in a terminal and execute it.
user@users-iMac ~ % /bin/bash -c "$(curl -fsSL https://raw.githubusercontent.com/Homebrew/install/HEAD/install.sh)" ==> Checking forsudoaccess (which may request your password). Password: ==> This script will install: /usr/local/bin/brew /usr/local/share/doc/homebrew ... ==> Next steps: Runbrew helpto get started Further documentation: https://docs.brew.sh user@users-iMac ~ %
Once Brew is installed, we can use it to install Wimlib:
user@users-iMac ~ % brew install wimlib
 ==> Downloading https://ghcr.io/v2/homebrew/core/openssl/1.1/manifests/1.1.1k
...
==> Installing wimlib
==> Pouring wimlib--1.13.4.big_sur.bottle.tar.gz
🍺  /usr/local/Cellar/wimlib/1.13.4: 65 files, 2.7MB
user@users-iMac ~ %
Split install.wim and get it on the USB drive
Now that we have Wimlib installed, we can use it to split the large install.wim file and copy it to our USB drive. In the same or a new Terminal session, execute the following:
user@users-iMac ~ % wimlib-imagex split /Volumes/CCCOMA_X64FRE_EN-GB_DV9/sources/install.wim /Volumes/WINUSB/sources/install.swm 4000
Splitting WIM: 4654 MiB of 4654 MiB (100%) written, part 2 of 2
Finished splitting "/Volumes/CCCOMA_X64FRE_EN-GB_DV9/sources/install.wim"
In the command above, we told to execute the wimlib-imagex tool (part of Wimlib) and passed some arguments:
- “split” to indicate that we want to split this larger file
- “/Volumes/CCCOMA_X64FRE_EN-GB_DV9/sources/install.wim” which is the source file to split. Keep in mind that the name under /Volumes depends on the ISO name so you need to adjust this accordingly. Just do ls /Volumes from the terminal to see what is there.
- “/Volumes/WINUSB/sources/install.swm” the destination of where the split files should end. As with the ISO name, here WINUSB is the volume label I gave to my USB drive when erasing it with Disk Utility. Adjust this as well when you chose something different earlier.
- 4000 the max. size of the destination file, so the file will be split in a part of 4000MB and the rest.
After this command completes, you can see that now two files were created on the USB drive:

The Windows 10 installer knows how to deal with these and will just work fine.
That should be all you need to create a bootable USB drive for Windows 10 installation.
(Optionally) download Windows 10 drivers for your Mac
If you plan to use the USB drive, which you created with the above steps, on a regular PC then you can skip this step. If you, on the other hand, plan to use this for installation on a Mac, it is a good idea to go through these additional steps.
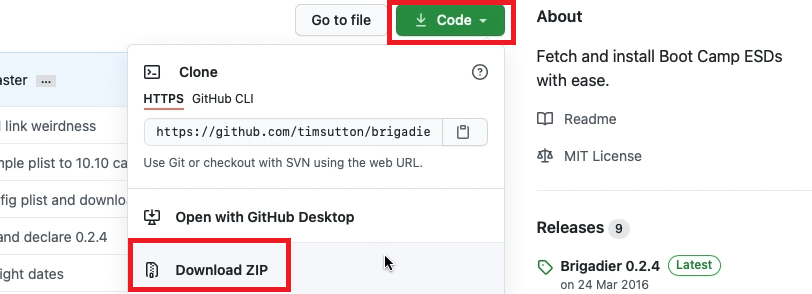
The goal of this is to fetch the necessary drivers for use on Mac. As I did from Windows in a previous article, I will use Brigadier for this. Brigadier, which is basically a script, works just from macOS directly as well.
From the author’s Github page: https://github.com/timsutton/brigadier, click the green Code button then choose to “Download ZIP”
Once the file is downloaded, open a fresh Terminal session and navigate to the “brigadier-master” in your Downloads folder, then simply execute it using ./brigadier:
user@user-iMac ~ % cd Downloads/brigadier-master
user@user-iMac brigadier-master % ./brigadier
Using Mac model: iMac13,1
...
Expanding flat package...
Extracting Payload...
Extracted to /Users/user/Downloads/brigadier-master/BootCamp-041-84821/WindowsSupport.dmg
user@user-iMac brigadier-master %
As you can see in the output, executing brigadier automatically detected the model identifier of the mac which we executed this on. If you want to download the required drivers for another model, you can simply pass it using the –model parameter. The files got downloaded as a subfolder of brigadier-master as WindowsSupport.dmg
All that is left to do is to navigate to the folder using Finder, then to open WindowsSupport.dmg to mount it and to copy those files to the USB drive:
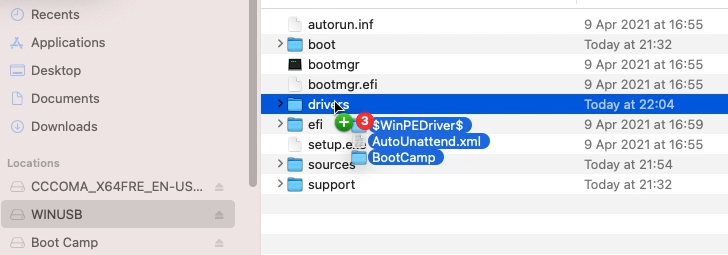
After going through the installation, executing BootCamp/setup.exe will install most of the required drivers or at least enough to continue the rest of the driver installation using Windows update.
Boot from the USB drive
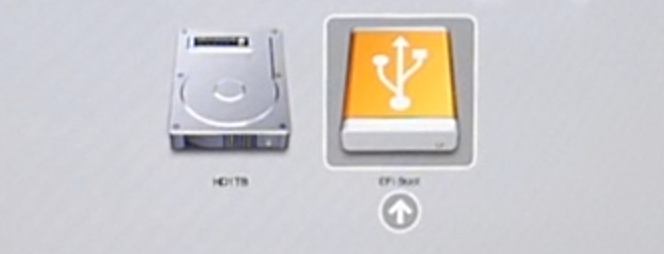
As the final step, now that the USB drive is prepared, with or without additional drivers for your Mac, you can boot from it.
On a regular PC, this is usually done by pressing a key at BIOS time to bring up a boot menu (F11 is often used for this) or, for some older BIOS, by changing the boot order from the BIOS setup.
On a Mac, you can choose to boot from USB by holding down the Alt key on boot and to select the USB drive from the boot loader:
Операционная система Windows более капризная и менее стабильная, чем macOS от Apple. Открытость ОС, отсутствие встроенной системы резервного копирования и большое количество вредоносного ПО часто приводят к необходимости перестанавливать Windows.
При наличии второго Windows-компьютера под рукой создать загрузочную флешку не составит никакого труда.
? Спасибо re:Store за полезную информацию. ?
Сейчас расскажем, как выйти из ситуации, когда есть только рабочий Mac.
В тему: как создать загрузочную флешку macOS в Windows
Еще несколько лет назад создать загрузочную флешку можно было при помощи стандартной утилиты Boot Camp, которая предназначена для быстрой установки Windows на Mac.
Приложение подготавливало загрузочную флешку, записывало на нее установщик Windows и заливало драйвера для корректной работы всех модулей Mac. Использовать такую флешку можно было не только на компьютерах Apple, с ее помощью можно было установить Windows на любой подходящий компьютер.
С недавнего времени разработчики macOS переработали утилиту и вместо создания загрузочной флешки она сразу же начинает установку системы на отдельный раздел Mac.
К счастью, есть и другой достаточно простой способ задать флешку для установки Windows.
Как создать загрузочную флешку Windows
1. Для начала потребуется образ с операционной системой. Скачать его можно прямо с официального сайта Microsoft.
Образ Windows 10 занимает чуть более 5 Гб дискового пространства, на скачивание обычно уходит от 15 до 30 минут.
2. Далее понадобится флешка объемом 8 ГБ и более, которая будет отформатирована в формате Fat32.
Можно воспользоваться приложением Дисковая утилита или сделать все в Терминале.
3. В Терминале выполняем следующую команду:
diskutil list
Видим перечень внутренних и внешних накопителей на Mac. Находим нужный по объему и запоминаем его номер. Далее вводим команду:
sudo diskutil eraseDisk FAT32 WININSTALL MBRFormat /dev/disk3
FAT32 — нужная нам файловая система;
WININSTALL — метка флешки после форматирования (можно указать любое имя);
disk3 — номер подключенного накопителя, который будем форматировать.
Вводим пароль администратора, ждем несколько секунд и получаем готовую чистую флешку.
4. Остается лишь скопировать содержимое образа с Windows 10 на флешку.
Для этого монтируем образ и вводим в Терминале такую команду:
cp -R расположение_образа/ расположение_флешки
Чтобы вручную не прописывать длинные пути, нужно лишь ввести начало команды “cp -R “, а затем перетянуть образ на окно Терминала из Finder. Путь к нему пропишется автоматически.
Теперь пишем “/ ” (без кавычек с пробелом) и перетаскиваем в Терминал флешку из Finder.
5. Копирование займет определенное время. Никакого статуса при этом отображаться не будет. Об окончании процесса можно судить по светящемуся диоду на флешке (во время копирования он будет мигать).
Можно просто подождать около 20 минут.
Теперь флешку можно использовать для загрузки на компьютерах и ноутбуках с поддержкой UEFI. К сожалению, для старых Windows-ПК такой способ не подойдет.

 (85 голосов, общий рейтинг: 4.46 из 5)
🤓 Хочешь больше? Подпишись на наш Telegram.
![]()
iPhones.ru
Сделать это проще, чем флешку macOS из Windows.
- macOS,
- windows,
- инструкции,
- Маки
![]()
Артём Суровцев
@artyomsurovtsev
Люблю технологии и все, что с ними связано. Верю, что величайшие открытия человечества еще впереди!
March 21, 2019 updated by
Leave a reply »
How can I make a bootable Windows installation USB on Mac OS X? After upgrading to macOS Mojave, you may find that Boot Camp Assistant is no longer supported and thus creating a bootable USB turns out to be a little bit challenging. In this tutorial we’ll show you how to create Windows 10 bootable USB from ISO on Mac, by using the Terminal or third-party software like UNetbottin.
Method 1: Create Windows 10 Bootable USB on Mac Using UNetbottin
UNetbootin is a free, open source utility that allows you to create bootable USB drives on Windows, Linux, and Mac OS X. If you’ve downloaded Windows 10 ISO image, here is how you can create a bootable Windows installer USB on Mac using UNetbootin.
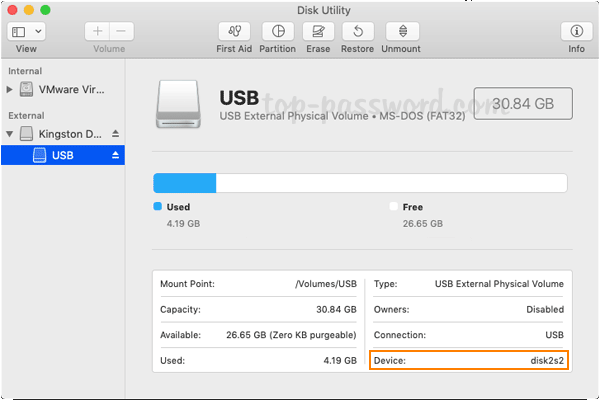
- Plug a USB drive into your Mac and open Disk Utility. Select your USB drive from the left panel and click on Info button. Note down the device name since we will need that later.

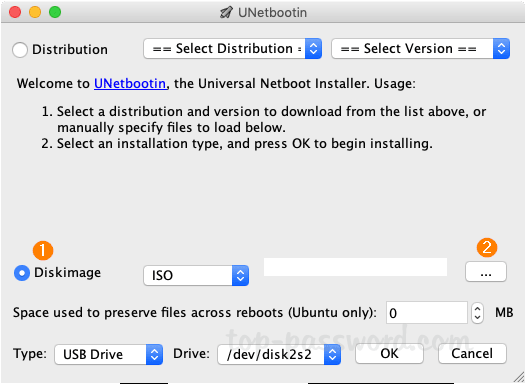
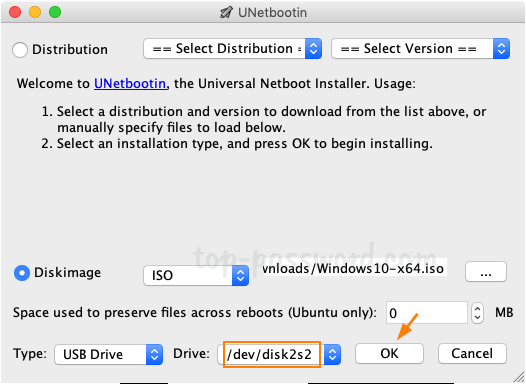
- Next, download and launch the UNetbottin utility. Select the “Diskimage” radio button, click “…” to select a bootable ISO image.

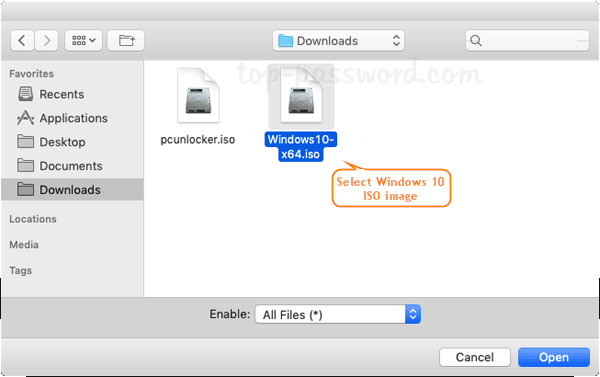
- After locating your Windows 10 ISO file, click on Open.

- Choose Type as USB Drive and select the device name of your USB drive (you probably would’ve noted it down earlier, so refer to that). Click OK to start installing to the USB drive.
- This process takes several minutes or longer, depending on the size of your selected ISO image.
Method 2: Create Windows 10 Bootable USB on Mac Using Terminal
Of course, if you prefer not to use third-party software, you can still use the excellent Terminal app, which is a little bit more involved, but no additional software needs to be installed. Follow these steps:
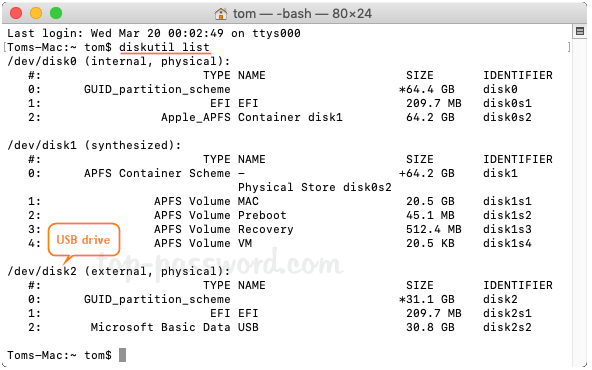
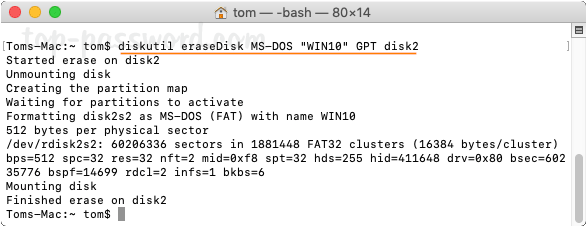
- After connecting a USB drive to your Mac, open a Terminal window and type diskutil list to display all the disks attached to your machine. You have to figure out the disk identifier of the USB drive you need to format. In my example, my USB drive is mounted as “disk2” and it’s about 32GB.

- Next, run the following command to format your USB drive and name it “WIN10“, where # is a placeholder for the disk identifier of your USB drive.
diskutil eraseDisk MS-DOS "WIN10" GPT disk#
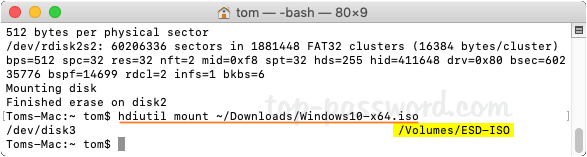
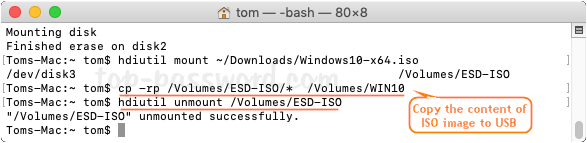
- Now, mount your Windows 10 ISO image with the command below, assuming it’s saved the Downloads folder. In my case, it is mounted as a volume named “ESD-ISO“.
hdiutil mount ~/Downloads/your_windows_10_image.iso
- Finally, run the following command to copy all the files from the mounted ISO to your USB drive.
cp -rp /Volumes/ESD-ISO/* /Volumes/WIN10/
This command will take a while, and once it finishes, you can disconnect the mounted ISO with this command:
hdiutil unmount /Volumes/ESD-ISO - Now you should be able to boot from the USB to install Windows 10 on your Mac or Windows machine.
Conclusion
These should be the easiest ways to create a Windows 10 bootable USB from ISO on Mac, without using Boot Camp Assistant. No matter which method you prefer, be sure that you backup any important data on your USB drive, as the procedure of creating bootable USB will delete everything on it.
- Previous Post: How to Securely Delete Files in Windows 10 without Third Party Software
- Next Post: 3 Ways to Open and Mount ISO File on Mac OS X