You can use installation media (a USB flash drive or DVD) to install a new copy of Windows, perform a clean installation, or reinstall Windows.
To create installation media, go to the software download website, where you’ll find step-by-step instructions. On that website, you can select a version of Windows and create your own installation media using either a USB flash drive or a DVD. To go directly to one of the versions, select one of these links:
-
Windows 7
-
Windows 8.1
-
Windows 10 (Then select Download tool now.)
-
Windows 11 (Then select Download tool now.)
Important: Back up your files before you install or reinstall Windows on your PC. Learn how.
To create the installation media, here’s what you’ll need:
-
A PC with a reliable internet connection. The download time will vary, depending on your internet connection.
-
A USB flash drive, external hard drive, or DVD. A blank USB flash drive or external hard drive with at least 8 GB of space, or a blank DVD (and DVD burner). We recommend using a blank USB or blank DVD because any content on it will be deleted. When burning a DVD from an ISO file, if you’re told the disc image file is too large, you’ll need to use dual layer (DL) DVD media.
-
A product key. Your 25-character product key (not required for digital licenses). For help finding it, go to Find your Windows product key.
After you’ve created the installation media, you can reset or reinstall Windows. To learn more, go to Recovery options in Windows.
Need more help?
Windows 10 Media Creation Tool is a very useful tool for users to upgrade Windows 10 or reinstall Windows 10. In this article, I will show you how to use Windows 10 Media Creation Tool to make Windows installation media or to download ISO file with detailed steps and screenshots.
When you want to install or upgrade Windows 10, you will need a Windows 10 installation media like a bootable USB drive or CD/DVD disc. And Windows 10 Media Creation Tool enables you to create an installation USB drive or download its ISO file so that you can burn on to a DVD to install the operating system on a different computer.
It sounds that using Media Creation Tool to upgrade or install windows 10 is very convenient. However, some users don’t know what it is and how to make use of this utility.
The free Windows 10 Media Creation Tool is a very popular utility developed by Microsoft. With this marvelous Windows 10 creation tool, you can upgrade Windows 10 to its latest version without a hassle and create a Windows 10 installation USB drive/DVD disc to perform a clean install or to repair a problematic PC.
Windows Media Creation Tool is also a Windows upgrade tool as it can upgrade your PC to the latest Windows 10 version. According to many Windows 10 users, using Windows Update to upgrade Windows 10 may encounter some errors like the common Windows 10 update error 0x8007007e, leading to upgrade failure.
In this case, it is highly recommended to utilize Windows 10 Media Creation Tool to upgrade Windows 10. With this Windows upgrade tool, you can quickly upgrade your computer to the latest version of Windows 10. Here are detailed steps and screenshots.
Note: If you intend to upgrade your current computer to Windows 10, make sure it meets the Windows 10 system requirements.
Step 1. Download Windows 10 Media Creation Tool from Microsoft’s official website.
Step 2. Run the Media Creation Tool. To run this tool, you need to be an administrator.
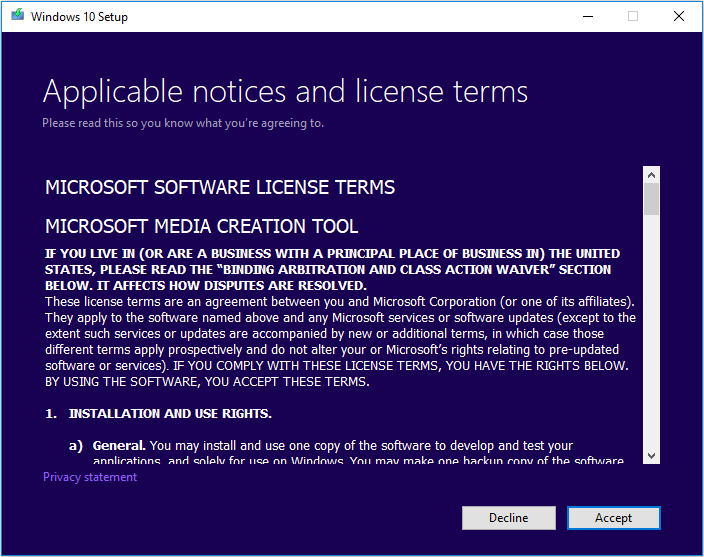
Step 3. On this page, select Accept.
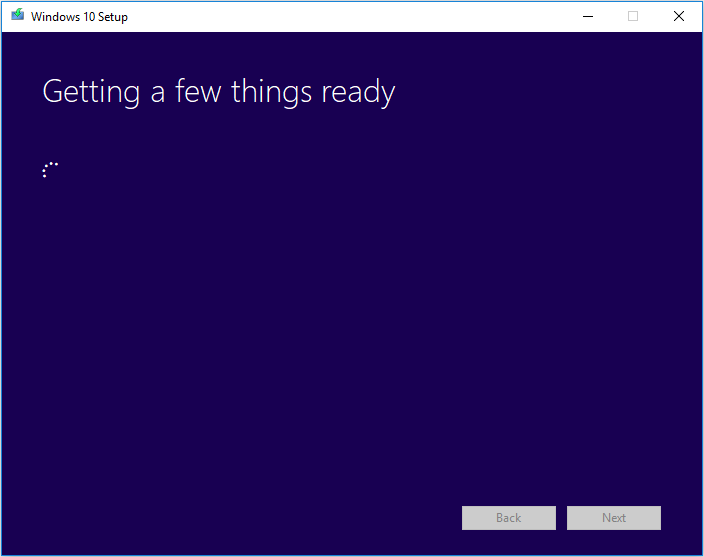
Step 4. Wait patiently for Media Creation Tool to get a few things ready. When it’s done, you can continue.
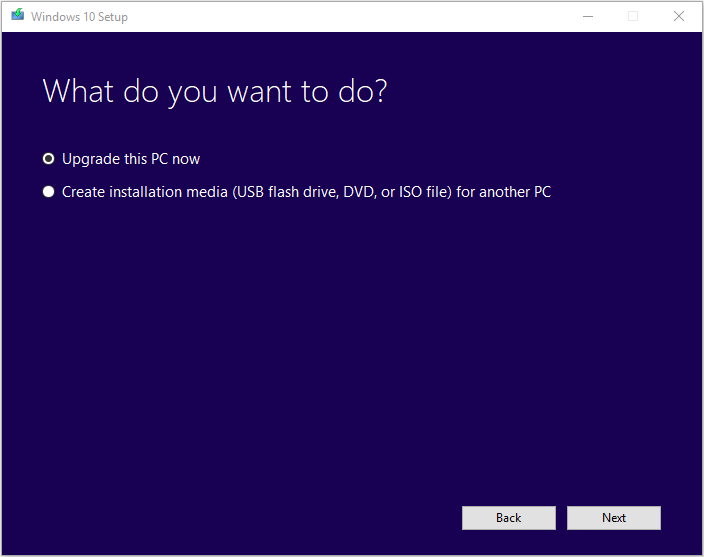
Step 5. On the What do you want to do page, select Upgrade this PC now, and then click Next.
Step 6. At this time, Media Creation Tool will download some files for updates and then check your PC. This process may take some time. Just wait patiently and it won’t be too long.
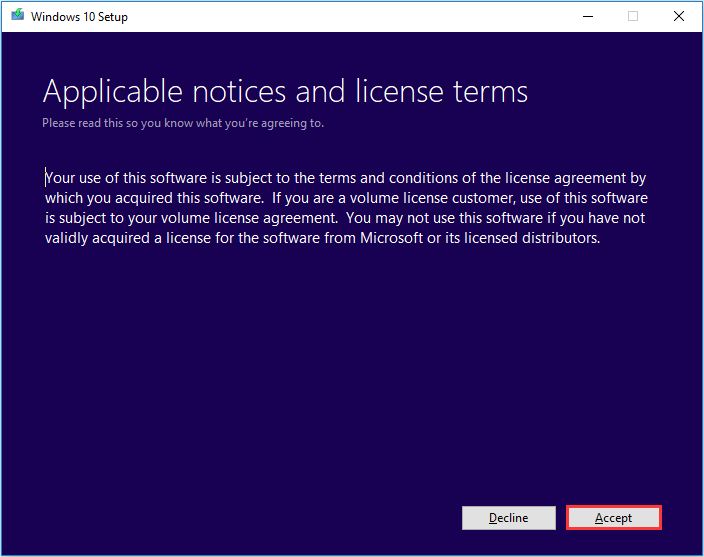
Step 7. Read the license terms and click Accept.
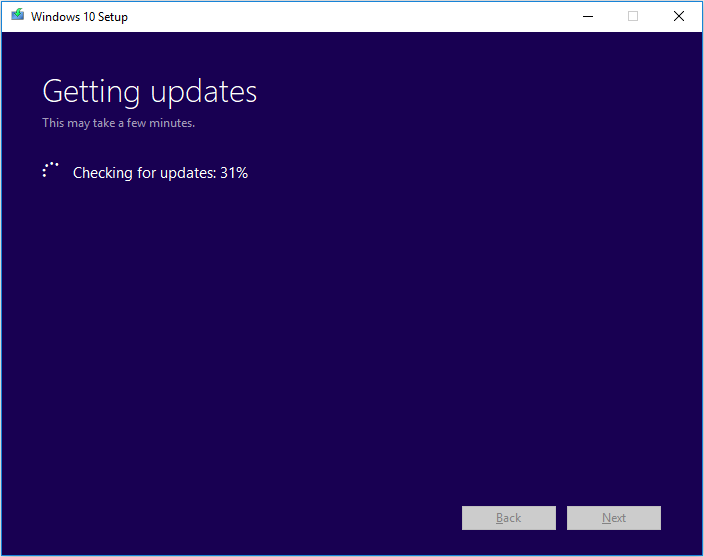
Step 8. Wait for Media Creation Tool to check for updates.
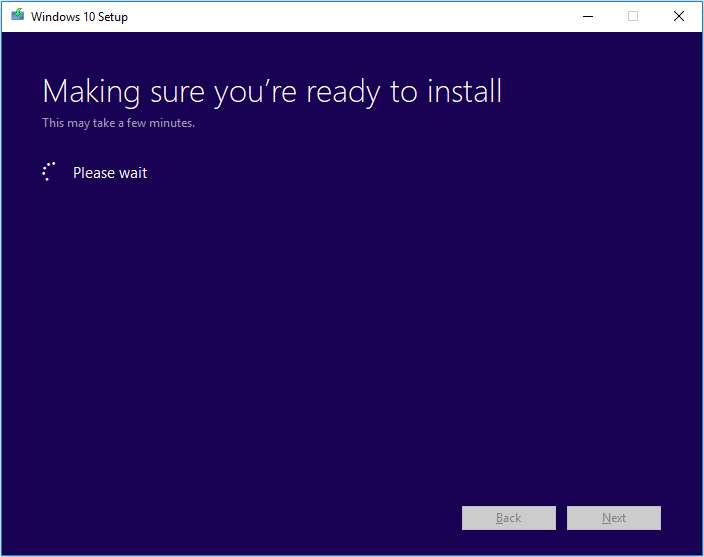
Step 9. Windows 10 Media Creation Tool will check for your PC again and make sure you are ready to install.
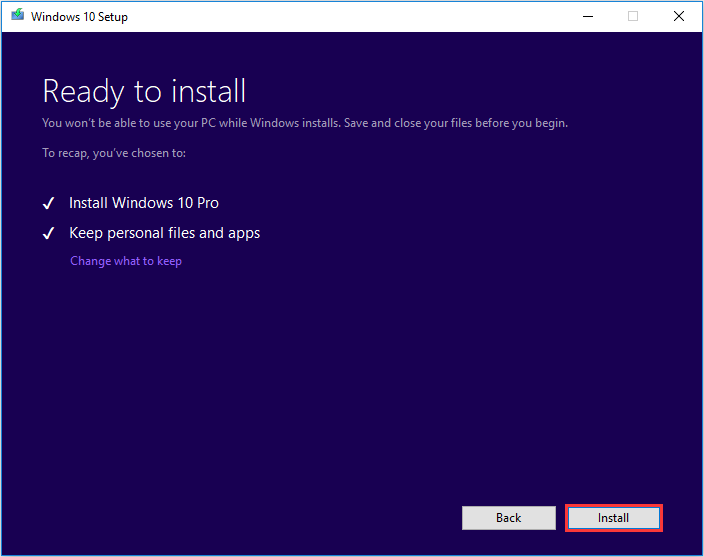
Step 10. When you get this page, you’ll see a recap of what you’ve chosen, and what will be kept through the upgrade. Choose Change what to keep, you can select what to keep by yourself.
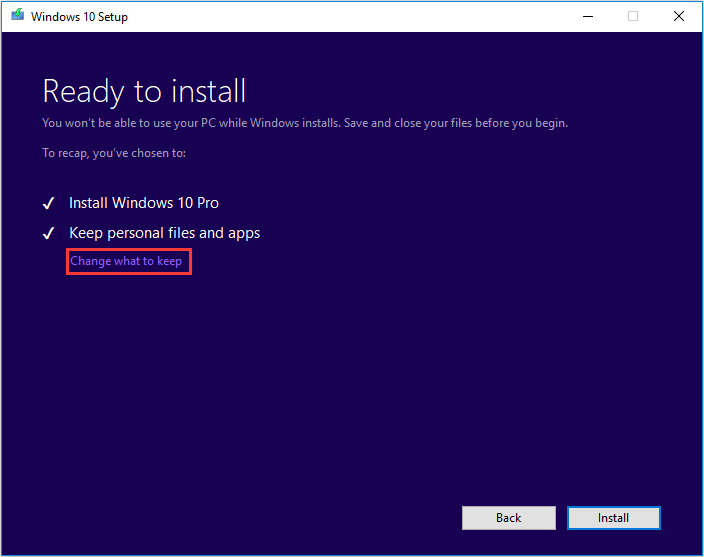
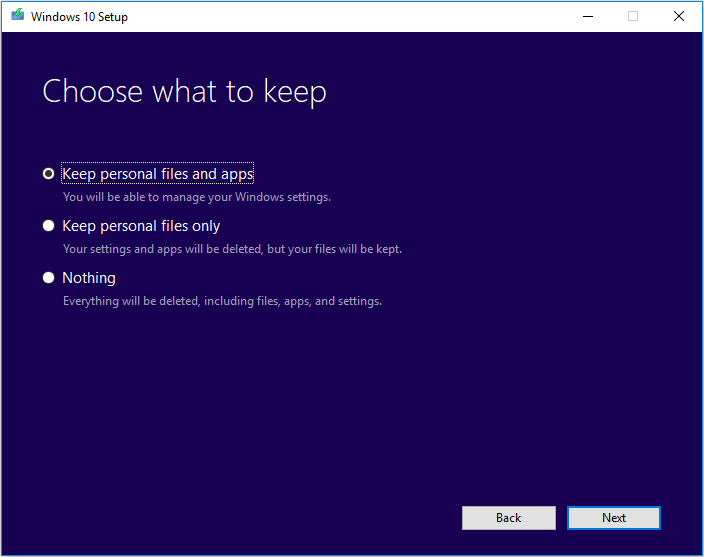
Step 11. Choose whether you would like to Keep personal files and apps, Keep personal files only, or keep Nothing during the upgrade. After selection, then click Next to continue.
Step 12. Close any running applications and when you’re ready, select Install. During the installation, your PC will restart for a few times. Please don’t turn off your PC.
Another function of Window 10 Media Creation Tool is that it can help you create an installation media for another PC or download ISO file. And all Windows 10 editions are available when you select Windows 10, except for Enterprise edition. When finished, you can use the bootable USB drive or DVD disc to install Windows 10.
Note: Before you install or reinstall Windows on your PC, remember to back up important files on your system disk.
Before you download Windows 10 Media Creation tool, make sure you have:
- A PC with a working Internet connection
- A blank USB flash drive or DVD with at least 8 GB of available storage space
- A product key if you’ve not installed Windows 10 before or if you want to perform a clean install
Now you can follow the steps as below to create Windows 10 installation media (USB flash drive or DVD) and use it to install a new copy of Windows 10, perform a clean installation, or reinstall Windows 10.
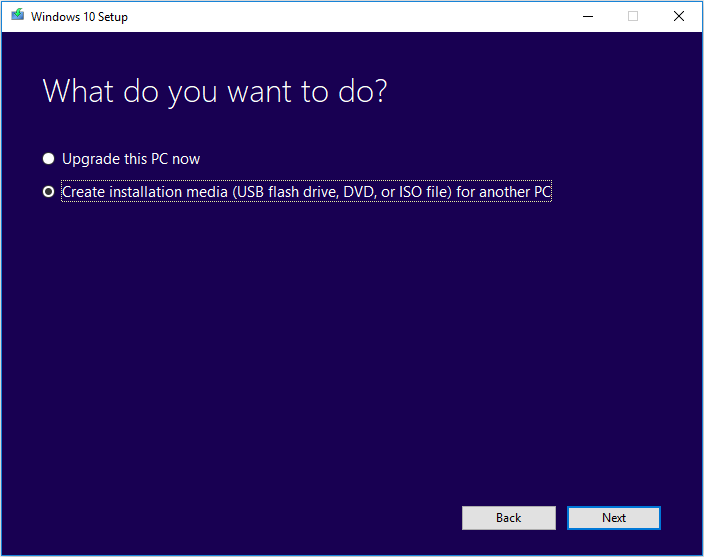
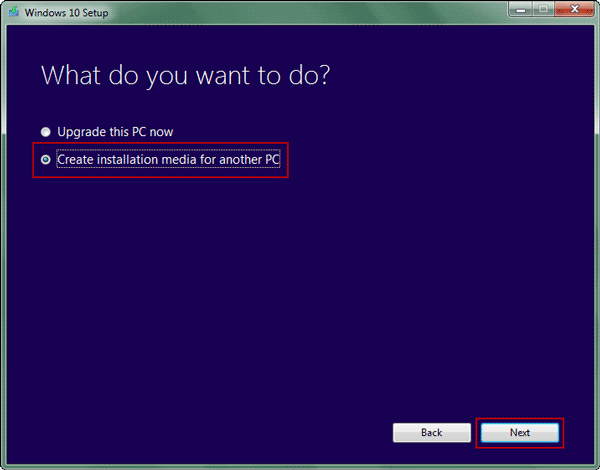
Step 1. Download Windows 10 Media Creation Tool and follow the instruction to get the following page. Then, check the second option Create installation media (USB flash drive, DVD, or ISO file) for another PC and click Next.
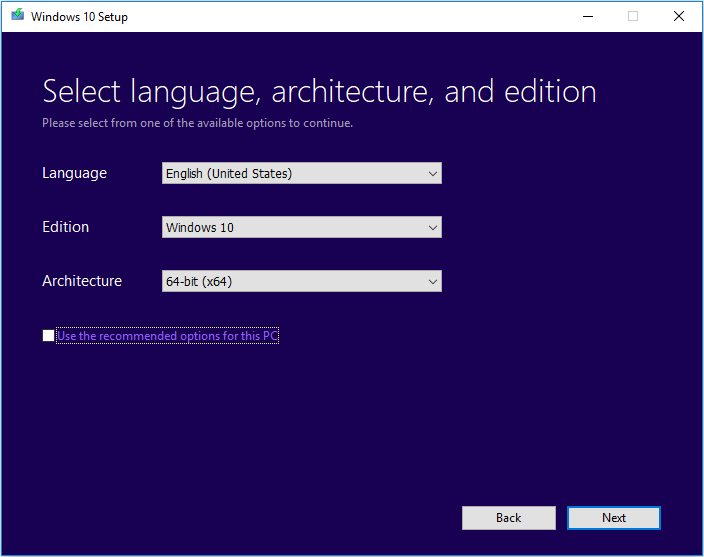
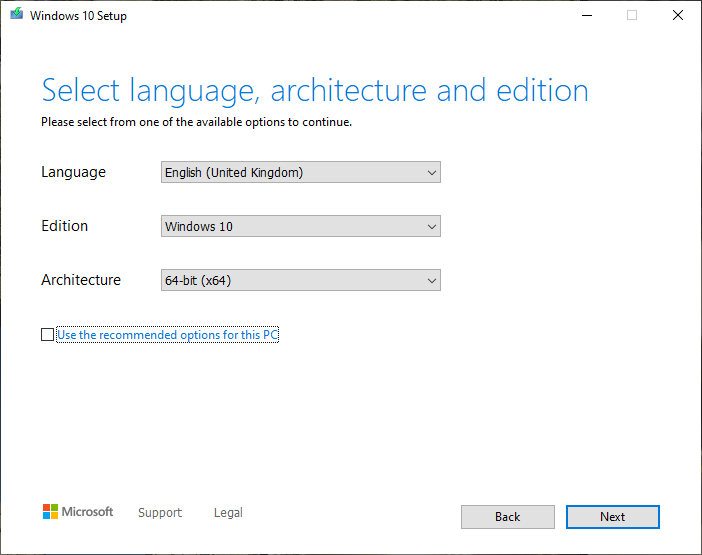
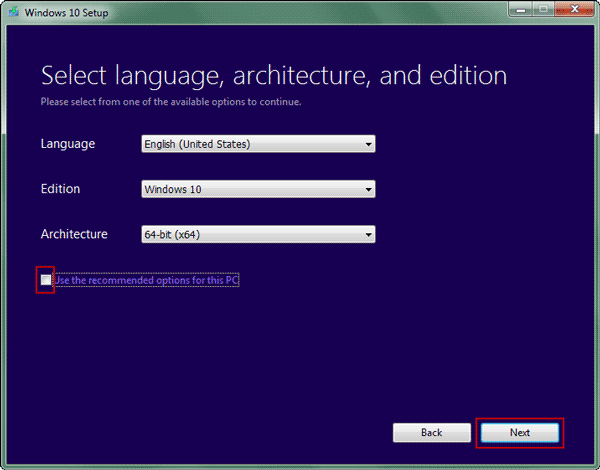
Step 2. Choose the Language, Windows Edition, and Architecture that you want to use for creating the installation media. After selection, then click Next to continue.
You can also choose to Use the recommended options for this PC, which automatically selects the language, edition, and architecture that match the PC that you are using right now.
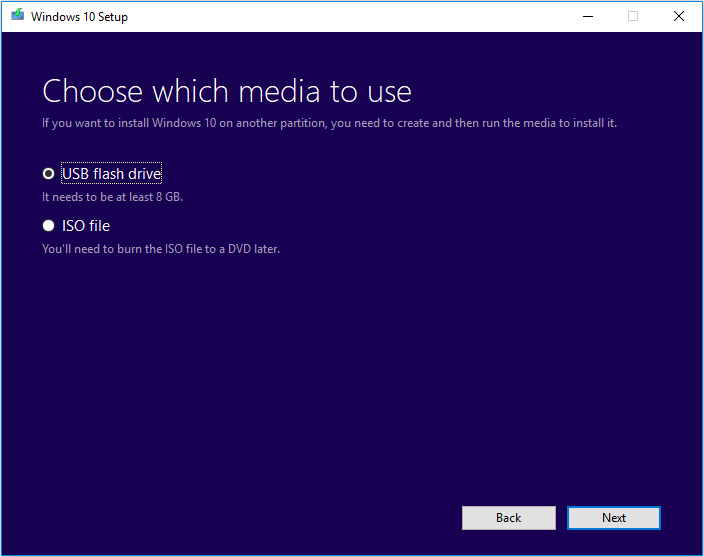
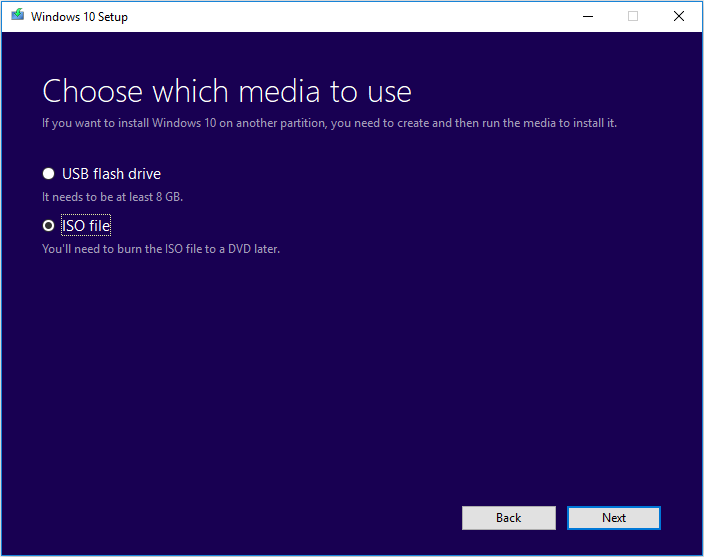
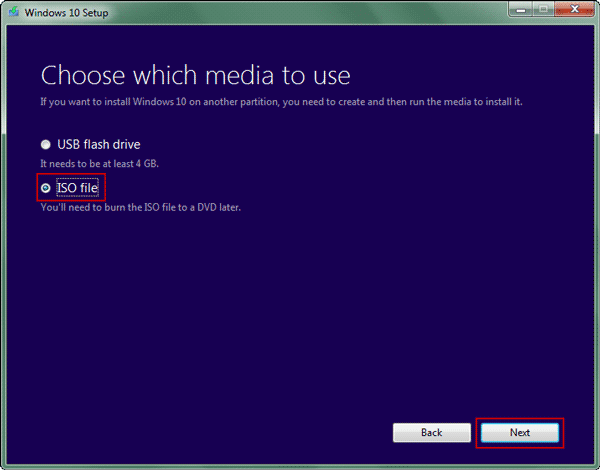
Step 3. Choose what kind of media storage device you want to use. Here I take USB flash drive as an example. Choose USB flash drive and press Next.
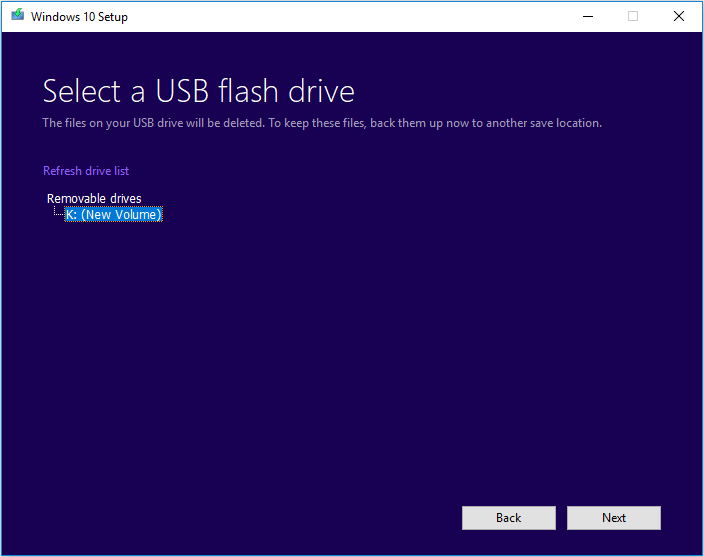
Step 4. Select the USB drive you want to use for creating Windows 10 installation media and click Next.
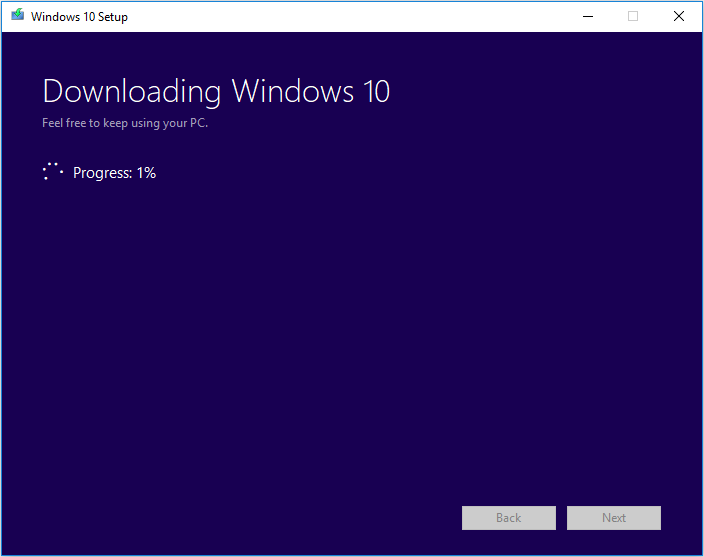
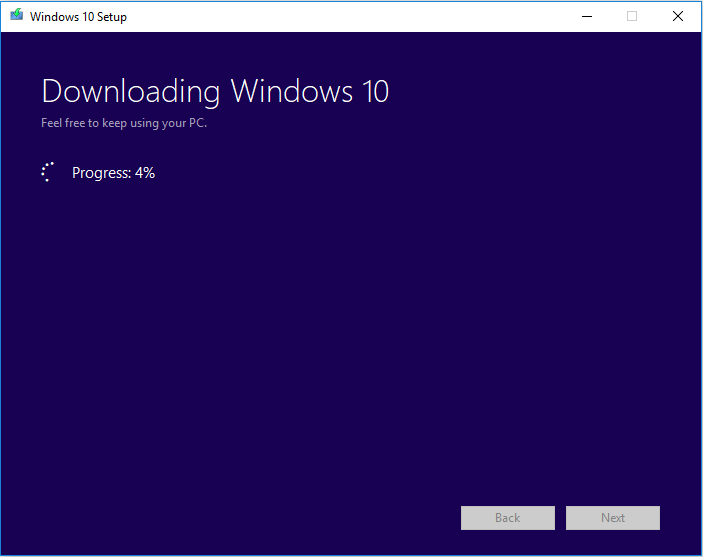
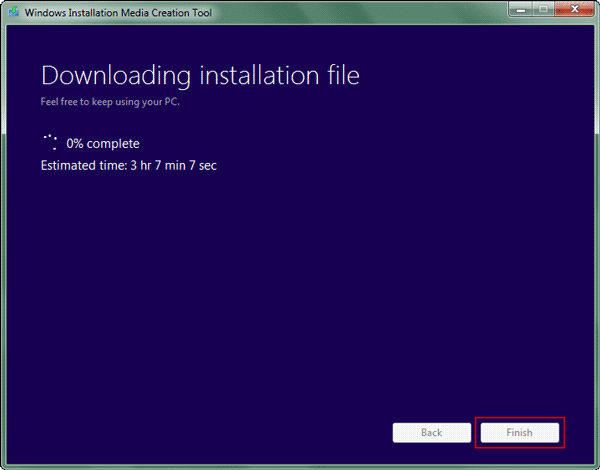
Step 5. Then Microsoft Media Creation Tool starts to download the latest Windows 10 installation files on your computer or device.
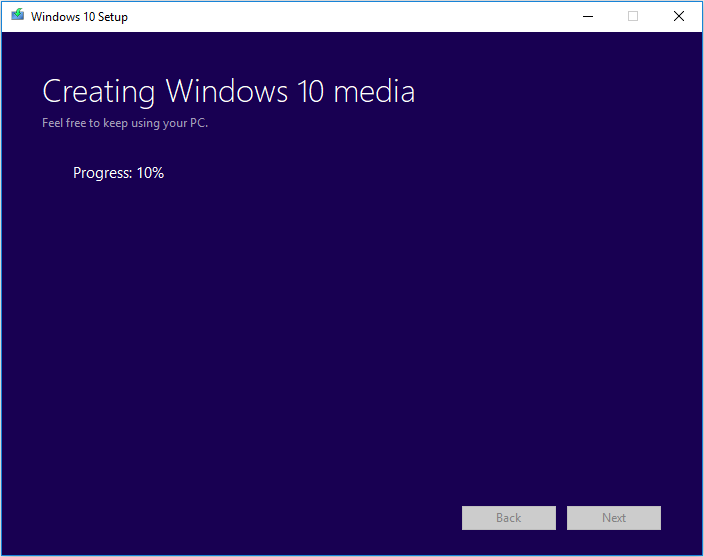
Step 6. When the download is completed, it will start to create Windows 10 media.
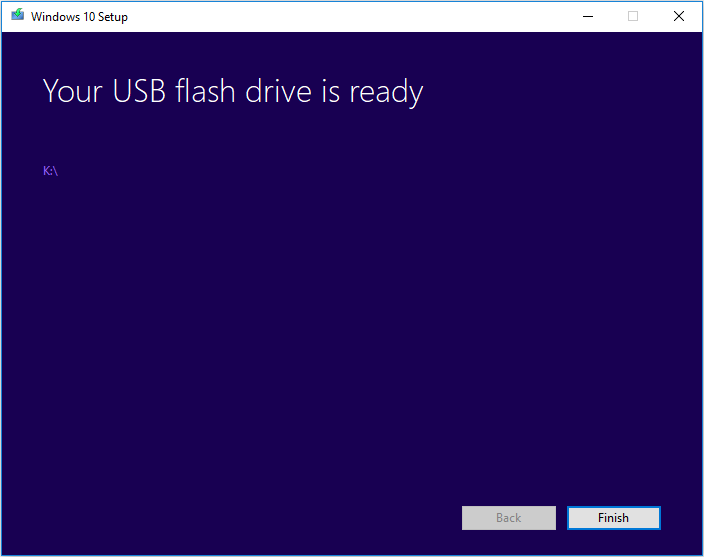
Step 7. When it is done, click Finish and then you can use that drive to boot up your computer and install Windows 10.
If the computer that you want to install Windows 10 has a DVD player, you can also select ISO file to burn the ISO file to a DVD later.
Just follow the step-by-step prompts on the Media Creation Tool to download Windows 10 installation files and save the ISO file to a specific location. When it is finished, you can burn the ISO file to a DVD.
How to Upgrade or Get Windows 10 without Installation
After reading the above, some users may find, even Windows Media Creation Tool is easy to use, it will still take you much time to upgrade or install Windows 10. Is there any much simpler way on Windows installation?
Actually, there is a method that can make Windows 10 installation as a breeze — migrate Windows 10 from another healthy PC to your PC with a Windows migration tool. If your friends or family are using the latest Windows 10, you can just use the Windows migration tool to migrate their Windows OS to your PC without reinstallation.
In this way, you do not need to create an installation media with Windows 10 Media Creation Tool and then use it to install Windows 10 as the whole process is time-consuming.
Well then, how to migrate Windows 10 with a reliable Windows migration tool? Here it is recommended to use MiniTool Partition Wizard Pro Ultimate Edition to migrate Windows 10, which can migrate OS to various types of SSD/HDD, including NVMe M.2, PCI4 4.0 SSD, and more.
MiniTool Partition Wizard is a reliable Windows migration tool as well as a professional partition manager trusted by tens of millions of people. It helps users to repartition hard drive, extend partition, convert FAT to NTFS, check files system, convert MBR to GPT without data loss, wipe disk, copy partition and migrate OS to SSD/HD, etc.
With MiniTool Partition Wizard, you can use Windows 10 operating system without installation.
Step 1. Shut down your computer and take out your system disk. Connect the HDD/SSD to another PC of your family or friends who are using the latest Windows 10 via a SATA-to-USB cable.
Note: If there are important files and data on your system disk, please make a backup as the process will delete all the files on your disk. If it is a brand new disk, then you can go ahead directly.
Step 2. Get the system cloning software to computer by clicking the following button. And run it to get the main interface.
Buy Now
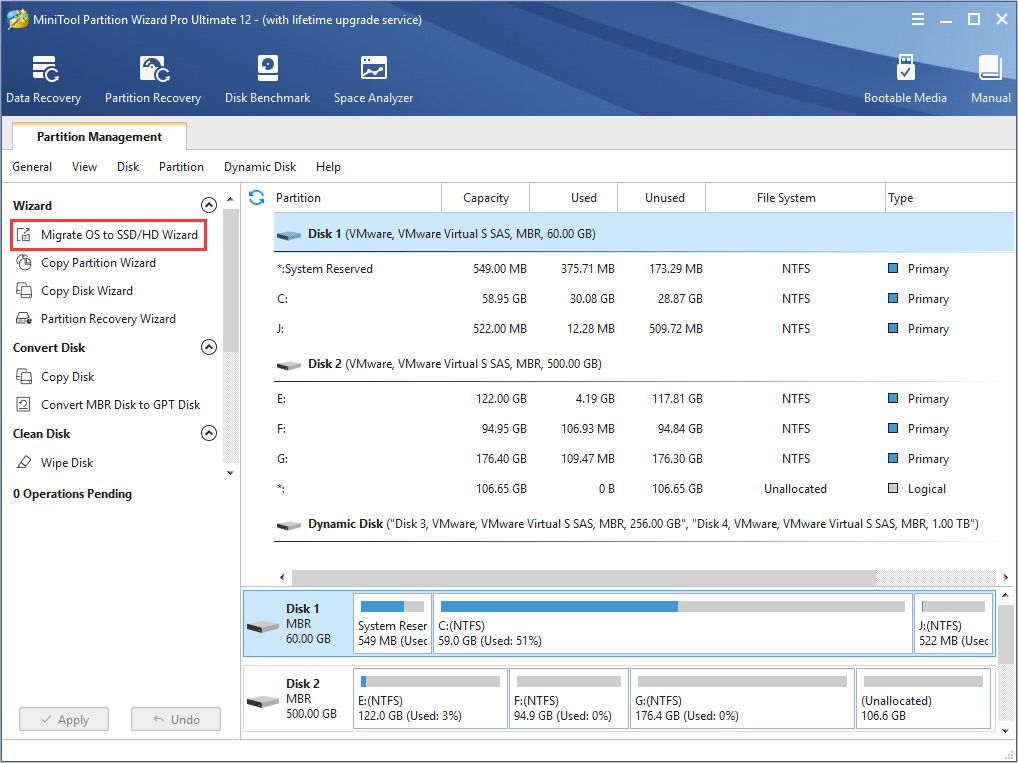
Step 3. Select the function Migrate OS to SSD/HD Wizard on the top toolbar.
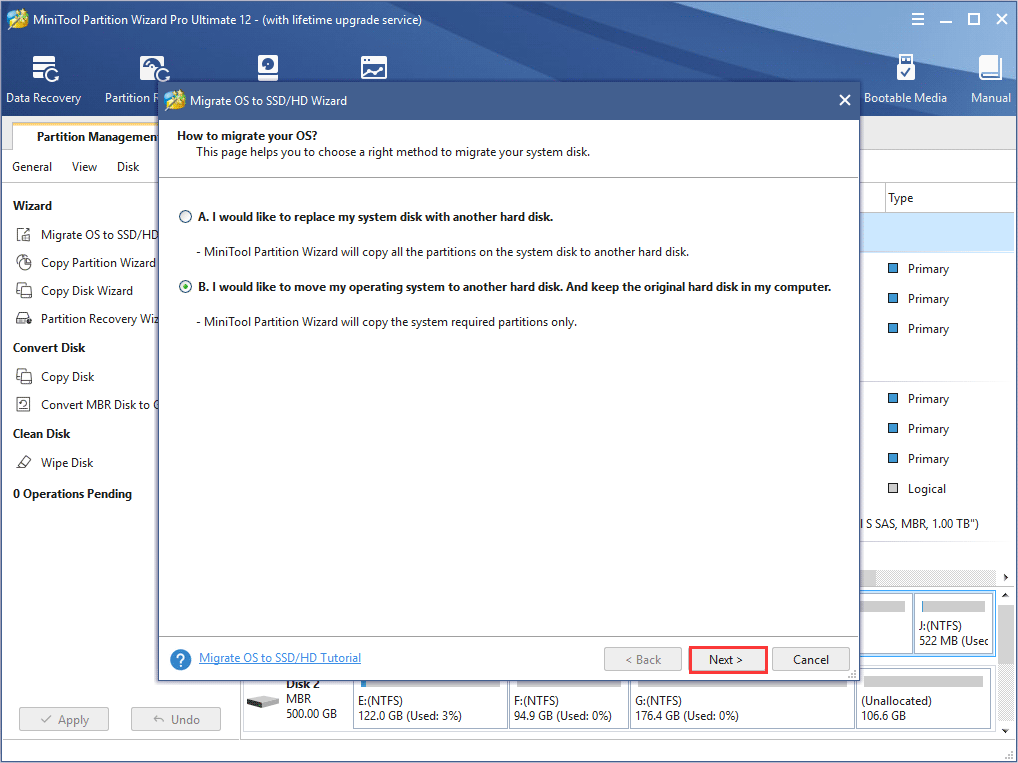
Step 4. Choose option B to move operating system to another hard disk, as the following picture shows.
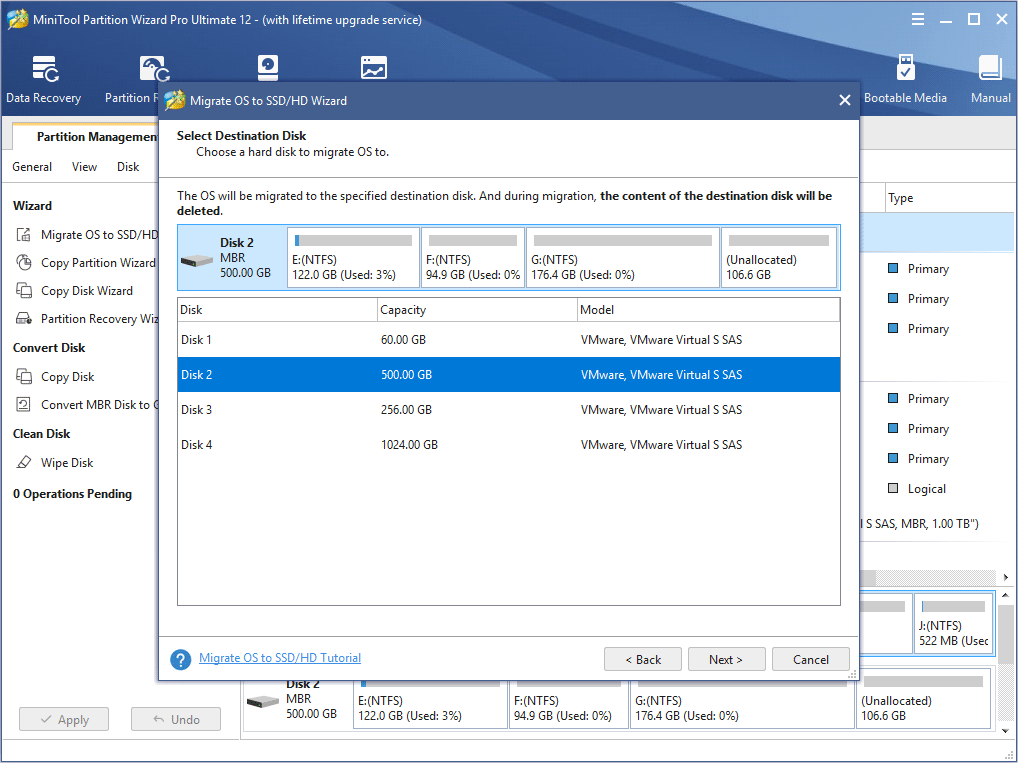
Step 5. Then, choose your HDD/SSD to migrate OS to and click Next.
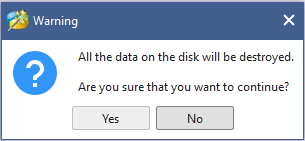
Step 6. All data saved on your HDD/SSD will be destroyed, so please make sure there is no important file and data on the SSD or backup significant ones in advance. Then click Yes on the pop-up Window.
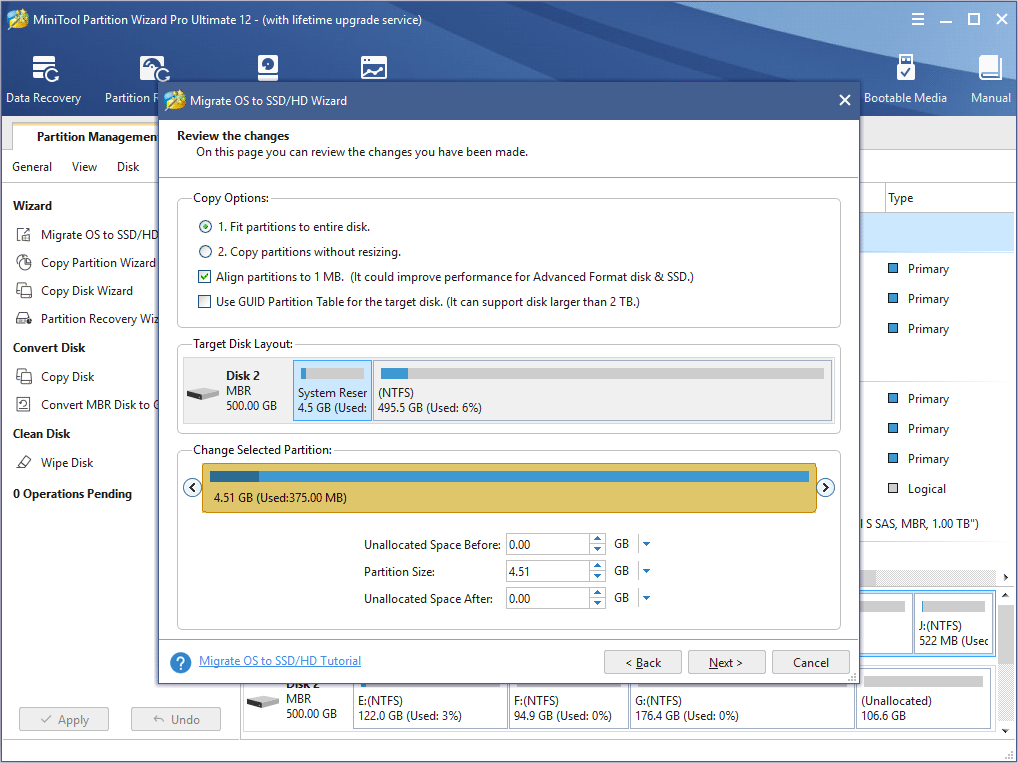
Step 7. Choose a copy method and click Next. If you choose the first one, system partition and boot partition will be enlarged to take up all space of the SSD. If you choose the second one, partitions will be cloned with the same partition size, but you can adjust partition size and location according to actual demands by dragging the handle.
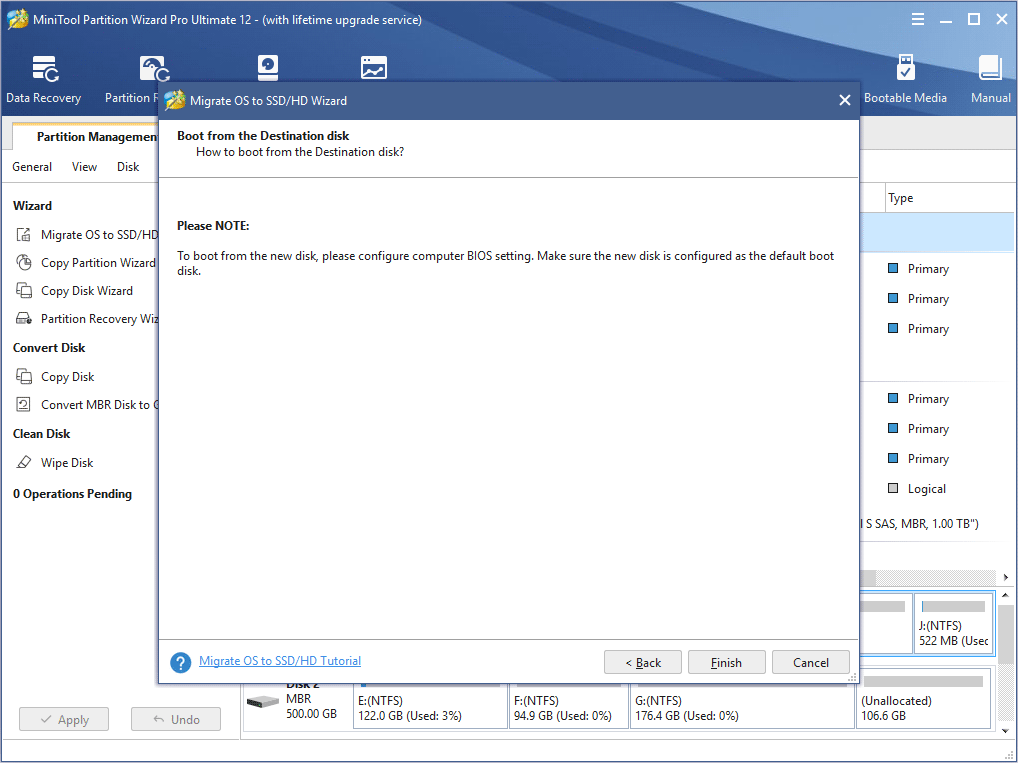
Step 8. This page will remind you to reset BIOS order, giving the new SSD boot priority, so your computer can boot from the new system disk successfully. Then click Finish.
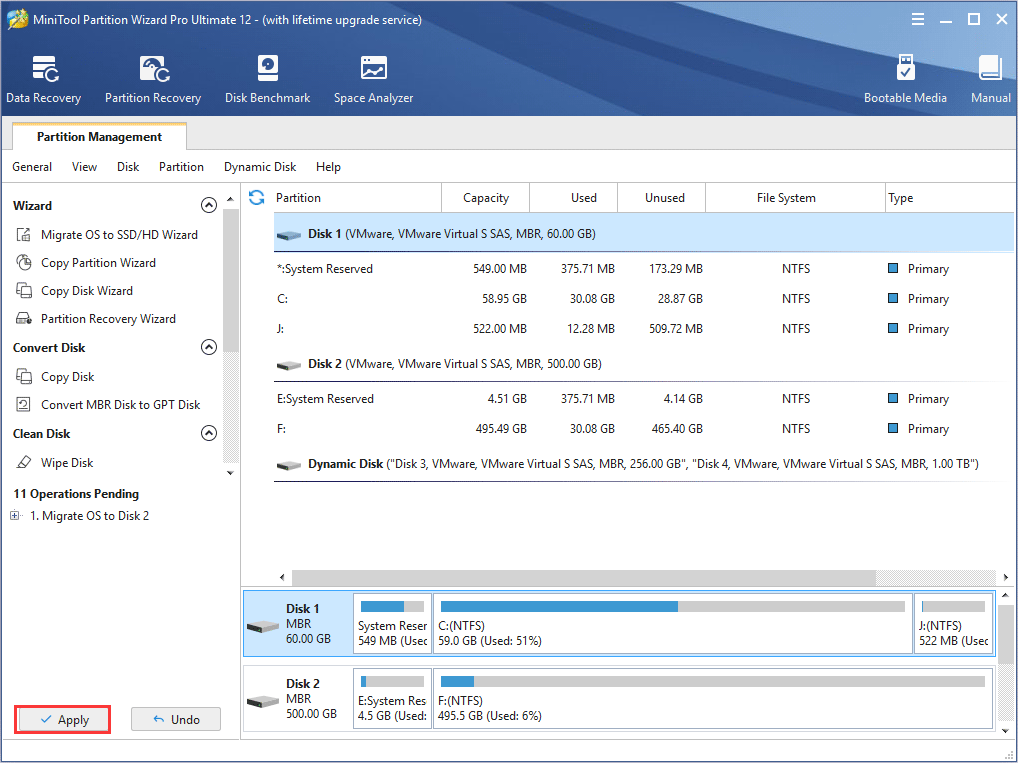
Step 9. At last, please click Apply button on the top to apply all these pending operations. Since the Windows OS is still running, MiniTool Partition Wizard will ask you to restart the computer for data protection.
step 10. you can enter BIOS and then set the newly installed SSD/HDD as the default boot disk. If you don’t know how to boot from the NVMe M.2 SSD, you can refer to this post.
You see, it is very convenient to migrate OS to another disk with this Windows migration tool. If you find Windows reinstallation is troublesome and time-consuming, you can try using MiniTool Partition Wizard, which can be a big help.
«By using MiniTool Partition Wizard, I successfully clone Windows 10 operating system to my HDD with its Migrate OS to SSD/HD feature.»Click to Tweet
Bottom Line
After reading this post, have you learned how to use Windows 10 creation tool or how to migrate Windows 10 with MiniTool Partition Wizard Edition? If you do, now try these methods to get the latest Windows 10 now!
If you have any question about how to clone Windows 10 to SSD/HD with MiniTool Partition Wizard, you can leave a message in the following comment zone and we will reply as soon as possible. If you need any help when using MiniTool software, you can contact us via [email protected].
How do I get Windows 10 media creation tool?
You can get Windows 10 media creation tool by visiting the Microsoft Media Creation Tool website. Then click the Download tool now button from the webpage. Then install and run the application on your PC. After that, you can choose to create installation media for another PC or upgrade Windows 10 with Windows 10 media creation tool.
How do I upgrade to Windows 10 using media creation tool?
First, visit the Microsoft support website. Click the Download tool now button on the page. Run the Media Creation Tool and click the Accept button to agree to the terms. On What do you want to do page, select Upgrade this PC now and click Next. Then follow the prompt to complete upgrade to Windows 10.
How do I create a bootable USB using Windows 10 media creation tool?
Prepare a blank USB flash drive with at least 8 GB and connect it to your PC. Download the free Windows 10 media creation tool from the Microsoft’s official website and run the tool. On the What do you want to do page, select Create installation media for another PC. Then select language, Windows Edition, and Architecture for the installation media. On Choose which media to use page, select USB flash drive and follow the prompts to create the bootable USB drive.
What is Windows 10 media creation tool?
Windows 10 Media Creation Tool is a free utility developed by Microsoft, which lets you create a Windows 10 installation USB drive or download its .ISO file that you can burn on to a DVD to install the operating system on a different computer. With Windows 10 creation tool, you can upgrade Windows to its latest version or create a Windows 10 installation USB drive/DVD disc to install Windows 10 or repair a Windows PC.
Whether you arrived at Windows 10 through a dedicated upgrade or a shiny new Windows 10 license, you will eventually have to restore or reset Windows 10.
There are now a whole host of ways to install Windows 10. Read on for our comprehensive guide to creating Windows 10 installation media.
The first and most obvious choice for creating Windows 10 installation media is the Windows Media Creation Tool. This application allows you to download the Home or Pro versions of Windows 10, and you can pick from the 32-bit or 64-bit version for both. Following your selections, you can choose to install directly to a USB drive or download a single or dual-use ISO to install to a disc at a later time.
- Download the Windows Media Creation Tool.
- Once downloaded, run the application and select Create installation media for another PC. Windows 10 will download within the application, ready for you to choose your version, system architecture, and which versions you’d like to include in your Windows 10 installation media.
If you choose to install directly to a USB or disc, follow the onscreen instructions to complete your installation. If you’re installing Windows 10 further down the line, read the next section on how to create bootable media.
Download Windows 10 ISO Direct from Microsoft
You can download Windows 10 direct from Microsoft without the Windows Media Creation Tool. The Windows 10 ISO was available from the Microsoft Tech Bench Upgrade Program for a long time, although this option is no longer available.
However, there is an alternative method for downloading a Windows 10 ISO.
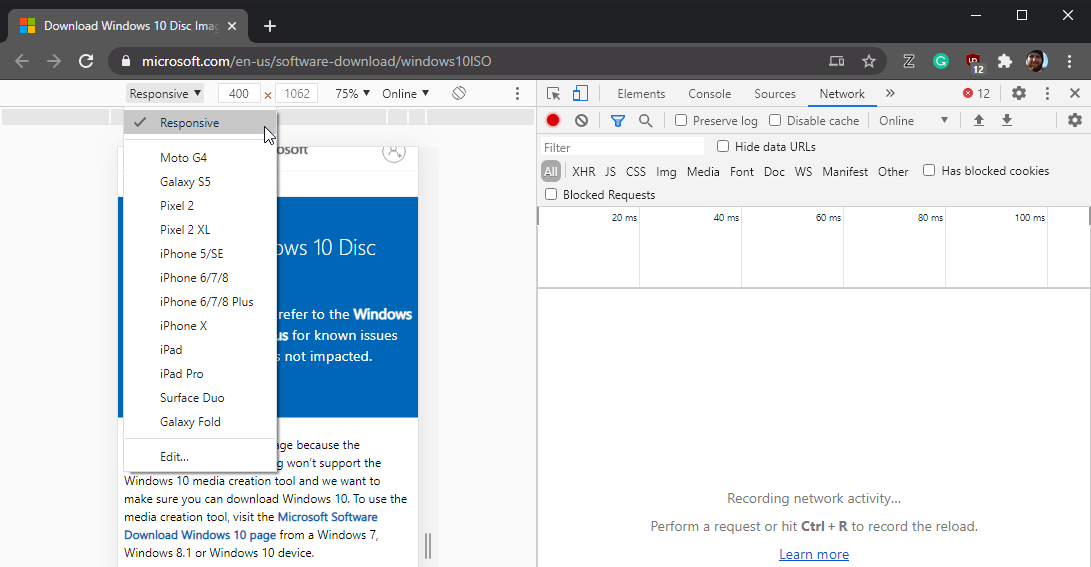
- Head to the Windows 10 ISO
- Press F12 to open the Developer Options.
- Press CTRL + Shift + M to open the Toggle device toolbar, which appears above the webpage. From the dropdown menu, select Responsive, then press F5 to refresh the page.
- When the page reloads, select the latest edition of Windows 10 from the dropdown, then Confirm the download.
After the ISO finishes downloading, head to the section below.
If you downloaded a Windows 10 ISO to install later, you need to create bootable Windows 10 installation media using an ISO burning tool. You can burn the Windows 10 ISO to a USB flash drive or a disc. You’ll find instructions for both options below.
Windows 10 USB Installation Media
To create USB installation media, you’ll need ISO to USB burning tool. I’m using Rufus for this tutorial, but there many other ISO to USB burning tool options.
- Download and install Rufus.
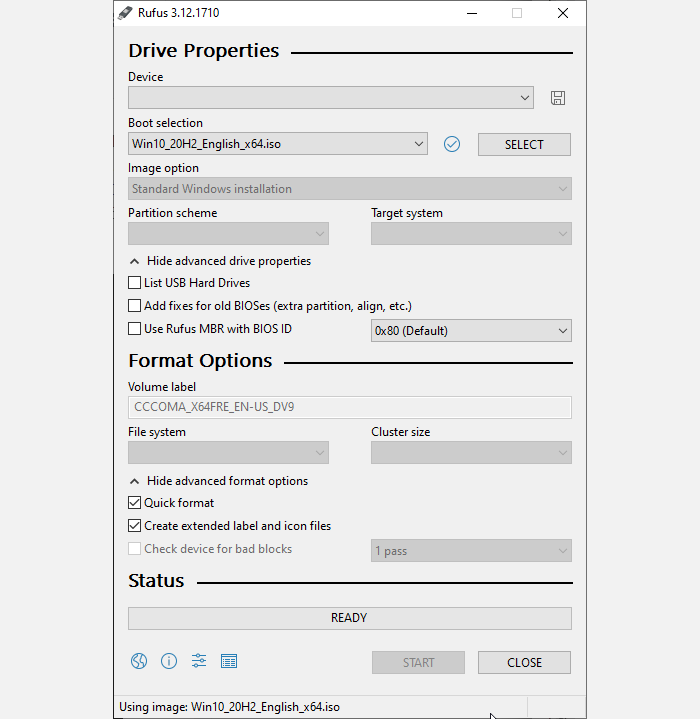
- Select the target USB Device from the dropdown menu, then Select the Windows 10 ISO. Rufus will update the properties and burning options automatically.
- Press Start to burn the Windows 10 ISO to the USB drive.
The burning process will vary depending on your computer but usually takes around 10-15 minutes.
Windows 10 Disc Installation Media
You don’t have to use a USB to create your installation media. Many people prefer the traditional disc approach, and there are numerous free applications to help you get the job done. For this example, I’m going to use ImgBurn.
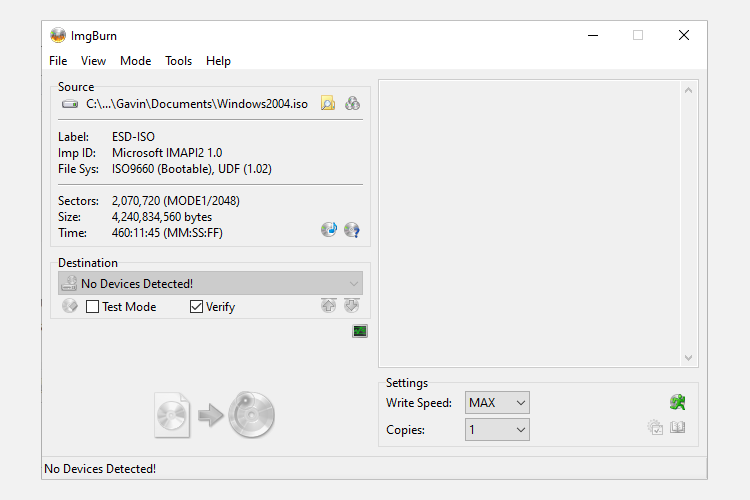
- Download and install ImgBurn.
- Now, select Write image file to disc.
- On the next window, select the Browse for file icon, which looks like a folder, then browse to and select your Windows 10 ISO.
- Set the Destination using the dropdown menu, then set the Write Speed to MAX.
- When you’re ready, hit the ISO to disc icon to start the burn process.
Already have a Windows disc but want to create an ISO? Here’s how you create a bootable USB drive from your Windows CD.
3. Unattended Windows 10 Installation
If you’re pressed for time, heading out for the evening, or simply have other tasks to get on with while installing Windows 10, you could try an unattended install. An unattended install is as it sounds: you have no input during the installation. All it takes is a little setting up beforehand.
I will be creating a bootable USB for this part of the article.
First off, you need to generate an Autounattend.xml answer file. This answer file will be included in our bootable USB and will «answer» the questions throughout the Windows 10 installation.
Create Your Answer File
Head to the Windows Answer File Generator (WAFG). Enter your Windows 10 product key or use the generic product key provided by the WAFG. Windows 10 generic product keys allow you to complete the setup before entering a unique key after installation.
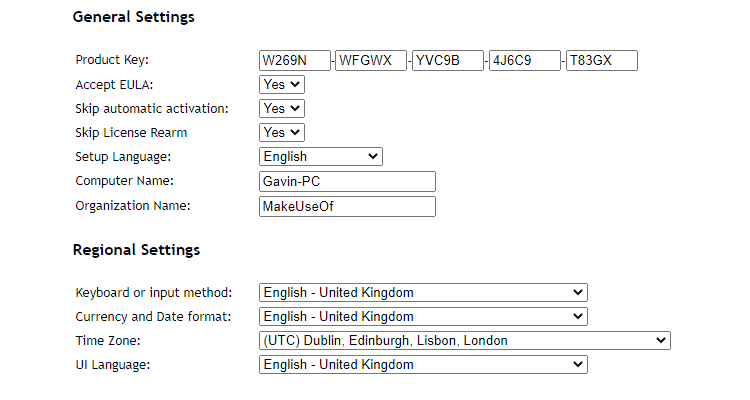
Now, choose the options you want to include in your unattended installation. For example, accepting the EULA, skipping automatic activation, skipping the license rearm, the setup language, entering your computer name, keyboard language and input, whether to use express privacy and sharing settings, and more.
Input Your Partition Settings
Next, you need to input your partition settings for the unattended Windows 10 installation. It is important to get these settings correct. If you use the wrong disk and partition information, you could wipe data from another drive on your system.
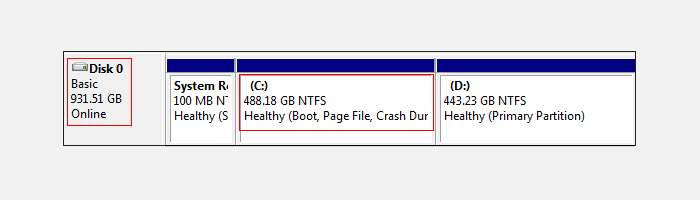
To begin, decide if you are performing a clean install or upgrading your system. If you’re opting for a clean install, change the Wipe Disk option to Yes. Select the number of the disk to install to. If you’re unsure of the disk number, type disk management in your Start Menu search bar and select the Best Match. Note the disk number and the partition number you are installing Windows on. Use the following images as a reference:
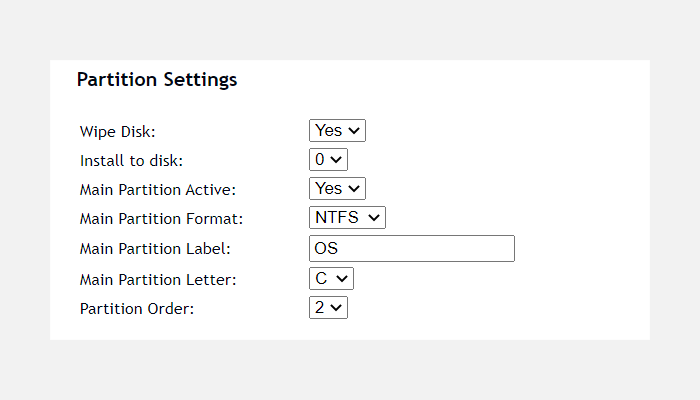
I will be installing to disk 0. Select Yes to Main Partition Active. Ensure your Main Partition Format is NTFS. Set a name for your Main Partition Label. Make sure your Main Partition Letter matches the Partition Order, e.g., my C: partition is equivalent of partition order number two.
Finally, enter your User Account information, including a User Name, whether you’d like UAC enabled, and whether you’d like your account to Auto-Logon. You’re all set!
Download and Copy Your Answer File
Scroll down to the console box. Download your Autounattend.xml file using the Download File located underneath the box.
To complete your unattended Windows 10 installation media, follow the Make Windows 10 Installation Media section covered earlier in the article. When you finish burning the Windows 10 installation to your USB flash drive or disc, you must copy the Autounattend.xml file into the root directory, alongside the installation files.
The next time you need to install Windows 10, the entire process will be automated, leaving you free to drink tea and eat scones.
The Easy Way to Install Windows 10
You now know the three main methods of creating Windows 10 installation media. You can use any of these methods for a clean installation of Windows 10. Before commencing with your clean install, please make sure to back up any important files to a safe location—not the same drive you’ll be installing to!
You can use installation media or a bootable USB drive or DVD to perform a clean installation, install a new copy of windows or reinstall Windows. Also using a Bootable USB drive you can access advanced startup options to fix windows startup problems. If you have a windows 10 PC its good idea to create windows 10 installation media, so you can install or reinstall windows or repair a PC that won’t turn on. Here in this post, you will learn how to create Windows 10 Bootable USB using the official media creation tool or third-party utility Rurus.
How To Create a Bootable USB drive
To create a USB Bootable drive For Windows 10 First We Need A USB Flash Drive (At least 8GB, And make sure the USB drive is Empty or Backup your USB Drive Data). Also, Require Windows 10 ISO files. Otherwise, if you use the Media Creation Tool then Make Sure you have a Stable Internet Connection.
First Download The Windows 10 ISO 64-bit and 32-bit (As your requirement). If you are looking for creating a Bootable USB using the Media Creation Tool no need to download Windows 10 ISO direct jump here.
Using Windows USB / DVD Download Tool
— Advertisement —
First Download Windows USB / DVD Download Tool & Install it on your computer.
- After finishing its installation, Simply Run it.
- It requires an ISO image file of windows.
- Click Browse and select the ISO image.
- Then click Next, and select the USB Drive,
- Also, you Can Select DVD (which you want for bootable purposes),
- Now Click begin Copying to start the process,
- This will warn you to erase/format the USB Drive before makes it bootable click yes and proceed.
- The process will take a while.
- Wait a while until you see the Bootable USB device created successfully.
- Then After you can use this bootable USB / DVD for windows installation purposes.
— Advertisement —
Using Rufus Tool
Also, you can use the third-party utility Rufus tool, which allows you to easily create a Bootable USB drive with Flew steps.
Rufus is a utility that helps format and create bootable USB flash drives, such as USB keys/pendrives, memory sticks, etc
- First Download Rufus from the official site.
- Then Double-click the Rufus-x.xx.exe file to Run the tool.
- Here Under “Devices,” select the USB drive with at least 8GB of space.
- Then Under the “Partition scheme and target system type,” select the GPT partition scheme for UEFI option from the drop-down menu.
— Advertisement —
- Next Under “File system” and “Cluster size,” leave the default settings.
- And On “New volume label,” type a descriptive label for the drive.
- Next Under “Format Options,” check the Create a bootable disk using the “ISO image”option.
- Now Click on the drive icon and select the Windows 10 ISO image.
- When you are ready Click the Start button.
- And Click OK to confirm that the USB drive will the erased.
- Once you’ve completed the steps, Rufus will proceed to create the USB bootable media.
Using Media Creation Tool
Also, Microsoft Officially Released Windows Media Creation Tool Which let you to create a Windows 10 installation USB drive or download its ISO file that you can burn onto a DVD to install the operating system on a different computer.
- First Insert the USB Drive into the computer
- Download the Windows Media Creation Tool.
- Save the Media Creation Tool.exe file to your desktop and Double click on it to run the Setup.
- Accept the Terms and Conditions then on the Next screen Select the Create installation media (USB flash drive, DVD, or ISO file) for another PC option and click next.
- Now on the next screen, the language, architecture, and edition will be selected automatically based on your computer configuration.
- But you can clear Use the recommended options for this PC option to select the appropriate settings if you’re trying to use the media on another device.
- We recommend Select Architecture for both So that we can use the USB for 32 bit and 64-bit windows installation purposes.
- Click Next and select the USB Flash Drive option.
- Again click Next and select the removable drive from the list.
- That’s all when you click next the Media Creation Tool Will Start windows Downloading (it will take time depending on your internet connection speed).
- After that, you see Creation Windows 10 media, Wait Until 100% Complete the process.
- Then after finish the process and Now you can use the USB drive for Windows installation or Upgradation purposes.
Did this help to create Windows 10 Installation media? Let us know in the comments below. Also, read:
- Setup And Configure an FTP server on Windows 10 step by step Guide
- Windows 10 start menu not opening after update? here how to fix it
- How to Create a Password Reset Disk on Windows 10
- How To well Optimize Windows 10 Performance For Gaming
Follow the article, and you would learn how to create installation media or disc step by step for Windows 10/8/7 with writable USB flash drive or CD on an accessible computer.
- How to create Windows 7 installation disc
- How to create Windows 8/8.1 installation media
- How to create Windows 10 installation media
Why we create Windows installation media?
Besides installing or reinstalling Windows operational system on a computer, installation disc would also help to reset Windows 10 forgotten password for local account. So you know how important it is when you are locked out of Windows 10 computer and have no available administrator, password reset disk and don’t find or want to use third-party software.
Preparation before installation media creation:
- Internet connection
- Writable USB flash drive or CD with enough storage space, at least 4 GB of space
- Windows product key
How to create Windows 7 installation disc
If you want to create a Windows 7 installation disc, there is one more thing you would need to prepare. That is Windows 7 product key. Otherwise, you cannot download Windows 7 ISO file from Microsoft.
1. Go to Windows 7 download page and enter product key to Verify.
https://www.microsoft.com/en-us/software-download/windows7
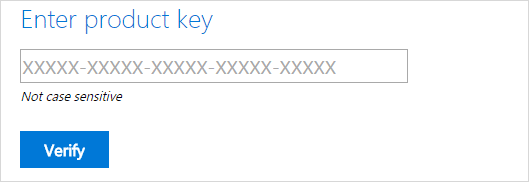
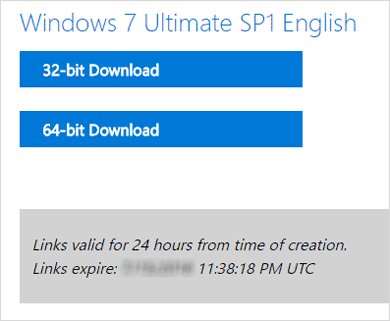
2. If product key is available, you would be able to select product language such as “English“. Click Confirm.
3. Click 32-bit Download or 64-bit Download to download Windows 7 installation file. The download link is only valid for 24 hours.
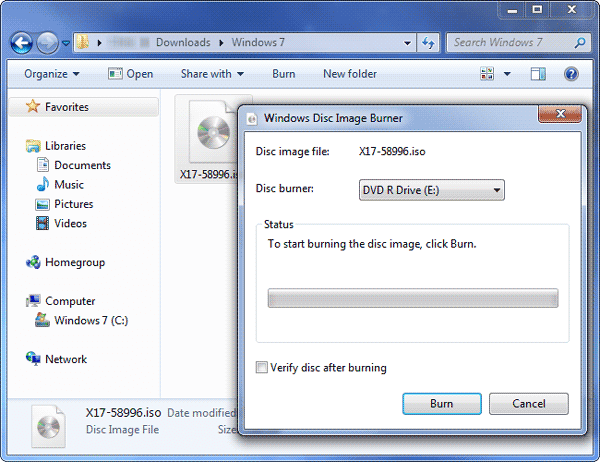
4. After downloading the ISO file, you can burn it into a DVD by right-clicking it in Windows Explorer and selecting “Burn disc image” to burn it to a disc. Then you would get Windows 7 installation disc.
How to create Windows 8 installation media
Creating installation media for Windows 8/10 would be different from Windows7 because you can use media creation tool Microsoft provides to directly download system file and burn the file into blank USB flash drive or CD.
1. Click Download Tool Now to download Media Creation Tool on Microsoft.
https://www.microsoft.com/en-us/software-download/windows8
2. Run Media Creation Tool on your accessible computer and insert USB or CD.

3. Select the Windows system you want to create installation media for. Click Next.
- Language: English
- Edition: Windows 8.1, Windows 8.1 N, Windows 8.1 Pro, Windows 8.1 Pro N, Windows 8.1 Single Language
- Architecture: 32-bit (x86), 64-bit (x64)
4. Select appropriate device, USB flash drive or ISO file on Media Creation Tool. Click Next.
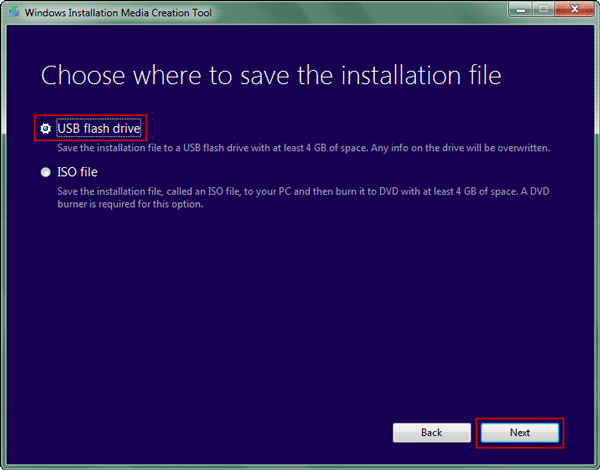
5. Choose the removal drive you have plugged into computer. And click Next.
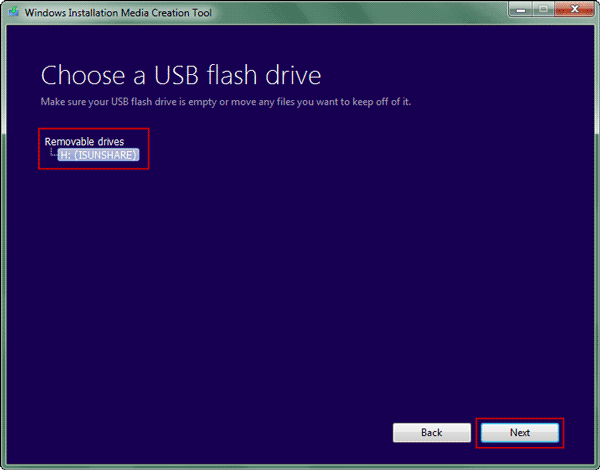
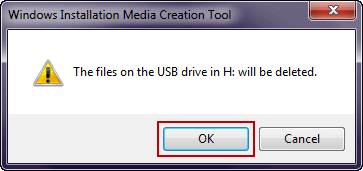
A message would pop up and prompt you that the files on the USB drive/CD would be deleted. So blank USB drive or CD is recommended, and you would not lose data on the removal device. But if you want to continue, click OK please.
6. The media creation tool would download the installation file and burn the file to USB or CD. Click Finish button at last on the creation tool.
How to create Windows 10 installation media
1. Go to Microsoft website and download Windows 10 media creation tool with a link Download tool now on an accessible computer.
https://www.microsoft.com/en-us/software-download/windows10
2. Double-click the program you download to launch media creation tool.
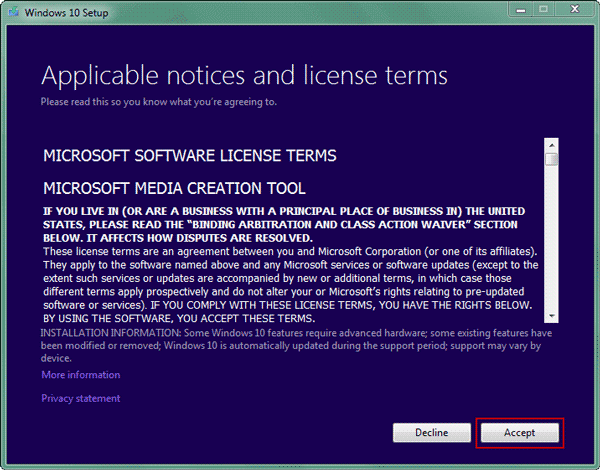
3. Accept Microsoft software license terms.
4. Select what you want to do, such as “Create installation media for another PC“. Click Next.
5. Uncheck “Use the recommended options for this PC“, and select Windows edition, language and architecture and click Next to download Windows 10 installation file.
- Language: English (United States), select the one you are familiar with or want
- Edition: Windows 10, Windows 10 Home Single Language, Windows 10 N
- Architecture: 32-bit (x86), 64-bit (x64), or Both
6. Choose which media you want to use to create installation media. Click Next.
Similarly, Windows 10 installation file would be downloaded and burned into USB or CD. You would get a Windows 10 installation USB or CD disc, which you can get to reinstall Windows 10 computer or reset forgotten local account password for locked Windows 10.
Related Articles:
- 2 Ways to Create a Windows Password Reset Disk
- 3 Options to Create a Windows 10 Recovery Disk
- How to Find Windows 10 Lost Product Key
- How to Create New Administrator on Windows 10 without Login
- How to Reset a Windows Password without an Install CD
- How to Set Computer Boot from USB Flash Drive
Posted in Windows Password
Comments are currently closed.
Windows Installation Media Creation Tool is a tiny Microsoft software executable file that allows you to download Windows 10 and build installation media. Furthermore, the Media Creation Tool will enable you to update your current machine or laptop to Windows 10 directly.
It creates no difference whether you want to make your installation media or download an ISO image file with the most recent Windows 10. The Media Creation Tool is needed for both tasks.
The media creation tool permits users to download Windows 10 Home or Pro, and you can choose between 32-bit and 64-bit versions of both. You have the option of installing directly to a USB flash drive or downloading a single or dual-use ISO to install to a disc later.
Things To Know Before Proceeding
Microsoft offers a direct download of the Media Creation Tool. This tool is compatible with Windows 7, 8, 8.1, and 10. When creating the Install Media or ISO image File, you do not need to enter your Windows product key.
Here’s what you might need before you begin:
- A computer with a reliable internet connection is needed.
- The download is approximately 4 GB in size, and the time it takes to finish highly depends on your link speed and other factors.
- A DVD writer and a blank DVD. It includes a DVD writer on the device you’re creating the media on, as well as a DVD player on the system you’re installing it on.
- A Media USB flash drive/DVD with at least 8 GB of storage space is needed since any existing content would be removed.
How Do I Find The Windows 10 Installation Media?
Windows 10 installation media is freely available for Windows 8.1, Windows 10, and another version of windows on the official website of Microsoft Software.
If users want to install Windows, they can download these files to install or reinstall Windows operating systems and repair respective Windows. Users just have a flash drive of at least 8 GB and a fast internet connection.
How Do I Create A Windows 10 USB Drive?
To get the Media Creation Tool, go to Microsoft Windows(window 10) page in web browsers. Windows 10 is available for download. Scroll down the opened page until you see the “Download tool now” Tab, then press or tap it. It’s in the segment titled “Build Windows 10 installation media.”
If you need to update your Windows 10 on the same personal computer, you are working right now. Just click on “Update Now,” as shown in the image below.

To download windows 10 and select create installation media USB flash, then follow the given steps.
- Scroll down on the same provided page and select “Download Tool Now.”

- Open and install the media creation tool from the downloads section.
- After installing, open the tool from the desktop icon and follow the below steps.
- Click on Accept on the licenses terms page, as shown below.

- In the succeeding step, select whether you want to upgrade this Personal computer or download the ISO file for any other Personal Computer.

- Pick the language, edition, and architecture (64-bit or 32-bit) for the Windows 10 installation media you want to make, then click Next.

- Please choose the correct language, edition, and architecture for your target unit to avoid any problems with Windows 10 activation (if your device has a digital license, it will enable windows 10 automatically once it’s online after the installation is complete).
- Select the method you want to create installation media from the provided options.
- Media USB flash drive.
- DVD or ISO file for another PC

- Go to next and click to proceed further.
- In case you want to save the ISO file in System. Select the save path from the save menu as shown below.

- Once completed, wait for the download to complete and save in your installation media USB flash drive or your DVD or iso file.

- After completion, you can continue with reinstall windows 10 or install windows 10.
How To Make Windows 10 UEFI Boot Media With Rufus Tool
There are other methods to make a bootable flash drive or installation media using tools like RUFUS and PowerISO.
Rufus is a lightweight executable that has steadily developed its capabilities over time. Rufus detects and fills in the best settings for the ISO file you choose and standard ISO to USB options like cluster size and file system. Rufus also has a secret Advanced Mode with a slew of extra features.
Rufus’ time was 21m12s, which was far from the fastest. Regardless, Rufus is an excellent ISO to USB platform.
Download the Rufus tool setup to create windows 10 and follow the below steps.
- After downloading the Rufus setup software, install the setup on your personal computer.

- Double click Rufus and follow the below instructions for making a bootable USB.
- Insert the flash drive into your personal computer. (drive with at least 8GB space)
- Select your flash drive in which you want the Rufus tool to create Windows 10 installation media.

- Choose boot selection to select the types of file you have to create bootable USB.

- Now click on select to browse for the ISO file location and select the installation files.

- Choose the name from the window of your windows installation drive.

- Select the Standard Windows installation option from the “Image option” drop-down menu.
- Select the GPT option from the “Partition scheme” drop-down menu.

- Select the UEFI (non-CSM) option from the “Target device” drop-down menu.
- After all the above-given steps, click on Start to initiate windows installation media creation.
- Wait for the process to get completed, and then you can use the flash drive to install windows 10
How to recover Windows 10 using a Recovery USB Flash Drive
- Swipe in from the screen’s right side, then tap Search. (If you’re using a cursor, drag the mouse pointer up to the lower-right corner of the screen and then press Search.)
- In the search box provided in windows 10, type recovery drive, and then select Create a recovery drive.
- Make sure to create a copy of the recovery partition from the Personal Computer to the recovery drive check box is selected when the recovery drive tool opens, and then pick Next.
(When your computer doesn’t have a recovery partition, the check box is greyed out. It will include only the recovery tools and a bootable image on the recovery drive; there will be no recovery image for refreshing or resetting your computer.)
- Insert a USB flash drive that is at least as big as the size shown on the screen into your computer.
- Choose the flash drive you want to use as your recovery drive, and then click Next.
- Choose to Create. It will copy the recovery image and recovery tools to your USB flash drive, which could take some minutes depending on your personal computer and the size of the recovery image.
- When the procedure is completed, choose one of the following options:
- Select Finish if you want to keep the recovery partition on your computer.
- Click Delete the recovery partition to uninstall the recovery partition from your computer and free up disc space. Then choose Delete. It will free up some space on your hard disk previously used to store your recovery image. Select Finish until the removal is complete.
(some PCs do not allow you to delete a recovery partition. If this happens to you, there isn’t a recovery partition on your computer taking up extra space.)
- Remove the USB Pen drive from the device. It is your Windows 8.1 recovery disc, and you’ll need it in the future if you need to refresh or reset your computer. Keep it in a secure location, and don’t use it to store any other data or information.
(If you upgraded your PC from Windows 8 to Windows 8.1, your recovery drive would still contain Windows 8, and you’ll need to update to Windows 8.1 after you refresh or reset your PC.)
Conclusion
I hope you learned how to create Windows 10 installation media from this illustrated tutorial. These were some simple steps for making a USB flash drive. Also, don’t forget to back up your data before installing windows.
Frequently Asked Questions
What’s A Bootable USB Flash Drive?
USB drives have become common due to their portability and ease of use. A bootable flash drive allows you to start your device from the flash drive’s file system rather than your hard drive’s. On the hard drive of your device, a boot sector contains details about how to use it.
Does Windows 10 Media Creation Tool Download The Latest Version?
The Media Creation tool always downloads Windows 10’s most recent stable version and build. When you download Windows 10 to make installation media, you’ll be asked whether you want to create media for 32-bit, 64-bit, or both architectures.
Can I Put Windows 10 On A Flash Drive?
If you want to use the most recent edition of Windows, you can install it directly from a USB drive. A USB Pen drive with at least 8 GB of space, but preferably 16 GB, is needed. For activation of Windows 10 on the USB drive, you’ll also need to buy a license. You can buy the license from Microsoft software.
Can Windows 10 be installed on legacy BIOS?
USB flash drives can automatically install Windows 10 if they are booted on computers that have a product key saved in BIOS or UEFI for Windows 8, 8.1, or 10. Unless a product key can be found, then the installation process will ask you which version of Windows you wish to use.