If Credential Manager is not working and showing UI Host is not responding error, these solutions will be helpful for you. It mainly appears when your computer cannot allocate a sufficient amount of RAM or Memory for open the Credential Manager. However, there could be other reasons too. This article explains almost all the possible causes and solutions so that you can get rid of this issue within moments.
To fix UI Host is not responding RDP error of Credential Manager, on Windows 11/10 systems, follow these steps:
- Restart Windows Explorer
- Close unnecessary apps
- Restart Credential Manager service
- Scan for malware
To know more about these steps, continue reading.
1] Restart Windows Explorer
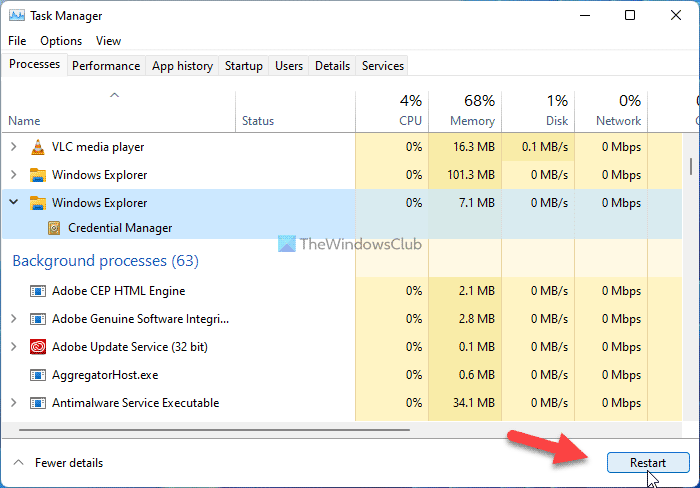
At times, restarting the Windows Explorer process can help you fix this issue on your computer. If this issue appears due to an internal file conflict, restarting the Windows Explorer will fix it within moments. The easiest way to restart the Windows Explorer is by using the Task Manager.
To restart the Windows Explorer in Windows 11/10, follow these steps:
- Right-click on the Start Menu.
- Select the Task Manager from the Win+X menu.
- Click on the Windows Explorer process.
- Click the Restart button.
Then, try to open the Windows Credential Manager on your computer. If the problem still remains, continue following other solutions.
2] Close unnecessary apps
As said earlier, this error message appears when Windows cannot allocate the correct or sufficient amount of Memory for opening the Windows Credential Manager. If you have a low amount of RAM, it is highly recommended to close unnecessary apps. If you are not using an app for a long time and it is still open on your computer, you can use the Task Manager to terminate it.
On the other hand, if you have opened multiple heavy-weight apps simultaneously, you can close a few of them as well. Once done, restart the Windows Explorer and open the Windows Credential Manager.
3] Restart the Credential Manager service
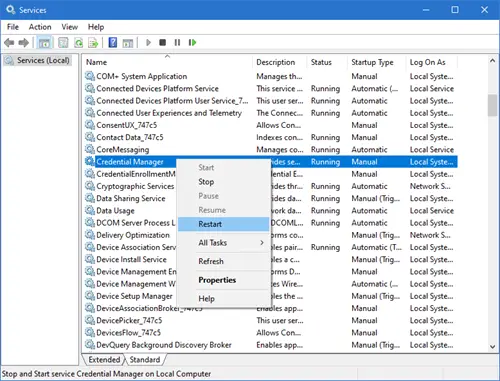
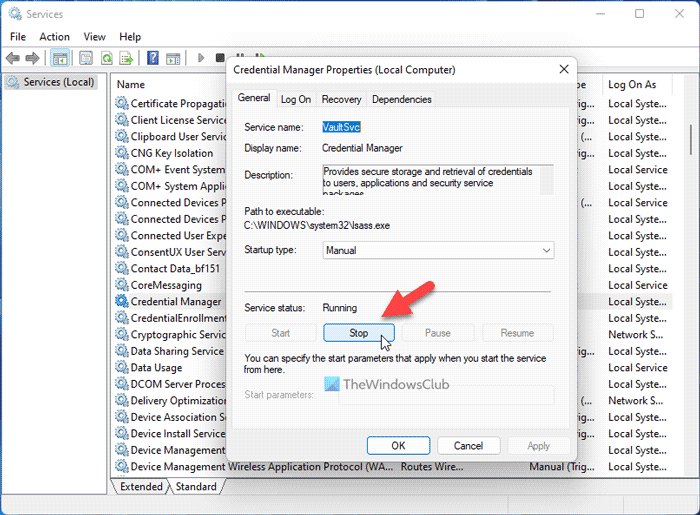
If the Credential Manager service is no longer running in the background, you can find the same issue on your computer. As this service is mandatory to run on your computer, make sure its startup type is set to Manual and it is running. Even if it is running, you may face this issue. Therefore, follow these steps to restart the Credential Manager service:
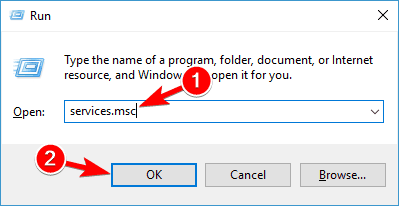
- Press Win+R to open the Run prompt.
- Type services.msc and hit the Enter button.
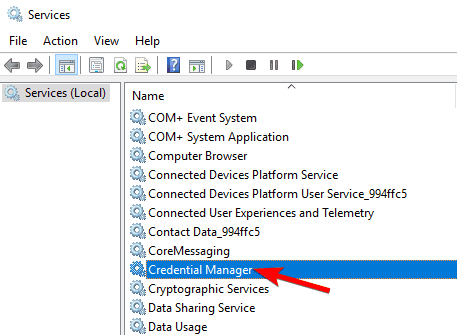
- Double-click on the Credential Manager service.
- Click on the Stop button.
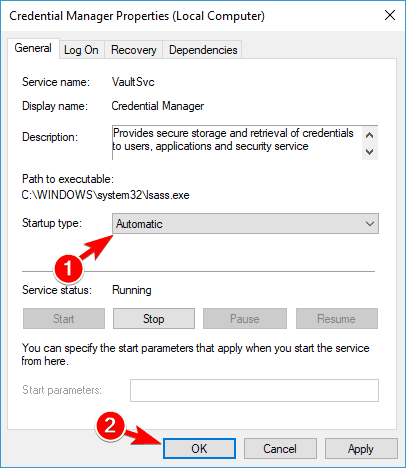
- Choose the Manual option.
- Click on the Start button.
Following that, click the OK button, close all windows, and restart your computer. Hopefully, it won’t show the same problem anymore.
4] Scan for malware
If your computer is attacked by malware or adware, there is a high chance of getting this issue on your computer. You need to scan your computer with a reliable antivirus or antimalware and adware removal tool.
Read: Credential Manager not showing, opening or working properly
Why are my network credentials not working?
Network Credentials work when you have set things up correctly. However, if you have done everything in the right way, but it is not working, you need to check the Credential Manager service in the Services panel. On the other hand, if you are getting any error while opening the Windows Credential Manager, you need to fix that issue first.
Related reads:
- Windows Credential Manager loses credentials after reboot
- Credential Manager, The system cannot find the path specified, Error 0x80070003
- Credential Manager Access is denied
- Credential Manager Error 0x80090345
Is it OK to clear Credential Manager?
If you clear the Credential Manager or delete credentials from the Credential Manager, you won’t be able to access that username and password anymore. Other than that, there is no harm in clearing the Credential Manager. Whether you are talking about Web Credentials or Windows Credentials, the rule applies to both.
That’s all! Hope these solutions worked.
Read: File Picker UI Host PickerHost.exe is not responding.
Диспетчер учетных данных представляет собой встроенную функцию, расположенную во внутренней системе Windows 8.
Эта функция используется Internet Explorer и другими клиентами просмотра веб-страниц для хранения ваших имен пользователей и паролей для различных веб-сайтов и учетных записей.
Теперь, в строках ниже, мы будем проверять, как исправить проблемы, связанные с функцией диспетчера учетных данных, поэтому, если вы имеете дело с неисправностями, не стесняйтесь и прочитайте следующие рекомендации.
Но почему так важно использовать диспетчер учетных данных? Ну, в основном ваше веб-приложение использует эту функцию по умолчанию для хранения ваших личных данных и учетных записей.
Затем с помощью этой информации система Windows 8 может автоматически войти на веб-сайты или другие компьютеры.
Поэтому, если Credential Manager не работает должным образом, ваше устройство Windows 8 не сможет сохранить ваши учетные данные, и вы не сможете автоматически входить в различные учетные записи — таким образом, каждый раз, когда вы захотите, потребуется ручная операция. получить доступ к веб-сайту или другому компьютеру.
Решение проблем, связанных с вашими учетными данными, легко, хотя вы можете решить эти проблемы двумя способами: вручную, используя встроенные опции и получив доступ к Реестру на вашем компьютере; Оба метода будут объяснены ниже, выберите решение для устранения неполадок, которое вы предпочитаете.
Диспетчер учетных данных является важной частью Windows, но пользователи сообщали о различных проблемах, и, говоря о проблемах, сегодня мы рассмотрим следующие проблемы:
- Диспетчер учетных данных Windows 10 не сохраняет пароль. Это одна из самых распространенных проблем, но вы должны решить ее, введя свои учетные данные вручную или удалив и добавив их снова.
- Ошибка диспетчера учетных данных 0x80070425 — это довольно распространенная проблема с диспетчером учетных данных, и если у вас возникла эта проблема, обязательно попробуйте одно из наших решений.
- Не удается открыть диспетчер учетных данных. Одной из наиболее серьезных проблем с диспетчером учетных данных является невозможность его открытия. Это может быть большой проблемой, так как вы вообще не сможете получить доступ к сохраненным паролям.
- Доступ к диспетчеру учетных данных запрещен — это сообщение об ошибке иногда может появляться при попытке доступа к диспетчеру учетных данных. Обычно это происходит из-за отсутствия определенных привилегий, но вы можете легко решить эту проблему.
- Диспетчер учетных данных продолжает падать — если происходит сбой в работе диспетчера учетных данных, это может быть большой проблемой. Тем не менее, вы должны быть в состоянии исправить это с помощью одного из наших решений.
Решение 1. Измените настройки Интернета
По словам пользователей, вы можете решить проблемы с Credential Manager, изменив настройки Интернета. Для этого выполните следующие действия:
- Нажмите клавишу Windows + R, чтобы открыть диалоговое окно « Выполнить ». В поле «Выполнить» введите inetcpl.cpl и нажмите клавишу « Ввод» или нажмите кнопку « ОК».
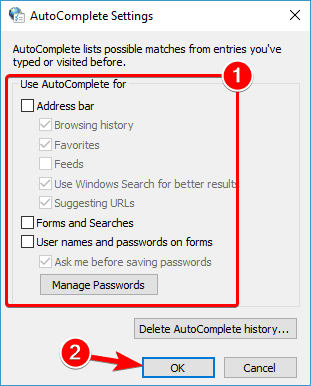
- В окне свойств Интернета нажмите на вкладке « Содержимое » и в разделе « Автозаполнение » выберите « Настройки».
- Теперь снимите все флажки и нажмите кнопку ОК, чтобы сохранить изменения.
- Нажмите кнопку « Настройки» еще раз, включите все параметры и нажмите « ОК», чтобы сохранить изменения.
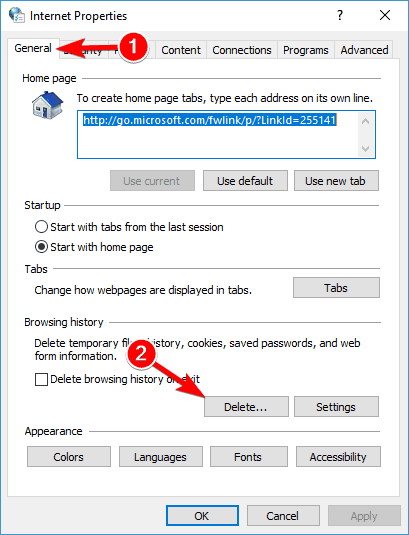
- Вернитесь на вкладку « Общие » и в разделе « История просмотра » нажмите « Удалить».
- Теперь кеш будет очищен, поэтому в конце вы должны перезагрузить компьютер, так как проблема должна быть решена.
После внесения этих изменений проверьте, работает ли Credential Manager.
Решение 2 — Используйте редактор реестра
Немногие пользователи утверждают, что вы можете исправить проблемы с помощью Credential Manager просто с помощью редактора реестра. Для этого выполните следующие действия:
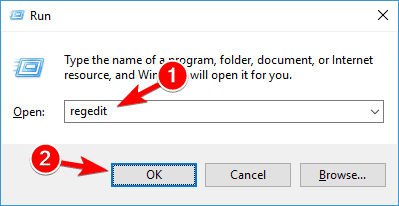
- Нажмите Windows Key + R и введите regedit. Нажмите Enter или нажмите ОК.
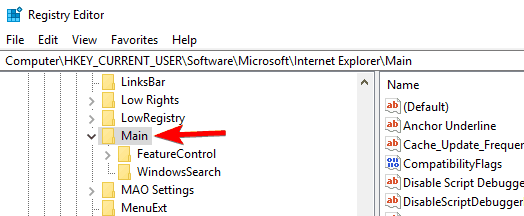
- Из редактора реестра перейдите по следующему пути HKEY_CURRENT_USERSoftwareMicrosoftInternet ExplorerMain.
- Направьте свое внимание на правую панель редактора реестра. Оттуда выберите строку FormSuggest PW.
- Щелкните по нему правой кнопкой мыши, выберите « Редактировать строку» и в поле «Значение» введите « Да».
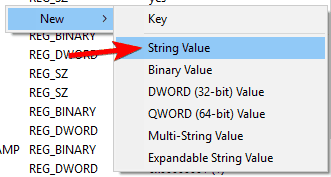
- Если вы не можете найти строку FormSuggest PW, вы можете создать ее вручную, щелкнув правой кнопкой мыши на правой панели и выбрав New> String Value из меню. Введите FormSuggest PW в качестве имени и повторите инструкции, начиная с шага 4.
- Закройте редактор реестра и перезагрузите устройство Windows 8.
После внесения этих изменений в реестр проверьте, решена ли проблема.
Решение 3 — Смена владельца для каталога Vault
Диспетчер учетных данных хранит свою информацию в определенном каталоге Vault. Однако иногда управление учетными данными не работает, поскольку в каталоге Vault отсутствуют определенные разрешения.
Чтобы устранить проблему, вам необходимо изменить разрешения вручную, выполнив следующие действия:
- Откройте проводник.
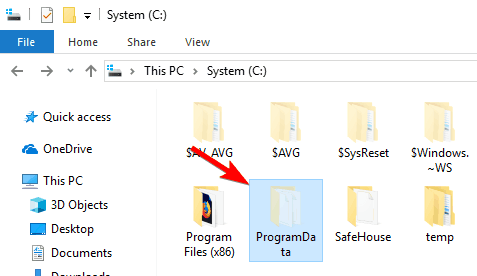
- Теперь перейдите в каталог C: ProgramData.
Примечание. По умолчанию этот каталог скрыт, и для его обнаружения необходимо перейти на вкладку « Просмотр » и выбрать « Скрытые элементы».
Кроме того, вы можете просто вставить C: ProgramData в адресную строку, чтобы получить прямой доступ к папке.
- Перейдите в каталог Microsoft. Найдите каталог Vault и щелкните по нему правой кнопкой мыши. Выберите Свойства из меню.
- Перейдите на вкладку « Безопасность » и нажмите « Дополнительно».
- Нажмите кнопку Изменить разрешения в левом нижнем углу.
- Теперь установите флажок Заменить все записи разрешений дочерних объектов и нажмите Применить и OK.
После этого вам нужно найти папку AC658CB4-9126-49BD-B877-31EEDAB3F204. Вы должны быть в состоянии найти его в каталоге Vault. Как только вы найдете эту папку, вам нужно сделать следующее:
- Щелкните правой кнопкой мыши каталог AC658CB4-9126-49BD-B877-31EEDAB3F204 и выберите « Свойства» в меню. Перейдите на вкладку « Безопасность » и нажмите кнопку « Дополнительно».
- В разделе « Владелец » нажмите кнопку « Изменить».
- В поле Введите имя объекта для выбора введите Администраторы. Теперь нажмите Проверить имена. Если все в порядке, нажмите ОК.
- Теперь установите флажок Заменить владельца на субконтейнеры и объекты. В левом нижнем углу нажмите « Заменить все записи разрешений дочерних объектов», нажмите « Применить» и « ОК», чтобы сохранить изменения.
Многие пользователи сообщили, что этим каталогам не были назначены какие-либо разрешения, и это привело к появлению сообщения об ошибке « Отказано в доступе» при попытке запустить Credential Manager.
После изменения разрешений эта проблема должна быть решена, и вы снова сможете использовать Credential Manager.
Решение 4. Установите для службы диспетчера учетных данных значение Автоматически.
Если у вас возникают проблемы с Credential Manager, вы можете решить эти проблемы, просто изменив тип запуска его службы.
Многие пользователи сообщали, что Credential Manager забывал сохраненные пароли, и если у вас возникла эта проблема, вы можете решить ее, выполнив следующие действия:
- Нажмите Windows Key + R и введите services.msc. Теперь нажмите Enter или нажмите ОК.
- Список услуг теперь появится. Найдите службу диспетчера учетных данных и дважды щелкните ее.
- Установите тип запуска « Автоматический», нажмите « Применить» и « ОК», чтобы сохранить изменения.
После изменения типа запуска службы ваш менеджер учетных данных должен снова начать работать без каких-либо проблем.
Немногие пользователи сообщили, что перезапуск службы Credential Manager устранил проблему, поэтому не стесняйтесь делать это тоже.
Чтобы перезапустить эту службу, просто нажмите кнопку « Стоп», подождите несколько секунд, а затем нажмите кнопку « Пуск», чтобы снова запустить службу.
Решение 5. Введите учетные данные вручную
Если диспетчер учетных данных не работает должным образом, вы можете решить проблему, введя свои учетные данные вручную.
Пользователи сообщили, что их учетные данные не сохраняются, и вы можете решить проблему, выполнив следующие действия:
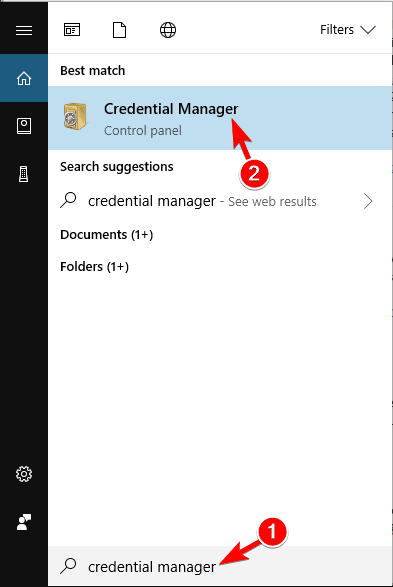
- Нажмите Windows Key + S и введите диспетчер учетных данных. Выберите Диспетчер учетных данных из списка результатов.
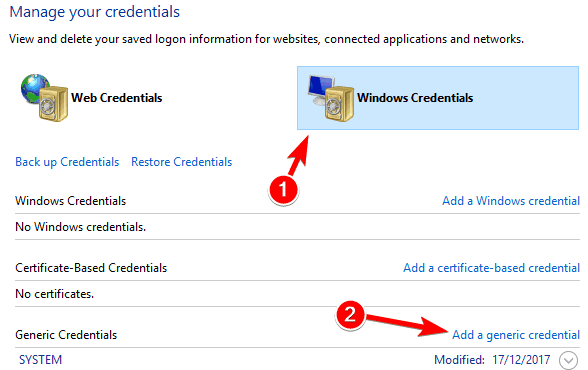
- Когда диспетчер учетных данных запускается, убедитесь, что выбраны учетные данные Windows. Теперь нажмите Добавить общие учетные данные.
- Введите необходимую информацию и нажмите ОК, чтобы сохранить изменения.
Имейте в виду, что вам, возможно, придется повторить это решение несколько раз, чтобы решить эту проблему, поэтому не стесняйтесь попробовать его.
Решение 6. Используйте Microsoft Edge для изменения сохраненных паролей
По словам пользователей, вы можете исправить проблемы с помощью Credential Manager, просто изменив сохраненные пароли в Microsoft Edge.
Это относительно просто, и вы можете сделать это, выполнив следующие действия:
- Откройте Microsoft Edge.
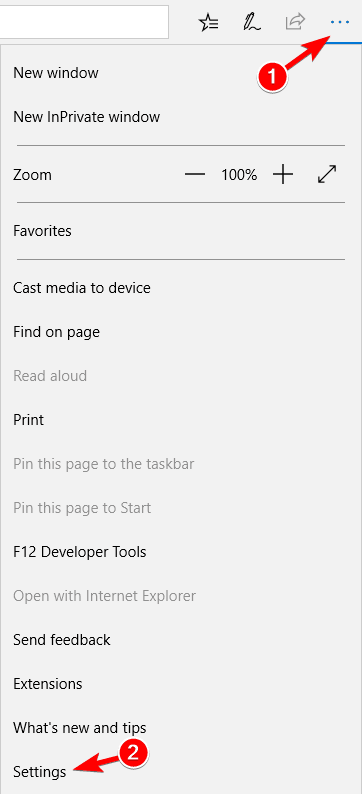
- Нажмите кнопку « Меню» в правом верхнем углу и выберите « Настройки» в меню.
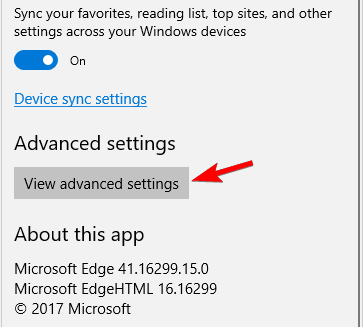
- Прокрутите весь путь вниз и в разделе « Дополнительные настройки » нажмите « Просмотр дополнительных настроек».
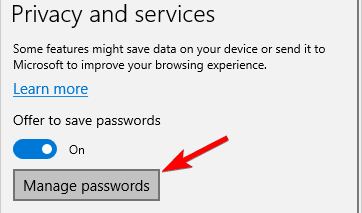
- Прокрутите вниз до раздела « Конфиденциальность и услуги » и нажмите « Управление паролями».
- Появится список сохраненных паролей. Нажмите на любой сохраненный пароль, чтобы изменить его.
- Измените имя пользователя или пароль и нажмите Сохранить.
После этого ваш менеджер учетных данных должен начать работать снова. Если все работает правильно, обязательно отмените все изменения, внесенные в сохраненные пароли в Edge.
Несколько пользователей предложили удалить все сохраненные пароли из Edge, чтобы решить проблему. Прежде чем удалять свои пароли, обязательно экспортируйте их или запишите их, так как вы не сможете их восстановить.
Немногие пользователи сообщили, что удаление сохраненных паролей из Edge решило проблему, поэтому обязательно попробуйте это.
Решение 7. Используйте IP-адрес устройства
Если вы не можете получить доступ к сетевому диску, вам, возможно, придется внести несколько изменений в Диспетчер учетных данных. Чтобы решить эту проблему, пользователи предлагают найти проблемные учетные данные и удалить их.
Теперь создайте новые учетные данные, но обязательно используйте IP-адрес устройства в процессе создания учетных данных. Теперь введите ваше имя пользователя и пароль, и проблема должна быть решена.
Решение 8 — Удалить каталог защиты
Немногие пользователи сообщили, что они исправили проблему с помощью Credential Manager, просто удалив все файлы из каталога Protect.
Имейте в виду, что этот процесс удалит все учетные данные для входа на ваш компьютер, поэтому ycredeou может захотеть экспортировать и сохранить ваши пароли.
Чтобы удалить содержимое каталога Protect, выполните следующие действия:
- Нажмите клавиши Windows + R и введите % appdata%. Теперь нажмите Enter или нажмите ОК.
- Теперь перейдите в каталог MicrosoftProtect.
- После входа в каталог защиты выберите все файлы и нажмите « Удалить».
После удаления содержимого каталога Protect проблема должна быть полностью решена.
Так вот, как вы можете в любое время исправить ваши проблемы с диспетчером учетных данных.
Попробуйте оба метода, если первый не работает для вас; Кроме того, если после выполнения этого пошагового руководства у вас по-прежнему возникают проблемы с устройством Windows 8, не стесняйтесь и делитесь с нами своими проблемами, используя поле комментариев ниже, и мы постараемся помочь вам как можно скорее.
Примечание редактора: этот пост был первоначально опубликован в июле 2014 года и с тех пор был полностью переработан и обновлен для обеспечения свежести, точности и полноты.
ЧИТАЙТЕ ТАКЖЕ:
- Исправлено: ошибка «Доверяй это устройство» в Windows 10
- Исправление: Microsoft Teams «Что-то пошло не так»
- Как отключить ошибку «Windows защищен ваш компьютер» в Windows 10
- Как исправить проблемы с доступом OneDrive в Windows
- Сообщение «Неопознанная сеть» в Windows 10
Содержание
- FIX: Credential Manager doesn’t work in Windows 10
- How do I fix the Credential manager in Windows 10?
- 1. Change your Internet Options
- 2. Use Registry Editor
- 3. Change ownership for Vault directory
- 4. Set the Credential Manager service to Automatic
- 5. Enter the credentials manually in Credential Manager
- 6. Use Microsoft Edge to change saved passwords in Credential Manager
- 7. Use the IP address of the device
- 8. Delete the Protect directory
FIX: Credential Manager doesn’t work in Windows 10
- Thanks to the Credentials Manager, storing your login data has never been simpler, since now you don’t have to remember any account names or passwords.
- The Credentials Manager can still be the subject of corruption, and that is the main focus of the article below.
- This article is part of a much larger hub that targets Windows Services Errors, so check it out for more interesting information.
- Visit our specialized Windows Services section for more interesting articles.
- Generates strong random passwords for you
- Synchronize the login data between your devices
- Store your passwords and login data in a personal encrypted vault
Auto-pilot for all your passwords
Manage your passwords
- Download Restoro PC Repair Tool that comes with Patented Technologies (patent available here).
- Click Start Scan to find Windows issues that could be causing PC problems.
- Click Repair All to fix issues affecting your computer’s security and performance
- Restoro has been downloaded by 0 readers this month.
Credential Manager represents an inbuilt feature located within the Windows 10 internal system. This feature is used by Internet Explorer and by other web browsing clients in order to store your user names and passwords for various websites and accounts.
Now, during the lines from below we will be checking how to fix the problems that are related to the Credential Manager feature thus if you are dealing with malfunctions, don’t hesitate and read the following guidelines.
But why is so important to use the Credential Manager after all? Well, basically your web browser app is using this default feature for storing your personal data and accounts.
Then, through this information, the Windows 10 system can automatically log you on to websites or other computers.
Therefore, if Credential Manager isn’t working properly, your Windows 10 device will not be able to save your credentials and you will not be able to automatically log in into your various accounts – thus a manual operation will be required each time you want to access a website or a different computer.
Addressing the issues that are related to your credentials is easy though you can fix these problems in two ways: manually by using in-built options and by accessing Registry on your computer; both methods will be explained below, choose the troubleshoot solution you prefer the most.
How do I fix the Credential manager in Windows 10?
Credential Manager is an important part of Windows, but users reported various issues with it, and speaking of issues, today we’re going to cover the following problems:
- Windows 10 Credential Manager not saving password
- This is one of the most common problems, but you should be able to solve it by entering your credentials manually or by removing and adding them again.
- Credential manager error 0x80070425
- This is a relatively common issue with Credential Manager, and if you’re having this problem, be sure to try one of our solutions.
- Cannot open Credential Manager
- One of the more serious problems with Credential Manager is the inability to open it.
- This can be a big problem since you won’t be able to access your saved passwords at all.
- Credential Manager Access denied
- This error message can sometimes appear while trying to access Credential Manager.
- This is usually caused due to lack of certain privileges, but you can easily fix this issue.
- Credential Manager keeps crashing
- If your Credential Manager is crashing, this can be a big problem.
- However, you should be able to fix it using one of our solutions.
1. Change your Internet Options
- Press Windows Key + R to open the Run dialog.
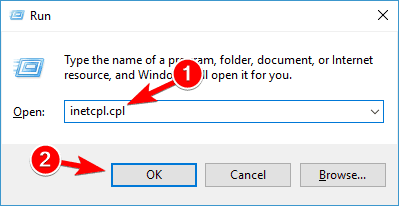
- In the Run box type inetcpl.cpl and press Enter or click OK.
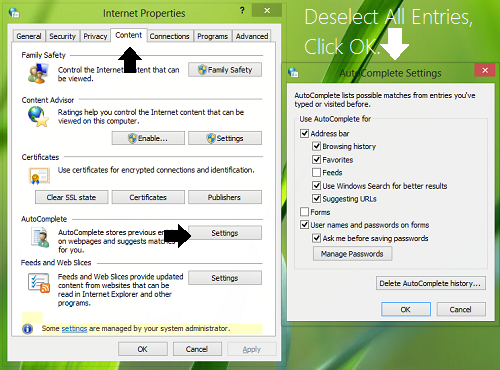
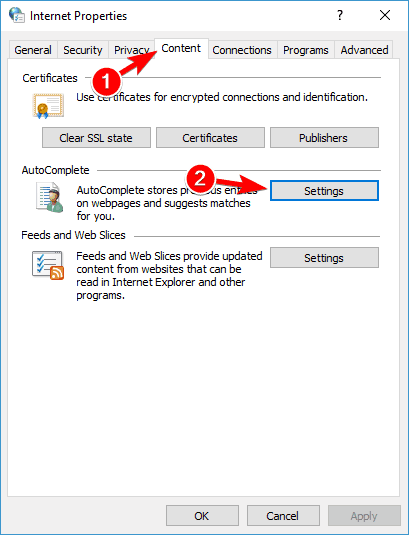
- From the Internet Properties window press on the Content tab and within Auto Complete section select Settings.
- Now uncheck all options and click on OK button to save changes.
- Click the Settings button again, enable all options and click on OK to save changes.
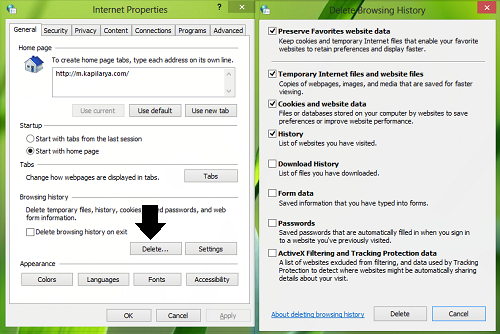
- Go back to the General tab and from Browsing history section click on Delete.
- Now cache will be cleared so in the end you should reboot your machine as the problem should be solved.
According to users, you might be able to fix the problems with Credential Manager by changing your Internet Options. After making these changes, check if Credential Manager is working.
2. Use Registry Editor
- Press Windows Key + R and enter regedit. Press Enter or click OK.
- From Registry Editor go to the following path:
- HKEY_CURRENT_USERSoftwareMicrosoftInternet ExplorerMain.
- HKEY_CURRENT_USERSoftwareMicrosoftInternet ExplorerMain.
- Head your attention towards the right panel of the Registry Editor.
- From there select the FormSuggest PW string.
- Right-click on the same, select Edit String and within the Value data field enter Yes.
- If you can’t find FormSuggest PW string, you can manually create it by right-clicking the right pane and choosing New > String Value from the menu.
- Enter FormSuggest PW as the name, and repeat the instructions from Step 4.
- Enter FormSuggest PW as the name, and repeat the instructions from Step 4.
- Close Registry Editor and reboot your Windows 10 device.
Few users claim that you can fix the problems with Credential Manager simply by using Registry Editor. After making these changes to the registry, chek if the problem is resolved.
3. Change ownership for Vault directory
- Open File Explorer.
- Now navigate to C:ProgramData directory.
Note: This directory is hidden by default, and in order to reveal it you need to go to View tab and check Hidden items.
- Alternatively, you can just paste the C:ProgramData in the address bar to access the folder directly.
- Navigate to Microsoft directory.
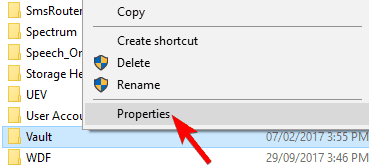
- Locate the Vault directory and right-click it. Choose Properties from the menu.
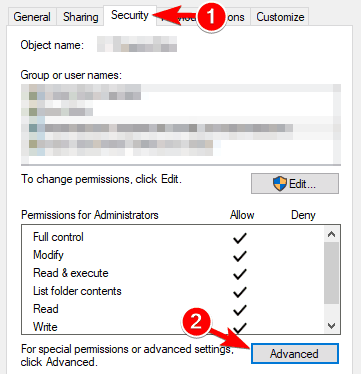
- Navigate to the Security tab and click on Advanced.
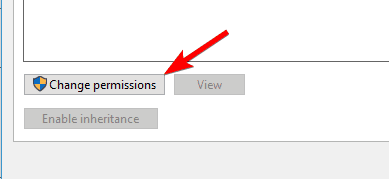
- Click the Change permissions button in the bottom left.
- Now check Replace all child object permissions entries and click on Apply and OK.
Credential Manager holds its information in a certain Vault directory. However, sometimes Credential Manage is not working because the Vault directory is missing certain permissions.
After doing that, you need to locate the AC658CB4-9126-49BD-B877-31EEDAB3F204 folder. You should be able to find it inside the Vault directory. Once you locate this folder, you need to do the following:
- Right-click the AC658CB4-9126-49BD-B877-31EEDAB3F204 directory and choose Properties from the menu.
- Go to the Security tab and click on the Advanced button.
- In the Owner section, click on the Change button.
- In Enter the object name to select field enter Administrators.
- Now click Check Names. If everything is in order, click on OK.
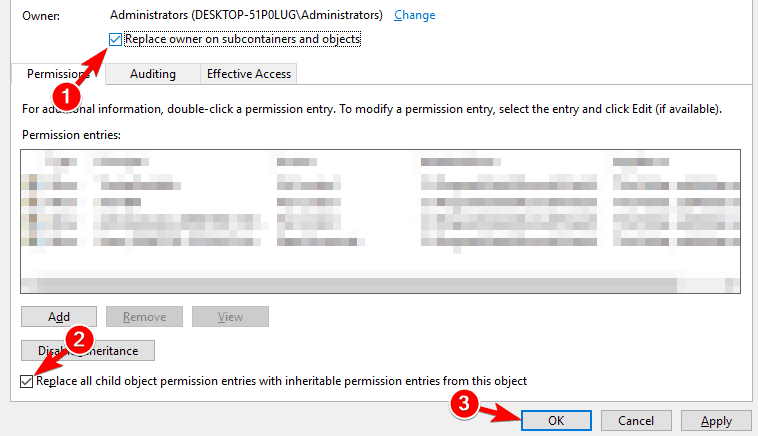
- Now check Replace owner on subcontainers and objects.
- In the bottom left corner click on Replace all child object permission entries and click on Apply and OK to save changes.
Many users reported that these directories didn’t have any permissions assigned to them, and that caused Access Denied error message to appear when trying to run Credential Manager.
After changing the permissions, this problem should be resolved and you’ll be able to use Credential Manager again.
4. Set the Credential Manager service to Automatic
- Press Windows Key + R and enter services.msc. Now press Enter or click on OK.
- A list of services will now appear.
- Locate the Credential Manager service and double click it.
- Set the Startup type to Automatic and click on Apply and OK to save changes.
If you’re having problems with Credential Manager, you might be able to fix those problems simply by changing the Startup type of its service.
Many users reported that Credential Manager was forgetting saved passwords. After changing the Startup type of service, your Credential Manager should start working again without any problems.
Few users reported that restarting the Credential Manager service fixed the problem, so feel free to do that as well. To restart this service, simply click the Stop button, wait for a few seconds and then click on the Start button to start the service again.
5. Enter the credentials manually in Credential Manager
- Press Windows Key + S and enter credential manager. Select Credential Manager from the list of results.
- When Credential Manager starts, make sure that Windows Credentials is selected. Now click on Add a generic credential.
- Enter the required information and click on OK to save changes.
If the Credential Manager isn’t working properly, you might be able to fix the problem by entering your credentials manually. Keep in mind that you might have to repeat this solution few times to fix this problem, so feel free to try it out.
6. Use Microsoft Edge to change saved passwords in Credential Manager
- Open Microsoft Edge.
- Click the Menu button in the top right corner and choose Settings from the menu.
- Scroll all the way down and in the Advanced settings section click on View advanced settings.
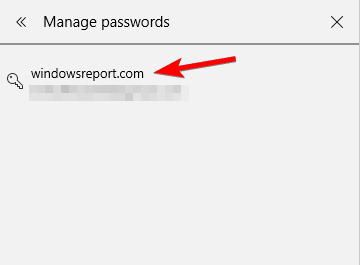
- Scroll down to the Privacy and services section and click on Manage passwords.
- A list of saved passwords will now appear.
- Click on any saved password to change it.
- Change the username or password and click on Save.
According to users, you can fix problems with Credential Manager simply by changing saved passwords in Microsoft Edge.
After doing that, your Credential Manager should start working again. If everything is working properly, be sure to revert any changes you made to your saved passwords in Edge.
Several users suggested removing all your saved passwords from Edge in order to fix the problem. Before you remove your passwords, be sure to export them or write them down since you might not be able to restore them.
Few users reported that removing saved passwords from Edge fixed the problem, so be sure to try that.
7. Use the IP address of the device
If you can’t access the network drive, you might have to make a few changes in Credential Manager. To fix the issue, users are suggesting to find the problematic credential and remove it.
Now create a new credential, but be sure to use the IP address of the device in the credential creation process. Now enter your username and password and the issue should be resolved.
8. Delete the Protect directory
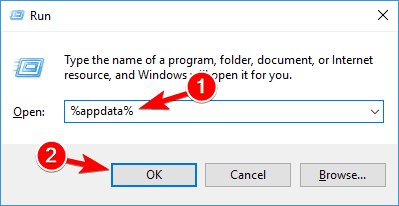
- Press Windows Key + R and enter %appdata%. Now press Enter or click OK.
- Now navigate to MicrosoftProtect directory.
- Once you enter Protect directory, select all files and choose Delete.
Few users reported that they fixed the problem with Credential Manager simply by removing all files from Protect directory. Keep in mind that this process will delete all login credentials on your PC, so you might want to export and save your passwords.
After deleting the contents of the Protect directory, the problem should be completely resolved.
So that’s how you can anytime fix your Credential Manager problems.
Try both methods if the first one isn’t working for you; also if after completing this step by step guide you are still experiencing problems with your Windows 10 device, don’t hesitate and share your issues with us by using the comments field from below and we will try to assist you as soon as possible.
ÐÑÐµÐ¼Ñ Ð¸ СÑекло Так вÑпала ÐаÑÑа HD VKlipe Net
Оглавление:
- Диспетчер учетных записей не работает
Что касается сохранения веб-паролей в Internet Explorer, Credential Manager — это встроенный инструмент в Windows, который IE использует для хранения учетных данных. Тем не менее, я заметил, что на многих сайтах IE не предоставляет мне возможность сохранять учетные данные. Таким образом, для почти 60% сайтов, которые я посещаю с помощью IE, я должен снова и снова вводить данные для входа, сеанс после сеанса. В других словах эта функция Credentials Manager не работает должным образом в моей системе, иначе я бы не столкнулся с такой проблемой.
Диспетчер учетных записей не работает
Итак, как можно устранить эту проблему, чтобы Диспетчер учетных данных снова становится полностью функциональным и начинает сохранять мои учетные данные для сайтов, которые я желаю? Ну, если вы тоже устали от этой проблемы, вот исправления, которые вы можете попытаться решить. Но сначала откройте диспетчер служб и убедитесь, что служба Credential Manager и ее зависимости запущены и работают правильно.
FIX 1: Использование параметров вручную
1. Нажмите Windows Key + R комбинация, введите put inetcpl.cpl в Запустить диалоговое окно и нажмите Ввести, чтобы открыть окно Интернет Свойства.
2. В окне Свойства Интернета перейдите на вкладку Содержание; затем нажмите Настройки в разделе Автозаполнение. Теперь в окне Параметры автозаполнения снимите все отмеченные записи, нажмите ОК , а затем повторно выберите записи, которые были выбраны до и нажмите OK . Это означает, что вам нужно отменить выбор записей. Когда вы закончите, перезагрузите компьютер, проверьте состояние своей проблемы, если он еще не исправлен; перейдите к следующему шагу.
3. Теперь в окне Интернет Свойства перейдите на вкладку Общие, нажмите Удалить , как показано ниже. Откроется окно Удалить историю просмотров, где вы должны выбрать все параметры и нажать Удалить . Это, наконец, очистит кэш, и ваша проблема должна быть решена к настоящему времени.
FIX 2: Использование редактора реестра
1. Нажмите комбинацию Windows Key + R , введите put Regedt32.exe в Запустите диалоговое окно и нажмите Enter, чтобы открыть Редактор реестра.
2. Перейдите к следующему местоположению:
HKEY_CURRENT_USER Software Microsoft Internet Explorer Main
3. В правой панели этого местоположения найдите FormSuggest PW с именем string (REG_SZ). Если его нет, вы можете создать его вручную, используя Щелкните правой кнопкой мыши -> Создать -> Строковое значение. Дважды щелкните в той же строке, чтобы изменить его Данные значения:
4. В приведенном выше окне установите Значение данных на да и нажмите ОК . Теперь вы можете закрыть Редактор реестра и перезагрузиться, чтобы получить результаты.
Надеюсь, вы найдете статью полезной!
Это устройство отсутствует, не работает должным образом, код 24
Если какое-либо ваше оборудование перестала работать, и вы увидите сообщение. Это устройство отсутствует, не работает должным образом или не имеет всех установленных драйверов (код 24) в диспетчере устройств, вот некоторые возможные решения для устранения этой проблемы.
Исправление: кнопка назад в Internet Explorer не работает должным образом
Если вы сталкиваетесь с кнопкой возврата в Internet Explorer 10, которая не работает должным образом, вы можете попробовать эти устранение неполадок на вашем Windows 7 | 8.
Функция Night Light в Windows 10 сильно нарушена даже после нескольких крупных обновлений. Читайте дальше, чтобы узнать, как заставить его работать нормально!
If Credential Manager is not working, showing, opening, has stopped working, or not updating passwords in Windows 11/10, then this article will help you. You may see a Credential Manager File system error.
As far as the saving of web passwords are concerned, Credential Manager is the built-in tool in Windows 11/10/8/7, which Edge uses to store credentials. However, I have noticed that on many of the sites, they don’t provide me the option to save credentials. Thus for almost 60% of sites, I visit using Edge, I have to enter the login details, again and again, session after session. In other words, this Credentials Manager feature isn’t working properly on my system – otherwise, I wouldn’t have faced such an issue.

So how can one fix this problem so that Credential Manager becomes fully functional again and starts saving my credentials for the sites I desire? Well, if you too are fed up with this issue, here are the fixes you can try to solve it. But first, open Services Manager and make sure that the Credential Manager service and its Dependencies are started and working properly.
Fix Credential Manager File system error
Before you begin, you might want to check for Windows Updates and run System File Checker.
1] Check Internet Properties
1. Press Windows Key + R combination, type put inetcpl.cpl in Run dialog box and hit Enter to open the Internet Properties window.
2. In the Internet Properties window, switch to the Content tab; then click Settings under AutoComplete section. Now in the AutoComplete Settings window, clear all the checked entries, click OK and then reselect the entries as selected before and again click OK. That means you have to deselect the entries there. When you’re done, reboot the machine, check the status of your problem, if it is not fixed yet; go to the next step.
3. Now in the Internet Properties window, switch to General tab, click on the Delete button as shown below. This will open Delete Browsing History window, where you’ve to select all the options and click Delete. This will finally clear the cache, and your problem should be solved by now.
2] Using Registry Editor
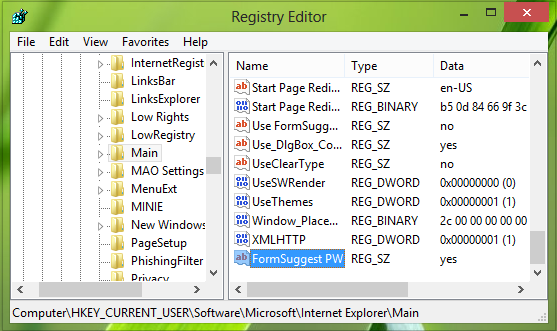
1. Press Windows Key + R combination, type put Regedt32.exe in Run dialog box and hit Enter to open the Registry Editor.
2. Navigate to the following location:
HKEY_CURRENT_USERSoftwareMicrosoftInternet ExplorerMain
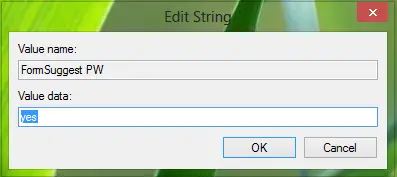
3. In the right pane of this location, look for the FormSuggest PW named string (REG_SZ). If it is not there, you can create it manually using Right-click > New > String Value. Double click on the same string to modify its Value data:
4. In the above-shown box, set the Value data to yes and click OK. You may now close the Registry Editor and reboot to get results.
3] Restart these Windows Services
Open Services Manager and ensure that the following Services are started. If they are already running, Restart them.
- Credential Manager
- CredentialEnrollmentManagerUserSvc
- Remote Protocol Call.
4] Delete the contents of the Protect folder
Navigate to the following location in Explorer:
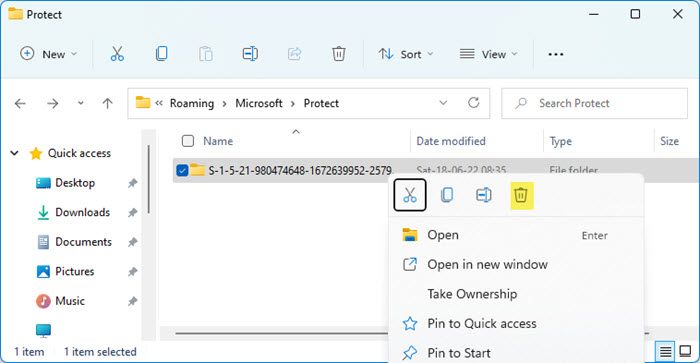
C:Users<username>AppDataRoamingMicrosoftProtect
All encrypted caches are stored in this directory. Delete the contents of the Protect folder. When you do this all the saved credentials and other encrypted will be lost. By doing this we reset the encrypted cache folder.
You may backup this folder and its content to another location in case you wish to restore it here and create a system restore point as well.
Restart your computer and see if this has helped make the problem go away.
5] Enter credentials manually a few times and see
If the Credential Manager is not working properly, you enter your credentials manually a few times and see if that helps in the long run.
- Open Credential Manager
- Select Windows Credentials
- Click on Add a generic credential
- Enter the required details
- Click on OK and exit.
6] Change saved passwords in Credential Manager via Edge
- Open Microsoft Edge browser
- Click the Menu button in the top right corner
- Choose Settings from the menu.
- Locate Advanced settings and click on View advanced settings.
- Scroll down to Privacy and services and click on Manage passwords.
- Click on any saved password to change it.
- Make the changes and click on Save.
I hope you find the article useful!
Related reads:
- Windows Credential Manager loses credentials after reboot
- Credential Manager, The system cannot find the path specified, Error 0x80070003
- Credential Manager Access is denied
- Credential Manager Error 0x80090345
- Credential Manager UI Host is not responding RDP error.
by Andrew Wafer
Andrew is not just trying to bring you closer to Windows, but he’s truly interested in this platform. He just happens to be passionate about sharing that knowledge… read more
Updated on January 20, 2023
- Thanks to the Credentials Manager, storing your login data has never been simpler, since now you don’t have to remember any account names or passwords.
- The Credentials Manager can still be the subject of corruption, and that is the main focus of the article below.
XINSTALL BY CLICKING THE DOWNLOAD FILE
This software will repair common computer errors, protect you from file loss, malware, hardware failure and optimize your PC for maximum performance. Fix PC issues and remove viruses now in 3 easy steps:
- Download Restoro PC Repair Tool that comes with Patented Technologies (patent available here).
- Click Start Scan to find Windows issues that could be causing PC problems.
- Click Repair All to fix issues affecting your computer’s security and performance
- Restoro has been downloaded by 0 readers this month.
Credential Manager represents an inbuilt feature located within the Windows 10 internal system. This feature is used by Internet Explorer and by other web browsing clients in order to store your user names and passwords for various websites and accounts.
Now, during the lines from below we will be checking how to fix the problems that are related to the Credential Manager feature thus if you are dealing with malfunctions, don’t hesitate and read the following guidelines.
But why is so important to use the Credential Manager after all? Well, basically your web browser app is using this default feature for storing your personal data and accounts.
Then, through this information, the Windows 10 system can automatically log you on to websites or other computers.
Therefore, if Credential Manager isn’t working properly, your Windows 10 device will not be able to save your credentials and you will not be able to automatically log in into your various accounts – thus a manual operation will be required each time you want to access a website or a different computer.
Addressing the issues that are related to your credentials is easy though you can fix these problems in two ways: manually by using in-built options and by accessing Registry on your computer; both methods will be explained below, choose the troubleshoot solution you prefer the most.
Credential Manager is an important part of Windows, but users reported various issues with it, and speaking of issues, today we’re going to cover the following problems:
- Windows 10 Credential Manager not saving password
- This is one of the most common problems, but you should be able to solve it by entering your credentials manually or by removing and adding them again.
- Credential manager error 0x80070425
- This is a relatively common issue with Credential Manager, and if you’re having this problem, be sure to try one of our solutions.
- Cannot open Credential Manager
- One of the more serious problems with Credential Manager is the inability to open it.
- This can be a big problem since you won’t be able to access your saved passwords at all.
- Credential Manager Access denied
- This error message can sometimes appear while trying to access Credential Manager.
- This is usually caused due to lack of certain privileges, but you can easily fix this issue.
- Credential Manager keeps crashing
- If your Credential Manager is crashing, this can be a big problem.
- However, you should be able to fix it using one of our solutions.
How do I fix the Credential manager in Windows 10?
1. Change your Internet Options
- Press Windows Key + R to open the Run dialog.
- In the Run box type inetcpl.cpl and press Enter or click OK.
- From the Internet Properties window press on the Content tab and within Auto Complete section select Settings.
- Now uncheck all options and click on OK button to save changes.
- Click the Settings button again, enable all options and click on OK to save changes.
- Go back to the General tab and from Browsing history section click on Delete.
- Now cache will be cleared so in the end you should reboot your machine as the problem should be solved.
According to users, you might be able to fix the problems with Credential Manager by changing your Internet Options. After making these changes, check if Credential Manager is working.
2. Use Registry Editor
- Press Windows Key + R and enter regedit. Press Enter or click OK.
- From Registry Editor go to the following path:
- HKEY_CURRENT_USERSoftwareMicrosoftInternet ExplorerMain.
- HKEY_CURRENT_USERSoftwareMicrosoftInternet ExplorerMain.
- Head your attention towards the right panel of the Registry Editor.
- From there select the FormSuggest PW string.
- Right-click on the same, select Edit String and within the Value data field enter Yes.
- If you can’t find FormSuggest PW string, you can manually create it by right-clicking the right pane and choosing New > String Value from the menu.
- Enter FormSuggest PW as the name, and repeat the instructions from Step 4.
- Enter FormSuggest PW as the name, and repeat the instructions from Step 4.
- Close Registry Editor and reboot your Windows 10 device.
Few users claim that you can fix the problems with Credential Manager simply by using Registry Editor. After making these changes to the registry, chek if the problem is resolved.
Can’t access Registry Editor? Check out this guide and solve the issue quickly.
3. Change ownership for Vault directory
- Open File Explorer.
- Now navigate to C:ProgramData directory.
Note: This directory is hidden by default, and in order to reveal it you need to go to View tab and check Hidden items.
- Alternatively, you can just paste the C:ProgramData in the address bar to access the folder directly.
- Navigate to Microsoft directory.
- Locate the Vault directory and right-click it. Choose Properties from the menu.
- Navigate to the Security tab and click on Advanced.
- Click the Change permissions button in the bottom left.
- Now check Replace all child object permissions entries and click on Apply and OK.
Credential Manager holds its information in a certain Vault directory. However, sometimes Credential Manage is not working because the Vault directory is missing certain permissions.
After doing that, you need to locate the AC658CB4-9126-49BD-B877-31EEDAB3F204 folder. You should be able to find it inside the Vault directory. Once you locate this folder, you need to do the following:
- Right-click the AC658CB4-9126-49BD-B877-31EEDAB3F204 directory and choose Properties from the menu.
- Go to the Security tab and click on the Advanced button.
- In the Owner section, click on the Change button.
- In Enter the object name to select field enter Administrators.
- Now click Check Names. If everything is in order, click on OK.
- Now check Replace owner on subcontainers and objects.
- In the bottom left corner click on Replace all child object permission entries and click on Apply and OK to save changes.
Many users reported that these directories didn’t have any permissions assigned to them, and that caused Access Denied error message to appear when trying to run Credential Manager.
After changing the permissions, this problem should be resolved and you’ll be able to use Credential Manager again.
4. Set the Credential Manager service to Automatic
- Press Windows Key + R and enter services.msc. Now press Enter or click on OK.
- A list of services will now appear.
- Locate the Credential Manager service and double click it.
- Set the Startup type to Automatic and click on Apply and OK to save changes.
If you’re having problems with Credential Manager, you might be able to fix those problems simply by changing the Startup type of its service.
Some PC issues are hard to tackle, especially when it comes to corrupted repositories or missing Windows files. If you are having troubles fixing an error, your system may be partially broken.
We recommend installing Restoro, a tool that will scan your machine and identify what the fault is.
Click here to download and start repairing.
Many users reported that Credential Manager was forgetting saved passwords. After changing the Startup type of service, your Credential Manager should start working again without any problems.
Few users reported that restarting the Credential Manager service fixed the problem, so feel free to do that as well. To restart this service, simply click the Stop button, wait for a few seconds and then click on the Start button to start the service again.
Keep your passwords safe with these password sync tools for Windows!
5. Enter the credentials manually in Credential Manager
- Press Windows Key + S and enter credential manager. Select Credential Manager from the list of results.
- When Credential Manager starts, make sure that Windows Credentials is selected. Now click on Add a generic credential.
- Enter the required information and click on OK to save changes.
If the Credential Manager isn’t working properly, you might be able to fix the problem by entering your credentials manually. Keep in mind that you might have to repeat this solution few times to fix this problem, so feel free to try it out.
6. Use Microsoft Edge to change saved passwords in Credential Manager
- Open Microsoft Edge.
- Click the Menu button in the top right corner and choose Settings from the menu.
- Scroll all the way down and in the Advanced settings section click on View advanced settings.
- Scroll down to the Privacy and services section and click on Manage passwords.
- A list of saved passwords will now appear.
- Click on any saved password to change it.
- Change the username or password and click on Save.
According to users, you can fix problems with Credential Manager simply by changing saved passwords in Microsoft Edge.
After doing that, your Credential Manager should start working again. If everything is working properly, be sure to revert any changes you made to your saved passwords in Edge.
Several users suggested removing all your saved passwords from Edge in order to fix the problem. Before you remove your passwords, be sure to export them or write them down since you might not be able to restore them.
Few users reported that removing saved passwords from Edge fixed the problem, so be sure to try that.
7. Use the IP address of the device
If you can’t access the network drive, you might have to make a few changes in Credential Manager. To fix the issue, users are suggesting to find the problematic credential and remove it.
Now create a new credential, but be sure to use the IP address of the device in the credential creation process. Now enter your username and password and the issue should be resolved.
Everything you need to know about hiding your IP address on Local Area Network!
8. Delete the Protect directory
- Press Windows Key + R and enter %appdata%. Now press Enter or click OK.
- Now navigate to MicrosoftProtect directory.
- Once you enter Protect directory, select all files and choose Delete.
Few users reported that they fixed the problem with Credential Manager simply by removing all files from Protect directory. Keep in mind that this process will delete all login credentials on your PC, so you might want to export and save your passwords.
After deleting the contents of the Protect directory, the problem should be completely resolved.
So that’s how you can anytime fix your Credential Manager problems.
Try both methods if the first one isn’t working for you; also if after completing this step by step guide you are still experiencing problems with your Windows 10 device, don’t hesitate and share your issues with us by using the comments field from below and we will try to assist you as soon as possible.
Still having issues? Fix them with this tool:
SPONSORED
If the advices above haven’t solved your issue, your PC may experience deeper Windows problems. We recommend downloading this PC Repair tool (rated Great on TrustPilot.com) to easily address them. After installation, simply click the Start Scan button and then press on Repair All.
Newsletter
- Remove From My Forums
-
Question
-
Hi, This is almost a clean install.
The Credentials were working perfectly for a while but now they disappear after logoff or restart.
The last thing I did (after it was still working) was installing Windows updates.
Steps to reproduce:
1. Open Credential Manager
2. Add a Windows Credential (Credential appears under Windows Credential)
3. Test the created credential (Working)
4. Log off Windows
5. Open Credential Manager
6. Credential Manager is empty
Please I need to fix that as soon as possible.
Thank you
Windows 7 pro x64
Answers
-
It turns out that there are multiple circumstances that create this issue.
1. The computer is member of a domain.
2. You are creating a credential to login to that same domain.
3. You are using as username, «domainusername» or «username@domain.nnn» to connect to server.domain.nnn
The hint here is that these credentials are considered «Persistence: Logon session» and what you want is «Persistence: Enterprise»
Having these 3 conditions will cause the credential not getting saved after logging out of Windows. (You will be able to login, no problem, although)
The solution is to use only username and not «domainusername» or «username@domain.nnn»
-
Edited by
Tuesday, June 27, 2017 1:51 PM
-
Marked as answer by
ThierryPon
Tuesday, June 27, 2017 1:52 PM
-
Edited by



 Note: This directory is hidden by default, and in order to reveal it you need to go to View tab and check Hidden items.
