I have been trying to build qt for raspberry pi3 on windows for 6 months. I have tried lots of tutorials, read lots of forums but there is no successful result.
I can build qt on ubuntu 14.04 in virtualbox by following RaspberryPi2EGLFS, it has some error but I could solve them. I could deploy an application. I want to do same on windows.
There is a tutorial about building on windows in http://visualgdb.com/tutorials/raspberry/qt/embedded/ I can not build by following it.
A person who could build qt for raspberry pi3 wrote into qt forums by referencing tutorial above. https://forum.qt.io/topic/68381/cross-compile-qt-windows-to-raspberry-3 I tried this I get error again.
I tried lots of releases of QT such as 5.6.1, 5.7.0, 5.8.0, 5.6.2(Last released long term support version). Mingw versions greater than 4.9, MSVC2015 etc.
Every versions have different errors. 5.7.0 has a bug they said this bug is solved in 5.8.0 and there is another error in 5.8.0. This problems does not finish.
I just want to build qt easily for raspberry pi3 on windows.
Please someone write a tutorial by giving all tools with working in harmony with a version that supports Raspberry Pi3.
visualgdb gives links of compilers but they are old versions for Raspberry Pi3 and it has error and I can not build Qt.
LAST OUTPUT :
Performing shadow build… Preparing build tree… Running
configuration tests (phase 1)… Precompiled-headers support
enabled. C:/SysGCC/Raspberry/bin/arm-linux-gnueabihf-g++ -c
-fvisibility=hidden fvisibility.c Symbol visibility control enabled. c:/sysgcc/raspberry/bin/../lib/gcc/arm-linux-gnueabihf/4.9/../../../../arm-linux-gnueabihf/bin/ld.gold.exe:
-plugin: unknown option c:/sysgcc/raspberry/bin/../lib/gcc/arm-linux-gnueabihf/4.9/../../../../arm-linux-gnueabihf/bin/ld.gold.exe:
use the —help option for usage information collect2.exe: error: ld
returned 1 exit status C:/SysGCC/Raspberry/bin/arm-linux-gnueabihf-g++
—sysroot=C:/SysGCC/Raspberry/arm-linux-gnueabihf/sysroot -o libtest.so -shared -Wl,-Bsymbolic-functions -fPIC
bsymbolic_functions.c bsymbolic_functions.c:2:2: error: #error
«Symbolic function binding on this architecture may be broken,
disabling it (see QTBUG-36129).»
error «Symbolic function binding on this architecture may be broken, disabling it (see QTBUG-36129).» ^ Symbolic function binding disabled.
DEFAULT_INCDIRS=»c:sysgccraspberrybin../arm-linux-gnueabihf/include/c++/4.9
c:sysgccraspberrybin../arm-linux-gnueabihf/include/c++/4.9/backward
c:sysgccraspberrybin../lib/gcc/arm-linux-gnueabihf/4.9/include
c:sysgccraspberrybin../lib/gcc/arm-linux-gnueabihf/4.9/include-fixed
c:sysgccraspberrybin../arm-linux-gnueabihf/include
C:/SysGCC/Raspberry/arm-linux-gnueabihf/sysroot/usr/include/arm-linux-gnueabihf
C:/SysGCC/Raspberry/arm-linux-gnueabihf/sysroot/usr/include »
DEFAULT_LIBDIRS=»c
/sysgcc/raspberry/lib/gcc/arm-linux-gnueabihf/4.9/;c
/sysgcc/raspberry/lib/gcc/arm-linux-gnueabihf/;c
/sysgcc/raspberry/lib/gcc/;c
/sysgcc/raspberry/arm-linux-gnueabihf/lib/;C
/SysGCC/Raspberry/arm-linux-gnueabihf/sysroot/lib/arm-linux-gnueabihf/;C
/SysGCC/Raspberry/arm-linux-gnueabihf/sysroot/lib/;C
/SysGCC/Raspberry/arm-linux-gnueabihf/sysroot/usr/lib/arm-linux-gnueabihf/;C
/SysGCC/Raspberry/arm-linux-gnueabihf/sysroot/usr/lib » Done running
configuration tests. Creating qmake…
C:/SysGCC/Raspberry/bin/arm-linux-gnueabihf-g++ -c -o qlibraryinfo.o
-pipe -fno-keep-inline-dllexport -U__STRICT_ANSI__ -ffunction-sections -O2 -DUNICODE -g -IC:/qt/qt-everywhere-opensource-src-5.6.2/qtbase/qmake -IC:/qt/qt-everywhere-opensource-src-5.6.2/qtbase/qmake/library -IC:/qt/qt-everywhere-opensource-src-5.6.2/qtbase/qmake/generators -IC:/qt/qt-everywhere-opensource-src-5.6.2/qtbase/qmake/generators/unix
-IC:/qt/qt-everywhere-opensource-src-5.6.2/qtbase/qmake/generators/win32
-IC:/qt/qt-everywhere-opensource-src-5.6.2/qtbase/qmake/generators/mac -IC:/qt/qt-everywhere-opensource-src-5.6.2/qtbase/qmake/generators/integrity
-IC:/qt/qt-everywhere-opensource-src-5.6.2/qtbase/include -IC:/qt/qt-everywhere-opensource-src-5.6.2/qtbase/include/QtCore -IC:/qt/qt-everywhere-opensource-src-5.6.2/qtbase/include/QtCore/5.6.2 -IC:/qt/qt-everywhere-opensource-src-5.6.2/qtbase/include/QtCore/5.6.2/QtCore
-I../src/corelib/global -DHAVE_QCONFIG_CPP -IC:/qt/qt-everywhere-opensource-src-5.6.2/qtbase/mkspecs/win32-g++ -IC:/qt/qt-everywhere-opensource-src-5.6.2/qtbase/tools/shared -DQT_VERSION_STR=»5.6.2″ -DQT_VERSION_MAJOR=5 -DQT_VERSION_MINOR=6 -DQT_VERSION_PATCH=2 -DQT_BUILD_QMAKE -DQT_BOOTSTRAPPED -DPROEVALUATOR_FULL -DQT_NO_TEXTCODEC -DQT_NO_UNICODETABLES -DQT_NO_COMPONENT -DQT_NO_COMPRESS -DQT_NO_THREAD -DQT_NO_QOBJECT -DQT_NO_GEOM_VARIANT -DQT_NO_DATASTREAM -DQT_CRYPTOGRAPHICHASH_ONLY_SHA1 -DQT_JSON_READONLY -DQT_NO_STANDARDPATHS C:/qt/qt-everywhere-opensource-src-5.6.2/qtbase/src/corelib/global/qlibraryinfo.cpp
arm-linux-gnueabihf-g++: error: command line option
‘-fno-keep-inline-dllexport’ is not supported by this configuration
make: *** [qlibraryinfo.o] Error 1
I change MinGW with 4.9.2 than I could generate qmake.exe Then, I change a line ( if true; then ###[ ‘!’ -f «$outpath/bin/qmake» ]; to if [ ‘!’ -f «$outpath/bin/qmake» ]; then ###[ ‘!’ -f «$outpath/bin/qmake» ];) configure file in qtbase. I run configure again.
$ ../qt-everywhere-opensource-src-5.6.2/configure -platform win32-g++ -xplatform linux-arm-gnueabi-g++ -release -opengl es2 -device linux-rpi3-g++ -sysroot
C:/SysGCC/Raspberry/arm-linux-gnueabihf/sysroot -prefix /usr/local/qt5
-device-option CROSS_COMPILE=C:/SysGCC/Raspberry/bin/arm-linux-gnueabihf- -qt-xcb
-verbose
OUTPUT:
Build options: Configuration ………. accessibility
accessibility-atspi-bridge alsa audio-backend c++11 c++14
clock-gettime clock-monotonic compile_examples concurrent
cross_compile cups dbus egl eglfs eglfs_brcm enable_new_dtags evdev
eventfd freetype full-config getaddrinfo getifaddrs harfbuzz iconv icu
inotify ipv6ifname large-config largefile libudev linuxfb
medium-config minimal-config mremap neon opengl opengles2 openssl pcre
png posix_fallocate precompile_header qpa qpa reduce_exports release
rpath shared small-config system-jpeg system-zlib threadsafe-cloexec
xcb xcb-glx xcb-plugin xcb-qt xcb-xlib xinput2 xkbcommon-qt xlib
xrender Build parts ………… libs Mode ……………….
release Using sanitizer(s)…… none Using C++ standard …..
c++14 Using gold linker……. no Using new DTAGS …….. yes
Using PCH ………….. yes Using LTCG …………. no Target
compiler supports:
Neon …………….. yesQt modules and options: Qt D-Bus …………… yes (loading dbus-1
at runtime) Qt Concurrent ………. yes Qt GUI ……………..
yes Qt Widgets …………. yes Large File …………. yes
QML debugging ………. yes Use system proxies ….. noSupport enabled for: Accessibility ………. yes ALSA
………………. yes CUPS ………………. yes Evdev
……………… yes FontConfig …………. no FreeType
…………… yes (bundled copy) Glib ………………. no
GStreamer ………….. no GTK theme ………….. no HarfBuzz
…………… yes (bundled copy) Iconv ……………… yes
ICU ……………….. yes Image formats:
GIF ……………… yes (plugin, using bundled copy)
JPEG …………….. yes (plugin, using system library)
PNG ……………… yes (in QtGui, using bundled copy) libinput……………. no Logging backends:
journald …………… no
syslog …………… no mtdev ……………… no Networking:
getaddrinfo ………. yes
getifaddrs ……….. yes
IPv6 ifname ………. yes
libproxy………….. no
OpenSSL ………….. yes (loading libraries at run-time) OpenGL / OpenVG:
EGL ……………… yes
OpenGL …………… yes (OpenGL ES 2.0+)
OpenVG …………… no PCRE ………………. yes (bundled copy) pkg-config …………. yes PulseAudio …………. no
QPA backends:
DirectFB …………. no
EGLFS ……………. yes
EGLFS i.MX6 …….. no
EGLFS i.MX6 Wayland. no
EGLFS EGLDevice …. no
EGLFS GBM ………. no
EGLFS Mali ……… no
EGLFS Raspberry Pi . yes
EGLFS X11 ………. no
LinuxFB ………….. yes
Mir client………… no
XCB ……………… yes (bundled copy)
EGL on X ……….. no
GLX ……………. yes
MIT-SHM ………… yes
Xcb-Xlib ……….. yes
Xcursor ………… yes (loaded at runtime)
Xfixes …………. yes (loaded at runtime)
Xi …………….. no
Xi2 ……………. yes
Xinerama ……….. yes (loaded at runtime)
Xrandr …………. yes (loaded at runtime)
Xrender ………… yes
XKB ……………. yes
XShape …………. yes
XSync ………….. yes
XVideo …………. yes Session management ….. yes SQL drivers:
DB2 ……………… no
InterBase ………… no
MySQL ……………. no
OCI ……………… no
ODBC …………….. yes (plugin)
PostgreSQL ……….. no
SQLite 2 …………. no
SQLite …………… yes (plugin, using bundled copy)
TDS ……………… yes (plugin) tslib ……………… no udev ………………. yes xkbcommon-x11……….. yes (bundled
copy, XKB config root: not found) xkbcommon-evdev……… no zlib
………………. yes (system library)WARNING: Could not find XKB config root, use -xkb-config-root to set a
path to XKB configuration data. This is required for keyboard input
support.NOTE: Qt is using double for qreal on this system. This is binary
incompatible against Qt 5.1. Configure with ‘-qreal float’ to create a
build that is binary compatible with 5.1.Qt is now configured for building. Just run ‘make’. Once everything is
built, you must run ‘make install’. Qt will be installed into
/usr/local/qt5Prior to reconfiguration, make sure you remove any leftovers from the
previous build.TheBUKs@DESKTOP-5D6JDFN MSYS /c/qt/qt-build $ make cd qtbase/ && ( test -e Makefile || C:/qt/qt-build/qtbase/bin/qmake.exe
C:/qt/qt-everywhere-opensource-src-5.6.2/qtbase/qtbase.pro -o Makefile
) && C:/SysGCC/Raspberry/bin/make -f Makefile make[1]: Entering
directoryC:/Qt/qt-build/qtbase' C:/qt/qt-build/qtbase/bin/qmake.exeC:/Qt/qt-build/qtbase’ make[1]: Entering
-o Makefile C:/qt/qt-everywhere-opensource-src-5.6.2/qtbase/qtbase.pro make[1]: Leaving directory
directoryC:/Qt/qt-build/qtbase' cd src/ && ( test -e Makefile ||C:/Qt/qt-build/qtbase/src’
C:/qt/qt-build/qtbase/bin/qmake.exe
C:/qt/qt-everywhere-opensource-src-5.6.2/qtbase/src/src.pro -o
Makefile ) && C:/SysGCC/Raspberry/bin/make -f Makefile make[2]:
Entering directory
C:/qt/qt-build/qtbase/bin/qmake.exe -o Makefile
C:/qt/qt-everywhere-opensource-src-5.6.2/qtbase/src/src.pro make[2]:
Leaving directoryC:/Qt/qt-build/qtbase/src' make[2]: EnteringC:/Qt/qt-build/qtbase/src’ cd corelib/ && ( test -e
directory
Makefile.qtzlib || C:/qt/qt-build/qtbase/bin/qmake.exe
C:/qt/qt-everywhere-opensource-src-5.6.2/qtbase/src/corelib/qtzlib.pro
-o Makefile.qtzlib ) && C:/SysGCC/Raspberry/bin/make -f Makefile.qtzlib make[3]: Entering directory
C:/Qt/qt-build/qtbase/src/corelib'C:/Qt/qt-build/qtbase/src/corelib’
C:/qt/qt-build/qtbase/bin/qmake.exe -o Makefile.qtzlib
C:/qt/qt-everywhere-opensource-src-5.6.2/qtbase/src/corelib/qtzlib.pro
make[3]: Leaving directory
make[3]: Entering directoryC:/Qt/qt-build/qtbase/src/corelib'first’. make[3]: Leaving directory
make[3]: Nothing to be done for
C:/Qt/qt-build/qtbase/src/corelib' The syntax of the command isC:/Qt/qt-build/qtbase/src’ make[1]: *
incorrect. make[2]: *** [sub-bootstrap-make_first] Error 1 make[2]:
Leaving directory
[sub-src-make_first] Error 2 make[1]: Leaving directory
`C:/Qt/qt-build/qtbase’ make: *** [module-qtbase-make_first] Error 2
*
This topic has been deleted. Only users with topic management privileges can see it.
Hi,
I’ve been looking for informations on how to configure the cross compilation on qt (windows) for the raspberry 3. I don’t know if it’s the place to write it, but for people who are interested in, here is how I did the cross compilation beetwee windows 8 and raspberry pi 3 (debian jessie).
Most of steps come from the tuto here : http://visualgdb.com/tutorials/raspberry/qt/embedded/
Based on that, here are the changes I made to make it work for the rpi3 :
-
Open this : http://visualgdb.com/tutorials/raspberry/qt/embedded/
-
Follow STEP 2.
-
WARNING : For step 3, you need to change MinGW32 with MinGW64 with gcc >= 4.9. So download it, and install it in C:/SysGCC/MinGW64
-
Follow step 4.
-
For step 5., download qt-everywhere >= 5.6 (otherwise rpi3 won’t be supported)
-
Follow step 6.
-
From here, all the cmd line on the terminal must be done on msys2 MinGW64 !
Download MSYS2, install it in C:/SysGCC/MinGW64/msys2
Open mingw64_shell
Run those cmd to update the needed libs :pacman -S make pacman -S perl pacman -S pkg-config pacman -S diffutilsContinue the tuto with this shell
-
Follow step 8.
-
Step 9 : check that gcc is linked to MinGW64/bin/gcc.exe
-
Follow 10. and 11.
-
For step 12, change «linux-rasp-pi2-g++» to «linux-rpi3-g++»
PS : you can add the «-nomake examples» in the configure cmd lines if you don’t need them to save time
PS2 : opengl and libxcb may have some link troubles, I removed them, I use linuxfb -
Follow 13-14-15
-
Follow step 16
Ex : In my case, the cmd was :../qt-everywhere-opensource-src-5.6.1/configure -platform win32-g++ -xplatform linux-arm-gnueabi-g++ -release -device linux-rpi3-g++ -sysroot C:/SysGCC_RPi3/Raspberry/arm-linux-gnueabihf/sysroot -prefix /usr/local/qt5 -device-option CROSS_COMPILE=C:/SysGCC_RPi3/Raspberry/bin/arm-linux-gnueabihf- -nomake examples -opensource -confirm-license -
Now, if you’re configuration file has been well generated, launch «make && make install» (step 17.)
-
Copy the built qt from C:/SysGCC/Raspberry/arm-linux-gnueabihf/sysroot/usr/local/qt5 to your pi3 in /usr/local/qt5 (step 18 — end)
There should be different ways to make it work, maybe this is not the best one, but it works for me. Hope it’s helpful, sorry if i’ts not the place.
Etienne
All fine until step 13.
Excuting the following command:
../qt-everywhere-opensource-src-5.6.1/configure -platform win32-g++ -xplatform linux-arm-gnueabi-g++ -release -device linux-rpi3-g++ -sysroot F:/SysGCC/Raspberry/arm-linux-gnueabihf/sysroot -prefix /usr/local/qt5 -device-option CROSS_COMPILE=F:/SysGCC/Raspberry/bin/arm-linux-gnueabihf- -nomake examples -opensource -confirm-license -qt-xcb -v
generates a lot of error messages like:
… arm-linux-gnueabihf-g++.exe: error: unrecognized command line option ‘-std=c++1z’ …
Any advise?
======================================================
Update:
- I finally gave up on cross compile
- installed QT/Creator on pi3 (actually the build time for what I’m doing is not too bad)
- vnc access from PC is ok
Hi,
I’m trying to install QT5.7 environment with Raspberry PI3 support. I’m using MINGW64 and QT-everywhere 5.7.0. For some reason 5.7.0 requires c++11, which my env doesn’t have. Step 16 will fail for that. QT 5.6.1 is fine with c++, but is having problems OpenGL ES 2.0.
Would be great if some guru would update instructions for RPI3.
Thanks in advance.
Br,
Hannu
==============================
edit:
- When merged linux-arm-gnueabi-g++qmake.conf from QT-everywhere 5.7.0 to 5.6.1 OpenGL problem was solved.
- «pacman -S python» was also needed for make
@etiennedm
Silly question but what advantages are in this solution special for RPi3 when tutorial by sysprogs itself is useable on RPi3?
@pVit Can you tell us how you got the tutorial by sysprogs to work? I think most people are having problems getting it to work.
@Garyio
What problem do you have? I did everything in tutorial, used mingw32-gcc 4.7.2, python 2.7.11 and raspberry-gcc 4.6.3 and everything is okay.
@Hannu Hi, you said Qt5.6.1 has problems with opengl es? What is the problem ?
Where to download MINGW64 gcc 4.9.2
@lygstate The easiest way is to use Qt Maintenance Tool if you used Qt Online Installer to install Qt.
Also, how is your question related to this thread?
How to exclude qtscript from build?
If the steps is not appear, then following the steps in https://visualgdb.com/tutorials/raspberry/qt/embedded/, otherwise using the steps below instead
-
Step 3: Download gcc 4.9.2 for Windows
https://wiki.qt.io/MinGW
https://download.qt.io/online/qtsdkrepository/windows_x86/desktop/tools_mingw/
The download URL is
https://download.qt.io/online/qtsdkrepository/windows_x86/desktop/tools_mingw/qt.tools.win32_mingw492/4.9.2-1i686-4.9.2-release-posix-dwarf-rt_v3-rev1.7z
extract as C:/SysGCC/mingw32
gcc would placed at C:/SysGCC/mingw32/bin/gcc.exe -
Step 5: Download Qt 5.8.0/Qt 5.6.1 source
and extract as
C:SysGCCqt-everywhere-opensource-src-5.8.0
There is path C:SysGCCqt-everywhere-opensource-src-5.8.0qtbase -
Step 6: Sync sysroot
/lib /usr/include /usr/lib /usr/local/include /usr/local/lib /opt /opt/vc -
Step 7: Install MSYS2
Download newest msys2 from http://www.msys2.org/
http://repo.msys2.org/distrib/x86_64/msys2-x86_64-20161025.exe
Install it.
open msys2/mingw32.exepacman -S make perl pkg-config diffutilsClose the shell
-
Steop 8: Edit
~/.bashrc
Append following linesexport PATH=$PATH:/c/SysGCC/mingw32/bin export PATH=$PATH:/c/Python27 export PATH=$PATH:/c/SysGCC/Raspberry/bin mkdir -p /c/SysGCC/qt-build cd /c/SysGCC/qt-buildopen msys2/mingw32.exe
-
Step 9: Check that gcc is linked to
C:/SysGCC/mingw32/bin/gcc.exe -
Step10: Prepare the source code
Copy folderqt-everywhere-opensource-src-5.8.0qtbasemkspecslinux-arm-gnueabi-g++
and it’s contents as
qt-everywhere-opensource-src-5.8.0qtbasemkspecslinux-arm-gnueabihf-g++
in folderqt-everywhere-opensource-src-5.8.0qtbasemkspecslinux-arm-gnueabihf-g++
grep -irn arm-linux-gnueabi- arm-linux-gnueabihf- .Edit
qt-everywhere-opensource-src-5.8.0qtbasemkspecsdeviceslinux-rpi3-g++qmake.conf
Replace part lines with (This should also works for Qt 5.6.1, not tested for OpenGL ES):VC_LIBRARY_PATH = $$[QT_SYSROOT]/opt/vc/lib VC_INCLUDE_PATH = $$[QT_SYSROOT]/opt/vc/include QMAKE_LFLAGS += -L$${VC_LIBRARY_PATH} VC_LINK_LINE = -L$${VC_LIBRARY_PATH} -
Step 12: Configure for Host & Target(Only Qt 5.8 and upper, Qt 5.7 not tested)
For Qt 5.8 Host & Target
No step 16, results are in step 16.../qt-everywhere-opensource-src-5.8.0/configure -skip qtscript -platform win32-g++ -xplatform linux-arm-gnueabihf-g++ -release -device linux-rpi3-g++ -sysroot C:/SysGCC/Raspberry/arm-linux-gnueabihf/sysroot -prefix /usr/local/qt5 -device-option CROSS_COMPILE=C:/SysGCC/Raspberry/bin/arm-linux-gnueabihf- -nomake examples -opensource -confirm-licenseFor Qt 5.6 and lower, Only Host
../qt-everywhere-opensource-src-5.6.1/configure -skip qtscript -platform win32-g++ -xplatform linux-arm-gnueabihf-g++ -release -device linux-rpi3-g++ -sysroot C:/SysGCC/Raspberry/arm-linux-gnueabihf/sysroot -prefix /usr/local/qt5 -opensource -confirm-license -
Step13: Skip
-
Step 14: This is normal as long as qmake.exe got built. Check this by running
qtbase/bin/qmake -v -
Step 15: Skip
-
Step 16: Configure the Target (Only Qt 5.6 and lower), otherwise Skip it
Remove-std=c++1zfromqt-everywhere-opensource-src-5.6.1qtbasemkspecsdeviceslinux-rpi3-g++qmake.conf
Qt 5.6.x execute the following command../qt-everywhere-opensource-src-5.6.1/configure -skip qtscript -platform win32-g++ -xplatform linux-arm-gnueabihf-g++ -release -device linux-rpi3-g++ -sysroot C:/SysGCC/Raspberry/arm-linux-gnueabihf/sysroot -prefix /usr/local/qt5 -device-option CROSS_COMPILE=C:/SysGCC/Raspberry/bin/arm-linux-gnueabihf- -nomake examples -opensource -confirm-license -
Step 17: Building And Install
make && make install
@lygstate Pass this to configure:
-skip qtscript
@jsulm Thanks, I am using this method.
I do all the tuto and i can make a excutable with qt but the qlabel and the qpushbutton it isn’t show. i think it’s because when create the qmake the modul gtk isn’t enable. when i try to enable it that said
ERROR: Feature ‘gtk3’ was enabled, but the pre-condition ‘features.glib && libs.gtk3’ failed.
it’s do 1 week i try to fine how to fix the pre-condition.
@CrazyCreepy «qlabel and the qpushbutton it isn’t show» — what does it mean? Are they not shown at all, or no text?
For gtk3 support you probably need to install gtk3 dev packages, but it actually should work without.
If there is no text then you probably have some font issues.
@jsulm I mean the label and push button doesn’t exist! if i wants to close my windows i will use httop… it work without gtk3 but not all feature is enable and this can be very problematic later… and i installe Gtk3 on my rasp, but they change noting i need to configure in my compiler but i don’t know how .
@CrazyCreepy As I said you need to install gtk3/glib dev packages on your RPi/sysroot and then build Qt (there is nothing to configure in compiler).
«label and push button doesn’t exist» — you probably mean — they are not shown?
that what i get on my raspberry pi

and that was i get

I have already install the glib and gtk3 on my raspberry… I also try to syncronize all of my raspberry pi with smartputty in my sysroot and it’s doesn’t work… I’m little exhausted of this…. thanks for help.
Hello.
Very good instructions to config QT5 for RPY3 with cross. I try to install but fail in step6, seem some permissions problem, but do not know why, I work with Administrator user, and I have change permissions to all files to get access to all users.
This is capture screen about fail when I try to run step 6 to syncronize sysroot. Somebody may help me, why fail ??. Translation to english language about the error message is «Cannot connect: Try to access to one socket not allowed because your access permissions 192.168.1.7»
If I run directly StmarTTY from Windows work perfectly, but I run SmarTTY from a DOS window also fail with same error message,

.
Hello.
My before problem was because the firewall, already solved. I have follow instructions of lystate user, and all seem ok but fail in last step, with this error message.
Somebody know how to solve this problem to may compile ??

.
And this is the content of the config.log file:
executing config test use_gold_linker
cd C:SysGCCqt-buildqtbaseconfig.tests && C:/SysGCC/Raspberry/bin/arm-linux-gnueabihf-g++ -fuse-ld=gold -o conftest-out conftest.cpp
cc1plus.exe: error: unrecognized command line option ‘-fuse-ld=gold’
test config.qtbase.tests.use_gold_linker FAILED
executing config test verifyspec
cd C:SysGCCqt-buildqtbaseconfig.testscommonverifyspec && C:SysGCCqt-buildqtbasebinqmake.exe -qtconf C:/SysGCC/qt-build/qtbase/bin/qt.conf «CONFIG -= qt debug_and_release app_bundle lib_bundle» «CONFIG += shared console» «QMAKE_CFLAGS += —sysroot=C:/SysGCC/Raspberry/arm-linux-gnueabihf/sysroot» «QMAKE_CXXFLAGS += —sysroot=C:/SysGCC/Raspberry/arm-linux-gnueabihf/sysroot» «QMAKE_LFLAGS += —sysroot=C:/SysGCC/Raspberry/arm-linux-gnueabihf/sysroot» C:/SysGCC/qt-everywhere-opensource-src-5.8.0/qtbase/config.tests/common/verifyspec
cd C:SysGCCqt-buildqtbaseconfig.testscommonverifyspec && set MAKEFLAGS=& C:/SysGCC/msys2/usr/bin/make
C:/SysGCC/Raspberry/bin/arm-linux-gnueabihf-g++ -c -march=armv8-a -mtune=cortex-a53 -mfpu=crypto-neon-fp-armv8 -mfloat-abi=hard —sysroot=C:/SysGCC/Raspberry/arm-linux-gnueabihf/sysroot -O2 -Wall -W -fPIC -IC:/SysGCC/qt-everywhere-opensource-src-5.8.0/qtbase/config.tests/common/verifyspec -I. -IC:/SysGCC/qt-everywhere-opensource-src-5.8.0/qtbase/mkspecs/devices/linux-rpi3-g++ -o verifyspec.obj C:/SysGCC/qt-everywhere-opensource-src-5.8.0/qtbase/config.tests/common/verifyspec/verifyspec.cpp
cc1plus.exe: error: bad value (armv8-a) for -march switch
cc1plus.exe: error: bad value (cortex-a53) for -mtune switch
C:/SysGCC/qt-everywhere-opensource-src-5.8.0/qtbase/config.tests/common/verifyspec/verifyspec.cpp:1:0: error: invalid floating point option: -mfpu=crypto-neon-fp-armv8
make: *** [Makefile:176: verifyspec.obj] Error 1
executing config test verifyspec
cd C:SysGCCqt-buildqtbaseconfig.testscommonverifyspec && C:SysGCCqt-buildqtbasebinqmake.exe -qtconf C:/SysGCC/qt-build/qtbase/bin/qt.conf «CONFIG -= qt debug_and_release app_bundle lib_bundle» «CONFIG += shared console» «QMAKE_CFLAGS += —sysroot=C:/SysGCC/Raspberry/arm-linux-gnueabihf/sysroot» «QMAKE_CXXFLAGS += —sysroot=C:/SysGCC/Raspberry/arm-linux-gnueabihf/sysroot» «QMAKE_LFLAGS += —sysroot=C:/SysGCC/Raspberry/arm-linux-gnueabihf/sysroot» C:/SysGCC/qt-everywhere-opensource-src-5.8.0/qtbase/config.tests/common/verifyspec
cd C:SysGCCqt-buildqtbaseconfig.testscommonverifyspec && set MAKEFLAGS=&
C:/SysGCC/msys2/usr/bin/make clean && set MAKEFLAGS=& C:/SysGCC/msys2/usr/bin/make
rm -f verifyspec.obj
rm -f *~ core *.core
C:/SysGCC/Raspberry/bin/arm-linux-gnueabihf-g++ -c -march=armv8-a -mtune=cortex-a53 -mfpu=crypto-neon-fp-armv8 -mfloat-abi=hard —sysroot=C:/SysGCC/Raspberry/arm-linux-gnueabihf/sysroot -O2 -Wall -W -fPIC -IC:/SysGCC/qt-everywhere-opensource-src-5.8.0/qtbase/config.tests/common/verifyspec -I. -IC:/SysGCC/qt-everywhere-opensource-src-5.8.0/qtbase/mkspecs/devices/linux-rpi3-g++ -o verifyspec.obj C:/SysGCC/qt-everywhere-opensource-src-5.8.0/qtbase/config.tests/common/verifyspec/verifyspec.cpp
cc1plus.exe: error: bad value (armv8-a) for -march switch
cc1plus.exe: error: bad value (cortex-a53) for -mtune switch
C:/SysGCC/qt-everywhere-opensource-src-5.8.0/qtbase/config.tests/common/verifyspec/verifyspec.cpp:1:0: error: invalid floating point option: -mfpu=crypto-neon-fp-armv8
make: *** [Makefile:176: verifyspec.obj] Error 1
@pinballsp armv8-a? Shouldn’t it be armv7 for RPi? Please show your configure call.
@lygstate I followed your steps in details, but it looks like there is something wrong in step 10. My compilation terminates due to #include <EGL/egl.h> not found.
Please can you elaborate step 10 again. Inside the directory «qt-everywhere-opensource-src-5.8.0qtbasemkspecs» , there only exist «linux-arm-gnueabi-g++» and no other directory called «linux-arm-gnueabihf-g++» under that path found.
Is it the same to open «qt-everywhere-opensource-src-5.8.0qtbasemkspecslinux-arm-gnueabi-g++qmake.conf» and change every instance of arm-linux-gnueabi- with arm-linux-gnueabihf- ??
Any way the error I get is as follows:
 image url)
Please did you go through all these steps and compiled 5.8 at the end ?
Thanks in advance
This post is deleted!
@etiennedm ,
thanks for this very good tutorial.
It works without any problems and you can follow them without any modification.
I would be happy if I can find such detailed description also for actual Qt5 for cross compiling on a Windows machine and other Qt5 topics!
Kurt
Hello, it appears this tutorial does not work with the QT version 5.9.1 due to the following error:
S:/Development/qt-everywhere-opensource-src-591/qtbase/src/corelib/io/qsettings.cpp:965:40: error: 'KNOWNFOLDERID' does not name a type
S:/Development/qt-everywhere-opensource-src-591/qtbase/src/corelib/io/qsettings.cpp:965:55: error: ISO C++ forbids declaration of 'type' with no type [-fpermissive]
S:/Development/qt-everywhere-opensource-src-591/qtbase/src/corelib/io/qsettings.cpp: In function 'QString windowsConfigPath(const int&)':
S:/Development/qt-everywhere-opensource-src-591/qtbase/src/corelib/io/qsettings.cpp:970:53: error: 'SHGetKnownFolderPath' was not declared in this scope
S:/Development/qt-everywhere-opensource-src-591/qtbase/src/corelib/io/qsettings.cpp:976:21: error: 'FOLDERID_ProgramData' was not declared in this scope
S:/Development/qt-everywhere-opensource-src-591/qtbase/src/corelib/io/qsettings.cpp:978:28: error: 'FOLDERID_RoamingAppData' was not declared in this scope
S:/Development/qt-everywhere-opensource-src-591/qtbase/src/corelib/io/qsettings.cpp: In function 'void initDefaultPaths(QMutexLocker*)':
S:/Development/qt-everywhere-opensource-src-591/qtbase/src/corelib/io/qsettings.cpp:1080:64: error: 'FOLDERID_RoamingAppData' was not declared in this scope
S:/Development/qt-everywhere-opensource-src-591/qtbase/src/corelib/io/qsettings.cpp:1081:61: error: 'FOLDERID_ProgramData' was not declared in this scope
So I tried with version 5.6.2 and that one works until step 16 — since I need OpenGL and libxcb, I can’t omit them, and then I get the error that OpenGL is missing:
The OpenGL ES 2.0 functionality test failed!
 Use of pkg-config is not enabled, maybe you want to pass -pkg-config?
 You might need to modify the include and library search paths by editing
 QMAKE_INCDIR_OPENGL_ES2, QMAKE_LIBDIR_OPENGL_ES2 and QMAKE_LIBS_OPENGL_ES2 in
 S:/Development/qt-everywhere-opensource-src-562/qtbase/mkspecs/devices/linux-rpi3-g++.
From my understanding, judging from the -v option output, it’s trying to include a file gl2.h, but failing:
S:/Development/SysGCC/Raspberry/bin/arm-linux-gnueabihf-g++ -c -march=armv8-a -mtune=cortex-a53 -mfpu=crypto-neon-fp-armv8 -mfloat-abi=hard --sysroot=S:/Development/SysGCC/Raspbery/arm-linux-gnueabihf/sysroot -g -std=gnu++0x -Wall -W -fPIC  -I. -I/opt/vc/include -I/opt/vc/include/GLES2 -I/opt/vc/include/GLES -I/opt/vc/include/EGL -I/opt/vc/include/vcinclude -I/opt/vc/include/interface/vcos/pthreads -I/opt/vc/include/interface/vmcs_host/linux -I../../../mkspecs/devices/linux-rpi3-g++ -o opengles2.obj opengles2.cpp
opengles2.cpp:37:25: fatal error: GLES2/gl2.h: No such file or directory
   #include <GLES2/gl2.h>
However, the file actually does exit as the sysroot: 
Looking at the internet for 2 days, it appears that proper cross-compilation of QT from Windows to Raspberry is literally just impossible. Or am I missing something?
EDIT: The tutorial says to replace MinGW with MinGW64 with GCC 4.9>=, but the sysprogs website only has one with 4.6. I went to MinGW site to obtain the latest, but that one has some strange parameters in the installer (sjsj??) I don’t know what to set there.
EDIT#2:
I managed to get the build to completion by replacing SysProg’s synchronization with rsync using Windows 10 Bash and by manually installing the latest version of MinGW64 instead of using SysProgs installer. Manually rsyncing using the following command seemed to have resolved the symlink mess (need to cd to parent of sysroot first):
RSYNC_OPTS='-rtkLDvz --no-specials --no-devices'
sshpass -p $RSYNC_PASSWORD rsync $RSYNC_OPTS pi@$R_HOST:/lib sysroot &&
sshpass -p $RSYNC_PASSWORD rsync $RSYNC_OPTS pi@$R_HOST:/usr/include sysroot/usr &&
sshpass -p $RSYNC_PASSWORD rsync $RSYNC_OPTS pi@$R_HOST:/usr/lib sysroot/usr &&
sshpass -p $RSYNC_PASSWORD rsync $RSYNC_OPTS pi@$R_HOST:/usr/share/X11 sysroot/usr/share &&
sshpass -p $RSYNC_PASSWORD rsync $RSYNC_OPTS pi@$R_HOST:/opt/vc sysroot/opt
Where RSYNC_PASSWORD is the password to your raspberry host.
However after running the build, I looked into the qt5 directory and saw Windows .exe files in there instead of qmake that raspberry can use. Then I couldn’t get the QT Creator to work with that toolchain because it just didnt detect the qmake (ofc it didnt theres a windows .exe in there instead!). So any suggestions? The final configure call before I run make && make install is:
../../qt-everywhere-opensource-src-5.6.2/qtbase/configure -platform win32-g++ -xplatform linux-arm-gnueabi-g++ -release -device linux-rpi3-g++ -sysroot E:/SysGCC/Raspberry/arm-linux-gnueabihf/sysroot -prefix /usr/local/qt5 -device-option CROSS_COMPILE=E:/SysGCC/Raspberry/bin/arm-linux-gnueabihf- -nomake examples -opensource -confirm-license -opengl es2
(Drive is different since its another PC)
EDIT#3
From the limited amount of information online about this, it seems like qmake is not required on target since the package is a runnable binary, and at first glance the QtCreator CAN build my package, however it can not deploy and it can not debug. And when I manually rsync-ed the app binary to the raspberry and tried to run it, it gave me a bunch of strange errors like Qt_5 is not defined in some header, etc. and didn’t run. But the binary is at least in the correct format to run at raspberry so at least the cross compiler worked. Can someone help me get that Qt Creator and GDB setup?
EDIT#4
I managed to solve the problem by setting an env variable in bashrc to point to the qt installation, then it started complaining about some plugin that failed to load, so I had to add the plugin variable, and then finally the font variable:
export LD_LIBRARY_PATH=$LD_LIBRARY_PATH:/usr/local/qt5/lib
export QT_PLUGIN_PATH=/usr/local/qt5/plugins
export QT_QWS_FONTDIR=/usr/local/qt5/lib/fonts
Now the app complains a different thing:
qt.qpa.egldeviceintegration: Failed to load EGL device integration "eglfs_brcm"
Could not open egl display
Aborted
If I start the app using ./app -platform linuxfb it works, but looks horrible, lags and has some strange graphical artifacts whenever I change window position.
EDIT#5:
After I disabled the desktop login, like the SysProgs tutorial suggests, I set the app to start using the following command
/usr/bin/startx /home/pi/app -platform linuxfb
so the opengl stuff still doesn’t work (cant find display, I suspect this is a system configuration problem), but without the desktop running, the app looks fine (we have no intensive graphics anyway). In QT Creator make sure its set to login to device as root (and enable root login over ssh on your development raspberry), then set deployment to a custom command, set the command to /usr/bin/startx and everything that comes after that (/home/pi/app -platform linuxfb) as arguments. Then QT should be able to deploy the app. Now the problem is with debugger, as QT can not use the toolchain debugger due to no pythin support. I have to build it myself. When I manage to do that, I try to document the full process and link it here.
@pinballsp I am having the same problem. Did you find a way to solve it?
This is just gibberish, its mindboggling that there is no option it Qt5 to add raspberry and it will install all option/setting its required.
Linux and Qt is so discouraging to use it, I don’t understand people and their mind, either this instructions are written poorly or just always assuming that the person will understand what being told.
Instruction provided here is extremely disorganized and actually not working, maybe it was working when it was created but not now.
@csaba911 You can’t expect QtCompany to provide official Qt installers/binaries for every existing and future platform/hardware. This is simply not possible because of limited resources and time.
If you want to do cross compilation, then yes you have to learn how it works, this is life.
Did you check https://wiki.qt.io/Raspberry_Pi_Beginners_Guide ?
«Linux and Qt is so discouraging to use it, I don’t understand people and their mind» — then don’t use it, really…
I use both since many many years and don’t want to use anything other than Linux for software development.
Posts like yours do not improve anything, sorry. Constructive critic, improvement suggestions and patches are welcome (this is how open source works).
The tutorial this thread relates to, + the bare existence of this thread, shows how incredibly poor Qt works. «Easy» is what they try to sell it as. What a load of bulls….
And Yes, we can expect Qt to provide official installer for the RPI. And they did, it just doesn’t work. As does, seemingly, nothing else. And it seems Qt doesn’t bother to fix it or even inform about the problems or how to work around them, if even possible.
Having tried to get this s**t to work for a few days now and having googled a lot to find info, I can conclude that the official info is incredibly messy and never complete, and anything else is just out-dated and non-working. This thread is more than three years old, and the forum seems pretty dead, not a single response for days on my post, and very few views.
I don’t know, perhaps Qt has some corporate customers getting a lot of support from Qt to get things working, but other than that, is seems totally wasted. Sorry, but that’s the impression I am getting.
Constructive criticism? Sure: Fix the things that doesn’t work: Like Qt2Boot for RPI3. Write tutorials that start at the beginning and works through to the end, and that are up to date.
And this is just not the open source, it’s the same issues with the commercial stuff. I know, I tried it!
And if there really are people out there who’s used it for years, knows how to do it, why not give som help? Telling us not to use it isn’t helping, really…
@hervir @Csaba911
Try CDP Studio instead. In less than 30 minutes I had a full graphical demo interface up and running on Pi3B+ with working touch screen and all. That was truly magically simple.
Hello.
Could you please help,
I call a command in MSYS2
../qt-everywhere-src-5.15.2/configure -platform win32-g++ -xplatform linux-arm-gnueabi-g++ -release -opengl es2 -device linux-rasp-pi3-g++ -sysroot C:/SysGCC/raspberry/arm-linux-gnueabihf/sysroot -prefix /usr/local/qt5
and after some time get an error:
Creating qmake...
make: g++: No such file or directory
make: *** [Makefile:258: main.o] Error 127
But I am sure the PATH variable contains the correct path to the gcc/g++. In windows CMD console I call g++ -v and get correct data.
If I call «which g++» in MSYS2, I get following:
# which g++
which: no g++ in (/usr/local/bin:/usr/bin:/bin:/opt/bin:/c/Windows/System32:/c/Windows:/c/Windows/System32/Wbem:/c/Windows/System32/WindowsPowerShell/v1.0/:/usr/bin/site_perl:/usr/bin/vendor_perl:/usr/bin/core_perl)
Why MSYS2 does not see the gcc/g++ ?? I have restarted PC already, no change.
From where these path addresses like /usr/local/bin:/usr/bin are coming??
I stuck on step 9 and 10, and have no idea.
Thank you!
somehow
Developing Applications on a Raspberry Pi with QEMU on Windows 10

This is a tutorial showing how to develop Qt applications for the Raspberry Pi 3 cross compiling on Windows, using MYSYS2 with GCC and arm tool chain.
- QEMU
- Qt-everywhere-src
- MSYS2
- Windows toolchain for Raspberry Pi
Installation
- Download the latest version of Windows toolchain for Raspberry/PI e.g raspberry-gcc6.3.0-r3 and install it.
- Download and install MSYS2. I used the
msys2-x86_64-20180531.exeversion, after the successful installation, run MSYS2 and execute the following commands:pacman -Syu pacman -S base-devel git mercurial cvs wget p7zip pacman -S perl ruby python2 mingw-w64-i686-toolchain mingw-w64-x86_64-toolchain - Set the paths for mingw32 and mingw64. I modified
.bash_profilefile located underC:msys64homenapiZip. I added the following section in order to make the tool chain for the Raspberry available by adding the Windows toolchain for Raspberry/PI folder containing thearm-linux-gnueabihf-... .exefiles:
PATH="${PATH}:/C/SysGCC/raspberry/bin"
Note:
After setting the path you should be able to run the following commands otherwise your path was not set correctly:
 $ arm-linux-gnueabihf-gcc -v

Using built-in specs.
COLLECT_GCC=C:SysGCCraspberrybinarm-linux-gnueabihf-gcc.exe
COLLECT_LTO_WRAPPER=c:/sysgcc/raspberry/bin/../libexec/gcc/arm-linux-gnueabihf/6/lto-wrapper.exe
Target: arm-linux-gnueabihf
Configured with: ../../gcc-6-6.3.0/src/configure -v --with-pkgversion='Raspbian 6.3.0-18+rpi1' --with-bugurl=file:///usr/share/doc/gcc-6/README.Bugs --enable-languages=c,c++ --enable-shared --enable-linker-build-id --without-included-gettext --enable-threads=posix --enable-nls --enable-clocale=gnu --enable-libstdcxx-debug --enable-libstdcxx-time=yes --with-default-libstdcxx-abi=new --enable-gnu-unique-object --disable-libitm --disable-libquadmath --with-system-zlib --disable-browser-plugin --enable-gtk-cairo --with-arch-directory=arm --with-target-system-zlib --enable-objc-gc=auto --enable-multiarch --disable-sjlj-exceptions --with-arch=armv6 --with-fpu=vfp --with-float=hard --enable-checking=release --target=arm-linux-gnueabihf --host=i686-w64-mingw32 --prefix /q/gnu/raspberry/out/ --with-sysroot=/q/gnu/raspberry/out/arm-linux-gnueabihf/sysroot
Thread model: posix
gcc version 6.3.0 20170516 (Raspbian 6.3.0-18+rpi1)

$  g++ -v
Using built-in specs.
COLLECT_GCC=C:msys64mingw32bing++.exe
COLLECT_LTO_WRAPPER=C:/msys64/mingw32/bin/../lib/gcc/i686-w64-mingw32/7.3.0/lto-wrapper.exe
Target: i686-w64-mingw32
Configured with: ../gcc-7.3.0/configure --prefix=/mingw32 --with-local-prefix=/mingw32/local --build=i686-w64-mingw32 --host=i686-w64-mingw32 --target=i686-w64-mingw32 --with-native-system-header-dir=/mingw32/i686-w64-mingw32/include --libexecdir=/mingw32/lib --enable-bootstrap --with-arch=i686 --with-tune=generic --enable-languages=c,lto,c++,objc,obj-c++,fortran,ada --enable-shared --enable-static --enable-libatomic --enable-threads=posix --enable-graphite --enable-fully-dynamic-string --enable-libstdcxx-time=yes --enable-libstdcxx-filesystem-ts=yes --disable-libstdcxx-pch --disable-libstdcxx-debug --disable-isl-version-check --enable-lto --enable-libgomp --disable-multilib --enable-checking=release --disable-rpath --disable-win32-registry --disable-nls --disable-werror --disable-symvers --with-libiconv --with-system-zlib --with-gmp=/mingw32 --with-mpfr=/mingw32 --with-mpc=/mingw32 --with-isl=/mingw32 --with-pkgversion='Rev2, Built by MSYS2 project' --with-bugurl=https://sourceforge.net/projects/msys2 --with-gnu-as --with-gnu-ld --disable-sjlj-exceptions --with-dwarf2
Thread model: posix
gcc version 7.3.0 (Rev2, Built by MSYS2 project)
- Install and set up QEMU with a Raspberry image distribution, for details see my repository here.
Build Tutorial
This tutorial shows the exact steps needed to generate the build artifacts for the Raspberry Pi 3, as well as how to run applications created with Qt within QEMU.
- Download the latest version of the Qt source code. I used qt-everywhere-src-5.11.2.
- Extract the file
qt-everywhere-src-5.11.2.zipinto any directory of desire. - In order to build for the Raspberry Pi we need to make sure that our
sysrootdirectory is up to date. We need to ensure that we are linking against the same libraries and we have the same headers as base. The Windows toolchain for Raspberry Pi offers a handy batch script which supports us, the script is calledUpdateSysroot.batand is located inSysGCCraspberryTOOLS. I used the following settings to connect to QEMU:
Host name: 127.0.0.1
User name: pi
I downloaded the sysroot into the following directory C:SysGCCraspberryarm-linux-gnueabihfsysroot.
Note:
SmartTTY is only able to connect to port 22, if you changed the port routing in QEMU, make sure that 22 is available in order to connect, or use netsh to create a port proxy, an example can be found here.
4. The next step after the successful download of the sysroot directory is to configure the build. I used mingw32.exe , and changed the directory to /c/SysGCC/raspberry in my case. The following section shows the creation of a qt-build directory, which is then used for the build artifacts, and then the command in order to configure the Qt build.
mkdir qt-build
cd qt-build

../qt-everywhere-src-5.11.2/configure -platform win32-g++ -device linux-rasp-pi3-g++ -release -sysroot C:/SysGCC/raspberry/arm-linux-gnueabihf/sysroot -prefix /usr/local/qt5 -device-option "CROSS_COMPILE=arm-linux-gnueabihf-" -nomake examples -opensource -confirm-license
- After the configuration is done successfully we need to execute the build, within the
qt-builddirectory, with the following command:
- Copy the build artefacts by running:
Note:
The files are copied into the sysroot directory, the exact location depends on how the Qt build was configured, the prefix specifies the location within the sysroot directory, in this case C:SysGCCraspberryarm-linux-gnueabihfsysrootusrlocalqt5. You should see more sub folder within this directory e.g. bin, include and lib.
7. Open SmarTTY.exe, select the target as defined in step tree and connect. Then run the following command:
cd /usr/local
sudo mkdir qt5
sudo chown pi qt5
-
Upload the build artefacts with
SmarTTY.exe. SelectSCP->Upload. I used the following path:C:SysGCCraspberryarm-linux-gnueabihfsysrootusrlocalqt5 -
Run a test application e.g.
qtdiagwhich is located in thebindirectory by calling:
Problems
Here are some issues I ran into. I am hoping by showing some problems and their solutions you guys can adapt the approaches to your problems.
- Here is an error which occurred during building after I created the configuration.
'C:SysGCCraspberryqt-buildqtbasebinmoc.exe' -DQT_NO_URL_CAST_FROM_STRING -DQT_NO_INTEGER_EVENT_COORDINATES -DQT_NO_FOREACH -DWTF_EXPORT_PRIVATE= -DJS_EXPORT_PRIVATE= -DENABLE_ASSEMBLER_WX_EXCLUSIVE=1 -DWTFReportAssertionFailure=qmlWTFReportAssertionFailure -DWTFReportAssertionFailureWithMessage=qmlWTFReportAssertionFailureWithMessage -DWTFReportBacktrace=qmlWTFReportBacktrace -DWTFInvokeCrashHook=qmlWTFInvokeCrashHook -DENABLE_LLINT=0 -DENABLE_DFG_JIT=0 -DENABLE_DFG_JIT_UTILITY_METHODS=1 -DENABLE_JIT_CONSTANT_BLINDING=0 -DBUILDING_QT__ -DWTF_USE_UDIS86=0 -DNDEBUG -DQT_NO_NARROWING_CONVERSIONS_IN_CONNECT -DQT_BUILD_QML_LIB -DQT_BUILDING_QT -DQT_NO_CAST_TO_ASCII -DQT_ASCII_CAST_WARNINGS -DQT_MOC_COMPAT -DQT_USE_QSTRINGBUILDER -DQT_DEPRECATED_WARNINGS -DQT_DISABLE_DEPRECATED_BEFORE=0x050000 -DQT_NO_EXCEPTIONS -D_LARGEFILE64_SOURCE -D_LARGEFILE_SOURCE -DQT_NO_DEBUG -DQT_NETWORK_LIB -DQT_CORE_LIB -D__ARM_ARCH_6__ --include C:/SysGCC/raspberry/qt-build/qtdeclarative/src/qml/.moc/moc_predefs.h -IC:/SysGCC/raspberry/qt-everywhere-src-5.11.2/qtbase/mkspecs/devices/linux-rasp-pi3-g++ -IC:/SysGCC/raspberry/qt-everywhere-src-5.11.2/qtdeclarative/src/qml -IC:/SysGCC/raspberry/qt-everywhere-src-5.11.2/qtdeclarative/src/qml/memory -IC:/SysGCC/raspberry/qt-build/qtdeclarative/src/qml -IC:/SysGCC/raspberry/qt-everywhere-src-5.11.2/qtdeclarative/src/qml/compiler -IC:/SysGCC/raspberry/qt-build/qtdeclarative/src/qml -IC:/SysGCC/raspberry/qt-everywhere-src-5.11.2/qtdeclarative/src/qml/jsruntime -IC:/SysGCC/raspberry/qt-build/qtdeclarative/src/qml -IC:/SysGCC/raspberry/qt-everywhere-src-5.11.2/qtdeclarative/src/qml/jit -IC:/SysGCC/raspberry/qt-build/qtdeclarative/src/qml -IC:/SysGCC/raspberry/qt-everywhere-src-5.11.2/qtdeclarative/src/qml/debugger -IC:/SysGCC/raspberry/qt-everywhere-src-5.11.2/qtdeclarative/src/qml/animations -IC:/SysGCC/raspberry/qt-everywhere-src-5.11.2/qtdeclarative/src/3rdparty/masm/jit -IC:/SysGCC/raspberry/qt-everywhere-src-5.11.2/qtdeclarative/src/3rdparty/masm/assembler -IC:/SysGCC/raspberry/qt-everywhere-src-5.11.2/qtdeclarative/src/3rdparty/masm/runtime -IC:/SysGCC/raspberry/qt-everywhere-src-5.11.2/qtdeclarative/src/3rdparty/masm/wtf -IC:/SysGCC/raspberry/qt-everywhere-src-5.11.2/qtdeclarative/src/3rdparty/masm/stubs -IC:/SysGCC/raspberry/qt-everywhere-src-5.11.2/qtdeclarative/src/3rdparty/masm/stubs/wtf -IC:/SysGCC/raspberry/qt-everywhere-src-5.11.2/qtdeclarative/src/3rdparty/masm -IC:/SysGCC/raspberry/qt-everywhere-src-5.11.2/qtdeclarative/src/3rdparty/masm/disassembler -IC:/SysGCC/raspberry/qt-everywhere-src-5.11.2/qtdeclarative/src/3rdparty/masm/disassembler/udis86 -IC:/SysGCC/raspberry/qt-everywhere-src-5.11.2/qtdeclarative/src/qml/.generated -IC:/SysGCC/raspberry/qt-everywhere-src-5.11.2/qtdeclarative/include -IC:/SysGCC/raspberry/qt-everywhere-src-5.11.2/qtdeclarative/include/QtQml -IC:/SysGCC/raspberry/qt-build/qtdeclarative/include -IC:/SysGCC/raspberry/qt-build/qtdeclarative/include/QtQml -IC:/SysGCC/raspberry/qt-everywhere-src-5.11.2/qtdeclarative/include/QtQml/5.11.2 -IC:/SysGCC/raspberry/qt-everywhere-src-5.11.2/qtdeclarative/include/QtQml/5.11.2/QtQml -IC:/SysGCC/raspberry/qt-build/qtdeclarative/include/QtQml/5.11.2 -IC:/SysGCC/raspberry/qt-build/qtdeclarative/include/QtQml/5.11.2/QtQml -IC:/SysGCC/raspberry/qt-everywhere-src-5.11.2/qtbase/include/QtCore/5.11.2 -IC:/SysGCC/raspberry/qt-everywhere-src-5.11.2/qtbase/include/QtCore/5.11.2/QtCore -IC:/SysGCC/raspberry/qt-build/qtbase/include/QtCore/5.11.2 -IC:/SysGCC/raspberry/qt-build/qtbase/include/QtCore/5.11.2/QtCore -IC:/SysGCC/raspberry/qt-everywhere-src-5.11.2/qtbase/include -IC:/SysGCC/raspberry/qt-everywhere-src-5.11.2/qtbase/include/QtNetwork -IC:/SysGCC/raspberry/qt-build/qtbase/include -IC:/SysGCC/raspberry/qt-build/qtbase/include/QtNetwork -IC:/SysGCC/raspberry/qt-everywhere-src-5.11.2/qtbase/include/QtCore -IC:/SysGCC/raspberry/qt-build/qtbase/include/QtCore -I. -Ic:/sysgcc/raspberry/arm-linux-gnueabihf/include/c++/6 -Ic:/sysgcc/raspberry/arm-linux-gnueabihf/include/c++/6/backward -Ic:/sysgcc/raspberry/lib/gcc/arm-linux-gnueabihf/6/include -Ic:/sysgcc/raspberry/lib/gcc/arm-linux-gnueabihf/6/include-fixed -Ic:/sysgcc/raspberry/arm-linux-gnueabihf/include -Ic:/sysgcc/raspberry/arm-linux-gnueabihf/include/arm-linux-gnueabihf/c++/6 -Ic:/sysgcc/raspberry/arm-linux-gnueabihf/sysroot/usr/include/arm-linux-gnueabihf -Ic:/sysgcc/raspberry/arm-linux-gnueabihf/sysroot/usr/include C:/SysGCC/raspberry/qt-everywhere-src-5.11.2/qtdeclarative/src/qml/util/qqmladaptormodel.cpp -o .moc/qqmladaptormodel.moc
mingw32-make[2]: *** [Makefile:12064: .moc/qqmladaptormodel.moc] Error -1073741701
mingw32-make[2]: Leaving directory 'C:/SysGCC/raspberry/qt-build/qtdeclarative/src/qml'
mingw32-make[1]: *** [Makefile:53: sub-qml-make_first-ordered] Error 2
mingw32-make[1]: Leaving directory 'C:/SysGCC/raspberry/qt-build/qtdeclarative/src'
mingw32-make: *** [Makefile:48: sub-src-make_first] Error 2
I used err.exe to resolve the error code.
C:Program FilesMicrosoft SDKsWindowsv7.1Bin>err.exe -1073741701
# for decimal -1073741701 / hex 0xc000007b
  STATUS_INVALID_IMAGE_FORMAT                                    ntstatus.h
# {Bad Image}
# %hs is either not designed to run on Windows or it contains
# an error. Try installing the program again using the
# original installation media or contact your system
# administrator or the software vendor for support.
# as an HRESULT: Severity: FAILURE (1), FACILITY_NULL (0x0), Code 0x7b
# for decimal 123 / hex 0x7b
  ERROR_INVALID_NAME                                             winerror.h
# The filename, directory name, or volume label syntax is
# incorrect.
# 2 matches found for "-1073741701"
Turns out that the error code -1073741701 = 0x000007b is translated to ERROR_INVALID_NAME. The reason for this particular error was using double forward slashes //, notice also the inconsistent use of them for the -prefix argument -prefix //usr//local/qt5:
../qt-everywhere-src-5.11.2/configure.bat -platform win32-g++ -device linux-rasp-pi3-g++ -release -sysroot C://SysGCC//raspberry//arm-linux-gnueabihf//sysroot -prefix //usr//local/qt5 -device-option "CROSS_COMPILE=arm-linux-gnueabihf-" -nomake examples -opensource -confirm-license
-
Here is a different error I encountered so far:
pi@raspberrypi:/usr/local/qt5/bin $ ./qtdiag
Illegal instruction
This is the output I get when I execute the application in gdb:
and "show warranty" for details. This GDB was configured as "arm-linux-gnueabihf". Type "show configuration" for configuration details. For bug reporting instructions, please see: <http://www.gnu.org/software/gdb/bugs/>. Find the GDB manual and other documentation resources online at: <http://www.gnu.org/software/gdb/documentation/>. For help, type "help". Type "apropos word" to search for commands related to "word"... Reading symbols from qtdiag...(no debugging symbols found)...done. (gdb) r Starting program: /usr/local/qt5/bin/qtdiag [Thread debugging using libthread_db enabled] Using host libthread_db library "/lib/arm-linux-gnueabihf/libthread_db.so.1". Program received signal SIGILL, Illegal instruction. 0xb610cb30 in qRegisterResourceData(int, unsigned char const*, unsigned char const*, unsign ed char const*) () from /usr/local/qt5/lib/libQt5Core.so.5 -
One major problem I encountered is that for some reason the install path is somehow not correct. Take a look at the
qt.conf, theDevicePaths,PrefixandHostPrefixare not correct, since they are not absolute and theHostPathcontains the local drive.[EffectivePaths] Prefix=.. [DevicePaths] Prefix=C:/usr/local/qt5 [Paths] Prefix=C:/usr/local/qt5 HostPrefix=C:/SysGCC/raspberry/arm-linux-gnueabihf/sysrootC:/usr/local/qt5 Sysroot=C:/SysGCC/raspberry/arm-linux-gnueabihf/sysroot SysrootifyPrefix=true TargetSpec=devices/linux-rasp-pi-g++ HostSpec=win32-g++ [EffectiveSourcePaths] Prefix=C:/SysGCC/raspberry/qt-everywhere-src-5.11.2/qtbaseThis leads to the fact, that some environment variables need to be set in order to run Qt applications, I used the folowing commands to resolve that issue:
#!/bin/bash

export LD_LIBRARY_PATH=/usr/local/qt5/lib
export QT_QPA_PLATFORM_PLUGIN_PATH=/usr/local/qt5/plugins/platforms
export QT_QPA_FONTDIR=/user/share/fonts
sudo ldconfig
Special thanks to
I thank etiennedm, for an awesome article which I used as a starting point. Also thanks to the people from visualgdb.com.
Contributing, Help, Feedback and Questions
To get started with contributing to my GitHub repository, if you need help or if you have any suggestions, feel free to join my Slack workspace.
Одним из инструментов для создания приложений с графическим пользовательским интерфейсом является хорошо известный фреймворк Qt. Кроссплатформенность Qt позволяет нам успешно использовать его в том числе и для разработки на Raspberry Pi. Но здесь есть один нюанс, о котором мы и поговорим в этой статье.
В принципе, можно без проблем установить Qt Creator и сопутствующие библиотеки непосредственно на Raspberry. И, соответственно, на самой же плате и заниматься разработкой. Но! Компиляция требует достаточно серьезных мощностей, в связи с чем этот процесс на Raspberry будет занимать довольно продолжительное время, что, естественно, нежелательно.
Решение данной проблемы такое — разработка и дальнейшая компиляция выполняются на ПК, а уже готовое приложение загружается и используется на Raspberry Pi. Для реализации этого нам нужно будет кросс-компилировать Qt на хосте (ПК), чтобы затем можно было разворачивать и отлаживать приложения уже на плате. Итак, в отправной точке у нас в наличии:
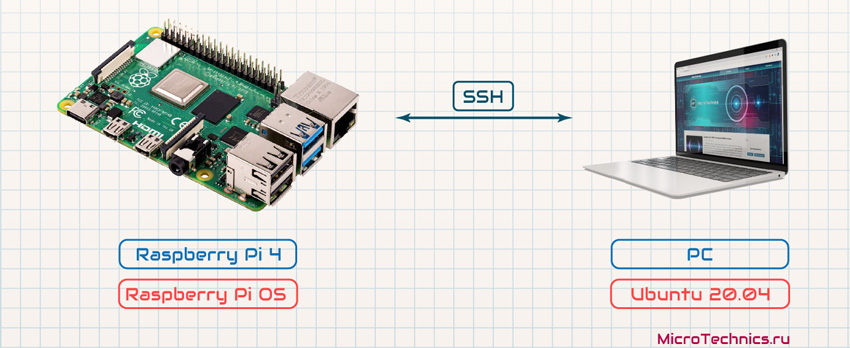
- Raspberry Pi 4 с установленной Raspberry Pi OS.
- Хост — ПК с ОС Ubuntu 20.04 (моя версия на момент написания статьи).
- Подключение по SSH.
В дальнейшем часть команд будут выполняться на ПК, а часть — на Raspberry Pi, поэтому во избежание путаницы для каждой команды и каждого шага будем добавлять наглядные метки: [PC] или [Raspberry Pi].
Шаг 1. [Raspberry Pi]
Произведем необходимые настройки:
sudo raspi-config
Первым делом включаем поддержку OpenGL driver with fake KMS. Для этого переходим в Advanced Options — GL Driver:
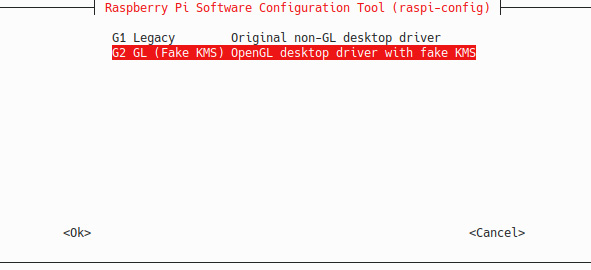
И второй момент — настраиваем Raspberry Pi OS на загрузку без запуска графической оболочки. Идем в System Options — Boot / Auto Login:

Шаг 2. [Raspberry Pi]
Редактируем файл /etc/apt/sources.list, например, при помощи редактора nano:
sudo nano /etc/apt/sources.list
Нашей целью здесь является раскомментирование строки:
deb-src http://raspbian.raspberrypi.org/raspbian/ buster main contrib non-free rpi
Шаг 3. [Raspberry Pi]
Обновляем систему и устанавливаем необходимые пакеты:
sudo apt-get update
sudo apt-get upgrade

sudo apt-get build-dep qt5-qmake
sudo apt-get build-dep libqt5gui5
sudo apt-get build-dep libqt5webengine-data
sudo apt-get build-dep libqt5webkit5
sudo apt-get install libudev-dev libinput-dev libts-dev libxcb-xinerama0-dev libxcb-xinerama0 gdbserver pkg-config mesa-utils libgles2-mesa-dev libdrm.dev libgbm.dev
Шаг 4. [Raspberry Pi]
Создаем на Raspberry Pi папку для пользователя pi для дальнейшего развертывания в ней Qt:
sudo mkdir /usr/local/qt
sudo chown pi:pi /usr/local/qt
Шаг 5. [PC]
Теперь создаем папку на хосте и скачиваем тулчейн для кросс-компиляции:
mkdir ~/raspberrypi
cd ~/raspberrypi
wget https://releases.linaro.org/components/toolchain/binaries/latest-7/arm-linux-gnueabihf/gcc-linaro-7.5.0-2019.12-x86_64_arm-linux-gnueabihf.tar.xz
tar xf gcc-linaro-7.5.0-2019.12-x86_64_arm-linux-gnueabihf.tar.xz
У меня 64-битная ОС, соответственно, версия — x86_64.
Шаг 6. [PC]
Создаем sysroot для кросс-компиляции под Raspberry Pi:
mkdir sysroot sysroot/usr sysroot/opt
Шаг 7. [PC]
Синхронизируем sysroot на ПК с Raspberry Pi:
rsync -avz pi@192.168.0.101:/lib sysroot
rsync -avz pi@192.168.0.101:/usr/include sysroot/usr
rsync -avz pi@192.168.0.101:/usr/lib sysroot/usr
rsync -avz pi@192.168.0.101:/opt/vc sysroot/opt
Соответственно, здесь и далее имя пользователя (pi) и ip-адрес платы (192.168.0.101) нужно заменить на свои.
Шаг 8. [PC]
Заменяем символьные ссылки sysroot на относительные при помощи готового скрипта sysroot-relativelinks.py. Скачиваем скрипт и запускаем:
wget https://raw.githubusercontent.com/riscv/riscv-poky/master/scripts/sysroot-relativelinks.py
chmod +x sysroot-relativelinks.py
./sysroot-relativelinks.py sysroot
Шаг 9. [PC]
Скачиваем исходники Qt. Будем использовать LTS версию 5.15.1:
git clone git://code.qt.io/qt/qtbase.git -b 5.15.1
cd qtbase
Шаг 10. [PC]
Выполняем конфигурацию перед сборкой. Для Raspberry Pi 4 аргументом -device будет linux-rasp-pi4-v3d-g++:
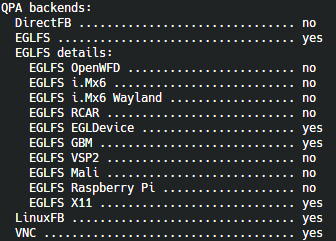
./configure -release -opengl es2 -eglfs -device linux-rasp-pi4-v3d-g++ -device-option CROSS_COMPILE=~/raspberrypi/gcc-linaro-7.5.0-2019.12-x86_64_arm-linux-gnueabihf/bin/arm-linux-gnueabihf- -sysroot ~/raspberrypi/sysroot -prefix /usr/local/qt -extprefix ~/raspberrypi/qt -hostprefix ~/raspberrypi/host-qt -opensource -confirm-license -skip qtscript -skip qtwayland -skip qtwebengine -nomake tests -make libs -pkg-config -no-use-gold-linker -v -recheck
При успешном выполнении данного шага в консоли должны быть активированы следующие пункты:
При неудавшейся конфигурации или сборке не забываем выполнить полную очистку перед повторной попыткой:
git clean -dfx
Шаг 11. [PC]
Приготовления закончены, собираем:
make -j8
make install
Шаг 12. [PC]
Разворачиваем собранный Qt на Raspberry Pi:
cd ~/raspberrypi
rsync -avz qt pi@192.168.0.101:/usr/local
И на этом процесс завершен 👍 Переходим к следующему аспекту — установке, запуску и настройке Qt Creator.
Qt Creator для Raspberry Pi.
Шаг 1. [PC]
Установка проста:
sudo apt install qtcreator
Шаг 2. [PC]
Добавляем устройство в Qt Creator. Переходим в меню Tools — Options, открываем раздел Devices и добавляем Generic Linux Device:
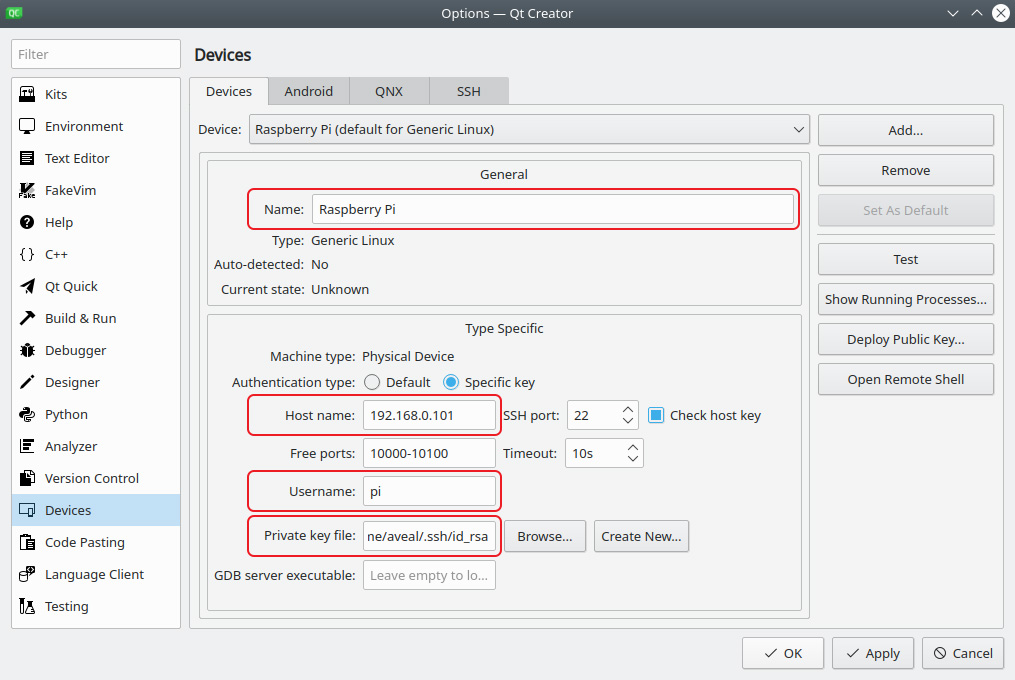
Здесь мы задали имя устройства, ip-адрес и имя пользователя. Кроме того, указываем приватный SSH-ключ для доступа к Raspberry Pi по SSH.
Шаг 3. [PC]
Идем в раздел Kits на вкладку Compilers и добавляем компиляторы для C и C++:
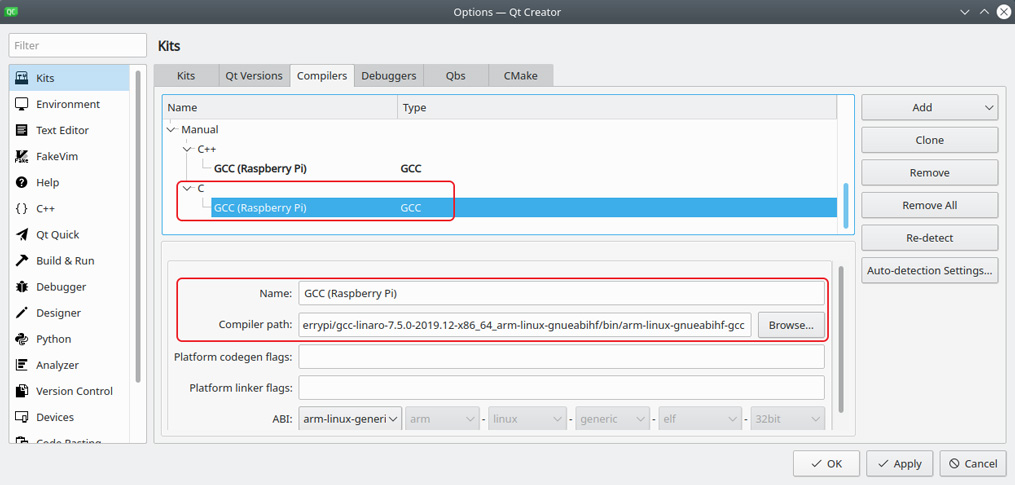
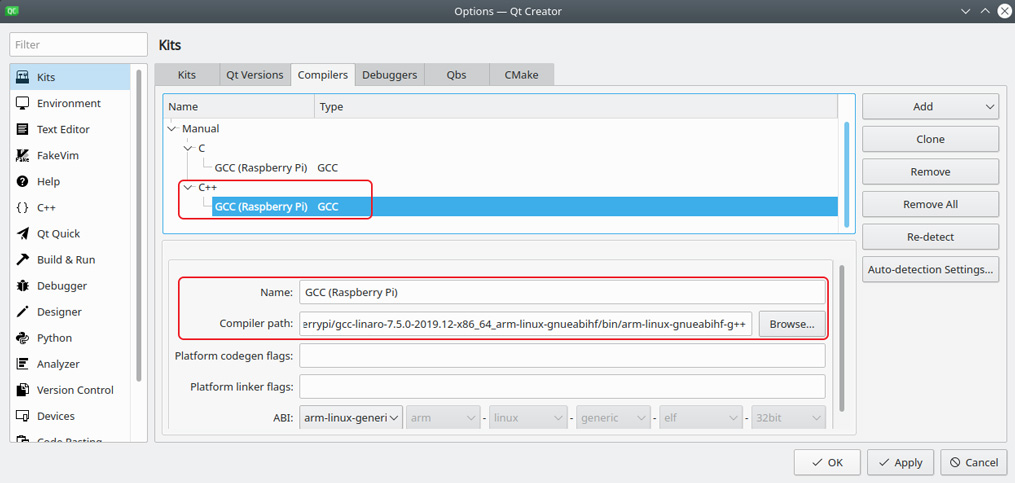
Шаг 4. [PC]
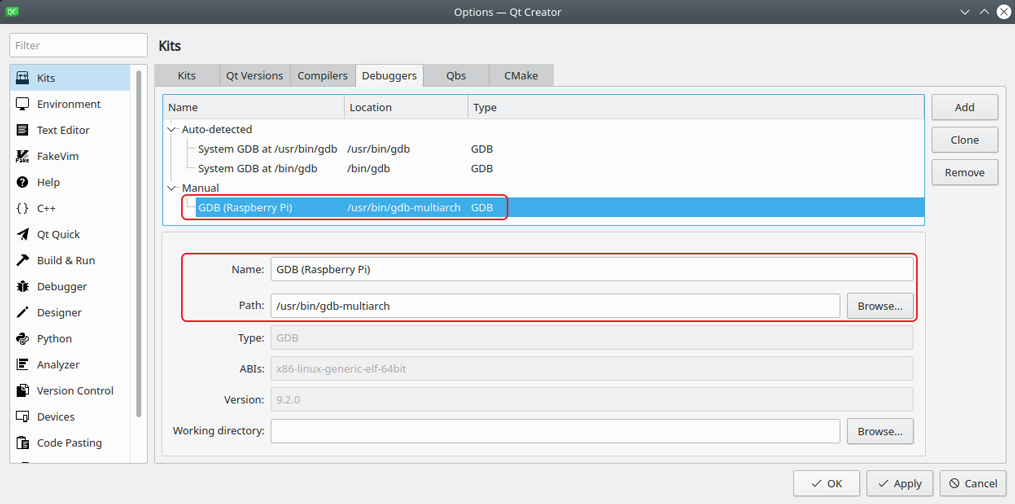
В том же разделе на вкладке Debuggers добавляем отладчик для работы с Raspberry. Но для этого предварительно устанавливаем:
sudo apt-get install gdb-multiarch
А затем уже возвращаемся в Debuggers:
Шаг 5. [PC]
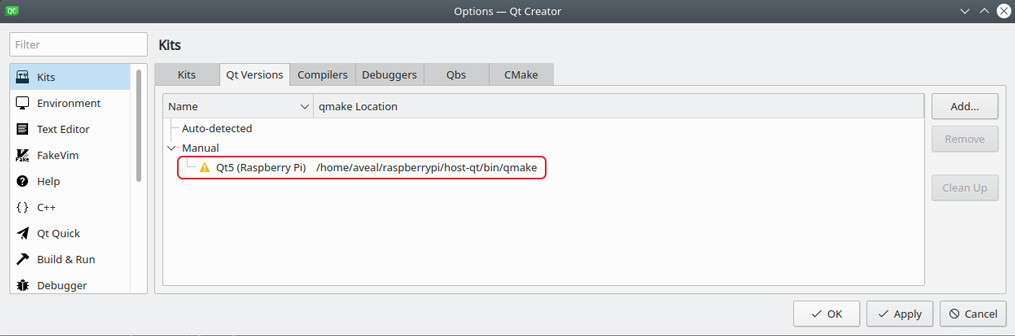
Дальше по списку вкладка Qt Versions, где мы добавляем версию Qt:
Шаг 6. [PC]
И финишируем на вкладке Kits, добавив набор инструментов, которые мы будем использовать для Raspberry Pi. Собственно, систематизируем все, что мы добавили ранее:
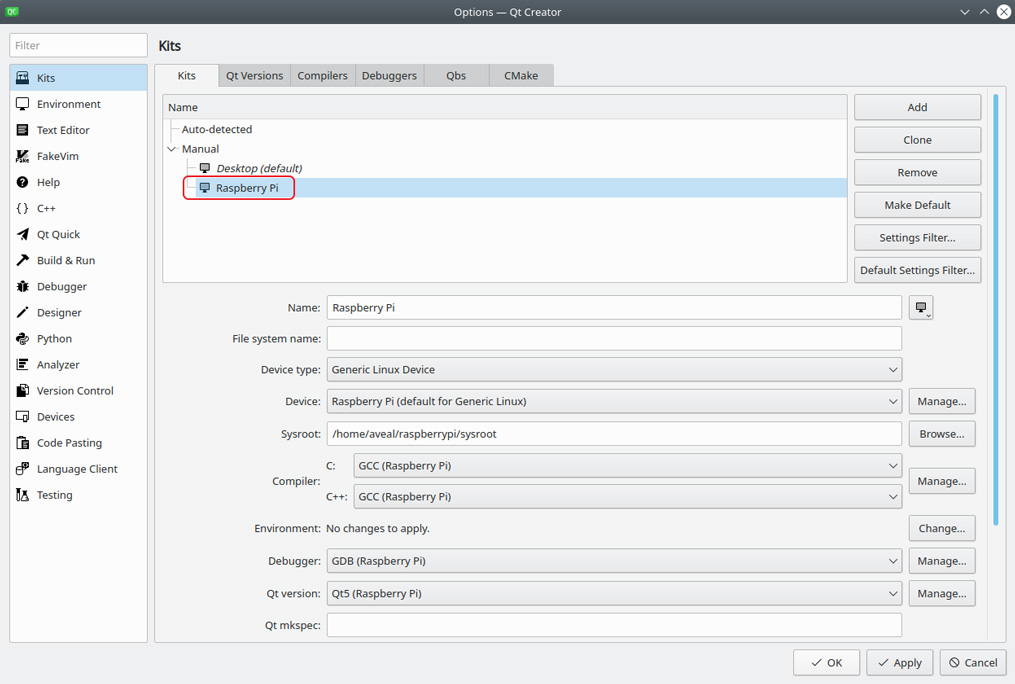
Теперь при создании нового проекта будет доступен созданный набор, названный нами — Raspberry Pi. В общем-то, как раз и переходим к созданию тестового проекта.
Создание проекта.
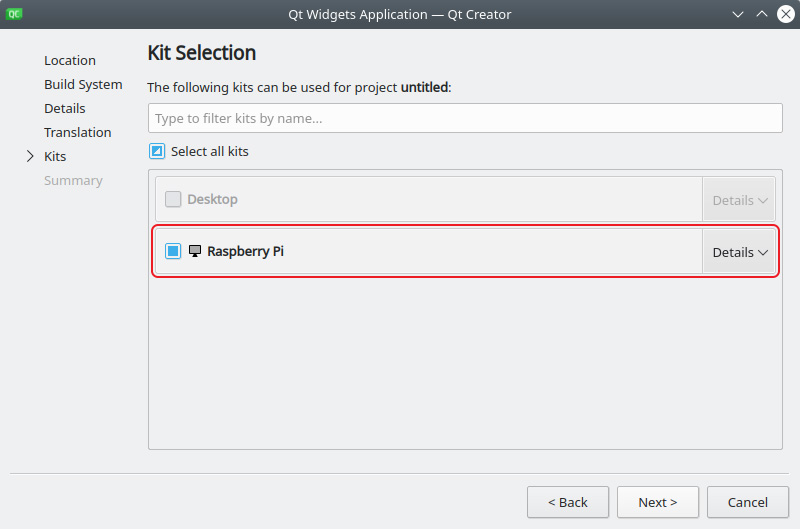
Шаг 1. [PC]
Создаем проект и выбираем добавленный ранее набор инструментов:
Шаг 2. [PC]
В настройках проекта в .pro файле можно задать путь для установки приложения на Raspberry Pi. К примеру:
# Default rules for deployment.
qnx: target.path = /tmp/$${TARGET}/bin
else: unix:!android: target.path = /home/pi/Qt_Projects/$${TARGET}
!isEmpty(target.path): INSTALLS += target
То есть в данном случае созданное приложение будет развернуто в папке /home/pi/Qt_Projects/ на Raspberry Pi.
Шаг 3. [PC]
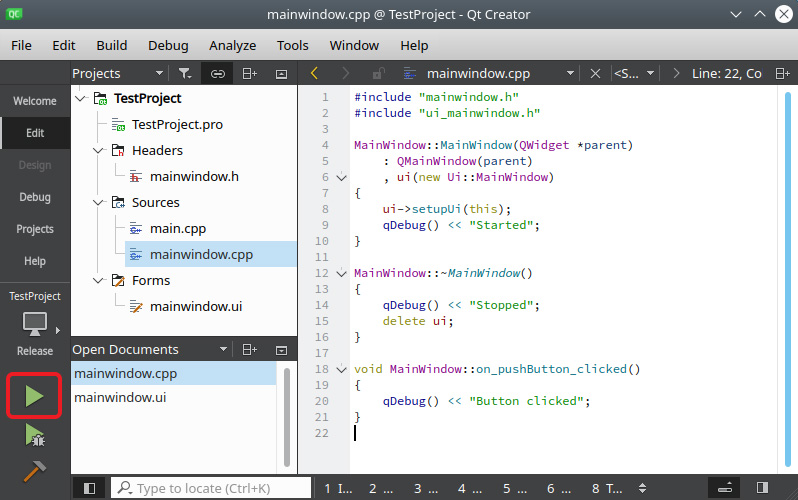
Создаем простейшее приложение с одной кнопкой. По нажатию кнопки, а также в конструкторе и деструкторе MainWindow выдаем сообщение через qDebug().
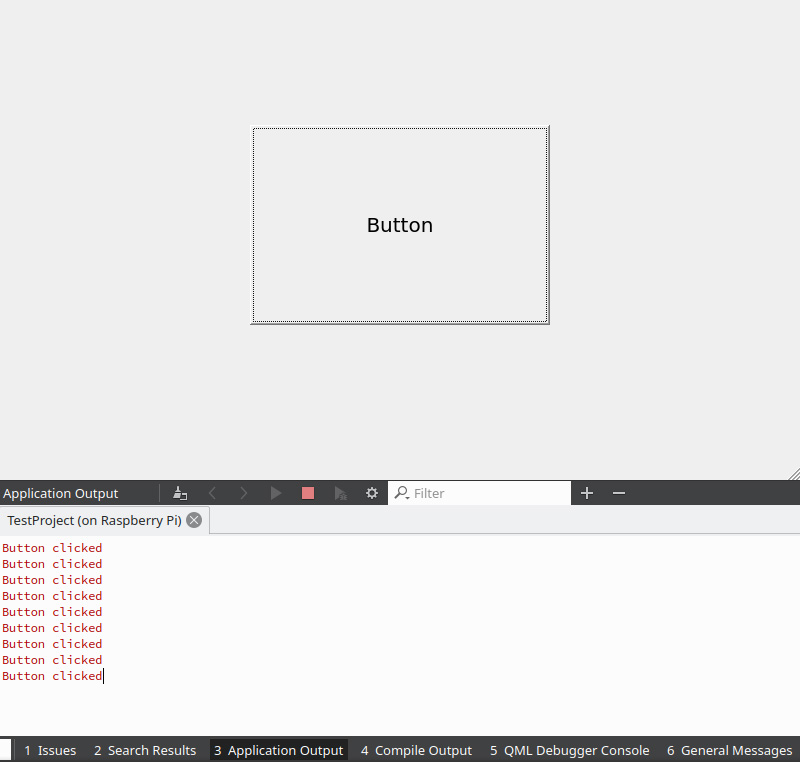
Собираем приложение и разворачиваем на Raspberry Pi:
Итогом будет успешный запуск на Raspberry:
Собственно, цель достигнута. В завершение, разберем одну потенциальную проблему. При компиляции тестового проекта могут возникнуть ошибки вроде:
error: variable has incomplete type 'QApplication'
error: unknown type name 'MainWindow'
Часто это связано с тем, что Ubuntu 20.04 по умолчанию использует clang-10. А Qt требует clang-8. Поэтому для устранения ошибок выполняем последовательно:
sudo apt install clang-8
sudo update-alternatives --install /usr/bin/clang++ clang++ /usr/bin/clang++-8 100
sudo update-alternatives --install /usr/bin/clang clang /usr/bin/clang-8 100
Вот на этом точно все, спасибо за внимание и до скорого 🤝
- Author
- Recent Posts

PhD. in Computer Science / Solar Thermal Energy Researcher
Qt 5.12 is a long-term support (LTS) release of the popular Qt framework. If you are not familiar with it, Qt is a rich framework with plenty of ready-to-use multi-platform components for diverse areas such as multimedia, network, connectivity, graphics, and much more.
In this tutorial, you will learn how to cross-compile Qt 5.12 for Raspberry Pi in your computer and install it in your Raspberry. This will allow you to design and build your Raspberry Pi apps in your computer thanks to Qt Creator and, execute and debug them directly in your Raspberry Pi. Qt creator is a powerful multi-platform Integrated Development Environment (IDE) to create and deploy your Qt apps and it is available for Linux, macOS and Windows.
Article updates
| 29 September, 2019 | Updated for Qt 5.12.4 & 5.12.5, and Raspbian Buster |
| 10 May, 2019 | Updated for Qt 5.12.3 |
| 23 January, 2019 | First version for Qt 5.12, later updated for Qt 5.12.2 |
Hardware
This tutorial considers Raspberry Pi 3 model B+ and Qt 5.12 branch, however these instructions should be similar for new Qt releases, as well as other Raspberry Pi board versions. The desktop Operating System (OS) is Linux (it works in most common Linux distributions: Ubuntu, openSUSE, Debian, Fedora, etc.) and the Raspberry Pi OS is Raspbian Buster, any version works (Raspbian Stretch is also supported). Again, the tutorial steps should be quite similar in other configurations.
- Raspberry PI 3 Model B+
- Raspberry Pi Zero WH (WiFi and pre-soldered header)
These are affiliate links. This means if you click on the link and purchase the promoted item, we will receive a small affiliate commission at no extra cost to you, the price of the product is the same. We would really appreciate your support to our work and website if this is fine for you.
Note: this tutorial works for Qt 5.12 and 5.12.2 to 5.12.5 (it doesn’t for 5.12.1 due to some bugs). For Qt 5.12.2 to 5.12.5, the build configuration file must be set to linux-rasp-pi-g++ instead of linux-rasp-pi3-g++ in the -device argument. This is also mentioned below in the step 6. Stay tuned for updates about new versions. Also, have a look at the comments below for new findings.
It is assumed that you have a SD card with Raspbian strech installed in your Raspberry Pi, otherwise download it and follow the installation guide. Also, check that you have the latest firmware, or install it and reboot the system. Execute the following command in the Raspberry Pi command-line interface for updating the firmware.
sudo rpi-update
reboot
Make sure that you have activated the Secure Shell (SSH) protocol in Raspbian. We will need it later to comunicate Qt Creator with your Raspbery Pi.
sudo raspi-config
Select Interfacing Options, select ssh, choose yes and finish.

The following list summarizes the main steps to cross-compile Qt 5.12 for Raspberry Pi, we will be describing each of them in this post. The [Pi] label means this action is done in the Raspberry Pi, whereas [Co] means it has to be performed in you computer.
- Install development libraries – [Pi]
- Prepare target folder – [Pi]
- Create working folder and set a toolchain – [Co]
- Create and configure a sysroot – [Co]
- Download Qt – [Co]
- Configure Qt for cross compilation – [Co]
- Compile, install and deploy Qt – [Co]
- Setup Qt Creator for Raspberry Pi cross compilation – [Co]
1. Install development libraries – [Pi]
We need to install some development libraries, so the first thing to do is to allow the system to install source packages, for this you only have to uncomment the deb-src line in the /etc/apt/sources.list file, which configures the system repositories. Use your favorite text editor for this, we are using nano in this example.
sudo nano /etc/apt/sources.list
The next step is to update and install the required development packages.
sudo apt-get update
sudo apt-get build-dep qt4-x11
sudo apt-get build-dep libqt5gui5
sudo apt-get install libudev-dev libinput-dev libts-dev libxcb-xinerama0-dev libxcb-xinerama0
2. Prepare target folder – [Pi]
This step just involves creating a folder in our Raspberry Pi for the pi user. This folder (/usr/local/qt5pi) will be used to deploy Qt from our computer to the Raspberry Pi.
sudo mkdir /usr/local/qt5pi
sudo chown pi:pi /usr/local/qt5pi
3. Create working folder and set a toolchain – [Co]
Create a working folder in your computer and download the toolchain.
mkdir ~/raspi
cd ~/raspi
git clone https://github.com/raspberrypi/tools
4. Create and configure a sysroot – [Co]
A sysroot is a directory structure that includes all the folders needed to run a particular system. We are creating here a sysroot for Raspberry Pi cross compilation in our computer.
mkdir sysroot sysroot/usr sysroot/opt
We can use rsync to synchronize our computer sysroot and the Raspberry Pi. So, if we make changes in our computer sysroot, they can be easily transferred to our Raspberry Pi; raspberrypi_ip is the network interface name or IP address of your Raspberry Pi.
rsync -avz pi@raspberrypi_ip:/lib sysroot
rsync -avz pi@raspberrypi_ip:/usr/include sysroot/usr
rsync -avz pi@raspberrypi_ip:/usr/lib sysroot/usr
rsync -avz pi@raspberrypi_ip:/opt/vc sysroot/opt
Next, we need to adjust our symbolic links in sysroot to be relative since this folder structure is in both our computer and Raspberry Pi.
wget https://raw.githubusercontent.com/riscv/riscv-poky/master/scripts/sysroot-relativelinks.py
chmod +x sysroot-relativelinks.py
./sysroot-relativelinks.py sysroot
5. Download Qt – [Co]
Download and untar Qt 5.12.5 or any other version you want to use.
wget http://download.qt.io/official_releases/qt/5.12/5.12.5/single/ qt-everywhere-src-5.12.5.tar.xz
tar xvf  qt-everywhere-src-5.12.5.tar.xz
cd  qt-everywhere-src-5.12.5
6. Configure Qt for cross compilation – [Co]
Note: In new Raspbian versions, EGL libraries have different names than those assumed in Qt configuration files, so edit the ./qtbase/mkspecs/devices/linux-rasp-pi-g++/qmake.conf file and substitute all references to -lEGL and -LGLESv2 for -lbrcmEGL and -lbrcmGLESv2, respectively.
The linux-rasp-pi3-g++ (Qt 5.12) or linux-rasp-pi-g++ (Qt 5.12.2 to Qt 5.12.5) folder applies to Raspberry Pi 3 version, if you have a different board version check the list of compatible devices which can be found in ./qtbase/mkspecs/devices and in the table below (summarized from the table in the tutorial to build Qt 5.12 for Raspbian directly on Raspberry Pi).
| Version | Configure option | Architecture | Remarks |
| Raspberry Pi 3 (not working for Qt 5.12.2 to 5.12.5) |
-device linux-rpi3-g++ | ARM V8 | QtScript build fails -skip qtscript needed |
| Raspberry Pi 2 | -device linux-rpi2-g++ | ARM V7 | |
| Raspberry Pi 1 Raspberry Pi Zero |
-device linux-rpi-g++ | ARM V6 |
An alternative way to fix the issue with the EGL libraries (copying and moving them) is given at Qt Wiki – RaspberryPi2EGLFS – step 14.
The following command configure the open-source Qt version for cross compilation. Again, the particular device is set by the -device argument in this case linux-rasp-pi-g++, set the appropriate value for your board version. You can omit the compilation of problematic or time consuming modules using the -skip argument. In this case, we have omitted the compilation of the qtwayland, qtlocation and qtscript modules.
Note: For Qt 5.12.2 to 5.12.5, the build configuration file must be set to linux-rasp-pi-g++ instead of linux-rasp-pi3-g++ in the -device argument.
./configure -release -opengl es2 -device linux-rasp-pi-g++ -device-option CROSS_COMPILE=~/raspi/tools/arm-bcm2708/gcc-linaro-arm-linux-gnueabihf-raspbian-x64/bin/arm-linux-gnueabihf- -sysroot ~/raspi/sysroot -opensource -confirm-license -skip qtwayland -skip qtlocation -skip qtscript -make libs -prefix /usr/local/qt5pi -extprefix ~/raspi/qt5pi -hostprefix ~/raspi/qt5 -no-use-gold-linker -v -no-gbm
For a successful configuration, verify that the build options includes EGFLS for Raspberry Pi.
Build options:
......
QPA backends:
  ......
  EGLFS .................................. yes
  EGLFS details:
    ......
    EGLFS Raspberry Pi ................... yes
    ......
7. Compile, install and deploy Qt – [Co]
The exact compilation time depends on your computer performance. This process can take up to 2 or 3 hours in nowadays common computers. Compiler processes can be executed in parallel by means of the j flag. For four make processes, execute: make -j 4.
make
make install
Once Qt is compiled, it can be deployed to your Raspberry Pi using the rsync command.
rsync -avz qt5pi pi@raspberrypi_ip:/usr/local
Note: You may face some errors during the compilation the Qt 5.12 process due to some bugs. They have been already patched in Qt 5.12.1, but this tutorial currently doesn’t work for this version. You may prefer to compile the newest Qt 5.12.2 to Qt 5.12.5 versions to avoid these bugs.
The procedure to fix these bugs for Qt 5.12 consists in downloading Qt 5.12.1 and overwriting the same files in your Qt 5.12.0 source folder. You can find a list of the bugs you may face below together with the files you need to update.
qendian – QTBUG-71945
- qtbase/src/corelib/global/qendian.cpp
- qtbase/src/corelib/global/qendian.h
qquicktableview – QTBUG-71998
- qtdeclarative/src/quick/items/qquicktableview.cpp
qconnectionfactories – QTBUG-72991
- qtremoteobjects/src/remoteobjects/qconnectionfactories.cpp
qquickcontrol – QTBUG-73308
- qtquickcontrols2/src/quicktemplates2/qquickcontrol.cpp
qvirtualkeyboardselectionlistmodel – Qt bug?
- qtvirtualkeyboard/src/virtualkeyboard/qvirtualkeyboardselectionlistmodel.cpp
8. Setup Qt Creator for Raspberry Pi cross compilation – [Co]
If you do not have installed Qt Creator, follow the instructions in the Qt download page to download and install it. Then, follow these instructions to configure cross-compilation support.
First, open Qt Creator, go to the Tools -> Options menu, select the Devices section and Devices tab. Add a new Generic Linux Device.

Set a name for the configuration (Raspberry Pi), the network name or IP, the username (pi) and password (by default raspberry).

Before you finish the wizard, the connection to your Raspberry Pi will be verified and you will have then a new device configured in Qt Creator.

Next, go to the Kits section and Compilers tab, Add GCC C and C++ cross compilers for Raspberry Pi.
The path for the GCC C Raspberry Pi compiler is ~/raspi/tools/arm-bcm2708/gcc-linaro-arm-linux-gnueabihf-raspbian-x64/arm-linux-gnueabihf/bin/gcc.

The path for the GCC C++ Raspberry Pi compiler is the same as for the GCC C compiler.

Next, go to the Debuggers tab, and Add a debugger, set its path to ~/raspi/tools/arm-bcm2708/arm-rpi-4.9.3-linux-gnueabihf/bin/arm-linux-gnueabihf-gdb.

Go to the Qt Versions tab and Add a new version: Qt 5.12 (Raspberry Pi), set the qmake path to ~/raspi/qt5/bin/qmake.

Finally, go to the Kits tab, Add a new kit, set the name and icon you prefer, and pay attention to the following configuration:
- Device type: Generic Linux Device
- Device: Raspberry Pi (defaut for Generic Linux)
- Sysroot: ~/raspi/sysroot
- Compiler C: GCC (Raspberry Pi)
- Compiler C++: GCC (Raspberry Pi)
- Debugger: GDB (Raspberry Pi)
- Qt version: Qt 5.12 (Raspberry Pi)

All the configuration is already done. You can test your configuration by creating anew project and selecting the previously defined kit configuration: Raspberry Pi.

Congratulations! You can now design, build and deploy your Qt Raspberry Pi apps in you computer and, execute and debug them directly in your Raspberry Pi.

4.7 6 votes
Article Rating
Поскольку вычислительные мощности Raspberry Pi достаточно слабы, то компиляция приложений прямо на плате может оказаться очень длительным процессом, особенно если это касается каких-то сложных приложений, а не элементарных Hello World’ов.
Намного удобнее разрабатывать и компилировать приложения на мощном стационарном компьютере. Так как процессоры обычных компьютеров и ноутбуков чаще всего имеют архитектуру x86, которая отличается от архитектуры ARM процессора Raspberry Pi, то просто скомпилированное и работающее на компьютере приложение при копировании на Raspberry Pi работать не будет.
Чтобы собрать приложение на своём стационарном компьютере или ноутбуке для Raspberry Pi нужно скачать и настроить специальный инструментарий (toolchain), который включает в себя ARM-компилятор и некоторые библиотеки, скомпилированные для целевой ARM-платформы (например glibc).
Далее будет описано, как наиболее просто заполучить такой инструментарий.
Здесь нам отлично поможет Buildroot. Это ПО для сборки кастомизированных Linux дистрибутивов для embedded-систем. Как это работает?Скачивается Buildroot, запускается его конфигуратор, где выбирается тип процессора, тулчейн для кросс-компиляции, набор библиотек и программ, которые необходимо включить в дистрибутив, версию ядра и т.д. Далее нужно закрыть конфигуратор и вбить в консоли команду make. После этого buildroot начнёт скачивать всё, что необходимо, компилировать¸ применять всякие патчи (процесс длительный, занимает несколько часов). На выходе получим образ ядра, загрузчик и корневую файловую систему.И в качестве бонуса тулчейн для кросс-компиляции, который можно использовать для сборки своих программ.
Разработчики Buildroot включают в программу конфигурации для различных популярных платформ, у меня стоит версия Buildroot от 08.12, там ещё нет официальной конфигурации для Raspberry Pi(может в декабрьской версии что-то появилось, не проверял). В Интернете можно найти несколько конфигураций Buildroot’а, заточенных для работы с Raspberry Pi от энтузиастов. Мне больше всего понравился http://bsquask.com/. Работа с ним строится следующим образом
1. Скачиваем Bsquask с сайта разработчика.
git clone git://github.com/nezticle/RaspberryPi-BuildRoot.git BuildRoot
2. Создаём папку, в которую Buildroot будет собирать новый дистрибутив и всё необходимое:
export BSQUASK_DIR=/opt/bsquask
mkdir -p $BSQUASK_DIR
3. Заходим в папку с Buildroot’ом, скаченную в шаге №1. Выполняем команду make raspberrypi_defconfig O=$BSQUASK_DIR
Она указывает Buildroot’у, что нужно использовать файл конфигурации «raspberrypi_defconfig», а сборку производить в каталог BSQUASK_DIR, заданный в шаге 2.
Можно также выполнить команду make xconfig, чтобы посмотреть, что из себя представляет конфигуратор BuildRoot’а и внести свои коррективы.
4. Заходим в BSQUASK_DIR и отдаём команду на начало сборки. Процесс займёт несколько часов.
cd $BSQUASK_DIR
make
Когда процесс сборки завершится, в папке BSQUASK_DIR/images появятся архив с загрузчиком (boot.tar.gz) и архив с корневой файловой системой (rootfs.tar.gz), которые можно записать на подготовленную SD-карту и использовать на Raspberry Pi:
mount /dev/sd[x]1 /media/BOOT
mount /dev/sd[x]2 /media/rootfs
tar -zxvf boot.tar.gz -C /media/BOOT
sudo tar -zxvf rootfs.tar.gz -C /media/rootfs
Важно, чтобы при распаковке на SD-карту архива с корневой файловой системой у вас были права пользователя root, иначе при загрузке возможны проблемы
На SD-карте должно быть два раздела — FAT32 для загрузчика и ядра и ext для корневой файловой системы.
Подготовить карту можно скриптом mkcard (http://downloads.angstrom-distribution.org/demo/beagleboard/mkcard.txt):
$ chmod +x mkcard.txt //делаем скаченный скрипт исполняемым
$ ./mkcard.txt /dev/sdx //где x - буква, соответствующая SD-карте. Это можно выяснить,вставив карту и выполнив команду dmesg | tail. В выводе должна содержаться информация об обнаруженном устройстве. Моя монтируется как sdc
После подготовки SD-карты и записи на неё загрузчика и корневой файловой системы, её можно использовать в Raspberry Pi. Логин/пароль для входа после загрузки: root/root
В папке $BSQUASK_DIR/host содержатся все необходимые инструменты для кросс-компиляции. Чтобы воспользоваться arm компилятором нужно добавить папку $BSQUASK_DIR/host/usr/bin в переменную окружения PATH: export PATH=$BSQUASK_HOST_DIR/usr/bin:$PATH
Теперь пробуем скомпилировать простое приложение на С для Raspberry Pi. Исходный код программы hello.c:
#include  'stdio.h'
 int main()
 {
  printf ("Hello World!n");
  return 0;
}
Компилируем: arm-raspberrypi-linux-gnueabi-gcc -o hello_app hello.c
Получившийся файл hello_app можно скопировать на Raspberry Pi и запустить
Аналогично можно компилировать и Qt приложения:
$BSQUASK_DIR/host/usr/bin/qmake yourproject.pro
make
В BSQUASK включена 5-ая версия Qt. Несмотря на то, что разработчиками Qt было заявлено, что она полностью совместима с 4-ой, на практике всё не так гладко. Так например из Qt5 модуль Phonon был полностью выпилен и заменён на QtMultimedia. Наверняка и ещё где есть несовместимости. Рассмотрим, как создать новый профиль в Qt Creator’е для создания Qt приложения для Raspberry Pi. Потребуется последняя версия Qt Creator’а (у меня стоит 2.6.1). http://qt.digia.com/Product/Developer-Tools/
1. В верхнем меню: Инструменты->Параметры. В левой колонке выбираем «Сборка и запуск», в правой колонке вкладка «Профили Qt», нажимаем добавить, указываем путь до qmake. Либо «$BSQUASK_DIR/host/usr/bin/qmake», либо «$BSQUASK_DIR/build/qtbase-5.0.0/bin/qmake»
2. Переходим во вкладку «Инструментарии», добавляем новый. Название: Raspberry, sysroot: BSQUASK_DIR/host/usr/arm-unknown-linux-gnueabi/sysroot, профиль Qt — выбрать тот, который был создан в шаге 1.
После этого приложения Qt для Raspberry Pi можно будет компилировать прямо в QtCreator’е. Для этого в нижнем левом углу нужно нажать на картинку с компьютером и выбрать профиль Raspberry
Приложения Qt, скомпилированные данным способом мне удалось запустить только в дистрибутиве, собранном Buildroot’ом. О том, как сделать так, чтобы работало и в Raspbian’e напишу в ближайшее время
How do I compile an app I made in Qt Creator to my Raspberry Pi?
Here’s my current setup: Qt Creator 2.4.1 running on Windows 7. I’m using MinGW for windows development, and Yagarto is installed as the Linux cross-compiler. Under the Qt Creator options, under Linux Devices, I have set up the Pi (at this point, Qt Creator sees the Pi with no problems when I press Test).
Here’s my problem: I don’t know how to get the Pi as a build target. I believe I have to set up the cross-compiler under Build & Run -> Tools. I’ve manually added the Yagarto executable here, but that hasn’t gotten me a build target, or allowed me to compile anything for the Pi.
The documentation for Qt hasn’t helped me, and the majority of what I find online about compiling for the Pi, or about deploying to general Linux systems, deploying from Linux to Linux, or from Linux to Windows. What I need is Windows to Linux.
Notes: I’m not married to any particular compiler or tool-chain, so feel free to give me your recommendations. Also, I’m a complete beginner (and with Linux, I’m less than a beginner). Really I’m just hacking around, trying to familiarize myself with the Pi/Linux, and developing for it. One thing I’ve read is «set up a virtual machine and develop on Linux,» but I’d like to avoid that if possible.
Thanks in advance.
EDIT: NEW INFORMATION
After doing some research, I now realize that I need to compile Qt from source for the Linux/ARM architecture before I do anything else.
I found this question on StackOverflow, which led me to this blog post. Following these instructions has enabled me to use ‘configure’ to create the makefile with no problems. However, when I use jom to build qt, it builds for about 5 minutes, and then exits with the following errors at the command line:
jom: C:qt-pisrccoreLibMakefile [....liblibQtCore4.dll] Error 1
jom: C:qt-pisrccoreLibMakefile [all] Error 2
jom: C:qt-piMakefile [sub-sorelib-make_default-ordered] Error 2
jom: C:qt-piMakefile [all] Error 2
Anybody have any ideas?
I’m using MSVC2010 as the host compiler, building for arm-none-linux-gnueabi-g++. Sourcery Codebench Lite is installed as the cross compiler. Perl is installed. Finally, I do run the vcvarsall.bat file from the MSVC2010 directory before I do anything.
EDIT: REALIZATION
I just realized that where I’m at now with this is probably more appropriate for StackOverflow than here, so I’ve posed this question on that side. If anyone reading this has any ideas, though, please post your answers here. Also, if I ever figure this out, I’ll post the solution here, too.
Introduction
This article will walk you through all the steps needed to cross compile Qt 5 code for the Raspberry Pi 3 using Linux. Once we have finished, you will be able to write code with Qt as you normally would, and then when you’re ready to build for the Pi, just select it as a build option and compile for the Pi!
The steps that we will cover are:
- Install Raspberry Pi OS (Buster) onto an SD card for the Raspberry Pi, and get it ready for development.
- Install all software and tools needed in a Linux Virtual Machine (VM).
- Create a sysroot folder in the Linux virtual machine, which we will use to synchronize the Qt libraries we will build onto the Pi.
- Build Qt from source, and any Qt modules we might need.
- Copy the Qt libraries over to the Pi.
- Build a Qt example, and deploy and run it on the Pi!
Quick links:
Linux Virtual Machine
Raspberry Pi installation
Update and configure the Pi
Synchronize the Pi and the Linux VM
Install Qt 5.12.3
Build and run an example!
Building and debugging with Qt Creator
First Qt project
Prerequisites
Before we start out, there are a few things that you are going to need:
- Raspberry Pi 3 and suitable 2.1A power supply
- 16 or 32GB micro SD card
- A computer with an SD card read or USB SD card reader — any OS will do
- Internet connection
- Ideally Ethernet network between Pi and and PC, WiFi will do but is slower
- Around 3 hours
- Linux VM to install Qt and the required software in — LUbuntu 18.04 alternate used here and recommended
Prepare the Raspberry Pi SD card
You will need to download the latest Raspberry Pi OS image from the Raspberry Pi website, available here: https://www.raspberrypi.org/downloads/raspberry-pi-os/
I recommend the medium sized image: “Raspberry Pi OS (32-bit) with desktop”. Direct download link: https://downloads.raspberrypi.org/raspios_armhf_latest
You will also need to download Balena Etcher to burn the image to the SD card, available here: https://www.balena.io/etcher/
Once you have the image downloaded, and Etcher installed, open Etcher, and open the Raspberry Pi image, and burn it to the SD card.
Open Etcher:

Click «Flash from file» and select the Raspberry Pi Image:

Click «Select target» and choose your SD card:

Click «Flash!» and wait for it to burn to the SD card:

Linux Virtual Machine
You will need a fresh Linux virtual machine for the development. If you already use Linux, you can install the tools and Qt on your normal machine, but I would recommend against this unless you are sure. If anything goes wrong with the installation, you can delete the Linux VM, and start again. Issues can also crop up due to conflicts with software you already have installed. For these reasons it is best to use a VM. I would recommend Ubuntu 18.04, or best LUbuntu 18.04, as it is lightweight and flexible. The “Alternate” download image is best, as it has the least extra software that won’t be needed, and saves some space and download time. It can be downloaded here: https://lubuntu.me/downloads/
Direct download of the image: https://cdimage.ubuntu.com/lubuntu/releases/18.04/release/lubuntu-18.04-alternate-amd64.iso
If you do not already have a virtual machine host installed, Oracle’s VirtualBox works well and is free, available here: https://www.virtualbox.org/wiki/Downloads
Once you have a virtual host installed, such as VirtualBox or VMWare’s player, and the LUbuntu image downloaded, create a new virtual machine with the following settings:
- 60GB virtual hard drive
- 8GB RAM
- As many virtual CPU cores as you can spare, but I would recommend no more than half the number as your PCs threads, i.e. if you have 8 threads (if you have an i7), 4 vCPU’s is a good choice. Make a note of how many vCPU’s you allocated, it will be needed later.
Install LUbuntu using the installation menu. Once installed, open up a terminal by clicking on the bottom left menu icon > System Tools > LXTerminal.

Run the following command — note: each line is a separate command:
sudo apt update && sudo apt full-upgrade -y
You will be prompted for your user password, type it into the terminal and then press enter. Then run:
sudo apt install openssh-server net-tools -y
The following command installs the VM tools, needed if you are running in a virtual machine, with VMWare or VirtualBox:
sudo apt install open-vm-tools -y
Reboot the virtual machine. From this point on, it may be easier to SSH into the virtual machine for the rest of the commands, but this is not required. If you are able to copy and paste from your host machine into the virtual machine, you can skip this step. To SSH into the virtual machine, from Linux or MacOS, run the following command from a terminal:
ssh <VM username>@<VM IP address>
Follow the onscreen instructions
The IP address of the virtual machine can be found by running the command “ifconfig” from a terminal.

Raspberry Pi installation
Now that we have the Linux virtual machine ready, we can prepare the Raspberry Pi, although this can be done in parallel to installing the Linux VM to save time. Once the Raspberry Pi image has been burned to the SD card, put the SD card into the Raspberry Pi, connect it to a monitor, keyboard, mouse, and an Ethernet connection. Then connect the Pi to a suitable power supply. The official Raspberry Pi power supply is recommended for this.
On initial boot up, the Pi will resize the disk image to use the full SD card space, and so it may reboot, this is normal, just give it a few minutes. Once the Pi has booted up, you should see the following screen:
In the welcome window, click “Next”.

Select your country and timezone, and click “Next”.

Choose a password for your Pi. I used “pidev” as it’s easy to remember, and you will be typing it in a lot! Enter this password and click “Next”. Please use a secure password if this is for production or deployment!

If you see a black border around the monitor, check the tickbox and then click “Next”, otherwise just click “Next”.

If you are using WiFi, connect to your WiFi network. Note, you will need to be on the same network as the Linux VM, or rather the Linux VM has to be able to reach the Pi, and Pi needs to reach the Internet. Ethernet is definitely preferable, as there will be a lot of files to transfer. If you are using Ethernet, click “Skip”, otherwise connect and then click “Next”.

Click “Next” to update the software on the Pi.

Once the update has finished, it should say «Up to date», if not, there may be an issue with your internet connection.

Once done, click “Restart”.

Once the Pi has restarted, open the “Raspberry Pi Configuration” menu, by clicking on the Raspberry Pi icon in the top left, then “Preferences”, then “Raspberry Pi Configuration”. Click on the “Interfaces” tab, and click the “Enabled” radio button next the to the SSH line, and then click “OK”.

Make a note of the IP address of the Pi, by hovering over the network icon in the top left (WiFi symbol or two arrows if using Ethernet) [Pi IP image]. You now won’t need physical access to the Pi for a while.

Update and configure the Pi
Now that the Pi is setup, and SSH is enabled, SSH into the Raspberry Pi. This can be done from Linux or MacOS by running the following command from a terminal:
ssh pi@<PI IP address>
You may be connecting with SSH into the Pi quite a bit, so you may wish to enable key based login without a password. Todo this, run the following command to authorize you with the Pi:
ssh-copy-id pi@<PI IP address>
If you get the error that no hosts are found, run the following:
ssh-keygen
Then you can SSH into the Pi without typing out the password.
The first time you SSH into the Pi, you will be prompted to accept the host for security, type “yes” and then press enter.

You will then be prompted for the password for the Pi, enter the password and press enter.

Now you should be connected to the Pi via SSH. The prompt should change to say:
pi@raspberrypi

Now that we have remote access to the Pi, we need to enable the source repository for apt. To do this, run the following command:
[ Raspberry Pi ]
sudo nano /etc/apt/sources.list
Move the cursor to after the ‘#’ on the third line, and use backspace to delete the ‘#’, enabling the

Quit and save the changes, by pressing control + ‘y’.

Confirm the file name by pressing enter.

Now we need to update following that change, by running the following command:
sudo apt update && sudo apt full-upgrade -y && sudo apt autoremove -y
Reboot the Pi, with: Note — if no updates were installed in the above step you can skip this reboot.
sudo reboot
Wait for the Pi to boot back up by SSHing back into the Pi (re run the following command or press up in your terminal and then enter.
ssh pi@<PI IP address>
We need to install various Qt and graphics libraries for building Qt code for the Pi.
Run the following commands:
[ Raspberry Pi ]
sudo apt build-dep qt4-x11 -y

sudo apt build-dep libqt5gui5 -y

sudo apt install -y libudev-dev libinput-dev libts-dev libxcb-xinerama0-dev libxcb-xinerama0

sudo mkdir /usr/local/qt5pi

sudo chown pi:pi /usr/local/qt5pi

sudo rpi-update
Press ‘y’ when prompted.
sudo reboot
Synchronize the Pi and the Linux VM
Now that the Pi has been updated, and had those libraries installed, we need to synchronize the Linux development VM with the Pi. We will be creating the directory «raspi» in the home directory to hold the development tools and the sysroot that will be created, to mirror files from the Pi.
First we need terminal access in the Linux VM. Either open a terminal in the VM or SSH into it if you prefer with the following: note to change the user and IP address
ssh <dev user>@<dev VM>
As before, you can enable key based authentication Todo this, run the following command to authorize you with the VMi:
ssh-copy-id <VM user>@<VM IP address>
If you get the error that no hosts are found, run the following:
ssh-keygen
Then you can SSH into the VM without typing out the password.
Once you have a shell (terminal or SSH) into the VM, we want to get the Raspberry Pi tools, create our sysroot, and synchronize it with the Pi.
[ Dev VM ]
sudo apt update && sudo apt full-upgrade -y && sudo apt autoremove -y

mkdir ~/raspi && cd ~/raspi

sudo apt install git python python3 -y

git clone https://github.com/raspberrypi/tools

mkdir sysroot sysroot/usr sysroot/opt
(Replace pi@<pi IP> with IP or local hostname)
export PI_IP=<pi IP>
ssh-keygen
(press enter when prompted — three times)
ssh-copy-id pi@$PI_IP
When prompted, enter «yes» then enter, and enter the password for the Pi.
rsync -avz pi@$PI_IP:/lib sysroot

rsync -avz pi@$PI_IP:/usr/include sysroot/usr

rsync -avz pi@$PI_IP:/usr/lib sysroot/usr

rsync -avz pi@$PI_IP:/opt/vc sysroot/opt
Note: If you didn’t run ssh-copy-id, you will need to enter the Pi’s password for each command. There may be one or two errors, due to symbolic links and such, this won’t matter.
We need to get a script to fix some of the symbolic links to allow us to use the files we just copied across. Luckily there is a great script provided by Kukkimonsuta:
wget https://raw.githubusercontent.com/Kukkimonsuta/rpi-buildqt/master/scripts/utils/sysroot-relativelinks.py

chmod +x sysroot-relativelinks.py

./sysroot-relativelinks.py sysroot
Install Qt 5.12.3
Now we need to install Qt in the VM. We will be using 5.12.3. This is not the latest release, but I have found later releases do not work correctly. Check this space! I’ll be updating this article or creating a new one with other versions of Qt that work. Before installing Qt, we need to install some libraries and utilities that will be used later. Run the following:
[ Dev VM ]
sudo apt install -y libgl1-mesa-dev libglu1-mesa-dev mesa-common-dev libxkbcommon-x11-0

sudo apt-get install -y lib32z1

sudo apt-get install -y libxcb-xinerama0-dev

sudo apt-get install -y flex bison gperf libicu-dev libxslt-dev ruby

sudo apt-get install -y libssl-dev libxcursor-dev libxcomposite-dev libxdamage-dev libxrandr-dev libfontconfig1-dev libcap-dev libxtst-dev libpulse-dev libudev-dev libpci-dev libnss3-dev libasound2-dev libxss-dev libegl1-mesa-dev gperf bison
Now we need to get the Qt installer. The easiest way is to use commands below, but you can go to their website and get it. Be sure to get the 5.12.3 version.
Download installer for Qt 5.12.3:
cd ~/Downloads

wget http://download.qt.io/official_releases/qt/5.12/5.12.3/qt-opensource-linux-x64-5.12.3.run

chmod +x qt-opensource-linux-x64-5.12.3.run
Note when you run the installer you will have to create an account and log in. Qt, if you’re listening, this is bad! We just want to write code! Anyway… Go through the installer, and make sure you enable these exact options, you can add other modules if you want them.

Carry on through the installer. At the last page untick the option to launch Qt Creator now, we have more to do.
Go back to your shell into the VM, either with a terminal or SSH, and run the following to download the source code for Qt to build for the Pi, we’re getting there!
[ Dev VM ]
cd ~/raspi

git clone git://code.qt.io/qt/qtbase.git -b 5.12.3
This may take a little while depending on your internet connection. Once done, we need to fix a broken mkspec for the Pi, annoying but straight forward. The easiest way is to just replace the file with the following. Or you can edit the file with nano, and make the changes yourself.
git clone https://github.com/LangtonsAnt/Qt5.12.3-RPi3-mkspec.git

cp Qt5.12.3-RPi3-mkspec/qmake.conf qtbase/mkspecs/devices/linux-rasp-pi3-g++/

cd qtbase
Now we’re getting the fun stuff. The next command will configure Qt ready for building. It’s a big old command, but don’t worry. It will take around 5 — 10 minutes.
./configure -release -egl -opengl es2 -device linux-rasp-pi3-g++ -device-option CROSS_COMPILE=~/raspi/tools/arm-bcm2708/gcc-linaro-arm-linux-gnueabihf-raspbian-x64/bin/arm-linux-gnueabihf- -sysroot ~/raspi/sysroot -opensource -confirm-license -make libs -prefix /usr/local/qt5pi -extprefix ~/raspi/qt5pi -hostprefix ~/raspi/qt5 -v -no-use-gold-linker
Once it finishes, look at the output carefully. Make sure there are no errors. If there are, you can use the following the reset the qtbase directory:
git clean -dfx
Note this will keep the changes you made to the makespec.
Now we can build Qt! This will build qmake, and all needed libraries as binaries, for the Raspberry Pi! This could take a while based on your hardware…
sudo make -j<VM vCPU count>
We need to use sudo, because we’re modifying files from the Pi. Now we need to install our newly built libraries into our sysroot for the Pi. Do that with the following:
sudo make install
Now to copy across those libraries to the Pi:
cd ..

rsync -avz qt5pi pi@$PI_IP:/usr/local
Now we need to let the Pi know about these new libraries. Open an SSH into the Pi, with:
ssh pi@<PI IP address>
[ Raspberry Pi ]
echo /usr/local/qt5pi/lib | sudo tee /etc/ld.so.conf.d/qt5pi.conf

sudo ldconfig
Build and run an example!
If all went well, we should now be able to build code for the Pi!
Let try out the analogue clock example included with Qt. Feel free to try any other example with the same method. Open a shell into the Linux development VM and run:
[ Dev VM ]
cd ~/Qt5.12.3/Examples/Qt-5.12.3/gui/analogclock/

~/raspi/qt5/bin/qmake

make -j<vCPU count>

scp analogclock pi@$PI_IP:~
On the Raspberry Pi, from the desktop open the home folder, and run the «analogcock» program, to check it works. If it did, congratulations! You can now cross compile for the Pi!
For certain programs, you may need extra modules. These are available here: https://code.qt.io/cgit/qt/
To build and include these modules in our sysroot, do the following, in this example QtSVG is used:
SSH into the development VM:
[ Dev VM ]
cd ~/raspi

git clone git://code.qt.io/qt/qtsvg.git -b 5.12.3

cd qtsvg

~/raspi/qt5/bin/qmake

sudo make -j<vCPU count>

sudo make install

cd ..

rsync -avz qt5pi pi@$PI_IP:/usr/local
Other modules can be used, just make sure to specify the 5.12.3 branch, with the -b flag to git. Once you have checked out, built, and installed the modules you want, copy them across to the Pi with the following:
rsync -avz qt5pi pi@$PI_IP:/usr/local
You may also need to refresh the list of libraries available on the Pi, by running the following from a shell into the Pi, with SSH for example:
[ Raspberry Pi ]
rsync -avz qt5pi pi@$PI_IP:/usr/local
Building and debugging with Qt Creator
Being able to build code and copy it across to the Pi with scp may be all you need, but if you’re developing on the Pi you will want to add a kit in Qt to remotely upload compiled code to the Pi, and remotely debug!
First we need to install gdb-multiarch on the Linux VM, so we can debug the binaries. Run the following in the VM:
[ Dev VM ]
sudo apt install -y gdb-multiarch
Now we need the debug server to be running on the Raspberry Pi, install with:
[ Raspberry Pi ]
sudo apt install -y gdbserver
With those installed, now to configure Qt. Open Qt Creator, and open the options dialog, by clicking on «Tools» in the top menu, and then «Options…». Select «Devices» in the left side panel. Select the «Devices» tab, and click «Add…». Select «Generic Linux Device», and then click «Start Wizard».

Enter a descriptive name for your Pi, such as “Dev Pi 3″. Enter the IP address of the Pi, and the username, usually «pi». Note, you will probably want to set your Pi to have a static IP address, or better yet, in your router issue a static DHCP lease and IP address for the Pi.
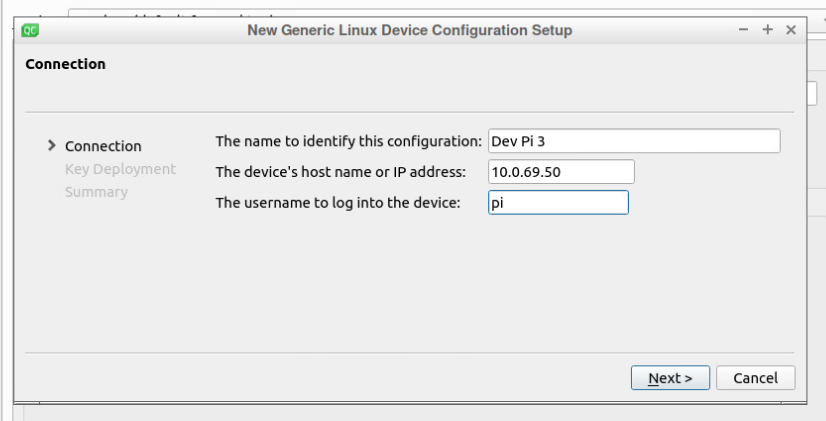
Your key should be automatically detected, if not select it with the «Browse…» button. If no key is detected, this is likely because one hasn’t been generated. This can be solved by running ssh-keygen from a terminal, into the Linux VM. You may also need to run:
ssh-copy-id pi@<PI IP address>
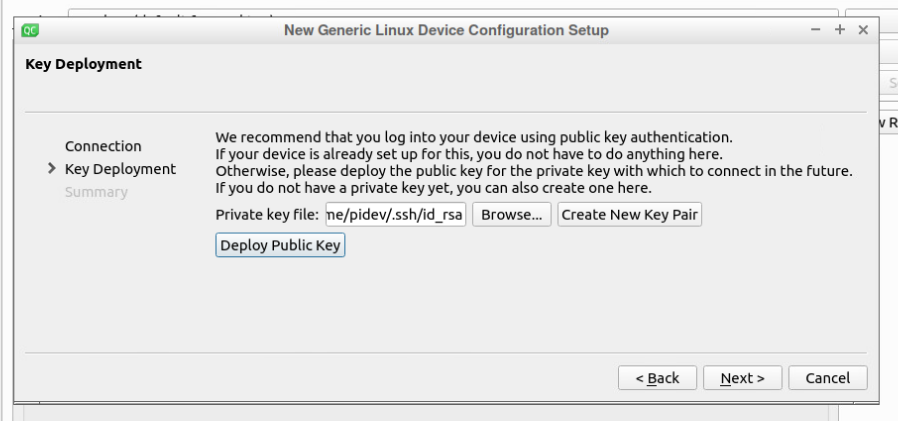
Click «Next», and Qt will test the connection with your Pi.
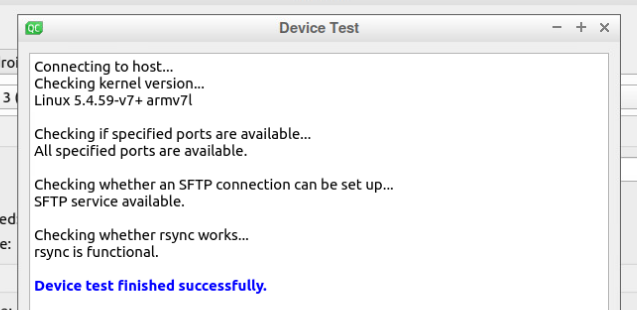
Now your device is configured, it should something like this.
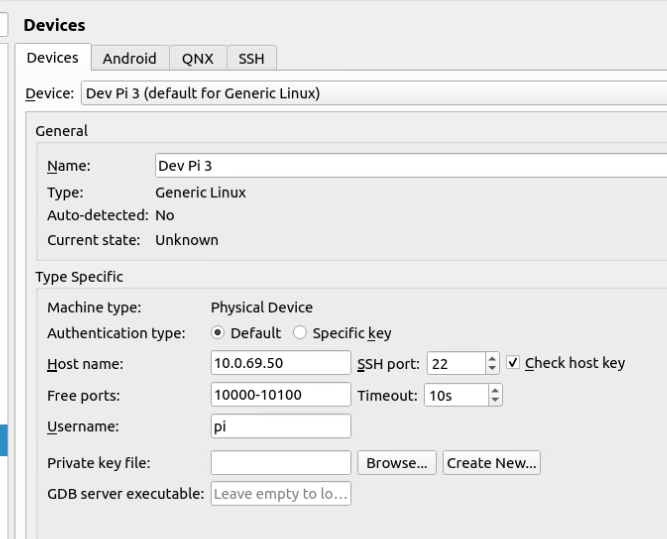
Now the device is configured, we need to set Qt Creator up with a kit. From the options windows, go to the «Kits» menu, in the left side bar. Select the «Qt Versions» tab, click “Add…”. Click the “Browse…” button below and navigate to:
/home/pidev/raspi/qt5/bin/qmake
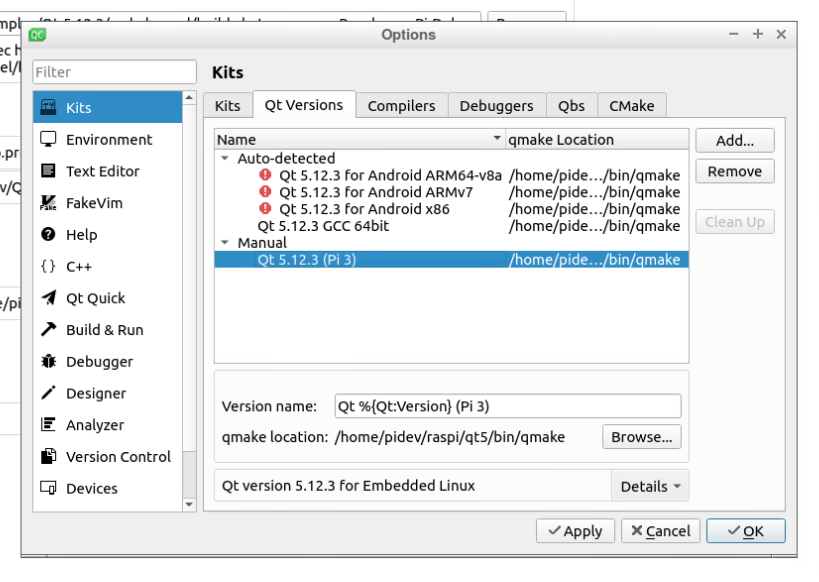
Click «Apply» to save the changes. Next, go to the «Compilers» tab. Click “Add” GCC > C. Change the name to “Pi 3 GCC”. Click “Browse…”, navigate to:
/home/pidev/raspi/tools/arm-bcm2708/gcc-linaro-arm-linux-gnueabihf-raspbian-x64/bin/arm-linux-gnueabihf-gcc
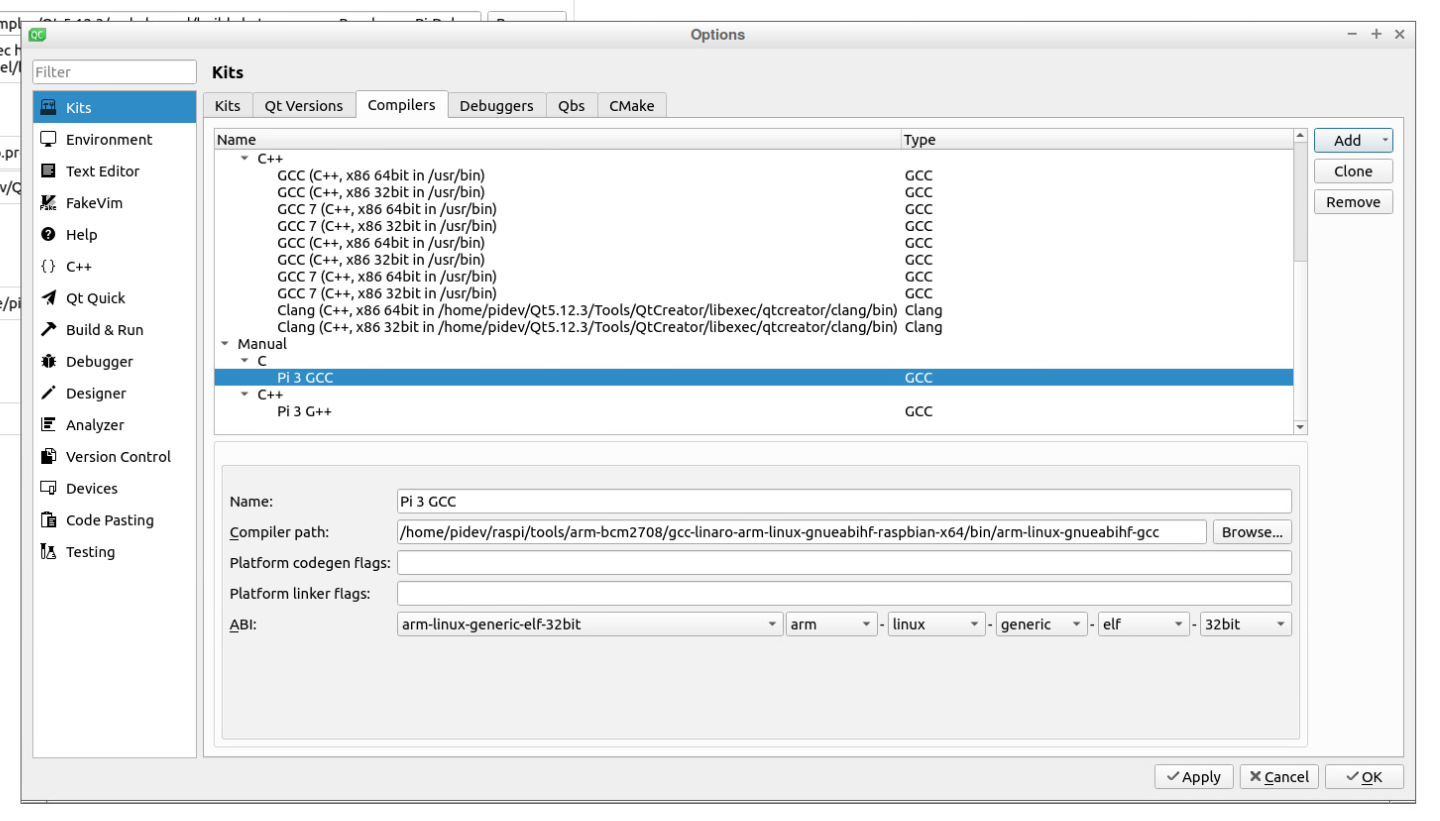
To add the C++ compiler: Click “Add” GCC > C++. Change the name to “Pi 3 GCC”. Click “Browse…”, navigate to:
/home/pidev/raspi/tools/arm-bcm2708/gcc-linaro-arm-linux-gnueabihf-raspbian-x64/bin/arm-linux-gnueabihf-g++
Click «Apply» to save the changes.

Now go to the Debuggers tab. Click «Add». Set the name to «GDB Multiarch». Click browse, and navigate to the following:
/usr/bin/gdb-multiarch
Click «Apply» to save the changes.

Finally to build the kit. Goto “Kits” tab. Click “Add”. Set the name something descriptive, such as: “RPi 3 Qt %{Qt::Version}”. %{Qt::Version} will print the selected Qt version. Set «Device Type» to «Generic Linux Device». Select the «Device» we created earlier. Set «Sysroot» to «/home/pidev/raspi/sysroot». For C and C++ compilers, choose the ones we created earlier. Set «Debugger» to «GBD Multiarch». Set the «Qt mkspec» to: «/home/pidev/raspi/qtbase/mkspecs/devices/linux-rasp-pi3-g++/». Note: you may have to change the username from «pidev». Once you have filled out the kit, click «OK».

First Qt project
Now to create our own example project and remotely debug it!
In Qt Creator, create a new project by pressing control + n or by going to the «File» menu (top left), then «New File or Project…». Select «Applications» under the «Projects», then «Qt Console Application», and click «Next».
Choose a name for the project, and a directory to create the project in. It might be best to create a directory, such as QtProjects.
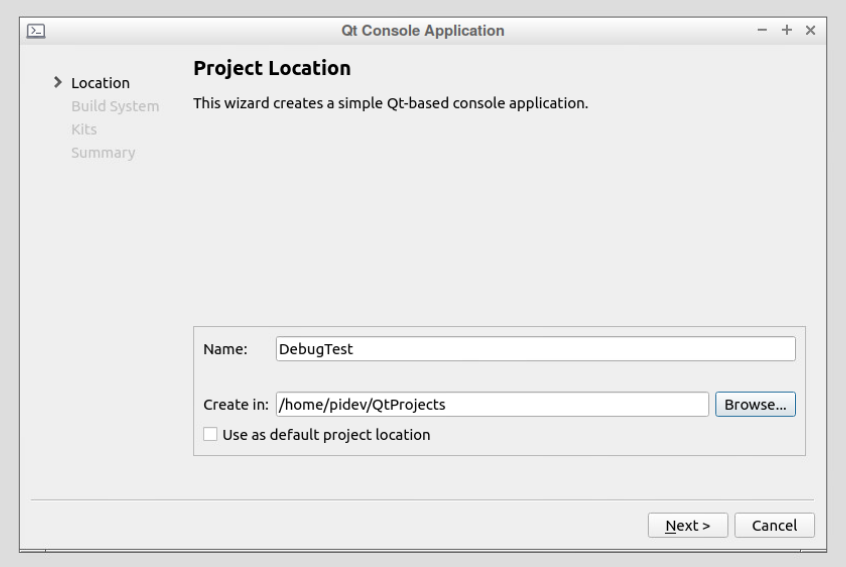
Select The Raspberry Pi kit we created earlier, and also the Desktop Kit, as this can be useful to troubleshoot.
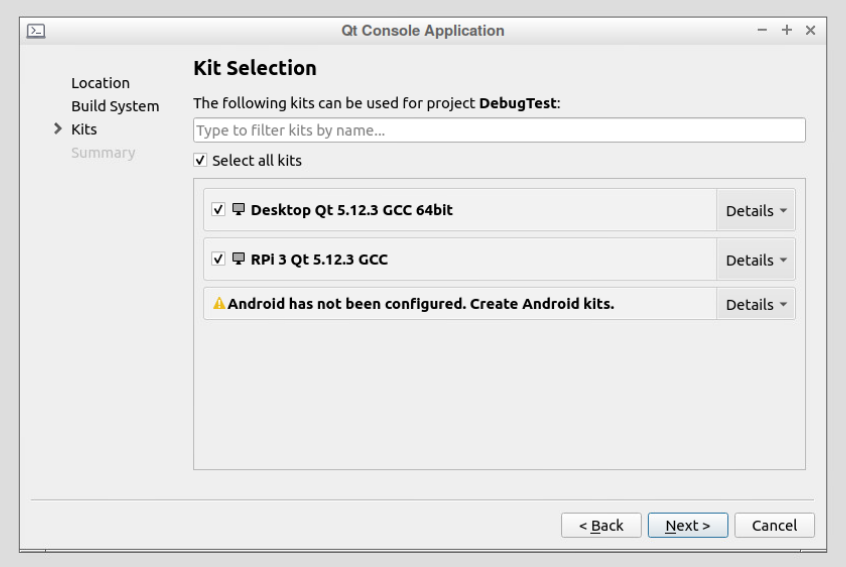
Click «Finish».
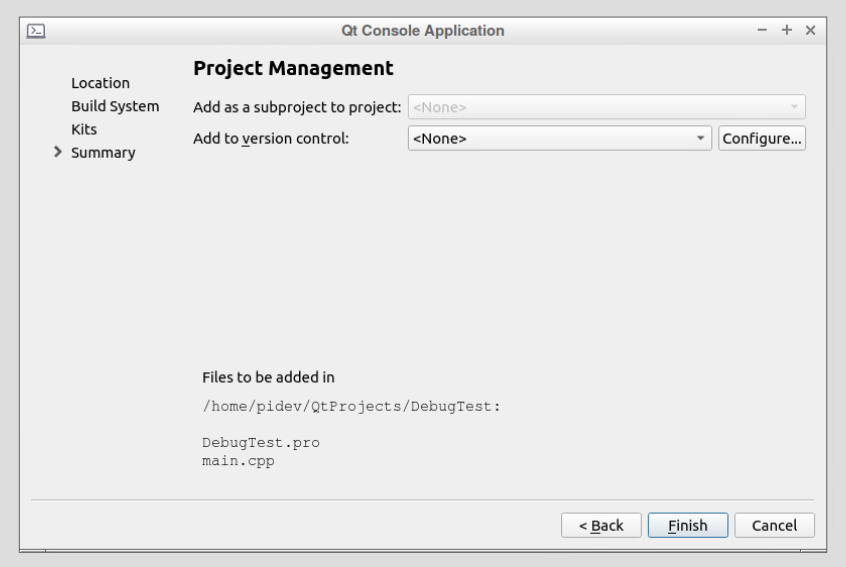
Now that the project is created, we need to make a change to the project file to specify where to upload the binary on the Pi. This is because the default location, /tmp, requires root privalages to upload to. We could SSH as root, but this is not advisable. I like to upload to a folder in the home directory or Desktop, making it easier to find from the Pi.
Open the .pro project file in the left bar by double clicking on it, and change the lines to match:
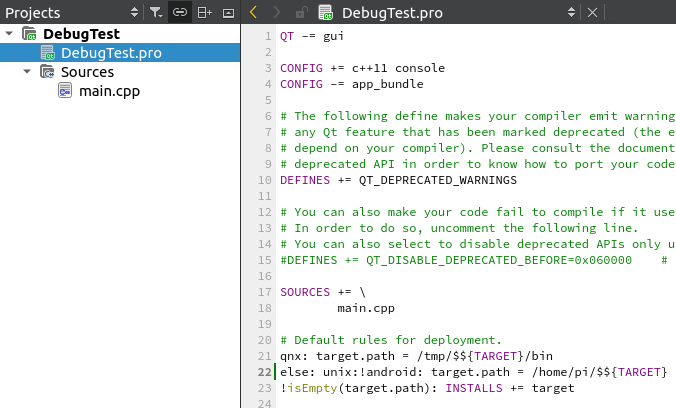
Save the changes by pressing control + s.
Now for some code to debug. Open main.cpp, highlight all the code and delete it (control + a, then backspace). Copy and paste the following code, or modify the code already there to match.
#include <QCoreApplication>

#include <QDebug>
int main(int argc, char *argv[])
{
QCoreApplication a(argc, argv);
qDebug("Hello, world!");
qDebug("Hello again!");
int myInt = 0;
++myInt;
myInt += 5;
return a.exec();
}
Click to add a breakpoint in the left margin, while the line numbers are. Add a breakpoint between the two qDebug statements. This should leave a red circle on line 9 in the margin. Add another breakpoint on line 11, as below, just before declaring «myInt». This code will print out the text in the qDebug statements, and modify myInt. By using the debugger, we can single step through the code, and see «myInt» changing each step, with the code running remotely on the Pi!
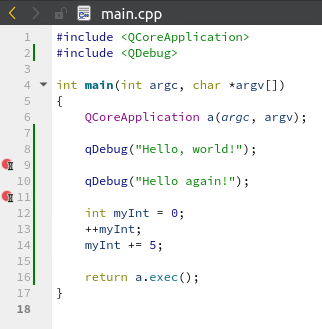
Now that we have our code and breakpoints, from the far left side bar, click on the PC icon, Select the Raspberry Pi kit, and the «debug» build option. This will enable building for the Pi, and enable the use of the debugger.
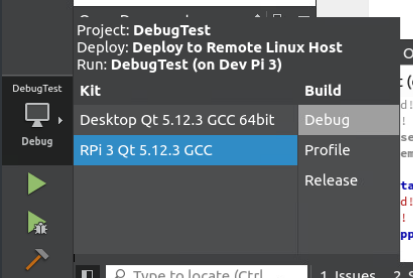
Click on the lower run button to start the debug session. This will build the code, and upload it to the Pi.
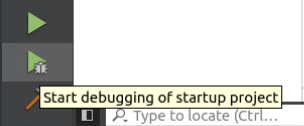
The code should run up to the first breakpoint, at which point it will break execution. The «Application Output» tab should show the first debug statement, «Hello, world!».
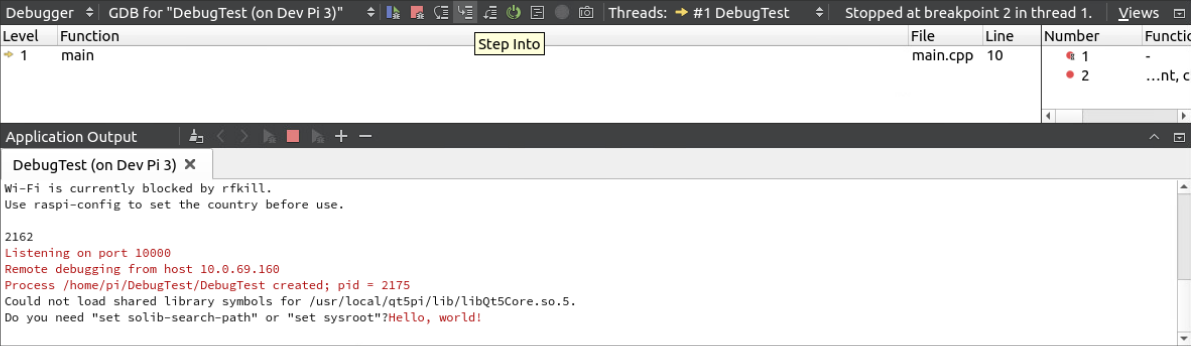
In the middle of the debug bar, click the «Step Into» button, until the next debug statement appears. If you keep pressing «Step Into», you will see the variable myInt changing in the right side bar, where variables can be inspected.
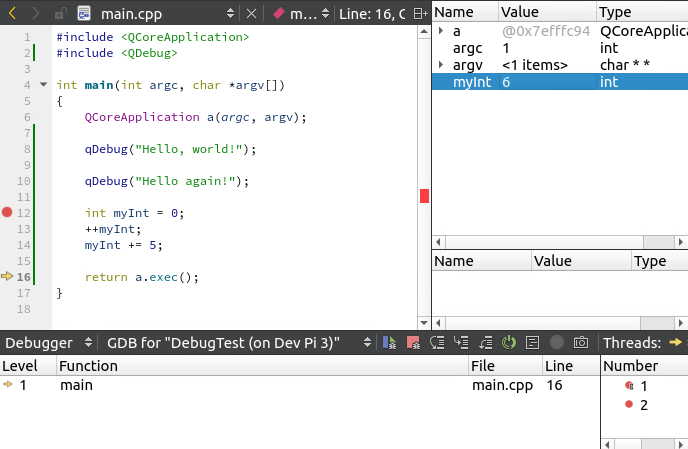
Congratulations! You can now remotely debug programs on the Pi, from your desktop!
If you had any issues please leave a comment below, and I will try to help, and update this guide. Happy programming!