This document will assist with silently installing NetApp Data ONTAP DSM for Windows MPIO v4.1. These processes should be performed in the following order:
1) HOWTO: Silent Installation for NetApp Data ONTAP DSM for Windows MPIO v4.1
2) HOWTO: Silent Installation for NetApp Windows Host Utilities 6.0.2
3) HOWTO: Silent Installation for NetApp SnapDrive for Windows v7.0.3
4) HOWTO: Verify NetApp SnapDrive for Windows 7.0.3 Installations were successful
The following pre-requisites and requirements are assumed:
· ntap_win_mpio_4.1P1_setup_x64.msi and/or ntap_win_mpio_4.1P1_setup_x86.msi downloads from the NetApp NOW site
o NOTE: NO testing has been done for 32 bit OS, and no provisions exist in the current batch file. It is assumed that you are on an actual modern server OS, and it is x64. If not… perform the installation manually.
· 215-08396_A0 – Installation and Administration Guide.pdf from NetApp NOW site
· As this was intended for UPGRADES of systems with at least SnapDrive for Windows, we are assuming that the .NET 3.5 pre-requisite has been met. Additional work will be required in order to provide the error checking and installation processes for .NET 3.5, as each OS has a slightly different method of doing so. I’d recommend creating a standardized “INSTALL_DOTNET_35.BAT” that could be called by any other installation that requires it, to keep the process modular.
· The following Windows HotFixes:
I:INSTALLSNETAPPData ONTAP DSM for Windows v4.1WINDOWS_HOTFIXES2008Windows6.0-KB2684681-x64.msu
I:INSTALLSNETAPPData ONTAP DSM for Windows v4.1WINDOWS_HOTFIXES2008Windows6.0-KB2754704-x64.msu
I:INSTALLSNETAPPData ONTAP DSM for Windows v4.1WINDOWS_HOTFIXES2008R2Windows6.1-KB2520235-x64.msu
I:INSTALLSNETAPPData ONTAP DSM for Windows v4.1WINDOWS_HOTFIXES2008R2Windows6.1-KB2528357-v2-x64.msu
I:INSTALLSNETAPPData ONTAP DSM for Windows v4.1WINDOWS_HOTFIXES2008R2Windows6.1-KB2684681-x64.msu
I:INSTALLSNETAPPData ONTAP DSM for Windows v4.1WINDOWS_HOTFIXES2008R2Windows6.1-KB2754704-x64.msu
I:INSTALLSNETAPPData ONTAP DSM for Windows v4.1WINDOWS_HOTFIXES2008R2Windows6.1-KB979711-x64.msu
I:INSTALLSNETAPPData ONTAP DSM for Windows v4.1WINDOWS_HOTFIXES2008R2SP1Windows6.1-KB2528357-v2-x64.msu
I:INSTALLSNETAPPData ONTAP DSM for Windows v4.1WINDOWS_HOTFIXES2008R2SP1Windows6.1-KB2684681-x64.msu
I:INSTALLSNETAPPData ONTAP DSM for Windows v4.1WINDOWS_HOTFIXES2008R2SP1Windows6.1-KB2754704-x64.msu
I:INSTALLSNETAPPData ONTAP DSM for Windows v4.1WINDOWS_HOTFIXES2008SP2Windows6.0-KB2684681-x64.msu
I:INSTALLSNETAPPData ONTAP DSM for Windows v4.1WINDOWS_HOTFIXES2008SP2Windows6.0-KB2754704-x64.msu
I:INSTALLSNETAPPData ONTAP DSM for Windows v4.1WINDOWS_HOTFIXES2008SP2Windows6.0-KB968675-x64.msu
I:INSTALLSNETAPPData ONTAP DSM for Windows v4.1WINDOWS_HOTFIXES2012Windows8-RT-KB2796995-x64.msu
o NOTE: the Folder path for the HotFixes from Microsoft MUST be:
§ IN the installation folder
§ IN a folder called “WINDOWS_HOTFIXES”
§ IN folders based on OS of 2008, 2008SP2, 2008R2, 2008R2SP1, 2012 (there are no 2012R2 hotfixes required)
o Links to obtain the hotfixes are located in the Administration Guide, on Page 56. Links will have a HF # only, eg: “2796995”. These links may include downloads for multiple OS’s (eg: Vista/Windows 7 – equal to 2008 and 2008 R2), and each must be downloaded and located separately. These hotfixes will unfortunately be named such as “457359_intl_x64_zip.exe” for KB2796995. This is unfortunate as it is near impossible to correlate the versions and the files. I would recommend saving the files as “KB2796995-457359_intl_x64_zip.exe” with the KB######## as the prefix. Upon downloading, UNZIP the files in the same folder/folder structure, and you will note the final output of “Windows8-RT-KB2796995.msu”. You will quickly be able to tell if you have only downloaded one version if you see “Windows6.1” for a 2008 file and “Windows6.0 for a 2008R2” file, etc.
· You are installing as “Local System” account vs a named service account – there is no interaction with the NetApp Filer, so there is no functional reason to use a named service account
· You have been given the MPIO-WIN 14 digit product key from the NetApp NOW Licencing portal.
The general process in the installation batch file is:
· LOG output is in the PRODUCT_FOLDER as %BATCH%.LOG
· MSI LOG is to %TEMP% as %BATCH%.LOG, and is NOT cleaned up after installation. Use for troubleshooting.
· Check if the product is already installed, using WMIC. If installed, jumps to CLEANUP
· Check for OS version to determine what hotfixes are required
· Copy hotfixes locally – they will not run properly via a UNC path as they update the system via DISM and the machine account likely has no rights to the share
· Run the installers for the hotfixes and wait for each to complete – it does not check if they are missing or already present
· Copy installation MSI locally
· Run the installer for the MSI and wait for complete
· Updates the registry with 190 second MPIO timeouts in two places
· Cleans up local files
=== INSTALL_NETAPP_DSM_MPIO_41.BAT ===
@echo off
REM
REM Enter the path to the installation folder – does not require quotes, quotes are assumed, with or without spaces – MUST not contain training «»
REM
set INSTALL_FOLDER=\netwise.caDFSINSTALLSNetAppData ONTAP DSM for Windows v4.1
set PRODUCT_NAME=Data ONTAP DSM for Windows MPIO
set LOG_FILE=»%INSTALL_FOLDER%%~n0.LOG»
ECHO. >>%LOG_FILE%
REM Obtain Licence Code and update
set LICENSECODE=XXXXXXXXXXX
:CHECK_ALREADY_INSTALLED
REM
REM Use a Product Name substring search and the exact version number. Note the double percent characters are correct
REM
wmic product where «Name like ‘%%DSM%%’ and Version like ‘4.1.4348.1209’» get Name, Version | find /i «4.1.4348.1209»
if %ERRORLEVEL%==1 goto CHECK_OS_VERSION
if %ERRORLEVEL%==0 echo %COMPUTERNAME% %DATE% %TIME% – %PRODUCT_NAME% already installed! >>%LOG_FILE%
goto CLEANUP
:CHECK_OS_VERSION
REM
REM Check for OS Version
REM
set OS_VER=0
set OS_NAME=0
for /f «tokens=1-5* delims=[] » %%A in (‘ver’) do set OS_VER=%%D
if %OS_VER%==6.3.9200 set OS_NAME=2012R2
if %OS_VER%==6.2.9200 set OS_NAME=2012
if %OS_VER%==6.0.6001 set OS_NAME=2008
if %OS_VER%==6.0.6002 set OS_NAME=2008SP2
if %OS_VER%==6.1.7600 set OS_NAME=2008R2
if %OS_VER%==6.1.7601 set OS_NAME=2008R2SP1
goto INSTALL_PREREQ_HOTFIXES
:INSTALL_PREREQ_HOTFIXES
REM
REM Will copy ALL *.MSU files locally from matching folder name to OS_NAME list above, and then install ALL *.MSU files from the local drive,
REM waiting for each to complete before continuing.
REM
ECHO %COMPUTERNAME% %DATE% %TIME% – %PRODUCT_NAME% copying pre-requisite hotfixes locally >>%LOG_FILE%
xcopy «%INSTALL_FOLDER%»WINDOWS_HOTFIXES%OS_NAME%*.msu %TEMP%DSM.INST /s /e /c /k /i /y
ECHO %COMPUTERNAME% %DATE% %TIME% – %PRODUCT_NAME% installing pre-requisite hotfixes >>%LOG_FILE%
for /f «tokens=1* delims=» %%A in (‘dir %temp%DSM.INST /b’) do start /w wusa.exe %temp%%%A /quiet /norestart
goto INSTALL_DSM_MPIO
:INSTALL_DSM_MPIO
ECHO %COMPUTERNAME% %DATE% %TIME% – %PRODUCT_NAME% copying installation files locally >>%LOG_FILE%
xcopy «%INSTALL_FOLDER%»»ntap_win_mpio_4.1P1_setup_x64.msi» %TEMP%DSM.INST /s /e /c /k /i /y
ECHO %COMPUTERNAME% %DATE% %TIME% – %PRODUCT_NAME% installing main application >>%LOG_FILE%
msiexec.exe /quiet /i»%TEMP%DSM.INSTntap_win_mpio_4.1P1_setup_x64.msi» /l*v %TEMP%%~n0.LOG LICENSECODE=%LICENSECODE% USESYSTEMACCOUNT=1 /norestart
wmic product where «Name like ‘%%DSM%%’ and Version like ‘4.1.4348.1209’» get Name, Version | find /i «4.1.4348.1209»
if %ERRORLEVEL%==1 echo %COMPUTERNAME% %DATE% %TIME% – %PRODUCT_NAME% reports as NOT INSTALLED >>%LOG_FILE%
if %ERRORLEVEL%==0 echo %COMPUTERNAME% %DATE% %TIME% – %PRODUCT_NAME% reports as INSTALLED >>%LOG_FILE%
goto CLEANUP
:CLEANUP
ECHO %COMPUTERNAME% %DATE% %TIME% – %PRODUCT_NAME% cleaning up installation files locally >>%LOG_FILE%
if exist %TEMP%DSM.INST rmdir %TEMP%DSM.INST /q /s
REM
REM Set Registry keys for both NetApp MPIO and Windows MPIO to 190 second timeouts
REM
ECHO %COMPUTERNAME% %DATE% %TIME% – %PRODUCT_NAME% updating registry with 190 second MPIO timeouts >>%LOG_FILE%
REG add HKLMSystemCurrentControlSetServicesontapdsmParameters /v PDORemovePeriod /t REG_DWORD /d 190 /f
REG add HKLMSYSTEMCurrentControlSetServicesDisk /v TimeoutValue /t REG_DWORD /d 190 /f
REG QUERY «HKLMSYSTEMCurrentControlSetControlSession Manager» /v PendingFileRenameOperations | find /i «C:»
if %ERRORLEVEL%==0 ECHO %COMPUTERNAME% %DATE% %TIME% – %PRODUCT_NAME% HAS a reboot pending… >>%LOG_FILE%
ECHO. >>%LOG_FILE%
=== INSTALL_NETAPP_DSM_MPIO_41.BAT ===
=== SAMPLE LOG OUTPUT ===
SRVDC113B 11/09/2014 16:46:13.13 – Data ONTAP DSM for Windows MPIO already installed!
SRVDC113B 11/09/2014 16:46:13.13 – Data ONTAP DSM for Windows MPIO cleaning up installation files locally
SRVDC113B 11/09/2014 16:46:13.13 – Data ONTAP DSM for Windows MPIO updating registry with 190 second MPIO timeouts
SRVD511 Thu 09/11/2014 16:49:06.95 – Data ONTAP DSM for Windows MPIO copying pre-requisite hotfixes locally
SRVD511 Thu 09/11/2014 16:49:07.08 – Data ONTAP DSM for Windows MPIO installing pre-requisite hotfixes
SRVD511 Thu 09/11/2014 16:49:07.25 – Data ONTAP DSM for Windows MPIO copying installation files locally
SRVD511 Thu 09/11/2014 16:49:07.36 – Data ONTAP DSM for Windows MPIO installing main application
SRVD511 Thu 09/11/2014 16:49:46.44 – Data ONTAP DSM for Windows MPIO reports as INSTALLED
SRVD511 Thu 09/11/2014 16:49:46.44 – Data ONTAP DSM for Windows MPIO cleaning up installation files locally
SRVD511 Thu 09/11/2014 16:49:46.45 – Data ONTAP DSM for Windows MPIO updating registry with 190 second MPIO timeouts
=== SAMPLE LOG OUTPUT ===

In this NetApp training tutorial, I will cover MultiPath Input/Output (MPIO), Device-specific Modules (DSM), NetApp Host Utilities, and Asymmetric Logical Unit Access (ALUA). These are the software utilities that allow the initiator (the SAN client) to discover and correctly use multiple paths to the storage system. Scroll down for the video and also text tutorial.
NetApp MPIO, DSM, SLM and Host Utilities Video Tutorial

[testimonial_view id=”2″]
MultiPath Input/Output (MPIO)
Let’s start with MPIO. Multipath I/O solutions use multiple physical paths between the storage system and the host. If a path fails, the MPIO system switches I/O to other paths so that hosts can still access their data. This provides load balancing and redundancy.
MPIO software is a must if you have multiple paths between a storage system and a host so that it sees all of the paths as connecting to a single virtual disk. Without MPIO the client operating system may treat each path as a separate disk. If you have configured a single LUN for a client but you see it reporting multiple identical disks then you have a multipathing configuration issue on the host itself that you need to fix.
Windows MPIO and Device Specific Module (DSM)
On a Windows system there are two main components to any MPIO solution: the Device Specific Module (DSM) and the Windows MPIO components. The MPIO software presents a single disk to the operating system for all paths, and the DSM manages the path failover.
To connect to NetApp storage, enable Windows MPIO on your Windows host. For the DSM you can use the Windows native DSM (which is enabled along with MPIO), or you can install the ONTAP DSM for Windows MPIO. You can download this from the NetApp website. Current Windows versions have full NetApp support so you can use either.
The DSM includes storage system specific intelligence needed to identify paths and to manage path failure and recovery. The NetApp DSM sets host SAN parameters to the recommended settings for NetApp and also includes reporting tools.
NetApp Host Utilities
Other software with can be downloaded from the NetApp website includes NetApp Host Utilities. This also sets recommended SAN parameters such as timers on your host computer, and on certain host bus adapters.
Hosts can connect to LUNS on NetApp storage systems without installing the Host Utilities. To ensure the best performance and that the host will successfully handle storage system failover events it is however recommended to install Host Utilities or the NetApp DSM.
You can install either one or both. Or you could install neither and still be able to connect to your NetApp storage from the Windows client. To ensure you have the NetApp recommended settings it’s recommended to use either or both of them.
Unlike the NetApp DSM, NetApp Host Utilities does not require a license. To download the software, just visit www.netapp.com. Click on the Sign In link, then log into the Support site. Login using your username/password, then once the page loads, hover your mouse on the Downloads link then click on the Software option. Once the Software page loads, scroll down and look for the Host Utilities SAN. The Host Utilities software comes in various flavors of UNIX, Linux and Windows. You can scroll down the page to see the other options such as Multipath I/O, and the NetApp DSM which is only available for Windows.

Asymmetric Logical Unit Access (ALUA)
Now let’s discuss Asymmetric Logical Unit Access (ALUA) and selective LUN mapping. ALUA is an industry-standard protocol for identifying optimized paths between a storage system target and a host initiator. It enables the initiator to query the target about path attributes, and the target to communicate events back to the initiator.
Direct paths to the node owning the LUN are marked as optimized paths and you can configure the initiator to prefer them. Other paths are marked as non-optimized paths. If all of the optimized paths fail, the DSM will automatically switch to the non-optimized paths, maintaining the host’s access to its storage. In that case traffic would be going over the cluster interconnect on a NetApp FAS system though, so it’s preferable to use the optimized paths that terminate on the node that actually owns the LUN. ALUA is enabled by default on Clustered ONTAP.
Selective LUN Mapping (SLM)
We also have Selective LUN Mapping (SLM) that reduces the number of paths from the host to the LUN to keep things cleaner. With SLM, when a new LUN map is created, the LUN is accessible only through paths on the node owning the LUN and its HA partner. The optimized paths that terminate on the node owning the LUN will be preferred. The non-optimized paths will be on the HA partner.
For example, if we had Fabric A and Fabric B, and each node is connected to both Fabrics, and we had four nodes, with Selective LUN Mapping we will have two optimized paths terminating on the node that owns the LUN, two non-optimized paths that terminate on the HA partner, and the four paths on the other two nodes would not be reporting. That provides enough paths for our load balancing and redundancy, while keeping things clean and not reporting too many paths.
SLM is enabled by default from Clustered ONTAP 8.3. Previously to version 8.3 you could enable it with this command:
lun mapping remove-reporting-nodes command
MPIO, ALUA and SLM Example
Let’s take a look at an example of how MPIO, ALUA, and SLM works. Here we’ve got a four-node cluster, redundant fabrics A and B, and the LUN is owned by Node 1.
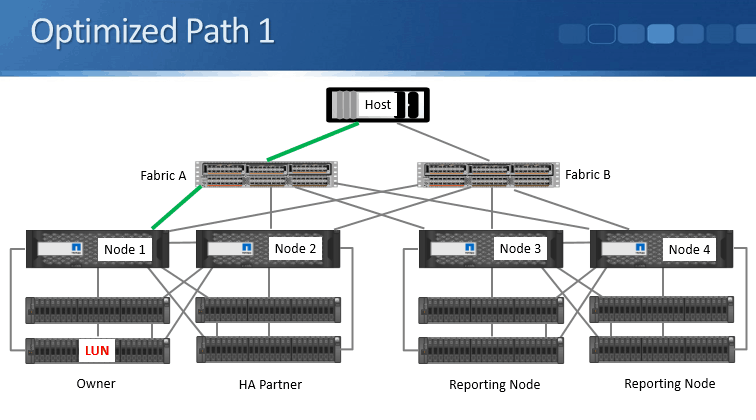
Optimized Path 1 shown in bold green in the diagram above terminates on Node 1 and is via the Fabric A switch.
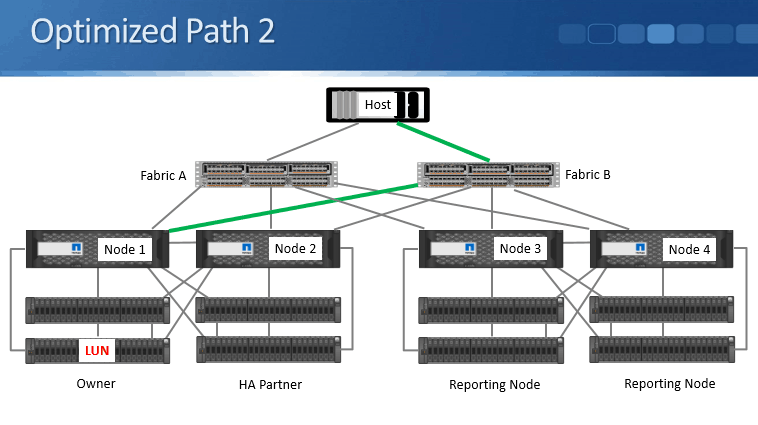
Optimized Path 2 again terminates on Node 1 because it owns the LUN, and is going through Fabric B.
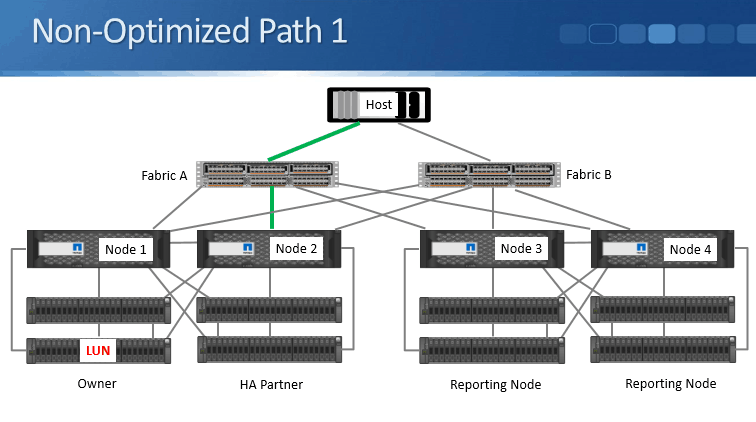
Non-optimized Path 1 is on the HA peer Node 2 and goes via Fabric A.

Non-Optimized Path 2 also terminates on the HA peer Node 2 but goes through Fabric B.
With Selective LUN Mapping enabled, as it is by default, the host will learn just those four paths, and it will prefer the optimized paths that terminate on Node 1.
From the MPIO software on the host itself, you’ll be able to configure how you want the load balancing and the redundancy to work. For example, you could use Active/Active, or you could use Active/Standby. Typically we’re going to prefer to use Active/Active and load balance over both optimized paths.
Using the NetApp DSM, there are six load balancing policies that can be used for both Fibre Channel and iSCSI paths:
- Least Queue Depth
- Least Weighted Paths
- Round Robin
- Round Robin with Subset
- Failover only
- Auto Assigned
NetApp DSM Load Balancing Options
The first one is Least Queue Depth which is the default policy. I/O is sent Active/Active preferring the optimized path with the smallest current outstanding queue. It can load balance between the paths using whichever one has got the smallest current outstanding queue right now. This policy works as Active/Standby if the LUN is 2TB or larger. So this is good as the default if the LUN is smaller than 2TB. If it’s larger than 2TB, it’s better to use one of the other options.
The next available policy is Least Weighted Paths. Here, the administrator defines weight on the available paths. I/O is sent Active/Standby preferring the optimized path with the lowest weight value. Typically we’re going to want to use Active/Active rather than Active/Standby to get the best use of our available paths.
The next available option is Round Robin. All optimized paths to the storage system are used Active/Active when they are available.
Next is Round Robin with Subset. Here, the administrator defines a subset of paths. I/O is Round Robin load balanced between them. This is recommended to be used for 2TB LUNs or larger. With Round Robin with Subset, you can also use non-optimized as well as optimized paths, but it’s not recommended to do that because then you’ll have some of the traffic going over the cluster interconnect.
Our next option is Failover Only. This is an Active/Passive option. The administrator defines the active path. Again, it can use non-optimized paths, but that’s not recommended.
The last available option is Auto Assigned. For each LUN, only one path is chosen at a time. This is another Active/Standby option.
Windows Native DSM Load Balancing Options
The load balancing options for the Windows native DSM are similar – we have Failover, Round Robin, Round Robin with a subset of paths, Dynamic Least Queue Depth, Weighted Path, or Least Blocks.
All of these other than Least Blocks are also available with the NetApp DSM. With Least Blocks, I/O is sent down the path with the fewest data blocks that are currently being processed. This is another Active/Active option.
Additional Resources
NetApp Clustered ONTAP, iSCSI, and MPIO with Server 2012
Installing and Configuring Host Utilities
NetApp DSM Concepts
Want to practice NetApp SAN utilities on your laptop? Download my free step-by-step guide ‘How to Build a NetApp ONTAP Lab for Free’
Click Here to get my ‘NetApp ONTAP 9 Storage Complete’ training course.
1 Data ONTAP DSM 4.1 for Windows MPIO Installation and Administration Guide January _B0
2
3 Table of Contents 3 Contents DSM concepts… 7 Device-specific module overview… 7 Tasks required for installing and configuring the DSM… 8 Windows configurations supported by the DSM… 8 ALUA support and requirements… 9 Mixing FC and iscsi paths Microsoft iscsi DSM I_T and I_T_L nexus overview Multiple paths require MPIO software Load balance policies determine failover behavior Path limits Windows Administrator account option Timeout and tuning parameters overview FC HBA and CNA parameters set by Data ONTAP DSM for Windows MPIO Registry values set by Data ONTAP DSM for Windows MPIO When to change the load balance policy Path types and Windows clusters affect failover behavior DSM prefers optimized paths DSM can use disabled paths Failover examples Least queue depth example Round robin example Round robin with subset example Failover-only example Auto-assigned example Mapping identifiers between the host and storage system Dynamic disk support What the Hyper-V Guest Utilities are What Hyper-V is Methods for using storage with Hyper-V Methods for clustering Windows hosts with Hyper-V Recommended LUN layout with Hyper-V About SAN booting Support for non-english operating system versions Installing the DSM Verifying your host configuration Stopping host I/O and the cluster service Installing Windows hotfixes List of required hotfixes for Windows Server Removing or upgrading SnapDrive for Windows… 29
4 4 Data ONTAP DSM 4.1 for Windows MPIO Installation and Administration Guide Confirming your storage system configuration Configuring FC HBAs and switches Checking the media type of FC ports Configuring iscsi initiators iscsi software initiator options Downloading the iscsi software initiator Installing the iscsi initiator software Options for iscsi sessions and error recovery levels Options for using CHAP with iscsi initiators Using RADIUS for iscsi authentication Enabling ALUA for FC paths Obtaining a DSM license key Installing PowerShell Installing.NET framework on Windows Server 2003 or DSM installation options Running the DSM installation program interactively Running the DSM installation program from a command line Configuring Hyper-V systems Adding virtual machines to a failover cluster Configuring SUSE Linux and RHEL 5.5 and 5.6 guests for Hyper-V Configuring RHEL 6.0 and 6.1 guests for Hyper-V Hyper-V VHD requires alignment for best performance Upgrading the DSM Verifying your host configuration Stopping host I/O and the cluster service Installing Windows hotfixes List of required hotfixes for Windows Server Removing FC or iscsi paths to 7-Mode LUNs Enabling ALUA for FC paths Installing PowerShell Running the DSM upgrade program Upgrading Windows cluster configurations Running the DSM upgrade interactively Running the DSM upgrade from a command line Removing or repairing the DSM Uninstalling the Data ONTAP DSM interactively Uninstalling the DSM silently (unattended) Repairing the Data ONTAP DSM installation Managing the DSM using the GUI Starting the DSM GUI Discovering new disks Viewing summary information for virtual disks Viewing events report information for virtual disks Displaying the events report Changing the number of entries in the detailed events report… 61
5 Table of Contents 5 Viewing detailed information for virtual disks Viewing path information for virtual disks Viewing LUN information for virtual disks Viewing I/O statistics for virtual disks Viewing history information for virtual disk Changing the load balance policy Changing the default load balance policy Changing the operational state of a path Changing the administrative state of a path Changing the path weight Changing the preferred path Displaying the persistent reservation key for a virtual disk Setting persistent reservation parameters Changing what gets logged by the DSM Setting MPIO tunable parameters Setting the DSM GUI auto refresh rate Refreshing the display manually Viewing the DSM license key Managing the DSM using Windows PowerShell cmdlets What you can do with the PowerShell cmdlets Requirements for the PowerShell cmdlets Running PowerShell cmdlets on the local host Running PowerShell cmdlets from a remote host Getting help with PowerShell cmdlets Displaying DSM settings Getting information about virtual disks Changing the load balance policy using a cmdlet Changing the default load balance policy using a cmdlet Viewing path information using a cmdlet Changing path status using a cmdlet Supported path changes for load balance policies Changing the path weight using a cmdlet Displaying statistics about SAN connectivity Clearing SAN connectivity statistics Prioritizing FC paths over iscsi paths Modifying values for DSM parameters Configuring for Fibre Channel and iscsi What FC and iscsi identifiers are Recording the WWPN Recording the iscsi initiator node name Setting up LUNs LUN overview Initiator group overview About FC targets Adding iscsi targets… 90
6 6 Data ONTAP DSM 4.1 for Windows MPIO Installation and Administration Guide Overview of initializing and partitioning the disk Setting up a SAN boot LUN for Windows Server Troubleshooting Troubleshooting installation problems Installing missing Windows hotfixes Internal Error: Access is Denied during installation Installing Windows Host Utilities after installing the DSM resets the persistent reservation timeout value incorrectly Troubleshooting failover problems Troubleshooting ALUA configuration problems Troubleshooting interoperability problems Areas to check for possible problems Installing fcinfo for Windows Server 2003 FC configurations Updating the HBA software driver Enabling logging on the Emulex HBA Enabling logging on the QLogic HBA FCoE troubleshooting overview Installing the nsanity data collection program Collecting diagnostic data using nsanity Windows event log entries How DSM event log entries relate to MPIO driver event log entries Changing what gets logged by the DSM Event data section encoding Event message reference Copyright information Trademark information How to send comments about documentation and receive update notifications Index
7 7 DSM concepts The Data ONTAP DSM for Windows MPIO enables you to have multiple Fibre Channel (FC) and iscsi paths between a Windows host computer and a NetApp storage system. Note: FC support includes traditional Fibre Channel and Fibre Channel over Ethernet (FCoE). FCoE is used like traditional FC unless otherwise noted. Device-specific module overview The Data ONTAP DSM for Windows MPIO is a device-specific module (DSM) that works with Microsoft Windows MPIO drivers to manage multiple paths between NetApp and Windows host computers. For Windows Server 2003, the DSM installation program installs or upgrades the Windows MPIO components to the version required by the DSM if needed. For Windows Server 2008 and later, the DSM uses the standard MPIO components included with the operating system. DSM includes storage system-specific intelligence needed to identify paths and manage path failure and recovery. You can have multiple optimized paths and multiple non-optimized paths. If all of the optimized paths fail, the DSM automatically switches to the non-optimized paths, maintaining the host’s access to storage. The following illustration shows an example of an FC multipathing topology. The DSM manages the paths from the Windows host to the LUN. HBA 1 Host HBA 2 Fabric 1 Fabric 2 0b 0d 0b 0d Controller 1 Controller 2 LUN Coexistence with other DSMs The Data ONTAP DSM claims all LUNs it discovers on NetApp storage systems. These LUNs have the vendor identifier and product identifier (VID/PID) pair «NETAPP LUN» for Data ONTAP operating in 7-Mode or «NETAPP LUN C-Mode» for clustered Data ONTAP. You can use Microsoft-branded DSMs on the same Windows host to claim LUNs from other storage systems with other VID/PID values: The Microsoft iscsi Initiator for Windows Server 2003 includes a DSM named msiscdsm that you can use to manage iscsi paths.
8 8 Data ONTAP DSM 4.1 for Windows MPIO Installation and Administration Guide Windows Server 2008 and later includes a DSM named msdsm that you can use to manage FC and iscsi paths. The native DSMs claim only devices that are not claimed by other DSMs. They can coexist with the Data ONTAP DSM, provided that the versions of each product in use on the host are compatible. A third-party DSM that complies with the Microsoft MPIO framework can coexist with the Data ONTAP DSM, provided that the product is configured not to claim NetApp LUNs, and does not require hotfixes that may interfere with Data ONTAP DSM operations. The Data ONTAP DSM cannot coexist with legacy MPIO solutions that do not comply with the Microsoft MPIO framework. Tasks required for installing and configuring the DSM Installing and configuring the DSM involves performing a number of tasks on the host and the storage system. The required tasks are as follows: 1. Install the DSM. Note: If you install Windows Host Utilities 6.0 or later after installing DSM 4.0 or later, you must repair the DSM using the Windows repair option. 2. Record the FC and iscsi initiator identifiers. 3. Create LUNs and make them available as virtual disks on the host computer. Optionally, depending on your configuration, you can configure SAN booting of the host. Related concepts Setting up LUNs on page 87 What FC and iscsi identifiers are on page 85 Related tasks Setting up a SAN boot LUN for Windows Server on page 93 Installing the DSM on page 26 Windows configurations supported by the DSM The DSM supports a number of different Windows host configurations. Depending on your specific environment, the DSM supports the following: iscsi paths to the storage system Fibre Channel paths to the storage system Multiple paths to the storage system Virtual machines using Hyper-V (Windows Server 2008, Windows Server 2008 R2, Windows Server 2012, Windows Server 2012 R2) or Virtual Server 2005 (Windows Server 2003), both parent and guest SAN booting Use the Interoperability Matrix to find a supported combination of host and storage system components and software and firmware versions.
9 DSM concepts 9 Related information NetApp Interoperability Matrix — ALUA support and requirements Data ONTAP uses ALUA (asymmetric logical unit access) to identify optimized paths. ALUA is required for specific configurations. ALUA is an industry-standard protocol for identifying optimized paths between a storage system and a host. ALUA enables the initiator to query the target about path attributes, such as primary path and secondary path. It also allows the target to communicate events back to the initiator. ALUA must be enabled for specific configurations. Windows version Protocol Data ONTAP version ALUA supported and required? Windows Server 2003 iscsi 7-Mode No Clustered Data ONTAP Yes Fibre Channel 7-Mode Yes Clustered Data ONTAP Yes Windows Server 2008 iscsi 7-Mode No Clustered Data ONTAP Yes Fibre Channel 7-Mode Yes Clustered Data ONTAP Yes Windows Server 2012 iscsi 7-Mode No Clustered Data ONTAP Yes Fibre Channel 7-Mode Yes Clustered Data ONTAP Yes Windows Server 2012 R2 iscsi 7-Mode Yes Fibre Channel Clustered Data ONTAP Yes ALUA support is enabled or disabled on the igroup or igroups to which a LUN is mapped. All igroups mapped to a LUN must have the same ALUA setting. Windows detects a change to the ALUA setting when rebooted. ALUA is enabled by default on clustered Data ONTAP igroups. In some situations, ALUA is not automatically enabled on 7-Mode igroups. Note: Data ONTAP does not support ALUA on single-controller storage systems. Even though ALUA is not supported, the Data ONTAP DSM supports paths to single-controller storage systems. The DSM identifies paths to single-controller storage systems as active/optimized.
10 10 Data ONTAP DSM 4.1 for Windows MPIO Installation and Administration Guide Related concepts Mixing FC and iscsi paths on page 10 Related tasks Enabling ALUA for FC paths on page 35 Troubleshooting ALUA configuration problems on page 97 Mixing FC and iscsi paths The Data ONTAP DSM supports both FC and iscsi paths to the same LUN for clustered Data ONTAP. The DSM does not support both FC and iscsi paths to the same LUN for Data ONTAP operating in 7-Mode. Note: FC refers to traditional Fibre Channel and Fibre Channel over Ethernet (FCoE). Because ALUA is required for FC paths, and ALUA is not supported for iscsi paths to 7-Mode LUNs, the DSM does not support both FC and iscsi paths to the same 7-Mode LUN. All paths must have the same ALUA setting. You can still have FC paths to some 7-Mode LUNs and iscsi paths to other 7-Mode LUNs. If you are upgrading from an earlier version of the Data ONTAP DSM and have mixed FC and iscsi paths to a 7-Mode LUN, you must remove either the FC or the iscsi paths to the LUN before you enable ALUA and upgrade the DSM. Related concepts Load balance policies determine failover behavior on page 11 ALUA support and requirements on page 9 Microsoft iscsi DSM If you are using iscsi to access another vendor’s storage, install the Microsoft iscsi DSM by selecting the Microsoft MPIO Multipathing Support for iscsi check box when installing the iscsi initiator for Windows Server The iscsi initiator can manage LUNs from other vendors’ storage systems. When both DSMs are installed, the Data ONTAP DSM has priority in claiming iscsi LUNs on NetApp and IBM N series storage systems. I_T and I_T_L nexus overview An initiator-target (I_T) nexus represents the path from the host s initiator to the storage system s target. An initiator-target-lun (I_T_L) nexus represents the DSM’s view of the LUN on a particular I_T nexus. The DSM groups all I_T_L nexuses to the same LUN together, and presents a single virtual disk to the Windows disk manager. The I_T_L nexus is assigned an eight-character DSM identifier. The identifier is made up of four fields: port, bus, target, and LUN. For example, DSM ID represents port 03, bus 00, target 01, and LUN 01. Each path (I_T nexus) also has an eight-character identifier made up of four fields. The first three fields are the same as the DSM ID: port, bus, and target. The fourth field is for internal use.
11 DSM concepts 11 Multiple paths require MPIO software If you have multiple paths between a storage system and a Windows host computer, you must have some type of MPIO software so that the Windows disk manager sees all of the paths as a single virtual disk. Multipath I/O (MPIO) solutions use multiple physical paths between the storage system and the Windows host. If one or more of the components that make up a path fails, the MPIO system switches I/O to other paths so that applications can still access their data. Without MPIO software, the disk manager treats each path as a separate disk, which can corrupt the data on the virtual disk. Load balance policies determine failover behavior The DSM chooses one or more active I_T_L nexuses between the LUN on the storage system and the Windows host based on several factors. The factors include: Load balance policy of the LUN Whether the path is optimized or non-optimized State of all possible paths Load on each path There are six load balance policies that can be used for FC and iscsi paths: Least Queue Depth The Least Queue Depth policy is an active/active policy. I/O to the virtual disk is automatically sent on the active/optimized path with the smallest current outstanding queue. The policy selects paths on a per I/O basis. It checks the queues serially, rather than all at once. It is not uncommon if some paths are not used for I/O because the policy always selects the active/optimized path with the smallest queue. The queue length is determined at the I_T_L nexus level. Active/non-optimized paths are not used for I/O if an optimized path is available. This policy enables you to maximize bandwidth utilization without the need for administrator intervention. Least Queue Depth is the default policy. Note: If the mapped LUN is 2TB or greater and you are using the Least Queue Depth policy on any Windows Server operating system, I/O is serviced on only one path instead of across all available Active/Optimized paths. You should use the Round Robin with Subset policy for LUNs that are 2TB or greater Least Weighted Paths The Least Weighted Paths policy is an active/passive policy. The available path with the lowest weight value is used to access the virtual disk. If multiple paths with the same weight value are available, the DSM selects the path shared with the fewest other LUNs. The weight value can be set from 0 to 255. Set the weight of a path to 0 to always use it when it is available. Round Robin The Round Robin policy is an active/active policy. All optimized paths to the storage system are used when available.
12 12 Data ONTAP DSM 4.1 for Windows MPIO Installation and Administration Guide Round Robin with Subset The Round Robin with Subset policy is an active/active policy. The Round Robin with Subset policy also uses multiple paths. However, you can specify the paths you want used when available. By default, all optimized paths are initially selected. To specify the subset, you make individual paths preferred or not preferred. Although you can specify non-optimized (proxy) paths as part of the active subset, this is not recommended. FailOver Only The FailOver Only policy is an active/passive policy. The FailOver Only policy enables you to manually select a single preferred I_T_L nexus. This I_T_L nexus will be used whenever it is available. Auto Assigned The Auto Assigned policy is an active/passive policy. For each LUN, only one path is used at a time. If the active path changes to a passive path, the policy chooses the next active path. The Auto Assigned policy does not spread the load evenly across all available local paths. Related concepts Mixing FC and iscsi paths on page 10 Path limits In clustered Data ONTAP, you can have a maximum of 32 paths to a LUN. In Data ONTAP operating in 7-Mode, you can have a maximum of 8 paths to a LUN. This maximum applies to any mix of FC and iscsi paths. This is a limitation of the Windows MPIO layer. Attention: Additional paths can be created, but are not claimed by the DSM. Exceeding the maximum paths leads to unpredictable behavior of the Windows MPIO layer and possible data loss. Windows Administrator account option When installing DSM, you can opt to supply the user name and password of an Administrator-level account. If you later change the password of this user-specified account, you must run the Repair option of the DSM installation program and enter the new password. You can also update the credentials of the Data ONTAP DSM Management Service in the Windows Services applet. Timeout and tuning parameters overview The Data ONTAP DSM for Windows MPIO uses a number of parameters to optimize performance and ensure correct failover and giveback behavior. You should not change these values unless directed to do so by your storage system support representative. More information about what each setting does is included in the following topics.
13 DSM concepts 13 FC HBA and CNA parameters set by Data ONTAP DSM for Windows MPIO The DSM installer sets required parameters for Fibre Channel host bus adapters (HBA) and converged network adapters (CNA). The names of the parameters might vary slightly depending on the program. For example, in QLogic QConvergeConsole, one parameter is displayed as Link Down Timeout. The fcconfig.ini file displays this same parameter as MpioLinkDownTimeOut. Emulex HBAs and CNAs For Emulex HBAs and CNAs, the DSM installation program sets the following parameters: LinkTimeOut=1 The LinkTimeOut parameter specifies the interval after which a link that is down stops issuing a BUSY status for requests and starts issuing a SELECTION_TIMEOUT error status. This LinkTimeOut includes port login and discovery time. NodeTimeOut=10 The NodeTimeOut parameter specifies the interval after which a formerly logged-in node issues a SELECTION_TIMEOUT error status to an I/O request. This causes the system to wait for a node that might reenter the configuration soon before reporting a failure. The timer starts after port discovery is completed and the node is no longer present. QLogic HBAs and CNAs For QLogic HBAs and CNAs, the DSM installation program sets the following parameters: LinkDownTimeOut=1 The LinkDownTimeOut parameter controls the timeout when a link that is down stops issuing a BUSY status for requests and starts issuing a SELECTION_TIMEOUT error status. This LinkDownTimeOut includes port login and discovery time. PortDownRetryCount=10 The PortDownRetryCount parameter specifies the number of times the I/O request is resent to a port that is not responding in one second intervals. Registry values set by Data ONTAP DSM for Windows MPIO The Data ONTAP DSM for Windows MPIO uses a number of Windows registry values to optimize performance and ensure correct failover and giveback behavior. The settings that the DSM uses are based on the operating system version. The following values are decimal unless otherwise noted. HKLM is the abbreviation for HKEY_LOCAL_MACHINE. Registry key Value When set HKLMSYSTEMCurrentControlSetServicesontapdsm ParametersInquiryRetryCount HKLMSYSTEMCurrentControlSetServicesontapdsm ParametersInquiryTimeout 6 Always 2 Always HKLMSOFTWARENetAppMPIOInstallDir C: Program Files NetApp MPIO Always
14 14 Data ONTAP DSM 4.1 for Windows MPIO Installation and Administration Guide Registry key Value When set HKLMSYSTEMCurrentControlSetControlClass {iscsi_driver_guid} instance_idparameters IPSecConfigTimeout HKLMSYSTEMCurrentControlSetServicesontapdsm ParametersiSCSILeastPreferred HKLMSYSTEMCurrentControlSetControlClass {iscsi_driver_guid} instance_idparameters LinkDownTime HKLMSOFTWARENetAppMPIOLogDir HKLMSYSTEMCurrentControlSetServicesClusDisk ParametersManageDisksOnSystemBuses HKLMSYSTEMCurrentControlSetControlClass {iscsi_driver_guid} instance_idparameters MaxRequestHoldTime HKLMSYSTEMCurrentControlSetControlMPDEV MPIOSupportedDeviceList HKLMSYSTEMCurrentControlSetServicesmpio ParametersPathRecoveryInterval HKLMSYSTEMCurrentControlSetServicesontapdsm ParametersPathVerifyEnabled HKLMSYSTEMCurrentControlSetServicesontapdsm ParametersPersistentReservationKey HKLMSYSTEMCurrentControlSetServicesontapdsm ParametersPDORemovePeriod HKLMSOFTWARENetAppMPIOProductVersion HKLMSYSTEMCurrentControlSetServicesontapdsm ParametersProtocols HKLMSYSTEMCurrentControlSetServicesontapdsm ParametersReservationRetryInterval HKLMSYSTEMCurrentControlSetServicesontapdsm ParametersReservationTimeout HKLMSYSTEMCurrentControlSetServicesontapdsm ParametersRetryCount 60 Always Not set 15 Always C:temp netapp Not set unless you manually set it Always 1 Always 60 Always «NETAPP LUN», «NETAPP LUN C- Mode» Always 40 Windows Server 2008, 2008 R2, 2012, or 2012 R2 only 0 Always A unique generated binary value 130 Always Installed version of Data ONTAP DSM for Windows MPIO Windows Server 2003 only Always 3 Always 2 Always 60 Always 6 Always
15 DSM concepts 15 Registry key Value When set HKLMSYSTEMCurrentControlSetServicesontapdsm ParametersRetryInterval HKLMSYSTEMCurrentControlSetServicesontapdsm ParametersSupportedDeviceList HKLMSYSTEMCurrentControlSetServicesontapdsm ParametersTestUnitReadyRetryCount HKLMSYSTEMCurrentControlSetServicesontapdsm ParametersTestUnitReadyTimeout HKLMSYSTEMCurrentControlSetServicesdisk TimeOutValue HKLMSYSTEMCurrentControlSetServicesmpio ParametersUseCustomPathRecoveryInterval 2 Always «NETAPP LUN», «NETAPP LUN C- Mode» Always 20 Always 2 Always 60 Always 1 Windows Server 2008, 2008 R2, 2012, or 2012 R2 only InquiryRetryCount setting The InquiryRetryCount parameter specifies how many times the DSM retries SCSI inquiry requests to the storage system. The DSM sends SCSI inquiry requests to the storage system controller to get information about a LUN or about storage system configuration. If a response is not received within the InquiryTimeout time, the request is retried the number of times specified by InquiryRetryCount before failing the request. InquiryTimeout setting The InquiryTimeout parameter specifies how long the DSM waits before retrying SCSI inquiry requests of the storage system. The DSM sends SCSI inquiry requests to the storage system controller to get information about a LUN or about storage system configuration. If a response is not received within the InquiryTimeout time, the request is retried the number of times specified by InquiryRetryCount before failing the request. InstallDir setting The InstallDir parameter specifies the installation directory used by the DSM. This parameter is configurable. IPSecConfigTimeout setting The IPSecConfigTimeout parameter specifies how long the iscsi initiator waits for the discovery service to configure or release ipsec for an iscsi connection. The supported value enables the initiator service to start correctly on slow-booting systems that use CHAP.
16 16 Data ONTAP DSM 4.1 for Windows MPIO Installation and Administration Guide iscsileastpreferred setting The iscsileastpreferred parameter specifies whether the Data ONTAP DSM prioritizes FC paths over iscsi paths to the same LUN. You might enable this setting if you want to use iscsi paths as backups to FC paths. By default, the DSM uses ALUA access states to prioritize paths. It does not prioritize by protocol. If you enable this setting, the DSM prioritizes by ALUA state and protocol, with FC paths receiving priority over iscsi paths. The DSM uses iscsi optimized paths only if there are no FC optimized paths available. This setting applies to LUNs that have a load balance policy of either Least Queue Depth or Round Robin. This parameter is not set by default. The allowed values for this setting are «0» (no preference) and «1» (FC preferred). LinkDownTime setting For iscsi only, the LinkDownTime setting specifies the maximum time in seconds that requests are held in the device queue and retried if the connection to the target is lost. If MPIO is installed, this value is used. If MPIO is not installed, MaxRequestHoldTime is used instead. LogDir setting The LogDir parameter specifies the directory used by the DSM to store log files. ManageDisksOnSystemBuses setting The ManageDisksOnSystemBuses parameter is used by SAN-booted systems to ensure that the startup disk, pagefile disks, and cluster disks are all on the same SAN fabric. For detailed information about the ManageDisksOnSystemBuses parameter, see Microsoft Support article Related information Microsoft Support article MaxRequestHoldTime setting The MaxRequestHoldTime setting specifies the maximum time in seconds that requests are queued if connection to the target is lost and the connection is being retried. After this hold period, requests are failed with «error no device» and the disk is removed from the system. The supported setting enables the connection to survive the maximum expected storage failover time. MPIOSupportedDeviceList The MPIOSupportedDeviceList setting specifies that the Windows MPIO component should claim storage devices with the specified vendor identifier and product identifier (VID/PID). PathRecoveryInterval setting The PathRecoveryInterval setting specifies how long in seconds the MPIO component waits before retrying a lost path. The PathRecoveryInterval setting causes the MPIO component to try to recover a lost path that had a transient error before it decides the disk device is no longer available.
17 DSM concepts 17 Note that this parameter affects all DSMs on the system. PathVerifyEnabled setting The PathVerifyEnabled parameter specifies whether the Windows MPIO driver periodically requests that the DSM check its paths. Note that this parameter affects all DSMs on the system. PDORemovePeriod setting This parameter specifies the amount of time that the multipath pseudo-lun stays in system memory after all paths to the device are lost. PersistentReservationKey setting The PersistentReservationKey parameter stores the persistent reservation key generated by the DSM for Windows Server 2003 systems. The DSM uses a persistent reservation key to track which node in a Microsoft Windows cluster (MSCS) is currently allowed to write to a virtual disk (LUN). ProductVersion setting The ProductVersion parameter indicates the version of Data ONTAP DSM for Windows MPIO installed on the host. Protocols setting The Protocols parameter specifies which LUNs are claimed by the DSM. Starting with DSM 3.3.1, both FC and iscsi LUNs are always claimed. The parameter was used by previous versions of the DSM to specify which types of LUNs are claimed. ReservationRetryInterval setting The ReservationRetryInterval parameter is used by the DSM to control persistent reservation handling in a Windows cluster configuration. ReservationTimeout setting The ReservationTimeout parameter is equivalent to the TimeOutValue parameter, except that it is specific to persistent reservation commands within Data ONTAP DSM. RetryCount setting The RetryCount parameter specifies the number of times the current path to a LUN is retried before failing over to an alternate path. The RetryCount setting enables recovery from a transient path problem. If the path is not recovered after the specified number of retries, it is probably a more serious network problem. RetryInterval setting The RetryInterval parameter specifies the amount of time to wait between retries of a failed path. This setting gives the path a chance to recover from a transient problem before trying again.
18 18 Data ONTAP DSM 4.1 for Windows MPIO Installation and Administration Guide SupportedDeviceList setting The SupportedDeviceList parameter specifies the vendor identifier (VID) and product identifier (PID) of LUNs that should be claimed by the DSM. TestUnitReadyRetryCount setting The TestUnitReadyRetryCount parameter specifies the number of times the DSM sends a SCSI TEST UNIT READY command on a path before marking a path as failed and rebalancing paths. The DSM sends a SCSI TEST UNIT READY command to the target to verify a path is available for use. Occasionally, the target may fail to respond to the command, so the DSM sends it again. TestUnitReadyTimeout setting The TestUnitReadyTimeout parameter specifies the number of seconds the DSM waits between sending SCSI TEST UNIT READY commands. The DSM sends a SCSI TEST UNIT READY command to the target to verify a path is available for use. TimeOutValue setting The disk TimeOutValue parameter specifies how long an I/O request is held at the SCSI layer before timing out and passing a timeout error to the application above. Attention: Installing the cluster service on Windows 2003 changes the disk TimeOutValue. Upgrading the Emulex or QLogic HBA driver software also changes TimeOutValue. If cluster service is installed or the HBA driver is upgraded after you install this software, use the Repair option of the installation program to change the disk TimeOutValue back to the supported value. UseCustomPathRecoveryInterval setting The UseCustomPathRecoveryInterval setting enables or disables use of the PathRecoveryInterval setting. Note that this parameter affects all DSMs on the system. When to change the load balance policy The Data ONTAP DSM sets the default load balance policy to Least Queue Depth. This policy provides the best method of distributing I/O to all active optimized LUN paths. Other load balance policies exist for specialized uses. Work with your application vendor to determine if another load balance policy is appropriate. Path types and Windows clusters affect failover behavior In addition to the load balance policy, failover behavior is affected by optimized paths, disabled paths, and Windows clusters. DSM prefers optimized paths The DSM differentiates between optimized and non-optimized paths. Non-optimized paths use the cluster interconnect between storage system controllers in an HA pair or storage system cluster and are less efficient than optimized paths.
19 DSM concepts 19 Non-optimized paths are not used when optimized paths are available, unless you explicitly set nonoptimized paths to active when using the FailOver-only or Round Robin with Subset policy, or you set non-optimized paths to a lower weight using the Least Weighted Paths policy. Note: Do not make non-optimized paths active, except for brief maintenance work on the optimized paths. For fabric-attached MetroCluster configurations, never make non-optimized paths active manually. DSM can use disabled paths If you manually disable an I_T_L nexus, the DSM does not normally fail over to it. However, if the active I_T_L nexus fails, and there are no enabled I_T_L nexuses available, the DSM will try to enable and fail over to a disabled I_T_L nexus. As soon as an enabled I_T_L nexus is available, the DSM will fail back to the enabled I_T_L nexus and return the I_T_L nexus to the disabled state. Failover examples Examples of the failover behavior for different load balance policies demonstrate how the DSM selects active paths. Least queue depth example This example of least queue depth failover demonstrates failover behavior with FC paths to a LUN. A Windows host has four FC paths to a LUN, two optimized paths to one node (controller) in an HA storage system configuration and two non-optimized paths to the partner node. The load balance policy is Least Queue Depth. Although the status of the non-optimized paths is called Active/Non-optimized, these paths are not actively used for I/O as long as an optimized path is available. When no Active/Optimized paths are available, the Active/Non-optimized paths are become Active/Optimized. Initial path selection with all components working: ITL_1 Optimized FC — Used for I/O ITL_2 Optimized FC — Used for I/O ITL_3 Non-optimized FC — Not used for I/O ITL_4 Non-optimized FC — Not used for I/O I/O between the host and storage system is sent on ITL_1 or ITL_2, depending on which currently has the shorter queue. After ITL_1 fails, all I/O is sent over ITL_2: ITL_2 Optimized FC — Used for I/O ITL_3 Non-optimized FC — Not used for I/O ITL_4 Non-optimized FC — Not used for I/O If both ITL_1 and ITL_2 fail, I/O is sent on ITL_3 or ITL_4, depending on which currently has the shorter queue: ITL_3 Non-optimized FC — Used for I/O ITL_4 Non-optimized FC — Used for I/O
20 20 Data ONTAP DSM 4.1 for Windows MPIO Installation and Administration Guide Round robin example This example demonstrates failover behavior of iscsi paths using the round robin load balance policy. The example applies to Data ONTAP operating in 7-Mode. A Windows host has four iscsi paths to a LUN on a controller in an active/active (HA-pair) storage system configuration. The load balance policy is round robin. For iscsi, all paths connect to ports on the controller that owns the LUN. If that controller becomes unavailable, all paths fail over to partner ports on the partner controller. All available iscsi paths are treated as optimized paths. Before path failover: ITL_1 Optimized iscsi — Used for I/O ITL_2 Optimized iscsi — Used for I/O ITL_3 Optimized iscsi — Used for I/O ITL_4 Optimized iscsi — Used for I/O After one active I_T_L nexus (path) fails, the other active I_T_L nexus continues to deliver data: ITL_2 Optimized iscsi — Used for I/O ITL_3 Optimized iscsi — Used for I/O ITL_4 Optimized iscsi — Used for I/O If the second active I_T_L nexus fails, the two remaining paths continue to serve data: ITL_2 Optimized iscsi — Used for I/O ITL_3 Optimized iscsi — Used for I/O Round robin with subset example This example demonstrates failover behavior of FC paths when you select a preferred path using the round robin load balance policy. A Windows host has four FC paths to a LUN, two paths to each node (controller) in an active/active (HA-pair) storage system configuration. The load balance policy is round robin with subset. The administrator has set ITL_1 and ITL_4 as the preferred paths. Before path failover: ITL_1 Optimized FC, Preferred — Used for I/O ITL_2 Non-optimized FC — Not used for I/O ITL_3 Non-optimized FC — Not used for I/O ITL_4 Optimized FC, Preferred — Used for I/O After ITL_4 fails, the other preferred path continues to deliver data: ITL_1 Optimized FC, Preferred — Used for I/O ITL_2 Non-optimized FC — Not used for I/O ITL_3 Non-optimized FC — Not used for I/O After losing the optimized, preferred paths, the two non-preferred paths are activated:
21 DSM concepts 21 ITL_2 Non-optimized FC — Used for I/O ITL_3 Non-optimized FC — Used for I/O Finally, both optimized paths become available again, and the preferred paths are again active and the other two paths are not used to deliver data. Failover-only example This example demonstrates failover behavior of FC paths when you select an active path using the failover only load balance policy. Because this is an active/passive policy, only one path is active at a time. A Windows host has four FC paths to a LUN, two paths to each node in an active/active (HA-pair) storage system configuration. The load balance policy for the LUN is failover only. ITL_1 has been selected as the preferred ITL nexus by manually activating it. Before path failover: ITL_1 Optimized FC — Active ITL_2 Non-optimized FC — Passive ITL_3 Non-optimized FC — Passive ITL_4 Optimized FC — Passive After the active I_T_L nexus fails, the DSM selects the passive optimized I_T_L nexus: ITL_2 Non-optimized FC — Passive ITL_3 Non-optimized FC — Passive ITL_4 Optimized FC — Active After losing both optimized I_T_L nexuses, the DSM selects the non-optimized I_T_L nexus with the lowest load: ITL_2 Non-optimized FC — Active ITL_3 Non-optimized FC — Passive Whenever the preferred optimized I_T_L nexus becomes available again, the DSM activates that I_T_L nexus for I/O to the LUN. Auto-assigned example This example demonstrates failover behavior of FC paths using the auto-assigned load balance policy. Because this is an active/passive policy, only one path is active at a time. In this example, the Windows host has four FC paths and the load balance policy is auto assigned. The DSM activates the optimized I_T_L nexus that uses the path with the fewest active I_T_L nexuses. In this example, ITL_4 is selected. The administrator is not allowed to manually activate a path. Before path failover: ITL_1 Optimized FC — Passive ITL_2 Non-optimized FC — Passive ITL_3 Non-optimized FC — Passive ITL_4 Optimized FC — Active
22 22 Data ONTAP DSM 4.1 for Windows MPIO Installation and Administration Guide The failover behavior is the same as for the failover only load balance policy. The DSM will first select an optimized passive I_T_L nexus. If there are no optimized I_T_L nexuses, the DSM will select a proxy I_T_L nexus. The particular I_T_L nexus selected depends on which available path has the lowest current load. After the active I_T_L nexus fails, the DSM selects the passive optimized I_T_L nexus: ITL_2 Non-optimized FC — Passive ITL_3 Non-optimized FC — Passive ITL_4 Optimized FC — Active After losing both optimized I_T_L nexuses, the DSM selects the non-optimized I_T_L nexus with the lowest load: ITL_2 Non-optimized FC — Active ITL_3 Non-optimized FC — Passive The auto-assigned failback behavior is somewhat different from failover only. If a non-optimized I_T_L nexus is in use, the DSM will activate the first available optimized I_T_L nexus. If ITL_1 was the first optimized I_T_L nexus available, it would be activated: ITL_1 Optimized FC — Active ITL_2 Non-optimized FC — Passive ITL_3 Non-optimized FC — Passive As additional optimized paths become available, the DSM rebalances paths so that active I_T_L nexuses are distributed evenly across paths. In this example, ITL_4 becomes available and uses a path with no active I_T_L nexus. ITL_1 uses a path that currently has two active I_T_L nexuses. The DSM activates ITL_4 so that each path has one active I_T_L nexus: ITL_1 Optimized FC — Passive ITL_2 Non-optimized FC — Passive ITL_3 Non-optimized FC — Passive ITL_4 Optimized FC — Active If the paths are used by a clustered Windows host, the DSM waits two minutes after the path becomes available before balancing the load. This enables the I/O to stabilize and prevents the Windows cluster from failing over unnecessarily. Of course if a Windows cluster loses an active I_T_L nexus, a passive I_T_L nexus is activated immediately. Mapping identifiers between the host and storage system The Data ONTAP DSM for Windows MPIO includes a number of identifiers to help you map virtual disks to LUNs, and the paths (I_T_L nexuses) between the Windows host and the storage system. Disk serial number The upper pane of the DSM GUI and the output of the get-sandisk cmdlet include a serial number for each virtual disk. This serial number is assigned by Data ONTAP to a LUN on the storage system. The Data ONTAP lun show -v command displays the serial number. You can also view the serial number in the System Manager interface by selecting LUN > Manage and clicking the path name in the LUN column.
23 DSM concepts 23 The DSM virtual disks GUI page also shows the host name of the storage system controller, the LUN path, and the LUN identifier on the storage system for each virtual disk. DSM Identifier (DSM ID) Each path (I_T_L nexus) is assigned an eight-character DSM identifier consisting of four two-character fields: port, bus, target, and LUN. For example, DSM ID represents port 03, bus 00, target 01, and LUN 01. The DSM ID is displayed on the DSM GUI details page for each virtual disk and is returned by the get-sanpath cmdlet. The DSM ID is included in most event log messages written by the Data ONTAP DSM. Path Identifier Each path also has an eight-character identifier consisting of four two-character fields. The first three fields are the same as the DSM ID: port, bus, and target. The fourth field is for NetApp internal use. The path identifier references an I_T nexus. The DSM ID references an I_T_L nexus. The path identifier can be repeated across LUNs and disks, but the combinations of DSMID/PathID are unique. The Path ID is displayed on the DSM GUI details pane for each virtual disk and is returned by the get-sanpath cmdlet. Dynamic disk support Windows dynamic disks are supported with specific configuration requirements. When using the native Windows storage stack, all LUNs composing the dynamic volume must be located on the same storage system controller. Dynamic disks are not supported by SnapDrive for Windows. What the Hyper-V Guest Utilities are When you install Data ONTAP DSM, you can choose to install the Hyper-V Guest Utilities. You use the Hyper-V Guest Utilities to configure Hyper-V systems. Use LinuxGuestConfig.iso in the Hyper-V Guest Utilities to set disk timeouts for Hyper-V virtual machines that run Linux. Setting timeout parameters on a Linux guest ensures correct failover behavior. Related concepts Configuring Hyper-V systems on page 40 What Hyper-V is Hyper-V is a Windows technology that enables you to create multiple virtual machines on a single physical x64 computer running certain versions of Microsoft Windows Server. Hyper-V is a role available in the following versions of Microsoft Windows Server. Windows Server 2008 Windows Server 2008 R2 Windows Server 2012 Windows Server 2012 R2
24 24 Data ONTAP DSM 4.1 for Windows MPIO Installation and Administration Guide Each virtual machine runs its own operating system and applications. Methods for using storage with Hyper-V Hyper-V enables you to provision storage using a virtual hard disk, an unformatted (raw) LUN, or an iscsi LUN. Virtual machines use storage on a storage system in the following ways: A virtual hard disk (IDE or SCSI) formatted as NTFS. The virtual hard disk is stored on a LUN mapped to the Hyper-V parent system. The guest OS must boot from an IDE virtual hard disk. An unformatted (raw) LUN mapped to the Hyper-V parent system and provided to the virtual machine as a physical disk mapped through either the SCSI or IDE virtual adapter. An iscsi LUN accessed by an iscsi initiator running on the guest OS. For Windows Vista, use the built-in iscsi initiator; multipathing is not supported. For Windows XP, use Microsoft iscsi initiator 2.07; multipathing is not supported. For Windows Server 2003, Windows Server 2008, Windows Server 2008 R2, Windows Server 2012, and Windows Server 2012 R2, use an iscsi initiator and multipathing solution that is supported by NetApp for use on a standard host platform. The guest OS supports the same iscsi configurations as if it was not running on a virtual machine. For SUSE Linux Enterprise Server, use a supported iscsi initiator and multipathing solution. The guest OS supports the same iscsi configurations as if it was not running on a virtual machine. The parent Hyper-V system can connect to storage system LUNs just like any other host for Windows Server 2008, Windows Server 2008 R2, Windows Server 2012 or Windows Server 2012 R2. Methods for clustering Windows hosts with Hyper-V Hyper-V provides two ways to let you cluster Windows hosts. You can cluster the parent Hyper-V system with other parent systems using Windows failover clustering. You can cluster guest systems running in virtual machines with other guest systems using the clustering solution supported on the operating system. You must use an iscsi software initiator on the guest system to access the quorum and shared disks. Recommended LUN layout with Hyper-V You can put one or more virtual hard disks (VHDs) on a single LUN for use with Hyper-V. The recommended LUN layout with Hyper-V is to put up to 10 VHDs on a single LUN. If you need fewer than ten VHDs, put each VHD on its own LUN. If you need more than ten VHDs for a Windows host, spread the VHDs evenly across approximately ten LUNs. When you create virtual machines, store the virtual machine and the VHD it boots from in the same LUN. For Windows failover clusters, the layout is different: For Windows Server 2008 R2 and Windows Server 2012 with cluster shared volumes (CSVs), you can have VHDs for multiple guests on the same LUN. For failover clusters without CSV, use a separate LUN for each guest’s VHDs.
25 DSM concepts 25 About SAN booting SAN booting is the general term for booting a Windows host from a storage system LUN instead of an internal hard disk. The host might or might not have any hard drives installed. SAN booting offers many advantages. Because the system (C:) drive is located on the storage system, all of the reliability and backup features of the storage system are available to the system drive. You can also clone system drives to simplify deploying many Windows hosts and to reduce the total storage needed. SAN booting is especially useful for blade servers. The downside of SAN booting is that loss of connectivity between the host and storage system can prevent the host from booting. Be sure to use a reliable connection to the storage system. There are two options for SAN booting a Windows host: Fibre Channel HBA Requires one or more supported adapters. These same adapters can also be used for data LUNs. The Data ONTAP DSM for Windows MPIO installer automatically configures required HBA settings. iscsi software boot Requires a supported network interface card (NIC) and a special version of the Microsoft iscsi software initiator. For information on iscsi software boot, see the vendor (Intel or IBM) documentation for the iscsi boot solution you choose. Also, see Technical Report Related tasks Setting up a SAN boot LUN for Windows Server on page 93 Downloading the iscsi software initiator on page 32 Related information Technical Report Support for non-english operating system versions Data ONTAP DSM for Windows MPIO is supported on all Language Editions of Windows Server. All product interfaces and messages are displayed in English. However, all variables accept Unicode characters as input.
26 26 Installing the DSM Complete the following tasks in the order shown to install the DSM and related software components. 1. Verifying your host configuration on page Stopping host I/O and the cluster service on page Installing Windows hotfixes on page Removing or upgrading SnapDrive for Windows on page Confirming your storage system configuration on page Configuring FC HBAs and switches on page Checking the media type of FC ports on page Configuring iscsi initiators on page Enabling ALUA for FC paths on page Obtaining a DSM license key on page Installing PowerShell 2.0 on page Installing.NET framework on Windows Server 2003 or 2008 on page DSM installation options on page Configuring Hyper-V systems on page 40 Related concepts Tasks required for installing and configuring the DSM on page 8 Windows Administrator account option on page 12 Verifying your host configuration Verify your configuration before you install or upgrade the DSM. 1. Use the Interoperability Matrix to verify that you have a supported combination of the following components: Data ONTAP software Windows operating system SnapDrive for Windows software Fibre Channel host bus adapter model, driver, and firmware Fibre Channel switch model and firmware version After you search for your configuration and click a configuration name, details for that configuration display in the Configuration Details dialog box. In this dialog box, be sure to review the information in the following tabs: Notes Lists important alerts and notes that are specific to your configuration. Review the alerts to identify the hotfixes that are required for your operating system.
The following post
runs through a complete install of the NetApp Software Stack on a Windows
Server 2008 R2 SP1 to which NetApp storage is to be attached.
— FC Host Utilities for Windows
— iSCSI Host Utilities for
Windows
— Multipath I/O for Windows
Note: The links for FC Host Utilities and iSCSI Host Utilities both
lead to downloading the Windows Host Utilities.
Installation Order
1. FC/iSCSI Host Utilities for
Windows
2. Multipath I/O for Windows
Latest Versions
For this post we will use a
fully patched Windows Server 2008 R2 SP1 box and these latest versions:
— FC/iSCSI Host Utilities for
Windows: Windows Host Utilities 6.0.2 (11 April 2013)
— Multipath I/O for Windows:
Data ONTAP DSM 4.0 for Windows MPIO (14 Feb 2013)
— SnapDrive for Windows:
SnapDrive 6.5
Installing
NetApp FC/iSCSI Host Utilities
The Windows Host Utilities require the following hotfixes
to be downloaded and installed first (the installer will prompt for these to be
installed if they haven’t been already):
Q2528357 — storport.sys
(Required: 6.1.7601.17610)
Q2684681 — msiscsi.sys
(Required: 6.1.7601.17792.21938)
Q2754704 — mpio.sys
(Required: 6.1.7601.18015.22177)
Note: When
downloading the hotfix, tick only the Windows 7/Windows Server 2008 R2 SP1 checkbox
(Windows version 6.1)
Double-click the downloaded hotfixes to unpack:
432658_intl_x64_zip.exe
445355_intl_x64_zip.exe
456116_intl_x64_zip.exe
Double-click the patches to install:
Windows6.1-KB2528357-v2-x64.msu
Windows6.1-KB2684681-x64.msu
Windows6.1-KB2754704-x64.msu
Reboot to complete the hotfix installs.
Double-click the downloaded netapp_windows_host_utilities_6.0.2_x64.msi to install the NetApp
Windows host utilities.
Image: Welcome to
the NetApp Windows Host Utilities 6.0.2 Setup Wizard

Follow through the wizard, accepting the EULA.
Select whether to install support for Multipath I/O or
not.
Note: Selecting ‘Yes,
install support for Multipath I/O’ automatically installs the Windows Server
2008 R2 feature ‘Multipath I/O’.
Image: NetApp Windows
Host Utilities Support for Multipathing?

Choose an install location (default is C:Program FilesNetAppWindows Host
Utilities).
Complete the wizard, and then click Install and — once
complete — click Finish.
Reboot to complete the host utilities install.
The install will create a folder in All Programs for >
NetApp > Windows Host Utilities, with a shortcut to SAN Version
Image: All Programs
> NetApp > Windows Host Utilities

In the install folder — ‘C:Program FilesNetAppWindows
Host Utilities’ — contains:
LinuxGuestConfig.iso,
mbralign.exe, san_version.exe, sanpolicy.txt
In ‘C:Program FilesNetAppWindows Host UtilitiesNetAppQCLI’
we have (amongst other files):
enable_disable_x64.exe,
fcconfig.exe, qaucli.exe, qlnic.exe
Installing NetApp
Multipath I/O for Windows
Note: It is not
essential for this to be installed for the server to understand multipath to
NetApp storage. Windows Server 2008 R2 MPIO natively has support for NetApp.
Image: Windows
Server 2008 R2 MPIO Devices pre NetApp Multipath I/O install.

Double-click the downloaded ntap_win_mpio_4.0_setup_x64.msi to install NetApp Multipath I/O for
Windows.
Note: With the
NetApp Windows Host Utilities already installed, no patches are required here.
Image: Welcome to
the Data ONTAP DSM for Windows MPIO Setup Wizard

Click OK to the ‘Data ONTAP(R) DSM requires ALUA to be
enabled on your storage controller for the associated FC igroups’.
Enter the 14-character license key.
Image: Data ONTAP
DSM for Windows requires a License Key!

Specify the account information for the installed
services.
Image: Data ONTAP
DSM Management Service

Select whether to install Hyper-V Guest Utilities or not.
Image: Data ONTAP
DSM for Windows — Hyper-V Guest Utilities

Verify the driver information before installing or updating.
Image: Data ONTAP
DSM for Windows — Driver Information

Choose an install location (default is C:Program FilesNetAppMPIO)
Reboot to complete the NetApp Multipath I/O for Windows
install.
Image: Windows
Server 2008 R2 MPIO Devices post NetApp Multipath I/O install.

Note: The NetApp
Data ONTAP DSM install does not add anything to All Programs.
Installing
NetApp SnapDrive for Windows
Double-click the downloaded SnapDrive6.5_x64.exe to install NetApp SnapDrive for Windows.
Follow through the SnapDrive — Installation Wizard.
Image: SnapDrive
Installation Wizard

SnapDrive can be licensed in two ways, either ‘Per
Storage System’ or ‘Per Server’. If per-server then a Valid SnapDrive License
Key is required before continuing!
Image: SnapDrive
Installation Wizard — SnapDrive License

Enter Customer Information.
Choose an install location (default is C:Program FilesNetAppSnapDrive)
Tick or not the box to ‘Enable SnapDrive to communicate
through the Windows Firewall’
(If required) Enable SnapDrive with VMware vCenter
integration and specify the account information for the installed services.
Image: SnapDrive —
VirtualCenter or ESX Server Web Service Credentials

(If required) Enable SnapDrive with Virtual Storage
Console integration and specify VSC details.
Image: SnapDrive —
Virtual Storage Console Details

Specify SnapDrive Service Credentials.
Image: Specify
SnapDrive Service Credentials

Specify SnapDrive Web Service port configuration. The
default SnapDrive ports are:
808 —
SnapDrive Web Service Tcp/Ip Endpoint
4094 —
SnapDrive Web Service HTTP Endpoint
4095 —
SnapDrive Web Service HTTPS Endpoint
Specify the Transport Protocol Default Setting — RPC,
HTTP, or HTTPS.
Image: SnapDrive —
Transport Protocol Default Setting

Specify SnapDrive Protection Manager integration.
Image: SnapDrive —
OnCommand Configuration

A reboot is
not
required after installing
SnapDrive.
After install, SnapDrive is available via All Programs
> NetApp > SnapDrive.
The following Windows Services exist in services.msc:
— Data ONTAP VSS
Hardware Provider / navssprv.exe (Manual — only runs when in use)
— SnapDrive /
swsvc.exe (Automatic — Started)
— SnapDrive
Management Service / sdmgmtsvc.exe (Automatic — Started)
THE END
Image: Windows
Server 2008 R2 > Programs and Features — showing the installed NetApp
software stack
![]()
Latest (downloaded
16/05/2013):
Data ONTAP DSM for
Windows MPIO — 4.0.4594.1228
NetApp Windows Host
Utilities 6.0.2 — 6.0.4649.1236
SnapDrive — 6.5.0.5474
В этой статье мы рассмотрим особенности реализации, установки и настройки MPIO в Windows Server 2016/2012 R2. Многопутевый ввод-вывод (MPIO) или многопутевый ввод-вывод – это технология для создания отказоустойчивого транспорта к системе хранения (SSS) или серверу, которая выполняет эти функции с использованием избыточных путей. Дополнительные пути между сервером и хранилищем создаются с использованием избыточных физических компонентов (коммутаторов, кабелей, адаптеров или сетевых карт). Недостатком такой избыточности является то, что операционная система может видеть один и тот же LUN в разных местах и обрабатывать их как разные устройства.
Если сервер может получить доступ к логическому диску (LUN) через несколько адаптеров инициатора iSCSI или несколько портов Fibre Channel, диспетчер устройств / дисков в системе без установленного модуля MPIO будет иметь больше LUN, чем фактически представлено (= количество путей к LUN * количество представленных LUN).
На снимке экрана ниже показано (список подключенных дисков можно просмотреть с помощью get-disk), который Windows видит без MPIO, видит 2 диска в разных путях, которые на самом деле являются LUN:

Если операционная система поддерживает MPIO, она увидит каждый из дисков, представленных в копии. Когда MPIO включен, сервер может получать доступ к данным в системе хранения по различным путям, что увеличивает скорость доступа к подключенному LUN и позволяет использовать для доступа несколько сетевых адаптеров или HBA.
MPIO может использовать альтернативный логический путь в случае отказа одного или нескольких компонентов, вынуждая операционную систему использовать резервный маршрут для доступа к логическому диску (LUN), сохраняя непрерывность доступа к данным. Следовательно, MPIO является важным компонентом в реализации отказоустойчивой системы доступа к данным, кроме того, модули, включенные в MPIO, позволяют распределять нагрузку между разными путями к одному и тому же LUN.
Совет. Если ваша операционная система не поддерживает MPIO, чтобы предотвратить потерю данных, вам необходимо уменьшить количество путей к LUN до 1. На сервере вам нужно оставить включенным только порт Fibre Channel или адаптер iSCSI инициатора. Вы также должны отключить дополнительные пути для этого LUN на уровне хранилища и коммутатора.
Windows Server поддерживает многопутевый ввод-вывод MPIO из Windows Server 2008 R2. Технология Microsoft MPIO обеспечивает высокую доступность и балансировку нагрузки с возможностью организации нескольких подключений к системам хранения, не зависит от протокола и поддерживает подключение дисков и массивов хранения через iSCSI, Fibre Channel и хранилище SAS.
Модуль MPIO не включен по умолчанию в Windows Server. Установить его на Windows Server 2016 можно двумя способами:
- Из графического интерфейса с помощью консоли Server Manager
- Из командной строки Powershell
Установка MPIO с помощью консоли Server Manager
- Откройте консоль Server Manager;
- В списке Features найдите и включите опцию multipath I / O;

- Завершите установку компонента MPIO и перезапустите сервер.
Установка MPIO с помощью Powershell
Запустите консоль PowerShell от имени администратора и выполните команду для установки компонента:
Add-WindowsFeature -Name 'Multipath-IO'

Чтобы убедиться, что модуль MPIO установлен на вашем сервере Windows, запустите:
Get-WindowsFeature -Name 'Multipath-IO'
Примечание. Чтобы отключить MPIO, выполните команду:
Remove-WindowsFeature -Name 'Multipath-IO'
Настройка MPIO в Windows Server 2016
После установки модуля MPIO вам необходимо активировать его для LUN, доступных в разных местах. По умолчанию операционная система видит каждое подключение к диску как отдельный логический диск (LUN).
Совет. Одним из компонентов MPIO является специальный модуль Microsoft Device Service Module (MSDSM), который позволяет управлять политиками балансировки нагрузки. По умолчанию MPIO устанавливается вместе со стандартным Microsoft DSM, но в большинстве случаев стоит установить модуль DSM, предоставленный поставщиком хранилища (IBM DSM, HP DSM MPIO и т.д.). Обычно скорость и функциональность нативного модуля DSM выше, чем у стандартного модуля Microsoft DSM (производитель пишет свои модули DSM с учетом специфики работы и характеристик своего оборудования)/
Разрешить Microsoft DSM (MSDSM) автоматически объединять блоки SAN в зависимости от типа подключения. MSDSM автоматически определяет наличие LUN с несколькими путями к системам хранения и поддерживает самые популярные системы хранения.
Это можно сделать из командной строки:
- Для дисков SAS:
Enable-MSDSMAutomaticClaim -BusType SAS
- Для дисков iSCSI:
Enable-MSDSMAutomaticClaim -BusType iSCSI
Примечание. Эту же операцию можно выполнить с помощью утилиты mpclaim (представленной в Windows 2008 R2). Следующая команда просканирует все устройства, обнаруженные системой, определит, какие из них имеют несколько путей, и включит для них поддержку MPIO. Параметр
-r
[автоматический перезапуск (при необходимости) без запроса] включает автоматический перезапуск сервера:
mpclaim.exe -r -i -a ""
Вы также можете включить DSM через графический интерфейс. Откройте административную консоль Server Manager и выберите MPIO в меню «Инструменты» (или запустите команду mpiocpl).
Перейдите на вкладку «Обнаружение нескольких путей», включите параметр «Добавить поддержку устройства SAS» (или «Добавить поддержку устройства iSCSI», если вы используете хранилище iSCSI) и нажмите «Добавить». Затем перезапустите сервер.
После перезагрузки откройте Диспетчер устройств или Управление дисками и убедитесь, что количество подключенных дисков (LUN), доступных серверу, уменьшилось в 2 раза (при наличии двунаправленных подключений к системе хранения).
вы можете управлять списком устройств, для которых включена поддержка MPIO, на вкладке «Устройства MPIO» (или с помощью команды
Get-MSDSMSupportedHw
).
Вы можете добавить новые устройства MPIO, нажав кнопку «Добавить» или из PowerShell:
New-MSDSMSupportedHw -VendorId <vend> -ProductId <product>
При настройке кластера настройку MPIO необходимо выполнить на всех узлах.
Если вы подключаете цель iSCSI через 2 пути и хотите использовать MPIO для этого подключения, вам необходимо выбрать iSCSI LUN при подключении цели, нажать кнопку «Подключить» и включить параметр «Включить многопутевый режим.
Затем нажмите кнопку «Дополнительно» и сопоставьте разные IP-адреса инициатора с разными IP-адресами назначения.
Используя PowerShell, вы можете получить текущие настройки MPIO:
Get-MPIOSetting
PathVerificationState: отключено PathVerificationPeriod: 30 PDOremovePeriod: 20 RetryCount: 3 RetryInterval: 1 UseCustomPathRecoveryTime: отключено CustomPathRecoveryTime: 40 DiskTimeoutValue: 60
вы можете изменить настройки таймера MPIO следующим образом (например, установить рекомендуемые настройки для флеш-массива):
Set-MPIOSetting -NewPathRecoveryInterval 20 -CustomPathRecovery Enabled -NewPDORemovePeriod 30 -NewDiskTimeout 60 -NewPathVerificationState Enabled
Доступны следующие критерии балансировки MPIO:
- FOO – Только аварийное переключение
- RR – круговая система
- LQD – Минимальная глубина хвоста
- LB – Минимальные блоки
Чтобы настроить политику балансировки (например, Round Robin):
Set-MSDSMGlobalLoadBalancePolicy -Policy RR
Также политику балансировки можно изменить в свойствах подключенного LUN на вкладке MPIO. В этом примере для массива выбран циклический перебор.
Чтобы увидеть полный список команд PowerShell, доступных в модуле MPIO, выполните команду:
Get-Command –Module Mpio
SAN Policy
В Windows есть специальная политика SAN, которая определяет, должны ли диски монтироваться автоматически при подключении к хосту.
Текущий параметр политики SAN можно получить с помощью diskpart. Политика SAN по умолчанию – Shared Offline.
именно из-за этой политики SAN внешние диски, подключенные к системе хранения, могут отключаться при перезагрузке. См. Статью «Диск отключен в соответствии с политикой, установленной администратором”.
Для автоматического монтирования дисков необходимо изменить значение политики SAN на OnlineAll.
DISKPART> san policy=OnlineAll
Возможные значения политики SAN:
| OfflineВсе | По умолчанию все диски отключены |
| Автономный Внутренний | Все агрегаты на внутренних шинах отключены |
| Общий доступ в автономном режиме | Все диски подключены через iSCSI, FC или SAS в автономном режиме |
| ОнлайнВсе | Все диски автоматически переводятся в онлайн (рекомендуется) |
Источник изображения: winitpro.ru