
- Remove From My Forums
-
Вопрос
-
подскажите, можно ли и как откатиться до лицензии 2012 r2
процессор один, физических ядра 4
Все ответы
-
подскажите, можно ли и как откатиться до лицензии 2012 r2
процессор один, физических ядра 4
Здравствуйте.
Юридически — можно.
Технически — в зависимости от способа покупки Windows Sever 2019 (ОЕМ, коробка, корп.лицензия), о котором Вы ничего не сказали.
-
Технически — в зависимости от способа покупки Windows Sever 2019 (ОЕМ, коробка, корп.лицензия), о котором Вы ничего не сказали.
Технически тоже никаких проблем.
Если это ОЕМ-поставка, то приезжает ОЕМ и устанавливает нужную ОС.
Если «коробка», то ТС сам достаёт дистрибутив любым
законным способом.-
Изменено
10 февраля 2020 г. 9:15
-
Изменено
-
2019 еще не куплен
подскажите оптимальный вариант покупки в таком случае?
оем наверное не вариант, коробку или корп?
А ключик где взять для 2012r2 при таком раскладе?
-
Изменено
modd
10 февраля 2020 г. 9:40
-
Изменено
-
А ключик где взять для 2012r2 при таком раскладе?
У того, у кого покупаете.
-
ну если я просто коробку покупаю, сомневаюсь что мне ТАМ дадут ключик для 2012
-
А Вы заранее узнайте у продавца, предоставляют ли они ключи для понижения редакции.
-
Все понял, всем огромное спасибо
-
2019 еще не куплен
подскажите оптимальный вариант покупки в таком случае?
Оптимальный вариант — лицензии Open Value. Выглядят они так:
9EM-00717 — WinSvrSTDCore 2019 SNGL OLV 16Lic NL Each AP CoreLic — это лицензия на сервер
R18-05907 — WinSvrCAL 2019 SNGL OLV NL Each AP DvcCAL — это лицензия на устройство человека (пользователя сервера)
R18-05908 — WinSvrCAL 2019 SNGL OLV NL Each AP UsrCAL — это лицензия на человека (пользователя сервера)После покупки лицензий, компания Microsoft предоставит на сайте
VLSC доступ к дистрибутивам и ключам 2019, 2016 и 2012R2. Данные лицензии разрешают перенос на другое устройство.Касательно прочих лицензий:
Лицензия ОЕМ стоит дешевле и, потому, выглядит вкуснее. Но она запрещает перенос Windows Server на другое устройство и тех.поддержку оказывает Сборщик устройства, а не компания Microsoft.
Коробка стоит дорого, но у нее есть важное преимущество — это обезличенная лицензия, разрешающая перенос на другое устройство.
При анализе используемых серверных лицензий в сети с KMS сервером мы обнаружили, что на одном из серверов установлена значительно более дорогая редакция Windows Server Datacenter, чем требуют задачи, запущенные на сервере (на сервере не используется виртуализация, S2D, Azure Stack, Storage Replica и прочее). Возникала идея изменить (понизить) редакцию установленного Windows Server 2016 Datacenter на Standard в целях экономии более дорогих лицензий. Чистую переустановку Windows Server мы не рассматривали, потому что на сервере уже настроены ряд ролей и установлено дополнительное ПО, лицензии которого жестко привязаны к ОС и железу.

Несмотря на то, что Microsoft поддерживает только апгрейд редакции Windows Server с младшей на старшую с помощью DISM (см. статью о конвертировании ознакомительной версии Windows Server), вы можете выполнить и обратную процедуру – downgrade версии Datacenter до Standard с сохранением всех текущих настроек и установленных ролей, программ.
Важно! Microsoft официально не поддерживает даунгрейд редакции Windows Server со старшей на младшую. Официально рекомендуемый способ – чистая переустановка ОС. Поэтому, все описанные ниже действия вы производите на свой страх и риск.
Настоятельно рекомендуем перед выполнением даунгрейда сделать бэкап системы (хотя бы через Windows Server Backup).
Также будьте внимательны при выполнении даунгрейда Windows Server с ролью контроллера домена AD. Желательно сначала перенести с него FSMO роли и понизить его до рядового сервера домена (предварительно сделайте бэкап DC, к которому можно будет вернуться при проблемах).
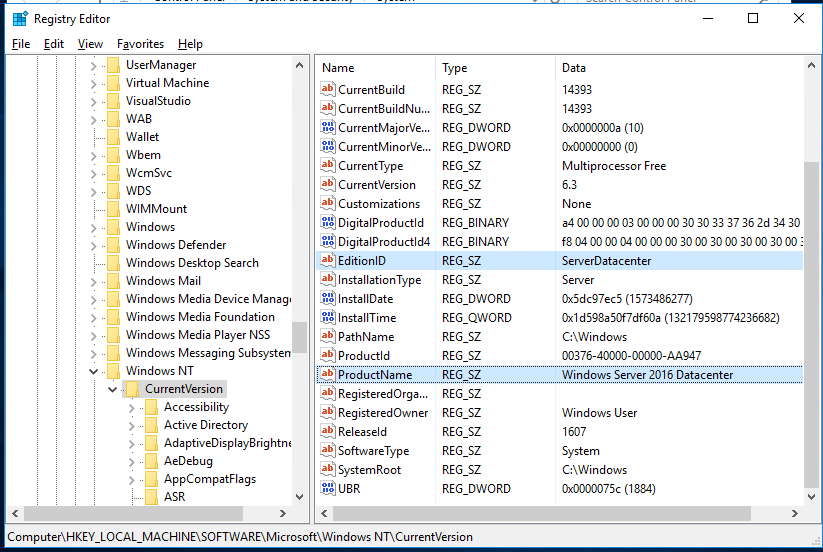
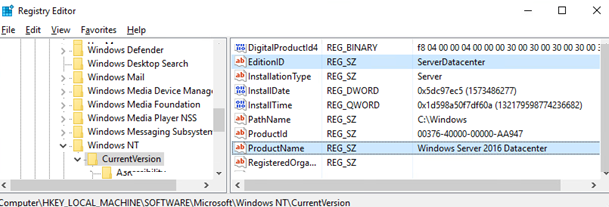
- На работающем Windows Server 2016 Datacenter запустите редактор реестра и перейдите в ветку HKEY_LOCAL_MACHINESOFTWAREMicrosoftWindows NTCurrentVersion;
- Проверьте значения следующих REG_SZ параметров: EditionID = ServerDatacenter, ProductName = Windows Server 2016 Datacenter;

- Измените значения параметров следующим образом: EditionID на ServerStandard, ProductName на Windows Server 2016 Standard;

- Закройте редактор реестра;
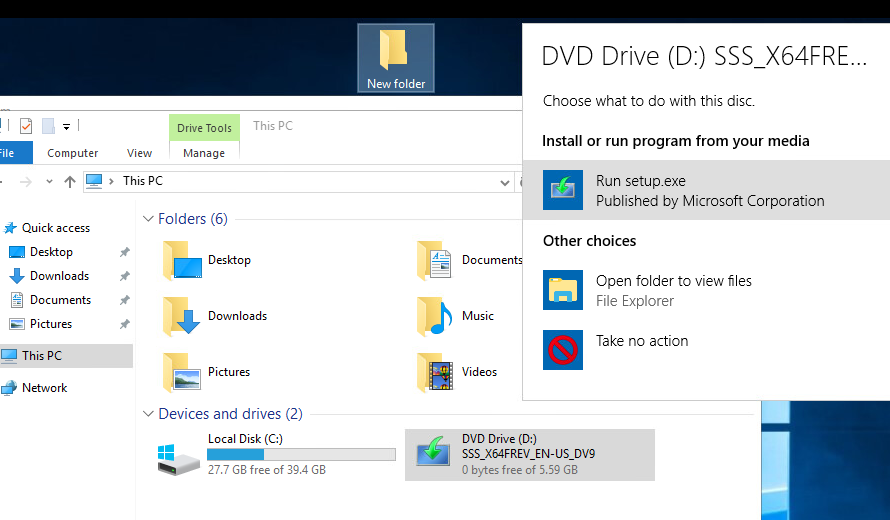
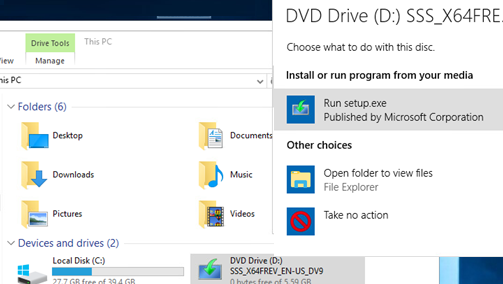
- Смонтируйте установочный ISO образ с Windows Server 2016 и запустите мастер установки (setup.exe);

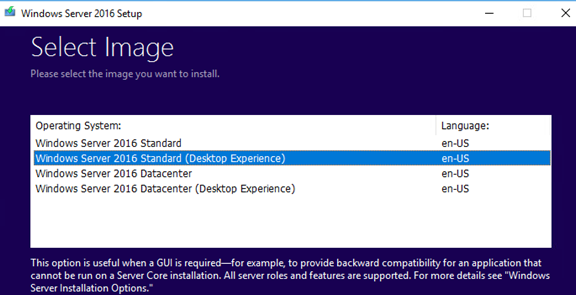
- При выборе вариантов установки в окне Windows Server Setup выберите Upgrade и редакцию Windows Server 2016 Standard (Desktop Experience);

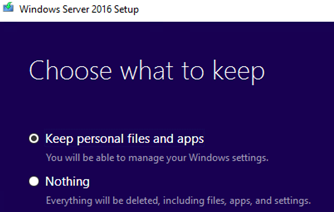
- Укажите, что вы хотите сохранить персональные данные и установленные программы — Keep personal files and apps (если эта опция недоступна, проверьте каталог установки Windows);

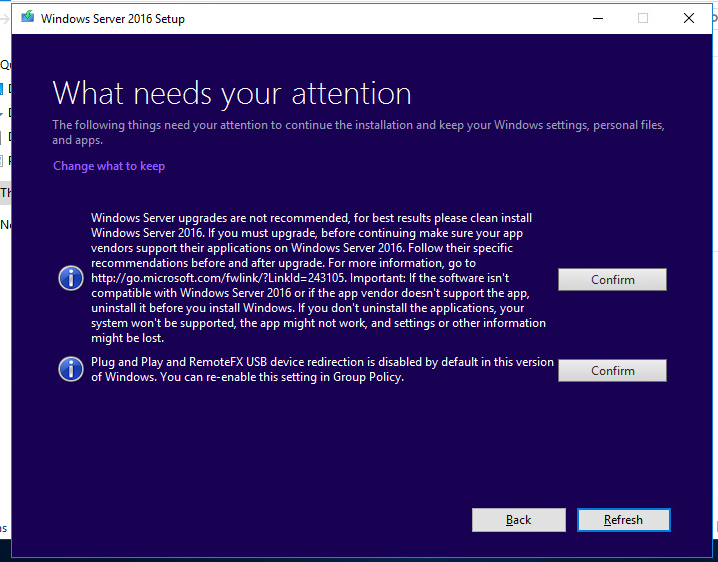
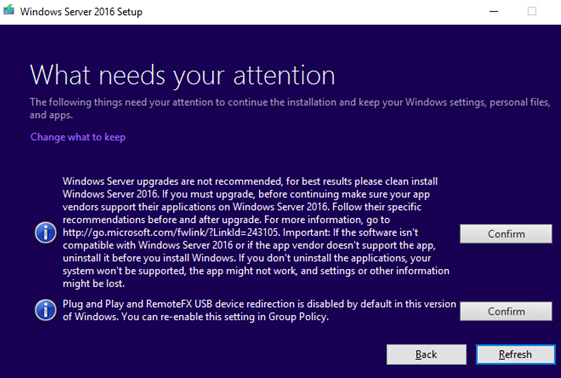
- Нажмите на кнопку Confirm у каждого обнаруженного пункта. В моем случае в первом пункте было указано, что апгрейд версии Windows Server не рекомендуется, лучше выполнить чистую установку; во втором – в этой версии Windows по-умолчанию отключены PnP и RemoteFX USB перенаправление устройств;

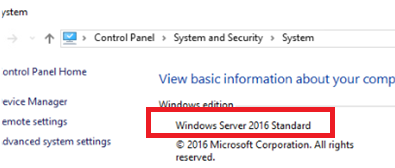
- Запустите обновление Windows, дождитесь его окончания и после нескольких перезагрузок проверьте, что теперь на сервере запущена редакция Windows 2016 Standard.


Данный способ даунгрейда должен работать во всех поддерживаемых версиях Windows Server (2012R2/2016/2019). Кроме того, вы можете использовать его для даунгрейда с обновлением версии, например, с Windows Server 2012 R2 Datacenter до Windows Server 2019 Standard (хотя это также не рекомендуемый сценарий).

DragonsRule

This person is a verified professional.
Verify your account
to enable IT peers to see that you are a professional.
pure capsaicin
Microsoft Licensing Expert
-
check
215
Best Answers -
thumb_up
874
Helpful Votes -
format_list_bulleted
1
How-to
Actually I am going to buy 7 licenses for 7 severs. And another 50 licenses from OLP 2lic NL CoreLic. Is it enough? Do I need to buy CAL?
mohammadksaeed wrote:
I mean is it enough to be in VL program?
You need 5 to get into the program, so yes, 7 is enough.
1 found this helpful
thumb_up
thumb_down
I’ve talked a lot about the benefits of Windows Server 2019 and why customers should start making migration plans before the Windows Server 2008 End of Support date. But, what if your customers aren’t ready to run Windows Server 2019 yet… perhaps they are using legacy business applications that have not yet migrated to the latest technology…
Windows Server 2019 Downgrade Rights
Did you know that many Microsoft software products, including Windows Server 2019 OEM licenses from HPE, include the right to use an earlier version of the software in place of the version that was licensed? These are called “Downgrade Rights”. In addition, Windows Server 2019 OEM license from HPE offer “Down-Edition Rights”, which allow users to run an instance of a lower edition (here, “edition” refers to the named version: Essentials, Standard, Datacenter) of the same generation of Windows Servers. Note: this is applicable only for certain products, and permitted under the product license terms.
In addition, downgrade and down-edition rights can be combined! Let’s look at an example… Let’s say your customer purchases a Windows Server 2019 Datacenter license. Using downgraded and down-edition rights, they could deploy a Windows Server 2016 Standard Virtual Machine!
Microsoft Downgrade Licenses: How do Downgrade and Down-Edition Rights Benefit Customers?
If you’re wondering why customers would need to run a different generation or edition of Windows Server that is a great question. Downgrade and down-edition rights simplify application migration scenarios for customers by allowing them to license the newest Windows Server product, then run an earlier version and/or down-edition of Windows Server to support legacy business applications that have not yet migrated to the latest technology, until they are ready to migrate to the purchased Windows Server license. Then, once they are ready, they can migrate to the purchased license.
HPE offers downgrade and down-edition kits that include installation media and product key in accordance with Microsoft OEM policies—some options may get discontinued over time, and some options are never released through the OEM downgrade/down-edition program. Most kits are available at the time of server purchase but can also be ordered after the server purchase. Downgrade kits will be fulfilled by Hewlett Packard Enterprise ONLY for a Windows Server license purchased directly from HP, Hewlett Packard Enterprise or any of our authorized Resellers.
Microsoft Server Downgrade Rights: What Your Customers Want to Know
HPE OEM Windows Server licensed customers who wish to exercise their downgrade or down-edition rights have two options.
1) With server purchase: When a customer purchases an HPE OEM Windows Server license along with a new HPE ProLiant Server, they can request the downgrade at the time of purchase. Most common downgrade options are available from the factory and include a DVD installation media and a product key.
2) After server purchase: Customers may also obtain a downgrade kit after the initial HPE OEM Windows Server product purchase by placing a request online at https://ebiz3.mentormediacorp.com/HPEDGRCR/.
Customers must be able to provide proof of purchase (such as a photo of the Microsoft Certificate of Authenticity (COA) showing the physical 5×5 Windows Server product key for the purchased HPE OEM Windows Server product). HPE can fulfill a downgrade kit for the same server OS only one time.

With Windows Server 2008 End of Support quickly approaching, many customers will need to migrate to a current, supported, version of Windows Server such as Windows Server 2019. If they think they’re not ready for Windows Server 2019, remind them of their downgrade and down-edition rights!
Willa Anderson
Hewlett Packard Enterprise
twitter.com/CoffeeCoaching
linkedin.com/in/groups/3413248/
hpe.com/info/CoffeeCoaching
|
Вопрос: Dowgrade Windows Server 2019 FPP
Здравствуйте.
Воспользоваться этим правом разрешается так, как написано в EULA Windows Server 2019 пункт 5.b «Права на переход к использованию более ранней версии». Образец EULA Windows Server 2019 доступен по ссылке — https://www.microsoft.com/en-u К сожалению, в EULA нет ответов на самые важные вопросы: 1. где взять дистрибутив предыдущей версии Windows Server? Тут нужно понимать, что компания Microsoft не заинтересована в простоте реализации права Downgrade, т.к. чем меньше на этой планете установлено старых версий, тем дешевле процессы поддержки выпущенных продуктов внутри компании Microsoft. Поэтому, право Downgrade есть, но его реализация не имеет регламента. Источник дистрибутива предыдущей версии — коробка на предыдущую версию. Другим легальным способом невозможно получить коробочный дистрибутив предыдущей версии. Источник ключа — коробка на предыдущую версию или, в случае ее утери, Центр активации продуктов Microsoft.
|
.png)
When analyzing the server licenses used in our corporate network (with a KMS server deployed) we found that a more expensive Windows Server Datacenter edition is installed on one of the host. At the same time the server does not use Datacenter features such as virtualization, S2D, Azure Stack, Storage Replica, etc. There was an idea to change (downgrade) the installed Windows Server 2016 Datacenter to Standard edition to save money. We did not consider clean Windows Server reinstallation, because some roles are already configured, and additional software with hardware-related licenses had been installed on the server.

Although Microsoft supports only Windows Server edition upgrade using DISM (see the article on how to convert Windows Server Evaluation to licensed version), you can also perform a reverse procedure and downgrade the Datacenter edition to Standard one keeping all current settings, installed roles and apps.
Important! Officially Microsoft does not support the downgrade of a higher Windows Server edition to a lower one. The officially recommended method is a clean OS installation. So you may follow the steps described below at your own risk.
We strongly recommend to backup your operating system image before performing a downgrade (at least through Windows Server Backup).
Also be very careful when downgrading a Windows Server with the ADDS domain controller role installed. It is better to transfer the FSMO roles and demote it from a DC to domain-member server (before you do it, backup your domain controller and you can restore the DC from a backup in case of any issues).
- On a running Windows Server 2016 Datacenter, open the Registry Editor and go to reg key HKEY_LOCAL_MACHINESOFTWAREMicrosoftWindows NTCurrentVersion;
- Check the values of the following REG_SZ parameters: EditionID = ServerDatacenter, ProductName = Windows Server 2016 Datacenter;
- Change the values as follows:
EditionIDto ServerStandard,ProductNameto Windows Server 2016 Standard;
- Close the rgedit.exe;
- Mount the installation Windows Server 2016 ISO image and run the setup wizard (setup.exe);
- When selecting the install options in the Windows Server Setup window, select Upgrade and Windows Server 2016 Standard (Desktop Experience) edition;
- Check the option Keep personal files and apps (if this option is unavailable with the message “
You can’t keep Windows settings, personal files, and apps because your current version of Windows might be installed in a unsupported directory”, check the following post); - Click on the Confirm button for items found. In my case, the first item said that a Windows Server upgrade is not recommended, and it was better to clean install the OS, and the second one said that PnP and RemoteFX USB device redirection were disabled in this Windows version by default;
- Start the Windows Server update. Wait till it is over and after several restarts make sure that Windows 2016 Standard edition is now running on the host.
This downgrade method should work for all supported Windows Server versions (2012R2/2016/2019). Also you can use it to downgrade and update the version, for example from Windows Server 2012 R2 Datacenter to Windows Server 2019 Standard (although it is not recommended either).
32 comments

Iqbal
August 25, 2020 — 9:04 am
Awesome!! This is really worked well. Thanks 🙂
Reply

Teronbytes
January 19, 2023 — 1:13 pm
Y r a Machine God kkkkk, worked wonderfully
Reply

Scott
September 17, 2020 — 3:57 pm
This works, but after when looking at the local server in the Server Administrator the Product ID shows as Unknown. Any way to fix this?
Reply

Vlad
October 14, 2020 — 4:34 pm
Hey guys,
Its not working for me, after modifying the registry and running the setup.exe again I do not get the screen to pick the version but instead whether I want updated or not to my current version and no matter what I chose I am being asked for a SN which is obviously not accepting a standard one but a datacenter one.
Any ideas ?
Reply
Vlad
October 14, 2020 — 4:52 pm
apparently this is only possible for 2016, for 2019 it isnt working …
Reply

Matt
February 12, 2021 — 10:40 pm
See my comment below. It worked on 2019 for me.
Reply

ed
December 11, 2020 — 8:12 pm
super awesome cos it worked
Reply
Matt
February 12, 2021 — 10:38 pm
Worked for me on 2019. Accidentally installed the wrong version, then installed all my apps. Didn’t want to have to rebuild. With this procedure, downgraded 2019 Datacenter to Standard.
To the commenter above who says it didn’t work on 2019, there is another reg key to edit called “CompositionEditionID” … I also changed this from ServerDatacenter to ServerStandard before running the setup. Perhaps that’s necessary for it to work? I don’t know for sure as I didn’t try it without doing that. Just seemed to make sense to change that as well. 🙂
Reply

matt
February 16, 2021 — 4:34 pm
Thanks Matt, works for my 2019 accident also
Reply

steven
February 16, 2021 — 5:17 pm
Hey Matt,
u got the “unknown” state at the local server in the Server Administrator the Product ID and some other Entries too?
any solution so show the
Reply
steven
February 16, 2021 — 5:19 pm
Sry for typo,
any solution for this issue?
ps: worked and slmgr /dlv gives also the expected output (std).
Reply

Sebastian
March 3, 2021 — 7:25 am
Wehn i got to the point to pick what to keep, there is the prompt: “Your Files and Settings cannot be kept because you try to install an other version as the currently used”.
Reply

DSC
May 3, 2021 — 9:49 am
Works for my Windows Server 2019 Domain Controller with changing three (!) registry parameters:
CompositionEditionID = ServerDatacenter,
EditionID = ServerDatacenter,
ProductName = Windows Server 2019 Datacenter,
to ServerStandard / Windows Server 2019 Standard
Thx!
Reply
Server 2019 Standard to Datacenter
May 5, 2021 — 9:26 am
[…] Strangely I’m going the other way as Std Licencing was far cheaper than DC. It’s not an officially supported route (AFAIK) but it seems pretty straight forward. How to Downgrade Windows Server Datacenter to Standard Edition? | Windows OS Hub […]
Reply

premax
May 23, 2021 — 9:20 pm
This tutorial is perfect and this is the only one working on the Internet. I’ve just converted my Windows 2019 Datacenter Trial to Windows 2019 Standard Retail. Previously I have downloaded Windows 2019 Datacenter VHD from MS Website and installed AD, DNS, SQL and other stuff and really tried to avoid reinstalling all the stuff once again.
First (1), I’ve setup secondary AD controller and demoted my W2019 Datacenter.
Second (2), did the hack with HKLM registry (all three values updated: CompositionEditionID, EditionID, ProductName).
Then (3) I’ve downloaded VL ISO Windows 2019 Standard – it took me hours to find out that with Windows 2019 Standard TRIAL we cannot save files and apps! You really NEED to have a licensed copy of ISO (mine was: “SW_DVD9_Win_Server_STD_CORE_2019_1909.4_64Bit_English_DC_STD_MLF_X22-29333.ISO”) to be able to run setup and save the files and apps. If you use trial ISO, the first save option will be always greyed out.
And finally couple of reboots, and change of license to mine (slmgr.vbs /upk + slmgr.vbs /cpky + slmgr.vbs /ipk xxxxx-xxxxx-xxxxx-xxxxx + slmgr.vbs /ato) and I have working licensed Windows 2019 Standard. All is fine when querying via GUI or DISM /online /get-currentedition or sslmgr /dlv. Now will promote DC again, keep fingers crossed! PP
Reply

Veijo Jones
July 10, 2022 — 1:47 am
Thanks very much for posting your experience – it was exactly what my problem was and I was able to follow your steps to fix it.
Reply

Squuiid
November 4, 2021 — 1:08 pm
Worked perfectly from 2016 Datacenter to 2019 Standard.
Thank you!
ISO used: SW_DVD9_Win_Server_STD_CORE_2019_1809.18_64Bit_English_DC_STD_MLF_X22-74330.ISO
Reply

Thomas
January 7, 2022 — 12:51 pm
Unfortunately, this does not work for us. I have a 2019 Datacenter VM that I want to downgrade. I make the changes to the registry, boot from our image “Windows Server 2019 Datacenter SSS_X64FRE_DE-DE_DV9.iso”.
When I select “Upgrade”, the message appears:
The upgrade option is not available when you boot the computer using the Windows installation media.
Reply

Fernando
January 7, 2022 — 8:10 pm
you’re not supposed to boot from the iso. Just mount it and run setup.exe
Reply
Thomas
January 11, 2022 — 6:57 am
Ok, I run setup. I have to enter a license key to continue.
I enter the standard key, choose Windows Server Standard, continue and cannot choose to keep data.
“Your Files and Settings cannot be kept because you try to install an other version as the currently used”.
The same as Sebastian wrote.
Reply
Thomas
January 11, 2022 — 7:53 am
Got the solution. You MUST NOT reboot the machine after changing the values in the registry, or otherwise they will be reverted.
Reply
Thomas
January 11, 2022 — 9:43 am
Our AVMA key is not accepted in the “SAFE_OS” phase.
But I tried it once more with the general KMS key and changed it later, that worked.

LUCA
January 20, 2022 — 8:31 pm
i have the same problem on win19 .. can you give me the details pls ? “But I tried it once more with the general KMS key and changed it later, that worked.”
Reply
Thomas
January 22, 2022 — 9:20 pm
You can google for the KMS Key. That key is normally used with a key management system, a special server in your network. Therefore, that key is always accepted when installing and is later checked for validity. In our case, that key cannot be validated and so after reboot Windows is not activated. You can then provide a valid key and Windows gets activated.

Andrew Brand
April 5, 2022 — 8:40 am
Hi there – thanks for your guide. I’ve come across an issue where im unable to upgrade the server despite making the following reg key changes:
CompositionEditionID = ServerStandard,
EditionID = ServerStandard,
ProductName = Windows Server 2019 Standard,
When i try to update the server, the option to ‘Keep personal files and apps’ is greyed out. Below i get the following message, ‘your files, apps. and settings can’t be kept because you’re installing an edition of Windows that’s different thna the once you’re currently using’.
Have you got any guidance around what could help to resolve this issue?
Reply

admin
April 7, 2022 — 8:22 am
Double check check you Windows version and build number:
Get-ComputerInfo | select WindowsProductName, WindowsVersion, OsHardwareAbstractionLayer
Reply
Andrew Brand
April 22, 2022 — 3:57 pm
Hi We were able to complete these steps successfully. Just struggling to activate windows now… we get the following error code: 0x8007232B. Alternatively, i have tried to clear the key with CMD and input a legitimate key for 2019 Server Standard and getting the following error code: 0xC004E016.
Any thoughts on how we can get past this?
Reply
admin
May 12, 2022 — 7:14 am
0x8007232B: DNS name does not exist (The KMS client cannot find KMS server resource records (SRV RRs) in DNS)
0xC004E016 – The Software Licensing Service reported that the product key is invalid.
Reply

Zdenek
May 12, 2022 — 4:52 am
Hi all, it works perfect fot me from W2K12 DC to Std., also for W2k8. But now I’ve found one server with W2k8 R2 Enterprise and changing to Std. doesn’t not work – there is still greyed out “keep files” even for Std., even for Datacenter (tried w2k12,w2k16, w2k19, w2k22). Changing both keys – done. But there still in About this comp “Windows Server 2008 R2 Enteprise” (but both keys are changed), also tried restart.
any idea? thanks
Reply

Thibal
August 9, 2022 — 6:58 am
Thanks for the tip ! And what about moving an AD server from 2012 R2 datacenter to 2019 standard ? Is there any problem with the FSMO roles ?
Reply

Batuhan
October 24, 2022 — 6:18 am
Dear All, I had finished multiple downgrades (2019 Datacenter to Standard). Thank you very much for the article. FYI, if you are going to downgrade Hyper-V Host Server, please downgrade the guest machines first, afterwards, shutdown the guest machines and disable the automatic start of the guest machines before initiating downgrade process for Hyper-V host. This will give you a smooth operation. Best Regards,
Reply

Chad
February 2, 2023 — 8:20 pm
In 2019 I installed, configured, and deployed a Windows Server 2019 Domain Controller and Application Server ( RemoteApp ) before i realized the VHD I used was DataCenter Edition ( didn’t notice until I went to apply the licenses ). I could not find a way to downgrade at the time, and so I kicked the can down the road for a couple years by resetting the trial license before finding this article. I thought I was going to have to re-create the application server, which isn’t trivial to do ( due to SSL and what not ). Thanks You So Much!
Reply
Leave a Comment
Содержание
- Обновление Windows Server 2012 R2 до Windows Server 2019 Upgrade Windows Server 2012 R2 to Windows Server 2019
- Подготовка к обновлению на месте Before you begin your in-place upgrade
- Сбор данных To collect your info
- Выполнение обновления To perform the upgrade
- Действия по завершении обновления After your upgrade is done
- Проверка успешности обновления To make sure your upgrade was successful
- Downgrade редакции в Windows Server с Datacenter до Standard
- Как понизить контроллер домена и удалить роль AD DS
- Подготовка системы
- Перенос ролей контроллера домена
- Проверка состояния AD
- Понижение контроллера домена
- Графика
- Powershell
- Удаление роли AD DS
- Графика
- Powershell
- Вывод сервера из домена
- Графика
- Powershell
- Вопросы и ответы
Обновление Windows Server 2012 R2 до Windows Server 2019 Upgrade Windows Server 2012 R2 to Windows Server 2019
Если вы хотите сохранить существующее оборудование и все роли сервера, которые вы настроили, без сжатия сервера, необходимо выполнить обновление на месте. If you want to keep the same hardware and all the server roles you’ve already set up without flattening the server, you’ll want to do an in-place upgrade. При обновлении на месте вы переходите с более старой версии операционной системы на более новую, сохраняя свои параметры, роли сервера и данные. An in-place upgrade allows you to go from an older operating system to a newer one, while keeping your settings, server roles, and data intact. Эта статья поможет вам перейти с Windows Server 2012 R2 на Windows Server 2019. This article helps you to move from Windows Server 2012 R2 to Windows Server 2019.
Подготовка к обновлению на месте Before you begin your in-place upgrade
Перед началом обновления Windows Server рекомендуется выполнить сбор данных с устройств для диагностики и устранения неполадок. Before you start your Windows Server upgrade, we recommend that you collect some information from your devices, for diagnostic and troubleshooting purposes. Так как эти сведения предназначены для использования только в случае сбоя обновления, необходимо убедиться в том, что вы храните информацию в расположении, доступ к которому можно получить с вашего устройства. Because this information is intended for use only if your upgrade fails, you must make sure that you store the information somewhere that you can get to it off of your device.
Сбор данных To collect your info
Откройте командную строку, перейдите в c:Windowssystem32 , а затем введите systeminfo.exe. Open a command prompt, go to c:Windowssystem32 , and then type systeminfo.exe.
Скопируйте, вставьте и сохраните полученные сведения о системе в любом расположении на устройстве. Copy, paste, and store the resulting system information somewhere off of your device.
Введите ipconfig /all в командной строке, а затем скопируйте и вставьте полученные сведения о конфигурации в то же расположение, что и ранее. Type ipconfig /all into the command prompt, and then copy and paste the resulting configuration information into the same location as above.
Откройте редактор реестра, перейдите в куст HKEY_LOCAL_MACHINESOFTWAREMicrosoftWindowsNTCurrentVersion, а затем скопируйте и вставьте значения BuildLabEx (версия) и EditionID (выпуск) для Windows Server в то же расположение, что и выше. Open the Registry Editor, go to the HKEY_LOCAL_MACHINESOFTWAREMicrosoftWindowsNTCurrentVersion hive, and then copy and paste the Windows Server BuildLabEx (version) and EditionID (edition) into the same location as above.
После получения всех данных, относящихся к Windows Server, мы настоятельно рекомендуем создать резервную копию операционной системы, приложений и виртуальных машин. After you’ve collected all of your Windows Server-related information, we highly recommend that you backup your operating system, apps, and virtual machines. Кроме того, необходимо завершить работу, выполнить быструю миграцию или динамическую миграцию всех виртуальных машин, выполняющихся в данный момент на сервере. You must also Shut down, Quick migrate, or Live migrate any virtual machines currently running on the server. Во время обновления на месте виртуальные машины не могут работать. You can’t have any virtual machines running during the in-place upgrade.
Выполнение обновления To perform the upgrade
Убедитесь, что значение BuildLabEx указывает, что используется Windows Server 2012 R2. Make sure the BuildLabEx value says you’re running Windows Server 2012 R2.
Найдите установочный носитель Windows Server 2019 и выберите setup.exe. Locate the Windows Server 2019 Setup media, and then select setup.exe.

Выберите Да, чтобы начать процесс установки. Select Yes to start the setup process.
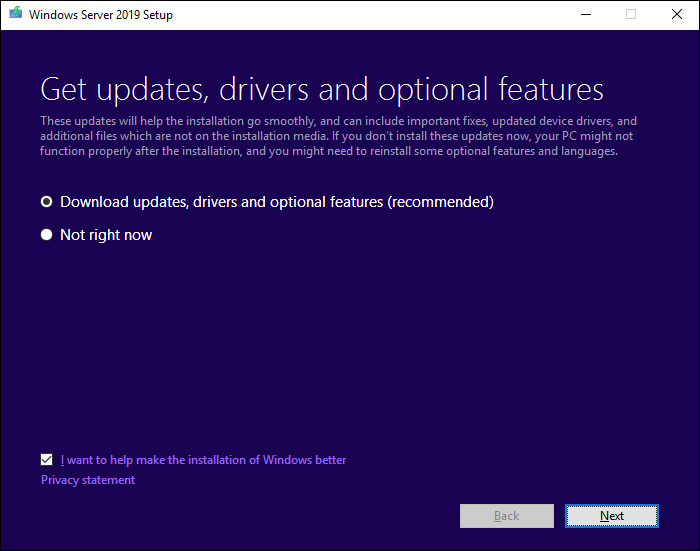
Для устройств, подключенных к Интернету, выберите вариант Скачать обновления, драйверы и дополнительные компоненты (рекомендуется) , а затем щелкните Далее. For internet-connected devices, select the Download updates, drivers and optional features (recommended) option, and then select Next.
Программа установки проверяет конфигурацию устройства. Дождитесь ее завершения и щелкните Далее. Setup checks your device configuration, you must wait for it to finish, and then select Next.
В зависимости от канала распространения, из которого был получен носитель Windows Server (розничная, корпоративная, OEM, ODM и т. д.) и лицензия на сервер, может появиться запрос на ввод лицензионного ключа для продолжения. Depending on the distribution channel that you received Windows Server media from (Retail, Volume License, OEM, ODM, etc.) and the license for the server, you may be prompted to enter a licensing key to continue.
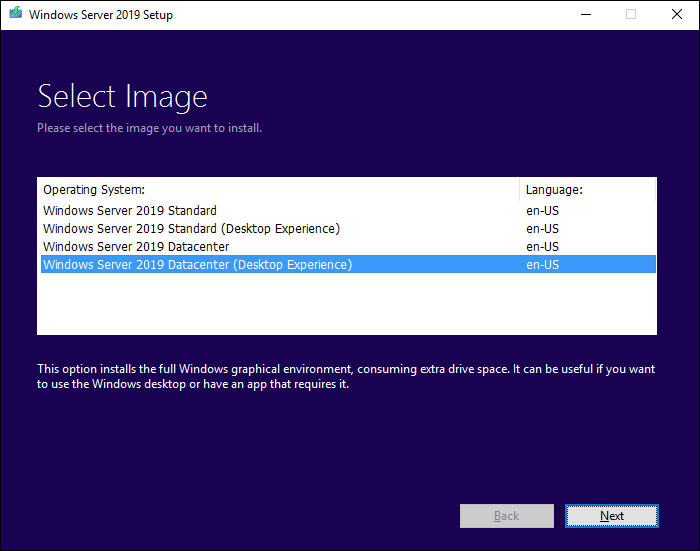
Выберите выпуск Windows Server 2019, который вы хотите установить, а затем щелкните Далее. Select the Windows Server 2019 edition you want to install, and then select Next.
Выберите Принимаю, чтобы подтвердить условия лицензионного соглашения, исходя из вашего канала распространения (например, розничная, корпоративная, OEM, ODM версия и т. д.). Select Accept to accept the terms of your licensing agreement, based on your distribution channel (such as, Retail, Volume License, OEM, ODM, and so on).

Программа установки предложит вам удалить модуль Microsoft Endpoint Protection через оснастку Установка и удаление программ. Setup will recommend that you remove Microsoft Endpoint Protection using Add/Remove programs.
Эта функция несовместима с Windows Server 2019. This feature isn’t compatible with Windows Server 2019.
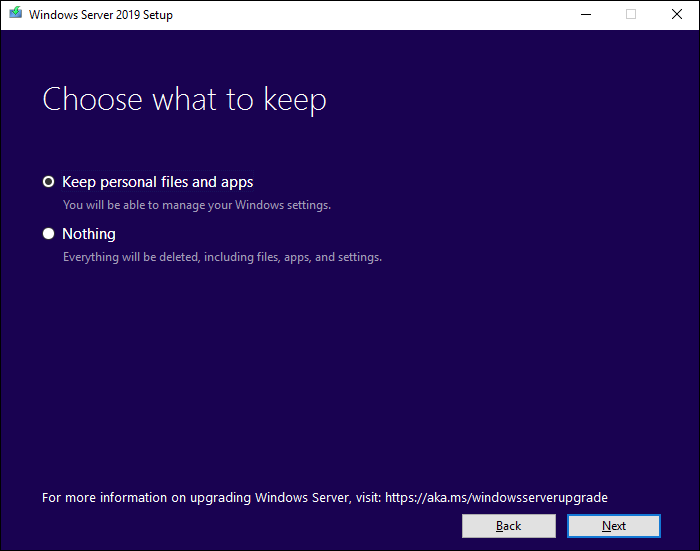
Выберите Сохранить личные файлы и приложения, чтобы выполнить обновление на месте, а затем щелкните Далее. Select Keep personal files and apps to choose to do an in-place upgrade, and then select Next.
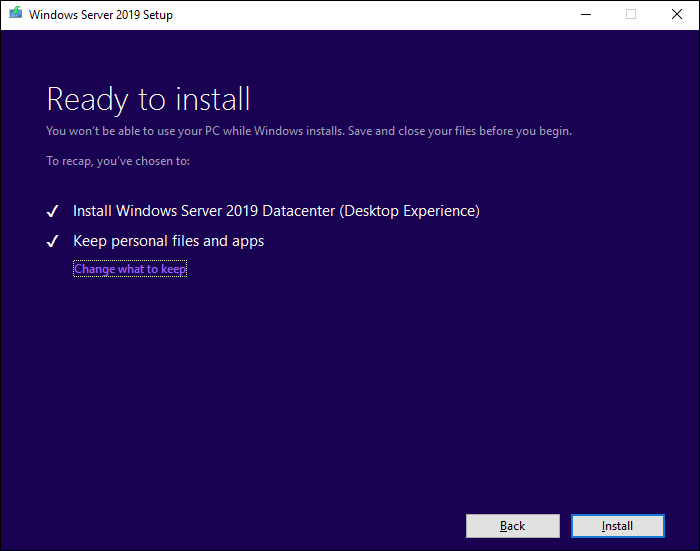
Когда программа установки завершит анализ устройства, она предложит перейти к обновлению, выбрав действие Установить. After Setup analyzes your device, it will prompt you to proceed with your upgrade by selecting Install.
Начнется обновление на месте, в котором отображается окно Обновление Windows с информацией о ходе выполнения. The in-place upgrade starts, showing you the Upgrading Windows screen with its progress. После завершения обновления сервер перезапустится. After the upgrade finishes, your server will restart.

Действия по завершении обновления After your upgrade is done
После завершения обновления необходимо убедиться, что обновление до Windows Server 2019 прошло успешно. After your upgrade completes, you must make sure the upgrade to Windows Server 2019 was successful.
Проверка успешности обновления To make sure your upgrade was successful
Откройте редактор реестра, перейдите в куст HKEY_LOCAL_MACHINESOFTWAREMicrosoftWindowsNTCurrentVersion и просмотрите запись ProductName. Open the Registry Editor, go to the HKEY_LOCAL_MACHINESOFTWAREMicrosoftWindowsNTCurrentVersion hive, and view the ProductName. Вы должны увидеть здесь выпуск Windows Server 2019, например Windows Server 2019 Datacenter. You should see your edition of Windows Server 2019, for example Windows Server 2019 Datacenter.
Убедитесь, что все приложения работают, и что подключения клиентов к приложениям выполняются успешно. Make sure all of your applications are running and that your client connections to the applications are successful.
Если вы считаете, что во время обновления возникли проблемы, скопируйте и создайте архив каталога %SystemRoot%Panther (обычно C:WindowsPanther ) и обратитесь в службу поддержки Майкрософт. If you think something might have gone wrong during your upgrade, copy and zip the %SystemRoot%Panther (usually C:WindowsPanther ) directory and contact Microsoft support.
Downgrade редакции в Windows Server с Datacenter до Standard
При анализе используемых серверных лицензий в сети с KMS сервером мы обнаружили, что на одном из серверов установлена значительно более дорогая редакция Windows Server Datacenter, чем требуют задачи, запущенные на сервере (на сервере не используется виртуализация, S2D, Azure Stack, Storage Replica и прочее). Возникала идея изменить (понизить) редакцию установленного Windows Server 2016 Datacenter на Standard в целях экономии более дорогих лицензий. Чистую переустановку Windows Server мы не рассматривали, потому что на сервере уже настроены ряд ролей и установлено дополнительное ПО, лицензии которого жестко привязаны к ОС и железу.
Несмотря на то, что Microsoft поддерживает только апгрейд редакции Windows Server с младшей на старшую с помощью DISM (см. статью о конвертировании ознакомительной версии Windows Server), вы можете выполнить и обратную процедуру – downgrade версии Datacenter до Standard с сохранением всех текущих настроек и установленных ролей, программ.
Настоятельно рекомендуем перед выполнением даунгрейда сделать бэкап системы (хотя бы через Windows Server Backup).
Также будьте внимательны при выполнении даунгрейда Windows Server с ролью контроллера домена AD. Желательно сначала перенести с него FSMO роли и понизить его до рядового сервера домена (предварительно сделайте бэкап DC, к которому можно будет вернуться при проблемах).
- На работающем Windows Server 2016 Datacenter запустите редактор реестра и перейдите в ветку HKEY_LOCAL_MACHINESOFTWAREMicrosoftWindows NTCurrentVersion;
- Проверьте значения следующих REG_SZ параметров: EditionID = ServerDatacenter, ProductName = Windows Server 2016 Datacenter;
- Измените значения параметров следующим образом: EditionID на ServerStandard, ProductName на Windows Server 2016 Standard;
- Закройте редактор реестра;
- Смонтируйте установочный ISO образ с Windows Server 2016 и запустите мастер установки (setup.exe);
- При выборе вариантов установки в окне Windows Server Setup выберите Upgrade и редакцию Windows Server 2016 Standard (Desktop Experience);
- Укажите, что вы хотите сохранить персональные данные и установленные программы — Keep personal files and apps (если эта опция недоступна, проверьте каталог установки Windows);
- Нажмите на кнопку Confirm у каждого обнаруженного пункта. В моем случае в первом пункте было указано, что апгрейд версии Windows Server не рекомендуется, лучше выполнить чистую установку; во втором – в этой версии Windows по-умолчанию отключены PnP и RemoteFX USB перенаправление устройств;
- Запустите обновление Windows, дождитесь его окончания и после нескольких перезагрузок проверьте, что теперь на сервере запущена редакция Windows 2016 Standard.
Данный способ даунгрейда должен работать во всех поддерживаемых версиях Windows Server (2012R2/2016/2019). Кроме того, вы можете использовать его для даунгрейда с обновлением версии, например, с Windows Server 2012 R2 Datacenter до Windows Server 2019 Standard (хотя это также не рекомендуемый сценарий).
Как понизить контроллер домена и удалить роль AD DS
Мы рассмотрим пример корректного удаление роли Active Directory Domain Services для Windows Server 2012 / 2012 R2 / 2016 / 2019.
Процесс полного удаления разобьем на несколько этапов:
Подготовка системы
Если в нашей среде AD не один контроллер домена и мы не хотим удалять сам домен, а только один из его серверов со службой каталогов, стоит выполнить предварительные операции, чтобы минимизировать возможные проблемы.
Перенос ролей контроллера домена
Active Directory насчитываем 5 FSMO ролей, которые отвечают за корректную работу службы каталогов. Смотрим, на каких серверах запущены данные роли с помощью команд в Powershell:
Get-ADForest dmosk.local | ft DomainNamingMaster, SchemaMaster
Get-ADDomain dmosk.local | ft InfrastructureMaster, PDCEmulator, RIDMaster
* где dmosk.local — домен, для которого нужно узнать назначенные роли FSMO.
Если какие-то роли назначены на сервере, который планируется понизить, то необходимо с помощью команды типа:
Проверка состояния AD
На любом из контроллеров домена вводим команду:
Данная команда запустит проверку состояния среды AD и выдаст ошибки, если такие будут. Необходимо обратить внимание на сообщения и, по возможности, решить проблемы.
Понижение контроллера домена
Первым шагом понизим наш сервер до рядового сервера. Это можно сделать с помощью графического интерфейса, Powershell или командной строки.
Графика
Открываем Диспетчер серверов и переходим в Управление — Удалить роли и компоненты:

Если откроется окно с приветствием, то просто нажимаем Далее (при желании, можно поставить галочку Пропускать эту страницу по умолчанию):

В окне «Выбор целевого сервера» выбираем сервер, для которого мы будем понижать уровень AD:

. и нажимаем Далее.
Снимаем галочку Доменные службы Active Directory. откроется окно в котором отобразится список компонентов для удаления — нажимаем Удалить компоненты:

Система вернет ошибку с предупреждением, что сначала нужно понизить AD — кликаем по ссылке Понизить уровень этого контроллера домена:

В следующем окне мы увидим предупреждение о том, что компьютер будет перезагружен и возможность принудительно понизить уровень — просто нажимаем Далее:

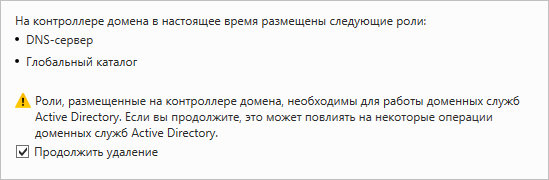
Система отобразит роли AD, которые будут удалены. Ставим галочку Продолжить удаление и нажимаем Далее:
Вводим дважды пароль учетной записи локального администратора, который будет использоваться после понижения до рядового сервера:

Кликаем по Понизить уровень:

Процесс займет какое-то время. После мы увидим «Уровень контроллера домена Active Directory успешно понижен»:

Сервер автоматически будет перезагружен.
Powershell
Открываем консоль Powershell от администратора и вводим:
Система запросит пароль для локальной учетной записи администратора, которая будет использоваться после понижения — задаем новый пароль дважды:
LocalAdministratorPassword: **********
Подтвердить LocalAdministratorPassword: **********
Мы получим предупреждение о перезагрузки сервера. Соглашаемся:
После завершения этой операции сервер будет автоматически перезапущен. Когда вы удалите доменные службы Active
Directory на последнем контроллере домена, этот домен перестанет существовать.
Вы хотите продолжить эту операцию?
[Y] Да — Y [A] Да для всех — A [N] Нет — N [L] Нет для всех — L [S] Приостановить — S [?] Справка
(значением по умолчанию является «Y»): A
Для выполнения команды уйдет некоторое время, после чего сервер уйдет в перезагрузку.
После понижения сервера роль, по-прежнему, будет установлена. Для ее удаления мы также можем воспользоваться графической оболочкой или командной строкой.
Графика
В диспетчере серверов кликаем снова по Управление — Удалить роли и компоненты:
Среди серверов выбираем тот, на котором будем удалять роль:
* сервер может быть только один. Тогда выбираем его.
Снимаем галочку Доменные службы Active Directory, в открывшемся окне кликаем по Удалить компоненты:
Галочка для доменных служб будет снята:

. кликаем по Далее несколько раз.
В последнем окне ставим галочку Автоматический перезапуск конечного сервера, если требуется и подтверждаем действие ответом Да:
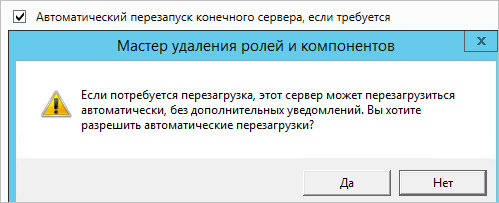
Роль будет удалена, а сервер отправлен в перезагрузку.
Powershell
Запускаем Powershell от администратора и вводим:
Remove-WindowsFeature -Name AD-Domain-Services
Роль контроллера будет удалена. Перезагружаем сервер:
Вывод сервера из домена
В случае, если у нас есть другие контроллеры домена, наш сервер останется в домене. При необходимости его окончательного вывода из эксплуатации, стоит вывести его из среды AD.
Графика
Открываем свойства системы (команда control system или свойства Компьютера) и кликаем по Изменить параметры:
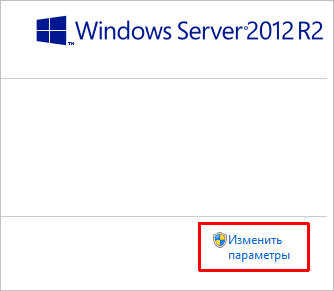
В открывшемся окне нажимаем на Изменить:

И переводим компьютер в рабочую группу:

* в данном примере в группу с названием WORKGROUP.
Система запросит логин и пароль от пользователя Active Directory, у которого есть права на вывод компьютеров из домена — вводим данные.
Если все сделано верно, мы должны увидеть окно:

После перезагружаем сервер или выключаем его.
Powershell
Запускаем Powershell от имени администратора и вводим:
Remove-Computer -UnjoinDomaincredential dmoskmaster -PassThru -Verbose
* где dmoskmaster — учетная запись в домене с правами вывода компьютеров из AD.
Соглашаемся продолжить, ознакомившись с предупреждением:
Подтверждение
Чтобы войти в систему на этом компьютере после его удаления из домена, вам потребуется пароль учетной записи локального
администратора. Вы хотите продолжить?
[Y] Да — Y [N] Нет — N [S] Приостановить — S [?] Справка (значением по умолчанию является «Y»): Y
Вопросы и ответы
Дополнительные сведения относительно понижения и удаления AD.
1. Как удалить дочерний домен?
Мы должны быть уверены, что в данном домене не осталось важных ресурсов предприятия. После необходимо по очереди удалить все контроллеры домена по данной инструкции. При удалении последнего сервера AD для дочернего домена, будет удален сам дочерний домен из леса.
2. Как понизить режим работы домена?
Данный режим не понизить — это односторонняя операция. Максимум, что можно сделать, это восстановить службу AD из резервной копии, когда режим был нужного уровня.
3. Что делать, если умер основной контроллер домена?
Рассмотрим несколько вариантов:
- Если есть резервная копия, восстанавливаемся из нее.
- Если в среде несколько контроллеров домена, захватываем FSMO-роли (подробнее в инструкции Управление FSMO ролями Active Directory с помощью Powershell) и вручную удаляем уже несуществующий контроллер. После можно поднять новый контроллер, сделав его резервным.
- Хуже, когда нет ни копий, ни второго контроллера. В таком случае, поднимаем новый контроллер, создаем новый лес, домен и переводим все компьютеры в него.
4. Что делать, если контроллер домена возвращает ошибку при понижении?
Самый лучший способ, разобраться с ошибкой, решив проблему, которая ее вызывает. Если это не удалось сделать, принудительно понижаем сервер командой: