Многие новички и опытные пользователи Linux держат также установленной на своем компьютере операционную систему Windows, например, последней, десятой версии. Новичкам это нужно чтобы иметь запасную операционную систему, к которой они смогут вернуться, если их Linux сломается. А для опытных пользователей важно программное обеспечение, которое не поддерживается ни в Linux, ни даже с помощью эмулятора Wine, а таких программ достаточно много.
Но временами случается такая ситуация, что загрузчик Grub не распознает установленную Windows и не отображает ее в списке для систем для загрузки. В этой статье мы рассмотрим почему возникает ошибка grub не видит Windows 10 и как ее решить.
Причин такой ошибки может быть несколько, начиная от того, что система установлена на другом жестком диске, и заканчивая неизвестными глюками пакета os-prober, который и занимается определением операционных систем в Linux. Также, если у вас есть несколько версий Windows на компьютере, то программа может видеть только одну из них.
Сначала можно попытаться сделать наш с Windows раздел более видимым для программы. Для этого примонтируйте его в какую-либо папку. Например, в /mnt/:
sudo mount -t ntfs-3g -o ro /dev/sda1
Я предполагаю, что система Windows установлена на разделе, который определяется в Linux, как /dev/sda1. Дальше запустите утилиту os-prober:
sudo os-prober

Если программа обнаружит Windows, то вам останется обновить конфигурацию загрузчика Grub:
sudo update-grub

Или:
sudo grub2-mkconfig -o /boot/grub/grub.cfg
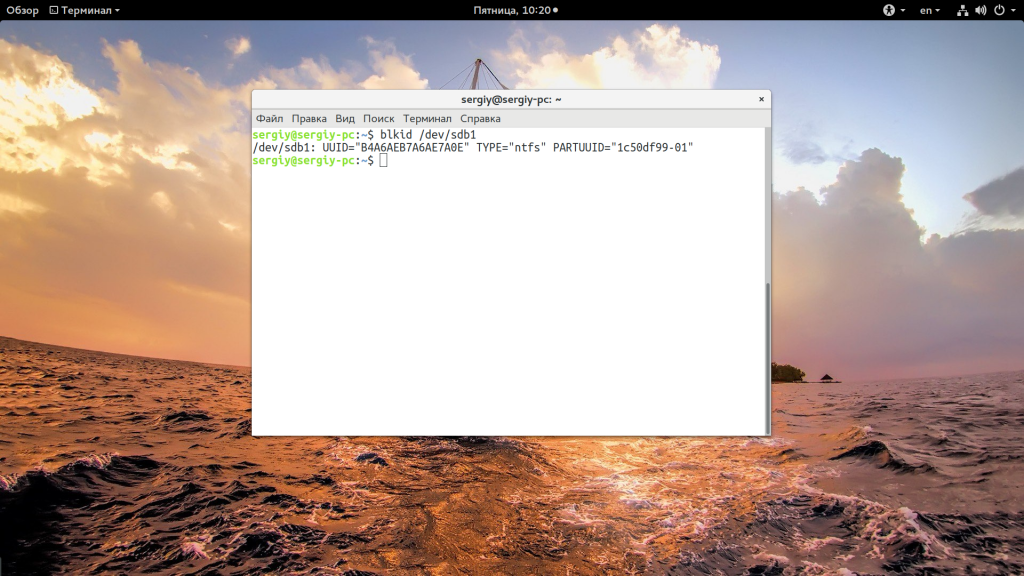
Если же этот способ не сработает, а он, скорее всего, не сработает, то вам останется только вручную добавить пункт меню для Windows. Это не самое простое, но зато эффективное решение. Сначала нам нужно узнать UUID раздела диска, на который установлена Windows, например, /dev/sda1:
blkid /dev/sda1
Затем откройте файл /etc/grub.d/40_custom и добавьте туда такой код:
menuentry "Windows 10" {

insmod ntfs

set root='(hd0,1)'

search --no-floppy --fs-uuid --set B4A6AEB7A6AE7A0E

chainloader +1

}
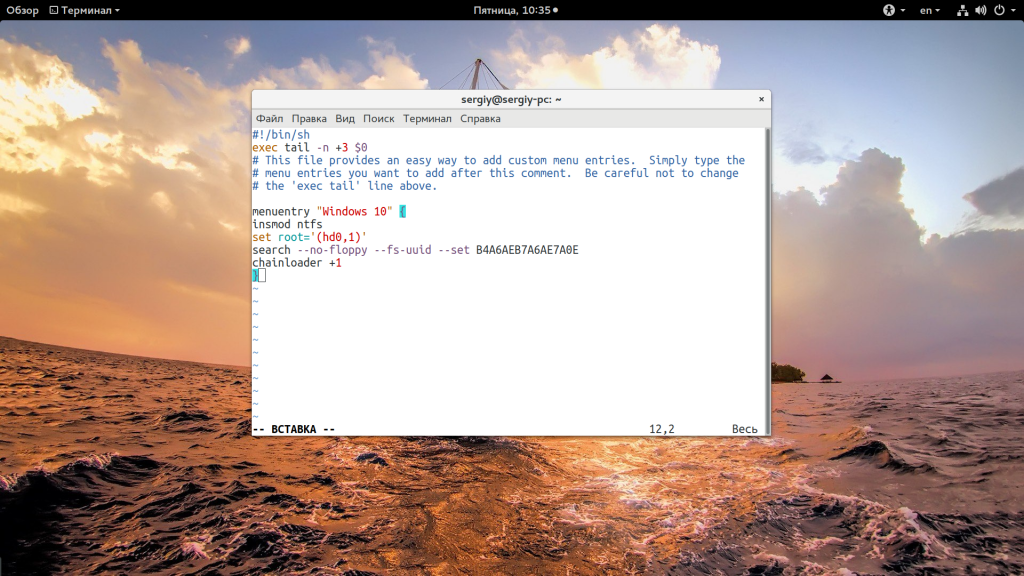
Если кратко, то здесь мы устанавливаем в качестве корня первый раздел первого диска, а затем указываем загрузчику, что нужно найти раздел с нужным нам UUID. Затем передаем управление загрузчику на этом разделе с помощью chainloader. Дальше осталось обновить конфигурацию Grub:
sudo update-grub
Мы использовали такой метод потому что теперь настройка не собьется после обновления ядра или другого процесса, инициализирующего обновление конфигурации. Потому что если бы мы добавили эти строки в /boot/grub/grub.cfg, то они были бы перезаписаны если не при первом, то при одном из следующих обновлений системы.
Когда конфигурация обновлена вы можете перезагрузить компьютер и загружать Windows с помощью нового пункта. Таким образом, можно добавить несколько пунктов, только для разных разделов нужно указывать их UUID.
Выводы
В этой небольшой статье мы разобрали что делать когда у вас возникнет ошибка grub не видит windows 10 и какими способами ее можно исправить. На самом деле решение очень простое, если вы не используете систему с UEFI. В варианте с EFI загрузка Windows управляется не Grub, а загрузчиком UEFI, но при использовании Linux рекомендуется отключить эту технологию.

Статья распространяется под лицензией Creative Commons ShareAlike 4.0 при копировании материала ссылка на источник обязательна .
Об авторе
![]()
Основатель и администратор сайта losst.ru, увлекаюсь открытым программным обеспечением и операционной системой Linux. В качестве основной ОС сейчас использую Ubuntu. Кроме Linux, интересуюсь всем, что связано с информационными технологиями и современной наукой.
I have finally installed Ubuntu on my second drive. When I start my computer GRUB only offers me to boot Ubuntu, not Windows 7. What needs to be done so that I can choose between Ubuntu and Windows in GRUB?
When I press F12 for boot menu at startup and I choose Windows Boot Manager it boots into Windows 7.
I ran command sudo fdisk -l and here is log (http://pastebin.com/Cgv1igHc):
WARNING: GPT (GUID Partition Table) detected on '/dev/sda'! The util fdisk doesn't support GPT. Use GNU Parted.


Disk /dev/sda: 1000.2 GB, 1000204886016 bytes
255 heads, 63 sectors/track, 121601 cylinders, total 1953525168 sectors
Units = sectors of 1 * 512 = 512 bytes
Sector size (logical/physical): 512 bytes / 4096 bytes
I/O size (minimum/optimal): 4096 bytes / 4096 bytes
Disk identifier: 0xc3ffc3ff

   Device Boot      Start         End      Blocks   Id  System
/dev/sda1               1  1953525167   976762583+  ee  GPT
Partition 1 does not start on physical sector boundary.
![]()
LiveWireBT
28.2k25 gold badges107 silver badges217 bronze badges
asked Oct 8, 2012 at 16:20
![]()
2
-
Boot Ubuntu and mount your Windows partition (simply open the disk on Nautilus)
-
Run the following on the command line (Ctrl+Alt+t):
sudo os-prober -
If your Windows installation was found, you can run:
sudo update-grub
Note that step 2 is just for your convenience. You could just mount the Windows 7 partition and then run update-grub.
Related question
- Unable to mount Windows (NTFS) filesystem due to hibernation
![]()
answered Oct 11, 2012 at 10:36
![]()
HermesHermes
1,2871 gold badge7 silver badges2 bronze badges
3
If the os-prober method above doesn’t work try adding a custom grub menu entry. Documented here.
First two steps are for finding your <UUID>.
- Run
lsblkand find the name of the row with/boot/efi
Example output (here the answer is sda2):
lsblk
NAME        MAJ:MIN RM   SIZE RO TYPE MOUNTPOINT
sda           8:0    0   477G  0 disk
├─sda1        8:1    0   450M  0 part
├─sda2        8:2    0   100M  0 part /boot/efi
├─sda3        8:3    0    16M  0 part
├─sda4        8:4    0    47G  0 part /windows
├─sda5        8:5    0 425,6G  0 part /
└─sda6        8:6    0   3,7G  0 part [SWAP]
mmcblk0     179:0    0  14,9G  0 disk
└─mmcblk0p1 179:1    0  14,9G  0 part
- Run
sudo blkid /dev/sdaXwheresdaXis the answer from previous step (sda2in my case).
Example output (here the answer is 58E4-427D):
/dev/sda2: UUID="58E4-427D" TYPE="vfat" PARTLABEL="EFI system partition" PARTUUID="b81727be-ba90-5f8c-ab98-d3ec67778b7d"
- Add the following at the end of the file
/etc/grub.d/40_custom:
menuentry "Windows 7" {
     insmod ntfs
     set root='(hd0,1)'
     search --no-floppy --fs-uuid --set <UUID>
     chainloader +1
}
- Run
sudo update-gruband reboot.
![]()
Carolus
5533 silver badges18 bronze badges
answered May 29, 2015 at 9:27
![]()
Philippe GachoudPhilippe Gachoud
5,6503 gold badges41 silver badges49 bronze badges
2
I had Windows 10 running and then tried dual boot. Once Ubuntu was installed, Win 10 wasn’t showing up in my GRUB loader. I tried the following —
First of all, I disabled Secure Boot in Win10. Then ran the below
commands in Ubuntu :
sudo add-apt-repository ppa:yannubuntu/boot-repair
sudo apt-get update
sudo apt-get install -y boot-repair && boot-repair
Worked out pretty well. Was able to find both Windows and Ubuntu in GRUB after that.
![]()
αғsнιη
34.6k39 gold badges126 silver badges188 bronze badges
answered Oct 23, 2016 at 17:13
![]()
3
I solved a similar problem following steps of Boot-Repair
Install boot-repair
sudo add-apt-repository ppa:yannubuntu/boot-repair
sudo apt-get update
sudo apt-get install -y boot-repair && boot-repair
Push «Recommended repair»
And put in a terminal some commands as it suggested.
I think my Grub doesn’t recognize windows due to a bad shutdown, and it solved the problem.
answered Apr 25, 2016 at 14:30
![]()
RutrusRutrus
1,5011 gold badge9 silver badges10 bronze badges
Slightly different method as I copied from a working example on another computer, posting for my own records.
Append the following to /etc/grub.d/40_custom:
menuentry "Windows 10" {
        insmod part_gpt
        insmod fat
        search --no-floppy --fs-uuid --set <boot_efi_uuid>
        chainloader /EFI/Microsoft/Boot/bootmgfw.efi
}
where <boot_efi_uuid> is the UUID of your /boot/efi partition. To find this:
$ lsblk
NAME              MAJ:MIN RM   SIZE RO TYPE  MOUNTPOINT
sda                 8:0    0 119.2G  0 disk
└─md126             9:126  0 357.7G  0 raid0
  ├─md126p1       259:0    0   499M  0 md
  ├─md126p2       259:1    0   100M  0 md    /boot/efi
$ sudo blkid | grep md126p2 # Replace with your device
/dev/md126p2: UUID=<boot_efi_uuid>
Then of course, once you’re saved the file, run:
sudo update-grub
Reboot, you should now be able to successfully start up Windows.
answered Feb 16, 2019 at 23:45
![]()
2
If you have previously had a RAID installed that may be causing issues. In my case, I built my desktop in 2010, and I installed two 1.5 TB with a striped RAID. User gracemercy54 mentions here that this is left over metadata from the former RAID configuration.
When I originally tried the steps by Hermes I got an error specifying «wrong number of devices in a RAID set.» So, if this happens to you open a terminal and run:
   sudo dmraid -rE
   sudo os-prober
   sudo update-grub
That fixed this for me.
answered Mar 18, 2017 at 18:56
![]()
2
I had issues like here above and the solution was just to add manual entry as below:
menuentry "WINDOWS10 (on /dev/sda1)" --class windows --class os {
    insmod part_msdos
    insmod ntfs
    set root='(/dev/sda,msdos1)'
    search --no-floppy --fs-uuid --set=root 688EB92384B85968
    drivemap -s (hd0) ${root}
    chainloader +1
}
where UUID above (688E…) was taken from boot windows disk via blkid /dev/sdb1.
ATTENTION: the additional line
set root='(/dev/sda,msdos1)'
refers to sda which is visible under Ubuntu as /dev/sdb even actually it is the first disk in sata bus while /dev/sda is in fact second drive mounted as root /.
Maybe that is why grub scripts could not work properly. I had no time to change the physical order of disks but it is quite possible it would help to resolve the issue, too.
![]()
Eliah Kagan
115k53 gold badges310 silver badges482 bronze badges
answered Dec 4, 2017 at 22:50
![]()
I had the same problem with Windows 10. I installed Linux Mint 18.1 Cinnamon 64-bit on my laptop for dual boot with WIN10. After the installation GRUB only offered to boot Linux but not Windows.
I found the video solution for windows 10 missing from grub menu and the forum thread Grub not recognizing Win10 after Update/Repair, but unfortunately neither worked for me so I used a combination of these two to resolve my problem.
Open your terminal and follow these commands and open the file named 40_custom:
sudo gedit /etc/grub.d/40_custom
Add these lines to the end of the file and then save and exit:
menuentry "Windows 10" {
   set root='{hd0,1}'
   chainloader + 1
}
After you save the file update your GRUB with this command:
sudo update-grub
Then restart your machine to see if it works.
Hope this will work for others too!
![]()
Eliah Kagan
115k53 gold badges310 silver badges482 bronze badges
answered May 30, 2017 at 13:16
![]()
1
Follow these steps if os-prober shows Windows, but GRUB does not.
- Edit
grub-mkconfigsudo nano /usr/bin/grub-mkconfig - Find these lines near the middle
# Disable os-prober by default due to security reasons. GRUB_DISABLE_OS_PROBER="true" - Change
truetofalse - Exit nano (CTRL+X, Y, Enter)
- Update GRUB
sudo update-grub
answered Mar 11, 2021 at 13:16
![]()
nathanfrankenathanfranke
1561 gold badge1 silver badge7 bronze badges
1
I had the same problem and had spent 2 days figuring it out. But today I had this sudden idea in the morning and it worked out.
You should review your bios/uefi settings. In my case I had to let Uefi boot first. Otherwise I wasn’t able to detect windows from ubuntu. What I had to set was ubuntu > Windows Boot Manager > DISK1 > DISK2 > DISK3. Insted DISK1 > ubuntu > Windows Boot Manager > DISK3.
I had 2 ubuntu installations one on hdd and one on ssd. Apparently ssd installation wasn’t showing as UEFI for some reasone but I wanted boot faster disk first.
I wasn’t expecting that order of boot can influence grub in detecting systems. So it is worth to review that.
answered Apr 29, 2017 at 7:08
![]()
I had the same issue after I installed the updates from ubuntu. The following commands worked for me perfectly:
sudo apt-get install os-prober
First install os-prober to detect windows and then update grub:
sudo grub-mkconfig -o /boot/grub/grub.cfg
answered Oct 29, 2019 at 21:02
![]()
1
In addition to the answer of Bartosz Dabrowski, which lead me to solving my problem:
Be sure that if your Linux uses UEFI Boot/GPT that your other OS (eg. Windows in my case) also uses UEFI Boot/GPT. Coming from an old Win7 to Win10 installation the hard drive still had old school boot and MBR. Somehow os-prober and boot-repair had their problems to fix this.
Ensure that in BIOS / Boot order there is your HDD with ubuntu (eg. uefi: ubuntu) and your HDD with Windows Boot Manager (eg. uefi: Windows Boot Manager) to be found.
If WBM is missing ensure that windows boot disk has GPT. You can check this in Windows using Disk Management (Win + X, then Disk Management).
There is a Windows tool: mbr2gpt which can convert your MBR to GPT. After doing so (and booting via UEFI) os-prober and finally update-grub was able to find my Windows installation and added it to the boot options of grub.
answered Oct 15, 2020 at 6:35
![]()
Okay, so I had the same problem and couldn’t find a solution for me out there for a long time, finally got it, so here is my little grain of sand to the world. Before you try, remember to check you are booting using UEFI everytime you can:
Apparently, in the process of installing Debian the Windows data inside the EFI partition was lost, so what I did is a System restore using a Windows 10 USB (I tried fixing the boot but somehow it didn’t work, I even tried it on console, anyways I lost no data). After this, now I coulnd’t boot Debian, so I run a Debian live CD, mounted everything and chrooted like this (and don’t forget to boot the USB as UEFI):
mount /dev/your_linux_partition /mnt
cd /mnt
mount -t proc /proc proc/
mount -t sysfs /sys sys/
mount --rbind /dev dev/
mount --rbind /sys/firmware/efi/efivars sys/firmware/efi/efivars/
mount /dev/your_efi_partition /boot/efi/
chroot /mnt /bin/bash
Now, here os-prober didn’t detect Windows 10, but I decided to grub-install /dev/sda and grub-update anyways and restart.
Here is the funny thing, now I couldn’t boot Windows 10 and only Debian, BUT!, I tried once again to grub-update and finally found the Windows 10 boot. This doesn’t make any sense honestly, but I don’t care. Hope it helps anyone as desperate as me  .
.
answered Oct 16, 2021 at 18:56
![]()
Windows 10 was installed first on a non-formated disk using a non-UEFI BIOS.
A partition table (type msdos) and a partition for Windows were created manually during the installation of Windows. Windows automatically created a «System Reserved» partition (/dev/sda1) used for booting. Windows was installed into the second partition (/dev/sda2). Debian was installed into the third partition (/dev/sda3).
Problem: After running package upgrades, a GRUB entry for Windows was not added by the os-prober.
Solution: Re-enable os-prober to create a custom GRUB menu entry for Windows.
To re-enable os-prober uncomment the following line in /etc/default/grub:
#GRUB_DISABLE_OS_PROBER=false
NOTE: You will likely have to retrieve and enter your Windows volume Bitlocker key to get Win10 to continue booting after each time GRUB updates take place.
Problem: The GRUB entry created for Windows by the os-prober is wrong (e.g., has the wrong name).
Solution: Disable os-prober create a custom GRUB menu entry for Windows.
To disable os-prober add the following line to /etc/default/grub:
GRUB_DISABLE_OS_PROBER=true
Discover the UUID of the partition containing the Windows boot loader by executing the following command in terminal as root:
blkid /dev/sda1
The output will be something like this:
/dev/sda1: LABEL="System Reserved" UUID="1D584C40586B2873" TYPE="ntfs" PARTUUID="adc19fb9-33"
Use the UUID value to create a custom menu entry at the end of the /etc/grub.d/40_custom file:
menuentry "Windows 10" --class windows --class os {
   insmod ntfs
   search --no-floppy --set=root --fs-uuid 1D584C40586B2873
   ntldr /bootmgr
}
Update grub by executing the following command in terminal as root:
update-grub
Info on menuentry syntax:
-
—class is used to group menu entries into classes. Menu themes may display different classes using different styles.
-
—no-floppy option prevents searching floppy devices, which can be slow.
-
ntldr is a new method to chainload Windows boot loader (the old one is chainload +1).
-
—hint. You may have seen other menu entries using —hint* options with the search command. In case when two or more partitions have identical IDs, this hints help to find the right one. In our case, we use UUID and it is very unlikely that several partitions on one system get identical UUIDs.
-
drivemap and parttool commands. You may have seen other menu entries using these commands. They are needed if you have more than one Windows/DOS installation on one disk.
References:
http://www.gnu.org/software/grub/manual/grub.html
http://unix.stackexchange.com/questions/115555/what-does-the-hint-option-in-grub2s-search-command-do
http://www.linuxcommand.org/man_pages/blkid8.html
https://wiki.gentoo.org/wiki/GRUB2/Chainloading#Probing
The disk order (recognized by grub2) may change between different boot (even with same configuration for secure boot).
d33p wrote:I just disabled secure boot, it is funny (or not) now: (hd2,gpt2) turn to (hd2,msdos2) for example… strange no?
In the above case, you should have replaced «(hd2,msdos2)» with the proper one, such as «(hd0,gpt2)» or «(hd1,gpt2)».
You have set wrong partition as root partition, thus,
d33p wrote:I tried this again:
chainloader /efi/Boot/bootx64.efi
or
chainloader /efi/Microsoft/Boot/bootmgfw.efifile not found…
seems very natural to me.
But,
d33p wrote:same result:
invalid signature
seems weird.
If you set the EFI system partition as root partition and selected the correct .efi file for booting windows, maybe my suggestion does not work for your case.
If you want to convert the debian from non-UEFI booting mode to UEFI booting mode, do as follows:
( I refer https://forums.bunsenlabs.org/viewtopic.php?id=391 . Head_on_a_Stick knows better than I. If s/he posts, ignore the following and obey to his/her suggestion.)
1) Boot the installed debian without connecting any unnecessary removable media such as live debian, debian installation DVD/USB.
2) Open a termnal or log in to tty2 or so. Get root pivilege by
and type root password.
3) Understand the device file name such as /dev/sdc2 of EFI system partition by
I assume that it is /dev/sdc2. If not, replace «/dev/sdc2» with the proper result below.
4) Make /boot/efi directory by
5) Mount the EFI system partition onto /boot/efi by
Code: Select all
mount -t vfat /dev/sdc2 /boot/efi -o rw6) Install grub-efi package by
Code: Select all
apt-get update
apt-get install grub-efi
7) Install grub2 code (maybe grubx64.efi) under /boot/efi/debian
Code: Select all
grub-install --target=$(if [ -n "$(uname -r|grep amd64)" ];then echo x86_64;else echo i386;fi)-efi --efi-directory=/boot/efi --recheck8 ) Generate grub.cfg under /boot/grub by
9) Find default booted .efi file by
10) If you can find the default .efi file (to be booted first), change the name of it to back up the contents of it.
11) Copy the generated grubx64.efi (or so) to a file name of which is the same as the original name (before its change) of the default .efi file.
12) Reboot and select the windows partition with F12 key.
If your BIOS has a boot option that says literally «Windows Boot Manager», that is a pretty strong indication that your Windows has been installed in UEFI style.The fact that the Debian installer even offers to write GRUB to the MBR indicates the Debian installer has been booted in legacy BIOS style.
A 16-bit legacy BIOS bootloader cannot chainload an UEFI bootloader (without first transitioning into either 32- or 64-bit mode and setting up an UEFI environment, which kind of defeats the purpose of being in the legacy 16-bit mode in the first place).
Usually, the boot mode (BIOS vs. UEFI) you use to boot the OS installer will automatically determine which mode the new OS to be installed will use. An OS installer running in UEFI mode could technically install a BIOS-based bootloader instead of UEFI-based one, but the opposite is generally not possible as activating the legacy BIOS compatibility requires disabling the UEFI Runtime Services interface, which is needed to write the boot settings into system NVRAM (e.g. that «Windows Boot Manager» text in the BIOS settings) — and that is a requirement to complete the installation of an UEFI bootloader.
It looks like your laptop may currently prefer booting in legacy BIOS mode over UEFI, if the boot media has both options available, and the Debian 10 installation media does indeed have both options. So it might have booted the Debian installer in BIOS mode, and thus been unable to complete the installation of an UEFI bootloader in the standard way. When in BIOS mode, the installer also won’t tell you that installing an UEFI bootloader requires having an ESP (EFI System Partition) on the disk you want to install the UEFI bootloader onto. If you did not opt to create one on your HDD, there was no valid place to install the UEFI bootloader.
There is also the problem that some UEFI firmware implementations are buggy and/or Windows-centric. As the Debian Wiki says:
Many UEFI firmware implementations are unfortunately buggy, as mentioned earlier. Despite the specification for boot entries and boot order being quite clear about how things should work, there are lots of systems in the wild which get it wrong. Some systems simply ignore valid requests to add new boot entries. Others will accept those requests, but will refuse to use them unless they describe themselves as «Windows» or similar. There are lots of other similar bugs out there, suggesting that many system vendors have done very little testing beyond «does it work with Windows?»
Fortunately, the system vendors occasionally get firmware bugs fixed. So, as the first step, see if Lenovo has a an updated firmware («a BIOS update») available for your model, and install it if there is one. That may make installing a dual-boot configuration easier.
As the second step, you probably should disable the legacy BIOS compatibility feature, if you can. If you find a «BIOS» setting that allows to force the system to UEFI only, select that setting; or there is a setting that mentions CSM («Compatibility Support Module»), disable it. Now it should be easier to get the Debian installer to boot in UEFI mode, just like your existing Windows installation does. That will make it install the correct type of boot loader.
As the third step, be aware of the requirement to have an ESP (EFI System Partition). It is essentially a small FAT32 partition (256M is plenty for Debian 10 alone) which in Debian should be mounted to /boot/efi. If you use MBR partitioning, it should have a special partition type code 0xef; if using GPT partitioning, the partitioner option to mark a partition as «bootable» and/or «ESP» should do the right thing. Having an ESP on your HDD will allow you to move the HDD to another system and boot your existing Debian installation from it, if you want to do so later.
The alternative to creating a separate ESP on HDD for Debian is to select the Windows ESP on the SSD when setting up your partitioning, choose to not format it, but mount it with its existing filesystem as /boot/efi. The standardized directory structure on the ESP is designed to handle the bootloaders of multiple OSs on the same ESP. The UEFI bootloader of Debian 10 should fit nicely into the standard Windows 10 ESP with room to spare, if you choose this option. But you may have to go into «advanced/manual» partitioning options to do this.
If you still have problems after this, I’d recommend reading Roderick W. Smith’s text on challenges with UEFI bootloaders. It’s written for the rEFInd bootloader, but many things described in it are applicable to the UEFI version of GRUB also.
Once you’ve got both your OSs booting in UEFI style:
If your SSD is NVMe type, then it might appear in Linux as /dev/nvme0n1 (and its partitions as /dev/nvme0n1pN, N = partition number). Make sure Linux sees your SSD, then run update-grub as root.
If it doesn’t say it detected Windows, run blkid as root: it should report the UUIDs of all your filesystems and partitions. Find the filesystem UUID of the Windows ESP on the SSD. If the Windows ESP uses the standard FAT32 filesystem type, it should be listed in the form UUID="xxxx-xxxx" (it’s actually a FAT32 filesystem serial number).
Once you know the UUID, you can configure a custom GRUB menu entry for Windows, by adding these lines to the end of /etc/grub.d/40_custom:
menuentry 'Whatever you want the Windows 10 boot menu entry to say' {
    insmod part_gpt
    insmod fat
    search --no-floppy --fs-uuid --set=root xxxx-xxxx
    chainloader /EFI/Microsoft/Boot/bootmgfw.efi
}
That should be the bare-bones UEFI chainloader entry for Windows. Just replace xxxx-xxxx with the actual Windows ESP filesystem UUID. After editing the file, run update-grub as root. Then set the default boot option to debian and you should have your boot menu.
It is possible that Lenovo has chosen to go above and beyond the UEFI specification requirements and implemented a NTFS filesystem support in their UEFI firmware, and has provided a Windows installation that uses NTFS on the ESP. In that case, replace insmod fat with insmod ntfs, and the filesystem UUID will have a different format: in blkid output will look something like UUID="A268B58668B559AD".
Note: check out the efibootmgr command. You can use it to manipulate the firmware boot settings within Linux, without entering the BIOS settings menus. In Windows, bcdedit can do the same, although its user interface is more awkward in my opinion.
Использование Windows 10 и Linux на одном компьютере болезненно. Иногда безопасная загрузка UEFI нарушает работу GRUB, а иногда GRUB не может просто загрузить Windows 10. Недавно я обновил Ubuntu до 19.10 Beta с Ubuntu 19.04. Теперь Ubuntu 19.10 поставляется с новой версией GRUB 2.04, в котором, как сообщается, много ошибок. В моем случае GRUB каким-то образом испортил расположение Windows MBR, и теперь я не могу загрузиться в Windows 10. Чтобы исправить ситуацию, я выполнил пару шагов, и вот подробное руководство о том, как исправить Windows 10, не загружающуюся в Linux.
Если вы используете Ubuntu 19.10 Beta, в GRUB 2.04 много ошибок. Было бы лучше перейти на Ubuntu 19.04 или полностью перейти на Windows. Перейдите к этому шагу, чтобы проверить способы изменения загрузчика по умолчанию на Windows NT.
1. Восстановите GRUB.
Иногда GRUB не может найти MBR-файл Windows на ваших дисках. Первым шагом будет проверка того, может ли Windows 10 обнаруживаться Linux. Для этого выполните следующую команду.
sudo os-prober
Вышеупомянутая команда будет искать другие операционные системы, установленные на ваших дисках. Если Windows обнаружена, вы получите результат, как показано ниже.

Если указанная выше команда может найти операционную систему Windows 10, мы можем перестроить файл конфигурации GRUB. Для этого используйте следующую команду.
sudo update-grub

Приведенная выше команда запускает сканирование всех разделов на вашем локальном диске и ищет различные установленные операционные системы. Если он обнаружит Windows 10, вы должны получить результат, аналогичный приведенному ниже. Команда также автоматически создаст запись Windows в файле конфигурации.
2. Восстановление загрузки
Если командная строка вам не по душе, вы также можете попробовать графический инструмент восстановления загрузки. Иногда файл GRUB не работает. Инструмент восстановления загрузки автоматически ищет другие операционные системы на вашем диске. Он также восстанавливает и перестраивает файл конфигурации GRUB. Это похоже на запуск os-prober вручную и перестройку файла конфигурации GRUB.
Для начала используйте следующие команды, чтобы добавить требуемый репозиторий и установить Boot Repair.
sudo apt-add-repository ppa: yannubuntu / boot-repair && sudo apt-get update sudo apt-get install -y boot-repair
Затем запустите средство восстановления загрузки. Сканирование всех дисков и разделов займет минуту или две. После этого нажмите «Рекомендуемый ремонт». Эта опция удалит предыдущий файл GRUB и восстановит его с нуля.

На следующем экране вам будет представлен набор команд, которые вы должны скопировать и вставить в терминал. Просто следуйте инструкциям на экране, предоставляемым инструментом восстановления загрузки, и он восстановит файл GRUB за вас.

Восстановление загрузки выдаст неожиданную ошибку, если вы используете бета-версию дистрибутива Linux.
Если этот метод не работает для вас, скорее всего, файл диспетчера загрузки Windows не может быть обнаружен GRUB. Следовательно, нам нужно будет создать запись для него в файле конфигурации GRUB.
3. Используйте инструмент настройки GRUB.
В общем, я бы не рекомендовал вручную обновлять что-либо в файле конфигурации GRUB. Мы будем использовать инструмент с открытым исходным кодом под названием Grub Customizer. Выполните следующие команды, чтобы загрузить и установить инструмент.
sudo add-apt-repository ppa: danielrichter2007 / grub-customizer && sudo apt-get update sudo apt install grub-customizer

Далее нам нужно расположение загрузчика Windows 10. Чтобы найти его, выполните следующую команду в терминале.
lsblk
Найдите раздел с точкой монтирования «/ boot / efi». Это раздел, в котором установлен диспетчер загрузки Windows. Нам нужно имя устройства конкретного раздела. В моем случае это sda1, следовательно, расположение загрузочного файла — «/ dev / sda1».

Кроме того, вы также можете установить gnome-disk-utility, которая представляет собой графический инструмент для отображения дисков и разделов. В меню вы можете найти системный раздел EFI. Описание раздела должно выглядеть примерно так.

Затем перейдите к инструменту настройки GRUB и щелкните значок страницы вверху, чтобы сделать запись.
Во всплывающем окне редактора записей выберите тип «Chainloader» и раздел как «/ dev / sda1». Вы также можете указать подходящее имя для записи. Опубликуйте это, нажмите Enter.
 Теперь вы сможете увидеть запись, которую вы создали, в меню настройщика Grub. Однако вам нужно нажать кнопку «Сохранить», чтобы синхронизировать изменения с исходным файлом конфигурации GRUB.

Наконец, выполните перезагрузку, и теперь вы сможете загрузиться в Windows 10. Если вы не можете этого сделать, скорее всего, Windows MBR является посредником или загрузочные файлы повреждены.
4. Восстановление при запуске
Если GRUB не может загрузить Windows MBR, скорее всего, файл поврежден. Мы можем восстановить его, используя ISO-файл Windows и флешку. Вы можете использовать любое загрузочное программное обеспечение USB для Linux. Я бы посоветовал ГореUSB поскольку он прост и быстро выполняет свою работу. Когда USB-накопитель будет готов, загрузитесь с него. Нажмите «Далее» на первом экране, а затем нажмите «Восстановить компьютер» на следующем экране.

На следующей странице нажмите «Параметры устранения неполадок» и, наконец, нажмите «Восстановление при загрузке». На исправление загрузочных файлов и MBR потребуется время.

В большинстве случаев восстановление при запуске исправляет загрузочный файл Windows. В случае успеха перезагрузите компьютер, и GRUB сможет загрузить Windows. Если проблема не исчезнет, нам нужно будет снова переключить загрузчик на Windows NT.
5. Сменить загрузчик по умолчанию
Если вы уверены, что загрузочный файл Windows не поврежден, и вы не стерли данные с диска C по ошибке, мы можем снова изменить загрузчик на Windows NT. Для этого загрузитесь с USB-накопителя Windows, нажмите «Далее» на первом экране. Затем нажмите «Восстановить компьютер», а затем «Устранение неполадок».

На странице «Дополнительные параметры» нажмите «Командная строка».

В командной строке выполните следующую команду.
bcdedit / set {bootmgr} путь WINDOWS system32 winload.efi

Вышеупомянутая команда изменит загрузчик с GRUB на Windows NT. Теперь, когда вы перезагружаете свою систему, она должна загружаться прямо в Windows. Если вы переходите с Ubuntu 19.10, вам нужно будет вернуться к стабильной версии Ubuntu 19.04, поскольку в GRUB 2.04 есть много ошибок.
6. Свежая установка Windows 10
Если ни один из вышеперечисленных способов вам не подходит, скорее всего, вы случайно стерли данные с Windows. Последнее средство — выполнить новую установку Windows 10. Хорошо, что вам нужно будет только отформатировать диск C, и данные на других дисках не будут потеряны. Но, тем не менее, вы потеряете файлы на рабочем столе, в папке «Загрузки» и «Документы».
Заключительные слова
Это некоторые из способов решить, что Windows 10 не загружается в Linux. Если у вас возникнут дополнительные вопросы или вопросы, касающиеся Linux или GRUB, дайте мне знать в комментариях ниже.
Также читайте: Как заставить Windows и Mac использовать мультитач-жесты в Ubuntu
Всем привет! В этой заметке я покажу, как можно исправить ситуацию, когда после успешной установки дистрибутива Linux Debian 10 рядом с Windows 10 на компьютер с UEFI, загрузчик GRUB не загружается, а вместо него по-прежнему, как и до установки Debian, запускается Windows 10, т.е. в обход GRUB.

Содержание
- Зачем нужно, чтобы GRUB запускался по умолчанию?
- Почему не загружается GRUB?
- Делаем загрузчик GRUB загрузчиком по умолчанию
- Шаг 1 – Запускаем менеджер загрузки
- Шаг 2 – Запускаем UEFI Shell
- Шаг 3 – Входим в файловую систему загрузочного раздела
- Шаг 4 – Переименовываем текущий загрузочный файл
- Шаг 5 – Копирование файла загрузчика GRUB
- Шаг 6 – Выход из командной строки
Если Вы захотели установить на один компьютер Linux и Windows, например, дистрибутив Debian 10 и Windows 10, то Вам необходимо сначала установить Windows, а потом Debian, так как загрузчик Windows не работает с Linux, а загрузчик Debian, т.е. GRUB, умеет запускать все загрузочные системы, включая Windows.
Таким образом, если установить сначала Debian, а потом Windows, то Windows просто перепишет загрузчик GRUB, и Debian запускаться не будет.
Поэтому, для того чтобы иметь возможность по выбору запускать операционные системы на компьютере, необходимо, чтобы загрузкой управлял GRUB, т.е. запускался по умолчанию.
Почему не загружается GRUB?
Все дело в том, что по умолчанию установщик Debian устанавливает загрузчик в область UEFI согласно всем спецификациям, а Windows нет, именно это и не позволяет Debian загружаться даже после успешной установки.
В данном случае UEFI запускает загрузчик по умолчанию, т.е. Windows, а загрузчик Debian просто не запускается. В результате Вы успешно установили Debian, но по умолчанию загружается все равно Windows 10.
Поэтому, для того чтобы изначально избежать такой ситуации, установку Debian 10 необходимо производить в экспертном режиме, чтобы принудительно установить загрузчик в нужную область (removable media path), так же как это делает Windows.
Заметка! Установка Debian 10 рядом с Windows 10 на компьютер с UEFI (экспертный режим) – в материале подробно рассмотрен процесс установки дистрибутива Debian 10 на один компьютер с UEFI рядом с Windows 10 в экспертном режиме.
Некоторые другие дистрибутивы Linux, например, Ubuntu, по умолчанию устанавливают загрузчик в область removable media path, и таких проблем у них не возникает, но такой подход создает предпосылки конфликта с любыми другими установщиками, что плохо и неправильно. Вот почему в Debian не делают этого по умолчанию.
Заметка! Установка Ubuntu рядом с Windows 10 на компьютер с UEFI – в материале подробно рассмотрен процесс установки дистрибутива Linux Ubuntu на один компьютер рядом с Windows 10.
Однако если Вы все-таки установили Debian 10 в обычном режиме, и у Вас возникла такая ситуация, что вместо загрузчика GRUB загружается Windows 10, Вам необязательно переустанавливать Debian, достаточно зайти в загрузочное меню, запустить UEFI Shell и настроить загрузку UEFI. А как все это сделать, я сейчас и покажу.
Делаем загрузчик GRUB загрузчиком по умолчанию
Сейчас мы рассмотрим все действия, которые необходимо выполнить, чтобы сделать загрузчик GRUB загрузчиком по умолчанию.
Примечание! Все действия ниже предполагают наличие у Вас определенного опыта администрирования операционных систем и навыков работы с компьютером. При определенных обстоятельствах некорректные действия могут повлечь нарушение работы загрузчика компьютера.
Шаг 1 – Запускаем менеджер загрузки
Для того чтобы управлять загрузчиком компьютера, необходимо зайти в загрузочное меню, т.е. запустить менеджер загрузки.
Обычно это можно сделать клавишей F9, но иногда используются и другие клавиши (F12 и т.д.).
Итак, во время включения компьютера нажимаем клавишу F9.
Шаг 2 – Запускаем UEFI Shell
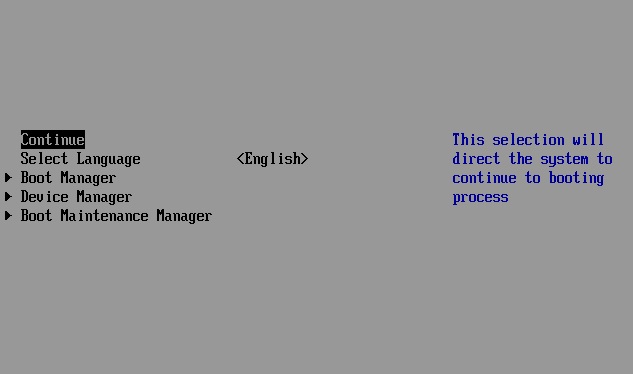
В итоге запустится загрузочное меню. Нам нужно открыть UEFI Shell. Для этого входим в «Boot Manager» (интерфейс у Вас может отличаться).
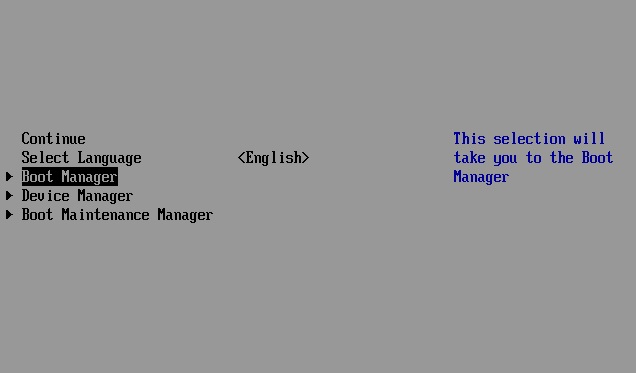
Затем выбираем пункт «EFI Internal Shell».

После чего запустится командная оболочка для работы с UEFI. В командной строке отобразится приглашение ввода команд «Shell>».
Шаг 3 – Входим в файловую систему загрузочного раздела
Вносить изменения мы будем путем определенных действий с файлами, поэтому нам необходимо открыть файловую систему загрузочного раздела UEFI.

Это делается достаточно просто, вводим команду FS0: (обычно именно такая метка у загрузочного раздела).

Заметка! Рейтинг популярности серверных дистрибутивов Linux.
Шаг 4 – Переименовываем текущий загрузочный файл
Весь смысл наших действий заключается в том, чтобы заменить текущий загрузочный файл на тот, который нам нужен, т.е. на загрузчик GRUB.
Но для начала нам нужно переименовать текущий загрузочный файл, так как файл загрузчика, который мы будет потом копировать, должен быть с таким же названием (можно, конечно, его и удалить, но лучше этого не делать).
Переименовываем файл следующей командой.
mv EFIBootbootx64.efi EFIBootbootx64.efi_
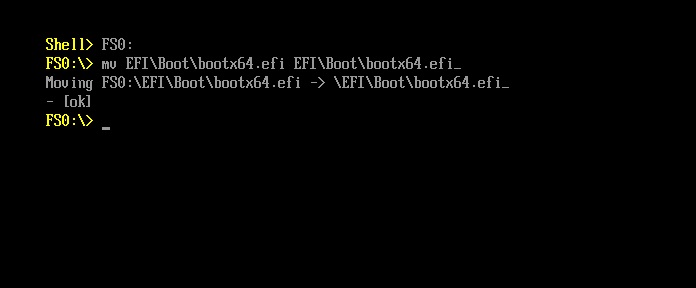
Если у Вас отобразилось сообщение [ок], значит, все прошло успешно.
Таким образом, файл bootx64.efi мы переименовали в bootx64.efi_, этот файл расположен в каталоге EFIBoot.
Шаг 5 – Копирование файла загрузчика GRUB
Теперь нам нужно в каталог EFIBoot скопировать файл загрузчика GRUB, чтобы он запускался по умолчанию.
В этой статье речь идет о Debian, поэтому загрузчик лежит в одноименном каталоге EFIdebian, а файл его называется grubx64.efi.
Для копирования можно использовать следующую команду.
cp EFIdebiangrubx64.efi EFIBootbootx64.efi
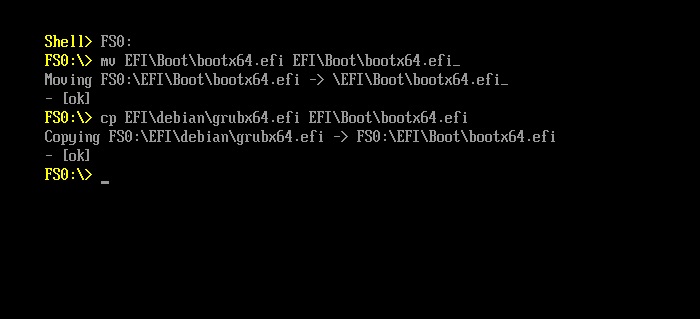
Как видите, файл мы копируем с новым названием, для того чтобы EFI запускала его по умолчанию.
Шаг 6 – Выход из командной строки
На этом все, теперь мы можем выйти из командной строки и попробовать запустить компьютер.
Для выхода из «EFI Internal Shell» вводим команду Exit.
Чтобы продолжить загрузку компьютера, выбираем пункт «Continue».
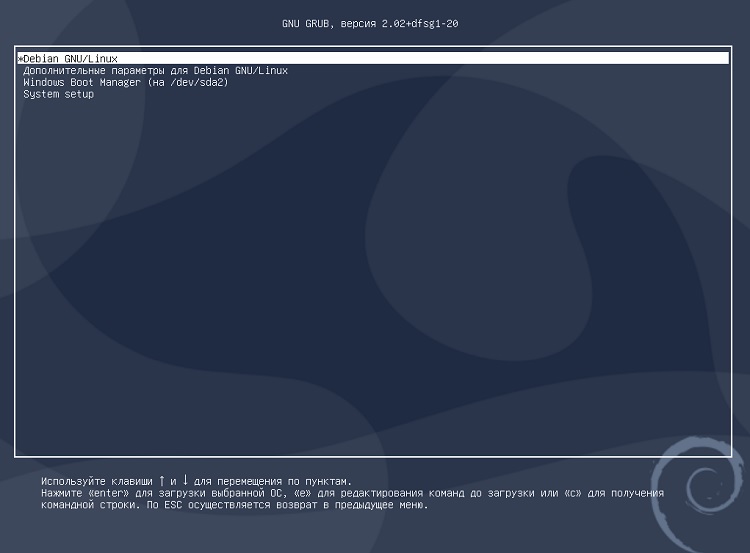
После вышеупомянутых операций с файлами по умолчанию у Вас должен загружаться GRUB, в котором можно будет выбрать операционную систему для загрузки, Debian или Windows.
На заметку! Новичкам рекомендую почитать книгу «Linux для обычных пользователей» – в ней подробно рассказывается про основы операционной системы Linux
Где:
- Debian GNU/Linux– это операционная система Debian;
- Windows Boot Manager (на /dev/sda2) – это Windows 10.
Если ничего не выбрать в течение нескольких секунд, по умолчанию будет загружаться Debian, однако можно сделать и так, чтобы по умолчанию загружалась Windows 10, и даже переименовать пункты меню для удобства, об этом я уже рассказывал в материале – Как изменить порядок загрузки операционных систем (Linux, Windows) в GRUB.
На сегодня это все, надеюсь, материал был Вам полезен, пока!