Engine Version: 4.14, 4.15, 4.16, 4.17, 4.18
NOTE — Apologies for the video quality of the tutorials. They were recorded in 1080p and decent quality
but for some reason after uploading to you tube they became horribly blurred. I will redo them ASAP. Thanks
Contents
-
1
Section 1 Building a dedicated server in Unreal Engine 4
-
1.1
1. Download the Unreal engine from source
-
1.2
2. Setup source unreal engine
-
1.3
2.a Setup source unreal engine To use Visual studio 2017
-
1.4
Congratulations — you should have now successfully setup a source built version of unreal engine
-
1.5
3. Video guide
-
-
2
Section 2 setting up a dedicated server on windows
-
2.1
1. Dedicated Server from a brand new project
-
2.2
2. Dedicated Server from a blueprint only project
-
2.3
3. preparing the project for building
-
2.3.1
1. Target file instructions for engine version 4.14
-
2.3.2
2. Target file instructions for engine version 4.15
-
2.3.3
3. Target file instructions for engine version 4.16
-
2.3.4
4. Target file instructions for engine version 4.17
-
2.3.5
5. Target file instructions for engine version 4.18
-
-
2.4
4. Switch Unreal engine versions & generate project files
-
2.5
5. Building the server
-
2.6
6. Fixing the lighting swarm error
-
2.7
6.a Video Guide
-
2.8
7. Prepare the project for packaging
-
2.9
8. setup packaging settings
-
2.10
9. Congratulations you have now packaged your project yay :-p
-
-
3
Section 3 launching and joining the dedicated server
-
3.1
1. copy the server executable
-
3.2
2. create the server shortcut and setup log options
-
3.3
3. Launch and test the server
-
-
4
Section 4 notes
-
4.1
1. allowing friends to join over internet
-
4.2
2. Hosting on a virtual server
-
4.3
3. Creating additional maps and joining different maps
-
4.4
4. Enabling Physics
-
-
5
Section 5
-
5.1
1. Im too lazy for all this just give me the files
-
-
6
section 6 Contact the author
-
6.1
1.
-
-
7
section 7 Building and deploying a UE4 dedicated server for Linux
-
7.1
1. Configure Visual Studio for Linux cross compilation
-
7.2
2. Package your project to a distinct location
-
7.3
3. Build a dedicated server binary for Linux
-
7.4
4. Deploy your binary to a remote machine
-
7.5
5. Connect to your server and run the dedicated server binary
-
7.6
6. Open UDP:7777
-
7.7
7. Play your game on your server
-
7.8
8. Issues
-
-
8
8. Dedicated Server on Steam
Section 1 Building a dedicated server in Unreal Engine 4
Building a standalone dedicated server wasn’t an easy thing to do and i know a lot of people struggle with it so i decided to make this wiki guide to try and help people. I’m going to cover the steps I took to build a Windows executable of a dedicated server.
1. Download the Unreal engine from source
You’ll need a source-built version of the engine in order to build using the server solution configurations in Visual Studio.
To build the engine from source go to
https://github.com/EpicGames/UnrealEngine
Note: to see the content of the link above you need first to create a git hub account and associate it to your epic games account, then accept the invite of epic games on GitHub. You will then need to click the link and login to your account.
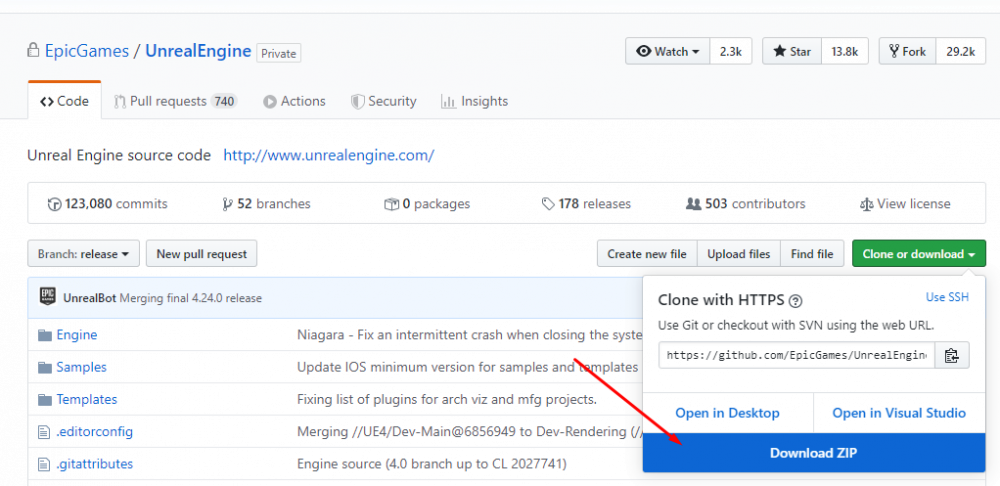
Next select engine version and click the green clone/download button
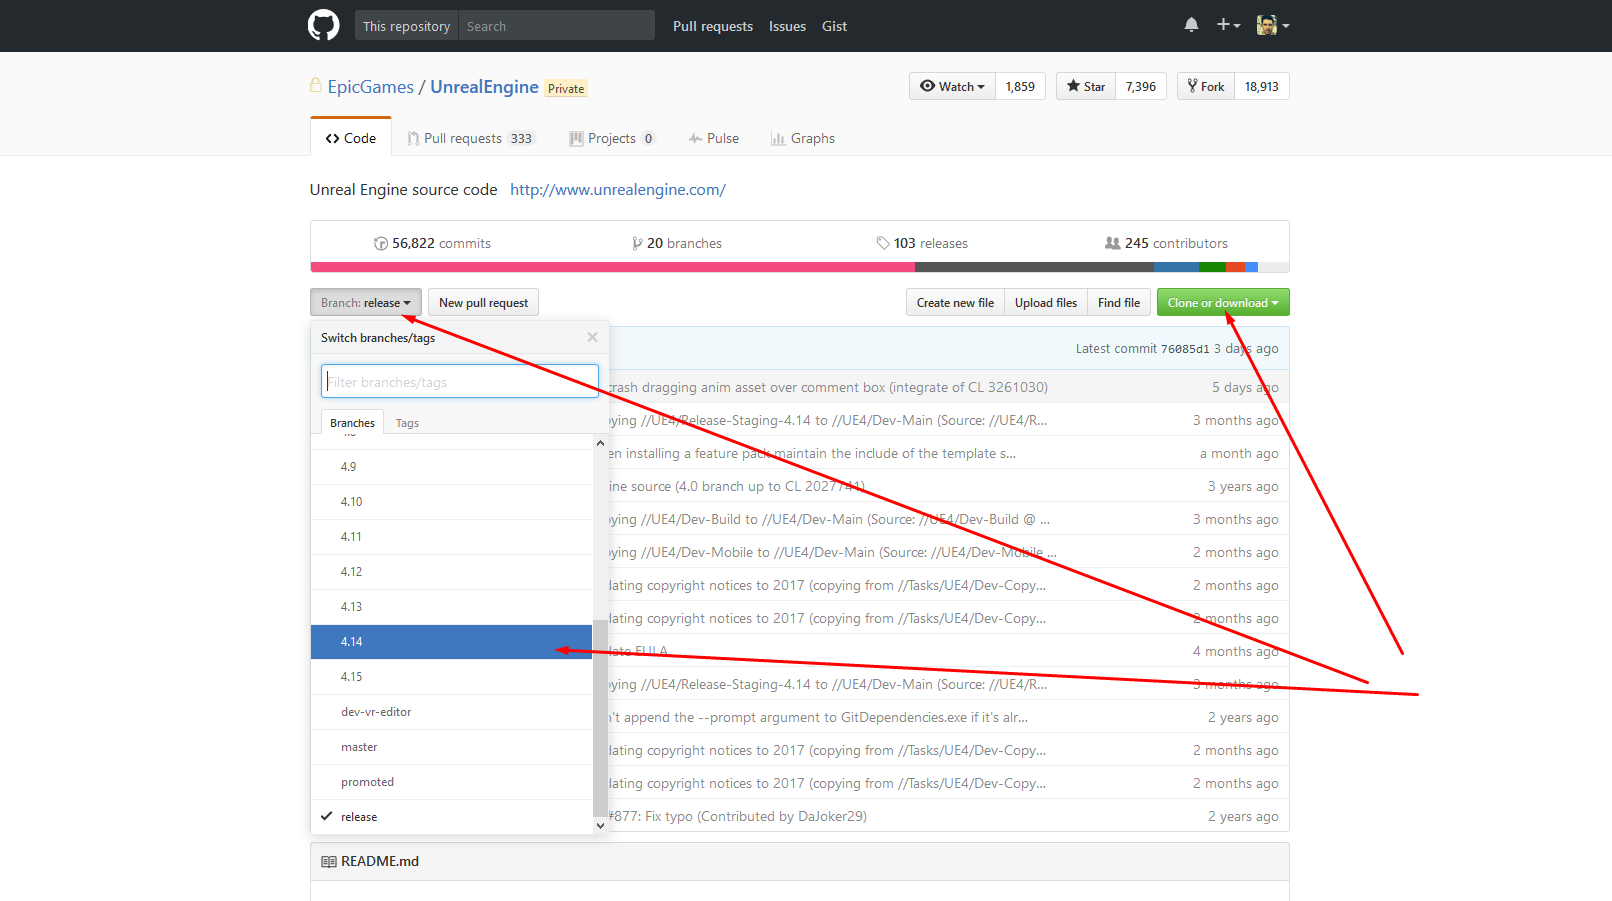
there are several options but i always prefer to just download as zip file
extract and unzip the zip file to a location of your choice.
2. Setup source unreal engine
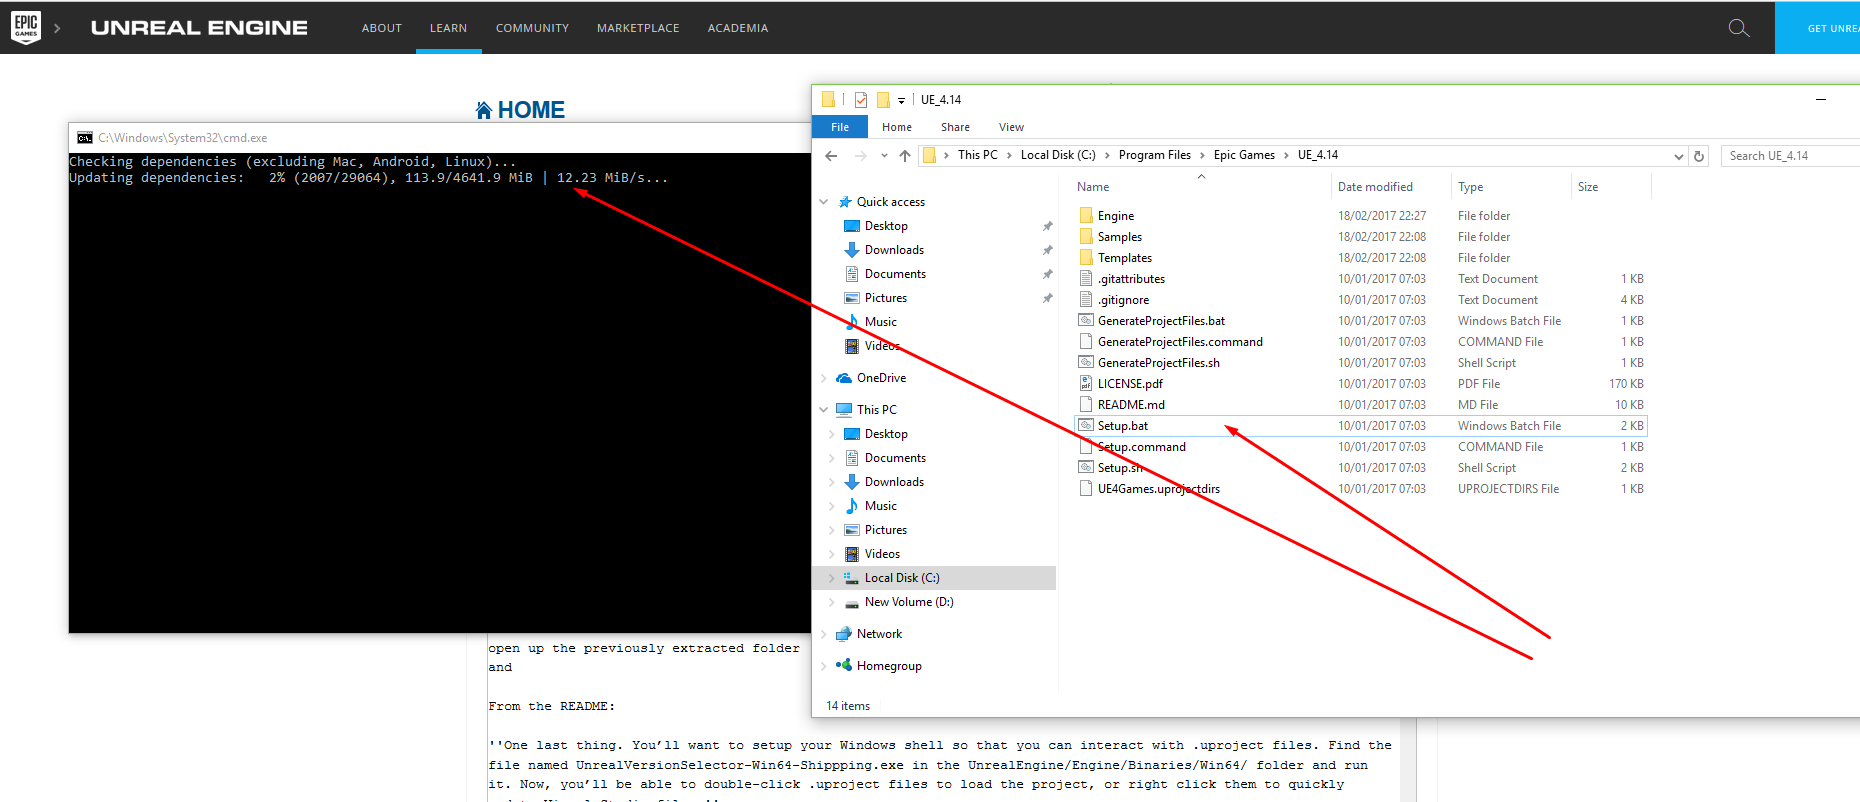
open up the previously extracted folder
and find a file called Setup.bat
double click this file and it will open up a console window and begin installing unreal dependencies
Note if you receive any errors when trying to open the .bat file then just right click instead and select run as administrator
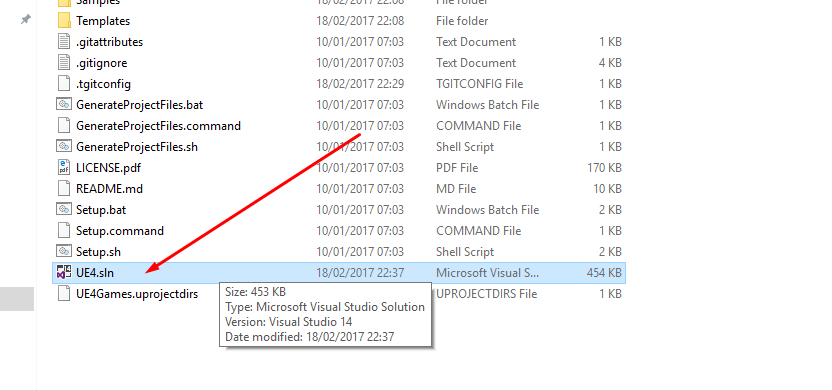
now find a file called GenerateProjectFiles.bat
double click this file or again right click and run as administrator
once it is done you will then have a visual studios solution project file in your folder
2.a Setup source unreal engine To use Visual studio 2017
If you are using visual studio 2017. Instead of clicking on the GenerateProjectFiles.bat as shown above. Open up a CMD prompt window.
Navigate to the folder where source built unreal files are by using the cd (change directory) command.
Once inside the correct directory you need to run the following command.
«GenerateProjectFiles.bat -2017»
this will then generate visual studio 2017 project files instead.
full info can be found here
https://answers.unrealengine.com/questions/579186/what-about-visual-studio-2017-in-ue4.html
_______________________________________________________________________________________________
now open this solution file and it will open visual studios and begin loading the source code.
note the first time you open the solution it normally takes a long time to parse all the header files .
make sure you let it completely finish until it says ready at the bottom before you continue.
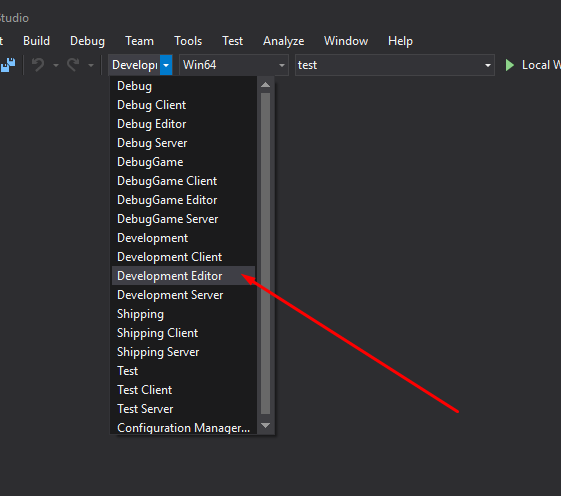
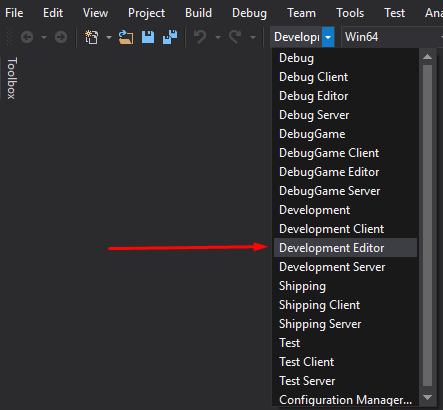
next go up to where it says develop next to where it says win64 and in the drop down menu select DEVELOPMENT EDITOR

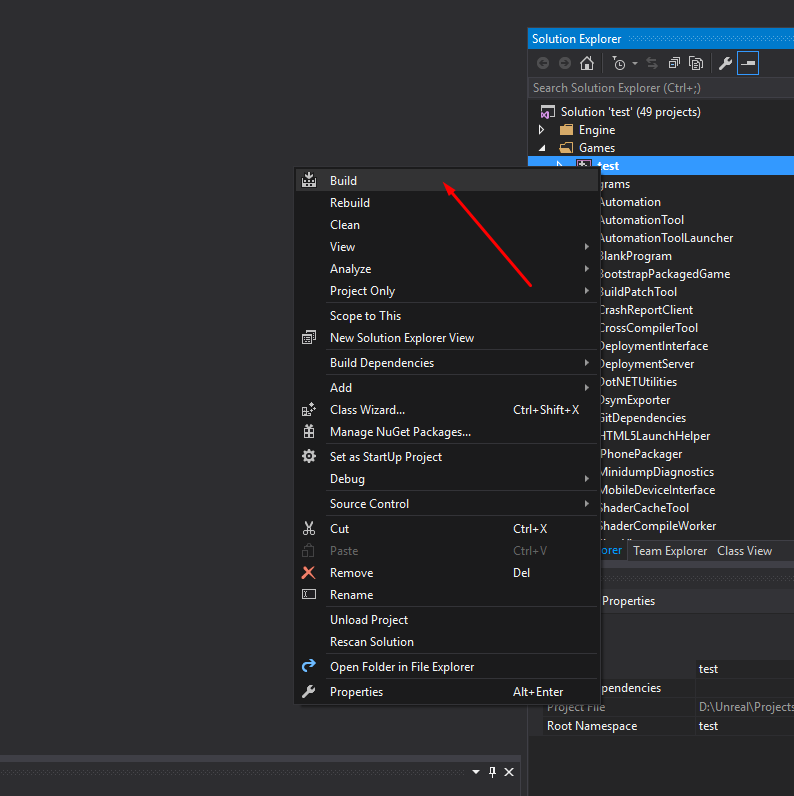
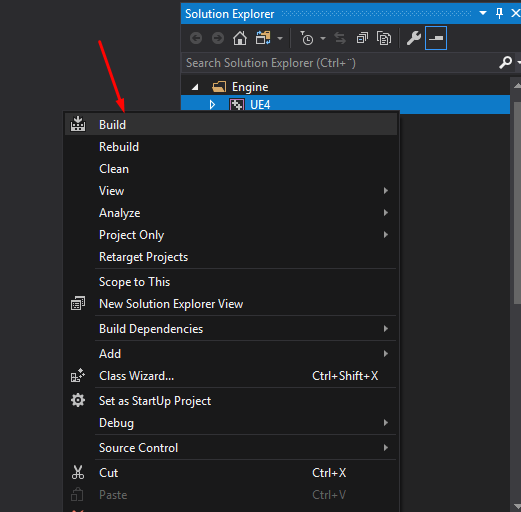
next go to the solution explorer and right click the ue4 and select build

note depending on your system this can again take quite a long time to complete
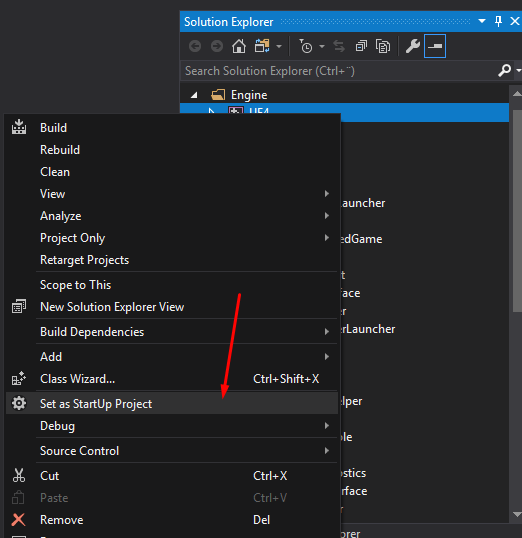
once complete you then need to right click on ue4 again in the solution explorer and go to «set as start up project»

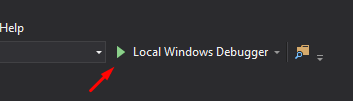
finally go up to where it says local windows debugger and click the little green play button
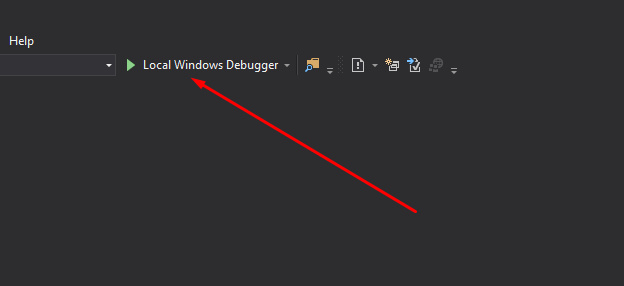
you may get a warning pop up like this
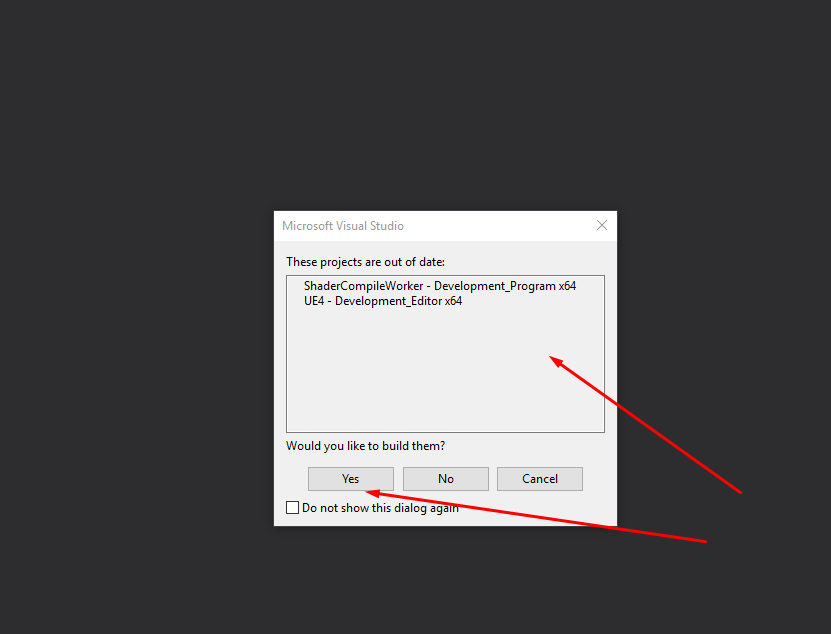
just click yes and the editor will begin to open.
note again the first time it may take a while to open and can appear to be stuck on a certain percentage as if its frozen. just be patient and it will open.
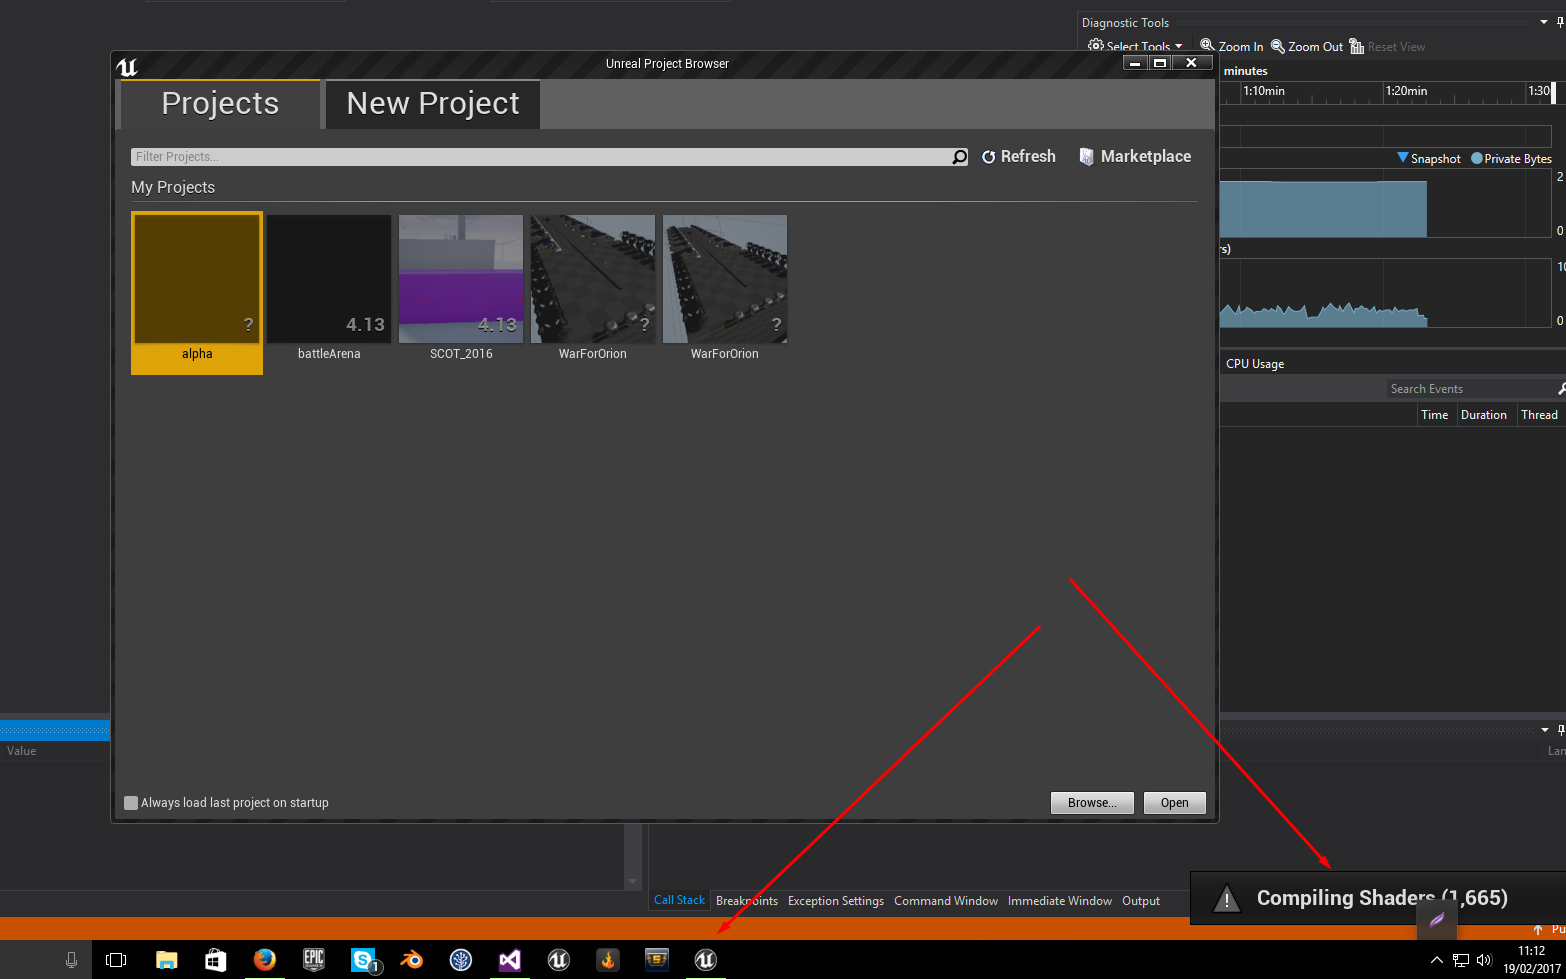
it will compile all the shaders as well which can take a while the first time.
What i do now is right click and add to task bar so that next time you can just open the engine directly rather than having to open visual studio and do it that way.
Congratulations — you should have now successfully setup a source built version of unreal engine
3. Video guide
Section 2 setting up a dedicated server on windows
1. Dedicated Server from a brand new project
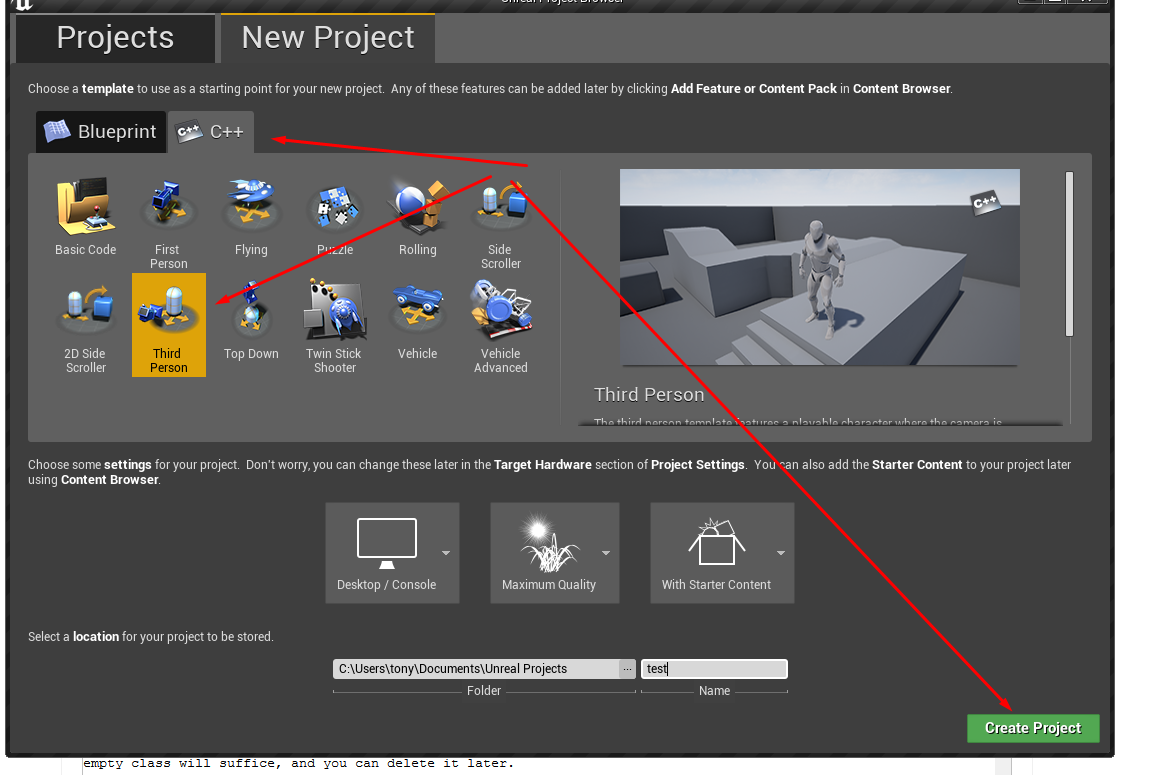
Open up source unreal engine, select c++ and third person template, give it a suitable name and save location
once the project and visual studio have finished completely loading, close them both down.
Note again wait until the header files have all been parsed in visual studio before closing. it may prompt you to save just click ok.
2. Dedicated Server from a blueprint only project
if your project was made with a none source or different engine version or was simply only BLUEPRINTS to begin with
you will not be able to make a dedicated server until you add some c++ code.
So simply go to add new, c++ class, an empty class will suffice, and you can delete it later.
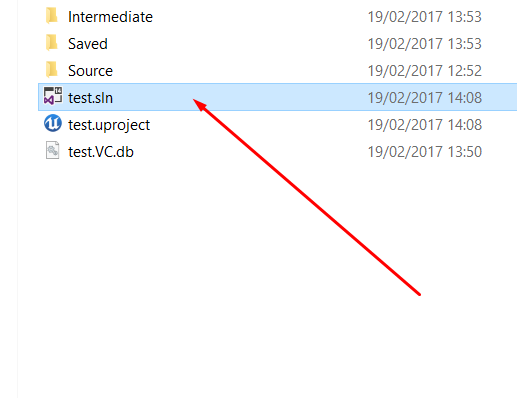
Once you have a source directory, right click on the .uproject file and generate visual studio project files. This should create an .sln in the project directory that you can open in visual studio.
3. preparing the project for building
1. Target file instructions for engine version 4.14
open up the previously created project folder from the file explorer
inside there will be a folder called source . open this up
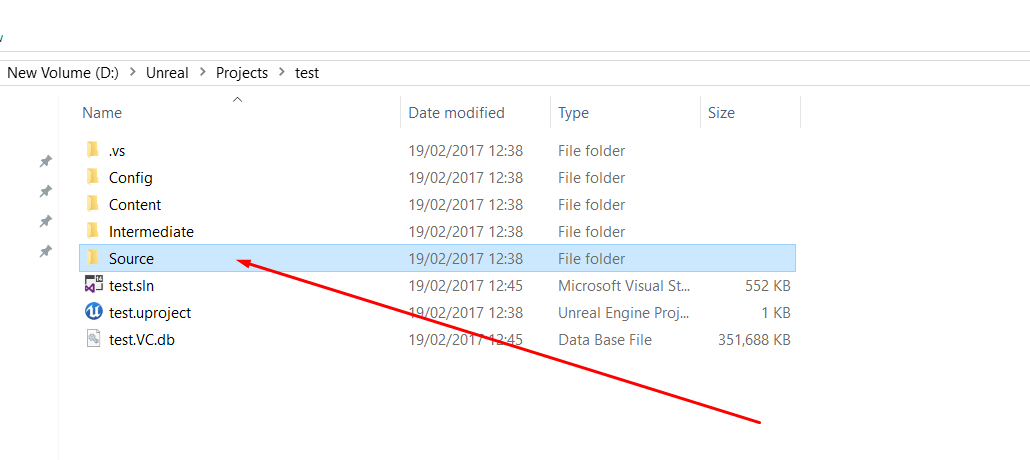
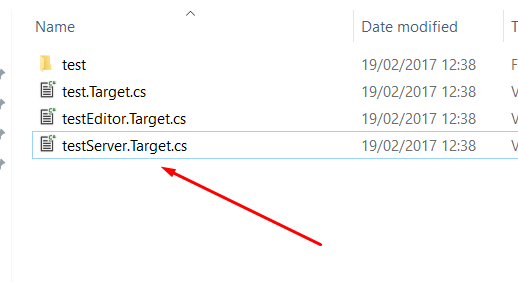
inside you will find some visual studio source files. take one of the source files and copy and paste it and then rename it to match the others . format is gamenameServer.Target.cs
so in my case because my project game name is called test i would rename my file to testServer.Target.cs
like so
right click this newly created file and click edit
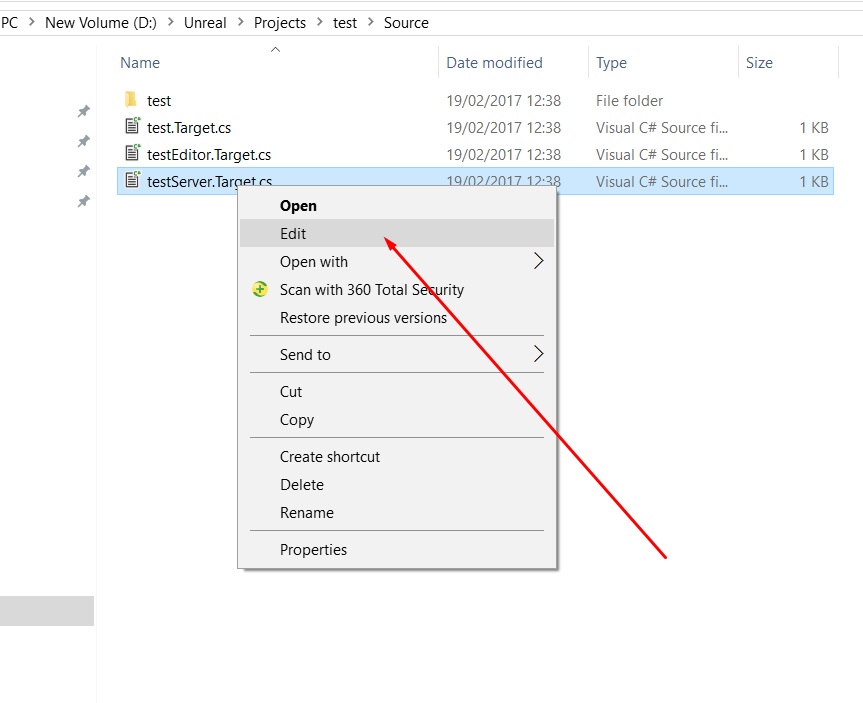
this will normally bring up a notepad so you can edit the file , although you can use any kind of text or code editor you wish. notepad is just quick and easy.
delete anything that is in the file so it is completely blank and replace with this code/text
// Copyright 1998-2016 Epic Games, Inc. All Rights Reserved.

using UnrealBuildTool;
using System.Collections.Generic;

public class ShooterGameServerTarget : TargetRules
{
      public ShooterGameServerTarget(TargetInfo Target)
      {
         Type = TargetType.Server;
         bUsesSteam = true;
      }

       //
       // TargetRules interface.
       //

       public override bool GetSupportedPlatforms(ref List<UnrealTargetPlatform> OutPlatforms)
       {
            // It is valid for only server platforms
            return UnrealBuildTool.UnrealBuildTool.GetAllServerPlatforms(ref OutPlatforms, false);
       }

       public override void SetupBinaries
       (
          TargetInfo Target, ref List<UEBuildBinaryConfiguration> OutBuildBinaryConfigurations,
          ref List<string> OutExtraModuleNames
       )
       {
         OutExtraModuleNames.Add("ShooterGame");
       }
}
next you have to make 3 changes to the file
first find this line of code at the top
public class ShooterGameServerTarget : TargetRules
and change it so that it has your game name instead so in my case my game is called test so i would change the line of code to this
public class testServerTarget : TargetRules
next underneath it find this line of code and do the same as before and change the name to match your game
public ShooterGameServerTarget(TargetInfo Target)
so again in my case my game name is test so i would change this line of code to this
public testServerTarget(TargetInfo Target)
and finally find this line of code and do the same as before and change the name to match your game
OutExtraModuleNames.Add("ShooterGame");
so again in my case my game is called test so i would change this line of code to this
OutExtraModuleNames.Add("test");
Now just save the file with the same name and close it.
2. Target file instructions for engine version 4.15
// Copyright 1998-2017 Epic Games, Inc. All Rights Reserved.

using UnrealBuildTool;
using System.Collections.Generic;

[SupportedPlatforms(UnrealPlatformClass.Server)]
public class ShooterGameServerTarget : TargetRules      // Change this line of code as shown in the previous steps
{

    public ShooterGameServerTarget(TargetInfo Target)  // Change this line of code as shown in the previous steps

       {

     Type = TargetType.Server;

      bUsesSteam = false;

       }

        //
        // TargetRules interface.
        //
            public override void SetupBinaries
            (
             TargetInfo Target,
             ref List<UEBuildBinaryConfiguration> OutBuildBinaryConfigurations,
             ref List<string> OutExtraModuleNames
             )
               {
                OutExtraModuleNames.Add("ShooterGame");     // Change this line of code as shown in the previous steps
               }
  }
3. Target file instructions for engine version 4.16
// Copyright 1998-2017 Epic Games, Inc. All Rights Reserved.

using UnrealBuildTool;
using System.Collections.Generic;

[SupportedPlatforms(UnrealPlatformClass.Server)]
public class ShooterGameServerTarget : TargetRules    // Change this line of code as shown previously
{
	public ShooterGameServerTarget(TargetInfo Target) : base(Target) // Change this line of code as shown previously
       {
              Type = TargetType.Server;
              ExtraModuleNames.Add("ShooterGame");   // Change this line of code as shown previously
       }
}
4. Target file instructions for engine version 4.17
// Copyright 1998-2017 Epic Games, Inc. All Rights Reserved.

using UnrealBuildTool;
using System.Collections.Generic;

[SupportedPlatforms(UnrealPlatformClass.Server)]
public class ShooterGameServerTarget : TargetRules   // Change this line as shown previously
{
       public ShooterGameServerTarget(TargetInfo Target) : base(Target)  // Change this line as shown previously
       {
        Type = TargetType.Server;
        ExtraModuleNames.Add("ShooterGame");    // Change this line as shown previously
       }
}
5. Target file instructions for engine version 4.18
// Copyright 1998-2017 Epic Games, Inc. All Rights Reserved.

using UnrealBuildTool;
using System.Collections.Generic;

[SupportedPlatforms(UnrealPlatformClass.Server)]
public class ShooterGameServerTarget : TargetRules   // Change this line as shown previously
{
       public ShooterGameServerTarget(TargetInfo Target) : base(Target)  // Change this line as shown previously
       {
        Type = TargetType.Server;
        ExtraModuleNames.Add("ShooterGame");    // Change this line as shown previously
       }
}
4. Switch Unreal engine versions & generate project files
next inside the project folder right click the uproject file and when the menu pops up select «switch unreal engine versions»
if when you right click on a uproject file you dont get a menu that looks like this
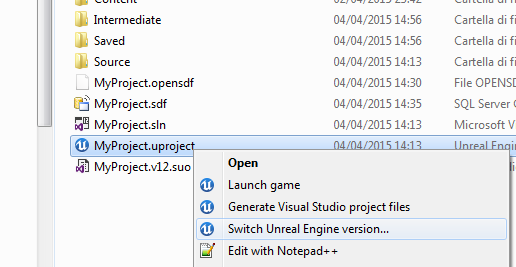
then follow this step below from the read me file.
One last thing. You’ll want to setup your Windows shell so that you can interact with .uproject files. Find the file named UnrealVersionSelector-Win64-Shippping.exe in the UnrealEngine/Engine/Binaries/Win64/ folder and run it. Now, you’ll be able to double-click .uproject files to load the project, or right click them to quickly update Visual Studio files.
This should now allow you to right click on the uproject file to bring up the menu.
when you click switch engine versions make sure that your source build version of the engine is selected in the drop down box and click ok.
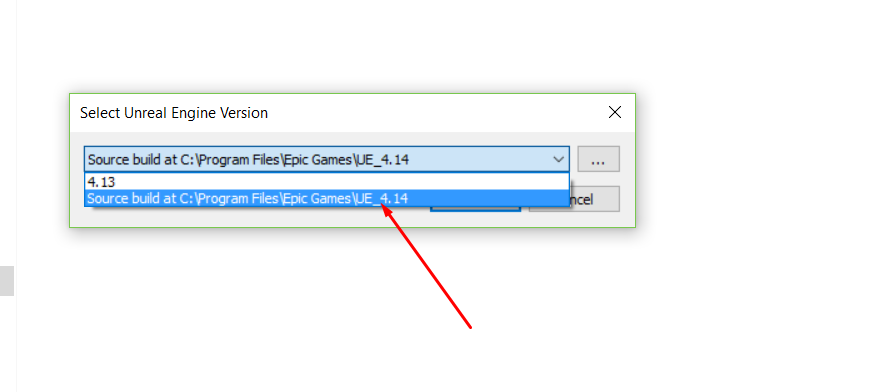
this should automatically regenerate the visual studio solution project files . if it does not then it means your files are already up to date but just to be safe you can right click the uproject file again and click «generate visual studio project files»
5. Building the server
next open up the visual studio project solution and allow it to fully load until it says ready.
go up to the drop down box and in the menu this time select DEVELOPMENT EDITOR
then same as before go to the solution explorer and right click and click build

again depending on youre computer this can take a long time to complete.
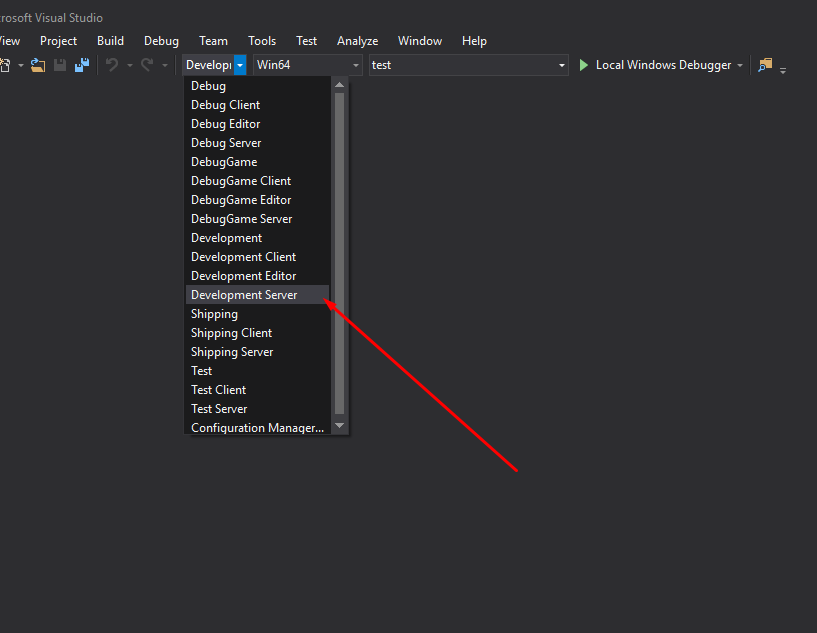
once this is done go back to the menu and in the drop down box this time select DEVELOPMENT SERVER
then same as before go to the solution explorer and right click and click build
again depending on your computer this can take a long time to complete.
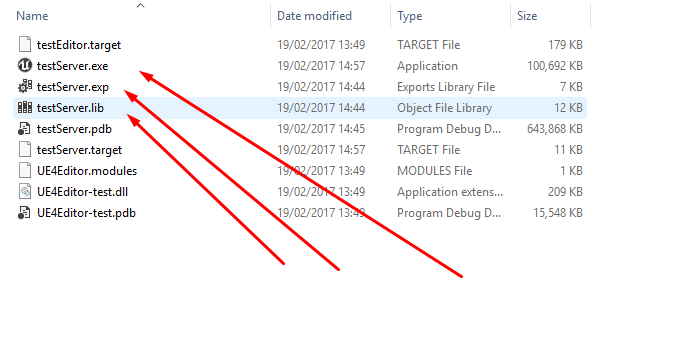
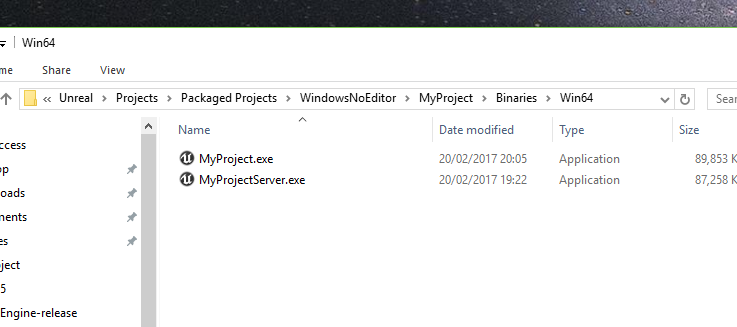
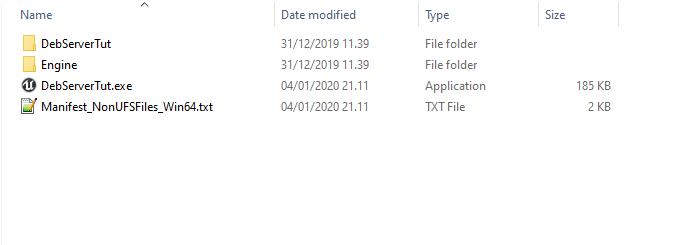
once the server is built if you go into your project folder again then click binaries, win64
and you should have the server files in there like this
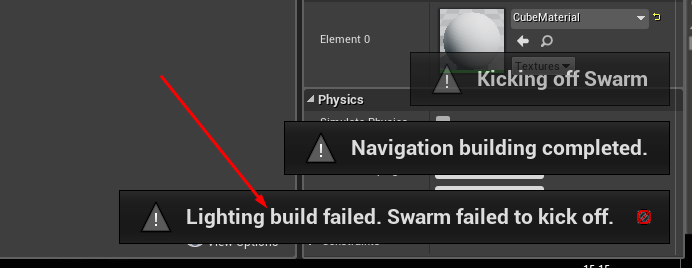
6. Fixing the lighting swarm error
With source built unreal when you go to build the lighting it is common for the following error to occur and it took me forever to find the solution so i am including it here to save you guys the headache.
so what you do is in your solution explorer in visual studio scroll down until you see «unreal lightmass»
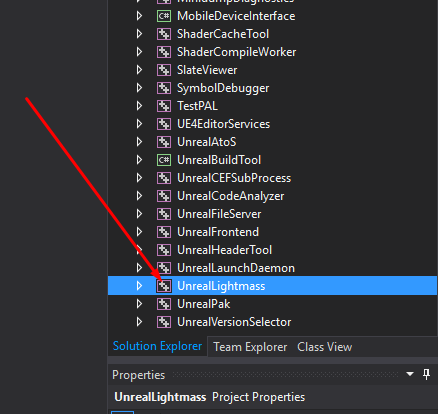
and again like before right click it and click build.
when it has finished close visual studio and now the swarm bug error should be fixed.
6.a Video Guide
7. Prepare the project for packaging
now open up your project again by clicking on the uproject file.
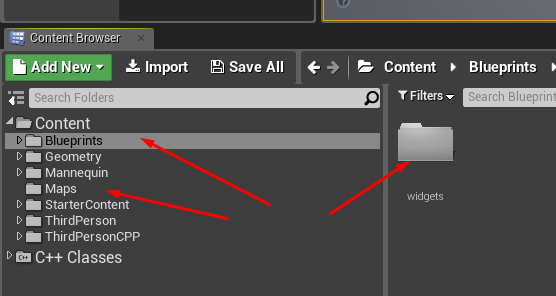
ok so the first thing we need to do is under the content folder is add two new folders .
one called maps, the other blueprints.
then we need to go down to where the third person example map is stored and move it into your newly created map folder like so.

rename this to test level or whatever you like. this will be the level that the player loads into the server on and plays the game .
as of engine versions 4.14+ whenever you make a new map you must open the map and then click on build so that it generates the correct mapBuildDataRegistry Files for it. once this is done then click save all.
now we need to create 2 more additional maps. so go up to file, then new level and select the empty map level.
name this first level entry map, and the second level transition map. like so
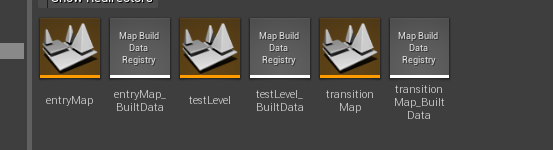
again dont forget to build each time on the new map to make sure the data is saved correctly.
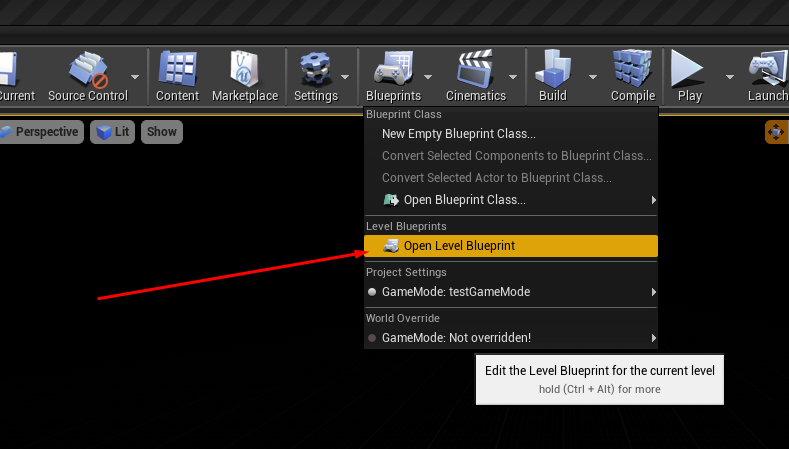
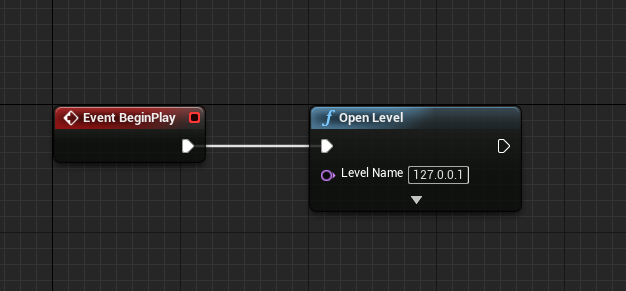
open up the entry level map and go up to blueprints and open the level blueprint
in this blueprint drag off from begin play and find the open level node. in the level name set the parameter to
127.0.0.1 this is your local ip address.

compile and save and close the blueprint.
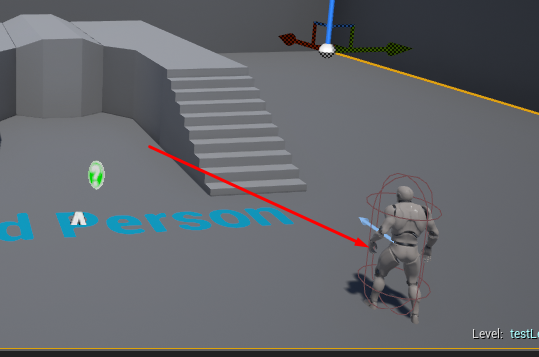
finally open up the test level map and just click on the default character that is in the map and just delete him otherwise when you join the server you will end up with duplicated characters.
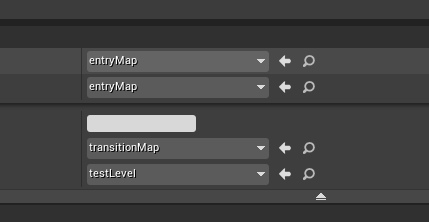
now we need to set the project settings up
so open up the project settings and then go to maps and modes.
set the editor startup map to entry
set the game default map to entry
set the transition map to transition
set the server default map to test level
like so
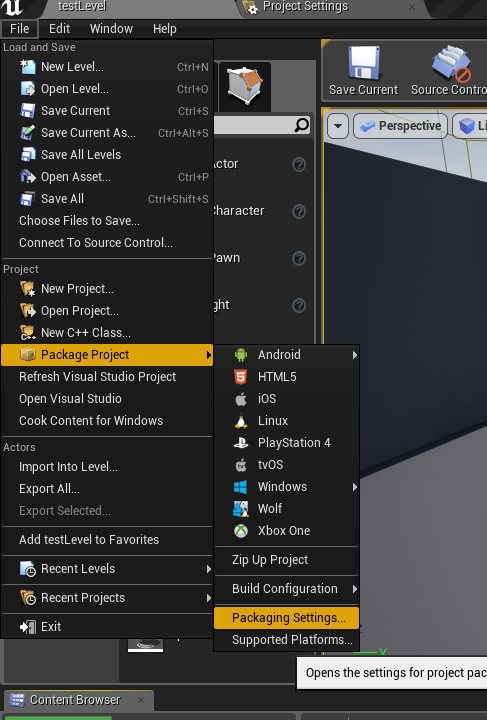
8. setup packaging settings
go to file, packaging, packaging settings
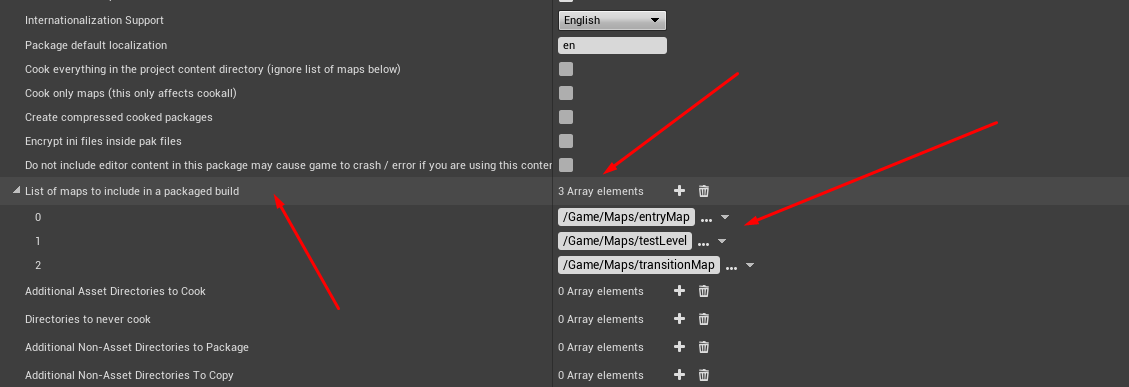
in the packaging settings scroll down till you find the section list of maps to include in a packaged build . click on the + sign to add 3 elements to the array. one for each map you have in the project.
then browse to your map folder and add each of your 3 maps to the array like so
now close the settings and package the project.
9. Congratulations you have now packaged your project yay :-p
Section 3 launching and joining the dedicated server
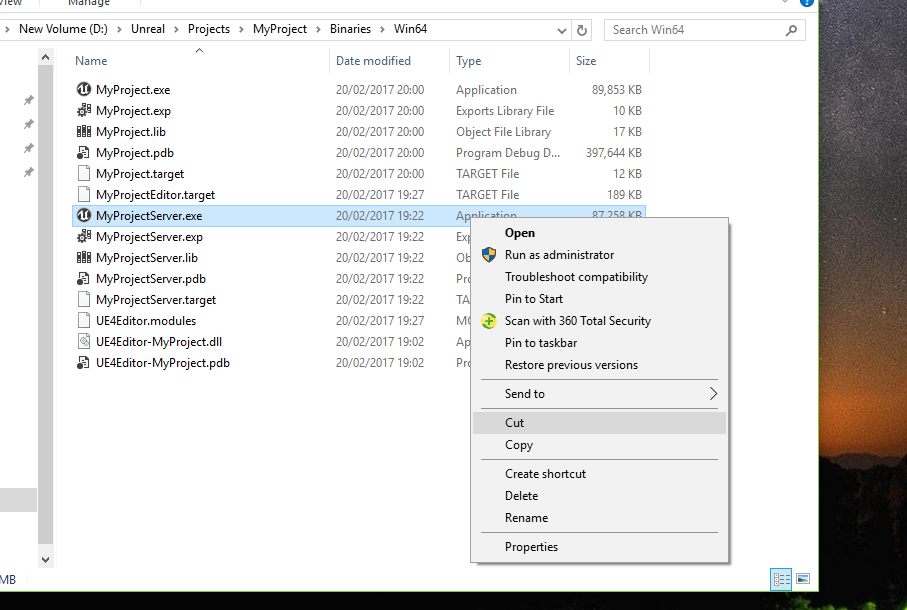
1. copy the server executable
go to your project folder, then binaries, win 64, and find the file called «yourProjectNameServer.exe»
and right click it and copy it.
next go to your packaged game location. then WindowsNoEditor, then the name of your project, binaries, win64,
and paste in the server.exe like so.
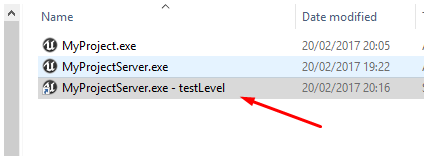
2. create the server shortcut and setup log options
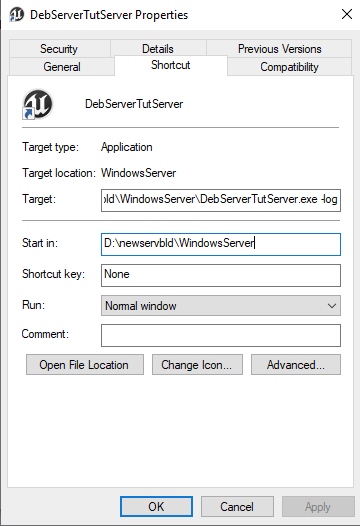
now take the server file and create a shortcut to it. then rename it to match whatever you called your map inside the project . in my case i called it test level so my shortcut will look like this
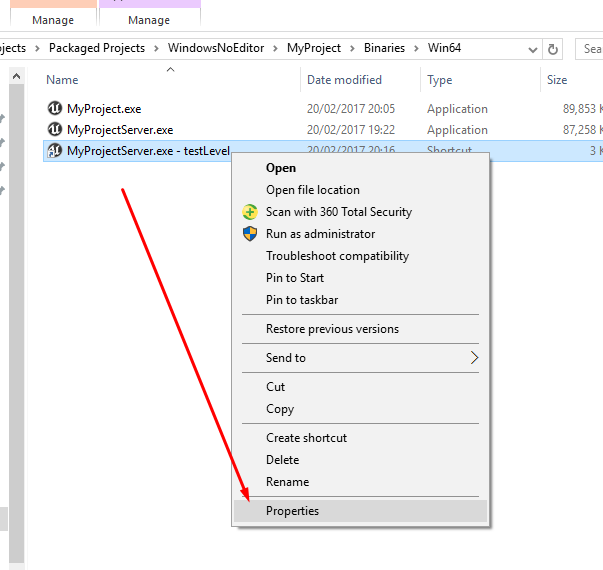
now right click this shortcut and go to properties
at the end of the target path simply add -log like so
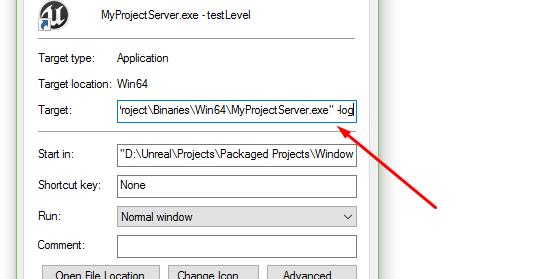
and click ok
3. Launch and test the server
Now we are ready to launch the dedicated server and test level.
double click the server shortcut you just modified
if all goes well you should see a command window open and the server will launch itself
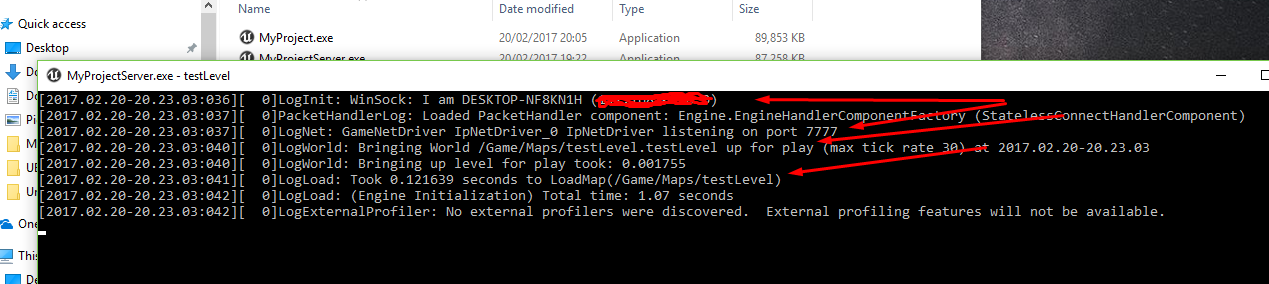
here you can see the ip address of the computer hosting the server, you can see the server is listening on port 7777 which is the default unreal port, and it has loaded up the test level map as we set out in our project.
Your server is now running all that’s left now is to click the project.exe to join the server.
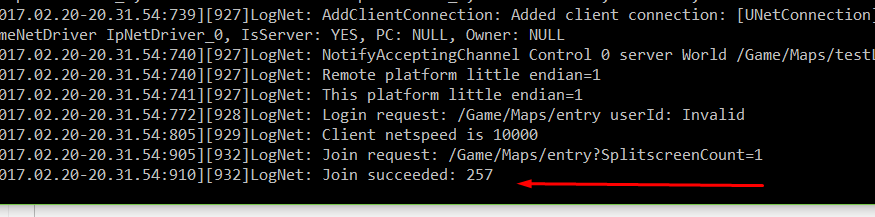
in the logs if all is well you will see that a client requested to join the server and then at the bottom you should see join succeeded: 256
this means the player has successfully joined the dedicated server.

if you were to launch another game exe you would now see another login success and the number would now be :257
like so
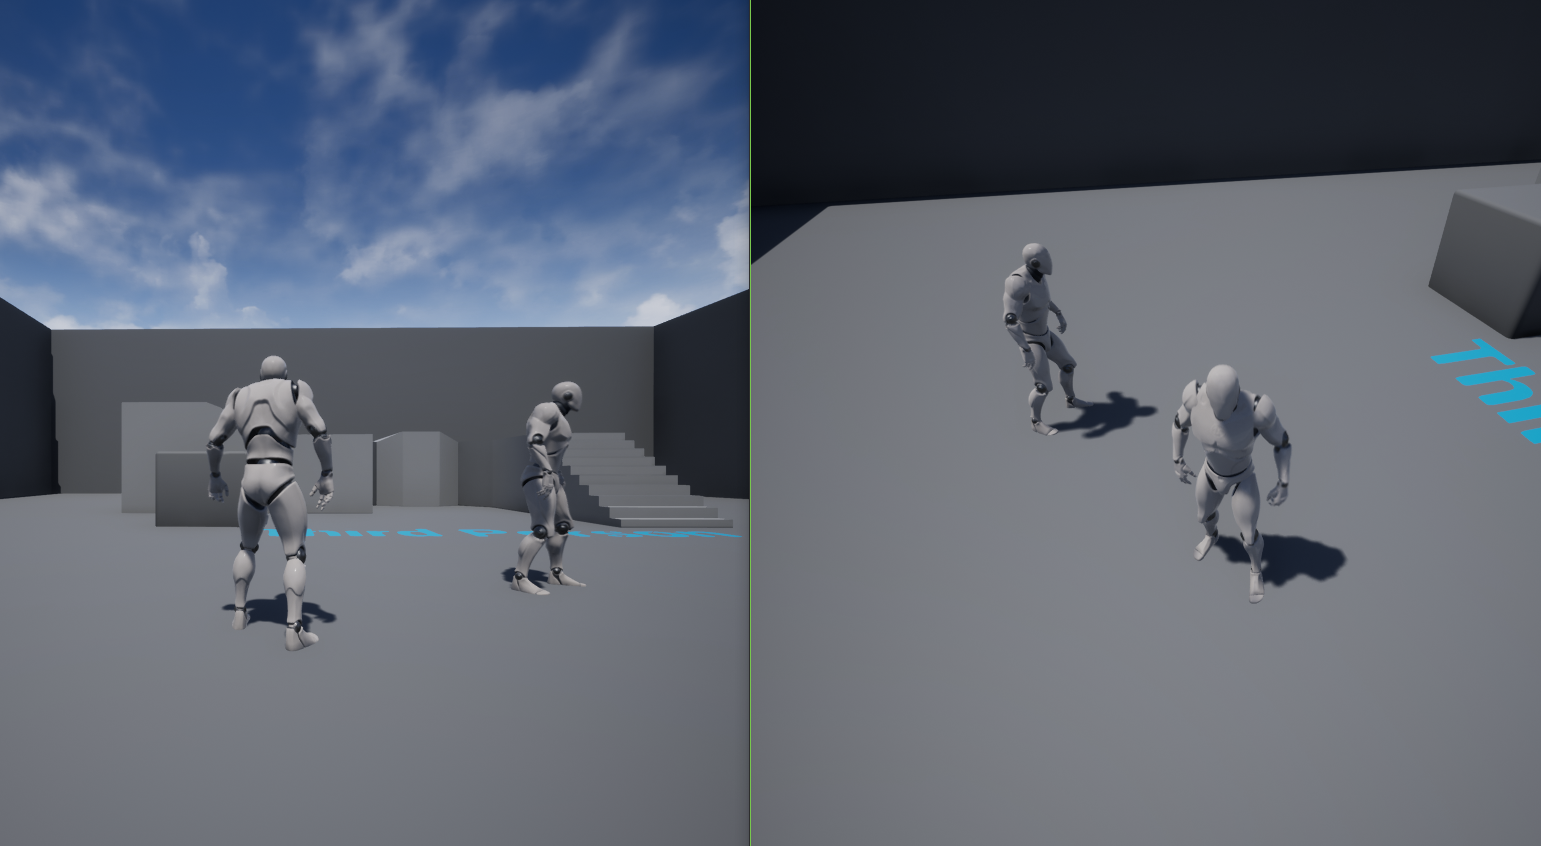
congratulations you are now hosting a dedicated server on your own computer and have two players joined that can run around and see each other
to properly close down the server in the command window press ctrl c. alternatively you can press the x on the log window or failing that you can ctr alt delete and kill any unreal processes that are running. but the best method is to use ctrl c
Section 4 notes
1. allowing friends to join over internet
if you want to allow friends to join your games etc then simply go back to your project and on the entry level, open the level blueprint and instead of using your local ip address, input your real public ip address.
to find this simply type in to google «what is my ip» . or use an ip address finding program etc.
also remember that when you make changes in the game you need to repackage the game . so once you change the ip address to your real public ip make sure to repackage the game before you send it to your friends.
also you might need to rebuild the server binaries in visual studio.
once package is complete then zip up the whole windows no editor game folder and send it to youre friends.
start the server your end , then get the friends to open the game executable and join your game.
if your friends are unable to join your game it will be because you do not have the ports forwarded and setup properly on your router, and you may need to set up a static ip address.
2. Hosting on a virtual server
log into your virtual server, open up the internet and download the game package. unzip it and then launch the server shortcut as normal.
3. Creating additional maps and joining different maps
4. Enabling Physics
Not sure if this is still relevant in engine 4.14+ but ive left it here just in case. from original wiki authors.
As of 4.4.3, if you’re replicating actors whose movement depends on simulated physics, you’ll need to set their
SkeletalMeshComponent.bEnablePhysicsOnDedicatedServer
property to true. The standalone dedicated servers return true to
IsRunningDedicatedServer()
, which results in prevention of physics simulations for SkeletalMeshComponents that do not explicitly set the bEnablePhysicsOnDedicatedServer property.
Thanks to user
HateDread
for pointing this out for me.
Details:
https://answers.unrealengine.com/questions/97074/vehicle-template-issues-with-standalone-dedicated.html#answer-101321
Commit that fixes this:
https://github.com/EpicGames/UnrealEngine/commit/9860acf7b10c7187cc9287342e43c73b0083791f
Section 5
1. Im too lazy for all this just give me the files
i will provide the test project files soon i ran out of time
1.
if you need help you can find me on unreal forums —
https://forums.unrealengine.com/member.php?42414-EniGmaa
Or on unreal slackers discord
http://unrealslackers.org/
Username is PrintStringFTW#6597
thankyou
section 7 Building and deploying a UE4 dedicated server for Linux
Original blog post:
http://blog.piinecone.com/post/98470361272/building-and-deploying-a-ue4-dedicated-server-for-linux
In a prior post I covered the basics of building a standalone dedicated server executable for Windows from a UE4 game. This post will cover packaging, building, and deploying a Linux binary.
1. Configure Visual Studio for Linux cross compilation
Epic have provided a prebuilt cross compilation toolchain for building Linux binaries from Windows. Follow the installation guide on the wiki:
Compiling For Linux
.
Once you have the toolchain installed, verify that you have a LINUX_ROOT env var pointing to it. You can check this in git bash with the following command:
`env | grep LINUX_ROOT `
2. Package your project to a distinct location
Thanks to Osman for pointing this out to me. In order to compress everything you’ll need to deploy and run a standalone binary, you should package your project somewhere outside of your project’s working directory. The resulting file structure will contain the essentials.
Open the editor and package your project for Linux. Choose a distinct destination for the build (eg, ~/Desktop/MyGameLinux/). Once this completes, you should see a client build for Linux in the destination you chose.
3. Build a dedicated server binary for Linux
Open your project solution in Visual Studio, select the Development Server configuration (or whichever server configuration you’d like to use) and build for Linux. Make sure you’ve followed the previous guide and that your Server target is correctly setup.
When the build completes, you’ll have a new server binary in your project’s working directory (../MyGame/Binaries/Win64/MyGameServer).
Copy the Linux Server binary to the packaged project directory we created in step 2. You should put it next to the client binary. So when you look in:
~/Desktop/MyGameLinux/LinuxNoEditor/MyGame/Binaries/Linux
You should see:
MyGame
MyGameServer
4. Deploy your binary to a remote machine
You’ll need a Linux machine to deploy and run your server. I’m using a Google Compute VM for testing, but EC2 or any other cloud provider should suffice for now. I haven’t done any research or benchmarking to determine which provider, OS, and machine type is ideal for running UE4 dedicated servers.
Using git bash, create a gzipped tar of your packaged directory (I foolishly forgot to remove the client binary before doing this; you should remove it as you won’t be running it remotely):
tar -cvzf mygame-linux-server.tar.gz ~/Desktop/MyGameLinux/
Copy the resulting archive to your remote Linux machine:
scp mygame-linux-server.tar.gz piinecone@123.456.78.91
This will copy the tar into the home directory of the machine at the supplied IP address. Replace my nonsense numbers with the external IP of your remote machine. Note that you may have to append
-i ~/.ssh/<name of your private key>
to perform the secure copy, depending on your ssh configuration.
5. Connect to your server and run the dedicated server binary
SSH into your machine:
ssh piinecone@123.456.78.91
You may need to append `-i ~/.ssh/<your private key>` again here.
Once connected, you’ll be in your home directory. `ls` and you should see your gzipped tarball. Unpack it:
tar -xzf mygame-linux-server.tar.gz
`cd` to your binary location:
cd MyGameLinux/LinuxNoEditor/MyGame/Binaries/Linux
Make your server binary executable:
chmod +x MyGameServer
Run it!
./MyGameServer -log
Okay, now kill it with Ctrl+C because we have to open up allow connections on UDP:7777.
Also, if you see this error:
Could not adjust number of file handles
Add this line to /etc/security/limits.conf:
user — nofile 10000
And for Debian and Ubuntu, add this line to /etc/pam.d/common-session:
session required pam_limits.so
After rebooting your machine you should be able to run the server executable.
6. Open UDP:7777
Most cloud VMs default to fairly tight security so you’ll probably have to manually open port 7777 (the UE4 server’s default port) to accept UDP connections. I’m not going to cover the specifics of this because it can vary by machine and provider. For a Google Compute VM you can just create a forwarding rule with the CLI. Other machines will require that you modify the iptables.
Once you’ve opened UDP 7777, you can verify the connection is working with netcat. On the remote machine:
nc -luv 777
On your machine:
nc -vu server.ip.add.ress 7777
Enter text on either console and it should appear in the other.
7. Play your game on your server
This is, after all, the whole point. Build a client executable (or just use the one you built in step 2). Run it, open the console (with “~”), and type:
open my.server.ip.address:7777
You should see a join in your server log, and your client pawn should spawn into whichever map the server is currently running.
8. Issues
At some point of time (around Unreal Engine 4.4.x), Linux servers required glibc 2.14+, which made it unable to run on Debian-stable (back then Debian 7 ‘wheezy’). This was a temporary issue not experienced in previous versions, and it was fixed in later ones. Cross-toolchain provided with the Unreal Engine targets glibc 2.12.2, which is old enough to run on most contemporary distros, including Debian-stable and even CentOS 6.x without hassle.
8. Dedicated Server on Steam
Now on it’s own page:
This document covers the bare basics on how to get your Unreal Engine 4 game project able to build both Windows and Linux dedicated server builds, using just a Windows machine for compiling.
Requirements
-
For 4.9.X or older, you need Visual Studio Community Edition 2013
-
For 4.10 or newer, you need Visual Studio Community Edition 2015
-
Unreal Engine 4 compiled from source code
- A Tutorial I wrote on how to do this
- Epic’s Documentation on how to do this
-
Project must be a C++ code project
- If your project is a Blueprint Only project, follow this tutorial to wrap it in C++. Don’t worry, you won’t have to write any code.
-
Linux Toolchain for Windows installed for Linux x86 Server Support
- Link to my beginner’s guide goes over this.
- There is also the UE4 Wiki documentation
Adding Dedicated Server Support
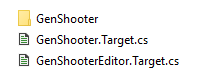
Note: The word Project in any referenced file name or code will refer to your project’s name. For example, my project for this tutorial is named GenShooter, so in my case Project.Target.cs refers to GenShooter.Target.cs. ProjectTarget in my case would be GenShooterTarget.
- Navigate to your Project’s Source folder. You should see some
.Target.csfiles.

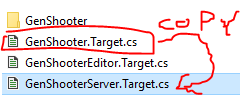
- Make a copy of
Project.Target.csfile and rename itProjectServer.Target.cs, be sure not to grabProjectEditor.Target.cs.
- Open up
ProjectServer.Target.csin your favorite text editor. I’ll be using Visual Studio here. - Rename all instances of
ProjectTargettoProjectServerTarget. - Change
Type = TargetType.Game;toType = TargetType.Server;. - Save this file. Your
ProjectServer.Target.csfile should look something like this now:
// Your Copyright Text Here

using UnrealBuildTool;
using System.Collections.Generic;

public class GenShooterServerTarget : TargetRules
{
	public GenShooterServerTarget(TargetInfo Target)
	{
		Type = TargetType.Server;
	}

	//
	// TargetRules interface.
	//

	public override void SetupBinaries(
		TargetInfo Target,
		ref List<UEBuildBinaryConfiguration> OutBuildBinaryConfigurations,
		ref List<string> OutExtraModuleNames
		)
	{
		OutExtraModuleNames.AddRange( new string[] { "GenShooter" } );
	}
}
Building your Dedicated Server
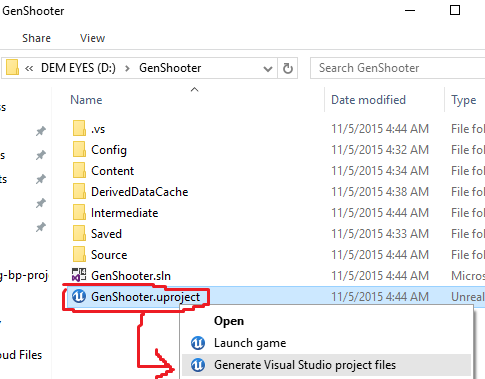
- Right-click your project’s
.uprojectfile in your project’s folder and «Generate Visual Studio project files».
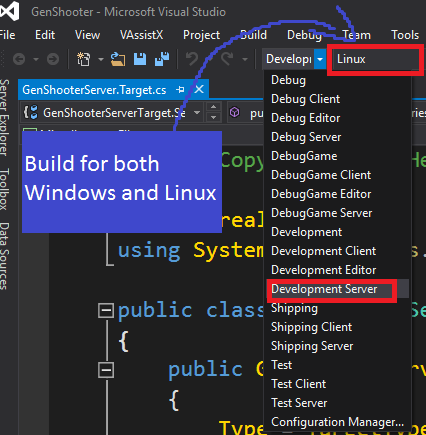
- Now we need to build our project in Visual Studio with the
Development Serverconfiguration for the Windows platform, and for the Linux platform as well if you have the Linux x86 Cross-Compile Toolchain installed. To do this, build your game project just as we built it in the past tutorials but this time with theDevelopment Serverbuild configuration.
When the Windows server is done building, your output should look like this.
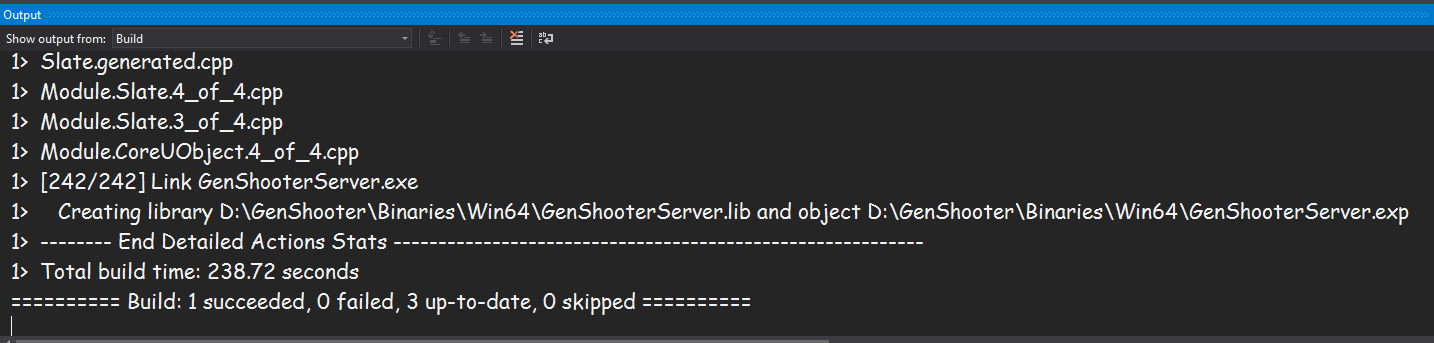
Here is the build output for the Linux server.
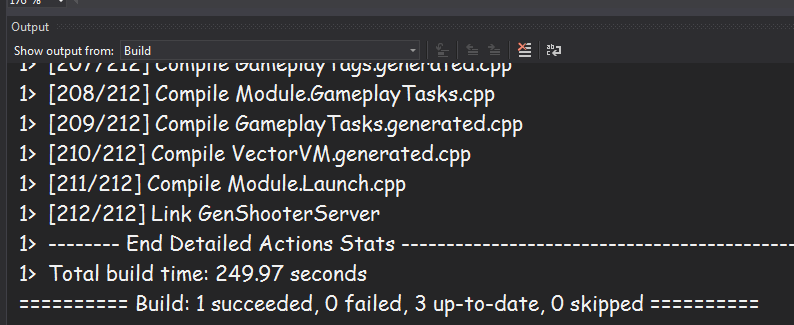
Now your project supports building for dedicated servers, for all platforms, including Linux. Whether Linux will compile is dependant on if your Linux x86 Cross-Compile Toolchain is setup correctly.
Packaging Your Dedicated Server
- Open up your project in the UE4 Editor.
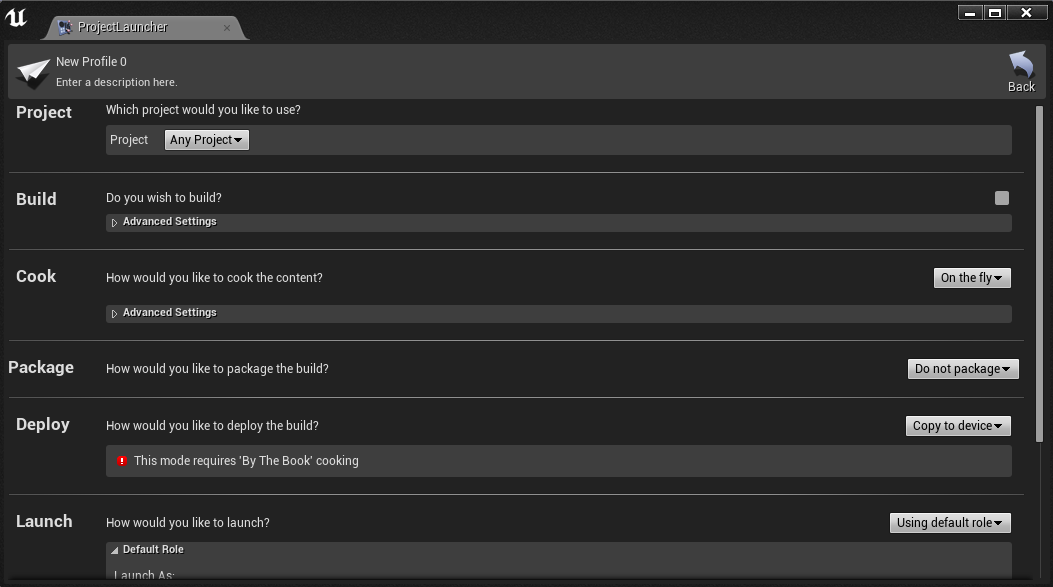
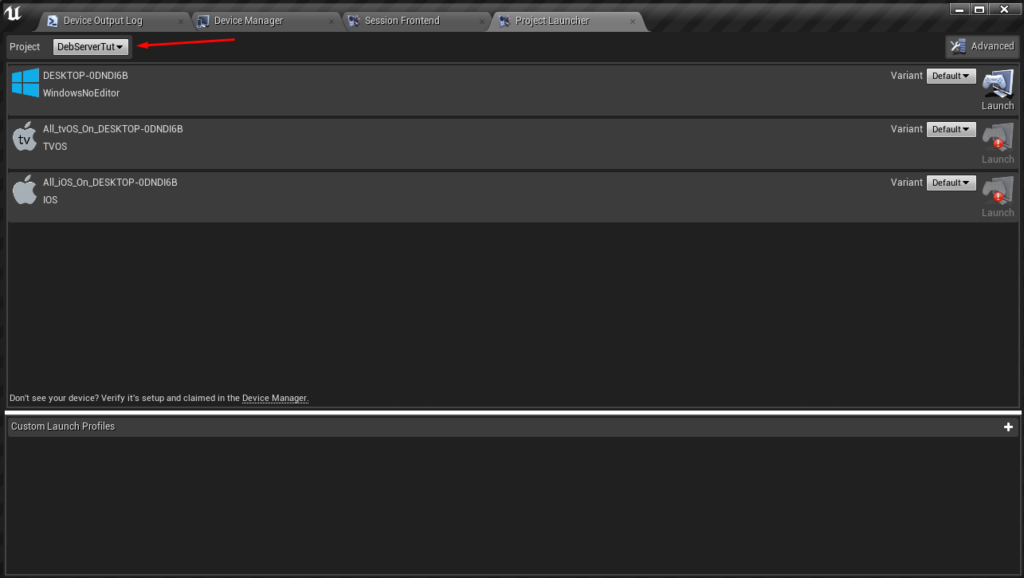
- Open up the Project Launcher using Window -> Project Launcher.
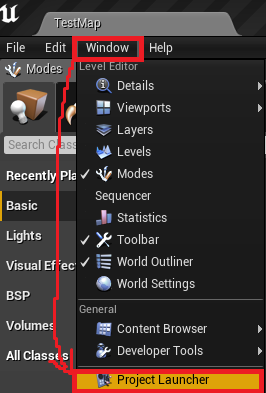
This should greet you with a window that looks like this.
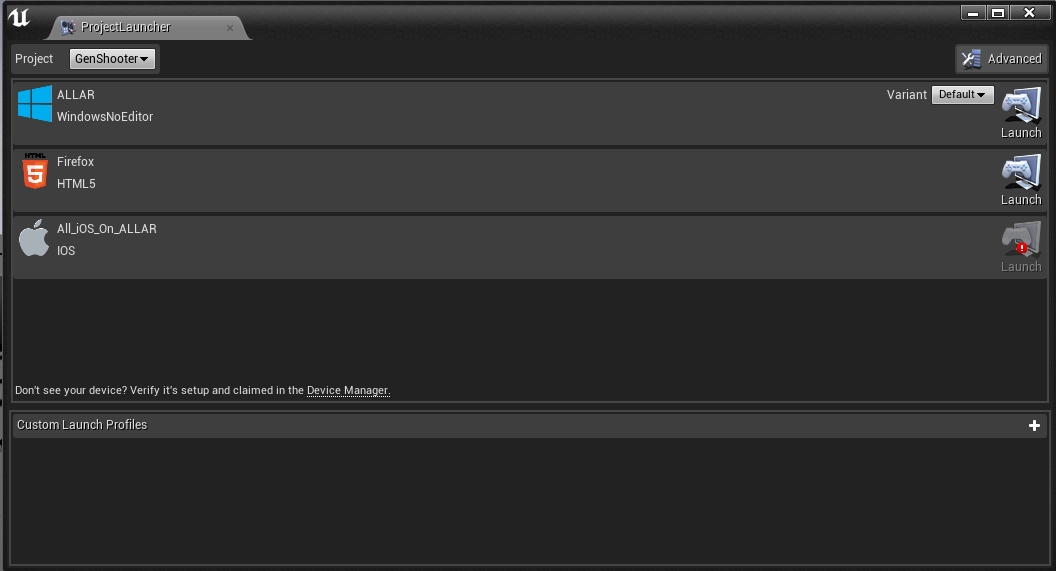
This window allows for launching various project deployment configurations.
- To build your project in dedicated server form, we need to make a custom build profile. Click the «Add a new custom launch profile» button in the bottom panel that looks like a plus sign. This should open up the custom profile editing screen.
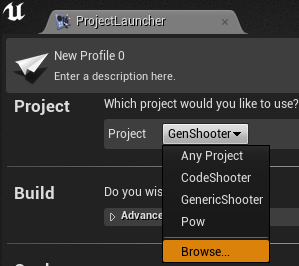
- Choose your Project in the Project drop down. If you do not see it, click browse and feed it your project’s .uproject file.
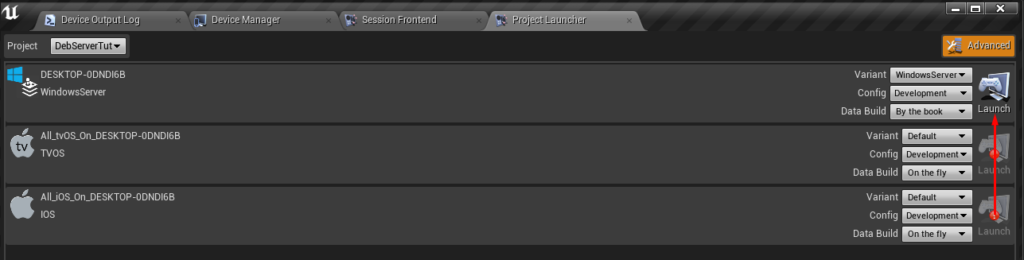
- Change Cook mode from
On the flytoBy the Book. Select theWindowsServerplatform under Cooked Platforms. Select theLinuxServerplatform as well if you have the Linux x86 Cross-Compile Toolchain installed. Also, selectenunder Cooked Cultures, or select your base language if your project is not English centric. Click here to see what these settings look like.

- Change Package mode from
Do not packagetoPackage & store locally. Leave all the settings in here blank by default.

- Change Deploy mode to
Do not deploy.

- Click «Back» on the top right of this window to go back to the main Project Launcher Window.
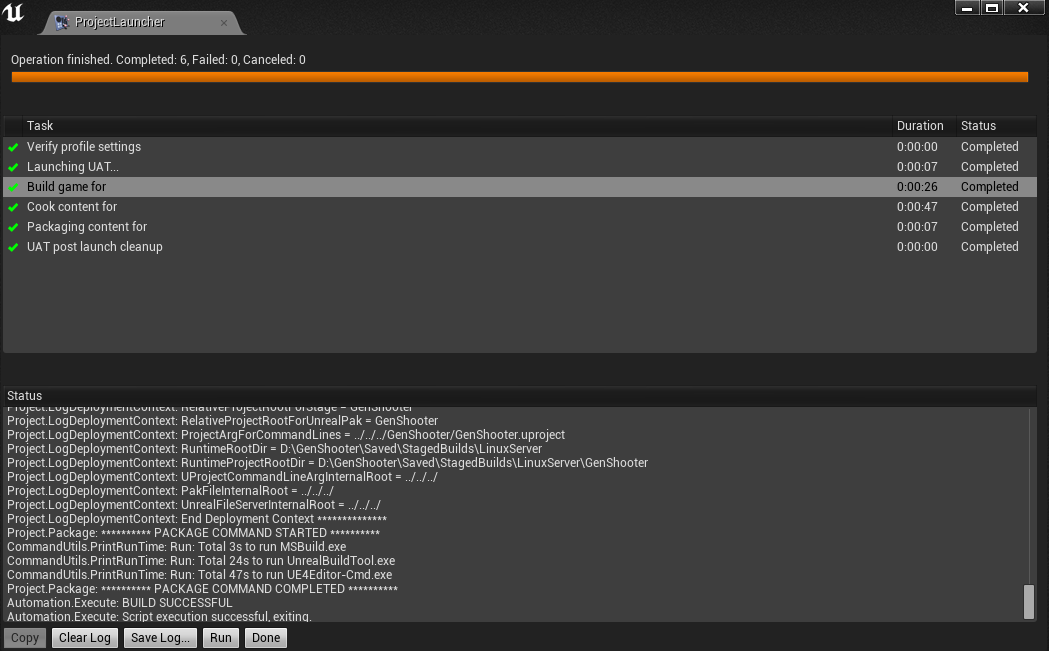
- Click the «Launch This Profile» button next to your new custom profile. This button looks like the Play button in the level editor window.

- This will begin the process of cooking and packaging your dedicated servers for your selected platforms. This will take a while. When it is done, it should look like this.
Locating your Dedicated Server Builds
Now that you have packaged your dedicated server builds, you can find them in your project’s SavedStagedBuild directory. If you have packaged your regular game builds, you’ll see them listed here as WindowsNoEditor and LinuxNoEditor as well. You are free to copy these builds to your target machines and distribute them as you like.
Note about running the Windows Dedicated Server
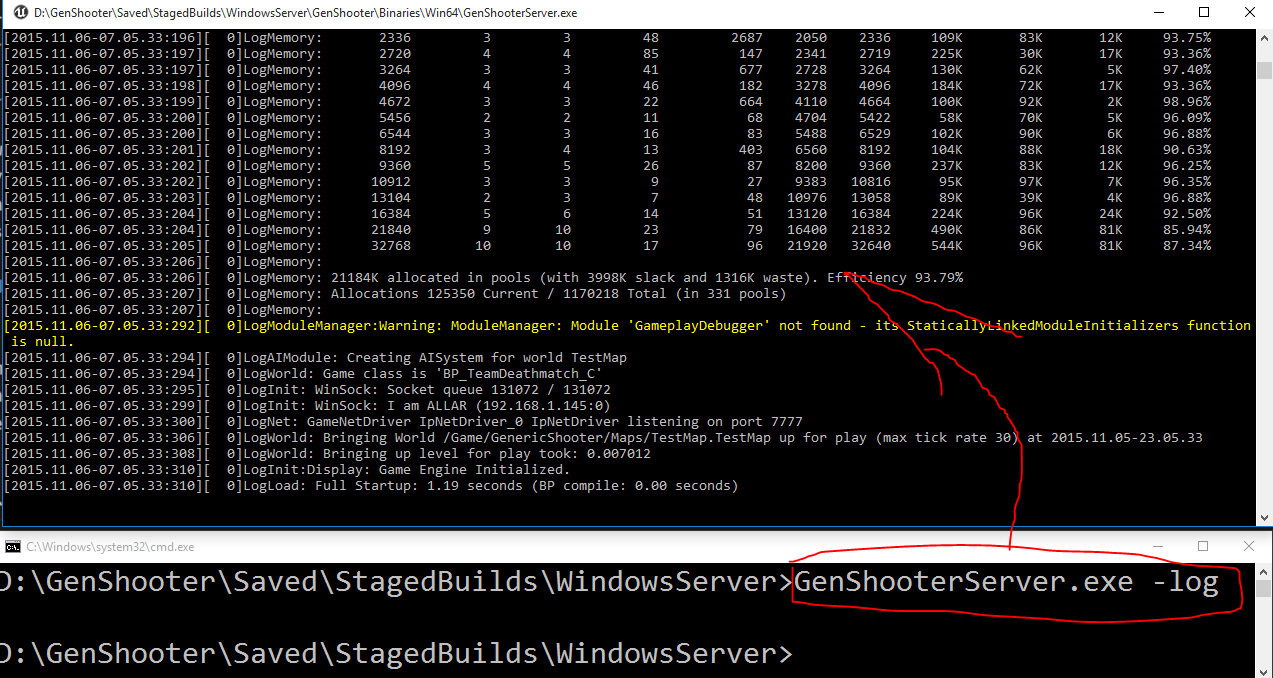
If you load the Windows Dedicated Server, it will seem that nothing loads up and that there is no UI or command prompt of any kind. If you open up your Windows Task Manager, you will see that your server is in fact running, but it is invisible. If you would like to see the log output of your Windows Dedicated Server, you need to run it with the -log command argument. The easiest way to do this is:
- Hold Shift and Right-click the folder your Windows Dedicated Server is in and choose «Open command window here.»
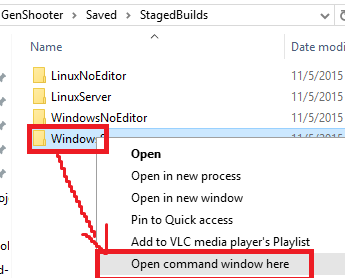
- Type in
ProjectServer.exe -logand hitEnter. In my case, this is namedGenShooterServer.exe -log - This will load your Windows Dedicated Server with a log window.
Note about running the Linux Dedicated Server
After copying your files to your Linux server (which is outside the scope of this tutorial), you will need to run ProjectServer located in your builds Project/Binaries/Linux/ folder.
In my case that is, loading it from a terminal would look like:
GenShooter/Binaries/Linux/GenShooterServer
If you want to load it and then send it to the background so that it will not terminate when you close your terminal session, you can load it with:
nohup GenShooter/Binaries/Linux/GenShooterServer &
To kill a server that has been sent to the background, find it’s process name using the command top, then route that name to pkill, which would look like this:
pkill GenShooterServe
Your process name is usually your server binary’s name limited to 16 characters.
1.Компиляция движка из исходников.
Вам понадобятся исходники движка, поскольку они потребуются для компиляции серверного решения в Visual Studio.
Для этого посетите официальный репозиторий Unreal Engine 4 на GitHub:
https://github.com/EpicGames/UnrealEngine
2. Выбор версии движка
Из README:
Последние приготовления. Настройте Windows так, чтобы вы могли взаимодействовать с .uproject-файлами. Для этого найдите «UnrealVersionSelector-Win64-Shippping.exe» в папке UnrealEngine/Engine/Binaries/Win64/ и запустите. Теперь проект будет запускаться двойным щелчком по .uproject-файлам, а нажатие ПКМ по ним позволит быстро обновить файлы Visual Studio.
Причем, при загрузке проекта вы сможете выбрать версию движка, в которой необходимо открыть проект.
3. Использование проекта с Visual Studio и движком, скомпилированным из исходников.
Нажмите ПКМ по вашему .uproject-файлу и измените версию движка на «source-built engine». Лучше всего, чтобы в вашем проекте был код. Достаточно пустого класса (вы сможете удалить его позже).
После этого перейдите в корневую папку проекта и щелкните ПКМ по .uproject-файлу, чтобы сгенерировать файлы для Visual Studio.
4.Создание <МойПроект>Server.Target.cs
Выделенному серверу необходим контент. Зайдите в File -> Package Project -> Packaging settings. Здесь вы найдете несколько опций:
- Use Pak File (Использовать Pak-файл): запаковать все ассеты в один .pak-файл – отключите, если вам требуется сохранить обычную структуру контента (например, для дополнительных загрузок контента)
- Full Rebuild (Полная компиляция): Возможно, вы захотите отключить эту функцию, дабы уменьшить время запаковки.
После этого перейдите в File -> Package Project -> Package Windows/Linux и выберите папку. Теперь запаковывайте контент и компилируйте клиент.
Следующим шагом будет компиляция серверного кода с помощью Visual Studio. Первым дело нужно настроить серверный target для UnrealBuildTool.
Можно использовать следующий пример:
// Copyright 1998-2014 Epic Games, Inc. All Rights Reserved.
using UnrealBuildTool;
using System.Collections.Generic;
public class GameServerTarget : TargetRules
{
public GameServerTarget(TargetInfo Target)
{
Type = TargetType.Server;
}
//
// TargetRules interface.
//
public override void SetupBinaries(
TargetInfo Target,
ref List OutBuildBinaryConfigurations,
ref List OutExtraModuleNames
)
{
base.SetupBinaries(Target, ref OutBuildBinaryConfigurations, ref OutExtraModuleNames);
OutExtraModuleNames.Add("Game");
}
public override void SetupGlobalEnvironment(
TargetInfo Target,
ref LinkEnvironmentConfiguration OutLinkEnvironmentConfiguration,
ref CPPEnvironmentConfiguration OutCPPEnvironmentConfiguration
)
{
if (UnrealBuildTool.UnrealBuildTool.BuildingRocket())
{
UEBuildConfiguration.bCompileLeanAndMeanUE = true;
// Don't need editor or editor only data
UEBuildConfiguration.bBuildEditor = false;
UEBuildConfiguration.bBuildWithEditorOnlyData = false;
UEBuildConfiguration.bCompileAgainstEngine = true;
// no exports, so no need to verify that a .lib and .exp file was emitted by the linker.
OutLinkEnvironmentConfiguration.bHasExports = false;
}
else
{
// Tag it as a UE4Game build
OutCPPEnvironmentConfiguration.Definitions.Add("UE4GAME=1");
}
}
public override bool GetSupportedPlatforms(ref List OutPlatforms)
{
// It is valid for only server platforms
return UnrealBuildTool.UnrealBuildTool.GetAllServerPlatforms(ref OutPlatforms, false);
}
public override List GUBP_GetPlatforms_MonolithicOnly(UnrealTargetPlatform HostPlatform)
{
if (HostPlatform == UnrealTargetPlatform.Mac)
{
return new List();
}
return new List { HostPlatform, UnrealTargetPlatform.Win32, UnrealTargetPlatform.Linux };
}
public override List GUBP_GetConfigs_MonolithicOnly(UnrealTargetPlatform HostPlatform, UnrealTargetPlatform Platform)
{
return new List { UnrealTargetConfiguration.Development };
}
}
Просто замените везде «Game» на название вашего проекта. Сохраните файл как <МойПроект>Server.Target.cs и сгенерируйте заново файлы проекта. Откройте Visual Studio, установите конфигурацию на сервер и выберите целевую платформу. Теперь скомпилируйте ваш проект.
Сейчас можно пропустить упаковку контента, но будьте готовы к вылетам из-за отсутствия необходимого контента.
5. Подготовка к упаковке контента
В этот момент могут появиться разные ошибки (“The game module could not be found” и подобные). Стоит перекомпилировать проект в Visual Studio.
6. Подготовка к упаковке контента в Unreal Frontend для сервера
Откройте в Visual Studio исходники движка и скомпилируйте UnrealFronted (шелкните ПКМ по решению «UnrealFrontend» и постройте его), запустите. Файл, скорее всего, находится в папке /Engine/Binaries/Win64.
Как только откроется Unreal Frontend, перейдите во вкладку «Project Launcher» и нажмите на кнопку «Advanced». Создайте пользовательский профиль, назвав его, скажем, «<МойПроект> Dedicated Server». Выберите конфигурацию под Windows и любые карты, которые хотите. Запустите процесс. После окончания работы можно приступить к компилированию выделенного сервера из исходников в Visual Studio.
7. Компиляция выделенного сервера из исходников
Вернитесь в Visual Studio, выберите серверное решение (к примеру, «Development Server / Win64») и постройте его. В папке /MyProject/Binaries/ должен находится файл «<МойПроект>Server.exe»
8. Создание клиента
Достаточно просто открыть редактор и скомпилировать клиент.
9. Запуск выделенного сервера
Двойной щелчок по <МойПроект>Server.exe приведет к тому, что сервер запустится в фоне. Мы же запустим его с помощью командной строки: откройте её и перейдите в директорию с исходниками проекта. Для активации логов добавьте параметр «-log»:
“<МойПроект >Server.exe –log”
Если у вас запущены другие копии сервера, то их стоит закрыть.
Заметьте, что сервер по умолчанию слушает порт 7777.
10. Присоединение к серверу
Откройте клиент, который вы создали на 8 шаге. Войдите в консоль, нажав «~» и введите:
«open 127.0.0.1:7777»
Если у вас откроется черный экран, проверьте, что вы установили стандартную серверную карту в настройках проекта в редакторе.
11. Активация физики
Возможно, во всяком случае, на версии 4.4.3, при использовании экторов, движение которых основывается на симуляции физики, необходимо будет установить их параметр SkeletalMeshComponent.bEnablePhysicsOnDedicatedServer в значение «true». Выделенный сервер возвращает «true» для IsRunningDedicatedServer(), что предотвращает использование физики для SkeletalMeshComponents при неактивном значении bEnablePhysicsOnDedicatedServer.
// Copyright 1998-2014 Epic Games, Inc. All Rights Reserved.
using System.Collections.Generic;
public class GameServerTarget : TargetRules
public GameServerTarget(TargetInfo Target)
Type = TargetType.Server;
// TargetRules interface.
public override void SetupBinaries(
ref List<UEBuildBinaryConfiguration> OutBuildBinaryConfigurations,
ref List<string> OutExtraModuleNames
base.SetupBinaries(Target, ref OutBuildBinaryConfigurations, ref OutExtraModuleNames);
OutExtraModuleNames.Add(«Game»);
public override bool GetSupportedPlatforms(ref List<UnrealTargetPlatform> OutPlatforms)
// It is valid for only server platforms
return UnrealBuildTool.UnrealBuildTool.GetAllServerPlatforms(ref OutPlatforms, false);
public override List<UnrealTargetPlatform> GUBP_GetPlatforms_MonolithicOnly(UnrealTargetPlatform HostPlatform)
if (HostPlatform == UnrealTargetPlatform.Mac)
return new List<UnrealTargetPlatform>();
return new List<UnrealTargetPlatform> { HostPlatform, UnrealTargetPlatform.Win32, UnrealTargetPlatform.Linux };
public override List<UnrealTargetConfiguration> GUBP_GetConfigs_MonolithicOnly(UnrealTargetPlatform HostPlatform, UnrealTargetPlatform Platform)
return new List<UnrealTargetConfiguration> { UnrealTargetConfiguration.Development };
I want to build a DedicatedServer on Linux!
So, make a note of what I tried variously
This article
- Check with UE4.25
- Use AWS EC2
- Requires C ++ build environment
Check the operation in Windows environment
First, let’s check that it works on the editor

[Selected Viewport] x [Standalone Game] x [Play Offline] x [Play As Client] x [Number of Players]
I will check the operation of each of these combinations, so it’s quite Taihen. ..
Launch from outside the editor
If you start it with PIE, you can trace all server and client processes.
This is convenient, but if you follow a function that is called CLI1, CLI2, SERV multiple times (BeginPlay, etc.), your head will get very tired (!).
Describes how to start processes individually
Server startup batch
RunServer.bat
:: [UE4DIR], [ProjectName]Replace with your own environment
set EDITOR=[UE4DIR]EngineBinariesWin64UE4Editor.exe
set GAME_UPROJECT=%~dp0%[ProjectName].uproject

::Optional launch map
::The default is the project settings[Server Default Map]Is used
set MAP_NAME=

::Start the server from the editor
start %EDITOR% %GAME_UPROJECT% %MAP_NAME% -server -log
exit
Client launch batch
RunClient.bat
set EDITOR=[UE4DIR]EngineBinariesWin64UE4Editor.exe
set GAME_UPROJECT=%~dp0%[ProjectName].uproject

start %EDITOR% %GAME_UPROJECT% -game -log -windowed -ResX=1024 -ResY=576
exit
Build & Cook
Next, I will describe binary creation
Add server build target
The target file does not exist in the template, so add it
[ProjectDir]/Source/[ProjectName]Server.Target.cs
using UnrealBuildTool;
using System.Collections.Generic;

public class [ProjectName]ServerTarget : TargetRules
{
	public [ProjectName]ServerTarget(TargetInfo Target) : base(Target)
	{
		Type = TargetType.Server;
		DefaultBuildSettings = BuildSettingsVersion.V2;
		ExtraModuleNames.Add("[ProjectModuleName]");
	}
}
Please add by referring to [ProjectName] .Target.cs in the same directory.

After adding the file, update the VS file from the uproject menu

Make sure you have more targets (VSCode image)
Cook from the command line
There are many tutorials on ProjectLauncher when you google,
It is not necessary to start the editor, so it is recommended to execute it from a batch file.
BuildServer.bat
set ENGINE_ROOT=[UE4DIR]Engine
set GAME_UPROJECT=%~dp0%[ProjectName].uproject

::If one line is long^Line break with
::If you enter start, the window will remain at the end
start %ENGINE_ROOT%BuildBatchFilesRunUAT ^
	BuildCookRun -project=%GAME_UPROJECT% ^
	-nop4 -build -cook -compressed -stage ^
	-noclient -server -serverplatform=Win64 -serverconfig=Development ^
	-pak -utf8output

When BUILD SUCCESSFUL is displayed, it is complete.
Packages will be generated under [ProjectDir] Saved StagedBuilds Windows Server

Open the folder in explorer and type cmd to open a command prompt on the fly (I didn’t know)

Run the exe with the -log argument to start the server

You can connect to the server by launching PIE, pressing the @ key, and typing [open 127.0.0.1].
Build a Linux environment
Read Linux Cross-Compiling first.
Did you read it? What should I do···
Should I build in a Linux environment in the first place? You thought so! !! !!

When I tried to create a P4 environment and submitted and updated UE4DIR, it looked like this, so I was scared and stopped.
When you hit Setup, it’s about 120GB, so … the volume isn’t enough in the first place …
Building Unreal Engine Game Client and Dedicated Server on Linux
There are people who are doing it, but what kind of operation is it?
That’s why build on Windows-> transfer only executable files
Toolchain installation

Clicking link does not start the installation, but
Right-click-> Open new window to install
Run Generate Visual Studio project files again and Linux should be added to the target
(I don’t have confidence in the details around here …)
Linux server cook
Change -serverplatform in BuildServer.bat to Linux and build & cook
Success if packaged in Saved StagedBuilds LinuxServer
Build an AWS server
It’s not the main subject so only the main points
-
Launch t3.micro (cheaper than t2, next generation, but not free)
-
In t3.nano, the server cannot be started because there is not enough memory </ font> (described later)
-
The default volume of 8GiB wasn’t enough, so I increased it to 16GiB (be careful about weight loss because it’s too annoying!)
Reference: EC2 Volume (EBS) Capacity Expansion Method Verification (Amazon Linux) -
I want to start it only when I use it, so it’s easier to fix it with Elastic IP
-
UE4 communication uses UDP: 7777, so let’s open it
-
Transferred with WinSCP
Saved StagedBuilds LinuxServer [ProjectName] Binaries Linux [ProjectName] Server.debug has a large capacity, so decide whether to transfer it according to your purpose.
It may be necessary for development because it follows stack traces with gdb

Start the server
$ ./[ProjectName]Server.sh -log
I will try to execute the command for the time being,
./[ProjectName]Server.sh: line 5:  2950 Segmentation fault
"$UE4_PROJECT_ROOT/[ProjectName]/Binaries/Linux/[ProjectName]Server" [ProjectName] "[email protected]"
w
start gdb debugger
$ gdb [ProjectName]Server
GNU gdb (GDB) Red Hat Enterprise Linux 8.0.1-30.amzn2.0.3
Copyright (C) 2017 Free Software Foundation, Inc.
License GPLv3+: GNU GPL version 3 or later <http://gnu.org/licenses/gpl.html>
This is free software: you are free to change and redistribute it.
There is NO WARRANTY, to the extent permitted by law.  Type "show copying"
and "show warranty" for details.
This GDB was configured as "x86_64-redhat-linux-gnu".
Type "show configuration" for configuration details.
For bug reporting instructions, please see:
<http://www.gnu.org/software/gdb/bugs/>.
Find the GDB manual and other documentation resources online at:
<http://www.gnu.org/software/gdb/documentation/>.
For help, type "help".
Type "apropos word" to search for commands related to "word"...
Reading symbols from [ProjectName]Server...Reading symbols from /var/www/[ProjectName]/Binaries/Linux/[ProjectName]Server.debug...done.
done.
(gdb) run -log
Starting program: /var/www/[ProjectName]/Binaries/Linux/[ProjectName]Server -log
fork: Cannot allocate memory.
(gdb)
Cannnnnnnnnot allocate memory!!!
So I changed from t3nano to t3micro and was able to start up safely
Confirm that you can connect with [open ###. ###. ###. ### (GlobalIP)]
Start in the background with nohup
//Grant execute permission to start with nohup
$ chmod +x SlothServer.sh
//standard/Change the error output as appropriate
//MapName is optional (if not specified)[Server Default Map])
$ nohup ./SlothServer.sh [MapName] > nohup.out 2> nohup.err &
kill nohup boot process
$ pkill SlothServer
Reference link
How To Set Up Dedicated Servers for Windows and Linux For Your UE4 Game (using Windows)
Legacy/Dedicated Server Guide (Windows & Linux)
Epic Games is a leading interactive entertainment company responsible for some of the world’s largest games including Fortnite, and also develops Unreal Engine, Unreal Engine is a world leading open and advanced real-time 3D creation tool. Continuously evolving, it not only powers the world’s leading games, it also offers creators across industries the freedom and control to deliver cutting-edge content, interactive experiences, and immersive virtual worlds.
To help developers of all shapes and sizes build, run, and grow amazing games, Epic Games and AWS have collaborated to bolster AWS Graviton2 instance support for Unreal Engine. AWS Graviton processors are custom built by AWS using 64-bit Arm Neoverse cores to deliver the best price performance for your cloud workloads running in Amazon EC2. With AWS Graviton2 support, Unreal Engine creators can utilize up to 40% improved price performance over comparable current generation x86-based instances.
Full support for AWS Graviton2 will be released in Unreal Engine 4.27, with further improvements in future releases. Unreal Engine 4.27 previews are available via the Epic Games launcher and GitHub. ARM64 Support is also merging into earlier versions of Unreal Engine in order to benefit developers running games and applications on AWS.
If your game becomes a smash hit overnight, continued success depends on reliable servers capable of scaling to player demands. Flexibility is essential, and AWS offers the broadest and deepest cloud-based compute platform, whether you would like to build game servers yourself, integrate with existing tools, or even move to a fully managed service.
The introduction of AWS EC2 Graviton2 instances provides even more options for hosting your dedicated game servers on Amazon EC2, delivering a major leap in performance and capabilities over first-generation AWS Graviton processors. Re-compiling your dedicated game server code for compatibility with ARM64 is simple and easy with Unreal Engine 4 (UE4). Learn how to create a dedicated game server with Unreal Engine and AWS Graviton2 instances by following the step-by-step guide below:
Prerequisites
- A Windows 10 workstation with a dedicated GPU
- Visual Studio
Development environment setup
This section guides you through getting an Unreal Engine 4 dedicated server compiled for the Arm platform and compatible to run on an AWS Graviton2 instance. Most of the following instructions are independent of x86 and Arm platforms. This guide focuses on building a clean and working environment on Windows prior to building the game for AWS Graviton2 instances.
Obtain Unreal Engine source code access
To compile Unreal Engine dedicated game servers, you must have Unreal Engine built from source. To get access to UE4 Source Code, please complete the steps outlined here, and then return to this guide.
Install Visual Studio Community Edition
To build Unreal Engine from source, I recommend downloading Visual Studio 2019 Community Edition. You can download Visual Studio 2019 Community Edition for free here. Once the download is complete, proceed to the install.
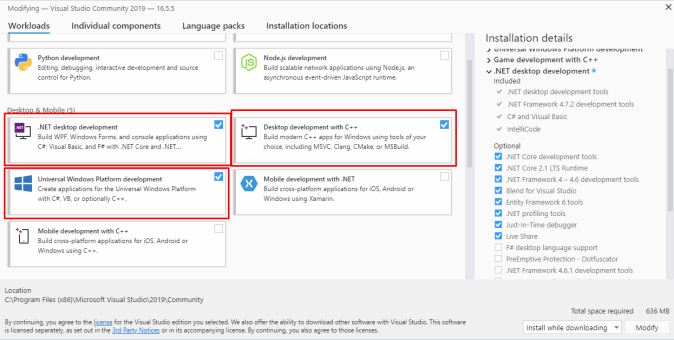
To build the Unreal Engine editor and Unreal Engine projects, you must install some optional features. Navigate under the Workloads Tab, select “Game development with C++”, then select the following options on the right-hand side:
- C++ profiling tools
- C++ AddressSanitizer
- Windows10 SDK (10.0.18362.0)
- Unreal Engine Installer

Select the Individual components tab, and then scroll down to “Compilers, build tools, and runtimes” and select MSBuild.

You are now ready to install Visual Studio 2019. Click Install, and allow time to complete.
Download Unreal Engine source code
Log in to GitHub, and navigate to Unreal Engine’s GitHub Repository and download version 4.26.2 or newer. While official support is releasing as part of 4.27, the changes have already been merged in 4.26.2 and later versions. I am using 4.26.2 for this guide.

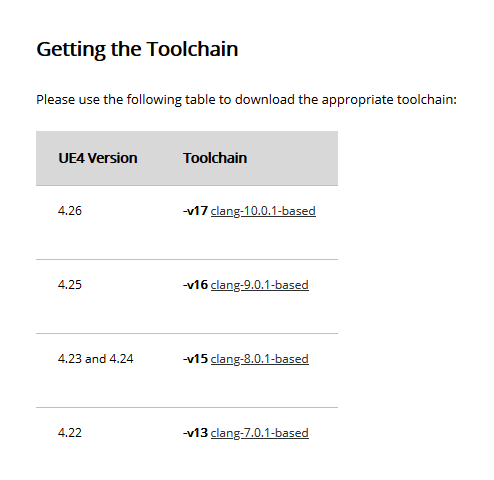
Install cross-compile dependencies
For Unreal Engine to compile binaries for Linux distributions when running on Windows, you need to install the Cross-Compiling Toolchain. To do this, navigate to the Cross-Compiling for Linux Unreal Engine documentation page. Download and install the v17 toolchain.

Compile Unreal Engine from source
Extract the Unreal Engine source code zip archive. I placed the extracted folder in “C:UsersAdministratorDocumentsUnrealEngine”.
Open a Windows PowerShell session as an Administrator:

Navigate to C:UsersAdministratorDocumentsUnrealEngine

Run Setup.bat and wait for it to complete.

Run the GenerateProjectFiles.bat script

In C:UsersAdministratorDocumentsUnrealEngine there should now be a file called UE4.sln. Open it in Visual Studio 2019.

If your Visual Studio 2019 install recommends installing any additional components, install them now. Once installation is complete, set your solution configuration to “Development Editor”, and your solution platform to “Win64”.

In the Solution Explorer on the right hand column, right click the UE4 build target and select “Build”.

Unreal Engine will take a little time, so grab a cup of your favorite beverage and return once the build has completed.
Open Unreal Engine
Navigate to C:UsersAdministratorDocumentsUnrealEngineEngineBinariesWin64 and launch UE4Editor.exe

Third person example game project setup
In the Unreal Project Browser, create a new games project.

Under Select Template, select “Third Person”, and click Next.

Under Project Settings make sure “C++ Project” is selected, name your project GravitonServer and select Create Project.

The project should now automatically open in Visual Studio. However, to build a dedicated server, you must make a few file changes and then regenerate the Visual Studio project file. Close the Visual Studio window and make the following changes.
Create dedicated server build target
To build a dedicated server for your game, you must create a dedicated server build target. To do this, you will copy the editor target file and turn it into a dedicated server target file.
Open Windows Explorer and navigate to C:UsersAdministratorDocumentsUnreal ProjectsGravitonServerSource.
Copy the GravitonServerEditor.Target.cs file and name the new one GravitonServerServer.Target.cs


Open GravitonServerServer.Target.cs in Visual Studio

Replace both instances of GravitonServerEditorTarget with GravitonServerServerTarget. Change Type = TargetType.Editor to Type = TargetType.Server. Your final file should look like the following image:

Now, regenerate the Unreal Engine project files so Unreal Engine recognizes the new server build target. To do this, navigate to “C:UsersAdministratorDocumentsUnreal ProjectsGravitonServer”, right click GravitonServer.uproject, and then click “Generate Visual Studio project files.”

Once the files have been generated, double-click “GravitonServer.sln” to open the Visual Studio project. Once the project has loaded, you need to make changes to the editor settings to setup a dedicated server build.
In the “Solution Configuration” dropdown box, switch to “Development Server.”

Now you can build the dedicated server project. Simply right click the GravitonServer project name on the right, and select “Build”.

Before you can make tweaks to your game and package our project, recompile your editor build target. To do this, simply change the “Solution Configuration” drop-down to “Development Editor.”

Now build your development editor target by right clicking the project name and clicking “Build” one more time.
Then, open your project in the Unreal Engine editor and package this game for delivery. To do so, double-click the “GravitonServer.uproject” file in Windows Explorer:

Since you’re using the default 3rd Person Example Project, the GravitonServer project should look like the below image once it has successfully loaded:

Add startup map
Add a new map to your project. This will be what the user sees when they load the game. To keep this tutorial simple, the new map will just be a black screen. Start by double-clicking the “Maps” folder:

Right click and select “New Level”, and then name the new file “EntryLevel”.
Now open your new level. Double-click “EntryLevel” and select “Save Selected” when prompted.
Configure map settings
Now, configure which map the client and dedicated server will load by default. For this tutorial, the client will load EntryLevel by default, and the dedicated server will load ThirdPersonExampleMap by default. To do so, open Project Settings by going to Edit → Project Settings.

Then select “Maps & Modes” and expand the Advanced Settings menu and change “Global Default Server Game Mode” to “GravitonServerGameMode”.
Now change the default maps that are loaded by the dedicated server and game client. Expand the default maps section. Change the “Game Default Map” to “EntryLevel”, and “Server Default Map” to “ThirdPersonExampleMap”:

Next, change the packaging settings to package maps with the game when it is built and packaged for deployment. To do this, click the “Packaging” option on the left menu and expand it by clicking the dropdown arrow.

Now add your maps to the build package. Scroll down to “List of maps to include in a packaged build”, click the “+” button and Two new rows will pop up beneath.
Click the three dots next to the box to add your maps and a file explorer window should open. Navigate to “C:UsersAdministratorDocumentsUnreal ProjectsGravitonServerContentThirdPersonCPPMaps” and select the “ThirdPersonExampleMap.umap” file. Repeat this for the “EntryLevel.umap” file. When completed, your project settings screen should look like the following image:

For this tutorial, use the in-game console function to connect to the dedicated server for the game.
Note: In a production game this would usually be handled by custom matchmaking logic, but that exceeds the scope of this tutorial.
To use the in-game console to connect to the dedicated server, under Packaging settings, scroll down to the “Project” section and verify that “Build Configuration” is set to “Development”.

You can build and package your game! Build the game client first, and then the dedicated server binaries. To verify the server works correctly, first build and package the game for Windows and run it on localhost to ensure the client can connect properly. Once you know the game is working, you will then build and package it for AWS Graviton instances.
Building and packaging the Game and dedicated game server
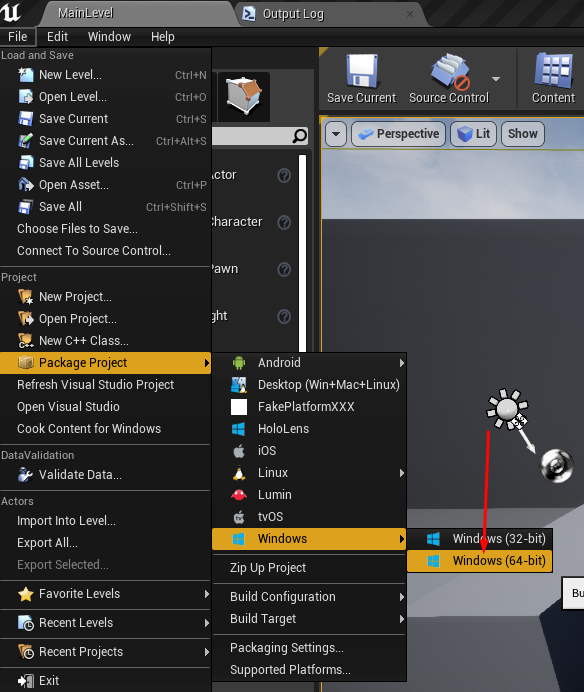
The first step in building and packaging the game is ensuring the right build target is selected. Build the game first. To verify that the correct build target is selected, go to File → Package Project → Build Target and verify that “GravitonServer” is selected.

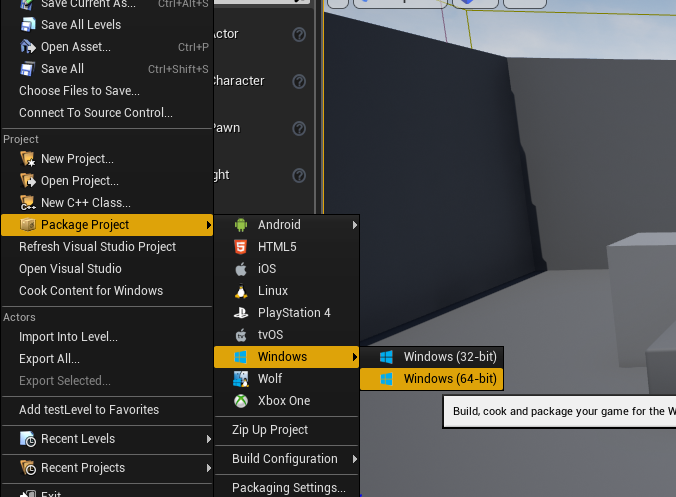
To build the game, select File → Package Project → Windows (64-bit). A Windows Explorer window will open, in which you can select where the binaries will be saved once they’re built and packaged.
I have selected “C:UsersAdministratorDocumentsUnreal ProjectsGravitonServerBinaries”. Place them wherever you want to store them. Once you’ve decided on where, click “Select Folder” and the build process will begin.
In the Unreal Editor, selecting “Show output log” will let you monitor the build process. This may take some time, so now is a good time to get another cup of your favourite beverage. Once the game binary has been built and packaged, you can build and package the dedicated server binary. To do this, change the build target to “GravitonServerServer” by going to File → Package Project → Build Target, and selecting “GravitonServerServer”.

Select File → Package Project → Windows (64-bit) one more time. Select the place to save your built and packaged dedicated server binaries, and then wait for the build to complete. Once the build has completed, you will now start the dedicated server and connect the client to it.
Running dedicated game servers on Windows
To start the dedicated server process in order to verify that everything is running properly, start the dedicated server process with logging enabled. Open Powershell, and change directories to wherever you stored your dedicated server binaries. I used “C:UsersAdministratorDocumentsUnreal ProjectsGravitonServerBinariesWindowsServer”

To start the server, type .GravitonServerServer.exe -log which should start the dedicated server with logging enabled. A new window should now open containing the server logs. This will display the port that the server is listening on. In my case, it’s port 7777, as shown in the server logs here:

Connect to dedicated game server running on Localhost
Now let’s verify that your game can connect to your dedicated server running on Localhost. To launch the game, open Windows Explorer and navigate to “C:UsersAdministratorDocumentsUnreal ProjectsGravitonServerBinariesWindowsNoEditor”, and then double-click “GravitonServer.exe” to get started.
The game should open to a black screen in the Unreal Editor, which is the EntryLevel map that you created earlier. Once the game has opened, open the in-game console by pressing the ` key on your keyboard. To connect to the server, type “Open “127.0.0.1:7777”” and push enter:

If the game doesn’t immediately connect, then the dedicated server process may have gone to sleep. Simply stop and restart the server process running in PowerShell and try connecting again. Once the game connects, you should see the in-game experience in the Unreal Editor.

Building and packaging dedicated game server for AWS Graviton2 Instances
Now that you have verified that both the game and dedicated server are functioning correctly, you can now build and package your dedicated server for EC2 Instances powered by AWS Graviton2. Go back to the Unreal Engine editor. Select File → Package Project → Linux → Linux (AArch64):

A Windows Explorer window will open, allowing you to select where the binaries will be saved once they’re built and packaged. I have selected “C:UsersAdministratorDocumentsUnreal ProjectsGravitonServerBinaries”. Place them wherever you want to store them. Click “Select Folder” and the build process will begin. Once the build has completed, you should see a folder titled “LinuxAArch64Server” wherever you chose to save your binaries.
To more easily copy over to your AWS Graviton2 powered EC2 Instance, create a zip archive of the entire folder which you will copy to your AWS Graviton2 EC2 Instance.

Dedicated game server setup
Launch AWS Graviton2 EC2 Instance
For the dedicated server, I will use an m6g.large EC2 instance running Amazon Linux 2. Feel free to use any m6g instance size, but an m6g.large instance should be large enough. Head over to the AWS console and launch your own development instance. When launching Graviton2 instances, you’ll need to specify an Arm compatible AMI.
When launching this instance, ensure that your security group configuration allows your Windows development machine to communicate with the dedicated server on UDP port 7777 and TCP port 22. We will use port 7777 for gameplay traffic, and port 22 for SSH.
Once the instance is running, copy the binary from Windows to the AWS Graviton2 instance using your preferred tooling.
Run dedicated game server startup script
Once the zip archive containing the dedicated server binary has been copied to your instance, the setup takes a few more steps. First, unzip the archive. Navigate to the directory you stored the archive in and run “unzip ./LinuxAArch64Server.zip”.

Once the archive has been unzipped you should see a new directory. Navigate to the newly created directory by running cd LinuxAArch64Server/ The new directory should look like the following image:

To run the dedicated server, add execute permissions to the startup shell script GravitonServerServer-AArch64.sh script. To do this, execute chmod +x GravitonServerServer-AArch64.sh
Now you can start your game server processing by running ./GravitonServerServer-AArch64.sh Once the process has started, you should see the following image:

Connect to dedicated game server running on AWS Graviton2 Instance
Now that the game server is running and waiting for connections, connect to it from the Windows development machine running the game. Launch the game as before. It should open to a black screen, which is the EntryLevel map you created earlier. Once the game has opened, open the in-game console by pressing the ` key on your keyboard. Once the in-game console is open, connect to the public IP address of your instance. Once the game connects, you should see something like this:

You have now successfully built and compiled an Unreal Engine example game for both Windows and AWS Graviton2 EC2 instances. You can now take advantage of up to 40% improved price performance over comparable current generation x86-based instances by hosting dedicated servers on AWS Graviton2 instances. Now that you can compile an AWS Graviton2 compatible game server, go ahead and test your game servers on Graviton2 instances.
Welcome
This is a series about Unreal Engine 4 Multiplayer Deathmatch. In this series we go through Setting up of Dedicated Server using Source code and creating a Deathmatch multiplayer Game Mode.
Unreal Engine 4 versions this tutorial supports
- 4.23
- 4.24
- 4.25
- 4.26
In order to build Dedicated Server you need source code of UE4. Source code takes around 100gb hard drive space.

Visual Studio
Before we can build UE4 Source code we need to install Visual Studio.
You can use Visual Studio 2017 or 2019 to build Source code. For 4.25 or later it’s recommended to use Visual Studio 2019.
https://visualstudio.microsoft.com/vs/community/
Once you have installed Visual Studio, UE4 requires some special libraries. You can install those using Visual Studio Installer.
Windows key -> Visual Studio Installer -> Modify

Install Unreal Engine installer.

For Visual Studio 2019 select Universal Windows Platform development, .NET desktop development and Desktop development with C++
Files
Before we can do anything we need to get the source code and build it.
Download Unreal Source Code from GitHub.
Github – UnrealEngine
Login to Github and click Join to see this page:
Open up command prompt as administrator.
Type “pushd” and location where you unzipped the file.
Type “Setup.bat”

When it has finished that
Type “GenerateProjectFiles.bat -2017” or -2019 depending on your visual studio version.
Go to folder and launch the solution “UE4.sln”
Set build configuration to “Development Editor”
Then in Solution Explorer right click UE4 and select Build
After it has finished, right click UE4 again and select “Set as Startup Project”
Then launch it from “Local Windows Debugger”
Believe it or not, that’s it. Once it has finished Building Shaders create a ThirdPerson Blueprint Project and you’re good to go.
I prefer Blueprint because you get the Character stuff all in blueprint and that’s what we are going to work with.
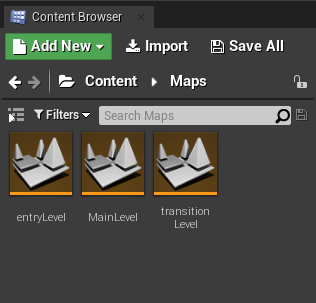
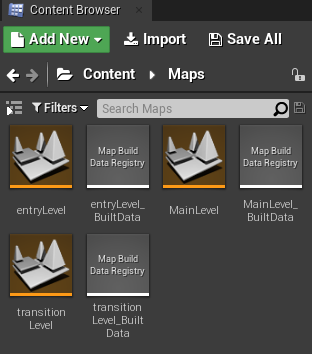
Set up Maps
Create “Maps” folder and add two empty levels “entryLevel” and “transitionLevel”.
And your game level map as “MainLevel” or any other name.
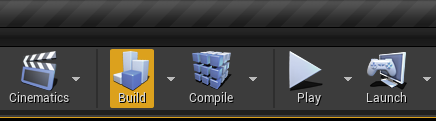
Then Build Maps so we can get “Map Build Data Registry”.
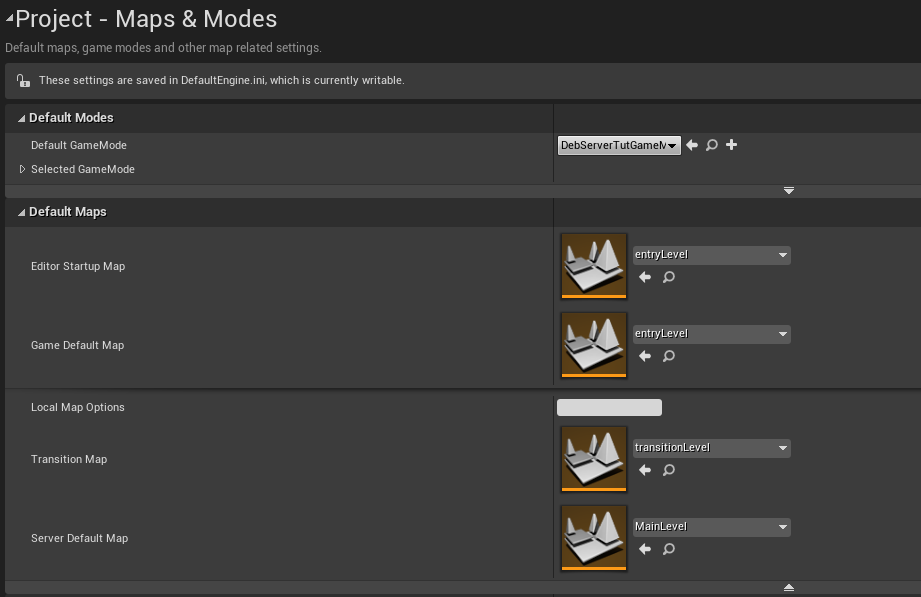
Go to project settings -> Maps & Modes.
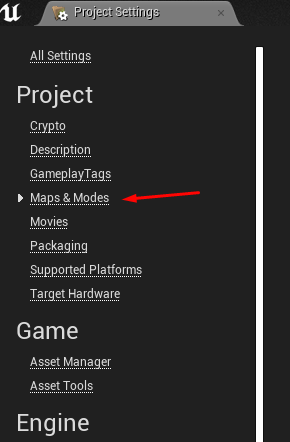
Open Default Maps from a small triangle pointing down.
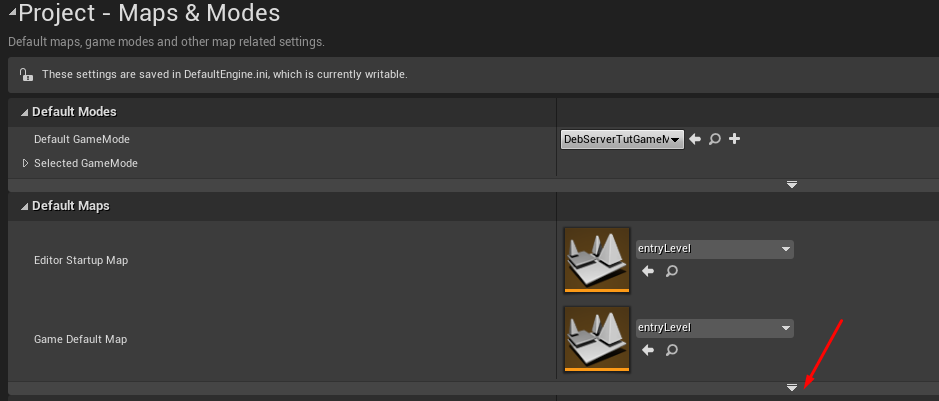
And set all maps like in picture below:
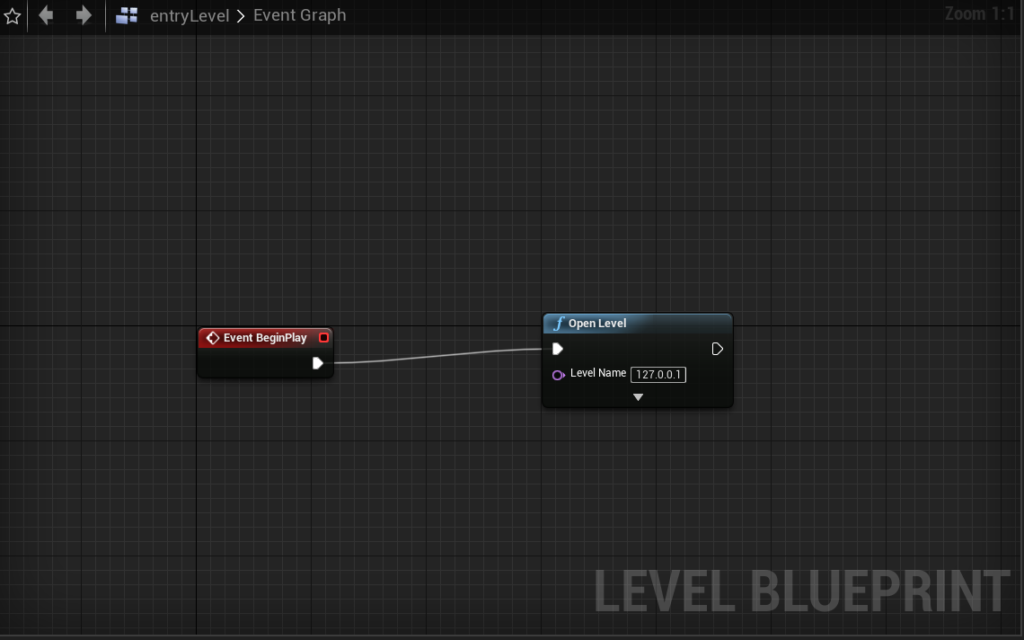
Add Open Level node in entryLevel Level:
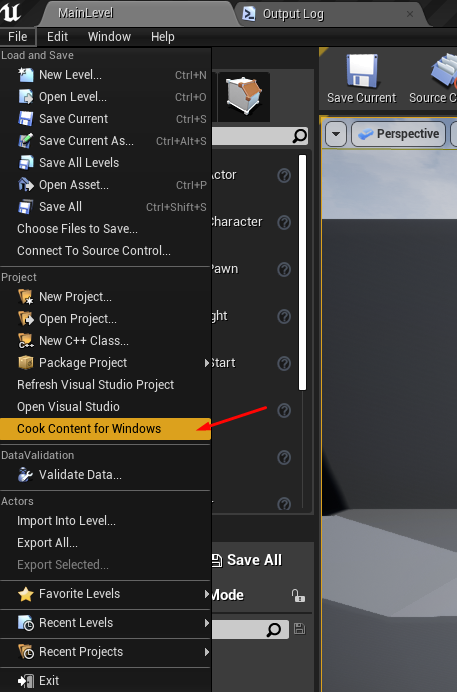
Now cook Content:
Building Client
Once you have finished cooking the content you can build Client.
Building Server
It’s not possible to build a server with Visual Studio. So we have to build it with Unreal tools.
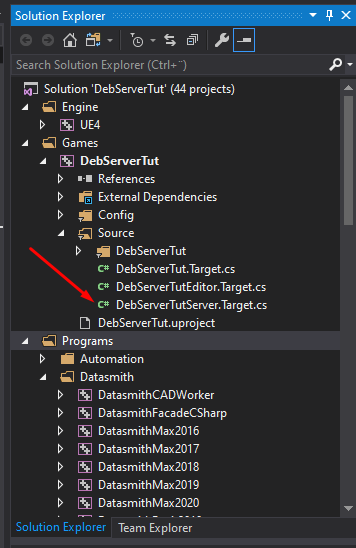
Create a new file ProjectNameServer.Target.cs
Replace “DebServerTut” with your project name.
// Copyright 1998-2019 Epic Games, Inc. All Rights Reserved.

using UnrealBuildTool;
using System.Collections.Generic;

public class DebServerTutServerTarget : TargetRules
{
	public DebServerTutServerTarget(TargetInfo Target) : base(Target)
	{
		Type = TargetType.Server;
		ExtraModuleNames.Add("DebServerTut");
	}
}
Then add it in Sources folder:
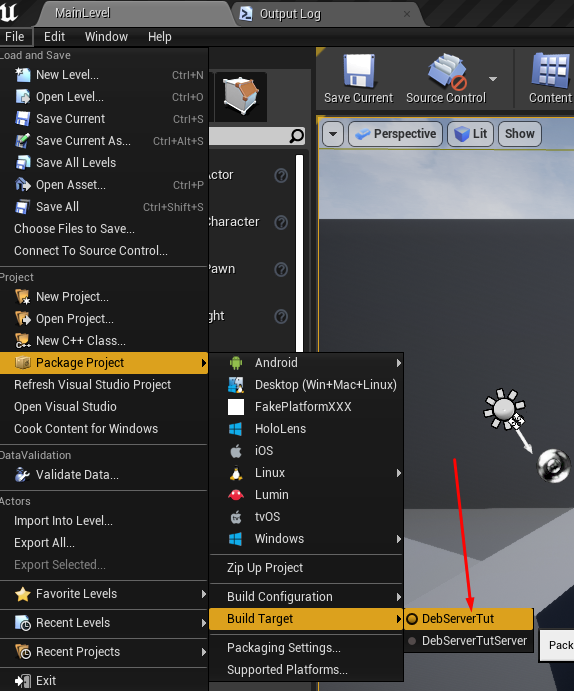
Set Build Target to Server:
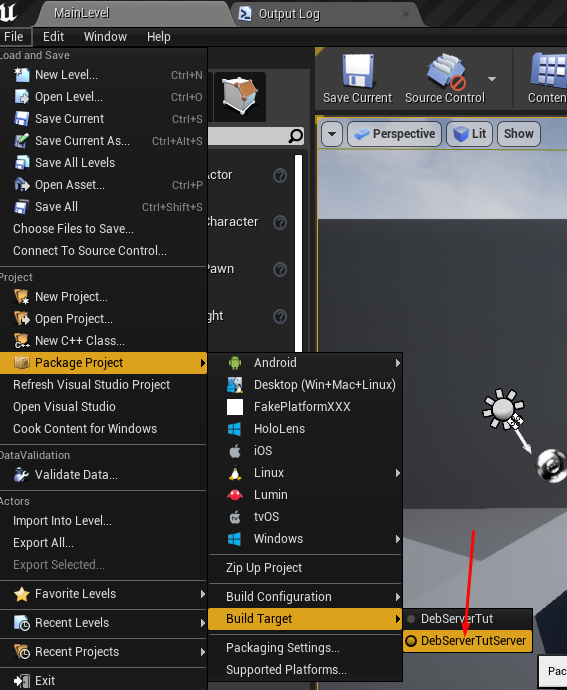
If for some reason this doesn’t appear, then you need to regenerate project files.
Now you should be able to build it:
You can also build it using UnrealFrontEnd:
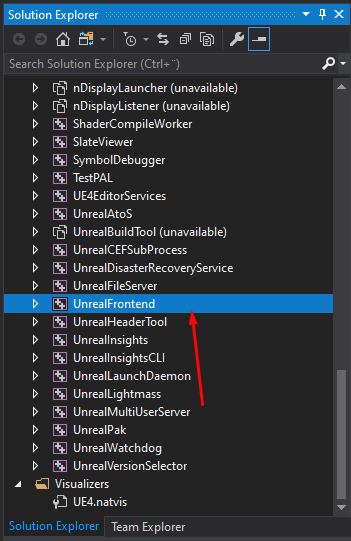
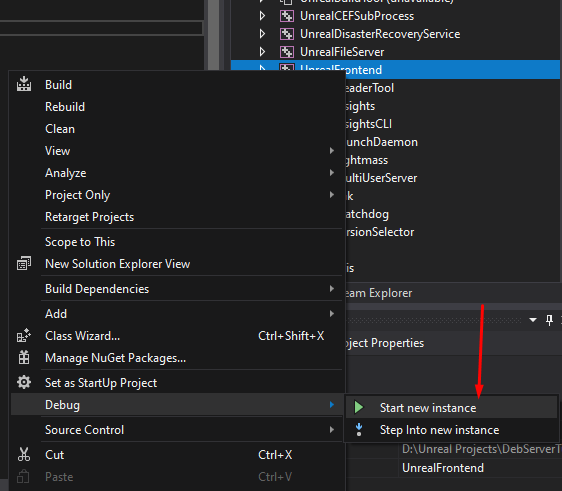
You can launch UnrealFrontend from Right click -> Debug -> Start new instance.
Set uproject file first:
Then set it like this and hit Launch:
Launching Server and Client
Once you have build both Server and Client go to WindowsServer folder and create shortcut to Server executable.
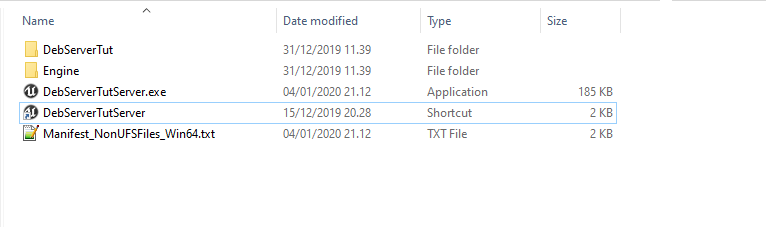
In server.exe shortcut add “-log” at the end of target:
WindowsNoEditor is the client folder and it should look like this:
Launch server first from shortcut and then client.
Building for Linux
Building Linux is very simple once you get Cross platform toolchain.
So just install this and then Package Project -> Linux
https://docs.unrealengine.com/en-US/Platforms/Linux/GettingStarted/index.html
Once you have installed Toolchain you need to open your project in Visual Studio and hit Build.
Problems & Tips
4.27
Stay with 4.26 if you can it’s much more stable and beginner friendly then this one. This one also makes your assets unsupportive for previous versions.
4.23
Can only be built on Visual Studio 2017 and older because of mathtest failure.
https://issues.unrealengine.com/issue/UE-81677
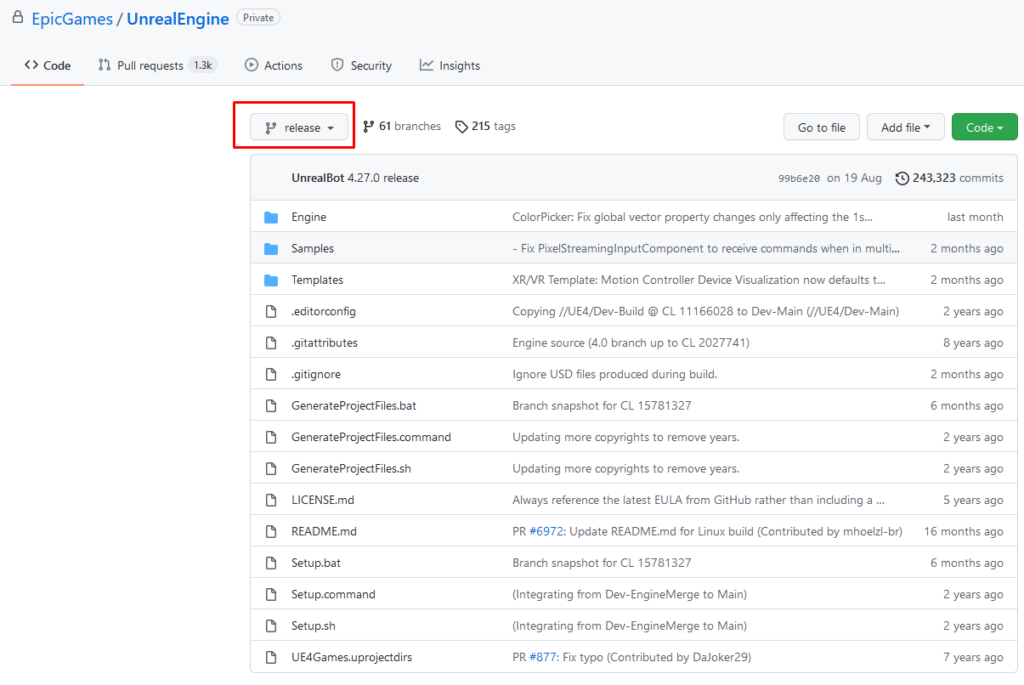
Looking for different versions
If you wan’t previous version of ue4 source code click the release button.
PsAllocator
If you get this problem:
C1083 Cannot open include file: 'typeinfo.h': No such file or directory

Go to Solution Explorer, type in search bar “PsAllocator.h”
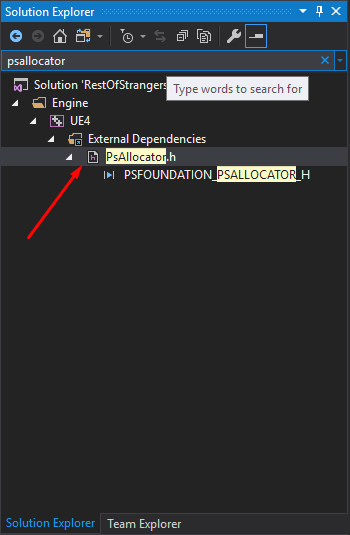
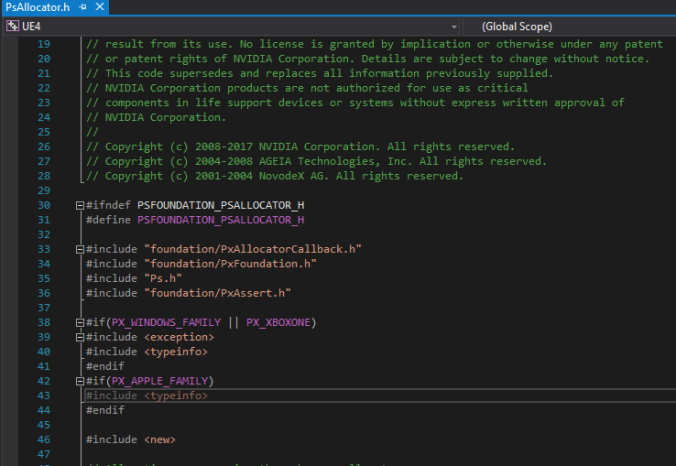
In “PsAllocator.h” file go to line 43 and make sure that it’s
- “typeinfo”
- and not
- “typeinfo.h”
https://github.com/NVIDIAGameWorks/PhysX/pull/181
Megascan
If you add Megascan plugin with Bridge (into Source code Plugins folder) you need to close unreal editor and visual studio and then start the solution again (UE4.sln), then launch the solution (local windows debugger) so visual studio can update the project. Otherwise you’ll get this error: Plugin ‘MegascanPlugin’ failed to load because module ‘MegascanPlugin’ could not be loaded.
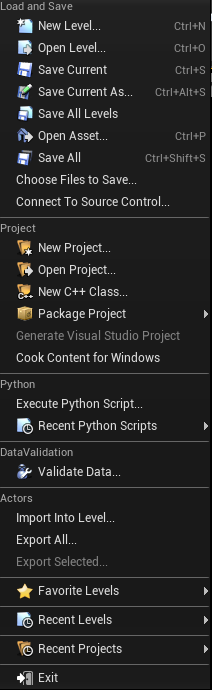
No C++ Code
If your File Menu looks like this, you need to add New C++ Class in order to be able to build a Server.
Good to Know
- Your Source Code build is unique, this means that if you build plugins with it they don’t work with Epic’s Official Unreal Engine 4 release build. You need to compile the plugin with the official build.
- You can simulate the server environment in the editor. So you don’t need to build a server unless you want to see how it performs as a standalone.