Skip to content
Описание и рекомендации
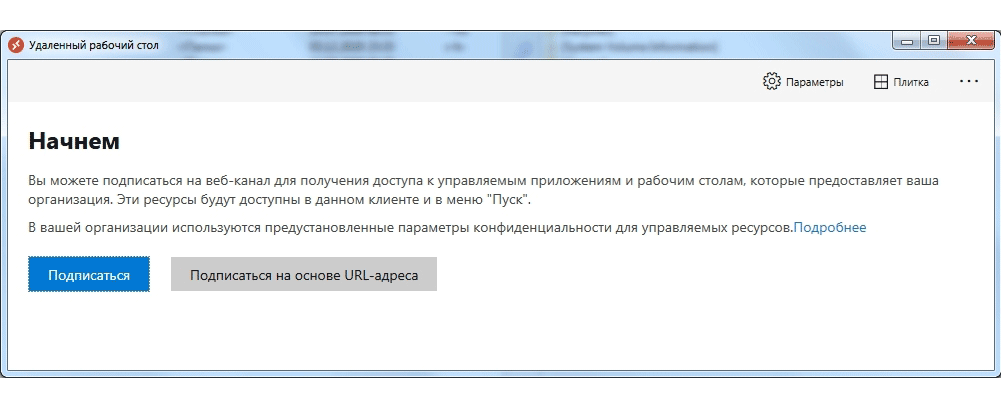
Microsoft Remote Desktop – клиентское приложение для удаленного доступа к компьютеру с других устройств, подключенных к сети Интернет. Кроссплатформенная программа поддерживает издания Windows 7 – 10/11, включая некоторые серверные редакции.
Также удаленный рабочий стол функционирует на ПК под управлением Mac OS (не ниже 10.14), мобильных устройствах Android (от 4.1), iOS (14.0 и выше). Клиент распространяется бесплатно, но требует учетной записи Microsoft и корректного выбора инсталлятора, соответственно разрядности системы 32/64-бит.
Remote Desktop для Windows 11, 10, 7
Непосредственно клиентское приложение имеет мультиязычный интерфейс. Русская версия активируется автоматически при соответствующих региональных настройках Виндовс. Удаленное подключение устанавливается при помощи протокола RDP (Remote Desktop Protocol).
Возможности клиента для Windows 10/11 включают:
- управление при помощи графического интерфейса на русском языке с использованием клавиатуры, мышки или сенсорного экрана;
- поддержку жестов;
- полноценный доступ к компьютерам и ресурсам;
- использование нескольких сеансов одновременно;
- удаленная печать;
- конфигурирование системных настроек, включая разрешение монитора, прочие параметры;
- скоростная передача аудио и потокового видео с возможностью сжатия данных.
Для Семерки и ранних релизов Windows 10 рекомендуется использовать Microsoft Remote Desktop Assistant. Последнюю версию ассистента можно скачать у нас или с официального сайта разработчика. Приложение произведет автоматическое конфигурирование удаленного подключения.
Программа имеет незначительные ограничения. Удаленный доступ невозможен к любым ПК, включая ноутбуки, управляемым Домашним (Home) релизом Windows.
Версия для Mac OS
Редакция для Мак не отличается от Виндовс клиента. После запуска приложения необходимо добавить удаленный компьютер по его имени или IP.
Мобильные издания
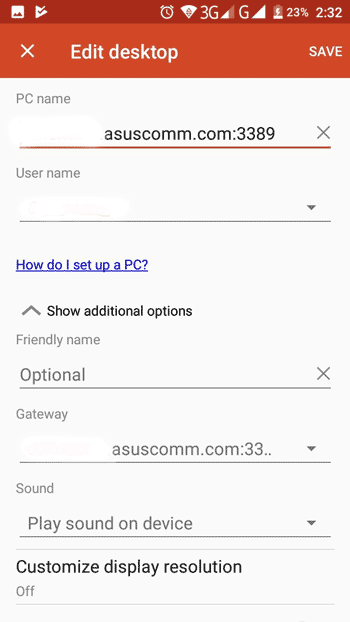
Клиент для телефонов и планшетов открывает быстрый доступ к удаленному ПК с любого места, где имеет сеть Интернет. Принцип подключения остается прежним. Необходимо добавить компьютер, используя имя (IP-адрес) и пароль.
Заключение
Скачать Microsoft Remote Desktop наш сайт предлагает в нескольких вариациях. Доступны установщики клиента под Виндовс 7/10/11, для Mac ОС и мобильных устройств, функционирующих на платформах Android, iOS.
Скриншоты

Другие версии
Скачать Microsoft Remote Desktop 1.2.3770 для Windows (64-bit)
Скачать Microsoft Remote Desktop 1.2.3770 для Windows (32-bit)
Скачать Microsoft Remote Desktop 1.2.3770 для Windows (ARM)
Скачать Microsoft Remote Desktop для Windows из Microsoft Store
Скачать Microsoft Remote Desktop 10 для Android 9.0 и выше (Play Маркет)
Скачать Microsoft Remote Desktop 10.0.15.1208 для Android 9.0 и выше (APK)
Скачать Microsoft Remote Desktop 10.0.15.1207 для Android 9.0 и выше (APK)
Скачать Microsoft Remote Desktop 10.0.12.1148 для Android 8.0 и выше (APK)
Скачать Microsoft Remote Desktop 8.1 для Android 4.1–7.1.1 (Play Маркет)
Скачать Microsoft Remote Desktop 8.1 для Android 4.1–7.1.1 (APK)
Скачать Microsoft Remote Desktop для macOS (App Store)
Скачать Microsoft Remote Desktop Assistant для Windows (ZIP)
Topics
- Overview
- Installing DesktopServer
- 1. Downloading DesktopServer
- 2. Installing DesktopServer
- 3. Configuring DesktopServer
- 4. Starting DesktopServer
- 5. Creating A New Local Site
- 6. Shutting Down DesktopServer
- Next Steps
DesktopServer is a local server package that runs on Mac and Windows. The installation, configuration, and site creation steps are almost identical for both platforms.
This article will walk you through the steps to install DesktopServer on your computer.
Download the installer file for the latest free version of DesktopServer (currently 3.9.4), and save the file to your computer. Scroll down the page to download the free version for your operating system.

The download is about 100mb, so it will take a few minutes.
Once the download is complete, extract the contents of the zip file to a folder on your computer.
You should use the DesktopServer installer for new installations, as it performs checks for conflicts on your computer. The installer file’s icon is a blue box with a green arrow. Open the installer file to begin the installation.
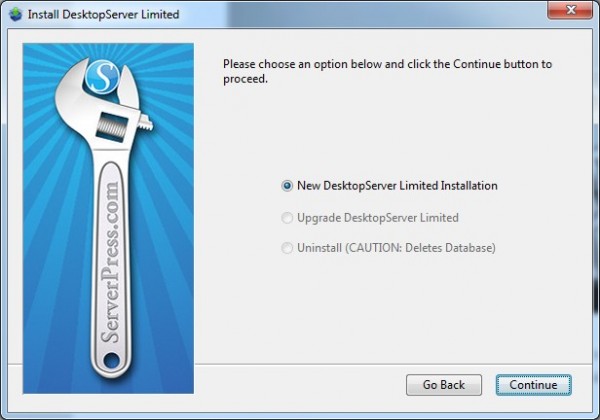
The first screen that appears will ask you whether you want to install, upgrade, or uninstall DesktopServer. Choose New DesktopServer Limited Installation, then click Continue.

You will be presented with the License Agreement screen next. Read the agreement, then click Accept.

The next screen shows DesktopServer extracting the files into the correct location on your computer:
- Mac: Macintosh HD/Applications/XAMPP/
- Windows: C:/xampplite/

Once all of the files have been extracted, the Installation Complete screen will appear. Click Finish to complete the installation.
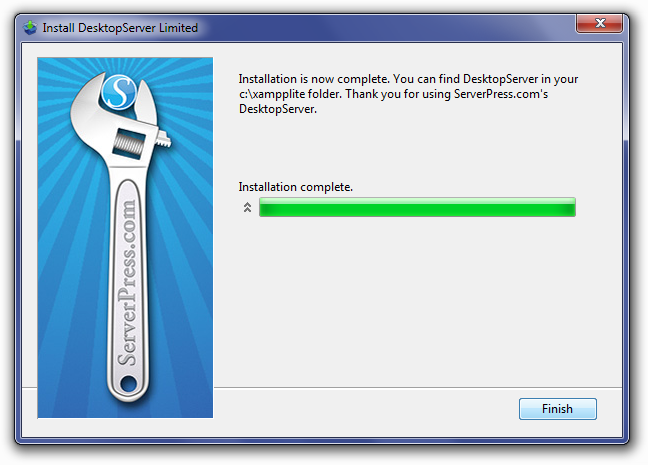
A small window will appear, with the install location and how to start DesktopServer. Click OK to close the window, then click Finish on the main screen to close the installer.

DesktopServer includes the latest stable release of WordPress when you install the program (currently 3.6.1). The program also allows you to add other versions of WordPress in the Blueprints folder, including beta A pre-release of software that is given out to a large group of users to trial under real conditions. Beta versions have gone through alpha testing in-house and are generally fairly close in look, feel and function to the final product; however, design changes often occur as part of the process. releases, as well as create a custom package for installing WordPress via Subversion (SVN Subversion, the popular version control system (VCS) by the Apache project, used by WordPress to manage changes to its codebase.). Any new packages you create will automatically show up in the Blueprint dropdown when you create a new local site. The following shows the location of the Blueprints folder:
- Mac: Macintosh HD/Applications/XAMPP/blueprints/
- Windows: C:/xampplite/blueprints/
To add the latest alpha release, download the zip file of the latest nightly build, and place it in the Blueprints folder. Make sure the zip file has the appropriate beta release name (e.g. wordpress-3.8-alpha.zip).

To create a blank package for installing WordPress via SVN, create a new subfolder called Blank (WordPress SVN) in the Blueprints folder. Copy the index.html file from the Blank (non-WordPress) subfolder, then add a copy of the wp-config-sample.php file from the latest WordPress release. This file is needed during site creation so DesktopServer can create a wp-config.php file with the database credentials for that local site.

Once you’ve completed the installation and configuration process, navigate to the install directory and open the program.
Tip: Create a program shortcut (or alias) on your desktop or dock to make it easier to start DesktopServer each time.
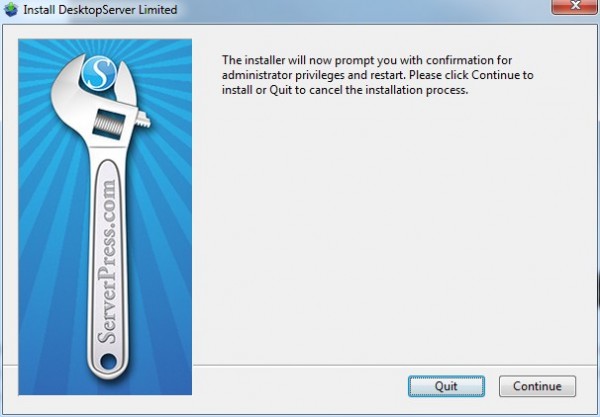
DesktopServer needs to run with Administrator Privileges on both Mac and Windows. On the start-up screen, select Yes, then click Next to restart DesktopServer and grant those privileges.

Next you will need to start Apache Apache is the most widely used web server software. Developed and maintained by Apache Software Foundation. Apache is an Open Source software available for free. and MySQL MySQL is a relational database management system. A database is a structured collection of data where content, configuration and other options are stored. https://www.mysql.com/. services. On the next screen, select Yes, then click Next.

The final startup screen will appear, indicating that both services have been started. Click Next to create your first local site.

Now it’s time for you to create your first local site to use for testing WordPress. Select Create a New Development Website, then click Next.

The next screen asks for the information about the site you want to create.
- Site Name: Enter your desired site name (e.g. wordpress-trunk A directory in Subversion containing the latest development code in preparation for the next major release cycle. If you are running «trunk», then you are on the latest revision.) in the first box.
- Blueprint: To install the WordPress alpha release, you will choose WordPress-3.8-alpha.zip (or the latest beta release) for your blueprint.
- Site Root: DesktopServer will automatically display the default location where WordPress will be installed. If you would like to change the location to another folder (such as /htdocs/), click Browse, select the desired folder, then click Okay.
Once you have completed all 3 fields, click Create.

Next, DesktopServer will create the source folder, virtual host, and server name entries; create a database and pre-configure the wp-config.php file with the database information; and restart the Apache and MySQL services. Once those are done, click Next to continue.

You will be able to access your WordPress install at the URL A specific web address of a website or web page on the Internet, such as a website’s URL www.wordpress.org listed on the next screen. Clicking the URL will bring up the WordPress install screen, where you will enter your site title, desired username, choice of a password (twice), and your e-mail address. Click Install WordPress to complete the installation.

Note: After you have finished installing the latest WordPress beta release, you will need to do the following 2 things:
- It is important that you to set
WP_DEBUGto true in yourwp-config.phpfile to display errors, warnings, etc. during testing:/** * For developers: WordPress debugging mode. * * Change this to true to enable the display of notices during development. * It is strongly recommended that plugin and theme developers use WP_DEBUG * in their development environments. */ define('WP_DEBUG', true); - You will need to install and activate the WordPress Beta Tester plugin to upgrade the install from the latest beta release to the latest bleeding-edge version of WordPress trunk. Once installed, follow the directions for configuring the plugin to update to the bleeding edge The latest revision of the software, generally in development and often unstable. Also known as trunk. nightlies.
To shut down DesktopServer, double-click the shortcut on your screen. On the first screen, select Stop or restart web and database services, then click Next.

You will be asked to confirm whether you want to restart or stop the services. Select Stop web and database services, then click Next.

DesktopServer will then shut down the Apache and MySQL services. Once this task is completed, click Close to exit the program.

- Installing WordPress Via SVN
Last updated: October 19, 2022
Сталкивались ли вы с необходимостью установки WordPress локально на свой компьютер? Многие способы кажутся сложными и запутанными. Однако в данной статье мы приведем вам очень аккуратное решение.
В данном учебном руководстве вы изучите, как установить WordPress на локальный компьютер всего за 10 минут, используя превосходный инструмент под названием DesktopServer.
Тестовая среда – необходимость для разработчика, дизайнера или владельца сайта WordPress, который желает протестировать темы, плагины или код.
DesktopServer — это отдельный инструмент от ServerPress, который доступен как в платной, так и в бесплатной версии. В данной статье мы протестируем бесплатную версию инструмента.
В бесплатной версии вы можете создавать три виртуальных хост-сервера, в то время как в платной версии количество таких серверов не ограничено. Однако трех виртуальных серверов вполне достаточно. Если вам нужно больше, тогда вы можете уже приобрести себе платную версию.
DesktopServer позволяет быстро создавать локальные разрабатываемые сайты. Вам не нужно иметь подключение к интернету, чтобы работать над своими проектами. За пару минут вы можете быстро создать свой первый виртуальный сервер, чтобы протестировать новые темы, плагины WordPress, мультисайты или BuddyPress.
Инструмент доступен для Macintosh OS X 10.6.X-10.10 и Windows XP/Vista/7/8.1.
В бесплатной версии DesktopServer включает в себя следующее:
- Apache сервер
- MySQL сервер
- phpMyAdmin
- PHP 5.4
- Xdebug
- Кроссплатформенность (Macintosh & Windows)
- Подключение WordPress
- Поддержка Domain Mapping
- Автоматическое создание виртуальных хостов
- Автоматическая установка WordPress
- Копирование WordPress-сайтов
DesktopServer – один из самых простых способов создания локальной установки WordPress, если сравнивать с:
- WAMP
- MAMP
- XAMPP
Всего за пару минут вы сможете создать работоспособную сборку WordPress.
Как установить DesktopServer
Сначала нам понадобится скачать установочный файл из раздела загрузок DesktopServer. Я использую Windows 7, поэтому мне понадобится версия Windows XP / Vista / 7 / 8.1. Извлекаем zip-файл и запускаем установку DSL v365.exe.
Щелкаем Continue

Щелкаем Accept
Щелкаем Continue
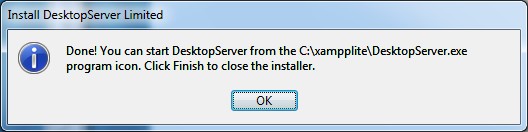
Первая часть сделана. Щелкаем OK и переходим по адресу, который мы видим на изображении, и запускаем DesktopServer.exe.
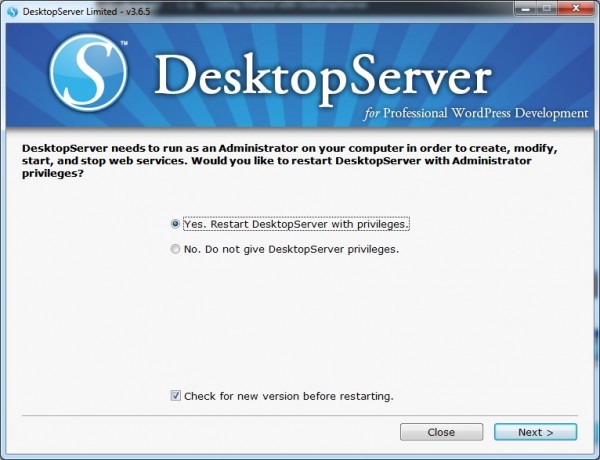
Часть вторая. DesktopServer должен быть запущен от имени администратора. Это нужно, чтобы создать ваши виртуальные серверы. В таком случае браузер сможет найти несуществующий .dev домен для разработки. Щелкаем Next.
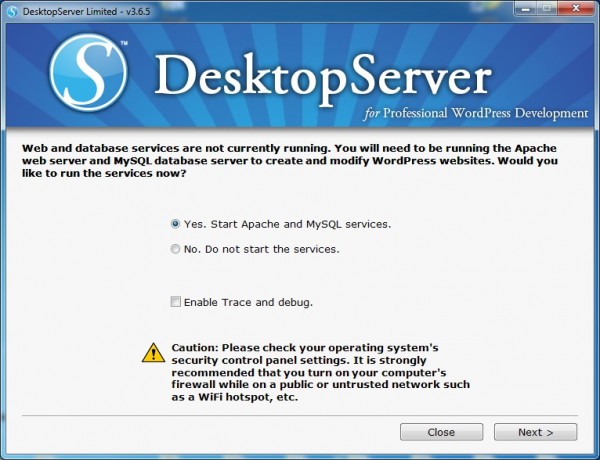
Здесь тоже щелкаем Next.
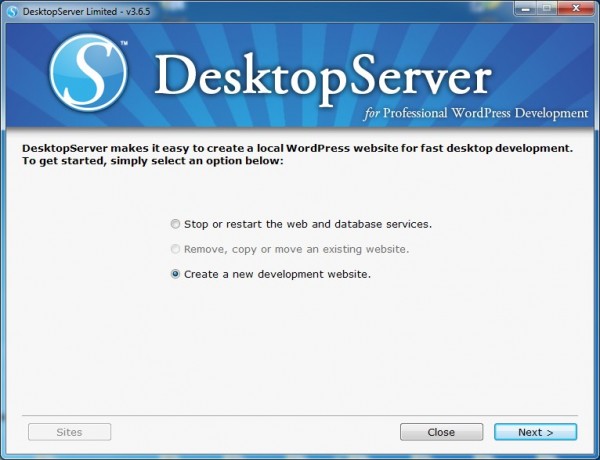
Создаем свой первый веб-сайт WordPress. Просто щелкаем Next.
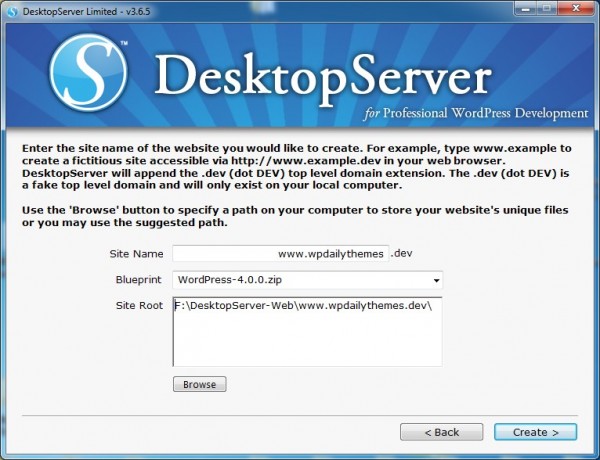
Задаем доменное имя, которое вы хотите использовать. В моем случае это будет WP Daily Themes Dev. DesktopServer автоматически добавит .dev к выбранному вами доменному имени. По умолчанию так же будет называться и папка, содержащая все ваши файлы WordPress. Вы можете определить другое название и расположение, если хотите. Щелкаем Create.
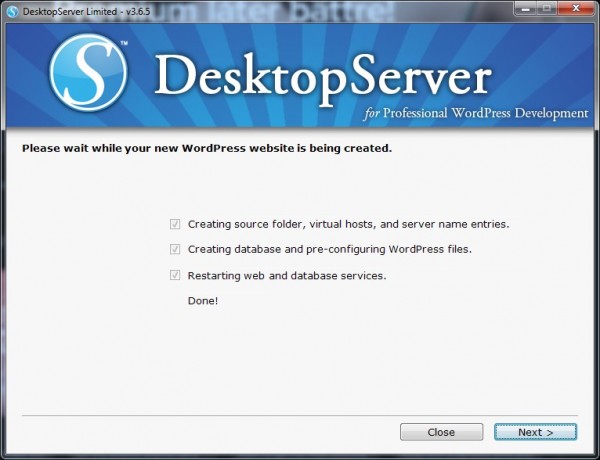
DesktopServer теперь скопирует все файлы WordPress, создаст базу данных, настроит WordPress, а также создаст фиктивные записи hostname, чтобы вы могли получить доступ к сайту по URL-адресу. Нажмите Next.
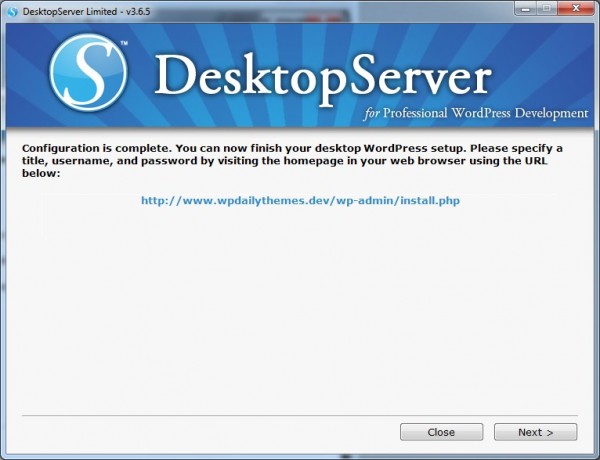
DesktopServer создаст ваш сервер и сайт. Вам будет предложен URL-адрес, и вы сможете посетить свой сайт, щелкнув по гиперссылке. Жмем Next.
Часть третья.
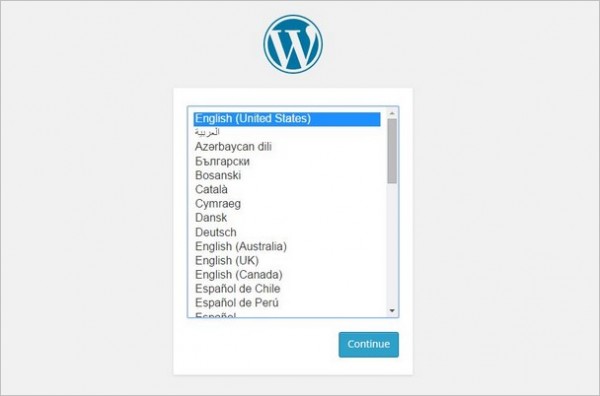
Выбираем язык. Жмем Continue.
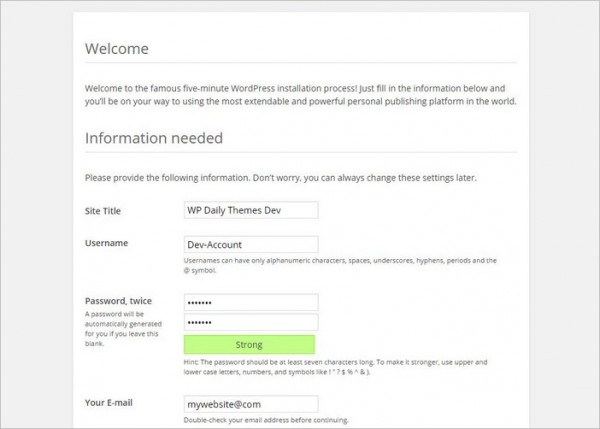
Самое время настроить WordPress. Введите свой логин и пароль. Введите информацию и нажмите Install WordPress.
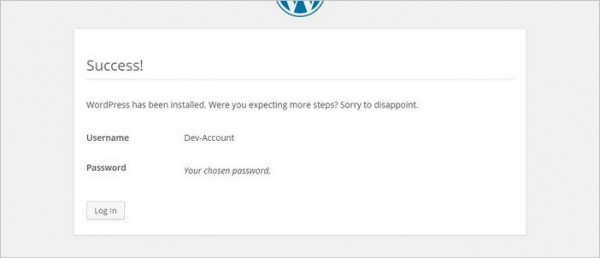
Готово.
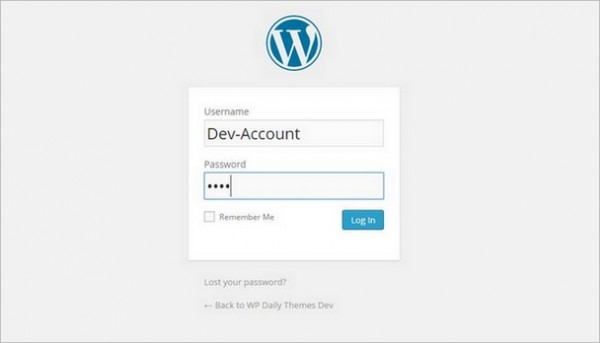
Заходим на свой DesktopServer WordPress сайт.
DesktopServer готов к работе
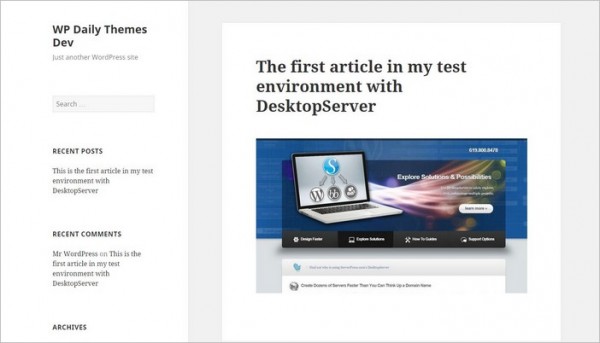
Ваша тестовая среда готова. Вы можете тестировать и разрабатывать в ней темы, плагины, CSS и т.д.
Источник: www.wpdailythemes.com