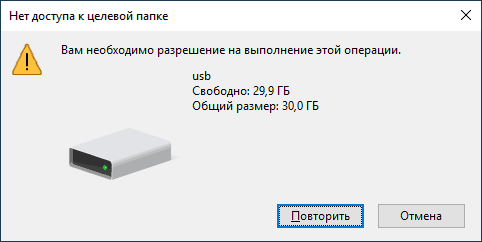
 Наиболее распространенные сценарии появления ошибки «Нет доступа к целевой папке. Вам необходимо разрешение на выполнение этой операции» — попытка что-то изменить в одной из системных папок Windows или же, в некоторых случаях, при записи на флешку или создании каких-либо файлов на ней. В обоих случаях это сравнительно несложно решается.
В этой инструкции о том, как исправить ошибку «Нет доступа к целевой папке» для системных папок Windows 10, 8.1 и Windows 7 (первый раздел статьи) и эту же ошибку на флешки и других USB-накопителей (вторая часть). Во всех случаях, чтобы проделать указанные действия у вас должны быть права администратора на компьютере.
Нет доступа к целевой папке при операциях внутри системных папок
Предположим, что вам требуется выполнить какие-то изменения в системной папке (создание и копирование файлов и другие), вы уже стали владельцем папки, но при попытках действий в ней получаете сообщение о том, что вам необходимо разрешение на выполнение этой операции.
Прежде всего учитывайте, что действия над файлами в системных папках Windows потенциально опасны, будьте осторожны. Путь исправления проблемы будет следующим (возможно, вы уже выполняли часть описанных действий, но я изложу их все по порядку, пример приводится для Windows 10, в предыдущих ОС всё примерно так же):
- Запустите командную строку от имени администратора (как это сделать).
- По порядку вводите следующие команды, в скобках — описание действия команды.
takeown /F "путь_к_папке" (становимся владельцем папки)
takeown /F "путь_к_папке" /r /d y (становимся владельцем содержимого папки)
icacls "путь_к_папке" /grant Администраторы:F (даем полные права доступа к папке Администраторам)
icacls "путь_к_папке" /grant Администраторы:F /t (получаем полные  права для всех вложенных папок и файлов)
В результате у вас должна появиться возможность выполнять любые действия в выбранной папке. Важно: учитывайте, что с папкой C:Program FilesWindowsApps это не получится: в последних версиях Windows 10 она защищена так, что никакие «стандартные» способы не работают, а содержимое этой папки зашифровано (EFS). Также может случиться, что и другие «по-особенному» защищенные системные папки или папки антивирусов не удастся разблокировать описываемым способом.
Нет доступа к целевой папке при записи на флешку или создании файлов и папок на ней
В случае, если сообщение об отсутствии доступа к целевой папке вы получаете при попытке скопировать что-либо на USB флешку, карту памяти или внешний жесткий диск, вполне вероятно, причина в установленных политиках доступа к съемным запоминающим устройствам.
Исправить это можно следующим образом:
- Нажмите клавиши Win+R, введите regedit и нажмите Enter.
- В редакторе реестра перейдите к разделу
HKEY_LOCAL_MACHINESOFTWAREPoliciesMicrosoftWindows
- Если в нем присутствует подраздел RemovableStorageDevices, удалите его.

- Выполните шаги 2 и 3 в разделе
HKEY_CURRENT_USERSOFTWAREPoliciesMicrosoftWindows

Обычно, этого достаточно, чтобы снять ограничения на запись данных на флешку и изменение данных на ней, однако может потребоваться отключить и снова подключить накопитель, чтобы сделанные изменения вступили в силу. Суть параметров в этом разделе — блокировка доступа к флешке и другим съемным USB-накопителям.
Однако, если раздела RemovableStorageDevices в реестре не оказалось, можно попробовать применить первый метод: стать владельцем и получить права на доступ к папкам и файлам на флешке (только для накопителей с файловой системой NTFS).
Let’s see the quick navigation to fix the destination folder access denied error and regain access.
| Workable Solutions | Step-by-step Troubleshooting |
|---|---|
| Recover data from hard drive at first | Before fixing destination folder access denied issue, recover data from the inaccessible folder or hard drive…Full steps |
| Fix 1. Change ownership | Right-click the folder that you want to take ownership of, click «Properties». Click «Security» > «Advanced»…Full steps |
| Fix 2. Perform clean boot | From the Start, search for msconfig. Select «System Configuration» from the search results…Full steps |
| Fix 3. Gain permissions | To get the permission of the destination folder, right-click the inaccessible hard drive or file folder, choose…Full steps |
| More useful methods | To fix the error, check and repair the file system with a free partition manager, format the hard drive…Full steps |
«For some reason, I can’t access the files on my WD Elements external Hard drive. Also, the drive is no longer showing up on my network. I received an error message saying: Destination Folder Access Denied. You need permission to perform this action. I clicked «Try Again», but it didn’t work. How do I regain access to my files?»
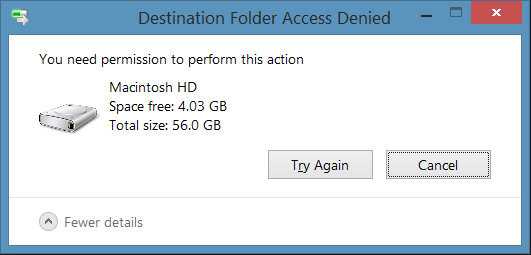
«Destination Folder Access Denied. Need Permissions to Perform this Action» generally occurs when you are trying to copy or move any folder or file to another location. Usually, this problem occurs due to the unavailability of ‘Ownership’. The ownership of the folder or file is present with some other user account. Although the folder and files are available in your account, it’s not available for any modifications. In this case, changing the ownership to your current user account solves the problem.
However, you may soon find that you cannot delete system files, even as an administrator. This is because the Trusted Installer service owns windows system files by default, and Windows File Protection will keep them from being overwritten. Therefore you will encounter the destination folder access denied error. Read this how-to article and learn effective ways to fix the issue.
Check video tutorial first:
Things to Do First: Recover Data from an Inaccessible Hard Drive
Before taking action to fix the destination folder access denied issue, export your important data first to avoid any data loss trouble.
EaseUS Data Recovery Wizard allows you to recover deleted/lost files or formatted data on storage devices with a few simple clicks. It also can repair corrupted files in Windows 10/8/7. It repairs damaged photos, videos, Word, Excel, and other files automatically during the recovery.
You can free download and apply this software to retrieve data from an inaccessible hard drive, USB, or other devices within three steps.
Step 1. Launch EaseUS Data Recovery Wizard in Windows 11/10/8/7 and choose the place where you lost data. Then, click «Scan».

Step 2. After the scan, use the file format filter on the left or upper right corner to find the files you need. Then, you can click the «Preview» button or double-click a file to preview its content.

Step 3. Click the checkbox next to the file and click «Recover» to get back the lost data to a secure place.

Top 5 Ways to Fix Destination Folder Access Denied in Windows 10/8/7
After restoring data, try the five methods below to solve destination folder access denied even with full control.
Fix 1. Grant Full Control to the Folder by Changing the Ownership
To fix destination folder access denied, you should take ownership of the folder:
For Windows 10 users
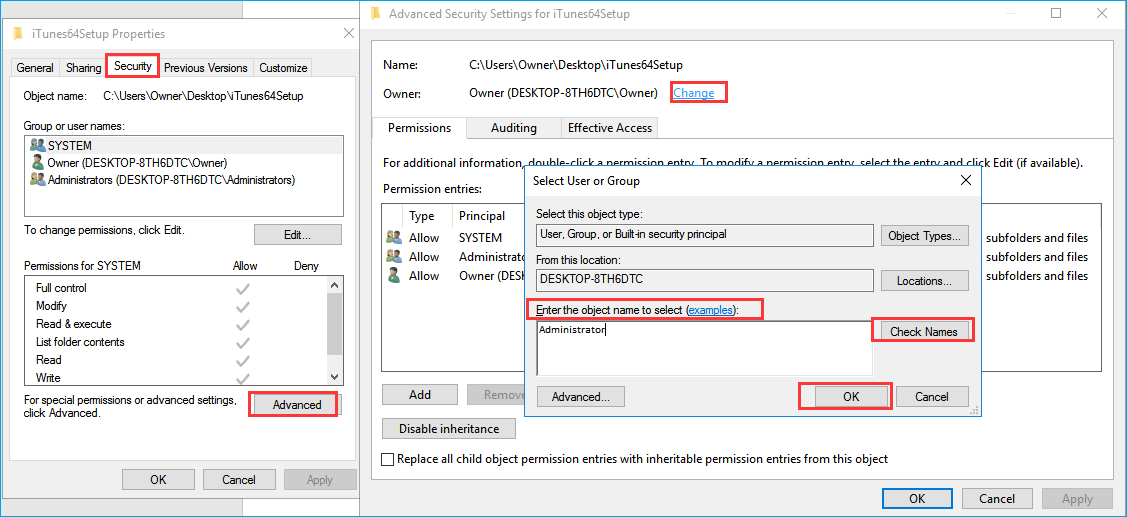
Step 1. Right-click the folder that you want to take ownership of, and then click «Properties» from the Context Menu.
Step 2. Click «Security» > «Advanced», and then click the «Owner» tab.
Step 3. Click «Change». on the popped-up screen, in the «Enter the object name to select» field, enter Administrators, or enter your user name. Then, click the «Check Names». If all goes well, the input will change. Click «OK» to save changes.
Step 4. The owner section will now change. Check «Replace owner on subcontainters and objects» and click «Apply» and «OK» to save changes. Or you can check the «Replace all child object permission entries» option.
For Windows 7 users to grant permissions
Step 1. Right-click on the file and select «Properties» from Context Menu.
Step 2. Click on the «Edit» button in Properties windows Click «OK» to confirm the prompt.
Step 3. Select «user/group» from permission windows or click «Add» to add other users or groups.
Step 4. Under «Permission», check «Full Control» under the «Allow» column to assign full access rights control permissions.
Step 5. Click «OK» for changes to take effect and click ok to exit from the «Properties» window.
Once you have taken ownership of a file or folder, check if you have solved your problems.
Also read: You Don’t Currently Have Permission To Access This Folder
Fix 2. Perform a Windows 10 Clean Boot to Fix Folder Access Denied
Another way to fix the folder access denied error is by performing a clean boot. Follow these steps to access your folder.
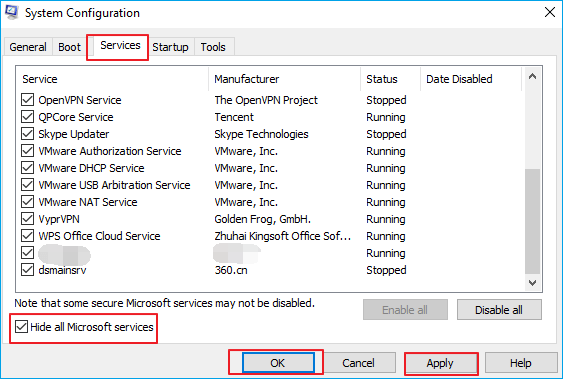
Step 1. From the Start, search for msconfig.
Step 2. Select «System Configuration» from the search results. On the «Services» tab of the System Configuration dialog box, tap or click to select the «Hide all Microsoft services» checkbox, and then tap or click «Disable all».
Step 3. On the «Startup» tab of the System Configuration dialog box, tap or click «Open Task Manager».
Step 4. On the «Startup» tab in Task Manager, for each startup item, select the item and then click «Disable». Close Task Manager.
Step 5. On the Startup tab of the System Configuration dialog box, tap or click «OK», and then restart the computer.
Fix 3. Gain Permissions to the Inaccessible Device
If you still fail to fix Windows 10 destination folder access denied, you can try to gain permission in this way.
Step 1. Right-click the inaccessible hard drive, USB, or file folder, and select «Properties».
Step 2. Go to «Security», click «Advanced» and navigate to the Owner tab.
Step 3. Click «Edit», click your username under «Group» or username.
Step 4. Check all boxes in the Allow column and click «OK», then click «Apply» to gain permissions to access your inaccessible device.
Fix 4. Repair Corrupted File System to Fix Destination Folder Access Denied
If the hard drive’s file system is corrupted, you cannot access the folder either. You can use a free hard drive repair tool — EaseUS Partition Mater to check and repair the hard drive with clicks. This free partition software helps you create, clone, format, merge and resize/move partition. Follow these steps to check and repair the file system.
Step 1. Run EaseUS Partition Master, right-click the target partition, and choose «Change Drive Letter».
Step 2. In the new window, click the down arrow and choose a drive letter for the partition from the drop-down menu, then click «OK».
Step 3. Click the «Execute 1 Task(s)» button in the top-left corner, check the changes, and click «Apply» to change the drive letter of the selected partition.
Or you can run the CHKDSK command to repair the damaged file system of the access denied hard drive.
- Open a Command Prompt and type: chkdsk /f c: (replace c with the drive letter of your inaccessible hard drive).
- Hit Enter to let the checking process run.
- When it’s finished, type exit and hit Enter to complete the process.
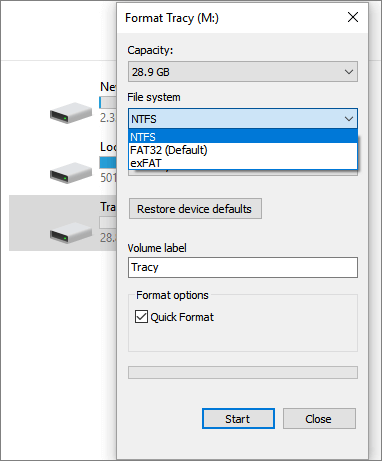
Fix 5. Format the Device to Fix the Denied Access Error
If these quick fixes cannot help you get out of the trouble, you can format the device to resolve Windows destination folder access denied error. As format will delete files, so make a backup in advance. There are several ways to format a hard drive, follow the steps below to format hard drive in File Explorer.
Step 1. Right-click on the inaccessible device — internal/external hard drive, USB or SD card, etc. and select «Format».
Step 2. Set the file system, label name, etc. for the inaccessible devices.
Step 3. Check «Quick Format» and click «Start» to solve the destination folder access denied error.
Conclusion
Many computer users have reported getting a «Destination Folder Access Denied» error message when they try to copy, move, or delete a file or a folder either locally, or from a shared resource. You can effectually solve the destination folder access denied error if you have tried the solutions above.
EaseUS can not only provide you with access denied error solutions but also give you ways to recover files or folders with professional EaseUS data recovery tool. You can always ask EaseUS for help if you have any problems.
FAQs — Destination Folder Access Denied Windows 10
The message Destination folder access denied usually appears when you don’t have the necessary administrator rights to copy a file or folder. If you have other related problems, you can read the questions and answers below to get additional help.
Why is Folder Access Denied?
The «Access Denied» error appears because of the following reasons:
- You may not grant ownership to access files and folder
- Folder access is denied due to its encryption
- Something goes wrong with your file system
What are administrator rights?
Administrator rights are a set of protocols that designate a specific user as the owner of a System.
How do I fix destination folder access denied?
If you are getting the Access Denied error in Windows follow these solutions:
- Fix 1. Change ownership
- Fix 2. Perform clean boot
- Fix 3. Gain permissions
- Fix 4. Run CHKDSK to fix file system
- Fix 5. Format the device
How do I access the Found.000 folder?
The FOUND.000 folder is created when users run the CHKDSK command. Users can’t always see the FOUND.000 folder. To reveal the folder:
Step 1. Open Windows Control Panel and navigate to File Explorer Options in Windows 10, 8.1, and 8.
Step 2. On the File Explorer Options window, navigate to the View tab, under the Hidden files and folders section, tick the option of Show hidden files, folders, and drives.
Step 3. Re-open your local hard drive or device to check the FOUND.000 folder on your PC again.
What happens if a destination folder gets deleted?
If a destination folder gets deleted, all the data and the associated data will either be deleted as well or become unresponsive, so knowing how to recover them is good.
by Ivan Jenic
Passionate about all elements related to Windows and combined with his innate curiosity, Ivan has delved deep into understanding this operating system, with a specialization in drivers and… read more
Updated on October 5, 2022
- Administrator rights are a way for Windows to make sure system files as well as personal data don’t fall into the right hands by granted limited permissions to outside users.
- This guide covers the steps that need to be taken if you cannot access folders and other type of data due to ownership issues.
- This article is just a small part of a much larger hub dedicated to fixing Administrator Rights issues that may appear in Windows 10.
- Visit our dedicated System Errors page for more articles of interest

XINSTALL BY CLICKING THE DOWNLOAD FILE
This software will keep your drivers up and running, thus keeping you safe from common computer errors and hardware failure. Check all your drivers now in 3 easy steps:
- Download DriverFix (verified download file).
- Click Start Scan to find all problematic drivers.
- Click Update Drivers to get new versions and avoid system malfunctionings.
- DriverFix has been downloaded by 0 readers this month.
After you upgraded to Windows 10, Windows 8 or Windows 8.1, you might get the message Destination folder access denied when you are trying to copy a file or folder either from a USB stick, from an external hard drive or just from a simple CD or DVD to your C: partition in your Windows.
The message Destination folder access denied usually appears when you don’t have the necessary administrator rights to copy a file or folder to the C: partition or to the partition your Windows 10, operating system is installed in.
In some cases however it will let you copy and paste any file or folder but only in specific paths in your C: drive.
How do I fix the Destination folder access denied error?
- Check your administrator rights
- Check your program permissions
- Use Command Prompt
If you get this error message in your Windows 10 operating system it is usually followed by the message You’ll need to provide administrator permission to copy to this folder but if you click(left click) on the Continue box it will paste your data to that specific place.
Seeing that it is quite annoying to click on Continue every time you copy/paste your data to the C: partition we will see below how to do a permanent fix on this.
1. Check your administrator rights
- If you are the only one using the Windows 10 PC or laptop and you know you are on the administrator account then press and hold the buttons Windows and E .
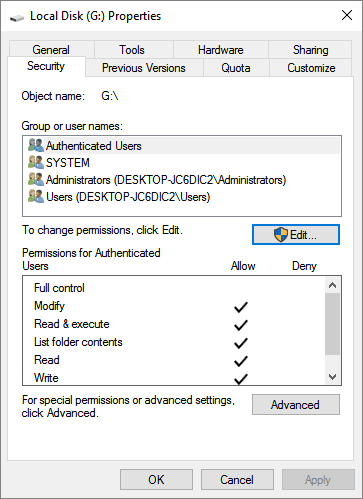
- Click (right click) on the C: drive or the partition you are having issues with and select from that menu Properties .
- Click (left click) on the Security tab presented in the upper side of the window.
- Click (left click) on the Administrators (computer name and administrators)section.
- First you will need to verify if you have a check mark for every entry and it is on Allowed .
- If you don’t have every entry on Allowed then click(left click) on Edit and change the entry to Allowed .
- Click (left click) on OK button after you changed all the entries to allowed
- Click (left click) again on OK in the other window you had opened.
- Reboot the Windows 10 PC.
- See if you have the same message appearing after the reboot
2. Check your program permissions
- Click (right click) on the C: drive or the partition you are having issues with and select from that menu Properties .
- Click (left click) on the Security tab presented in the upper side of the window.
- Click (left click) on the Advanced button presented in the window.
- You will have there a Permissions tab in the upper side of the window you opened, open it.
- Click on Administrators in the Permissions tab and choose from there the feature called Change Permissions .
- You have there a Basic permissions area, verify that all of them are checked.
- You have there a drop down menu that says Applies to, in this drop down menu you will have to make sure that the feature This folder, subfolder and files is selected.
- Click (left click) on OK .
- Click (left click) on OK again in the other window.
- Click (left click) on Apply in the last window.
- Reboot the Windows 10 PC or laptop and verify if you can copy or paste the files or folders now.
3. Use Command Prompt to take ownership of the drive
You can also use a quick CMD command to take ownership of the problematic files, folder or even drive.
For example, here’s how you can take ownership of computer drives so that you can freely copy, move and change any files located on the respective drive:
- Go to Start > type cmd > double-click on the first result to launch Command Prompt
- Type the takeown /f C:Music command to take ownership of all the files stored in the Music folder
So there you have it, these three methods will help you fix the Destination folder access denied issue on Windows 10, 8 or 8.1. Now you can use your device freely without any limitations.
Still having issues? Fix them with this tool:
SPONSORED
If the advices above haven’t solved your issue, your PC may experience deeper Windows problems. We recommend downloading this PC Repair tool (rated Great on TrustPilot.com) to easily address them. After installation, simply click the Start Scan button and then press on Repair All.
![]()
Newsletter
Many users have reported getting a “Destination Folder Access Denied” error window when they try to copy, move or delete a file or a folder either locally, or from a shared resource. It mostly occurs when there are multiple users configured on a system, and/or after you have updated your operating system and are trying to modify an existing file or folder on your old operating system. The situation can be different, but issue’s root cause is the ownership properties of the target file/folder.
The error may say “Destination Folder Access Denied“, but the problem mostly is with the properties of the source folder. Follow our guide to troubleshoot it.
Solution 1: Check Connectivity and Sharing
If you are getting this error when trying to access a shared folder, then the chances are that permissions for some reason on the other computer have messed up. The first method to diagnose this would be to test the connectivity and if it’s successful then check Share Permissions, else troubleshoot and make sure that both the systems are online. In this solution, i will refer the computer sharing the folder as the source computer, and the one accessing it as the host. First, get the local ip of the source computer, which you can obtain by typing ipconfig /all in the command prompt. To do this on the source computer, Hold the Windows Key and Press R. In the run dialog, type cmd and in the black command prompt window that opens up, type ipconfig /all.
Once you have the IP Address, go to the host computer where you’re getting this error and ping the source.
ping -t ip.address.here
If the replies are coming, then it is connected to the network, if not or if it times out, then it is not connected or if it is connected then the firewall may be blocking it, make sure that it is connected and ensure that firewall/antivirus and security softwares are disabled for this test.

Once the test has completed, and the ping is receiving replies, the next step is to check sharing permissions. To do this, go to the folder that is shared, Right click on it and choose Properties. Then click the Sharing/Share tab and choose Share.
Now, in the Share properties, you will be able to check/add/delete users. Make sure the user trying to access this folder from the other computer is listed here, if not you can add it easily via command prompt.
If adding a user, and trying the new credentials does not allow you access, then proceed to Solution 2.
Solution 2: Turn On Network Discovery & File Sharing
If you are copying/moving a file to or from a network location, and getting this error, make sure Network Discovery & File Sharing is enabled on both the systems (SOURCE / DESTINATION)
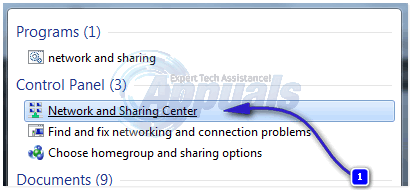
Press Windows key. In the search box type Network and Sharing Center. Press Enter to open it.
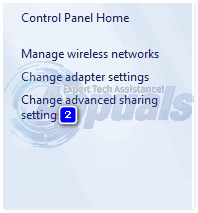
In the Network and Sharing Center’s window, click on Change advanced sharing settings in the left pane.
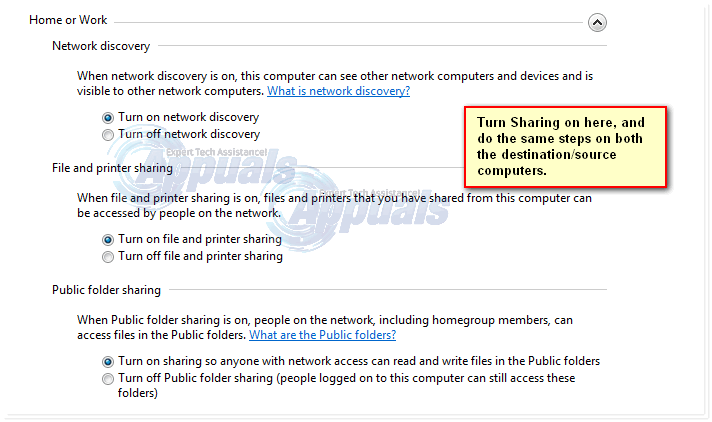
Click the arrow against Home or Work. Make sure Turn on network discovery and Turn on file and printer sharing radio buttons are selected. If not, select them and click OK.
Solution 3: Using Advanced Sharing
When accessing a source file shared on another computer we can use Advanced sharing, which provides more control over what is shared with whom and with what level of access.
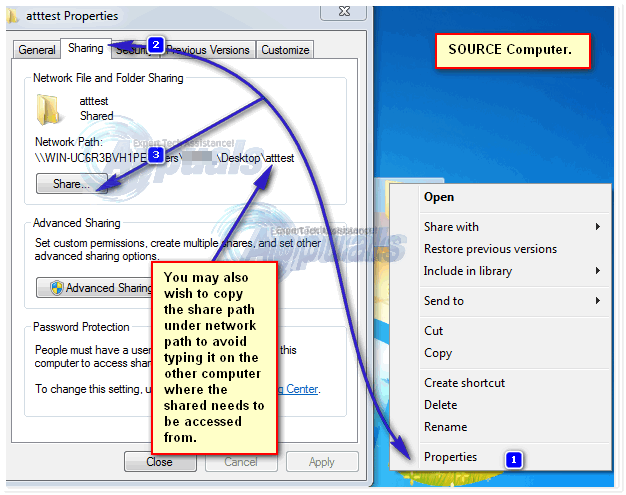
Right click on the source file/folder, and click on Properties,
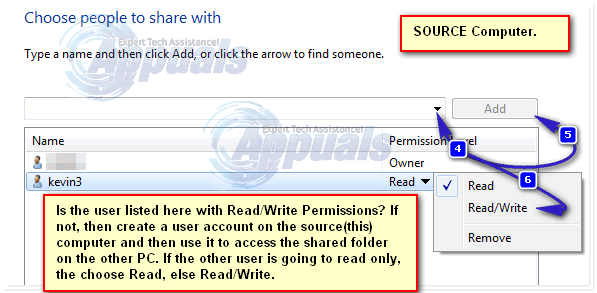
Click on the Sharing tab. Click Share, write the ComputerNameUsername of the user who wants to modify it, and click Add. If the user’s already there, you can skip this.
Note: Click on Start Button, and the name on the upper right corner of the menu will be your User name. Press Windows key + Pause/Break to open your computer properties. Your Computer name will be given there.
Against the user name, under Permission Level, select Read/Write. Click Share > Done.
Now click on Advanced Sharing, click yes if the User Account Control (UAC) warning appears. Click on Share this folder to put a check on it.
Click on Permissions. Click Add.
Now type YourComputerNameYourUserName & click OK.
In the permissions panel below, make sure “Full Control” option is checked under the “Allow” column. Click Apply > OK.
Click Apply > OK in the Advanced Sharing window.
Close the properties.
Solution 4: Disabling User Account Control
UAC can also deny access to a folder. This can be re-enabled later, but must be done to test the issue.
Click on Start button. Type UAC in the search box. In the search results above, click Change User Access Control Settings. Drag the slider on the left to the bottom to “Never notify”. Click OK.
A UAC warning window will appear. Click Yes.
Restart your computer. Check if the issue persists. If yes, move on to the next solution. You can change the UAC settings to default (Second one on the slider) once you have completed this guide.
Solution 5: Transferring Ownership of the File/Folder
Unavailability of the ownership to your account can cause the system to restrict you to modify the file/folder in question. This usually occurs when the folder has been copied from a different computer, or is located on an external drive. To take ownership, log on with an administrator account
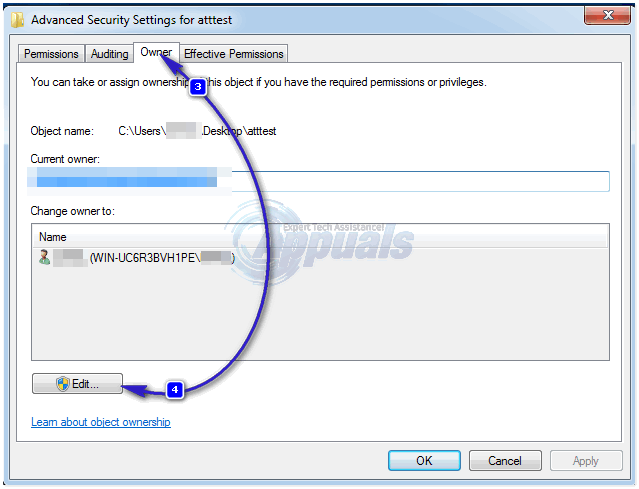
Right click on the target folder/file. From the pop up menu, click on Properties. In the folder’s Properties window, click on the Security tab. Click on Advanced button.

Click on Owner tab in the newly opened window. Click the Edit button in the bottom to change the owner.
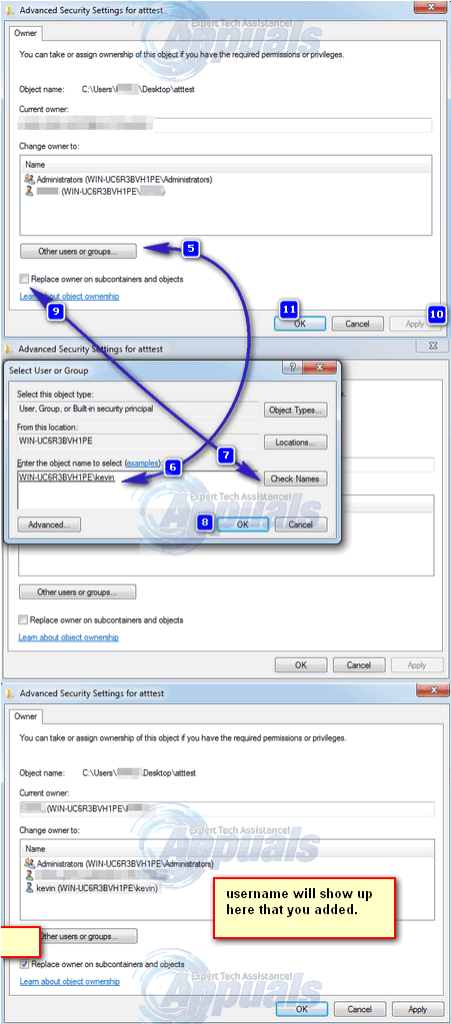
Click on Other users or groups. Now enter your account’s user name in the following format:
YourComputerNameYourUsername (or enter just the username and hit check names) if user is local, it will be automatically populated.
Note: Click on Start Button, and the name on the upper right corner of the menu will be your User name. Press Windows key + Pause/Break to open your computer properties. Your Computer name will be given there.
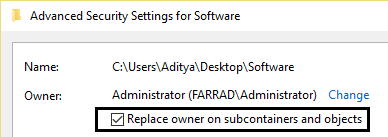
Click OK to add the user as owner. Click the Checkbox of Replace owner on subcontainers and objects to place a check on it. Click Apply > OK. Keep clicking OK to confirm and close the opened windows. Now try modifying the target folder. If not, you may have to repeat the process for each and every file and folder within the folder you intend to modify.
Solution 6: Setting Permissions for your User Account
Your account may not have the required permission to modify the target file/folder. To add permission, Right click on the target file/folder you want to modify (copy/move/delete/rename).
Click on Properties.
In the Properties window, Make sure the Read-only checkbox is clear. If not, clear it.
Click on the Security tab.
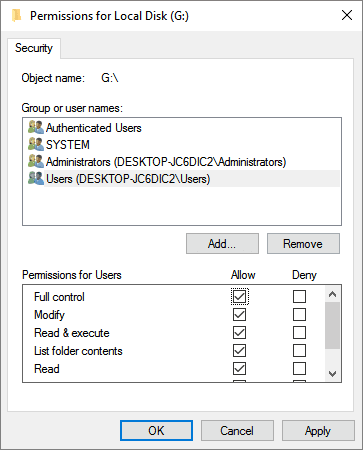
Click on the Edit button.
If your user name is already on the “Groups or user names” list, click on it.
Click on the box next to “Full control” to place a check on it. If it’s already checked, clear the check box, and then click on it again to place a check on it.
If your user name is not on the list, Click Add.
Now enter your account’s user name following the way mentioned in Solution 4.
Click Apply, and then OK.
Click Apply in the Properties window. If a window appears, select “Apply changes to this folder, subfolders and files”. Click OK and let the Windows complete its process.
Click OK to close the Properties window.
Now try modifying the target folder/file. Same results? Move on the next solution.
If the target folder is a sub folder, apply Solution 3, and then Solution 4 on the parent folder.
If the issue still persists, move on to the next method.
Solution 7: Through Command Prompt
In this solution, we will take ownership of the target file/folder and grant full access to he user through cmd.
Press Windows key. Type cmd.
Right click on cmd, and click Run as administrator.
Type the following code:
icacls “full path of file” /grant %username%:F /t
To find the full path of the target file or folder, open the folder.
Click on the address bar on the top. Copy the complete address that appears.
Write the full path with quotes. Press enter to run the code.
Once the command runs successfully, type the following code:
takeown /f “full path of file” /r
Similarly, write the full path of the target folder/file with quotes in the command above. Press Enter to execute the code. Now try modifying your target file/folder. Tell us which solution worked for you, or not for that matter. We will work out something else for you.
The error «Destination Folder Access Denied. Need Permissions to Perform this Action» normally occurs while trying to copy or move any folder or file to another location. It mainly occurs when multiple users are configured on one system or modifying an existing file or folder on the old operating system with the newly installed operating system. Although the reason can be different but it occurs due to the unavailability of the «Ownership». The ownership of the file or folder that is being accessed is associated with some other user’s account. We have researched this issue and found out some exciting and time-saving solutions that you can try. So, let’s get started.

- Fix 1. Change the Folder Ownership
- Fix 2. Set Permissions to the Inaccessible USB/Hard Drive
- Fix 3. Turn On Network Discovery & File Sharing
- Fix 4. Run CHKDSK
- Fix 5. Check Connectivity and Sharing
- Fix 6. Disable User Account Control
- Fix 7. Perform a Windows 10 Clean Boot
- Fix 8. Use Advanced Sharing
- Fix 9. Recover the Inaccessible FilesHot
1. Fix Destination Folder Access Denied by Changing the Folder Ownership
You should take ownership of the folder to fix the destination folder access denied problem. Here’s what you can do:
For Windows 10 Users
- Go to the folder whose ownership you want to take and right-click on it. Then select the «Properties» item from the dropdown menu.
- In properties, click on «Security» and then «Advanced».
- Click the «Owner» tab and click «Change» on the popped up screen.
-
Now enter the user name and click the «Check Names» to see if the user exists. You can also click «Change» on the popped up screen and then enter the user name in the «Enter the object name to select (examples)» field. Once the user name of the new user is inputted, click «OK» to save the changes.

- Navigate to «Replace owner on sub containers and objects» and save your changes by clicking «Apply» and then the «Ok» button. Another way of doing that is by checking the «Replace all child object permission entries» option.
For Windows 7 Users
- Go to the folder whose ownership you want to take and right-click on it. Then select the «Properties» item from the dropdown menu.
- Click the «Edit» button in the properties and click «Ok» to confirm the dialog.
- Click «Add» to add other users or groups or you can also select «User/Group» from permission windows.
- Navigate to «Permission», Assign full access rights control permissions by checking «Full Control» under the «Allow» column.
- Save the changes by clicking the «OK» button and then click the «Ok» button for the «Properties Window» to exit.
After taking ownership of the file or folder, you need to check if your problem is solved. If not, move on to try the other methods listed below.
2. Fix the Destination Folder Access Denied by Setting Permissions to the Inaccessible USB/Hard Driver
Your account may need the required permissions to change the target file/folder. Follow the steps below to gain the permissions for this:
- Right-click the inaccessible USB/Hard drive, file, or folder and then select the «Properties» item from the dropdown menu.
-
Select your username under «Group or user names» and click the «Edit» button.
-
Allow the permissions by checking the permissions checkbox and then click «OK». Gain the permissions to access the inaccessible hard drive by clicking the «Apply» button.
3. Fix Destination Folder Access Denied by Turning on Network Discovery & File Sharing
If you’re getting this error while copying or moving a file to or from a network location, make sure the Network Discovery & File Sharing is enabled on both source and destination system.
-
Step 1: Type Network and Sharing Center in the Windows search bar and hit enter to open it.
- Step 2: Navigate to the left pane and click «Change Advanced Sharing Settings».
-
Step 3: Click on the down arrow in front of «Home and Work» and make sure to turn on Network Discovery and File and Printer sharing.
4. Fix Destination Folder Access Denied By Running CHKDSK
You can use CHKDSK to solve the destination folder access denied error. Here are the steps:
-
Step 1: Open Command Prompt and type chkdsk c: /f /r (Whereas the drive letter «c» can be replaced with the letter of the inaccessible hard drive).
- Step 2: After entering the command, hit the enter button to begin the checking process.
- Step 3: Once the check process is completed, type exit and hit the enter button to complete the process.
5. Fix Destination Access Folder Denied by Checking Connectivity and Sharing
If you’re getting the access folder denied error when accessing a shared folder, then there is a high possibility that the permissions on the other computer have messed up for no reason. In this solution, the computer that is sharing the folder is defined as a folder as a source computer whereas the computer(s) accessing it are the host(s).
- Step 1: Firstly, get the IP of the source computer by typing ipconfig/all in the command prompt.
- Step 2: After getting the local IP address, go to the host computer where this error is showing up, and enter this command in the command prompt: ping -t ip.address.here.
- After this, if you get the replies, it confirms that you are connected to the network. If you don’t get the reply or it times out, it depicts either you’re not connected to the Internet or you’re connected but the firewall may be blocking it. Make sure it is connected and firewall/antivirus software is disabled for this.
- When the ping starts receiving replies, it is time to check the sharing permissions. To do so, go to the shared folder, right-click on it and select «Properties». Then click the «Sharing» tab from the menu and click the «Share» button.
- You will be able to check/add/delete users in the Share properties. Ensure that the user trying to access this folder from the other computer is listed here. Otherwise, you can add it easily via CMD (Command Prompt).
6. Fix Destination Folder Access Denied by Disabling User Account Control
UAC (User Account Control) can deny access to a folder as well. It can be re-enabled after testing the issue.
- Step 1: Open the Windows search bar and type «UAC».
- Step 2: Go to the search results and click Change User Access Control Settings».
-
Step 3: Drag the slider on the left side to «Never Notify» and click «Ok».
- Step4. Click «Yes» when a UAC warning window appears and Restart your computer to see if the issue persists.
7. Fix Destination Folder Access Denied by Performing a Windows 10 Clean Boot
You can also fix this error by performing a clean boot. To do so, follow the below-given steps to access the folder:
- Step 1: Open the Windows search bar, type MSConfig to open system configuration.
-
Step 2: Navigate to the «Services» tab of the system configuration dialog box. Check the «Hide all Microsoft Services» checkbox and click the «Disable all» button for not disabling the Microsoft Services.
- Step 3: Click on the «Startup» tab of the «System Configuration» and then click «Open Task Manager».
- Step 4: Go to the «Startup» tab in the Task Manager, and disable each startup item by clicking «Disable». Close the Task Manager.
- Step 5: Go back to the startup tab of the «System Configuration». Click «OK» and restart your computer.
8. Fix Destination Folder Access Denied by Using Advanced Sharing
We can use the «Advanced Sharing» option while accessing a source file shared on another computer. It provides more control over what is shared with whom and what level of access is granted to the other person.
- Step 1: Head to the source file or folder, right-click on it and click on the «Properties».
- Step 2: Go to the «Sharing» tab. Click the «Share» button and enter the username of the person who wants to modify it and click the «Add» button. You can skip it if the user already exists there.
- Step 3: In front of the username, under Permission Level and select «Read/Write», click «Share» and then «Done».
- Step 4: After this, go to the Advanced Sharing and click «yes» if the UAC warning appears. Put a check on it by clicking «Share this folder».
- Step 5: Click «Permission» and then click «Add».
-
Step 6: Enter «Username» and click «OK».
- Step 7: In the permissions panel below it, check the «Full Control» option under the «Allow» column. After doing so, click «Apply» and then click «Ok».
- Step 8: Click «Apply» and the «OK» in the Advanced Sharing window. Close the properties window.
9. Fix Destination Folder Access Denied by Recovering the Inaccesible Files
If you are unable to recover the inaccessible files with the above-provided solutions, explore the amazing data recovery software Tenorshare 4DDiG. You can easily recover all kind of inaccessible and lost files in Windows XP/7/8/8.1/10 by using it. We have mentioned its features to check out and steps to recover data with it below:
Features:
- Recovers all kinds of accidentally deleted data.
- Recovers data from crashed computer.
- Provides BitLocker data recovery support.
- Recovers data from the raw partitions.
- Previews the data before recovering.


Steps:
- Install and launch the Tenorshare 4DDiG software.Pick a location from the connected drives section from where you want to recover the data.
-
Click the «Scan» button and Tenorshare 4DDiG will begin to scan for the files in the selected location. It displays a progress bar with elapsed and remaining time. After the scanning is completed, the software will display a dialog box showing how many files it has recovered. You can use the deep scan feature if you are unable to find the required files in the found data.
-
After previewing and selecting the files, click the “Recover” button to save the recovered data to your computer.
Video tutorial on How to Recove Deleted Files from Recycle Bin after Empty in Windows 10/8/7?
The Bottom Line
The error message “Destination Folder Access Denied” is common and many people are getting it on their computers whenever they try to move copy or delete a file from local or shared storage. It can be easily solved by using the above-mentioned solutions. Tenorshare 4DDiG does not only provide the solution for access denied error but it gives a way to recover your files or folders. You can try its free version to know more about its exciting features.
Position: How Tos — Disk Utilities — 5 Solutions to Destination Folder Access Denied in Windows 11/10/8/7
Table of Contents
Destination Folder Access Denied Error Overview
«I just installed Window10 to my laptop and reinstalled some programs including games. I got the error ‘destination file access denied you need permission to perform this action. You require permission from TrustedInstaller to make changes to this folder’ when copying a file into a game folder. Moreover, same error occurs when I try to copy files to an external hard drive. I think I am the owner and admin of laptop and external hard drive, and I should already have the permission to copy and move files. Has anyone here got similar error? How do I grant permission and fix the access denied error?»
The error talked about in this page tends to occur when you attempt to move, copy or delete certain files or folders to another local or shared location. It is shown on a pop-up dialog box with error message «You need to permission to perform this action» «You require permission from TrustedInstaller to make changes to this folder». There are two options: Try Again and Cancel. In most cases, the problem won’t be fixed by itself after trying again.
Why does the error occur to your computer? The error message makes it clear to know the causes. The primary cause should be ownership. With regard to the meaning of ownership here, it refers to that the folder or file in question are under the control of another account. Although the folder is displayed in the account you’ve logged in, it is not allowed to be changed by this account. There might be more than one user account on in your Windows 10 system. Operating system grants the administrator account special privilege, and only administrators can access files that belong to other users. The second reason of the error is TrustedInstaller service which keeps checking ownership for system and prevents unauthorized users from making modifications. What’s more, sometimes the error may also be caused by corrupted file, virus attack, corrupted user profile, permission, etc.
How do I fix Destination Folder Access Denied error? — 5 Solutions
It is no longer a pleasant thing that the access of files or folders gets denied. Luckily the error can be fixed. This part of the article focuses on providing several solutions to fix the access denied error in Windows 10/8/7 without affecting existing files.
Solution #1: Disable User Account Control
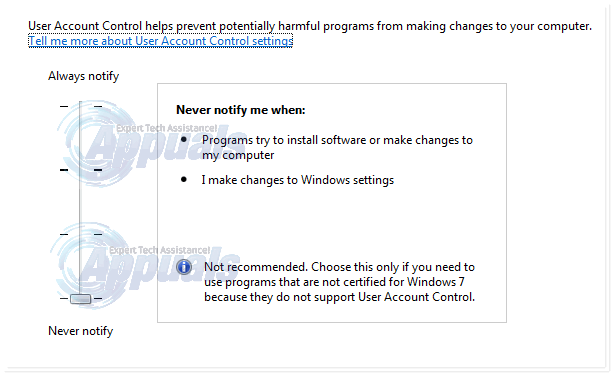
Step 1. Click the search option next to Start menu and type UAC in searching box. Then click Change User Access Control Settings from searching result.
Step 2. Drag the slider down to the bottom «Never notify» and click OK. This option means that there won’t be any notification either applications try to install software or make changes to computer, or you make changes to Windows settings.
Step 3. Click Yes when Windows prompts to restart computer.
Solution #2: Change ownership for the file/folder
Step 1. Right-click on the folder that you cannot access and select Properties.
Step 2. On Properties window, choose Security tab and click Advanced button.
Step 3. After «Advanced Security Settings» window appears, you can click Change to open Select User or Group window.
Step 4. In the «Enter the object name to select» section, type the username for the account which you want to give access to, and click Check Names button. Click OK to save changes.
Apart from taking ownership via steps above, you can also try fix this via Command Prompt. Here are steps to change ownership using Command Prompt
Step 1. Run Command Prompt as administrator. Type cmd in searching box to locate Command Prompt and click Run as administrator.
Step 2. Get the full path of the access denied folder, for example, the folder named «download» in E: partition reports the access denied error, the path of the folder is «E:download»
Step 3. Type command takeown /f «E:download» and press Enter key.
Solution #3: Set permission for access denied hard drive/USB drive
Step 1. In Windows File Explorer, right-click on the partition where the access denied file/folder are stored and click Properties.
Step 2. Select Security tab and click Advanced button, after which the Advanced Security Settings window appears.
Step 3. Click Change link next to Owner item to open «Select User or Group» window.
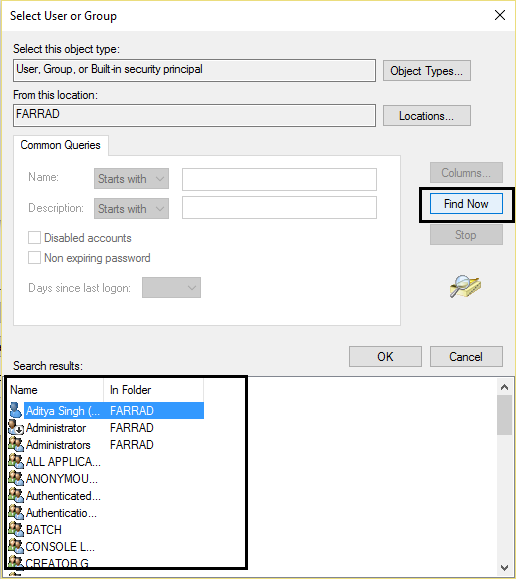
Step 4. On «Select User or Group» window click Advanced button and then click Find Now button on another pop-up window.
Step 5. Select the user account you want to grant permission and click OK. Then click OK again until back to the Advanced Security Settings window
Step 6. Select «Replace all child object permission entries with inheritable permission entries from this object» and click OK and Apply button.
Solution #4: Turn on network discovery and file and printer sharing
Step 1. Click Start menu to choose Settings.
Step 2. Click Network & Internet > Network and Sharing Center > Change advanced sharing settings.
Step 3. Choose Turn on network discovery and Turn on file and printer sharing and click Save changes button.
Solution #5: Run sfc/scannow
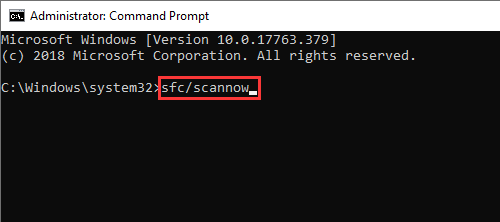
Step 1. Run Command Prompt as administrator. Type cmd in searching box to find out Command Prompt and click Run as administrator.
Step 2. In Command Prompt, type sfc/scannow and press Enter key. The sfc/scannow command will scan system files and repair corrupted ones.
How to recover data from inaccessible/corrupted hard drive?
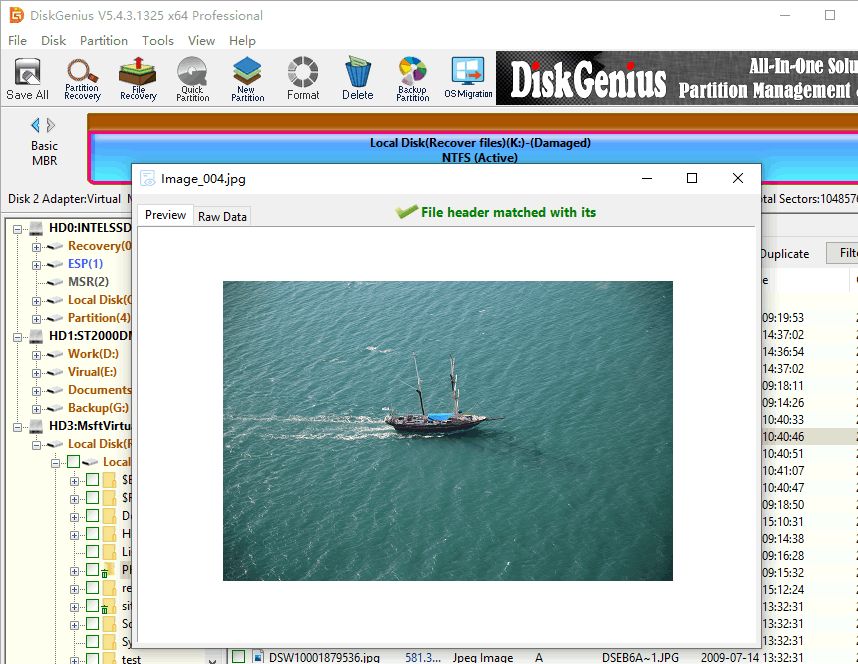
When the access denied folder or drive cannot be repaired with solution above, you can try data recovery using DiskGenius. After that, you can try the ultimate solution: format and repartition hard drive. DiskGenius is packed with powerful data recovery features which can help you perform RAW partition recovery, formatted drive recovery, corrupted hard drive recovery, lost partition recovery, deleted file recovery etc. You can free download DiskGenius Pro trial edition and recover lost data from an inaccessible hard drive, external HDD, USB flash drive, Windows Storage Space, etc.
ô Free Download
Step 1. Run DiskGenius and you can see the corrupted/inaccessible hard drive listed in the main interface. Select and right-click the corrupted partition and click Load Current Partition Intelligently. Then lost files will be listed within a couple of second.
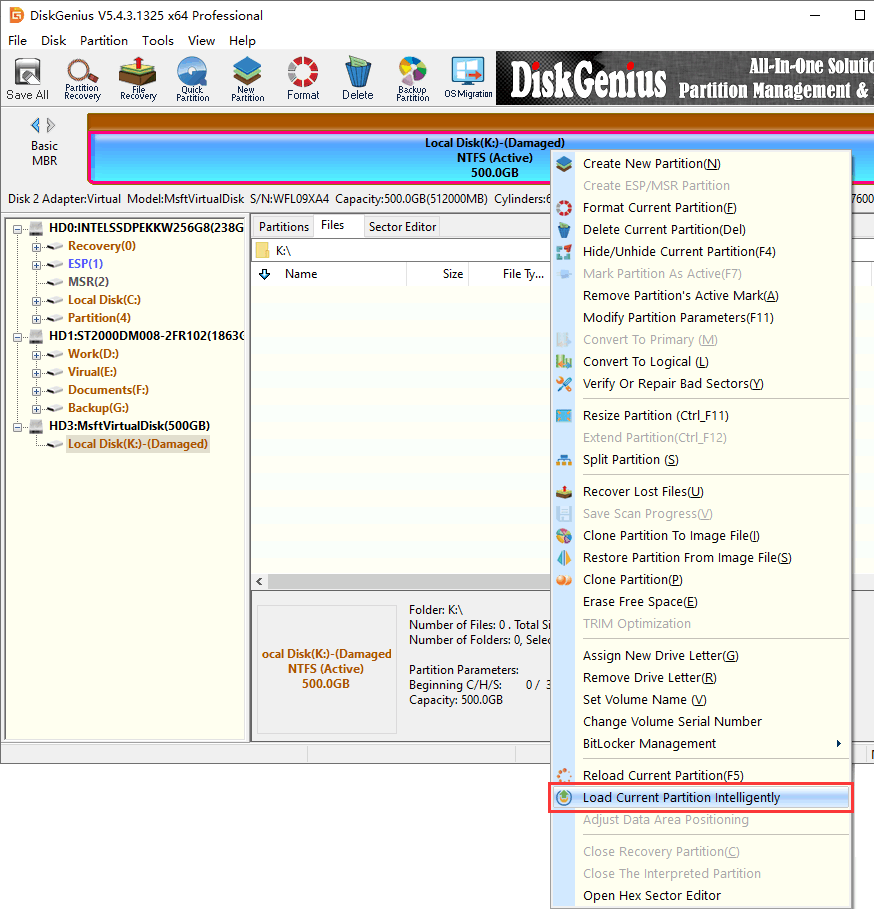
If this does not work on your drive, then move to step 2.
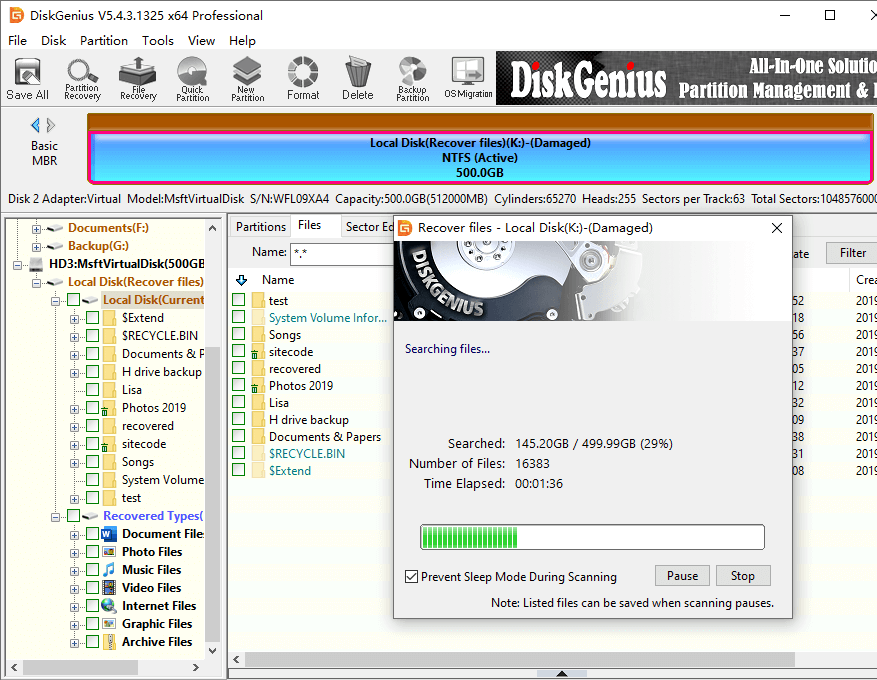
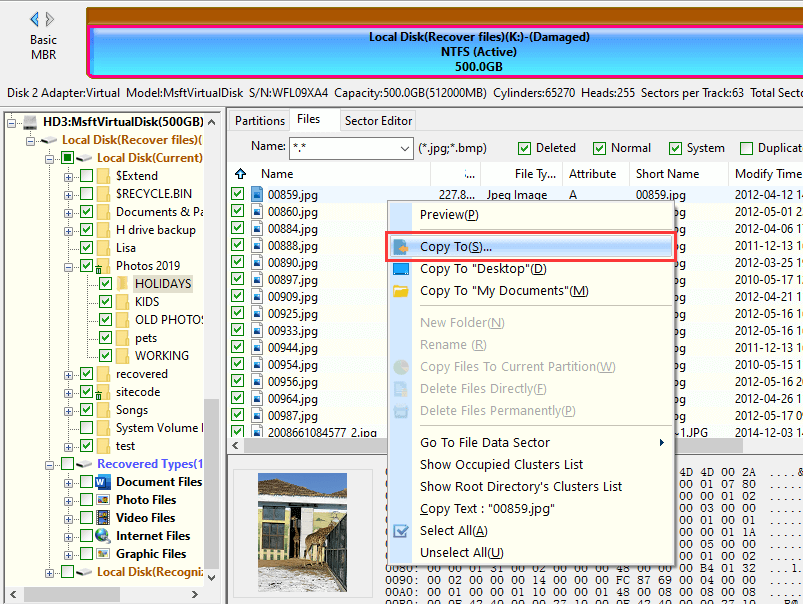
Step 2. Select the corrupted drive again, click File Recovery button from toolbar to open Recover File dialog box. Then click Start button to run a complete scanning for the inaccessible drive.
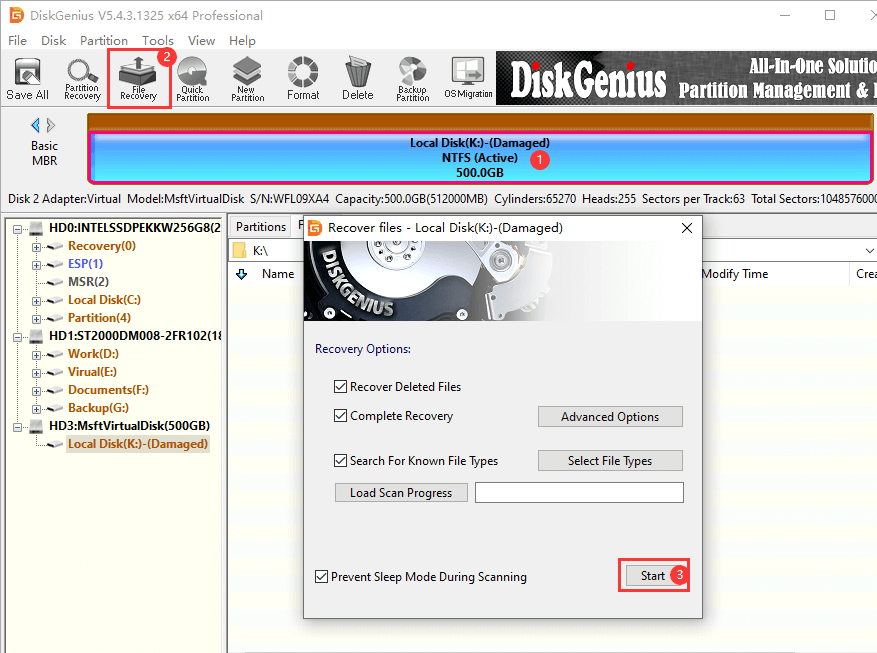
Wait for the scanning to complete.
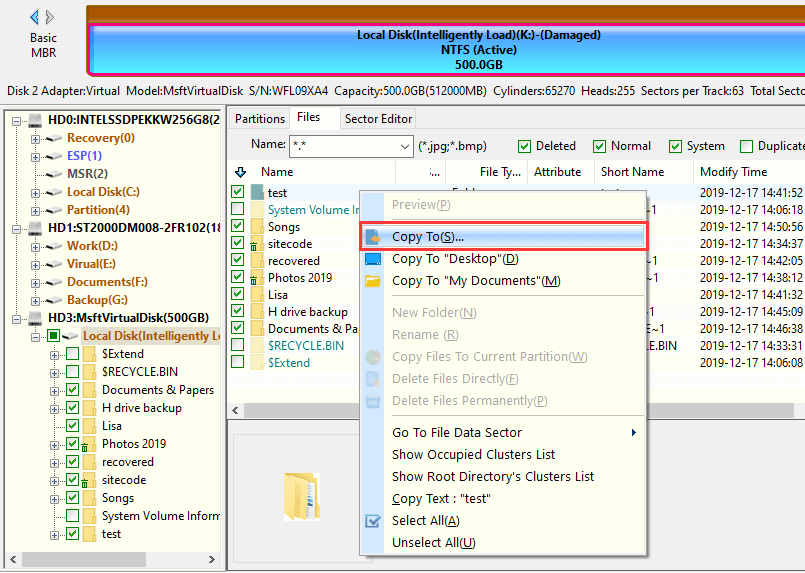
Step 3. No matter whether the scanning is completed, you can preview files found by the software. Double-click a file to open file preview window, and you can easily check if the file gets corrupted.
Step 4. Copy found files to another partition to get them recovered. Note: registration is required to copy lost files, otherwise you can copy very smaller files only.
FAQs on destination folder access denied error
1. Why is Folder Access Denied?
Reasons why access of a folder or drive gets denied differs from one to another, for example, the folder ownership has changed, you do not get proper permission, the file is encrypted, file system goes wrong, etc.
2. How do I get rid of Access Denied?
You can try these methods to get right of access denied error: take ownership, get appropriate permission, run chkdsk, enable network recovery, etc.
3. What is full control but access denied?
There might be more than one users in your Windows system, and the ownership of the folder or file you cannot access is related with other user accounts. Although you have full control, access is still denied due to the lack of the permission or ownership
4. How do I fix I need permission to perform this action?
To fix «You need permission to perform this action», you can try following solutions:
Solution 1: Sign in Windows with administrator account.
Solution 2: Turn off third-party antivirus software and scan computer using Windows Defender.
Solution 3: Change ownership and permission for the item in question.
5. How do I fix inaccessible and incorrect parameter external hard drive?
The easiest way of fixing a corrupted external hard drive is formatting, however, which will wipe all data from it. You can refer to this guide to fix the issue without losing data: Solved — Drive is not accessible the parameter is incorrect on external hard drive
Conclusion
That is all about solutions to «Destination Folder Access Denied. You need permission to perform this action» error in Windows 11/10/8/7. In addition to methods above, you can also try reinstalling Windows operating system to get rid of the error. If you feel this article useful, you can share it on your social media to help more people. Should you need any help, feel free to contact us via email.
Destination Folder Access Denied: You need permission to perform this action is an issue that has been bugging a lot of Windows users, especially Windows 10 since its inception. The issue costs users an ample amount of time deliberating and scratching their heads in agony and frustration.

So today in this blog we will be erasing the existence of the issue Destination Folder access Denied: You need permission to perform this action. By the end of the blog, you will be perfectly capable of eradicating this problem. Moreover, even help others, maybe your friends or family who are also facing the same issue.
But before we direct our attention towards the solutions to this particular issue, first let us discuss in brief the causes. Also sometimes files asked for administration permission when you want to delete them, you can even fix that just by clicking here!
Table of Contents
- 1 Why Destination Folder Access Denied Error Occur?
- 2 How to Fix the Destination Folder Access Denied error?
- 2.1 Method 1: Transferring Ownership Using Command Prompt Approach
- 2.2 Method 2: Ownership Registry File installing approach
- 2.3 Method 3: Manual Ownership Transfer Approach
- 3 Final Words
This error mainly occurs due to the Ownership status of the user with the Windows. The unavailability or void in the ownership does not let the users copy, paste, or modify a folder. Thus the error pops up when the user tries to do so.
The reason behind the ownership problem is that the Windows ownership might be present by some other name. Windows has by default a TrustedInstaller service which keeps in check the ownership issues. Hence when an unauthorized user tries to do any modification the service stops him from doing anything and disables that particular functionality.
If you are signed in as an administrator and the owner is not the same registered then also the problem will persist. The Destination Folder Access Denied error will loom around with its sharp tentacles to torment you ever and after.
How to Fix the Destination Folder Access Denied error?
We’ve bundled & explained some of the working methods to fix this error. Go through them to resolve this error quickly.
Method #0 Use Advanced System Repair Pro (Strongly Recommended)
Our tool will quickly repair common computer errors, protect you from file or data loss, malware, trojans, hardware failure and optimize your PC to boost for maximum performance. Fix PC issues now using 3 easy steps:
- Download this PC Repair Tool rated as «Excellent» on TrustPilot.com.
- Click on Start Scan button to find errors related to Windows.
- Click Repair All to fix all issues with Patented Technologies.
Method 1: Transferring Ownership Using Command Prompt Approach
1. At First, press Windows Key+X together.
2. Then select Command Prompt (Admin) from the list of options displayed.

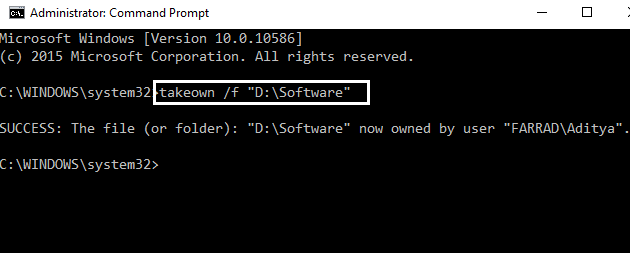
3. Now, let’s assume that you want to take ownership of a folder Software located inside D drive. The full address of the drive is D:Software.
4. Then type the following inside the command prompt:
takeown /f “D:Software”
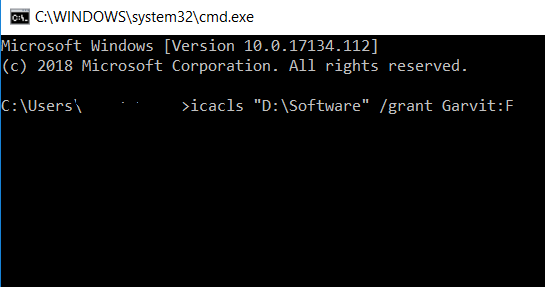
5. If the above command is not working then try this one (Including double quotes):
icacls “full path of file” /grant (username):F
Example: icacls “D:Software” /grant Garvit:F
6. Finally, a message named as Successfully process 1 files; Failed processing 0 files will be displayed.
Hence by following the above steps, you are transferring the ownership of the faltering folder to your own. By doing so, the Destination Folder Access Denied: You Need Permission to perform this action Windows 10 issue would be resolved. Therefore you will be free from the problem. If it didn’t work out for you, No problem! You can try the next method to fix the issue.
Method 2: Ownership Registry File installing approach
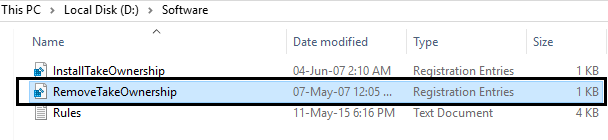
1. First of all, download the following registry file using this link.

2. The first file InstallTakeOwnership.reg is used to take the ownership of a particular file or folder and the second file RemoveTakeOwnership.reg is mainly used to uninstall the InstallTakeOwneship registry software.
3. Afterwards, downloading the above two files click on the InstallTakeOwnership and install it.
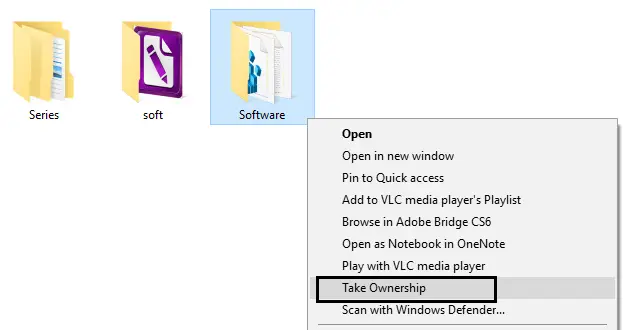
4. After it has completely installed, then go to the file or folder whose ownership you would like to transfer. Right-click on it and you will notice a new option named as “Take Ownership.” Click on it.
5. Afterwards, by doing this your ownership will be transferred to the respective file or folder and the issue will be resolved.
6. After following the above steps & installing the RemoveTakeOwnership registry file which you downloaded previously, you can restore the registry settings back to the original.
Thus, by going through the above steps, the Destination Folder Access Denied issue will be gone into the air like thin smoke.
Method 3: Manual Ownership Transfer Approach
If the above methods didn’t work for you, then you can adopt the following foolproof way which is sure to resolve the issue mentioned above and finally rid you of the menacing problem which has been tormenting you from a long time.
1. At First, navigate to the File/folder you want to change the ownership such as D:Software and right click on it.
2. Then click on Properties from the list of options displayed.

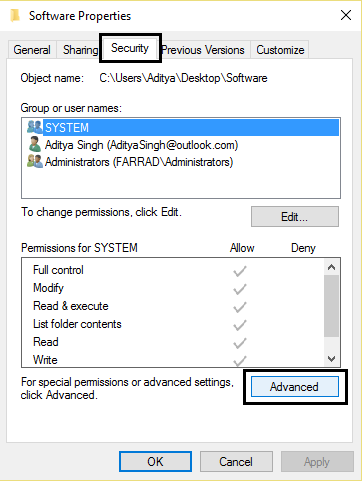
3. Afterwards, the properties window will be opened. From the list of tabs in the properties window, click on Security.
4. Then click on Advanced that is being displayed in the lower corner of the Security tab.
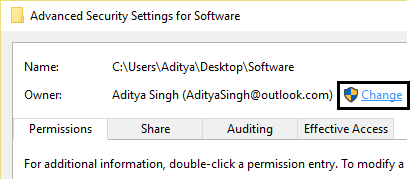
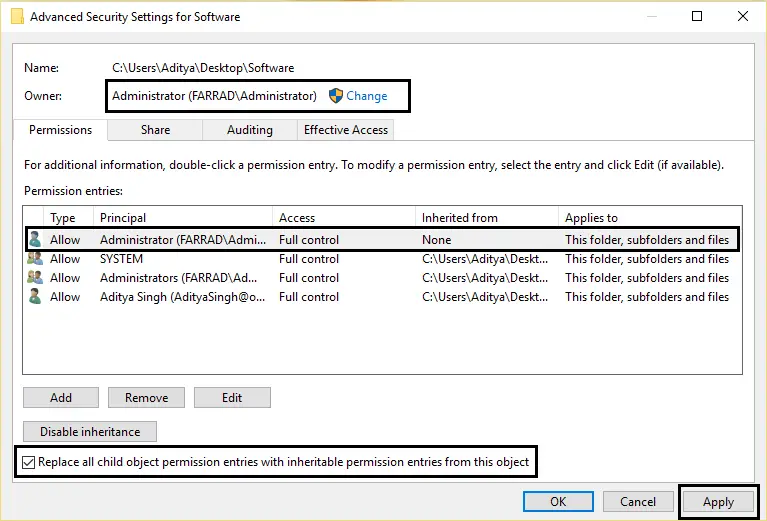
5. The Advanced security settings for Software will be opened. Afterwards, click on the Change option which is beside the owner detail in the window.
6. The Select User or Group window will appear.

7. Select the respective user account with which you want to associate the ownership either by typing your account name under Enter the object name to select and then clicking on Check Names or by clicking on the Advanced Tab and then filling the Name and Description in a more detailed manner and then clicking on Find now.
8. Then type the username of the account in Enter the object name to select which you want to give access to.

9. You can also check the option Replace owner on subcontainers and objects in the Advanced Security Settings window. By doing so, you will also grant ownership access to all the subfolders and the file that particular folder contains. Click on OK to change the ownership.
10. Now, you’ll have to provide full access to the file or folder for your account. To do so, simply, right-click on the file or folder & choose Properties.
11. Then click on the Advanced button under the Security Tab.
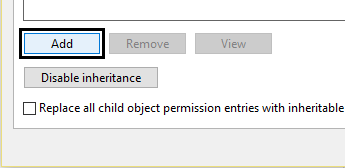
13. After doing that click on Add button. The Permission Entry window will open.
14. Afterwards, click on Select a principal and select your account.
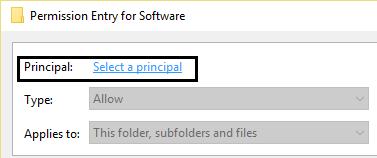
15. Set permissions to Full control and then click on OK.
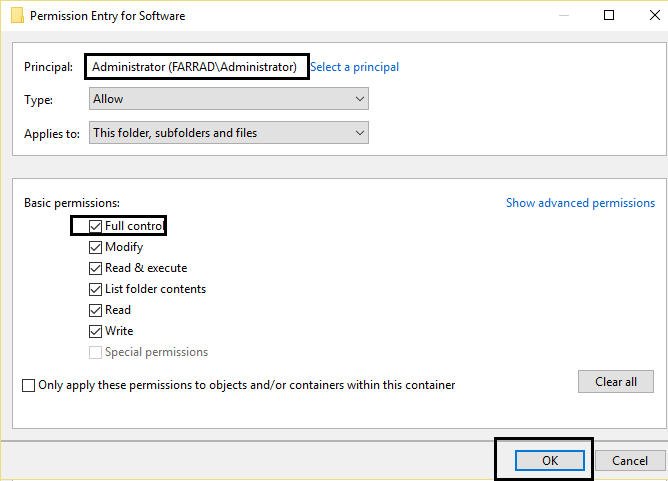
16. Optionally, you can click on Replace all child object permission entries with inheritable permission entries from this object. This will permit all the sub-folders and the files of that particular folder.
Voila! You have entirely and manually changed the ownership of the folder permanently and have successfully resolved the issue of Destination folder Access Denied: You need permission to perform this action in Windows 7.
You may also like:
{Solved} Fix Bootmgr is Missing Error in Windows 10
{Solved} You Don’t Have Permission to Save in This
7 Ways to Fix Steam Download Stopping and Restarting Error
Fix: Your IT Administrator Has Limited Access
Final Words
These were some of the basic and most followed fixes which a user can adapt to solve the tedious and irksome issue. 80 % of the users have reported that their problem was resolved within the ballpark of these fixes as being collected from feedback in various discussion portals. Hope you also find the repairs worthful. Until then stay updated and stay ahead.

Gravit Sinha is the founder of ValidEdge. Ever since he was a kid, he has been a problem fixer and that passion is what inspired him to start and grow this website! 🙂