I’ve always loved the idea of virtual desktops. Have one for the fun things in life, another for work, another for presentations. Until the latest Windows 10 update, though, they’ve been hidden away. Now, I’m determined to use them. But the first thing I wanted to do was put different wallpapers on each virtual desktop. Here’s how to do it.
I’ll get the basics out of the way first. If you want to create a new virtual desktop in Windows 10, you click the icon that looks like a ladder that sits next to the search box on the taskbar. It’s called the Task View.

This will bring up all your active windows, but also offers a “Create desktop” option at the top left. Click this to create your new virtual desktop, and then you can switch between them by hitting Task View.
Name and change virtual desktop wallpapers in Windows 10: Download time
Annoyingly, there’s no built-in way to change the name of each virtual desktop within Windows 10. Nor can you use different wallpapers by default. But there is an answer, and it’s all thanks to a third-party program called Windows 10 Virtual Desktop Enhancer.
You can install this using the excellent AutoHotkey. but developer Sergio Dias also supplies a downloadable EXE file so that it runs on its own. Head to the download page and select the Zip file.
Extract the Zip to a folder of your choosing. You’ll see two files of particular interest: settings.ini (although the .ini may not show in the final name) and virtual-desktop-enhancer.exe. The latter is easily spotted because it has a green square icon with H in the middle.
Double-click the virtual-desktop-enhancer.exe file. Nothing much will happen, but you’ll now find a black icon in the taskbar with 1 in the middle.
Rename virtual desktop names in Windows 10
Now double-click the settings.ini file. It will open in Notepad, offering a whole range of settings to play with. You can see what they all do at the Virtual Desktop Enhancer docs page.
Here, I’m just interested in changing the name of Desktop 1 to Work and Desktop 2 to Play.
 Scroll down the Notepad file until you see [DesktopNames]. By default, they’re all left blank. As you can see from the screenshot, I’ve renamed them to Work and Play.
Close the file, then head down to the black 1 icon in the taskbar. Right-click it and select “Reload settings”. This will then apply the settings you’ve just changed.
Annoyingly, if you press the Task View then Windows 10 will still call them Desktop 1, Desktop 2 etc. I haven’t found a way to change that.
Change virtual desktop wallpapers in Windows 10
Let’s now change the virtual desktop wallpapers in our different wallpapers. Open up the settings file again, then scroll down to the [Wallpapers] section.
 This is easy to understand: point to the picture file you want to act as your backdrop. Note that if you want to use existing wallpapers they’re likely to be in C:WindowsWebWallpaper.
Again, the Task View is a bit annoying. I really want it to show me the different wallpapers so I can identify and jump to different virtual desktops by sight. Instead, it previews each virtual desktop with the current wallpaper. Stupid Windows.
Windows 10 Virtual Desktop Enhancer
There are a couple of other neat things about Virtual Desktop Enhancer. One is that, if you’re using a mouse, then flicking the scroll wheel while on the taskbar takes you to the next virtual desktop. (Note the screen can glitch, which is irritating.)
Another is that it’s hugely customisable. Want to automatically run Excel when you flick to virtual desktop 3? No problem, just add it in the settings.
You’ll probably want to ensure it loads when you launch Windows, though. Rather than duplicate the advice on how to do this, head to this AutoStart section of the Virtual Desktop Enhancer resource page.
More Windows 10 articles you might like
How do I get the latest Windows 10 update?
What can I do if Windows 10 won’t boot after an update?
How do I get photos from my phone or camera onto my Windows 10 PC?
How can you share Windows 10 laptops’ internet co
You are here:
Home » Windows 10 » How To Set Different Wallpaper For Each Virtual Desktop In Windows 10
The virtual desktop feature has been part of Windows 10 for a long time. With virtual desktops, users can create multiple desktop spaces. For instance, you can open and use your office applications in one virtual desktop and use another virtual desktop for casual web browsing and other things.
In Windows 10, one can access virtual desktops by simultaneously pressing the Windows logo and Tab keys or clicking on the Task View button on the taskbar (if you have not removed it from the taskbar).
Until now, Windows 10 did not allow users to set different wallpapers for each virtual desktop. That is, when you apply a new desktop background, the same would appear across all virtual desktops. Although third-party tools have been existed for a long time to change virtual desktop backgrounds, nothing beats an in-built option.
Some time back, Microsoft added the ability to rename virtual desktops. This time around, we have the option to have different desktop backgrounds for all virtual desktops.
Windows 10 offers three ways to change the desktop background of virtual desktops.
IMPORTANT: You must be running Windows 10 build 21337 or later to change the virtual desktop background. If you are running an earlier version, use this free software.
Method 1 of 3
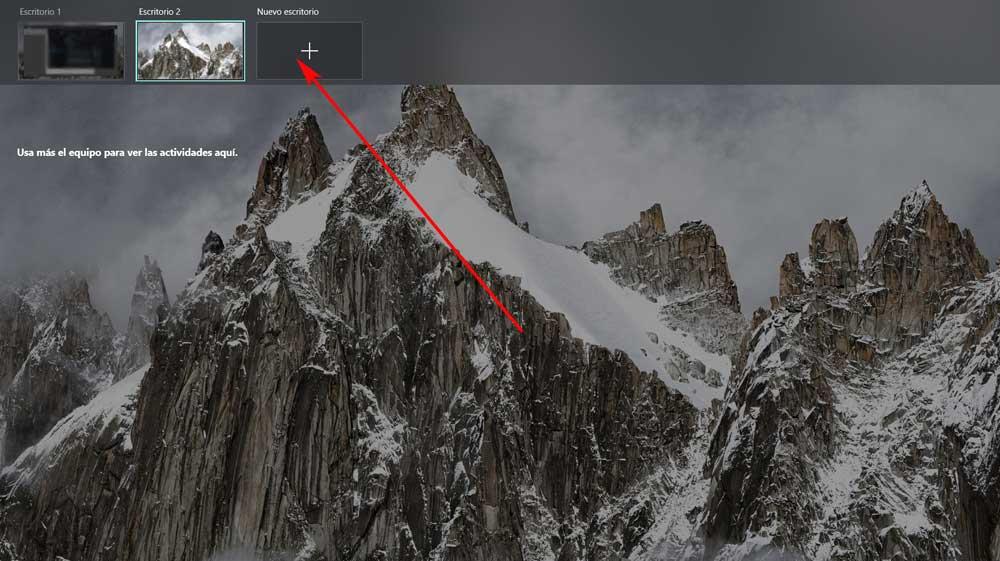
Change virtual desktop background via Windows + Tab screen
Step 1: Simultaneously press the Windows logo and Tab keys on the keyboard to view all virtual desktops. Alternatively, click on the Task View button on the taskbar to open the same screen.
Step 2: Perform a right-click on the virtual desktop where you want to change the desktop background and then click the Choose background option. If the Choose background option does not show up, it is likely because your Windows 10 build does not support the feature yet.
Tip: Right-clicking on a virtual desktop tile also displays options to move it to the left or right and rename it.
Step 3: Clicking the Choose background option will open the Settings > Personalization > Background page. Here, either click on one of the recently used background pictures or click on the Browse button, choose a background and then click the Open button to apply the newly selected desktop background picture.
Method 2 of 3
Change the virtual desktop background picture via Settings in Windows 10
Step 1: When using a virtual desktop, perform a right-click on an empty spot on the desktop and then click the Personalization option.
Step 2: Here, in the Choose your picture section, click on one of the recently used pictures to set it as the desktop background. If you would instead like to have a different picture, click on the Browse button, select an image of your choice, and then click on the Open button. Simple as that!
Method 3 of 3
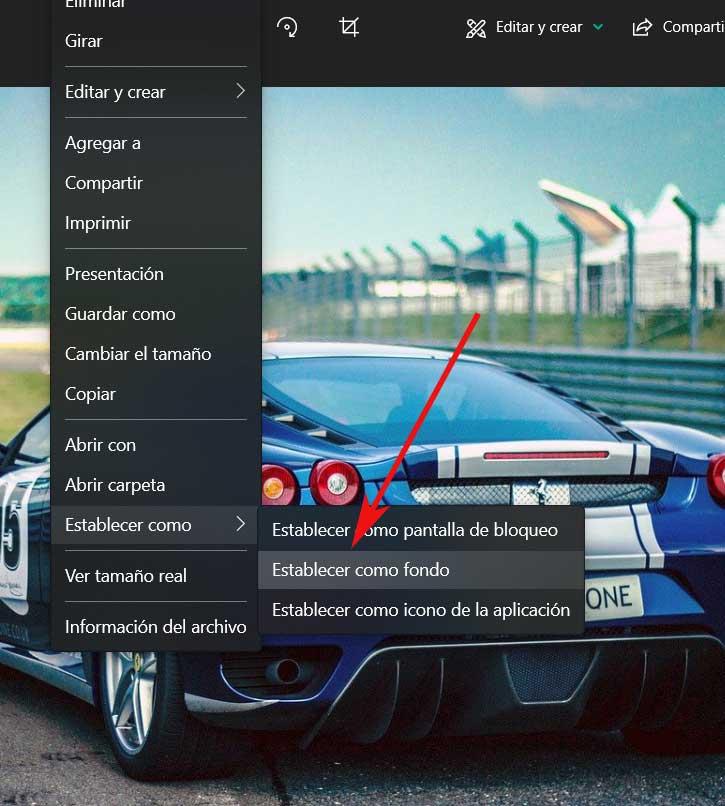
Change the virtual desktop background via File Explorer in Windows 10
Step 1: Launch the File Explorer and navigate to the folder containing the picture you want to set as the current virtual desktop background.
Step 2: Perform a right-click on the picture file and click the Set as desktop background option to set it as the current virtual desktop background picture.
How to change Windows 11 wallpaper guide might also interest you.
How to get different background images for different virtual Desktops in Windows 10?
I know how to change it for two different monitors, but is it also possible for virtual desktops?
asked Aug 8, 2015 at 10:14
![]()
Unfortunately, it isn’t possible yet. You can, however, use a third party app, such as Dexpot, which allows you to set individual backgrounds for each desktop.
answered Aug 11, 2015 at 14:49
![]()
tezkerektezkerek
3892 silver badges4 bronze badges
6
This guy wrote a program to do this, basically, check the background and change accordingly in certain interval. Not elegant, but seems the only working solution for now…
‘Basically, it uses APIs to get the current desktop and checks every small period of time to see if it has changed. If it detects a change, it sets the wallpaper to the appropriate one (configured by the user in the main screen).’
Setting The Virtual Desktop Background (In Windows 10)
![]()
mic84
2,3632 gold badges21 silver badges17 bronze badges
answered Mar 12, 2016 at 2:13
![]()
1
Interesting note: this feature — different wallpapers for different desktops — exists in (Linux) Kubuntu 14.04 but unfortunately not in later versions of Kubuntu. That change has been the subject of ferocious controversy in the Kubuntu community, and relates to the fact that newer editions of Kubuntu are oriented about «activities». People keep proposing workarounds, with lukewarm reception. I haven’t tried any of them, but I get the impression that they all have drawbacks. For myself, I’ve stuck with 14.04 because of this. Alas, 14.04 will lose maintenance in 2019, a year that is fast approaching.
answered Feb 24, 2018 at 0:29
![]()
I know this is an v.old thread but I kept coming across it when looking for answers
Not a proper solution but what I did & think is not a bad option: Windows Stickies
I use Windows 10 OEM Stickies anyway and found you can drag a particular sticky to whichever virtual desktop you want.
So can have a nice bright sticky with a heading or whatever that indicates which screen you are on. I was using a .txt doc but not pretty.
Of course it takes up some display space but I guess you would not see a background anyway if a windows fully open.
Annoyed I did not think of this earlier, I have a sticky’s for work and many for personal and fed up hiding the business one, so 2 birds with one stone.
On full restart do have to re-drag from task view as they all open on 1 virtual DT but no hardship. Sleep, they stay where they are.
answered Oct 30, 2020 at 9:34
![]()
answered Oct 28, 2016 at 8:52
![]()
1
Try VirtualDesktopManager (https://github.com/m0ngr31/VirtualDesktopManager). It is portable and released in zip file format. Simply unpack to whatever folder you desired and launch VirtualDesktopManager.exe.
I downloaded release 1.9.0 and it works well on all 4 virtual desktops I have. There is a minor delay on background repaint when switching between virtual desktops.
answered Nov 18, 2016 at 1:40
![]()
2
I recommend VirtuaWin (free, opensource) and installing the module VirtuaWallpaperPlus to achieve this.
answered Oct 29, 2020 at 7:28
![]()
Try this solution, worked great for me:
https://wizardsoft.nl/products/wsvirtualdesktoptool
From their site:
«This utility lets you switch between multiple virtual desktops and
move windows instantly with keyboard shortcuts. It also allows you to
configure different wallpapers for each virtual desktop. When you
switch to another virtual desktop, its associated wallpaper is
automatically shown. To configure different wallpapers, just do so
through the usual Windows Background settings
(ms-settings:personalization-background).»
![]()
Ξένη Γήινος
2,4885 gold badges24 silver badges57 bronze badges
answered Jan 28, 2021 at 6:11
![]()

To set a different wallpaper on each monitor, open Settings > Personalization > Background, then right-click an image under «Choose Your Picture.» Click «Set for Monitor 1,» «Set for Monitor 2,» or whichever monitor is appropriate.
Setting a unique background on each of your multiple monitors was a simple trick in Windows 8, and, for a while, the menu was buried in Windows 10. Luckily, it has been added back in a more logical location.
The Easy Way: Set a Wallpaper in the Settings App
Since we originally published this article, Microsoft added a better solution to Windows 10. Here it is:
To change desktop backgrounds individually for each monitor, head to Settings > Personalization > Background. Under Choose Your Picture, right-click a background image and select “Set For Monitor 1,” “Set For Monitor 2,” or whichever other monitor you want to use it on.
To add additional images to this list, click “Browse” and select a wallpaper you want to use. Windows will set it as your default on all desktops. Right-click the wallpaper icons and choose which monitor you want to use each on.

When to Use This Trick (and When to Use Third Party Tools)
Update: Since Windows 10 has added an easy, effective way to change your desktop wallpaper, as we outlined above, it isn’t necessary to use either of the following methods to change your desktop wallpaper. You still can use the “Imperfect Method” if you want to, though.
First and foremost, we want to make the best use of your time — both in reading this tutorial and down the road when you’re using our advice to mix up your wallpapers. With that in mind, consider the following two scenarios.
Scenario one: You infrequently change your desktop wallpaper, but you would really like to have a different background on each monitor. In this scenario, the solution in this article (which is quick and uses Windows’ built-in setting) is a perfect one as it’s light on system resources.
Scenario two: if you want to use multiple and different wallpapers on each of your monitors, and you want a high degree of control over that, then the standard wallpaper options in Windows 10 probably won’t cut it. If you’re a wallpaper junkie or really need fine-tooth control over the backgrounds, then we strongly recommend the venerable (and still quite useful) John’s Background Switcher (free) or the Swiss Army Knife of multimonitor management, DisplayFusion (the features relevant to wallpaper management are available in the free version).
If you find yourself in scenario one, though, let’s take a look at how to set a custom wallpaper on each monitor in Windows 10. (And if you’re in a customize-all-the-things mood, be sure to check out how to customize your Windows 10 login and lock screen, too.)
RELATED: How to Change the Login Screen Background on Windows 10
How to Select Unique Wallpapers for Different Monitors in Windows 10
There are two ways two go about selecting multiple monitor wallpapers in Windows 10–neither particularly intuitive. For each method, we’ll use a handful of Game of Thrones wallpapers to demonstrate. For frame of reference, here’s what our current desktop looks like, with the default Windows 10 wallpaper repeated on each of our three monitors.
It’s nice wallpaper, as far as stock wallpaper goes, but a tad boring. Let’s mix it up.
The Easy but Imperfect Method: Change Your Wallpaper With the Windows File Explorer
The first method isn’t intuitive because it relies on you selecting the images in Windows’ File Explorer and knowing how Windows will handle your multiple image selection. Select your images in the File Explorer, using Ctrl or Shift to select multiple images. Right-click on the image you wish to assign to your primary monitor while the images you want to use are still selected.
Note: This is primary as in the monitor Windows thinks of as the primary monitor per the Settings > System > Display menu in the Control Panel, not necessarily the monitor you consider the primary/important one.
In the right-click context menu, select “Set as desktop background”.
Windows will set those images as your desktop wallpapers. Below, you can see that the image we clicked on (the red wallpaper with the House Lannister crest) is on the center monitor. The two other wallpapers, for House Stark and House Baratheon, are more or less randomly placed on the secondary and tertiary monitor.
This is a particularly inelegant solution because you have no control over where the images on the non-primary monitors will be placed. It also has two other irritating shortcomings: if the images are not the exact resolution of your monitor, they won’t work, and they will randomly rotate positions every 30 minutes.
With those shortcomings in mind, know that we’ve shown you this method entirely in the name of thoroughness and education and not because we think you’ll prefer it. Let’s look at a much better method.
The Complicated but Powerful Method: Change Your Wallpaper With the Personalization Menu
Update: The command here no longer brings up the traditional Control Panel interface, but you can now use the Settings > Personalization > Background window to accomplish the same thing.
When Windows 8 came out, one of the first things multi-monitor users noticed is that there were a bunch of new menu options, including a very easy-to-use multi-monitor wallpaper selection tool built right into the Personalizations menu in the Control Panel. Inexplicably, that option vanished in Windows 10.
You won’t find it in Settings > Personalization > Backgrounds where it used to be — there, you can only set a single image as your background regardless of how many monitors you have. Further, you won’t find it where it used to reside in Windows 8, in Control Panel > Appearance and Personalization > Personalization, where there used to be a direct link to it. Strangely, even though no menus directly link to it anymore, the menu itself is just hanging out there waiting for you.
To access it, press Windows+R on your keyboard to call up the Run dialog box and enter the following text:
control /name Microsoft.Personalization /page pageWallpaper
Press Enter and, by the power of command-line tricks, you’ll see the old wallpaper selection menu.
If we click on the “Browse” button, we can browse to the folder with our Game of Thrones wallpapers (or we can use the dropdown menu to navigate to existing wallpaper locations like the Windows Pictures library).
Once you’ve loaded the directory you wish to work with, here’s where you’ll finally get the per-monitor control you’ve been looking for. Deselect the images (Windows automatically checks all of them when you load the directory) and then select a single image. Right-click on it and select the monitor you wish to assign it to (again, visit Settings > System > Display if you don’t know which monitor is which number).
Repeat the process for whatever wallpaper you wish to use for each monitor. The end result? Exactly the wallpaper we want on each monitor:
If you want to further mix things up, you can always select multiple images and then use the “Picture position” drop-down menu to make adjustments to how the image is displayed and the “Change picture every” menu to tweak how often the selection of photos you have are changed up.
It’s not the most sophisticated system in the world (see some of the third-party options we highlighted in the introduction for more advanced features), but it gets the job done.
Despite the menu vanishing from the Control Panel, a little command line-fu returns it, and you can easily customize your wallpapers across multiple monitors to your heart’s content.
READ NEXT
- › How to Customize Windows 10’s Appearance
- › How to Use Different Wallpapers on Multiple Monitors in Windows 7
- › How to Use Multiple Monitors to Be More Productive
- › Here’s Where Windows 10 Stores Its Default Wallpapers
- › It’s Time to Stop Using Desktop Icons
- › How to Screen Record on iPhone
- › How to Change Your Age on TikTok
- › Get PC Power With Tablet Portability in the Surface Pro 9 for $200 Off
Can you have different backgrounds on different desktops Windows 10?
To change desktop backgrounds individually for each monitor, head to Settings > Personalization > Background. Under Choose Your Picture, right-click a background image and select “Set for monitor 1,” “Set for monitor 2,” or whichever other monitor you want to use it on.
How do I set dual monitor wallpaper?
Determine the Resolution
Before setting up your wallpaper, you need to know the resolution of your dual-screens. Right-click an open space on your desktop and select “Screen Resolution.” Write down the resolution of display 1, then click display 2 and write that resolution down.
How to set different wallpapers for multiple monitors in Windows…
- Save the different wallpapers you want to use in the same folder. …
- Hold down the Ctrl key and click the different wallpapers you want to use. …
- Once you’ve selected your wallpapers, right-click on one of the wallpapers and select Set as desktop background. …
- You should now see different wallpapers on each of your monitors.
24 авг. 2015 г.
What is the use of multiple desktops in Windows 10?
Multiple desktops are great for keeping unrelated, ongoing projects organized, or for quickly switching desktops before a meeting. To create multiple desktops: On the taskbar, select Task view > New desktop .
How do I know which wallpaper fits my screen?
How to Find Out What Size Your Computer Wallpaper Is
- Minimize or close any open windows to get to your computer desktop.
- Right-click on the desktop and select “Personalize.”
- Choose “Display Settings,” or for Windows 7, “Adjust Screen Resolution.”
- Check the current resolution for your computer monitor and then close the window.
What is the resolution of two 1920×1080 monitors?
Picture this – you have two monitors side by side, both with a Full HD 1080p Full HD resolution. This means that both have 1,920 horizontal pixels and 1,080 vertical pixels.
How do I put different wallpapers on different screens on Iphone?
Wallpaper
- Open Settings.
- Tap Wallpaper.
- Tap Choose a New Wallpaper.
- Select Dynamic, Stills, or Live.
- Tap the wallpaper you wish to select.
- Swipe, pinch, and zoom to set the picture to your liking.
- Tap Set.
- Choose whether you want it to be your lock screen, home screen, or both.
21 сент. 2020 г.
How do you make a desktop wallpaper?
If you are on Windows, you can right click the file you downloaded and click set as desktop background. On Mac, you can right click a photo in the Photos app, click Share, then click Set Desktop Picture.
How do I have two different wallpapers on dual monitors Windows 7?
It’s time to set your new image as your wallpaper. Right-click an empty area of the desktop and click “Personalize.” Click “Desktop Background” at the bottom of the window. Click “Browse.” Select the folder you saved the image to in step three. Click the specific image if there are more than one in the folder.
Can you have multiple desktops on Windows 10?
The Task View pane in Windows 10 allows you to add an unlimited number of virtual desktops quickly and easily. You can manage the view of your virtual desktop, and move applications to different desktops, show windows on all desktops or close pages on a selected desktop.
Does Windows 10 slow multiple desktops?
There seems to be no limit to the number of desktops you can create. But like browser tabs, having multiple desktops open can slow down your system. Clicking on a desktop on Task View makes that desktop active.
How do I switch between desktops in Windows?
To switch between desktops:
Open the Task View pane and click on the desktop you would like to switch to. You can also quickly switch between desktops with the keyboard shortcuts Windows key + Ctrl + Left Arrow and Windows key + Ctrl + Right Arrow.
Как большинство из вас знает не понаслышке, сотрудники Redmond заботятся о своем продукте, поэтому у нас есть все возможности в том же смысле. Под этим мы подразумеваем, что можем полностью настроить что-то настолько важное в нашем повседневном ПК, как операционная система . Оттуда, основываясь на обновлениях, они не перестают присылать нам улучшения в этом отношении. Все это для того, чтобы мы могли максимально адаптировать работу оборудования к нашим возможностям.

Как мы уже упоминали, это то, что выполняется как функционально, так и для пользовательского интерфейса системы. Таким образом, среди наиболее распространенных элементов настройки, используемых в Windows , мы находим популярные фоны рабочего стола. Фактически, в этих же строках мы собираемся сосредоточиться на том же самом элементе, который мы комментируем, но несколько особым образом. Как вы наверняка знаете, установить новый фон рабочего стола в Windows очень просто.
Достаточно открыть, например, изображение, которое мы собираемся использовать с приложением Windows Photos, и из контекстного меню установить его в качестве фона рабочего стола.
Содержание
- Что такое виртуальные рабочие столы Windows 10
- Как установить обои на каждый рабочий стол
- Как работает программа SylphyHorn
Однако, как мы уже упоминали, в этих строках мы сосредоточимся на несколько специальном разделе в том же смысле. И, как вы наверняка уже знаете, Windows 10 также позволяет нам работать с несколькими рабочими столами одновременно. Это то, что мы называем виртуальными рабочими столами. Таким образом, может оказаться, что нам нужно или мы хотим установить другой обои для каждого виртуального рабочего стола Windows 10.
Но первое, что нам нужно знать в этом отношении, — это то, о чем мы на самом деле говорим здесь. Сказать, что Windows виртуальных рабочих столов — это элементы, позволяющие виртуально моделировать работу с несколькими мониторами. Они виртуальные, но работают независимо, каждое со своими приложениями открытыми, не мешая остальным; все на одном экране.
Конечно, это может быть очень полезно во многих ситуациях. Конечно, если мы откроем много таких виртуальных рабочих столов, потребление ресурсов ПК значительно увеличится. И одно из основных применений всего этого заключается в том, что приложения запускаются независимо на каждом компьютера . Что ж, чтобы иметь возможность управлять этими элементами, которые мы упомянули, например, для создания нового, нам нужно только использовать Win + Tab комбинация клавиш.
Как установить обои на каждый рабочий стол
Что ж, те из вас, кто регулярно использует эту полезную функцию Windows, знают, что при создании новых рабочих столов этого типа фон сохраняется. В тот момент, когда мы меняем фон в любом из созданных нами изображений, это изображение изменяется одновременно во всех из них. Но давайте посмотрим, как мы можем обойти это ограничение и, таким образом, иметь возможность работа с десктопами с разным фоном. Это, например, поможет нам идентифицировать их, когда они у нас есть в миниатюре.
Конечно, чтобы добиться всего того, о чем мы вам рассказываем, нам придется использовать стороннее решение. В частности, под этим мы подразумеваем приложение UWP, которое мы можем бесплатно загрузить из официального магазина системы. Он называется SylphyHorn и будет нам очень полезен для решения различных задач, связанных с этими рабочими столами. И, конечно, в то же время помогает нам в управление фондами что мы комментируем.
Разработчик: Escribcr.net
Что ж, как только мы установим ее на компьютер с Windows, мы сообщим вам, что программа как таковая находится на системной панели инструментов. В частности, он создает новый значок, который помещает в этот раздел и по которому мы можем щелкнуть правой кнопкой мыши. Это позволит нам либо закрыть его, либо получить доступ к функциям настройки, нажав «Настройки».
Как работает программа SylphyHorn
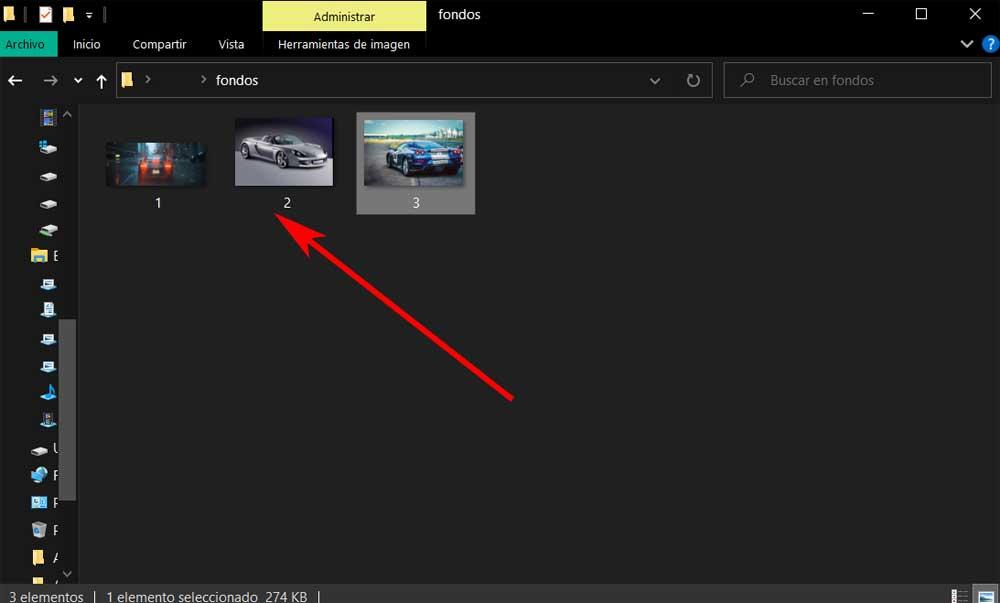
Как только у нас будет загружена и запущена программа SylphyHorn, первое, что мы сделаем, — это получим средства как таковые. Делаем это обычным способом, то есть скачивая соответствующий фотографии и сохраняя их на диске. Мы должны помнить, что каждый из них будет соответствовать и использоваться на каждом виртуальном рабочем столе, который мы создаем. У нас есть возможность использовать столько средств, сколько захотим.
Конечно, мы должны учитывать то, что все они должны иметь, по крайней мере, разрешение экрана, на котором мы работаем. Таким образом, мы уже добились того, что они идеально адаптируются и хорошо смотрятся при перемещении между столами. Мы должны принять во внимание то, что все эти средства, которые мы собираемся потратить на парты должны храниться в том же папку. . В свою очередь, мы должны переименовать их в зависимости от номера рабочего стола, на котором мы хотим использовать это изображение.
Скажем, рабочие столы, которые мы создаем в Windows, имеют имена 1, 2, 3… и так далее. Следовательно, это имена, которые мы должны присвоить фотографиям, которые в дальнейшем будут использоваться в качестве фона.
Затем мы открываем интерфейс программы, щелкнув правой кнопкой мыши на ее значке и выбрав «Настройки». Затем мы переходим на вкладку «Фон», где у нас будет возможность отметить опцию «Изменить фон» для каждого рабочего стола. После них со ссылкой кнопка , мы выбираем папку, в которой мы сохраняем изображения, которые будут использоваться в качестве фона, уже переименованные.
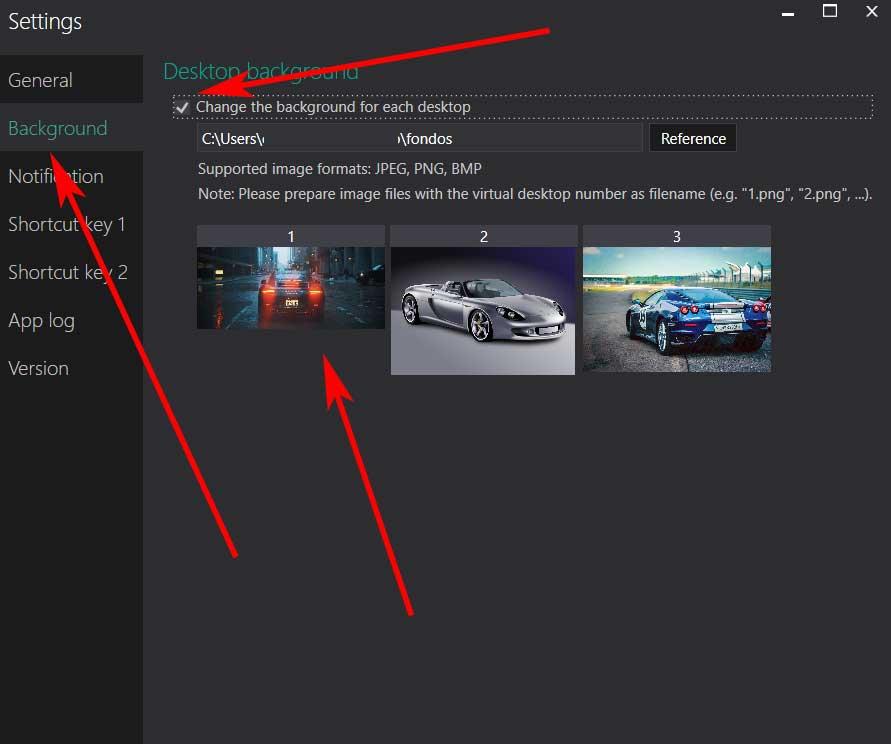
Чтобы закончить, нам нужно только свернуть программу , и по мере загрузки новых виртуальных рабочих столов мы увидим, как эти новые средства устанавливаются в каждом из них индивидуально.

Настройка уникального фона для каждого из нескольких мониторов была простой уловкой в Windows 8, но в Windows 10 меню похоронено до такой степени, что становится невидимым. Но оно все еще существует, если вы знаете, где искать.
Новое: установить обои в приложении «Настройки».
Поскольку мы изначально опубликовали эту статью, Microsoft добавила лучшее решение в Windows 10.
Чтобы изменить фон рабочего стола индивидуально для каждого монитора, перейдите в «Настройки»> «Персонализация»> «Фон». В разделе «Выбор изображения» щелкните правой кнопкой мыши фоновое изображение и выберите «Установить для монитора 1», «Установить для монитора 2» или любого другого монитора, на котором вы хотите его использовать.
Чтобы добавить дополнительные изображения в этот список, нажмите «Обзор» и выберите обои, которые хотите использовать. Windows установит его по умолчанию на всех рабочих столах. Щелкните правой кнопкой мыши значки обоев и выберите, на каком мониторе вы хотите использовать каждый.

Когда использовать этот трюк (и когда использовать сторонние инструменты)
Прежде всего, мы хотим максимально использовать ваше время — как при чтении этого руководства, так и в будущем, когда вы воспользуетесь нашими советами, чтобы смешать обои. Имея это в виду, рассмотрим следующие два сценария.
Сценарий первый: вы нечасто меняете обои рабочего стола, но вам бы очень хотелось, чтобы на каждом мониторе был другой фон. В этом случае решение из этой статьи (быстрое и использующее встроенные настройки Windows) является идеальным, так как оно не требует больших ресурсов системы.
Сценарий второй: если вы хотите использовать несколько разных обоев на каждом из ваших мониторов и хотите иметь высокий уровень контроля над этим, то стандартные параметры обоев в Windows 10, вероятно, не помогут. Если вы фанат обоев или действительно нуждаетесь в тонком контроле над фоном, мы настоятельно рекомендуем почтенный (и все же весьма полезный)
Фоновый переключатель Джона
(бесплатно) или Swiss Army Knife мультимониторного управления,
DisplayFusion
(функции, относящиеся к управлению обоями, доступны в
бесплатная версия
).
Однако, если вы попали в первый сценарий, давайте посмотрим, как установить пользовательские обои на каждый монитор в Windows 10. (И если вы настроены настраивать все, не забудьте проверить как настроить свой
Вход в Windows 10
а также
экран блокировки
, тоже.)
СВЯЗАННЫЕ С:
Как изменить фон экрана входа в систему в Windows 10
Как выбрать уникальные обои для разных мониторов в Windows 10
Есть два способа выбрать обои для нескольких мониторов в Windows 10 — ни один из них не является интуитивно понятным. Для каждого метода мы будем использовать несколько
Игра престолов
обои для демонстрации. Для справки, вот как выглядит наш текущий рабочий стол с обоями Windows 10 по умолчанию, повторяющимися на каждом из трех мониторов.

Что касается стандартных обоев, это хорошие обои, но немного скучные. Давайте перемешаем.
Простой, но несовершенный метод: измените обои с помощью проводника Windows
Первый метод не является интуитивно понятным, поскольку он основан на выборе изображений в проводнике Windows.
а также
зная, как Windows будет обрабатывать ваш выбор нескольких изображений. Выберите изображения в проводнике, используя Ctrl или Shift, чтобы выбрать несколько изображений. Щелкните правой кнопкой мыши изображение, которое вы хотите назначить для основного монитора, пока изображения, которые вы хотите использовать, все еще выбраны. (Обратите внимание, что это основной монитор, который Windows считает основным монитором в меню «Параметры»> «Система»> «Экран» на панели управления, а не обязательно монитор, который вы считаете основным / важным.) В контекстном меню, вызываемом правой кнопкой мыши. , выберите «Сделать фоном рабочего стола».

Windows установит эти изображения в качестве обоев рабочего стола. Ниже вы можете видеть, что изображение, на которое мы нажали (красные обои с гербом Дома Ланнистеров), находится на центральном мониторе. Два других обоя, для Дома Старков и Дома Баратеонов, более или менее случайным образом размещаются на вторичном и третичном мониторах.

Это особенно неэлегантное решение, потому что вы не можете контролировать, где будут размещаться изображения на неосновных мониторах. У него также есть два других раздражающих недостатка: если изображения не соответствуют разрешению вашего монитора, они не будут работать и будут произвольно менять положение каждые 30 минут.
Помня об этих недостатках, знайте, что мы показали вам этот метод исключительно во имя тщательности и обучения, а не потому, что мы думаем, что вы его предпочтете. Давайте посмотрим на гораздо лучший метод.
Сложный, но эффективный метод: измените обои с помощью меню персонализации
Обновить
: Эта команда больше не вызывает традиционный интерфейс панели управления, но теперь вы можете использовать окно «Настройки»> «Персонализация»> «Фон», чтобы сделать то же самое.
Когда вышла Windows 8, первое, что заметили пользователи с несколькими мониторами, — это появление множества новых опций меню, включая очень простой в использовании инструмент выбора обоев для нескольких мониторов, встроенный прямо в меню «Персонализация» на панели управления. Необъяснимым образом, эта опция исчезла в Windows 10.
Вы не найдете его в разделе «Настройки»> «Персонализация»> «Фоны», где он был раньше — там вы можете установить только одно изображение в качестве фона независимо от того, сколько у вас мониторов. Кроме того, вы не найдете его там, где он раньше располагался в Windows 8, в Панели управления> Внешний вид и персонализация> Персонализация, где раньше была прямая ссылка на него. Как ни странно, хотя ни одно меню больше не ссылается на него напрямую, само меню просто висит там, ожидая вас.
Чтобы получить к нему доступ, нажмите Windows + R на клавиатуре, чтобы вызвать диалоговое окно Выполнить, и введите следующий текст:
control / имя Microsoft.Personalization / page pageWallpaper
Нажмите Enter, и с помощью уловок командной строки вы увидите старое меню выбора обоев.

Если мы нажмем кнопку «Обзор», мы сможем перейти к папке с нашим
Игра престолов
обои (или мы можем использовать раскрывающееся меню для перехода к существующим расположениям обоев, например к библиотеке изображений Windows).

После того, как вы загрузите каталог, с которым хотите работать, здесь вы, наконец, получите тот контроль для каждого монитора, который вы так долго искали. Снимите выделение с изображений (Windows автоматически проверяет их все при загрузке каталога), а затем выберите одно изображение. Щелкните его правой кнопкой мыши и выберите монитор, которому вы хотите его назначить (снова откройте «Настройки»> «Система»> «Экран», если вы не знаете, какой монитор имеет какой номер).

Повторите процесс для любых обоев, которые вы хотите использовать для каждого монитора. Конечный результат? Именно те обои, которые нам нужны на каждом мониторе:

Если вы хотите еще больше перемешать вещи, вы всегда можете выбрать несколько изображений, а затем использовать раскрывающееся меню «Положение изображения», чтобы настроить способ отображения изображения, и меню «Смена изображения каждые», чтобы настроить частоту выбора. имеющихся у вас фото изменены.

Это не самая сложная система в мире (см. Некоторые из сторонних вариантов, которые мы выделили во введении, чтобы узнать о более продвинутых функциях), но она выполняет свою работу.
Несмотря на то, что меню исчезает с панели управления, небольшая командная строка возвращает его, и вы можете легко настроить свои обои на нескольких мониторах по своему усмотрению.
How To Set A Different Wallpaper On Each Monitor In Windows 10
Dual Monitor Different Wallpaper Windows 10
Set Different Wallpaper On Multiple Monitors In Windows 10
Weekly Tip #6: How To Set A Different Wallpaper On Each Monitor In Windows 10
Set Two Different Wallpapers In Windows 10
How To Set Different Backgrounds On Multiple Monitors In Windows 10
How To Set Individual Multiple Monitor Wallpapers In Windows 10
How To Set Different Wallpapers For Different Monitors In Windows 10!
How To Put A Different Wallpaper On Multi Monitors Windows 10
Windows 10 — Set Different Backgrounds On Multiple Monitors
How: To Set Different Wallpapers On Multi-monitor Setup In Windows 10?
Set Different Wallpapers On Multiple Monitors In Windows 10 (Simple How To)
Setup Dual Monitors Different Wallpaper In Windows 10 (It’s Simple)
How To Set Different Wallpapers For Virtual Desktops In Windows 10 (64 Bit)
Easily Get Different Backgrounds On Windows 10 Dual Monitor Setup | Guiding Tech
Multi Screen Wallpaper Windows 7, 8, 10
Setup Different Wallpapers On Multiple Displays In Windows 10 (2019!)!
[100% Works] How To Set Different Wallpapers For Different Monitors On Windwos 10 \\ 2017
- You can set different wallpapers when using dual monitors on Windows 10 so that each display has its own distinct background.
- To set these different wallpapers, you’ll need to go to Windows 10’s «Personalize» menu, which you can open with just a click.
- Visit Business Insider’s homepage for more stories.
If you have dual monitors set up, then having the same image on both screens may be a wasted opportunity. Why not display two images that you love, instead of just one?
In Windows 10, you can set a different wallpaper on each monitor with a few easy clicks — however, exactly what you need to click isn’t immediately obvious.
Here’s what you need to know about setting different wallpapers on your dual monitors, using Windows 10.
Check out the products mentioned in this article:
Windows 10 (From $139.99 at Best Buy)
Microsoft Surface Pro 7 (From $999 at Best Buy)
How to set different wallpapers on dual monitors in Windows 10
1. Right-click your desktop background and select «Personalize» from the menu.
Ross James/Business Insider
2. In the new menu, browse for the images you want. Find both of the images you want so they’re pre-loaded in the «Choose your picture» bar.
3. Right-click the images you want from this bar. This will allow you to assign each image to its own monitor. They will all be «fit» in the same way (you can select this using the «Choose a fit» drop-down menu), so it’s a good idea to choose images that are similar dimensions.
Ross James/Business Insider
Do this for both pictures, and they will appear on your monitors.
Ross James/Business Insider
While you have multiple displays set up, you’ll also be offered a new fit option — «Span.» Span will allow long images, like panoramic shots, to be stretched across the multiple displays.
To do this:
1. Set the long image as the background on your first monitor.
2. Under «Choose a fit,» select «Span.»
3. The image will fill both monitors.

Related coverage from How To Do Everything: Tech:
-
How to manually check for updates on a Windows 10 computer and install them
-
How to change your screen resolution in Windows 10 to customize your display
-
How to move the taskbar in Windows 10 to any side of your screen
-
How to turn off the mouse acceleration feature on a Windows 10 computer, to get more accuracy with your mouse
-
How to turn off sleep mode on your Windows 10 device, or adjust the time it takes for it to turn on
Ross James is a freelance writer for Business Insider.
Read more
Read less
Insider Inc. receives a commission when you buy through our links.