Preface
We have gone through the VPN deployments using SSTP, PPTP, and so on in our other articles. Today we are going to deploy the DirectAccess server in Windows Server 2019. The same step can be followed on Windows Server 2016 or Windows Server 2022.
This is a single server deployment where the default settings are used to deploy the server. It is recommended to enable a firewall at the server and client-side to make the remote access more secure. We don’t need a certificate authority in an Active Directory domain, but if it is there we can make use of it. In this deployment, a public hostname pointing to the DirectAccess server with a third-party certificate will be used. The client computers accessing DirectAccess must be Windows 8 Client operating system or later. The network location server in this scenario is the same server with that we are deploying the DirectAccess role. Also, the Network Access Protection server is not used and multi-factor authentication is not supported. As all services related to DirectAccess point to the same server, the installation of the DirectAccess role service will be simple and easy.
The server deployment is started with creating a security group to assign client computers that are a member of this computers group. After that, we are installing a remote access role and configuring DirectAccess alone Remote Access client, Remote Server, and Infrastructure is the components we are going to configure in it. Also, the DirectAccess client configuration is mostly dependent on Group Policy objects and the windows client computers need to be connected to the domain network before connecting from the remote network as the client computers need to be updated with group policy object settings. The client PC with group policy updated required for DirectAccess connected to domain network from any public network over the internet where the connection to the DirectAccess server is allowed to access.
What are we waiting for, lets’s start dipping in the water to get a rinse of how to deploy DirectAccess and configure of single server scenario. The demonstration will cover DirectAccess role installation and configuration and connecting from an external network using a windows 10 client computer. Let’s get started.
Create Direct Access Client Security Group
Before we start adding the Remote Access role on the DirectAccess server we are going to create a group to allow access to specific computers as a member and get the DirectAccess connectivity privileges.
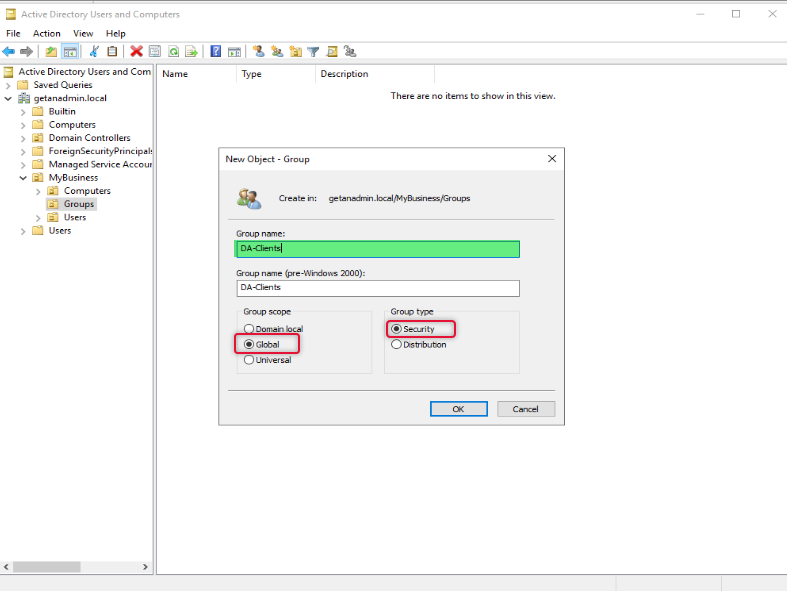
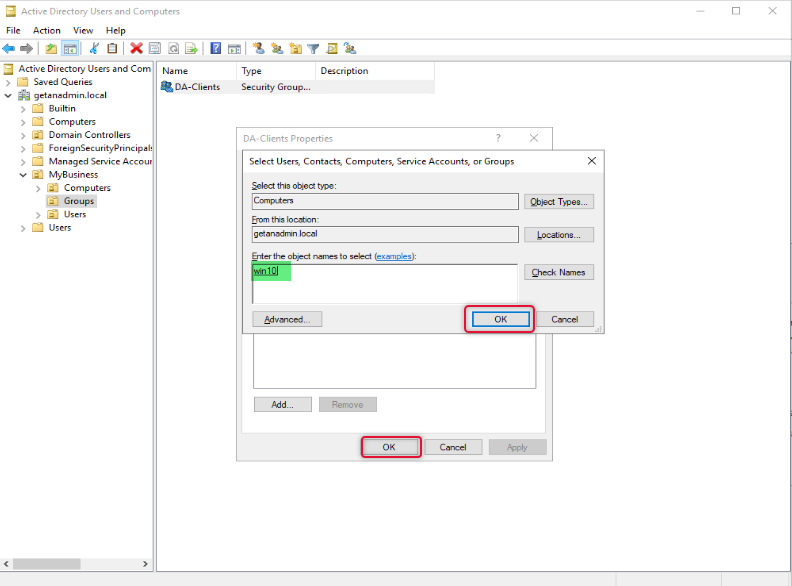
To add a security group, we are login into Domain Controller and launching “Active Directory Users and Computers” and this group is under the appropriate OU under the Domain hierarchy. In this case to identify the nature of the group we call the OU name “DA-Clients”.
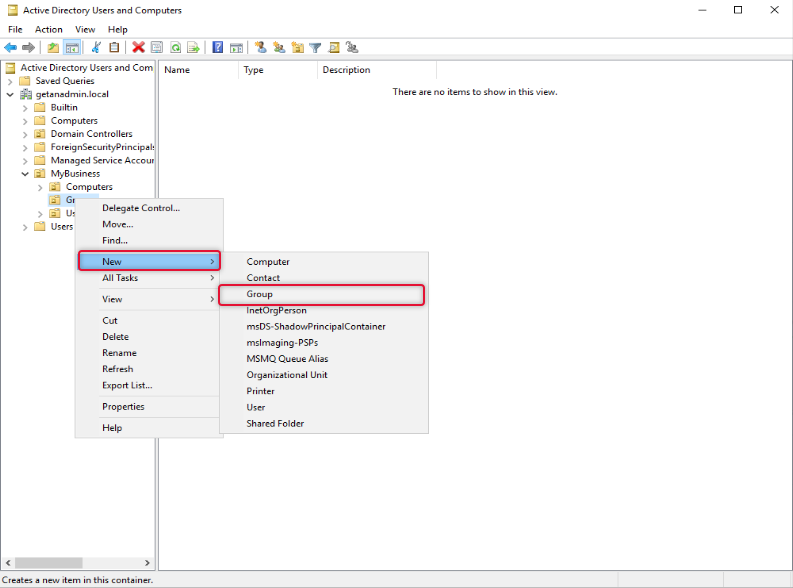
Type a name for the group and select scope as Global and type as Security and click OK.
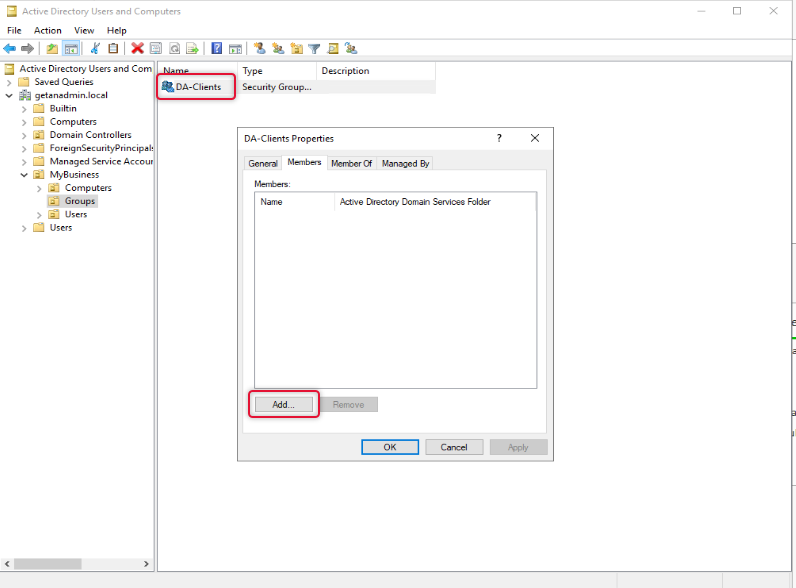
Once a group has been created double click the group object to go to its property and select the member’s tab and add the computers that you want to allow access to connect to DirectAccess.
On the Select object type select Computers as we are going to add computer objects as members.
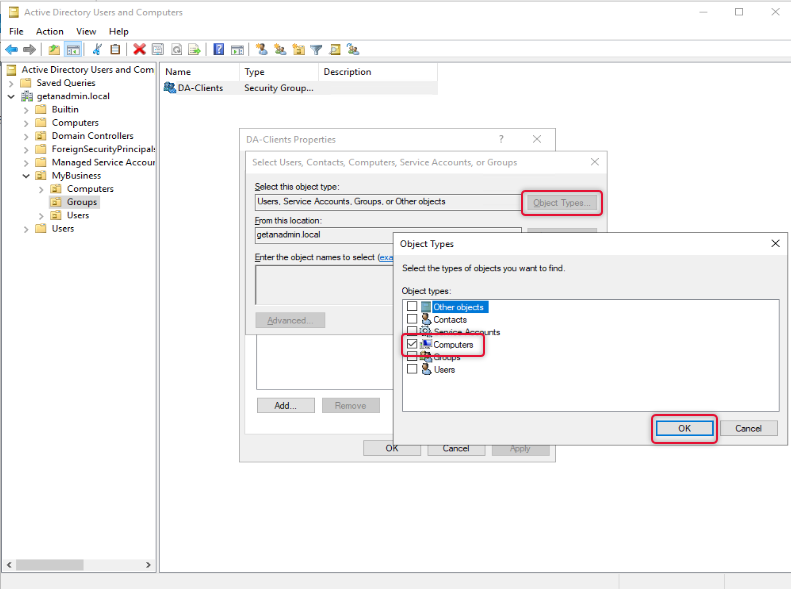
On the Enter object names to select box type names of the computers, you want to give access to and click OK twice to close the properties window.
We have completed creating a group and are ready to go to the next step which is to add the Remote Access role.
Add Remote Access Role Service
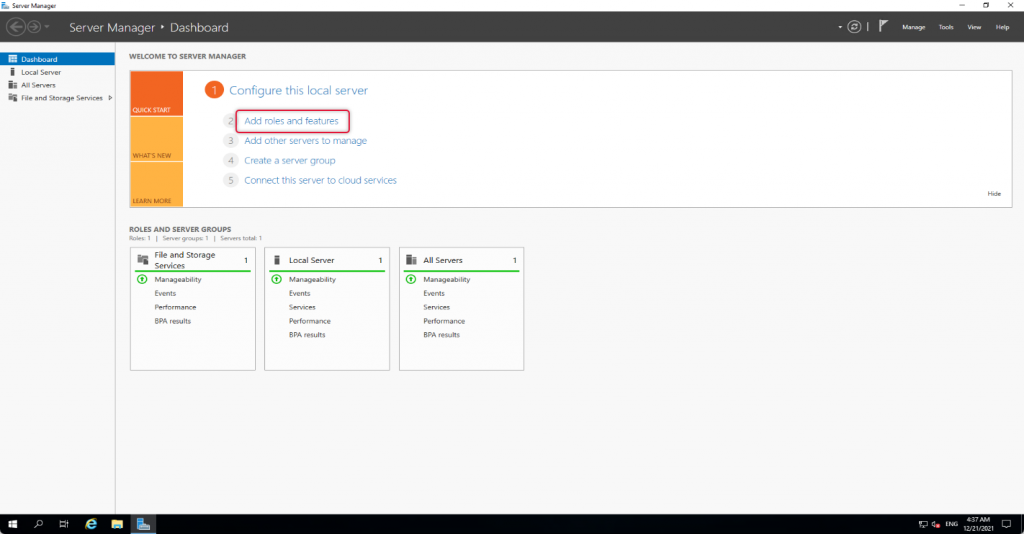
To add Remote Access role launch, Select Server Manager “Add roles and features”
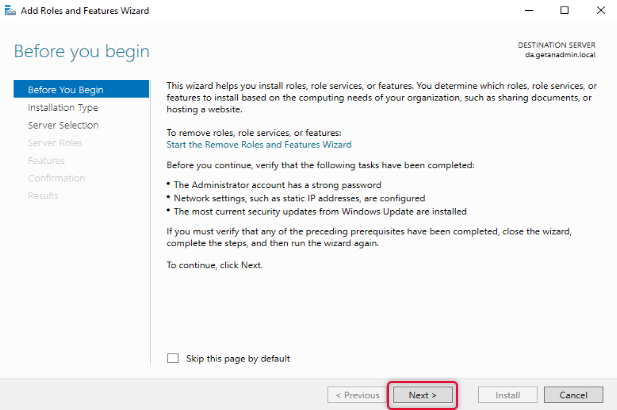
The wizard instructions give you a gist of how the Add roles and features wizard helps you install the roles or features to your local or remote computer. You may go through the instruction if you are new to adding roles and features to Windows Server. If you don’t want to see “before you begin page” anymore, click skip this page and click next to move on to the next page of the wizard.
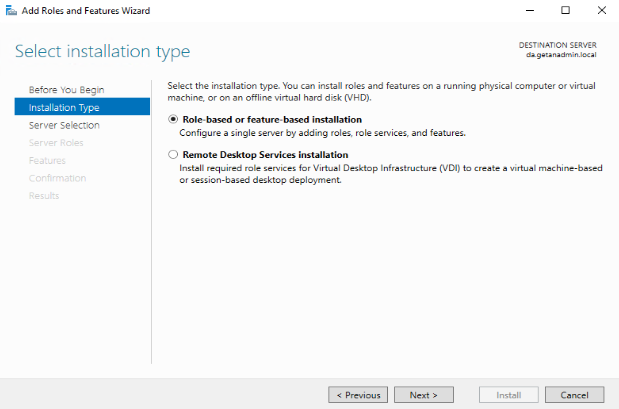
The Remote Access role comes under role-based or feature-based installation. So, click Role-Based or Feature-Based installation and click Next.
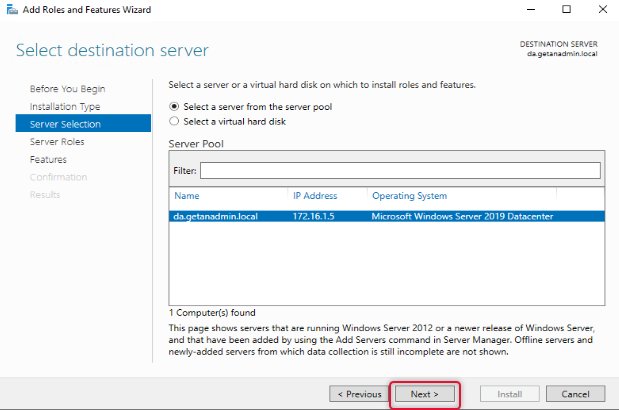
On the server selection, the local server is listed, and our intention is also to install the Remote Access role on the local server. Click Next to continue.
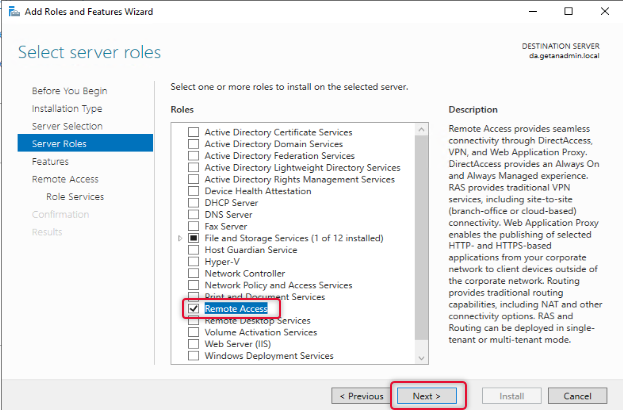
From the server roles list, select Remote Access and click Next.
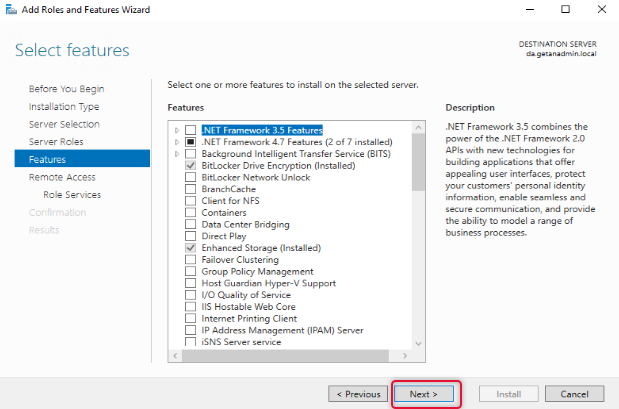
The next screen is to select features related to the role, leave the default selection, and click Next.
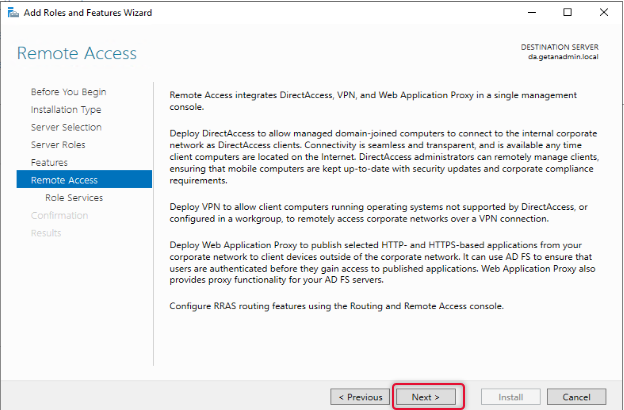
On the Remote Access page, the instruction for the Remote Access role would be given, go through the Remote Access instruction, and click Next to continue.
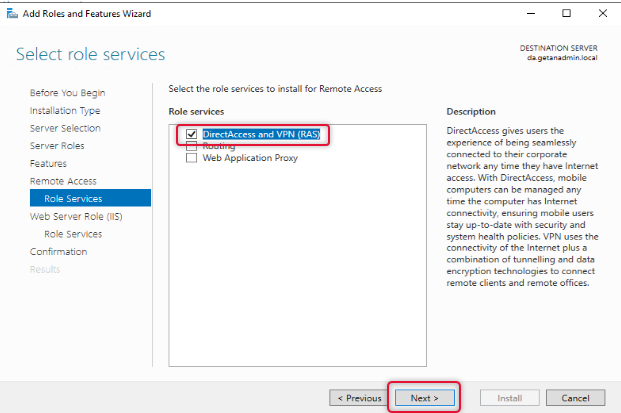
From the Remote Access role services list, select DirectAccess and VPN, and when you click on the role service, you will be prompted to choose the features to install, leave the default selection and click Add Features to return to the role services selection window.
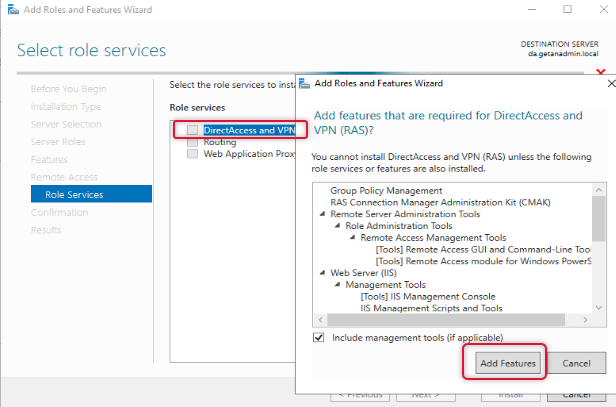
When the role service features are selected click Next to continue.
On the web service, role services go through the instruction and click Next.
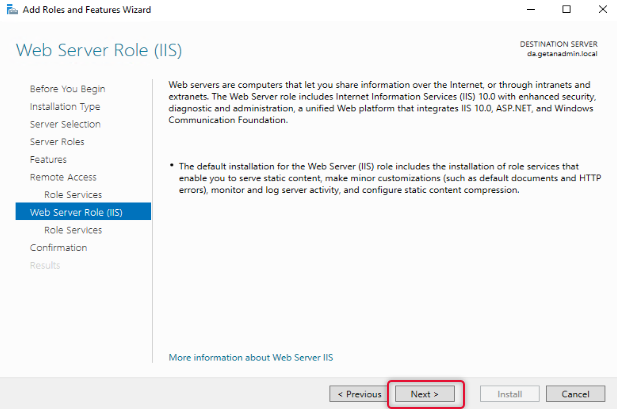
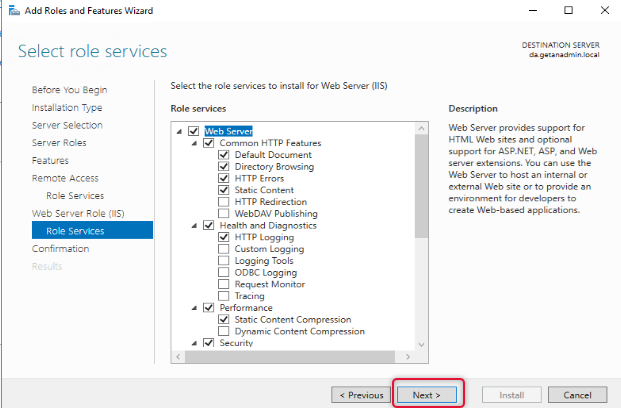
Under Web Server Role, leave the default role services and click Next.
Click Install on the confirmation page to start the installation.
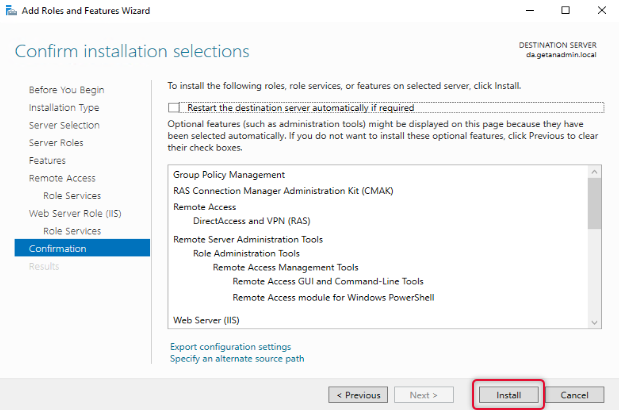
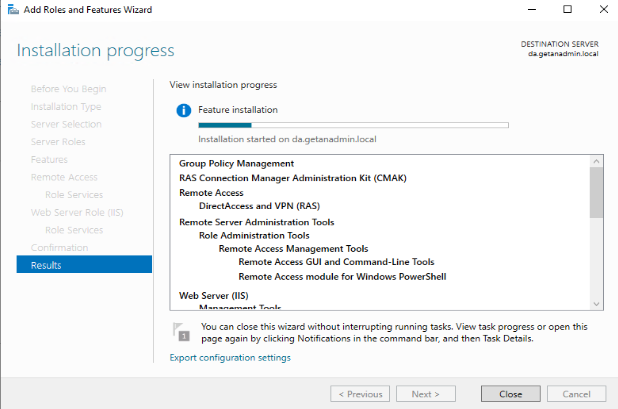
The view installation progress, let you know the installation progress of the installation, wait for the Remote Access role installation to complete.
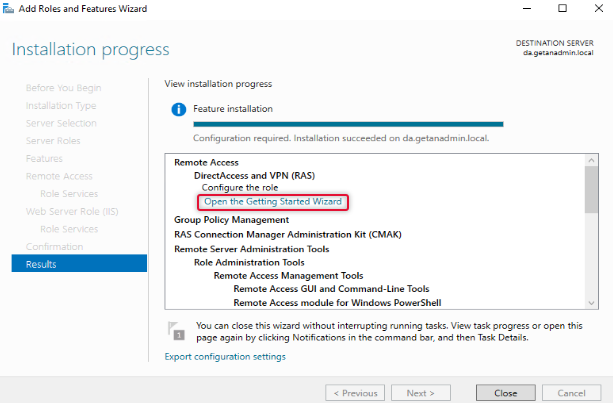
The Remote Access role has been added. Now, click on Open the getting started wizard to start the wizard.
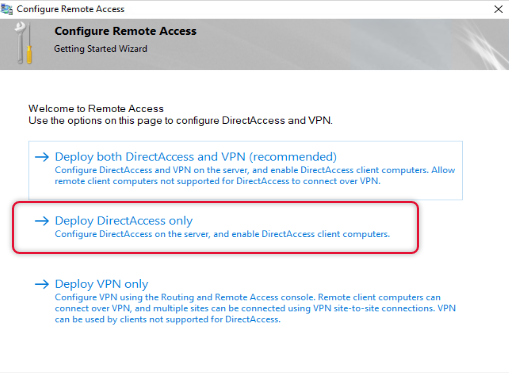
Configure and Deploy DirectAccess Service
We are going to configure DirectAccess, so click on Deploy DirectAccess only.
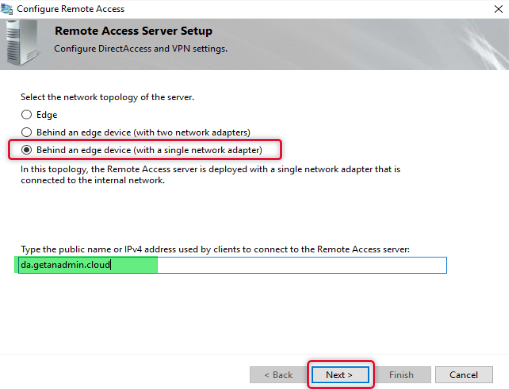
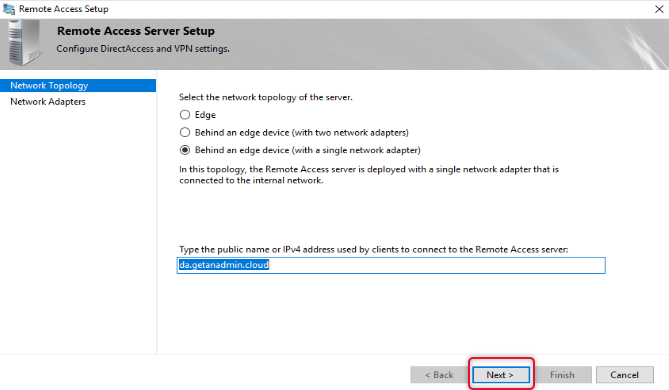
Every DirectAccess setup may not have the same network topology of the server, select the appropriate topology as per your network, if your remote access server is behind a firewall, choose behind an edge device. Type the public hostname of the DirectAccess server. You can create a host record on your domain registrar DNS and install a third-party certificate from a CA. I have created a hostname in the name of da.getanadmin.cloud and installed the CA certificate already.
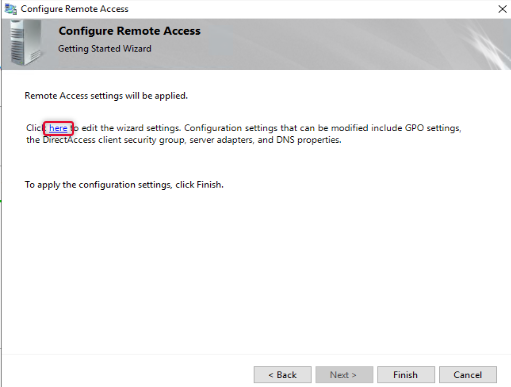
On clicking Next, you will be prompted to apply settings, before we apply settings, we need to configure a few more settings, to open the settings wizard, click the link on the as in the wizard.
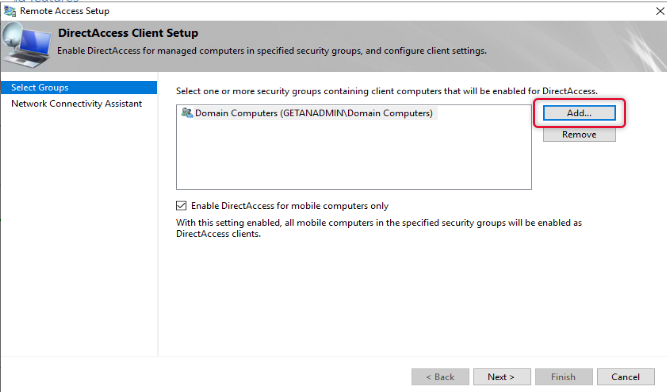
First, we are going to configure Remote clients with a few settings.
The default group added to the remote clients is domain computers, to allow only certain computers to access the domain network we need to remove domain computers and add the group with computers that we need. Click Add to add a group to the list. You may remember we have created a security group previously for this purpose add that group and remove the Domain Computers group.
Once the security group with allowed computer members in it is added, remove the domain computers. Also, uncheck “Enable DirectAccess for mobile Computers Only”.
Now the group has been tidied up and click Next to continue.
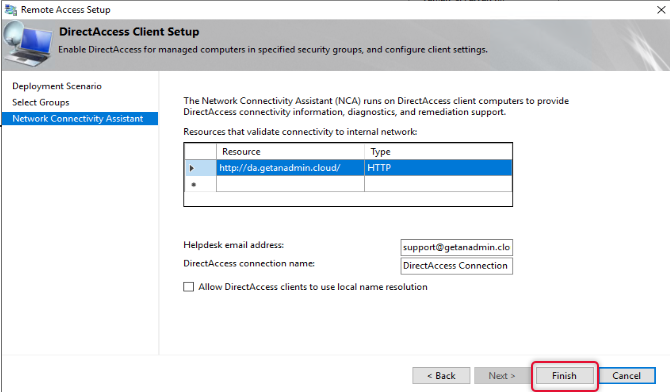
Type email address to get email related to the issue and logs from Remote client computers to contact the administrator and type a connection name and click finish.
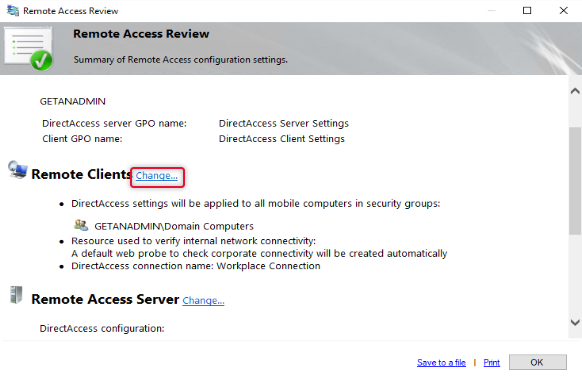
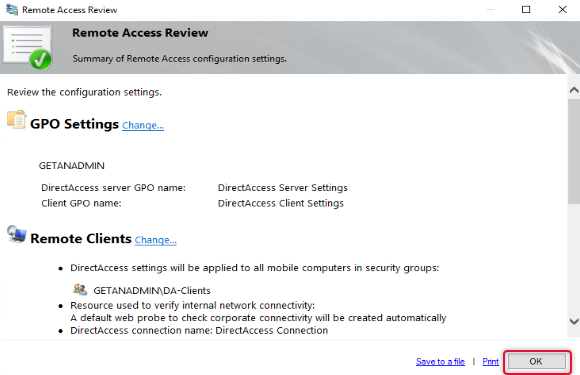
On the Remote Access review page click Change besides Remote Access Server.
On the Remote Access Server settings, we have already configured the details click next on the network topology to get to the next page.
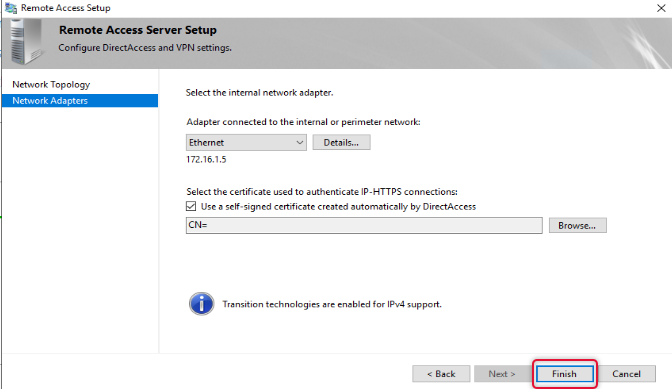
On the Network Adapters page leave the default settings and click Finish.
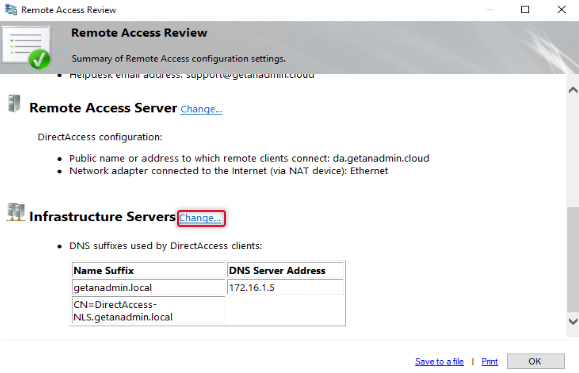
The Final setting, we are doing on the remote access review is to change the remote access infrastructure server. Click Change next to Infrastructure Servers
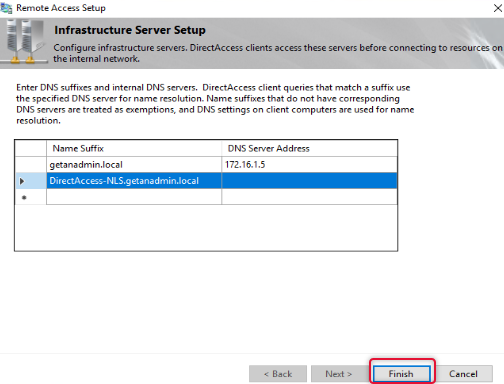
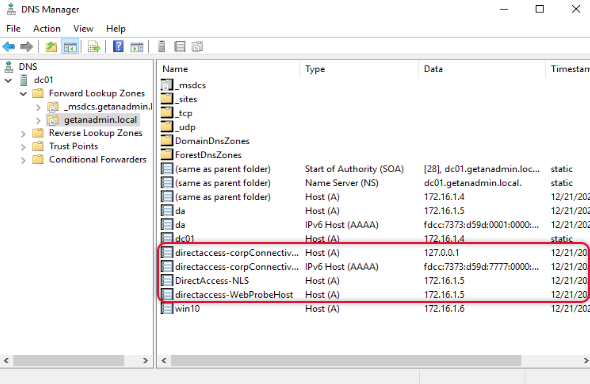
Here makes sure DNS IP address is specified for domain suffix and make sure there is a DNS host record available on the local DNS for the name DirectAccess-NLS. Click Finish to exit out of the infrastructure server configuration.
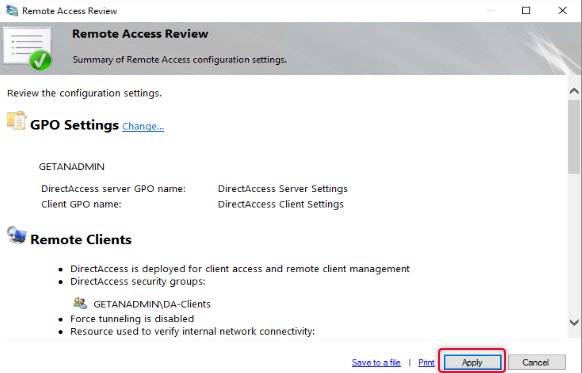
Click OK on the Remote Access review page to apply changes.
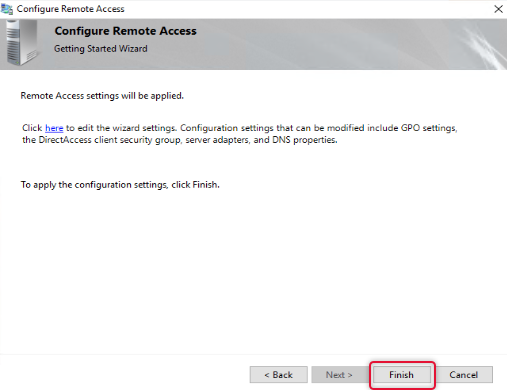
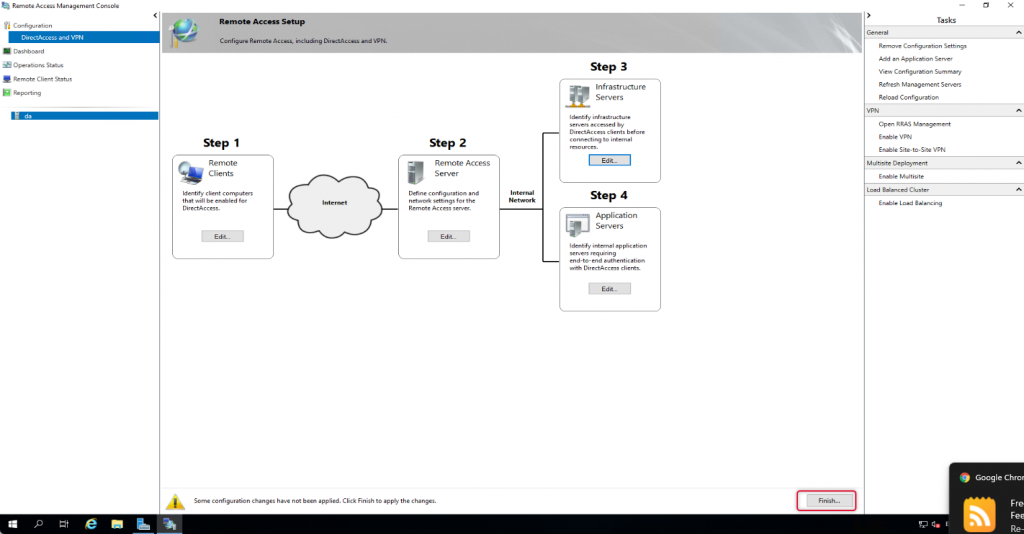
Click Finish to apply changes to return to the Remote Access Management console.
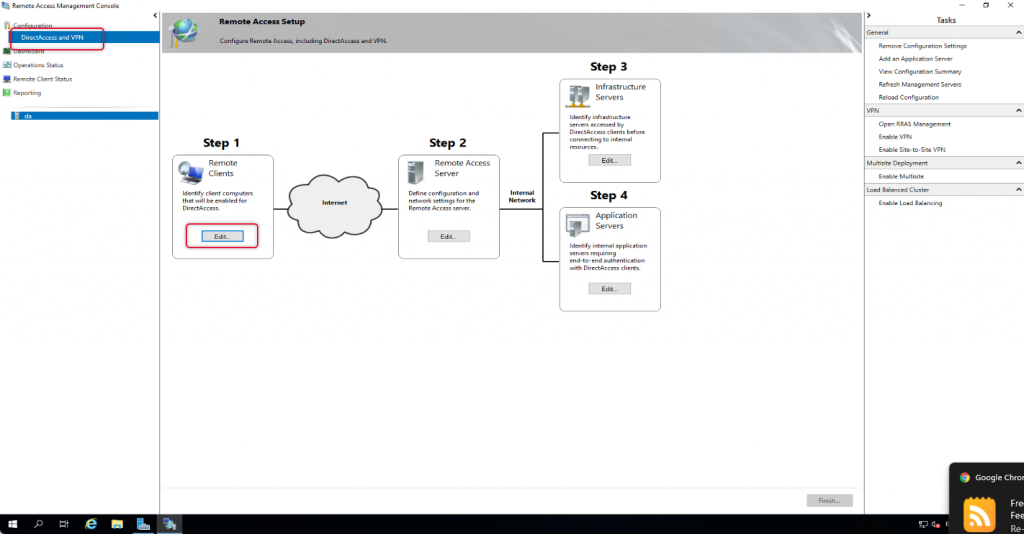
On the Remote Access management console, under configuration and Remote Client, click Edit to Edit the settings.
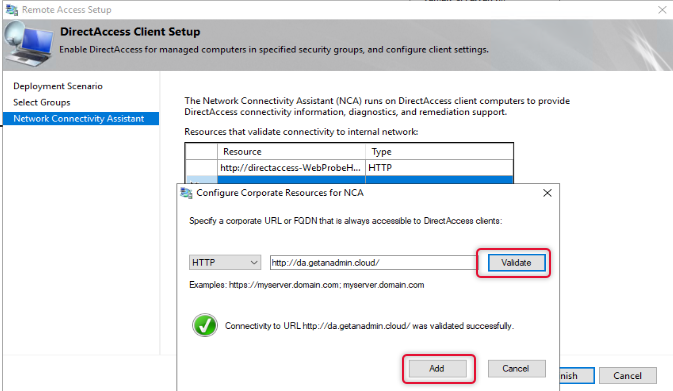
By Default, Network Connectivity Assistant settings will get Direct-AccessWebProbehost hostname on the resources list, we need to remove it and add the hostname we have added on the public DNS. Choose the protocol as HTTP on the dropdown list. And add the URL with the public hostname pointing to the DirectAccess server. Click Validate to validate the URL and click add.
Click Finish to exit out of Remote client settings.
Click Finish at the bottom of the Remote access setup to apply changes.
Click Apply to apply the configuration changes.
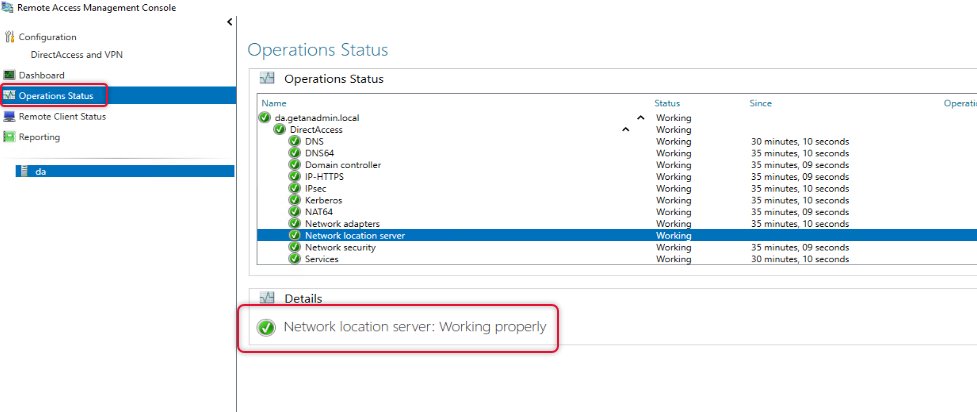
Once configuration changes are applied go to operation status and check all operations are working.
Go to Domain controller and open DNS Manager management console and check the highlighted hostnames are created.
Connect Windows 10 client from an external network
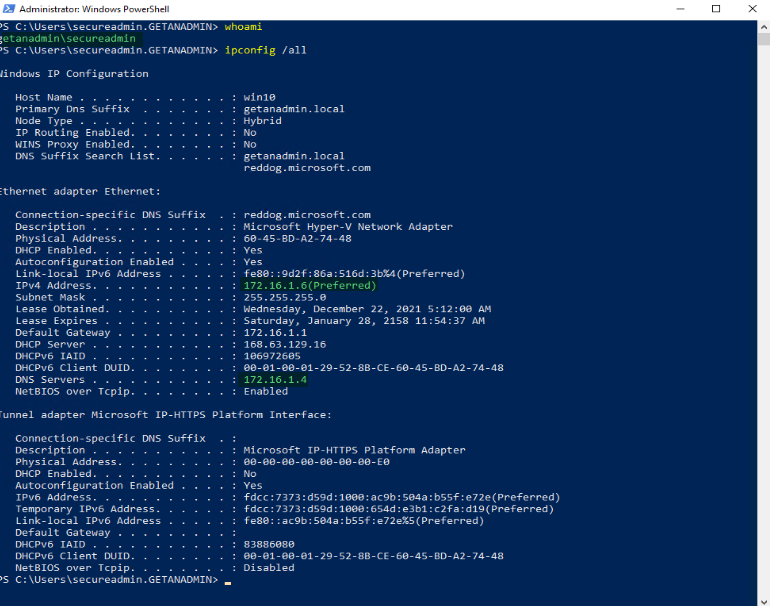
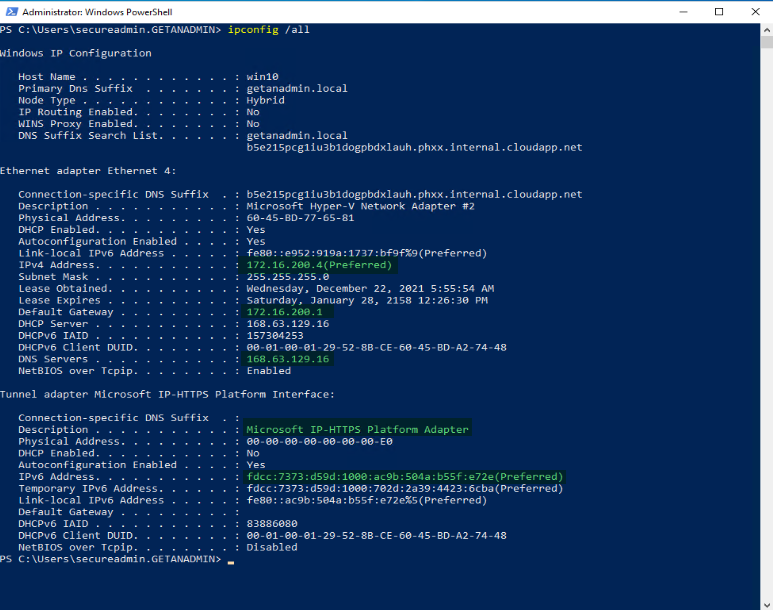
We have completed the server-side setup and now the time to access a windows client PC from an outside network using DirectAccess connected. Before we do log in to the client computer and check the server is in the domain network and the IP address of it by running ipconfig /all. We can run gpupdate /force to get the PC to get the DirectAccess group policy settings, but I recommend restarting the Windows client PC.
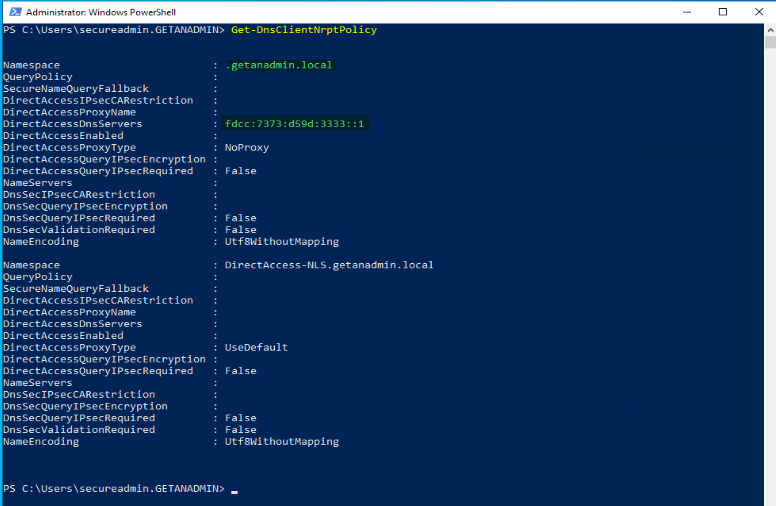
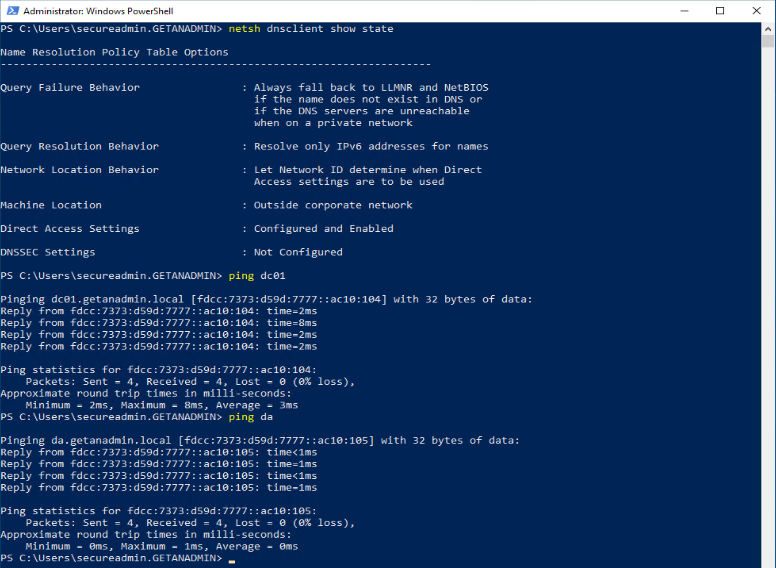
We can utilize some PowerShell commands to check if the settings are updated on the client’s computer. You can use these commands to troubleshoot DirectAccess in case remote clients are not connecting or unable to access resources from outside the network.
Get-DNSClientNRPTPolicy is the command to check the DirectAccess DNS IP address is assigned for the domain namespace.
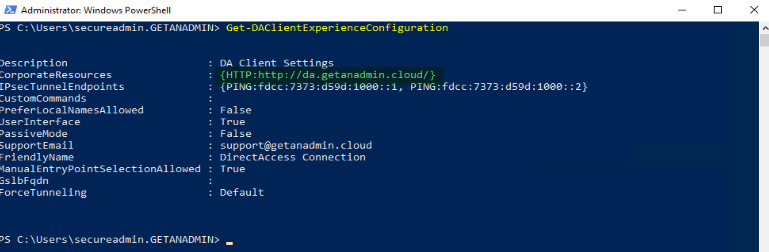
Get-DAClientExperienceConfiguration PowerShell command to check the URL that we mentioned in the remote client resource setup is displaying correctly.
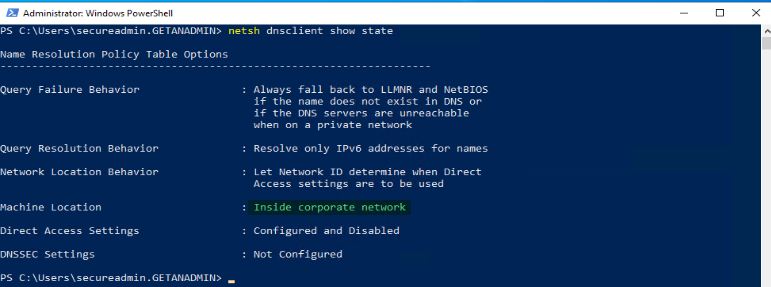
netsh dnsclient show state
Command will show whether the windows client PC is inside or outside the network. In this case, we have not disconnected from the domain network, so it’s showing that the client PC is inside the network as Machine Location.
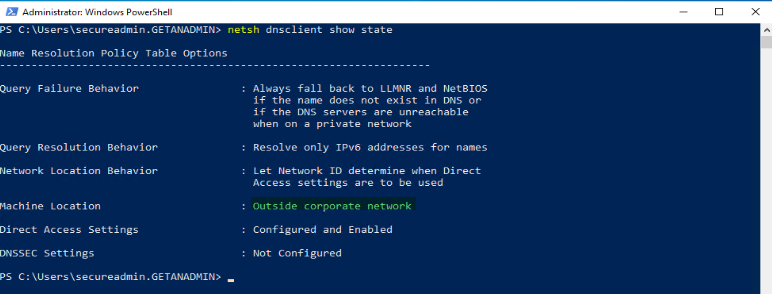
Now, we have disconnected the Windows Client PC from the domain network and connected it to a private network away from the domain network. You can see the different network and DNS IP addresses. Also, you can see the tunnel network adapter IP address for the Microsoft IP-HTTPS platform. The adapter will get only IPv6.
As you can see that the Machine Location is not Outside Corporate Network.
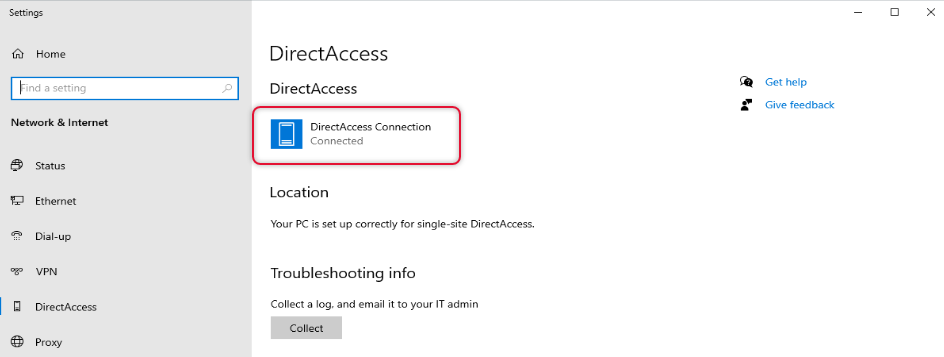
Click on the network link on the taskbar and find the Direct Access connection connected.
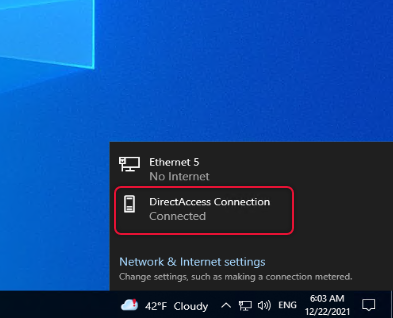
If you look under network & Internet settings you can see DirectAccess connection status.
Test domain network resources access
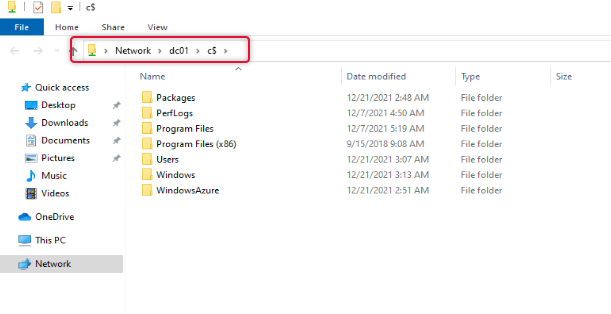
We can try to ping some servers inside the corporate network, and you can see it pining. I try to ping the domain controller and DirectAccess server and I can see a successful ping reply.
I also tried to access the file share on the DC01 and was able to get to the share as well.
Conclusion
In this article, we have discussed the complete installation and configuration to deploy DirectAccess. Also, we have tested with a remote client to access the resources inside the corporate network. The demonstration is completed here and if you have any queries or feedback that you want to share, please send a comment below. I look forward to seeing you another time with a different article.
Contents
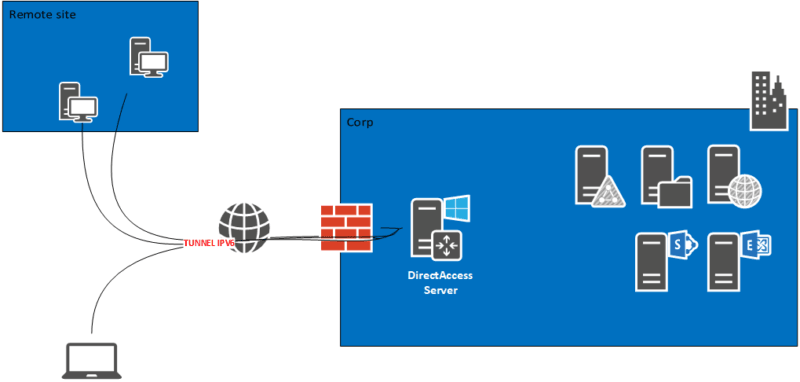
DirectAccess is a feature available with the Remote Access role, which allows you to set up an automatic connection solution to the corporate network for mobile computers or for small remote sites.
Unlike a VPN, the connection is initiated directly by a service on the remote computer, which allows for similar behavior if the workstation is in the corporate network:
- Applying group policies.
- Ability to open another user session in the Active Directory.
DirectAccess also has two other benefits that are:
- The automatic connection without manipulation on the part of the user.
- The ability to force internet traffic through the corporate network which allows to apply the rules of web filtering (proxy).
DirectAccess relies on the IPv6 protocol for communication between the corporate network and the customer.
Before establishing the connection, the client tests access to a probe to find out if it is in the company network or outside.
For DNS resolution, a Group Policy configures the NRPT table so that the computer when it is connected to the corporate network sends the requests from the local domain to the DirectAccess server.
It is possible to increase the security of connections by identifying computers with a certificate.
In this tutorial, we will see how to deploy DirectAccess with a server with a single network card behind a firewall.
This tutorial can also be used to deploy DirectAccess with Windows 2012R2
To work you have to make the server accessible from the Internet by correctly configuring the NAT / PAT.
Documentation Microsoft : https://docs.microsoft.com/fr-fr/windows-server/remote/remote-access/directaccess/directaccess
| title | description | manager | ms.topic | ms.assetid | ms.author | author | ms.date |
|---|---|---|---|---|---|---|---|
|
Step 1 Configure Advanced DirectAccess Infrastructure |
Learn how to configure the infrastructure that is required for an advanced Remote Access deployment that uses a single DirectAccess server in a mixed IPv4 and IPv6 environment. |
brianlic |
article |
43abc30a-300d-4752-b845-10a6b9f32244 |
jgerend |
JasonGerend |
08/07/2020 |
Step 1 Configure Advanced DirectAccess Infrastructure
Applies to: Windows Server 2022, Windows Server 2019, Windows Server 2012 R2, Windows Server 2012
This topic describes how to configure the infrastructure that is required for an advanced Remote Access deployment that uses a single DirectAccess server in a mixed IPv4 and IPv6 environment. Before you begin the deployment steps, ensure that you have completed the planning steps that are described in Plan an Advanced DirectAccess Deployment.
| Task | Description |
|---|---|
| 1.1 Configure server network settings | Configure the server network settings on the DirectAccess server. |
| 1.2 Configure force tunneling | Configure force tunneling. |
| 1.3 Configure routing in the corporate network | Configure routing in the corporate network. |
| 1.4 Configure firewalls | Configure additional firewalls, if required. |
| 1.5 Configure CAs and certificates | Configure a certification authority (CA), if required, and any other certificate templates that are required in the deployment. |
| 1.6 Configure the DNS server | Configure the Domain Name System (DNS) settings for the DirectAccess server. |
| 1.7 Configure Active Directory | Join client computers and the DirectAccess server to the Active Directory domain. |
| 1.8 Configure GPOs | Configure GPOs for the deployment, if required. |
| 1.9 Configure security groups | Configure security groups that will contain DirectAccess client computers, and any other security groups that are required in the deployment. |
| 1.10 Configure the network location server | Configure the network location server, including installing the network location server website certificate. |
[!NOTE]
This topic includes sample Windows PowerShell cmdlets that you can use to automate some of the procedures described. For more information, see Using Cmdlets.
1.1 Configure server network settings
The following network interface settings are required for a single server deployment in an environment that is using IPv4 and IPv6. All IP addresses are configured by using Change adapter settings in the Windows Networking and Sharing Center.
Edge topology
-
Two Internet-facing consecutive public static IPv4 or IPv6 addresses
[!NOTE]
Two public addresses are required for Teredo. If you are not using Teredo, you can configure a single public static IPv4 address. -
A single internal static IPv4 or IPv6 address
Behind NAT device (with two network adapters)
-
A single Internet-facing static IPv4 or IPv6 address
-
A single internal network-facing static IPv4 or IPv6 address
Behind NAT device (with one network adapter)
- A single internal network-facing static IPv4 or IPv6 address
[!NOTE]
If a DirectAccess server with two or more network adapters (one classified in the domain profile and the other in a public or private profile) is configured with a single network adapter topology, we recommend the following:
Ensure that the second network adapter and any additional network adapters are classified in the domain profile.
If the second network adapter cannot be configured for the domain profile, the DirectAccess IPsec policy must be manually scoped to all profiles by using the following Windows PowerShell command after DirectAccess is configured:
$gposession = Open-NetGPO "PolicyStore <Name of the server GPO>
Set-NetIPsecRule "DisplayName <Name of the IPsec policy> "GPOSession $gposession "Profile Any
Save-NetGPO "GPOSession $gposession
1.2 Configure force tunneling
Force tunneling can be configured through the Remote Access Setup Wizard. It is presented as a check box in the Configure Remote Clients Wizard. This setting only affects DirectAccess clients. If VPN is enabled, VPN clients will by default use force tunneling. Administrators can change the setting for VPN clients from the client profile.
Selecting the check box for force tunneling does the following:
-
Enables force tunneling on DirectAccess clients
-
Adds an Any entry in the Name Resolution Policy Table (NRPT) for DirectAccess clients, which means that all DNS traffic will go to the internal network DNS servers
-
Configures DirectAccess clients to always use the IP-HTTPS transition technology
To make Internet resources available to DirectAccess clients that use force tunneling, you can use a proxy server, which can receive IPv6-based requests for Internet resources and translate them to requests for IPv4-based Internet resources. To configure a proxy server for Internet resources, you need to modify the default entry in NRPT to add the proxy server. You can accomplish this by using the Remote Access PowerShell cmdlets or the DNS PowerShell cmdlets. For example, use the Remote Access PowerShell cmdlet as follows:
Set-DAClientDNSConfiguration "DNSSuffix "." "ProxyServer <Name of the proxy server:port>
[!NOTE]
If DirectAccess and VPN are enabled on the same server, and VPN is in force-tunnel mode, and the server is deployed in an edge topology or a behind NAT topology (with two network adapters, one connected to the domain and one to a private network), VPN Internet traffic cannot be forwarded through the external interface of the DirectAccess server. To enable this scenario, organizations must deploy Remote Access on the server behind a firewall in single network adapter topology. Alternatively, organizations can use a separate proxy server in the internal network to forward the Internet traffic from VPN clients.
[!NOTE]
If an organization is using a web proxy for DirectAccess clients to access Internet resources, and the corporate proxy is not capable of handling internal network resources, DirectAccess clients will not be able to access internal resources if they are outside the intranet. In such a scenario, to enable DirectAccess clients to access internal resources, manually create NRPT entries for the internal network suffixes by using the DNS page of the infrastructure wizard. Do not apply proxy settings on these NRPT suffixes. The suffixes should be populated with default DNS server entries.
1.3 Configure routing in the corporate network
Configure routing in the corporate network as follows:
-
When native IPv6 is deployed in the organization, add a route so that the routers on the internal network route IPv6 traffic back through the DirectAccess server.
-
Manually configure the organization»s IPv4 and IPv6 routes on the DirectAccess servers. Add a published route so that all traffic with an organization (/48) IPv6 prefix is forwarded to the internal network. For IPv4 traffic, add explicit routes so that IPv4 traffic is forwarded to the internal network.
1.4 Configure firewalls
When using additional firewalls in your deployment, apply the following Internet-facing firewall exceptions for Remote Access traffic when the DirectAccess server is on the IPv4 Internet:
-
Teredo traffic»User Datagram Protocol (UDP) destination port 3544 inbound, and UDP source port 3544 outbound.
-
6to4 traffic»IP Protocol 41 inbound and outbound.
-
IP-HTTPS»Transmission Control Protocol (TCP) destination port 443, and TCP source port 443 outbound. When the DirectAccess server has a single network adapter, and the network location server is on the DirectAccess server, then TCP port 62000 is also required.
[!NOTE]
This exemption must be configured on the DirectAccess server, while all the other exemptions have to be configured on the edge firewall.
[!NOTE]
For Teredo and 6to4 traffic, these exceptions should be applied for both of the Internet-facing consecutive public IPv4 addresses on the DirectAccess server. For IP-HTTPS the exceptions need only be applied to the address where the public name of the server resolves.
When using additional firewalls, apply the following Internet-facing firewall exceptions for Remote Access traffic when the DirectAccess server is on the IPv6 Internet:
-
IP Protocol 50
-
UDP destination port 500 inbound, and UDP source port 500 outbound.
-
Internet Control Message Protocol for IPv6 (ICMPv6) traffic inbound and outbound » for Teredo implementations only.
When using additional firewalls, apply the following internal network firewall exceptions for Remote Access traffic:
-
ISATAP»Protocol 41 inbound and outbound
-
TCP/UDP for all IPv4/IPv6 traffic
-
ICMP for all IPv4/IPv6 traffic
1.5 Configure CAs and certificates
Remote Access in Windows Server 2012 allows you to choose between using certificates for computer authentication or using a built in Kerberos proxy that authenticates using user names and passwords. You must also configure an IP-HTTPS certificate on the DirectAccess server.
For more information, see Active Directory Certificate Services.
1.5.1 Configure IPsec authentication
A computer certificate is required on the DirectAccess server and on all DirectAccess clients to use IPsec authentication. The certificate must be issued by an internal certification authority (CA), and DirectAccess servers and DirectAccess clients must trust the CA chain that issues root and intermediate certificates.
To configure IPsec authentication
-
In the internal CA, decide if you will use the Computer certificate template, or if you will create a new certificate template as described in Creating Certificate Templates.
[!NOTE]
If you create a new template, it must be configured for Client Authentication. -
Deploy the certificate template, if required. For more information, see Deploying Certificate Templates.
-
Configure the certificate template for autoenrollment, if required. For more information, see Configure Certificate Autoenrollment.
1.5.2 Configure certificate templates
When you use an internal CA to issue certificates, you must configure a certificate template for the IP-HTTPS certificate and the network location server website certificate.
To configure a certificate template
-
In the internal CA, create a certificate template as described in Creating Certificate Templates.
-
Deploy the certificate template as described in Deploying Certificate Templates.
1.5.3 Configure the IP-HTTPS certificate
Remote Access requires an IP-HTTPS certificate to authenticate IP-HTTPS connections to the DirectAccess server. There are three certificate options that are available for IP-HTTPS authentication:
Public certificate
A public certificate is supplied by a third party. If the certificate subject name does not contain wildcard characters, it must be the externally resolvable fully qualified domain name (FQDN) URL that is used only for the DirectAccess server IP-HTTPS connections.
Private certificate
If you use a private certificate, the following are required, if they do not already exist:
-
A website certificate that is used for IP-HTTPS authentication. The certificate subject should be an externally resolvable FQDN that is reachable from the Internet. The certificate is based on the certificate template that you created by following the instructions in 1.5.2 Configure certificate templates.
-
A certificate revocation list (CRL) distribution point that is reachable from a publicly resolvable FQDN.
Self-signed certificate
If you use a self-signed certificate, the following are required, if they do not already exist:
-
A website certificate that is used for IP-HTTPS authentication. The certificate subject should be an externally resolvable FQDN that is reachable from the Internet.
-
A CRL distribution point that is reachable from a publicly resolvable FQDN.
[!NOTE]
Self-signed certificates cannot be used in multisite deployments.
Make sure that the website certificate that is used for IP-HTTPS authentication meets the following requirements:
-
The common name of the certificate should match the name of the IP-HTTPS site.
-
In the Subject field, specify the FQDN of the IP-HTTPS URL.
-
For the Enhanced Key Usage field, use the server authentication object identifier (OID).
-
For the CRL Distribution Points field, specify a CRL distribution point that is accessible by DirectAccess clients that are connected to the Internet.
-
The IP-HTTPS certificate must have a private key.
-
The IP-HTTPS certificate must be imported directly into the personal store.
-
IP-HTTPS certificates can have wildcard characters in the name.
To install the IP-HTTPS certificate from an internal CA
-
On the DirectAccess server: On the Start screen, typemmc.exe, and then press ENTER.
-
In the MMC console, on the File menu, click Add/Remove Snap-in.
-
In the Add or Remove Snap-ins dialog box, click Certificates, click Add, click Computer account, click Next, click Local computer, click Finish, and then click OK.
-
In the console tree of the Certificates snap-in, open Certificates (Local Computer)PersonalCertificates.
-
Right-click Certificates, point to All Tasks, and then click Request New Certificate.
-
Click Next twice.
-
On the Request Certificates page, select the check box for the certificate template that you previously created (for more information, see 1.5.2 Configure certificate templates). If required, click More information is required to enroll for this certificate.
-
In the Certificate Properties dialog box, on the Subject tab, in the Subject name area, in Type, select Common Name.
-
In Value, specify the IPv4 address of the external facing adapter of the DirectAccess server or the FQDN of the IP-HTTPS URL, and then click Add.
-
In the Alternative name area, in Type, select DNS.
-
In Value, specify the IPv4 address of the external facing adapter of the DirectAccess server or the FQDN of the IP-HTTPS URL, and then click Add.
-
On the General tab, in Friendly name, you can enter a name that will help you identify the certificate.
-
On the Extensions tab, click the arrow next to Extended Key Usage, and make sure that Server Authentication appears in the Selected options list.
-
Click OK, click Enroll, and then click Finish.
-
In the details pane of the Certificates snap-in, verify that the new certificate was enrolled with Intended Purposes of Server Authentication.
1.6 Configure the DNS server
You must manually configure a DNS entry for the network location server website for the internal network in your deployment.
To create the network location server
-
On the internal network DNS server: On the Start screen, typednsmgmt.msc, and then press ENTER.
-
In the left pane of the DNS Manager console, expand the forward lookup zone for your domain. Right click the domain, and click New Host (A or AAAA).
-
In the New Host dialog box, In the IP address box:
-
In the Name (uses parent domain name if blank) box, enter the DNS name for the network location server website (this is the name that the DirectAccess clients use to connect to the network location server).
-
Enter the IPv4 or IPv6 address of the network location server, and then click Add Host, and then click OK.
-
-
In the New Host dialog box:
-
In the Name (uses parent domain name if blank) box, enter the DNS name for the web probe (the name for the default web probe is directaccess-webprobehost).
-
In the IP address box, enter the IPv4 or IPv6 address of the web probe, and then click Add Host.
-
Repeat this process for directaccess-corpconnectivityhost and any manually created connectivity verifiers.
-
-
In the DNS dialog box, click OK, and then click Done.
 Windows PowerShell equivalent commands
The following Windows PowerShell cmdlet or cmdlets perform the same function as the preceding procedure. Enter each cmdlet on a single line, even though they may appear word-wrapped across several lines here because of formatting constraints.
Add-DnsServerResourceRecordA -Name <network_location_server_name> -ZoneName <DNS_zone_name> -IPv4Address <network_location_server_IPv4_address>
Add-DnsServerResourceRecordAAAA -Name <network_location_server_name> -ZoneName <DNS_zone_name> -IPv6Address <network_location_server_IPv6_address>
You must also configure DNS entries for the following:
-
The IP-HTTPS server
DirectAccess clients must be able to resolve the DNS name of the DirectAccess server from the Internet.
-
CRL revocation checking
DirectAccess uses certificate revocation checking for the IP-HTTPS connection between DirectAccess clients and the DirectAccess server, and for the HTTPS-based connection between the DirectAccess client and the network location server. In both cases, DirectAccess clients must be able to resolve and access the CRL distribution point location.
-
ISATAP
Intrasite Automatic Tunnel Addressing Protocol (ISATAP) uses tunneling to enable DirectAccess clients to connect to the DirectAccess server over the IPv4 Internet, encapsulating IPv6 packets within an IPv4 header. It is used by Remote Access to provide IPv6 connectivity to ISATAP hosts across an intranet. In a non-native IPv6 network environment, the DirectAccess server configures itself automatically as an ISATAP router. Resolution support for the ISATAP name is required.
1.7 Configure Active Directory
The DirectAccess server and all DirectAccess client computers must be joined to an Active Directory domain. DirectAccess client computers must be a member of one of the following domain types:
-
Domains that belong in the same forest as the DirectAccess server.
-
Domains that belong to forests with a two-way trust with the DirectAccess server forest.
-
Domains that have a two-way domain trust to the DirectAccess server domain.
To join the DirectAccess server to a domain
-
In Server Manager, click Local Server. In the details pane, click the link next to Computer name.
-
In the System Properties dialog box, click the Computer Name tab, and then click Change.
-
In Computer Name, type the name of the computer if you are also changing the computer name when joining the server to the domain. Under Member of, click Domain, and then type the name of the domain to which you want to join the server (for example, corp.contoso.com), and then click OK.
-
When you are prompted for a user name and password, enter the user name and password of a user with rights to join computers to the domain, and then click OK.
-
When you see a dialog box that welcomes you to the domain, click OK.
-
When you are prompted that you must restart the computer, click OK.
-
In the System Properties dialog box, click Close.
-
When you are prompted to restart the computer, click Restart Now.
To join client computers to the domain
-
On the Start screen, typeexplorer.exe, and then press ENTER.
-
Right-click the Computer icon, and then click Properties.
-
On the System page, click Advanced system settings.
-
In the System Properties dialog box, on the Computer Name tab, click Change.
-
In Computer name, type the name of the computer if you are also changing the computer name when joining the server to the domain. Under Member of, click Domain, and then type the name of the domain to which you want to join the server (for example, corp.contoso.com), and then click OK.
-
When you are prompted for a user name and password, enter the user name and password of a user with rights to join computers to the domain, and then click OK.
-
When you see a dialog box that welcomes you to the domain, click OK.
-
When you are prompted that you must restart the computer, click OK.
-
In the System Properties dialog box, click Close.
-
When you are prompted to restart the computer, click Restart Now.
Windows PowerShell equivalent commands
The following Windows PowerShell cmdlet or cmdlets perform the same function as the preceding procedure. Enter each cmdlet on a single line, even though they may appear word-wrapped across several lines here because of formatting constraints.
[!NOTE]
You must supply domain credentials when you enter the following Add-Computer command.
Add-Computer -DomainName <domain_name>
Restart-Computer
1.8 Configure GPOs
A minimum of two Group Policy Objects are required to deploy Remote Access:
-
One contains settings for the DirectAccess server
-
One contains settings for DirectAccess client computers
When you configure Remote Access, the wizard automatically creates the required Group Policy Objects. However, if your organization enforces a naming convention, you can type a name in the GPO dialog box in the Remote Access Management console. For more information, see 2.7. Configuration summary and alternate GPOs. If you have created permissions, the GPO will be created. If you do not have the required permissions to create GPOs, they must be created prior to configuring Remote Access.
To create Group Policy Objects, see Create and Edit a Group Policy Object.
[!IMPORTANT]
Administrators can manually link the DirectAccess Group Policy Objects to an organizational unit (OU) by following these steps:
- Before you configure DirectAccess, link the created GPOs to the respective OUs.
- When you configure DirectAccess, specify a security group for the client computers.
- The Remote Access administrator may or may not have permissions to link the Group Policy Objects to the domain. In either case, the Group Policy Objects will be configured automatically. If the GPOs are already linked to an OU, the links will not be removed, and the GPOs will not be linked to the domain. For a server GPO, the OU must contain the server computer object, or the GPO will be linked to the root of the domain.
- If you did not link to the OU before running the DirectAccess Wizard, after the configuration is complete, the domain administrator can link the DirectAccess Group Policy Objects to the required OUs. The link to the domain can be removed. For more information, see Link a Group Policy Object.
[!NOTE]
If a Group Policy Object was created manually, it is possible that the Group Policy Object will not be available during the DirectAccess configuration. The Group Policy Object may not have been replicated to the closest domain controller to the management computer. In this event, the administrator can wait for replication to complete, or force the replication.
1.8.1 Configure Remote Access GPOs with limited permissions
In a deployment that uses staging and production GPOs, the domain administrator should do the following:
-
Obtain the list of required GPOs for the Remote Access deployment from the Remote Access administrator. For more information, see 1.8 Plan Group Policy Objects.
-
For each GPO that is requested by the Remote Access administrator, create a pair of GPOs with different names. The first will be used as the staging GPO, and the second as the production GPO.
To create Group Policy Objects, see Create and Edit a Group Policy Object.
-
To link the production GPOs, see Link a Group Policy Object.
-
Grant the Remote Access administrator Edit settings, delete and modify security permissions on all of the staging GPOs. For more information, see Delegate Permissions for a Group or User on a Group Policy Object.
-
Deny the Remote Access administrator permissions to link GPOs in all domains (or verify that the Remote Access administrator doesn’t have such permissions). For more information, see Delegate Permissions to Link Group Policy Objects.
When Remote Access administrators configure Remote Access, they should always specify only the staging GPOs (not the production GPOs). This is true in the initial configuration of Remote Access and when performing additional configuration operations where additional GPOs are required; for example, when adding entry points in a multisite deployment or enabling client computers in additional domains.
After the Remote Access administrator completes any changes to the Remote Access configuration, the domain administrator should review the settings in the staging GPOs, and use the following procedure to copy the settings to the production GPOs.
[!TIP]
Perform the following procedure after each change of the Remote Access configuration.
To copy settings to the production GPOs
-
Verify that all of the staging GPOs in the Remote Access deployment have been replicated to all of the domain controllers in the domain. This is required to ensure the most up-to-date configuration is imported to the production GPOs. For more information, see Check Group Policy Infrastructure Status.
-
Export the settings by backing up all of the staging GPOs in the Remote Access deployment. For more information, see Back Up a Group Policy Object.
-
For each production GPO, change the security filters to match the security filters of the corresponding staging GPO. For more information, see Filter Using Security Groups.
[!NOTE]
This is required because Import Settings does not copy the security filter of the source GPO. -
For each production GPO, import the settings from the backup of the corresponding staging GPO as follows:
-
In the Group Policy Management Console (GPMC), expand the Group Policy Objects node in the forest and domain that contains the production Group Policy Object into which the settings will be imported.
-
Right-click the GPO, and click Import Settings.
-
In the Import Settings Wizard, on the Welcome page, click Next.
-
On the Backup GPO page, click Backup.
-
In the Back up Group Policy Object dialog box, in the Location box, enter the path for the location where you want to store the GPO backups, or click Browse to locate the folder.
-
In the Description box, type a description for the production GPO, and then click Back Up.
-
When the backup completes, click OK, and then on the Backup GPO page, click Next.
-
On the Backup location page, in the Backup folder box, enter the path for the location in which the backup of the corresponding staging GPO was stored in Step 2, or click Browse to locate the folder, and then click Next.
-
On the Source GPO page, select the Show only the latest version of each GPO check box to hide older backups, and select the corresponding staging GPO. Click View Settings to review the Remote Access settings before applying them to the production GPO, and then click Next.
-
On the Scanning Backup page, click Next, and then click Finish.
-
Windows PowerShell equivalent commands
The following Windows PowerShell cmdlet or cmdlets perform the same function as the preceding procedure. Enter each cmdlet on a single line, even though they may appear word-wrapped across several lines here because of formatting constraints.
-
To back up the staging client GPO «DirectAccess Client Settings — Staging» in domain «corp.contoso.com» to the backup folder «C:Backups»:
$backup = Backup-GPO "Name 'DirectAccess Client Settings - Staging' "Domain 'corp.contoso.com' "Path 'C:Backups' -
To see the security filtering of the staging client GPO «DirectAccess Client Settings — Staging» in domain «corp.contoso.com»:
Get-GPPermission "Name 'DirectAccess Client Settings - Staging' "Domain 'corp.contoso.com' "All | ?{ $_.Permission "eq 'GpoApply'} -
To add the security group «corp.contoso.comDirectAccess clients» to the security filter of the production client GPO «DirectAccess Client Settings » Production» in domain «corp.contoso.com»:
Set-GPPermission "Name 'DirectAccess Client Settings - Production' "Domain 'corp.contoso.com' "PermissionLevel GpoApply "TargetName 'corp.contoso.comDirectAccess clients' "TargetType Group -
To import settings from the backup to the production client GPO «DirectAccess Client Settings » Production» in domain «corp.contoso.com»:
Import-GPO "BackupId $backup.Id "Path $backup.BackupDirectory "TargetName 'DirectAccess Client Settings - Production' "Domain 'corp.contoso.com'
1.9 Configure security groups
The DirectAccess settings that are contained in the client computer Group Policy Object are applied only to computers that are members of the security groups that you specify when you configure Remote Access. In addition, if you are using security groups to manage your application servers, create a security group for these servers.
To create a security group for DirectAccess clients
-
On the Start screen, typedsa.msc, and then press ENTER. In the Active Directory Users and Computers console, in the left pane, expand the domain that will contain the security group, right-click Users, point to New, and then click Group.
-
In the New Object — Group dialog box, under Group name, enter the name for the security group.
-
Under Group scope, click Global, and under Group type, click Security, and then click OK.
-
Double-click the DirectAccess client computers security group, and in the properties dialog box, click the Members tab.
-
On the Members tab, click Add.
-
In the Select Users, Contacts, Computers, or Service Accounts dialog box, select the client computers that you want to enable for DirectAccess, and then click OK.
Windows PowerShell equivalent commands
The following Windows PowerShell cmdlet or cmdlets perform the same function as the preceding procedure. Enter each cmdlet on a single line, even though they may appear word-wrapped across several lines here because of formatting constraints.
New-ADGroup -GroupScope global -Name <DirectAccess_clients_group_name>
Add-ADGroupMember -Identity DirectAccess_clients_group_name -Members <computer_name>
1.10 Configure the network location server
The network location server should be a server with high availability, and it should have a valid SSL certificate that is trusted by the DirectAccess clients. There are two certificate options for the network location server certificate:
-
Private certificate
This certificate is based on the certificate template that you created by following the instructions in 1.5.2 Configure certificate templates.
-
Self-signed certificate
[!NOTE]
Self-signed certificates cannot be used in multisite deployments.
The following are required for either type of certificate, if they do not already exist:
-
A website certificate that is used for the network location server. The certificate subject should be the URL of the network location server.
-
A CRL distribution point that has high availability from the internal network.
[!NOTE]
If the network location server website is located on the DirectAccess server, a website is created automatically when you configure Remote Access. This site is bound to the server certificate that you provide.
To install the network location server certificate from an internal CA
-
On the server that will host the network location server website: On the Start screen, typemmc.exe, and then press ENTER.
-
In the MMC console, on the File menu, click Add/Remove Snap-in.
-
In the Add or Remove Snap-ins dialog box, click Certificates, click Add, click Computer account, click Next, click Local computer, click Finish, and then click OK.
-
In the console tree of the Certificates snap-in, open Certificates (Local Computer)PersonalCertificates.
-
Right-click Certificates, point to All Tasks, and then click Request New Certificate.
-
Click Next twice.
-
On the Request Certificates page, select the check box for the certificate template that you created by following the instructions in 1.5.2 Configure certificate templates. If required, click More information is required to enroll for this certificate.
-
In the Certificate Properties dialog box, on the Subject tab, in the Subject name area, in Type, select Common Name.
-
In Value, enter the FQDN of the network location server website, and then click Add.
-
In the Alternative name area, in Type, select DNS.
-
In Value, enter the FQDN of the network location server website, and then click Add.
-
On the General tab, in Friendly name, you can enter a name that will help you identify the certificate.
-
Click OK, click Enroll, and then click Finish.
-
In the details pane of the Certificates snap-in, verify that new certificate was enrolled with Intended Purposes of Server Authentication.
To configure the network location server
-
Set up a website on a high availability server. The website does not require any content, but when you test it, you might define a default page that provides a message when clients connect.
[!NOTE]
This step is not required if the network location server website is hosted on the DirectAccess server. -
Bind an HTTPS server certificate to the website. The common name of the certificate should match the name of the network location server site. Ensure that DirectAccess clients trust the issuing CA.
[!NOTE]
This step is not required if the network location server website is hosted on the DirectAccess server. -
Set up a CRL site that has high availability from the internal network.
CRL distribution points can be accessed through:
-
Web servers by using an HTTP-based URL, such as: https://crl.corp.contoso.com/crld/corp-APP1-CA.crl
-
File servers that are accessed through a universal naming convention (UNC) path, such as \crl.corp.contoso.comcrldcorp-APP1-CA.crl
If the internal CRL distribution point is reachable only over IPv6, you must configure a Windows Firewall with Advanced Security connection security rule to exempt IPsec protection from the IPv6 address of your intranet to the IPv6 addresses of your CRL distribution points.
-
-
Ensure that DirectAccess clients on the internal network can resolve the name of the network location server. Ensure that the name is not resolvable by DirectAccess clients on the Internet.
Next step
- Step 2: Configure Advanced DirectAccess Servers
| title | description | manager | ms.topic | ms.assetid | ms.author | author | ms.date |
|---|---|---|---|---|---|---|---|
|
Step 1 Configure Advanced DirectAccess Infrastructure |
Learn how to configure the infrastructure that is required for an advanced Remote Access deployment that uses a single DirectAccess server in a mixed IPv4 and IPv6 environment. |
brianlic |
article |
43abc30a-300d-4752-b845-10a6b9f32244 |
jgerend |
JasonGerend |
08/07/2020 |
Step 1 Configure Advanced DirectAccess Infrastructure
Applies to: Windows Server 2022, Windows Server 2019, Windows Server 2012 R2, Windows Server 2012
This topic describes how to configure the infrastructure that is required for an advanced Remote Access deployment that uses a single DirectAccess server in a mixed IPv4 and IPv6 environment. Before you begin the deployment steps, ensure that you have completed the planning steps that are described in Plan an Advanced DirectAccess Deployment.
| Task | Description |
|---|---|
| 1.1 Configure server network settings | Configure the server network settings on the DirectAccess server. |
| 1.2 Configure force tunneling | Configure force tunneling. |
| 1.3 Configure routing in the corporate network | Configure routing in the corporate network. |
| 1.4 Configure firewalls | Configure additional firewalls, if required. |
| 1.5 Configure CAs and certificates | Configure a certification authority (CA), if required, and any other certificate templates that are required in the deployment. |
| 1.6 Configure the DNS server | Configure the Domain Name System (DNS) settings for the DirectAccess server. |
| 1.7 Configure Active Directory | Join client computers and the DirectAccess server to the Active Directory domain. |
| 1.8 Configure GPOs | Configure GPOs for the deployment, if required. |
| 1.9 Configure security groups | Configure security groups that will contain DirectAccess client computers, and any other security groups that are required in the deployment. |
| 1.10 Configure the network location server | Configure the network location server, including installing the network location server website certificate. |
[!NOTE]
This topic includes sample Windows PowerShell cmdlets that you can use to automate some of the procedures described. For more information, see Using Cmdlets.
1.1 Configure server network settings
The following network interface settings are required for a single server deployment in an environment that is using IPv4 and IPv6. All IP addresses are configured by using Change adapter settings in the Windows Networking and Sharing Center.
Edge topology
-
Two Internet-facing consecutive public static IPv4 or IPv6 addresses
[!NOTE]
Two public addresses are required for Teredo. If you are not using Teredo, you can configure a single public static IPv4 address. -
A single internal static IPv4 or IPv6 address
Behind NAT device (with two network adapters)
-
A single Internet-facing static IPv4 or IPv6 address
-
A single internal network-facing static IPv4 or IPv6 address
Behind NAT device (with one network adapter)
- A single internal network-facing static IPv4 or IPv6 address
[!NOTE]
If a DirectAccess server with two or more network adapters (one classified in the domain profile and the other in a public or private profile) is configured with a single network adapter topology, we recommend the following:
Ensure that the second network adapter and any additional network adapters are classified in the domain profile.
If the second network adapter cannot be configured for the domain profile, the DirectAccess IPsec policy must be manually scoped to all profiles by using the following Windows PowerShell command after DirectAccess is configured:
$gposession = Open-NetGPO "PolicyStore <Name of the server GPO>
Set-NetIPsecRule "DisplayName <Name of the IPsec policy> "GPOSession $gposession "Profile Any
Save-NetGPO "GPOSession $gposession
1.2 Configure force tunneling
Force tunneling can be configured through the Remote Access Setup Wizard. It is presented as a check box in the Configure Remote Clients Wizard. This setting only affects DirectAccess clients. If VPN is enabled, VPN clients will by default use force tunneling. Administrators can change the setting for VPN clients from the client profile.
Selecting the check box for force tunneling does the following:
-
Enables force tunneling on DirectAccess clients
-
Adds an Any entry in the Name Resolution Policy Table (NRPT) for DirectAccess clients, which means that all DNS traffic will go to the internal network DNS servers
-
Configures DirectAccess clients to always use the IP-HTTPS transition technology
To make Internet resources available to DirectAccess clients that use force tunneling, you can use a proxy server, which can receive IPv6-based requests for Internet resources and translate them to requests for IPv4-based Internet resources. To configure a proxy server for Internet resources, you need to modify the default entry in NRPT to add the proxy server. You can accomplish this by using the Remote Access PowerShell cmdlets or the DNS PowerShell cmdlets. For example, use the Remote Access PowerShell cmdlet as follows:
Set-DAClientDNSConfiguration "DNSSuffix "." "ProxyServer <Name of the proxy server:port>
[!NOTE]
If DirectAccess and VPN are enabled on the same server, and VPN is in force-tunnel mode, and the server is deployed in an edge topology or a behind NAT topology (with two network adapters, one connected to the domain and one to a private network), VPN Internet traffic cannot be forwarded through the external interface of the DirectAccess server. To enable this scenario, organizations must deploy Remote Access on the server behind a firewall in single network adapter topology. Alternatively, organizations can use a separate proxy server in the internal network to forward the Internet traffic from VPN clients.
[!NOTE]
If an organization is using a web proxy for DirectAccess clients to access Internet resources, and the corporate proxy is not capable of handling internal network resources, DirectAccess clients will not be able to access internal resources if they are outside the intranet. In such a scenario, to enable DirectAccess clients to access internal resources, manually create NRPT entries for the internal network suffixes by using the DNS page of the infrastructure wizard. Do not apply proxy settings on these NRPT suffixes. The suffixes should be populated with default DNS server entries.
1.3 Configure routing in the corporate network
Configure routing in the corporate network as follows:
-
When native IPv6 is deployed in the organization, add a route so that the routers on the internal network route IPv6 traffic back through the DirectAccess server.
-
Manually configure the organization»s IPv4 and IPv6 routes on the DirectAccess servers. Add a published route so that all traffic with an organization (/48) IPv6 prefix is forwarded to the internal network. For IPv4 traffic, add explicit routes so that IPv4 traffic is forwarded to the internal network.
1.4 Configure firewalls
When using additional firewalls in your deployment, apply the following Internet-facing firewall exceptions for Remote Access traffic when the DirectAccess server is on the IPv4 Internet:
-
Teredo traffic»User Datagram Protocol (UDP) destination port 3544 inbound, and UDP source port 3544 outbound.
-
6to4 traffic»IP Protocol 41 inbound and outbound.
-
IP-HTTPS»Transmission Control Protocol (TCP) destination port 443, and TCP source port 443 outbound. When the DirectAccess server has a single network adapter, and the network location server is on the DirectAccess server, then TCP port 62000 is also required.
[!NOTE]
This exemption must be configured on the DirectAccess server, while all the other exemptions have to be configured on the edge firewall.
[!NOTE]
For Teredo and 6to4 traffic, these exceptions should be applied for both of the Internet-facing consecutive public IPv4 addresses on the DirectAccess server. For IP-HTTPS the exceptions need only be applied to the address where the public name of the server resolves.
When using additional firewalls, apply the following Internet-facing firewall exceptions for Remote Access traffic when the DirectAccess server is on the IPv6 Internet:
-
IP Protocol 50
-
UDP destination port 500 inbound, and UDP source port 500 outbound.
-
Internet Control Message Protocol for IPv6 (ICMPv6) traffic inbound and outbound » for Teredo implementations only.
When using additional firewalls, apply the following internal network firewall exceptions for Remote Access traffic:
-
ISATAP»Protocol 41 inbound and outbound
-
TCP/UDP for all IPv4/IPv6 traffic
-
ICMP for all IPv4/IPv6 traffic
1.5 Configure CAs and certificates
Remote Access in Windows Server 2012 allows you to choose between using certificates for computer authentication or using a built in Kerberos proxy that authenticates using user names and passwords. You must also configure an IP-HTTPS certificate on the DirectAccess server.
For more information, see Active Directory Certificate Services.
1.5.1 Configure IPsec authentication
A computer certificate is required on the DirectAccess server and on all DirectAccess clients to use IPsec authentication. The certificate must be issued by an internal certification authority (CA), and DirectAccess servers and DirectAccess clients must trust the CA chain that issues root and intermediate certificates.
To configure IPsec authentication
-
In the internal CA, decide if you will use the Computer certificate template, or if you will create a new certificate template as described in Creating Certificate Templates.
[!NOTE]
If you create a new template, it must be configured for Client Authentication. -
Deploy the certificate template, if required. For more information, see Deploying Certificate Templates.
-
Configure the certificate template for autoenrollment, if required. For more information, see Configure Certificate Autoenrollment.
1.5.2 Configure certificate templates
When you use an internal CA to issue certificates, you must configure a certificate template for the IP-HTTPS certificate and the network location server website certificate.
To configure a certificate template
-
In the internal CA, create a certificate template as described in Creating Certificate Templates.
-
Deploy the certificate template as described in Deploying Certificate Templates.
1.5.3 Configure the IP-HTTPS certificate
Remote Access requires an IP-HTTPS certificate to authenticate IP-HTTPS connections to the DirectAccess server. There are three certificate options that are available for IP-HTTPS authentication:
Public certificate
A public certificate is supplied by a third party. If the certificate subject name does not contain wildcard characters, it must be the externally resolvable fully qualified domain name (FQDN) URL that is used only for the DirectAccess server IP-HTTPS connections.
Private certificate
If you use a private certificate, the following are required, if they do not already exist:
-
A website certificate that is used for IP-HTTPS authentication. The certificate subject should be an externally resolvable FQDN that is reachable from the Internet. The certificate is based on the certificate template that you created by following the instructions in 1.5.2 Configure certificate templates.
-
A certificate revocation list (CRL) distribution point that is reachable from a publicly resolvable FQDN.
Self-signed certificate
If you use a self-signed certificate, the following are required, if they do not already exist:
-
A website certificate that is used for IP-HTTPS authentication. The certificate subject should be an externally resolvable FQDN that is reachable from the Internet.
-
A CRL distribution point that is reachable from a publicly resolvable FQDN.
[!NOTE]
Self-signed certificates cannot be used in multisite deployments.
Make sure that the website certificate that is used for IP-HTTPS authentication meets the following requirements:
-
The common name of the certificate should match the name of the IP-HTTPS site.
-
In the Subject field, specify the FQDN of the IP-HTTPS URL.
-
For the Enhanced Key Usage field, use the server authentication object identifier (OID).
-
For the CRL Distribution Points field, specify a CRL distribution point that is accessible by DirectAccess clients that are connected to the Internet.
-
The IP-HTTPS certificate must have a private key.
-
The IP-HTTPS certificate must be imported directly into the personal store.
-
IP-HTTPS certificates can have wildcard characters in the name.
To install the IP-HTTPS certificate from an internal CA
-
On the DirectAccess server: On the Start screen, typemmc.exe, and then press ENTER.
-
In the MMC console, on the File menu, click Add/Remove Snap-in.
-
In the Add or Remove Snap-ins dialog box, click Certificates, click Add, click Computer account, click Next, click Local computer, click Finish, and then click OK.
-
In the console tree of the Certificates snap-in, open Certificates (Local Computer)PersonalCertificates.
-
Right-click Certificates, point to All Tasks, and then click Request New Certificate.
-
Click Next twice.
-
On the Request Certificates page, select the check box for the certificate template that you previously created (for more information, see 1.5.2 Configure certificate templates). If required, click More information is required to enroll for this certificate.
-
In the Certificate Properties dialog box, on the Subject tab, in the Subject name area, in Type, select Common Name.
-
In Value, specify the IPv4 address of the external facing adapter of the DirectAccess server or the FQDN of the IP-HTTPS URL, and then click Add.
-
In the Alternative name area, in Type, select DNS.
-
In Value, specify the IPv4 address of the external facing adapter of the DirectAccess server or the FQDN of the IP-HTTPS URL, and then click Add.
-
On the General tab, in Friendly name, you can enter a name that will help you identify the certificate.
-
On the Extensions tab, click the arrow next to Extended Key Usage, and make sure that Server Authentication appears in the Selected options list.
-
Click OK, click Enroll, and then click Finish.
-
In the details pane of the Certificates snap-in, verify that the new certificate was enrolled with Intended Purposes of Server Authentication.
1.6 Configure the DNS server
You must manually configure a DNS entry for the network location server website for the internal network in your deployment.
To create the network location server
-
On the internal network DNS server: On the Start screen, typednsmgmt.msc, and then press ENTER.
-
In the left pane of the DNS Manager console, expand the forward lookup zone for your domain. Right click the domain, and click New Host (A or AAAA).
-
In the New Host dialog box, In the IP address box:
-
In the Name (uses parent domain name if blank) box, enter the DNS name for the network location server website (this is the name that the DirectAccess clients use to connect to the network location server).
-
Enter the IPv4 or IPv6 address of the network location server, and then click Add Host, and then click OK.
-
-
In the New Host dialog box:
-
In the Name (uses parent domain name if blank) box, enter the DNS name for the web probe (the name for the default web probe is directaccess-webprobehost).
-
In the IP address box, enter the IPv4 or IPv6 address of the web probe, and then click Add Host.
-
Repeat this process for directaccess-corpconnectivityhost and any manually created connectivity verifiers.
-
-
In the DNS dialog box, click OK, and then click Done.
Windows PowerShell equivalent commands
The following Windows PowerShell cmdlet or cmdlets perform the same function as the preceding procedure. Enter each cmdlet on a single line, even though they may appear word-wrapped across several lines here because of formatting constraints.
Add-DnsServerResourceRecordA -Name <network_location_server_name> -ZoneName <DNS_zone_name> -IPv4Address <network_location_server_IPv4_address>
Add-DnsServerResourceRecordAAAA -Name <network_location_server_name> -ZoneName <DNS_zone_name> -IPv6Address <network_location_server_IPv6_address>
You must also configure DNS entries for the following:
-
The IP-HTTPS server
DirectAccess clients must be able to resolve the DNS name of the DirectAccess server from the Internet.
-
CRL revocation checking
DirectAccess uses certificate revocation checking for the IP-HTTPS connection between DirectAccess clients and the DirectAccess server, and for the HTTPS-based connection between the DirectAccess client and the network location server. In both cases, DirectAccess clients must be able to resolve and access the CRL distribution point location.
-
ISATAP
Intrasite Automatic Tunnel Addressing Protocol (ISATAP) uses tunneling to enable DirectAccess clients to connect to the DirectAccess server over the IPv4 Internet, encapsulating IPv6 packets within an IPv4 header. It is used by Remote Access to provide IPv6 connectivity to ISATAP hosts across an intranet. In a non-native IPv6 network environment, the DirectAccess server configures itself automatically as an ISATAP router. Resolution support for the ISATAP name is required.
1.7 Configure Active Directory
The DirectAccess server and all DirectAccess client computers must be joined to an Active Directory domain. DirectAccess client computers must be a member of one of the following domain types:
-
Domains that belong in the same forest as the DirectAccess server.
-
Domains that belong to forests with a two-way trust with the DirectAccess server forest.
-
Domains that have a two-way domain trust to the DirectAccess server domain.
To join the DirectAccess server to a domain
-
In Server Manager, click Local Server. In the details pane, click the link next to Computer name.
-
In the System Properties dialog box, click the Computer Name tab, and then click Change.
-
In Computer Name, type the name of the computer if you are also changing the computer name when joining the server to the domain. Under Member of, click Domain, and then type the name of the domain to which you want to join the server (for example, corp.contoso.com), and then click OK.
-
When you are prompted for a user name and password, enter the user name and password of a user with rights to join computers to the domain, and then click OK.
-
When you see a dialog box that welcomes you to the domain, click OK.
-
When you are prompted that you must restart the computer, click OK.
-
In the System Properties dialog box, click Close.
-
When you are prompted to restart the computer, click Restart Now.
To join client computers to the domain
-
On the Start screen, typeexplorer.exe, and then press ENTER.
-
Right-click the Computer icon, and then click Properties.
-
On the System page, click Advanced system settings.
-
In the System Properties dialog box, on the Computer Name tab, click Change.
-
In Computer name, type the name of the computer if you are also changing the computer name when joining the server to the domain. Under Member of, click Domain, and then type the name of the domain to which you want to join the server (for example, corp.contoso.com), and then click OK.
-
When you are prompted for a user name and password, enter the user name and password of a user with rights to join computers to the domain, and then click OK.
-
When you see a dialog box that welcomes you to the domain, click OK.
-
When you are prompted that you must restart the computer, click OK.
-
In the System Properties dialog box, click Close.
-
When you are prompted to restart the computer, click Restart Now.
Windows PowerShell equivalent commands
The following Windows PowerShell cmdlet or cmdlets perform the same function as the preceding procedure. Enter each cmdlet on a single line, even though they may appear word-wrapped across several lines here because of formatting constraints.
[!NOTE]
You must supply domain credentials when you enter the following Add-Computer command.
Add-Computer -DomainName <domain_name>
Restart-Computer
1.8 Configure GPOs
A minimum of two Group Policy Objects are required to deploy Remote Access:
-
One contains settings for the DirectAccess server
-
One contains settings for DirectAccess client computers
When you configure Remote Access, the wizard automatically creates the required Group Policy Objects. However, if your organization enforces a naming convention, you can type a name in the GPO dialog box in the Remote Access Management console. For more information, see 2.7. Configuration summary and alternate GPOs. If you have created permissions, the GPO will be created. If you do not have the required permissions to create GPOs, they must be created prior to configuring Remote Access.
To create Group Policy Objects, see Create and Edit a Group Policy Object.
[!IMPORTANT]
Administrators can manually link the DirectAccess Group Policy Objects to an organizational unit (OU) by following these steps:
- Before you configure DirectAccess, link the created GPOs to the respective OUs.
- When you configure DirectAccess, specify a security group for the client computers.
- The Remote Access administrator may or may not have permissions to link the Group Policy Objects to the domain. In either case, the Group Policy Objects will be configured automatically. If the GPOs are already linked to an OU, the links will not be removed, and the GPOs will not be linked to the domain. For a server GPO, the OU must contain the server computer object, or the GPO will be linked to the root of the domain.
- If you did not link to the OU before running the DirectAccess Wizard, after the configuration is complete, the domain administrator can link the DirectAccess Group Policy Objects to the required OUs. The link to the domain can be removed. For more information, see Link a Group Policy Object.
[!NOTE]
If a Group Policy Object was created manually, it is possible that the Group Policy Object will not be available during the DirectAccess configuration. The Group Policy Object may not have been replicated to the closest domain controller to the management computer. In this event, the administrator can wait for replication to complete, or force the replication.
1.8.1 Configure Remote Access GPOs with limited permissions
In a deployment that uses staging and production GPOs, the domain administrator should do the following:
-
Obtain the list of required GPOs for the Remote Access deployment from the Remote Access administrator. For more information, see 1.8 Plan Group Policy Objects.
-
For each GPO that is requested by the Remote Access administrator, create a pair of GPOs with different names. The first will be used as the staging GPO, and the second as the production GPO.
To create Group Policy Objects, see Create and Edit a Group Policy Object.
-
To link the production GPOs, see Link a Group Policy Object.
-
Grant the Remote Access administrator Edit settings, delete and modify security permissions on all of the staging GPOs. For more information, see Delegate Permissions for a Group or User on a Group Policy Object.
-
Deny the Remote Access administrator permissions to link GPOs in all domains (or verify that the Remote Access administrator doesn’t have such permissions). For more information, see Delegate Permissions to Link Group Policy Objects.
When Remote Access administrators configure Remote Access, they should always specify only the staging GPOs (not the production GPOs). This is true in the initial configuration of Remote Access and when performing additional configuration operations where additional GPOs are required; for example, when adding entry points in a multisite deployment or enabling client computers in additional domains.
After the Remote Access administrator completes any changes to the Remote Access configuration, the domain administrator should review the settings in the staging GPOs, and use the following procedure to copy the settings to the production GPOs.
[!TIP]
Perform the following procedure after each change of the Remote Access configuration.
To copy settings to the production GPOs
-
Verify that all of the staging GPOs in the Remote Access deployment have been replicated to all of the domain controllers in the domain. This is required to ensure the most up-to-date configuration is imported to the production GPOs. For more information, see Check Group Policy Infrastructure Status.
-
Export the settings by backing up all of the staging GPOs in the Remote Access deployment. For more information, see Back Up a Group Policy Object.
-
For each production GPO, change the security filters to match the security filters of the corresponding staging GPO. For more information, see Filter Using Security Groups.
[!NOTE]
This is required because Import Settings does not copy the security filter of the source GPO. -
For each production GPO, import the settings from the backup of the corresponding staging GPO as follows:
-
In the Group Policy Management Console (GPMC), expand the Group Policy Objects node in the forest and domain that contains the production Group Policy Object into which the settings will be imported.
-
Right-click the GPO, and click Import Settings.
-
In the Import Settings Wizard, on the Welcome page, click Next.
-
On the Backup GPO page, click Backup.
-
In the Back up Group Policy Object dialog box, in the Location box, enter the path for the location where you want to store the GPO backups, or click Browse to locate the folder.
-
In the Description box, type a description for the production GPO, and then click Back Up.
-
When the backup completes, click OK, and then on the Backup GPO page, click Next.
-
On the Backup location page, in the Backup folder box, enter the path for the location in which the backup of the corresponding staging GPO was stored in Step 2, or click Browse to locate the folder, and then click Next.
-
On the Source GPO page, select the Show only the latest version of each GPO check box to hide older backups, and select the corresponding staging GPO. Click View Settings to review the Remote Access settings before applying them to the production GPO, and then click Next.
-
On the Scanning Backup page, click Next, and then click Finish.
-
Windows PowerShell equivalent commands
The following Windows PowerShell cmdlet or cmdlets perform the same function as the preceding procedure. Enter each cmdlet on a single line, even though they may appear word-wrapped across several lines here because of formatting constraints.
-
To back up the staging client GPO «DirectAccess Client Settings — Staging» in domain «corp.contoso.com» to the backup folder «C:Backups»:
$backup = Backup-GPO "Name 'DirectAccess Client Settings - Staging' "Domain 'corp.contoso.com' "Path 'C:Backups' -
To see the security filtering of the staging client GPO «DirectAccess Client Settings — Staging» in domain «corp.contoso.com»:
Get-GPPermission "Name 'DirectAccess Client Settings - Staging' "Domain 'corp.contoso.com' "All | ?{ $_.Permission "eq 'GpoApply'} -
To add the security group «corp.contoso.comDirectAccess clients» to the security filter of the production client GPO «DirectAccess Client Settings » Production» in domain «corp.contoso.com»:
Set-GPPermission "Name 'DirectAccess Client Settings - Production' "Domain 'corp.contoso.com' "PermissionLevel GpoApply "TargetName 'corp.contoso.comDirectAccess clients' "TargetType Group -
To import settings from the backup to the production client GPO «DirectAccess Client Settings » Production» in domain «corp.contoso.com»:
Import-GPO "BackupId $backup.Id "Path $backup.BackupDirectory "TargetName 'DirectAccess Client Settings - Production' "Domain 'corp.contoso.com'
1.9 Configure security groups
The DirectAccess settings that are contained in the client computer Group Policy Object are applied only to computers that are members of the security groups that you specify when you configure Remote Access. In addition, if you are using security groups to manage your application servers, create a security group for these servers.
To create a security group for DirectAccess clients
-
On the Start screen, typedsa.msc, and then press ENTER. In the Active Directory Users and Computers console, in the left pane, expand the domain that will contain the security group, right-click Users, point to New, and then click Group.
-
In the New Object — Group dialog box, under Group name, enter the name for the security group.
-
Under Group scope, click Global, and under Group type, click Security, and then click OK.
-
Double-click the DirectAccess client computers security group, and in the properties dialog box, click the Members tab.
-
On the Members tab, click Add.
-
In the Select Users, Contacts, Computers, or Service Accounts dialog box, select the client computers that you want to enable for DirectAccess, and then click OK.
Windows PowerShell equivalent commands
The following Windows PowerShell cmdlet or cmdlets perform the same function as the preceding procedure. Enter each cmdlet on a single line, even though they may appear word-wrapped across several lines here because of formatting constraints.
New-ADGroup -GroupScope global -Name <DirectAccess_clients_group_name>
Add-ADGroupMember -Identity DirectAccess_clients_group_name -Members <computer_name>
1.10 Configure the network location server
The network location server should be a server with high availability, and it should have a valid SSL certificate that is trusted by the DirectAccess clients. There are two certificate options for the network location server certificate:
-
Private certificate
This certificate is based on the certificate template that you created by following the instructions in 1.5.2 Configure certificate templates.
-
Self-signed certificate
[!NOTE]
Self-signed certificates cannot be used in multisite deployments.
The following are required for either type of certificate, if they do not already exist:
-
A website certificate that is used for the network location server. The certificate subject should be the URL of the network location server.
-
A CRL distribution point that has high availability from the internal network.
[!NOTE]
If the network location server website is located on the DirectAccess server, a website is created automatically when you configure Remote Access. This site is bound to the server certificate that you provide.
To install the network location server certificate from an internal CA
-
On the server that will host the network location server website: On the Start screen, typemmc.exe, and then press ENTER.
-
In the MMC console, on the File menu, click Add/Remove Snap-in.
-
In the Add or Remove Snap-ins dialog box, click Certificates, click Add, click Computer account, click Next, click Local computer, click Finish, and then click OK.
-
In the console tree of the Certificates snap-in, open Certificates (Local Computer)PersonalCertificates.
-
Right-click Certificates, point to All Tasks, and then click Request New Certificate.
-
Click Next twice.
-
On the Request Certificates page, select the check box for the certificate template that you created by following the instructions in 1.5.2 Configure certificate templates. If required, click More information is required to enroll for this certificate.
-
In the Certificate Properties dialog box, on the Subject tab, in the Subject name area, in Type, select Common Name.
-
In Value, enter the FQDN of the network location server website, and then click Add.
-
In the Alternative name area, in Type, select DNS.
-
In Value, enter the FQDN of the network location server website, and then click Add.
-
On the General tab, in Friendly name, you can enter a name that will help you identify the certificate.
-
Click OK, click Enroll, and then click Finish.
-
In the details pane of the Certificates snap-in, verify that new certificate was enrolled with Intended Purposes of Server Authentication.
To configure the network location server
-
Set up a website on a high availability server. The website does not require any content, but when you test it, you might define a default page that provides a message when clients connect.
[!NOTE]
This step is not required if the network location server website is hosted on the DirectAccess server. -
Bind an HTTPS server certificate to the website. The common name of the certificate should match the name of the network location server site. Ensure that DirectAccess clients trust the issuing CA.
[!NOTE]
This step is not required if the network location server website is hosted on the DirectAccess server. -
Set up a CRL site that has high availability from the internal network.
CRL distribution points can be accessed through:
-
Web servers by using an HTTP-based URL, such as: https://crl.corp.contoso.com/crld/corp-APP1-CA.crl
-
File servers that are accessed through a universal naming convention (UNC) path, such as \crl.corp.contoso.comcrldcorp-APP1-CA.crl
If the internal CRL distribution point is reachable only over IPv6, you must configure a Windows Firewall with Advanced Security connection security rule to exempt IPsec protection from the IPv6 address of your intranet to the IPv6 addresses of your CRL distribution points.
-
-
Ensure that DirectAccess clients on the internal network can resolve the name of the network location server. Ensure that the name is not resolvable by DirectAccess clients on the Internet.
Next step
- Step 2: Configure Advanced DirectAccess Servers
| title | description | manager | ms.topic | ms.assetid | ms.author | author | ms.date |
|---|---|---|---|---|---|---|---|
|
Deploy a Single DirectAccess Server with Advanced Settings |
Learn about the DirectAccess scenario that uses a single DirectAccess server, and allows you to deploy DirectAccess with advanced settings. |
brianlic |
article |
b211a9ca-1208-4e1f-a0fe-26a610936c30 |
jgerend |
JasonGerend |
08/07/2020 |
Deploy a Single DirectAccess Server with Advanced Settings
Applies to: Windows Server 2022, Windows Server 2019, Windows Server 2016
This topic provides an introduction to the DirectAccess scenario that uses a single DirectAccess server, and allows you to deploy DirectAccess with advanced settings.
Before you begin deploying, see the list of unsupported configurations, known issues, and prerequisites
You can use the following topics to review prerequisites and other information before you deploy DirectAccess.
-
DirectAccess Unsupported Configurations
-
Prerequisites for Deploying DirectAccess
Scenario description
In this scenario, a single computer running either Windows Server 2016, Windows Server 2012 R2 or Windows Server 2012, is configured as a DirectAccess server with advanced settings.
[!NOTE]
If you want to configure a basic deployment with simple settings only, see Deploy a Single DirectAccess Server Using the Getting Started Wizard. In the simple scenario, DirectAccess is configured with default settings by using a wizard, without any need to configure infrastructure settings such as a certification authority (CA) or Active Directory security groups.
In this scenario
To set up a single DirectAccess server with advanced settings, you must complete several planning and deployment steps.
Prerequisites
Before you begin, you can review the following requirements.
-
Windows Firewall must be enabled on all profiles.
-
The DirectAccess server is the network location server.
-
You want all wireless computers in the domain where you install the DirectAccess server to be DirectAccess-enabled. When you deploy DirectAccess, it is automatically enabled on all mobile computers in the current domain.
[!IMPORTANT]
Some technologies and configurations are not supported when you deploy DirectAccess.
- Intra-Site Automatic Tunnel Addressing Protocol (ISATAP) in the corporate network is not supported. If you are using ISATAP, you must remove it and use native IPv6.
Planning steps
Planning is divided into two phases:
-
Planning for the DirectAccess infrastructure. This phase describes the planning required to set up the network infrastructure before beginning the DirectAccess deployment. It includes planning the network and server topology, certificate planning, DNS, Active Directory and Group Policy object (GPO) configuration, and the DirectAccess network location server.
-
Planning for the DirectAccess deployment. This phase describes the planning steps required to prepare for the DirectAccess deployment. It includes planning for DirectAccess client computers, server and client authentication requirements, VPN settings, infrastructure servers, and management and application servers.
Deployment steps
Deployment is divided into three phases:
-
Configuring the DirectAccess infrastructure. This phase includes configuring network and routing, configuring firewall settings if required, configuring certificates, DNS servers, Active Directory and GPO settings, and the DirectAccess network location server.
-
Configuring DirectAccess server settings. This phase includes steps for configuring DirectAccess client computers, the DirectAccess server, infrastructure servers, management and application servers.
-
Verifying the deployment. This phase includes steps to verify the DirectAccess deployment.
For detailed deployment steps, see Install and Configure Advanced DirectAccess.
Practical applications
Deploying a single DirectAccess server provides the following:
-
Ease of access. Managed client computers running Windows 10, Windows 8.1, Windows 8, and Windows 7 can be configured as DirectAccess client computers. These clients can access internal network resources via DirectAccess any time they are located on the Internet without needing to log in to a VPN connection. Client computers not running one of these operating systems can connect to the internal network via VPN.
-
Ease of management. DirectAccess client computers located on the Internet can be remotely managed by Remote Access administrators over DirectAccess, even when the client computers are not located in the internal corporate network. Client computers that do not meet corporate requirements can be remediated automatically by management servers. Both DirectAccess and VPN are managed in the same console and with the same set of wizards. Additionally, one or more DirectAccess servers can be managed from a single Remote Access Management console
Roles and features required for this scenario
The following table lists the roles and features that are required for this scenario:
| Role/feature | How it supports this scenario |
|---|---|
| Remote Access role | The role is installed and uninstalled using the Server Manager console or Windows PowerShell. This role encompasses both DirectAccess and Routing and Remote Access Services (RRAS). The Remote Access role consists of two components:
1. DirectAccess and RRAS VPN. DirectAccess and VPN are managed together in the Remote Access Management console. The Remote Access server role is dependent on the following server roles/features: — Internet Information Services (IIS) Web Server — This feature is required to configure the network location server on the DirectAccess server, and the default web probe. |
| Remote Access Management Tools feature | This feature is installed as follows:
— It is installed by default on a DirectAccess server when the Remote Access role is installed, and supports the Remote Management console user interface and Windows PowerShell cmdlets. The Remote Access Management Tools feature consists of the following: — Remote Access graphical user interface (GUI) Dependencies include: — Group Policy Management Console |
Hardware requirements
Hardware requirements for this scenario include the following:
-
Server requirements:
-
A computer that meets the hardware requirements for Windows Server 2016, Windows Server 2012 R2 or Windows Server 2012 .
-
The server must have at least one network adapter installed, enabled, and connected to the internal network. When two adapters are used, there should be one adapter connected to the internal corporate network, and one connected to the external network (Internet, or private network).
-
If Teredo is required as an IPv4 to IPv6 transition protocol, the external adapter of the server requires two consecutive public IPv4 addresses. If a single IP address is available, then only IP-HTTPS can be used as the transition protocol.
-
At least one domain controller. The DirectAccess server and DirectAccess clients must be domain members.
-
A certification authority (CA) is required if you do not want to use self-signed certificates for IP-HTTPS or the network location server, or if you want to use client certificates for client IPsec authentication. Alternatively, you can request certificates from a public CA.
-
If the network location server is not located on the DirectAccess server, a separate web server is required to run it.
-
-
Client requirements:
-
A client computer must be running Windows 10, Windows 8, or Windows 7.
[!NOTE]
The following operating systems can be used as DirectAccess clients: Windows 10, Windows Server 2012 R2 , Windows Server 2012 , Windows 8 Enterprise, Windows 7 Enterprise, or Windows 7 Ultimate.
-
-
Infrastructure and management server requirements:
-
During remote management of DirectAccess client computers, clients initiate communications with management servers such as domain controllers, System Center Configuration Servers, and Health Registration Authority (HRA) servers for services that include Windows and antivirus updates and Network Access Protection (NAP) client compliance. The required servers should be deployed before beginning the Remote Access deployment.
-
If Remote Access requires client NAP compliance, NPS and HRS servers should be deployed before beginning remote access deployment
-
If VPN is enabled, a DHCP server is required to allocate IP addresses automatically to VPN clients, if a static address pool is not used.
-
Software requirements
There are a number of requirements for this scenario:
-
Server requirements:
-
The DirectAccess server must be a domain member. The server can be deployed at the edge of the internal network, or behind an edge firewall or other device.
-
If the DirectAccess server is located behind an edge firewall or NAT device, the device must be configured to allow traffic to and from the DirectAccess server.
-
The person deploying remote access on the server requires local administrator permissions on the server, and domain user permissions. In addition, the administrator requires permissions for the GPOs used in DirectAccess deployment. To take advantage of the features that restricts DirectAccess deployment to mobile computers only, permissions to create a WMI filter on the domain controller are required.
-
-
Remote Access client requirements:
-
DirectAccess clients must be domain members. Domains containing clients can belong to the same forest as the DirectAccess server, or have a two-way trust with the DirectAccess server forest or domain.
-
An Active Directory security group is required to contain the computers that will be configured as DirectAccess clients. If a security group is not specified when configuring DirectAccess client settings, by default the client GPO is applied on all laptop computers in the Domain Computers security group.
[!NOTE]
It is recommended that you create a security group for each domain that contains DirectAccess client computers.[!IMPORTANT]
If you have enabled Teredo in your DirectAccess deployment, and you want to provide access to Windows 7 clients, ensure that the clients are upgraded to Windows 7 with SP1. Clients using Windows 7 RTM will not be able to connect over Teredo. However, these clients will still be able to connect to the corporate network over IP-HTTPS.
-
See also
The following table provides links to additional resources.
| Content type | References |
|---|---|
| Deployment | DirectAccess Deployment Paths in Windows Server
Deploy a Single DirectAccess Server Using the Getting Started Wizard |
| Tools and settings | Remote Access PowerShell cmdlets |
| Community resources | DirectAccess Survival Guide
DirectAccess Wiki entries |
| Related technologies | How IPv6 works |
Содержание
- Deploy a Single DirectAccess Server with Advanced Settings
- Перед началом развертывания ознакомьтесь со списком неподдерживаемых конфигураций, известных проблем и предварительных условий.
- Описание сценария
- Содержание сценария
- Предварительные требования
- Шаги планирования
- Шаги по развертыванию
- Практическое применение
- Роли и компоненты, необходимые для данного сценария
- Требования к оборудованию
- Требования к программному обеспечению
- См. также раздел
- DirectAccess
- Развертывание одного сервера DirectAccess с помощью мастера начальной настройки
- Перед началом развертывания ознакомьтесь со списком неподдерживаемых конфигураций, известных проблем и предварительных условий.
- Описание сценария
- Содержание сценария
- Предварительные требования
- Шаги планирования
- Шаги по развертыванию
- Практическое применение
- Роли и компоненты, используемые в данном сценарии
- Требования к оборудованию
- Требования к программному обеспечению
- См. также раздел
- Шаг 2. Настройка расширенных серверов DirectAccess
- 2.1. Установка роли удаленного доступа
- Установка роли удаленного доступа
- 2.2. Настройка типа развертывания
- Настройка типа развертывания
- 2.3. Настройка клиентов DirectAccess
- Настройка клиентов DirectAccess
- 2.4. Настройка сервера удаленного доступа
- Настройка сервера удаленного доступа
- 2.5. Настройка серверов инфраструктуры
- Настройка серверов инфраструктуры
- 2.6. Настройка серверов приложений
- Настройка серверов приложений
- 2.7. Сводка конфигурации и альтернативные объекты групповой политики
- 2.8. Настройка сервера удаленного доступа с помощью Windows PowerShell
Deploy a Single DirectAccess Server with Advanced Settings
Область применения: Windows Server 2022, Windows Server 2019, Windows Server 2016
В этом разделе приводятся общие сведения о сценарии DirectAccess, использующем один сервер DirectAccess, и разрешается развертывание DirectAccess с дополнительными параметрами.
Перед началом развертывания ознакомьтесь со списком неподдерживаемых конфигураций, известных проблем и предварительных условий.
Следующие разделы содержат предварительные требования и другие сведения перед развертыванием DirectAccess.
Описание сценария
в этом сценарии один компьютер, на котором выполняется Windows Server 2016, Windows Server 2012 R2 или Windows Server 2012, настроен в качестве сервера directaccess с дополнительными параметрами.
Если требуется настроить базовое развертывание лишь с простыми настройками, см. раздел Deploy a Single DirectAccess Server Using the Getting Started Wizard. В простом сценарии DirectAccess настраивается с параметрами по умолчанию с помощью мастера, при этом отсутствует необходимость настраивать параметры инфраструктуры, такие как центр сертификации (ЦС) или группы безопасности Active Directory.
Содержание сценария
Чтобы настроить один сервер DirectAccess с расширенными параметрами, необходимо выполнить несколько этапов планирования и развертывания.
Предварительные требования
Прежде чем начать, изучите следующие требования.
Брандмауэр Windows должен быть включен для всех профилей.
Сервер DirectAccess действует как сервер сетевых расположений.
Вы хотите, чтобы все беспроводные компьютеры в домене, где установлен сервер DirectAccess, могли использовать DirectAccess. При развертывании службы DirectAccess она автоматически активируется на всех мобильных компьютерах в текущем домене.
Некоторые технологии и конфигурации не поддерживаются при развертывании DirectAccess.
Шаги планирования
Планирование разделено на два этапа.
Планирование инфраструктуры DirectAccess. На этом этапе описывается планирование до начала развертывания DirectAccess, необходимое для настройки сетевой инфраструктуры. На этом этапе планируются топология сети и серверов, сертификаты, DNS, конфигурация Active Directory и объектов групповой политики (GPO), а также сервер сетевых расположений DirectAccess.
Планирование развертывания DirectAccess. На этом этапе описывается планирование для подготовки к развертыванию DirectAccess. Он включает в себя планирование требований при проверке подлинности серверов, клиентов и компьютеров клиентов DirectAccess, параметров VPN, инфраструктуры серверов, серверов управления и серверов приложений.
Шаги по развертыванию
Развертывание разделено на три этапа.
Настройка инфраструктуры DirectAccess. Этот этап включает в себя настройку сети и маршрутизации, при необходимости — настройку параметров брандмауэра, настройку сертификатов, DNS-серверов, параметров Active Directory и объектов групповой политики, сервера сетевых расположений DirectAccess.
Настройка параметров сервера DirectAccess. Этот этап включает в себя действия для настройки компьютеров клиентов DirectAccess, сервера DirectAccess, серверов инфраструктуры, серверов управления и серверов приложений.
Проверка развертывания. На этом этапе выполняется проверка развертывания DirectAccess.
Практическое применение
Ниже описываются преимущества, предоставляемые развертыванием единого сервера DirectAccess.
Упрощенный доступ. управляемые клиентские компьютеры под управлением Windows 10, Windows 8.1, Windows 8 и Windows 7 можно настроить в качестве клиентских компьютеров directaccess. Эти клиенты могут получать доступ к ресурсам внутренней сети через DirectAccess в любое время, когда они находятся в Интернете, без необходимости входа в VPN-подключение. Клиентские компьютеры под управлением других операционных систем могут подключаться к внутренней сети через VPN.
Упрощенное управление. Администраторы могут управлять клиентскими компьютерами DirectAccess, расположенными в Интернете, через DirectAccess с помощью удаленного доступа, даже если эти компьютеры не находятся во внутренней корпоративной сети. Серверы управления могут автоматически исправить клиентские компьютеры, которые не отвечают корпоративным требованиям. Управление DirectAccess и VPN осуществляется с помощью одной консоли и одного набора мастеров. Кроме того, при помощи одной консоли управления DirectAccess можно администрировать один или более серверов удаленного доступа.
Роли и компоненты, необходимые для данного сценария
В следующей таблице перечислены роли и компоненты, необходимые для данного сценария.
| Роль/компонент | Способ поддержки сценария |
|---|---|
| Роль удаленного доступа | Роль можно установить и удалить с помощью консоли диспетчера серверов или Windows PowerShell. В эту роль входят и DirectAccess, и службы маршрутизации и удаленного доступа (RRAS). Роль удаленного доступа включает два компонента.
1. DirectAccess и VPN-подключение к RRAS. Управление DirectAccess и VPN осуществляется вместе в консоли управления удаленным доступом. Роль сервера удаленного доступа зависит от следующих ролей и компонентов сервера: -службы IIS (IIS). эта функция необходима для настройки сервера сетевых расположений на сервере directaccess и веб-проверки по умолчанию. |
| Средства управления удаленным доступом | Этот компонент устанавливается описанным ниже образом.
— он устанавливается по умолчанию на сервере directaccess при установке роли удаленного доступа и поддерживает пользовательский интерфейс консоли удаленного управления и командлеты Windows PowerShell. Средства управления удаленным доступом включают следующие элементы: — Графический пользовательский интерфейс для удаленного доступа (GUI) Зависимости включают следующее: — Консоль управления групповыми политиками |
Требования к оборудованию
Для этого сценария действуют следующие требования к оборудованию.
Требования к серверу.
компьютер, отвечающий требованиям к оборудованию для Windows Server 2016, Windows Server 2012 R2 или Windows Server 2012.
Сервер должен иметь по меньшей мере один сетевой адаптер, установленный, включенный и подключенный к внутренней сети. При использовании двух адаптеров один адаптер должен быть подключен к внутренней корпоративной сети, а другой — к внешней сети (к Интернету или частной сети).
Если в качестве протокола перехода с IPv4 на IPv6 требуется Teredo, внешнему адаптеру сервера необходимы два последовательных открытых адреса IPv4. Если доступен только один IP-адрес, в качестве протокола перехода можно использовать только IP-HTTPS.
Минимум один контроллер домена. Сервер DirectAccess и клиенты DirectAccess должны быть членами домена.
Если вы не хотите использовать самозаверяющие сертификаты для IP-HTTPS или сервера сетевых расположений либо хотите использовать сертификаты клиентов для проверки подлинности IPsec клиентов, требуется центр сертификации (ЦС). Вы также можете запрашивать сертификаты у общедоступного ЦС.
Если сервер сетевых расположений находится не на сервере DirectAccess, для него потребуется отдельный веб-сервер.
Требования к клиенту.
клиентский компьютер должен работать под управлением Windows 10, Windows 8 или Windows 7.
в качестве клиентов directaccess можно использовать следующие операционные системы: Windows 10, Windows Server 2012 R2, Windows Server 2012, Windows 8 Корпоративная, Windows 7 Корпоративная или Windows 7 Максимальная.
Требования к серверу инфраструктуры и управления.
Во время удаленного управления клиентскими компьютерами DirectAccess клиенты инициируют связь с серверами управления, например контроллерами доменов, серверами System Center Configuration и центра регистрации работоспособности для служб, которые включают обновления Windows и антивирусной программы и соответствие клиента принципам защиты сетевого доступа (NAP). Необходимые серверы следует развернуть до начала развертывания удаленного доступа.
Если для удаленного доступа требуется соответствие клиента требованиям NAP, серверы NPS и HRS необходимо развернуть до начала развертывания удаленного доступа.
Если включена VPN, необходим DHCP-сервер для автоматического выделения IP-адресов VPN-клиентам, в случае когда статический пул адресов не используется.
Требования к программному обеспечению
Для этого сценария действуют следующие требования.
Требования к серверу.
Сервер DirectAccess должен быть членом домена. Сервер можно развернуть на границе внутренней сети или за пограничным межсетевым экраном либо другим устройством.
Если сервер DirectAccess расположен после пограничного брандмауэра или устройства NAT, устройство необходимо настроить, чтобы передавать трафик на сервер DirectAccess и от него.
Пользователю, который развертывает удаленный доступ на сервере, требуются права администратора на сервере или права пользователя домена. Кроме того, администратору требуются права для объектов групповой политики, которые используются при развертывании DirectAccess. Чтобы воспользоваться преимуществами компонентов, ограничивающих развертывание DirectAccess только мобильными компьютерами, необходимы права на создание фильтра WMI на контроллере домена.
Требования к клиенту удаленного доступа.
Клиенты DirectAccess должны входить в состав домена. Домены, членами которых являются клиенты, могут принадлежать к общему лесу с сервером DirectAccess или иметь двустороннее доверие с лесом или доменом сервера DirectAccess.
Требуется группа безопасности Active Directory, в которую необходимо включить компьютеры, настраиваемые как клиенты DirectAccess. Если при настройке параметров клиента DirectAccess группа безопасности не была указана, по умолчанию объект групповой политики клиента применяется ко всем ноутбукам в группе безопасности компьютеров домена.
Рекомендуется создать группу безопасности для каждого домена, содержащего клиентские компьютеры DirectAccess.
если вы включили Teredo в развертывании directaccess и хотите предоставить доступ к клиентам Windows 7, убедитесь, что клиенты обновлены до Windows 7 с пакетом обновления 1 (SP1). клиенты, использующие Windows 7 RTM, не смогут подключаться через Teredo. Однако они по-прежнему смогут подключиться к корпоративной сети по протоколу IP-HTTPS.
См. также раздел
В следующей таблице перечислены ссылки на дополнительные ресурсы.
Источник
DirectAccess
Applies to: Windows Server 2022, Windows Server 2019, Windows Server 2016
You can use this topic for a brief overview of DirectAccess, including the server and client operating systems that support DirectAccess, and for links to additional DirectAccess documentation for Windows Server 2016.
In addition to this topic, the following DirectAccess documentation is available.
Do not attempt to deploy Remote Access on a virtual machine (VM) in Microsoft Azure. Using Remote Access in Microsoft Azure is not supported. You cannot use Remote Access in an Azure VM to deploy VPN, DirectAccess, or any other Remote Access feature in Windows Server 2016 or earlier versions of Windows Server. For more information, see Microsoft server software support for Microsoft Azure virtual machines.
DirectAccess provides support only for domain-joined clients that include operating system support for DirectAccess.
The following server operating systems support DirectAccess.
You can deploy all versions of Windows Server 2016 as a DirectAccess client or a DirectAccess server.
You can deploy all versions of Windows Server 2012 R2 as a DirectAccess client or a DirectAccess server.
You can deploy all versions of Windows Server 2012 as a DirectAccess client or a DirectAccess server.
You can deploy all versions of Windows Server 2008 R2 as a DirectAccess client or a DirectAccess server.
The following client operating systems support DirectAccess.
Windows 10 Enterprise
Windows 10 Enterprise 2015 Long Term Servicing Branch (LTSB)
Источник
Развертывание одного сервера DirectAccess с помощью мастера начальной настройки
Область применения: Windows Server 2022, Windows Server 2019, Windows Server 2016
В этом разделе описывается сценарий DirectAccess, в котором используется один сервер DirectAccess и представлена несложная процедура развертывания DirectAccess.
Перед началом развертывания ознакомьтесь со списком неподдерживаемых конфигураций, известных проблем и предварительных условий.
Следующие разделы содержат предварительные требования и другие сведения перед развертыванием DirectAccess.
Описание сценария
в этом сценарии один компьютер, на котором выполняется Windows Server 2016, Windows Server 2012 R2 или Windows Server 2012, настроен в качестве сервера directaccess с параметрами по умолчанию на нескольких простых шагах мастера, без необходимости настройки параметров инфраструктуры, таких как центр сертификации или группа безопасности Active Directory #d0.
Сведения о настройке расширенного развертывания с пользовательскими параметрами см. в разделе Deploy a Single DirectAccess Server with Advanced Settings.
Содержание сценария
Чтобы настроить базовый сервер DirectAccess, требуется выполнить несколько этапов планирования и развертывания.
Предварительные требования
Перед началом развертывания этого сценария ознакомьтесь со списком важных требований.
Брандмауэр Windows должен быть включен для всех профилей.
этот сценарий поддерживается только в том случае, если клиентские компьютеры работают Windows 10, Windows 8.1 или Windows 8.
ISATAP в корпоративной сети не поддерживается. Если вы используете протокол ISATAP, необходимо удалить его и перейти на собственный IPv6.
Инфраструктура открытых ключей (PKI) не требуется.
Для развертывания не поддерживается двухфакторная проверка подлинности. Для проверки подлинности требуются учетные данные домена.
DirectAccess автоматически развертывается на всех мобильных компьютерах в текущем домене.
Трафик в Интернет не передается по туннелю DirectAccess. Конфигурация принудительного туннелирования не поддерживается.
Сервер DirectAccess действует как сервер сетевых расположений.
Защита доступа к сети (NAP) не поддерживается.
Изменение политик вне консоли управления DirectAccess или командлетов PowerShell не поддерживается.
Шаги планирования
Планирование разделено на два этапа.
Планирование инфраструктуры DirectAccess. На этом этапе описывается планирование до начала развертывания DirectAccess, необходимое для настройки сетевой инфраструктуры. Включает в себя планирование топологий сети и серверов, а также сервера сетевых расположений DirectAccess.
Планирование развертывания DirectAccess. На этом этапе описывается планирование для подготовки к развертыванию DirectAccess. Он включает в себя планирование требований при проверке подлинности серверов, клиентов и компьютеров клиентов DirectAccess, параметров VPN, инфраструктуры серверов, серверов управления и серверов приложений.
Шаги по развертыванию
Развертывание разделено на три этапа.
Настройка инфраструктуры DirectAccess. на этом этапе включается настройка сети и маршрутизации, Настройка параметров брандмауэра при необходимости, Настройка сертификатов, DNS-серверов, параметров Active Directory и объектов групповой политики и сервера сетевого расположения DirectAccess.
Настройка параметров сервера DirectAccess. Этот этап включает в себя действия для настройки компьютеров клиентов DirectAccess, сервера DirectAccess, серверов инфраструктуры, серверов управления и серверов приложений.
Проверка развертывания. Этот этап включает шаги, позволяющие убедиться, что развертывание работает должным образом.
Более подробное описание шагов развертывания см. в разделе Install and Configure Basic DirectAccess.
Практическое применение
Ниже описываются преимущества, предоставляемые развертыванием единого сервера удаленного доступа.
Простота доступа. в качестве клиентов directaccess можно настроить управляемые клиентские компьютеры под управлением Windows 10, Windows 8.1, Windows 8 или Windows 7. Эти клиенты могут получать доступ к ресурсам внутренней сети через DirectAccess в любое время, когда они находятся в Интернете, без необходимости входа в VPN-подключение. Клиентские компьютеры, использующие другие операционные системы, могут подключаться к внутренней сети с помощью традиционных VPN-подключений.
Простота управления. Администраторы могут управлять клиентскими компьютерами DirectAccess, расположенными в Интернете, через DirectAccess с помощью удаленного доступа, даже если эти компьютеры не находятся во внутренней корпоративной сети. Серверы управления могут автоматически исправить клиентские компьютеры, которые не отвечают корпоративным требованиям. Управление DirectAccess и VPN осуществляется с помощью одной консоли и одного набора мастеров. Кроме того, при помощи одной консоли управления удаленным доступом можно администрировать один или более серверов удаленного доступа.
Роли и компоненты, используемые в данном сценарии
В следующей таблице перечислены роли и компоненты, необходимые для сценария.
| Роль/компонент | Способ поддержки сценария |
|---|---|
| Роль удаленного доступа | Роль можно установить и удалить с помощью консоли диспетчера серверов или Windows PowerShell. Эта роль включает как DirectAccess, который раньше был компонентом Windows Server 2008 R2, так и службы маршрутизации и удаленного доступа, которые были службой роли в рамках роли сервера служб политики сети и доступа (NPAS). Роль удаленного доступа включает два компонента.
1. VPN-подключение directaccess и маршрутизация и удаленный службы Access (RRAS). Управление DirectAccess и VPN осуществляется вместе в консоли управления удаленным доступом. Роль сервера удаленного доступа зависит от следующих ролей и компонентов сервера: -службы IIS (IIS). эта функция необходима для настройки сервера сетевых расположений на сервере удаленного доступа и веб-проверки по умолчанию. |
| Средства управления удаленным доступом | Этот компонент устанавливается описанным ниже образом.
— он устанавливается по умолчанию на сервере удаленного доступа при установке роли удаленного доступа и поддерживает пользовательский интерфейс консоли удаленного управления и командлеты Windows PowerShell. Средства управления удаленным доступом включают следующие элементы: — Графический интерфейс удаленного доступа Зависимости включают следующее: — Консоль управления групповыми политиками |
Требования к оборудованию
Для этого сценария действуют следующие требования к оборудованию.
Требования к серверу.
компьютер, отвечающий требованиям к оборудованию для Windows Server 2016, Windows Server 2012 R2 или Windows Server 2012.
Сервер должен иметь по меньшей мере один сетевой адаптер, установленный, включенный и подключенный к внутренней сети. При использовании двух адаптеров один адаптер должен быть подключен к внутренней корпоративной сети, а другой — к внешней сети (к Интернету или частной сети).
Минимум один контроллер домена. Сервер удаленного доступа и клиенты DirectAccess должны быть членами домена.
Требования к клиенту.
клиентский компьютер должен работать под управлением Windows 10, Windows 8.1 или Windows 8.
в качестве клиентов directaccess могут использоваться только следующие операционные системы: Windows 10 Корпоративная, Windows 8.1 Корпоративная, Windows Server 2016, Windows Server 2012 r2, Windows Server 2012, Windows 8 Корпоративная, Windows Server 2008 r2, Windows 7 Корпоративная и Windows 7 Максимальная.
Требования к серверу инфраструктуры и управления.
требуется DNS-сервер, на котором работает Windows Server 2016, Windows Server 2012 R2, Windows Server 2012, Windows server 2008 SP2 или Windows server 2008 R2.
Требования к программному обеспечению
Для этого сценария действуют следующие требования.
Требования к серверу.
Сервер удаленного доступа должен быть членом домена. Сервер можно развернуть на границе внутренней сети или за пограничным межсетевым экраном либо другим устройством.
Если сервер удаленного доступа расположен за пограничным межсетевым экраном или устройством преобразования сетевых адресов (NAT), на устройстве необходимо разрешить трафик на сервер удаленного доступа и с него.
Пользователю, который развертывает удаленный доступ на сервере, требуются права администратора на сервере или права пользователя домена. Кроме того, администратору требуются права для объектов групповой политики, которые используются при развертывании DirectAccess. Чтобы воспользоваться преимуществами компонентов, ограничивающих развертывание DirectAccess только мобильными компьютерами, необходимы права на создание фильтра WMI на контроллере домена.
Требования к клиенту удаленного доступа.
Клиенты DirectAccess должны входить в состав домена. Домены, членами которых являются клиенты, могут принадлежать одному лесу с сервером удаленного доступа или иметь двустороннее доверие с лесом сервера удаленного доступа.
Требуется группа безопасности Active Directory, в которую необходимо включить компьютеры, настраиваемые как клиенты DirectAccess. Если при настройке параметров клиента DirectAccess группа безопасности не была указана, по умолчанию объект групповой политики клиента применяется ко всем ноутбукам в группе безопасности компьютеров домена. в качестве клиентов directaccess могут использоваться только следующие операционные системы: Windows Server 2016, Windows Server 2012 R2, Windows Server 2012, Windows Server 2008 R2, Windows 8 Корпоративная, Windows 7 Корпоративная и Windows 7 Максимальная.
См. также раздел
В следующей таблице перечислены ссылки на дополнительные ресурсы.
Источник
Шаг 2. Настройка расширенных серверов DirectAccess
Область применения: Windows Server 2022, Windows Server 2019, Windows Server 2016
В этом разделе описывается, как настроить параметры клиента и сервера, необходимые для расширенного развертывания службы удаленного доступа, в котором используется один сервер удаленного доступа в смешанной среде с поддержкой IPv4 и IPv6. Прежде чем приступать к развертыванию, убедитесь, что выполнены шаги по планированию, описанные в статье планирование расширенного развертывания DirectAccess.
| Задача | Описание |
|---|---|
| 2.1. Установка роли удаленного доступа | Установите роль удаленного доступа. |
| 2.2. Настройка типа развертывания | Настройте тип развертывания как DirectAccess и VPN, только DirectAccess или только VPN. |
| Планирование расширенного развертывания DirectAccess | Настройте сервер удаленного доступа с использованием групп безопасности, содержащими клиенты DirectAccess. |
| 2.4. Настройка сервера удаленного доступа | Настройте параметры сервера удаленного доступа. |
| 2.5. Настройка серверов инфраструктуры | Настройте серверы инфраструктуры, используемые в организации. |
| 2.6. Настройка серверов приложений | Настройте серверы приложений так, чтобы они требовали применения проверки подлинности и шифрования. |
| 2.7. Сводка конфигурации и альтернативные объекты групповой политики | Просмотрите сводку конфигурации удаленного доступа и при необходимости измените объекты GPO. |
| 2.8. Настройка сервера удаленного доступа с помощью Windows PowerShell | Настройте удаленный доступ с помощью Windows PowerShell. |
В этом разделе приводятся примеры командлетов Windows PowerShell, которые можно использовать для автоматизации некоторых описанных процедур. Дополнительные сведения см. в разделе Использование командлетов.
2.1. Установка роли удаленного доступа
Для развертывания службы удаленного доступа необходимо установить роль удаленного доступа на сервере в организации, который будет действовать как сервер удаленного доступа.
Установка роли удаленного доступа
На сервере удаленного доступа в консоли диспетчер сервера на панели мониторингащелкните Добавить роли и компоненты.
Нажмите кнопку Далее трижды, чтобы перейти на страницу выбора роли сервера.
На странице Выбор ролей сервера выберите Удаленный доступ, щелкните Добавить компоненты, а затем нажмите кнопку Далее.
Нажмите кнопку Далее пять раз.
На странице Подтверждение выбранных элементов для установки нажмите кнопку Установить.
На странице Ход установки убедитесь в успешном завершении установки, а затем нажмите кнопку Закрыть.
Windows PowerShell эквивалентные команды
Следующие командлеты Windows PowerShell выполняют ту же функцию, что и предыдущая процедура. Вводите каждый командлет в одной строке, несмотря на то, что здесь они могут отображаться разбитыми на несколько строк из-за ограничений форматирования.
2.2. Настройка типа развертывания
Службу удаленного доступа можно развернуть с помощью консоли управления удаленным доступом тремя способами:
DirectAccess и VPN;
В примерах в данном руководстве используется развертывание только с DirectAccess.
Настройка типа развертывания
На сервере удаленного доступа откройте консоль управления удаленным доступом: на начальном экране введитеRAMgmtUI.exeи нажмите клавишу ВВОД. Если появится диалоговое окно контроля учетных записей, подтвердите, что отображаемое в нем действие именно то, которое требуется, и нажмите кнопку Да.
В средней области консоли управления удаленным доступом щелкните Запустить мастер настройки удаленного доступа.
В диалоговом окне Настройка удаленного доступа выберите, будет ли развернут DirectAccess и VPN, только DirectAccess или только VPN.
2.3. Настройка клиентов DirectAccess
Чтобы настроить клиентский компьютер для использования DirectAccess, он должен принадлежать выбранной группе безопасности. После настройки DirectAccess клиентские компьютеры в группе безопасности настраиваются для получения объекта групповой политики (GPO) DirectAccess. Вы также может настроить сценарий развертываний, позволяющий настроить DirectAccess для клиентского доступа и удаленного управления или только удаленного управления.
Настройка клиентов DirectAccess
В средней области консоли управления удаленным доступом в разделе Этап 1. Удаленные клиенты щелкните Настроить.
В мастере настройки клиента DirectAccess на странице Сценарий развертывания выберите сценарий развертывания, который будет использовать в организации (Полный DirectAccess или Только удаленное управление), а затем нажмите кнопку Далее.
На странице Выбор групп щелкните Добавить.
В диалоговом окне Выбор групп выберите группы безопасности, в которые входят клиентские компьютеры DirectAccess.
Установите флажок Разрешить DirectAccess только для мобильных компьютеров, чтобы предоставить доступ к внутренней сети только мобильным компьютерам.
При необходимости установите флажок Использовать принудительное туннелирование, чтобы направлять весь клиентский трафик (во внутреннюю сеть и в Интернет) через сервер удаленного доступа.
Щелкните Далее.
На странице Помощник по подключению к сети:
Добавьте в таблицу ресурсы, которые будут использоваться для определения возможности подключения к внутренней сети. Если другие ресурсы не настроены, веб-проба по умолчанию создается автоматически.
При настройке расположений веб-пробы для определения возможности подключения к корпоративной сети убедитесь, настроен по крайней мере одна проба на основе HTTP. Только одной пробы ping будет недостаточно, это может привести к неточному определению возможности подключения. Это связано с тем, что для ping существует исключение в IPsec, в результате невозможно определить, правильно ли настроены туннели IPsec.
Добавьте адрес электронной почты службы поддержки, чтобы позволить пользователям отправлять информацию при возникновении проблем с подключением.
Введите понятное имя для подключения DirectAccess. Это имя отображается в списке сетей, когда пользователь щелкает значок сети в области уведомлений.
При необходимости установите флажок Разрешить клиентам DirectAccess использовать локальное разрешение имен.
Если локальное разрешение имен разрешено, пользователи, запускающие помощник по подключению к сети, могут выбрать возможность разрешения имен с помощью DNS-серверов, настроенных на клиентском компьютере DirectAccess.
Нажмите кнопку Готово.
2.4. Настройка сервера удаленного доступа
Для развертывания службы удаленного доступа необходимо настроить сервер удаленного доступа с соответствующими сетевыми адаптерами, URL-адрес сервера удаленного доступа, к которому будут подключаться клиентские компьютеры (адрес ConnectTo), сертификат IP-HTTPS с субъектом, соответствующим адресу ConnectTo, параметры IPv6 и проверку подлинности клиентских компьютеров.
Настройка сервера удаленного доступа
В средней области консоли управления удаленным доступом в разделе Этап 2. Сервер удаленного доступа щелкните Настроить.
На странице Топология сети мастера настройки сервера удаленного доступа выберите топологию, которая будет использоваться в вашей организации. В поле Введите общедоступное имя или IPv4-адрес, используемые клиентами для подключения к серверу удаленного доступа введите общедоступное имя развертывания (оно совпадает с именем субъекта сертификата IP-HTTPS, например edge1.contoso.com), а затем нажмите кнопку Далее.
На странице Сетевые адаптеры мастер автоматически обнаруживает сетевые адаптеры для сетей в вашем развертывании. Если мастер не определяет правильные сетевые адаптеры, вручную выберите нужные адаптеры. Мастер также автоматически определяет сертификат IP-HTTPS на основе общедоступного имя развертывания, заданного на предыдущем шаге мастера. Если мастер не обнаруживает верный сертификат IP-HTTPS, нажмите кнопку Обзор, чтобы вручную выбрать правильный сертификат, и нажмите Далее.
На странице Конфигурация префикса (она отображается, только если во внутренней сети развернут протокол IPv6) мастер автоматически определяет параметры IPv6, используемые во внутренней сети. Если для развертывания требуются дополнительные префиксы, настройте префиксы IPv6 для внутренней сети, префикс IPv6, который будет назначен клиентским компьютерам DirectAccess, и префикс IPv6, который будет назначен клиентским компьютерам VPN.
Можно указать несколько внутренних префиксов IPv6 в списке, разделенным точкой запятой, например: 2001:db8:1::/48;2001:db8:2::/48.
На странице Проверка подлинности выполните следующие действия.
В разделе Проверка подлинности пользователя щелкните Учетные данные Active Directory. Чтобы настроить развертывание с использованием двухфакторной проверки подлинности, щелкните Двухфакторная проверка подлинности. Дополнительные сведения см. в разделе Развертывание удаленного доступа с проверкой подлинности с помощью OTP.
Для развертываний с несколькими сайтами и двухфакторной проверкой подлинности необходимо использовать проверку подлинности с сертификатом компьютера. Установите флажок Использовать сертификаты компьютеры, чтобы использовать проверку подлинности с сертификатами компьютера, и выберите корневой сертификат IPsec.
В этом типе развертывания также следует использовать проверку подлинности с сертификатом компьютера.
Нажмите кнопку Готово.
2.5. Настройка серверов инфраструктуры
Для настройки серверов инфраструктуры в развертывании удаленного доступа необходимо настроить сервер сетевых расположений, параметры DNS (в том числе список поиска суффиксов DNS) и серверы управления, которые не обнаруживаются автоматически службой удаленного доступа.
Настройка серверов инфраструктуры
В средней области консоли управления удаленным доступом в разделе Этап 3. Серверы инфраструктуры щелкните Настроить.
На странице Сервер сетевых расположений мастера настройки серверов инфраструктуры щелкните параметр, соответствующий расположению сервера сетевых расположений в вашем развертывании. Если сервер сетевых расположений находится на удаленном веб-сервере, введите его URL-адрес и нажмите кнопку Проверить. Если сервер сетевых расположений размещен на сервере удаленного доступа, нажмите кнопку Обзор, чтобы найти соответствующий сертификат, а затем нажмите Далее.
На странице DNS в таблице введите любые дополнительные суффиксы имен, которые применяются как исключения таблицы NRPT. Выберите параметр локального разрешения имен и нажмите кнопку Далее.
На странице Список DNS-суффиксов сервер удаленного доступа автоматически обнаруживает все суффиксы в развертывании. С помощью кнопок Добавить и Удалить, чтобы добавить или удалить суффиксы доменов из списка. Чтобы добавить новый суффикс домена, в поле Новый суффикс введите суффикс и нажмите кнопку Добавить. Щелкните Далее.
На странице Управление добавьте все серверы управления, которые не были определены автоматически, и нажмите кнопку Далее. Удаленный доступ автоматически добавляет контроллеры домена и Configuration Manager серверы.
Хотя серверы добавляются автоматически, они не отображаются в списке. После первого применения конфигурации в списке отобразятся Configuration Manager серверы.
Нажмите кнопку Готово.
2.6. Настройка серверов приложений
В развертывании удаленного доступа настраивать серверы приложений необязательно. Служба удаленного доступа позволяет принудительно использовать проверку подлинности для выбранных серверов приложений, которые включены в группу безопасности серверов приложений. По умолчанию трафик на серверы приложений, требующие проверки подлинности, также шифруется. Однако вы можете отказаться от шифрования трафика для серверов приложений и использовать только проверку подлинности.
проверка подлинности без шифрования поддерживается только на серверах приложений, работающих Windows Server 2012 r2, Windows Server 2012 или Windows Server 2008 r2.
Настройка серверов приложений
В средней области консоли управления удаленным доступом в разделе Этап 4. Серверы приложений щелкните Настроить.
В мастере настройки сервера приложений DirectAccess щелкните Использовать сквозную проверку подлинности для выбранных серверов приложений, чтобы принудительно использовать проверку подлинности для выбранных серверов приложений. Нажмите кнопку Добавить, чтобы выбрать группу безопасности сервера приложений.
Чтобы предоставить доступ только для группы безопасности серверов приложений, установите флажок Разрешить доступ только серверам, включенным в группы безопасности.
Нажмите кнопку Готово.
2.7. Сводка конфигурации и альтернативные объекты групповой политики
После завершения настройки удаленного доступа отображается окно Сведения об удаленном доступе. Вы можете просмотреть все параметры, выбранные ранее, в том числе следующие.
Параметры объектов групповой политики. Отображается имя объекта групповой политики для сервера и клиента DirectAccess. Кроме того, вы можете перейти по ссылке Изменить рядом с заголовком Параметры объектов групповой политики, чтобы изменить параметры GPO.
Удаленные клиенты. Отображается конфигурация клиента DirectAccess, в том числе группа безопасности, состояние принудительного туннелирования, средства проверки подключения и имя подключения DirectAccess.
Сервер удаленного доступа. Отображается конфигурация DirectAccess, в том числе общедоступное имя и адрес, конфигурация сетевого адаптера, сведения о сертификате и одноразовом пароле (если он настроен).
Серверы инфраструктуры. Этот список содержит URL-адрес сервера сетевых расположений, DNS-суффиксы, используемые клиентами DirectAccess, и сведения о серверах управления.
Серверы приложений. Отображается состояние удаленного управления DirectAccess, а также состояние сквозной проверки подлинности для определенных серверов приложений.
2.8. Настройка сервера удаленного доступа с помощью Windows PowerShell
Windows PowerShell эквивалентные команды
Следующие командлеты Windows PowerShell выполняют ту же функцию, что и предыдущая процедура. Вводите каждый командлет в одной строке, несмотря на то, что здесь они могут отображаться разбитыми на несколько строк из-за ограничений форматирования.
для выполнения полной установки в топологии пограничной организации удаленного доступа для directaccess только в домене с корневым corp.contoso.com и с использованием следующих параметров: объект групповой политики: сервер directaccess Параметры, объект групповой политики клиента: клиент directaccess Параметры, внутренний сетевой адаптер: корпоративная , внешний сетевой адаптер:интернет, коннекттто адрес: edge1.contoso.comи сетевое расположение s erver: NLS.Corp.contoso.com:
Чтобы настроить сервер удаленного доступа для использования проверки подлинности с сертификатом компьютера и корневым сертификатом IPsec, выданным ЦС CORP-APP1-CA, выполните следующие действия.
Чтобы добавить группу безопасности, в которую входят клиенты DirectAccess, с именем DirectAccessClients и удалить группу безопасности «Компьютеры домена» по умолчанию, выполните следующие действия.
включение удаленного доступа для всех компьютеров (не только записных книжек и ноутбуков) и включение удаленного доступа для клиентов Windows 7.
Чтобы настроить работу клиентов DirectAccess, в том числе понятное имя подключения и URL-адрес веб-пробы, выполните следующие действия.
Источник
This blog post is a step by step guide on how to install Routing and Remote Access Service on Windows Server 2019.
Overview:
The Remote Access server role provides three network access technologies in Windows Server 2019. These technologies are the role services of the Remote Access server role.
- DirectAccess
- Routing and Remote Access
- Web Application Proxy
By using RRAS, you can deploy DirectAccess and VPN connections to provide end-users with remote access to your organization’s network. You can also create a site-to-site VPN connection between two servers at different locations.
- PART-1 How to Install Remote Access Service on Windows Server 2019
- PART-2 How to Install and Configure VPN in Windows Server 2019
- PART-3 Configure Network Policy Server (NPS) for VPN in Windows Server 2019
- PART-4 Configure Port Forwarding and Test VPN Connection on Windows 10
Understanding Test Lab:
- WS2K19-DC01: Domain Controller and DNS server.
- WS2K19-VPN01: Member Server.
- WS10-CLI01: Windows 10 PC.
Install Remote Access service on Windows Server 2019:
1. Open Server Manager Console.
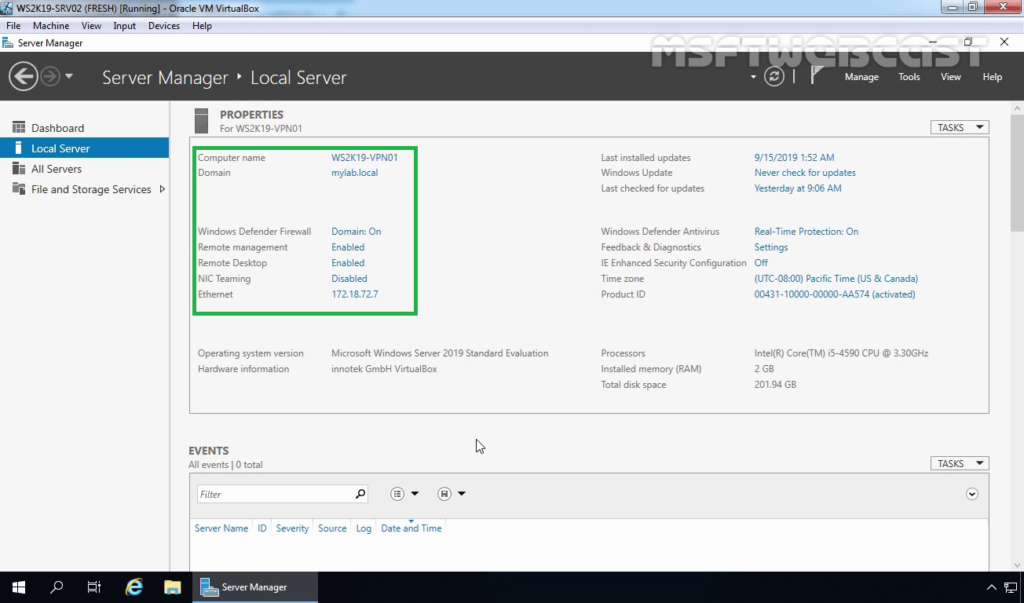
2. At the top of the Server Manager, click on Manage and select Add Roles and Features.
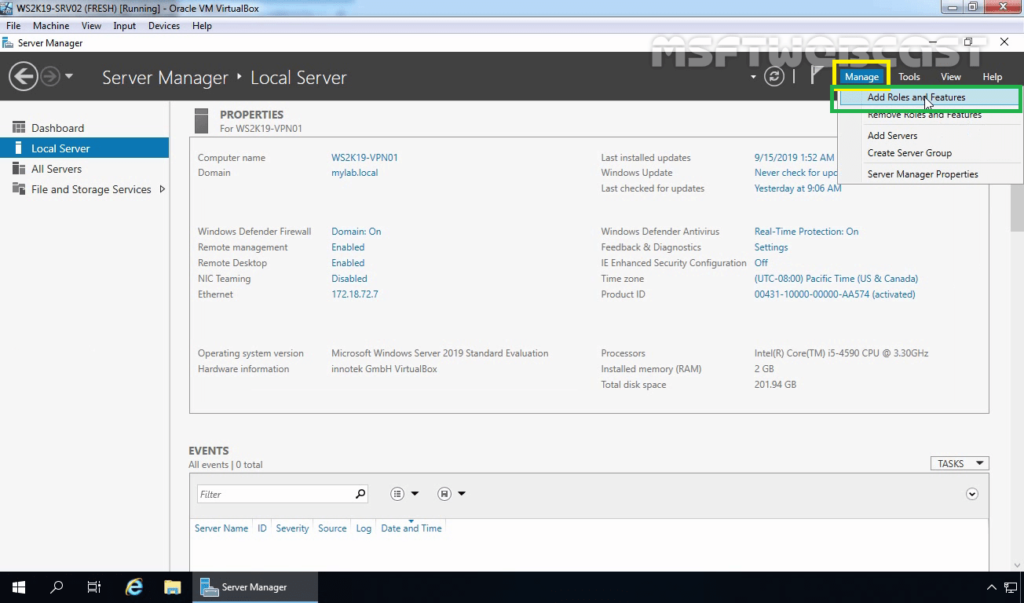
3. On the Before you begin page, click Next.
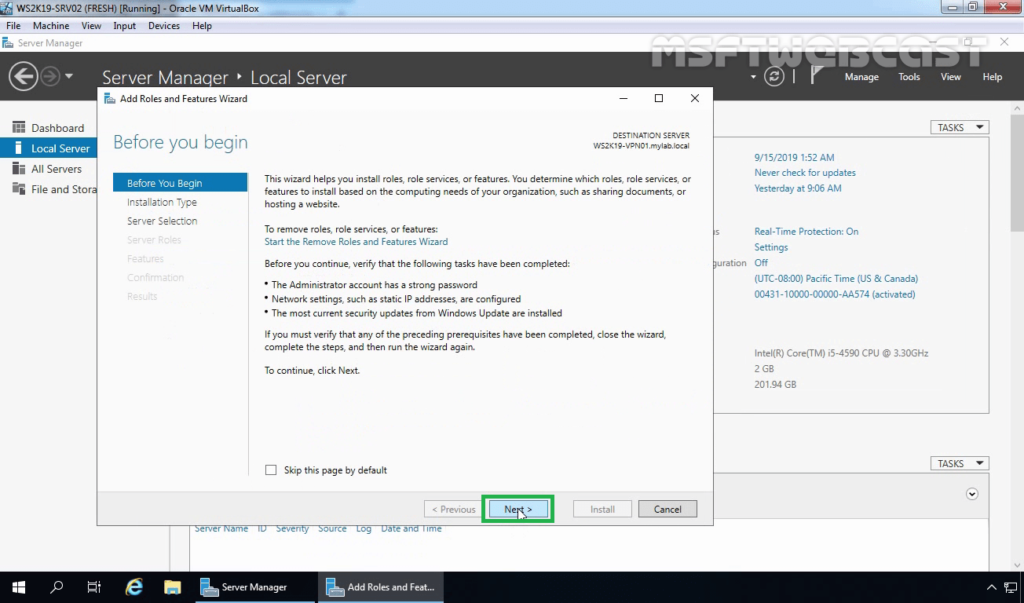
4. Select Role-based or feature-based installation and then click Next.
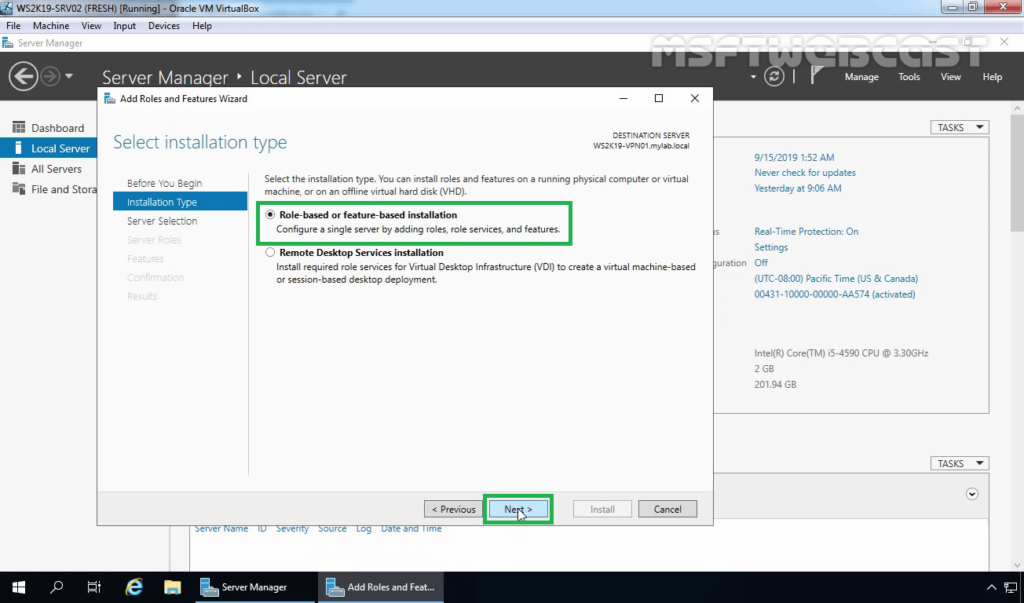
5. Select a server from the server pool on which you want to install the Remote Access Service, click Next.
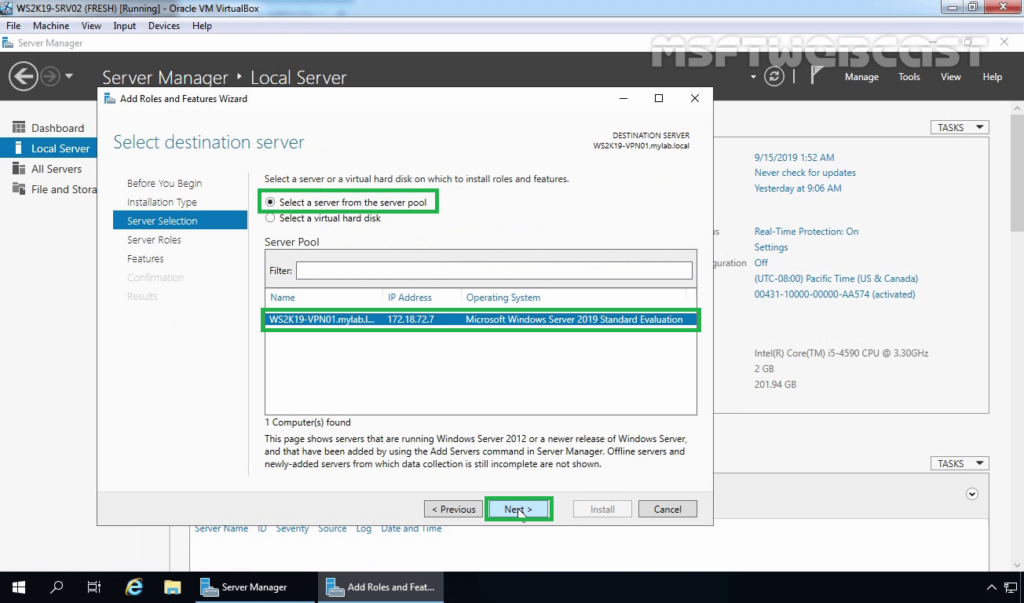
6. On select server roles page, select Remote Access Service. Click Next.

7. On select features page, click Next.
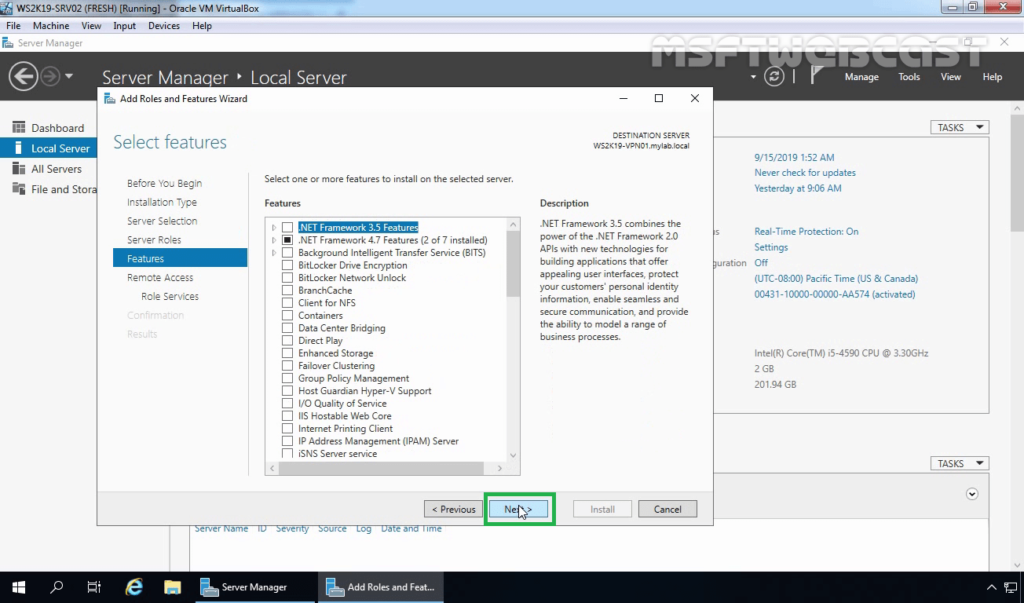
8. On the Remote Access page, read a brief overview of the Routing and Remote Access Service. Click Next.
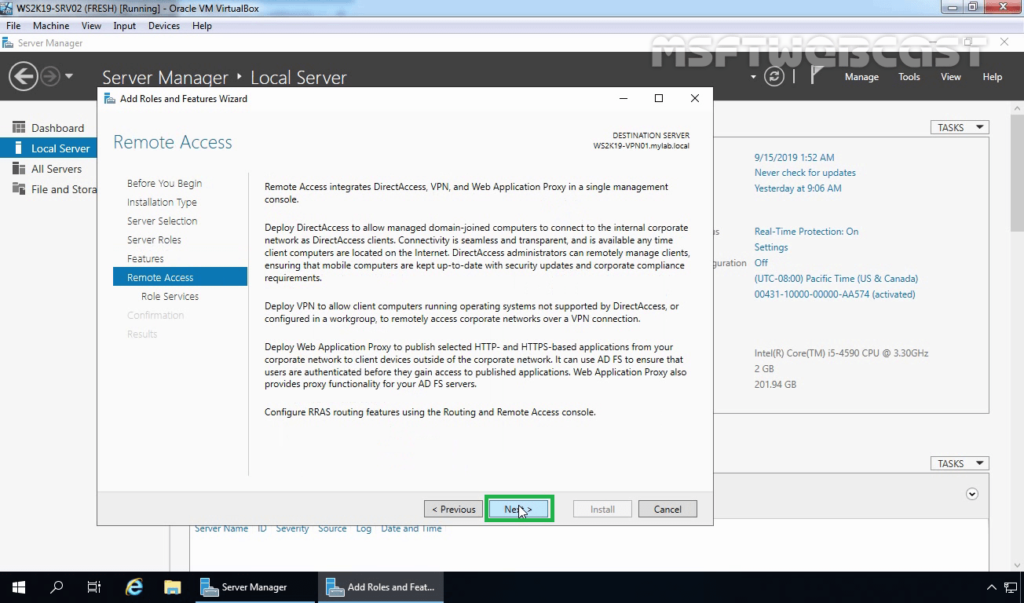
9. On select role services page, select DirectAccess and VPN (RAS) service.
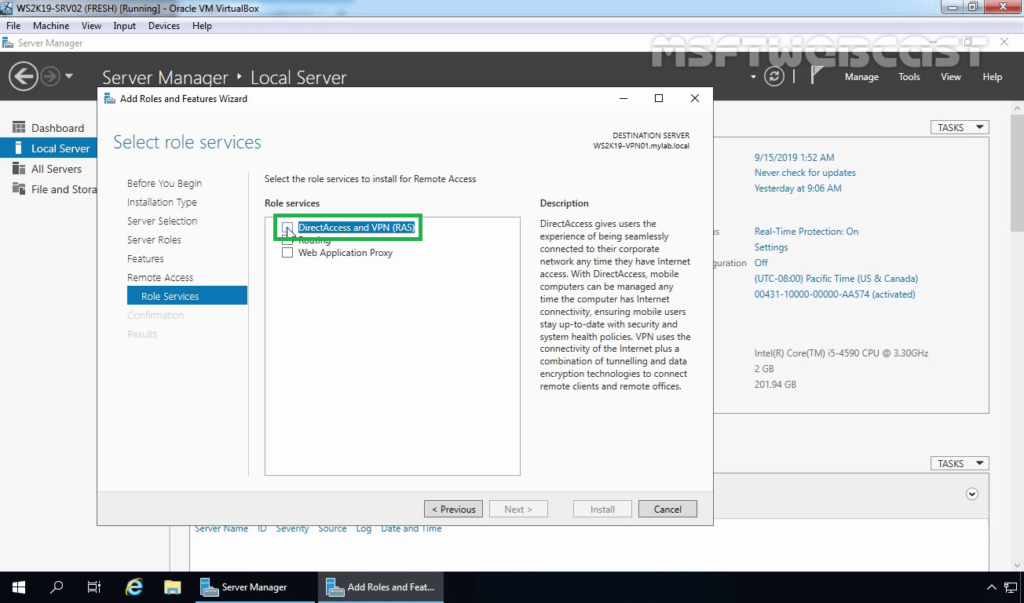
10. A new window will pop up, click on Add Features to include required features and management tools for DirectAccess and VPN.
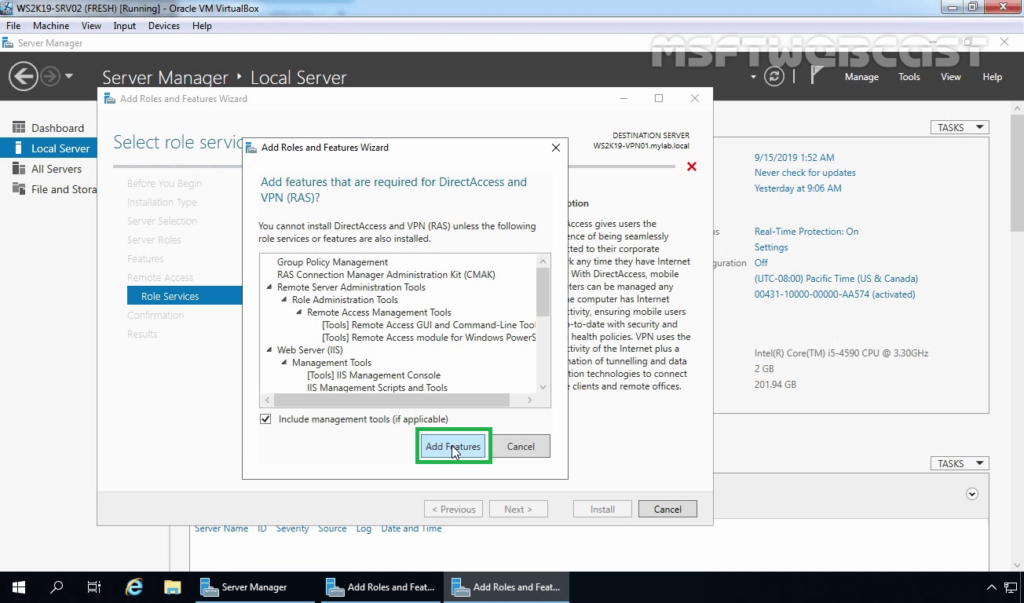
11. Make sure that DirectAccess and VPN role service is selected.
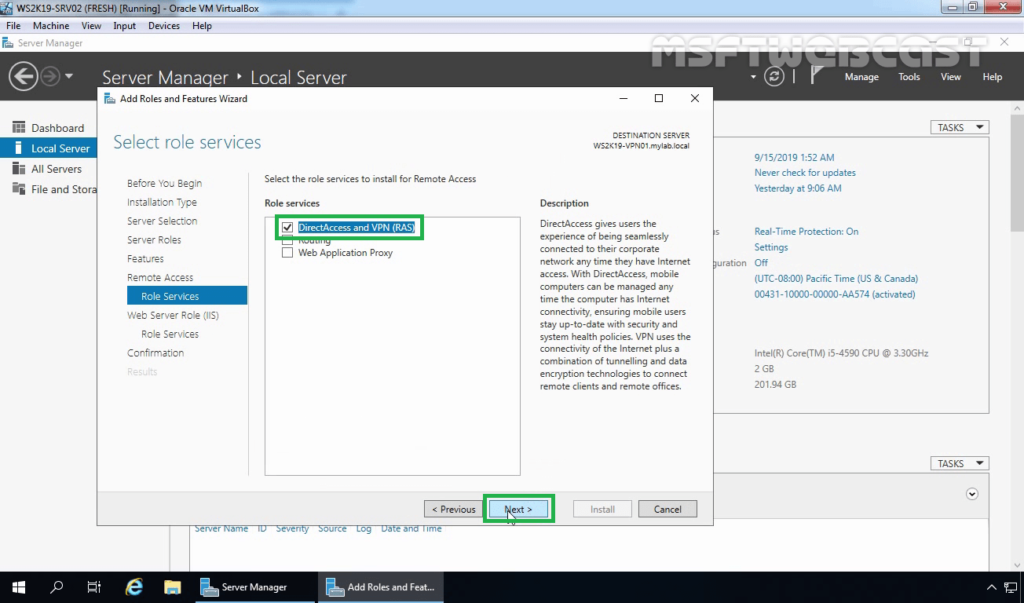
12. On the Web Server Role (IIS) page, read a brief overview of the IIS Service. Click Next.
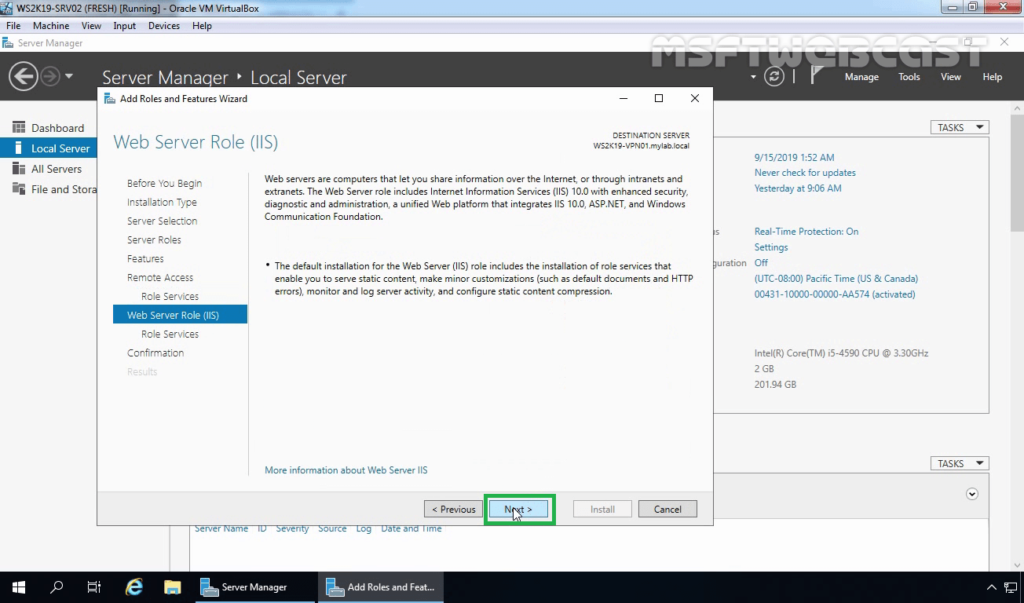
13. All required IIS role services are already selected. Click Next to continue.
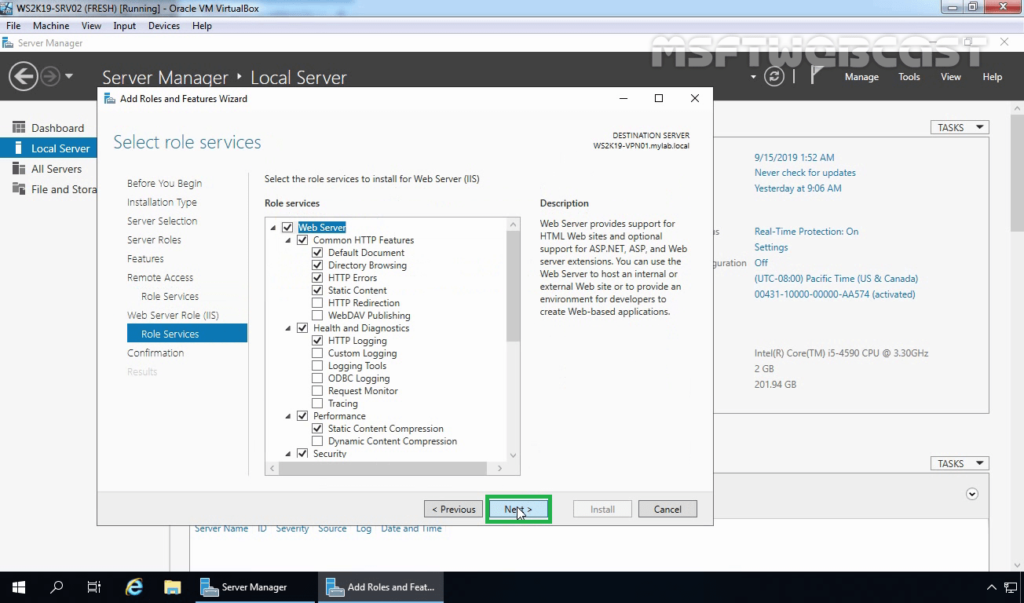
14. Click on the Install button to start the installation of Remote Access Service on Windows Server 2019.
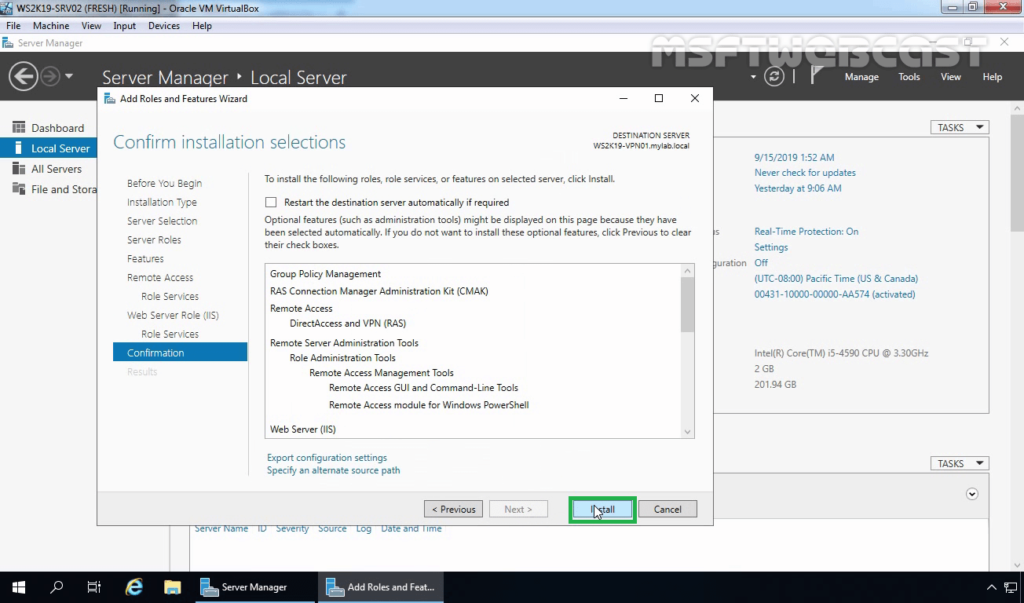
15. After installing the Remote Access service on windows server 2019, the next step is to configure the Remote Access server.
16. Click on the Open the Getting Started Wizard link to start the wizard to configure DirectAccess and VPN on Windows Server 2019 Remote Access Server.
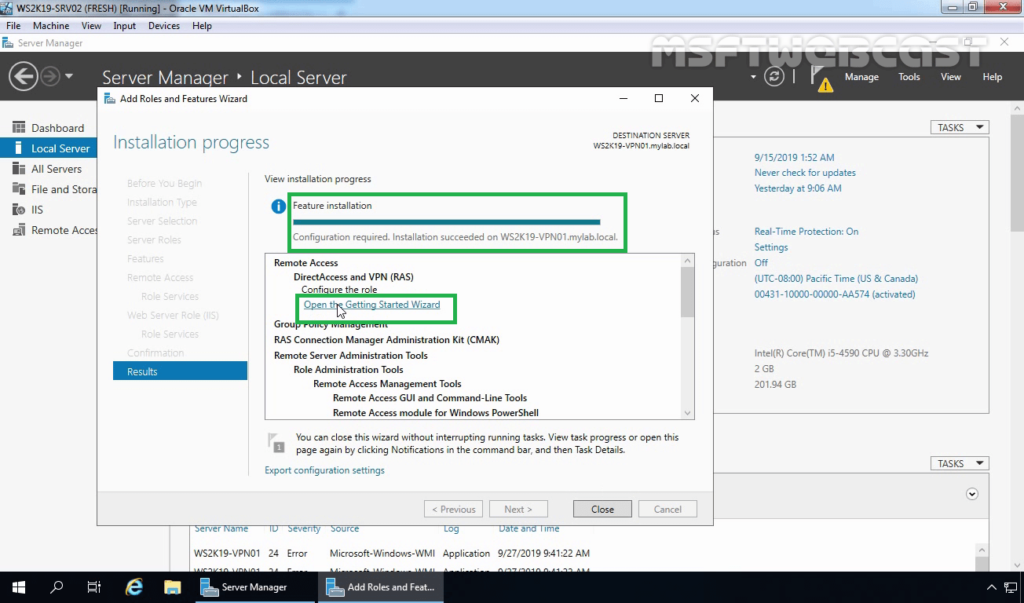
17. From this console, we can configure VPN on Windows Server 2019. In the next post on How to Configure VPN using Remote Access Service on Windows Server 2019.
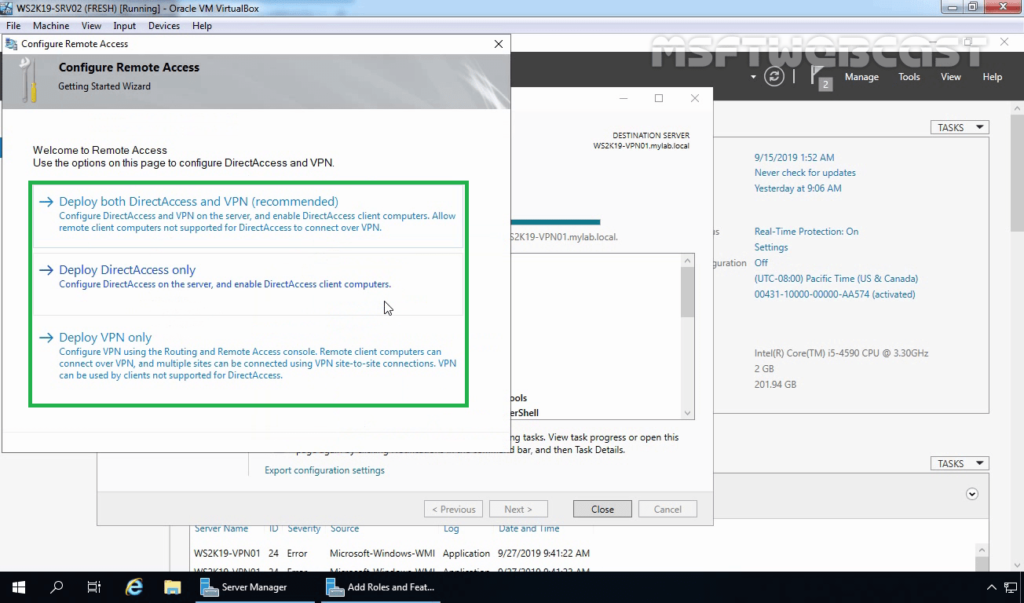
After installing the Remote Access Service, next steps will be configure it.
Thank you for reading.
Post Views: 2,833
This blog post is a step by step guide how to install and configure VPN on Windows Server 2019. The blog post shows you how you can easily set up a VPN server for a small environment, branch office, or for a hosted server scenario. This VPN (Virtual Private Network) server allows you to connect from remote clients or firewalls to the Windows Server.
I already did a similar post for other versions of Windows
- How to Install VPN on Windows Server 2008 R2
- How to Install VPN on Windows Server 2012
- How to Install VPN on Windows Server 2012 R2
- How to Install VPN on Windows Server 2016
To install VPN access to a Windows Server 2019, simply follow this step by step guide:
Install Remote Access Role
First, install the “Remote Access” via Server Manager or PowerShell.
Open Server Manager and select Add Roles and Features
Select the Remote Access Role and click next through the wizard.
On the step Role Services, select the DirectAccess and VPN (RAS)
On the final step, select install to install the Remote Access role.
This might requires a reboot of the server.
Install and Configure VPN on Windows Server 2019
After you have successfully installed, now you can start the wizard to install and configure the VPN server in Windows Server 2019.
After the features are installed, which can take a while to finish, you see the link for the Getting Started Wizard. Click on “Open the Getting Started Wizard“.
This opens a new wizard which will help you to configure the server. On the first screen, select “Deploy VPN only“.
This opens the Routing and Remote Access Management Console
Right click on the Server name and click on “Configure and Enable Routing and Remote Access“.
On the new wizard select “Custom configuration“.
Select “VPN Access“.
After you have click finish, you can now start the Routing and Remote Access service.
Configure VPN Access Users and Network
If you have a firewall between the internet and your Windows Server you have to open the following Firewall port sand forward them to your Windows Server:
For PPTP: 1723 TCP and Protocol 47 GRE (also known as PPTP Pass-through)
For L2TP over IPSEC: 1701 TCP and 500 UDP
For SSTP: 443 TCP
After the installation Users have to be enabled for Remote Access to connect to your VPN Server. On a standalone server this can be done in the Computer Management MMC, in a domain environment this can be done in the user properties of an Active Directory user.
If you don’t have a DHCP Server in your environment, you have to add a static IP address pool. This is often needed if you have a single server hosted at a service provider. In the properties of your VPN server, you can click on the IPv4 tab and enable and configure the “Static address pool”.
You now have to add an IP address from the same subnet as your static address pool to the network interface of your server so that users can access the server.
I hope this helps you to set up a VPN server in a small environment, lab, or hosted server. You can find more information about Windows Server in the Microsoft Docs.
Tags: DirectAccess, Install VPN Server on Windows Server, Microsoft, Remote Access, Virutal Private Network, VPN, VPN Server, Windows Server, Windows Server 2019, Windows Server 2019 VPN, Windows VPN Last modified: July 7, 2019
About the Author / Thomas Maurer

Thomas works as a Senior Cloud Advocate at Microsoft. He engages with the community and customers around the world to share his knowledge and collect feedback to improve the Azure cloud platform. Prior joining the Azure engineering team, Thomas was a Lead Architect and Microsoft MVP, to help architect, implement and promote Microsoft cloud technology.
If you want to know more about Thomas, check out his blog: www.thomasmaurer.ch and Twitter: www.twitter.com/thomasmaurer