Содержание
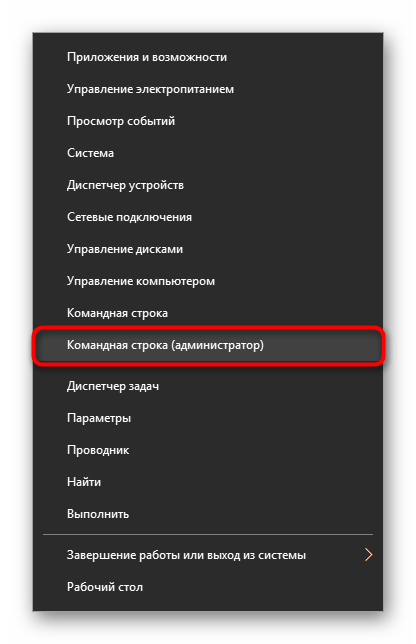
- Отключение Hyper-V в Windows 10
- Способ 1: Компоненты Windows
- Способ 2: PowerShell/Командная строка
- Hyper-V не отключается
- Вопросы и ответы
Hyper-V — система виртуализации в Windows, идущая по умолчанию в наборе системных компонентов. Она присутствует во всех версиях десятки за исключением Home, а ее предназначение — работа с виртуальными машинами. Ввиду определенных конфликтов со сторонними механизмами виртуализации, Hyper-V может потребоваться отключить. Сделать это очень легко.
Есть сразу несколько вариантов отключения технологии, и пользователь в любом случае может без труда включить ее обратно тогда, когда это нужно. И хотя по умолчанию Hyper-V обычно отключен, он мог быть активирован пользователем ранее, в том числе и случайно, либо при установке модифицированных сборок ОС, после настройки Виндовс другим человеком. Далее мы приведем 2 удобных способа отключения Hyper-V.
Способ 1: Компоненты Windows
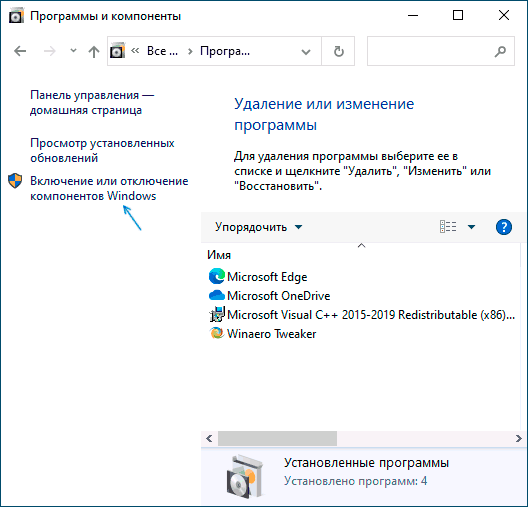
Так как рассматриваемый элемент является частью системных компонентов, отключить его можно в соответствующем окне.
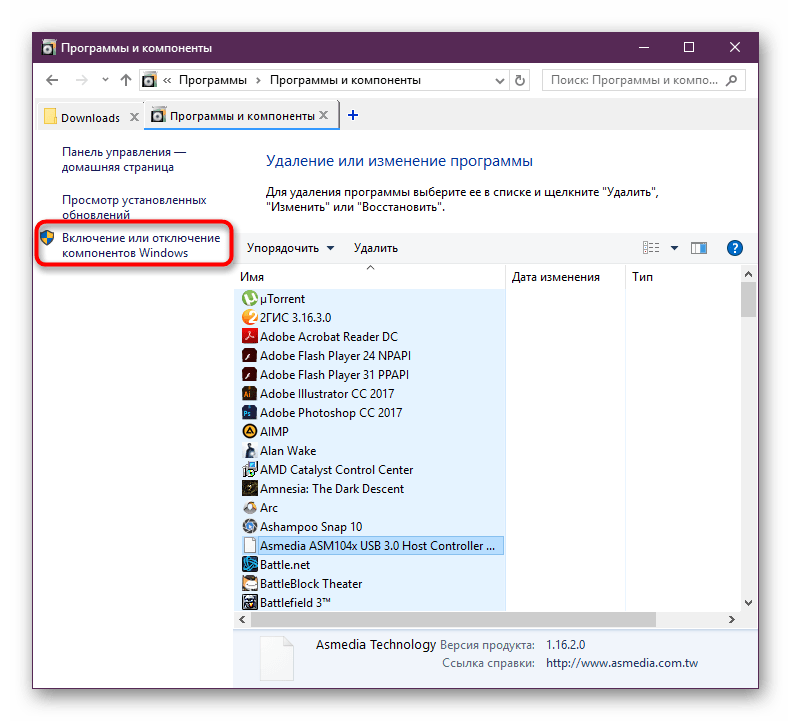
- Откройте «Панель управления» и перейдите в подраздел «Удаление программы».
- В столбце слева найдите параметр «Включение или отключение компонентов Windows».
- Из списка отыщите «Hyper-V» и деактивируйте его, убрав галочку или квадратик. Сохраните изменения, нажав на «ОК».


В последних версиях Виндовс 10 не требует перезагрузки, однако вы можете сделать это при необходимости.
Способ 2: PowerShell/Командная строка
Аналогичное действие можно совершить, используя «cmd» либо его альтернативу «PowerShell». При этом для обоих приложений команды будут разными.
PowerShell
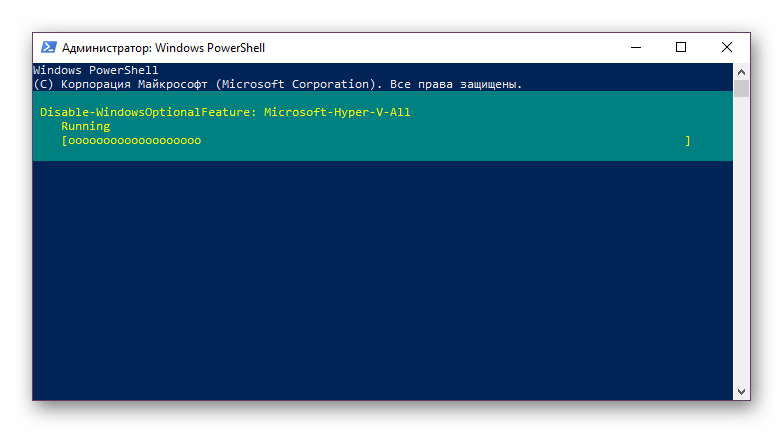
- Откройте приложение с правами администратора.
- Впишите команду:
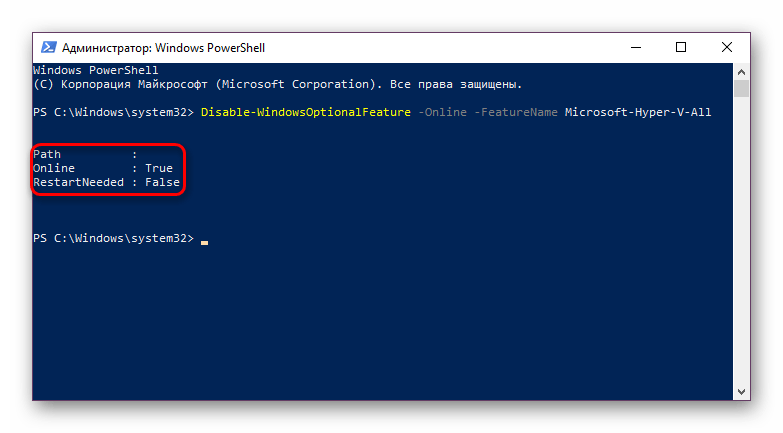
Disable-WindowsOptionalFeature -Online -FeatureName Microsoft-Hyper-V-All - Начнется процесс деактивации, он занимает несколько секунд.
- В конце вы получите уведомление со статусом. Перезагрузка не нужна.


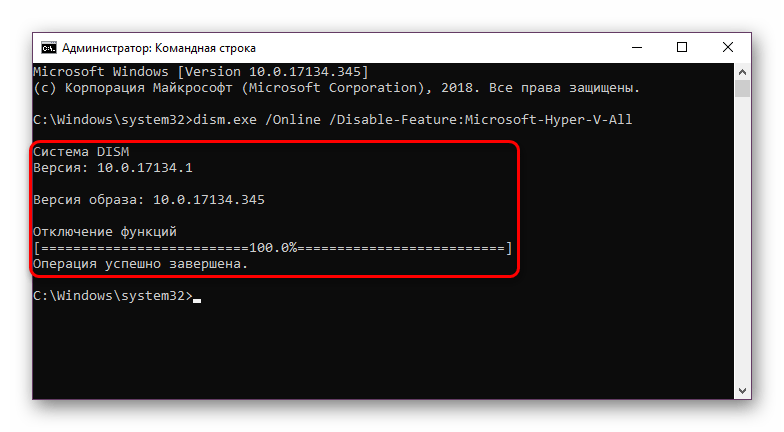
CMD
В «Командной строке» отключение происходит путем задействования хранилища системных компонентов DISM.
- Запускаем ее с правами администратора.
- Копируем и вставляем следующую команду:
dism.exe /Online /Disable-Feature:Microsoft-Hyper-V-All - Процедура отключения займет несколько секунд и по окончании отобразится соответствующая надпись. Перезагружать ПК, опять же, не нужно.


Hyper-V не отключается
В некоторых случаях у пользователей возникает проблема в деактивации компонента: он получает уведомление «Нам не удалось завершить компоненты» либо при последующем включении Hyper-V становится снова активен. Устранить эту неполадку можно проверкой системных файлов и хранилища в частности. Осуществляется сканирование через командную строку запуском инструментов SFC и DISM. В другой нашей статье мы уже рассматривали более подробно то, как произвести проверку ОС, поэтому чтобы не повторяться, прикладываем ссылку на полную версию этой статьи. В ней вам потребуется поочередно выполнить Способ 2, затем Способ 3.
Подробнее: Проверка Windows 10 на наличие ошибок
Как правило, после этого проблема отключения исчезает, если же нет, то причины следует искать уже в стабильности работы ОС, но поскольку спектр ошибок может быть огромным и это не укладывается в рамки и тему статьи.
Мы рассмотрели способы отключения гипервизора Hyper-V, а также основную причину, по которой его не удается деактивировать. Если у вас все равно возникли проблемы, напишите об этом в комментариях.
Еще статьи по данной теме:
Помогла ли Вам статья?
 Компоненты Hyper-V в Windows 10 позволяют создавать виртуальные машины встроенными средствами системы (подробнее: Виртуальные машины Hyper-V в Windows 10), а также служит для работы таких компонентов как Песочница Windows 10. Однако в некоторых случаях включенные компоненты Hyper-V могут мешать: например, для запуска виртуальных машин VirtualBox или эмуляторов Android.
В этой инструкции подробно о том, как отключить Hyper-V в Windows 10 двумя способами: первый предполагает отключение соответствующих компонентов системы, второй — отключение гипервизора без удаления самих компонентов Hyper-V.
- Отключение Hyper-V путем удаления в компонентах
- Как отключить Hyper-V без удаления
- Видео инструкция
- Дополнительные способы удалить Hyper-V
Отключение Hyper-V в компонентах Windows 10
Первый способ отключить Hyper-V предполагает использование соответствующего раздела «Программы и компоненты» в панели управления, шаги будут следующими:
- Откройте Панель управления, для этого можно использовать поиск в панели задач, либо нажать Win+R на клавиатуре, ввести control и нажать Enter.
- В панели управления перейдите в раздел «Программы и компоненты» или «Удаление программы».
- Слева нажмите по пункту «Включение или отключение компонентов Windows».

- Снимите отметку с пункта «Hyper-V» и примените настройки.

- При появлении запроса на перезагрузку, перезагрузите Windows 10 для вступления изменений в силу.

Обычно указанных действий достаточно, чтобы устранить проблемы, которые иногда могут быть вызваны наличием Hyper-V в системе.
Если указанные шаги не помогли, попробуйте там же в компонентах отключить пункт «Песочница Windows» и также перезагрузить компьютер при необходимости.
Как отключить Hyper-V без удаления компонентов
Предыдущий метод отключения Hyper-V предполагает удаление соответствующих компонентов из системы, однако можно обойтись и без этого:
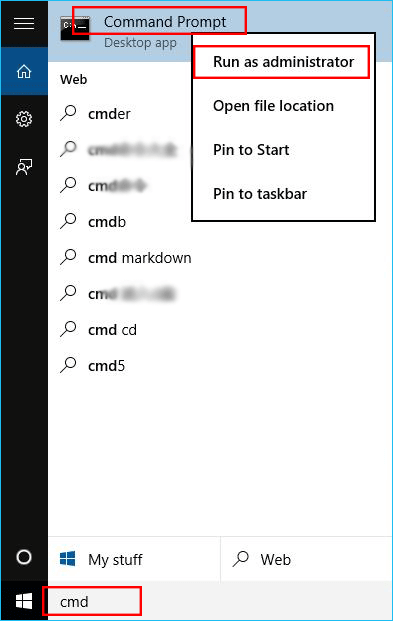
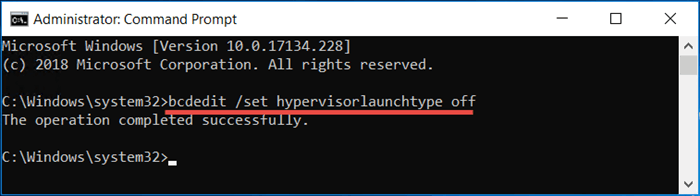
- Запустите командную строку от имени Администратора, для этого можно использовать поиск в панели задач, а потом выбрать пункт «Запуск от имени администратора». Другие способы запуска командной строки от имени администратора.
- Введите команду
bcdedit /set hypervisorlaunchtype off
и нажмите Enter.
- Перезагрузите компьютер.
После перезагрузки Hyper-V (гипервизор) будет выключен и не будет влиять на запуск каких-либо других виртуальных машин, при этом сам компонент останется включенным.
Чтобы снова включить Hyper-V, используйте ту же команду, но измените off на auto и перезагрузите компьютер. Также есть возможность создания меню загрузки для выбора режима, в котором будет запускаться система — с включенным или отключенным Hyper-V, об этом в инструкции Как запускать виртуальные машины Hyper-V и VirtualBox на одном компьютере.

Видео
Дополнительные способы удалить Hyper-V
Помимо описанных способов, вы можете удалить компоненты Hyper-V в PowerShell с помощью команды
Disable-WindowsOptionalFeature -Online -FeatureName Microsoft-Hyper-V-Hypervisor
Или, при использовании командной строки, с помощью команды:
DISM /Online /Disable-Feature:Microsoft-Hyper-V
Надеюсь, материал помог разобраться. Если же остаются вопросы — задавайте в комментариях. Также помните, что для работы виртуальных машин и эмуляторов следует включить аппаратную виртуализацию.
Question
Issue: How to Disable Hyper-V in Windows 10?
Hello all. Do you have any ideas why Windows does not allow me to uninstall Hyper-V? When I try to do so, I get an error saying: “The changes couldn’t be completed. Please reboot your computer and try again. Error Code: 0x800F0831.” I’ve tried many things, including bcdedit option, powershell scripts, DISM, and some other things, but none of them worked. Have you any ideas?
Solved Answer
Hyper-V is not a tool for inexperienced PC users.[1] It’s a utility, which replaces Microsoft Virtual PC and allows running multiple operating systems on a single device. Hyper-V simplifies the lives of software developers, professional IT workers or tech-savvy people who opt for working or experimenting with multiple OS, including various Linux releases, FreeBSD, and Windows.
When using the tool, there’s no need for physical hardware injected into machines. Hyper-V turns different OS into virtual machines (“guest”), which run in tandem on a single computer (“host”). While the tool is useful for many PC enthusiasts and experts, many of them find it lacking for some features, for example, live migration of virtual machines from one host to another, Hyper-V Replica, Virtual Fiber Channel, virtualizing GPUs using RemoteFX, and so on.
Due to this or other reasons, they decide to switch to other virtualization products. The problem is that sometimes Hyper-V removal fails and returns errors like “The changes couldn’t be completed. Please reboot your computer and try again. Error Code: 0x800F0831.” Users[2] also search for ways to make the program more user-friendly since it is difficult to disable/ enable the app when needed.
Also, like with other programs, there are possible issues with compatibility when some third-party applications are not working along with this app, so people need to disable Hyper-V when trying to launch any other piece of software. Such behavior seems to be common because various virtualization applications depend on the particular hardware extensions that are available on processors.
Only one software component can use this hardware virtualization extension at the time and those pieces cannot be shared. The problem causes crashes and keeps the user from using Hyper-V or different software until one of them is completely disabled.
 There were some instances when .Net Framework 3.5 were missing or damaged, which is why the removal process could not be completed. It can be related to PUPs[3] and other unwanted third-party apps that trigger changes. You might repair some system files and damaged pieces with tools like ReimageMac Washing Machine X9 quickly. If you are experiencing this same problem, the following methods may help you disable Hyper-V manually:
This video has all the information required:
Disable Hyper-V Hypervisor
Optimize now!
Optimize now!
To restore your computer’s peak performance, you have to purchase licensed version of Reimage Reimage repair software.
NOTE: this option will not uninstall Hyper-V, but disable the feature temporarily. It will be enabled automatically after the installation of crucial Windows Updates.
Disable Hyper-V via Command Prompt and PowerShell environments
Optimize now!
Optimize now!
To restore your computer’s peak performance, you have to purchase licensed version of Reimage Reimage repair software.
Reinstall .NET Framework to fix the Hyper-V disable/enable issue
Optimize now!
Optimize now!
To restore your computer’s peak performance, you have to purchase licensed version of Reimage Reimage repair software.
Download the latest version of the .NET Framework. If it has been damaged or removed due to virus infection or other reasons, follow these simple steps:
- Navigate to this website.
- Find .NET Framework and download it.
- Run the setup file and confirm the installation. Don’t worry if the process lasts up to 10 minutes.
- Once installed, try to Uninstall/Disable Hyper-V.
Optimize your system and make it work more efficiently
Optimize your system now! If you don’t want to inspect your computer manually and struggle with trying to find issues that are slowing it down, you can use optimization software listed below. All these solutions have been tested by ugetfix.com team to be sure that they help improve the system. To optimize your computer with only one click, select one of these tools:
Reimage — a patented specialized Windows repair program. It will diagnose your damaged PC. It will scan all System Files, DLLs and Registry Keys that have been damaged by security threats.Reimage — a patented specialized Mac OS X repair program. It will diagnose your damaged computer. It will scan all System Files and Registry Keys that have been damaged by security threats.
This patented repair process uses a database of 25 million components that can replace any damaged or missing file on user’s computer.
To repair damaged system, you have to purchase the licensed version of Reimage malware removal tool.

To stay completely anonymous and prevent the ISP and the government from spying on you, you should employ Private Internet Access VPN. It will allow you to connect to the internet while being completely anonymous by encrypting all information, prevent trackers, ads, as well as malicious content. Most importantly, you will stop the illegal surveillance activities that NSA and other governmental institutions are performing behind your back.
Unforeseen circumstances can happen at any time while using the computer: it can turn off due to a power cut, a Blue Screen of Death (BSoD) can occur, or random Windows updates can the machine when you went away for a few minutes. As a result, your schoolwork, important documents, and other data might be lost. To recover lost files, you can use Data Recovery Pro – it searches through copies of files that are still available on your hard drive and retrieves them quickly.
you can use my script.
paste code lines to notepad and save as vbs(for example switch_hypervisor.vbs)
Option Explicit

Dim backupfile
Dim record
Dim myshell
Dim appmyshell
Dim myresult
Dim myline
Dim makeactive
Dim makepassive
Dim reboot
record=""
Set myshell = WScript.CreateObject("WScript.Shell")

If WScript.Arguments.Length = 0 Then
    Set appmyshell  = CreateObject("Shell.Application")
    appmyshell.ShellExecute "wscript.exe", """" & WScript.ScriptFullName & """ RunAsAdministrator", , "runas", 1
    WScript.Quit
End if


Set backupfile = CreateObject("Scripting.FileSystemObject")
If Not (backupfile.FileExists("C:bcdedit.bak")) Then
    Set myresult = myshell.Exec("cmd /c bcdedit /export c:bcdedit.bak")
End If

Set myresult = myshell.Exec("cmd /c bcdedit")
Do While Not myresult.StdOut.AtEndOfStream
    myline = myresult.StdOut.ReadLine()

    If myline="The boot configuration data store could not be opened." Then
        record=""
        exit do
    End If
    If Instr(myline, "identifier") > 0 Then
        record=""
        If Instr(myline, "{current}") > 0 Then
            record="current"
        End If
    End If
    If Instr(myline, "hypervisorlaunchtype") > 0 And record = "current" Then
        If Instr(myline, "Auto") > 0 Then
            record="1"
            Exit Do
        End If
        If Instr(myline, "On") > 0 Then
            record="1"
            Exit Do
        End If
        If Instr(myline, "Off") > 0 Then
            record="0"
            Exit Do
        End If
    End If
Loop

If record="1" Then
    makepassive = MsgBox ("Hypervisor status is active, do you want set to passive? ", vbYesNo, "Hypervisor")
    Select Case makepassive
    Case vbYes
        myshell.run "cmd.exe /C  bcdedit /set hypervisorlaunchtype off"
        reboot = MsgBox ("Hypervisor chenged to passive; Computer must reboot. Reboot now? ", vbYesNo, "Hypervisor")
        Select Case reboot
            Case vbYes
                myshell.run "cmd.exe /C  shutdown /r /t 0"
        End Select
    Case vbNo
        MsgBox("Not Changed")
    End Select
End If

If record="0" Then
    makeactive = MsgBox ("Hypervisor status is passive, do you want set active? ", vbYesNo, "Hypervisor")
    Select Case makeactive
    Case vbYes
        myshell.run "cmd.exe /C  bcdedit /set hypervisorlaunchtype auto"
        reboot = MsgBox ("Hypervisor changed to active;  Computer must reboot. Reboot now?", vbYesNo, "Hypervisor")
        Select Case reboot
            Case vbYes
                myshell.run "cmd.exe /C  shutdown /r /t 0"
        End Select
    Case vbNo
        MsgBox("Not Changed")
    End Select
End If

If record="" Then
        MsgBox("Error: record can't find")
End If
Since Windows 8, we can create a virtual machine with Hyper-V. As a newly publish function, it has some unignorable shortcomings while compares to VirtualBox and VMware. Such as Hyper-V needs to configure virtual switch manager to connect to the network and it cannot connect to USB flash disk directly. That’s why most people tend to utilize VMware or VirtualBox instead. Besides, Hyper-V conflicts with VMware and VirtualBox. So, let’s go ahead and get started on how to disable or turn off Hyper-V in Windows 10.
- Option 1: Disable Hyper-V Windows 10 by Control Panel
- Option 2: Turn off Hyper-V Windows 10 via Computer Management
- Option 3: Disable Hyper-V Windows 10 by Command Prompt
- Option 4: Disable Hyper-V Windows 10 PowerShell
Option 1: Disable Hyper-V Windows 10 by Control Panel
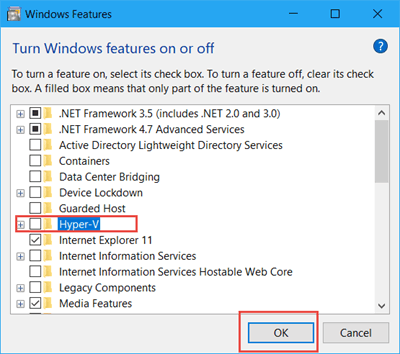
Step 1: Type Turn Windows features on or off in the Windows search bar and hit Enter to open it. Or you can navigate to Control Panel > Program > Turn Windows features on or off.
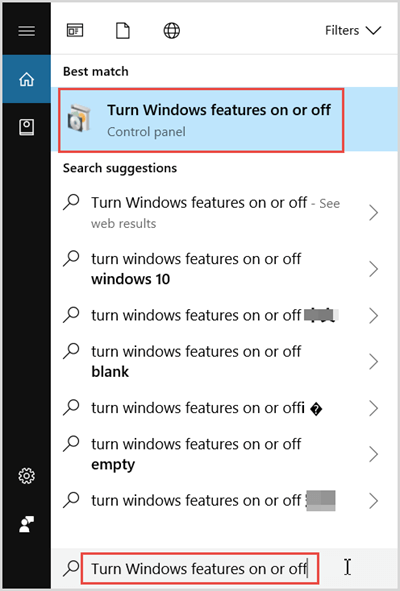
Step 2: Uncheck the box of Hyper-V and click OK. Restart your computer to disable Hyper-V completely.
Option 2: Turn off Hyper-V Windows 10 via Computer Management
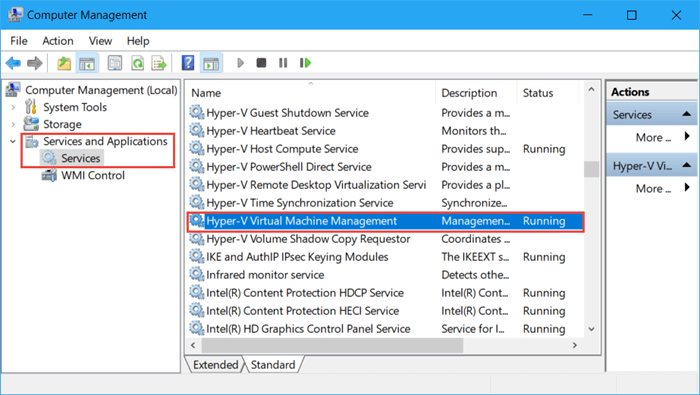
Step 1: Right-click on This PC icon then select Manage.
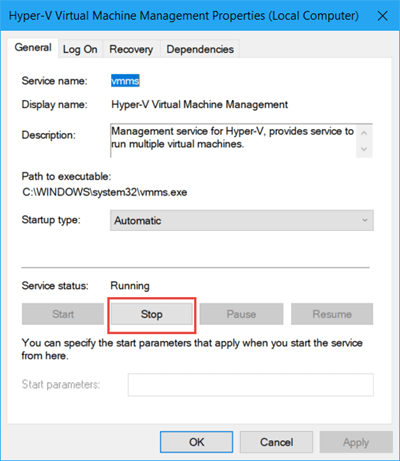
Step 2: In the Computer Management window, expand Services and Applications > Services and double Hyper-V Virtual Management.
Step 3: Tap on Stop button to turn off Hyper-V in Windows 10.
Option 3: Disable Hyper-V Windows 10 by Command Prompt
Step 1: Type cmd in the search bar and Run Command Prompt as administrator.
Step 2: Execute the “bcdedit /set hypervisorlaunchtype off” to disable Hyper-V in Windows 10. Restart to take effect.
Note: To enable Hyper-V in Command Prompt, you can run “bcdedit /set hypervisorlaunchtype auto” instead.
Option 4: Disable Hyper-V Windows 10 PowerShell
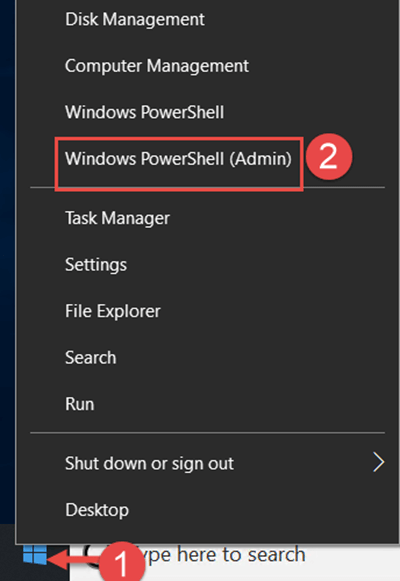
Step 1: Right-click on the Start icon and select Windows PowerShell (admin).
Step 2: Copy the command line below and run it.
Disable-WindowsOptionalFeature -Online -FeatureName Microsoft-Hyper-V-All
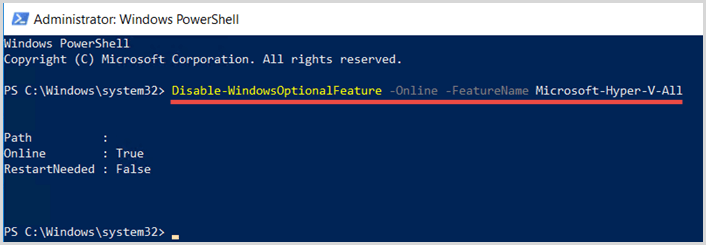
Step 3: Reboot Windows 10 to make changes effect.
Tags: disable hyper-v windows 10 command line, disable hyper-v windows 10 powershell, how to disable hyper v windows 10, turn off hyper v windows 10
Posted in Computer, Windows 10
Comments are currently closed.