While creating a partition on a hard disk by using the Diskpart utility, some users encountered the error “There is not enough usable space for this operation.” According to the error message, you are unable to create a new partition because of the lack of usable space on your hard disk. In this article, we will see how to deal with this error to get the issue fixed.

The complete error message displayed by the Diskpart utility could be either of the two:
There is not enough usable space on specified disks to extend the volume
There is not enough usable space for this operation
If Diskpart is showing the “Virtual Disk Service error: There is not enough usable space for this operation” while creating a new partition, the following solutions may help you fix the problem:
- Check the partition style of your Disk
- Rescan your disk
- Shrink the partition on your hard drive
- Use a third-party tool
1] Check the partition style of your disk
One possible cause of this error is the limitation of an MBR disk. If the disk installed on your system uses the Master Boot Record, you will not create more than 4 partitions on your disk. Whereas, in the GPT partition, there is no such limit. You can create unlimited partitions on a GPT disk, but Windows allows only up to 128 partitions on a GPT disk.

Check the partition style of your hard disk. To do so, follow the steps below:
- Launch the Run command box.
- Type diskmgmt.msc and click OK.
- The above command will open the Disk Management tool.
- Right-click on your hard disk and select Properties.
- Select the Volumes tab. You will see the partition style of your hard disk.
If the partition style of your hard disk is MBR and you already have 4 partitions on it, you have to convert it into GPT to create more partitions. Do note that the conversion is possible only if the hard disk contains no partitions or volumes. If your hard disk contains any partitions, you have to delete them before converting MBR into GPT. This action will also erase all the data on your hard disk. That’s why we suggest you backup all your data on an external hard disk.

The GPT disks use Unified Extensible Firmware Interface (UEFI) BIOS mode. You can check your BIOS mode in the System Information. If your BIOS supports both legacy and UEFI modes but it is set to the legacy mode, you can convert it to UEFI.
After converting your hard disk from MBR to GPT, check if the Diskpart is showing the same error while creating partitions.
2] Rescan your disk
The Rescan command helps you detect new disks added to your computer. When you run this command, it detects the configuration changes on your hard disk and updates the information. You can try running this command in Diskpart and see if it helps. Follow the steps below:
- Open Command Prompt as an administrator.
- Type Diskpart and press Enter.
- Type Rescan and press Enter.
After rescanning your disks, check if the issue persists.
3] Shrink the partition on your hard drive
According to the error, your disk does not have enough usable space. To fix this problem, you can shrink a partition to leave unallocated space. After shrinking the partition, you should be able to create a new partition. The steps to do this are written below:
- Open Command Prompt as an administrator.
- Type Diskpart.
- Type select disk #. Replace # with the disk number. For example, if you want to create a partition on disk 0, you have to type select disk 0 and press Enter.
- Now, you have to select the partition on your hard disk which you want to shrink. For this, type list par and press Enter. This command will list all the partitions on your hard disk.
- Now, type sel par #. Replace # with the partition number on your hard disk. After selecting a particular partition, say, partition 3, you will see a message “Partition 3 is now the selected partition.”
- Type shrink desired=size minimum=size. After that hit Enter. Replace the string size in the command with the actual size on the disk that you want to shrink. The size that you enter to shrink the volume should be less than the total size of the selected partition. For example, if the total size of the selected partition is 16 GB, the size to shrink the partition should be less than 16 GB.
- After the above command is executed successfully, a partition with unallocated space will be created. You can view this unallocated space in Disk Management.
- To make the unallocated space usable, you have to format it. Type fs=ntfs quick and press Enter.
- Wait till the formatting process gets completed.
After the formatting gets completed, a partition of the desired size is created. In step 6 above, we have used the command shrink desired=size minimum=size. This command consists of two values, namely, desired and minimum. Let’s see the meaning and purpose of each of these values.
- Desired: This represents the actual amount of space that you want on your partition.
- Minimum: It represents the minimum space on the selected partition.
If the size entered in the desired value is not possible to create, Windows will create the partition of the size that you enter in the minimum value. You can also enter the same size in both of these values.
Read: Diskpart error, The device does not recognize the command.
4] Use a third-party tool
You can also use a third-party tool to create partitions on your hard drive. If you search online, you will find many disk and partition manager tools that come with both free and paid plans.
Related:
- Diskpart Virtual Disk Service error. The operation timed out
- Diskpart Virtual Disk Service Error, The volume size is too big
- Diskpart Virtual Disk Service error, The file system is incompatible
- Diskpart Virtual Disk Service error. Delete is not allowed on the current boot, system, pagefile, crashdump or hibernation volume
- Diskpart Virtual Disk Service error, The operation is not supported by the object
- Diskpart Virtual Disk Service error, The specified disk is not convertible
How do you fix the virtual disk service error the specified disk is not convertible?
You may see an error message “The specified disk is not convertible” while converting an MBR disk into GPT by using the Diskpart utility. The complete error message is:
Virtual Disk Service error:
The specified disk is not convertible.
According to the error message, the disk you want to convert from MBR into GPT is not convertible. To fix this error, you should know what an MBR partition style is and what a GPT partition style is. If you want to convert an MBR disc into a GPT, your BIOS should support the UEFI mode. This is because the GPT disks use Unified Extensible Firmware Interface (UEFI) BIOS mode.
If you are getting this error message, first check your system’s BIOS mode. If it shows legacy mode, convert it into the UEFI mode. To know the BIOS mode, click on Windows Search and type System Information, then select the System Information app from the search results. In the System Information app, you will see your BIOS made on the right pane.
If your BIOS supports both legacy and UEFI modes, you will be able to convert legacy to UEFI. If your BIOS mode is already set to UEFI, but you are still getting this error message, you can use a third-party tool or software, like Minitool partition wizard to convert MBR to GPT.
Read: DiskPart error, Data error Cyclic redundancy check.
How do I fix the virtual disk service error volume size is too big?
The virtual disk service error volume size is too big usually occurs when you format a particular disk drive by using a FAT32 file system. In such a case, you can try another file system to format the disk drive, like NTFS. There are several limitations of the FAT32 file system. The maximum file size limit for the FAT32 file system is 4 GB. This is the reason why Diskpart displays this error while formatting a disk drive of large size by using the FAT32 file system.
Read next: Diskpart has encountered an error, The media is write-protected.
While creating a partition on a hard disk by using the Diskpart utility, some users encountered the error “There is not enough usable space for this operation.” According to the error message, you are unable to create a new partition because of the lack of usable space on your hard disk. In this article, we will see how to deal with this error to get the issue fixed.
The complete error message displayed by the Diskpart utility could be either of the two:
There is not enough usable space on specified disks to extend the volume
There is not enough usable space for this operation
If Diskpart is showing the “Virtual Disk Service error: There is not enough usable space for this operation” while creating a new partition, the following solutions may help you fix the problem:
- Check the partition style of your Disk
- Rescan your disk
- Shrink the partition on your hard drive
- Use a third-party tool
1] Check the partition style of your disk
One possible cause of this error is the limitation of an MBR disk. If the disk installed on your system uses the Master Boot Record, you will not create more than 4 partitions on your disk. Whereas, in the GPT partition, there is no such limit. You can create unlimited partitions on a GPT disk, but Windows allows only up to 128 partitions on a GPT disk.
Check the partition style of your hard disk. To do so, follow the steps below:
- Launch the Run command box.
- Type diskmgmt.msc and click OK.
- The above command will open the Disk Management tool.
- Right-click on your hard disk and select Properties.
- Select the Volumes tab. You will see the partition style of your hard disk.
If the partition style of your hard disk is MBR and you already have 4 partitions on it, you have to convert it into GPT to create more partitions. Do note that the conversion is possible only if the hard disk contains no partitions or volumes. If your hard disk contains any partitions, you have to delete them before converting MBR into GPT. This action will also erase all the data on your hard disk. That’s why we suggest you backup all your data on an external hard disk.
The GPT disks use Unified Extensible Firmware Interface (UEFI) BIOS mode. You can check your BIOS mode in the System Information. If your BIOS supports both legacy and UEFI modes but it is set to the legacy mode, you can convert it to UEFI.
After converting your hard disk from MBR to GPT, check if the Diskpart is showing the same error while creating partitions.
2] Rescan your disk
The Rescan command helps you detect new disks added to your computer. When you run this command, it detects the configuration changes on your hard disk and updates the information. You can try running this command in Diskpart and see if it helps. Follow the steps below:
- Open Command Prompt as an administrator.
- Type Diskpart and press Enter.
- Type Rescan and press Enter.
After rescanning your disks, check if the issue persists.
3] Shrink the partition on your hard drive
According to the error, your disk does not have enough usable space. To fix this problem, you can shrink a partition to leave unallocated space. After shrinking the partition, you should be able to create a new partition. The steps to do this are written below:
- Open Command Prompt as an administrator.
- Type Diskpart.
- Type select disk #. Replace # with the disk number. For example, if you want to create a partition on disk 0, you have to type select disk 0 and press Enter.
- Now, you have to select the partition on your hard disk which you want to shrink. For this, type list par and press Enter. This command will list all the partitions on your hard disk.
- Now, type sel par #. Replace # with the partition number on your hard disk. After selecting a particular partition, say, partition 3, you will see a message “Partition 3 is now the selected partition.”
- Type shrink desired=size minimum=size. After that hit Enter. Replace the string size in the command with the actual size on the disk that you want to shrink. The size that you enter to shrink the volume should be less than the total size of the selected partition. For example, if the total size of the selected partition is 16 GB, the size to shrink the partition should be less than 16 GB.
- After the above command is executed successfully, a partition with unallocated space will be created. You can view this unallocated space in Disk Management.
- To make the unallocated space usable, you have to format it. Type fs=ntfs quick and press Enter.
- Wait till the formatting process gets completed.
After the formatting gets completed, a partition of the desired size is created. In step 6 above, we have used the command shrink desired=size minimum=size. This command consists of two values, namely, desired and minimum. Let’s see the meaning and purpose of each of these values.
- Desired: This represents the actual amount of space that you want on your partition.
- Minimum: It represents the minimum space on the selected partition.
If the size entered in the desired value is not possible to create, Windows will create the partition of the size that you enter in the minimum value. You can also enter the same size in both of these values.
Read: Diskpart error, The device does not recognize the command.
4] Use a third-party tool
You can also use a third-party tool to create partitions on your hard drive. If you search online, you will find many disk and partition manager tools that come with both free and paid plans.
Related:
- Diskpart Virtual Disk Service error. The operation timed out
- Diskpart Virtual Disk Service Error, The volume size is too big
- Diskpart Virtual Disk Service error, The file system is incompatible
- Diskpart Virtual Disk Service error. Delete is not allowed on the current boot, system, pagefile, crashdump or hibernation volume
- Diskpart Virtual Disk Service error, The operation is not supported by the object
- Diskpart Virtual Disk Service error, The specified disk is not convertible
How do you fix the virtual disk service error the specified disk is not convertible?
You may see an error message “The specified disk is not convertible” while converting an MBR disk into GPT by using the Diskpart utility. The complete error message is:
Virtual Disk Service error:
The specified disk is not convertible.
According to the error message, the disk you want to convert from MBR into GPT is not convertible. To fix this error, you should know what an MBR partition style is and what a GPT partition style is. If you want to convert an MBR disc into a GPT, your BIOS should support the UEFI mode. This is because the GPT disks use Unified Extensible Firmware Interface (UEFI) BIOS mode.
If you are getting this error message, first check your system’s BIOS mode. If it shows legacy mode, convert it into the UEFI mode. To know the BIOS mode, click on Windows Search and type System Information, then select the System Information app from the search results. In the System Information app, you will see your BIOS made on the right pane.
If your BIOS supports both legacy and UEFI modes, you will be able to convert legacy to UEFI. If your BIOS mode is already set to UEFI, but you are still getting this error message, you can use a third-party tool or software, like Minitool partition wizard to convert MBR to GPT.
Read: DiskPart error, Data error Cyclic redundancy check.
How do I fix the virtual disk service error volume size is too big?
The virtual disk service error volume size is too big usually occurs when you format a particular disk drive by using a FAT32 file system. In such a case, you can try another file system to format the disk drive, like NTFS. There are several limitations of the FAT32 file system. The maximum file size limit for the FAT32 file system is 4 GB. This is the reason why Diskpart displays this error while formatting a disk drive of large size by using the FAT32 file system.
Read next: Diskpart has encountered an error, The media is write-protected.
|
0 / 0 / 0 Регистрация: 09.10.2015 Сообщений: 4 |
|
|
1 |
|
|
09.10.2015, 14:14. Показов 8374. Ответов 7
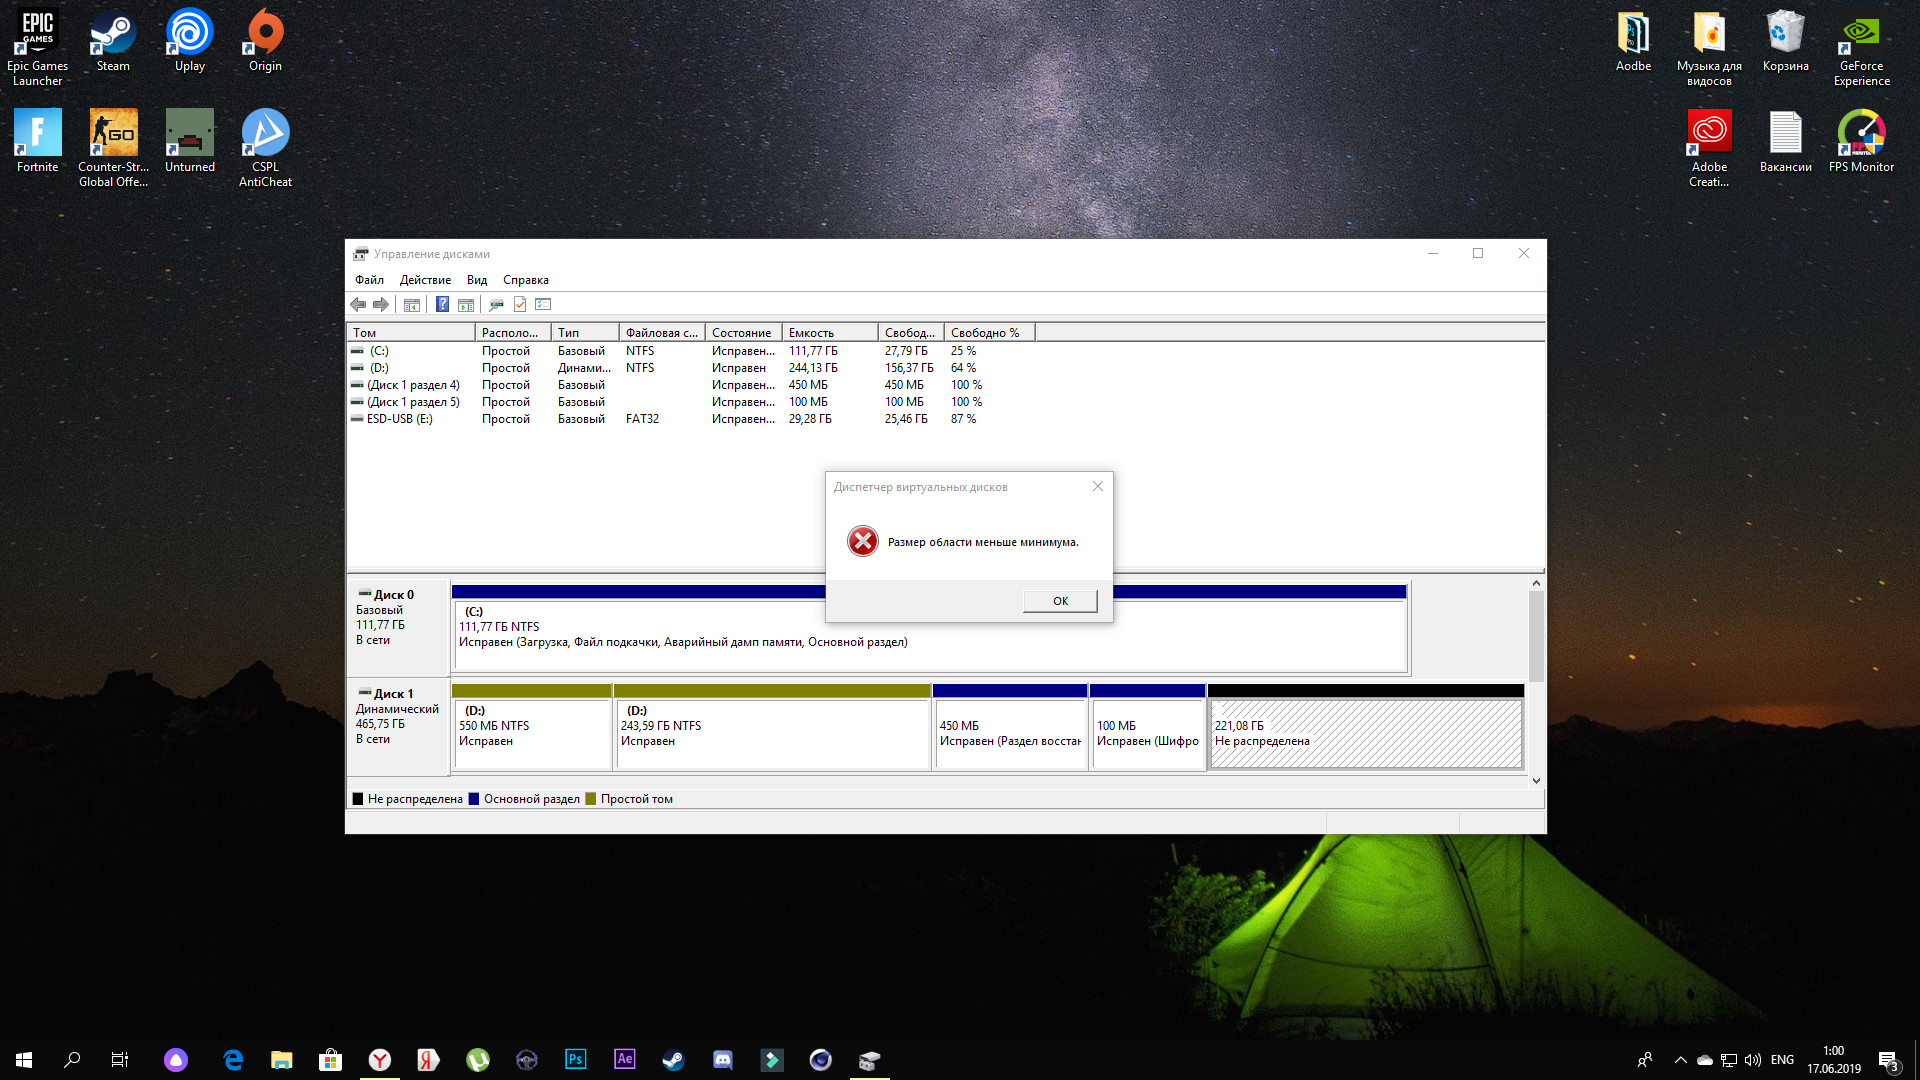
Переносил систему с hdd на ssd через Paragon Migrate OS to SSD 4.0. После процедуры перехода тот раздел, на котором стояла ос, уменьшился в два раза (с 566 МБ до ~250 МБ). Удалил этот раздел и хотел расширить второй, но выдает ошибку «На диске недостаточно свободного места для выполнения операции». При попытке создать новый раздел выдает ошибку «Размер области меньше минимума»
__________________
0 |

|
8446 / 2968 / 494 Регистрация: 14.04.2011 Сообщений: 7,361 |
|
|
09.10.2015, 15:21 |
2 |
|
Удалил этот раздел и хотел расширить второй, но выдает ошибку «На диске недостаточно свободного места для выполнения операции». При попытке создать новый раздел выдает ошибку «Размер области меньше минимума» Если это относится к SSD, то на нём действительно нет свободного места.
0 |

|
0 / 0 / 0 Регистрация: 09.10.2015 Сообщений: 4 |
|
|
09.10.2015, 15:32 [ТС] |
3 |
|
Нет, это относится к HDD Добавлено через 2 минуты
0 |
|
3135 / 1901 / 323 Регистрация: 25.10.2011 Сообщений: 5,527 |
|
|
09.10.2015, 16:53 |
4 |
|
У вас первый диск (диск 0) с MBR, а она позволяет макс 4 основных раздела. И зачем раздел Data динамический? Убейте все вспомогательные разделы с него, и создайте в начале еще один основной раздел.
0 |
|
0 / 0 / 0 Регистрация: 09.10.2015 Сообщений: 4 |
|
|
09.10.2015, 18:42 [ТС] |
5 |
|
А как вспомогательные разделы убрать? Через управление дисками они не убираются, там только можно посмотреть свойства.
0 |
|
8446 / 2968 / 494 Регистрация: 14.04.2011 Сообщений: 7,361 |
|
|
09.10.2015, 19:10 |
6 |
|
Решение
А как вспомогательные разделы убрать? Через управление дисками они не убираются, там только можно посмотреть свойства. Если разделы восстановления (вспомогательные) на HDD НЕ нужны , то перенести информацию с раздела D на другие носители (например на внешний HDD), после этого через меню Пуск открыть командную строку от имени администратора, ввести diskpart и нажать Enter и дальше после каждой команды — Enter Код list disk sel disk N, где N - номер HDD диска (ориентироваться по размеру дисков) clean (вся информация с диска будет потеряна) exit Закрыть командную строку. Открыть Управление дисками, при этом появится предложение проинициализировать диск 0. Проинициализировать диск (я бы предложил сделать таблицу разделов GUID т.е. GPT) и после этого в Управлении дисками можно будет создать разделы на этом диске.
1 |
 Сообщение было отмечено vim0r как решение
|
3135 / 1901 / 323 Регистрация: 25.10.2011 Сообщений: 5,527 |
|
|
09.10.2015, 20:49 |
7 |
|
Через управление дисками они не убираются Странно, пробуйте в dmde.
0 |
|
0 / 0 / 0 Регистрация: 09.10.2015 Сообщений: 4 |
|
|
11.10.2015, 18:45 [ТС] |
8 |
|
Андрей1224, Спасибо огромное! Все получилось!
0 |
Размер области меньше минимума пишет при попытке создания тома СПАСИТЕ!
 Макар Хакиев
16.06.2019
У меня так-же.
 Гость
Гость
25.06.2021
У мена так же пробовал смотреть в свойства и найти сам размер области что бы изменить только не чего не нашел вот ищу и еще не нашел ответ
- Сколько минимум места должно быть на диске С для работы винды 7, самого предельного минимума? Просто файлы на D уже хранить негде, хочу от С ещё отрезать несколько ГБ.
- Как размер Windows 7 превышает размер диска на котором он установлен? Объем диска С = 15Gb. Папка Windows занимает больше 18Gb. Как такое может быть? После установки автоматическое обновление было отключено. (Windows 7 х64 SP1)
- Подключение разорвано. Мтс конект менеджер 4g.Написано не подключен к 3g (в нашей области пока только 3g), винда 10 При подключении написано «подключение разорвано».Помогите, что делать? Модем мигает синим
- Почему размер на диске, меньше, чем размер в свойствах папки Windows? В свойствах «на диске» это фактический размер, который должен быть больше либо равно размеру файлов и это так, но вот я решил посмотреть размер папки Windows, а там все наоборот. Размер 27, а на диске 19
Помимо базовой способности удалять, создавать и форматировать раздел, Windows 10/8/7 встроенная утилита управления дисками имеет расширенные функции «Сжать том» и «Расширить том», чтобы помочь изменить размер разделов без потери данных. Однако он может сжимать раздел только влево и создавать нераспределенное пространство с правой стороны. Кроме того, в некоторых случаях даже не может уменьшить объем in Windows 10/8/7. В этой статье я объясню причины почему ты не можешь сжаться Windows 10 раздел с помощью управления дисками и что делать, если вы не можете уменьшить объем в Windows 10/8/7 ноутбук/настольный/планшет.
Содержание:
- Почему Управление дисками не может уменьшить раздел в Windows 10/8/7
- Что делать, если вы не можете уменьшить объем в Windows 10/8/7
- Что делать, если вы не можете сжать диск D, чтобы расширить диск C
Почему Управление дисками не может уменьшить раздел в Windows 10/8/7
Есть 4 распространенные причины, по которым вы не можете уменьшить объем в Windows 10/8/7 с родным инструментом управления дисками.
Причина 1. Файловая система не поддерживается.
Управление дисками может сжимать и расширять только разделы, отформатированные с помощью NTFS файловая система, FAT32 и любые другие типы разделов не могут быть сжаты или расширены.

Причина 2: недостаточно свободного места
После запуска Shrink Volume Управление дисками вычисляет использование дискового пространства и по умолчанию предоставляет вам максимально доступное пространство. Если вы не введете меньшую сумму, вы можете получить сообщение об ошибке, что «недостаточно места«.

Причина 3: ошибка файловой системы
Если есть ошибка файловой системы или другая системная проблема, Disk Management не может уменьшить раздел даже до 1 МБ.

Причина 4: Есть неподвижные файлы
Если в этом разделе есть несколько неподвижных файлов, таких как файл подкачки и файлы гибернации, «Управление дисками» может только уменьшить пространство.

Что делать, если вы не можете уменьшить объем в Windows 10/8/7
Когда вы не можете уменьшить громкость в Windows 10/8/7 в разделе «Управление дисками» выясните причину, указанную выше, и следуйте соответствующим решениям, приведенным ниже.
Решение 1. Сжимайте с помощью программного обеспечения для создания разделов
Если вы хотите уменьшить FAT32 раздел, Объем усадки неактивен in Windows 10/8/7 Управление диском. В этом случае вам необходимо запустить стороннее программное обеспечение, такое как NIUBI Partition Editor.
Решение 2. Сжимайте, занимая меньше места
Как я сказал выше, Управление дисками рассчитает дисковое пространство раздела, который вы хотите сжать, а затем даст вам максимальный доступное пространство. Если вы ввели большее пространство или много файлов, сохраненных в этом разделе, прежде чем нажать кнопку «Уменьшить». Реальное доступное пространство и рассчитанный объем пространства противоречат друг другу. В этом случае вам просто нужно снова запустить «Уменьшить объем» или ввести меньшую сумму самостоятельно.
Решение 3. Исправьте ошибку файловой системы
Многие компьютеры имеют ошибку файловой системы в одном или нескольких разделах. В общем, вы не заметите никакой разницы в повседневном использовании, но вы можете столкнуться с проблемами при сжатии и расширении разделов. Если в разделе много свободного места, но в «Управлении дисками» доступно 0 МБ или кнопка «Уменьшить» неактивна, попробуйте восстановить файловую систему.
Как восстановить файловую систему, если не удается уменьшить объем в Windows 10/8/7:
- Нажмите Windows значок или Начать меню, введите CMD, то вы увидите результат, щелкните его правой кнопкой мыши и выберите Запуск от имени администратора.
- В командной строке введите chkdsk X: / v / f и нажмите Enter. (X — буква диска раздела, который вы хотите сжать.)
- На системный диск C: командное окно сообщит, что этот раздел не может быть заблокирован, и спросит вас, запланировать ли это задание, введите Y и нажмите Enter.
- Перезагрузите компьютер и снова уменьшите размер диска C.
Решение 4.Уменьшите раздел с помощью NIUBI
Если в разделе много свободного места, но Управление дисками дает мало свободного места при сжатии, это означает, что в этом разделе есть «неподвижные» файлы. В этом случае уменьшите NIUBI Partition Editor. Лучше, чем Управление дисками, NIUBI может перемещать эти неподвижные файлы, поэтому вы можете уменьшить этот том до минимального размера, если хотите.
Что делать, если не удается сжать диск D, чтобы расширить диск C
Windows Инструмент управления дисками не может изменить начальную позицию раздела, поэтому он не может уменьшить перегородку вправо in Windows 10/8/7. Он только дает вам возможность ввести сумму, а затем автоматически сжимает том влево и автоматически делает Нераспределенное пространство справа.
Если вы просто хотите сжать раздел для создания нового тома, это не имеет значения. Но это большая проблема, если вы хотите сжать D, чтобы расширить диск C, потому что нераспределенное пространство, которое сократилось с D, не может быть добавлено на диск C с помощью управления дисками.
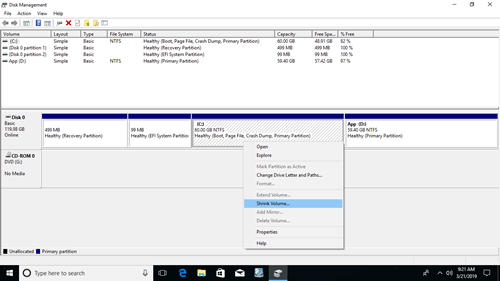
Как вы видите на снимке экрана, после сжатия диска D E находится справа от незанятого пространства, диск C не является смежным, поэтому Расширение томов отключено для обоих разделов.

Лучше, чем управление дисками, NIUBI Partition Editor имеет больше преимуществ, в то время как перераспределение жесткого диска:
- Он может сжимать и расширять разделы NTFS и FAT32.
- Он может перемещать неподвижные файлы и сокращать раздел до минимального размера.
- Он может сделать незанятое пространство слева или справа при сжатии раздела.
- Он может объединить незанятое пространство либо в смежный, либо в любой несмежный раздел на одном диске.
NIUBI Partition Editor имеет бесплатное издание для Windows 10/8/7/Vista/XP пользователи домашних компьютеров. То же самое с коммерческой версией, за исключением отсутствия технологии 1 Second Rollback и создания загрузочных носителей. К термоусадочная перегородка в Windows 10 ноутбук/рабочий стол/планшет, вам просто нужно перетащить на карту диска.
Скачать бесплатная версия, щелкните правой кнопкой мыши диск D (или другой) и выберите «Изменить размер/переместить том». У вас есть 2 варианта во всплывающем окне.
Вариант 1: Если вы перетащите левая граница к правильно
Нераспределенное пространство будет сделано на левая сторона.

Вариант 2: Если вы перетащите правая граница к оставил
Нераспределенное пространство будет сделано на правая сторона.

Следуйте инструкциям, если хотите расширить диск C, расширить системный зарезервированный раздел or увеличить привод D сжав другой раздел на диске. Помимо уменьшения и увеличения объема, NIUBI Partition Editor помогает выполнять множество других операций, таких как перемещение, объединение, преобразование, очистка, дефрагментация, скрытие, копирование раздела. Лучше, чем другие инструменты, он имеет уникальные 1 второй откат, Виртуальный режим и Отменить-на-хорошо технологии для защиты системы и данных.
Скачать
Некоторые пользователи сообщают об ошибке, когда они пытаются отформатировать внутренний или внешний жесткий диск с помощью дискпарт команда, они получают сообщение об ошибке, в котором говорится: «Размер тома слишком велик».
Что такое служба виртуальных дисков (VDS)?
Virtual Disk Service, сокращение от VDS, — это универсальный магазин для управления всеми вашими потребностями в дисках и томах. Он включает в себя несколько API-интерфейсов, направленных на то, чтобы сделать управление дисками более удобным. Пользователи в первую очередь сталкиваются с этой ошибкой, когда пытаются отформатировать жесткий диск объемом более 32 ГБ в файловую систему FAT32. И NTFS, и FAT32 являются популярными системами управления файлами, похожими на пользователей компьютеров в разных операционных системах, и, поскольку обе они предназначены для определенных целей, пользователи могут почувствовать необходимость соответствующим образом изменить свои файловые системы.
Исправить ошибку службы виртуального диска, размер тома слишком велик
Есть 2 способа решить эту проблему, оба из которых будут обсуждаться ниже.
- Форматирование с помощью DiskPart с использованием файловой системы NTFS
- Использовать стандарт AOMEI Partition Assistant
1]Отформатируйте с помощью DiskPart, используя файловую систему NTFS.
Если вам не нужно форматировать диск в системе FAT32, вы можете отформатировать его в системе NTFS с помощью DiskPart. Поскольку Windows позволяет форматировать разделы или диски размером более 32 ГБ при использовании файловой системы NTFS, это не должно вызывать рассматриваемую ошибку. Вот что вам нужно сделать:
- Откройте командную строку «Выполнить», нажав клавишу Windows + «R». Здесь введите «cmd» и нажмите Ctrl + Shift + Enter, чтобы открыть командную строку с повышенными правами.
- Подключите диск, который вы хотите отформатировать, и дождитесь его инициализации.
- Введите следующую команду, чтобы открыть утилиту DiskPart.
дискпарт
- Введите следующее, чтобы получить список всех доступных дисков на вашем компьютере.
список дисков
- Теперь вам нужно выяснить, какой диск вы хотите очистить. Диск 0 — это тот, который содержит файлы вашей ОС, поэтому вам не рекомендуется вмешиваться в него.
- Приняв решение, введите следующую команду, чтобы выбрать конкретный диск. Замените X на номер диска
выберите диск Х
- Когда диск выбран, введите ‘чистый‘ и нажмите Enter, чтобы начать процесс
- Создайте новый раздел и выберите его, введя следующие команды одну за другой.
создать основной разделвыбрать раздел 1
- Введите «active» и нажмите Enter, чтобы активировать этот вновь созданный раздел.
- Введите следующую команду, чтобы создать раздел с использованием системы NTFS и присвоить ему имя.
format FS=NTFS label=*Ваше имя* quick
- Подождите, пока он не будет полностью выполнен, а затем введите «выход», чтобы завершить процесс.
Если вам необходимо выполнить форматирование диска размером более 32 ГБ с использованием системы FAT32, вам придется использовать для этого стороннюю утилиту. Для целей этого руководства мы будем использовать бесплатную версию AOMEI Partition Assistant Standard.
2]Используйте стандарт AOMEI Partition Assistant
Вы можете скачать AOMEI Partition Assistant Standard. После того, как вы загрузили и установили его, выполните следующие действия, чтобы отформатировать диск в системе FAT32.
- Запустите приложение AOMEI Partition Assistant и найдите диск, который хотите отформатировать.
- Следуя вышеупомянутому процессу создания раздела NTFS для вашего диска, вы теперь увидите раздел для диска, который вы хотите отформатировать в соответствии с системой FAT32.
- Щелкните правой кнопкой мыши этот раздел NTFS и выберите «Форматировать раздел».
- Это откроет отдельное диалоговое окно. В раскрывающемся списке «Файловая система» выберите «FAT32» и нажмите «ОК».
- Предварительно просмотрите это новое форматирование, а затем выберите «Применить» > «Продолжить».
После завершения процесса вы увидите новый раздел диска с FAT32, успешно избежав ошибки службы виртуальных дисков «Размер тома слишком велик».
Можно ли отключить службу виртуальных дисков?
Если вы обнаружите, что не мешаете своим дискам и хотите полностью отключить службу виртуальных дисков, для этого есть процесс.
- Нажмите Ctrl + «R» и введите «services.msc».
- Прокрутите вниз, пока не найдете виртуальный диск.
- Щелкните его правой кнопкой мыши и выберите «Стоп».
- Процесс может занять некоторое время, но после его завершения встроенная служба виртуальных дисков будет отключена.
Связанный:
Могу ли я перезапустить службу виртуальных дисков?
Иногда у пользователей могут возникать сбои при работе службы виртуальных дисков, и обходным путем может быть перезапуск утилиты. Вот как вы можете это сделать.
- Откройте меню «Службы Windows».
- Найдите виртуальный диск.
- Щелкните его правой кнопкой мыши и выберите «Стоп».
- Затем снова щелкните по нему правой кнопкой мыши и снова включите, выбрав «Пуск».
Надеемся, пост помог вам.