Рано или поздно системные администраторы задаются вопросом о децентрализованном хранении информации или хотя бы об объединении нескольких существующих файловых серверов в единый. Параллельно этому поднимается вопрос о безопасности хранимой информации. Относительно простым, менее затратным и популярным среди администраторов AD (Active Directory) является использование DFS. Рассмотрим что это и как настроить.
DFS — Distributed File System — распределенная файловая система. Является продуктом компании Microsoft, предназначенный для упрощения доступа пользователей к файлам. Что примечательно, файлы могут быть разнесены территориально.
Выделяют два типа DFS:
1. Namespace DFS (Пространство имен DFS). Данный тип реализует виртуальное дерево, которое объединяет общие каталоги сети в единое пространство имен. Существует возможность настройки нескольких пространств имен.
2. Replication DFS (Репликация DFS) — репликация уже существующего каталога с отслеживанием содержимого и внесенных изменений.
Установка (DFS Installation)
Сразу заострим внимание, что установку, в рамках данного примера, будем выполнять на уже настроенный контроллер домена.
Открываем диспетчер серверов. В основной части окна кликаем по «Добавить роли и компоненты»:
В новом окне переходим к пункту «Тип установки», выбираем параметр «Установка ролей и компонентов», нажимаем кнопку «Далее»:
В обновленном окне выбираем текущий сервер и кликаем по кнопке «Далее»:
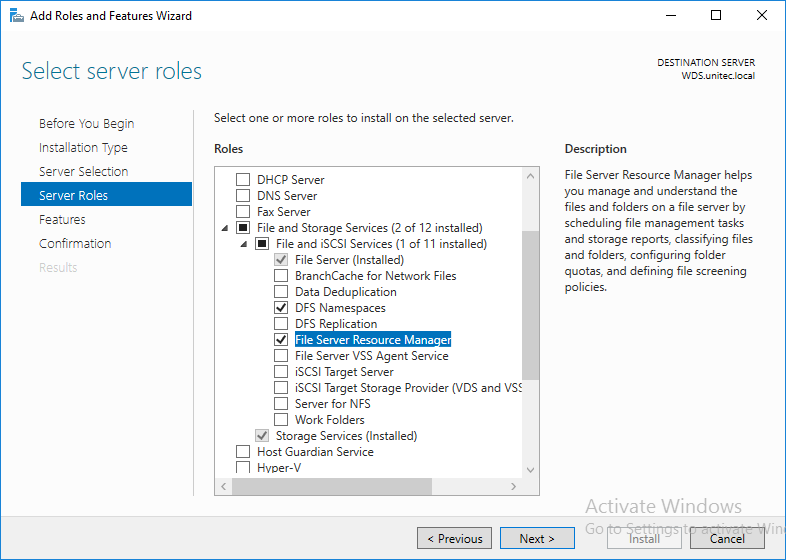
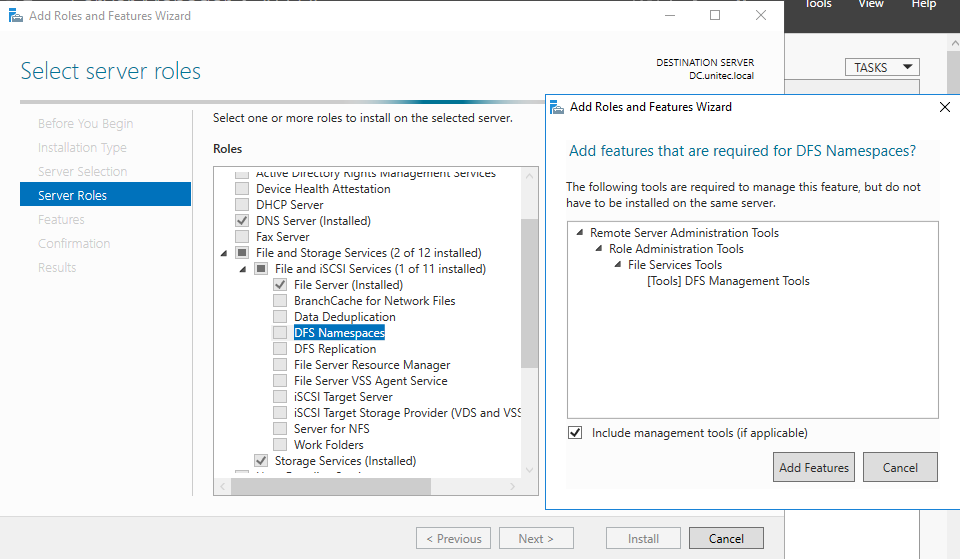
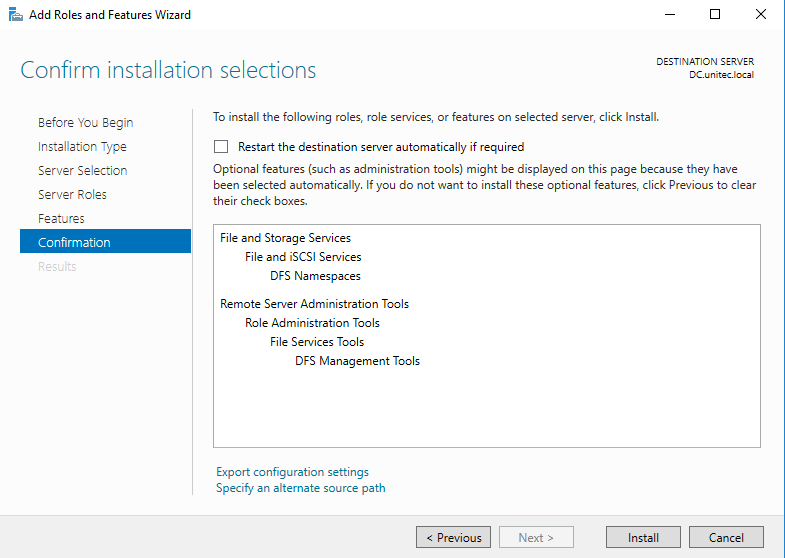
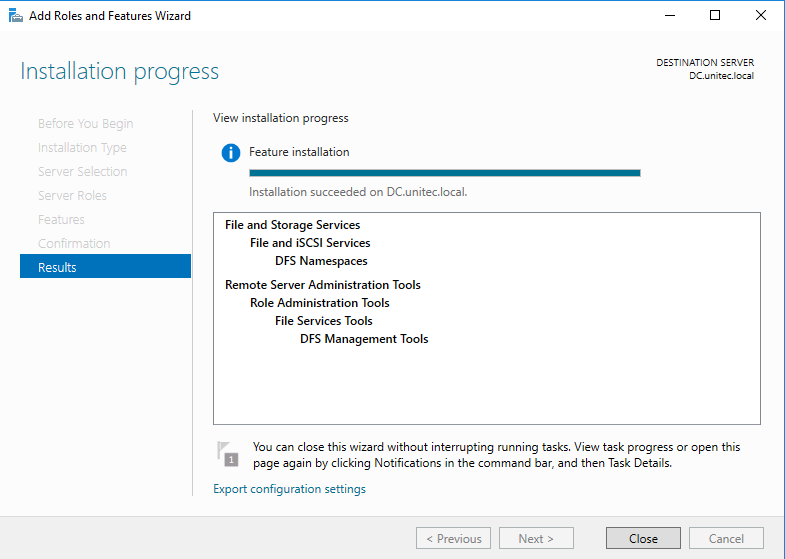
Следующим шагом, в списке доступных ролей находим «Файловые службы и службы хранилища» и раскрываем список, в котором необходимо отыскать «Файловые службы и службы iSCSI». Также раскрываем список параметров. Отмечаем галочками «Пространства имен DFS» и «Репликация DFS». В появившемся окне кликаем «Добавить компоненты». Нажимаем кнопку «Далее» несколько раз и дожидаемся окончания установки:
Создание пространства имен DFS
Перед тем, как приступить к созданию пространства имен DFS, необходимо создать хотя бы одну сетевую директорию на любом из серверов входящих в домен. В нашем случае будем использовать директорию созданную на том же контроллере домена.
Для того чтобы папка стала доступна из сети, кликаем по ней правой кнопкой мыши, в контекстном меню выбираем «Поделиться», затем «Отдельные люди»:
В поле ввода указываем «Пользователи домена», нажимаем кнопку «Добавить», затем «Поделиться»:
Общий доступ к папке готов. Кликаем по кнопке «Готово»:
Теперь сервер доступен по пути:
WINSERVER2019net_share
Создадим пространство имен DFS.
Для этого в меню «Пуск» выбираем «Средства администрирования Windows». Также можно через Панель управления ➝ Система и безопасность ➝ Администрирование.
В открывшемся окне, выбираем «Управление DFS»:
В новом окне «Управление DFS», в правой части кликаем по «Новое пространство имен …»:
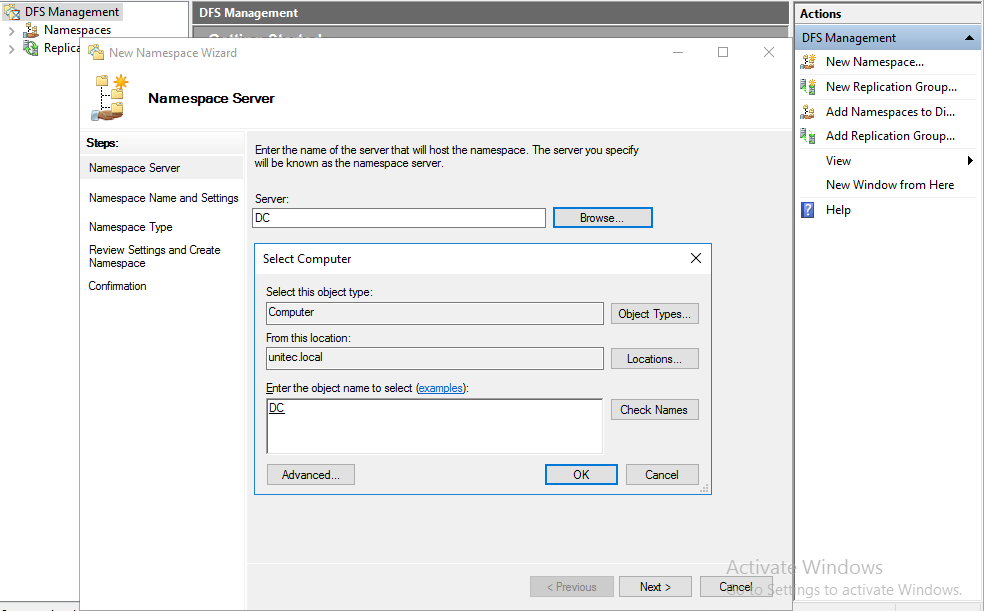
В окне мастера указываем имя сервера. Его можно отыскать как в окне, которое откроется при клике по кнопке «Обзор», так и в свойствах системы на вкладке «Имя компьютера». Нажимаем «Далее»:
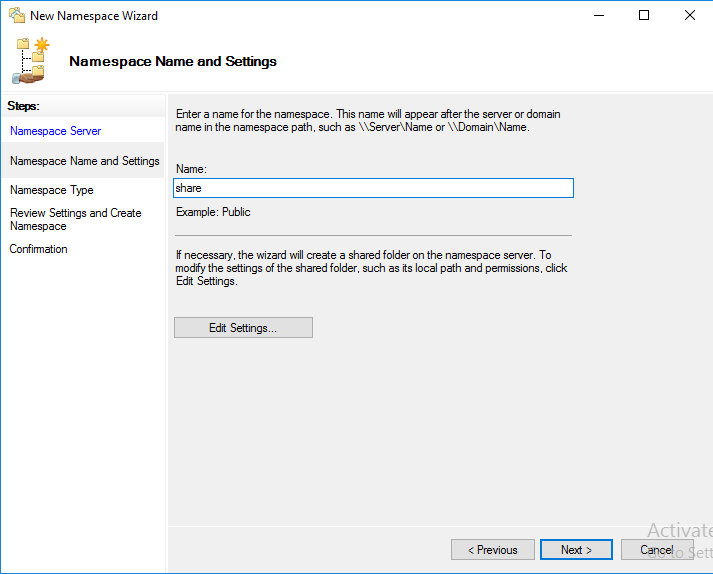
Следующим шагом указываем имя пространства имен. В нашем случае, пусть будет «MyDFS». Нажимаем кнопку «Изменить настройки…». В новом окне следует обратить внимание на строку «Локальный путь общей папки», при необходимости измените его. В том же окне установим переключатель на значение «Использовать пользовательские разрешения» и кликаем кнопку «Настроить»:
В открывшемся окне разрешаем полный доступ для всех и нажимаем кнопку «OK»:
Окно изменения настроек закрываем кликом по кнопке «OK», в окне мастера нажимаем кнопку «Далее»:
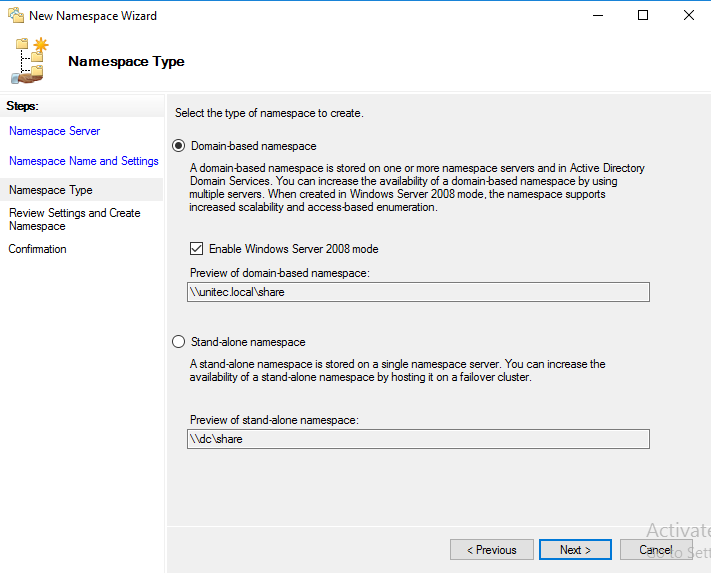
На новом этапе выбора типа пространства имен устанавливаем переключатель на значение «Доменное пространство имен», нажимаем кнопку «Далее».
Внимательно просматриваем настройки. Все устраивает — нажимаем «Создать»:
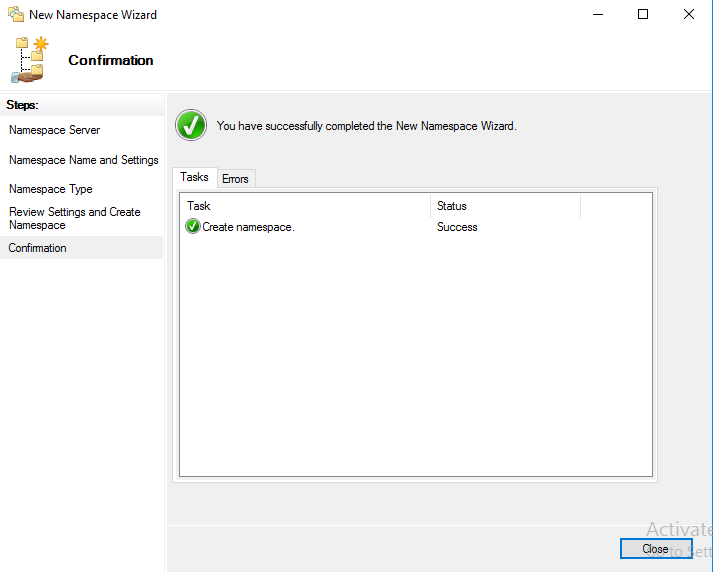
В случае успеха мастер покажет следующее окно:
Нажимаем кнопку «Закрыть».
Добавляем новый каталог в существующее пространство имен
Смысла в проделанном выше нет, если не добавить каталоги к уже существующему пространству имен. В примере процесс будет выполнен на том же сервере, однако, метод применим ко всем серверам в домене.
В окне управления DFS, в левой его части, разворачиваем дерево управления DFS до существующего, кликаем по необходимому. В правой части окна, в разделе действий, выбираем «Создать папку…»:
В открывшемся окне «Создание папки» указываем имя, в нашем случае «Test» и нажимаем кнопку «Добавить»:
В новом окне необходимо добавить путь к существующей сетевой папке. Список доступных каталогов можно посмотреть кликнув по кнопк «Обзор…». По окончании, нажимаем «OK»:
Результат будет таким:
Нажимаем «OK».
Доступ к DFS можно получить из любой адресной строки (Пуск->Выполнить, или из адресной строки любой папки) по шаблону:
<доменное_имя_сервера><имя_пространства_имен_DFS>
Например:
laa.testMyDFS
Результат таков:
Настройка DFS-репликации
Для выполнения репликации данных необходимо добавить второй сервер в этот же домен и установить на нем роль сервера «Репликация DFS» с помощью диспетчера серверов:
На этом же сервере создаем папку и разрешаем общий доступ к ней. В эту папку будут реплицироваться данные из директории, расположенной на сервере контроллера домена:
При открытии доступа и позже, в меню свойств папки можно увидеть сетевой путь до каталога:
Возвращаемся к контроллеру домена и развернутому на нем пространству имен DFS. Открываем уже знакомое из примеров выше окно «Управление DFS». В левой части окна, разворачиваем дерево до созданного пространства имен. В правой части окна выбираем «Добавить конечный объект папки…». В новом окне вводим адрес до общего каталога на другом сервер (который создали ранее). Нажимаем кнопку «OK»:
Система задаст вопрос желании создать группу репликации. Нажимаем кнопку «Да»:
Дожидаемся окончания хода выполнения. Итогом будет открытое окно «Мастера репликации папок». Необходимо проверить имя группы репликации, а также имя каталога, который будет реплицирован. Переходим к следующему шагу кликнув по кнопке «Далее»:
На данном этапе проверяем пути до сетевых каталогов и нажимаем «Далее»:
Следующим шагом предстоит выбрать основной узел из выпадающего списка. Это тот узел с которого данные будут реплицироваться. В случае с примером, основной член репликации сервер с именем WINSERV2016 — это сервер, на котором поднят контроллер доменов. Конкретный пример, лишний раз напоминает о необходимости определения понятных имен для серверов и прочих узлов сети. Нажимаем «Далее»:
Теперь предстоит выбрать топологию подключений между членами репликации. Выбираем доступную — «Полная сетка», однако если вы желаете создать свою топологию репликации позже, то выбирайте «Нет топологии». Нажимаем «Далее»:
Настройка подходит к концу и на этом шаге следует определиться с периодичностью репликации данных. Выбираем вариант с постоянной репликацией. Преимущества этого метода в том, что данные будут дублироваться сразу. Недостаток — нагружает локальную сеть при больших объемах информации, а также нагрузка на жесткий диск.
Второй вариант, предлагает настроить репликацию по расписанию. Минус этого способа в том, что данные будут синхронизированы «потом». Выбираем желаемый вариант и нажимаем «Далее»:
Программа предлагает просмотр выбранных параметров. Если все устраивает — нажимаем кнопку «Создать»:
В случае успеха результат будет таким:
Нажимаем кнопку «Закрыть».
Система напомнит о задержках репликации. Чтобы не получать это сообщение вновь, при желании, следует установить галочку в соответствующем месте. Нажимаем кнопку «OK»:
Настройку распределенной файловой системы, а также репликацию данных можно считать оконченной.
220140
Минск
ул. Домбровская, д. 9
+375 (173) 88-72-49
700
300
ООО «ИТГЛОБАЛКОМ БЕЛ»
220140
Минск
ул. Домбровская, д. 9
+375 (173) 88-72-49
700
300
ООО «ИТГЛОБАЛКОМ БЕЛ»
В серии статей мы рассмотрим установку файлового сервера на базе Windows Server 2016, настройку пространства имен, квотирования, группы AD, права доступа к сетевым папкам, создание ярлыков на сетевые папки через GPO.
За базу берем поставленную мне задачу, упростим ее для статьи. В примере будем использовать два отдела компании. На сервере будет использовано два HDD диска для хранения данных, также подключим третий HDD диск по сети с другого сервера.
1 . Установка и настройка файлового сервера, DFS Namespace и квот
2 . Настройка прав доступа к сетевым папкам на файловом сервере
3 . Добавление групп в AD
4 . Добавляем ярлыки на рабочий стол через GPO
Установка роли файлового сервера
1 . Открываем панель управления Server Manager, справа, вверху, находим Manage, выбираем «Add roles and features» (Добавить роли и компоненты)
2 . Тип установки указываем «Role-based or feature-based installation» (Установка ролей и компонентов)
3 . Выбираем необходимый нам сервер из пула (списка) серверов
4 . Выбираем компоненты
Установка DFS-namespace
Зачем нужен DFS?
DFS имеет ряд преимуществ как для пользователей сети, так и для предприятий.
Для пользователей сети:
Namespace DFS — это упрощенный доступ к файлам, распределенным по сети. Исчезает необходимость в подключении множества сетевых дисков. Пользователям предоставляется одна общая сетевая папка, в которой отображаются только те папки, к которым им предоставлен доступ, если конечно включен ABE.
Для организации:
Namespace DFS — гибкое использование свободных ресурсов. Создание и подключение к DFS сетевых папок с серверов и компьютеров со свободным местом на жестком диске.
Replication DFS (Репликация DFS) — автоматическое резервирование важной информации повышает отказоустойчивость всей системы (выход одного сервера или дискового устройства не повлияет на работу пользователей).
В моем случае DFS мне поможет создать более удобную структуру файлового сервера для пользователей, получить одну точку входа.
Установка DFS
Если вы не установили DFS при инсталляции роли файлового сервера, то можно ее просто добавить. Для этого:
Откройте панель управления сервером Windows и найдите Add roles and features (Добавить роли и компоненты).
В качестве типа установки укажите Role-based or feature-based installation (Установка ролей и компонен
Выбираем нужный сервер из пула серверов. тов).
Выбираем нужный сервер из пула серверов.
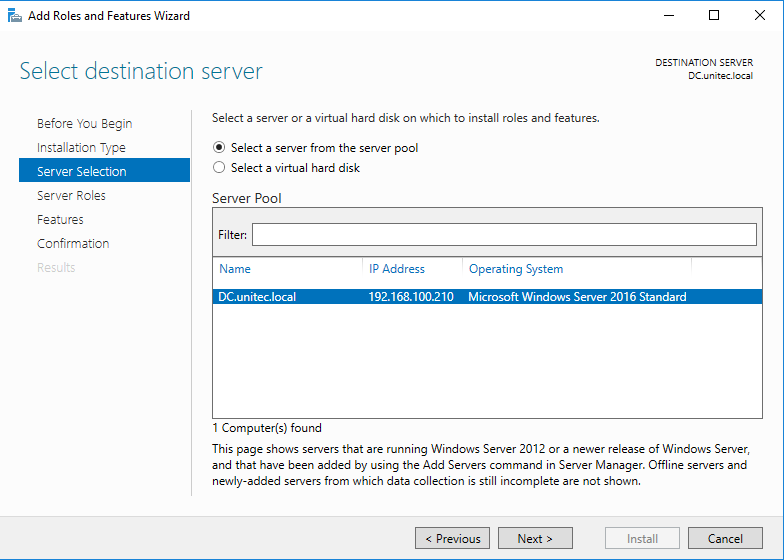
В следующем окне отмечаем DFS Namespaces и DFS Replication, если нужно.
После удачной инсталляции переходим к настройке DFS
Настройка DFS
В Server ManagerDashboard выберете > Tools > DFS Managment.
Или в поиске введите команду dfsmgmt.msc.
Для создания нового пространства имен выберете в правой части экрана New Namespace.
Введите название сервера и выберите его местоположение.
На следующем этапе задаем имя пространства имен DFS. Хочу обратить внимание, что заданное здесь имя будет использоваться при подключении общей сетевой папки. Например:
\companyname.localshareНа следующем шаге выбираем Domain-based namespace, так как используются доменные службы Active Directory.
В результате видим сообщение об успешном создании пространства имен.
Теперь подключаем к нашему созданному Namespace сетевые папки.
Настройку прав доступа для папок смотрите здесь >>>
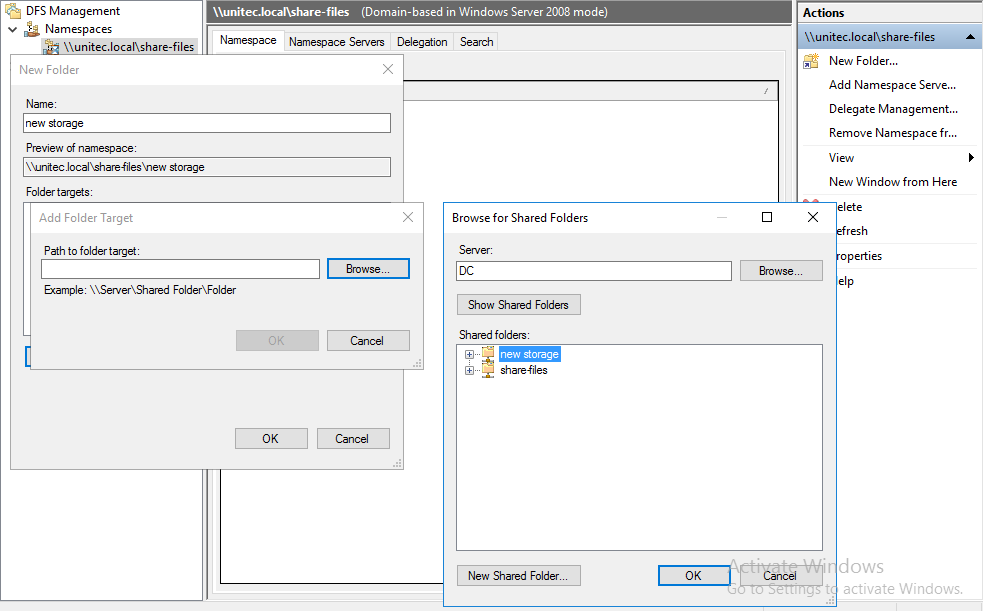
Для создания новой папки выберете в правой части экрана New Folder. Задайте имя папки и путь к ней.
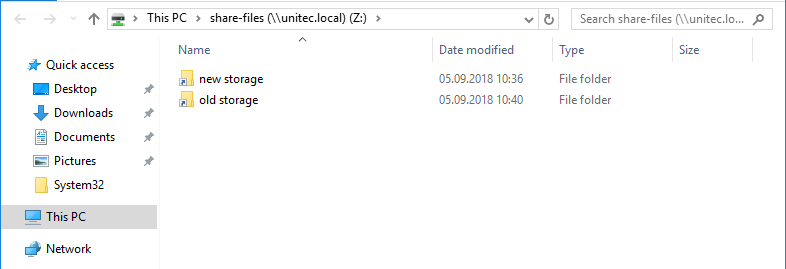
В моем случае у меня 2 разных сетевых папки на разных дисках. Но для пользователей отдела один сетевой ресурс:
\companyname.localshare-filesЕсли в будущем мне понадобится добавить какие-либо сетевые папки для отделов, но при этом не подключать несколько сетевых ресурсов, то достаточно будет создать новый Namespace и подключить к нему нужные папки.
НА ЗАМЕТКУ!
Если после удаления Namespace появилась ошибка и перестали отображаться другие, то нажмите на него
и выберите Remove DFS Namespaces from the display.
Ошибка исчезнет и все остальные Namespace появятся на экране.
Replication DFS (Репликация DFS) мною не настраивалась. Наличие свободных ресурсов всегда болезненный вопрос.
Для второго отдела был создана обычная сетевая папка с правами доступа.
\sharename-filesНастройка квот для сетевых папок в Windows Server 2016
Причины для установки квот на сетевые папки могут быть самые разные. Для меня было целью разделить место на логическом диске D: моего файлового сервера на 2 отдела.
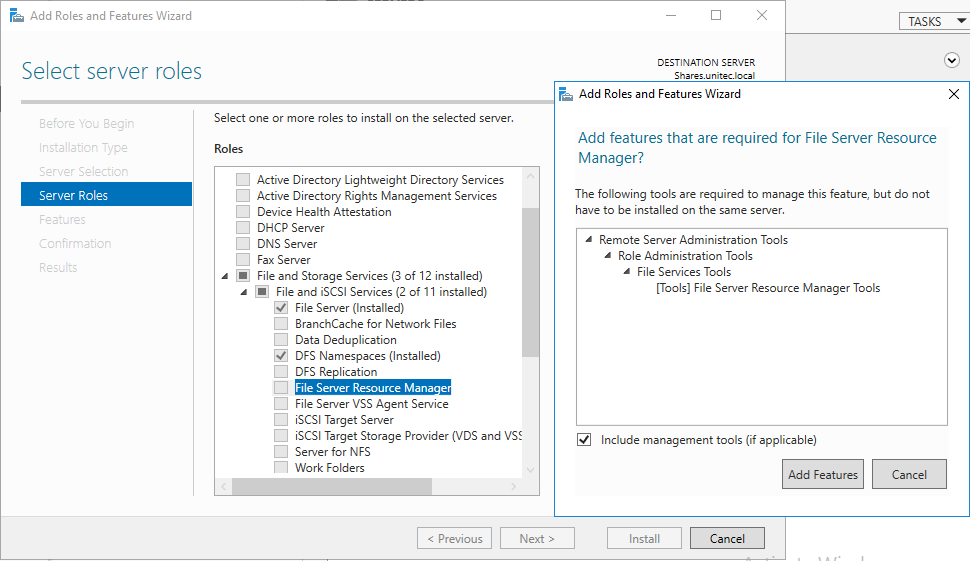
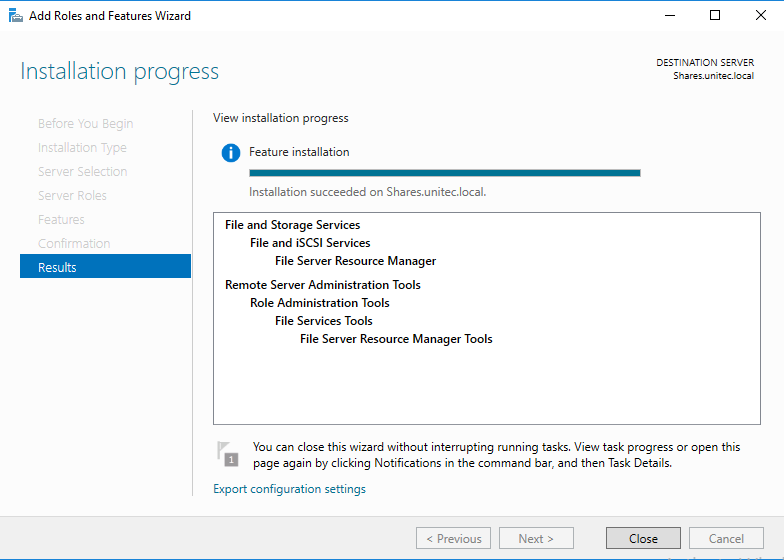
Для установки квот на сетевые папки необходимо установить File Server Resource Manager.
В Server ManagerDashboard выберете > Tools > File Server Resource Manager. Откроется окно управления File Server Resource Manager. Если у вас в компании есть настроенный SMTP server с 25 портом, то вы можете настроить отправку уведомлений о квотах на e-mail администратора. Для этого выберите: File Server Resource Manager > Configure Options…
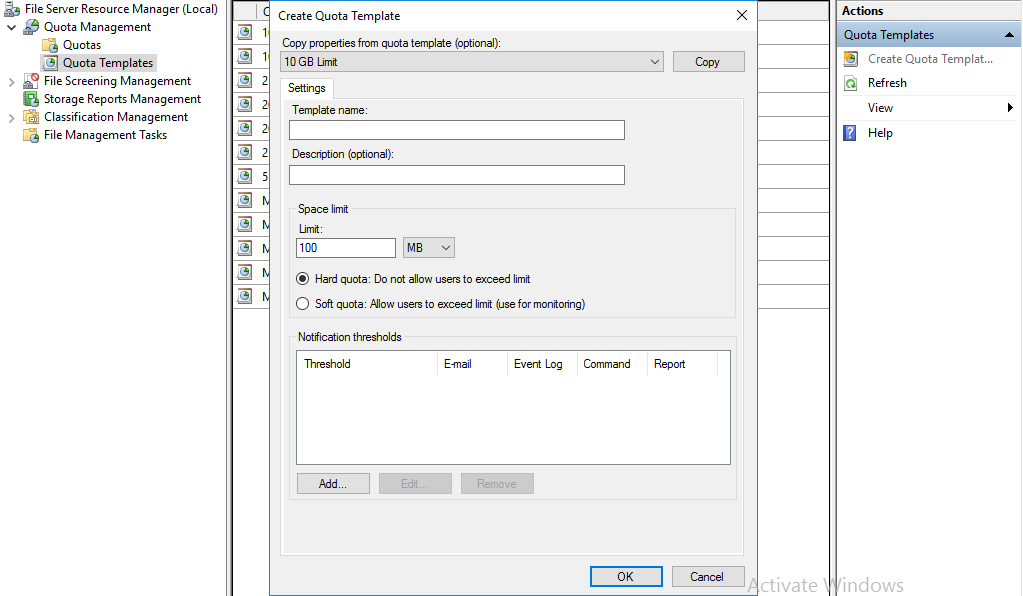
Для создания своей квоты выберите Quota Management > Quota Templates > Create Quota Templates
Задаем имя для нашей новой квоты, описание, если нужно, и устанавливаем лимит. Нажимаем OK. Квота создана. Если нажать кнопку ADD, то открывается окно с доп. настройками, в котором можно создать уведомления о действиях с папкой, к которой применена квота, запись уведомлений в журнал и отправки на e-mail администратора.
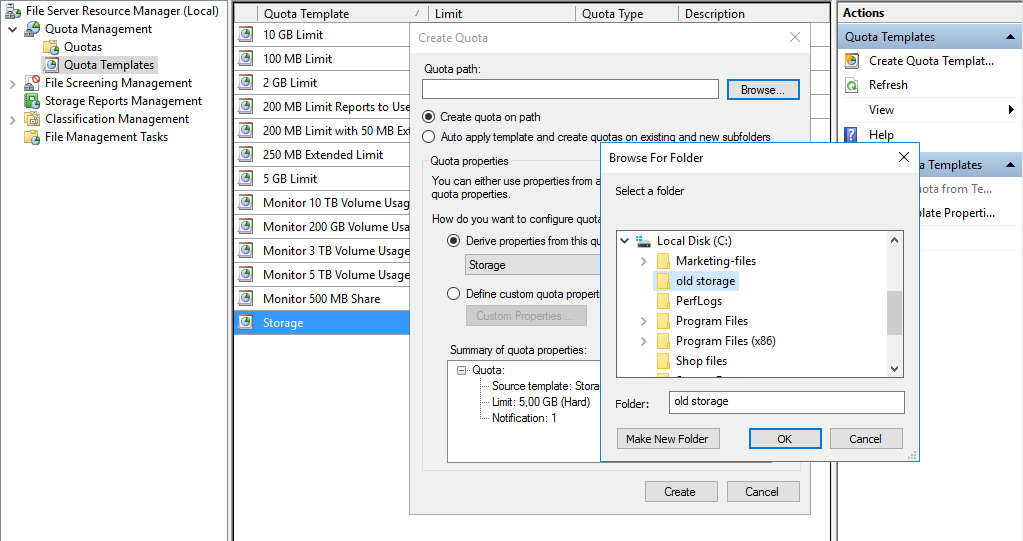
Создадим квоту Storage и применим ее к папке old storage.
Подключим эту папку на компьютере пользователя, видим результат.
Хочу добавить, что квоты бывают Hard (жесткими) и Soft (мягкими). Мягкие квоты – это квоты, в которых установленный лимит можно превышать при достижении порогового значения. Жесткие квоты – запрещают пользователю превышать установленное пороговое значение лимита. Я использую жесткие квоты, так как хочу закрепить выделенное место на жестком диске за отделами.
На заметку!
Если вы подключаете сетевую папку созданную в Namespace,
то корректного отображения информации об объеме данной сетевой папки не будет.
Обращаю внимание на то, что эта статья описывает конкретный пример. Задачи и решения для каждой компании индивидуальны.
DFSR is a role service of Windows Server that enables to replicate folders between multiple file servers across limited bandwidth network connections.
DFSR (Distributed File System) Replication it’s a good solution to keep sync file servers when you have branches and must be share the same File Servers across the organization.
Another use of DFS-R is as Disaster Recovery Solution for the File Servers.
In the past i have publish the article Install and Configure DFS Replication in Windows Server 2012
Today i would like to explain how can setup DFS replication in Windows Server 2016.
Improvements in win2016
Base on Microsoft Technet DFSR in Windows Server 2016 hasn’t any improvement
DFSR Requirements before installation
Before start the installation of DFSR it’s very important to meet the requirements in your environment
- Update the Active Directory Domain Services (AD DS) schema to include Windows Server 2003 R2 or later schema additions. You cannot use read-only replicated folders with the Windows Server 2003 R2 or older schema additions.
- Ensure that all servers in a replication group are located in the same forest. You cannot enable replication across servers in different forests.
- Install DFS Replication on all servers that will act as members of a replication group.
- Contact your antivirus software vendor to check that your antivirus software is compatible with DFS Replication.
- Locate any folders that you want to replicate on volumes formatted with the NTFS file system. DFS Replication does not support the Resilient File System (ReFS) or the FAT file system. DFS Replication also does not support replicating content stored on Cluster Shared Volumes.
How to Setup DFS Replication
After verify that meet all the requirements we can start to setup DFS Replication in Windows Server 2016
- Open Server Manager
- Click Manage — — > Add Roles & Features

- Click Next

- Leave the Role-base or Feature-based installation and click Next.

-
Leave the default options and click Next.

- Expand File Storage Services — — > File & iSCSI Services and check DFS Replication.

- Click Add Features to return in first screen and click Next.

- Click Next.

- Click Install and wait to finish the Installation.

How to Setup DFS Replication Group
Now we can start to configure DFS Replication across the File Servers.
- From Server Manager click Tools — DFS Management

- Right Click in Replication and select New Replication Group.
- In this scenario we have 2 File Servers so we must select Replication group for data collection.

- Type a name for the Replication Group and the Domain name of your environment.

- Select the source FileServer which contain that data that you want to replicate.

- Click Add and select the folder that you must replicate.

- After add the folder it will seems like this

- Select the destination File Server.

- Select the target folder. Don’t create the root folder in the destination because if select the target folder User as in example will be create the Path E:UsersUsers. We don’t want this. Just select the previous level before and the replication will be create the Folder. Click Next.

- Configure the Bandwidth and when you would like to Replicate. These settings depends on your requirements. In case that you want to use DFSR for Disaster Recovery it’s better to schedule the Replication after hours instead to replicate continuously.
- Select what is best for you and click Next.

- Click Create

- Check the Status all completed sucessfull and click Close
How to Configure DFS Replication
If you are setup dfs replication for the first time it’s very common to come across with specific errors because of the wrong configuration or no configuration at all.
It’s very important to know what must be change after setup of the DFS-Replication Group.
The most common errors related with the Staging folder.
Staging folder used by DFS Replication as caches for new and changed files that must be ready to replicate. By default the size of the Staging folder is 4GB.
I am sure that you will ask which is the recommended size of the staging folder?
Base on Microsoft Technet the recommended minimum size of staging folder can be calculated with the following Powershell command. The <replicatedfolderpath> is the path to replicated folder.
Get-ChildItem <replicatedfolderpath> -recurse –force | Sort-Object length -descending | select-object -first 32 | measure-object -property length -sum).sum /1gb
After calculate the staging folder size
- From the DFS Management Console in the Membership Tab right click and select Properties in the first folder.

- Click in Tab Staging
- Change the Quota (in megabytes)
- Click OK

- Another one important configuration is the File Filtering
- From the DFS Management Console select Replicated Folders Tab
- Right click and select Properties in the Replicated Folder.

- In the File Filter you can exclude extensions that you don’t want or it mustn’t replicate.
- By default has these extensions. If you have these type of files that must replicate then you must remove it from there.

- How can Force or Disable the Replication?
- From the DFS Management Console select the Tab Connections.
- Select the Server that you want to Disable or Force the Replication and with right click you can find the options.

- In the same Tab select the Server that you want. Right click and select properties
- Click in Tab Schedule.
- From here you can schedule the Replication and the Bandwidth usage
- You can click the button View Schedule to see what you have already schedule and the Bandwidth usage.

- If you want to change click Cancel.
- Select Custom connection schedule.
- Click in Edit Schedule.

Now you have Setup and Configure the DFS Replication between two FileServers.
Of course we aren’t finish here. Because now we must learn to monitoring how the replication is going.
So I will come back next week to explain DFS Replication monitoringm
Have a nice weekend !!
You can send me an email at info@askme4tech.com or do your comments in Twitter or Facebook
I invite you to follow me on Twitter or Facebook. If you have any questions, send email to me at info@askme4tech.com.
DFS stands for Distributed File System, and it provides the ability to consolidate multiple shares on different servers into a common namespace. Whether or not there are multiple locations providing easy access to that data is something that we and IT are charged with. If we can provide easy access, one that consolidates the different locations where data can exist under a single store in a single path, that makes things a lot easier for our users, which in turn makes it easier for us as admins. It is attempting to resolve both of these situations that is the reason why DFS exist and indeed has existed for a number of OS versions.
Let’s take a look at on example where DFS is useful. I am talking here about standalone DFS namespace and not the domain DFS namespace. I will talk about differences so that you know what to choose. Imagine you have the following share setup in your organization. What is “wrong” with the left side?
Well, imagine you were to move the software data or any other share to a new file server. You’re going to have to update all the user drive mappings to redirect them to the new server share. Now this might be a simple case of updating a logon script, but what about all those users that have mapped it manually. You’re going to have to let them know that you’ve made this change and then you’ll have to go through the process of fixing it, and explain to them why this IT change broke their share access. If you take a look at the right side, DFS will allow us to simplify this by presenting a common namespace to the users, whilst in the background transparently redirecting them to the various share locations. So we can update these locations in the background without affecting the UNC path. So for a standalone DFS namespace it would look something like this. We would have the server name (DFS01), we would have the DFS namespace name(Shared Files), and then we would have subfolders representing project Organization, Home, UserFiles, and Software, etc. So now we’ve got a single drive mapping, in this case S, which is mapping to all these shares in the background, and as I say, if you wanted to redirect or move those shares, then you can do that using the DFS namespace without having to go through and update all the user client drive mappings.
Now, if we were doing this using a Domain DFS namespace, then instead of using the server, DFS01, as as the server name, you actually use the Active Directory domain name, and like before, the user will see the shares presented as subfolders.
STANDALONE VS DOMAIN NAMSPACE
Tthe key difference is the referral server and where the DFS information is stored. On a standalone DFS implementation, the referral information is stored locally on the single DFS referral server that you choose when you configured DFS. Now this type of configuration is useful if you don’t have an Active Directory domain or if for some reason you don’t want to integrate with Active Directory, but the downside is that you can only have a single referral server, and if that server is offline then you’re not going to be able to access the DFS namespace. The more common and generally preferred approach is to use Domain DFS. In Domain DFS you can have multiple DFS namespace referral servers, perhaps spread out amongst your core sites, and we use Active Directory to direct the clients to the closest referral server.
DFS Replication
DFSR is the component of DFS that allows you to duplicate the DFS data and replicate copies of that data across multiple locations. DFSR enables you to take file data and keep the data synchronized across two or more locations, and that’s an important differentiation from BranchCache as BranchCache maintains a single master copy with only a local read-only cache. When you have multiple copies of the same data, there are inherent risks from people updating that data in multiple locations at the same time. Therefore, before setting up DFSR, ask yourself, will people, or maybe processes, be likely to be updating the files simultaneously in multiple locations? If this is expected to happen a lot, then DFSR may cause you issues and you may want to consider using BranchCache or perhaps just keeping a single copy of the data.
DFSR is very powerful, and it enables you to create really any type of replication topology that you can think of, and a useful feature of any replication mechanism is the ability to schedule and throttle the replication. If your WAN link is constrained, then you can protect it by only enabling replication in the evenings. Anytime you’re going about replicating content from two different locations, there’s always the chance that those two locations could get manipulated or changed at the same time. And so, for that reason, it can be important for us to configure staging or essentially a temporary location where data goes before it ends up replication from one site to the other. And finally, it also supports remote differential compression. This enables it to officially replicate only the changes to files, and not have to replicate the whole file itself when perhaps only a few bytes of data has changed. We will see how this works a little bit later.
DFSR Topologies
- One – to – One Replication –> This is where data is synchronized between two servers. This is an easy to understand topology, and relatively easy to troubleshoot, and it’s good if you have two main locations dispersed over a WAN link.
- One – to – Many Replication –> This is useful if you have a main central site and you want your branch sites to have local copies of the data. A great use case for this could be a software distribution share or maybe you have read-only reference information that you want to make available to your branch users. It’s worth highlighting that the shares on DFS within your branch sites or even your central site, can be made read-only, and the standard NTFS file permissions apply.
- Many – to – One Replication –> This, as the name suggests, is where multiple sites all replicate their data into a central location. So where might this be used? Well, it could be used for backup, where you have all the data replicated from your branch site, replicated into a single central site, and we have the backup software running on that central site.
- Hub – Spoke Replication –> this is similar to many-to-one replication, however, it’s bidirectional. This means that there would be two replication hubs between the branch sites because the branch sites would need to send data to the central site, and then the central site would replicate it out to the other branch sites.
- Full Mesh –> full mesh is where any server can potentially replicate with any other server. Now this can speed up the replication of changes, as there is a direct connection between sites, but it can also cause excessive replication, and it can also be very complicated to troubleshoot.
So, as you can see, you can configure replication pretty much as you wish, and as a rule of thumb I’d recommend aligning your replication topology to match your underlying physical network topology. So if all your branch sites connect via the central hub site, then the hub-spoke replication topology might make sense. However, like most design decisions, always strive to keep things as simple as possible, and always be able to justify why you’ve configured something in a particular way.
INSTALL AND CONFIGURE DFS NAMESPACE (STANDALONE)
The first thing we’re going to do is configure a standalone DFS namespace. A standalone DFS namespace is useful when you don’t want to integrate with Active Directory, but you want to store the DFS information locally.
The first thing we need to do is install the DFS namespace’s role within Windows
Once done click on Tools –> DFS Management
DFS Management Console will open and we can see both halves of DFS (Namespaces and Replication) We will talk about replication later.
For the first step in this process, let’s actually go through for the configuration of a namespace, which will point to our share location that we wanna make available. To create a new Namespace, right-click on Namespaces and select New Namespace
Now we need to select or tell DFS what server is going to be the Namespace Server. In my case that will be DFS. Click Next
(IF YOU NOTICE THAT YOU ARE NOT ABLE TO USE BROWSE IN WINDOWS SERVER 2016 DFS, UNINSTALL KB3186568 AND REBOOT THE SERVER.
The issue is connected to update Microsoft .NET Framework 4.7 (KB3186539 for 2012R2 and KB3186568 for 2016 and Win10)
Now we need to create a name for the namespace that we’re interested in. Now, this name for the namespace does not necessarily need to be the same thing as the share name. Instead, what we wanna create is a location that users can go to where subfolders of which, at least from their perspective will be the variety of different folders or shares that already exist. You can call it everything, or software or Shared Documents etc, I will call mine Data
Now, just like any old share, we also need to configure the permissions on that share as well as the location as to where it goes. Click on Edit Settings
Here you can change the permission of the share folder according to your requirements. Remember, this is not yet the company shared location. We’ll plug that in after we configure this DFS route. Our local path currently is C:DFSRootsData and then you can also configure some permissions on this shared folder as well. will leave the defaults and click OK and next
Now we have important distinction here because on one hand, you have what’s called a domain-based namespace where the namespace in pathing itself exists in Active Directory. On the other side, you have what’s called a standalone namespace, which correspond to the file server on which we’ve installed DFS. Now, in the case of a standalone namespace, you’re effectively creating a share just like you would a traditional share that collects and aggregates all the links of the share folders. Short of hosting this share on top of a fail over cluster, as you can see down in the description, this doesn’t provide you any height availability for the share. Now, this stands in contrast with the domain based namespace where when the namespace itself exists in Active Directory, any Active Directory domain controller can point that user to the correct location as long as you just have an Active Directory in place for them to reference against. Now, the biggest difference here is the idea that with the domain based namespace, you’re actually referring to the name of the domain itself as the source location for that share. So here we’re doing mehic.sedata is the root for the namespace we’re creating. This is different from down in the bottom where again, it’s just the file server itself.
We will first create a standalone namespace so that you see how it looks like and then we will create domain-based namespace. Click Stand-alone namespace and click next and Create
Now we can see that the namespace has been created. So the first part of the namespace, because it’s a standalone one, is the DFS name that we selected, followed by the namespace name.
Now a namespace without any targets is not much use to anyone, so the next thing we need to do is create a referral target. We will create a new folder which becomes the first in that series of links that we want to aggregate under the namespace. Right click on the namespace and choose New Folder
I will call it UserFiles –> Click ADD –> Browse and then for the folder target, we will set up the path of the folder target on our server DFS and we’ll associate it with that shared UserFiles.
Click OK 2 times.
Now let’s just go add a couple more, but now I’m going to add a share or a folder path that is on a different server. Right-Click on the Namespace and select New Folder
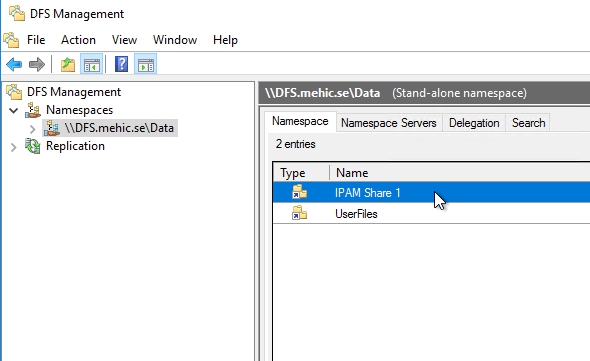
I will call it IPAM Share 1 ( This is just a friendly name that the users are going to see under the Data path within the namespace so you can type in whatever you want).
So this is just to demonstrate that even though it’s a standalone namespace you can still point to Folder Targets, or folder shares, on different servers. The standalone namespace just means that the referral information is stored on one server.
And you can see if I go to the Namespace again, you can see the IPAM path is present even though that’s on a different server.
INSTALL AND CONFIGURE DFS NAMESPACE (DOMAIN-BASED NAMESPACE)
This is very similar to what we do in the standalone namespace, but this time the information is going to be stored within Active Directory. I will use my servers FILESRV01 and FILESRV02 for this and for the DFSR part as well.
I already installed DFS Namespace and DFS Replication role on both servers.
Open DFS Management Console and right click on Namespace and select new namaspace
This time server will be filesrv01, click next
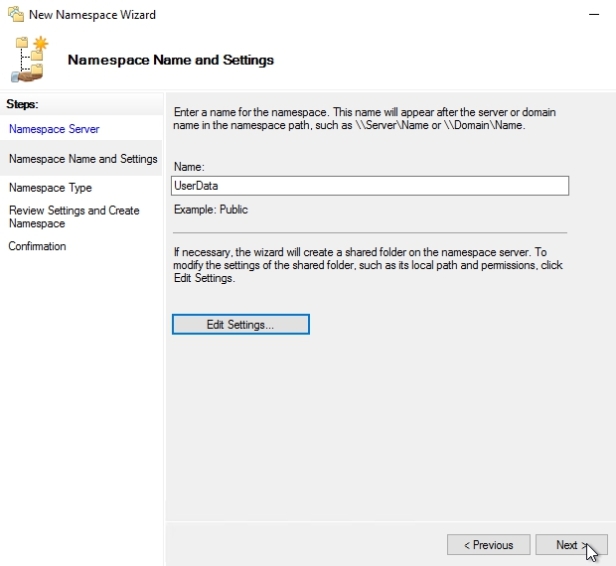
Now we need to give it a name and this time I will call it UserData and I will leave the permissions as default, click next
This time we will select the option Domain-Based namespace. Enable Windows Server 2008 mode will give us support for scalability as a function of Active Directory and also, so you to be able to use access base enumeration. Be aware that if you should choose the non-server 2008 mode and you later need to enable it, the only way to do that is to actually remove and then recreate the namespace in order to turn on this extra functionality like access based enumeration. So unless you’ve got an old server, it’s best to select that. Click next and create
Now, the difference you’ll notice is that now the namespace path is actually , my domain name, which is mehic.seUserData, whereas on a standalone namespace it would have been , and then the server name, so that’s the obvious difference between domain and standalone from a user’s perspective.
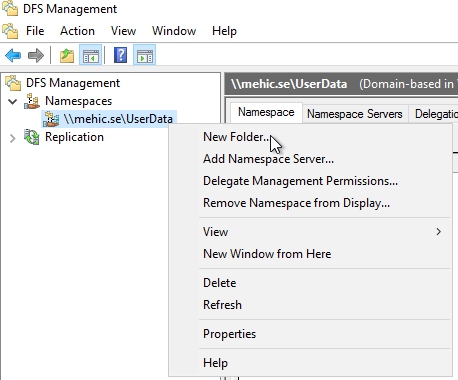
Let’s add some target folders to this. Right-Click on the namespace and select New Folder
Give it a name and browse to the shares. You will need to add the one by one.
CONFIGURE NAMESPACE REFERRAL SERVER
The referral servers are the servers that refer the DFS client requests for either a domain or a standalone DFS namespace, and redirects them to the target shares. Right now I have only one referral server and we can see that by clicking on DFS namespace –> Namespace Servers
However, we don’t have any backup servers, so if this server goes offline we’re going to lose our namespace. Just to point to be able to add second server you will need to have DFS Namespace role installed on that server. I will use my FILESRV02 for this. When that is done we can click on Add Namespace server in DFS Management Console –> Actions Pane –> Add Namespace server
Add your server and click on OK
You will notice in the middle it’s actually telling us what Active Directory site this server is in as well. DFS is Active Directory site aware, which basically means that if you have folder targets in different sites, then it’s going to try and allocate the client to the closest folder target based on the client site.
That’s it. Next part will focus on DFSR and how we can configure it. We will take a look at replication targets, scheduling, staging etc.
Thanks for reading!
Cheers,
Nedim
| title | ms.author | manager | ms.topic | author | ms.date | description |
|---|---|---|---|---|---|---|
|
DFS Namespaces overview |
jgerend |
daveba |
article |
jasongerend |
01/05/2022 |
This article describes DFS Namespaces, which is a role service in Windows Server enabling you to group shared folders located on different servers into one or more logically structured namespaces. |
DFS Namespaces overview
Applies to: Windows Server 2022, Windows Server 2019, Windows Server 2016, Windows Server 2012 R2, Windows Server 2012, Windows Server 2008 R2, Windows Server 2008
DFS (Distributed File System) Namespaces is a role service in Windows Server that enables you to group shared folders located on different servers into one or more logically structured namespaces. This makes it possible to give users a virtual view of shared folders, where a single path leads to files located on multiple servers, as shown in the following figure:
Here’s a description of the elements that make up a DFS namespace:
- Namespace server — A namespace server hosts a namespace. The namespace server can be a member server or a domain controller.
- Namespace root — The namespace root is the starting point of the namespace. In the previous figure, the name of the root is Public, and the namespace path is \ContosoPublic. This type of namespace is a domain-based namespace because it begins with a domain name (for example, Contoso) and its metadata is stored in Active Directory Domain Services (AD DS). Although a single namespace server is shown in the previous figure, a domain-based namespace can be hosted on multiple namespace servers to increase the availability of the namespace.
- Folder — Folders without folder targets add structure and hierarchy to the namespace, and folders with folder targets provide users with actual content. When users browse a folder that has folder targets in the namespace, the client computer receives a referral that transparently redirects the client computer to one of the folder targets.
- Folder targets — A folder target is the UNC path of a shared folder or another namespace that is associated with a folder in a namespace. The folder target is where data and content is stored. In the previous figure, the folder named Tools has two folder targets, one in London and one in New York, and the folder named Training Guides has a single folder target in New York. A user who browses to \ContosoPublicSoftwareTools is transparently redirected to the shared folder \LDN-SVR-01Tools or \NYC-SVR-01Tools, depending on which site the user is currently located in.
This article discusses how to install DFS, what’s new, and where to find evaluation and deployment information.
You can administer namespaces by using DFS Management, the DFS Namespace (DFSN) Cmdlets in Windows PowerShell, the DfsUtil command, or scripts that call WMI.
Server requirements and limits
There are no additional hardware or software requirements for running DFS Management or using DFS Namespaces.
A namespace server is a domain controller or member server that hosts a namespace. The number of namespaces you can host on a server is determined by the operating system running on the namespace server.
Servers that are running the following operating systems can host multiple domain-based namespaces in addition to a single stand-alone namespace.
- Windows Server 2022
- Windows Server 2019
- Windows Server 2016
- Windows Server 2012 R2
- Windows Server 2012
- Windows Server 2008 R2 Datacenter and Enterprise Editions
- Windows Server (Semi-Annual Channel)
Servers that are running the following operating systems can host a single stand-alone namespace:
- Windows Server 2008 R2 Standard
The following table describes additional factors to consider when choosing servers to host a namespace.
| Server Hosting Stand-Alone Namespaces | Server Hosting Domain-Based Namespaces |
|---|---|
| Must contain an NTFS volume to host the namespace. | Must contain an NTFS volume to host the namespace. |
| Can be a member server or domain controller. | Must be a member server or domain controller in the domain in which the namespace is configured. (This requirement applies to every namespace server that hosts a given domain-based namespace.) |
| Can be hosted by a failover cluster to increase the availability of the namespace. | The namespace cannot be a clustered resource in a failover cluster. However, you can locate the namespace on a server that also functions as a node in a failover cluster if you configure the namespace to use only local resources on that server. |
Installing DFS Namespaces
DFS Namespaces and DFS Replication are a part of the File and Storage Services role. The management tools for DFS (DFS Management, the DFS Namespaces module for Windows PowerShell, and command-line tools) are installed separately as part of the Remote Server Administration Tools.
Install DFS Namespaces by using Windows Admin Center, Server Manager, or PowerShell, as described in the next sections.
To install DFS by using Server Manager
-
Open Server Manager, click Manage, and then click Add Roles and Features. The Add Roles and Features Wizard appears.
-
On the Server Selection page, select the server or virtual hard disk (VHD) of an offline virtual machine on which you want to install DFS.
-
Select the role services and features that you want to install.
-
To install the DFS Namespaces service, on the Server Roles page, select DFS Namespaces.
-
To install only the DFS Management Tools, on the Features page, expand Remote Server Administration Tools, Role Administration Tools, expand File Services Tools, and then select DFS Management Tools.
DFS Management Tools installs the DFS Management snap-in, the DFS Namespaces module for Windows PowerShell, and command-line tools, but it does not install any DFS services on the server.
-
To install DFS by using Windows PowerShell
Open a Windows PowerShell session with elevated user rights, and then type the following command, where <name> is the role service or feature that you want to install (see the following table for a list of relevant role service or feature names):
Install-WindowsFeature <name>
| Role service or feature | Name |
|---|---|
| DFS Namespaces | FS-DFS-Namespace |
| DFS Management Tools | RSAT-DFS-Mgmt-Con |
For example, to install the Distributed File System Tools portion of the Remote Server Administration Tools feature, type:
Install-WindowsFeature "RSAT-DFS-Mgmt-Con"
To install the Distributed File System Tools portion for a client device, type:
Add-WindowsCapability -Name Rsat.FileServices.Tools~~~~0.0.1.0 -Online
To install the DFS Namespaces, and the Distributed File System Tools portions of the Remote Server Administration Tools feature, type:
Install-WindowsFeature "FS-DFS-Namespace", "RSAT-DFS-Mgmt-Con"
Interoperability with Azure virtual machines
Using DFS Namespaces on a virtual machine in Microsoft Azure has been tested.
- You can host domain-based namespaces in Azure virtual machines, including environments with Azure Active Directory.
- You can cluster stand-alone namespaces in Azure virtual machines using failover clusters that use Shared Disk or Ultra Disks.
To learn about how to get started with Azure virtual machines, see Azure virtual machines documentation.
Additional References
For additional related information, see the following resources.
| Content type | References |
|---|---|
| Product evaluation | What’s New in DFS Namespaces and DFS Replication in Windows Server |
| Deployment | DFS Namespace Scalability Considerations |
| Operations | DFS Namespaces: Frequently Asked Questions |
| Community resources | The File Services and Storage TechNet Forum |
| Protocols | File Services Protocols in Windows Server (Deprecated) |
| Related technologies | Failover Clustering |
| Support | Windows IT Pro Support |


