What Is DFS Replication and How to Configure It?
File shares are used in organizations to allow users to access and exchange files. If the number of file shares is large, it may be difficult to manage them because mapping many shared resources to each user’s computer takes time and effort. If the configuration of one file share changes, you need to update shared drive mappings for all users using this share. In this case, DFS can help you optimize the hierarchy of shared folders to streamline administration and the use of shared resources. This blog post explains DFS configuration and how to set up DFS replication in Windows Server 2019.
Table of Contents
- What Is DFS and How Does DFS Work?
- How to Set Up DFS in Your Windows Environment
- DFS Namespace Setup
- How to Configure DFS Replication
Before we start
In addition to replication, data stored on your file shares should be backed up and protected for operational recovery. NAKIVO Backup & Replication is a universal data protection solution to protect data on SMB and CIFS file shares, including on NAS, as well as data in virtual, cloud and physical environments.
What Is DFS and How It Works
A Distributed File System (DFS) is a logical organization that transparently groups existing file shares on multiple servers into a structured hierarchy. This hierarchy can be accessed using a single share on a DFS server.
A DFS file share can be replicated across multiple file servers in different locations to optimize server load and increase access speed to shared files. In this case, a user can access a file share on a server that is closest to them. DFS is intended to simplify access to shared files.

DFS uses the Server Message Block (SMB) protocol, which is also known as the Common Internet File System (CIFS). Microsoft’s implementation of DFS doesn’t work with other file sharing protocols like NFS or HDFS. However, you can connect multiple SMB shares configured on NAS devices and Linux machines using Samba to your DFS server running on Windows Server. DFS consists of server and client components.
You can configure one DFS share that includes multiple file shares and connect users to this single file share using a unified namespace. When users connect to this file share using a single path, they see a tree structure of shared folders (as they are subfolders of the main share) and can access all needed file shares transparently. Underlying physical file servers hosting file shares are abstracted from the namespace used to access shares. DFS namespaces and DFS replication are the two main components used for DFS functioning.
What is a DFS namespace?
A DFS namespace is a virtual folder that contains links to shared folders stored on different file servers. DFS namespaces can be organized in different ways depending on business needs. They can be organized by geographical location, organization units, a combination of multiple parameters, etc. You can configure multiple namespaces on a DFS server. A DFS namespace can be standalone or domain-based.
- A standalone DFS namespace stores configuration information and metadata locally on a root server in the system registry. A path to access the root namespace is started with the root server name. A standalone DFS namespace is located only on one server and is not fault-tolerant. If a root server is unavailable, the entire DFS namespace is unavailable. You can use this option if you don’t have an Active Directory domain configured (when using a Workgroup).
- A domain-based DFS namespace stores configuration in Active Directory. A path to access a root namespace starts with the domain name. You can store a domain-based DFS namespace on multiple servers to increase the namespace availability. This approach allows you to provide fault tolerance and load balancing across servers. Using domain-based DFS namespaces is recommended.
A namespace consists of the root, links (folders), and folder targets.
- A namespace root is a starting point of a DFS namespace tree. Depending on the type, a namespace can look like this:
\ServerNameRootName (a standalone namespace)
\DomainNameRootName (a domain-based namespace)
- A namespace server is a physical server (or a VM) that hosts a DFS namespace. A namespace server can be a regular server with the DFS role installed or a domain controller.
- A folder is a link in a DFS namespace that points to a target folder containing content for user access. There are also folders without targets used for organizing the structure.
- A folder target is a link to a shared file resource located on a particular file server and available via the UNC path (Universal Naming Convention). A folder target is associated with the folder in a DFS namespace, for example, \FS2TestShare on the FS2 server. A folder target is what users need to access files.
One folder target can be a link to a single folder or multiple folders (if these folders are located on two different servers and are synchronized/replicated with each other). For example, a user needs to access \DFS-server01TestShareDoc but depending on the user’s location, the user is redirected to a shared folder \FS01Doc or \FS02Doc.
The DFS tree structure includes the following components:
- DFS root, which is a DFS server on which the DFS service is running
- DFS links, which are links pointing to network shares used in DFS
- DFS targets, which are real network shares to which DFS links point
What is DFS replication?
DFS replication is a feature used to duplicate existing data by replicating copies of that data to multiple locations. Physical file shares can be synchronized with each other at two or more locations.
An important feature of DFS replication is that the replication of a file starts only after that file has been closed. For this reason, DFS replication is not suitable for replicating databases, given that databases have files opened during the operation of a database management system. DFS replication supports multi-master replication technology, and any member of a replication group can change data that is then replicated.
A DFS replication group is a group of servers participating in the replication of one or multiple replication folders. A replicated folder is synchronized between all members of the replication group.

DFS replication uses a special Remote Differential Compression algorithm that allows DFS to detect changes and copy only changed blocks of files instead of copying all data. This approach allows you to save time and reduce replication traffic over the network.
DFS replication is performed asynchronously. There can be a delay between writing changes to the source location and replicating those changes to the target location.
DFS Replication topologies
There are two main DFS replication topologies:
- Hub and spoke. This topology requires at least three replication members: one which acts as a hub and two others act as spokes. This technique is useful if you have a central source originating data (hub) and you need to replicate this data to multiple locations (spokes).
- Full mesh. Each member of a replication group replicates data to each group member. Use this technique if you have 10 members or less in a replication group.
What are the requirements for DFS?
The main requirement is using Windows Server 2008 DataCenter or Enterprise editions, Windows Server 2012, or a newer Windows Server version. It is better to use Windows Server 2016 or Windows Server 2019 nowadays.
NTFS must be a file system to store shared files on Windows Server hosts.
If you use domain-based namespaces, all servers of a DFS replication group must belong to one Active Directory forest.
How to Set Up DFS in Your Windows Environment
You need to prepare at least two servers. In this example, we use two machines running Windows Server 2019, one of which is an Active Directory domain controller:
- Server01-dc.domain1.local is a domain controller.
- Server02.domain1.local is a domain member.
This is because configuring DFS in a domain environment has advantages compared to Workgroup, as explained above. The domain name is domain1.local in our case. If you use a domain, don’t forget to configure Active Directory backup.
Enable the DFS roles
First of all, you need to enable the DFS roles in Windows Server 2019.
- Open Server Manager.
- Click Add Roles and Features in Server Manager.
- Select Role-based or featured-based installation in the Installation type screen of the Add Roles and Features wizard.
- In the Server Selection screen, make sure your current server (which is a domain controller in our case) is selected. Click Next at each step of the wizard to continue.
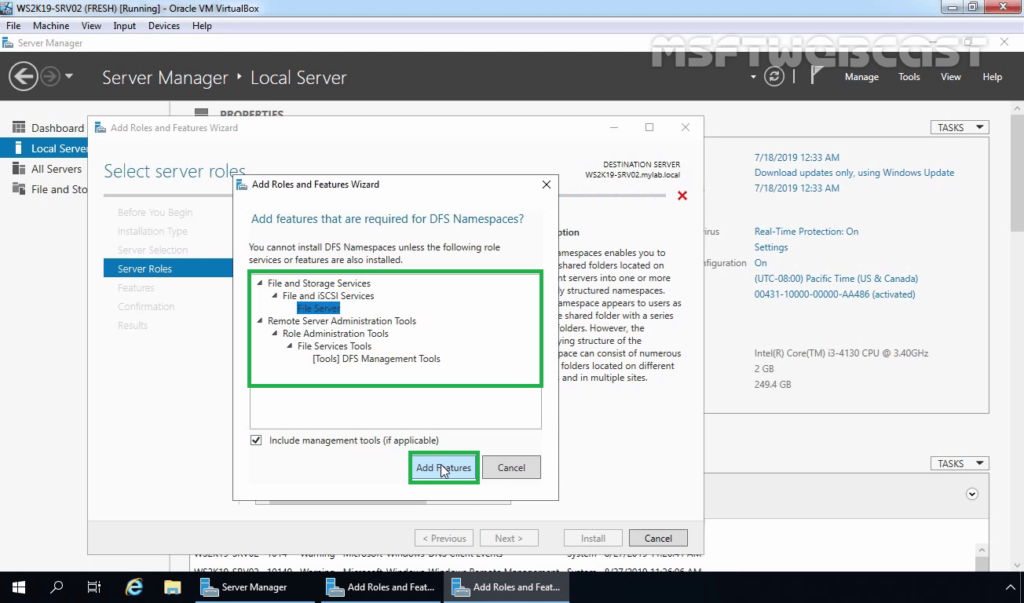
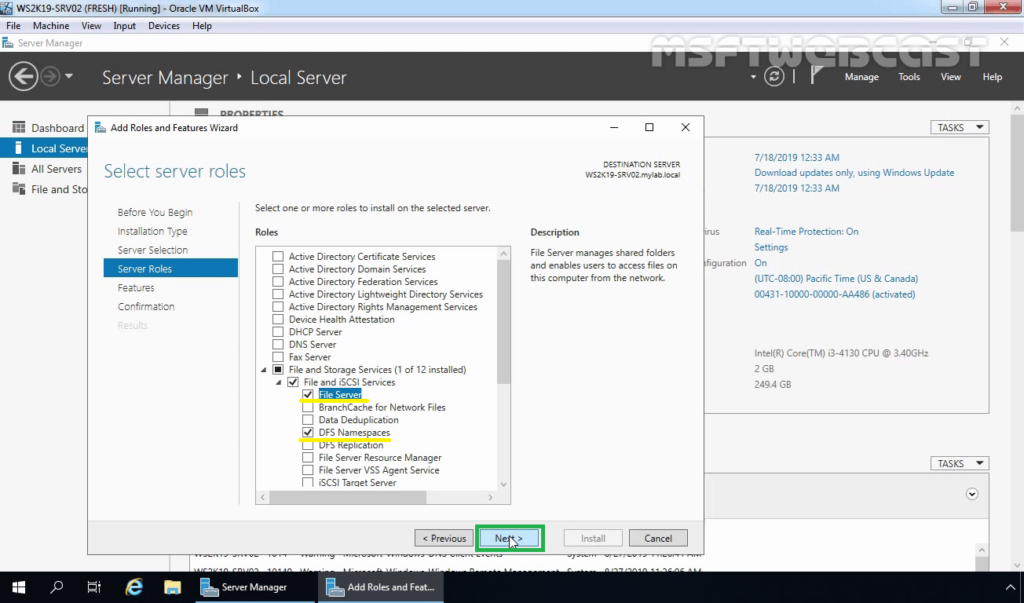
- Select server roles. Select DFS Namespaces and DFS Replication, as explained in the screenshot below.

- In the Features screen, you can leave settings as is.
- Check your configuration in the confirmation screen and if everything is correct, click Install.
- Wait for a while until the installation process is finished and then close the window.
DFS Namespace Setup
Create at least one shared folder on any server that is a domain member. In this example, we create a shared folder on our domain controller. The folder name is shared01 (D:DATAshared01).
Creating a shared folder
- Right-click a folder and, in the context menu, hit Properties.
- On the Sharing tab of the folder properties window, click Share.
- Share the folder with Domain users and set permissions. We use Read/Write permissions in this example.
- Click Share to finish. Then you can close the network sharing options window.

Now the share is available at this address:
\server01-dcshared01
Creating a DFS namespace
Let’s create a DFS namespace to link shared folders in a namespace.
- Press Win+R and run dfsmgmt.msc to open the DFS Management window. You can also run this command in the Windows command line (CMD).
As an alternative, you can click Start > Windows Administrative Tools > DFS Management.
- In the DFS Management section, click New Namespace.

- The New Namespace Wizard opens in a new window.
- Namespace Server. Enter a server name. If you are not sure that the name is correct, click Browse, enter a server name and click Check Names. In this example, we enter the name of our domain controller (server01-dc). Click Next at each step of the wizard to continue.

- Namespace Name and Settings. Enter a name for a namespace, for example, DFS-01. Click Edit Settings.

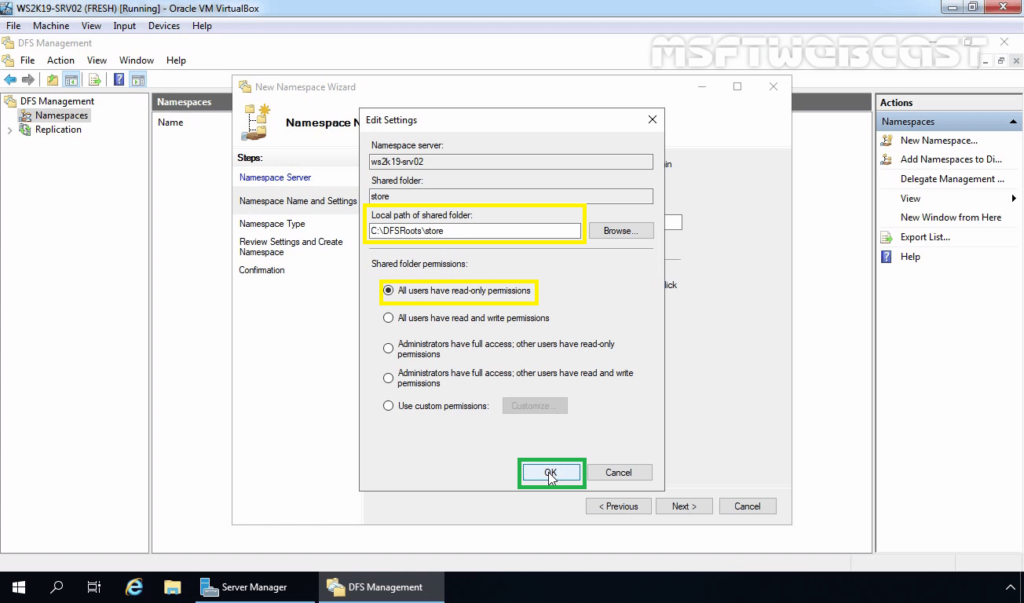
Pay attention to the local path of a shared folder. Change this path if needed. We use the default path in our example (C:DFSRootsDFS-01).
- You need to configure access permissions for network users. Click Use custom permissions and hit Customize.
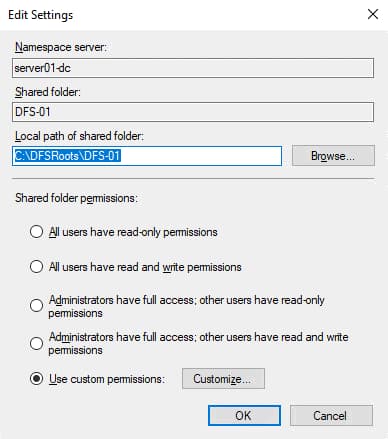
- We grant all permissions for domain users (Full Control). Click Add, select Domain Users, select the appropriate checkboxes, and hit OK to save settings.

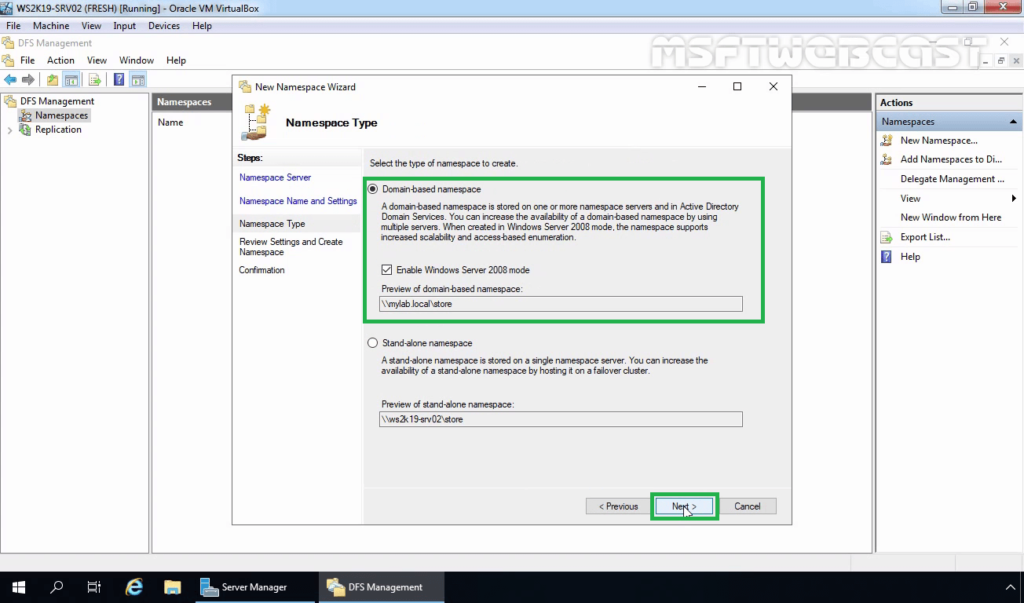
- Namespace type. Select the type of namespace to create. We select Domain-based namespace and select the Enable Windows Server 2008 mode checkbox. Select this checkbox if the functional level of your domain is Windows Server 2008 when you use Windows Server 2016 or Windows Server 2019 for better compatibility.
It is recommended that you use a Domain-based namespace due to advantages such as high DFS namespace availability by using multiple namespace servers and transferring namespaces to other servers.

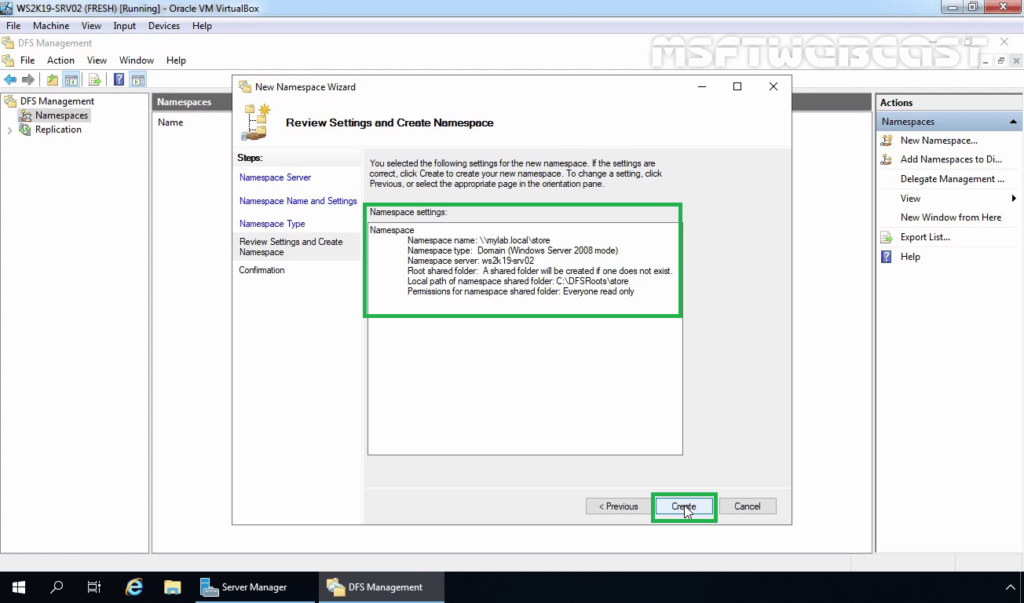
- Review Settings. Review settings and, if everything is correct, click Create.

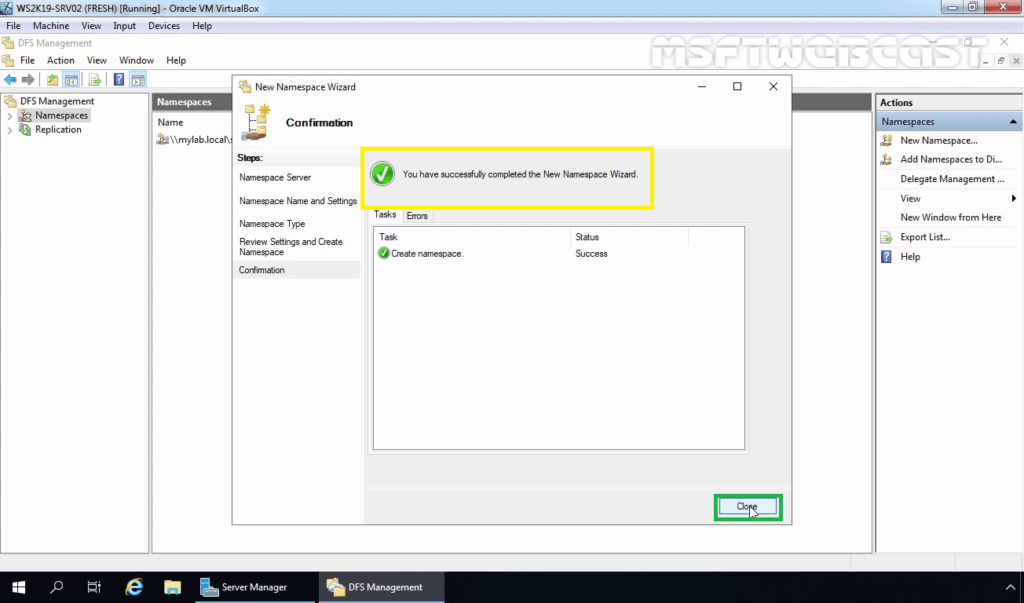
- Confirmation. The window view in case of success is displayed in the screenshot below. The namespace creation has finished. Click Close.

Adding a new folder to a namespace
Now we need to add a new folder into the existing namespace. We are adding a folder on the same server, which is a domain controller, but this method is applicable for all servers within a domain.
- Open the DFS management window by running dfsmgmt.msc as we did before. Perform the following actions in the DFS management window.
- In the left pane, expand a namespace tree and select a namespace (\domain1.localDFS-01 in our case).
- In the right pane (the Actions pane), click New Folder.
- In the New Folder window, enter a folder name, for example, Test-Folder to link the DFS folder and a shared folder created before. Click Add.

- Enter the path to the existing folder. We use \server01-dcshared01 in this example. You can click Browse and select a folder. Click OK to save the path to the folder target.

The folder target has been added.
- Click OK to save settings and close the New Folder window.

Now you can access the shared folder by entering the network address in the address bar of Windows Explorer:
\server01-dcdfs-01Test-Folder
You should enter a path in the format:
\DomainNameDFS-NameSpace

We need to configure the second server to replicate data. The name of the second server is Server02 and this server is added to the domain1.local domain in this example. Add your second server to a domain if you have not done this operation before.
Install the DFS roles, as we did for the first server. As an alternative method, you can use PowerShell instead of the Add Roles wizard. Run these two commands in PowerShell to install DFS replication and DFS namespace roles.
Install-WindowsFeature -name “FS-DFS-Replication” -IncludeManagementTools
Install-WindowsFeature -name “FS-DFS-Namespace” -IncludeManagementTools
First of all, we need to install the DFS Replication role on the second server.

Create a folder for replicated data, for example, D:Replication
We are going to use this folder to replicate data from the first folder created on the first server before.
Share this folder (D:Replication) on the second server and configure access permissions the same way as for the previous shared folder. In this example, we share the folder with Domain Users and grant Read/Write permissions.

The network path is \server02replication in this example after sharing this folder. To check the network path to the folder, you can right-click the folder name and open the Sharing tab.
Let’s go back to the domain controller (server01-dc) and open the DFS Management window.
In the left pane of the DFS Management window, expand the tree and select the namespace created before (Test-Folder in this case).
Click Add Folder Target in the Actions pane located in the top right corner of the window.
The New Folder Target window appears. Enter the network path of the folder that was created on the second server before:
\Server02Replication
Click OK to save settings and close the window.

A notification message is displayed:
A replication group can be used to keep these folder targets synchronized. Do you want to create a replication group?
Click Yes.

Wait until the configuration process is finished.
As a result, you should see the Replicate Folder Wizard window. Perform the next steps in the wizard window.
Check the replication group name and replicated folder name. Click Next to continue.

Check folder paths in the Replication Eligibility screen.

Select the primary member from the drop-down list. In this example, the primary member is Server01-dc. Data from the primary member is replicated to other folders that are a part of the DFS namespace.

Select the topology of connections for replication.
Full mesh is the recommended option when using a DFS replication group with less than ten servers. We use Full mesh to replicate changes made on one server to other servers.
The No Topology option can be used if you want to create a custom topology after finishing the wizard.
The Hub and spoke option is inactive (grayed out) because we use less than three servers.

Configure replication group schedule and bandwidth. There are two options:
- Replicate continuously using the specified bandwidth. Replication is performed as soon as possible. You can allocate bandwidth. Continuous replication of data that changes extensively can consume a lot of network bandwidth. To avoid a negative impact on other processes using the network, you can limit bandwidth for DFS replication. Keep in mind that hard disk load can be high.
- Replicate during the specified days and times. You can configure the schedule to perform DFS replication at the custom date and time. You can use this option if you don’t need to always have the last version of replicated data in target folders.
We select the first option in our example.

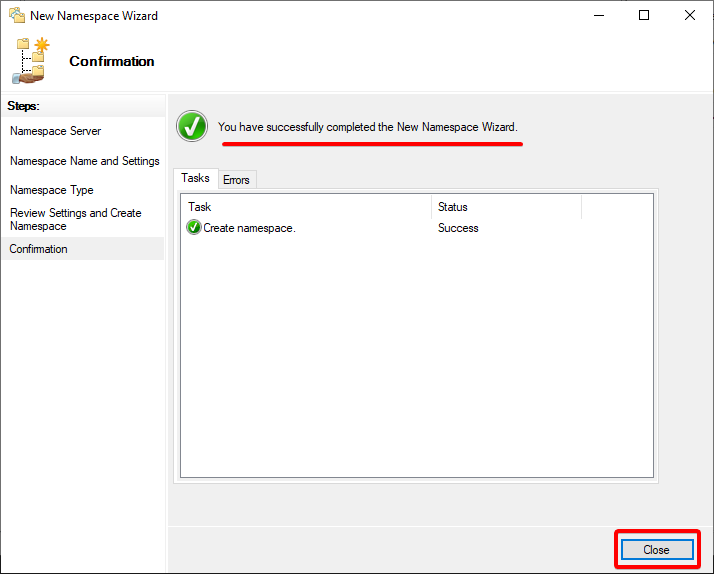
Review settings for your DFS replication group. If everything is correct, click Create.

View the DFS replication configuration status on the Confirmation screen. You should see the Success status for all tasks as displayed on the screenshot below. Click Close to close the wizard window.

A notification message about the replication delay is displayed. Read the message and hit OK.

DFS replication has been configured. Open a shared folder from which data must be replicated initially. Write a file to that network folder and check whether the new data is replicated to the second folder on another server. Don’t forget that opened files are not replicated until they are closed after saving changes to a disk. In a few moments, you should see a file-replica in the target folder.
Using filters for DFS Replication
Use file filters to select the file types you don’t want to replicate. Some applications can create temporary files and replicating them wastes network bandwidth, loads hard disk drives, consumes additional storage space in the target folder, and increases overall time to replicate data. You can exclude the appropriate file types from DFS replication by using filters.
To configure filters, perform the following steps in the DFS Management window:
- Expand the Replication tree in the navigation pane and select the needed DFS replication group folder name (domain1.localdfs-01Test-folder in our case).
- Select the Replicated Folders tab.
- Select the needed folder, right-click the folder name and hit Properties. Alternatively, you can select the folder and click Properties in the Actions pane.
- Set the filtered file types by using masks in the folder properties window. In this example, files matching the rule are excluded from replication:
~*, *.bak, *.tmp
You can also filter subfolders, for example, exclude Temp subfolders from DFS replication.

Staging location
There can be a conflict when two or more users save changes to a file before these changes are replicated. The most recent changes have precedence for replication. Older versions of changed files are moved to the Conflict or Deleted folder. This issue can happen when replication speed is low and the file size is large (amount of changes is high) when the amount of time to transfer changed data is lower than the interval between writing changes to the file by users.
Staging folders act as a cache for new and changed files that are ready to be replicated from source folders to target folders. The staging location is intended for files that exceed a certain file size. Staging is used as a queue to store files that must be replicated and ensure that changes can be replicated without worrying about changes to them during the transfer process.
Another aspect of configuring staging folders is performance optimization. DFS replication can consume additional CPU and disk resources, slow down and even stop if the staging quota is too small for your tasks. The recommended size of the staging quota is equal to the size of the 32 largest files in the replication folder.
You can edit staging folder properties for DFS Replication in the DFS Management window:
- Select a replication group in the left pane of the DFS Management window.
- Select the Memberships tab.
- Select the needed replication folder, right-click the folder, and hit Properties.
- Select the Staging tab in the Properties window.
- Edit the staging path and quota according to your needs.

Saved changes are not applied immediately. New staging settings must be replicated across all DFS servers within a domain. Time depends on Active Directory Domain Services replication latency and the polling interval of servers (5 minutes or more). Server reboot is not required.
DFS Replication vs. Backup
Don’t confuse DFS Replication of data in shared folders and data backup. DFS replication makes copies of data on different servers, but if unwanted changes are written to a file on one server, these changes are replicated to other servers. As a result, you don’t have a recovery point because the file has been overwritten with unwanted changes on all servers and you can use it for recovery in case of failure. This threat is present in case of a ransomware attack.
Use NAKIVO Backup & Replication to protect data stored on your physical Windows Server machines including data stored in shared folders. The product also supports Hyper-V VM backup and VMware VM backup at the host level for effective protection.
Download the free trial version and protect data in your environment.
Conclusion
Distributed File System (DFS) can significantly simplify shared resources management for administrators and make accessing shared folders more convenient for end-users. DFS makes transparent links to shared folders located on different servers. DFS namespaces and DFS replication are two main features that you can configure in the DFS Management window after installing the appropriate Windows server roles. Opt for configuring DFS in a domain environment rather than in a Workgroup environment because there are many advantages, such as high availability and flexibility in an Active Directory domain.
In this article, we will install and configure DFS (Distributed File System) Namespaces in Windows Server 2019.
What is DFS?
DFS Namespaces is a role service in Windows Server that allows you to group shared folders located on different servers into one or more logically structured namespaces.
DFS allows you to configure shared folders hosted on different servers in one or more logically structured namespaces.
Virtual Lab Setup:
- WS2K19-DC01: Active Directory Domain Controller with DNS.
- WS2K19-SRV02: Member Server for mylab.local domain.
Installing the DFS role:
Log in to your Windows Server 2019 and open the Server Manager console.
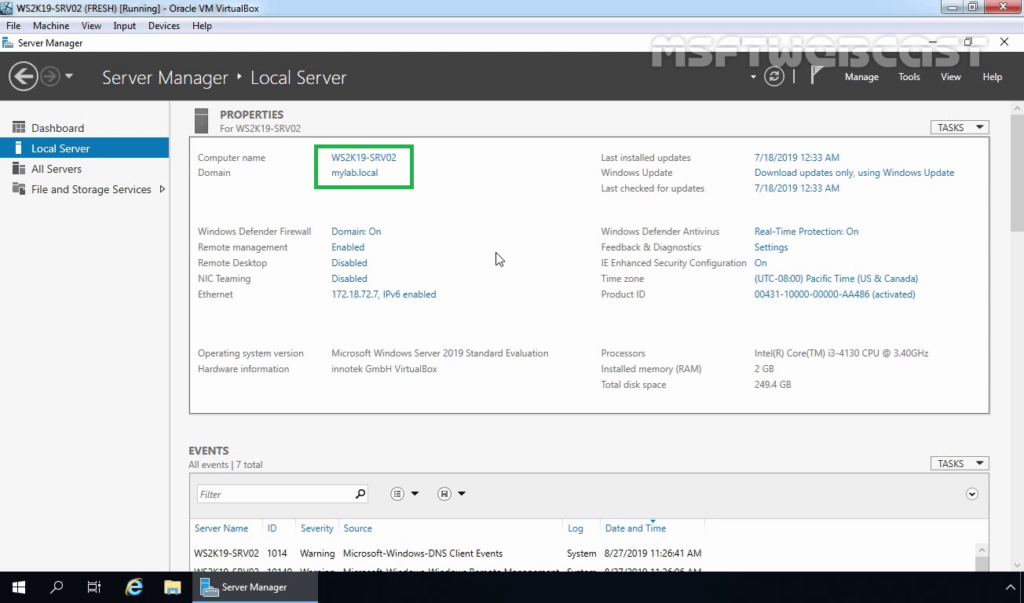
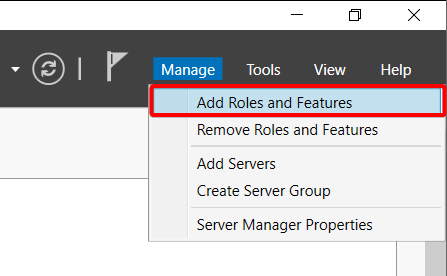
Click on Manage and select Add roles and features.
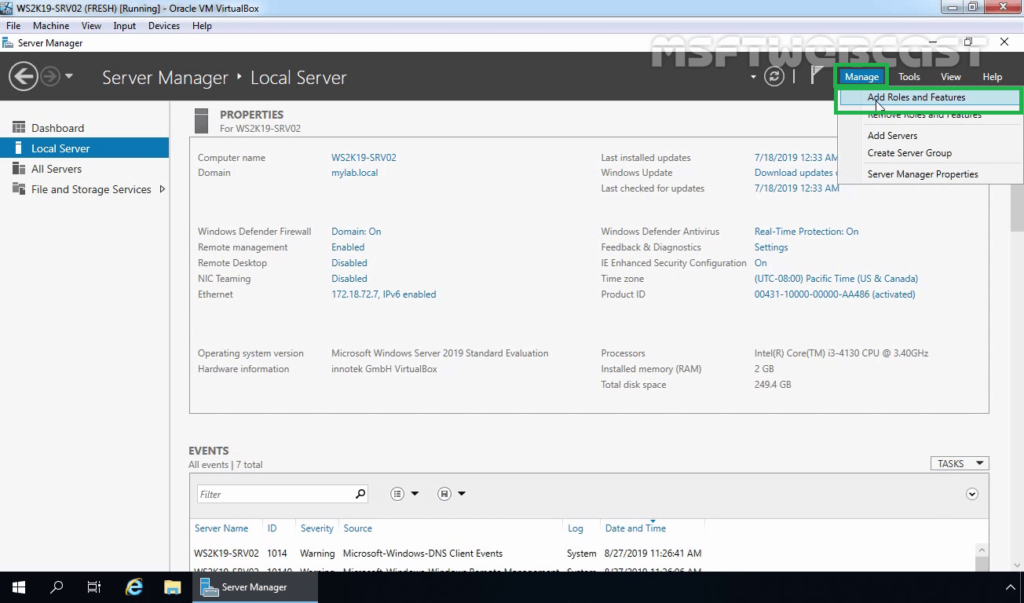
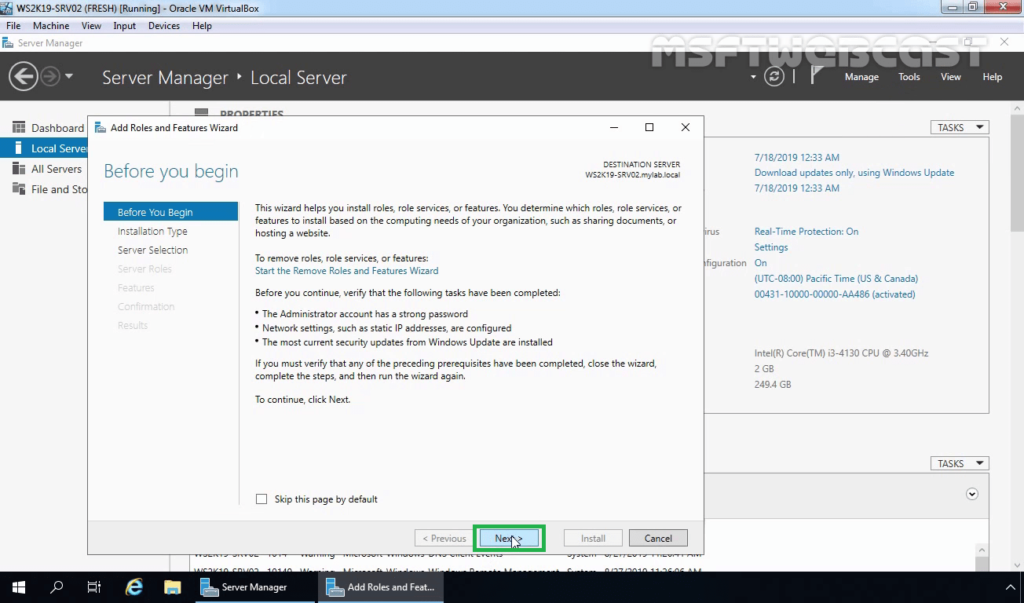
Click on Next on Before you begin console.
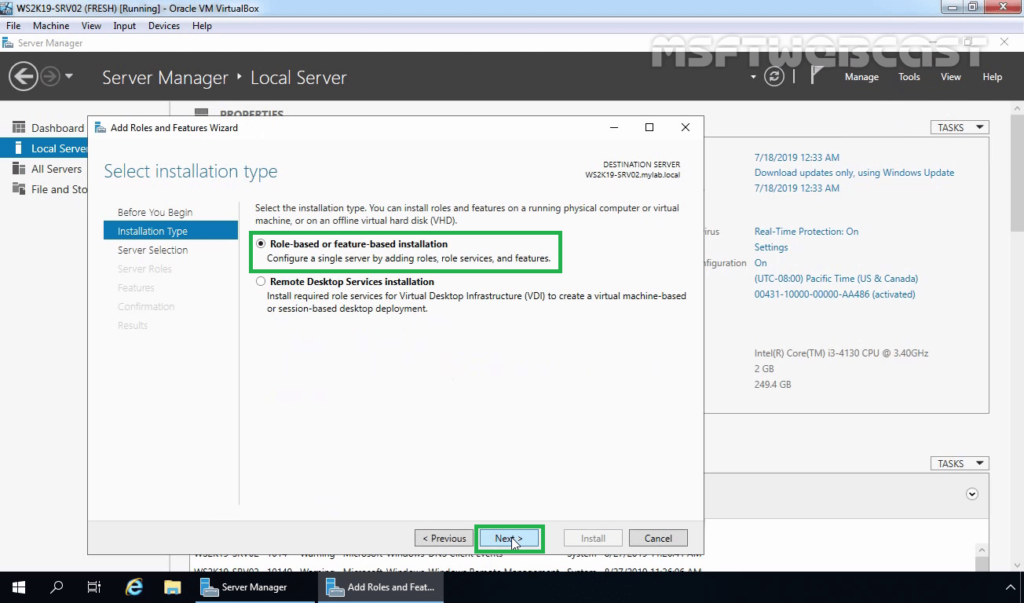
Choose Role-based or Feature-based installation and click Next.
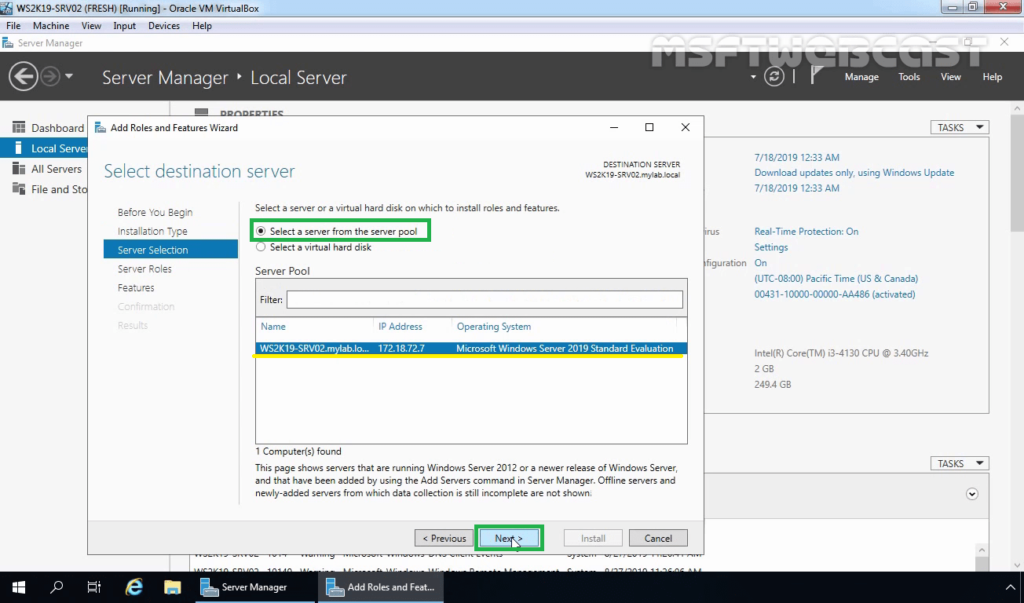
Select your server on which you want to install the DFS server role. Click on Next.
On select server role console, expand the File and Storage Services, expand File and iSCSI Services and select DFS Namespaces from the list.
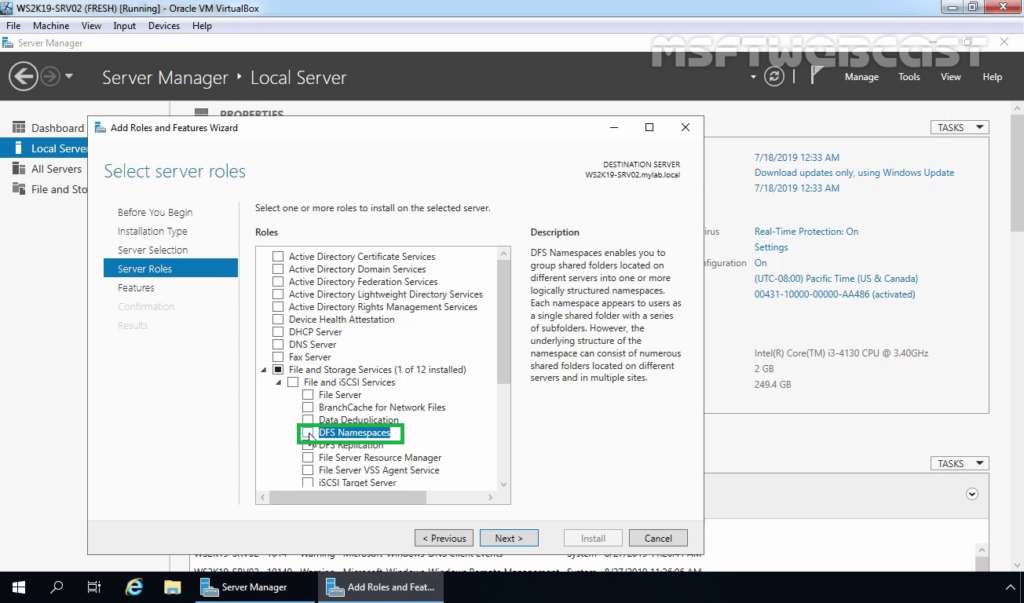
Click on Add Features when prompted to install the Management tools.
If you have not installed the File Server role, DFS will also install it as the File Server role is one of the prerequisites for DFS Namespace. Click on Next.
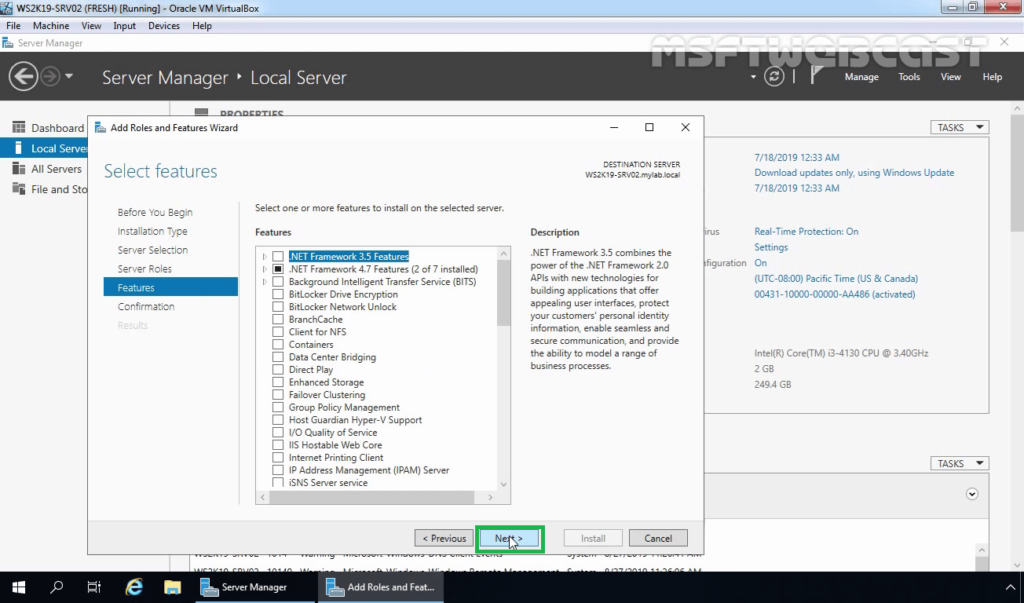
On Select features console, click on Next to continue.
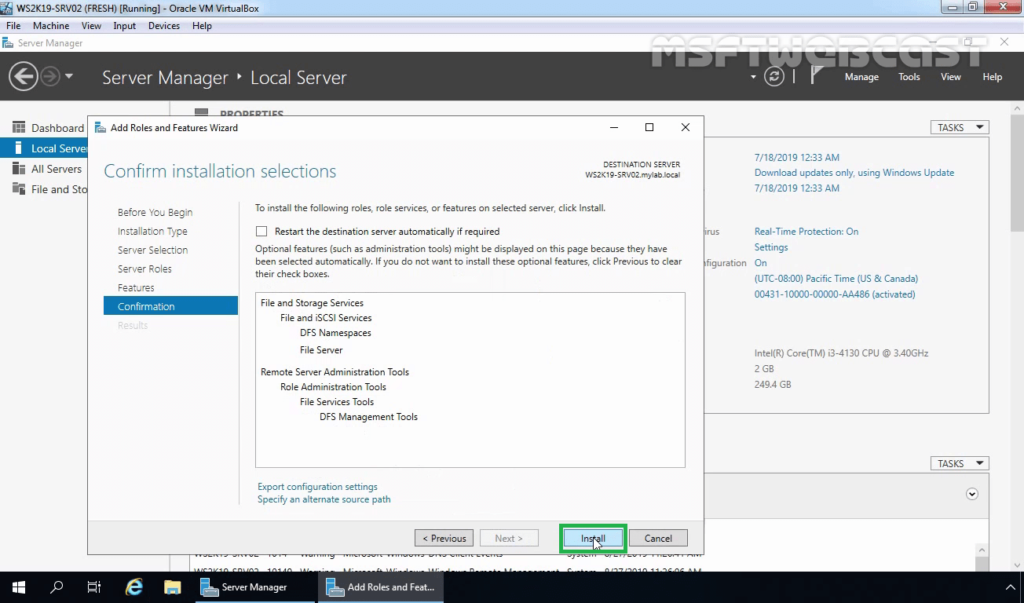
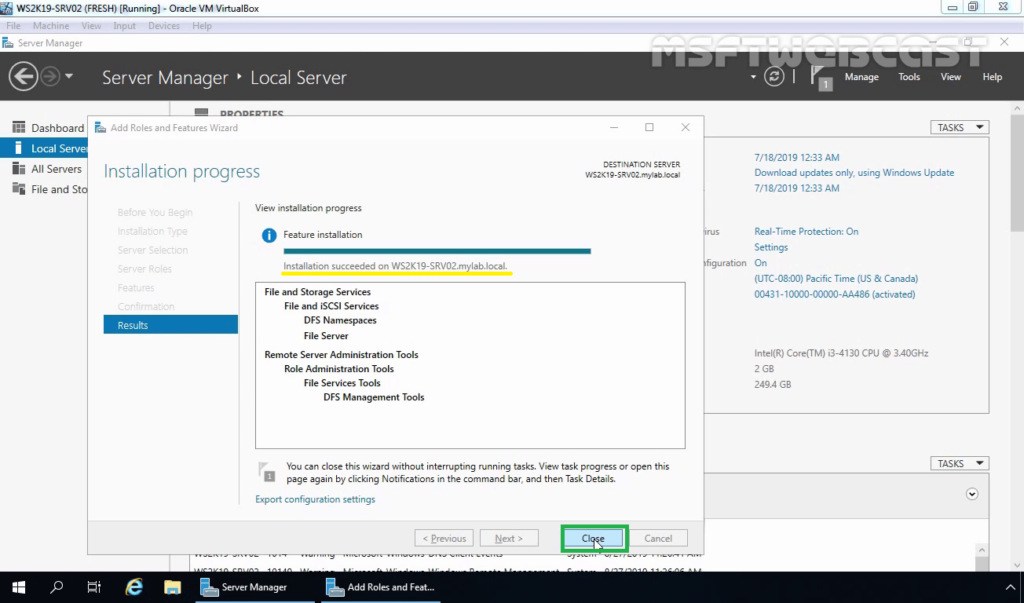
Click Install and wait for the installation process to complete.
Click on Close to close the console.
Configure DFS Namespace:
After installing the DFS role, our next step is to configure DFS namespace.
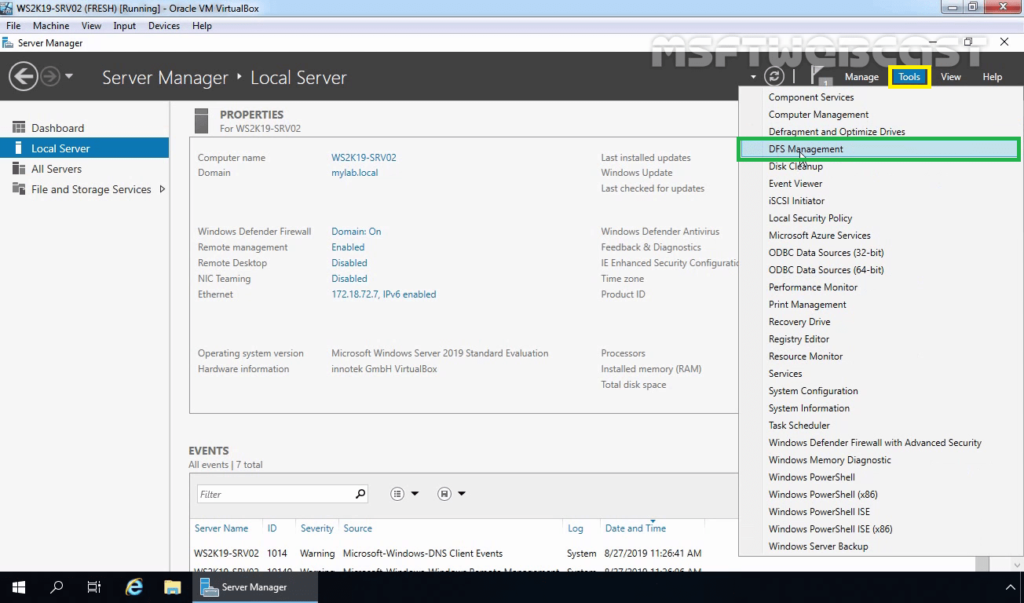
From the Server Manager console, select DFS Management from the Tools menu.
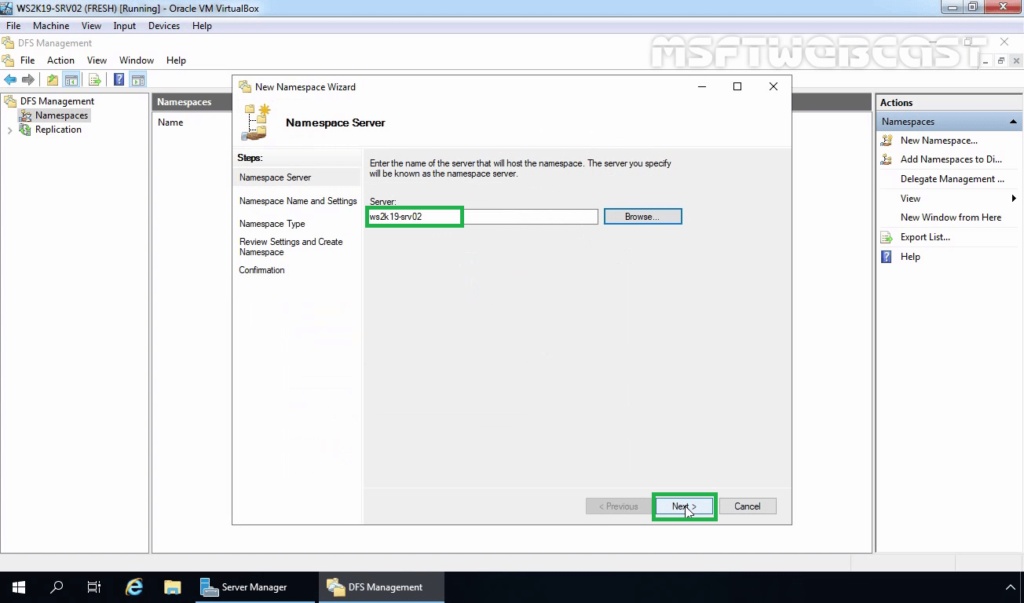
Expand DFS Management, right-click on Namespaces and select New Namespace:

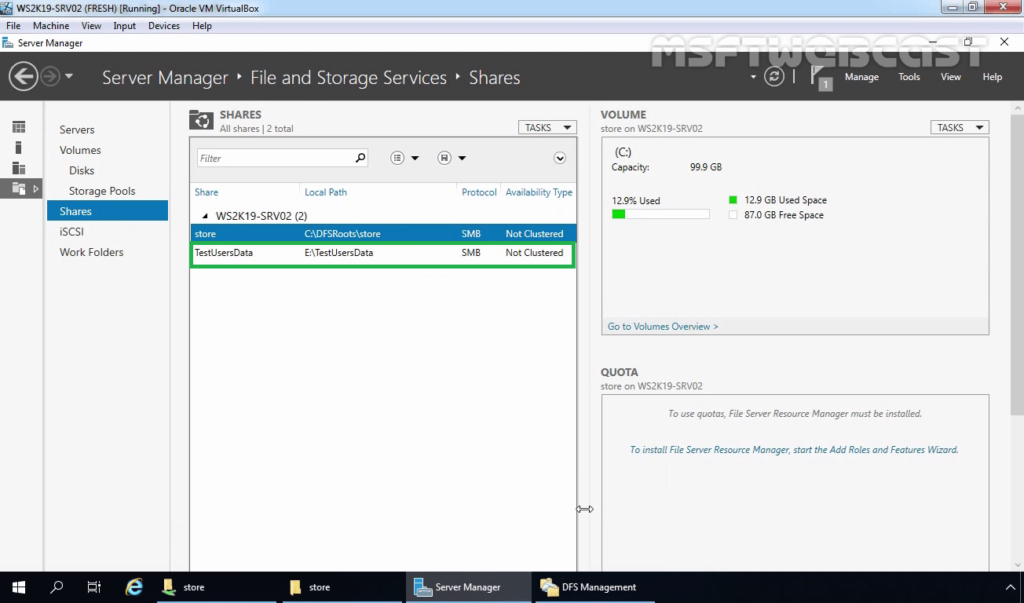
Type the name of the server that will host the namespace. In our case, WS2K19-SRV02 is going to host the DFS Namespace. Click on Next.
Type the name for the new DFS Namespace (Store) then click on Edit Settings.
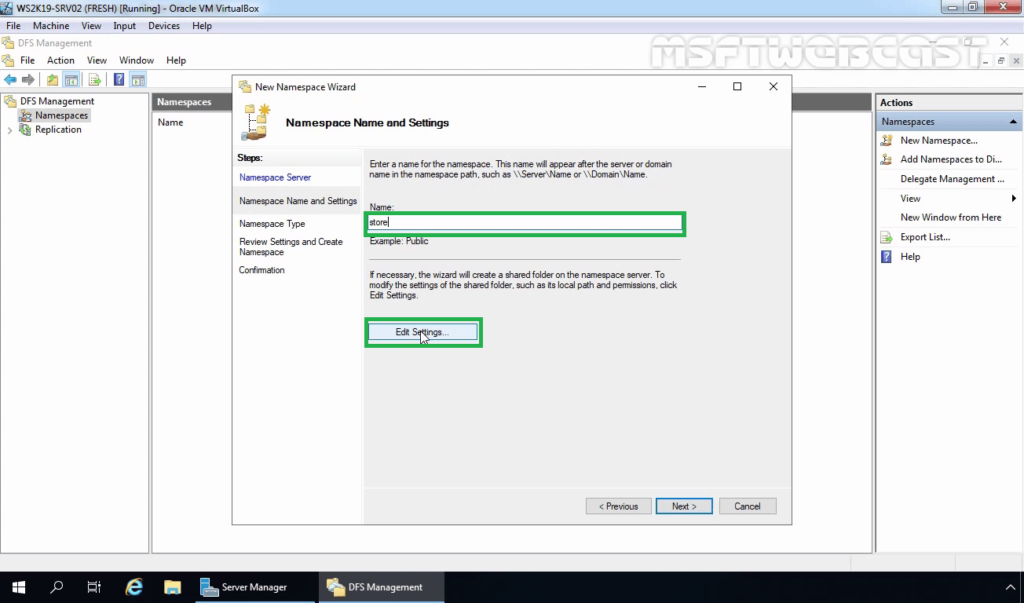
You can change the path and shared folder permissions for the new namespace. By default, all users have “read-only” permission. Click on Next.
Choose the Domain-based namespace and click on Next.
Review the settings and then click on Create.
Click on Close to close the namespace wizard.
Create DFS folders with Folder Target:
For the testing purpose, I have created one shared folder with proper NTFS permission on the local server WS2K19-SRV02. We will add that folder to the DFS namespace.
In DFS Management console, right-click on the namespace we just created, and choose New Folder.
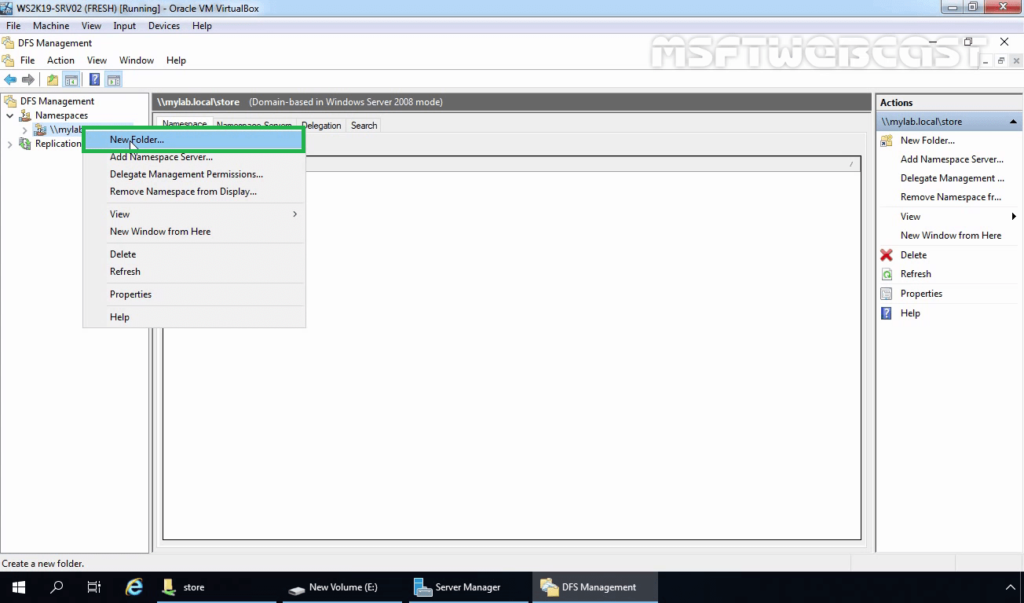
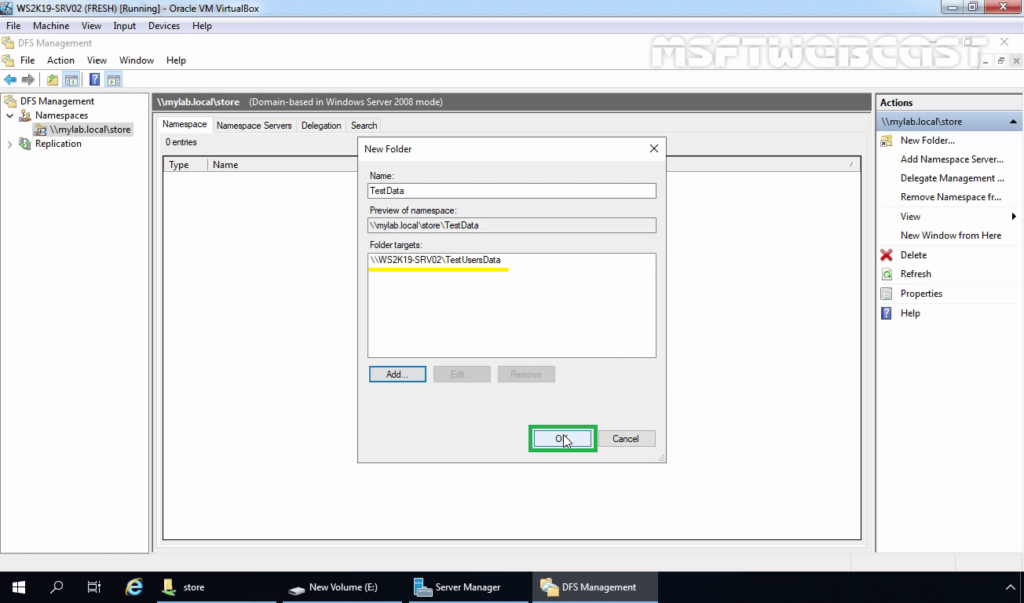
Type the name for the folder, and then click on Add to add folder targets.
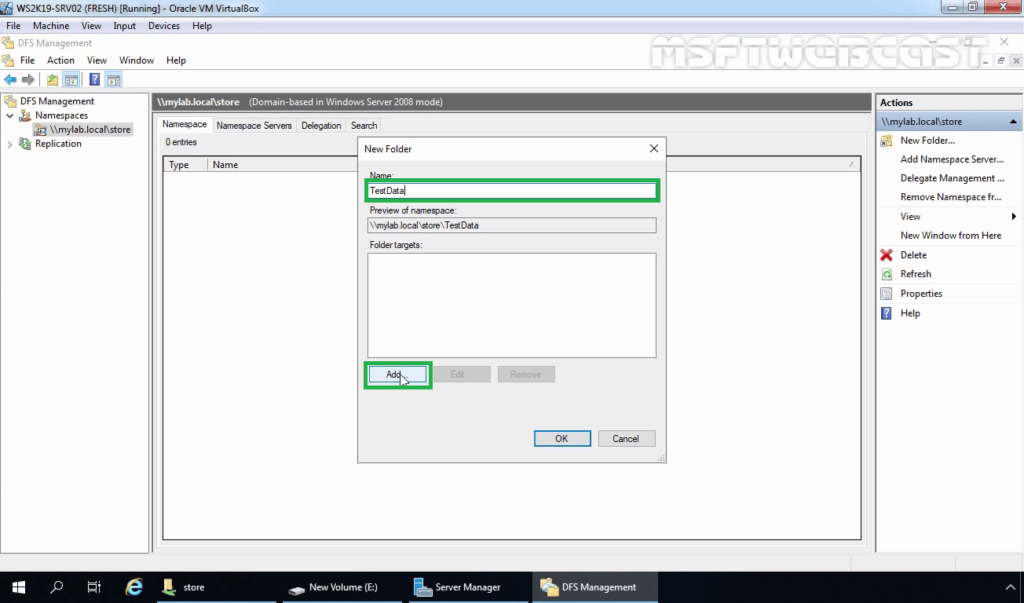
Click on Browse to browse for folder targets.
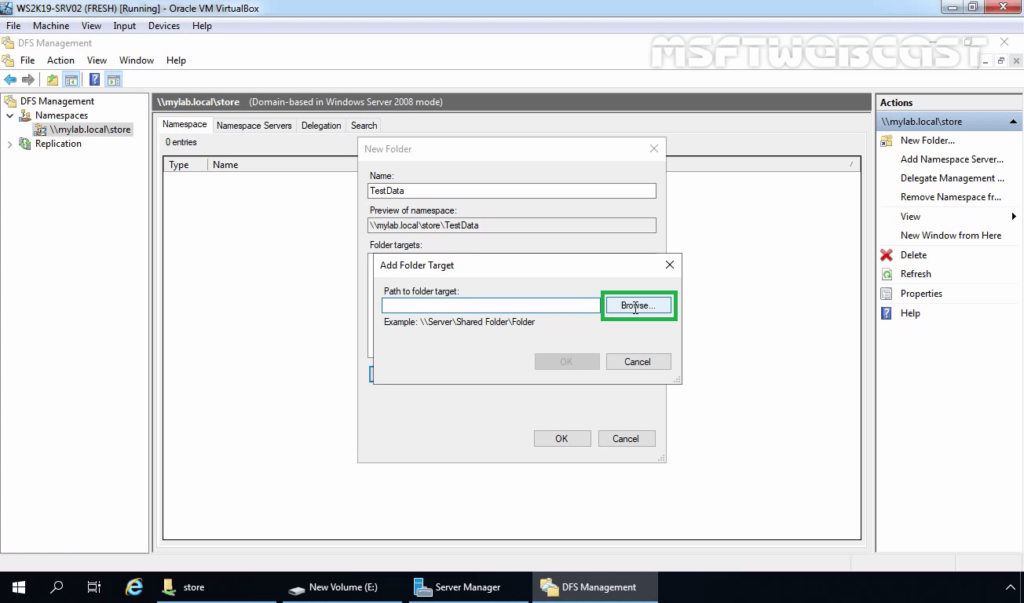
You can add an existing shared folder, or create a new one.
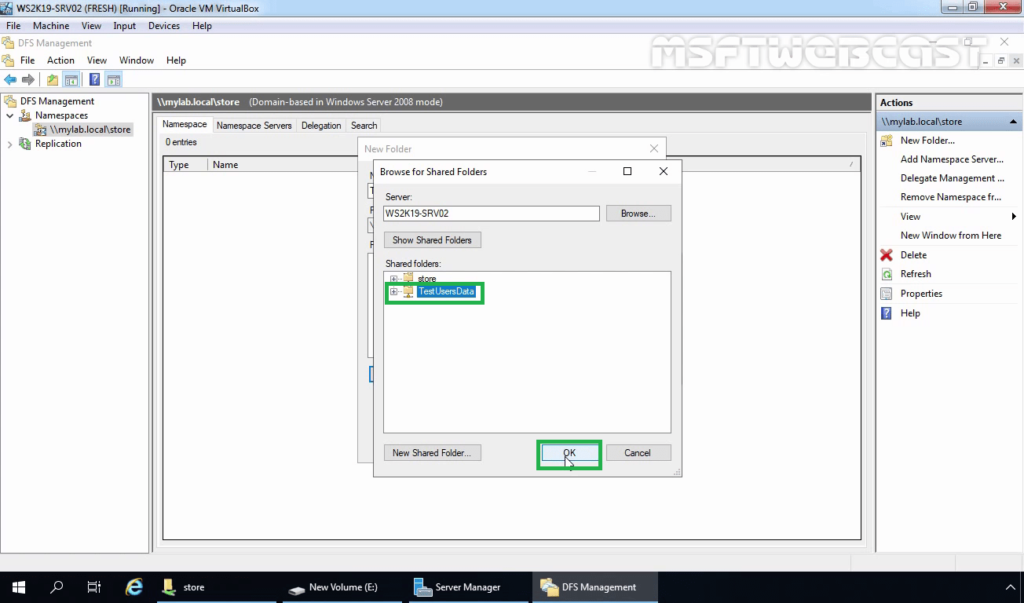
Click on OK.
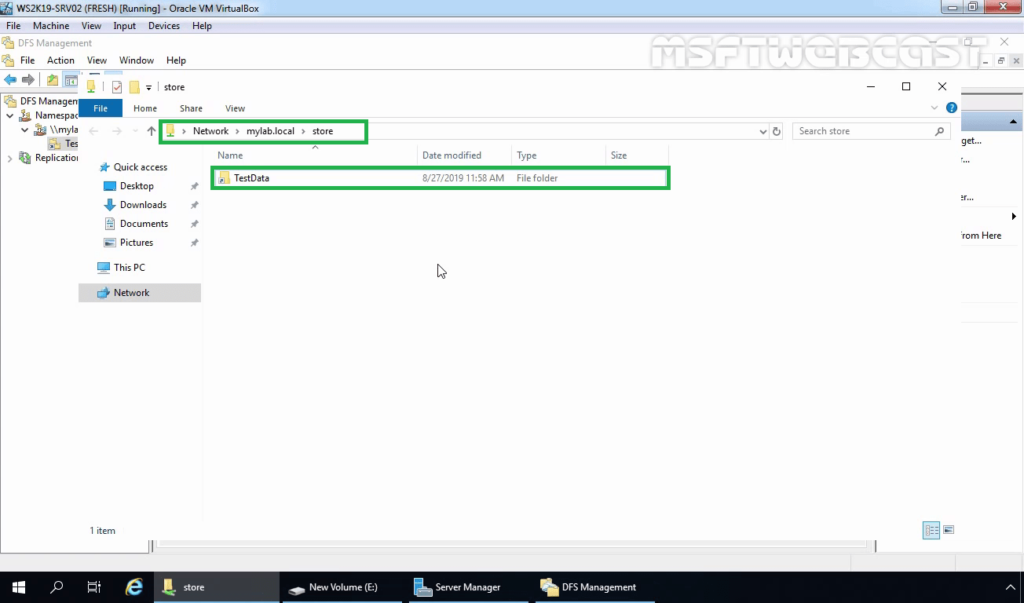
Let’s go to the network path (\mylab.localstore). You should see the folder we just added.
DFS Namespaces is a great feature to organize your network share folders. With DFS namespace, all shared folders are accessible from a single path.
Hope this article will help you in setting up DFS namespace in Windows Server 2019. In the next post, we will configure DFS replication in Windows Server 2019.
Related Articles:
- How to Configure DFS Replication in Windows Server 2019
- Configure Disk Quota with File Server Resource Manager (FSRM)
- Configure File Screening using FSRM in Windows Server 2019
Post Views: 3,352
| title | ms.author | manager | ms.topic | author | ms.date | description |
|---|---|---|---|---|---|---|
|
DFS Namespaces overview |
jgerend |
daveba |
article |
jasongerend |
01/05/2022 |
This article describes DFS Namespaces, which is a role service in Windows Server enabling you to group shared folders located on different servers into one or more logically structured namespaces. |
DFS Namespaces overview
Applies to: Windows Server 2022, Windows Server 2019, Windows Server 2016, Windows Server 2012 R2, Windows Server 2012, Windows Server 2008 R2, Windows Server 2008
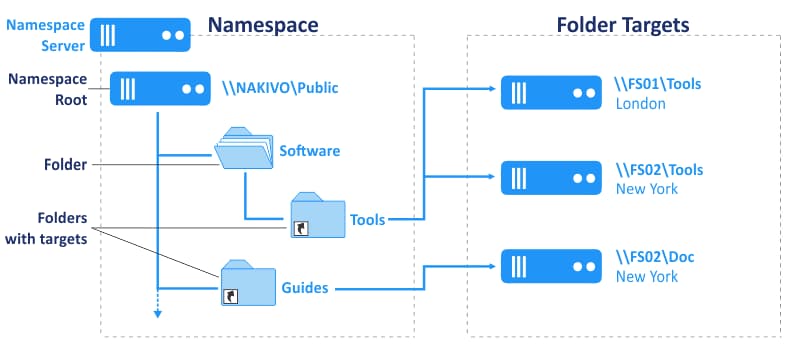
DFS (Distributed File System) Namespaces is a role service in Windows Server that enables you to group shared folders located on different servers into one or more logically structured namespaces. This makes it possible to give users a virtual view of shared folders, where a single path leads to files located on multiple servers, as shown in the following figure:

Here’s a description of the elements that make up a DFS namespace:
- Namespace server — A namespace server hosts a namespace. The namespace server can be a member server or a domain controller.
- Namespace root — The namespace root is the starting point of the namespace. In the previous figure, the name of the root is Public, and the namespace path is \ContosoPublic. This type of namespace is a domain-based namespace because it begins with a domain name (for example, Contoso) and its metadata is stored in Active Directory Domain Services (AD DS). Although a single namespace server is shown in the previous figure, a domain-based namespace can be hosted on multiple namespace servers to increase the availability of the namespace.
- Folder — Folders without folder targets add structure and hierarchy to the namespace, and folders with folder targets provide users with actual content. When users browse a folder that has folder targets in the namespace, the client computer receives a referral that transparently redirects the client computer to one of the folder targets.
- Folder targets — A folder target is the UNC path of a shared folder or another namespace that is associated with a folder in a namespace. The folder target is where data and content is stored. In the previous figure, the folder named Tools has two folder targets, one in London and one in New York, and the folder named Training Guides has a single folder target in New York. A user who browses to \ContosoPublicSoftwareTools is transparently redirected to the shared folder \LDN-SVR-01Tools or \NYC-SVR-01Tools, depending on which site the user is currently located in.
This article discusses how to install DFS, what’s new, and where to find evaluation and deployment information.
You can administer namespaces by using DFS Management, the DFS Namespace (DFSN) Cmdlets in Windows PowerShell, the DfsUtil command, or scripts that call WMI.
Server requirements and limits
There are no additional hardware or software requirements for running DFS Management or using DFS Namespaces.
A namespace server is a domain controller or member server that hosts a namespace. The number of namespaces you can host on a server is determined by the operating system running on the namespace server.
Servers that are running the following operating systems can host multiple domain-based namespaces in addition to a single stand-alone namespace.
- Windows Server 2022
- Windows Server 2019
- Windows Server 2016
- Windows Server 2012 R2
- Windows Server 2012
- Windows Server 2008 R2 Datacenter and Enterprise Editions
- Windows Server (Semi-Annual Channel)
Servers that are running the following operating systems can host a single stand-alone namespace:
- Windows Server 2008 R2 Standard
The following table describes additional factors to consider when choosing servers to host a namespace.
| Server Hosting Stand-Alone Namespaces | Server Hosting Domain-Based Namespaces |
|---|---|
| Must contain an NTFS volume to host the namespace. | Must contain an NTFS volume to host the namespace. |
| Can be a member server or domain controller. | Must be a member server or domain controller in the domain in which the namespace is configured. (This requirement applies to every namespace server that hosts a given domain-based namespace.) |
| Can be hosted by a failover cluster to increase the availability of the namespace. | The namespace cannot be a clustered resource in a failover cluster. However, you can locate the namespace on a server that also functions as a node in a failover cluster if you configure the namespace to use only local resources on that server. |
Installing DFS Namespaces
DFS Namespaces and DFS Replication are a part of the File and Storage Services role. The management tools for DFS (DFS Management, the DFS Namespaces module for Windows PowerShell, and command-line tools) are installed separately as part of the Remote Server Administration Tools.
Install DFS Namespaces by using Windows Admin Center, Server Manager, or PowerShell, as described in the next sections.
To install DFS by using Server Manager
-
Open Server Manager, click Manage, and then click Add Roles and Features. The Add Roles and Features Wizard appears.
-
On the Server Selection page, select the server or virtual hard disk (VHD) of an offline virtual machine on which you want to install DFS.
-
Select the role services and features that you want to install.
-
To install the DFS Namespaces service, on the Server Roles page, select DFS Namespaces.
-
To install only the DFS Management Tools, on the Features page, expand Remote Server Administration Tools, Role Administration Tools, expand File Services Tools, and then select DFS Management Tools.
DFS Management Tools installs the DFS Management snap-in, the DFS Namespaces module for Windows PowerShell, and command-line tools, but it does not install any DFS services on the server.
-
To install DFS by using Windows PowerShell
Open a Windows PowerShell session with elevated user rights, and then type the following command, where <name> is the role service or feature that you want to install (see the following table for a list of relevant role service or feature names):
Install-WindowsFeature <name>
| Role service or feature | Name |
|---|---|
| DFS Namespaces | FS-DFS-Namespace |
| DFS Management Tools | RSAT-DFS-Mgmt-Con |
For example, to install the Distributed File System Tools portion of the Remote Server Administration Tools feature, type:
Install-WindowsFeature "RSAT-DFS-Mgmt-Con"
To install the Distributed File System Tools portion for a client device, type:
Add-WindowsCapability -Name Rsat.FileServices.Tools~~~~0.0.1.0 -Online
To install the DFS Namespaces, and the Distributed File System Tools portions of the Remote Server Administration Tools feature, type:
Install-WindowsFeature "FS-DFS-Namespace", "RSAT-DFS-Mgmt-Con"
Interoperability with Azure virtual machines
Using DFS Namespaces on a virtual machine in Microsoft Azure has been tested.
- You can host domain-based namespaces in Azure virtual machines, including environments with Azure Active Directory.
- You can cluster stand-alone namespaces in Azure virtual machines using failover clusters that use Shared Disk or Ultra Disks.
To learn about how to get started with Azure virtual machines, see Azure virtual machines documentation.
Additional References
For additional related information, see the following resources.
| Content type | References |
|---|---|
| Product evaluation | What’s New in DFS Namespaces and DFS Replication in Windows Server |
| Deployment | DFS Namespace Scalability Considerations |
| Operations | DFS Namespaces: Frequently Asked Questions |
| Community resources | The File Services and Storage TechNet Forum |
| Protocols | File Services Protocols in Windows Server (Deprecated) |
| Related technologies | Failover Clustering |
| Support | Windows IT Pro Support |
DFS [https://docs.microsoft.com/ru-ru/windows-server/storage/dfs-namespaces/dfs-overview] делает общее пространство имён для подключения к файловым данным.
С помощью DFS системный администратор выстраивает общее дерево файловых ресурсов, которые хранятся на разных серверах. У пользователя будет только одно сетевое подключение, а не множество, и данные он будет получать с ближайшего к нему сервера (в распределённой сети).
В нашем случае есть файловые ресурсы \srv01-ftpinstall, \srv02-bdDocs, \srv-03-websprav, \srv04-krtkarta и ещё около 10ка. Крайне неудобно их использовать по отдельности, поэтому их желательно соединить (поместить) в одно целое, типа \srv05-ftpobmen.
Активируем роль Пространства имён DFS, открываем консоль Управление DFS. На разделе Пространства имён нажимаем правой кнопкой мыши, и в меню выбираем пункт Создать пространство имён. Далее в мастере настроек указываем сервер srv05-ftp, присваиваем имя obmen, определяемся с правами доступа (мы выбрали Администраторы имеют полный доступ; остальные – доступ для чтения), выбираем Доменное пространство имён и Далее->Создать. По умолчанию будет создана папка obmen в C:корни_DFS.
Теперь на созданном пространстве имён \srv05-ftpobmen нажимаем правой кнопкой мыши и выбираем пункт Создать папку, указываем путь к ней. После этого ко второй папке, третьей и так далее. В результате получится дерево папок (см. рис. 1) с доступом по одному сетевому имени к разным серверам. Проверяем сетевой доступ к этому ресурсу в проводнике и для сотрудников создаём всего одно сетевое подключение \srv-05-ftpobmen.

Рисунок 1. Пространство имён DFS.
Помимо настройки пространства имён DFS желательно позаботиться и об отказоустойчивости, а именно о резервных серверах и настройке репликации (DFS-R) [https://docs.microsoft.com/ru-ru/windows-server/storage/dfs-replication/dfsr-overview].
File sharing in an organization plays a critical role in the collaboration between users. Microsoft included in Windows Servers the DFS namespace and DFS Replication to help provide highly available resilience and traffic optimized shares.
These shares can be in multiple locations, and users won’t need to remember each shared content location or worry about its availability. And in this tutorial, you’ll learn how to configure a DFS infrastructure namespace and DFS replication.
Read on and start replicating your data automatically!
Prerequisites.
This tutorial comprises hands-on demonstrations. You can follow along by having the following in place:
- At least a Windows Server 2016 – This tutorial uses Windows Server 2019
- Active Directory Domain Services (AD DS).
- A user account as a member of the Domain Admins groups in a domain – This tutorial uses a domain namespace called Remote.local. This domain hosts two domain controllers named DCR and DCR1.
Installing DFS Namespace and Replication
Distributed File System (DFS) allows the grouping of logical share resources between multiple servers and branches. Included in a Windows Server OS, DFS is a free and great option for data sharing and replication.
To take advantage of DFS, below are two of DFS’s components that you’ll have to install:
- DFS Namespace (DFS-N) – DFS namespace allows the building of the namespace and the logical folder structure. These folders can be on multiple servers, as you’ll see later.
- DFS Replication (DFS-R) – DFS Replication replicates folders to other members in the network.
Microsoft did a great job making almost everything a wizard-base, so a couple of clicks and you’re ready to go.
1. Log in to the first server (DCR1), and open Server Manager.
2. On the Server Manager, click on Manage (top-right) —> Add Roles and Features to initiate adding features to your server.
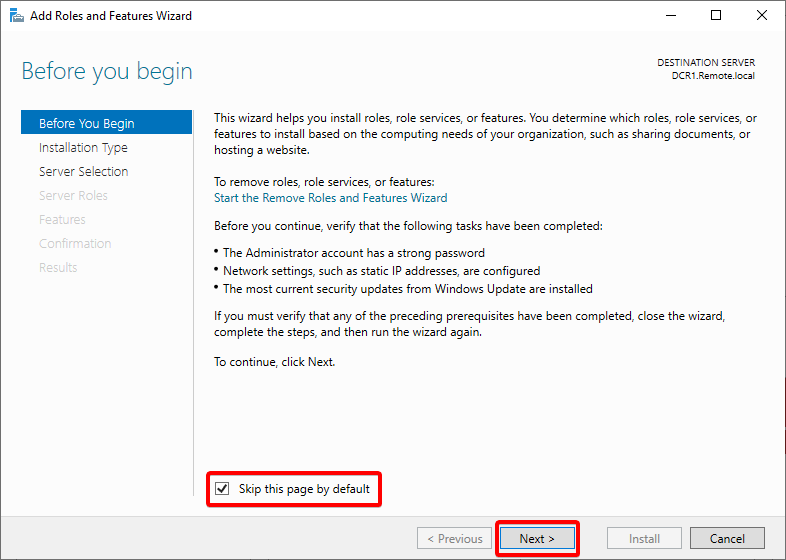
3. Tick the Skip this page by default option, and click Next. Doing so lets you skip this page when you add another feature in the future since this section is just an introduction to the wizard.
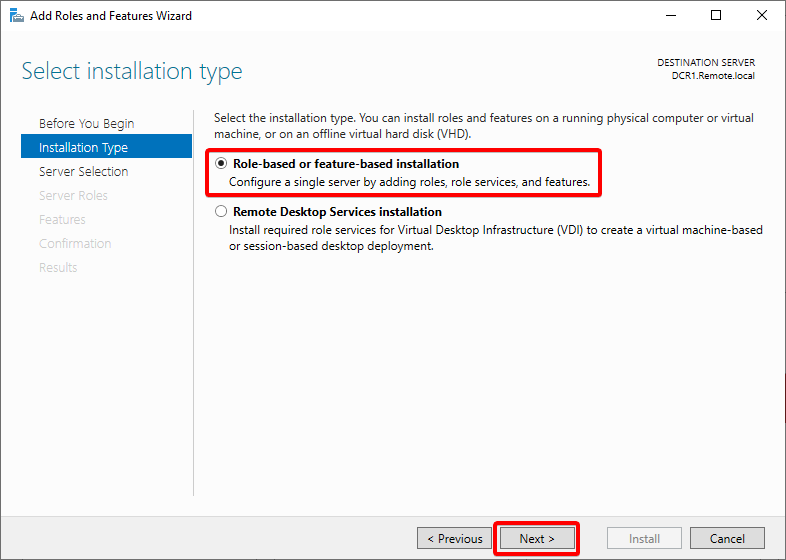
4. Now, select the Role-base or Feature-base installation and click Next since you’re working on a single server, not part of VDI.
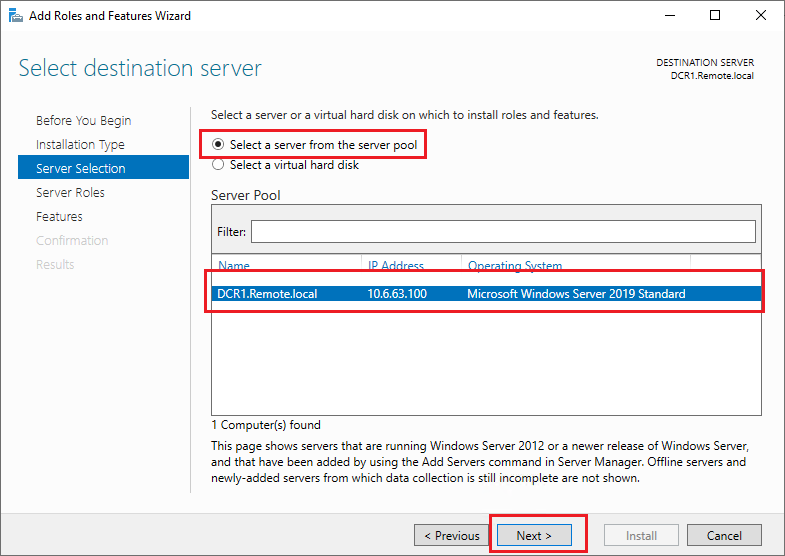
5. In the Select destination server page, select the installation’s destination server from the list and click Next.
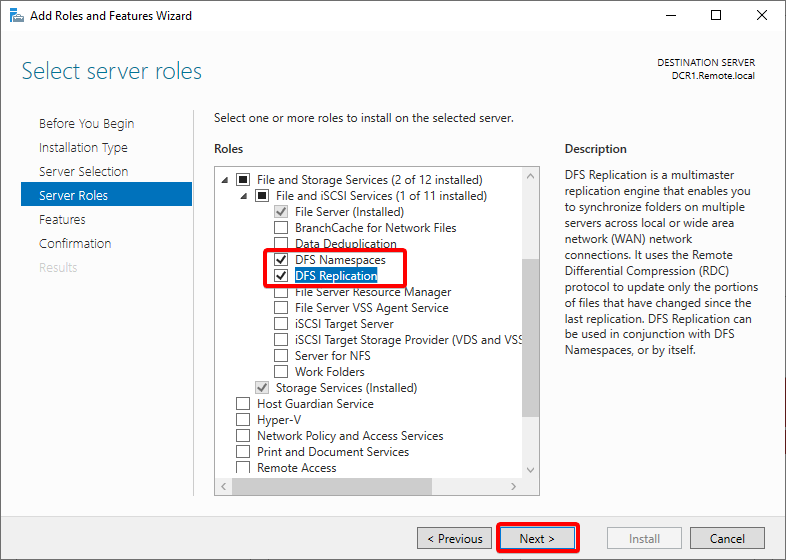
6. Next, expand File and Storage Services and File and iSCSI Services. Tick the boxes for the DFS Namespaces and DFS Replication.
Regardless of which box you tick first, you’ll get a pop-up window where you’ll confirm the features (step seven).
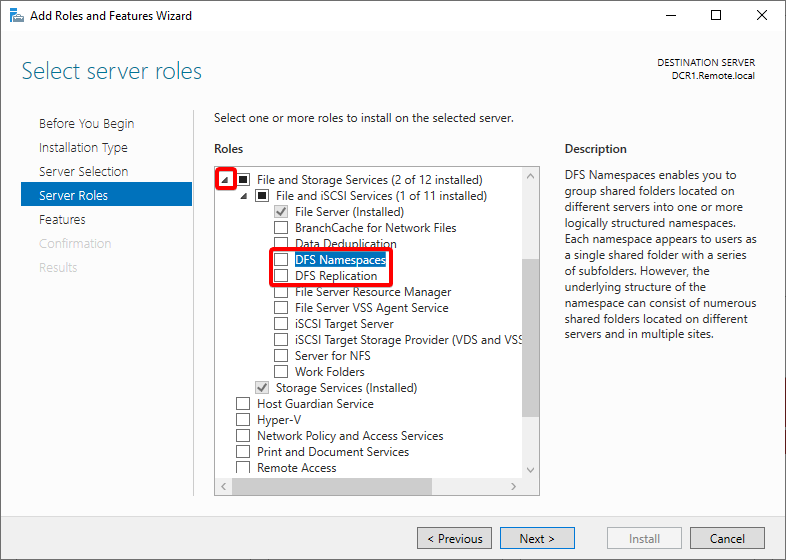
7. Click on Add Features, as shown below, to confirm the additional features.
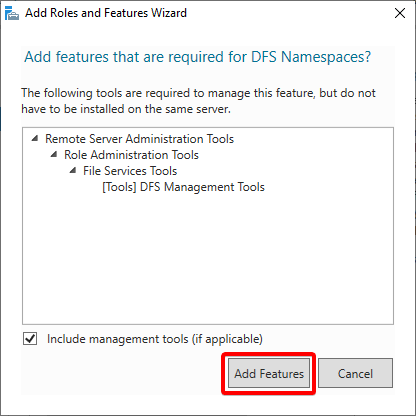
8. Ensure both DFS Namespaces and DFS Replication options are ticked and click on Next.
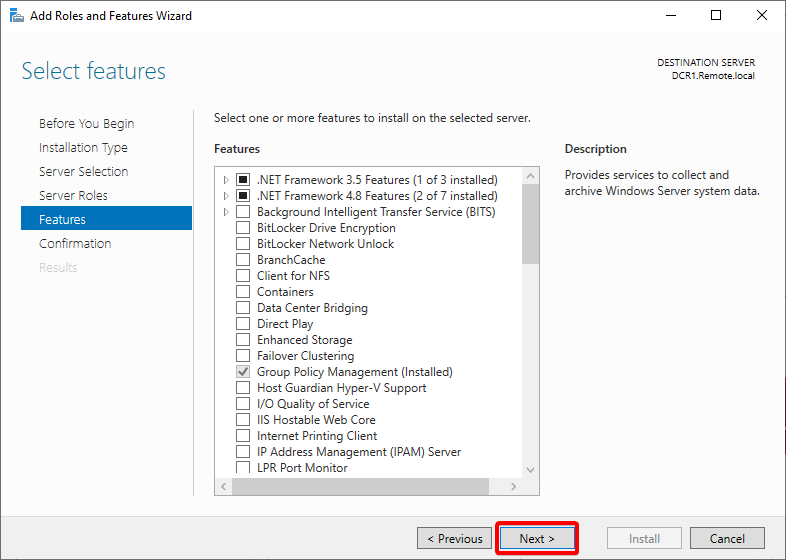
9. On the Features page, leave the defaults and click Next.
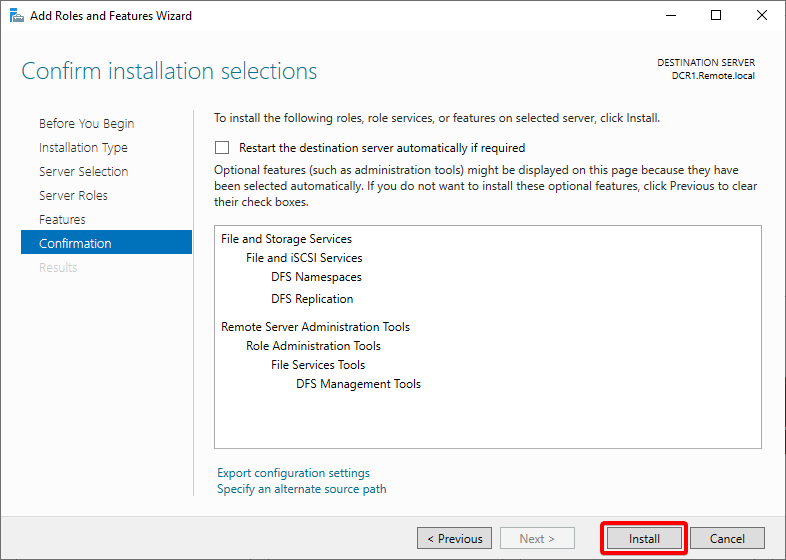
10. Review your installation selections and click the Install button to install DFS Namespaces, DFS Replication, and the binaries on your server.
11. Once installed, click on the Close button to close the wizard.
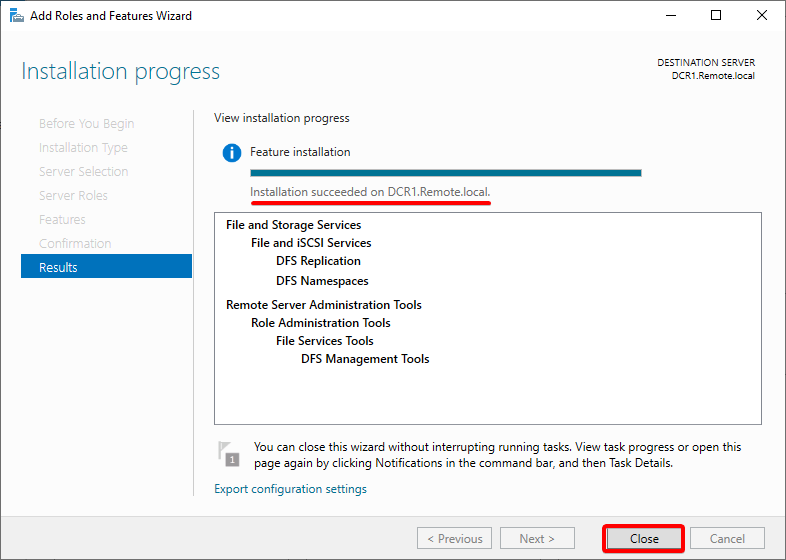
12. Finally, log in to the other server (DCR), and repeat steps 2-11 to install DFS Namespace and Replication.
Configuring DFS Namespace and DFS Replication
Now that the binaries are installed and available on your server, you must configure the service and create the DFS infrastructure. You’ll build the namespace structure and the required folders.
1. Open the DFS Management console in the Administrative Tools.
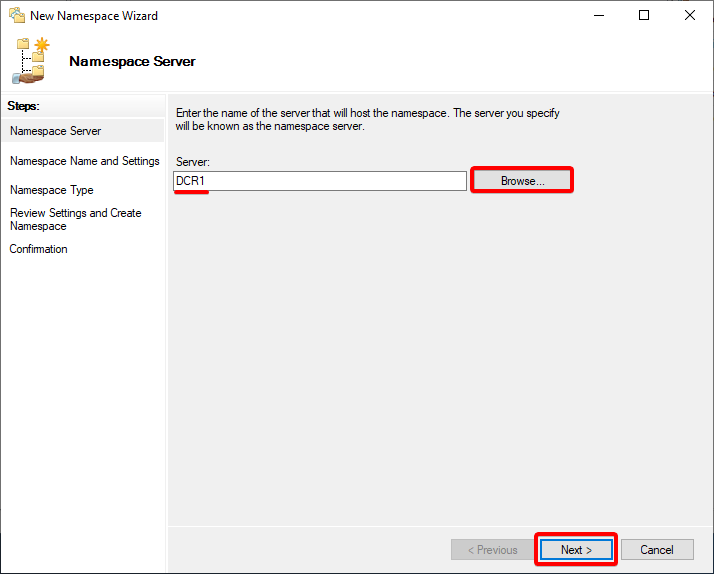
2. On the DFS Management, right-click on Namespaces and select New Namespace.

3. Input the server’s name (DCR1), or click on Browse to locate the server hosting the namespace, and click Next.
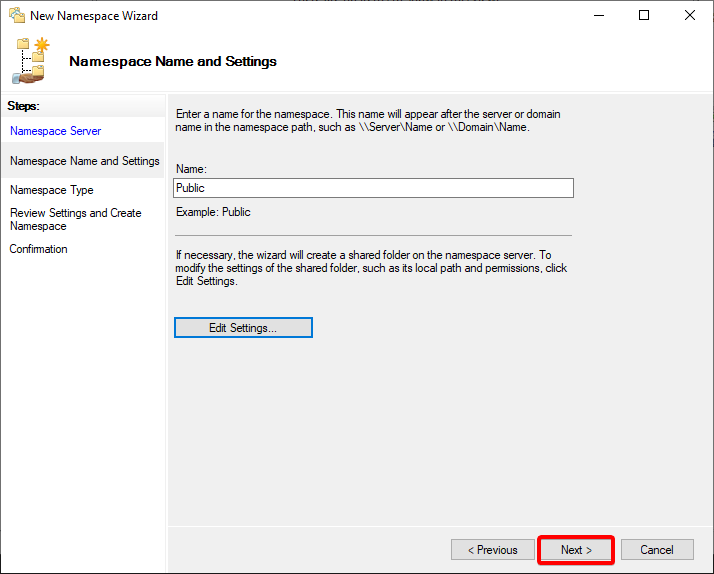
4. Now, type Public as the namespace’s Name, and click Edit Settings. A pop-up window appears where you’ll define a shared folder location and the sharing permission (step five).
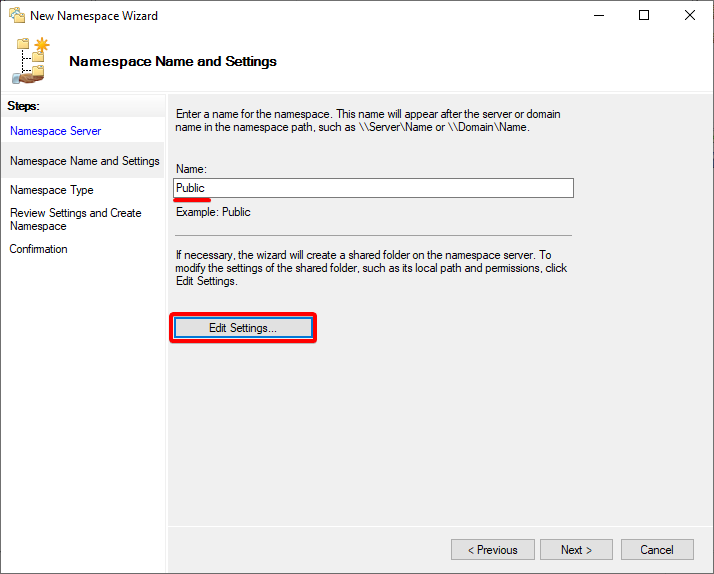
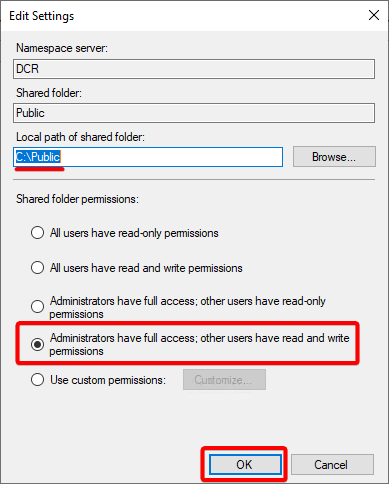
5. In the Edit Settings window, configure the settings of the shared folder with the following:
- Point the Local path of the shared folder to whatever path you want. This tutorial’s choice is the C:Public folder.
- Select the shared folder permissions that fit your need, and click OK. For this tutorial, choose the Administrators have full access: other users have read and write permissions option.
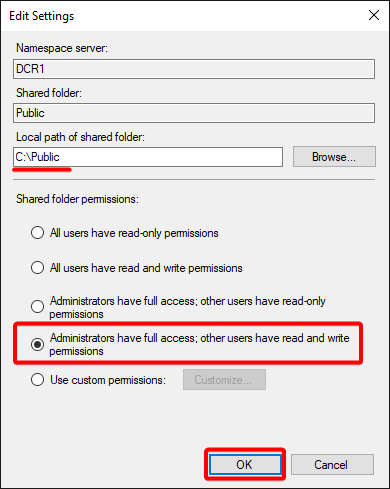
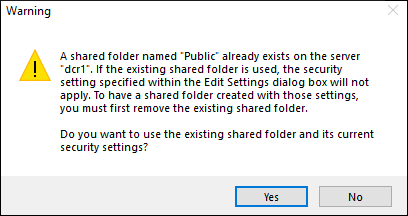
Don’t manually create the shared folder and point the wizard to the folder. Doing so makes folder permission management harder. Why? The specified sharing permission in the Edit Settings window won’t apply. As a result, you’ll get the following error message.
6. After defining the shared folder’s location, click on Next.
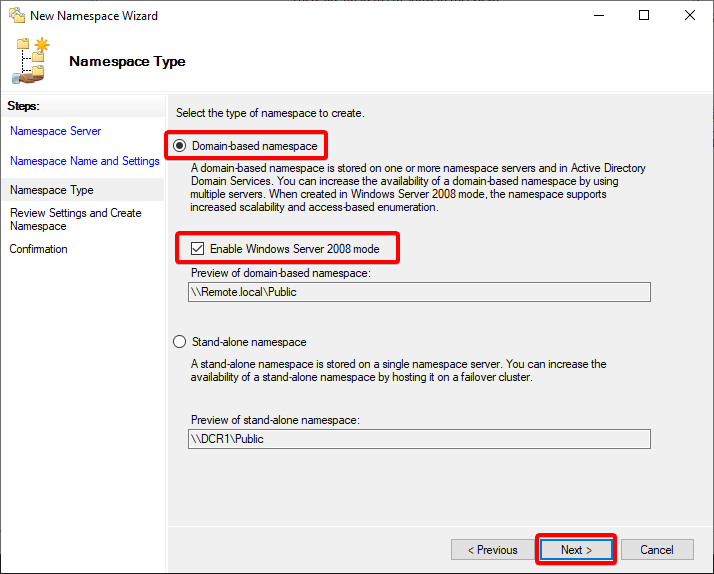
7. Now you must select any of the namespace types below to create:
- Domain-based – The namespace server settings are stored in one or more servers and Active Directory. Users can connect to the domain namespace to get the shared folder which looks like \mydomain.localMyShare.
- Stand-alone namespace – The namespace settings are stored in a single server, making hosting the namespace server on a Failover Cluster.
If you select the Stand-alone namespace option, users can access the namespace root using the server name \DCR1Public.
Tick the Enable Windows Server 2008 mode option, and click Next to increase scalability, and enable access-based enumeration,
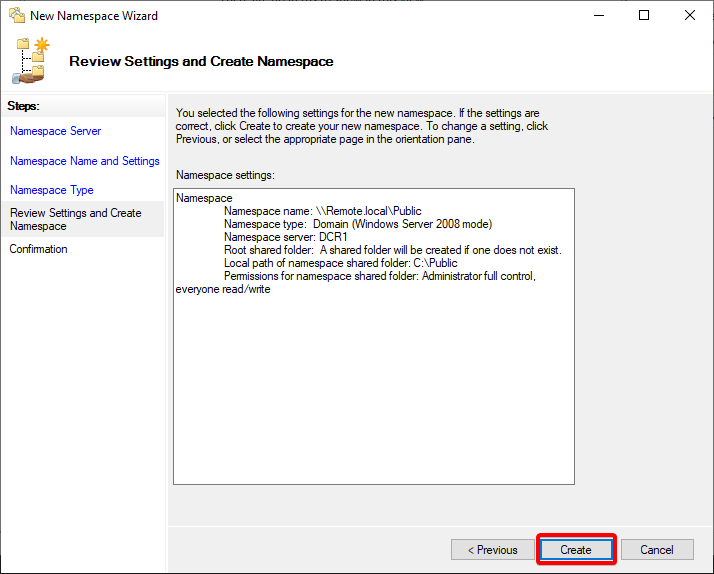
8. Review the settings you selected for the namespace, and click Create to finalize creating the new namespace.
9. Finally, click Close to close the wizard after successfully creating a new namespace.
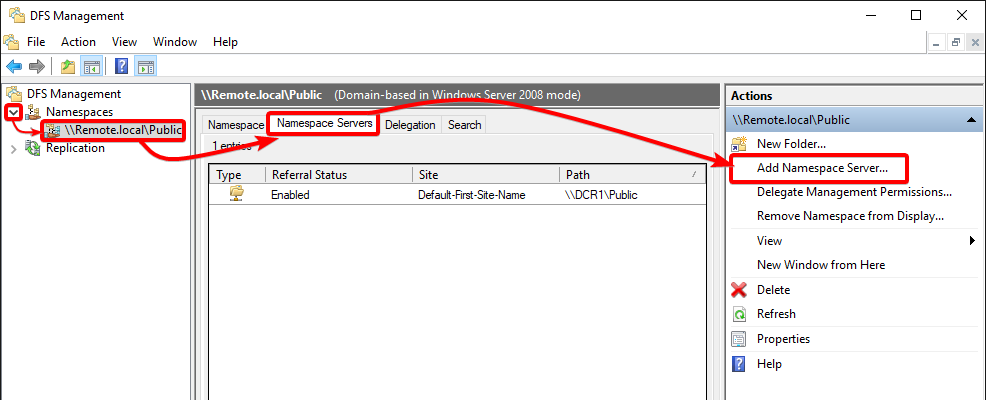
Adding More Namespace Servers
The namespace server is ready, and that’s great. But right now, only one server is added as a namespace server. Why not add more servers to the namespace? The more servers you add, the better the availability.
To add more servers to your namespace:
1. Expand Namespaces, click on the newly-created namespace —> Namespace Servers tab, and click on Add Namespace Server in the Actions panel (right-most). Doing so opens a pop-up window where you can specify the server to add (step two).
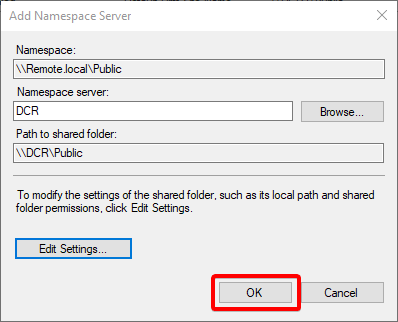
2. In the Add Namespace Server window, input the server’s name to add, and click on Edit Settings to modify the shared folder’s settings.
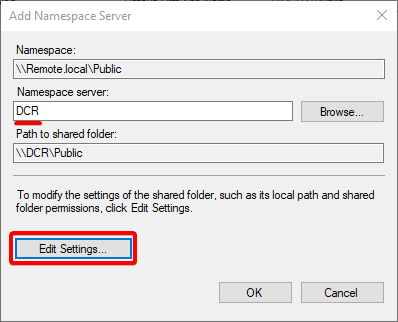
3. Specify the shared folder’s path and permissions as you did in step five of the “Configuring DFS Namespace and DFS Replication” section, and click OK.
4. Now, click OK in the Add Namespace Server window to save the changes and add the new namespace server.
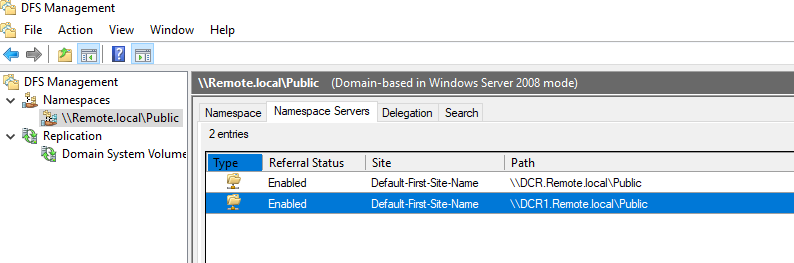
Once added, you’ll now see two namespace servers in the list below.
Configuring DFS Namespace Folder and Folder Target
Did you know you can aggregate multiple share resources in a single virtual share folder namespace? For instance, a company may have a shared folder for three different folders.
Even if these shared folders are on different servers and locations, the folder namespace aggregates so users can access them without remembering each folder location.
To configure the DFS Namespace folder and folder target:
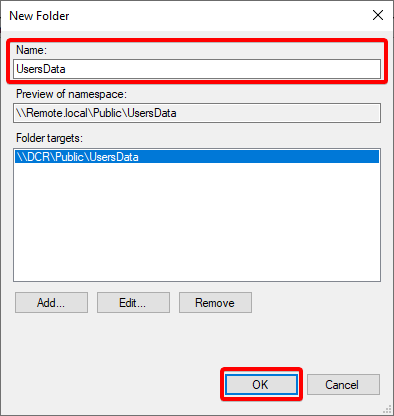
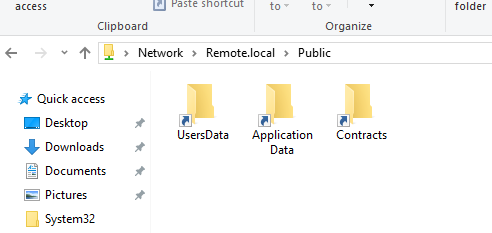
1. In the DCR1 server, create two regular folders named UsersData, and ApplicationData in the domain namespace’s shared folder (\Remote.localPublic).
2. Next, switch to the DCR server, and create a regular folder called Contracts in the \Remote.localPublic.

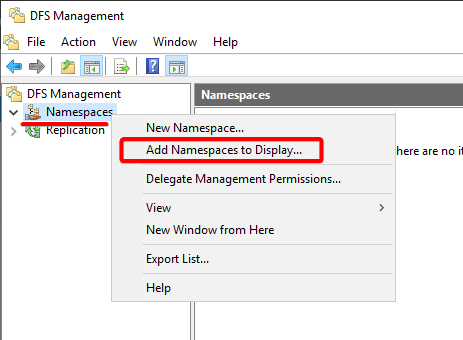
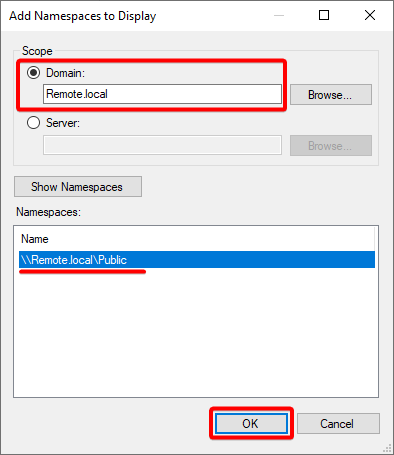
3. Open DFS Management in the DCR server, right-click on Namespaces, and select Add Namespaces to display.
4. Now, specify the domain (Remote.local), select the namespace, and click OK to display the namespace in the DFS Management.
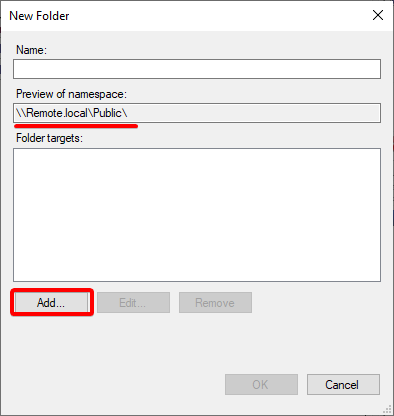
5. Right click on the Public namespace, and select New Folder to initiate adding a new folder.

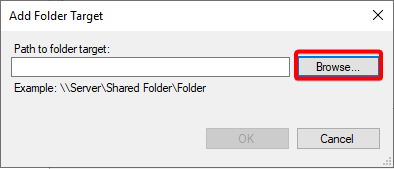
6. Click on Add, and a pop-up input box opens where you’ll target the shared folder path to add (step five).
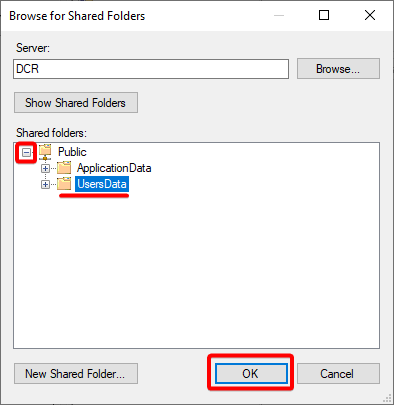
7. Click on Browse, and a new window opens where you’ll locate a shared folder.
8. Next, expand the Public folder, select the UsersData folder, and click OK to select the folder to add.
The folders you see below are shared folders from the DCR1 server.
9. Set the folder’s name to UsersData, and click OK to add the folder as a shared folder.
10. Next, repeat steps five to nine to add the ApplicationData folder.
11. Switch to the DCR1 server, and follow the same steps five to nine to add the Contracts folder.
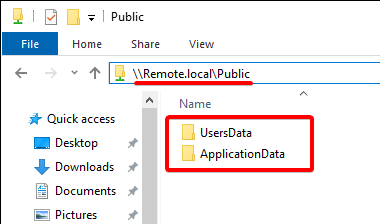
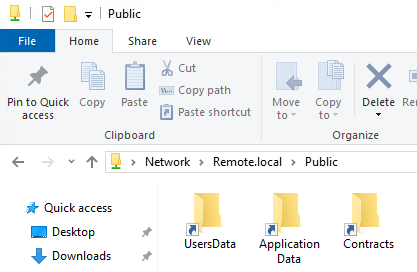
12. Finally, open File Explorer on both DCR and DCR1 servers and navigate to the Public namespace (\Remote.localPublic).
Regardless of which server you’re in, you’ll see the three virtual folders (UserData, ApplicationData, and Contracts), as shown below.
Configuring the DFS Replication
You’ve just completed a milestone of creating one shared folder (Public) under the Remote.local namespace and adding multiple folders. But now, if you try adding contents to the namespace, those contents will remain on the same server.
As a solution, you’ll configure the DFS Replication to ensure the added content gets replicated to all other servers for high availability.
To configure the DFS Replication:
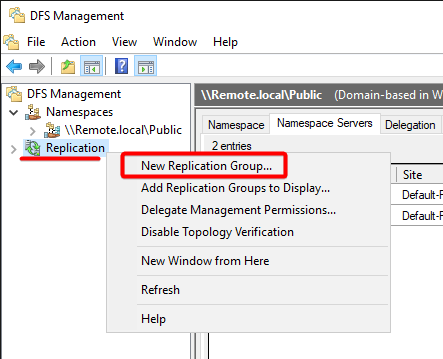
1. On the DFS Management in the DCR1 server, right-click on Replication, and select New Replication Group to initiate adding a new replication group.
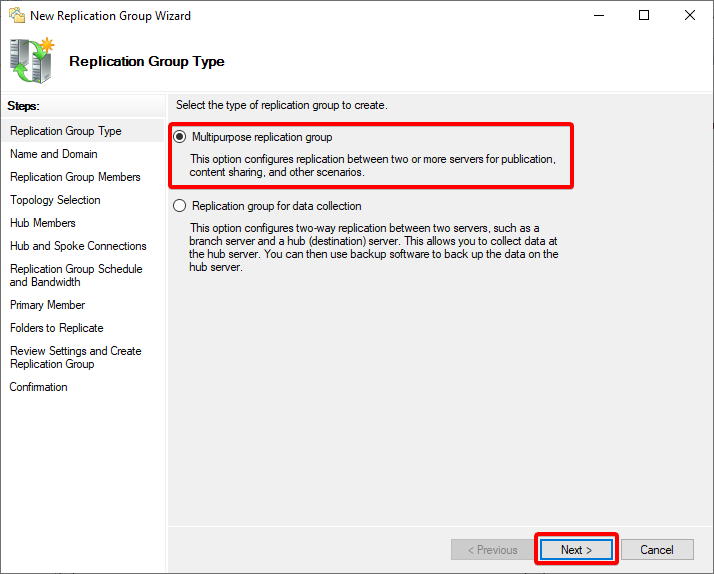
2. Next, choose a replication type that fits your need; there are two replication types as follows:
- Multipurpose replication group – Provides replication between two servers or more, usually used for file sharing.
- Replication group for data collection– Provides replication between two servers in different locations, usually for backup purposes between a branch office and the main office. This way, the backup software performs a backup of the replicated data instead of running the backup over the WAN.
Remember that only two servers can be in this replication group type, not more.
For this tutorial, select the Multipurpose replication group option and click Next since you share folders between two servers.
3. Input a unique name for the replication group (Public Replication), and click Next.
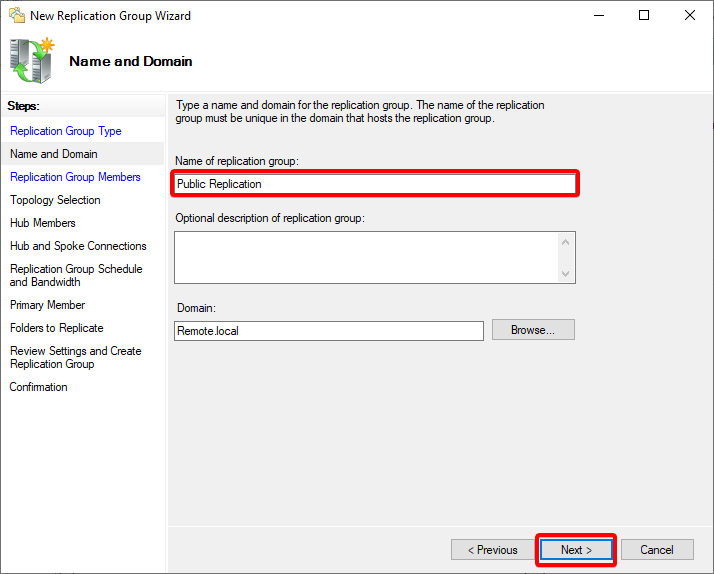
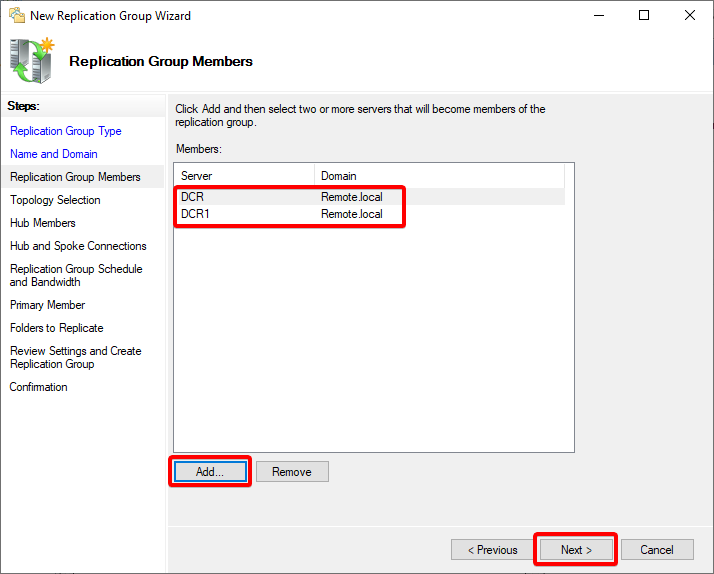
4. Now, on the Replication Group Members page, click on Add to locate the servers to add as members in the replication group, and click Next.
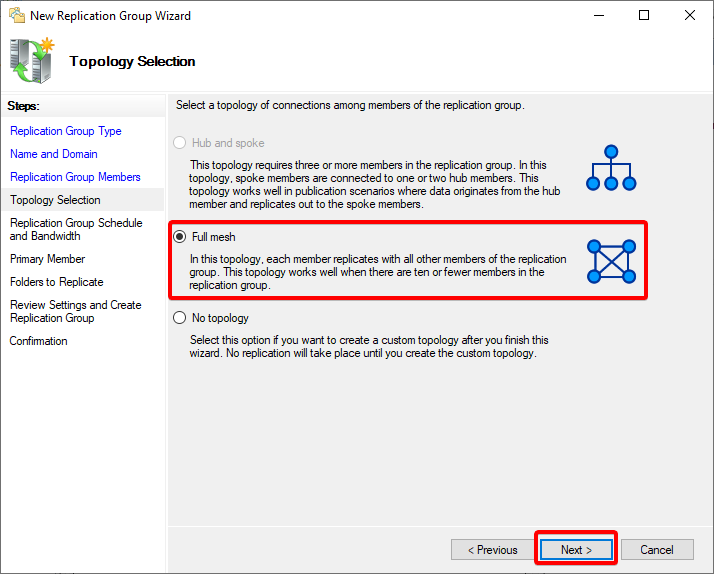
5. Choose a topology to set how servers replicate the contents from one server to another.
There are three topology options as follows:
- Hub and Spoke – This option requires at least three servers. One is the initial master Hub, and the other servers are the Spoke. This option is handy when the data originates from the Hub and should be replicated in multiple locations.
Each replica is a two-way replication with the Hub but spoke servers don’t replicate content between each other. But with this option, all replication stops until the Hub is up again when the Hub is down.
Since you’re only working on two servers, this option is disabled by default.
- Full Mesh – This option lets all servers replicate everything with each other.
- No Topology – With this option, no replication will be placed until you configure the replication topology.
For this tutorial, select the Full Mesh topology, and click Next. This topology works well regardless if you have ten or fewer replication group members,
Make sure to evaluate your network and connectivity speed between branches, as the replication can exhaust the bandwidth.
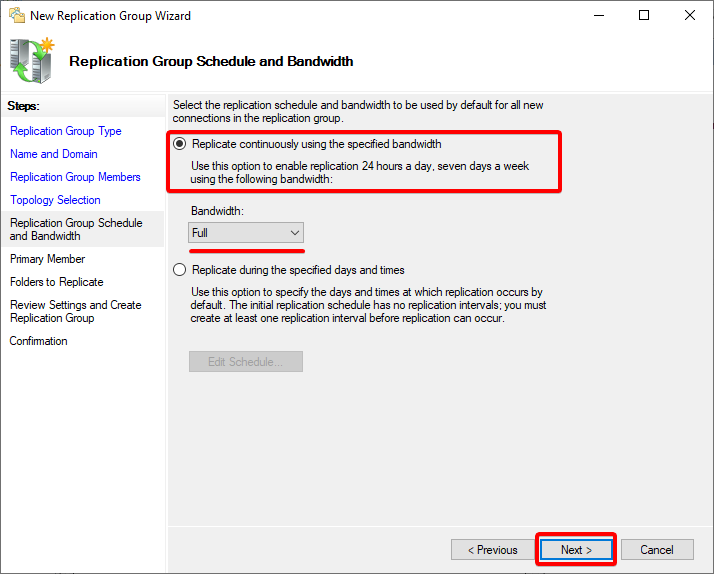
6. Next, select the Replicate continuously using specified bandwidth option to perform replications continuously. Keep the Bandwidth at default (Full), and click Next to create a bandwidth throttle.
But if you prefer a specific schedule for replications to execute, choose the Replicate during the specified days and times option instead.
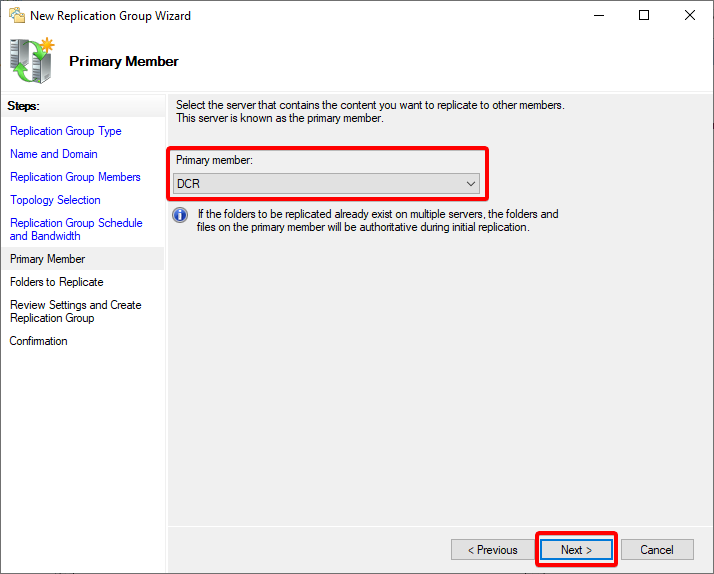
7. Select the primary member (DCR), and click Next. The immediate member is the server that initializes the replication and sends the content to all other members.
Ensure the destination folder on different nodes is empty as the content from the primary member is authoritative during the initial replication.
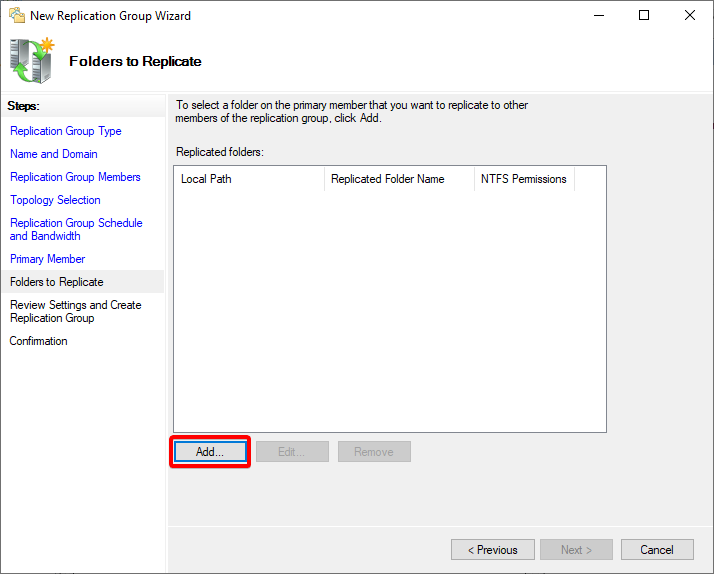
8. On the Folder to Replicate page, click on Add, and a pop-up window appears where you can select a folder to replicate.
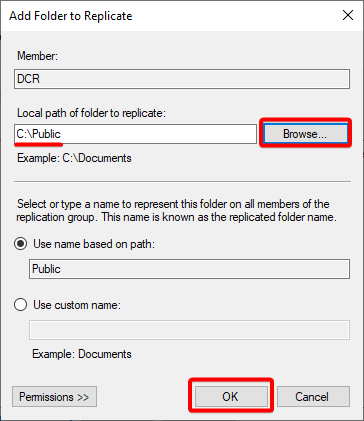
9. Click on Browse to locate the folder to add for replication, which is the primary source of the content to replicate to other nodes, and click OK.
Note that you can only add a folder from the primary member you selected in step seven.
You can customize and change the NTFS permission (not the folder sharing permission) as you want by clicking on Permissions
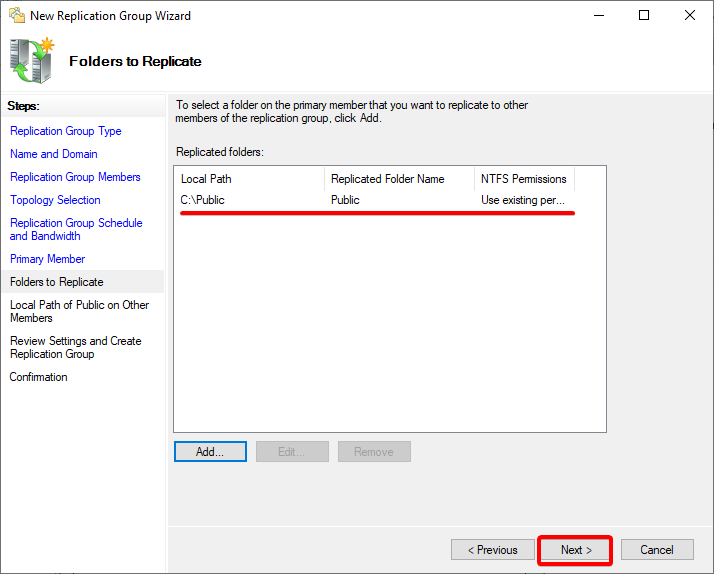
10. After adding the folder to replicate, click on Next.
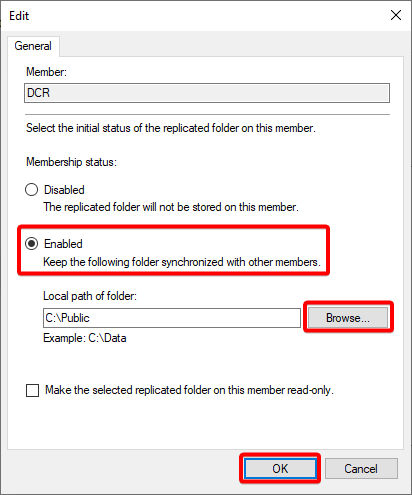
11. Now, click on Edit, which opens a window where you can specify the location to store the replicated content in the other member server.
If you’re using the DFS Management console and configuring the setting remotely, the Local path of folder is the local path, such as C:Public, and not a UNC.
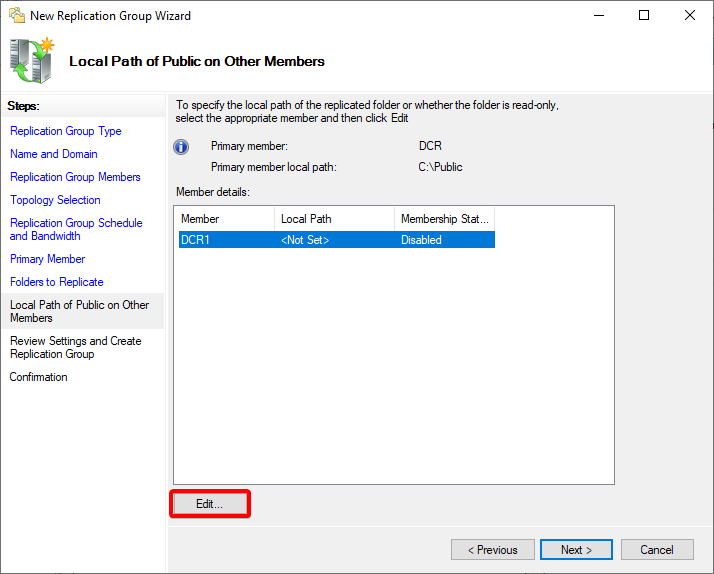
12. Edit the replication settings with the following:
- Select the Enable option to enable the replication for this server
- Click on Browse and locate the local path to store the replicated data.
- Click on OK to save the modified settings.
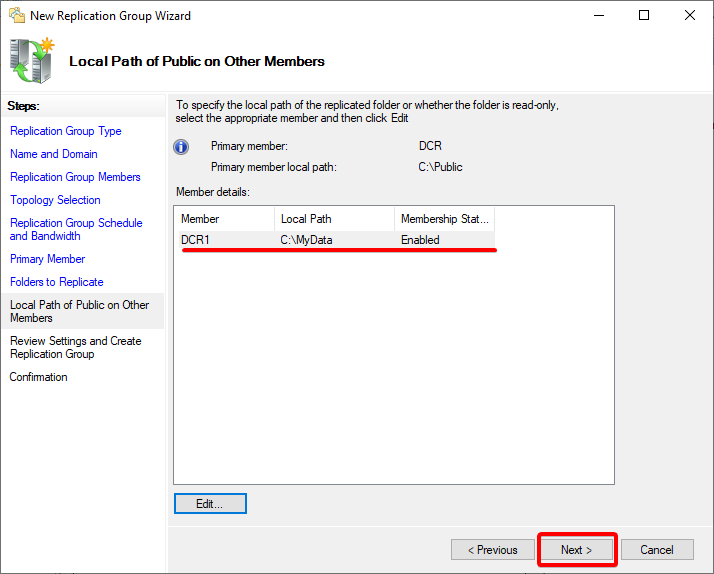
13. After setting the local path, click Next to confirm the modified settings.
14. Review the selected settings, and click on Create to finalize creating the new replication group.
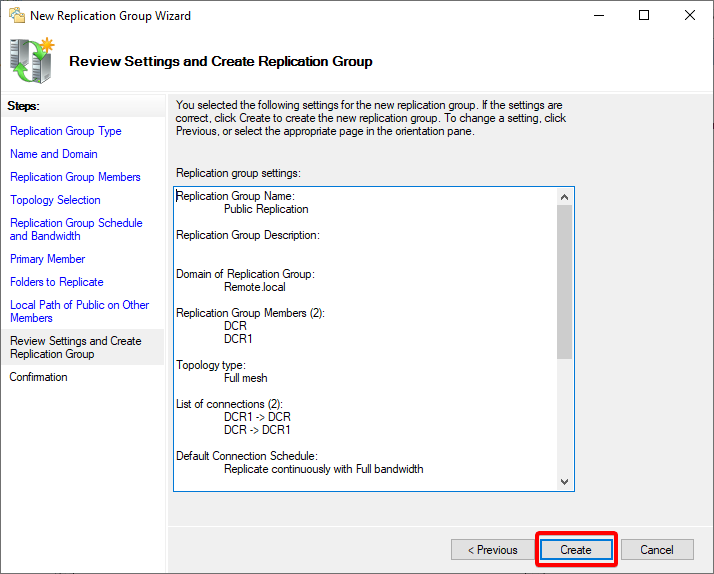
15. Finally, click on Close once the replication group is created to close the wizard.
Congratulation! You’ve successfully created your DFS Replication.
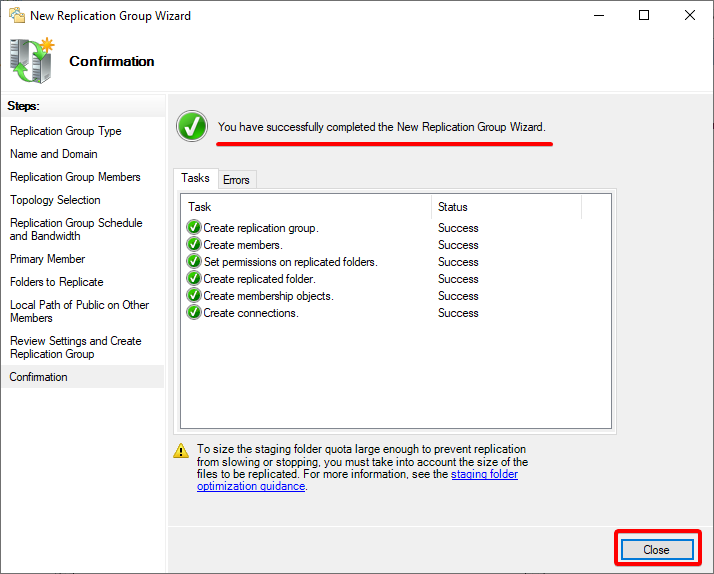
Testing the Replication
Everything has been set into place, and all that’s needed is to test the replication. How? You’ll create multiple files on different folders from different servers and see if each replicates in all servers.
To test the replication:
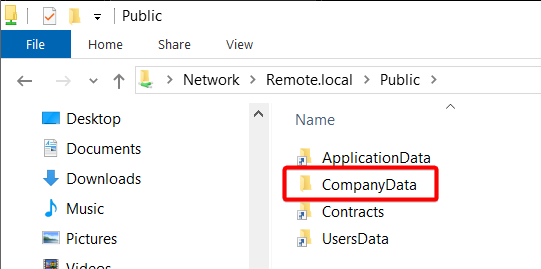
1. Navigate to \Remote.localPublic in File Explorer, and you’ll see the namespace folders created all under the root.
2. Next, inside \Remote.localPublic, create a new folder called CompanyData and place a few files inside the folder.
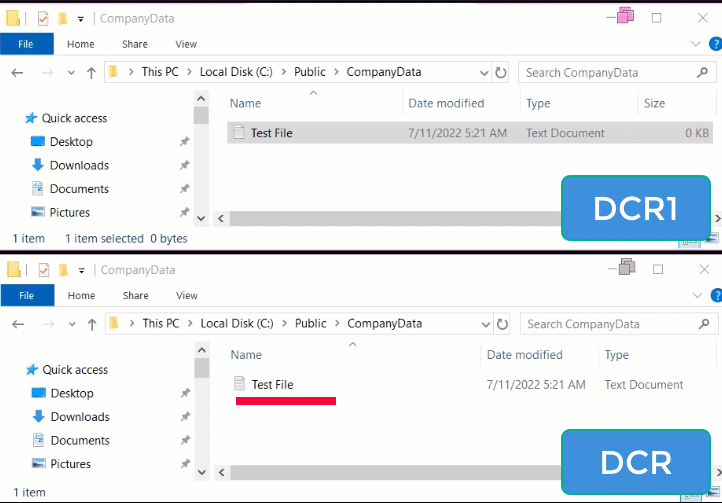
3. Lastly, navigate to C:PublicCompanyData on each server, and you’ll see the same content on both servers.
Below, you can see the file name change replicates from one server to another almost instantly, which indicates the replication is working as expected.
Conclusion
In this tutorial, you’ve learned how to keep data high availability with DFS Replication. DFS provides a great way to help in solving common content sharing issues, including availability, scalability, and the ability to support different connectivity speeds.
Having an automatic replication system truly comes in handy. But as a fail-safe, why not backup your entire system?
Часто при реализации структуры на базе Windows Server возникают задачи связанные с настройкой сервера для файлов и распределением прав на пользователейгруппы.
В нашем случае мы будем настраивать файловый сервер на Windows Server 2019.
1. Подготовка.
Для того чтобы настроить файловый сервер на Windows Server 2019, требуется установить операционную систему на виртуальную или физическую машину. Активировать операционную систему и подключиться на сервер с правами администратора.
2. Установка роли файлового сервера.
Чтобы установить роль файлового сервера, требуется:
- Зайти в диспетчер серверов.
- Управление => Добавить роли и компоненты.
- В мастере добавления ролей нажимаем “Далее” до Ролей сервера.
- Устанавливаем роль “Файловый сервер” и нажимаем “Далее”.
- Нажимаем “Установить”Нажимаем “Установить”.
3. Настройка файлового сервера.
- Заходим в Диспетчер Серверов => Файловые службы и службы хранилища => Общие ресурсы.
- Нажимаем “Задачи” и выбираем “Новый общий ресурс”.
- Выбираем подходящий нам профиль общего файлового сервера. В нашем случае мы выбираем “Общий ресурс SMB — быстрый профиль” и нажимаем “Далее”.
- Выбираем том на котором будет располагаться папка для доступа по сети, нажимаем “Далее”.
- Создаем имя общего ресурса, нажимаем “Далее”.
- В следующем окне выбираем требуемые параметры и нажимаем “Далее”.
- В окне “Распределения разрешение для управления доступом” мы настраиваем параметры безопасности на сетевую папку. А именно распределяем правами разрешения для определенных пользователей или групп, нажимаем “Далее”.
- В подтверждающем окне мы видим какие параметры будут сделаны и нажимаем “Создать”.

Рисунок 1 — Подтверждение выбора в мастере создания ресурсов
Убеждаемся в правильной настройки общей папки.
4. Проверка работоспособности файлового сервера.
Заходим на рабочую машину расположенную внутри локальной сеть. Подключаемся через проводник на сервер в нашем случае мы подключаемся к \10.15.73.38 так же можно вводить адрес сервера \domain.site.ru или по имени сервера \file-server
После авторизации мы подключились на сервере и видим нашу общую папку:

Рисунок 2 — Созданная общая папка
Мы провели настройку файлового сервера, чтобы можно было пользоваться общими папками и распределять права на определенные файлы. В дальнейшем можно увеличивать количество папок и строить файловую структуру по нуждам компании.
Эти и другие настройки для наших клиентов мы осуществляем в рамках ИТ-аутсорсинга.
Installing the Cluster is easy now days. But just this I post a little blog on how to do this, In my blog stats it shows that the 2012 post is still very active , so time for an update to Windows Server 2019. in the creation there isn’t much changed, it gets only easier. but If you still not in PowerShell you got more clicks to do an less Coffee. And Windows Admin Center is also a great addition to manage a cluster. This blog post is also usable in Azure Only you need to add Storagespacesdirect and a CSV file share.
Just install a bare metal (VM) windows Server 2019 and do a domain join and the fun can start.
Installing the Cluster Feature in powershell
|
Install-WindowsFeature –Name Failover-Clustering –IncludeManagementTools #Create cluster validation report Test-Cluster -Node MVP19-01,MVP19-02 #Create new Cluster New-Cluster -Name MVP1911-27 -Node MVP19-01,MVP19-02 -NoStorage -StaticAddress «10.255.255.45» #place witness file on USB device from my router Set-ClusterQuorum -FileShareWitness SERVERSHARE -Credential $(Get-Credential) |
Now that the basic cluster is ready we start with the HA share

File share witness enhancements We enabled the use of a file share witness in the following scenarios:
- Absent or extremely poor Internet access because of a remote location, preventing the use of a cloud witness.
- Lack of shared drives for a disk witness. This could be a Storage Spaces Direct hyperconverged configuration, a SQL Server Always On Availability Groups (AG), or an * Exchange Database Availability Group (DAG), none of which use shared disks.
- Lack of a domain controller connection due to the cluster being behind a DMZ.
- A workgroup or cross-domain cluster for which there is no Active Directory cluster name object (CNO). Find out more about these enhancements in the following post in Server & Management Blogs: Failover Cluster File Share Witness and DFS.
We now also explicitly block the use of a DFS Namespaces share as a location. Adding a file share witness to a DFS share can cause stability issues for your cluster, and this configuration has never been supported. We added logic to detect if a share uses DFS Namespaces, and if DFS Namespaces is detected, Failover Cluster Manager blocks creation of the witness and displays an error message about not being supported.
that’s it the cluster is created, we can start with the File server
Next is installation of the file server role
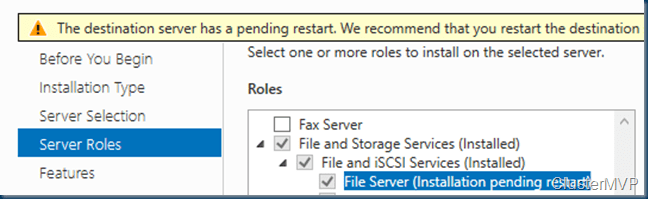
A restart is needed! After the restart we can build the cluster with the HA file share
|
$servers = («MVP19-01», «MVP19-02») foreach ($server in $servers) {Install-WindowsFeature -Name file-services -ComputerName $server} |
Now that the File Server Role is added we can add the Disk. Or use a disk that you already added before.
First we need to add a disk this can be done in the Failover Cluster manager or with PowerShell


Get-ClusterAvailableDisk | Add-ClusterDisk

The Roles are there and the Disk is added


Next step is adding the File server Role to the Cluster and add the HA File Share.
In this case I have a fail over disk and I use the File Server for general use.


So when adding the Disk it is not showing the disk. This is The disk is added to the cluster but the disk isn’t formatted!

Keep in mind that formating the cluster disk while it is online is not possible. You need to set the disk in maintenance mode else the format will fail.


So after the disk format we will see the Disk appear and can be added to the File server


After this the File server is up and running. As you can see the setup is screen intense, building this with PowerShell is a lot faster.
Powershell
|
add-ClusterFileServerRole -Storage «Cluster Disk 1» -Name MyFiles New-SmbShare -Name «Data» -Path «J:Data» -EncryptData $True |
Quick steps with powershell and even the share is created and encrypted

Next step is adding the file share.

go for the Quick setup


Pick the disk and select the folder with the data on the disk, if there is no data then create a folder that will hold the data later.

as you can see the UNC path from the File Server.


As you can see the settings can be adjusted for you needs and also set the right access, and keep in mind this needs to be don on the Cluster Level!

All Done

So creating a File Server and 2 file shares is Click intensive if you don’t use PowerShell.
But What about Windows Admin Center ? yes that would be an option also except here you can’t create a cluster role.


You can create a new role but no file server /share etc.
But when the share is created and running like now you can use Windows Admin Center for migration the data to the file share.

But more and more options are coming in Windows Admin Center below are some links that you can use to add your request to the UserVoice
https://docs.microsoft.com/en-us/windows-server/manage/windows-admin-center/use/manage-failover-clusters
More Coming
Failover cluster management in Windows Admin Center is actively under development and new features will be added in the near future. You can view the status and vote for features in UserVoice:
Feature Request
Show more clustered disk info
Support additional cluster actions
Support converged clusters running Hyper-V and Scale-Out File Server on different clusters
View CSV block cache
See all or propose new feature
+++++++++++++++
Follow Me on Twitter @ClusterMVP
Follow My blog https://robertsmit.wordpress.com
Linkedin Profile Robert Smit MVP Linkedin profile
Google : Robert Smit MVP profile