На чтение 4 мин Просмотров 729 Опубликовано 09.04.2019
![]() Панель инструментов – это специальная часть панели задач, которая создана для быстрого доступа к отдельным средствам операционной системы. Сегодня мы поговорим о том, где находится панель инструментов в Windows 7. Также рассмотрим функционал и возможные настройки данного элемента интерфейса.
Панель инструментов – это специальная часть панели задач, которая создана для быстрого доступа к отдельным средствам операционной системы. Сегодня мы поговорим о том, где находится панель инструментов в Windows 7. Также рассмотрим функционал и возможные настройки данного элемента интерфейса.
Содержание
- Для чего нужна панель инструментов?
- Настройка через панель задач
- Настройка через «Панель управления»
- Панель инструментов в проводнике
- Заключение
Для чего нужна панель инструментов?
Сначала поговорим о назначении данного элемента в операционной системе. Панель инструментов располагается на панели задач Windows. По умолчанию данный функционал не задействуется в работе компьютера. Пользователь может вручную включить и настроить его.
Инструмент позволяет выбрать как несколько заготовленных панелей, так и создать собственную. Во втором случае вы самостоятельно выбираете, какие элементы будут наполнять данную область интерфейса. При нажатии на добавленный ярлык вы сможете открыть содержимое раздела и быстро переключиться к нужному окну. Теперь подробнее разберем функционал.
Настройка через панель задач
Поскольку элемент расположен на панели задач, вы можете быстро его настроить через контекстное меню. Для этого необходимо следовать нашему руководству:
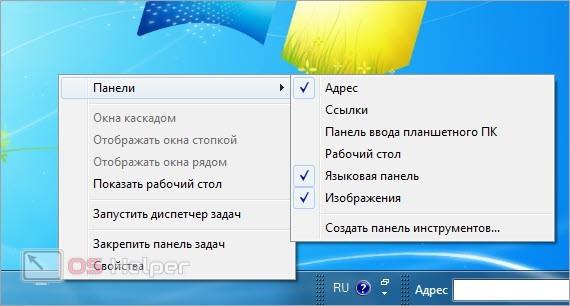
- Кликните ПКМ по любой области на панели задач.
- Перейдите в подраздел «Панели».
- Здесь выберите одну из заготовок или нажмите на «Создать панель инструментов».
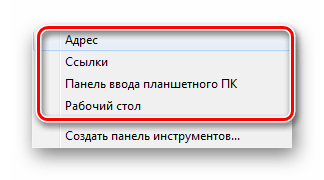
- В первом случае в интерфейс автоматически встроится выбранный элемент. Среди стандартных вариантов доступны адресная строка, ссылки, панель для планшетного ПК, рабочий стол и язык. Последняя, к слову, включена по умолчанию.
- Выбрав ручное создание, вы откроете проводник, в котором необходимо указать папку. Выбранная директория будет отображаться на панели быстрого доступа.
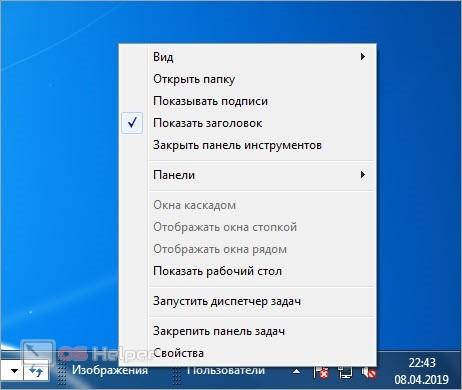
Точно так же вы можете убрать созданные панели. Чтобы настроить каждую из них, вам нужно кликнуть ПКМ по названию добавленной папки или по иконке, а затем выбрать нужный пункт из контекстного меню:
Добавленные вкладки можно перемещать по панели задач вручную, если вы не закрепили ее к рабочему столу.
Настройка через «Панель управления»
Те же действия вы можете выполнять через функционал «Панели управления». Однако в свойствах нельзя добавлять собственные элементы – доступен только ряд стандартных вкладок. Чтобы воспользоваться данным методом, сделайте следующее:
- Через меню «Пуск» откройте «Панель управления».
- Выберите тип просмотра «Крупные значки» и зайдите в раздел для управления панелью задач.
- Теперь откройте третью вкладку.
- Здесь появится список инструментов, которые можно добавлять и удалять с помощью галочки.

Мнение эксперта
Дарья Ступникова
Специалист по WEB-программированию и компьютерным системам. Редактор PHP/HTML/CSS сайта os-helper.ru.
Спросить у Дарьи
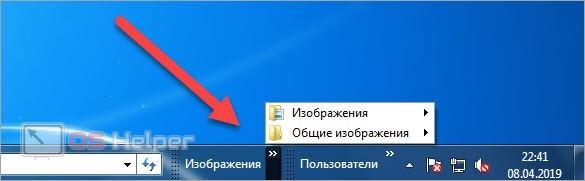
Чтобы увидеть содержимое папки на панели задач, нажмите на иконку с двумя стрелками. Подпапки данной директории откроются в контекстном меню. Выбрав одну из них, вы откроете окно проводника.
Панель инструментов в проводнике
Однако панель инструментов присутствует не только на рабочем столе Windows. Вы можете столкнуться с одноименным интерфейсом в стандартном проводнике, если обратите внимание на верхнюю панель. По умолчанию она может быть отключена. Для включения воспользуйтесь следующим руководством:
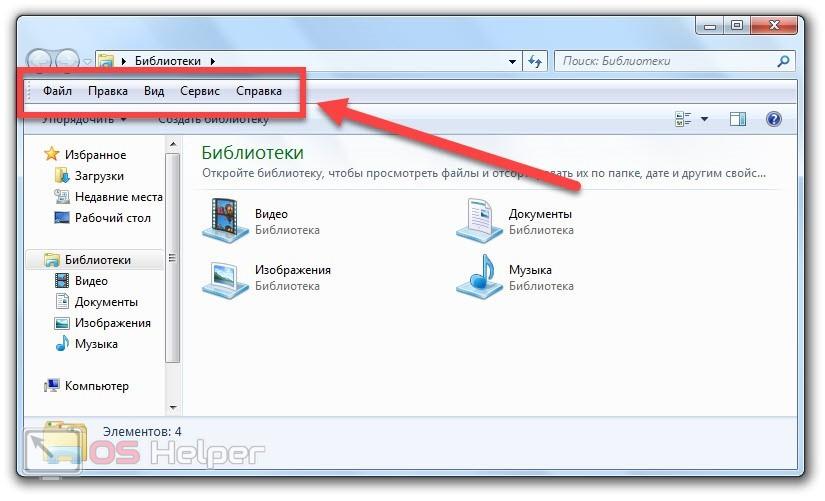
- Зайдите в любую папку через проводник и нажмите на меню «Упорядочить».
- Теперь в разделе «Представление» выберите пункт «Строка меню».
- После этого сверху появится панель инструментов с разделами «Файл», «Правка», «Вид» и так далее. Через контекстное меню ее можно открепить или закрепить.
Вы можете пользоваться панелью инструментов для быстрого перемещения объектов между папками. Например, откройте проводник в нужной директории и перетащите мышкой файл на иконку соответствующего каталога с панели задач. Можно добавить быстрый доступ к папке и отправлять туда файлы, не запуская лишнее окно проводника.
Заключение
Итак, мы рассмотрели все аспекты и нюансы в настройке и использовании панели инструментов Windows. Если вы привыкните к данному элементу управления, то поймете, что перемещение между папками и разделами с помощью данного метода гораздо удобнее. При появлении проблем или вопросов по настройке пишите в комментариях к статье.
Работа с Панелью инструментов в Windows 7
«Панелью инструментов» называют элементы, располагающиеся на панели быстрого запуска в операционной системе Windows. Используется такая функция для мгновенного перехода к необходимому приложению. По умолчанию она отсутствует, поэтому создать и настроить ее нужно самостоятельно. Далее мы бы хотели детально обсудить осуществление этой процедуры на компьютерах под управлением Виндовс 7.
Создаем Панель инструментов в Windows 7
Всего существует два метода добавления основных значков в область быстрого запуска. Каждый способ будет максимально подходящим для разных пользователей, поэтому давайте рассмотрим каждый из них, а вы уже выберите оптимальный.
Способ 1: Добавление через Панель задач
Вам доступен ручной выбор отображаемых элементов Панели инструментов в указанной области путем добавления ее через Панель задач (полоска, на которой и расположен «Пуск»). Производится эта процедура буквально в несколько кликов:
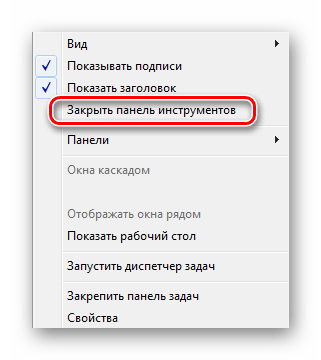
- Щелкните ПКМ на свободном месте области задач и снимите галочку возле пункта «Закрепить панель задач».
Выполните повторный клик и наведите курсор на пункт «Панели».
Выберите необходимую строку и нажмите по ней ЛКМ, чтобы активировать отображение.

Дважды щелкните ЛКМ, например, на кнопке «Рабочий стол», чтобы развернуть все элементы и сразу запустить нужное меню.

Что касается удаления случайно созданного объекта, осуществляется оно так:
-
Кликните ПКМ на необходимом элементе и выберите пункт «Закрыть панель инструментов».

Теперь вы знаете, как с помощью настроек области задач работать с элементами быстрого запуска. Однако такой способ вынуждает повторять каждое действие, если требуется добавить более одной панели. Активировать все их одновременно можно другим методом.
Способ 2: Добавление через «Панель управления»
Мы уже уточнили выше, что этот вариант позволит справиться с поставленной задачей немного быстрее. Пользователю только нужно произвести такие шаги:
-
Откройте меню «Пуск» и перейдите в «Панель управления».
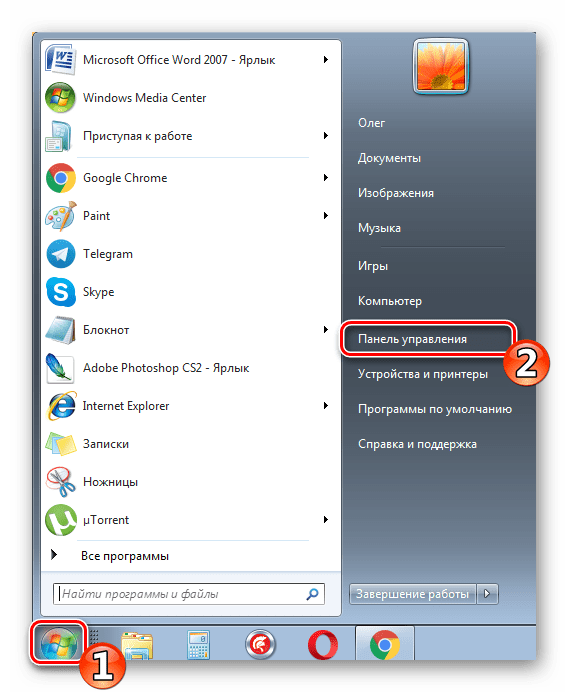
Среди всех значков отыщите «Панель задач и меню «Пуск»».
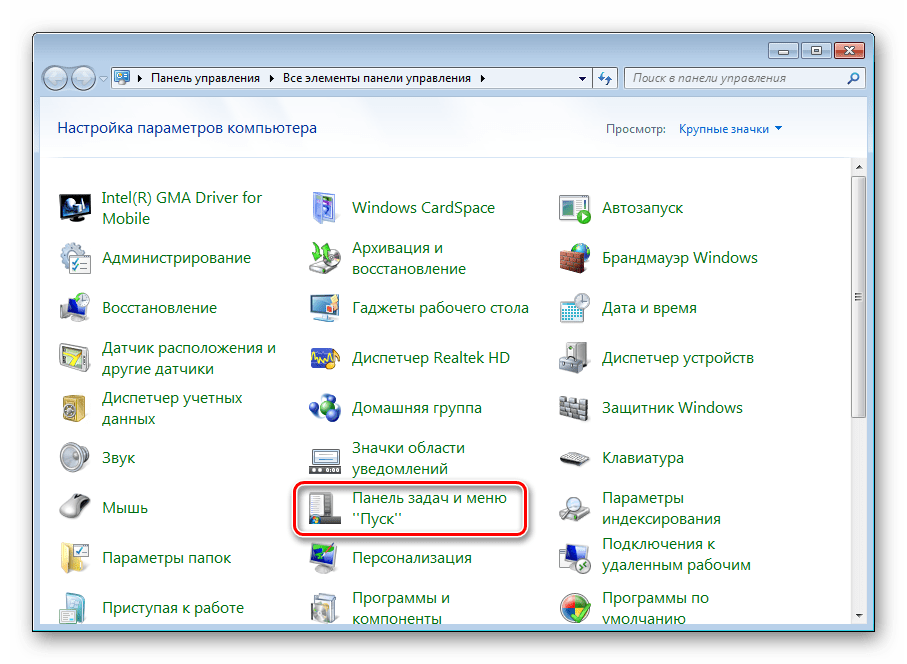
Переместитесь во вкладку «Панели инструментов».
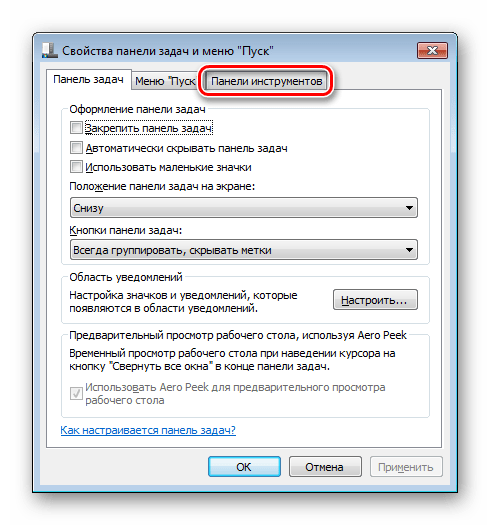
Поставьте галочки возле необходимых пунктов, а затем щелкните на «Применить».
Теперь на Панели задач отобразятся все выбранные объекты.

Восстановление панели Quick Launch
«Панель быстрого запуска» или Quick Launch является одним из объектов Панели инструментов, однако ее особенность в том, что пользователь сам добавляет нужные ему приложения для запуска, а сама панель не установлена по умолчанию. Поэтому в случае надобности восстановления или повторного создания потребуется осуществить такие действия:
-
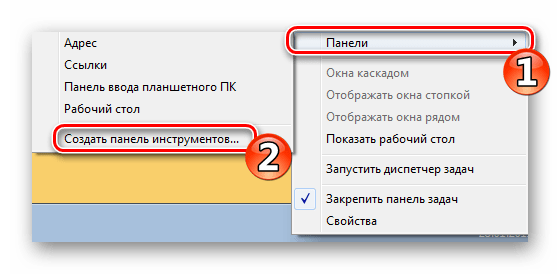
Нажмите ПКМ на области задач и открепите ее.

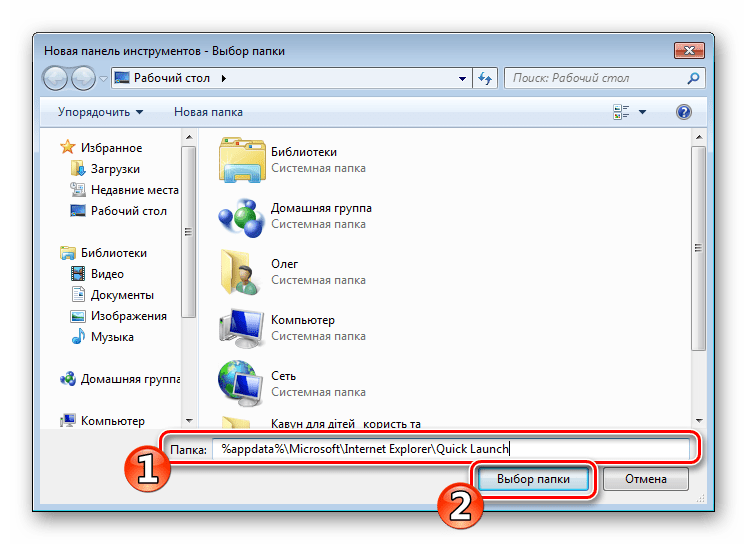
Теперь перейдите в «Панели» и создайте новый элемент.
В поле «Папка» введите путь %appdata%MicrosoftInternet ExplorerQuick Launch , а затем кликните на «Выбор папки».
Внизу появится полоса с соответствующей надписью. Осталось придать ей должный вид.
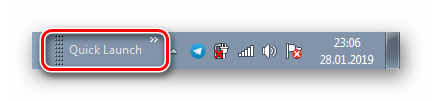
Кликните по ней ПКМ и снимите галочки с пунктов «Показывать подписи» и «Показать заголовок».
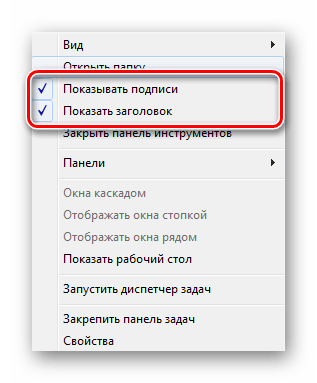
Вместо старой надписи будут отображаться значки быстрого доступа, которые вы можете удалять или добавлять новые путем перемещения ярлыков.
Приведенные инструкции по созданию панелей со стандартными инструментами в Windows 7 описывают лишь часть возможных взаимодействий с Панелью задач. Развернутое описание всех действий вы найдете в других наших материалах по следующим ссылкам.
Отблагодарите автора, поделитесь статьей в социальных сетях.
Назначение и создание панели инструментов в Windows 7?
Панель инструментов в Windows 7
 Панель инструментов в Windows 7 (и в других версиях Окон) нужна для быстрого вызова программы или файла. В Windows 7 существует достаточно панелей, можно годами обходиться без дополнительных. Но иногда такая необходимость возникает.
Какие варианты есть в Windows 7?
- Меню «Пуск». Здесь содержатся все программы, которые есть на компьютере. Здесь же быстрый доступ к панели управления, документам, библиотекам, устройствам, играм, содержимому компьютера, справочнику.
- Панель задач. На ней расположены программы, которыми вы постоянно пользуетесь.

- Рабочий стол. Здесь можно разместить сотни ярлыков.


Когда нужна дополнительная панель?
- Если вам не хватает панели задач Windows 7 для размещения ярлыков всех программ, которыми вы часто пользуетесь.
- Если вам требуется быстрое открытие всех документов определенной папки.
- Чтобы добраться до нескольких сотен ярлыков на рабочем столе, необходимо свернуть или закрыть все окна, что не всегда удобно.
- Как временное приспособление. Пока вы часто обращаетесь к определенным файлам или приложениям, они у вас перед глазами. Когда необходимость отпала, вы можете удалить папку. Останется только панель задач с теми программами, которые нужны всегда. Понадобится – можно создать новую панель инструментов.
- В новых версиях операционных систем добавляются новые функции взамен старых. Часто пользователи, привыкшие к интерфейсу XP, жалуются, что Windows 7 никуда не годится. Что в ней все неправильно расположено, и нет прежних удобных опций.
Что предлагает Windows?
По умолчанию панель инструментов в Windows 7 не отражается, но создать ее несложно.
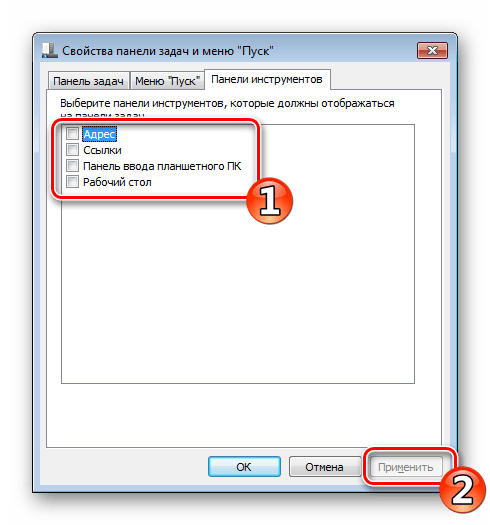
- Щелкнуть правой кнопкой «Пуск», выбрать «Свойства». Откроется меню настроек для кнопки «Пуск», панели задач и инструментов.
- Можно откорректировать настройки для «Пуска» и «Задач», но нам сейчас интересна третья вкладка. Предлагается на выбор создать пять панелей инструментов: Рабочий стол, Адрес, Ввод планшета, Ссылки и Bluetooth Remote Control. Сейчас против них нет ни одной птички, но если вам нужно что-то отсюда, то птицу можно поставить.

Требуется быстрый доступ к другим приложениям
- Щелкнуть правой кнопкой по свободному от ярлычков участку на панели задач.
- Выбрать в меню верхнюю строчку, «Панели».
- Дальше – нижнюю строчку: «Создать панель».
- В открывшемся окне выбрать любую папку с компьютера.
- Теперь она будет отражаться у вас рядом с языковой панелью. Если вы нажмете на кавычку справа от названия папки, вам откроется все ее содержимое.
- Если вам постоянно нужны не все документы/приложения из папки, можно создать новую директорию, поместить в нее то, что постоянно необходимо, и закрепить панель.
- Иначе: когда по команде «Создать панель» откроется окно, ввести адрес %appdata%MicrosoftInternet ExplorerQuick Launch, после чего нажать Enter. Появится новая папка Quick Launch, пустая.
- Папку можно переместить налево. Правой кнопкой щелкнуть по панели задач, снять птицу возле надписи «Закрепить панель задач». Рядом с кнопкой «Пуск» и рядом с вашей папкой появятся столбики из точек. За эти столбики можно таскать обе панели мышью вправо или влево.
- Если щелкнуть правой кнопкой по названию папки и убрать галочки против команд «Показывать заголовок» и «Подписи», вместо текстового названия на панели будут отражаться значки.
- Теперь в эту пустую папку можно поместить все документы и приложения, которые вам часто нужны.


Как удалить?
- Щелкнуть правой кнопкой «Пуск», выбрать «Свойства», «Панели инструментов», снять птицу.
- Щелкнуть правой кнопкой панель задач, «Панели», под «Языковой» увидите свою. Снять птицу.
Когда вы привыкнете к интерфейсу Windows 7, так и сделаете.
Волшебная панель задач Windows 7 и 8
 Знаете ли Вы, какие возможности у панели задач Windows 7 и 8? Чтобы повысить удобство работы, научимся настраивать её под себя.
Также я покажу, как добавить на панель задач Windows (любой версии) раскрывающееся меню к любой папке, таким меню очень удобно пользоваться!
Этот урок я опубликовал вне очереди, так как он Вам пригодится в следующем IT-уроке.
Знакомимся с панелью задач в Windows 7/8
С выходом Windows 7 панель задач заметно изменилась, по сравнению с предыдущими версиями этой операционной системы. И все нововведения я считаю очень удачными, они заметно упрощают работу.
Вот посмотрите на снимок экрана:

Панель задач Windows 7
Справа от меню «Пуск» находится кнопка проводника (обозначена цифрой 1). Приглядитесь к ней: она объемная, это говорит о том, что проводник запущен, а зеленый индикатор на кнопке сообщает, что выполняется какая-то операция (подсказка «закрывать его сейчас нельзя»). Это я запустил копирование, свернул окно, и могу контролировать процесс по индикатору.
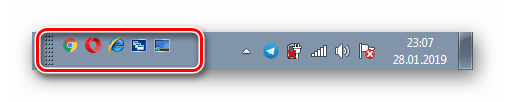
Второй и четвертый значок плоский, значит, эти программы не запущены, но закреплены на панели (чтобы можно было их быстро запустить, без поиска в меню «Пуск» или на рабочем столе).
Третья кнопка на панели задач не просто объемная, но и двойная. Это значит, что открыто два окна этой программы (браузера «Opera»). Если мы наведем курсором мышки на эту кнопку, то появится предпросмотр открытых окон (называются «панели миниатюр»):

Панель миниатюр появляется при наведении курсором мыши
Очень удобно, если у Вас открыто много документов, можно быстро выбрать необходимый.
Пятый значок объемный (программа запущена) и подсвечен, это говорит о том, что в этой программе появилось какое-то сообщение (результат выполнения операции или, может быть, ошибка).
А если нажать правой кнопкой…
Меню, которое появляется после нажатия правой кнопкой мыши на какой-либо элемент, называется «контекстное меню».
Запомните, нам еще пригодится не раз.
Так вот, если вы откроете контекстное меню любой кнопки программы на панели задач, то можете увидеть много полезных пунктов.
Контекстное меню кнопки на панели задач
Для разных программ это меню отличается, но есть похожие списки: «Часто используемые/посещаемые», «Последние документы», «Закрепленные».
Как закрепить программу на панели задач?
Закрепить программу очень просто:
- Запускаете программу (её значок сразу отображается на панели задач Windows 7/8);
- Нажимаете правой кнопкой мыши на значок программы;
- В появившемся меню выбираете пункт «Закрепить программу в панели задач»:

Теперь можете закрыть программу, её значок останется (вы можете его перетянуть кнопкой мыши, переместив между другими значками).
Если наоборот, Вам не нужна здесь программа, то выберите пункт «Изъять программу из панели задач»:

Легкое управление
Некоторые программы позволяют выполнять действия в свёрнутом виде с помощью панели задач Windows. Просто наведите мышью на кнопку программы и под панелью миниатюр появятся кнопки управления:

Кнопки управления функциями программы
Эту функцию имеют некоторые проигрыватели, Skype, QIP и другие программы.
Горячие клавиши для запуска программ
В начале этого урока вы видели картинку, на которой все кнопки пронумерованы. Так вот, если Вы нажмете сочетание клавиш «Win+1», то запустится программа, закрепленная первой после меню «Пуск»:

Горячие клавиши для запуска программ
Если Вы зажмете «Win+2», то запустится вторая программа и так далее. Очень удобно, попробуйте!
Если программа уже запущена, но свернута, то она развернется, а если развернута, то свернется. Таким образом, у нас есть еще один инструмент упрощения работы с программами, закрепленными на панели задач Windows.
Календарь и часы
Через панель задач Windows 7 и 8 можно быстро посмотреть календарь на текущий месяц, для этого просто нажмите на часы в области уведомления:

Календарь и часы
Удобное меню для папок на панели задач Windows
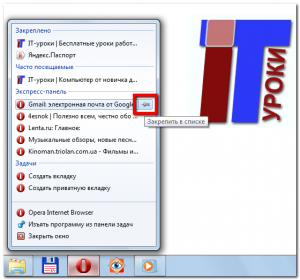
И на десерт, самое интересное (эксклюзивно от сайта IT-уроки)! Уже давно я пользуюсь вот такой удобной панелью:

Панель с меню для папки «Музыка»
Нажав на стрелочки можно открыть меню, в котором полный список содержимого папки с музыкой, запускать отсюда файлы, переименовывать их и т.д. В общем, очень удобно!

Раскрытое меню для папки «Музыка»
У меня часто спрашивают «как сделать такое меню?». На самом деле, сделать это просто:
- Нажимаете правой кнопкой мыши на панель задач Windows;
- Выбираете пункт «Панели»;
- В открывшемся подменю выбираете «Создать панель инструментов»

Создание панели с меню для папки
- Перед Вами откроется диалоговое окно, в котором останется выбрать нужную папку и нажать кнопку «Выбор папки».
Конечно же, так можно сделать с любой папкой: «Фото», «Видео», «Документы».
Если нужно убрать меню с панели задач, нажмите на ней правой кнопкой мыши, выберите пункт «Панели», в открывшемся меню найдите название Вашей папки, уберите с неё галочку.
Итого
Сегодня мы лучше узнали панель задач Windows 7 и Windows 8, научились её настраивать и добавлять меню для папки. Но это только самые важные моменты, которые нам пригодятся в следующем IT-уроке.
Чтобы не пропустить новые материалы сайта, подпишитесь на новости.
Мне интересно узнать, был ли этот урок интересным и полезным для Вас. Напишите в комментариях, продолжать ли серию таких уроков по базовой настройке Windows?
P.S. Тем временем продолжается конкурс под названием «1+1+1+»! Если Вы зарегистрированы в соц. сетях, то Вам будет интересно поучаствовать.
Копирование запрещено, но можно делиться ссылками:
Настройка панели задач windows 7
Панель задач обладает отличной функциональностью в Windows 7. Она имеет несколько очень интересных функций и улучшений, которые повышают работоспособность по сравнению с другими версиями. Поэтому актуально писать серии статей на подобного рода темы. Настройка панели задач windows 7, безусловна не должна остаться без внимания. Сейчас рассмотрим, как настраивается внешний вид, размер, расположение основных инструментов.
Как открыть окно “свойства панели задач”
Чтобы открыть данные настройки, нужно нажать правой кнопкой мыши на любом пустом месте панели задач и выбрать команду “свойства”.

Необходимые нам параметры располагаются в первой вкладки, которая называется “панель задач”. В следующих статьях рассмотрим все вкладки подробнее.

Как изменить внешний вид и расположение панели задач
Наборы настроек, в открывшемся окне, помогут изменить внешний вид и расположение. Таким образом, Вы сможите внести следующие изменения:
– Закрепить панель задач – если выбрана данная опция, то полоска меню пуск останется неподвижной. Вы не сможите переместить в другое место или изменить размеры.
– Автоматически скрывать панель задач – данная опция позволяет скрыть панель задач, когда вы ее не используете. Затем, когда наводите курсор в область ее расположения, она плавно всплывает.
– Использовать маленькие значки – если этот флажок установлен, то закрепленные значки выглядят помельче, что помогает сэкономить пространство рабочего стола.

– Положение панели задач на экране – параметры позволяющие определить расположение. Для этого кликните на выпадающее меню, как показано на изображении. Выберите позицию, какая больше нравится.

Есть другой способ перемещения. Щелкните левой кнопкой мыши на пустом месте полоски пуск, удерживая нажатой кнопку, переводим курсор в нужную сторону монитора. После того как перевели курсор, отпускаем кнопку и панель перемещается в нужную нам сторону. Если не получается перетащить, убедитесь, что опция “закрепить панель задач” отключена, снимите флажок и повторите попытку.
На самом деле настройка панели windows 7 не сложная в освоении. При правильном подходе, Вы с легкостью научитесь ей манипулировать.
– Кнопки панели задач – помогает определить внешний вид меток открытых приложений. Здесь присутствует три опции:
- Всегда группировать, скрывать метки – будут объединяться метки одного приложения и скрываться их названия. Применяется по умолчанию.
- Группировать при заполнении панели задач – объединяет в одной метки, в том случае если открыто несколько вкладок одного приложения. Эта настройка так же показывает названия открытых элементов.
- Не группировать – будет отображать все ярлыки отдельно и никогда не будет объединять метки одного и того же приложения как одну. Если у вас открыто 15 окон браузера google chrome, то они будут показаны отдельно. Если ярлыки занимают всю длину панели задач, то в правом углу Вы увидите стрелку, при нажатии на которую откроется новое рабочее пространство, с не влезшими метками. Когда панель задач заполнена, имена меток не показываются.

Настройка панели задач windows 7 позволяет изменять ее высоту. Чтобы изменить размер, наведите курсор мыши к краю до тех пор, пока не появится курсор, имеющий две стрелки (вверх и вниз). Зажмите кнопку мыши и задайте высоту, какую необходимо.
Примечание: изменять размер можно в том случае, если не включена опция “закрепить панель задач”.

Просмотр рабочего стола Aero Peek
Когда эта опция включена, вы можете переместить курсор на кнопку предварительного просмотра рабочего стола, после чего все открытые окна сделаются полупрозрачными. Это полезно, когда Вы хотите посмотреть гаджет или другую информацию на рабочем столе, не сворачивая открытые окна. Переместите курсор с кнопки, и все вернется на свои места.

Если функция является бесполезной для Вас, снимите флажок с “Использовать Aero Peek для предварительного просмотра рабочего стола”, и она отключится.

Если Вы кликните на кнопку предварительного просмотра рабочего стола, все открытые окна свернутся. Нажмете снова, и все окна будут показаны в исходном состоянии.
как добавить панели инструментов
Особенность, которая не является новой, но дает возможность добавления дополнительных инструментов. Чтобы добавить стандартные или пользовательские инструменты, щелкните правой кнопкой мыши по пустому месту на панели задач. В открывшемся меню перейдите к пункту “панели” и выберите опцию, которую желаете:
– Адрес – добавит адресную строку, в которую вводятся url сайтов. При вводе адреса, ссылка будет открыта браузером по умолчанию. Данную строку можно использовать для доступа к папки или файлу, но это не очень удобно. Проще ввести искомые элементы в поиске меню пуск.

– Ссылки – это добавляет урлы на ваши любимые сайты в Internet Explorer. Если по умолчанию используете другой браузер, то это довольно бесполезно. У меня на скриншоте видно, что значки opera. Это связано с недавним косяком. Любой браузер открывается в opera. Времени не было, чтобы это устранить, поэтому пришлось такой скрин сделать.

– Панель ввода планшетного ПК – создает кнопку, которую Вы можете использовать для быстрого запуска окна ввода планшетного ПК.

– Рабочий стол – добавит панель инструментов со всеми ярлыками рабочего стола.

– Создать панель инструментов – самый полезный вариант, поскольку позволяет добавлять пользовательские панели инструментов. Когда выберите этот параметр, появится новое окно. Перейдите к той папке, которую вы хотите использовать в качестве инструмента и нажмите “выбор папки”, после чего Вы получите быстрый доступ к выбранному элементу.

Еще можете увидеть такой элемент, как “языковая панель”, при нажатии на который привычная панель переключения языка переместится в отдельное место. Наведите курсор на языковую панель, зажмите левую кнопку и перетащите в любое место панели задач. После чего панель установится на прежнее место. Настройка панели задач windows 7 не отнимет у Вас много времени.
From Wikipedia, the free encyclopedia
A taskbar is an element of a graphical user interface which has various purposes. It typically shows which programs are currently running.
The specific design and layout of the taskbar varies between individual operating systems, but generally assumes the form of a strip located along one edge of the screen. On this strip are various icons which correspond to the windows open within a program. Clicking these icons allow the user to easily switch between programs or windows, with the currently active program or window usually appearing differently from the rest. In more recent versions of operating systems, users can also «pin» programs or files so that they can be accessed quickly, often with a single click. Due to its prominence on the screen, the taskbar usually also has a notification area, which uses interactive icons to display real-time information about the state of the computer system and some of the programs active on it.
With the rapid development of operating systems and graphical user interfaces in general, more OS-specific elements have become integrated into and become key elements of the taskbar.
Early implementations[edit]
Windows 1.0[edit]
Windows 1.0, released in 1985, features a horizontal bar located at the bottom of the screen where running programs reside when minimized (referred to as «iconization» at the time), represented by icons. A window can be minimized by double-clicking its title bar, dragging it onto an empty spot on the bar, or by issuing a command from one of its menus. A minimized window is restored by double-clicking its icon or dragging the icon out of the bar.
The bar features multiple slots for icons and expands vertically to provide the user with more rows as more slots are needed. Its color is the same as that of the screen background, which can be customized. Minimized windows can be freely placed in any of the empty slots. Program windows cannot overlap the bar unless maximized.
The Start button did not make an appearance in these early implementations of the taskbar, and would be introduced at a much later date with the release of Windows 95.
![]()
Appearance of the bar used for holding minimized windows in Windows 1.0
Arthur[edit]
Another early implementation can be seen in the Arthur operating system from Acorn Computers. It is called the icon bar[1] and remains an essential part of Arthur’s succeeding RISC OS operating system. The icon bar holds icons which represent mounted disc drives and RAM discs, running applications and system utilities. These icons have their own context-sensitive menus and support drag and drop behaviour.
![]()
Appearance of Acorn’s icon bar in 1987 under Arthur, after launching a number of devices and applications
Amiga[edit]
AmigaOS featured various third party implementations of the taskbar concept, and this inheritance is present also in its successors. For example, AmiDock, born as third-party utility, has then been integrated into AmigaOS 3.9 and AmigaOS 4.0.[2] The AROS operating system has its version of Amistart that is provided with the OS and free to be installed by users, while MorphOS has been equipped with a dock utility just like in AmigaOS or Mac OS X.
Microsoft Windows[edit]
The default settings for the taskbar in Microsoft Windows place it at the bottom of the screen and includes from left to right the Start menu button, Quick Launch bar, taskbar buttons, and notification area. The Quick Launch toolbar was added with the Windows Desktop Update and is not enabled by default in Windows XP. Windows 7 removed the Quick Launch feature in favor of pinning applications to the taskbar itself. On Windows 8 and Windows Server 2012, a hotspot located in the bottom-left corner of the screen replaced the Start button, although this change was reverted in Windows 8.1 and Windows Server 2012 R2.
The taskbar was originally developed as a feature of Windows 95, but it was based on a similar user interface feature called the tray that was developed as part of Microsoft’s Cairo project.[3][4][5]
With the release of Windows XP, Microsoft changed the behavior of the taskbar to take advantage of Fitts’s law by removing a border of pixels surrounding the Start button which did not activate the menu, allowing the menu to be activated by clicking directly in the corner of the screen.[6]
![]()
The first implementation of the modern Windows taskbar in Windows 95
![]()
A standard Windows XP taskbar with multiple tasks running. Note the Quick Launch toolbar, introduced in Windows 95 OSR 2.5. When the notification area is full, it can be expanded.
![]()
The taskbar in Windows Vista. The design is quite similar to Windows XP, but with a whole new Start button, Windows Aero, transparency on the taskbar, and more updated icons added to it.
![]()
The taskbar in Windows 7 hides application names in favor of large icons that can be «pinned» to the taskbar even when not running.
![]()
The taskbar in Windows 8. Note that the Start button is missing in this version of Windows (in favor of the Charms menu) and the Metro apps that are running are not shown in the taskbar.
![]()
The taskbar in Windows 8.1. The Start button has returned to this version of Windows, and Metro apps that are running are now shown by default on the taskbar.
![]()
The taskbar in Windows 10, in Desktop mode, on the RTM version (1507). The next major revision to the taskbar came in Windows 10, where icons for Search and Task View have been added. Also, the shortcut to Action Center is visible (the icon for Action Center has been moved to the right when the Windows Anniversary Update came along).
![]()
The taskbar in Windows 10, in tablet mode, on the RTM version (1507). The next major revision to the taskbar came in Windows 10, where icons for Search and Task View have been added. Also, the shortcut to Action Center is visible (the icon for Action Center has been moved to the right when the Windows Anniversary Update came along).
![]()
The taskbar in Windows 10, in Desktop mode, on version 22H2. New features got added to the taskbar like News and Interests, and Search spotlight and are shown by default on a clean install.
![]()
The taskbar in Windows 10, in Tablet (handheld) mode, on version 22H2.
![]()
The taskbar in Windows 11, in version 22H2, with the icons at the center by default.
![]()
The taskbar in Windows 11, in version 22H2, with the icons at the left.
Taskbar elements[edit]
- The Start button, a button that invokes the Start menu (or the Start screen in Windows 8.1). It appears in Windows 9x, Windows NT 4.0 and all its successors, except Windows 8 and Windows Server 2012.
- The Quick Launch bar, introduced on Windows 95 and Windows NT 4.0 through the Windows Desktop Update for Internet Explorer 4 and bundled with Windows 95 OSR 2.5 Windows 98, contains shortcuts to applications. Windows provides default entries, such as Launch Internet Explorer Browser, and the user or third-party software may add any further shortcuts that they choose. A single click on the application’s icon in this area launches the application. This section may not always be present: for example it is turned off by default in Windows XP and Windows 7.
- The Windows shell places a taskbar button on the taskbar whenever an application creates an unowned window: that is, a window that does not have a parent and that is created according to normal Windows user interface guidelines. Typically all Single Document Interface applications have a single taskbar button for each open window, although modal windows may also appear there.
- Windows 98 and Windows Desktop Update for Windows 95 introduced the ability to minimize foreground windows by clicking their button on the taskbar. They also introduced DeskBands (band objects).[7][8]
- Windows 2000 introduced balloon notifications.
- Windows Me added an option to disable moving or resizing the taskbar.
- Windows XP introduced taskbar grouping, which can group the taskbar buttons of several windows from the same application into a single button. This button pops up a menu listing all the grouped windows when clicked. This keeps the taskbar from being overcrowded when many windows are open at once.
- Windows Vista introduced window previews which show thumbnail views of the application in real-time. This capability is provided by the Desktop Window Manager. The Start menu tooltip no longer says «Click here to begin» but now says simply «Start».
- Windows 7 introduced jumplists which are menus that provide shortcuts to recently opened documents, frequently opened documents, folders paths (in case of Windows Explorer), or various options (called Tasks) which apply to that specific program or pinned website shortcut. Jump lists appear when the user right-clicks on an icon in the taskbar or drags the icon upwards with the mouse left click. Recent and frequent files and folders can be pinned inside the jump list.
- Windows 7 introduced the ability to pin applications to the taskbar so that buttons for launching them appear when they are not running. Previously, the Quick Launch was used to pin applications to the taskbar; however, running programs appeared as a separate button.
- Windows 7 removed several classic taskbar features.
- Deskbands are minimized functional, long-running programs, such as Windows Media Player. Programs that minimize to deskbands are not displayed in the taskbar.[9]
- The notification area is the portion of the taskbar that displays icons for system and program features that have no presence on the desktop as well as the time and the volume icon. It contains mainly icons that show status information, though some programs, such as Winamp, use it for minimized windows. By default, this is located in the bottom-right of the primary monitor (or bottom-left on languages of Windows that use right-to-left reading order), or at the bottom of the taskbar if docked vertically. The clock appears here, and applications can put icons in the notification area to indicate the status of an operation or to notify the user about an event. For example, an application might put a printer icon in the status area to show that a print job is under way, or a display driver application may provide quick access to various screen resolutions. The notification area is commonly referred to as the system tray, which Microsoft states is wrong,[10][11][12] although the term is sometimes used in Microsoft documentation,[13][14][15] articles,[16] software descriptions,[17] and even applications from Microsoft such as Bing Desktop. Raymond Chen suggests the confusion originated with systray.exe, a small application that controlled some icons within the notification area in Windows 95.[5] The notification area is also referred to as the status area by Microsoft.[18][19][20]
- In older versions of Windows the notification area icons were limited to 16 colors. Windows Me added support for high color notification area icons.
- Starting with Windows XP, the user can choose to always show or hide some icons, or hide them if inactive for some time. A button allows the user to reveal all the icons.
- Starting with Windows Vista, the taskbar notification area is split into two areas: one reserved for system icons including clock, volume, network and power; the other for applications.
- Since the Windows 95 Desktop Update, the Quick Launch bar featured Show desktop as one of its default shortcuts which automatically minimizes all opened applications, redundant with the Winkey-D key combination. On Windows 7, a dedicated Show desktop button was placed to the right of the notification area and could not be removed. With the «Peek» option enabled, hovering over the button hides all opened windows to expose the desktop (leaving outlines of them on-screen). On Windows 10, the «Show desktop» widget changed yet again, being reduced to a narrow iconless strip at the far right of the taskbar.
Customization[edit]
The Windows taskbar can be modified by users in several ways. The position of the taskbar can be changed to appear on any edge of the primary display (except in Windows 11, where the taskbar is permanently fixed at the bottom of the screen and cannot be moved to the top, left, or right side). Up to and including Windows Server 2008, the taskbar is constrained to single display, although third-party utilities such as UltraMon allow it to span multiple displays. When the taskbar is displayed vertically on versions of Windows prior to Windows Vista, the Start menu button will only display the text «Start» or translated equivalent if the taskbar is wide enough to show the full text.[21] However, the edge of the taskbar (in any position) can be dragged to control its height (width for a vertical taskbar); this is especially useful for a vertical taskbar to show window titles next to the window icons.
Users can resize the height (or width when displayed vertically) of the taskbar up to half of the display area. To avoid inadvertent resizing or repositioning of the taskbar, Windows XP and later lock the taskbar by default.[22][23] When unlocked, «grips» are displayed next to the movable elements which allow grabbing with the mouse to move and size. These grips slightly decrease amount of available space in the taskbar.
The taskbar as a whole can be hidden until the mouse pointer is moved to the display edge, or has keyboard focus. The Windows 7+ taskbar does not allow pinning any arbitrary folder to the taskbar, it gets pinned instead to the jumplist of a pinned Explorer shortcut, however third party utilities such as Winaero’s Taskbar Pinner can be used to pin any type of shortcut to the Taskbar.[24]
Desktop toolbars[edit]
Other toolbars, known as «Deskbands», may be added to the taskbar.[25] This feature, along with many other taskbar features is currently absent in Windows 11. Windows includes the following deskbands but does not display them by default (except the Quick Launch toolbar in certain versions and configurations).
- Address. Contains an address bar similar to that found in Internet Explorer. (not available in Windows XP SP3, due to legal restrictions).
- Windows Media Player. Optionally shown when the Windows Media Player is minimized.(Windows XP, Windows Vista)
- Links. Shortcuts to items located in the user’s Links folder. Usually shortcuts to internet sites.
- Tablet PC Input Panel. Contains a button to show the Tablet PC input panel for ink text entry.
- Desktop. Contains shortcuts to items contained on the user’s desktop. Since the taskbar is always shown, this provides easy access to desktop items without having to minimize applications.
- Quick Launch. Contains shortcuts to Internet Explorer, email applications and a link to display the desktop. Windows Vista adds a link to the Flip 3D feature.
- Language. Contains shortcuts to quickly change the desired language for the keyboard to follow.
In addition to deskbands, Windows supports «Application Desktop Toolbars» (also called «appbands») that supports creating additional toolbars that can dock to any side of the screen, and cannot be overlaid by other applications.[26]
Users can add additional toolbars that display the contents of folders. The display for toolbars that represent folder items (such as Links, Desktop and Quick Launch) can be changed to show large icons and the text for each item. Prior to Windows Vista, the Desktop Toolbars could be dragged off the taskbar and float independently, or docked to a display edge. Windows Vista greatly limited, but did not eliminate the ability to have desktop toolbar not attached to the taskbar.[27] Windows 7 has deprecated the use of Floating Deskbands altogether; they only appear pinned into the Taskbar.
- Upon opening the Taskbar properties on Windows 95 and Windows 98 whilst holding down the CTRL key, an extra tab for DeskBar Options is shown, but no part of it can be used. The DeskBar option was a feature that was never included within these versions of Windows.[28]
macOS[edit]
Classic Mac OS did not display a taskbar onscreen by default. Application switching prior to Mac OS 8.5 was done by clicking on an application’s window or via a pull-down menu at the right end of the menu bar. Prior to version 8.5 the menu’s title was the icon of the foreground application. Version 8.5 introduced the ability to optionally also display the application name and to «tear off» the menu by dragging the title with the mouse. The torn off menu was displayed as a palette. The palette window could be configured using AppleScript to appear much like a taskbar, with no title bar and fixed to one edge of the screen. No control panel was provided by Apple to access this functionality, but third-party developers quickly wrote applications that allowed users unfamiliar with AppleScript to customize their application palettes. Third party taskbars such as DragThing were a popular category of shareware on these systems.
The Dock, as featured in macOS and its predecessor NeXTSTEP, is also a kind of taskbar. The macOS Dock is application-oriented instead of window-oriented. Each running application is represented by one icon in the Dock regardless of how many windows it has on screen. A textual menu can be opened by right-clicking on the dock icon that gives access to an application’s windows. Mac OS X 10.2 added the ability for an application to add items of its own to this menu. Minimized windows also appear in the dock, in the rightmost section, represented by a real-time graphical thumbnail of the window’s contents. The trash can is also represented in the Dock, as a universal metaphor for deletion. For example, dragging selected text to the trash should remove the text from the document and create a clipping file in the trash.
The right side of macOS’s Menu bar also typically contains several notification widgets and quick access functions, called Menu extras.

Unix-like operating systems[edit]
KDE Plasma[edit]
In KDE Plasma 5, taskbar uses Widgets, called «Plasmoids», as elements in taskbar. In the update 5.20 (November 2020) they updated the taskbar to look more like Windows 10 by only displaying icons by default and grouping application windows together. [29]
![]()
The new taskbar of Plasma 5.20
GNOME[edit]
GNOME 2 used its own type of taskbar, known as panels (the program responsible for them is therefore called gnome-panel). By default, GNOME 2 usually contains two full-width panels at the top and bottom of the screen. The top panel usually contains navigation menus labeled Applications, Places, and System in that order. These menus hold links to common applications, areas of the file system, and system preferences and administration utilities, respectively.
![]()
Default top panel appearance from Ubuntu 6.10 to 8.04
![]()
Default bottom panel from Ubuntu 6.10 to 8.04
The top panel usually contains a clock and notification area, while the bottom panel contains buttons for navigating between virtual desktops, the window list proper, and a button which minimizes all windows (similarly to Windows’ Show desktop button). The contents of panels are handled by widgets called panel applets, which can consist of application shortcuts, search tools, or other tools. The contents of the panels can be moved, removed, or configured in other ways.
GNOME Shell Activities Overview which showcases the Dash
In GNOME 3, panels are replaced by GNOME Shell, which consists of a bar across the top of the screen with an Activities button on the left, a clock in the centre, and a notification area on the right. GNOME Shell does not contain a traditional taskbar; users can manage windows, virtual desktops, and launch applications from either a «Dash» on the side of the screen, or by searching from Activities Overview, which is displayed by clicking on the Activities button. GNOME 3.8 introduces Classic Mode, which re-implements certain aspects of GNOME 2’s desktop as an alternate desktop environment that can be selected at the login screen. [30]
Other Unix environments[edit]
These desktop environments provide their own implementation of a taskbar:
- Cinnamon
- MATE
- LXDE
- Xfce
- Trinity Desktop (based on KDE3’s Kicker)
Standalone window managers that provide an integrated taskbar include:
- Fluxbox
- FVWM95
- IceWM
- JWM
- qvwm
- WindowLab
- Window Maker
Programs that offer standalone taskbars for desktop environments or window managers without one include Avant Window Navigator, pypanel, fbpanel, perlpanel, tint2, and others.
References[edit]
- ^ Dan Ryan (13 April 2011). History of Computer Graphics: DLR Associates Series. AuthorHouse. p. 358. ISBN 978-1-4567-5115-9. Retrieved 13 June 2013.
- ^ Amiga Amidock Homepage
- ^ US patent 5825357, Malamud, Marceau, Grauman, Levien, Oran, Bolnick, Barnes, Johnson, Scott, «Continuously accessible computer system interface», issued 1998-10-20, assigned to Microsoft Corporation
- ^ Kent Sullivan (April 17, 1996). «The Windows 95 User Interface: A Case Study in Usability Engineering». CHI 96 Design Briefs. Archived from the original on October 22, 2008. Retrieved 2008-10-22.
- ^ a b Chen, Raymond (September 10, 2003). «Why do some people call the taskbar the «tray»?». The Old New Thing. Microsoft. Retrieved 2021-08-12.
{{cite web}}: CS1 maint: url-status (link) - ^ Harris, Jensen (August 22, 2006). «Giving You Fitts». Jensen Harris: An Office User Interface Blog. Microsoft. Retrieved 2008-01-14.
- ^ Creating Custom Explorer Bars, Tool Bands, and Desk Bands
- ^ The Next Windows: Windows 98
- ^ «Windows Vista Developer Center — The Windows desktop». Archived from the original on 2010-01-27. Retrieved 2008-05-27.
- ^ «How to remove items from the notification area in Windows 2000». November 1, 2006. Retrieved 2008-10-21.
- ^ «Microsoft Style Guide: System Tray». Retrieved 2020-02-10.
- ^ «Notification Area». Microsoft Developer Network. Archived from the original on 2010-01-27. Retrieved 2008-05-27.
- ^ «How To Manipulate Icons in the System Tray with Visual Basic». 2004-07-15. Retrieved 2009-01-23.
- ^ «How to use the System Tray directly from Visual Basic». 2006-09-26. Retrieved 2009-01-23.
- ^ «System Tray Icon Sample». Retrieved 2009-01-23.
- ^ «System Tray Balloon Tips and Freeing Resources Quickly in .NET». November 2002. Retrieved 2009-01-23.
- ^ «Microsoft Time Zone». Microsoft. 2004-10-20. Retrieved 2009-01-23.
- ^ «The Taskbar». Retrieved 2011-06-09.
- ^ «Shell_NotifyIcon Function». Retrieved 2011-06-09.
- ^ «How To Manipulate Icons in the System Tray with Visual Basic». Retrieved 2011-06-09.
- ^ Chen, Raymond (September 20, 2003). «When I dock my taskbar vertically, why does the word «Start» disappear?». The Old New Thing. Microsoft. Retrieved 2008-04-20.
- ^ «Differences with Windows XP Home Edition». Windows XP Resource Kit. Microsoft. November 3, 2005. Retrieved 2008-04-20.
- ^ «Cannot Move or Resize the Taskbar or Any Toolbars on the Taskbar (MSKB279774)». Knowledge Base. Microsoft. January 25, 2006. Retrieved 2008-04-20.
- ^ Taskbar Pinner
- ^ «Notification Area». Windows Vista User Experience Guidelines. Microsoft. Archived from the original on 2008-10-15. Retrieved 2008-04-20.
- ^ «Using Application Desktop Toolbars». Microsoft.
- ^ Create a shortcut toolbar on the desktop
- ^ DeskBar Options Tab in Taskbar Properties Is Not Functional
- ^ «Plasma 5.20: One absolutely massive release». KDE Community. 2020-10-13. Retrieved 2022-05-20.
- ^ «GNOME 3.8 Release Notes». help.gnome.org. Retrieved 2022-05-20.
From Wikipedia, the free encyclopedia
A taskbar is an element of a graphical user interface which has various purposes. It typically shows which programs are currently running.
The specific design and layout of the taskbar varies between individual operating systems, but generally assumes the form of a strip located along one edge of the screen. On this strip are various icons which correspond to the windows open within a program. Clicking these icons allow the user to easily switch between programs or windows, with the currently active program or window usually appearing differently from the rest. In more recent versions of operating systems, users can also «pin» programs or files so that they can be accessed quickly, often with a single click. Due to its prominence on the screen, the taskbar usually also has a notification area, which uses interactive icons to display real-time information about the state of the computer system and some of the programs active on it.
With the rapid development of operating systems and graphical user interfaces in general, more OS-specific elements have become integrated into and become key elements of the taskbar.
Early implementations[edit]
Windows 1.0[edit]
Windows 1.0, released in 1985, features a horizontal bar located at the bottom of the screen where running programs reside when minimized (referred to as «iconization» at the time), represented by icons. A window can be minimized by double-clicking its title bar, dragging it onto an empty spot on the bar, or by issuing a command from one of its menus. A minimized window is restored by double-clicking its icon or dragging the icon out of the bar.
The bar features multiple slots for icons and expands vertically to provide the user with more rows as more slots are needed. Its color is the same as that of the screen background, which can be customized. Minimized windows can be freely placed in any of the empty slots. Program windows cannot overlap the bar unless maximized.
The Start button did not make an appearance in these early implementations of the taskbar, and would be introduced at a much later date with the release of Windows 95.
![]()
Appearance of the bar used for holding minimized windows in Windows 1.0
Arthur[edit]
Another early implementation can be seen in the Arthur operating system from Acorn Computers. It is called the icon bar[1] and remains an essential part of Arthur’s succeeding RISC OS operating system. The icon bar holds icons which represent mounted disc drives and RAM discs, running applications and system utilities. These icons have their own context-sensitive menus and support drag and drop behaviour.
![]()
Appearance of Acorn’s icon bar in 1987 under Arthur, after launching a number of devices and applications
Amiga[edit]
AmigaOS featured various third party implementations of the taskbar concept, and this inheritance is present also in its successors. For example, AmiDock, born as third-party utility, has then been integrated into AmigaOS 3.9 and AmigaOS 4.0.[2] The AROS operating system has its version of Amistart that is provided with the OS and free to be installed by users, while MorphOS has been equipped with a dock utility just like in AmigaOS or Mac OS X.
Microsoft Windows[edit]
The default settings for the taskbar in Microsoft Windows place it at the bottom of the screen and includes from left to right the Start menu button, Quick Launch bar, taskbar buttons, and notification area. The Quick Launch toolbar was added with the Windows Desktop Update and is not enabled by default in Windows XP. Windows 7 removed the Quick Launch feature in favor of pinning applications to the taskbar itself. On Windows 8 and Windows Server 2012, a hotspot located in the bottom-left corner of the screen replaced the Start button, although this change was reverted in Windows 8.1 and Windows Server 2012 R2.
The taskbar was originally developed as a feature of Windows 95, but it was based on a similar user interface feature called the tray that was developed as part of Microsoft’s Cairo project.[3][4][5]
With the release of Windows XP, Microsoft changed the behavior of the taskbar to take advantage of Fitts’s law by removing a border of pixels surrounding the Start button which did not activate the menu, allowing the menu to be activated by clicking directly in the corner of the screen.[6]
![]()
The first implementation of the modern Windows taskbar in Windows 95
![]()
A standard Windows XP taskbar with multiple tasks running. Note the Quick Launch toolbar, introduced in Windows 95 OSR 2.5. When the notification area is full, it can be expanded.
![]()
The taskbar in Windows Vista. The design is quite similar to Windows XP, but with a whole new Start button, Windows Aero, transparency on the taskbar, and more updated icons added to it.
![]()
The taskbar in Windows 7 hides application names in favor of large icons that can be «pinned» to the taskbar even when not running.
![]()
The taskbar in Windows 8. Note that the Start button is missing in this version of Windows (in favor of the Charms menu) and the Metro apps that are running are not shown in the taskbar.
![]()
The taskbar in Windows 8.1. The Start button has returned to this version of Windows, and Metro apps that are running are now shown by default on the taskbar.
![]()
The taskbar in Windows 10, in Desktop mode, on the RTM version (1507). The next major revision to the taskbar came in Windows 10, where icons for Search and Task View have been added. Also, the shortcut to Action Center is visible (the icon for Action Center has been moved to the right when the Windows Anniversary Update came along).
![]()
The taskbar in Windows 10, in tablet mode, on the RTM version (1507). The next major revision to the taskbar came in Windows 10, where icons for Search and Task View have been added. Also, the shortcut to Action Center is visible (the icon for Action Center has been moved to the right when the Windows Anniversary Update came along).
![]()
The taskbar in Windows 10, in Desktop mode, on version 22H2. New features got added to the taskbar like News and Interests, and Search spotlight and are shown by default on a clean install.
![]()
The taskbar in Windows 10, in Tablet (handheld) mode, on version 22H2.
![]()
The taskbar in Windows 11, in version 22H2, with the icons at the center by default.
![]()
The taskbar in Windows 11, in version 22H2, with the icons at the left.
Taskbar elements[edit]
- The Start button, a button that invokes the Start menu (or the Start screen in Windows 8.1). It appears in Windows 9x, Windows NT 4.0 and all its successors, except Windows 8 and Windows Server 2012.
- The Quick Launch bar, introduced on Windows 95 and Windows NT 4.0 through the Windows Desktop Update for Internet Explorer 4 and bundled with Windows 95 OSR 2.5 Windows 98, contains shortcuts to applications. Windows provides default entries, such as Launch Internet Explorer Browser, and the user or third-party software may add any further shortcuts that they choose. A single click on the application’s icon in this area launches the application. This section may not always be present: for example it is turned off by default in Windows XP and Windows 7.
- The Windows shell places a taskbar button on the taskbar whenever an application creates an unowned window: that is, a window that does not have a parent and that is created according to normal Windows user interface guidelines. Typically all Single Document Interface applications have a single taskbar button for each open window, although modal windows may also appear there.
- Windows 98 and Windows Desktop Update for Windows 95 introduced the ability to minimize foreground windows by clicking their button on the taskbar. They also introduced DeskBands (band objects).[7][8]
- Windows 2000 introduced balloon notifications.
- Windows Me added an option to disable moving or resizing the taskbar.
- Windows XP introduced taskbar grouping, which can group the taskbar buttons of several windows from the same application into a single button. This button pops up a menu listing all the grouped windows when clicked. This keeps the taskbar from being overcrowded when many windows are open at once.
- Windows Vista introduced window previews which show thumbnail views of the application in real-time. This capability is provided by the Desktop Window Manager. The Start menu tooltip no longer says «Click here to begin» but now says simply «Start».
- Windows 7 introduced jumplists which are menus that provide shortcuts to recently opened documents, frequently opened documents, folders paths (in case of Windows Explorer), or various options (called Tasks) which apply to that specific program or pinned website shortcut. Jump lists appear when the user right-clicks on an icon in the taskbar or drags the icon upwards with the mouse left click. Recent and frequent files and folders can be pinned inside the jump list.
- Windows 7 introduced the ability to pin applications to the taskbar so that buttons for launching them appear when they are not running. Previously, the Quick Launch was used to pin applications to the taskbar; however, running programs appeared as a separate button.
- Windows 7 removed several classic taskbar features.
- Deskbands are minimized functional, long-running programs, such as Windows Media Player. Programs that minimize to deskbands are not displayed in the taskbar.[9]
- The notification area is the portion of the taskbar that displays icons for system and program features that have no presence on the desktop as well as the time and the volume icon. It contains mainly icons that show status information, though some programs, such as Winamp, use it for minimized windows. By default, this is located in the bottom-right of the primary monitor (or bottom-left on languages of Windows that use right-to-left reading order), or at the bottom of the taskbar if docked vertically. The clock appears here, and applications can put icons in the notification area to indicate the status of an operation or to notify the user about an event. For example, an application might put a printer icon in the status area to show that a print job is under way, or a display driver application may provide quick access to various screen resolutions. The notification area is commonly referred to as the system tray, which Microsoft states is wrong,[10][11][12] although the term is sometimes used in Microsoft documentation,[13][14][15] articles,[16] software descriptions,[17] and even applications from Microsoft such as Bing Desktop. Raymond Chen suggests the confusion originated with systray.exe, a small application that controlled some icons within the notification area in Windows 95.[5] The notification area is also referred to as the status area by Microsoft.[18][19][20]
- In older versions of Windows the notification area icons were limited to 16 colors. Windows Me added support for high color notification area icons.
- Starting with Windows XP, the user can choose to always show or hide some icons, or hide them if inactive for some time. A button allows the user to reveal all the icons.
- Starting with Windows Vista, the taskbar notification area is split into two areas: one reserved for system icons including clock, volume, network and power; the other for applications.
- Since the Windows 95 Desktop Update, the Quick Launch bar featured Show desktop as one of its default shortcuts which automatically minimizes all opened applications, redundant with the Winkey-D key combination. On Windows 7, a dedicated Show desktop button was placed to the right of the notification area and could not be removed. With the «Peek» option enabled, hovering over the button hides all opened windows to expose the desktop (leaving outlines of them on-screen). On Windows 10, the «Show desktop» widget changed yet again, being reduced to a narrow iconless strip at the far right of the taskbar.
Customization[edit]
The Windows taskbar can be modified by users in several ways. The position of the taskbar can be changed to appear on any edge of the primary display (except in Windows 11, where the taskbar is permanently fixed at the bottom of the screen and cannot be moved to the top, left, or right side). Up to and including Windows Server 2008, the taskbar is constrained to single display, although third-party utilities such as UltraMon allow it to span multiple displays. When the taskbar is displayed vertically on versions of Windows prior to Windows Vista, the Start menu button will only display the text «Start» or translated equivalent if the taskbar is wide enough to show the full text.[21] However, the edge of the taskbar (in any position) can be dragged to control its height (width for a vertical taskbar); this is especially useful for a vertical taskbar to show window titles next to the window icons.
Users can resize the height (or width when displayed vertically) of the taskbar up to half of the display area. To avoid inadvertent resizing or repositioning of the taskbar, Windows XP and later lock the taskbar by default.[22][23] When unlocked, «grips» are displayed next to the movable elements which allow grabbing with the mouse to move and size. These grips slightly decrease amount of available space in the taskbar.
The taskbar as a whole can be hidden until the mouse pointer is moved to the display edge, or has keyboard focus. The Windows 7+ taskbar does not allow pinning any arbitrary folder to the taskbar, it gets pinned instead to the jumplist of a pinned Explorer shortcut, however third party utilities such as Winaero’s Taskbar Pinner can be used to pin any type of shortcut to the Taskbar.[24]
Desktop toolbars[edit]
Other toolbars, known as «Deskbands», may be added to the taskbar.[25] This feature, along with many other taskbar features is currently absent in Windows 11. Windows includes the following deskbands but does not display them by default (except the Quick Launch toolbar in certain versions and configurations).
- Address. Contains an address bar similar to that found in Internet Explorer. (not available in Windows XP SP3, due to legal restrictions).
- Windows Media Player. Optionally shown when the Windows Media Player is minimized.(Windows XP, Windows Vista)
- Links. Shortcuts to items located in the user’s Links folder. Usually shortcuts to internet sites.
- Tablet PC Input Panel. Contains a button to show the Tablet PC input panel for ink text entry.
- Desktop. Contains shortcuts to items contained on the user’s desktop. Since the taskbar is always shown, this provides easy access to desktop items without having to minimize applications.
- Quick Launch. Contains shortcuts to Internet Explorer, email applications and a link to display the desktop. Windows Vista adds a link to the Flip 3D feature.
- Language. Contains shortcuts to quickly change the desired language for the keyboard to follow.
In addition to deskbands, Windows supports «Application Desktop Toolbars» (also called «appbands») that supports creating additional toolbars that can dock to any side of the screen, and cannot be overlaid by other applications.[26]
Users can add additional toolbars that display the contents of folders. The display for toolbars that represent folder items (such as Links, Desktop and Quick Launch) can be changed to show large icons and the text for each item. Prior to Windows Vista, the Desktop Toolbars could be dragged off the taskbar and float independently, or docked to a display edge. Windows Vista greatly limited, but did not eliminate the ability to have desktop toolbar not attached to the taskbar.[27] Windows 7 has deprecated the use of Floating Deskbands altogether; they only appear pinned into the Taskbar.
- Upon opening the Taskbar properties on Windows 95 and Windows 98 whilst holding down the CTRL key, an extra tab for DeskBar Options is shown, but no part of it can be used. The DeskBar option was a feature that was never included within these versions of Windows.[28]
macOS[edit]
Classic Mac OS did not display a taskbar onscreen by default. Application switching prior to Mac OS 8.5 was done by clicking on an application’s window or via a pull-down menu at the right end of the menu bar. Prior to version 8.5 the menu’s title was the icon of the foreground application. Version 8.5 introduced the ability to optionally also display the application name and to «tear off» the menu by dragging the title with the mouse. The torn off menu was displayed as a palette. The palette window could be configured using AppleScript to appear much like a taskbar, with no title bar and fixed to one edge of the screen. No control panel was provided by Apple to access this functionality, but third-party developers quickly wrote applications that allowed users unfamiliar with AppleScript to customize their application palettes. Third party taskbars such as DragThing were a popular category of shareware on these systems.
The Dock, as featured in macOS and its predecessor NeXTSTEP, is also a kind of taskbar. The macOS Dock is application-oriented instead of window-oriented. Each running application is represented by one icon in the Dock regardless of how many windows it has on screen. A textual menu can be opened by right-clicking on the dock icon that gives access to an application’s windows. Mac OS X 10.2 added the ability for an application to add items of its own to this menu. Minimized windows also appear in the dock, in the rightmost section, represented by a real-time graphical thumbnail of the window’s contents. The trash can is also represented in the Dock, as a universal metaphor for deletion. For example, dragging selected text to the trash should remove the text from the document and create a clipping file in the trash.
The right side of macOS’s Menu bar also typically contains several notification widgets and quick access functions, called Menu extras.
Unix-like operating systems[edit]
KDE Plasma[edit]
In KDE Plasma 5, taskbar uses Widgets, called «Plasmoids», as elements in taskbar. In the update 5.20 (November 2020) they updated the taskbar to look more like Windows 10 by only displaying icons by default and grouping application windows together. [29]
![]()
The new taskbar of Plasma 5.20
GNOME[edit]
GNOME 2 used its own type of taskbar, known as panels (the program responsible for them is therefore called gnome-panel). By default, GNOME 2 usually contains two full-width panels at the top and bottom of the screen. The top panel usually contains navigation menus labeled Applications, Places, and System in that order. These menus hold links to common applications, areas of the file system, and system preferences and administration utilities, respectively.
![]()
Default top panel appearance from Ubuntu 6.10 to 8.04
![]()
Default bottom panel from Ubuntu 6.10 to 8.04
The top panel usually contains a clock and notification area, while the bottom panel contains buttons for navigating between virtual desktops, the window list proper, and a button which minimizes all windows (similarly to Windows’ Show desktop button). The contents of panels are handled by widgets called panel applets, which can consist of application shortcuts, search tools, or other tools. The contents of the panels can be moved, removed, or configured in other ways.
GNOME Shell Activities Overview which showcases the Dash
In GNOME 3, panels are replaced by GNOME Shell, which consists of a bar across the top of the screen with an Activities button on the left, a clock in the centre, and a notification area on the right. GNOME Shell does not contain a traditional taskbar; users can manage windows, virtual desktops, and launch applications from either a «Dash» on the side of the screen, or by searching from Activities Overview, which is displayed by clicking on the Activities button. GNOME 3.8 introduces Classic Mode, which re-implements certain aspects of GNOME 2’s desktop as an alternate desktop environment that can be selected at the login screen. [30]
Other Unix environments[edit]
These desktop environments provide their own implementation of a taskbar:
- Cinnamon
- MATE
- LXDE
- Xfce
- Trinity Desktop (based on KDE3’s Kicker)
Standalone window managers that provide an integrated taskbar include:
- Fluxbox
- FVWM95
- IceWM
- JWM
- qvwm
- WindowLab
- Window Maker
Programs that offer standalone taskbars for desktop environments or window managers without one include Avant Window Navigator, pypanel, fbpanel, perlpanel, tint2, and others.
References[edit]
- ^ Dan Ryan (13 April 2011). History of Computer Graphics: DLR Associates Series. AuthorHouse. p. 358. ISBN 978-1-4567-5115-9. Retrieved 13 June 2013.
- ^ Amiga Amidock Homepage
- ^ US patent 5825357, Malamud, Marceau, Grauman, Levien, Oran, Bolnick, Barnes, Johnson, Scott, «Continuously accessible computer system interface», issued 1998-10-20, assigned to Microsoft Corporation
- ^ Kent Sullivan (April 17, 1996). «The Windows 95 User Interface: A Case Study in Usability Engineering». CHI 96 Design Briefs. Archived from the original on October 22, 2008. Retrieved 2008-10-22.
- ^ a b Chen, Raymond (September 10, 2003). «Why do some people call the taskbar the «tray»?». The Old New Thing. Microsoft. Retrieved 2021-08-12.
{{cite web}}: CS1 maint: url-status (link) - ^ Harris, Jensen (August 22, 2006). «Giving You Fitts». Jensen Harris: An Office User Interface Blog. Microsoft. Retrieved 2008-01-14.
- ^ Creating Custom Explorer Bars, Tool Bands, and Desk Bands
- ^ The Next Windows: Windows 98
- ^ «Windows Vista Developer Center — The Windows desktop». Archived from the original on 2010-01-27. Retrieved 2008-05-27.
- ^ «How to remove items from the notification area in Windows 2000». November 1, 2006. Retrieved 2008-10-21.
- ^ «Microsoft Style Guide: System Tray». Retrieved 2020-02-10.
- ^ «Notification Area». Microsoft Developer Network. Archived from the original on 2010-01-27. Retrieved 2008-05-27.
- ^ «How To Manipulate Icons in the System Tray with Visual Basic». 2004-07-15. Retrieved 2009-01-23.
- ^ «How to use the System Tray directly from Visual Basic». 2006-09-26. Retrieved 2009-01-23.
- ^ «System Tray Icon Sample». Retrieved 2009-01-23.
- ^ «System Tray Balloon Tips and Freeing Resources Quickly in .NET». November 2002. Retrieved 2009-01-23.
- ^ «Microsoft Time Zone». Microsoft. 2004-10-20. Retrieved 2009-01-23.
- ^ «The Taskbar». Retrieved 2011-06-09.
- ^ «Shell_NotifyIcon Function». Retrieved 2011-06-09.
- ^ «How To Manipulate Icons in the System Tray with Visual Basic». Retrieved 2011-06-09.
- ^ Chen, Raymond (September 20, 2003). «When I dock my taskbar vertically, why does the word «Start» disappear?». The Old New Thing. Microsoft. Retrieved 2008-04-20.
- ^ «Differences with Windows XP Home Edition». Windows XP Resource Kit. Microsoft. November 3, 2005. Retrieved 2008-04-20.
- ^ «Cannot Move or Resize the Taskbar or Any Toolbars on the Taskbar (MSKB279774)». Knowledge Base. Microsoft. January 25, 2006. Retrieved 2008-04-20.
- ^ Taskbar Pinner
- ^ «Notification Area». Windows Vista User Experience Guidelines. Microsoft. Archived from the original on 2008-10-15. Retrieved 2008-04-20.
- ^ «Using Application Desktop Toolbars». Microsoft.
- ^ Create a shortcut toolbar on the desktop
- ^ DeskBar Options Tab in Taskbar Properties Is Not Functional
- ^ «Plasma 5.20: One absolutely massive release». KDE Community. 2020-10-13. Retrieved 2022-05-20.
- ^ «GNOME 3.8 Release Notes». help.gnome.org. Retrieved 2022-05-20.
2.4.7. Панель инструментов
Под панелью меню расположена панель инструментов (кнопок). Панели в Windows XP, Windows Vista и Windows 7 отличаются друг от друга, поэтому мы их будем рассматривать отдельно.
Панель инструментов Проводника в Windows XP
Назад. Вернуться на предыдущую страницу.

Вперед. Перейти на следующую страницу. Обратите внимание на значок стрелки, направленной вниз. Если щелкнуть на нем мышью, откроется список папок, которые вы посещали. Вы можете выбрать нужную папку и перейти в нее. Аналогично можно перейти в нужную папку, открыв меню под кнопкой Назад.

Вверх (на один уровень).

Поиск. При нажатии данной кнопки открывается окно, в котором можно ввести имя потерянного файла, и система найдет его. В Windows XP есть специальный помощник, который спросит, что вы хотите найти. Подробнее о поиске файлов и папок рассказано в разд. 2.4.8.

Папки.

При нажатии данной кнопки откроется окно Проводника, позволяющее перемещаться по дискам и папкам компьютера с помощью панели в левой части экрана (см. рис. 2.10).
Вид. Нажав эту кнопку, вы вызовете выпадающее меню, с помощью которого можно выбрать тип отображения папок и файлов — плитка, значки, список, таблица или эскизы страниц.

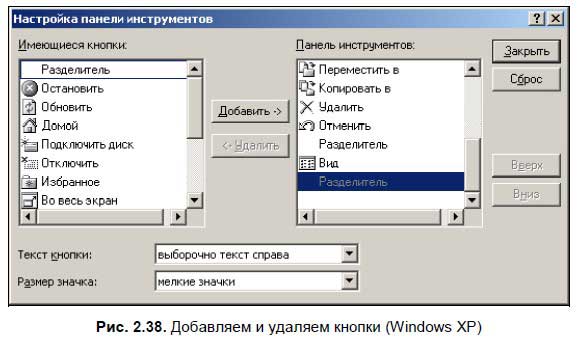
При желании внешний вид панели кнопок можно настроить по вашему вкусу — добавить или удалить кнопки. Для этого щелкните правой кнопкой мыши на панели кнопок — откроется меню, позволяющее добавлять или удалять кнопки (рис. 2.38).
Панель инструментов Проводника в Windows Vista
В Windows Vista панель кнопок была существенно переработана (см. рис. 2.8) — добавлены новые кнопки, переименованы старые. В зависимости от выбранной папки и файлов, находящихся в ней, на панели могут быть разные кнопки. С их помощью вы можете выполнять некоторые операции с файлами, изменять внешний вид значков и записывать файлы и папки на жесткий диск или оптические диски.
Рассмотрим панель инструментов подробнее.
? Упорядочить:

При нажатии этой кнопки открывается меню, с помощью которого вы можете выполнять операции с файлами (рис. 2.39).
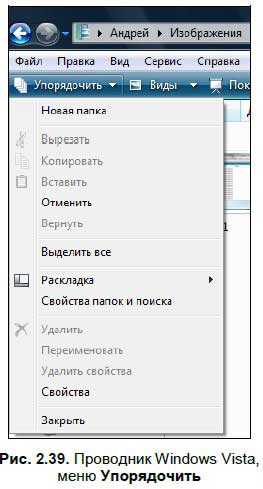
Здесь находятся следующие опции:
• Новая папка — при выборе этого пункта создается новая папка;
• Вырезать. Перемещение выбранных папок и файлов в другую папку или на другой жесткий диск. После перемещения они не будут доступны в исходной папке;
• Копировать — копирование файлов или папок в буфер обмена. Затем вы можете разместить файлы или папки в другой папке;
• Вставить. С помощью данной опции осуществляется копирование или перемещение файлов и папок. Выберите файл или папку, а затем одну из двух опций (вырезать или копировать). Когда файлы доступны в буфере обмена, выберите папку, в которую вы будете их копировать или перемещать, и нажмите Вставить.
• Отменить — отменить перемещение или копирование файла. Когда вы скопировали или переместили файл, вы можете вернуть его в исходную папку, выбрав его и выбрав в меню данную опцию;
• Вернуть — эта опция не что иное, как «отмена отмены». Если вы отменили копирование или перемещение, но потом все-таки решили переместить (или скопировать) файл или папку в эту директорию, то выберите опцию Вернуть;
• Выделить все. С помощью данной опции, вы можете выделить все файлы и папки на диске. Также все файлы и папки можно выделять с помощью сочетания клавиш <Ctrl>+<A>;
• Раскладка. С помощью данного меню можно установить отображение панелей в Проводнике. Здесь еще советую установить опцию Строка меню, добавляющую классическую панель опций в Проводнике;
• Свойства папок и поиска. При выборе данной опции открывается знакомое окно Свойства папки (см. рис. 2.33). Здесь вы можете настроить вид папки и параметры поиска;
• Удалить. Удаление выбранных файла или папки;
• Переименовать. Переименование файла или папки;
• Удалить свойства. Удаление свойств файла или папки;
• Свойства. Выбор данной опции вызывает окно свойств файла. Здесь находится общая информация о файле, и здесь вы можете изменить информацию о файле и папке;
• Закрыть. Закрыть окно Проводника.
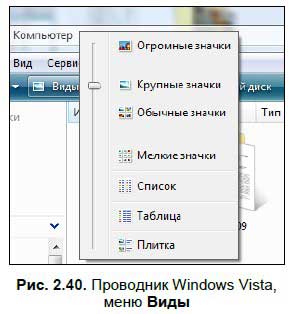
? Виды.

При нажатии этой кнопки открывается меню (рис. 2.40), с помощью которого вы можете установить отображение файлов и папок. Перетащите ползунок на любой из вариантов и посмотрите, как будут выглядеть файлы и папки. Файлы и папки можно отображать в виде крупных, мелких и средних значков, списка, таблицы и плитки.
Следующие кнопки различаются в зависимости от того, что вы просматриваете в данный момент в Проводнике и какие файлы у вас выбраны. Например, если у вас открыта папка Мой компьютер со списком дисков, то вы увидите кнопки: Свойства системы, Удалить или изменить программу, Подключить сетевой диск и Открыть панель управления. Когда вы откроете один из дисков компьютера, то будут доступны кнопки Упорядочить, Виды и Запись на оптический диск. При выборе папки станут доступны кнопки Проводник и Разрешить общий доступ.
При выборе файла могут появляться различные дополнительные кнопки, с помощью которых можно просмотреть или запустить файл — это зависит от его типа. Например, если вы выберете текстовой документ, появится кнопка Открыть, нажав которую вы сможете открыть документ. Если это музыкальный файл, то вместо кнопки Открыть, будет отображаться кнопка Воспроизвести. При ее нажатии запустится программа воспроизведения, и вы сможете прослушать выбранный файл. Программу, необходимую для работы с файлом, Windows определит самостоятельно.
Рассмотрим наиболее используемые кнопки подробнее.
? Свойства системы.

При нажатии этой кнопки открывается окно свойств системы, в котором отображается сводная информация о вашем компьютере — процессор, оперативная память и т. д.
? Удалить или изменить программу.

При нажатии этой кнопки открывается окно Программы и компоненты, с помощью которого можно устанавливать и удалять программы на компьютере. Более подробно об установке и удалении программ рассказано в разд. «Установка и удаление программ» данной главы.
? Подключить сетевой диск.

При нажатии данной кнопки открывается одноименное окно (рис. 2.32). Подробно о подключении сетевых дисков рассказано в разд. 2.4.5.
? Открыть панель управления.

При нажатии данной кнопки открывается панель управления. Более подробно о панели управления рассказано в разд. 2.6.7.
? Запись на оптический диск — нажатие данной кнопки вызывает мастер записи файла на CD или DVD. Выберите файл или папку, которые необходимо записать, и нажмите эту кнопку для запуска мастера. Данная опция доступна только в режиме просмотра одного из дисков компьютера.
? Показ слайдов.

Данная кнопка может появиться при просмотре папки с изображениями. Нажмите кнопку, чтобы просмотреть изображения в виде слайдов.
? Разрешить общий доступ.

Открытие общего доступа к папке всех пользователей. Данная опция доступна только в режиме просмотра одного из дисков компьютера.
? Электронная почта.

С помощью данной кнопки вы можете отправить выбранные файлы по электронной почте. Выберите один или несколько файлов и нажмите эту кнопку. Запустится окно создания сообщения программы Почта Windows. Выбранные файлы уже будут размещены во вложении к письму. Более подробно о программе Почта Windows рассказано в главе 7, о создании электронного почтового сообщения — в разд. 7.4.
? Открыть.

Нажатие этой кнопки открывает выбранную папку, после чего вы можете работать с ее содержимым. Вы можете выбрать несколько папок, тогда при нажатии этой кнопки содержимое каждой папки откроется в новом окне Проводника.
Панель инструментов Проводника в Windows 7
В Windows 7 в панель Проводника внесено несколько изменений — убраны некоторые пункты, кое-что добавилось. Как и в Windows XP/Vista в зависимости от того, что выбрано в Проводнике (жесткий диск, папка и т. д.), различаются и кнопки.
Теперь рассмотрим эту панель подробнее.
? Упорядочить — повторение одноименного меню опций в Windows Vista. В данном меню содержится набор опций, с помощью которых вы можете выполнять операции с файлами (вырезать, копировать, вставлять и т. д.), а также добавить меню опций Проводника (по умолчанию оно, как и в Vista, отключено). Чтобы включить меню опций, откройте меню Представление (в Vista она называется Раскладка) и установите флажок Строка меню.
? Свойства — данная опция доступна, если вы открыли папку Компьютер и выбрали какой-либо диск или устройство (чтобы выбрать, нужно щелкнуть один раз на значке раздела жесткого диска или дискового привода). С помощью данной опции можно посмотреть информацию об устройстве, например объем раздела жесткого диска и сколько на нем свободного и занятого пространства.
? Свойства системы — повтор одноименного меню в Windows Vista. При его выборе откроется окно с информацией о вашем выпуске Windows 7, а также имя компьютера, рабочей группы в локальной сети и прочая общая информация.
? Удалить или изменить программу — при нажатии этой кнопки открывается окно Программы и компоненты в панели управления. Подробнее об этом рассказано в разд. «Установка и удаление программ» данной главы.
? Подключить сетевой диск — откроется окно подключения сетевого диска. Подробнее об этом рассказано в разд. 2.4.5.
? Открыть панель управления — открывает панель управления. Подробнее о панели управления рассказано в разд. 2.6.7.
? Создать библиотеку — нововведение Windows 7. Теперь вы можете добавлять определенные папки и разделы жесткого диска в библиотеку. По умолчанию создано четыре раздела библиотеки — Видео, Документы, Изображения и Музыка. Чтобы добавить папку в библиотеку, выберите папку, щелкнув на ней мышью один раз, потом выберите Добавить в библиотеку, а затем в выпадающем меню нужно выбрать, в какую библиотеку вы хотите добавить папку. Также вы можете создать новую библиотеку — для этого в меню выберите соответствующий пункт. В дальнейшем вы сможете обращаться к добавленной папке через специальную папку Библиотека.
? Общий доступ — открытие общего доступа к папкам. Если ваш компьютер подключен к локальной сети (компании, предоставляющей вам доступ в Интернет, или домашней), то вы можете открывать папки для других пользователей. Открывать папку можно как на чтение, когда пользователи могут только просматривать файлы и копировать их на свой компьютер, так и на запись. В последнем случае удаленный пользователь может удалять файлы в открытой папке и добавлять в папку собственные файлы.
? Записать на оптический диск — повтор одноименного меню Windows Vista. Вы можете записать выбранные файлы и папки на CD- или DVD-диск.
? Изменить представление — аналог кнопки Виды в Windows Vista. С ее помощью вы можете изменить отображение значков в Проводнике. Значки могут быть крупными, средними или мелкими и отображаться в виде списка или таблицы.
? Показать область предварительного просмотра — при нажатии этой кнопки в рабочем пространстве проводника появится еще одна дополнительная область, в которой можно просмотреть выбранный файл (рис. 2.41). Обычно в области предварительного просмотра открываются не все файлы, а только графические и текстовые файлы.
? Вызов справки — вызов окна справки.
Данный текст является ознакомительным фрагментом.
Читайте также
Панель инструментов
Панель инструментов
Но для того чтобы начать фильтровать документы, необходимо начать их создавать. Давайте этим и займемся. Нажимаем кнопку «Новый» и в выпадающем меню выбираем пункт «Документ». Браузер открывает новое окно (или закладку – в зависимости от настроек
Панель инструментов
Панель инструментов
Настройка панели инструментовЕсли щелкнуть правой кнопкой мыши на панели инструментов, то появлятся всплывающее меню, содержащее пункт Настройка, который позволяет настраивать панель инструментов. Чтобы скрыть этот пункт, создайте параметр типа
Панель инструментов
Панель инструментов
Чаще всего вы будете пользоваться панелью инструментов. На данной панели расположены кнопки, нажимая которые, выбирают тот или иной инструмент. В процессе работы вам придется выделять отдельные фрагменты, рисовать, имитируя мазки кисти или линии от
Глава 4 Панель инструментов
Глава 4 Панель инструментов
Инструменты – важнейшая часть интерфейса CorelDRAW. Что бы вы ни делали в окне документа, вы делаете это с помощью какого-либо инструмента. При этом контекстно зависимая панель свойств инструмента (обычно она расположена в верхней части окна
Панель инструментов
Панель инструментов
Включить/выключить опцию выбора элемента одиночным кликом
.Убрать выбранный фрагмент
.Левый циклический сдвиг слов в выбранном фрагменте
.Поменять местами элементы Автор Книги и Название Книги
.Сделать все буквы элемента Автор Книги
Стандартная панель инструментов
Стандартная панель инструментов
Стандартная панель Standard показана на рис. 2.5.
Рис. 2.5. Стандартная панель инструментовОна содержит следующие инструменты:
Qnew – создание нового файла рисунка;
Open… CTRL+0 – загрузка существующего файла;
Save CTRL+S – сохранение текущего
Горизонтальная панель инструментов
Горизонтальная панель инструментов
В режиме конструирования эта панель содержит команды управления документом, масштабирования и кнопки отдельных режимов отображения данных проекта.• Новый проект
– запуск создания нового проекта. Если в системе на момент
Вертикальная панель инструментов
Вертикальная панель инструментов
В отличие от горизонтальной панели, состав вертикальной существенно отличается для режимов проектирования и дизайна. Рассмотрим команды, которые доступны в режиме конструирования. Это именно рассмотрение, а не изучение команд. Узнать
Панель инструментов
Панель инструментов
Включить/выключить опцию выбора элемента одиночным кликом
.
Убрать выбранный фрагмент
.
Левый циклический сдвиг слов в выбранном фрагменте
.
Поменять местами элементы Автор Книги и Название Книги
.
Сделать все буквы элемента Автор Книги
Горизонтальная панель инструментов
Горизонтальная панель инструментов
В режиме конструирования эта панель содержит команды управления документом, масштабирования, а также кнопки-флажки отдельных режимов отображения данных проекта.• Новый проект
– запуск создания нового проекта. Если в системе на
Стандартная панель инструментов
Стандартная панель инструментов
Стандартная панель Standard показана на рис. 2.2.
Рис. 2.2. Стандартная панель инструментовОна содержит следующие инструменты:
QNew – создание нового файла рисунка;
Open… (Ctrl+О) – загрузка существующего файла;
Save (Ctrl+S) – сохранение текущего
Панель инструментов
Панель инструментов
Включить/выключить опцию выбора элемента одиночным кликом.
Убрать выбранный фрагмент.
Левый циклический сдвиг слов в выбранном фрагменте.
Поменять местами элементы Автор Книги и Название Книги.
Сделать все буквы элемента Автор Книги
2.4.7. Панель инструментов
2.4.7. Панель инструментов
Под панелью меню расположена панель инструментов (кнопок). Панели в Windows XP, Windows Vista и Windows 7 отличаются друг от друга, поэтому мы их будем рассматривать отдельно.Панель инструментов Проводника в Windows XPНазад. Вернуться на предыдущую страницу.
Вперед.
Панель инструментов
Панель инструментов
Как и предыдущие версии, Windows Vista позволяет использовать разные панели инструментов. Пользователь может показывать фиксированные панели управления, увидеть которые можно на вкладке Панели инструментов (рис. 7.20).
Рис. 7.20. Настройка панели
Панель инструментов
Панель инструментов
Панель инструментов любой программы служит для удобной работы с этой программой. А для этого нужно настроить панель под себя. Для настройки панели Outlook Express служит команда Контекстное меню панели инструментов ? Настройка (рис. 5.22).
Рис. 5.22. Настройка
Панель инструментов окна
Панель инструментов окна
Панель инструментов – это расположенная в верхней части окна панель в виде кнопок. Некоторые программы имеют несколько панелей инструментов. Панель инструментов, которую вы можете увидеть в окне Мой компьютер, чаще других встречается в Windows XP.