4
Confused about one thing. So does running the docker engine on windows server 2012 work? Or is it just that the container OS needs to be 2016 or Nano?
So docker engine on 2012, running a container with 2016/Nano
- windows
- docker
asked May 11, 2017 at 13:35
![]()
user1340582user1340582
18.8k35 gold badges111 silver badges167 bronze badges
Add a comment
|
1 Answer
Sorted by:
Reset to default
10
From https://forums.docker.com/t/windows-server-2012-r2/24267 :
«No, Windows Server 2016 is required for running native Windows containers. The kernel containerization primitives are only available starting with WS 2016.»
answered May 11, 2017 at 13:37
![]()
Ricardo PortugalRicardo Portugal
3191 silver badge5 bronze badges
Add a comment
|
Your Answer
Sign up or log in
Sign up using Google
Sign up using Facebook
Sign up using Email and Password
Post as a guest
Name
Required, but never shown
By clicking “Post Your Answer”, you agree to our terms of service, privacy policy and cookie policy
Not the answer you’re looking for? Browse other questions tagged
- windows
- docker
or ask your own question.
Not the answer you’re looking for? Browse other questions tagged
- windows
- docker
or ask your own question.
Estimated reading time:
8 minutes
Docker Engine — Enterprise enables native Docker containers on Windows Server.
Windows Server 2016 and later versions are supported. The Docker Engine —
Enterprise installation package includes everything you need to run Docker on
Windows Server. This topic describes pre-install considerations, and how to
download and install Docker Engine — Enterprise.
Release notes
Release notes for all versions
System requirements
Windows OS requirements around specific CPU and RAM requirements also need to be
met as specified in the Windows Server
Requirements.
This provides information for specific CPU and memory specs and capabilities
(instruction sets like CMPXCHG16b, LAHF/SAHF, and PrefetchW, security: DEP/NX,
etc.).
- OS Versions:
- Long Term Service Channel (LTSC) — 2016 and 2019 (Core and GUI)
- Semi-annual Channel (SAC) — 1709, 1803 and 1809
- RAM: 4GB
- Disk space: 32 GB minimum recommendation for Windows.
Docker recommends an additional 32 GB of space for base images for ServerCore
and NanoServer along with buffer space for workload containers running IIS,
SQL Server and .Net apps.
Install Docker Engine — Enterprise
To install the Docker Engine — Enterprise on your hosts, Docker provides a
OneGet PowerShell Module.
-
Open an elevated PowerShell command prompt, and type the following commands.
Install-Module DockerMsftProvider -Force Install-Package Docker -ProviderName DockerMsftProvider -Force -
Check if a reboot is required, and if yes, restart your instance.
(Install-WindowsFeature Containers).RestartNeededIf the output of this command is Yes, then restart the server with:
-
Test your Docker Engine — Enterprise installation by running the
hello-worldcontainer.Windows Server 2019
docker run hello-world:nanoserverWindows Server 2016
docker run hello-world:nanoserver-sac2016The container starts, prints the hello message, and then exits.
Unable to find image 'hello-world:nanoserver' locally
nanoserver: Pulling from library/hello-world
bce2fbc256ea: Pull complete
3ac17e2e6106: Pull complete
8cac44e17f16: Pull complete
5e160e4d8db3: Pull complete
Digest: sha256:25eac12ba40f7591969085ab3fb9772e8a4307553c14ea72d0e6f98b2c8ced9d
Status: Downloaded newer image for hello-world:nanoserver

Hello from Docker!
This message shows that your installation appears to be working correctly.
(optional) Make sure you have all required updates
Some advanced Docker features, such as swarm mode, require the fixes included in
KB4015217
(or a later cumulative patch).
Select option 6) Download and Install Updates.
FIPS 140-2 cryptographic module support
Federal Information Processing Standards (FIPS) Publication
140-2
is a United States Federal security requirement for cryptographic modules.
With Docker Engine — Enterprise Basic license for versions 18.09 and later,
Docker provides FIPS 140-2 support in Windows Server. This includes a FIPS
supported cryptographic module. If the Windows implementation already has FIPS
support enabled, FIPS is automatically enabled in the Docker engine.
Note: FIPS 140-2 is only supported in the Docker Engine — Enterprise
engine. UCP and DTR currently do not have support for FIPS 140-2.
To enable FIPS 140-2 compliance on a system that is not in FIPS 140-2 mode,
execute the following command in PowerShell:
[System.Environment]::SetEnvironmentVariable("DOCKER_FIPS", "1", "Machine")
FIPS 140-2 mode may also be enabled via the Windows Registry. To update the
pertinent registry key, execute the following PowerShell command as an
Administrator:
Set-ItemProperty -Path "HKLM:SystemCurrentControlSetControlLsaFipsAlgorithmPolicy" -Name "Enabled" -Value "1"
Restart the Docker service by running the following command.
net stop docker
net start docker
To confirm Docker is running with FIPS-140-2 enabled, run the docker info command:
Labels:
 com.docker.security.fips=enabled
Note: If the system has the FIPS-140-2 cryptographic module installed on
the operating system, it is possible to disable FIPS-140-2 compliance. To
disable FIPS-140-2 in Docker but not the operating system, set the value
"DOCKER_FIPS","0"in the[System.Environment].`
Use a script to install Docker Engine — Enterprise
Use the following guide if you wanted to install the Docker Engine — Enterprise
manually, via a script, or on air-gapped systems.
-
In a PowerShell command prompt, download the installer archive on a machine
that has a connection.# On an online machine, download the zip file. Invoke-WebRequest -UseBasicParsing -OutFile docker-19.03.5.zip https://download.docker.com/components/engine/windows-server/19.03/docker-19.03.5.zipIf you need to download a specific Docker Engine — Enterprise Engine
release, all URLs can be found on this JSON index -
Copy the zip file to the machine where you want to install Docker. In a
PowerShell command prompt, use the following commands to extract the archive,
register, and start the Docker service.# Stop Docker service Stop-Service docker # Extract the archive. Expand-Archive docker-19.03.5.zip -DestinationPath $Env:ProgramFiles -Force # Clean up the zip file. Remove-Item -Force docker-19.03.5.zip # Install Docker. This requires rebooting. $null = Install-WindowsFeature containers # Add Docker to the path for the current session. $env:path += ";$env:ProgramFilesdocker" # Optionally, modify PATH to persist across sessions. $newPath = "$env:ProgramFilesdocker;" + [Environment]::GetEnvironmentVariable("PATH", [EnvironmentVariableTarget]::Machine) [Environment]::SetEnvironmentVariable("PATH", $newPath, [EnvironmentVariableTarget]::Machine) # Register the Docker daemon as a service. dockerd --register-service # Start the Docker service. Start-Service docker -
Test your Docker Engine — Enterprise installation by running the
hello-worldcontainer.Windows Server 2019
docker container run hello-world:nanoserverWindows Server 2016
docker container run hello-world:nanoserver-sac2016
Install a specific version
To install a specific version, use the RequiredVersion flag:
Install-Package -Name docker -ProviderName DockerMsftProvider -Force -RequiredVersion 19.03
...
Name                      Version               Source           Summary
----                      -------               ------           -------
Docker                    19.03                 Docker           Contains Docker Engine - Enterprise for use with Windows Server...
Updating the DockerMsftProvider
Installing specific Docker Engine — Enterprise versions may require an update to
previously installed DockerMsftProvider modules. To update:
Update-Module DockerMsftProvider
Then open a new PowerShell session for the update to take effect.
Update Docker Engine — Enterprise
To update Docker Engine — Enterprise to the most recent release, specify the
-RequiredVersion and -Update flags:
Install-Package -Name docker -ProviderName DockerMsftProvider -RequiredVersion 19.03 -Update -Force
The required version number must match a version available on the JSON
index
Uninstall Docker Engine — Enterprise
Use the following commands to completely remove the Docker Engine — Enterprise
from a Windows Server:
-
Leave any active Docker Swarm.
docker swarm leave --force -
Remove all running and stopped containers.
docker rm -f $(docker ps --all --quiet) -
Prune container data.
docker system prune --all --volumes -
Uninstall Docker PowerShell Package and Module.
Uninstall-Package -Name docker -ProviderName DockerMsftProvider Uninstall-Module -Name DockerMsftProvider -
Clean up Windows Networking and file system.
 Get-HNSNetwork | Remove-HNSNetwork
 Remove-Item -Path "C:ProgramDataDocker" -Recurse -Force
Preparing a Windows Host for use with UCP
To add a Windows Server host to an existing Universal Control Plane cluster
please follow the list of prerequisites and joining
instructions.
About Docker Engine — Enterprise containers and Windows Server
Looking for information on using Docker Engine — Enterprise containers?
-
Getting Started with Windows Containers (Lab)
provides a tutorial on how to set up and run Windows containers on Windows 10
or Windows Server 2016. It shows you how to use a MusicStore application with
Windows containers. -
Docker Container Platform for Windows Server articles and blog
posts on the Docker website.
Where to go next
-
Getting started provides an overview of
Docker Desktop for Windows, basic Docker command examples, how to get help or
give feedback, and links to all topics in the Docker Desktop for Windows guide. -
FAQs provides answers to frequently asked
questions. -
Release Notes lists component
updates, new features, and improvements associated with Stable and Edge
releases. -
Learn Docker provides general Docker tutorials.
-
Windows Containers on Windows Server
is the official Microsoft documentation.
Windows, Windows Server, install, download, ucp, Docker Engine — Enterprise
My environment: Windows Server 2012 R2. Slightly different steps may be required with other
versions of Windows.
Pretty straightforward, the only tricky parts here are about Hyper-V and finding out the IP
address of the VM.
With regards to the latter there is a lot of misleading information on the web.
1. Make sure Hyper-V is not running.
If it does, it will prevernt the VirtualBox VM to start and you will get mysterious errors.
Same goes if you use VMWare or any other hypervisor other than VirtualBox.
If you do need to have both Hyper-V and VirtualBox, Scott Hanselman wrote about some voodoo magic
you can do to easily switch between the two. I haven’t tried it.
2. Download and install Docker for Windows.
-
Download and install Boot2Docker from here: https://github.com/boot2docker/windows-installer/releases/latest
-
Install everthing
-
Tick “yes I trust that thing” when asked to install network driver. It’s required by VirtualBox.
-
You should have two icons added to the desktop:
- Boot2Docker Start
- Oracle VM VirtualBox

3. Run Boot2Docker
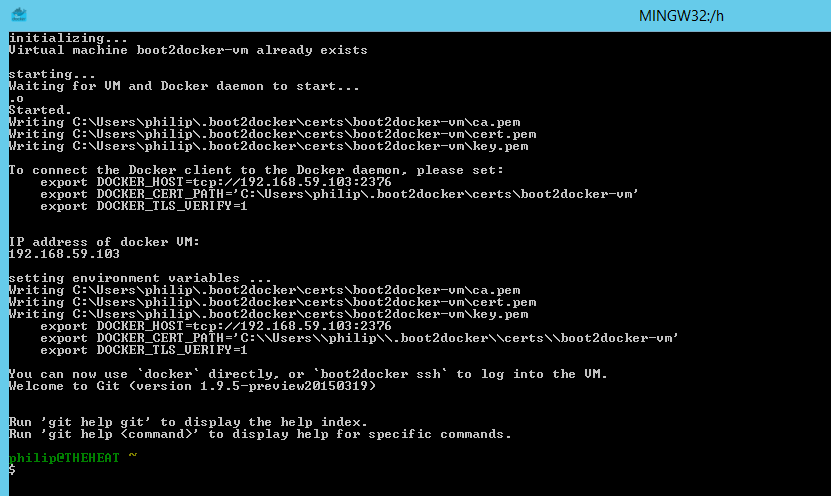
If everything goes well, you should see:
- bash command window should open
- after a bit, it should have ouput similar to the one shown below
- take note of the line which says
DOCKER-HOST, it should have the IP address of the docker VM. -
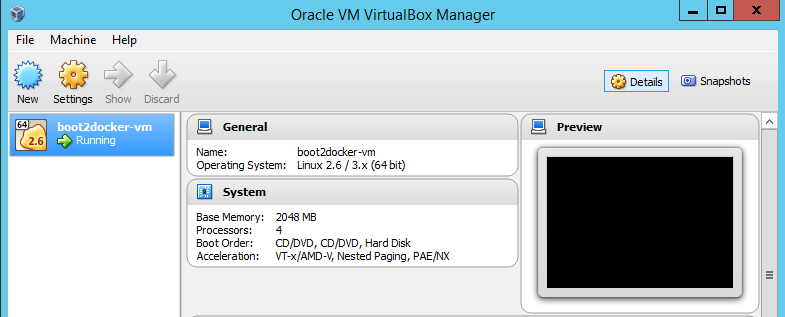
if you open Virtual Box, you should see
boot2docker-vmrunning there.
4. Post Install
A couple of useful things to know:
-
You can run as many instances of
Boot2Dockeras you want. It’s just a command prompt. -
Finding out the IP address of the docker VM (and things which run within it). Several options:
-
from
Boot2Dockercommand prompt runboot2docker.exe ip. This will show the IP address:$ boot2docker.exe ip 192.168.59.103 -
Look for
DOCKER-HOSTstring when you startBoot2Docker:... starting... Waiting for VM and Docker daemon to start... .o Started. ... To connect the Docker client to the Docker daemon, please set: export DOCKER_HOST=tcp://192.168.59.103:2376
-
-
Security and the images. One thing worth remembering is that when you say something like
docker run some-imageby default it will try andsome-imagefrom external repository.
Which repository it is, and who built that image with what is a good question. So probably a
good idea to install only “trusted” images.
I would like to deploy our microservices on a Windows Server 2012 installed machine. How can I enable containerization on that machine? On the Internet, the technical guides generally folds in two favors. One is for container technology on Linux platforms and the other one is for the Azure. I could not find any specific guide for what I am trying for.
Thanks
- windows-server-2012-r2
- docker
- kubernetes
- containers
asked Jul 24, 2017 at 10:15
![]()
1 Answer
answered Apr 1, 2018 at 20:27
![]()
sceeesceee
1213 bronze badges
I have a windows 2012 server virtual machine, and i am trying to install and run docker on top of it, its running into all sorts of errors with Hyper-V, are there any specific steps which i have to follow?, my docker container always fails saying couldn’t start MobyLinuxVM: hyper V features are not enabled.
- virtualization
- windows-server-2012
- docker
- docker-for-windows
asked Jan 12, 2018 at 11:53
![]()
kumarDkumarD
1111 silver badge2 bronze badges
1
-
Did you try to enable them? As for steps at least the official documentation has quite a bit in relation to Hyper-V?
Jan 12, 2018 at 12:17
1 Answer
answered Jan 19, 2018 at 21:34
![]()
essjaeessjae
1,57911 silver badges13 bronze badges
Docker is an open-source application deployment solution that might play an important role in the Windows world soon. In this introduction to Docker, you will learn how to install and test Docker on Windows.
Contents
- Docker intoduction
- Installing Docker on Windows
- Testing Docker with Hello World container
- Installing a WordPress container
- Cleaning up the environment
- Conclusions
![]()
Docker logo
According to Microsoft technology analyst Mary Jo Foley and a leaked Microsoft internal slide deck, Windows Server vNext will include a containerized deployment option. Specifically, Microsoft is hard at work bringing Docker to Windows.
Of course, you probably have these questions on your mind:
- What the heck is Docker, and why is it considered to be so revolutionary?
- I thought Docker was for Linux?
Let’s address both of those questions straightaway. By the conclusion of this article, I want you to have a clear picture of what Docker is, how it works, and how it may factor into future Windows OS versions.
Docker intoduction
I want us to dive into the tech as quickly as possible, so I’ll make this definition fast. According to the Docker web site, Docker is and open-source platform for building and distributing applications. In a Docker infrastructure, your applications run in totally isolated, trimmed-down containers that are protected from other containers as well as your base operating system.
Some define Docker as an application virtualization solution, and Microsoft techs immediately draw comparisons between Docker and its own App-V and RemoteApp products.
Docker, I think, has some advantages over Microsoft, Citrix, and other app virtualization vendors. The open-source angle is nice from a security and cost standpoint. Also, Docker containers make it simple to deploy complex applications (even n-tier apps such as a WordPress content-management pod) along with all their dependencies. Docker accomplishes this through modularization. To wit, Docker consists of two primary components:
- Docker Engine: Lightweight runtime environment and container packaging tool
- Docker Hub: Public container repository
The challenge for us as Microsoft professionals, of course, is that Docker was conceived to run in the Linux world. This makes sense to me because most software in Linux is open-source and more accessible from a low level than is proprietary software such as Microsoft’s or Apple’s. That said, Microsoft sees enough business value in Docker that it won’t be too long before we see a native Windows Docker engine.
For now, though, we have to settle for a virtual machine-based Docker implementation that isn’t as lean as native Docker but is certainly better than nothing.
Installing Docker on Windows
In this case study, we’ll install Docker for Windows (such as it is in early 2015) and deploy a pre-made WordPress content management system (CMS) container as a proof of concept.
The first step is to download and install the latest Docker for Windows build from its GitHub repository. As you can see in the following figure, Docker for Windows uses a traditional Windows installer.

Installing Docker is straightforward.
If you accept the installation defaults (which I highly suggest you do), the software gives you the following three components:
- Boot2Docker management tool and ISO: This is the Docker administration command-line interface (CLI).
- VirtualBox: We need the core of the Oracle VirtualBox VM desktop virtualization product to allow us to run the core Linux code from inside Windows.
- MSYS-git UNIX tools: The Docker Hub will pull containers from public Git repositories, so we need to have client tools available on our system.
You’re recommended to restart Windows before running Docker for the first time, but I was able to proceed without rebooting.
Next, double-click the pretty Boot2Docker Start Desktop icon to start the Boot2Docker management tool. You’ll be prompted to allow VirtualBox to bind two virtual network interfaces, and before long you’ll see a decidedly Linux-y command prompt ,as shown in the following screen capture.
![]()
Docker for Windows gives us a pretty icon and a command-line interface. Is that an oxymoron?
Testing Docker with Hello World container
To verify that Docker is functioning correctly, run the following command from the Boot2Docker client:
docker run hello-world
If all goes well, you’ll see a bunch of explanatory text on your screen. The part that I find the most interesting is the following list, which explains what just happened on your Windows box:
To generate this message, Docker took the following steps:
 1. The Docker client contacted the Docker daemon.
 2. The Docker daemon pulled the "hello-world" image from the Docker Hub.
    (Assuming it was not already locally available.)
 3. The Docker daemon created a new container from that image which runs the
    executable that produces the output you are currently reading.
 4. The Docker daemon streamed that output to the Docker client, which sent it
    to your terminal.
So what’s happening is that when we try to start a container with the docker run command, our Boot2Docker client contacts the Docker runtime daemon (what we might consider to be a service in Windows) to check whether the container is locally available. In our case, the Docker daemon runs inside a VirtualBox VM.
If the container isn’t available locally, the daemon pulls the container from the Docker Hub and fires it up. Neat!
As you can see in the following screenshot, my Docker for Windows session spawns a bunch of Oracle VirtualBox processes, but it added nothing to my Windows box’s actual service list. When you exit Docker, those processes go away.

All we see of Docker at the Windows OS level is the VirtualBox VM that runs the Docker components.
That having been said, as you can see in the following screenshot, Docker for Windows does permanently install Oracle VirtualBox on your host system, so be prepared for that. Again, once Windows supports Docker natively, we won’t need a Linux-based virtual machine to act as a shim.

In Windows, the Docker engine runs in an honest-to-goodness Linux virtual machine inside Oracle VirtualBox.
Installing a WordPress container
Hello World is fine for starters, but I want to try out a truly impressive container. How about WordPress? As you may or may not know, WordPress is a blog/content management system that runs in a LAMP (Linux, Apache web server, MySQL database, PHP) stack.
We can run docker images at any time in Boot2Docker to see what containers are available locally:
docker@boot2docker:~$ docker images
REPOSITORY          TAG                 IMAGE ID            CREATED
VIRTUAL SIZE
hello-world         latest              e45a5af57b00        12 weeks ago
910 B
You’ll find that several Docker community members contributed their own WordPress Docker containers. Of course, the standard rules apply concerning how much you want to trust publically accessible software repositories. In the future, I’m sure that we Windows administrators will build our own Docker images and host them on private repositories.
Anyway, I chose Eugene Ware’s WordPress build because (a) it works; and (b) he uses nginx as the web server instead of Apache.
First we need to clone Eugene’s GitHub repo, which makes all the WordPress containers available to our Windows system:
git clone https://github.com/eugeneware/docker-wordpress-nginx.git
After Docker downloads all the bits, you’ll need to use cd to switch your focus into the local repository:
cd docker-wordpress-nginx
Next, we’ll build the containers:
sudo docker build -t="docker-wordpress-nginx" .
Don’t forget about the space and the dot at the end of the preceding command string!
Once the build completes, our final step is to start the containers and map TCP port 8081 in Windows to port 80 in the Docker container:
docker run -d -p 8081:80 docker-wordpress-nginx
As you can see in the following screenshot, I connected to WordPress instantly after pointing my browser to the VirtualBox virtual network interface’s private IP address (http://192.168.59.103:8081).

This is a fully portable and containerized WordPress installation.
Cleaning up the environment
You’ve heard the expression RTFM (“Read the Friendly Manual!”) before, right? To that point, you should spend time reading the Docker User Guide. Also, you can get a list of all available Docker commands from the CLI by running:
docker help
To stop a container, you need to know its name, so run the following command and take note of the image name. I took the liberty of formatting the output in a more eye-friendly way:
docker ps

CONTAINER ID: bbf255c32fd8
IMAGE: docker-wordpress-nginx:latest
COMMAND: /bin/bash /start.sh
CREATED: 22 minutes ago
STATUS: Up 22 minutes
PORTS: 3306/tcp, 0.0.0.0:8081->80/tcp
NAMES: romantic_mcclintock
I’m not sure what’s up with that wacky “romantic_mcclintock” name, to be perfectly honest with you. Perhaps it’s a tongue-in-cheek, globally unique identifier? Anyway, to stop our WordPress/nginx image, let’s run the appropriate command:
docker stop romantic_mcclintock
Refreshing my browser on my containerized WordPress site gives a 404 error, which is perfectly expected.
Conclusions
So what do you think of Docker? Even though its current implementation on Windows isn’t “true” Docker because we are hosting the Docker environment inside a Linux virtual machine, I hope that you were as impressed with its capabilities as I am.
Imagine a Windows Server in which the operating system itself runs in a tidy container. Think of how much more modular, granular, and secure this setup would be. Any applications we deploy on top of Windows also run in isolated containers. Yes—this is why Docker and application virtualization caught Microsoft’s attention so thoroughly in 2014. See you next time.
Note: This release of Docker deprecates the Boot2Docker command line in
favor of Docker Machine. Use the Docker Toolbox to install Docker Machine as
well as the other Docker tools.
You install Docker using Docker Toolbox. Docker Toolbox includes the following Docker tools:
- Docker Machine for running the
docker-machinebinary - Docker Engine for running the
dockerbinary - Kitematic, the Docker GUI
- a shell preconfigured for a Docker command-line environment
- Oracle VM VirtualBox
Because the Docker daemon uses Linux-specific kernel features, you can’t run
Docker natively in Windows. Instead, you must use docker-machine to create and attach to a Docker VM on your machine. This VM hosts Docker for you on your Windows system.
The virtual machine runs a lightweight Linux distribution made specifically to
run the Docker daemon. The VirtualBox VM runs completely from RAM, is a small
~24MB download, and boots in approximately 5s.
Requirements
To run Docker, your machine must have a 64-bit operating system running Windows 7 or higher. Additionally, you must make sure that virtualization is enabled on your machine.
To verify your machine meets these requirements, do the following:
-
Right click the Windows Start Menu and choose System.
If you are using an unsupported version of Windows, you should consider
upgrading your operating system in order to try out Docker. -
Make sure your CPU supports virtualization technology
and virtualization support is enabled in BIOS and recognized by Windows.For Windows 8, 8.1 or 10
Choose Start > Task Manager. On Windows 10, click more details. Navigate to the Performance tab.
Under CPU you should see the following:If virtualization is not enabled on your system, follow the manufacturer’s instructions for enabling it.
For Windows 7
Run the Microsoft® Hardware-Assisted Virtualization Detection
Tool and follow the on-screen instructions. -
Verify your Windows OS is 64-bit (x64)
How you do this verification depends on your Windows version. For details, see the Windows
article How to determine whether a computer is running a 32-bit version or 64-bit version
of the Windows operating system.


Note: If you have Docker hosts running and you don’t wish to do a Docker Toolbox
installation, you can install thedocker.exeusing the unofficial Windows package
manager Chocolatey. For information on how to do this, see Docker package on
Chocolatey.
Learn the key concepts before installing
In a Docker installation on Linux, your machine is both the localhost and the
Docker host. In networking, localhost means your computer. The Docker host is
the machine on which the containers run.
On a typical Linux installation, the Docker client, the Docker daemon, and any
containers run directly on your localhost. This means you can address ports on a
Docker container using standard localhost addressing such as localhost:8000 or
0.0.0.0:8376.

In an Windows installation, the docker daemon is running inside a Linux virtual
machine. You use the Windows Docker client to talk to the Docker host VM. Your
Docker containers run inside this host.

In Windows, the Docker host address is the address of the Linux VM. When you
start the VM with docker-machine it is assigned an IP address. When you start
a container, the ports on a container map to ports on the VM. To see this in
practice, work through the exercises on this page.
Installation
If you have VirtualBox running, you must shut it down before running the
installer.
-
Go to the Docker Toolbox page.
-
Click the installer link to download.
-
Install Docker Toolbox by double-clicking the installer.
The installer launches the «Setup — Docker Toolbox» dialog.
-
Press «Next» to install the toolbox.
The installer presents you with options to customize the standard
installation. By default, the standard Docker Toolbox installation:- installs executables for the Docker tools in
C:Program FilesDocker Toolbox - install VirtualBox; or updates any existing installation
- adds a Docker Inc. folder to your program shortcuts
- updates your
PATHenvironment variable - adds desktop icons for the Docker Quickstart Terminal and Kitematic
This installation assumes the defaults are acceptable.
- installs executables for the Docker tools in
-
Press «Next» until you reach the «Ready to Install» page.
The system prompts you for your password.
-
Press «Install» to continue with the installation.
When it completes, the installer provides you with some information you can
use to complete some common tasks. -
Press «Finish» to exit.


Running a Docker Container
To run a Docker container, you:
- Create a new (or start an existing) Docker virtual machine
- Switch your environment to your new VM
- Use the
dockerclient to create, load, and manage containers
Once you create a machine, you can reuse it as often as you like. Like any
VirtualBox VM, it maintains its configuration between uses.
There are several ways to use the installed tools, from the Docker Quickstart Terminal or
from your shell.
Using the Docker Quickstart Terminal
-
Find the Docker Quickstart Terminal icon on your Desktop and double-click to launch it.
The application:
- Opens a terminal window
- Creates a
defaultVM if it doesn’t exist, and starts the VM after - Points the terminal environment to this VM
Once the launch completes, you can run
dockercommands. -
Verify your setup succeeded by running the
hello-worldcontainer.$ docker run hello-world Unable to find image 'hello-world:latest' locally 511136ea3c5a: Pull complete 31cbccb51277: Pull complete e45a5af57b00: Pull complete hello-world:latest: The image you are pulling has been verified. Important: image verification is a tech preview feature and should not be relied on to provide security. Status: Downloaded newer image for hello-world:latest Hello from Docker. This message shows that your installation appears to be working correctly. To generate this message, Docker took the following steps: 1. The Docker client contacted the Docker daemon. 2. The Docker daemon pulled the "hello-world" image from the Docker Hub. (Assuming it was not already locally available.) 3. The Docker daemon created a new container from that image which runs the executable that produces the output you are currently reading. 4. The Docker daemon streamed that output to the Docker client, which sent it to your terminal. To try something more ambitious, you can run an Ubuntu container with: $ docker run -it ubuntu bash For more examples and ideas, visit: http://docs.docker.com/userguide/
Using Docker from Windows Command Prompt (cmd.exe)
-
Launch a Windows Command Prompt (cmd.exe).
The
docker-machinecommand requiresssh.exein yourPATHenvironment
variable. This.exeis in the MsysGitbinfolder. -
Add this to the
%PATH%environment variable by running:set PATH=%PATH%;"c:Program Files (x86)Gitbin" -
Create a new Docker VM.
 docker-machine create --driver virtualbox my-default
 Creating VirtualBox VM...
 Creating SSH key...
 Starting VirtualBox VM...
 Starting VM...
 To see how to connect Docker to this machine, run: docker-machine env my-default
The command also creates a machine configuration in the
C:USERSUSERNAME.dockermachinemachinesdirectory. You only need to run thecreate
command once. Then, you can usedocker-machineto start, stop, query, and
otherwise manage the VM from the command line. -
List your available machines.
 C:Usersmary> docker-machine ls
 NAME                ACTIVE   DRIVER       STATE     URL                         SWARM
 my-default        *        virtualbox   Running   tcp://192.168.99.101:2376
If you have previously installed the deprecated Boot2Docker application or
run the Docker Quickstart Terminal, you may have adevVM as well. -
Get the environment commands for your new VM.
C:Usersmary> docker-machine env --shell cmd my-default -
Connect your shell to the
my-defaultmachine.C:Usersmary> eval "$(docker-machine env my-default)" -
Run the
hello-worldcontainer to verify your setup.C:Usersmary> docker run hello-world
Using Docker from PowerShell
-
Launch a Windows PowerShell window.
-
Add
ssh.exeto your PATH:PS C:Usersmary> $Env:Path = "${Env:Path};c:Program Files (x86)Gitbin" -
Create a new Docker VM.
PS C:Usersmary> docker-machine create --driver virtualbox my-default -
List your available machines.
C:Usersmary> docker-machine ls NAME ACTIVE DRIVER STATE URL SWARM my-default * virtualbox Running tcp://192.168.99.101:2376 -
Get the environment commands for your new VM.
C:Usersmary> docker-machine env --shell powershell my-default -
Connect your shell to the
my-defaultmachine.C:Usersmary> eval "$(docker-machine env my-default)" -
Run the
hello-worldcontainer to verify your setup.C:Usersmary> docker run hello-world
Learn about your Toolbox installation
Toolbox installs the Docker Engine binary in the C:Program FilesDocker Toolbox directory. When you use the Docker Quickstart Terminal or create a
default VM manually, Docker Machine updates the
C:USERSUSERNAME.dockermachinemachinesdefault folder to your
system. This folder contains the configuration for the VM.
You can create multiple VMs on your system with Docker Machine. Therefore, you
may end up with multiple VM folders if you have created more than one VM. To
remove a VM, use the docker-machine rm <machine-name> command.
Migrate from Boot2Docker
If you were using Boot2Docker previously, you have a pre-existing Docker
boot2docker-vm VM on your local system. To allow Docker Machine to manage
this older VM, you can migrate it.
-
Open a terminal or the Docker CLI on your system.
-
Type the following command.
$ docker-machine create -d virtualbox --virtualbox-import-boot2docker-vm boot2docker-vm docker-vm -
Use the
docker-machinecommand to interact with the migrated VM.
The docker-machine subcommands are slightly different than the boot2docker
subcommands. The table below lists the equivalent docker-machine subcommand
and what it does:
boot2docker |
docker-machine |
docker-machine description |
|---|---|---|
| init | create | Creates a new docker host. |
| up | start | Starts a stopped machine. |
| ssh | ssh | Runs a command or interactive ssh session on the machine. |
| save | — | Not applicable. |
| down | stop | Stops a running machine. |
| poweroff | stop | Stops a running machine. |
| reset | restart | Restarts a running machine. |
| config | inspect | Prints machine configuration details. |
| status | ls | Lists all machines and their status. |
| info | inspect | Displays a machine’s details. |
| ip | ip | Displays the machine’s ip address. |
| shellinit | env | Displays shell commands needed to configure your shell to interact with a machine |
| delete | rm | Removes a machine. |
| download | — | Not applicable. |
| upgrade | upgrade | Upgrades a machine’s Docker client to the latest stable release. |
Upgrade Docker Toolbox
To upgrade Docker Toolbox, download and re-run the Docker Toolbox
installer.
Container port redirection
If you are curious, the username for the Docker default VM is docker and the
password is tcuser. The latest version of docker-machine sets up a host only
network adaptor which provides access to the container’s ports.
If you run a container with a published port:
$ docker run --rm -i -t -p 80:80 nginx
Then you should be able to access that nginx server using the IP address
reported to you using:
Typically, the IP is 192.168.59.103, but it could get changed by VirtualBox’s
DHCP implementation.
Note: There is a known
issue that
may cause files shared with your nginx container to not update correctly as you
modify them on your host.
Login with PUTTY instead of using the CMD
Docker Machine generates and uses the public/private key pair in your
%USERPROFILE%.dockermachinemachines<name_of_your_machine> directory. To
log in you need to use the private key from this same directory. The private key
needs to be converted into the format PuTTY uses. You can do this with
puttygen:
-
Open
puttygen.exeand load («File»->»Load» menu) the private key from (you may need to change to theAll Files (*.*)filter)%USERPROFILE%.dockermachinemachines<name_of_your_machine>id_rsa -
Click «Save Private Key».
-
Use the saved file to login with PuTTY using
docker@127.0.0.1:2022.
Uninstallation
You can uninstall Docker Toolbox using Window’s standard process for removing
programs. This process does not remove the docker-install.exe file. You must
delete that file yourself.
Learn more
You can continue with the Docker Engine User Guide. If you are
interested in using the Kitematic GUI, see the Kitematic user
guide.