Docker is a platform for creating and deploying applications in self-sufficient containers. The installation of Docker is pretty easy in Linux, but this is usually not the case with Windows. In this post, I will show you how to install Docker in Windows 10 or Windows 11 in multiple ways. You’ll learn there is indeed a way that makes the Docker Desktop installation in Windows as simple as in Linux.
Contents
- Prerequisites
- Docker with WSL2 backend
- Docker with Hyper-V backend
- Install Docker using the GUI
- Install Docker using winget
- Install Docker using PowerShell
- Author
- Recent Posts

Surender Kumar has more than twelve years of experience in server and network administration. His fields of interest are Windows Servers, Active Directory, PowerShell, web servers, networking, Linux, virtualization, and penetration testing. He loves writing for his blog.
Latest posts by Surender Kumar (see all)
- Extending LVM space in Ubuntu — Thu, Feb 2 2023
- Backup in Proxmox VE — Thu, Jan 26 2023
- Snapshots in Proxmox VE — Wed, Jan 25 2023
Prerequisites
You might already be aware that Docker relies on virtualization technology. On Windows, Docker can use either the Windows Subsystem for Linux (WSL) 2 or Hyper-V as a backend.
Docker with WSL2 backend
The current version of Docker Desktop only works on the 64-bit edition of Windows, whether you’re running Windows 10 or Windows 11. To run Docker with the WSL2 backend, your system must meet the following prerequisites:
- Windows 10: Home/Pro 21H1 (build 19043) or higher, or Enterprise/Education 20H2 (build 19042) or higher
- Windows 11: Home/Pro version 21H2 or higher, or Enterprise/Education version 21H2 or higher
- WSL2 feature enabled
- Linux kernel update package for WSL2
- For WSL2, the following are the hardware requirements:
- 64-bit CPU with second-level address translation (SLAT)
- Hardware virtualization support, which must be enabled in BIOS/UEFI
- 4 GB RAM
Docker with Hyper-V backend
To be able to run Docker with a Hyper-V backend and Windows containers, your system must meet the following prerequisites:
- Windows 10: Pro 21H1 (build 19043) or higher, or Enterprise/Education 20H2 (build 19042) or higher
- Windows 11: Pro/Enterprise/Education version 21H2 or higher
- Optional Windows features for Hyper-V and Containers must be enabled

Enable Hyper V and Containers windows features for Docker

For Hyper-V, following are the hardware requirements:
- 64-bit CPU with second-level address translation (SLAT)
- Hardware virtualization support, which must be enabled in BIOS/UEFI
- 4 GB RAM
In addition to the aforementioned requirements, if you want to run Docker in a Hyper-V guest VM, you need to enable nested virtualization by running this PowerShell command on the Hyper-V host:
Set-VMProcessor -VMName <VMName> -ExposeVirtualizationExtensions $True

Enable nested virtualization for a VM on Hyper V host using PowerShell
Make sure your VM is powered off before running this command. Without nested virtualization support, Docker will not work in a VM, and you will receive the error message shown below.

Docker desktop cannot start An unexpected error occurred
Install Docker using the GUI
To install Docker Desktop in Windows using the GUI, follow these steps:
Download Docker Desktop. You will see a configuration screen, as shown in the screenshot:

Docker desktop configuration Use WSL 2 instead of Hyper V recommended
To use Docker with the WSL 2 backend, check the box that says Use WSL 2 instead of Hyper-V (recommended). If you want to use Hyper-V instead, uncheck this option and click OK.
When the installation is complete, click the Close and Restart button to restart your computer.

Close Docker installer and restart the computer to complete installation
After restarting, you will be able to run Docker Desktop using either a shortcut or a command prompt. If you did not install WSL 2 before installing Docker, you will receive the WSL 2 installation is incomplete error when you try to start Docker.

Docker desktop error WSL 2 installation is incomplete
To fix this error, run the wsl —update command in an elevated PowerShell console, and restart your computer.

Installing WSL2 kernel updates to fix the WSL 2 installation is incomplete error
Install Docker using winget
Winget is a command-line package manager for modern versions of Windows, which works just like apt or DNF in Linux. If you have a little experience with package installation in Linux, you probably know that you usually just have to type a command and the package is ready for use. Well, winget does the exact same thing in Windows. All you need is Windows 10 1809 (build 17763) or Windows 11. To install Docker in Windows using winget, follow these steps:
Launch an elevated command prompt or PowerShell console, and type the following command:
winget install --exact --id Docker.DockerDesktop --accept-source-agreements --accept-package-agreements

Installing docker desktop in windows using winget
The —exact (or -e in short) parameter tells winget to find the package using an exact match. The installation can take a while, but it is pretty much automatic, so there is nothing you need to do but wait.
When the command is finished, open a new command prompt (or PowerShell console) and run the docker —version command.
If you try to run docker —version in the same command prompt, you will likely see The term ‘docker’ is not recognized as the name of a cmdlet, function, script file, or operable program error, as shown in the screenshot.

The term docker is not recognized as the name of a cmdlet function script file or operable program
This error occurs because your current command session (cmd or PowerShell) is still using the old environment variables. To be able to recognize the newly added Docker variable, you must reload the environment variables. Launching a new command session is the easiest way to load new variables.
Install Docker using PowerShell
To install Docker Desktop using PowerShell, follow these steps:
Download Docker Desktop.
Once the installer package is downloaded, open an elevated PowerShell console or Windows Terminal, and type the following command to start Docker installation:
Start-Process "D:Docker Desktop Installer.exe" -Wait -NoNewWindow "install --quiet --accept-license"

Installing Docker silently using PowerShell
Make sure you adjust the installer path. The -Wait parameter causes the Start-Process cmdlet to wait for the new process to finish, and the -NoNewWindow parameter prevents the new process from opening in a new window. The —quiet switch is offered by Docker’s install command and suppresses the installation information. To see the information, skip this switch. Since we are using PowerShell, notice how —quiet and other flags are enclosed in quotes along with the install command—this is very important to avoid errors. By default, Docker will use the WSL 2 backend, but you could include the —backend=hyper-v flag to use the Hyper-V backend instead.
Once the above command is finished, you will see a shortcut for Docker Desktop on your desktop. Double-click the shortcut to launch Docker.
All of these installation methods are self-sufficient, so there is nothing additional you need to do. But you may still get an error message that says Docker Desktop – Access denied. You are not allowed to use Docker. You must be in the «docker-users» group.
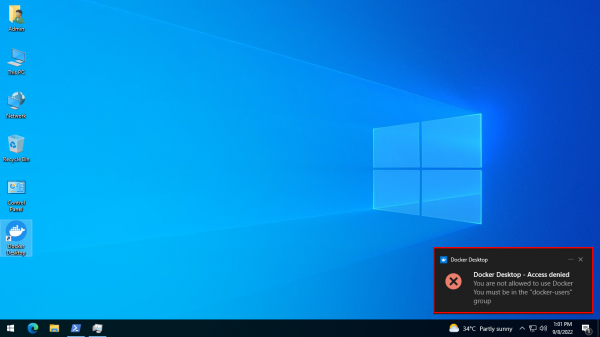
Docker Desktop – Access denied. You are not allowed to use Docker. You must be in the docker users group
If you get this error, run the following command in an elevated PowerShell console:
Add-LocalGroupMember -Group "docker-users" -Member $env:UserName -Verbose

Adding the current user to the docker users group using PowerShell
Don’t forget to log off and log on again after running this command. If you want to delegate another user to run Docker Desktop, you can specify that username with the -Member parameter instead of $env:UserName.
Subscribe to 4sysops newsletter!
That was all for this guide. You just learned how to install Docker in Windows using the GUI, winget, and PowerShell. I am curious to know which method you prefer, and why.
TL:DR; On the Hyper-V host run Set-VMProcessor -VMName “<Your Virtual Machine Name>” -ExposeVirtualizationExtensions $true
If you are like me, you may run all your Dev Environments from within Virtual Machines, leaving your base OS install as clean as possible – albeit with MS Office, Browsers etc. installed.
In recent projects I’ve been working with containerisation of system deployments with Docker. This has required me to have docker installed on my Virtual Machines. In order to run docker on Windows 10, i’ve needed to have Hyper-V installed… Hyper-V running on a VM !? Yup, it’s possible!
Prerequisites
- A Hyper-V host running Windows Server 2016 or Windows 10 Anniversary Update;
- A Hyper-V VM running Windows Server 2016 or Windows 10 Anniversary Update;
- A Hyper-V VM with configuration version 8.0 or greater;
- An Intel processor with VT-x and EPT technology.
Configure Nested Virtualisation
- Create a virtual machine.
- While the virtual machine is in the OFF state, run the following command on the physical Hyper-V host. This enables nested virtualisation for the virtual machine.
Set-VMProcessor -VMName “<Your Virtual Machine Name>” -ExposeVirtualizationExtensions $true - Start the virtual machine.
- Install Hyper-V within the virtual machine, just like you would for a physical server.
Containers are the future, so I need to be able to work with Docker. On Windows, Docker runs inside a virtual machine and by default ships with VirtualBox. As a Windows developer, all of my virtual machines and emulators are Hyper-V images which conflicts with VirtualBox. In the past, I would dual boot to switch between Hyper-V and VirtualBox, but that is a huge pain, so I decided to figure out how to get Docker running in Hyper-V. It turns out that it isn’t difficult, but most of the instructions assume VirtualBox or are out of date.
We’re all Windows developers here, so I will assume that you are already using Hyper-V and that it is working.
Download Docker Toolbox for Windows
Run the installer. On the third screen, you cannot uncheck VirtualBox even though you don’t need it. Damn you Docker! No worries, we can get around that…
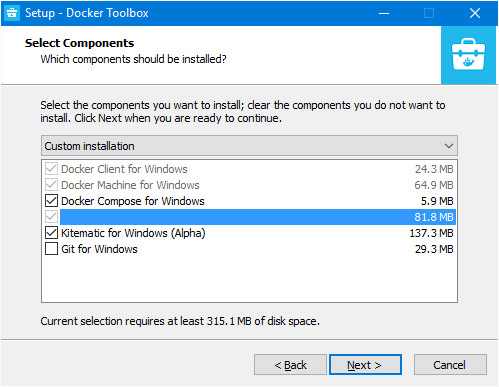
On the fourth screen, select all options, then continue to click through all of the screens.
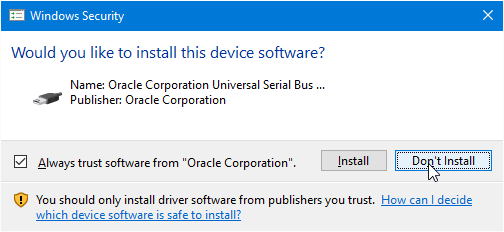
At the end of the Docker Toolbox install, it will begin installing VirtualBox. A Windows Security dialog will pop up asking you if you want to install Oracle device software. Clicking Don’t Install will abort the VirtualBox install.
The Docker Quickstart Terminal and Kitematic (Alpha) shortcuts won’t work without VirtualBox, so skip them. We will install the Docker vm into Hyper-V manually.
Create a Boot2Docker Hyper-V Machine
If you have many virtual machines in Hyper-V, you will likely have several Virtual Switches. You must specify which Virtual Switch to use when you create the Docker VM, so open Hyper-V Manager and select Virtual Switch Manager from the actions on the right.
Select a Virtual Switch that is connected directly to an external network interface, ideally to an ethernet connection, not to a wireless card. Copy the name of the switch, you will use it when you create the virtual machine.

Open an Admin command prompt and run docker-machine create, substituting your virtual switch name. In this example, the Hyper-V machine will be called Boot2Docker. See the Docker Hyper-V documentation for more command line options.
D:src
Ω docker-machine create --driver hyperv --hyperv-virtual-switch "Intel(R) Ethernet Connection I217-LM Virtual Switch" Boot2Docker
Creating CA: C:Usersrob.prouse.dockermachinecertsca.pem
Creating client certificate: C:Usersrob.prouse.dockermachinecertscert.pem
Running pre-create checks...
Creating machine...
(Boot2Docker) Copying C:Usersrob.prouse.dockermachinecacheboot2docker.iso to C:Usersrob.prouse.dockermachinemachinesBoot2Dockerboot2docker.iso...
(Boot2Docker) Creating SSH key...
(Boot2Docker) Creating VM...
(Boot2Docker) Using switch "Intel(R) Ethernet Connection I217-LM Virtual Switch"
(Boot2Docker) Creating VHD
(Boot2Docker) Starting VM...
(Boot2Docker) Waiting for host to start...
Waiting for machine to be running, this may take a few minutes...
Detecting operating system of created instance...
Waiting for SSH to be available...
Detecting the provisioner...
Provisioning with boot2docker...
Copying certs to the local machine directory...
Copying certs to the remote machine...
Setting Docker configuration on the remote daemon...
Checking connection to Docker...
Docker is up and running!
To see how to connect your Docker Client to the Docker Engine running on this virtual machine, run: C:Program FilesDocker Toolboxdocker-machine.exe env Boot2Docker
As this is working, back in Hyper-V Manager, connect to your docker image to see what it is doing.
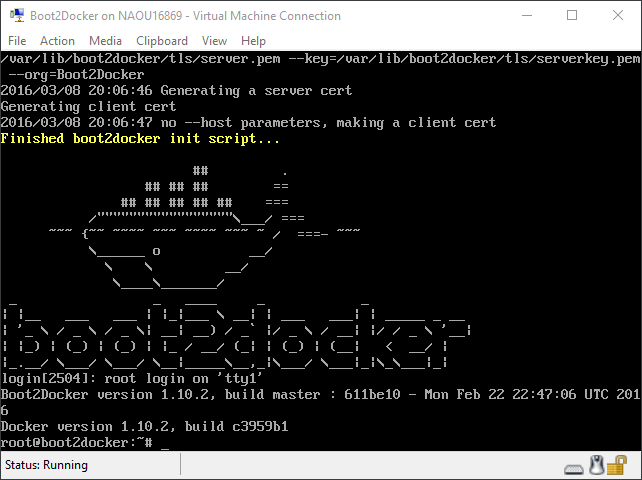
I don’t like working as an admin if I don’t need to, so close your admin command prompt and open a regular command prompt for the remaining work.
That’s it, you now have Docker installed and running in Hyper-V. Next up, let’s configure the Docker client to connect to your vm.
Working with docker-machine
From this point on, everything is standard Docker commands, so check out the docker-machine documentation. Whenever you want to work with Docker, you use docker-machine to start and stop your machines, to list running machines and to configure your shell to connect to a running Docker instance.
Listing Docker Machines
You use docker-machine ls to view registered Docker machines and their state.
D:src
> docker-machine ls
NAME          ACTIVE   DRIVER   STATE     URL                        SWARM   DOCKER    ERRORS
Boot2Docker   -        hyperv   Running   tcp://192.168.0.113:2376           v1.10.2
Starting and Stopping Machines
Use docker-machine start [MachineName] and docker-machine stop [MachineName] to start and stop virtual machines.
> docker-machine start Boot2Docker
Starting "Boot2Docker"...
(Boot2Docker) Waiting for host to start...
Machine "Boot2Docker" was started.
Waiting for SSH to be available...
Detecting the provisioner...
Started machines may have new IP addresses. You may need to re-run the `docker-machine env` command.
Configuring Your Shell
To connect your Docker client to a running vm, use the command docker-machine env [MachineName].
D:src
> docker-machine env Boot2Docker
$Env:DOCKER_TLS_VERIFY = "1"
$Env:DOCKER_HOST = "tcp://192.168.0.113:2376"
$Env:DOCKER_CERT_PATH = "C:Usersrob.prouse.dockermachinemachinesBoot2Docker"
$Env:DOCKER_MACHINE_NAME = "Boot2Docker"
# Run this command to configure your shell:
# & "C:Program FilesDocker Toolboxdocker-machine.exe" env Boot2Docker | Invoke-Expression
The last line tells you what you need to run to configure your shell. I am using PowerShell, so I need to run & docker-machine env Boot2Docker | Invoke-Expression to set the required environment variables.
Test Your Docker Installation
Now that you are setup and have your shell configured, run docker run hello-world to check that everything is working.
D:src
> docker run hello-world
Unable to find image 'hello-world:latest' locally
latest: Pulling from library/hello-world

03f4658f8b78: Pull complete ================================================>]    601 B/601 BB
a3ed95caeb02: Pull complete ================================================>]     32 B/32 BB
Digest: sha256:8be990ef2aeb16dbcb9271ddfe2610fa6658d13f6dfb8bc72074cc1ca36966a7
Status: Downloaded newer image for hello-world:latest

Hello from Docker.
This message shows that your installation appears to be working correctly.

To generate this message, Docker took the following steps:
 1. The Docker client contacted the Docker daemon.
 2. The Docker daemon pulled the "hello-world" image from the Docker Hub.
 3. The Docker daemon created a new container from that image which runs the
    executable that produces the output you are currently reading.
 4. The Docker daemon streamed that output to the Docker client, which sent it
    to your terminal.

To try something more ambitious, you can run an Ubuntu container with:
 $ docker run -it ubuntu bash

Share images, automate workflows, and more with a free Docker Hub account:
 https://hub.docker.com

For more examples and ideas, visit:
 https://docs.docker.com/userguide/
From here, if you are new to Docker, I would suggest continuing with the Docker on Windows Getting Started Step 2 — Understanding images & containers which picks up from this point.
Создает виртуальную машину Boot2Docker локально на машине Windows с помощью Hyper-V.
Hyper-V должен быть включен в вашей настольной системе. Docker Desktop для Windows автоматически включает его после установки. См. Эту статью в сети разработчиков Microsoft для получения инструкций о том, как вручную включить Hyper-V .
Notes:
Вы должны использовать учетную запись уровня администратора для создания и управления машинами Hyper-V.
Вам нужен существующий виртуальный коммутатор, чтобы использовать драйвер. Hyper-V может использовать внешний сетевой интерфейс (также известный как мостовое соединение). Смотрите этот блог, чтобы узнать больше. Если вы хотите использовать NAT, создайте внутреннюю сеть и используйте Internet Connection Sharing .
Эта справочная страница содержит пример, показывающий, как использовать PowerShell с повышенными правами (на уровне администратора), а также создать и использовать внешний сетевой коммутатор.
Usage
Options
-
--hyperv-boot2docker-url: URL-адрес загрузочного ISO-образа. -
--hyperv-virtual-switch: имя используемого виртуального коммутатора. -
--hyperv-disk-size: размер диска для хоста в МБ. -
--hyperv-memory: объем памяти для хоста в МБ. -
--hyperv-cpu-count: количество процессоров для хоста. -
--hyperv-static-macaddress: статический MAC-адрес сетевого адаптера Hyper-V. -
--hyperv-vlan-id: идентификатор VLAN сетевого адаптера Hyper-V, если есть. -
--hyperv-disable-dynamic-memory: отключить динамическое управление памятью.
Переменные среды и значения по умолчанию
| опция CLI | Переменная окружения | Default |
|---|---|---|
--hyperv-boot2docker-url |
HYPERV_BOOT2DOCKER_URL |
Последний загрузочный url |
--hyperv-cpu-count |
HYPERV_CPU_COUNT |
1 |
--hyperv-disk-size |
HYPERV_DISK_SIZE |
20000 |
--hyperv-memory |
HYPERV_MEMORY |
1024 |
--hyperv-static-macaddress |
HYPERV_STATIC_MACADDRESS |
undefined |
--hyperv-virtual-switch |
HYPERV_VIRTUAL_SWITCH |
впервые найден |
--hyperv-vlan-id |
HYPERV_VLAN_ID |
undefined |
--hyperv-disable-dynamic-memory |
HYPERV_DISABLE_DYNAMIC_MEMORY |
false |
Example:
1.Убедитесь,что Hyper-V включен.
Hyper-V автоматически включается при установке Docker Desktop для Windows. Чтобы включить его вручную, см. Инструкции о том, как вручную включить Hyper-V в сети разработчиков Microsoft.
2.Настройка нового внешнего сетевого коммутатора (опция)
Примечание . Если у вас уже есть внешний сетевой коммутатор, пропустите эту настройку и используйте ее.
Убедитесь,что у вас есть Ethernet-соединение.
Откройте диспетчер Hyper-V . (В Windows 10 найдите диспетчер Hyper-V в левом нижнем поле поиска.)
Выберите диспетчер виртуальных коммутаторов на правой панели « Действия» .
Настройте новый внешний сетевой коммутатор для использования вместо сетевого коммутатора DockerNAT (для Moby), который устанавливается по умолчанию при установке Docker Desktop для Windows. Если у вас уже настроен другой сетевой коммутатор, используйте его, но убедитесь, что это внешний коммутатор.)
Для этого примера мы создали виртуальный коммутатор с именем Primary Virtual Switch .
3.Перезагрузить
Смотрите эту проблему на virtualbox: зависает в ожидании запуска виртуальной машины # 986 .
Перезагрузите настольную систему, чтобы устранить любые проблемы с таблицей маршрутизации. Без перезагрузки первого, docker-machine create ... может зацикливаться на Waiting for host to start... . Если вы все еще зависли в «Ожидание запуска хоста …» после перезагрузки, убедитесь, что вы выбрали правильную сеть в Virtual Switch Manager.
4.Создание узлов с помощью машины Docker Machine и драйвера Microsoft Hyper-V
-
Запустите «повышенную» PowerShell с правами администратора. Для этого найдите PowerShell, затем щелкните правой кнопкой мыши и выберите « Запуск от имени администратора» .
-
Запустите команды
docker-machine createдля создания машин.Например, если вы будете следовать вместе с режимом учебник Swarm , который просит вас создать три сетевых хост — машины , вы можете создать эти роя узлы:
manager1,worker1,worker2. -
Используйте драйвер Microsoft Hyper-V и обратитесь к новому виртуальному коммутатору,который вы создали.
docker-machine create -d hyperv --hyperv-virtual-switch <NameOfVirtualSwitch> <nameOfNode>
Вот пример создания узла
manager1:PS C:WINDOWSsystem32> docker-machine create -d hyperv --hyperv-virtual-switch "Primary Virtual Switch" manager1 Running pre-create checks... Creating machine... (manager1) Copying C:Users<your_username>.dockermachinecacheboot2docker.iso to C:Users<your_username>.dockermachinemachinesmanag er1boot2docker.iso... (manager1) Creating SSH key... (manager1) Creating VM... (manager1) Using switch "Primary Virtual Switch" (manager1) Creating VHD (manager1) Starting VM... (manager1) Waiting for host to start... Waiting for machine to be running, this may take a few minutes... Detecting operating system of created instance... Waiting for SSH to be available... Detecting the provisioner... Provisioning with boot2docker... Copying certs to the local machine directory... Copying certs to the remote machine... Setting Docker configuration on the remote daemon... Checking connection to Docker... Docker is up and running! To see how to connect your Docker Client to the Docker Engine running on this virtual machine, run: C:Program FilesDoc kerDockerResourcesbindocker-machine.exe env manager1 PS C:WINDOWSsystem32>
-
Используйте тот же процесс,драйвер и сетевой коммутатор для создания других узлов.
Для нашего примера,это команды:
docker-machine create -d hyperv --hyperv-virtual-switch "Primary Virtual Switch" worker1
docker-machine create -d hyperv --hyperv-virtual-switch "Primary Virtual Switch" worker2
Куда идти дальше
Интересно отметить, что виртуальные машины, которые вы создаете с помощью docker-machine create отображаются в диспетчере Hyper-V в разделе «Виртуальные машины», но вам нужно управлять ими с помощью команд docker-machine , а не через Hyper-V Manager.
Чтобы начать использовать команды docker-machine , посмотрите эти темы:
-
Запускайте контейнеры и экспериментируйте с командами Machine и вступительными темами, которые следуют
-
Ссылка на командную строку докера
машина , Microsoft Hyper-V , драйвер
© 2019 Docker, Inc.
Лицензия Apache,версия 2.0.
Докер и логотип Докер являются торговыми марками или зарегистрированными торговыми марками компании Docker,Inc.в США и/или других странах.
Docker,Inc.и другие стороны также могут иметь права на товарные знаки в других терминах,используемых в настоящем документе.
https://docs.docker.com/machine/drivers/hyper-v/