I’m using Docker Toolbox, recently I got to know about the Docker installation using WSL 2.
What are the differences between Hyper-V and WSL 2? Which has better performance?
![]()
Daniel B
57k9 gold badges115 silver badges151 bronze badges
asked Jun 17, 2020 at 8:37
![]()
7
Please read this: https://www.docker.com/blog/docker-hearts-wsl-2/
We will replace the Hyper-V VM we currently use by a WSL 2 integration package. This package will provide the same features as the current Docker Desktop VM: Kubernetes 1-click setup, automatic updates, transparent HTTP proxy configuration, access to the daemon from Windows, transparent bind mounts of Windows files, and more.
A technical preview of Docker Desktop for WSL 2 will be available for download in July. It will run side by side with the current version of Docker Desktop, so you can continue to work safely on your existing projects. If you are running the latest Windows Insider build, you will be able to experience this first hand. In the coming months, we will add more features until the WSL 2 architecture is used in Docker Desktop for everyone running a compatible version of Windows.
Additionally I recommend to watch this video: https://www.youtube.com/watch?v=lwhMThePdIo
Good comparison you will find here: https://blog.logrocket.com/working-with-node-js-on-hyper-v-and-wsl2/
cite:
Comparing Hyper-V to WSL2
The biggest difference between running Ubuntu Linux in a Hyper-V virtual machine versus running the operating system in WSL2 lies in the ability to access the Ubuntu user interface in Hyper-V.
The user interface allows you to install and use more than just command-line tools.
Depending on your system’s hardware performance, you likely found that WSL2 is the faster option. To expedite the process of running Ubuntu Linux on Hyper-V, you could set up SSH access to the virtual machine.
This speeds up command-line access. However, WSL2 may still have the upper hand since it does not require SSH to enable access.
answered Jun 17, 2020 at 9:08
![]()
SysadminSysadmin
4612 silver badges6 bronze badges
1
Hyper-V and WSL2 (WSL2 runs on Virtual Machine Platform, the name of Hyper-V’s architecture packaged separately and made available to all SKUs) could have negative interactions with other VM solutions, for example VirtualBox v5 and under will not coexist with Hyper-V. As of VirtualBox v6+ there is support to run VirtualBox in a configuration to replace its own virtualization with that of Hyper-V paravirtualization. In the recent past there are reports that ‘performance will be worse’ as outlined in Use VirtualBox and Hyper-V simultaneously. If this is of particular interest to you, I’d encourage you to research what progress has been made on that front.
When people judge WSL2 as being «faster» they’re typically talking about setup time being easier and thus faster. Actual performance depends on how many presets and customizations were made for WSL2’s Hyper-V instance but more importantly, it depends on your use cases.
- Will you ONLY use WSL2 for Docker?
- If no, how do you plan to use WSL2 outside of Docker?
- Do you currently or plan to use any other Virtual Machines?
- Do you require a lot of direct Win 10 <-> WSL2 file access (WSL2 has poor file system performance when lots of file activity takes place between the two)?
In the most basic of answers:
If you’re ONLY using docker:
WSL2
If you require Linux, additional VMs or want access to Docker’s Advanced tab for resource allocation:
Hyper-V
Final Note:
Although Hyper-V is officially unsupported for Windows 10 Home edition and is stated so throughout published material, there is a proposed way to enable it which can be found in this MicrosoftDocs Virtualization-Documentation issue posting. While I am unable to comment on how well it works or if it works at all, there are guides available if you wish to try.
answered Nov 12, 2020 at 19:22
![]()
ZacZac
1411 silver badge3 bronze badges
0
Windows subsystem for linux 2 is a virtual machine for operating Linux. It initiallizes minimal hyper-v toolkit for booting Linux kernel. And hyper-v is virtualization software that can be used to virtualize other operating systems as well as Linux distros. The file sharing, command line, and networking between your Windows machine and the WSL2 environment is instant on launch. You do not have to manage this environment because it will update alongside Windows. If you don’t want to virtualize other operating systems rather than linux, then uninstall hyper-v and choose wsl2 because hyper-v doesn’t let other applications use virtualized hardware environment.
![]()
answered Jun 17, 2020 at 9:00
![]()
WasifWasif
7,5932 gold badges15 silver badges32 bronze badges
3
Docker is a platform for creating and deploying applications in self-sufficient containers. The installation of Docker is pretty easy in Linux, but this is usually not the case with Windows. In this post, I will show you how to install Docker in Windows 10 or Windows 11 in multiple ways. You’ll learn there is indeed a way that makes the Docker Desktop installation in Windows as simple as in Linux.
Contents
- Prerequisites
- Docker with WSL2 backend
- Docker with Hyper-V backend
- Install Docker using the GUI
- Install Docker using winget
- Install Docker using PowerShell
- Author
- Recent Posts

Surender Kumar has more than twelve years of experience in server and network administration. His fields of interest are Windows Servers, Active Directory, PowerShell, web servers, networking, Linux, virtualization, and penetration testing. He loves writing for his blog.
Latest posts by Surender Kumar (see all)
- Extending LVM space in Ubuntu — Thu, Feb 2 2023
- Backup in Proxmox VE — Thu, Jan 26 2023
- Snapshots in Proxmox VE — Wed, Jan 25 2023
Prerequisites
You might already be aware that Docker relies on virtualization technology. On Windows, Docker can use either the Windows Subsystem for Linux (WSL) 2 or Hyper-V as a backend.
Docker with WSL2 backend
The current version of Docker Desktop only works on the 64-bit edition of Windows, whether you’re running Windows 10 or Windows 11. To run Docker with the WSL2 backend, your system must meet the following prerequisites:
- Windows 10: Home/Pro 21H1 (build 19043) or higher, or Enterprise/Education 20H2 (build 19042) or higher
- Windows 11: Home/Pro version 21H2 or higher, or Enterprise/Education version 21H2 or higher
- WSL2 feature enabled
- Linux kernel update package for WSL2
- For WSL2, the following are the hardware requirements:
- 64-bit CPU with second-level address translation (SLAT)
- Hardware virtualization support, which must be enabled in BIOS/UEFI
- 4 GB RAM
Docker with Hyper-V backend
To be able to run Docker with a Hyper-V backend and Windows containers, your system must meet the following prerequisites:
- Windows 10: Pro 21H1 (build 19043) or higher, or Enterprise/Education 20H2 (build 19042) or higher
- Windows 11: Pro/Enterprise/Education version 21H2 or higher
- Optional Windows features for Hyper-V and Containers must be enabled

Enable Hyper V and Containers windows features for Docker

For Hyper-V, following are the hardware requirements:
- 64-bit CPU with second-level address translation (SLAT)
- Hardware virtualization support, which must be enabled in BIOS/UEFI
- 4 GB RAM
In addition to the aforementioned requirements, if you want to run Docker in a Hyper-V guest VM, you need to enable nested virtualization by running this PowerShell command on the Hyper-V host:
Set-VMProcessor -VMName <VMName> -ExposeVirtualizationExtensions $True

Enable nested virtualization for a VM on Hyper V host using PowerShell
Make sure your VM is powered off before running this command. Without nested virtualization support, Docker will not work in a VM, and you will receive the error message shown below.

Docker desktop cannot start An unexpected error occurred
Install Docker using the GUI
To install Docker Desktop in Windows using the GUI, follow these steps:
Download Docker Desktop. You will see a configuration screen, as shown in the screenshot:

Docker desktop configuration Use WSL 2 instead of Hyper V recommended
To use Docker with the WSL 2 backend, check the box that says Use WSL 2 instead of Hyper-V (recommended). If you want to use Hyper-V instead, uncheck this option and click OK.
When the installation is complete, click the Close and Restart button to restart your computer.

Close Docker installer and restart the computer to complete installation
After restarting, you will be able to run Docker Desktop using either a shortcut or a command prompt. If you did not install WSL 2 before installing Docker, you will receive the WSL 2 installation is incomplete error when you try to start Docker.

Docker desktop error WSL 2 installation is incomplete
To fix this error, run the wsl —update command in an elevated PowerShell console, and restart your computer.

Installing WSL2 kernel updates to fix the WSL 2 installation is incomplete error
Install Docker using winget
Winget is a command-line package manager for modern versions of Windows, which works just like apt or DNF in Linux. If you have a little experience with package installation in Linux, you probably know that you usually just have to type a command and the package is ready for use. Well, winget does the exact same thing in Windows. All you need is Windows 10 1809 (build 17763) or Windows 11. To install Docker in Windows using winget, follow these steps:
Launch an elevated command prompt or PowerShell console, and type the following command:
winget install --exact --id Docker.DockerDesktop --accept-source-agreements --accept-package-agreements

Installing docker desktop in windows using winget
The —exact (or -e in short) parameter tells winget to find the package using an exact match. The installation can take a while, but it is pretty much automatic, so there is nothing you need to do but wait.
When the command is finished, open a new command prompt (or PowerShell console) and run the docker —version command.
If you try to run docker —version in the same command prompt, you will likely see The term ‘docker’ is not recognized as the name of a cmdlet, function, script file, or operable program error, as shown in the screenshot.

The term docker is not recognized as the name of a cmdlet function script file or operable program
This error occurs because your current command session (cmd or PowerShell) is still using the old environment variables. To be able to recognize the newly added Docker variable, you must reload the environment variables. Launching a new command session is the easiest way to load new variables.
Install Docker using PowerShell
To install Docker Desktop using PowerShell, follow these steps:
Download Docker Desktop.
Once the installer package is downloaded, open an elevated PowerShell console or Windows Terminal, and type the following command to start Docker installation:
Start-Process "D:Docker Desktop Installer.exe" -Wait -NoNewWindow "install --quiet --accept-license"

Installing Docker silently using PowerShell
Make sure you adjust the installer path. The -Wait parameter causes the Start-Process cmdlet to wait for the new process to finish, and the -NoNewWindow parameter prevents the new process from opening in a new window. The —quiet switch is offered by Docker’s install command and suppresses the installation information. To see the information, skip this switch. Since we are using PowerShell, notice how —quiet and other flags are enclosed in quotes along with the install command—this is very important to avoid errors. By default, Docker will use the WSL 2 backend, but you could include the —backend=hyper-v flag to use the Hyper-V backend instead.
Once the above command is finished, you will see a shortcut for Docker Desktop on your desktop. Double-click the shortcut to launch Docker.
All of these installation methods are self-sufficient, so there is nothing additional you need to do. But you may still get an error message that says Docker Desktop – Access denied. You are not allowed to use Docker. You must be in the «docker-users» group.
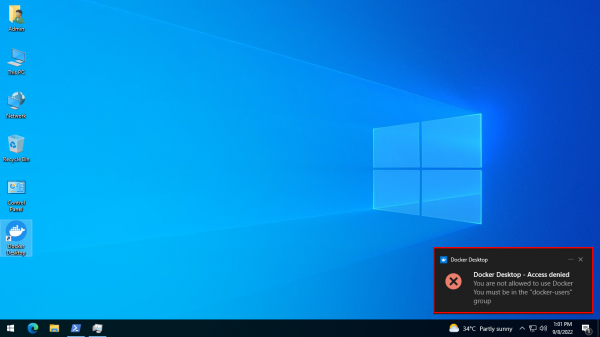
Docker Desktop – Access denied. You are not allowed to use Docker. You must be in the docker users group
If you get this error, run the following command in an elevated PowerShell console:
Add-LocalGroupMember -Group "docker-users" -Member $env:UserName -Verbose

Adding the current user to the docker users group using PowerShell
Don’t forget to log off and log on again after running this command. If you want to delegate another user to run Docker Desktop, you can specify that username with the -Member parameter instead of $env:UserName.
Subscribe to 4sysops newsletter!
That was all for this guide. You just learned how to install Docker in Windows using the GUI, winget, and PowerShell. I am curious to know which method you prefer, and why.
Updated in December 2020

TL;DR : In this article you learn how to install the necessary tools to run Docker & Kubernetes on Windows 10: Docker for Windows, Minikube, Kind, and K3s. You’ll also learn which setup is the best with regards to your machine.

Docker and Kubernetes are two popular tools to run containers at scale.
So what’s the problem with getting both of these tools on Windows?
Containers come in two flavours: Windows and Linux containers.
However, the majority of the time, when people say containers, they refer to Linux containers.
Unfortunately, you can’t run Linux containers on a Windows host or vice versa.
That’s because containers expect to use the kernel of the operating system they’re designed for.
A Linux executable expects a Linux host, and there’s no way to run it on Windows!
But there’s a workaround.
You could create a Virtual Machine that runs Linux on your Windows host.
This will let every Linux application or executable run inside a container in the virtual machine.
So how do we choose the right Virtual Machine?
It depends on your hardware and operating system.
There are several options available.
Today, you’re going to determine which combination is best for you and get up to speed on how to install it.
Specifically, we’re going to look whether you should install Docker through Docker for Windows or Minikube AND whether you should use Minikube, Kind, or K3s for Kubernetes.
Table of contents:
- The challenge with running Linux containers on Windows 10
- What options you have to run containers on Windows 10?
- Installing Docker for Windows With WSL 2 or Hyper-V
- What options do you have for installing Kubernetes on Windows 10?
- Installing Kubernetes on Windows 10 with Minikube
- Installing Kubernetes on Windows 10 with Kind
- Installing Kubernetes on Windows 10 with K3s
- Appendix 1: Installing WSL 2
- Appendix 2: Installing Chocolatey
The challenge with running Linux containers on Windows 10
Containers are processes that are isolated from the rest of the operating system but still use their resources.
Imagine clicking on an icon on your desktop and launching an application — the application runs unrestricted and can use as many CPU and memory as needed.
If you execute the same application but within a container, not only you can define how much memory and CPU it will use at most, but you can also restrict access to the filesystem, network, etc.
Containers use the underlying operating system to offer a restricted view of the resources available.
If your operating system is Windows, you can isolate Windows applications in containers.
The same is the case for Linux.
However, if you want to run Linux containers on Windows, you can’t unless you run a Linux host.
You have a few options when it comes to running Linux on your computer, but it all boils down to running a virtual machine.
Here’s a quick summary:

Let’s have a look in detail.
What options you have to run containers on Windows 10?
Docker is a tool designed to run containers.
It can run both Windows and Linux containers, but in this guide, you will focus primarily on Linux containers.
When Docker for Windows was released, it supported Hyper-V as its virtualization technology.
In other words, every Linux container that you created ran inside a virtual machine in Hyper-V.
Hyper-V is a Type-1 hypervisor and thus provides excellent performance for running virtual machines on Windows.
Then in May 2019, Windows Subsystem for Linux 2 (WSL 2) was announced.
WSL 2 runs a Hyper-V virtual machine with Linux inside — just like Docker does.
Why is WSL 2 a big deal?
WSL 2 runs on top of the Windows Hypervisor (Hyper-V), which is a bare-metal hypervisor.
You can expect the best type of performance from this hypervisor.
WSL 2 also supports memory reclaim, and this means that the system uses only the right amount of RAM required for running the Linux kernel.
And best of all, WSL 2 offers deep integration with the rest of the Windows host.
You can navigate and copy files across the virtual machine as if it were natively on Windows.
For more information on WSL 2, you should check out this deep dive by Microsoft themselves.
Wouldn’t it be great if you could use WSL2 to run your Docker containers?
If you’re running WSL 2, Docker for Windows integrates with it automatically, and it leverages the existing WSL 2 virtual machine to run your containerised applications.
If your Windows 10 build is higher than 19018, you should be easily able to install it.
You can check your build version with the following command:
—
□
𝖷
PowerShell
Get-ComputerInfo OsName,OsVersion,OsBuildNumber
OsName                      OsVersion  OsBuildNumber
------                      ---------  -------------
Microsoft Windows 10 Pro    10.0.19041 19041
You can follow the instructions on how to install WSL 2 here.
In case you don’t have access to WSL 2, that’s where things get a bit tricky.
Without WSL 2, your second best option for running Linux containers on Windows is using Docker for Desktop with Hyper-V.
In other words, rather then reutilising the Hyper-V virtual machine created by WSL 2, Docker for Windows creates a brand new virtual machine.
Unfortunately, not all Windows versions ship with Hyper-V.
Hyper-V is unavailable on Windows 10 Home, but ships with the Windows 10 Pro and Enterprise editions.
You can check if your computer supports Hyper-V with the following command:
—
□
𝖷
PowerShell
Get-WindowsOptionalFeature -Online -FeatureName Microsoft-Hyper-V
FeatureName      : Microsoft-Hyper-V
DisplayName      : Hyper-V Platform
RestartRequired  : Possible
State            : Enabled
If you have Hyper-V, but it is disabled, you can enable it with:
Enable-WindowsOptionalFeature -Online -FeatureName Microsoft-Hyper-V -All.
If your computer supports Hyper-V but not WSL 2, you can jump to the next chapter to install Docker for Windows on Hyper-V.
If your Windows installation doesn’t have WSL 2 or Hyper-V, you can’t install Docker for Windows unless you upgrade.
Installing Docker for Windows with WSL 2 or Hyper-V
Instead of downloading the binary and manually insert environment variables, this guide uses Chocolatey the Windows package manager to install Docker for Windows.
You can follow the instructions on how to install Chocolatey here.
With Chocolatey, you can install Docker for Windows with:
—
□
𝖷
PowerShell
choco install docker-desktop -y
Installing the following packages:
docker-desktop
By installing you accept licenses for the packages.
# truncated output
Installing docker-desktop...
docker-desktop has been installed.
Once the installation is over, you can search in the Windows menu for Docker by typing its name.
If it’s there, restart your PC for the changes to take effect because, without it, it won’t run.
After the restart, you might see the following error:

This error arises when virtualization is disabled in the BIOS.
The easiest way to find this setting in your BIOS is to Google the query «enable virtualization in bios + laptop name/motherboard name».
There’s a high chance you can find a tutorial specific to your machine that shows you all the steps to accomplish the task.
Once you make the changes, restart your machine and Docker should now work.
To confirm if it works, open PowerShell as an administrator and type:
—
□
𝖷
PowerShell
docker ps
CONTAINER ID   IMAGE   COMMAND   CREATED   STATUS   PORTS   NAMES
You can verify that Docker is installed correctly with the following command:
—
□
𝖷
PowerShell
docker run hello-world
Hello from Docker!
This message shows that your installation appears to be working correctly.
Excellent, now that you’ve installed Docker for Windows, you’re ready to install Kubernetes.
What options do you have for installing Kubernetes on Windows 10?
Similar to Docker, Kubernetes has constraints that you need to watch out for.
Kubernetes can run Windows and Linux containers.
However, you can only run Windows containers on Windows nodes and Linux containers on Linux nodes.
And there’s a further constraint: the Kubernetes control plane can only run on a Linux node.
In other words, Kubernetes will have to run inside a Linux virtual machine to operate correctly on Windows.
Here you have the same choice of virtual machines as you had with Docker:
- You can run Kubernetes in WSL 2.
- If your Windows version supports it, you can use Hyper-V to create a virtual machine or
- You can create a virtual machine using VirtualBox.
But choosing a virtual machine is only part of the challenge.
There are several tools designed to run a Kubernetes cluster locally.
In this guide, you will cover Minikube, Kind and K3s.
But how do you decide which method to install with?
Well, it depends on your use case.
- Are you getting started with Kubernetes and you need a fully working environment in no time? If so, Minikube will work just right.
- If you’re extending Kubernetes or you need to test Kubernetes using clusters larger than a single node, Kind is the way to go.
- If you have a low spec machine or want something that uses fewer resources, K3s is what you need.
After that, you need to look at your hardware capabilities.
The methods we’re going to look at demand anywhere from 2GB to up to 8GB of RAM.
To be specific, Minikube needs 2GB, Kind needs 8GB and K3s requires 2GB.
In most cases, your hardware will easily be able to support all three methods.
Once you know which methods your system is capable of running, you can look at your use case and choose your preferred method.

| WSL 2 | Hyper-V | VirtualBox | |
|---|---|---|---|
| Minikube | ✅ | ✅ | ✅ |
| KinD | ✅ | ✅ | |
| K3s | ✅ | ✅ | ✅ |
- Click here to learn how to install Minikube
- Click here to learn how to install Kind
- Click here to learn how to install K3s
Installing Kubernetes on Windows 10 with Minikube
Minikube is one of the most developer-friendly local Kubernetes cluster that you can install.
If you haven’t done so, install Chocolatey — the Windows package manager.
You can find the instructions here.
Open PowerShell as an administrator and execute:
—
□
𝖷
PowerShell
choco install minikube -y
Installing the following packages:
minikube
By installing you accept licenses for the packages.
# truncated output
minikube package files install completed. Performing other installation steps.
The install of minikube was successful.
Once the installation is complete, you can launch a local cluster with:
—
□
𝖷
PowerShell
minikube start
👍  Starting control plane node minikube in cluster minikube
🐳  Preparing Kubernetes v1.25.2 ...
🔎  Verifying Kubernetes components...
🌟  Enabled addons: default-storageclass, storage-provisioner
🏄  Done! kubectl is now configured to use "minikube" by default
Minikube follows the same logic as Docker for Windows.
If WSL 2 has been installed, it will be used by default.
If WSL 2 isn’t available, Minikube will try to use the same Hyper-V virtual machine created by Docker for Windows.
You can also create a separate Hyper-V virtual machine with :
—
□
𝖷
PowerShell
minikube start --driver=hypervAfter a while, you’ll either have a successful installation or be presented with some error.
In most cases, if following the instruction doesn’t help, you should try to delete the cluster with:
—
□
𝖷
PowerShell
minikube delete
🔥  Deleting "minikube" ...
💀  Removed all traces of the "minikube" cluster.
And create a new one with:
—
□
𝖷
PowerShell
minikube start --v=7The --v=7 flag increases the logging level, and you should be able to spot the error in the terminal output.
Once the command completes successfully, you can test the setup with:
—
□
𝖷
PowerShell
kubectl get nodes
NAME       STATUS   ROLES    AGE   VERSION
minikube   Ready    master   13d   v1.19.4
Congrats you have a fully working Kubernetes cluster!
Installing Kubernetes on Windows 10 — Kind
Kind is short for Kubernetes in Docker.
As the name suggests, you need to have a working installation of Docker before you can use KinD.
You can refer to instructions at the top of this article on the best option to install Docker on your machine.
Once Docker is installed, you should install kubectl next.
Kubectl is a command-line interface that assists in handling Kubernetes clusters.
In most cases, it should easily be installed through Chocolatey with:
The steps to install Chocolatey are described here.
—
□
𝖷
PowerShell
choco install kubernetes-cli -y
Installing the following packages:
kubernetes-cli
By installing you accept licenses for the packages.
# truncated output
The install of kubernetes-cli was successful.
If that doesn’t work, you can do it manually as well.
You can follow the instructions on the official homepage.
Now you will use choco to install Kind.
—
□
𝖷
PowerShell
choco install kind -y
Installing the following packages:
kind
By installing you accept licenses for the packages.
# truncated output
The install of kind was successful.
If you hadn’t installed Docker till now, the above command should install it automatically.
Note: If you have WSL 2 installed, it will automatically be used.
Let’s test it:
—
□
𝖷
PowerShell
kind create cluster
Creating cluster "kind" ...
 ✓ Ensuring node image (kindest/node:v1.19.1) 🖼
 ✓ Preparing nodes 📦
 ✓ Writing configuration 📜
 ✓ Starting control-plane 🕹️
 ✓ Installing CNI 🔌
 ✓ Installing StorageClass 💾
Set kubectl context to "kind-kind"
You can now use your cluster with:

kubectl cluster-info --context kind-kind

Have a nice day! 👋
The command could take a while (5 minutes+ and if your RAM is 8GB, you’ll see some slowdown as well).
To check if we were successful, type:
—
□
𝖷
PowerShell
kubectl cluster-info --context kind-kind
Kubernetes master is running at https://127.0.0.1:58120
KubeDNS is running at https://127.0.0.1:58120/api/…

To further debug and diagnose cluster problems, use 'kubectl cluster-info dump'.
Excellent, your cluster is ready!
Installing Kubernetes on Windows 10 — K3s
K3s is a minimal distribution of Kubernetes.
You can install K3s on:
- WSL 2
- Hyper-V or VirtualBox virtual machines.
You should pick the WSL 2 installation method if your computer supports it.
Using K3s with WSL 2
Now install K3s from this Github repository.
Open the WSL 2 shell and execute the following commands:
—
□
𝖷
PowerShell
chmod +x k3s
sudo ./k3s server
If you encounter problems, you might find it worth your time to check out this discussion).
If your computer doesn’t support WSL 2, you can try MultiPass.
Using K3s with MultiPass
MultiPass is a tool that creates and manages virtual machines that are based on Ubuntu.
You can download MultiPass with Chocolatey with:
—
□
𝖷
PowerShell
choco install multipass -y
Installing the following packages:
multipass
By installing you accept licenses for the packages.
# truncated output
The install of multipass was successful.
Once downloaded, run the executable file and choose installation options.
During the installation, you’ll be asked if you want to use Hyper-V or VirtualBox.
If you have Hyper-V, go for it.
Otherwise, stick to VirtualBox.
To launch a node with Multipass, open PowerShell and execute:
—
□
𝖷
PowerShell
multipass launch -n node1
Launched: node1
Here you created a node with default configurations of 1GB RAM and one CPU named node1.
To verify if the node exists, you can execute:
—
□
𝖷
PowerShell
multipass list
Name                    State             IPv4             Image
node1                   Running           172.25.60.186    Ubuntu 20.04 LTS
Sometimes you might not see an IP address assigned to your virtual machine.
There are a couple of reasons why you might encounter errors with the above command:
- Encountering a mistake because of VirtualBox or Hyper-V.
- Having a public network enabled.
- Having corrupted IP addresses.
Encountering an error because of VirtualBox or Hyper-V
Although Hyper-V is recommended, there’s a chance it just might not work on your system.
In that case, you should try changing your hypervisor.
To change to Hyper-V, type:
—
□
𝖷
PowerShell
multipass set local.driver=hypervTo change to VirtualBox, type:
—
□
𝖷
PowerShell
multipass set local.driver=virtualboxWhen you perform either change, be sure to reboot your system.
Having a public network enabled
MultiPass can give errors on a public network.
Type the following command to get information on your network:
—
□
𝖷
PowerShell
Get-NetConnectionProfile
Name             : Network
InterfaceAlias   : Ethernet
InterfaceIndex   : 6
NetworkCategory  : Public
IPv4Connectivity : Internet
IPv6Connectivity : NoTraffic
The NetworkCategory variable will tell you if your network is set to public or private.
The output will also give you an InterfaceIndex variable.
You’ll have that to change the network category to Private.
To change your network profile, execute:
—
□
𝖷
PowerShell
Set-NetConnectionProfile -InterfaceIndex 'your number' -NetworkCategory PrivateHaving corrupted IP addresses
When you execute multipass list and see a dash in the IP address column like below:
—
□
𝖷
PowerShell
multipass list
Name                    State             IPv4             Image
node1                   Running           N/A              Ubuntu 20.04 LTS
It means that your node isn’t assigned any IP address.
To fix that you need open a file called hosts.ics which can be located in either path:
C:WindowsSystem32driversetchosts.icsC:WindowsSystem32drivershosts.ics
Retrieve the content of the file and check if your machine has an IP address assigned to it.
—
□
𝖷
cat C:WindowsSystem32driversetchosts.ics
172.25.48.1 learnk8s.mshome.net
172.25.60.186 node1.mshome.net
If you see anything other than an IP address like random numbers, you need to do the following:
- Uninstall Multipass.
- Delete
hosts.ics. - Reboot.
- Reinstall Multipass.
- Rerun the launch command.
When your launch fails for whatever reason, you’ll be unable to create another node of the same name without clearing the list.
Before debugging, do this:
—
□
𝖷
PowerShell
multipass delete --purge --allJust keep in mind that this command deletes all instances.
Installing K3s on the node
Now you will install K3s on this node with the following command:
—
□
𝖷
PowerShell
multipass exec node1 -- bash -c "curl -sfL https://get.k3s.io | sh -"After a little wait you should be able to see your cluster in action with:
—
□
𝖷
PowerShell
multipass exec node1 -- sudo kubectl get nodes
NAME       STATUS   ROLES    AGE   VERSION
node1      Ready    master   13d   v1.19.4+k3s1
Congratulations, you installed K3s!
Appendix 1: Installing WSL 2
There are two ways you can install WSL 2: simplified and manual install.
To use the simplified install method, you need to be a member of the Windows Insider Program and have the preview build of Windows 10 (build 20262 or higher).
Then open PowerShell as an admin and type:
—
□
𝖷
PowerShell
wsl --installAfter the installation, you’ll need to restart your machine.
For a manual installation, perform the following steps:
Enable WSL through the PowerShell as an administrator with:
—
□
𝖷
PowerShell
dism.exe /online /enable-feature /featurename:Microsoft-Windows-Subsystem-Linux /all /norestart
Deployment Image Servicing and Management tool
Version: 10.0.19041.572

Image Version: 10.0.19041.685

Enabling feature(s)
[==========================100.0%==========================]
The operation completed successfully.
Now, enable the ‘Virtual Machine Platform’ setting through:
—
□
𝖷
PowerShell
Enable-WindowsOptionalFeature -Online -FeatureName VirtualMachinePlatform -NoRestart
Path          :
Online        : True
RestartNeeded : False
Reboot your system for the changes to take effect.
Set WSL 2 as the default version with:
—
□
𝖷
PowerShel
wsl --set-default-version 2Next thing you need is a Linux distro.
You can get them from the Microsoft Store.
If you are not sure, select Ubuntu as the Linux distro.
It might take a while to complete the installation, but once it is successful, you can test with:
—
□
𝖷
PowerShell
wsl --list --verbose
  NAME                   STATE           VERSION
* ubuntu-20.10           Running         2
As a safety measure, we’ll need to explicitly limit how much resource allowance we give to WSL 2.
Simply go to C:usersyour profile and create a .wslconfig file.
Here’s what its contents should be:
.wslconfig
[wsl2]
memory=4GB
processors=3
Open PowerShell as an administrator and execute:
—
□
𝖷
PowerShell
Restart-Service LxssManagerTo restart WSL 2 for the configurations to take place.
Appendix 2: Installing Chocolatey
Installing binaries on Windows could take some time.
You have to visit a website, hope that the download URL is still valid, search for the download page, select the right version, download it, install it, and finally add it to your path.
It’s doable, but I’m sure you would rather spend time doing more coding than chasing and installing executables from the internet.
Enter Chocolatey.
Chocolatey is a package manager for Windows.
You tell it what executables you wish to install, and Chocolatey installs them on your behalf.
You’re outsourcing all the hard work of provisioning software to Chocolatey.
Installing Chocolatey is easy.
You can find the full instructions on the official website.
To verify the installation, type:
—
□
𝖷
PowerShell
choco -v
0.10.15
Now you can use choco install <name> to install any executable you wish.
Don’t miss the next article!
Be the first to be notified when a new article or Kubernetes experiment is published.
*We’ll never share your email address, and you can opt-out at any time.
Introduction
Currently, there is a lot of hype around WSL and WSL 2 on Windows. It allows us to run almost any Linux application, including Docker. It even allows us to develop applications for Linux in VS Code using the «Remote — WSL» extension. But the goal of this article isn’t to praise WSL but to show that there is a better way to use Docker on Windows.
Let’s start from the beginning. Docker allows you to build and run Linux Containers (Windows too but we will not talk about it right now) in a very straightforward way — all you need is to put some build instruction in a docker-file, build the image using the «docker build» command and run the container using «docker run.» But how does docker run a container on a Linux/Windows machine?
«The Docker on Linux» Way
When you use Docker on Linux, it simply uses native kernel features, like cgroups, to run the code inside the container. As the result, it’s lightning-fast because it doesn’t use any emulation (e.g. in contrast to Virtual Box).
«The Docker on Windows» Way, Part 1 — Hyper-V
When you use Docker Windows and it doesn’t have WSL2 installed, the default backed is Hyper-V. After the installation, Docker asks you to activate it and reboot your machine. It is doing this because it uses Hyper-V to run a small virtual machine on it. Because there is no magic — you can’t run Linux executables natively on Windows. Interestingly, If you use Virtual Box on the same machine then it may become slower or stop working at all. Because what happens when you activate Hyper-V — your copy of Windows became some kind of a Virtual Machine (the host OS) that also runs on top of the Hyper-V virtualization layer. And when your run Virtual Box it’s somewhat similar to starting a VM inside another VM. It’s not completely similar, because the latest versions of Virtual Box can use Hyper-V as their emulation backend. But be aware that in order to use it your machine should support Hardware Virtualization.
«The Docker on Windows Way», Part 2 — WSL2
The first time I heard about the possibility of running Docker on WSL2 I was happy as a child. Running without Hyper-V with performance, batter than the performance of WSL1, isn’t it cool? Well, it would be cool if WSL2 didn’t rely on virtualization technology. It requires you to enable the «Virtual Machine Platform» feature of the latest builds of Windows 10. And as far as I can understand it is similar to running under Hyper-V. So, no benefits here. Almost. But it may change in the future. For now, it seems more like a marketing trick. For now, it even has a bug that prevents docker from reclaiming the memory from WSL it. One day while I was working building images with Docker on WSL2 I noticed that the process was using more than 10BG of memory! But this feature is still in beta and hopefully become better over the years. So, how can you enable it? First of all, install and WSL2 as described in the official documentation here. Then tick the following checkbox in the docker settings:
«The Docker on Windows» Way, Part 3 — WSL1
There is also an option to run Docker on WSL1 using an older version (it won’t work with the latest ones). All you have to do is to install that specific version inside any WSL1 distribution and start to use it. But then you became limited to that version, and when you run a container, it will always use around 30% of your CPU, even if the container is doing nothing. So, you can try it or even use it, especially if you have a powerful desktop PC. But it’s certainly not the best way to use Docker on your laptop due to increased power consumption and overheating.
«The Docker on Windows» Way, Part 4 — Virtual Box
This way is primarily designed for those who don’t have the hardware virtualization feature on their PC. All you have to do is to install Virtual Box on and then install a specific version of Docker called «Docker Toolbox.» Docker Toolbox also uses a small virtual machine but instead of running it on Hyper-V (which requires the virtualization) uses Virtual Box. It has its limitations, but I love it because it provides some benefits even when you do have the hardware virtualization support. Why? Because, because then you can disable Hyper-V and all other Windows Virtualization Features. It will allow you to run Virtual Box at full speed and also make your system a bit more responsive. You can read more about it in the official Hyper-V documentation in the «limitations» section here.
«The Docker on Windows», The Better Way
This way is a bit unusual and may not be suited for everyone, but I’m suggesting you reading to the end because there is a good chance you’ll love it as much as I do.
All options mentioned above can be pretty good, and some of them are official ways of running Docker on Windows. But what all those ways require you to modify your system, and sometimes it may be undesirable. For example, when you use Hyper-V it may make your system a bit unstable as described above. Also, when your run Docker Desktop, let’s say, on your laptop, it uses its resources during builds and for running containers. Sometimes it can slow you down. Needless to say, that when you build containers locally, it may use quite a lot of system disk space, and you should keep an eye on the size of the local images because it can grow pretty quickly. Mine was around 100GB one day, and it took a couple of hours to understand why and how to clean it up. So, what is the better way?
It’s «Docker on Raspberry Pi» way. Recently, I bought a Pi4, connected it to an external 2TB drive with USB 3, and configured a samba (Windows Share) service to expose it to the local network at home. I was tinkering with it, and, accidentally, decided to try to run a Minecraft server on it. I quickly build an image on my windows laptop with Docker Desktop on WSL2, pushed it to the Docker Hub, and tried to run it on the Raspberry Pi. But I quickly realized that it was failing with the following error:

As it turned out, Docker builds images with the same processor architecture under which it’s being built. In the case of «Docker on Windows,» the resulting architecture of an image is x86_64. In the case of Raspberry Pi 4 and Ubuntu (64 bit), it’s aarch64. We can verify it by running the «uname -m» command on a Raspberry Pi:

The next step was to build the image on Raspberry Pi. Only then I realized that I should build images on the Raspberry Pi itself. I didn’t use any git repositories for this quick project; and because my samba server had been already configured on my Windows laptop, all I have to do was to copy project files with the Dockerfile to a folder on the connected Network Drive (samba share).
So, I build the image once again on the Raspberry Pi. It succeeded, but then I’ve got a similar error. However, the error occurred not during a container startup, but on during Minecraft server startup:

Why a similar error? Didn’t I build it with the required architecture? To completely understand this error, you should know that a Minecraft Bedrock Edition Server is only available for Linux with x86_64 architecture (64 bit). And I was downloading it during the image build using wget. The resulting architecture of the image was aarch64, but I was trying to run x86_64 executable on it. It’s somewhat similar to trying to run a Visual Studio executable from Windows on the phone. The only way I found to make it work is to use an emulator. And so, my journey with Docker on Raspberry Pi and QEMU began. But I won’t describe it here. The only thing I mention about it here is that I’d got it working, but it was to slow to use even for a single player. Because the goal of this article is to show you the beauty of working with «Docker on Raspberry Pi.» Later that day, I opened the Visual Studio Code in the shared folder on the Raspberry Pi. And I was a similar (or even better) experience of running Visual Studio Code with the «Remote — WSL» extension. But because I was using Docker on a Raspberry Pi and connected to it via ssh, my laptop was using 0% CPUs during docker builds, its SSD was completely clean from temporary image layers, and all containers were running outside the main machine allowing it to be as responsive as possible.
Setting Up «Docker on Raspberry Pi»
Now, lets set it up from the beginning. First of all, we have to enable cgroups (it wasn’t enabled by default on Ubuntu 20, x64 for me) by editing «cmdline.txt». We can open it in vim with:
sudo vim /boot/firmware/cmdline.txt
Next, we should append the following configuration to the first line (e.g. by pressing Shift+A and entering:
cgroup_enable=cpuset cgroup_enable=memory cgroup_memory=1
Save it and quit from vim by pressing :wq<Enter>. The next step is to reboot the Raspberry Pi to apply the changes:
sudo reboot
Now, we are ready to install docker:
sudo apt update
sudo apt upgrade
sudo snap refresh
sudo snap install docker
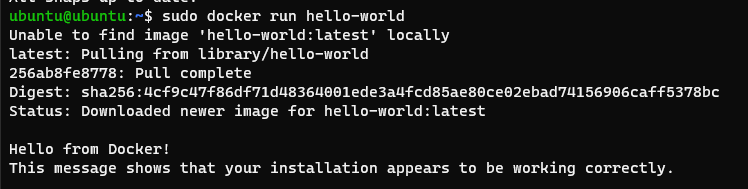
We can verify that it’s correctly installed by running:
sudo docker run hello-world
The output should look something like this:
The next step is to enable samba service to access project files easily on a Windows machine:
sudo apt install samba
Let’s say, we would like out code to live in ~/code (e.g. /home/ubuntu/code):
mkdir ~/code
In order to configure samba server on the Raspberry Pi and share ~/code folder we have to edit smb.conf file:
sudo vim /etc/samba/smb.conf
First of all, modify the «global» section. Mine looks like this:

and create a new share by appending it’s configuration at the end of a file. It may look like this:

Notice, here we configured ubuntu as our user. But we can specify any user name here, not just ubuntu. Samba users are not the same as system users. For simplicity, we can even enable public access without a password by setting «public = yes.» Save it and quit from vim. Now we should add our ubuntu-samba user and generate a password for it:
sudo smbpasswd -a ubuntu
To apply the changes, we should restart the samba service:
sudo service smbd restart
To verify that our service is working fine we can run the following command:
sudo systemctl status smbd

If it’s active then we didn’t mess with samba.conf and are ready to connect to the samba service from Windows. Notice, I’m assuming you are familiar with your network configuration. At this point, it would be almost essential to assign a static IP address to your Raspberry Pi on your router. I assigned 192.168.100.16 for mine. It will allow you to easily restore the network drive connection to Raspberry Pi each time your laptop is booted and connected to the local network.
All we have to do is to open the Windows Explorer and press the «Map Network Drive» button:

specify required options and press finish:
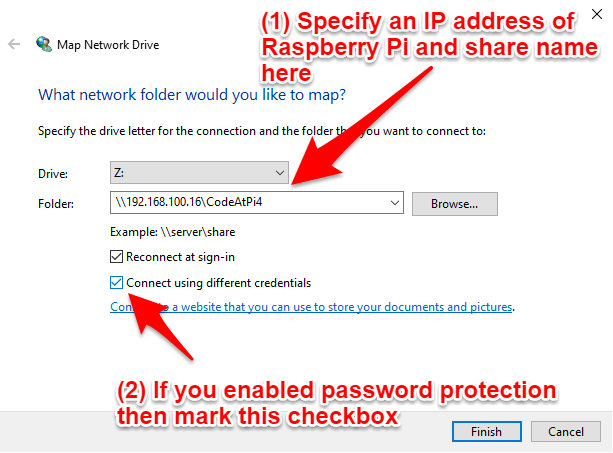
enter credentials for the ubuntu user (the ones you’ve added using smbpasswd):

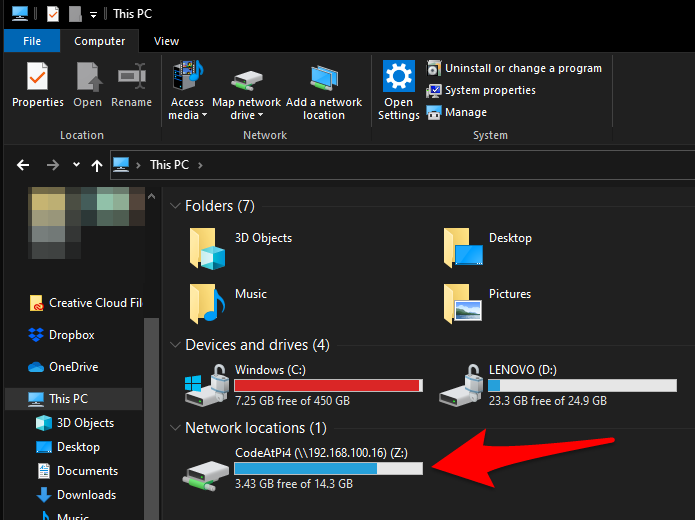
and viola, now we can access our share from Windows as it was a regular drive:
From here we can clone any git repository using PowerShell, and then open it in Visual Studio Code. For example:
git clone https://github.com/docker-library/hello-world
cd hello-world
git reset --hard 9ef4804c28679a416a445397f9b2e2b105005151
code .
To verify it’s working, open hello.c file, and add/modify any text you want. For example:

and remove those lines from Dockerfile.build (on the moment of writing this article those packages were unavailable on Raspberry Pi, Ubuntu 20, x64):

and delete all blocks that starts with «RUN set -ex» except this one:

and change CMD line from amd64 to arm64v8:

and save the changes. Then switch to the Raspberry Pi (I’m ssh-ing to it) and run the following commands:
cd ~/code/hello-world
sudo docker build -t hello:latest -f Dockerfile.build .
sudo docker run --rm hello:latest
And here is our modified message:
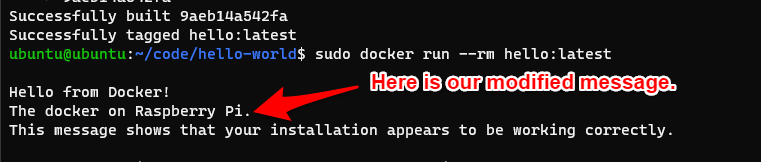
Isn’t that cool? Now, you can work on your docker projects on a Windows machine without the need to have Docker installed.
Summary:
So, what is the «Docker on Raspberri Pi» way about? It’s about isolating your personal/professional environment from the Docker itself, quickly iterating using shared folders on a Raspberry Pi filled with your project files and git repositories, and using your preferred code editor opened on your favorite machine. And it’s about freedom of choice.
Pros:
- It doesn’t rely on Hyper-V, WSL2, or any other virtualization technology.
- It doesn’t take any memory and processing power on your main laptop.
- You can easily bring it to your office.
- No need to pay for a separate VM and compute resources.
- Easy to use.
Cons:
- Resulting images are compiled to aarch64 (arm64) architecture and can’t be run on a laptop (unless you use buildx or an emulator).
- Computing resources of Raspberry Pi are limited.
- Some libraries may not be available on aarch64.
- Relatively hard to configure.
Thanks for reading and happy coding.
8 November, 2022
1,600 words, 8-minute read
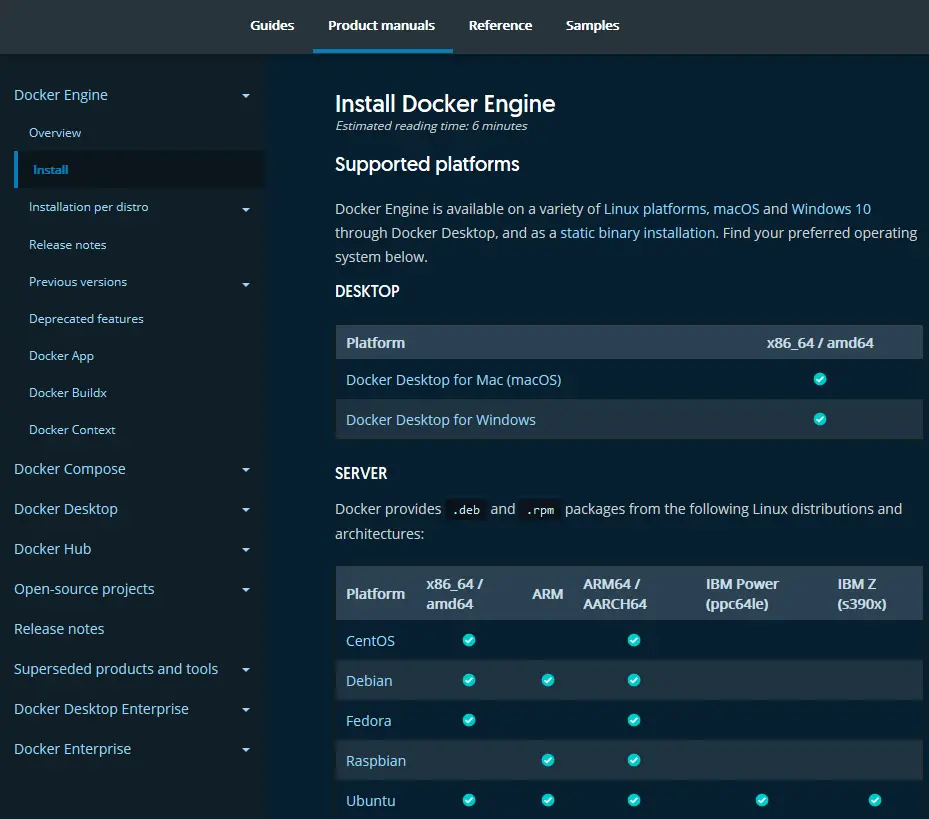
Docker can be installed on Linux, mac OS, or Windows.
Requirements and installation instructions can be found on the Docker Docs help pages.
Install Docker on Linux #
Docker Desktop for Linux can be downloaded from Docker Hub. The installer includes the Docker server, CLI, Docker Compose, Docker Swarm, and Kubernetes.
Alternatively, the Docker command-line tool is available in official Linux repositories although these are often older editions. The latest edition is supported on recent 64-bit editions of popular Linux distros:
- Ubuntu (and derivatives such as Mint)
- CentOS
- Debian
- Fedora
Static binaries are available for other distros, although Googling “install Docker on [your OS]” may provide easier instructions, e.g. “install Docker on a Raspberry Pi”.
Follow the Docker documentation for your distro. For example, Docker for Ubuntu is installed with the following commands:
sudo apt-get remove docker docker-engine docker.io containerd runc
sudo apt-get update
sudo apt-get install ca-certificates curl gnupg lsb-release

sudo mkdir -p /etc/apt/keyrings
curl -fsSL https://download.docker.com/linux/ubuntu/gpg | sudo gpg --dearmor -o /etc/apt/keyrings/docker.gpg

echo "deb [arch=$(dpkg --print-architecture) signed-by=/etc/apt/keyrings/docker.gpg] https://download.docker.com/linux/ubuntu $(lsb_release -cs) stable" | sudo tee /etc/apt/sources.list.d/docker.list > /dev/null

sudo apt-get update
sudo apt-get install docker-ce docker-ce-cli containerd.io docker-compose-plugin
To run Docker commands as a non-root user (without sudo), create and add yourself to a docker group:
sudo groupadd docker
sudo usermod -aG docker $USER
Then reboot to apply all changes.
Install Docker on macOS #
Docker Desktop for macOS Sierra 10.13 and above can be downloaded from Docker Hub. The package includes the Docker server, CLI, Docker Compose, Docker Swarm, and Kubernetes.
Two editions are available: stable and edge with experimental features. The stable version is best for most developers.
Double-click Docker.dmg to open the installer, then drag the Docker icon to the Applications folder. Double-click Docker.app in that folder to launch Docker.
After completion, the whale icon in the status bar indicates Docker is running and commands can be entered in the terminal.
![]()
Install Docker on Windows #
Docker Desktop for Windows requires either WSL2 or Hyper-V.
Windows Subsystem for Linux (WSL) 2 #
WSL allows you to run full Linux environments directly on Windows 10 or Windows 11.
IMPORTANT!
You can not install the Linux edition of Docker within a WSL-powered Linux distro. You must install Docker Desktop for Windows which allows Docker commands to be run in all Windows and Linux terminals.
WSL2 is the recommended default option for Docker on Windows. It is faster than Hyper-V and available in all editions of Windows 11 and Windows 10 from the May 2020 update (version 2004, OS build 19041).
To install WSL2:
-
Enable hardware virtualization support in your BIOS.
This will be active on most devices, but check by rebooting and accessing your PC’s BIOS panels – typically by hitting DEL, F2, or F10 as your system starts. Look for Virtualization Technology, VTx or similar options. Ensure they are enabled, save, and reboot.
WARNING! Be careful when changing BIOS settings – one wrong move could trash your PC.
-
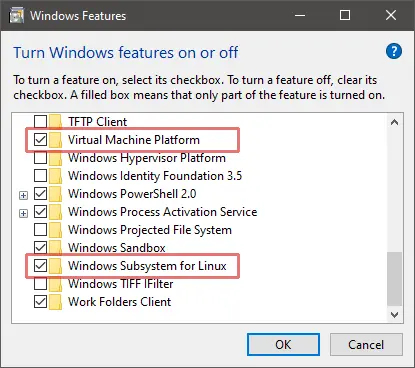
Enable the Virtual Machine Platform and Windows Subsystem for Linux options in the Turn Windows features on or off panel:

This can be accessed by hitting the Start button and typing the panel name or from Programs and Features in the classic Control Panel.
-
Reboot, then enter the following command in a Windows Powershell or
cmdprompt to set WSL2 as the default:wsl --set-default-version 2 -
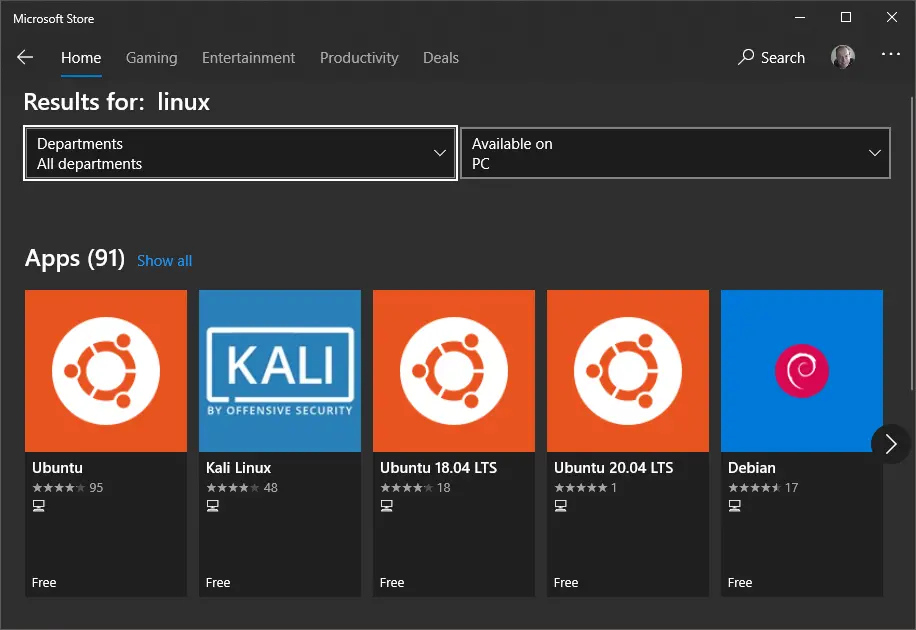
Download and install your preferred distro by searching for “Linux” in the Microsoft Store app. Ubuntu is a good choice.

-
To complete the installation, launch your distro by clicking its Store’s Launch button or choosing its icon from the Start menu.
You may be prompted to install a kernel update – follow the instructions and launch the distro again.
-
Enter a Linux username and password. These are separate from your Windows credentials although choosing the same ones can be practical.
-
Ensure your distro is up-to-date. For example, on an Ubuntu bash prompt enter:
sudo apt update && sudo apt upgrade
You can now install Docker Desktop (see below). For the best performance and stability, store development files in your Linux file system and run Docker from your Linux terminal.
More information about installing and using WSL2:
- Windows Subsystem for Linux 2: The Complete Guide, and
- optionally, Windows Terminal: The Complete Guide.
Hyper-V #
The Microsoft Hyper-V hypervisor is provided free with Windows 10 and 11 Professional and Enterprise. (Windows Home users must use WSL2.)
To install Hyper-V:
-
Enable hardware virtualization support in your BIOS.
This will be active on most devices, but check by rebooting and accessing your PC’s BIOS panels – typically by hitting DEL, F2, or F10 as your system starts. Look for Virtualization Technology, VTx or similar options. Ensure they are enabled, save, and reboot.
WARNING! Be careful when changing BIOS settings – one wrong move could trash your PC.
-
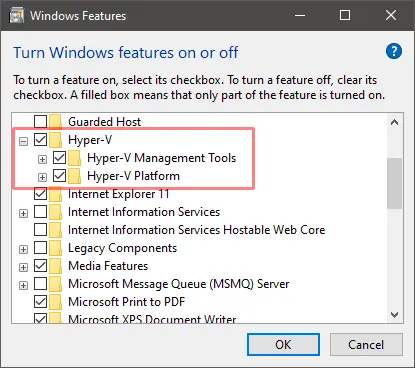
Enable the Hyper-V option in the Turn Windows features on or off panel then reboot.
This can be accessed by hitting the Start button and typing the panel name or from Programs and Features in the classic Control Panel.
You can now install Docker Desktop.
Install Docker Desktop for Windows #
Docker Desktop for Windows 10 and 11 can be downloaded from Docker Hub. The installer includes the Docker server, CLI, Docker Compose, Docker Swarm, and Kubernetes.
Two editions are available: stable and edge with experimental features. The stable version is best for most developers.
Double-click Docker Desktop Installer.exe to start the installation process. After completion and launch, the whale icon in the notification area of the task bar indicates Docker is running and ready to accept commands in the Windows Powershell/cmd terminal (and Linux if using WSL2).
Docker Engine Settings #
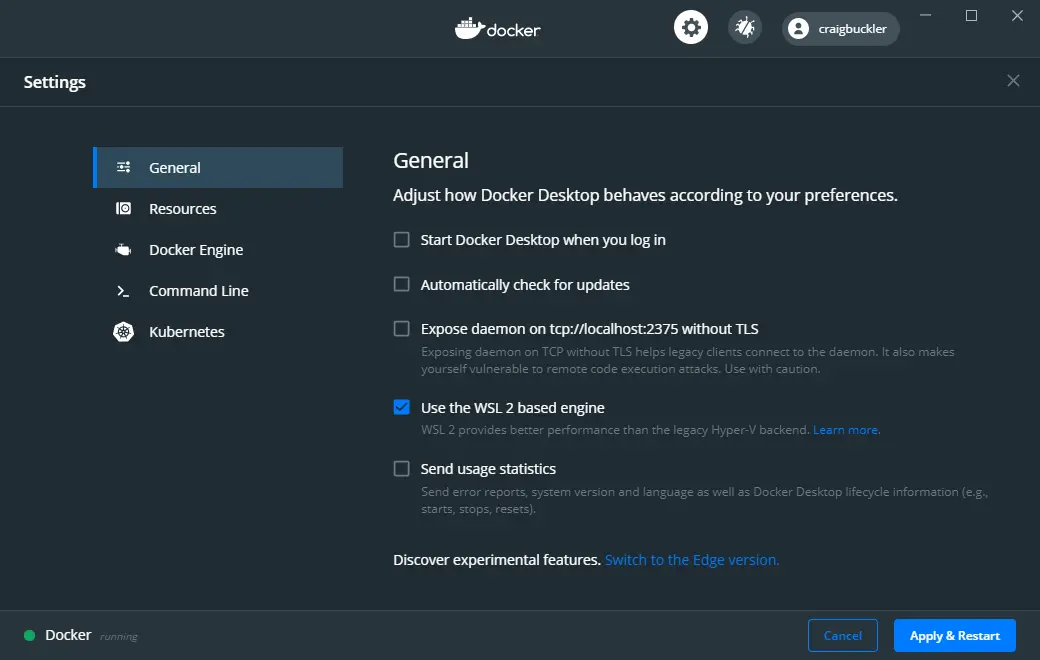
Docker uses WSL2 as the default engine when available. You will be prompted to confirm this choice during installation and after WSL2 is installed.
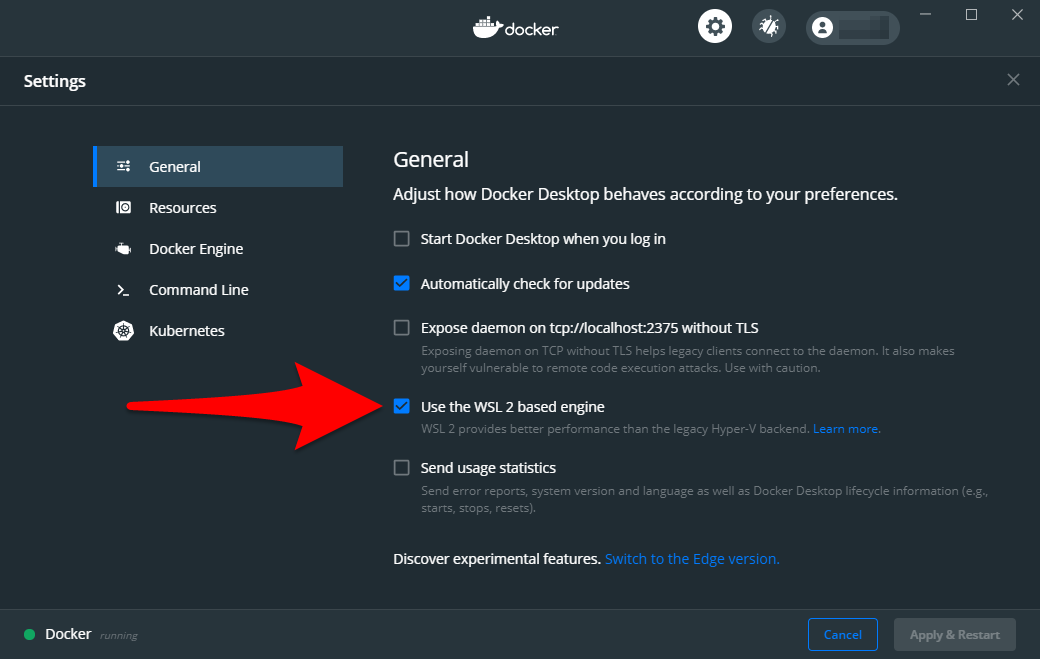
Alternatively, WSL2 can be enabled by checking Use the WSL 2 based engine in the General tab of Settings accessed from the Docker task bar icon. Unchecking the option reverts to Hyper-V.
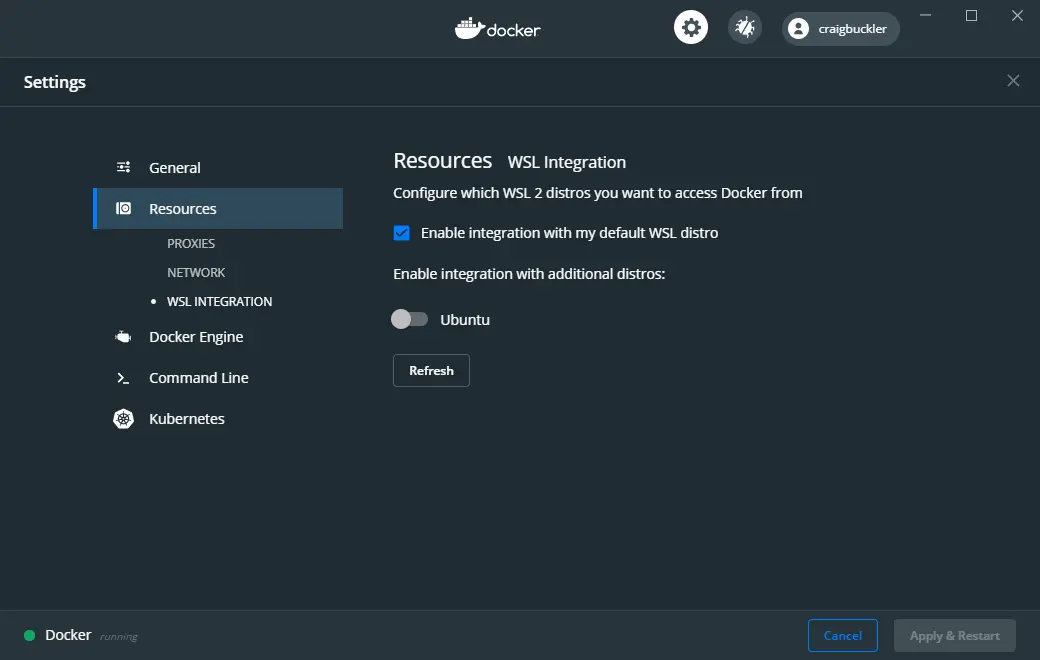
When using WSL2, at least one Linux distro must be enabled – the default is chosen. You can also permit Docker commands in other distros by accessing the WSL integration panel in the Resources section of the Docker Settings:
When using Hyper-V, Docker must be granted access to the Windows file system. Select the drives it is permitted to use by accessing the File Sharing panel in the Resources section of the Docker Settings:
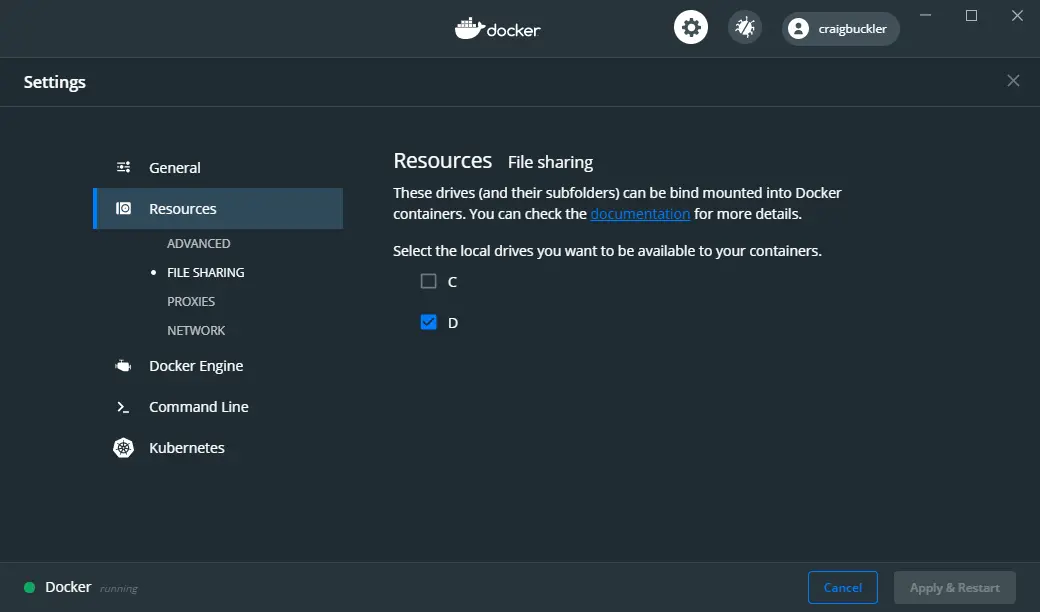
(This option was named Shared Drives in previous editions of Docker Desktop.)
Test your Docker installation #
Check Docker has successfully installed by entering the following command in your terminal:
docker versionA response similar to the following is displayed:
Client: Docker Engine - Community
 Version:           19.03.12
 API version:       1.40
 Go version:        go1.13.10
 Git commit:        abcdef0
 Built:             Mon Jun 22 15:45:36 2020
 OS/Arch:           linux/amd64
 Experimental:      false

Server: Docker Engine - Community
 Engine:
  Version:          19.03.12
  API version:      1.40 (minimum version 1.12)
  ...etc...
Ensure Docker Compose is working by entering:
docker-compose versionTo receive something like:
docker-compose version 1.27.2, build 8d51620a
docker-py version: 4.3.1
CPython version: 3.7.7
OpenSSL version: OpenSSL 1.1.1c  10 Sep 2019
Optionally, try entering:
docker run hello-worldto verify Docker can pull an image from Docker Hub and start containers as expected…
Unable to find image 'hello-world:latest' locally
latest: Pulling from library/hello-world
1b930d010525: Pull complete
Digest: sha256:f9dfddf63636d84ef479d645ab5885156ae030f611a56f3a7ac
Status: Downloaded newer image for hello-world:latest

Hello from Docker!
This message shows your installation appears to be working correctly.
Key points #
What you’ve learned in this chapter:
- How to install and configure Docker on your Linux, macOS, or Windows system.
- How to install Docker Compose.
- How to test the Docker installation.
The following chapters demonstrate how to use Docker during development…
…but to continue reading, you need to buy the book.
Do you want an easy-to-follow course which demonstrates how to use Docker and create practical web development environments on your Windows, macOS, or Linux PC?
Buy the «Docker for Web Developers» book & video course…
-
full course
$99 $50 £43 / €49
buy all
-
ebooks only
$30 $15 £13 / €15
buy books
-
videos only
$80 $40 £34 / €40
buy videos
plus your country’s sales tax where applicable
Table of Contents
The installation process for Docker can be a little confusing and complicated if you haven’t done it before. You’ll likely need to install it on several devices over time, so make sure you pay close attention to our guide on how to install Docker on Windows.
Requirements
WSL 2 Backend, Hyper-V backend and Windows containers
To use Docker on Windows 10, make sure you have Windows 10 64-bit Home or Pro (2004 or higher) or Enterprise or Education (version 1909 or higher).
Your computer will need to have the following specifications or better:
- 64-bit processor with Second Level Address Translation
- 4GB system RAM
- BIOS-level hardware virtualization support needs to be enabled in the BIOS settings
- Make sure to enable Hyper-V and Containers feature in Windows.
- Make sure you enable the WSL 2 feature on Windows.
Note: Docker Desktop only supports the Windows versions that are still supported by Microsoft, so make sure your Windows is updated.
How to Install Docker on Windows 10 or Above: Step-By-Step Installation Guide
First, we need to download the Docker file for installation. Here is the link to download the file for installation on Windows.
- Once the installation file is downloaded, it can usually be found in your download folder. Once you find it, right-click on the installation file and click on «Run as administrator.»
- As the setup starts, you will be able to see the configuration page. Make sure to select one of the following options on the configuration page:
a) Enable Hyper-V Windows Features
b) Install required Windows components for WSL 2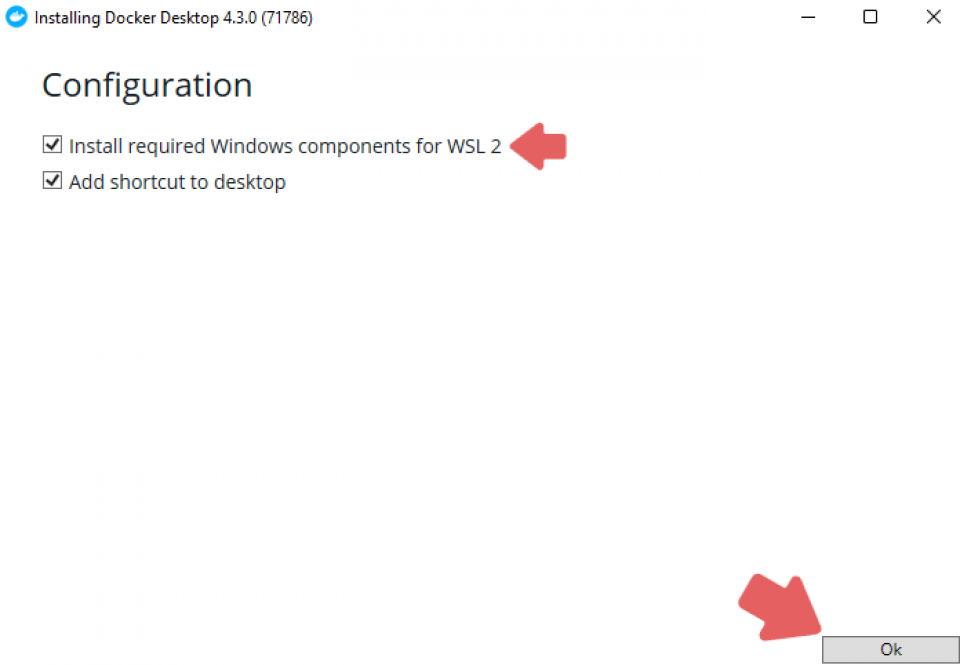
3. The installation process after the initial setup is fairly simple, so just follow the instructions on the wizard and authorize the installer to proceed with the installation.
4. Once the installation is finished, press the “Close” button to finalize the installation.
Note: If your administrator account is different from the user account, you need to add the user to the «docker-users» group.
- Run the Computer Management as an admin and go to «Local Users and Groups.»
- From there, go to «Groups» and then go to «docker-users.»

- Now just right-click to add the user into the group. Now, restart your pc for the changes to take place.

Basic Configuration
Now that you’re done with the Docker compose install on Windows, you need to set it up, as it doesn’t start automatically after installation. To start Docker Desktop, you need to follow a few steps.
- Start by searching for Docker in the Start Menu and click on Docker Desktop in the search results.
- On your first launch, you will be presented with the Docker Subscription Service Agreement window. Once you go past that, Docker Desktop will start as soon as you agree to the terms by clicking the Accept option.

- Once you’re done with the initialization, Docker Desktop will launch the «Quick Start Guide.» This includes simple exercises that will help you get started. Some examples include building a Docker image, running it as a container, pushing and saving it to the Docker Hub.

If you need to check the Quick Start Guide again, then just right-click the Docker icon in the notification tray in the bottom right and open the Docker desktop menu and select the Quick Start Guide.
How to Uninstall
To remove Docker Desktop from your Windows computer, follow these simple steps:
- Open the Start Menu by pressing the Windows key on your keyboard. Navigate to the settings and go to «Apps,» and then go to «Apps & Features.»
- From there, find “Docker Desktop” and click on the uninstall option.

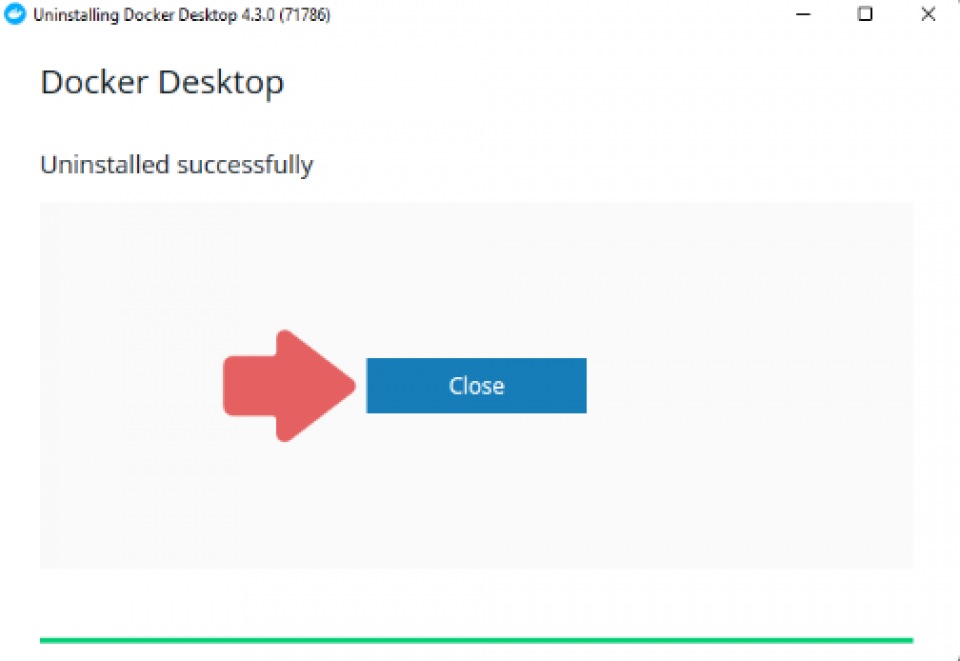
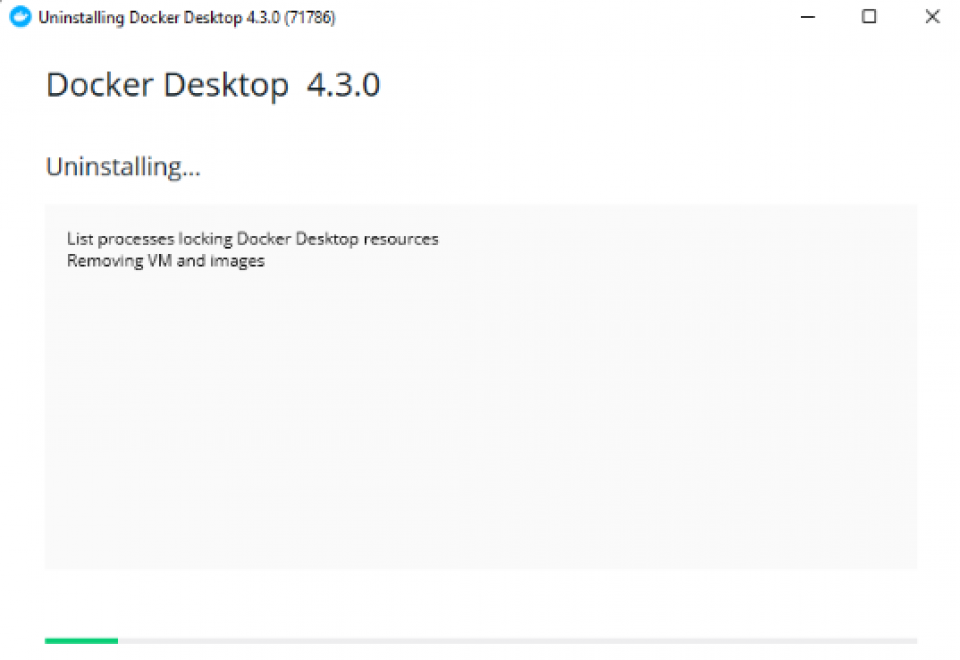
- You will be taken to an Uninstall wizard, and you just have to select the Uninstall option to confirm your selection. The Docker Desktop app will be uninstalled from your computer as soon as the setup ends.


Note: Once Docker Desktop is uninstalled, it destroys local Docker containers, volumes, images, and all other Docker-related data, as well as the files created by the program. Learn how to backup vital data before uninstalling so you can recover your data if you need to later on.
What Is Docker for Windows?
Docker is an open-source platform that allows developers to make packages of their applications into containers. These are executable components that combine application source code and the libraries in the operating system. This allows the developers to run this code in any environment.
These containers help make the delivery of distributed applications very simple and have become widely adopted by developers all over the world.
Even though developers are able to create containers without Docker, the platform just makes it more simple, easy and safer.
Docker & Kubernetes: The Practical Guide [2023 Edition]
Why Use Docker?
Docker is so popular that the term “Docker ” and «containers» are often interchanged for each other. Here are a few reasons why Docker for Windows 10 and 11 is so widely used:
- Portable: Docker containers are highly portable and can be seamlessly used without modification across any desktop environment
- Lightweight: In Docker containers, at a time, only one process is allowed to run in each container, which means that you can run the application while taking its parts out for repair or update
- Automated: Docker can quickly build containers based on an application’s source code.
- Versioning: It can easily track, roll back and trace versions of a container
- Reusability: Existing containers can be reused as templates for building new containers
- Shared libraries: Developers can easily access a registry containing thousands of containers contributed by users
Is Docker Desktop Free?
According to the Docker website, Docker is free to use for personal use, small business, education, and non-commercial use. However, it requires a paid subscription for use in larger enterprises by professionals.
Docker Certified Associate 2023: Master Course
Learn More About Docker
Now that you’ve learned how to install Docker on Windows, it’s time to master the program itself. We have plenty of courses on Hackr.io dedicated to learning how to use Docker. Get stuck into one of those to learn the ropes, or advance your already competent skills.
Блог компании RUVDS.com, Системное администрирование, Разработка под Linux
Рекомендация: подборка платных и бесплатных курсов личностного роста — https://katalog-kursov.ru/
Раньше моей рабочей машиной был ноутбук, созданный Apple. Я мог делать на нём практически всё что угодно: разрабатывать программы, писать тексты, сочинять музыку, да и много чего ещё. Но мне не давали покоя мысли о том, что я привязан к экосистеме Apple, о том, что я зависим от прихотей этой компании. Поэтому я приступил к поискам чего-то нового.
Я начал собирать рабочую станцию под задачи машинного обучения. Поставил в неё, кроме прочего, отличный процессор, много памяти, достойную видеокарту. Практически все мои задачи я решал в Ubuntu. Правда, для работы с текстами мне нужен был Microsoft Office. Онлайновый Office тогда ещё не появился, и, давайте называть вещи своими именами, LibreOffice — это просто ужас какой-то. Для меня решением стала двойная загрузка в конфигурации Ubuntu — Windows 10. Мне невероятно понравилось то ощущение свободы, которое испытываешь, переходя с ОС от Apple на Ubuntu. А возможности, которые открываются перед тем, кто сам собирает свой компьютер, практически бесконечны.

Двойная загрузка в течение долгого времени полностью меня устраивала. А когда я миллион раз ей воспользовался, появилась технология WSL (Windows Subsystem for Linux, подсистема Windows для Linux). Когда это случилось, я начал решать некоторые свои Linux-задачи в Windows. Правда, даже так, многого для полноценной работы мне ещё не хватало. Но теперь, с выходом WSL 2, у меня возникает такое ощущение, что новая версия WSL способна кардинальным образом изменить ситуацию. Сегодня я предлагаю поговорить о том, как, с помощью WSL 2, перенести задачи по разработке программ из Linux в Windows 10. Я расскажу о новых возможностях WSL 2, и о том, что можно ожидать от этой подсистемы в будущем.
Обзор WSL 2
WSL 2 — это новая версия подсистемы Windows для Linux. В этой версии имеются некоторые изменения, определяющие то, как Linux-дистрибутивы взаимодействуют с Windows.

Microsoft любит Linux
В этом релизе WSL в распоряжении пользователя оказывается улучшенная производительность файловой системы и полная совместимость с системными вызовами. Конечно, у нас есть возможность запускать Linux либо на WSL 1, либо на WSL 2, и, более того, переключаться между разными версиями WSL можно в любое время. WSL 2 — это результат серьёзного усовершенствования базовой архитектуры системы, её новые возможности основаны на технологии виртуализации и на функционале ядра Linux. При этом Microsoft берёт на себя заботу о мелких деталях, поэтому пользователь WSL может просто заниматься своими делами, ни на что не отвлекаясь.
Установка
Microsoft обещает, что в ближайшем будущем установка WSL 2 будет выполняться очень просто, и что Linux можно будет обновлять с использованием механизма обновлений Windows. Пока же процесс установки WSL 2 требует некоторых усилий, но, на самом деле, ничего страшного тут нет.
В этом примере мы установим на Windows 10 Ubuntu 20.04. Надо отметить, что процесс установки будет одним и тем же для всех дистрибутивов Linux, доступных в Microsoft Store. Для начала нужно включить компонент Windows Subsystem for Linux. Для этого надо открыть PowerShell от имени администратора и выполнить следующую команду:
dism.exe /online /enable-feature /featurename:Microsoft-Windows-Subsystem-Linux /all /norestart
Далее, нужно обновить WSL до WSL 2. Для этого Windows 10 должна быть обновлена до версии 2004. В BIOS должна быть включена технология виртуализации Intel. Снова воспользуемся PowerShell с административными привилегиями и выполним такую команду:
dism.exe /online /enable-feature /featurename:VirtualMachinePlatform /all /norestart
Для завершения установки WSL и обновления до WSL 2 перезагрузите компьютер. Затем нужно установить WSL 2 в качестве версии WSL, используемой по умолчанию при установке новых дистрибутивов Linux. Для этого, всё так же, пользуясь PowerShell с правами администратора, выполним эту команду:
wsl --set-default-version 2
После того, как вы выполните эту команду, может появиться такое сообщение:
WSL 2 requires an update to its kernel component. For information please visit https://aka.ms/wsl2kernel
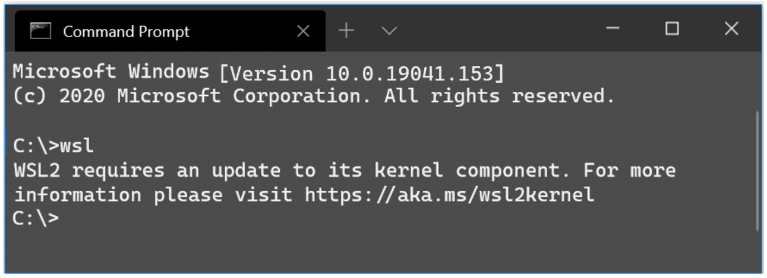
Сообщение, выдаваемое при попытке установки WSL 2 как подсистемы Windows для Linux, используемой по умолчанию
Перейдите по указанной ссылке и установите соответствующий MSI-файл, благодаря которому на вашу машину будет установлено ядро Linux для WSL 2. После того, как ядро будет установлено, выполните вышеприведённую команду снова. Теперь она должна завершиться успешно, не выдавая подобного сообщения.
Теперь осталось лишь установить нужный дистрибутив Linux. Для этого надо открыть Microsoft Store и поискать там Ubuntu 20.04 LTS. После установки дистрибутива в меню Пуск должен появиться ярлык для запуска Ubuntu. Запустите систему и следуйте инструкциям для завершения установки (в целом, завершение установки заключается в создании нового пользователя).
Для того чтобы проверить, действительно ли дистрибутив установлен на WSL 2, выполните такую команду:
wsl --list --verbose
Если оказалось, что используется WSL 1, то переключиться на WSL 2 можно, воспользовавшись командой такого вида:
wsl --set-version <distribution name> <versionNumber>
Вот и всё. Теперь в вашем распоряжении имеется полноценный дистрибутив Ubuntu, работающий в Windows 10.
Настройка рабочей среды для программиста
Теперь, когда в вашем распоряжении оказалась рабочая Ubuntu, вы можете устанавливать всё, что вам может понадобиться. Например, если вы — дата-сайентист, вы можете установить самый свежий дистрибутив Anaconda. Если вы — фронтенд-разработчик, то вас, например, могут заинтересовать Angular, npm и многое другое. Здесь же мне хотелось бы сосредоточиться на двух инструментах. Это — Visual Studio Code и связка Docker + Kubernetes.
?Visual Studio Code
VS Code — это редактор кода, которому отдаёт предпочтение множество разработчиков. Одна из сильных сторон этого редактора заключается в поддержке бесконечного множества расширений. А теперь, когда мы включили WSL 2, совершенно необходимым расширением для VS Code можно назвать Remote Development.
Это расширение позволяет удалённо работать над кодом, который имеется в среде, создаваемой средствами WSL 2, в контейнере, или даже на удалённой виртуальной машине, доступ к которой осуществляется по SSH. Данное расширение позволяет, например, создать проект в ОС Linux, работающей в WSL 2, и использовать для работы над этим проектом редактор VS Code, установленный в Windows 10.
Собственно говоря, VS Code отличается огромными возможностями. Это и интеллектуальная система IntelliSense, и интеграция с git, и отладчик, и терминал, и очень много чего ещё. Полагаю, с настройкой VS Code вы справитесь и очень скоро сможете сделать из этого редактора именно то, что нужно вам.
?Docker + Kubernetes
Docker для Windows сделан на «хорошо», но не на «отлично». На самом деле, именно Docker заставлял меня постоянно «прыгать» между Windows и Ubuntu. Например, мне приходилось делать это тогда, когда нужно было создать новый образ Docker. А вот WSL 2 отличается полной поддержкой Docker. Это, полагаю, такая возможность новой подсистемы, которая делает работу с Docker даже удобнее, чем в Linux.
Для того чтобы включить эту возможность, нужно перейти в настройки Docker Desktop и включить опцию Use the WSL 2 based engine.
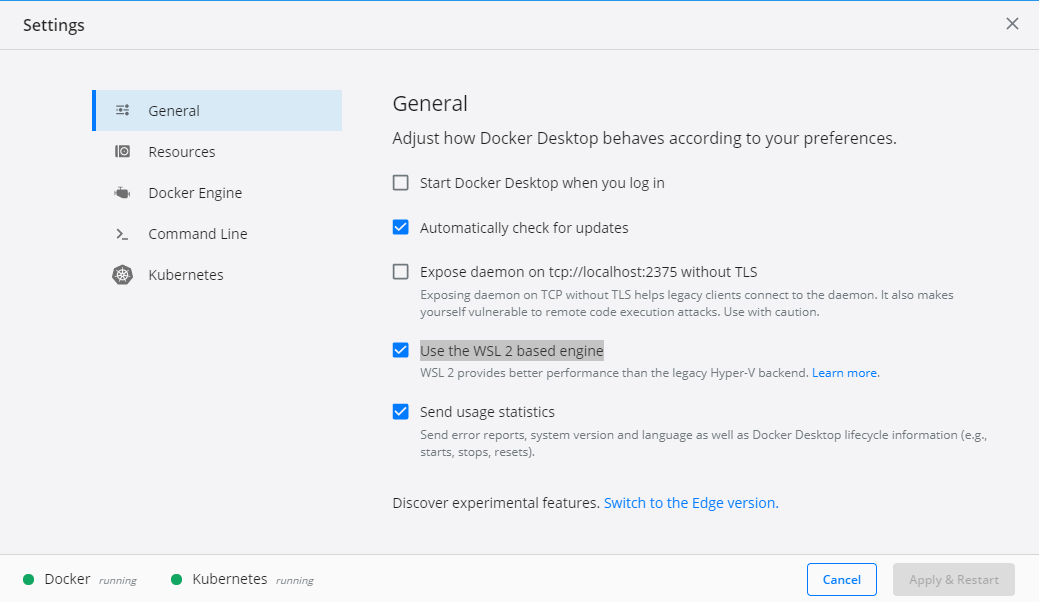
Включение поддержки Docker для WSL 2
Более того, перейдя в раздел настроек Kubernetes, можно включить возможность запуска локального кластера Kubernetes, просто установив соответствующий флажок.

Включение Kubernetes
Теперь можно перезапустить Ubuntu в WSL 2 и выполнить следующие команды:
docker version
kubectl version
Результаты выполнения подобных команд покажут, что в вашем распоряжении теперь есть Docker и Kubernetes.
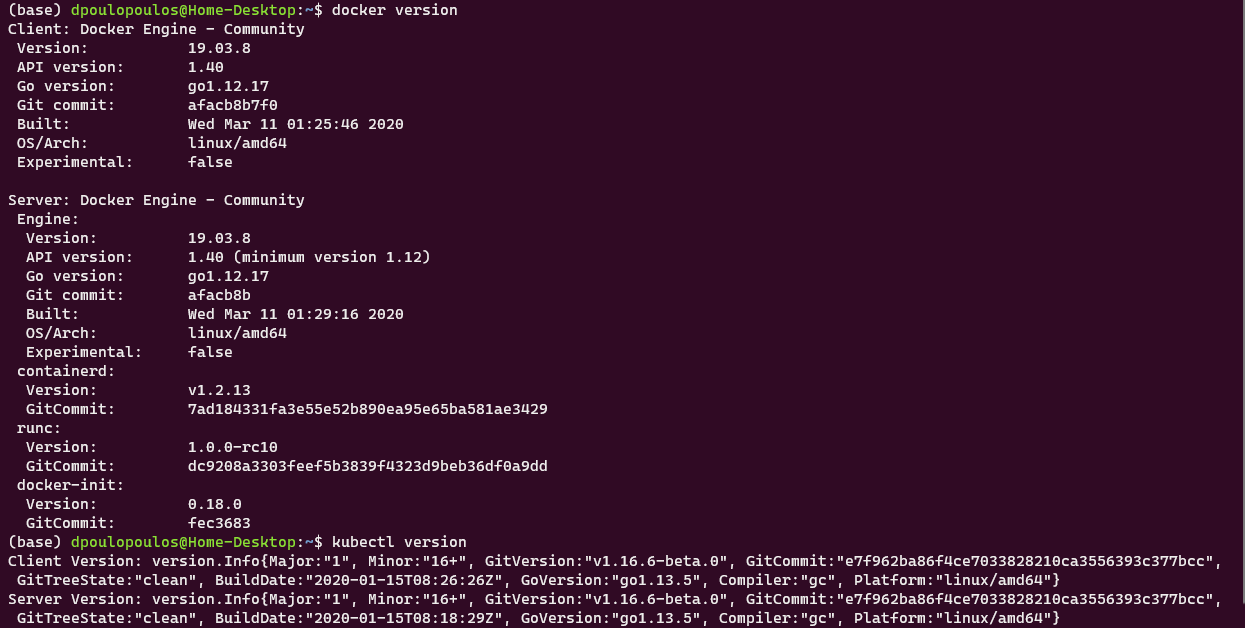
Docker и Kubernetes работают в среде WSL 2
Бонус: новый терминал Windows
В качестве дополнительной полезной программы вы можете установить из Microsoft Store новый терминал Windows. В описании к нему сказано, что перед нами новое современное приложение — быстрое, эффективное и мощное. Оно предназначено для пользователей, работающих с инструментами командной строки и с соответствующими средами, наподобие PowerShell. Среди его главных возможностей можно отметить следующие: поддержка вкладок и панелей, поддержка Unicode и UTF-8, ускорение вывода текста средствами GPU, поддержка пользовательских тем, стилей и настроек.
Вот видео про новый терминал Windows.
Более того, новый терминал очень хорошо выглядит, а его внешний вид поддаётся настройке. Настройки можно выполнять, пользуясь особым JSON-файлом. Здесь можно найти темы для терминала. Вот материал, в котором можно почитать подробности о терминале.
Планы развития WSL
В WSL 2 ещё недостаёт некоторых возможностей, но подсистема Windows для Linux развивается в правильном направлении. В ближайшее время установить WSL можно будет с помощью одной команды. Для этого достаточно будет открыть терминал Windows и выполнить в нём следующее:
wsl.exe --install
Кроме того, WSL 2 будет той версией подсистемы, которая, при первой установке WSL, устанавливается по умолчанию.
Надо отметить, что разработчики очень ждут от WSL следующих возможностей: поддержка видеокарт и поддержка приложений с графическим интерфейсом.
С момента выхода WSL 1 команду разработчиков этой подсистемы чаще всего просили о внедрении в WSL поддержки CUDA или GPU Compute. В последний код команды разработчиков WSL, систем виртуализации, DirectX, Windows Driver работают над этой возможностью. Поэтому — следите за новостями.
Обучение модели, использующей технологии глубокого обучения, в WSL 2 (с использованием CUDA)
Более того, на подходе и поддержка графических приложений для Linux. Например, в Linux-системах, установленных на WSL, можно будет пользоваться текстовыми редакторами или IDE. На Windows-машине можно будет даже разрабатывать GUI-приложения для Linux!
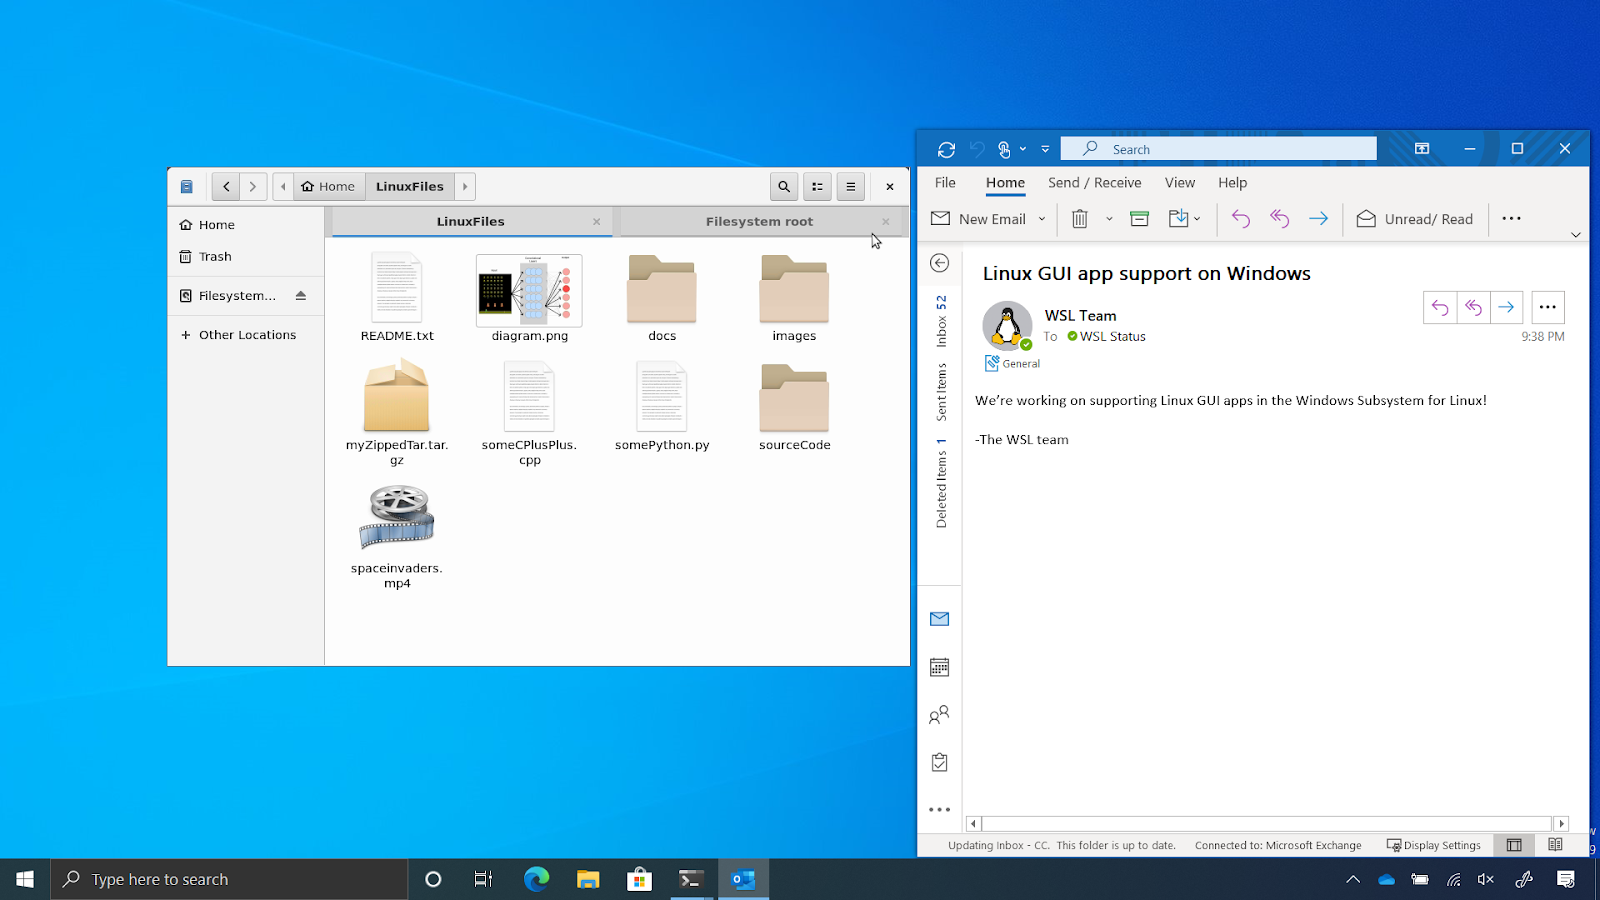
Поддержка графического интерфейса Linux в WSL 2
Итоги
Сегодня мы поговорили о том, как, пользуясь WSL 2 можно превратить Windows-компьютер в рабочую станцию программиста, пользующегося Linux. В распоряжении такого программиста оказывается высокая производительность и множество полезных возможностей, набор которых, со временем, пополнится. Поэтому я и могу говорить о том, что двойная загрузка умерла.
А вы пользуетесь WSL 2?