В статье подробно разберем процесс развертывания контроллер домена на базе Windows Server 2012 R2 и настройка служб AD DS, DNS, DHCP.
Наша задача:
- Установить Windows Server 2012 R2 и подготовить систему к развертыванию служб.
- Развернуть службы Active Directory + DNS, выполнить настройку служб.
- Развернуть службу DHCP, выполнить настройку обслуживания подсети 192.168.0.0/24.
Проделываться все действия будут на виртуальной машине.
Установка Windows Server 2012 R2 и настройка
При выборе типа устанавливаемой системы, выбираем Windows Server 2012 R2 Standart with GUI. Далее саму установку я пропущу, т.к. она полностью тривиальная.
После установки системы, обязательно обновляем систему до актуального состояния. Изменяем имя ПК (прим. DC1).
В настройках TCP/IP указываем статические IP-адреса (прим. как на скриншоте ниже)

Изменяем временную зону, выбираем относящуюся к нам зону (+03:00 Moscow, St. Petersburg, Volgograd).

На этом базовая подготовка системы выполнена, можно приступать к развертыванию служб.
Разворачиваем службы Active Directory + DNS
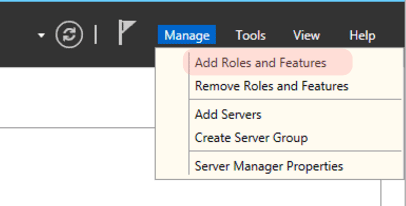
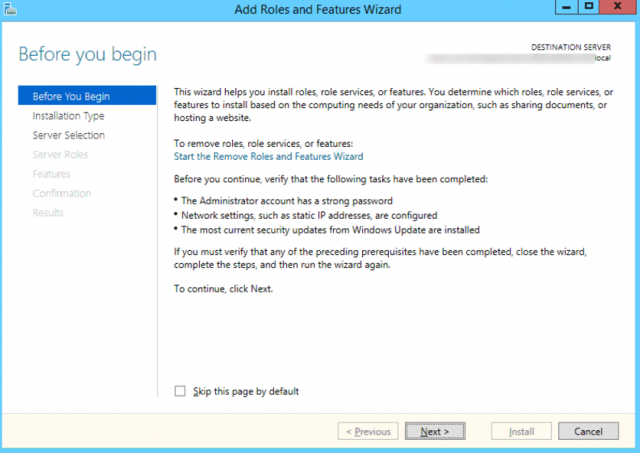
Добавляем новую роль Server Manager — Manage — Add Roles and Features. Отмечаем галочкой пункт Skip this page by default (чтобы в будущем не видеть эту страницу) и нажимаем Next.

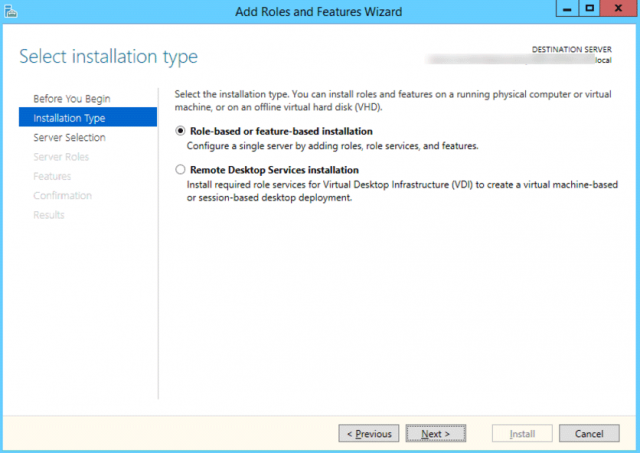
Выбираем первый пункт Role-based or feature-based installation (Базовая установка ролей и компонентов). Второй пункт Remote Desktop Service installtion предназначен только для установки роли удаленных рабочих столов. Нажимаем Next.

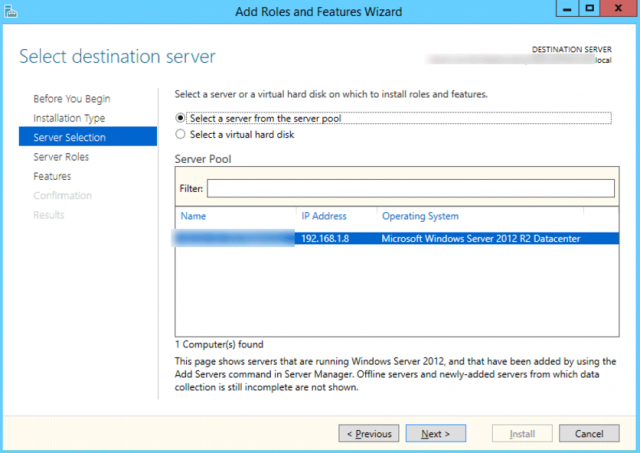
Выбираем Select a server from the server pool и выбираем сервер на котором будет развернута роль. Пункт Select a virtual hard disk позволяет указать сервер расположенный на VHD-диске. Нажимаем Next.

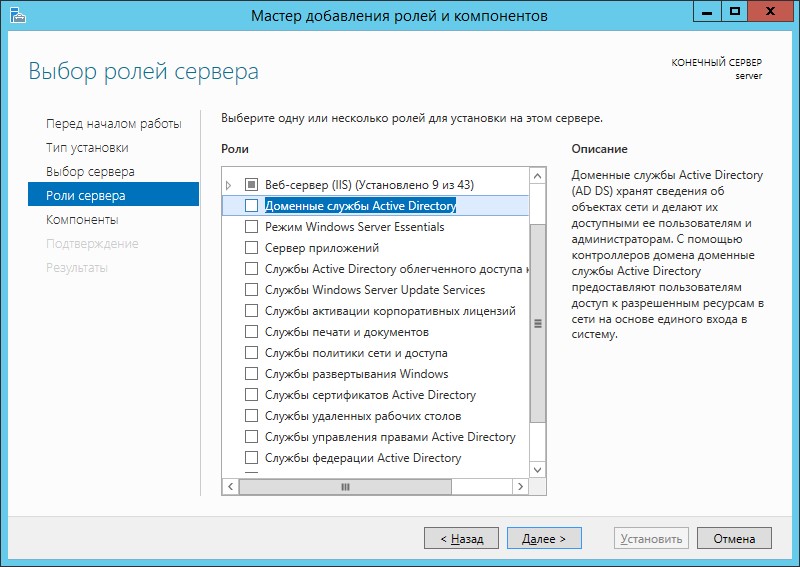
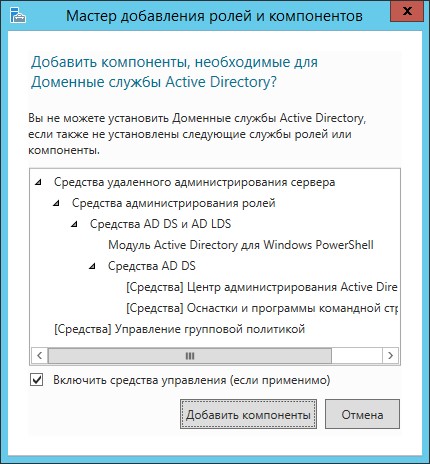
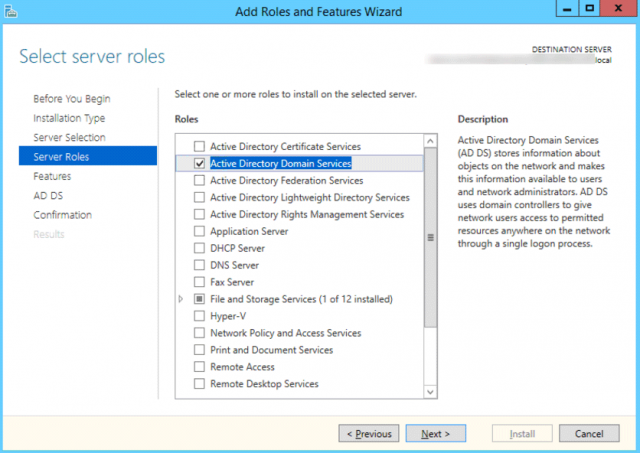
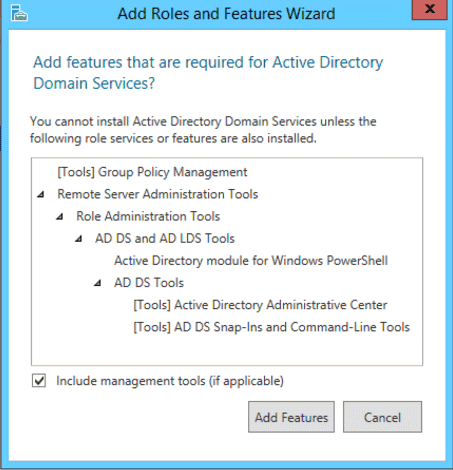
Отмечаем галочкой роль Active Directory Domain Services, в подтверждающем запросе добавления роли и компонентов, необходимых для установки AD нажимаем Add Features и после нажимаем Next.


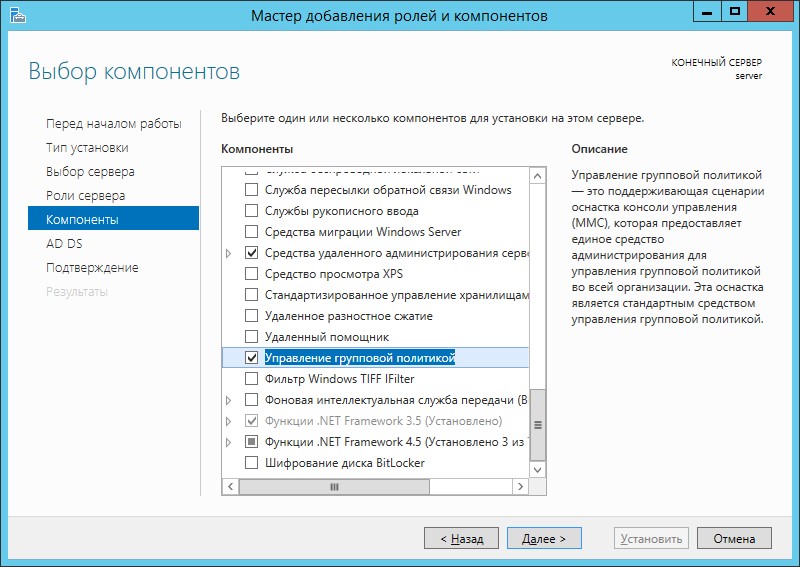
В этом окне предлагается выбрать дополнительные компоненты, в моем случае дополнительные компоненты не нужны, поэтому нажимаю Next.

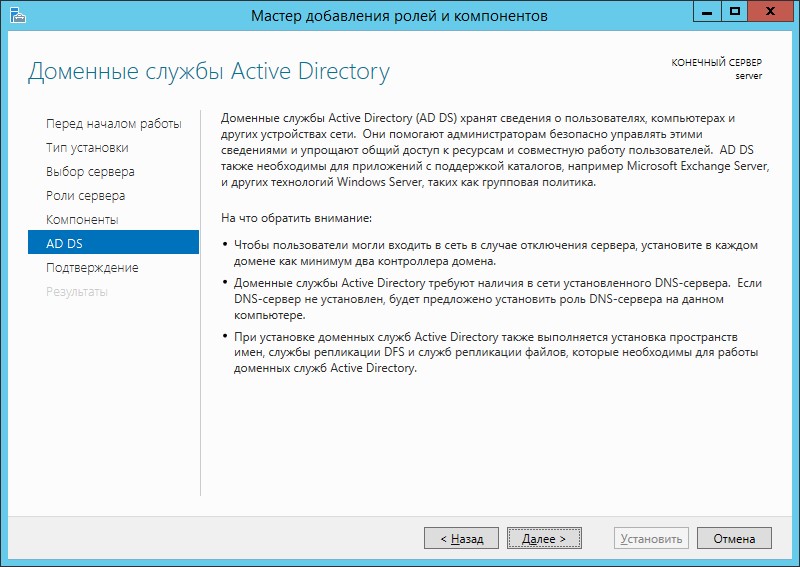
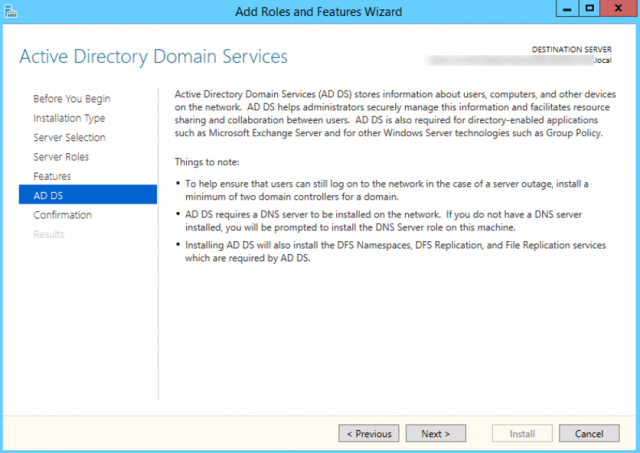
Информационная страница на которой обращается внимание на то что желательно иметь несколько контроллеров домена, на случай выхода из строя основного. Служба AD DS требует установленного в сети DNS-сервера, если он не установлен, то будет предложено его установить, а так же AD DS требует установки дополнительных служб DFS Namesspases (пространства имен), DFS Replication (DFS репликации) и File Replication (Файловой репликации). Нажимаем Next. 
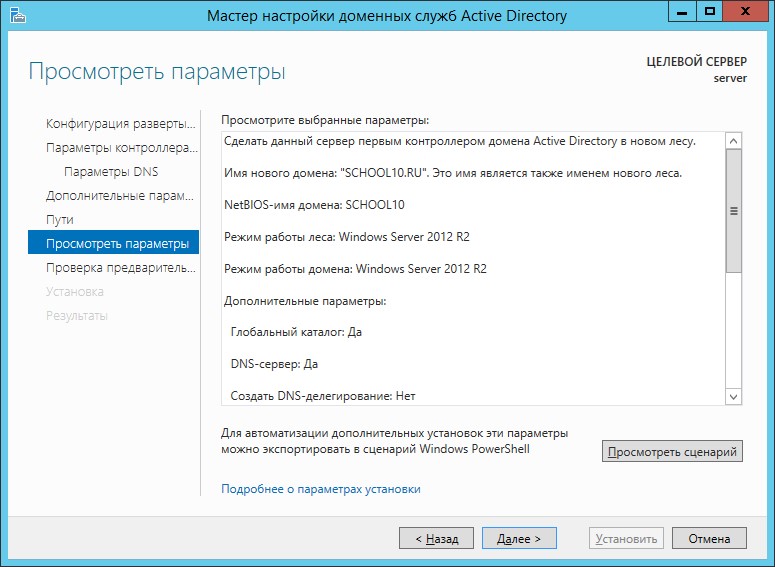
На завершающей странице мастера отображается информация по устанавливаемым компонентам. Так же здесь можно экспортировать конфигурацию в xml-файл (Export configuration settings), на случай если нужно развернуть идентичный сервер. Нажимаем Install.

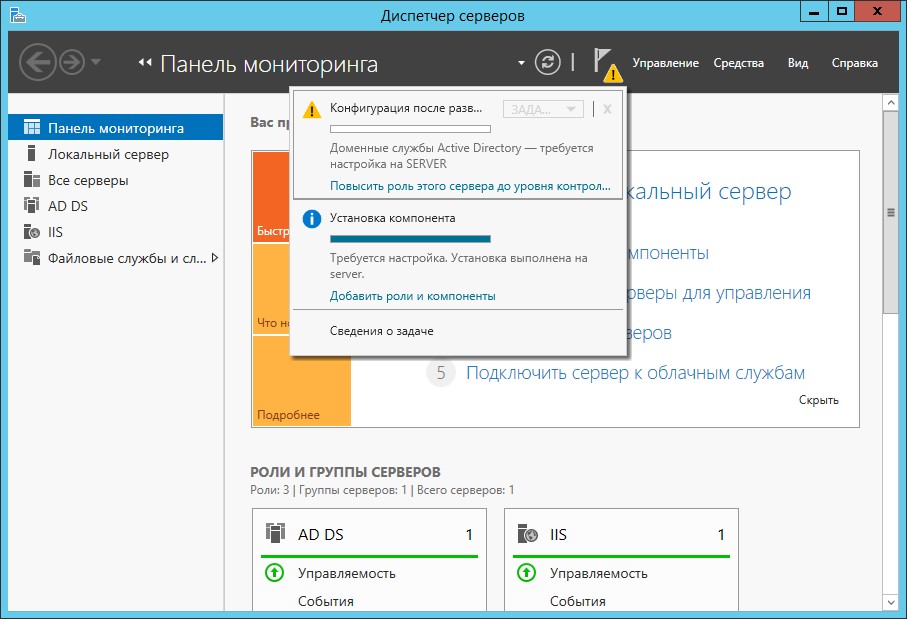
После установки Роли, в Server Manager нажимаем на значок Флажка с восклицательным знаком и выбираем Promote this server to a domain controller (Повысить этот сервер до контроллера домена). Запустится мастер конфигурирования AD DS.

Необходимо выбрать вариант развертывания AD DS.
- Add a domain controller to an existing domain — добавить дополнительный контроллер домена в существующем домене.
- Add a new domain to an existing forest — добавить новый домен в существующем лесу:
- Tree Domain — корневой домен нового дерева в существующем лесу
- Child Domain — дочерний домен в существующем лесу
- Add New Forest — создать новый корневой домен в новом лесу.
Выбираем вариант Add New Forest, указываем корневое имя домена, нажимаем Next.

В параметрах контроллера домена оставляем по умолчанию функционал леса и домена, проверяем отмечен ли галочкой пункт Domain Name System (DNS), будет автоматически поднята роль DNS и задаем пароль для режима восстановления служб каталогов. Нажимаем Next.

Не обращаем внимание на предупреждение ошибки делегирования для этого DNS-сервера, т.к. роль DNS поднимается в процессе конфигурации AD DS. Нажимаем Next.

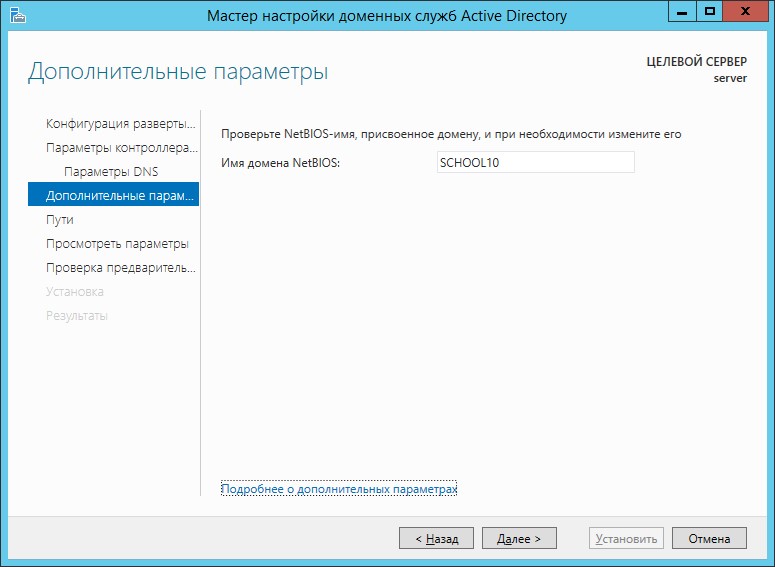
Оставляем подставленное мастером NetBIOS имя. Нажимаем Next.

Пути к каталогам оставляем по-умолчанию. Нажимаем Next.

Вывод сводной информации по настройке AD DS. Нажимаем Next.

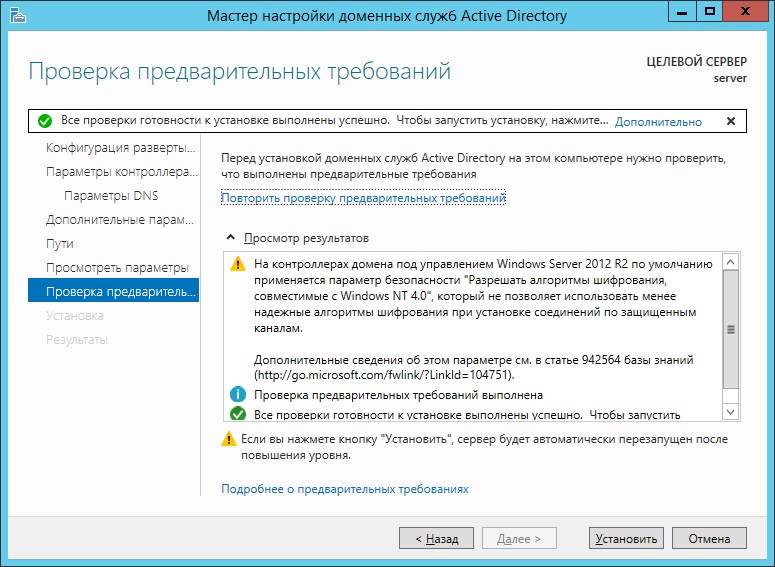
Дожидаемся выполнения предварительной проверки и если проверка прошла успешно, то мастер нам сообщит об этом: All prerequisite checks are passed successfully. Click «install» to begin installation. (Все предварительные проверки пройдены успешно. Нажмите кнопку «установить», чтобы начать установку.). Нажимаем Install.

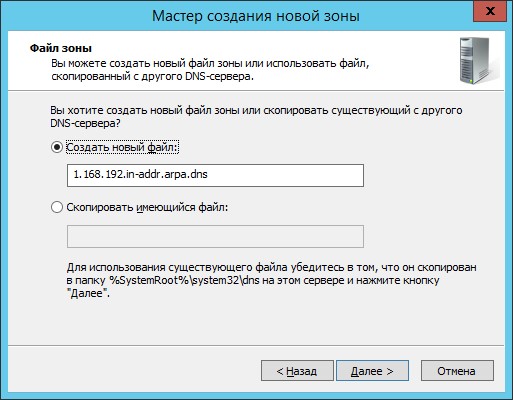
В ходе установки конфигурации AD DS, система будет перезагружена. После перезагрузки добавим зону обратного просмотра в DNS. Зоны обратного просмотра служат для разрешения IP-адресов в имена устройств.
Запускаем Server Manager, выбираем роль DNS и на сервере жмем правой кнопкой мыши. Выбираем пункт DNS Manager (Диспетчер DNS).

Выделяем вкладку Reverse Lookup Zones, нажимаем правой кнопкой и выбираем New Zone.

Задаем тип добавляемой зоны:
- Primary zone — Основная зона. Зона хранится на DNS-сервере, является основной. DNS-сервер становится основным источником сведений об этой зоне.
- Secondary zone — Дополнительная зона. DNS-сервер становится дополнительным источником сведений о зоне. Зона на этом сервере должна быть получена от другого удаленного компьютера DNS-сервера, который также хранит зону.
- Stub zone — Зона заглушка. DNS-сервер становится источником сведений только о полномочных серверах имен для этой зоны.
Выбираем Primary zone и нажимаем Next. 
Предлагается выбрать как будет выполнятся репликация добавляемой зоны:
- То all DNS servers running on domain controllers in this forest — Репликации во всем лесу AD включая все деревья доменов.
- То all DNS servers running on domain controllers in this domain — Репликация внутри текущего домена и его дочерних доменов.
- То all domain controllers in this domain — Репликация на все контроллеры домена внутри текущего домена и его дочерних доменов.
- To all domain controllers specified in the scope of this directory partition — Репликация на все контроллеры домена, но DNS-зона располагается в специальном каталоге приложений. Поле будет доступно для выбора, после создания каталога.
Выбираем То all DNS servers running on domain controllers in this domain. Нажимаем Next.

Выбираем протокол заданный по умолчанию IPv4 Reverse Lookup Zone. Нажимаем Next.

Задаем параметр Network ID. В моем случае 192.168.0. В поле Reverse Lookup Zone Name автоматически подставится адрес зоны обратного просмотра. Нажимаем Next.

Выбор параметра динамического обновления:
- Allow only secure dynamic updates (recommended for Active Directory) — Разрешить только безопасные динамические обновления.
- Allow both nonsecure and secure dynamic updates — Разрешить любые динамические обновления, как безопасные так и нет.
- Do not allow dynamic updates — Не разрешать динамические обновления.
Выбираем Allow both nonsecure and secure dynamic updates. Нажимаем Next.

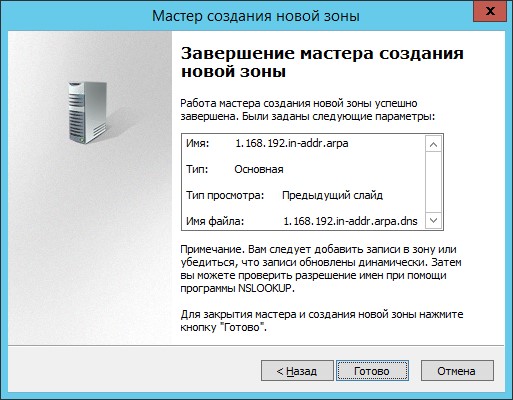
В завершении добавлении зоны обратного просмотра нажимаем Finish.

Теперь укажем Forwarders (Серверы пересылки). Серверы пересылки служат для того чтобы кэшировать и перенаправлять DNS-запросы с локального DNS-сервера на внешний DNS-сервер в сети интернет. Это нужно для того чтобы локальные компьютеры доменной сети смогли получить доступ в интернет.
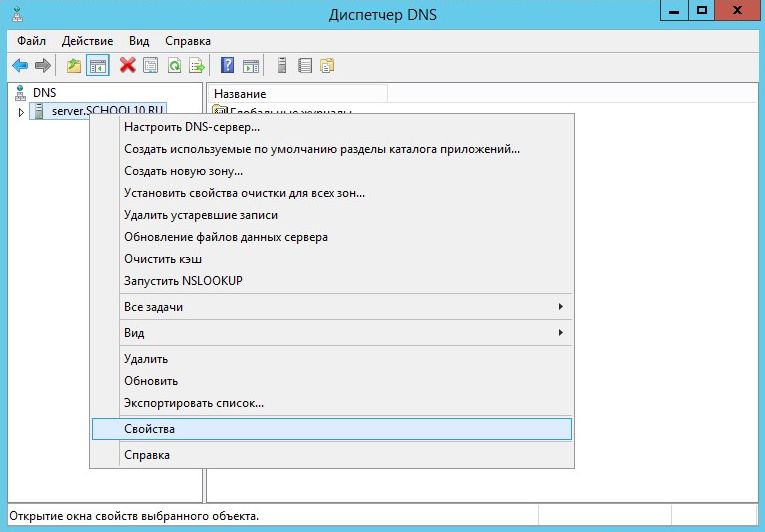
В оснастке DNS Manage (Диспетчер DNS) выделяем наш сервер и нажимаем правой кнопкой мыши. Выбираем Properties. Переходим во вкладку Forwarders и нажимаем на Edit.

В поле <Click here to add an IP Address or DNS Name> вбиваем IP-адрес или DNS имя, например провайдера или можно 8.8.8.8 (DNS Google). Нажимаем OK.

Теперь локальные компьютеры состоящие в доменной сети, смогут выходить в интернет.
Поднимаем службу DHCP и выполняем настройку ее
Добавляем новую роль Server Manager — Manage — Add Roles and Features. Выбираем первый пункт Role-based or feature-based installation (Базовая установка ролей и компонентов). Нажимаем Next.
Выбираем Select a server from the server pool и выбираем сервер на котором будет развернута роль. Нажимаем Next.
Отмечаем галочкой роль DHPC Server, в подтверждающем запросе добавления роли и компонентов, необходимых для установки DHCP Server нажимаем Add Features и после нажимаем Next.


В моем случае дополнительные компоненты не нужны, поэтому нажимаю Next.
Информационная страница на которой обращается внимание на то что необходимо настроить на компьютере статический IP-адрес и перед установкой DHCP сервера нужно спланировать подсеть, области и исключения. Нажимаем Next.

На завершающем этапе установки, нажимаем Install.

После установки Роли, в Server Manager нажимаем на значок Флажка с восклицательным знаком и выбираем Complete DHCP configuration (Завершить конфигурацию DHCP). Запустится мастер после установочной конфигурации DHCP.

Информационная страница, на которой сообщается что будут созданы группы безопасности администратора и пользователя DHCP-сервера, и будет произведена авторизация в AD. Нажимаем Next.

На следующем экране нажимаем Commit что бы завершить процесс авторизации в Active Directory.

Если процесс создания групп безопасности и авторизация в AD прошли успешно, то получим вывод Done. Нажимаем Close.

Запускаем Server Manager, выбираем роль DHCP и на сервере жмем правой кнопкой мыши. Выбираем пункт DHCP Manager (Диспетчер DHCP).

Выполним настройку DHCP. Создадим рабочий диапазон адресов из которого будут выдаваться адреса клиентам. Создавать диапазон будем в зоне IPv4. Выбираем протокол IPv4 и нажимаем Action — New Scope… или на иконку отмеченную ниже.

Задаем имя области и ее описание. Нажимаем Next.

Определяем начальный и конечный адрес диапазона подсети. Нажимаем Next.

По желанию можно задать диапазон адресов которые не будут выдаваться клиентам. Для задания диапазона исключения указываем начальный адрес и конечный и нажимаем Add. По окончании нажимаем Next.

Задаем время аренды выданного IP-адреса. Нажимаем Next.

Указываем Yes, I want to configure these options now (Да, я хочу настроить опции сейчас). Нажимаем Next.

Указываем адрес шлюза. Нажимаем Next.

Параметры задания доменного имени, DNS сервера и WINS Servers пропускаем, оставляем указанных значения по-умолчанию. Нажимаем Next.


Соглашаемся с активацией заданной области, выбираем Yes, I want to activate thisscope now. Нажимаем Next.

На этом установка и настройка AD DS, DNS, DHCP завершена.

Сервер готов к работе, можно заводить компьютеры в домен.
Понравилась или оказалась полезной статья, поблагодари автора
ПОНРАВИЛАСЬ ИЛИ ОКАЗАЛАСЬ ПОЛЕЗНОЙ СТАТЬЯ, ПОБЛАГОДАРИ АВТОРА
![]() Загрузка…
Загрузка…
Building Your First Domain Controller on 2012 R2
So you want to build an Active Directory
domain? Congratulations! This guide is not really meant for the seasoned admins who eat, sleep, & breathe
Active Directory. It is meant for the folks who have a real job, but since they own a computer at home, they are now the company’s network administrator.
J You know who you are. I will go through the process in as non-techie terms as possible, but will link to online documentation just in case you want to dive deeper. In this post I walk through setting up a brand new
2012R2 Standard edition
Server. While technically I am building out a virtual machine, a physical machine would be the same process. So why build a domain in the first place? There are many reasons to need or want a domain;
- Software like Exchange Server and many 3rd party vendors require having Active Directory in your environment.
- Centralized security – All user accounts are stored in the domain so users will be able to log into any PC in the domain and all Active Directory integrated apps with the same account – that means no more password post-it notes attached to monitors
- Centrally manage user and computer policies to control things like how long a password should be and what drive letters should be mapped for users
- Many, many other reasons.
But this isn’t a walkthrough on why, but how. Lets start:
Step 1 – Evaluate
- The Server — While Active Directory doesn’t tend to be processor intensive or memory intensive in small environments, minimally I would recommend 8 – 16 Gb of Ram, Quad-core processor, and around 100 GB’s of free hard drive space – Microsoft has some guidance
on the amount of memory and processing power Active Directory located
here . - The Network – Chances are you have a router, that hands out IP Addresses to computers to allow them to get to the network and ultimately
to the internet – this is a great time to figure out what the IP Range that it has is and any passwords that are needed to configure it are. The reason behind this would be that Active Directory stores information about itself in DNS
– I will go through the basics of DNS when the time comes, just think of DNS as how Internet Explorer knows how to find
www.facebook.com. The networking piece is an important part and where things can go wrong if not set up correctly. Microsoft has published a good explanation of DNShere.
- Domain – What are you going to call this creature you are about to build? In my test lab I build out a fictional company called Matrix.loc (Yes I really liked the movie). There are a few things to note about the name, Matrix is the fictional company name
and loc is a fake root domain. The fake root domain could easily be .com, edu, .net and I would have made it that if I actually owned those names on the internet – I don’t own them so I use a fake root name. It won’t matter the server will still be able to
get to the internet as will the clients.
Step 2 – Set Server up
- Get the server setup, cabled, powered up and if need be get OS installed on it
- First screen will ask for a password – fill that out – the server will finalize the settings, reboot and then allow you to log in.

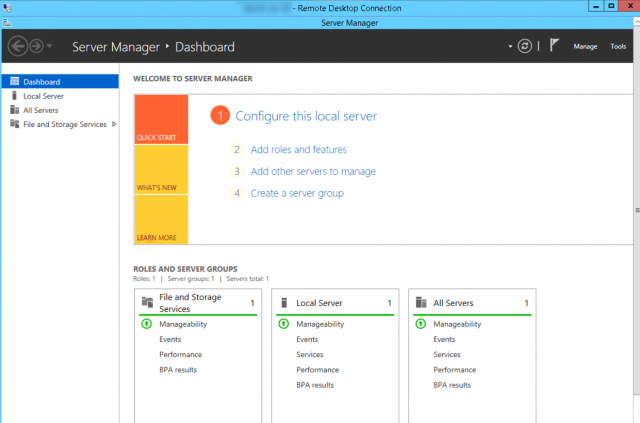
- When you finally log into the server for the first time – Server Manager will start up
- Select Local Server on the left and you should see a screen similar to below:
- NOTE: there are a few things we need to change here – first being Computer name (Nobody will remember that name if they needed to)
- Click on the Server’s Name (The Blue text) this screen will show up – Click Change
- Type in the name that you want for this domain controller in the screen that comes up like below
- Click OK when done, and then close the screen behind – Reboot when it asks you to
- Login to windows when ready and when Server Manager comes back up, click on Local Server again and validate the Name change
- Now let’s validate that the internet is working so we can get some network settings written down. I went to
www.bing.com and after the Internet Enhanced configuration prompts I was able to get to the internet. -
-
Let’s assign a static IP to the network card as you do not want the servers IP changing on you
-
Download and install all windows updates for the server – to do that right click the little flag icon by the clock and open the action center.
- On the left there will be a Windows Update link, click that and turn on Automatic Updating.
- Check for updates – this will take a bit to gather all of the updates that may be waiting for you.
- Go ahead and install any updates found and let the server reboot if it needs to. With the operating system being 2012 R2 there may not be a lot of updates.


Step 3 — Promote to Domain Controller
-
Once everything is up and running again – it’s time to finally install the Directory Services role
- In Server Manager, Local Server Click Manage and then Add Roles and Features
- Click next on the first screen
- Keep the defaults (Role-based or feature-based installation) on Installation type and click Next
- Keep the defaults (Select a server from the server pool), make sure your new server is highlighted, click Next
- Put a check mark next to «Active Directory Domain Services» on Server Roles , Click Add Features on the popup screen, click Next
- On the features screen, click Next
- On AD DS screen, Click Next
- And finally on the confirmation screen, click Install
- At this point the Active Directory binaries will be installed, once that finishes click the Close button
- In Server Manager, Local Server Click Manage and then Add Roles and Features
- The binaries are installed but where is my Active Directory? At this point you should be looking at Server Manager, and at the top of the screen there should be a flag next to the word manage with a yellow caution symbol.
- When you click the flag a window will open telling you that there is still some configuration that is needed to make this server a domain controller.
- Click the «Promote this server to a domain controller» link
-
Select the option to «Add a new
forest» and then type the domain name that you want, then click NextNOTE: Here are some guidelines to stay away from:
- No single label names i.e. Matrix
- Don’t over complicate it, if the name of your company is Brads Totally Awesome Computer Repair and Web Design, I would never create a domain called bradstotallyawesomecomputerrepairandwebdesign.local. In Fact the domain name should be less than 15 characters
for technical reasons. In the example above I would shorten it up to something like BTAC.local – trust me your users will thank you
J - Avoid using special characters in the domain name like |/?»><:*, periods are ok as long as it is not the first character, dashes (-) are OK but still wouldn’t use as first character
-
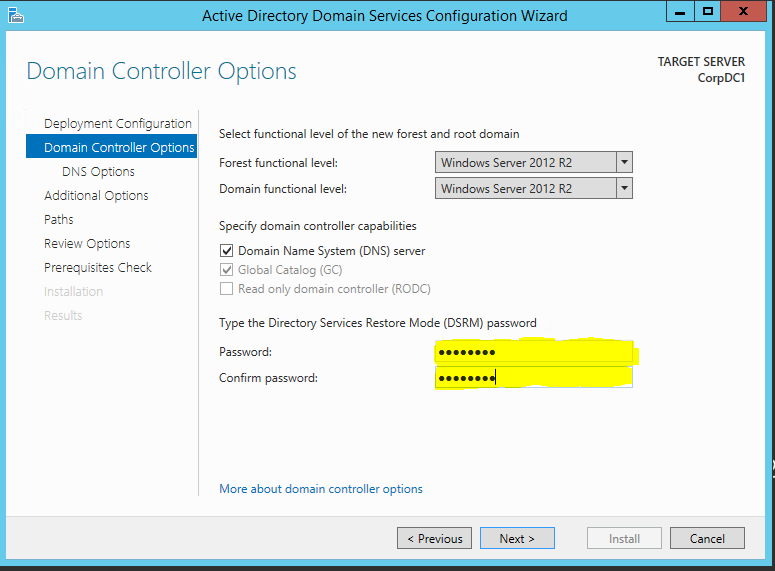
On the Domain Controller Options screen
- Select the Forest functional and Domain
functional level – The wizard will pick the highest functional level that the OS will support, so defaults are usually the best bet. - In the section labeled «Specify domain controller capabilities» again the defaults are the best option
- There is a section that can be hard to see for the DSRM password, which should be something that is easily remembered or stored securely somewhere,
as the only time you will need this password is during a disaster - Click Next
- Select the Forest functional and Domain
- On the DNS options screen, ignore the warning about the delegation and click Next
- On the Additional options page, make sure that the name of your domain is listed as the NetBios domain name, sometimes there will already
be a computer or printer on the network with the same name so if your NetBios name ends in a 0, we will need to change the name of that device before we continue. For my Domain of Matrix.loc the NetBios name is Matrix – Click Next - On the Paths screen, defaults should be fine but if you so desired you could change them to another local harddisk or partition.
- On review options click Next
- The server will now check to make sure all the prerequisites for the domain controller is satisfied, there will be some warnings, but that should be fine, review and Click Install
- Once the install completes the server will reboot
- Once rebooted you will sign into your new domain


Once the domain is up and running there are a few things that will need to be done to fully utilize Active Directory
- Users will need to be created
- Client computers will need to point their Nics dns settings to the servers IP
- Computers will need to be joined to the domain
Active Directory is scalable and flexible enough to grow with your company. Please feel free to ask us any questions or provide feedback (good or bad) to us.


Comments
-
6 May 2014 10:18 AM
Per Microsoft’s documentation, Selecting the Forest Root Domain (technet.microsoft.com/…/cc726016%28v=ws.10%29.aspx), they «do not recommend using unregistered suffixes, such as .local.» Nice tutorial though.
-
9 Oct 2014 4:45 PM
Great tut!!! would you happen to have instruction on creating the AD in a windows XP VM on server 2012 R2 please?
-
6 Dec 2014 1:57 AM
Helpful for newbs!
-
17 May 2015 9:16 AM
Almost got it, but I can’t get past this:
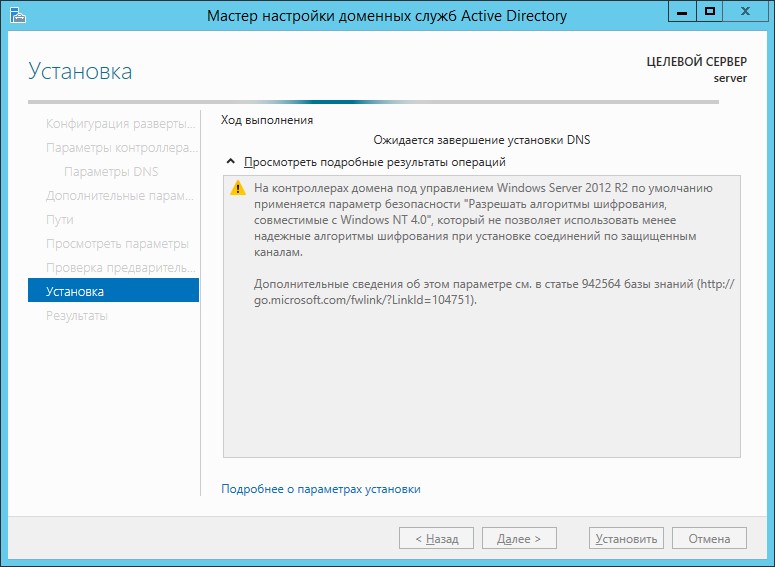
Windows Server 2012 R2 domain controllers have a default for the security setting named «Allow cryptography algorithms compatible with Windows NT 4.0» that prevents weaker cryptography algorithms when establishing security channel sessions.
For more information about this setting, see Knowledge Base article 942564 (go.microsoft.com/fwlink).
OR is it this:
Verification of prerequisites for Domain Controller promotion failed. The local Administrator account becomes the domain Administrator account when you create a new domain. The new domain cannot be created because the local Administrator account password does not meet requirements.
Currently, a password is not required for the local Administrator account. We recommend that you use the net user command-line tool with the /passwordreq:yes option to require a password for this account before you create the new domain; otherwise, a password will not be required for the domain Administrator account.
Great tut, but failed me in the end ?
-
10 Oct 2015 12:25 PM
@ Jigs Gaton: Just Change the password of your administrator, use a complex one like C0mpl3x# and re-run prerequisites.
-
16 Dec 2015 5:52 PM
So i followed the steps several times. I created a VM and installed server on it. When i try to add the PC to the domain it tells me it can not be found, am i doing something wrong? FULL DISCLOSURE i am using 2016 r2.. BUT THE SCREENS ARE THE SAME. Please help if you can. Thanks.
-
17 Dec 2015 5:09 PM
great stuff. thanks. after I created the domain & users I attempted to RDP from one of the user accounts I created but no dice. said user wasn’t set up for remote… I added the user to RDP Built-in group but still nada. I also went the distance & added them to the administrators but still cant remote w/ their account. I don’t have any GPOs set up yet so not sure what would be preventing this simple/basic feature… Thanks!
-
18 Dec 2015 7:42 AM
Hi Sasha.ben,
Could be one of a million things, but I would check a couple easy things first.
Does the client machine’s dns point to the DC’s IP Address? If so are you able to perform nslookup against the dc?
To test, from a command prompt type «nslookup»
Type the name of your domain like «Domain.com»
@Andres-Captain
Are you RDP’ing into the DC or do you have client machines you’re trying to connect to?
-
21 Oct 2016 4:14 AM
I have followed all the steps in your tutorial and so far everything has gone as you desribed.
Thought I would say thank you whilst it finishes the installation and reboot.
-
31 Dec 2021 10:18 AM
Thank you for your article. After considerable time fighting with 2012R2 configuration on a Proliant ML350p I have made some progress. ‘Connect to another computer’ on my Windows 10 machine now finds the server and produces: ‘Windows was unable to open service control manager database on PROLIANT error 5 Access denied’, Any ideas?
Поднимаем контроллер домена на Windows Server 2012 R2
Поднимаем контроллер домена на Windows Server 2012 R2
В рамках данной статьи не будем углубляться в принципы работы и организации клиент-серверных технологий. Говоря простым языком, если вы задолбались настраивать одно и тоже на десятках или сотнях компьютерах, то вам определённо пора задуматься о создании доменной сети.
Для этого вначале нужно развернуть контроллер доменной сети.
И здесь мы рассмотрим, как «поднять» контроллер домена в Windows Server 2012 R2
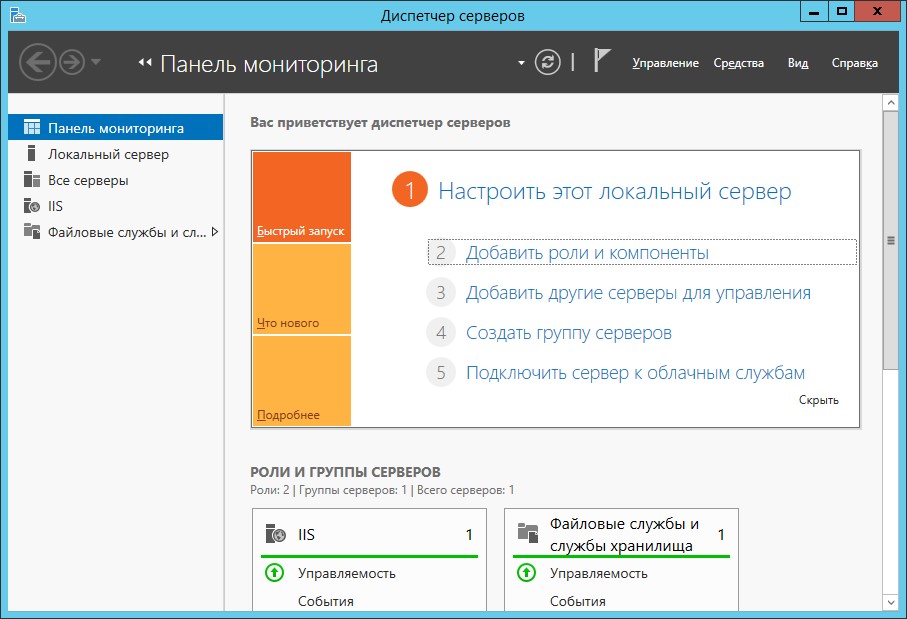
Запускаем «Диспетчер серверов» и жмём «Добавить роли и компоненты»
Помогать нам будет «Мастер добавления ролей и компонентов», который шаг за шагом приведёт нас к заветной цели.
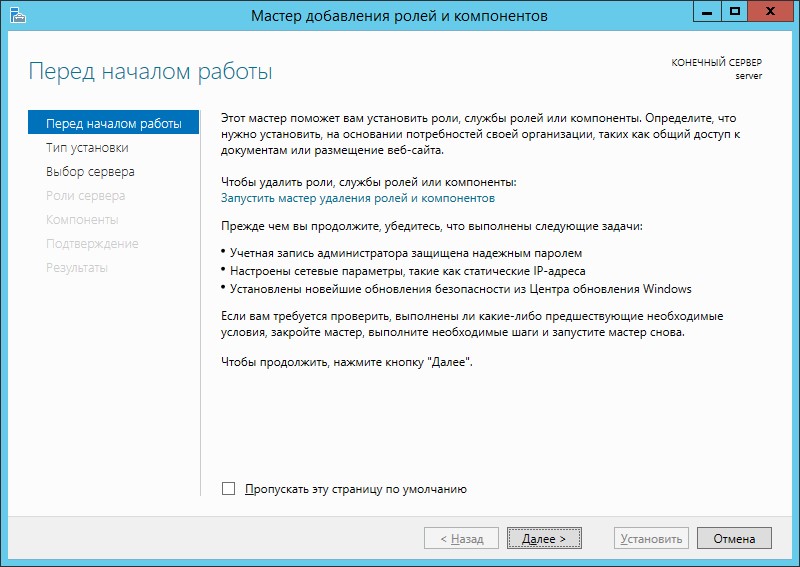
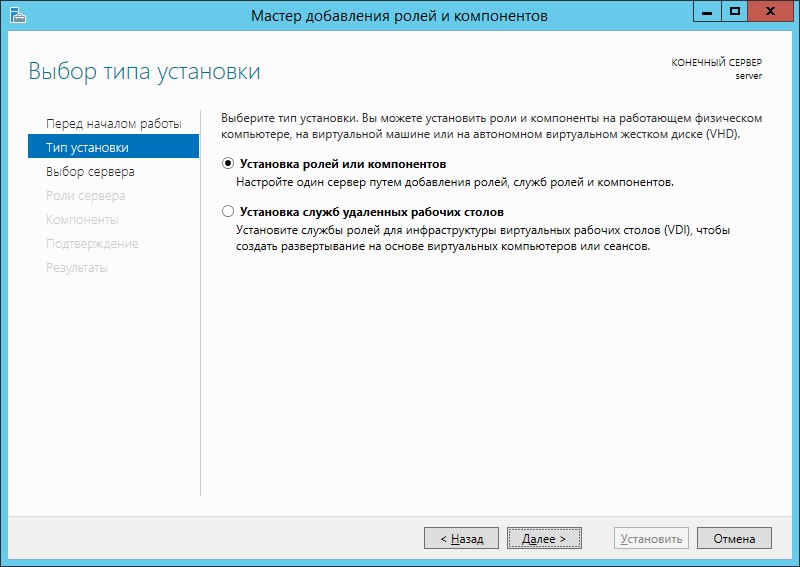
Ознакомившись с информацией и при необходимости выполнив рекомендации, приступаем к работе. Выбираем пункт «Установка ролей или компонентов».
Указываем сервер, на котором будет развёрнут контролер. У меня он один, поэтому оставляю как есть

Отмечаем галочкой «Доменные службы Active Directory» и подтверждаем.
Далее можно выбрать дополнительные компоненты. В моём случае дополнительно ничего не нужно, поэтому оставляю как есть.
Во время установки выводятся подсказки и рекомендации, например о том, желательно иметь несколько контроллеров домена, на случай выхода из строя основного.
Последний шанс отказаться. Но это нам не подходит. Ставим галочку «Автоматический перезапуск…» и жмём «Установить».

Пошла установка. По окончанию сервер автоматически будет перезагружен.

Роль установлена, но сервер как контролер домена ещё не работает. Переходим к следующему этапу.
В диспетчере серверов нажимаем на появившийся значок с восклицательным знаком и выбираем «Повысить этот сервер до контроллера домена».
Здесь нужно выбрать вариант, который нам подходит: добавить контроллер в существующий домен, добавить новый домен в существующий лес или добавить новый лес. В моём случае оставляю последний вариант, т.к. разворачиваю всё с нуля.

Автоматически будет поднята роль DNS. Задаем пароль для режима восстановления служб каталогов. Не забудьте его записать себе. Жмём «Далее».
Галочку «Создать делегирование DNS» нужно снять.
Предупреждение игнорируем, т.к. роль DNS поднимается в процессе конфигурации AD DS. Нажимаем «Далее».

Мастер подставляет NetBIOS имя. Оставляем его.
Пути к каталогам тоже оставляем по умолчанию.

Далее выводится итоговая информация по выбранным параметрам.
Дожидаемся окончания выполнения предварительной проверки и если она прошла успешно, то выйдет сообщение: «Все проверки выполнены успешно. Нажмите кнопку «установить», чтобы начать установку».
Запускается установка.
В ходе установки конфигурации, компьютер будет перезагружен. После перезагрузки добавляем зону обратного просмотра в DNS. Она служит для разрешения IP-адресов и имён устройств.
Запускаем «Диспетчер серверов», выбираем роль «DNS» и на сервере жмём правой кнопкой мыши. Выбираем пункт «Диспетчер DNS».

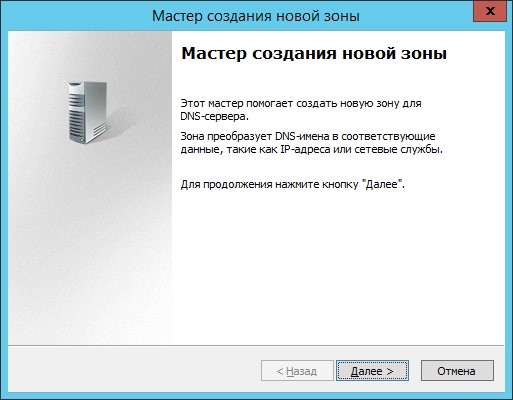
Выбираем вкладку «Зоны обратного просмотра», жмём по ней правой кнопкой и выбираем «Новая зона».

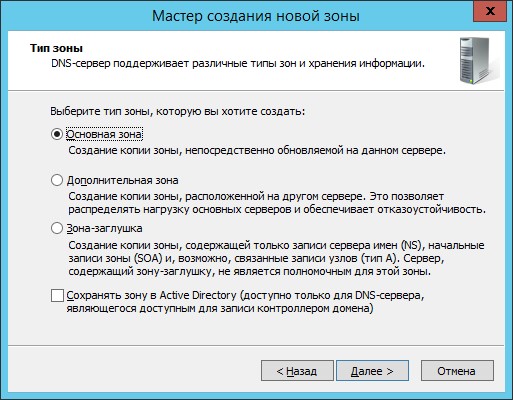
Задаём тип добавляемой зоны. Описания зон представлены в этом же окне.
Оставляем «Основная зона» и жмём «Далее».

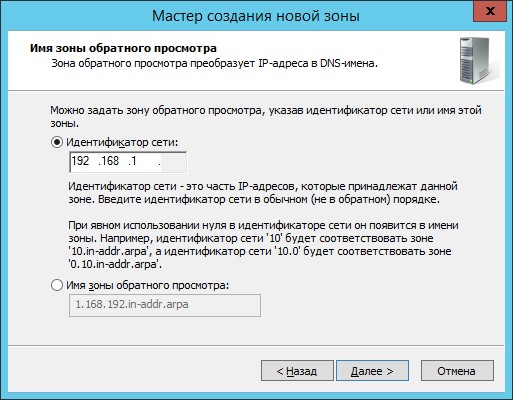
Задаем параметр «Идентификатор сети». В моем случае 192.168.1. В поле «Имя зоны обратного просмотра» автоматически подставится адрес. Нажимаем «Далее».
Выбираем параметр динамического обновления:
- Разрешить только безопасные динамические обновления.
- Разрешить любые динамические обновления.
- Запретить динамические обновления.
Выбираем второй вариант.

Теперь указываем Серверы пересылки. Они служат для кэширования и перенаправления DNS-запросов с локального DNS-сервера на внешний DNS-сервер. Это нужно для того, чтобы локальные компьютеры доменной сети смогли получить доступ в интернет.
В оснастке «Диспетчер DNS» находим наш сервер и жмём по нему правой кнопкой мыши. Выбираем «Свойства».
На вкладке «Сервер пересылки» нажимаем на «Изменить».
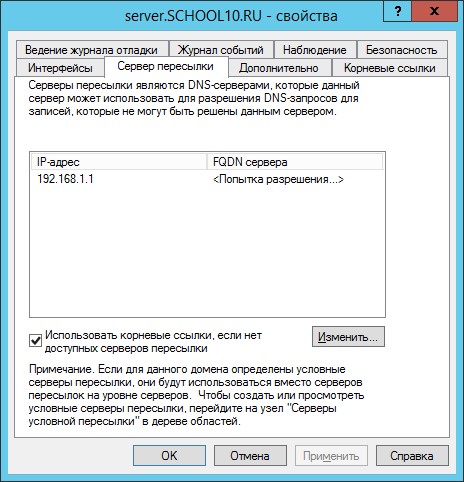
Я указал адрес роутера. Так же можно указать другой ip, например, у Google (8.8.8.8).
На этом настройка контроллера домена завершена. Далее будем добавлять пользователей, компьютеры, разделять их по группам, создавать различные правила, групповые политики и др. Но об этом в других статьях.
 Обновлено: 02.10.2022
Опубликовано: 01.10.2016
Что такое Active Directory простыми словами.
Подготовка системы
Установка роли AD
Повышение сервера до контроллера домена
Дополнительные настройки
Поиск ошибок в работе AD
1. Подготовка системы
Для контроллера домена необходимо заранее задать имя компьютера и настроить статический IP-адрес. Это важно, так как смена этих настроек на рабочем активном каталоге может привести к потери работоспособности системы.
Проверяем настройку системного времени и часового пояса. Данный параметр также важен для устанавливаемой роли.
2. Установка роли AD DS
Открываем Диспетчер серверов

Нажимаем Управление — Добавить роли и компоненты:

Если откроется окно с приветствием, просто нажимаем Далее. В следующем окне оставляем Установка ролей и компонентов и нажимаем Далее:

Выбираем сервер, на который будет установлена роль контроллера домена (по умолчанию выбран локальный сервер) и нажимаем Далее:
Среди всех ролей выбираем следующие:
- DHCP-сервер
- DNS-сервер
- Доменные службы Active Directory

* на самом деле, для работы роли контроллера домена не обязательна установка первых двух. Они могут быть настроены на других серверах.
В следующем окне Выбор компонентов просто нажимаем Далее.
Досчелкиваем Далее до конца и нажимаем Установить:

Те же действия можно выполнить командой Powershell:
Install-WindowsFeature -Name DNS, DHCP, AD-Domain-Services -IncludeManagementTools
После завершения установки роли не торопимся закрывать окно. Кликаем по пункту меню Повысить роль этого сервера до уровня контроллера домена:

* если мы перезагрузим сервер, повысить роль можно вернувшись в диспетчер серверов.
В открывшемся окне выбираем операцию развертывания. Если разворачивается первый контроллер домена в сети, оставляем выбор на Добавить новый лес, вводим имя домена и нажимаем Далее:

В следующем окне оставляем все как есть и вводим надежный пароль для режима восстановления:

В окне Параметры DNS нажимаем Далее.
В окне Дополнительные параметры автоматически будет подобрано имя NetBIOS. Его менять не обязательно — просто нажимаем Далее:

В окне Пути стоит оставить все, как есть. Нажимаем Далее. В окне Просмотреть параметры проверяем правильность введенных данных и нажимаем Далее.
Начнется проверка системы на соответствие требованиям. Если ошибок не будет, активируется кнопка Установить. Прочитайте все предупреждения, нажмите на данную кнопку и дождитесь окончания повышения сервера до контроллера домена. Сервер будет перезагружен, а после перезагрузки станет контроллером.
Настройка после развертывания сервиса
После развертывания контроллера домера, выполняем следующие действия.
Синхронизация времени
На контроллере домена с ролью PDC Emulator необходимо настроить источник синхронизации времени. Для этого открываем командную строку от администратора и вводим команду:
w32tm /config /manualpeerlist:»time.nist.gov,0x8 time.windows.com,0x8″ /syncfromflags:manual /reliable:yes /update
* данная команда задаст в качестве источника времени 2 сервера — time.nist.gov и time.windows.com.
* если мы не знаем, на каком контроллере у нас роль PDC Emulator, воспользуемся инструкцией Управление FSMO через powershell.
Соответствие рекомендациям Best Practice
1. Создание коротких имен файлов должно быть отключено
Ранее в DOS все файлы называли в формате 8.3 — 8 символов под имя, 3 для расширения. Необходимость такого подхода сильно устарело, однако по умолчанию для обеспечения совместимости может быть включено.
В командной строке от имени администратора вводим:
fsutil 8dot3name set 1
Готово — поддержка создания коротких имен отключено.
2. Файл Srv.sys должен быть настроен на запуск по требованию.
В обычной командной строке от имени администратора вводим:
sc config srv start= demand
3. Некоторые сетевые адаптеры поддерживают RSS, но эта возможность отключена.
Необходимо для сетевого адаптера, который используется для подключения к сети, включить RSS.
Вводим команду в Powershell:
Enable-NetAdapterRss -Name *
4. Некоторые сетевые адаптеры поддерживают IPsec TOv2, но эта возможность отключена.
Вводим команду в Powershell:
Enable-NetAdapterIPsecOffload -Name *
5. Некоторые сетевые адаптеры поддерживают LSO, но эта возможность отключена.
Вводим команду в Powershell:
Enable-NetAdapterLso -Name *
6. Значение … не соответствует рекомендуемому на этом сервере.
Система может предложить более оптимальные параметры для опций:
- Smb2CreditsMin — 128.
- Smb2CreditsMax — 2048.
- DurableHandleV2TimeoutInSeconds — 30.
- AutoDisconnectTimeout — 0.
- CachedOpenLimit — 5.
- AsynchronousCredits — 64.
Выставить данные опции можно командой Set-SmbServerConfiguration:
Set-SmbServerConfiguration -Smb2CreditsMin 128 -Smb2CreditsMax 2048 -DurableHandleV2TimeoutInSeconds 30 -AutoDisconnectTimeout 0 -CachedOpenLimit 5 -AsynchronousCredits 64 -Confirm:$false
Настройка DNS
Как правило, на один сервер с ролью контроллера домена устанавливается DNS. В этом случае необходимо выполнить ряд действий.
1. Настройка перенаправления.
Если наш сервер DNS не может ответить на запрос, он должен передавать его на внешний сервер. Для настройки перенаправления открываем консоль управления сервером имен и кликаем правой кнопкой по названию сервера — выбираем Свойства:

Переходим на вкладку Сервер пересылки:

Кликаем по кнопке Изменить:

Вводим адреса серверов, на которые хотим переводить запросы:

* это могут быть любые DNS, например, глобальные от Google или Яндекса, а также серверы от Интернет-провайдера.
2. Удаление корневых ссылок
Если наш сервер не работает по Ipv6, стоит удалить корневые ссылки, которые работают по этой адресации. Для этого заходим в свойства нашего сервера DNS:
Переходим во вкладку Корневые ссылки:

Мы увидим список серверов имен — удаляем все с адресами IPv6.
3. Включение очистки
Чтобы в DNS не хранилось много ненужных записей, настраиваем автоматическую читску. Для этого открываем настройки сервера имен:
Переходим на вкладку Дополнительно:

Ставим галочку Разрешить автоматическое удаление устаревших записей и ставим количество дней, по прошествию которых считать запись устаревшей:

Готово.
Проверка корректности работы AD
После выполнения всех процедур по настройке сервера, ждем около 15 минут. После открываем командную строку от администратора и вводим:
dcdiag /a /q
Данная команда выполнит диагностику работы контроллера домена и отобразит все замечания. Если такие будут, необходимо самостоятельно найти решение в сети.
![]()
Download Article
![]()
Download Article
In most corporate environments, to accomplish certain tasks inexpensively and quickly, you need a domain. You can configure a Windows Server 2012 R2 server to host a domain, and when the configuration completes, the server is called a domain controller. A domain controller serves many purposes, but is used primarily for user logon management, organization through security groups, and centralized management of policies and properties on computers throughout a network. Use this guide to start on your path towards simplifying control of your network!
-
1
Add Roles and Features.
- Boot your Windows 2012 R2 server, if it is not running.
- Log on to the server when it completes booting.
- Notice that Server Manager is displayed upon a successful login when using an administrator account at the initial logon prompt.
- Click Add Roles and Features to display the Add Roles and Features Wizard. This wizard helps you easily manage roles, role services, and features.
- Verify you have completed the requirements for the role to be installed.
- Click Next to display Select Installation Type.
-
2
Review Select Installation Type options.
- Note that this is a role-based and feature-based installation.
- Click Next to display Select destination server.
Advertisement
-
3
Choose a Destination Server.
- Note that this selection lets you select the server on which you want to do the installation. In this example there is only one server, so there is only one option.
- Click Next to display the Server Role and Feature Wizard so you can make a server role selection.
-
4
Select roles.
- Note that you can highlight a name in the center pane so that you can read the description in the right pane.
- Click the checkbox next to Active Directory Domain Service.
- Click Next to display Add Roles and Features.
-
5
Select features.
- Observe the popup informing you that in order for Active Directory Domain Service to be installed, additional features, not already on the machine, need to be installed.
- Click Add Features, the popup disappears, and you are shown the Active Directory Domain Service checkbox checked.
- Click Next to display a list of features that you can add.
- Note that in this step no additional selections are needed.
- Click Next to display a screen that gives an overview of Active Directory Domain Service.
- Click Next to display the Confirmation installation selections.
-
6
Review the Confirmation installation selections.
- Use the confirmation window to review your choices, then hit continue to accept the selection.
- Click install.
- Keep all windows open.
- Move on to creating your domain, and keep learning.


Advertisement
When the domain creation is complete, the Windows Server 2012 R2 computer is made the domain controller.
-
1
Verify Active Directory Domain Service is installed.
- Take note of the blue progress bar, and beneath it, you are reminded that Additional steps are required to make this machine a domain controller.
- Move your mouse and hover over the blue progress bar to see when installation is 100% complete.
-
2
Promote server.
- Observe that at this point, only the Active Directory Domain Service is installed. In other words, the server is not yet a domain controller.
- Note the link, in blue, Promote this server to a domain controller.
- Click Promote this server to a domain controller to display the Active Directory Domain Services Configuration Wizard.
- Notice under Select the deployment operation are three radio buttons; please review them, because they are very different.
- Click Add a new forest.
- Type your desired domain name under Specify the domain information for this operation, and to the right of Root domain name.
- Click Next to display Active Directory Domain Services Wizard.
-
3
Configure domain controller options.
- Notice that these are options, which means you are not required to install any.
- Notice that even though DNS is selected you can un-check it, since it is optional, but that is possible only if you have another DNS server in your domain. Since a DNS server does not exist yet in your domain you must leave it checked.
- Click the box under Type the Directory Service Restore Mode (DSRM) password.
- Type the restore password you desire. Don’t forget it!
- Click Next to display DNS options.
-
4
Configure name service options.
- Notice that the message in the yellow box is informing you that a domain could not be found with which to associate; the reason is because your domain is the first domain in the forest.
- Click Next to display additional name options.
- Notice that the wizard lets you select more options.
- Click Next to display Active Directory configuration settings.
-
5
Configure the path name.
- Notice the default location for saving active directory files, which you can accept or modify where Active Directory configuration will be stored.
- Click Next to accept the default location and display the options you have selected.
-
6
Review the selection.
- Review the selected options.
- Click Next to begin the installation prerequisite check.
-
7
Install the selection.
- Observe the green circle and the white check mark.
- Click Install to begin installing the options you have selected.
- Note that at this point the installation process goes through several displays, including reboot followed by the sign in prompt.
- Keep all windows open.
- Continue to Part 3, and keep learning.


Advertisement
-
1
Execute Ctrl+Alt+Delete
- Notice that the sign in prompt is an indication that the installation is complete.
- Issue Ctrl+Alt+Delete to display yourdomainnamehereAdministrator, which is requesting the Administrator password.
-
2
Log on to the domain.
- Notice that you are about to logon to the domain, and not the server, and that only the account Administrator can logon using the domain controller console logon prompt.
- Observe that this prompt means you are logging on to your domain using the user account Administrator and its password.
- Type the password for Administrator and click the arrow to display Server Manager, if logon is successful.
- Continue to Part 4, Create domain memberships, and keep learning.


Advertisement
At this point you are ready to make other configuration changes to test the functionality of your domain; one way to test is by creating memberships with other computers; these computers may have Windows server or Windows client operating system installed.
-
1
Verify connectivity.
- Take note that in this example you will configure membership using Windows 7, but you can use any other Windows machine.
- Boot a Windows 7 machine, if it is not up.
- Logon.
- Verify that your Windows 7 machine and your Windows 2012 R2 server can ping each other by IP address.
-
2
Join your Windows 7 computer to the domain.
- Go to Control Panel on your Windows 7 computer.
- Click System to display basic information about your computer.
- Click Advanced system settings to display System Properties.
- Click Computer Name.
- Click Change to display Computer Name/Domain Changes.
- Click the radio button next to Domain, Under Member of.
- Type yourdomainnamehere. (Ex. kim.local)
- Click OK to display User name and Password prompt; note that this is the administrator account on the domain controller.
- Note that Administrator is the only account that has authorization to add a computer to the domain.
- Type Administrator into the username field and use the password you’ve created.
- Click OK.
- Note that shortly after you will see a popup welcoming you to your domain.
- Click OK and you are prompted to restart the client.
-
3
Logon the domain.
- Click OK to return to System Properties.
- Click Close and you are prompted to Restart Now or Restart Later
- Click Restart Now to restart the client.
- Issue Ctrl+Alt+Delete, after the restart, to display the logon prompt.
- Notice that you can logon to the local computer with your normal Windows 7 user account. However, if that same account tries to logon to the domain, it will fail, for two reasons:
- Because so far only one domain user, Administrator, has been configured.
- Your Windows 7 local users is not a member of your domain.
- Click Switch User to display Select a user for logon, so you can logon as Administrator.
- Click Other User to display the domain logon prompt.
- Notice that under Password, Logon to: yourdomainnamehere displays; informing you that you are about to logon with a domain logon and not a local logon.
- Type Administrator into the username field and use the password you’ve created.
- You are now logged on to the domain, not your local Windows 7 computer.


Advertisement
Ask a Question
200 characters left
Include your email address to get a message when this question is answered.
Submit
Advertisement
-
You are highly encouraged to change the name and set a static IP address on your Windows 2012 R2 server prior to using this guide.
-
If the domain logon fails, make sure you are typing yourdomainnamehereAdministrator instead of just Administrator.
-
If you mistakenly closed the Installation progress display, click the yellow triangle to the left of Manage in Server Manager, so you can Promote this server to a domain controller.
Show More Tips
Thanks for submitting a tip for review!
Advertisement
-
Before you join the client to the domain be sure that the
- Machines can ping each other by IP address
- Client can ping the domain name
Advertisement
Things You’ll Need
- Windows computer, such as Windows 7 or 8.1.
- Windows 2012 R2 server.
References
- Microsoft. (2014, March 5). Server Roles and Technologies in Windows Server 2012 R2 and Windows Server 2012. Retrieved from TechNet: https://technet.microsoft.com/library/hh831669.aspx
About This Article
Thanks to all authors for creating a page that has been read 28,721 times.
Is this article up to date?
![]()
Download Article
![]()
Download Article
In most corporate environments, to accomplish certain tasks inexpensively and quickly, you need a domain. You can configure a Windows Server 2012 R2 server to host a domain, and when the configuration completes, the server is called a domain controller. A domain controller serves many purposes, but is used primarily for user logon management, organization through security groups, and centralized management of policies and properties on computers throughout a network. Use this guide to start on your path towards simplifying control of your network!
-
1
Add Roles and Features.
- Boot your Windows 2012 R2 server, if it is not running.
- Log on to the server when it completes booting.
- Notice that Server Manager is displayed upon a successful login when using an administrator account at the initial logon prompt.
- Click Add Roles and Features to display the Add Roles and Features Wizard. This wizard helps you easily manage roles, role services, and features.
- Verify you have completed the requirements for the role to be installed.
- Click Next to display Select Installation Type.
-
2
Review Select Installation Type options.
- Note that this is a role-based and feature-based installation.
- Click Next to display Select destination server.
Advertisement
-
3
Choose a Destination Server.
- Note that this selection lets you select the server on which you want to do the installation. In this example there is only one server, so there is only one option.
- Click Next to display the Server Role and Feature Wizard so you can make a server role selection.
-
4
Select roles.
- Note that you can highlight a name in the center pane so that you can read the description in the right pane.
- Click the checkbox next to Active Directory Domain Service.
- Click Next to display Add Roles and Features.
-
5
Select features.
- Observe the popup informing you that in order for Active Directory Domain Service to be installed, additional features, not already on the machine, need to be installed.
- Click Add Features, the popup disappears, and you are shown the Active Directory Domain Service checkbox checked.
- Click Next to display a list of features that you can add.
- Note that in this step no additional selections are needed.
- Click Next to display a screen that gives an overview of Active Directory Domain Service.
- Click Next to display the Confirmation installation selections.
-
6
Review the Confirmation installation selections.
- Use the confirmation window to review your choices, then hit continue to accept the selection.
- Click install.
- Keep all windows open.
- Move on to creating your domain, and keep learning.
Advertisement
When the domain creation is complete, the Windows Server 2012 R2 computer is made the domain controller.
-
1
Verify Active Directory Domain Service is installed.
- Take note of the blue progress bar, and beneath it, you are reminded that Additional steps are required to make this machine a domain controller.
- Move your mouse and hover over the blue progress bar to see when installation is 100% complete.
-
2
Promote server.
- Observe that at this point, only the Active Directory Domain Service is installed. In other words, the server is not yet a domain controller.
- Note the link, in blue, Promote this server to a domain controller.
- Click Promote this server to a domain controller to display the Active Directory Domain Services Configuration Wizard.
- Notice under Select the deployment operation are three radio buttons; please review them, because they are very different.
- Click Add a new forest.
- Type your desired domain name under Specify the domain information for this operation, and to the right of Root domain name.
- Click Next to display Active Directory Domain Services Wizard.
-
3
Configure domain controller options.
- Notice that these are options, which means you are not required to install any.
- Notice that even though DNS is selected you can un-check it, since it is optional, but that is possible only if you have another DNS server in your domain. Since a DNS server does not exist yet in your domain you must leave it checked.
- Click the box under Type the Directory Service Restore Mode (DSRM) password.
- Type the restore password you desire. Don’t forget it!
- Click Next to display DNS options.
-
4
Configure name service options.
- Notice that the message in the yellow box is informing you that a domain could not be found with which to associate; the reason is because your domain is the first domain in the forest.
- Click Next to display additional name options.
- Notice that the wizard lets you select more options.
- Click Next to display Active Directory configuration settings.
-
5
Configure the path name.
- Notice the default location for saving active directory files, which you can accept or modify where Active Directory configuration will be stored.
- Click Next to accept the default location and display the options you have selected.
-
6
Review the selection.
- Review the selected options.
- Click Next to begin the installation prerequisite check.
-
7
Install the selection.
- Observe the green circle and the white check mark.
- Click Install to begin installing the options you have selected.
- Note that at this point the installation process goes through several displays, including reboot followed by the sign in prompt.
- Keep all windows open.
- Continue to Part 3, and keep learning.
Advertisement
-
1
Execute Ctrl+Alt+Delete
- Notice that the sign in prompt is an indication that the installation is complete.
- Issue Ctrl+Alt+Delete to display yourdomainnamehereAdministrator, which is requesting the Administrator password.
-
2
Log on to the domain.
- Notice that you are about to logon to the domain, and not the server, and that only the account Administrator can logon using the domain controller console logon prompt.
- Observe that this prompt means you are logging on to your domain using the user account Administrator and its password.
- Type the password for Administrator and click the arrow to display Server Manager, if logon is successful.
- Continue to Part 4, Create domain memberships, and keep learning.
Advertisement
At this point you are ready to make other configuration changes to test the functionality of your domain; one way to test is by creating memberships with other computers; these computers may have Windows server or Windows client operating system installed.
-
1
Verify connectivity.
- Take note that in this example you will configure membership using Windows 7, but you can use any other Windows machine.
- Boot a Windows 7 machine, if it is not up.
- Logon.
- Verify that your Windows 7 machine and your Windows 2012 R2 server can ping each other by IP address.
-
2
Join your Windows 7 computer to the domain.
- Go to Control Panel on your Windows 7 computer.
- Click System to display basic information about your computer.
- Click Advanced system settings to display System Properties.
- Click Computer Name.
- Click Change to display Computer Name/Domain Changes.
- Click the radio button next to Domain, Under Member of.
- Type yourdomainnamehere. (Ex. kim.local)
- Click OK to display User name and Password prompt; note that this is the administrator account on the domain controller.
- Note that Administrator is the only account that has authorization to add a computer to the domain.
- Type Administrator into the username field and use the password you’ve created.
- Click OK.
- Note that shortly after you will see a popup welcoming you to your domain.
- Click OK and you are prompted to restart the client.
-
3
Logon the domain.
- Click OK to return to System Properties.
- Click Close and you are prompted to Restart Now or Restart Later
- Click Restart Now to restart the client.
- Issue Ctrl+Alt+Delete, after the restart, to display the logon prompt.
- Notice that you can logon to the local computer with your normal Windows 7 user account. However, if that same account tries to logon to the domain, it will fail, for two reasons:
- Because so far only one domain user, Administrator, has been configured.
- Your Windows 7 local users is not a member of your domain.
- Click Switch User to display Select a user for logon, so you can logon as Administrator.
- Click Other User to display the domain logon prompt.
- Notice that under Password, Logon to: yourdomainnamehere displays; informing you that you are about to logon with a domain logon and not a local logon.
- Type Administrator into the username field and use the password you’ve created.
- You are now logged on to the domain, not your local Windows 7 computer.
Advertisement
Ask a Question
200 characters left
Include your email address to get a message when this question is answered.
Submit
Advertisement
-
You are highly encouraged to change the name and set a static IP address on your Windows 2012 R2 server prior to using this guide.
-
If the domain logon fails, make sure you are typing yourdomainnamehereAdministrator instead of just Administrator.
-
If you mistakenly closed the Installation progress display, click the yellow triangle to the left of Manage in Server Manager, so you can Promote this server to a domain controller.
Show More Tips
Thanks for submitting a tip for review!
Advertisement
-
Before you join the client to the domain be sure that the
- Machines can ping each other by IP address
- Client can ping the domain name
Advertisement
Things You’ll Need
- Windows computer, such as Windows 7 or 8.1.
- Windows 2012 R2 server.
References
- Microsoft. (2014, March 5). Server Roles and Technologies in Windows Server 2012 R2 and Windows Server 2012. Retrieved from TechNet: https://technet.microsoft.com/library/hh831669.aspx
About This Article
Thanks to all authors for creating a page that has been read 28,721 times.
Is this article up to date?

With Windows 2003 nearing end-of-life, it is becoming more imperative to upgrade to a newer operating system. For many IT admins, this is a great opportunity to start upgrading infrastructures to Windows 2012 or Windows 2012R2. Since DCPromo was depreciated in Windows Server 2012, the following article serves as a step-by-step guide to creating a Windows 2012R2 domain controller and adding it to an existing environment.This article is the first of a series of articles:
- Creating a Windows 2012 or 2012R2 Domain Controller
- Promoting a Windows 2012R2 Server to Domain Controller
- Transferring FSMO Roles to a New Domain Controller
- Decommissioning a Windows 2003 or Windows 2008 Domain Controller
Adding the Windows 2012R2 Server Domain Services Role
There are a number of ways to get to the role management screen. The easiest will be to do it from the Server Manager window. If this window has already been closed, right click on My Computer, and select Manage.
Once the Server Manager has been opened, click on Manage and select Add Roles and Features.
Once the Add Roles and Features Wizard has started up, select Next.
On the next page, the default settings can be used.
Under server selection, the default settings should be selecting the domain control.
On the Server Roles page, select Active Directory Domain Services.
Windows will prompt for any additional features that will be needed.
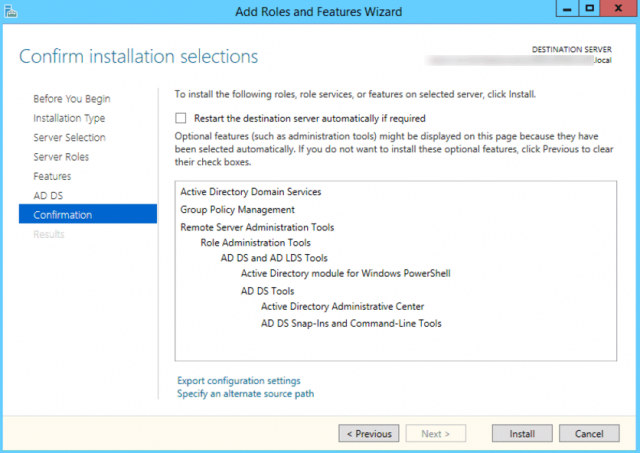
The next window will prompt with a few additional notes regarding best practices. Note that the Active Directory Domain Services Role will install the following in a new environment:
- DNS Services
- DFS Namespaces Services
- DFS Replication Services- Replication Services
- Group Policy Management
The confirmation page will display all components that will be reinstalled. Note that on a new server, a reboot is not required to install the Active Directory Domain Services role.
Once the installation has completed, this machine can be promoted to a domain controller. See the next article in this series here: Promoting a Windows 2012R2 Server to Domain Controller