Last Updated on January 31, 2023 by rudyooms
This blog (old but it is being kept up to date) will be about some more information and options on how to block administrative tools like regedit and the command Prompt.
I am going to divide it into multiple parts and I will show you all of the options you have to prevent access to the CMD.
- Applocker
- Prevent access to administrative tools (settings catalog)
- Don’t run / DisallowApps specified applications (settings catalog)
- Proactive Remediations
- Conclusion
1.Applocker
In one of my older blogs, I showed you how it could be done within the Intune for Education portal. It’s just an easy switch 🙂
When you are interested in a full app locker setup, please visit my blog on how to automate Applocker.
Applocker à la minute – Call4Cloud Powershell Automated
2. Prevent Access to Administrative Tools
Of course, that’s really nice. I noticed some ADMX updates inside the windows 10 insider preview build 20185.
https://blogs.windows.com/windowsexperience/2020/08/05/announcing-windows-10-insider-preview-build-20185/
I hope this ADMX update within the Insider preview build 20185 will help us to prevent access to the command prompt/ PowerShell and registry without using Applocker?
UPDATE 01-10-2020
Peter Klapwijk and I did a test drive with it and noticed some things weren’t working as they were supposed to. After reporting the bug to Microsoft it was fixed.
My blog: The never-ending Command Prompt – Call4Cloud
UPDATE 16-05-2021
I really start to love the settings catalog even more. It’s now possible to configure those 2 settings:
*Prevent access to registry editing tools
*Prevent access to the command prompt
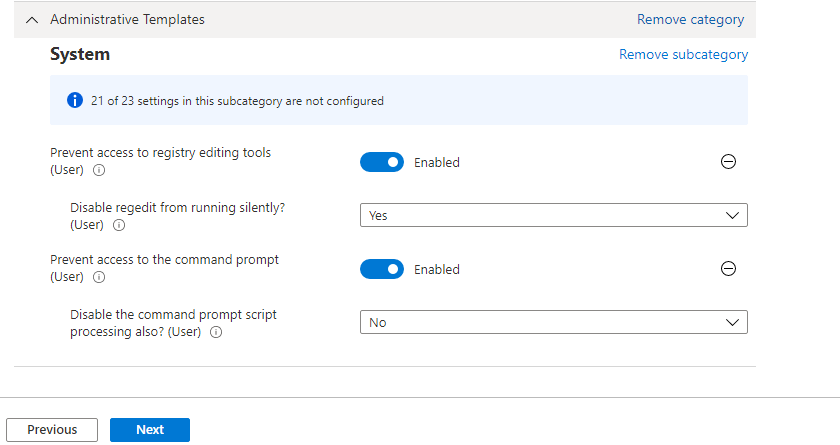
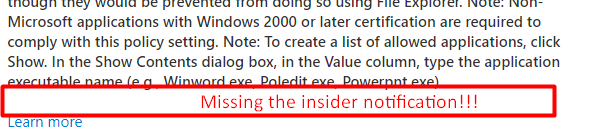
Of course, these settings are (for now) only available for Windows Insiders
![]()
3. Don’t run specified Windows Applications
Blocking the default administrative tools, won’t block access to PowerShell.exe. Instead of configuring these two settings to block cmd and regedit, try this one:
*Don’t run specified Windows Applications
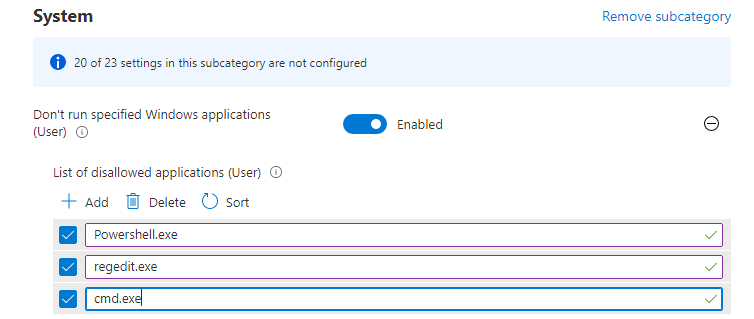
But just like with the prevention of launching the administrative tools it is only available to Windows Insiders.

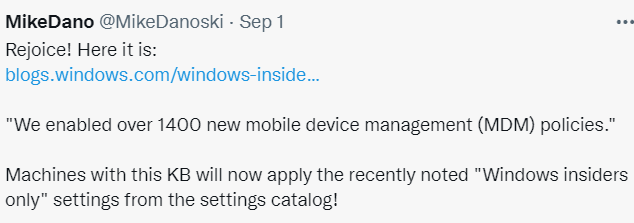
UPDATE 04-09-2021
Fantastic news! Finally, 1400 settings which were only available to the insider preview in the past are now available and ready to be implemented!
Looking back at the policy I showed earlier
Now go install this Windows 10, version 21H1 Build 19043.1200 also known as KB5005101!!
Now let’s see the results: So instead of getting this prompt
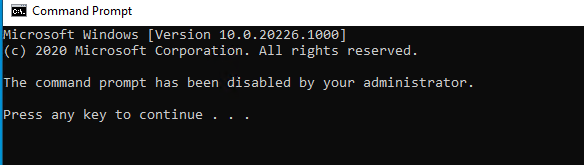
You will receive this notification. It’s a little different than the Applocker notification or the notification above but it is pretty clear the operation is not allowed.
“It’s just an action, not a piece of work”
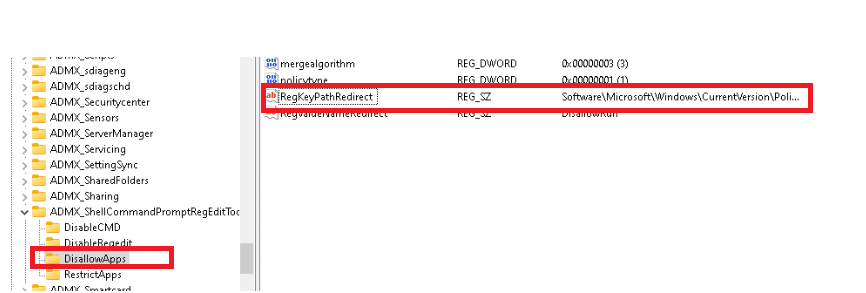
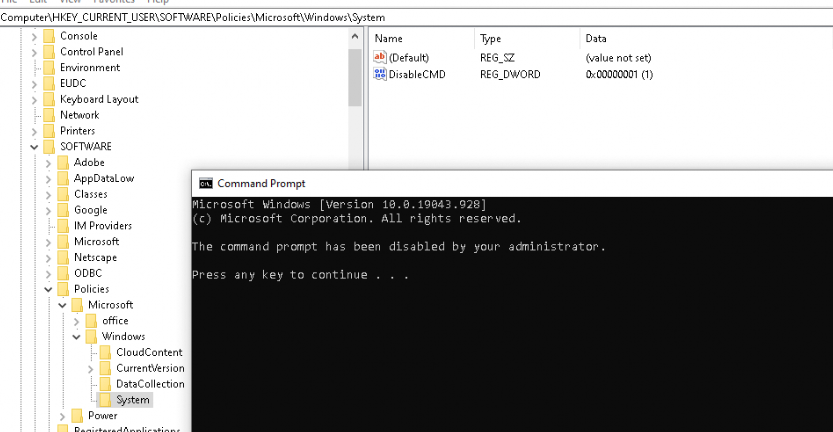
Let’s check which policy manager registry key is been created to restrict this operation.

It’s the same ADMX as they prevent access to administrative tools. Let’s find out the exact registry key we need to check the DisallowApps key.
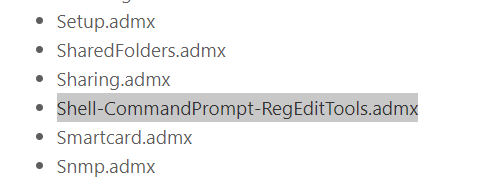
HKEY_LOCAL_MACHINESOFTWAREMicrosoftPolicyManagerdefaultADMX_ShellCommandPromptRegEditToolsDisallowApps
Now we know the policy path, let’s check how it looks inside the Azure Ad user registry.

4. Proactive Remediations
You could use proactive remediations for everything!. So why not block access to the CMD (as an example)
Detection Script
New-PSDrive HKU Registry HKEY_USERS | out-null
$user = get-wmiobject -Class Win32_Computersystem | select Username;
$sid = (New-Object System.Security.Principal.NTAccount($user.UserName)).Translate([System.Security.Principal.SecurityIdentifier]).value;
$key = "HKU:$sidSoftwarePoliciesMicrosoftWindowssystem"
$val = (Get-Item "HKU:$sidSoftwarePoliciesMicrosoftWindowssystem");
$Timer = $val.GetValue("DisableCMD");

##################################
#Launch password detection       #
##################################

if($Timer -ne 1)
{
    Write-Host "CMD is not blocked!"
    Exit 1
}
else
{
    Write-Host "CMD is already being blocked"
    Exit 0
}
Remediation Script
New-PSDrive HKU Registry HKEY_USERS | out-null
$user = get-wmiobject -Class Win32_Computersystem | select Username;
$sid = (New-Object System.Security.Principal.NTAccount($user.UserName)).Translate([System.Security.Principal.SecurityIdentifier]).value;
$key = "HKU:$sidSoftwarePoliciesMicrosoftWindowssystem"
$val = (Get-Item "HKU:$sidSoftwarePoliciesMicrosoftWindowssystem") | out-null
$reg = Get-Itemproperty -Path $key -Name DisableCMD -erroraction 'silentlycontinue'

##################################
#Launch password detection       #
##################################

if(-not($reg))
	{
		Write-Host "CMD registry key was not created, creating it now!"
		New-Item -path "HKU:$sidSoftwarePoliciesMicrosoftWindows" -name "System" | out-null
                New-Itemproperty -path $Key -name "DisableCMD" -value "1"  -PropertyType "dword" | out-null
		exit 1
	}
else
	{
 		Write-Host "CMD Registry key configured to 1"
		Set-ItemProperty  -path $key -name "DisableCMD" -value "1" | out-null
		Exit 0
	}
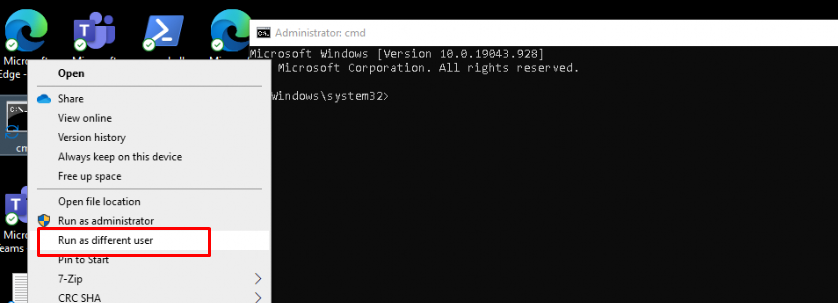
And of course, the results when you try to open the CMD as a regular user
And when we try to open it as a local admin…
Conclusion:
I showed you 3 options to block cmd/regedit or powershell.exe. In my opinion, Applocker is the way to go. But I really like the new settings catalog.
You can even block other executables, by simply adding them. Adding an executable to block with the settings catalog is a lot faster than copy/paste the applocker xml/changing it and uploading it back again.

- Remove From My Forums
-
Question
-
Maybe I’m missing something but no matter what I try, if I disallow certain programs or let’s call them EXE files, the users can still open these programs.
I have added for example databasecompare.exe (Office 2016) and Dropbox.exe to the GPO, and I can see that the GPO is being applied when running GPresult in the user session. However the OS still allows some of them.
How does Windows handle it when I rename notepad.exe to databasecompare.exe, should it disallow this program?
I want users to not open dropbox.exe and MicrosoftEdge.exe on any device in the network. What would be the best way? Do these blocked apps need to be installed? Does this prevent users from opening random EXE files from network drives etc?

If you’d like to limit what apps a user can run on a PC, Windows gives you two options. You can block the apps you don’t want a user to run, or you can restrict them to running only specific apps. Here’s how to do it.
RELATED: How to Use System Restore in Windows 10, 11, 7, and 8
NOTE: Be absolutely sure that you are making changes to a user account you actually want to restrict, and that you always have an unrestricted administrative account available to undo those changes. This is especially true if you are restricting users to a specific set of apps, as those users will lose access even to tools like Registry Editor and Local Group Policy Editor. If you do accidentally apply restrictions to your administrative account, the only way we’ve found to reverse the changes is to run System Restore by going to Settings > Update & Security > Recovery and clicking the “Restart now” button under Advanced Startup. From there, you can find the setting for running System Restore after a restart, since you won’t be able to run System Restore the normal way. For this reason, we also highly recommend creating a restore point before making any of the changes here.
Home Users: Block or Restrict Apps by Editing the Registry
To block or restrict apps in the Home edition of Windows, you’ll need to dive into the Windows Registry to make some edits. The trick here is that you’ll want to log on as the user you want to make changes for, and then edit the Registry while logged onto their account. If you have multiple users for which you want to changes for, you’ll have to repeat the process for each user.
Standard warning: Registry Editor is a powerful tool and misusing it can render your system unstable or even inoperable. This is a pretty simple hack and as long as you stick to the instructions, you shouldn’t have any problems. That said, if you’ve never worked with it before, consider reading about how to use the Registry Editor before you get started. And definitely back up the Registry (and your computer!) before making changes.
RELATED: Learning to Use the Registry Editor Like a Pro
Block Certain Apps Through the Registry
First, you’ll need to log on to Windows using the user account for which you want to block apps. Open the Registry Editor by hitting Start and typing “regedit.” Press Enter to open Registry Editor and give it permission to make changes to your PC.

In the Registry Editor, use the left sidebar to navigate to the following key:
HKEY_CURRENT_USERSOFTWAREMicrosoftWindowsCurrentVersionPolicies
Next, you’re going to create a new subkey inside the Policies key. Right-click the Policies key, choose New > Key, and then name the new key Explorer .
Next you’re going to create a value inside the new Explorer key. Right-click the Explorer key and choose New > DWORD (32-bit) value. Name the new value DisallowRun .
Double-click the new DisallowRun value to open its properties dialog. Change the value from 0 to 1 in the “Value data” box and then click “OK.”
Back in the main Registry Editor window, you’re now going to create a new subkey inside the Explorer key. Right-click the Explorer key and choose New > Key. Name the new key DisallowRun , just like the value you already created.
Now, it’s time to start adding apps you want to block. You’ll do this by creating a new string value inside the DisallowRun key for each app you want to block. Right-click the DisallowRun value and then choose New > String Value. You’ll be naming these values with simple numbers, so name the first value you create “1.”
Double-click the new value to open its property dialog, type the name of the executable you want to block into the “Value data” box (e.g., notepad.exe ), and then click “OK.”
Repeat this process, naming the second string value “2” and the third “3” and so on, and then adding the executable file names you want to block to each value.
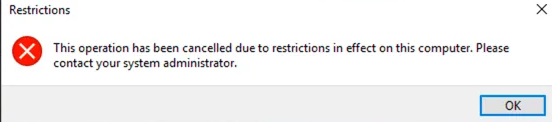
When you’re done, you can restart Windows, log onto that user account, and then test things by trying to run one of those apps. You should see a “Restrictions” window pop-up letting you know that you can’t run the app.
RELATED: How to Make Your Own Windows Registry Hacks
You’ll need to repeat this process for each user account for which you need to block apps. Though, if you’re blocking the same apps for multiple user accounts, you could always create your own Registry hack by exporting the DisallowRun key after you’ve configured the first user account and then importing it after logging onto to each subsequent account.
If you want to edit the list of blocked apps, just return to the DisallowRun key and make the changes you want. If you want to restore access to all apps, you can either delete the wholeExplorer key you created–along with DisallowRun subkey and all the values. Or you could just go back and change the value of the DisallowRun value you created from 1 back to 0, effectively turning off app blocking while leaving the list of apps in place should you want to turn it on again in the future.
Block Only Certain Apps Through the Registry
Restricting users to running only certain apps in the Registry follows almost exactly the same procedure as blocking specific apps. You’ll again need to log on to Windows using user account you want to change. Fire up Registry Editor and then head to the following key:
HKEY_CURRENT_USERSOFTWAREMicrosoftWindowsCurrentVersionPolicies
Right-click the Policies key, choose New > Key, and then name the new key Explorer .
Next you’re going to create a value inside the new Explorer key. Right-click the Explorer key and choose New > DWORD (32-bit) value. Name the new value RestrictRun .
Double-click the new RestrictRun value to open its properties dialog. Change the value from 0 to 1 in the “Value data” box and then click “OK.”
Back in the main Registry Editor window, you’re now going to create a new subkey inside the Explorer key. Right-click the Explorer key and choose New > Key. Name the new key RestrictRun , just like the value you already created.
Now, you’ll add apps to which the user is allowed access. Create a new string value inside the RestrictRun key for each app you want to block. Right-click the RestrictRun value and then choose New > String Value. You’ll be naming these values with simple numbers, so name the first value you create “1.”
Double-click the new value to open its property dialog, type the name of the executable you want to block into the “Value data” box (e.g., notepad.exe ), and then click “OK.”
Repeat this process, naming the values “2,” “3,” and so on, and then adding the executable file names you want the user to be able to run to each value.
When you’re done, restart Windows, log into that user account again, and test your settings. You should only be able to run apps to which you explicitly allowed access. You’ll need to repeat the process with each user account for which you want to restrict apps or create your own Registry hack you can use to apply settings to each user more quickly.
To reverse your changes, you can delete the Explorer key you created (along with the RestrictRun subkey and all values) or you can set that RestrictRun value you created back to 0, turning off restricted access.
Pro and Enterprise Users: Block or Restrict Apps with the Local Group Policy Editor
If you use the Pro or Enterprise version of Windows, blocking or restricting apps can be a little easier because you can use the Local Group Policy Editor to do the job. One big advantage is that you can apply policy settings to other users–or even groups of users–without having to log in as each user to make the changes the way you do when making these changes with Registry Editor.
The caveat here is that you’ll need to do a little extra setup by first creating a policy object for those users. You can read all about that in our guide to applying local Group Policy tweaks to specific users. You should also be aware that group policy is a pretty powerful tool, so it’s worth taking some time to learn what it can do. Also, if you’re on a company network, do everyone a favor and check with your admin first. If your work computer is part of a domain, it’s also likely that it’s part of a domain group policy that will supersede the local group policy, anyway.
RELATED: How to Apply Local Group Policy Tweaks to Specific Users
The process for allowing or restricting apps with the Local Group Policy Editor is almost identical, so we’re going to show you how to restrict users to only running certain apps here and just point out the differences. Start by finding the MSC file you created for controlling policies for those particular users. Double-click to open it and allow it to make changes to your PC. In this example, we’re using one we created for applying policy to all non-administrative user accounts.
In the Group Policy window for those users, on the left-hand side, drill down to User Configuration > Administrative Templates > System. On the right, find the “Run only specified Windows applications” setting and double-click it to open its properties dialog. If you want to block specific applications rather than restricting them, you would open the “Don’t run specified Windows applications” setting instead.
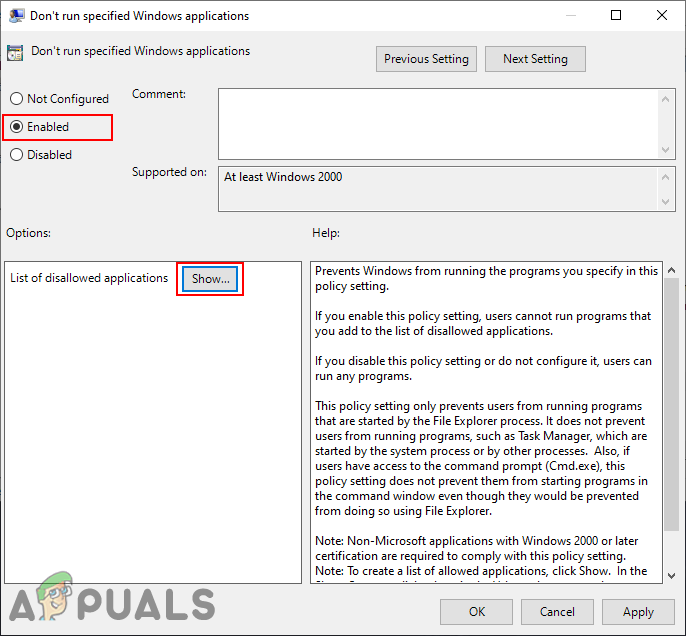
In the properties window that opens, click the “Enabled” option and then click the “Show” button.
In the “Show Contents” window, click each line in the list and type the name of the excecutable you want users to be able to run (or the name of apps you want to block if that’s what you’re doing instead). When you’re done building your list, click “OK.”
You can now exit the Local Group Policy window. To test your changes, sign in with one of the affected user accounts and try to launch an app to which the user should not have access. Instead of launching the app, you should see an error message.
If you want to disable your changes, just head back into the Local Group Policy editor by double-clicking your MSC file again. This time, change the “Run only specified Windows applications” or “Don’t run specified Windows applications” options to “Disabled” or “Not Configured.” This will turn the setting off entirely. It will also reset your list of apps, so if you want to turn it on again, you’ll need to retype that list.
READ NEXT
- › What Is “Group Policy” in Windows?
- › Windows Registry Demystified: What You Can Do With It
- › How to Block an Application or .EXE from Running in Windows
- › How to Set Time Limits for a Regular Account in Windows 10
- › The Best Articles for Tweaking and Customizing Windows 7
- › What Is a Condenser Microphone, and How Do They Work?
- › How to Change Your Age on TikTok
- › How to Screen Record on iPhone
A computer used by multiple users will always require some restrictions for better use. Some applications may not be suitable for kids or you may not want to share with other users. In certain situations, you might want to restrict some of the programs on your computer. The reason can be privacy-related for the users or to be safe from issues caused by misuse of the programs. In this article, we will show you methods through which you can prevent users from running specified applications.

Note: Make sure that you are making changes to the user account in which you want to restrict programs and not in the administrator account. If you are making changes in the administrator account, then make sure tools like Registry Editor and Local Group Policy Editor isn’t restricted. That is because you will lock yourself up and lose access to reversing the changes.
Preventing Users from Running Certain Programs
Most of you may already know about the third-party applications that lock certain applications and folders. However, this can also be done through the tools already available in the Windows operating system. There is a policy setting, especially for this specific task in the Group Policy Editor. You can also use the Registry Editor and restrict applications from the standard users.
Method 1: Using the Local Group Policy Editor
The Local Group Policy Editor is a Windows administration tool that allows users to configure settings for their operating system. It has two categories; computer configuration and user configuration. The setting that we will be using in this method can be found in the user configuration category. Follow the below guide to restrict applications for the standard user.
However, if you are using the Windows Home operating system, then skip this method and try other methods below. That is because the Group Policy Editor isn’t available in the Windows Home Edition.
- Hold the Windows key and press R on your keyboard to open a Run dialog. Type “gpedit.msc” in the text field of the Run box and press the Enter key to open the Local Group Policy Editor.

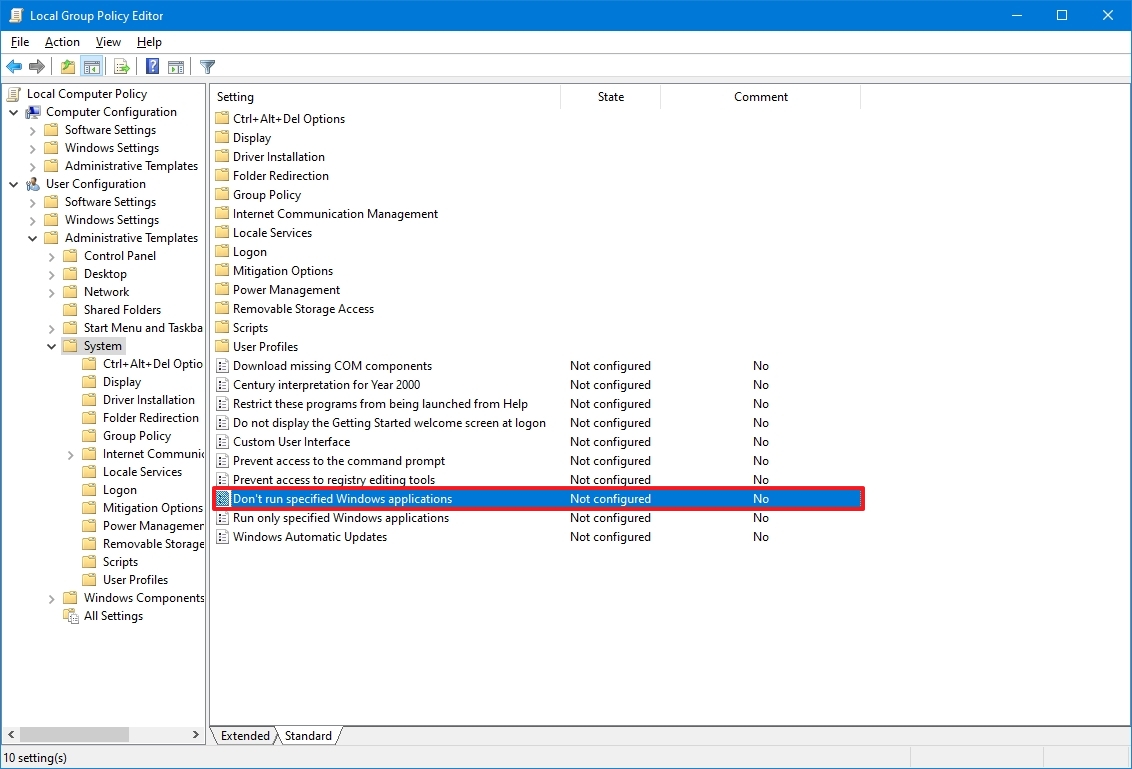
Opening Local Group Policy Editor - Expand the User Configuration and navigate to the following path:
User ConfigurationAdministrative TemplatesSystem

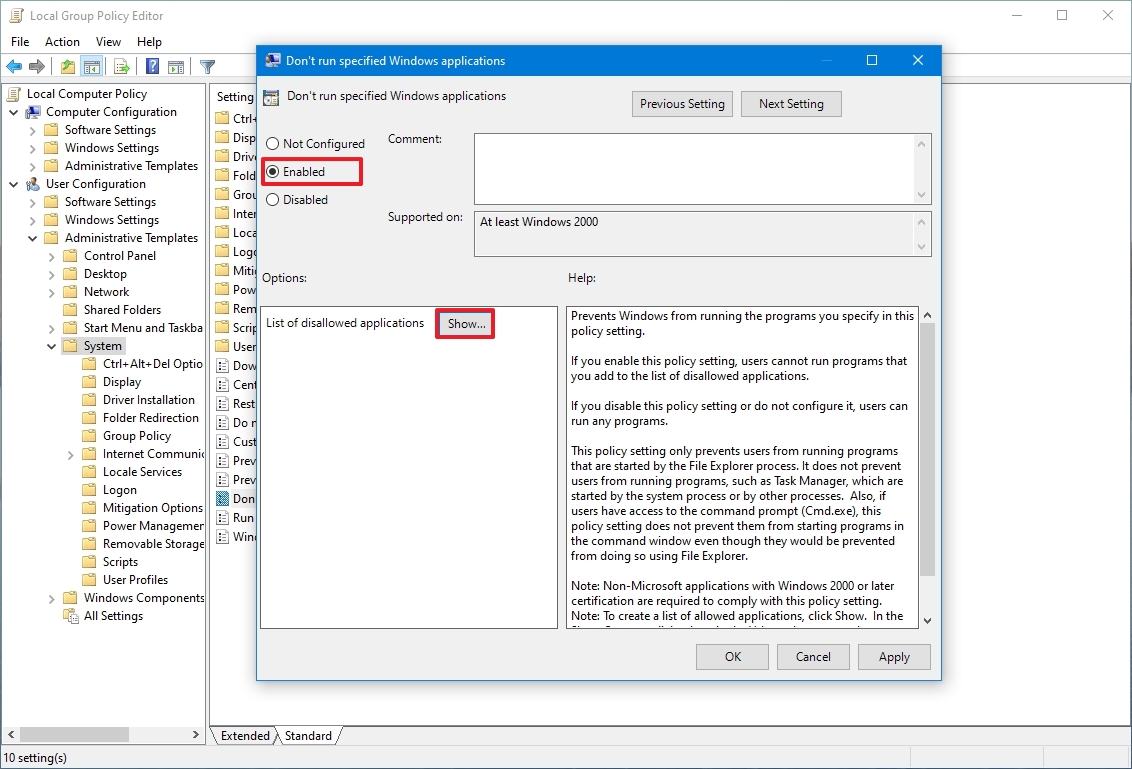
Navigating to the setting - Double-click on the “Don’t run specified Windows applications” setting and it will open in another window. Change the toggle option to Enabled and click on the Show button.

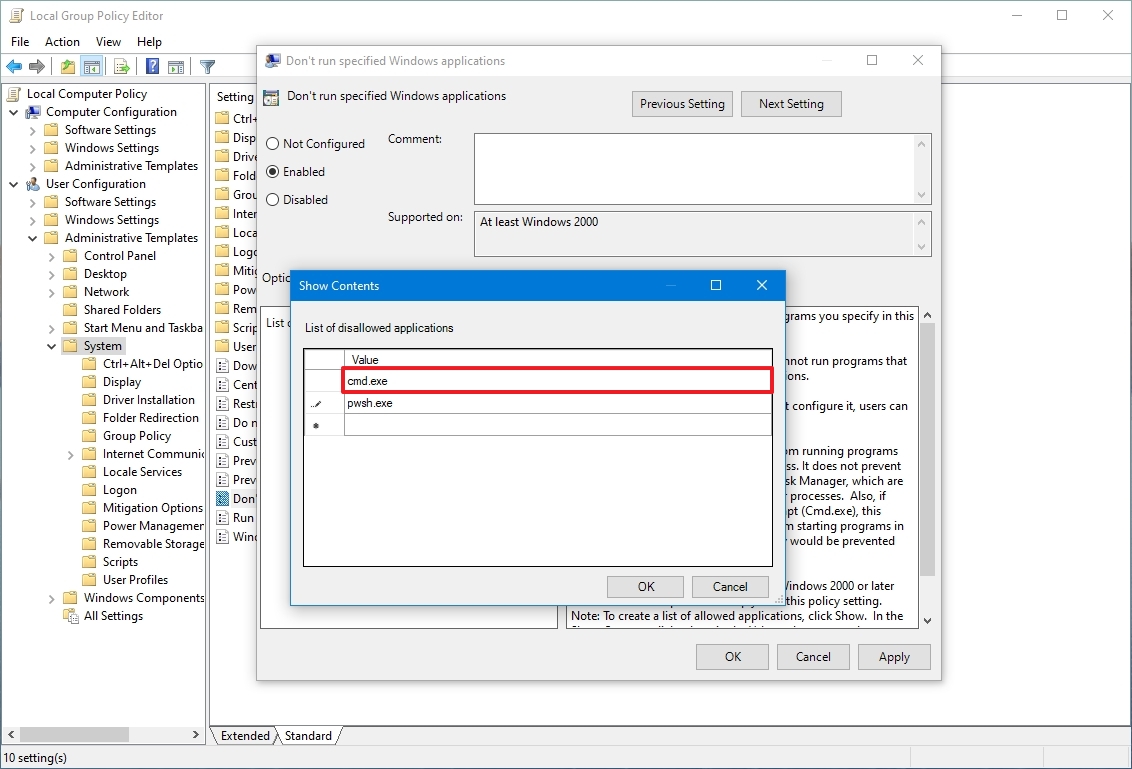
Enabling the setting - Now add programs executable names in the list as shown in the screenshot.

Adding programs executable names - Click on the Apply/Ok button to save changes and it will block the programs that you added to the list.
- To enable those programs back, simply change the toggle option back to Not Configured or Disabled.


Method 2: Using the Registry Editor
The Registry Editor is a graphical tool that the authorized users can use to view and makes changes in the Windows registry. It contains almost all of the information about the computer. In this method, the user will have to create missing keys and values for the setting to work. We also recommend users, always create a backup of the registry before making any changes. Check the below steps and apply them to restrict applications for the standard user.
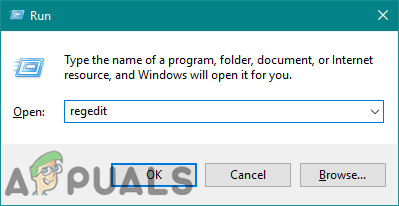
- Hold the Windows key and press R on your keyboard to open a Run dialog. Type “regedit” in the text field of the Run box and press the Enter key to open Registry Editor. If prompted by UAC (User Account Control), then click on the Yes button.
Opening the Registry Editor - In the Registry Editor, navigate to the following key path:
HKEY_CURRENT_USERSoftwareMicrosoftWindowsCurrentVersionPoliciesExplorer
- Create a new value under the Explorer key by right-clicking on the right pane and choosing New > DWORD (32-bit) Value. Name this value as “DisallowRun“.

Creating a new value - Double-click on the DisallowRun value and set the value data as 1.

Enabling the value - Now create another key under the Explorer key by right-clicking on it and choosing the New > Key option. Name this key as “DisallowRun“.
Creating a new key - Inside this key create a new value by right-clicking on the right pane and choosing New > String Value. You can name the values in numerical form, starting from 1.
Note: The second value will have the name as 2, the third value will have like 3, and so on.Creating values for programs - Open the value 1 and add the string value as the executable name of the program. In our case, we are blocking the notepad, so we type “notepad.exe” in it.

Adding the executable names of programs in each value - Finally, after configuring all the settings, make sure to restart your system to apply the changes.
- To enable the programs back on your system, you need to remove the executable names in string values or delete the values from the Registry.


Method 3: Using the Program Blocker
There are many third-party programs on the Internet that you can use to restrict applications. They will simply lock the applications and password-protect them. Every program blocker will have a different feature and working. We will be using Program Blocker software in this method to demonstrate the idea of how it works. Check the below guide:
- Open your browser and download the Program Blocker. Open the program by using the WinRAR program. At first, it will ask you to create a new password for the Program Blocker.

Downloading the application - After that, click on the Block Applications button on the Program Blocker.

Clicking on the Block Applications button - Search for the application that you want to block in the Common Applications list. You can also find the executable of the program that you want to block by clicking on the Add New button.
- Once selected, click on the Arrow button to move it to the right box, and then click on the Save button to save the changes.

Blocking the selected programs - This will restrict the application from the users and can only be opened by providing the password that you set for the Program Blocker.
- To unblock the application, simply open the Program Blocker and click on the Block Applications button. Now select the application and click on the Remove button.


Kevin Arrows
Kevin is a dynamic and self-motivated information technology professional, with a Thorough knowledge of all facets pertaining to network infrastructure design, implementation and administration. Superior record of delivering simultaneous large-scale mission critical projects on time and under budget.
Download PC Repair Tool to quickly find & fix Windows errors automatically
On Windows 11 or Windows 10 computers, PC users can apply stringent security measures like protect against and prevent Ransomware attacks & infections, block users from installing or running programs, and can use AppLocker to prevent users from installing or running applications. In this post, we walk you through the steps on how to block .exe files from running on Windows client or Windows Server by applying Software Restriction Policies, a set of rules that can be configured using Group Policy Editor.

What are Software Restriction Policies?
According to Microsoft documentation, Software Restriction Policies (SRP) is Group Policy-based feature that identifies software programs running on computers in a domain, and controls the ability of those programs to run. Software restriction policies are part of the Microsoft security and management strategy to assist enterprises in increasing the reliability, integrity, and manageability of their computers.
SRPs are integrated with Microsoft Active Directory and Group Policy – but can be used to create highly restricted configuration policies on stand-alone computers as well, in which you allow only specifically identified applications to run on the system.
Similar to configuring Controlled Folder Access using Group Policy & PowerShell, which when enabled, the feature is able to track executable files, scripts, and DLLs that attempt to make changes to files in the protected folders, PC users can block .exe files in vulnerable folders from running with Software Restriction Policies on Windows 11/10.
To block exe files from running using Group Policy in Windows 11/10, do the following:
- Press Windows key + R to invoke the Run dialog.
- In the Run dialog box type gpedit.msc and press Enter to open Group Policy Editor.
- Inside the Local Group Policy Editor, use the left pane to navigate to the path below:
Computer Configuration > Windows Settings > Security Settings > Software Restriction Policies
- At the location, on the left navigation pane, click the Software Restriction Policies folder to collapse it.
- Next, right-click the Additional Rules folder node.
- Select New Path Rule… from the context menu.
- Now, enter the path to the folder that you want to prevent executable files to run from and make sure to suffix the *.exe at the end, so that you will only block executable files.
- Add a description if you like.
- Click Apply > OK to save the changes.
- Repeat for additional folders.
You can block (at least) the following:
- C:WindowsTemp*.exe
- C:WindowsTemp**.exe
- %USERPROFILE%AppDataLocal*.exe
- %USERPROFILE%AppDataLocal**.exe
- %USERPROFILE%AppDataRoaming*.exe
- %USERPROFILE%AppDataRoaming**.exe
Once done, you can exit the Local Group Policy Editor. If you want to allow some specific executable files to run in these folders, simply create an exception by selecting the Unrestricted option in the Security level drop-down.
For Windows 11/10 Home users, you can add Local Group Policy Editor feature and then carry out the instructions as provided above.
That’s it on how to block exe files from running using Group Policy in Windows 11/10!
Related post: Block Macros from running in Microsoft Office using Group Policy
How do I disable .exe from Group Policy?
To disable .exe from Group Policy Editor or to apply GPO to block the software by file name, follow these instructions:
- Launch Registry Editor.
- Expand User Configuration > Policies > Administrative Templates > System.
- Double click on Don’t turn specified Windows applications.
- Click Enable.
- Click the Show button.
- Type in the file name you want to block.
How do I block an EXE file?
You can block exe in Windows 11/10 in either of the following ways:
- Using Path Rule: Based on the name of the executable and its file extension, all the versions of the specified application are blocked.
- Using Hash Value: After locating the executable on the server, the hash value of the executable is calculated.
Read: Exe files getting deleted randomly.
How do I fix this program is blocked by Group Policy?
To fix this program is blocked by Group Policy error on your system, do the following:
- Open Group Policy Editor.
- Expand User Configuration > Policies > Administrative Templates > System.
- Click the Show button.
- Remove the target program or application from the disallowed list.
- Click OK.
How do I run a program that is blocked by administrator?
To run a program that is blocked by an administrator, you need to unblock the file. Here’s how:
- Right-click on the file you’re trying to launch.
- Select Properties from the context menu.
- Switch to the General tab.
- Under the Security section, check the Unblock box.
- Click Apply > OK button.
Hope you find this post useful!
Related reads:
- Bock users from installing programs in Windows.
- Windows Program Blocker is a free App or Application blocker software to block software from running
- How to block third-party app installations in Windows.

Obinna Onwusobalu has studied Information & Communication Technology and is a keen follower of the Windows ecosystem. He has been a Windows Insider MVP (2020). He runs a computer software clinic.

(Image credit: Future)
On Windows 10, removing access to specific apps can come in handy in many scenarios, such as when you must prevent users from launching built-in tools (such as PowerShell and Command Prompt) to run scripts or make unwanted system changes. Maybe you need to set up an app that should only be accessible by you and no one else, or you installed the Microsoft 365 version of Office and since you can’t customize the installation, you need to restrict access to some of the apps to comply with your organization’s policies.
Regardless of the reason, if you have to restrict access to specific applications, Windows 10 includes at least two ways to disable them using Group Policy Editor or Security Policy console.
This guide will walk you through the steps to disable access to one or more desktop applications on Windows 10.
How to disable apps access from Group Policy
To disable access to certain apps on Windows 10 from Group Policy, use these steps:
- Open Start.
- Search for gpedit and click the top result to open the Local Group Policy Editor.
- Browse the following path: User Configuration > Administrative Templates > System
- On the right side, double-click the «Don’t run specified Windows applications» policy.
- Select the Enabled option.
- Click the Show button.
- Confirm the names of the apps you want to block.
- Quick note: Only add one name per line. Also, you need to specify the «.exe» file. For example, to block Command Prompt, you would add cmd.exe and pwsh.exe to block the built-in version of PowerShell.
- Click the Apply. button
- Click the OK button.
Once you complete the steps, the apps you specified should no longer be accessible by users configured on the device. The settings should apply immediately, but you may need to restart the computer for the changes to take effect in some cases.
You can always revert the changes using the same instructions, but in step 5, select the «Not configured» option.
These instructions will disable access to the apps for all users. However, you can also use the Local Group Policy Editor to apply the settings to one or multiple users while excluding the reset.
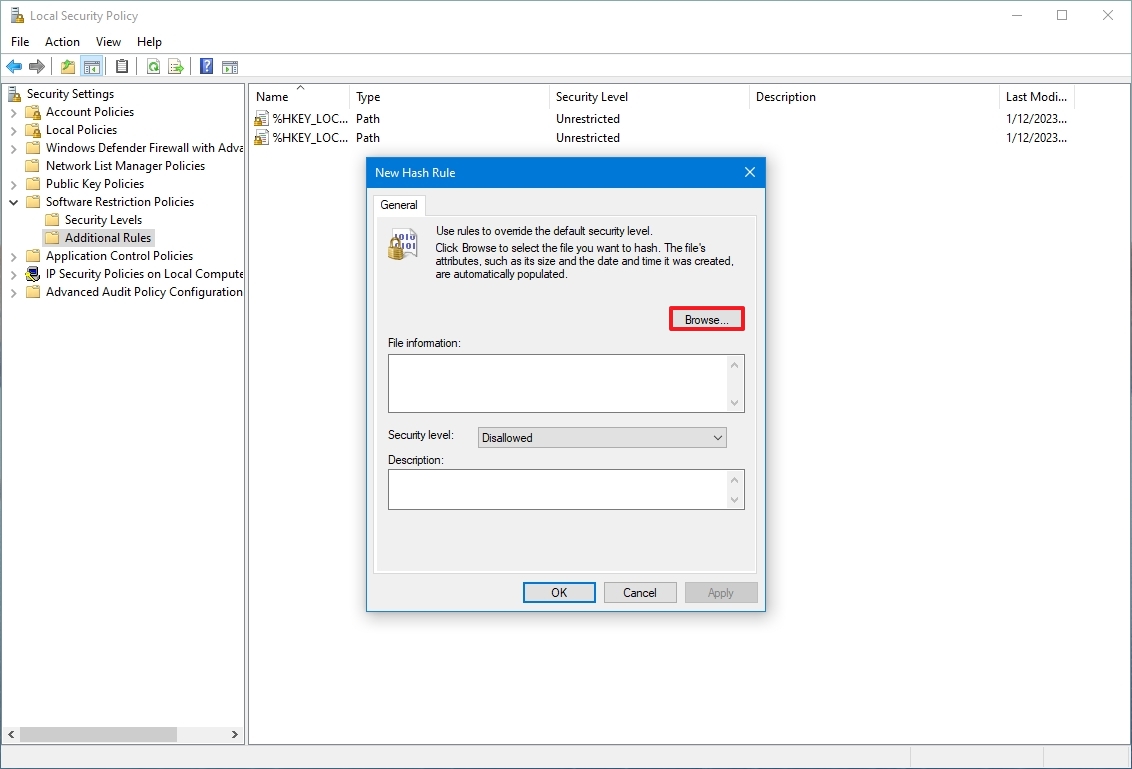
How to disable apps access from Security Policy
To prevent users from launching specific apps with the Local Security Policy on Windows 10, use these steps:
- Open Start.
- Search for Local Security Policy and click the top result to open the app.
- Double-click to expand the «Software Restriction Policies» branch.
- Right-click the Additional Rules category and select the «New Hash Rule» option.
- Quick tip: If the category is not available, right-click the «Software Restriction Policies» branch and select the «New Software Restriction Policies» option.

- Click the Browse button.
- Browse to the location of the application folder.
- Select the main executable (.exe) file – for example, cmd.exe.
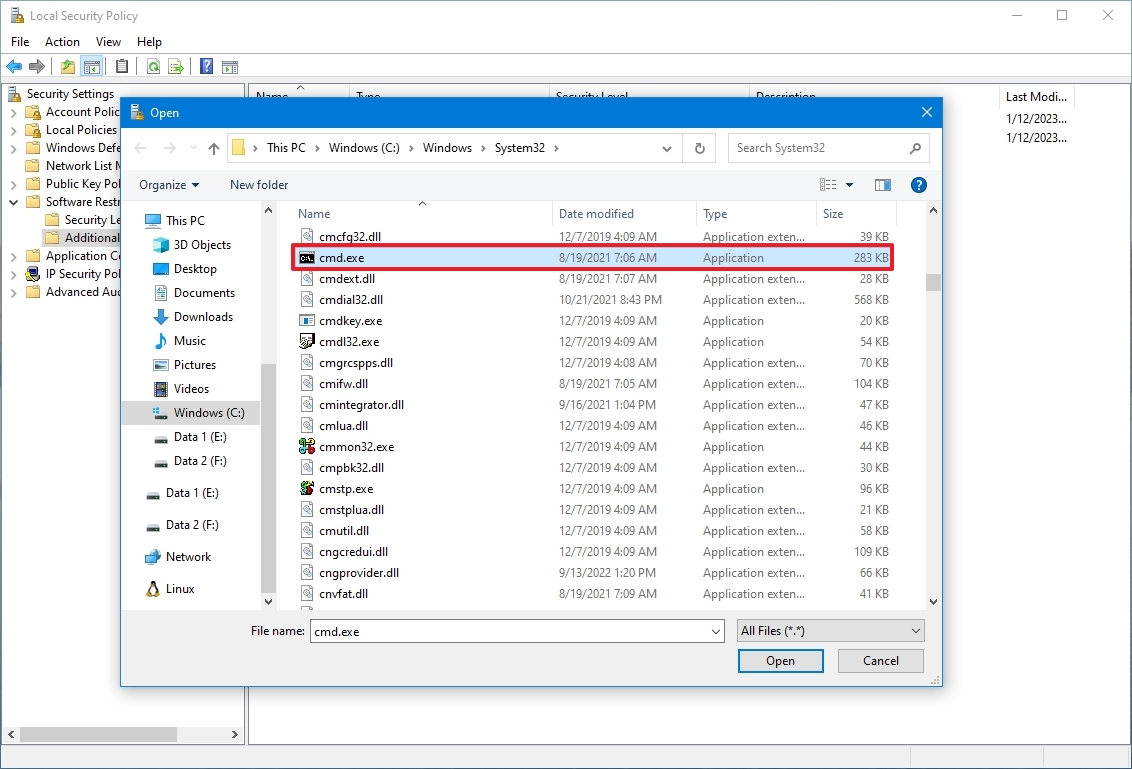
- Click the Open button.
- Click the Apply button.
- Click the OK button.
- Restart the computer.
After you complete the steps, users will no longer be able to launch the application you specified. You can always repeat the steps to block access to other desktop applications.
If you want to undo the changes, you can use the same instructions outlined above, but on step 4, right-click the hash of the app currently blocked and select the «Delete» option.
If you are disabling applications to prevent users from making system changes, you can use these instructions to restrict access to PowerShell or Command Prompt. You can also limit access to the Task Manager and Registry.
Furthermore, you can try switching the account type to «Standard User» to prevent users from making system changes and make the account more secure. The only caveat with this approach is that users will still have access to apps like PowerShell and Command Prompt to perform some non-administrative tasks.
More resources
For more helpful articles, coverage, and answers to common questions about Windows 10, visit the following resources:
- Windows 11 on Windows Central — All you need to know
- Windows 10 on Windows Central — All you need to know

(opens in new tab)
Cutting-edge operating system
A refreshed design in Windows 11 enables you to do what you want effortlessly and safely, with biometric logins for encrypted authentication and advanced antivirus defenses.
Get the best of Windows Central in in your inbox, every day!
Mauro Huculak is technical writer for WindowsCentral.com. His primary focus is to write comprehensive how-tos to help users get the most out of Windows 10 and its many related technologies. He has an IT background with professional certifications from Microsoft, Cisco, and CompTIA, and he’s a recognized member of the Microsoft MVP community.