| title | description | ms.date | ms.topic |
|---|---|---|---|
|
Troubleshooting Windows Subsystem for Linux |
Provides detailed information about common errors and issues people run into while running Linux on the Windows Subsystem for Linux. |
09/27/2021 |
article |
Troubleshooting Windows Subsystem for Linux
We have covered some common troubleshooting scenarios associated with WSL below, but please consider searching the issues filed in the WSL product repo on GitHub as well.
File an issue, bug report, feature request
The WSL product repo issues enables you to:
- Search existing issues to see if there are any associated with a problem that you are having. Note that in the search bar, you can remove «is:open» to include issues that have already been resolved in your search. Please consider commenting or giving a thumbs up to any open issues that you would like to express your interest in moving forward as a priority.
- File a new issue. If you have found a problem with WSL and there does not appear to be an existing issue, you can select the green New issue button and then choose WSL — Bug Report. You will need to include a title for the issue, your Windows build number (run
cmd.exe /c verto see your current build #), whether you’re running WSL 1 or 2, your current Linux Kernel version # (runwsl.exe --statusorcat /proc/version), the version # of your distribution (runlsb_release -r), any other software versions involved, the repro steps, expected behavior, actual behavior, and diagnostic logs if available and appropriate. For more info, see contributing to WSL. - File a feature request by selecting the green New issue button and then select Feature request. You will need to address a few questions describing your request.
You can also:
- File a documentation issue using the WSL docs repo. To contribute to the WSL docs, see the Microsoft Docs contributor guide.
- File a Windows Terminal issue using the the Windows Terminal product repo if your problem is related more to the Windows Terminal, Windows Console, or the command-line UI.
Installation issues
-
Installation failed with error 0x80070003
-
WslRegisterDistribution failed with error 0x8007019e
- The Windows Subsystem for Linux optional component is not enabled:
- Open Control Panel -> Programs and Features -> Turn Windows Feature on or off -> Check Windows Subsystem for Linux or using the PowerShell cmdlet mentioned at the beginning of this article.
-
Installation failed with error 0x80070003 or error 0x80370102
- Please make sure that virtualization is enabled inside of your computer’s BIOS. The instructions on how to do this will vary from computer to computer, and will most likely be under CPU related options.
- WSL2 requires that your CPU supports the Second Level Address Translation (SLAT) feature, which was introduced in Intel Nehalem processors (Intel Core 1st Generation) and AMD Opteron. Older CPUs (such as the Intel Core 2 Duo) will not be able to run WSL2, even if the Virtual Machine Platform is successfully installed.
-
Error when trying to upgrade:
Invalid command line option: wsl --set-version Ubuntu 2- Ensure that you have the Windows Subsystem for Linux enabled, and that you’re using Windows Build version 18362 or later. To enable WSL run this command in a PowerShell prompt with admin privileges:
Enable-WindowsOptionalFeature -Online -FeatureName Microsoft-Windows-Subsystem-Linux.
- Ensure that you have the Windows Subsystem for Linux enabled, and that you’re using Windows Build version 18362 or later. To enable WSL run this command in a PowerShell prompt with admin privileges:
-
The requested operation could not be completed due to a virtual disk system limitation. Virtual hard disk files must be uncompressed and unencrypted and must not be sparse.
- Deselect “Compress contents” (as well as “Encrypt contents” if that’s checked) by opening the profile folder for your Linux distribution. It should be located in a folder on your Windows file system, something like:
%USERPROFILE%AppDataLocalPackagesCanonicalGroupLimited... - In this Linux distro profile, there should be a LocalState folder. Right-click this folder to display a menu of options. Select Properties > Advanced and then ensure that the “Compress contents to save disk space” and “Encrypt contents to secure data” checkboxes are unselected (not checked). If you are asked whether to apply this to just to the current folder or to all subfolders and files, select “just this folder” because you are only clearing the compress flag. After this, the
wsl --set-versioncommand should work.
- Deselect “Compress contents” (as well as “Encrypt contents” if that’s checked) by opening the profile folder for your Linux distribution. It should be located in a folder on your Windows file system, something like:

[!NOTE]
In my case, the LocalState folder for my Ubuntu 18.04 distribution was located at C:Users<my-user-name>AppDataLocalPackagesCanonicalGroupLimited.Ubuntu18.04onWindows_79rhkp1fndgscCheck WSL Docs GitHub thread #4103 where this issue is being tracked for updated information.
-
The term ‘wsl’ is not recognized as the name of a cmdlet, function, script file, or operable program.
- Ensure that the Windows Subsystem for Linux Optional Component is installed. Additionally, if you are using an ARM64 device and running this command from PowerShell, you will receive this error. Instead run
wsl.exefrom PowerShell Core, or Command Prompt.
- Ensure that the Windows Subsystem for Linux Optional Component is installed. Additionally, if you are using an ARM64 device and running this command from PowerShell, you will receive this error. Instead run
-
Error: Windows Subsystem for Linux has no installed distributions.
- If you receive this error after you have already installed WSL distributions:
- Run the distribution at least once before invoking it from the command line.
- Check whether you may be running separate user accounts. Running your primary user account with elevated permissions (in admin mode) should not result in this error, but you should ensure that you aren’t accidentally running the built-in Administrator account that comes with Windows. This is a separate user account and will not show any installed WSL distributions by design. For more info, see Enable and Disable the Built-in Administrator Account.
- The WSL executable is only installed to the native system directory. When you’re running a 32-bit process on 64-bit Windows (or on ARM64, any non-native combination), the hosted non-native process actually sees a different System32 folder. (The one a 32-bit process sees on x64 Windows is stored on disk at WindowsSysWOW64.) You can access the “native” system32 from a hosted process by looking in the virtual folder:
Windowssysnative. It won’t actually be present on disk, mind you, but the filesystem path resolver will find it.
-
Error: This update only applies to machines with the Windows Subsystem for Linux.
- To install the Linux kernel update MSI package, WSL is required and should be enabled first. If it fails, it you will see the message:
This update only applies to machines with the Windows Subsystem for Linux. - There are three possible reason you see this message:
-
You are still in old version of Windows which doesn’t support WSL 2. See step #2 for version requirements and links to update.
-
WSL is not enabled. You will need to return to step #1 and ensure that the optional WSL feature is enabled on your machine.
-
After you enabled WSL, a reboot is required for it to take effect, reboot your machine and try again.
- To install the Linux kernel update MSI package, WSL is required and should be enabled first. If it fails, it you will see the message:
-
Error: WSL 2 requires an update to its kernel component. For information please visit https://aka.ms/wsl2kernel .
- If the Linux kernel package is missing in the %SystemRoot%system32lxsstools folder, you will encounter this error. Resolve it by installing the Linux kernel update MSI package in step #4 of these installation instructions. You may need to uninstall the MSI from ‘Add or Remove Programs’, and install it again.
Common issues
I’m on Windows 10 version 1903 and I still do not see options for WSL 2
This is likely because your machine has not yet taken the backport for WSL 2. The simplest way to resolve this is by going to Windows Settings and clicking ‘Check for Updates’ to install the latest updates on your system. See the full instructions on taking the backport.
If you hit ‘Check for Updates’ and still do not receive the update you can install KB KB4566116 manually.
Error: 0x1bc when wsl --set-default-version 2
This may happen when ‘Display Language’ or ‘System Locale’ setting is not English.
wsl --set-default-version 2
Error: 0x1bc
For information on key differences with WSL 2 please visit https://aka.ms/wsl2
The actual error for 0x1bc is:
WSL 2 requires an update to its kernel component. For information please visit https://aka.ms/wsl2kernel
For more information, please refer to issue 5749
Cannot access WSL files from Windows
A 9p protocol file server provides the service on the Linux side to allow Windows to access the Linux file system. If you cannot access WSL using \wsl$ on Windows, it could be because 9P did not start correctly.
To check this, you can check the start up logs using: dmesg |grep 9p, and this will show you any errors. A successful output looks like the following:
[    0.363323] 9p: Installing v9fs 9p2000 file system support
[    0.363336] FS-Cache: Netfs '9p' registered for caching
[    0.398989] 9pnet: Installing 9P2000 support
Please see this Github thread for further discussion on this issue.
Can’t start WSL 2 distribution and only see ‘WSL 2’ in output
If your display language is not English, then it is possible you are seeing a truncated version of an error text.
To resolve this issue, please visit https://aka.ms/wsl2kernel and install the kernel manually by following the directions on that doc page.
command not found when executing windows .exe in linux
Users can run Windows executables like notepad.exe directly from Linux. Sometimes, you may hit «command not found» like below:
$ notepad.exe
-bash: notepad.exe: command not found
If there are no win32 paths in your $PATH, interop isn’t going to find the .exe.
You can verify it by running echo $PATH in Linux. It’s expected that you will see a win32 path (for example, /mnt/c/Windows) in the output.
If you can’t see any Windows paths then most likely your PATH is being overwritten by your Linux shell.
Here is a an example that /etc/profile on Debian contributed to the problem:
if [ "`id -u`" -eq 0 ]; then
  PATH="/usr/local/sbin:/usr/local/bin:/usr/sbin:/usr/bin:/sbin:/bin"
else
  PATH="/usr/local/bin:/usr/bin:/bin:/usr/local/games:/usr/games"
fi
The correct way on Debian is to remove above lines.
You may also append $PATH during the assignment like below, but this lead to some other problems with WSL and VSCode..
if [ "`id -u`" -eq 0 ]; then
  PATH="/usr/local/sbin:/usr/local/bin:/usr/sbin:/usr/bin:/sbin:/bin:$PATH"
else
  PATH="/usr/local/bin:/usr/bin:/bin:/usr/local/games:/usr/games:$PATH"
fi
For more information, see issue 5296 and issue 5779.
«Error: 0x80370102 The virtual machine could not be started because a required feature is not installed.»
Please enable the Virtual Machine Platform Windows feature and ensure virtualization is enabled in the BIOS.
-
Check the Hyper-V system requirements
-
If your machine is a VM, please enable nested virtualization manually. Launch powershell with admin, and run:
Set-VMProcessor -VMName <VMName> -ExposeVirtualizationExtensions $true
-
Please follow guidelines from your PC’s manufacturer on how to enable virtualization. In general, this can involve using the system BIOS to ensure that these features are enabled on your CPU. Instructions for this process can vary from machine to machine, please see this article from Bleeping Computer for an example.
-
Restart your machine after enabling the
Virtual Machine Platformoptional component. -
Make sure that the hypervisor launch is enabled in your boot configuration. You can validate this by running (elevated powershell):
bcdedit /enum | findstr -i hypervisorlaunchtype
If you see
hypervisorlaunchtype Off, then the hypervisor is disabled. To enable it run in an elevated powershell:bcdedit /set {current} hypervisorlaunchtype Auto -
Additionally, if you have 3rd party hypervisors installed (Such as VMware or VirtualBox) then please ensure you have these on the latest versions which can support HyperV (VMware 15.5.5+ and VirtualBox 6+) or are turned off.
Learn more about how to Configure Nested Virtualization when running Hyper-V in a Virtual Machine.
WSL has no network connection on my work machine or in an Enterpise environment
Business or Enterprise environments may have Windows Defender Firewall settings configured to block unauthorized network traffic. If local rule merging is set to «No» then WSL networking will not work by default, and your administrator will need to add a firewall rule to allow it.
You can confirm local rule merging’s setting by following these steps:

- Open «Windows Defender Firewall with advanced security» (this is different than «Windows Defender Firewall» in the Control Panel)
- Right-click on the «Windows Defender Firewall with advanced security on Local Computer» tab
- Select «Properties»
- Select the «Public Profile» tab on the new Window that opens
- Select «Customize» under the «Settings» section
- Check in the «Customize Settings for the Public Profile» window that opens to see if «Rule Merging» is set to «No». This will block access to WSL.
You can find instructions on how to change this Firewall setting in Enterprise environment: Set up WSL for your company.
WSL has no network connectivity once connected to a VPN
If after connecting to a VPN on Windows, bash loses network connectivity, try this workaround from within bash. This workaround will allow you to manually override the DNS resolution through /etc/resolv.conf.
- Take a note of the DNS server of the VPN from doing
ipconfig.exe /all - Make a copy of the existing resolv.conf
sudo cp /etc/resolv.conf /etc/resolv.conf.new - Unlink the current resolv.conf
sudo unlink /etc/resolv.conf sudo mv /etc/resolv.conf.new /etc/resolv.conf- Edit
/etc/wsl.confand add this content to the file. (More info on this set up can be found in Advanced settings configuration)
[network]
generateResolvConf=false
- Open
/etc/resolv.confand
a. Delete the first line from the file which has a comment describing automatic generation
b. Add the DNS entry from (1) above as the very first entry in the list of DNS servers.
c. Close the file.
Once you have disconnected the VPN, you will have to revert the changes to /etc/resolv.conf. To do this, do:
cd /etcsudo mv resolv.conf resolv.conf.newsudo ln -s ../run/resolvconf/resolv.conf resolv.conf
Starting WSL or installing a distribution returns an error code
Follow these instructions to collect detailed logs and file an issue on our GitHub.
Updating WSL
There are two components of Windows Subsystem for Linux that can require updating.
-
To update the Windows Subsystem for Linux itself, use the command
wsl --updatein PowerShell or CMD. -
To update the specific Linux distribution user binaries, use the command:
apt-get update | apt-get upgradein the Linux distribution that you are seeking to update.
Apt-get upgrade errors
Some packages use features that we haven’t implemented yet. udev, for example, isn’t supported yet and causes several apt-get upgrade errors.
To fix issues related to udev, follow the following steps:
-
Write the following to
/usr/sbin/policy-rc.dand save your changes. -
Add execute permissions to
/usr/sbin/policy-rc.d:chmod +x /usr/sbin/policy-rc.d
-
Run the following commands:
dpkg-divert --local --rename --add /sbin/initctl
ln -s /bin/true /sbin/initctl
«Error: 0x80040306» on installation
This has to do with the fact that we do not support legacy console.
To turn off legacy console:
- Open cmd.exe
- Right click title bar -> Properties -> Uncheck Use legacy console
- Click OK
«Error: 0x80040154» after Windows update
The Windows Subsystem for Linux feature may be disabled during a Windows update. If this happens the Windows feature must be re-enabled. Instructions for enabling the Windows Subsystem for Linux can be found in the Manual Installation Guide.
Changing the display language
WSL install will try to automatically change the Ubuntu locale to match the locale of your Windows install. If you do not want this behavior you can run this command to change the Ubuntu locale after install completes. You will have to relaunch bash.exe for this change to take effect.
The below example changes to locale to en-US:
sudo update-locale LANG=en_US.UTF8
Installation issues after Windows system restore
- Delete the
%windir%System32TasksMicrosoftWindowsWindows Subsystem for Linuxfolder.
Note: Do not do this if your optional feature is fully installed and working. - Enable the WSL optional feature (if not already)
- Reboot
- lxrun /uninstall /full
- Install bash
No internet access in WSL
Some users have reported issues with specific firewall applications blocking internet access in WSL. The firewalls reported are:
- Kaspersky
- AVG
- Avast
- Symantec Endpoint Protection
In some cases turning off the firewall allows for access. In some cases simply having the firewall installed looks to block access.
If you are using Microsoft Defender Firewall, unchecking «Blocks all incoming connections, including those in the list of allowed apps.» allows for access.
Permission Denied error when using ping
For Windows Anniversary Update, version 1607,
administrator privileges in Windows are required to run ping in WSL. To run ping, run Bash on Ubuntu on Windows as an administrator, or run bash.exe from a CMD/PowerShell prompt with administrator privileges.
For later versions of Windows, Build 14926+, administrator privileges are no longer required.
Bash is hung
If while working with bash, you find that bash is hung (or deadlocked) and not responding to inputs, help us diagnose the issue by collecting and reporting a memory dump. Note that these steps will crash your system. Do not do this if you are not comfortable with that or save your work prior to doing this.
To collect a memory dump
-
Change the memory dump type to «complete memory dump». While changing the dump type, take a note of your current type.
-
Use the steps to configure crash using keyboard control.
-
Repro the hang or deadlock.
-
Crash the system using the key sequence from (2).
-
The system will crash and collect the memory dump.
-
Once the system reboots, report the memory.dmp to secure@microsoft.com. The default location of the dump file is %SystemRoot%memory.dmp or C:Windowsmemory.dmp if C: is the system drive. In the email, note that the dump is for the WSL or Bash on Windows team.
-
Restore the memory dump type to the original setting.
Check your build number
To find your PC’s architecture and Windows build number, open
Settings > System > About
Look for the OS Build and System Type fields.

To find your Windows Server build number, run the following in PowerShell:
systeminfo | Select-String "^OS Name","^OS Version"
Confirm WSL is enabled
You can confirm that the Windows Subsystem for Linux is enabled by running the following in an elevated PowerShell window:
Get-WindowsOptionalFeature -Online -FeatureName Microsoft-Windows-Subsystem-Linux
OpenSSH-Server connection issues
Trying to connect your SSH server is failed with the following error: «Connection closed by 127.0.0.1 port 22».
-
Make sure your OpenSSH Server is running:
and you’ve followed this tutorial:
https://ubuntu.com/server/docs/service-openssh -
Stop the sshd service and start sshd in debug mode:
sudo service ssh stop
sudo /usr/sbin/sshd -d
-
Check the startup logs and make sure HostKeys are available and you don’t see log messages such as:
debug1: sshd version OpenSSH_7.2, OpenSSL 1.0.2g  1 Mar 2016
debug1: key_load_private: incorrect passphrase supplied to decrypt private key
debug1: key_load_public: No such file or directory
Could not load host key: /etc/ssh/ssh_host_rsa_key
debug1: key_load_private: No such file or directory
debug1: key_load_public: No such file or directory
Could not load host key: /etc/ssh/ssh_host_dsa_key
debug1: key_load_private: No such file or directory
debug1: key_load_public: No such file or directory
Could not load host key: /etc/ssh/ssh_host_ecdsa_key
debug1: key_load_private: No such file or directory
debug1: key_load_public: No such file or directory
Could not load host key: /etc/ssh/ssh_host_ed25519_key
If you do see such messages and the keys are missing under /etc/ssh/, you will have to regenerate the keys or just purge&install openssh-server:
sudo apt-get purge openssh-server
sudo apt-get install openssh-server
«The referenced assembly could not be found.» when enabling the WSL optional feature
This error is related to being in a bad install state. Please complete the following steps to try and fix this issue:
-
If you are running the enable WSL feature command from PowerShell, try using the GUI instead by opening the start menu, searching for ‘Turn Windows features on or off’ and then in the list select ‘Windows Subsystem for Linux’ which will install the optional component.
-
Update your version of Windows by going to Settings, Updates, and clicking ‘Check for Updates’
-
If both of those fail and you need to access WSL please consider upgrading in place by reinstalling Windows using installation media and selecting ‘Keep Everything’ to ensure your apps and files are preserved. You can find instructions on how to do so at the Reinstall Windows 10 page.
Correct (SSH related) permission errors
If you’re seeing this error:
@@@@@@@@@@@@@@@@@@@@@@@@@@@@@@@@@@@@@@@@@@@@@@@@@@@@@@@@@@@
@         WARNING: UNPROTECTED PRIVATE KEY FILE!          @
@@@@@@@@@@@@@@@@@@@@@@@@@@@@@@@@@@@@@@@@@@@@@@@@@@@@@@@@@@@
Permissions 0777 for '/home/artur/.ssh/private-key.pem' are too open.
To fix this, append the following to the the /etc/wsl.conf file:
[automount]
enabled = true
options = metadata,uid=1000,gid=1000,umask=0022
Please note that adding this command will include metadata and modify the file permissions on the Windows files seen from WSL. Please see the File System Permissions for more information.
Running Windows commands fails inside a distribution
Some distributions available in Microsoft Store are yet not fully compatible to run Windows commands out of the box. If you get an error -bash: powershell.exe: command not found running powershell.exe /c start . or any other Windows command, you can resolve it following these steps:
- In your WSL distribution run
echo $PATH.
If it does not include:/mnt/c/Windows/system32something is redefining the standard PATH variable. - Check profile settings with
cat /etc/profile.
If it contains assignment of the PATH variable, edit the file to comment out PATH assignment block with a # character. - Check if wsl.conf is present
cat /etc/wsl.confand make sure it does not containappendWindowsPath=false, otherwise comment it out. - Restart distribution by typing
wsl -tfollowed by distribution name or runwsl --shutdowneither in cmd or PowerShell.
Unable to boot after installing WSL 2
We are aware of an issue affecting users where they are unable to boot after installing WSL 2. While we fully diagnose those issue, users have reported that changing the buffer size or installing the right drivers can help address this. Please view this Github issue to see the latest updates on this issue.
WSL 2 errors when ICS is disabled
Internet Connection Sharing (ICS) is a required component of WSL 2. The ICS service is used by the Host Network Service (HNS) to create the underlying virtual network which WSL 2 relies on for NAT, DNS, DHCP, and host connection sharing.
Disabling the ICS service (SharedAccess) or disabling ICS through group policy will prevent the WSL HNS network from being created. This will result in failures when creating a new WSL version 2 image, and the following error when trying to convert a version 1 image to version 2.
There are no more endpoints available from the endpoint mapper.
Systems that require WSL 2 should leave the ICS service (SharedAccess) in it’s default start state, Manual (Trigger Start), and any policy that disables ICS should be overwritten or removed. While disabling the ICS service will break WSL 2, and we do not recommend disabling ICS, portions of ICS can be disabled using these instructions
Using older versions of Windows and WSL
There are several differences to note if you’re running an older version of Windows and WSL, like the Windows 10 Creators Update (Oct 2017, Build 16299) or Anniversary Update (Aug 2016, Build 14393). We recommend that you update to the latest Windows version, but if that’s not possible, we have outlined some of the differences below.
Interoperability command differences:
bash.exehas been replaced withwsl.exe. Linux commands can be run from the Windows Command Prompt or from PowerShell, but for early Windows versions, you may need to use thebashcommand. For example:C:temp> bash -c "ls -la". The WSL commands passed intobash -care forwarded to the WSL process without modification. File paths must be specified in the WSL format and care must be taken to escape relevant characters. For example:C:temp> bash -c "ls -la /proc/cpuinfo"orC:temp> bash -c "ls -la "/mnt/c/Program Files"".- To see what commands are available for a particular distribution, run
[distro.exe] /?. For example, with Ubuntu:C:> ubuntu.exe /?. - Windows path is included in the WSL
$PATH. - When calling a Windows tool from a WSL distribution in an earlier version of Windows 10, you will need to specify the directory path. For example, to call the Windows Notepad app from your WSL command line, enter:
/mnt/c/Windows/System32/notepad.exe - To change the default user to
rootuse this command in PowerShell:C:> lxrun /setdefaultuser rootand then run Bash.exe to log in:C:> bash.exe. Reset your password using the distributions password command:$ passwd usernameand then close the Linux command line:$ exit. From Windows command prompt or Powershell, reset your default user back to your normal Linux user account:C:> lxrun.exe /setdefaultuser username.
Uninstall legacy version of WSL
If you originally installed WSL on a version of Windows 10 prior to Creators update (Oct 2017, Build 16299), we recommend that you migrate any necessary files, data, etc. from the older Linux distribution you installed, to a newer distribution installed via the Microsoft Store. To remove the legacy distribution from your machine, run the following from a Command Line or PowerShell instance: wsl --unregister Legacy. You also have the option to manually remove the older legacy distribution by deleting the %localappdata%lxss folder (and all it’s sub-contents) using Windows File Explorer or with PowerShell: rm -Recurse $env:localappdata/lxss/.
| title | description | ms.date | ms.topic |
|---|---|---|---|
|
Troubleshooting Windows Subsystem for Linux |
Provides detailed information about common errors and issues people run into while running Linux on the Windows Subsystem for Linux. |
09/27/2021 |
article |
Troubleshooting Windows Subsystem for Linux
We have covered some common troubleshooting scenarios associated with WSL below, but please consider searching the issues filed in the WSL product repo on GitHub as well.
File an issue, bug report, feature request
The WSL product repo issues enables you to:
- Search existing issues to see if there are any associated with a problem that you are having. Note that in the search bar, you can remove «is:open» to include issues that have already been resolved in your search. Please consider commenting or giving a thumbs up to any open issues that you would like to express your interest in moving forward as a priority.
- File a new issue. If you have found a problem with WSL and there does not appear to be an existing issue, you can select the green New issue button and then choose WSL — Bug Report. You will need to include a title for the issue, your Windows build number (run
cmd.exe /c verto see your current build #), whether you’re running WSL 1 or 2, your current Linux Kernel version # (runwsl.exe --statusorcat /proc/version), the version # of your distribution (runlsb_release -r), any other software versions involved, the repro steps, expected behavior, actual behavior, and diagnostic logs if available and appropriate. For more info, see contributing to WSL. - File a feature request by selecting the green New issue button and then select Feature request. You will need to address a few questions describing your request.
You can also:
- File a documentation issue using the WSL docs repo. To contribute to the WSL docs, see the Microsoft Docs contributor guide.
- File a Windows Terminal issue using the the Windows Terminal product repo if your problem is related more to the Windows Terminal, Windows Console, or the command-line UI.
Installation issues
-
Installation failed with error 0x80070003
-
WslRegisterDistribution failed with error 0x8007019e
- The Windows Subsystem for Linux optional component is not enabled:
- Open Control Panel -> Programs and Features -> Turn Windows Feature on or off -> Check Windows Subsystem for Linux or using the PowerShell cmdlet mentioned at the beginning of this article.
-
Installation failed with error 0x80070003 or error 0x80370102
- Please make sure that virtualization is enabled inside of your computer’s BIOS. The instructions on how to do this will vary from computer to computer, and will most likely be under CPU related options.
- WSL2 requires that your CPU supports the Second Level Address Translation (SLAT) feature, which was introduced in Intel Nehalem processors (Intel Core 1st Generation) and AMD Opteron. Older CPUs (such as the Intel Core 2 Duo) will not be able to run WSL2, even if the Virtual Machine Platform is successfully installed.
-
Error when trying to upgrade:
Invalid command line option: wsl --set-version Ubuntu 2- Ensure that you have the Windows Subsystem for Linux enabled, and that you’re using Windows Build version 18362 or later. To enable WSL run this command in a PowerShell prompt with admin privileges:
Enable-WindowsOptionalFeature -Online -FeatureName Microsoft-Windows-Subsystem-Linux.
- Ensure that you have the Windows Subsystem for Linux enabled, and that you’re using Windows Build version 18362 or later. To enable WSL run this command in a PowerShell prompt with admin privileges:
-
The requested operation could not be completed due to a virtual disk system limitation. Virtual hard disk files must be uncompressed and unencrypted and must not be sparse.
- Deselect “Compress contents” (as well as “Encrypt contents” if that’s checked) by opening the profile folder for your Linux distribution. It should be located in a folder on your Windows file system, something like:
%USERPROFILE%AppDataLocalPackagesCanonicalGroupLimited... - In this Linux distro profile, there should be a LocalState folder. Right-click this folder to display a menu of options. Select Properties > Advanced and then ensure that the “Compress contents to save disk space” and “Encrypt contents to secure data” checkboxes are unselected (not checked). If you are asked whether to apply this to just to the current folder or to all subfolders and files, select “just this folder” because you are only clearing the compress flag. After this, the
wsl --set-versioncommand should work.
- Deselect “Compress contents” (as well as “Encrypt contents” if that’s checked) by opening the profile folder for your Linux distribution. It should be located in a folder on your Windows file system, something like:
[!NOTE]
In my case, the LocalState folder for my Ubuntu 18.04 distribution was located at C:Users<my-user-name>AppDataLocalPackagesCanonicalGroupLimited.Ubuntu18.04onWindows_79rhkp1fndgscCheck WSL Docs GitHub thread #4103 where this issue is being tracked for updated information.
-
The term ‘wsl’ is not recognized as the name of a cmdlet, function, script file, or operable program.
- Ensure that the Windows Subsystem for Linux Optional Component is installed. Additionally, if you are using an ARM64 device and running this command from PowerShell, you will receive this error. Instead run
wsl.exefrom PowerShell Core, or Command Prompt.
- Ensure that the Windows Subsystem for Linux Optional Component is installed. Additionally, if you are using an ARM64 device and running this command from PowerShell, you will receive this error. Instead run
-
Error: Windows Subsystem for Linux has no installed distributions.
- If you receive this error after you have already installed WSL distributions:
- Run the distribution at least once before invoking it from the command line.
- Check whether you may be running separate user accounts. Running your primary user account with elevated permissions (in admin mode) should not result in this error, but you should ensure that you aren’t accidentally running the built-in Administrator account that comes with Windows. This is a separate user account and will not show any installed WSL distributions by design. For more info, see Enable and Disable the Built-in Administrator Account.
- The WSL executable is only installed to the native system directory. When you’re running a 32-bit process on 64-bit Windows (or on ARM64, any non-native combination), the hosted non-native process actually sees a different System32 folder. (The one a 32-bit process sees on x64 Windows is stored on disk at WindowsSysWOW64.) You can access the “native” system32 from a hosted process by looking in the virtual folder:
Windowssysnative. It won’t actually be present on disk, mind you, but the filesystem path resolver will find it.
-
Error: This update only applies to machines with the Windows Subsystem for Linux.
- To install the Linux kernel update MSI package, WSL is required and should be enabled first. If it fails, it you will see the message:
This update only applies to machines with the Windows Subsystem for Linux. - There are three possible reason you see this message:
-
You are still in old version of Windows which doesn’t support WSL 2. See step #2 for version requirements and links to update.
-
WSL is not enabled. You will need to return to step #1 and ensure that the optional WSL feature is enabled on your machine.
-
After you enabled WSL, a reboot is required for it to take effect, reboot your machine and try again.
- To install the Linux kernel update MSI package, WSL is required and should be enabled first. If it fails, it you will see the message:
-
Error: WSL 2 requires an update to its kernel component. For information please visit https://aka.ms/wsl2kernel .
- If the Linux kernel package is missing in the %SystemRoot%system32lxsstools folder, you will encounter this error. Resolve it by installing the Linux kernel update MSI package in step #4 of these installation instructions. You may need to uninstall the MSI from ‘Add or Remove Programs’, and install it again.
Common issues
I’m on Windows 10 version 1903 and I still do not see options for WSL 2
This is likely because your machine has not yet taken the backport for WSL 2. The simplest way to resolve this is by going to Windows Settings and clicking ‘Check for Updates’ to install the latest updates on your system. See the full instructions on taking the backport.
If you hit ‘Check for Updates’ and still do not receive the update you can install KB KB4566116 manually.
Error: 0x1bc when wsl --set-default-version 2
This may happen when ‘Display Language’ or ‘System Locale’ setting is not English.
wsl --set-default-version 2
Error: 0x1bc
For information on key differences with WSL 2 please visit https://aka.ms/wsl2
The actual error for 0x1bc is:
WSL 2 requires an update to its kernel component. For information please visit https://aka.ms/wsl2kernel
For more information, please refer to issue 5749
Cannot access WSL files from Windows
A 9p protocol file server provides the service on the Linux side to allow Windows to access the Linux file system. If you cannot access WSL using \wsl$ on Windows, it could be because 9P did not start correctly.
To check this, you can check the start up logs using: dmesg |grep 9p, and this will show you any errors. A successful output looks like the following:
[    0.363323] 9p: Installing v9fs 9p2000 file system support
[    0.363336] FS-Cache: Netfs '9p' registered for caching
[    0.398989] 9pnet: Installing 9P2000 support
Please see this Github thread for further discussion on this issue.
Can’t start WSL 2 distribution and only see ‘WSL 2’ in output
If your display language is not English, then it is possible you are seeing a truncated version of an error text.
To resolve this issue, please visit https://aka.ms/wsl2kernel and install the kernel manually by following the directions on that doc page.
command not found when executing windows .exe in linux
Users can run Windows executables like notepad.exe directly from Linux. Sometimes, you may hit «command not found» like below:
$ notepad.exe
-bash: notepad.exe: command not found
If there are no win32 paths in your $PATH, interop isn’t going to find the .exe.
You can verify it by running echo $PATH in Linux. It’s expected that you will see a win32 path (for example, /mnt/c/Windows) in the output.
If you can’t see any Windows paths then most likely your PATH is being overwritten by your Linux shell.
Here is a an example that /etc/profile on Debian contributed to the problem:
if [ "`id -u`" -eq 0 ]; then
  PATH="/usr/local/sbin:/usr/local/bin:/usr/sbin:/usr/bin:/sbin:/bin"
else
  PATH="/usr/local/bin:/usr/bin:/bin:/usr/local/games:/usr/games"
fi
The correct way on Debian is to remove above lines.
You may also append $PATH during the assignment like below, but this lead to some other problems with WSL and VSCode..
if [ "`id -u`" -eq 0 ]; then
  PATH="/usr/local/sbin:/usr/local/bin:/usr/sbin:/usr/bin:/sbin:/bin:$PATH"
else
  PATH="/usr/local/bin:/usr/bin:/bin:/usr/local/games:/usr/games:$PATH"
fi
For more information, see issue 5296 and issue 5779.
«Error: 0x80370102 The virtual machine could not be started because a required feature is not installed.»
Please enable the Virtual Machine Platform Windows feature and ensure virtualization is enabled in the BIOS.
-
Check the Hyper-V system requirements
-
If your machine is a VM, please enable nested virtualization manually. Launch powershell with admin, and run:
Set-VMProcessor -VMName <VMName> -ExposeVirtualizationExtensions $true
-
Please follow guidelines from your PC’s manufacturer on how to enable virtualization. In general, this can involve using the system BIOS to ensure that these features are enabled on your CPU. Instructions for this process can vary from machine to machine, please see this article from Bleeping Computer for an example.
-
Restart your machine after enabling the
Virtual Machine Platformoptional component. -
Make sure that the hypervisor launch is enabled in your boot configuration. You can validate this by running (elevated powershell):
bcdedit /enum | findstr -i hypervisorlaunchtype
If you see
hypervisorlaunchtype Off, then the hypervisor is disabled. To enable it run in an elevated powershell:bcdedit /set {current} hypervisorlaunchtype Auto -
Additionally, if you have 3rd party hypervisors installed (Such as VMware or VirtualBox) then please ensure you have these on the latest versions which can support HyperV (VMware 15.5.5+ and VirtualBox 6+) or are turned off.
Learn more about how to Configure Nested Virtualization when running Hyper-V in a Virtual Machine.
WSL has no network connection on my work machine or in an Enterpise environment
Business or Enterprise environments may have Windows Defender Firewall settings configured to block unauthorized network traffic. If local rule merging is set to «No» then WSL networking will not work by default, and your administrator will need to add a firewall rule to allow it.
You can confirm local rule merging’s setting by following these steps:
- Open «Windows Defender Firewall with advanced security» (this is different than «Windows Defender Firewall» in the Control Panel)
- Right-click on the «Windows Defender Firewall with advanced security on Local Computer» tab
- Select «Properties»
- Select the «Public Profile» tab on the new Window that opens
- Select «Customize» under the «Settings» section
- Check in the «Customize Settings for the Public Profile» window that opens to see if «Rule Merging» is set to «No». This will block access to WSL.
You can find instructions on how to change this Firewall setting in Enterprise environment: Set up WSL for your company.
WSL has no network connectivity once connected to a VPN
If after connecting to a VPN on Windows, bash loses network connectivity, try this workaround from within bash. This workaround will allow you to manually override the DNS resolution through /etc/resolv.conf.
- Take a note of the DNS server of the VPN from doing
ipconfig.exe /all - Make a copy of the existing resolv.conf
sudo cp /etc/resolv.conf /etc/resolv.conf.new - Unlink the current resolv.conf
sudo unlink /etc/resolv.conf sudo mv /etc/resolv.conf.new /etc/resolv.conf- Edit
/etc/wsl.confand add this content to the file. (More info on this set up can be found in Advanced settings configuration)
[network]
generateResolvConf=false
- Open
/etc/resolv.confand
a. Delete the first line from the file which has a comment describing automatic generation
b. Add the DNS entry from (1) above as the very first entry in the list of DNS servers.
c. Close the file.
Once you have disconnected the VPN, you will have to revert the changes to /etc/resolv.conf. To do this, do:
cd /etcsudo mv resolv.conf resolv.conf.newsudo ln -s ../run/resolvconf/resolv.conf resolv.conf
Starting WSL or installing a distribution returns an error code
Follow these instructions to collect detailed logs and file an issue on our GitHub.
Updating WSL
There are two components of Windows Subsystem for Linux that can require updating.
-
To update the Windows Subsystem for Linux itself, use the command
wsl --updatein PowerShell or CMD. -
To update the specific Linux distribution user binaries, use the command:
apt-get update | apt-get upgradein the Linux distribution that you are seeking to update.
Apt-get upgrade errors
Some packages use features that we haven’t implemented yet. udev, for example, isn’t supported yet and causes several apt-get upgrade errors.
To fix issues related to udev, follow the following steps:
-
Write the following to
/usr/sbin/policy-rc.dand save your changes. -
Add execute permissions to
/usr/sbin/policy-rc.d:chmod +x /usr/sbin/policy-rc.d
-
Run the following commands:
dpkg-divert --local --rename --add /sbin/initctl
ln -s /bin/true /sbin/initctl
«Error: 0x80040306» on installation
This has to do with the fact that we do not support legacy console.
To turn off legacy console:
- Open cmd.exe
- Right click title bar -> Properties -> Uncheck Use legacy console
- Click OK
«Error: 0x80040154» after Windows update
The Windows Subsystem for Linux feature may be disabled during a Windows update. If this happens the Windows feature must be re-enabled. Instructions for enabling the Windows Subsystem for Linux can be found in the Manual Installation Guide.
Changing the display language
WSL install will try to automatically change the Ubuntu locale to match the locale of your Windows install. If you do not want this behavior you can run this command to change the Ubuntu locale after install completes. You will have to relaunch bash.exe for this change to take effect.
The below example changes to locale to en-US:
sudo update-locale LANG=en_US.UTF8
Installation issues after Windows system restore
- Delete the
%windir%System32TasksMicrosoftWindowsWindows Subsystem for Linuxfolder.
Note: Do not do this if your optional feature is fully installed and working. - Enable the WSL optional feature (if not already)
- Reboot
- lxrun /uninstall /full
- Install bash
No internet access in WSL
Some users have reported issues with specific firewall applications blocking internet access in WSL. The firewalls reported are:
- Kaspersky
- AVG
- Avast
- Symantec Endpoint Protection
In some cases turning off the firewall allows for access. In some cases simply having the firewall installed looks to block access.
If you are using Microsoft Defender Firewall, unchecking «Blocks all incoming connections, including those in the list of allowed apps.» allows for access.
Permission Denied error when using ping
For Windows Anniversary Update, version 1607,
administrator privileges in Windows are required to run ping in WSL. To run ping, run Bash on Ubuntu on Windows as an administrator, or run bash.exe from a CMD/PowerShell prompt with administrator privileges.
For later versions of Windows, Build 14926+, administrator privileges are no longer required.
Bash is hung
If while working with bash, you find that bash is hung (or deadlocked) and not responding to inputs, help us diagnose the issue by collecting and reporting a memory dump. Note that these steps will crash your system. Do not do this if you are not comfortable with that or save your work prior to doing this.
To collect a memory dump
-
Change the memory dump type to «complete memory dump». While changing the dump type, take a note of your current type.
-
Use the steps to configure crash using keyboard control.
-
Repro the hang or deadlock.
-
Crash the system using the key sequence from (2).
-
The system will crash and collect the memory dump.
-
Once the system reboots, report the memory.dmp to secure@microsoft.com. The default location of the dump file is %SystemRoot%memory.dmp or C:Windowsmemory.dmp if C: is the system drive. In the email, note that the dump is for the WSL or Bash on Windows team.
-
Restore the memory dump type to the original setting.
Check your build number
To find your PC’s architecture and Windows build number, open
Settings > System > About
Look for the OS Build and System Type fields.
To find your Windows Server build number, run the following in PowerShell:
systeminfo | Select-String "^OS Name","^OS Version"
Confirm WSL is enabled
You can confirm that the Windows Subsystem for Linux is enabled by running the following in an elevated PowerShell window:
Get-WindowsOptionalFeature -Online -FeatureName Microsoft-Windows-Subsystem-Linux
OpenSSH-Server connection issues
Trying to connect your SSH server is failed with the following error: «Connection closed by 127.0.0.1 port 22».
-
Make sure your OpenSSH Server is running:
and you’ve followed this tutorial:
https://ubuntu.com/server/docs/service-openssh -
Stop the sshd service and start sshd in debug mode:
sudo service ssh stop
sudo /usr/sbin/sshd -d
-
Check the startup logs and make sure HostKeys are available and you don’t see log messages such as:
debug1: sshd version OpenSSH_7.2, OpenSSL 1.0.2g  1 Mar 2016
debug1: key_load_private: incorrect passphrase supplied to decrypt private key
debug1: key_load_public: No such file or directory
Could not load host key: /etc/ssh/ssh_host_rsa_key
debug1: key_load_private: No such file or directory
debug1: key_load_public: No such file or directory
Could not load host key: /etc/ssh/ssh_host_dsa_key
debug1: key_load_private: No such file or directory
debug1: key_load_public: No such file or directory
Could not load host key: /etc/ssh/ssh_host_ecdsa_key
debug1: key_load_private: No such file or directory
debug1: key_load_public: No such file or directory
Could not load host key: /etc/ssh/ssh_host_ed25519_key
If you do see such messages and the keys are missing under /etc/ssh/, you will have to regenerate the keys or just purge&install openssh-server:
sudo apt-get purge openssh-server
sudo apt-get install openssh-server
«The referenced assembly could not be found.» when enabling the WSL optional feature
This error is related to being in a bad install state. Please complete the following steps to try and fix this issue:
-
If you are running the enable WSL feature command from PowerShell, try using the GUI instead by opening the start menu, searching for ‘Turn Windows features on or off’ and then in the list select ‘Windows Subsystem for Linux’ which will install the optional component.
-
Update your version of Windows by going to Settings, Updates, and clicking ‘Check for Updates’
-
If both of those fail and you need to access WSL please consider upgrading in place by reinstalling Windows using installation media and selecting ‘Keep Everything’ to ensure your apps and files are preserved. You can find instructions on how to do so at the Reinstall Windows 10 page.
Correct (SSH related) permission errors
If you’re seeing this error:
@@@@@@@@@@@@@@@@@@@@@@@@@@@@@@@@@@@@@@@@@@@@@@@@@@@@@@@@@@@
@         WARNING: UNPROTECTED PRIVATE KEY FILE!          @
@@@@@@@@@@@@@@@@@@@@@@@@@@@@@@@@@@@@@@@@@@@@@@@@@@@@@@@@@@@
Permissions 0777 for '/home/artur/.ssh/private-key.pem' are too open.
To fix this, append the following to the the /etc/wsl.conf file:
[automount]
enabled = true
options = metadata,uid=1000,gid=1000,umask=0022
Please note that adding this command will include metadata and modify the file permissions on the Windows files seen from WSL. Please see the File System Permissions for more information.
Running Windows commands fails inside a distribution
Some distributions available in Microsoft Store are yet not fully compatible to run Windows commands out of the box. If you get an error -bash: powershell.exe: command not found running powershell.exe /c start . or any other Windows command, you can resolve it following these steps:
- In your WSL distribution run
echo $PATH.
If it does not include:/mnt/c/Windows/system32something is redefining the standard PATH variable. - Check profile settings with
cat /etc/profile.
If it contains assignment of the PATH variable, edit the file to comment out PATH assignment block with a # character. - Check if wsl.conf is present
cat /etc/wsl.confand make sure it does not containappendWindowsPath=false, otherwise comment it out. - Restart distribution by typing
wsl -tfollowed by distribution name or runwsl --shutdowneither in cmd or PowerShell.
Unable to boot after installing WSL 2
We are aware of an issue affecting users where they are unable to boot after installing WSL 2. While we fully diagnose those issue, users have reported that changing the buffer size or installing the right drivers can help address this. Please view this Github issue to see the latest updates on this issue.
WSL 2 errors when ICS is disabled
Internet Connection Sharing (ICS) is a required component of WSL 2. The ICS service is used by the Host Network Service (HNS) to create the underlying virtual network which WSL 2 relies on for NAT, DNS, DHCP, and host connection sharing.
Disabling the ICS service (SharedAccess) or disabling ICS through group policy will prevent the WSL HNS network from being created. This will result in failures when creating a new WSL version 2 image, and the following error when trying to convert a version 1 image to version 2.
There are no more endpoints available from the endpoint mapper.
Systems that require WSL 2 should leave the ICS service (SharedAccess) in it’s default start state, Manual (Trigger Start), and any policy that disables ICS should be overwritten or removed. While disabling the ICS service will break WSL 2, and we do not recommend disabling ICS, portions of ICS can be disabled using these instructions
Using older versions of Windows and WSL
There are several differences to note if you’re running an older version of Windows and WSL, like the Windows 10 Creators Update (Oct 2017, Build 16299) or Anniversary Update (Aug 2016, Build 14393). We recommend that you update to the latest Windows version, but if that’s not possible, we have outlined some of the differences below.
Interoperability command differences:
bash.exehas been replaced withwsl.exe. Linux commands can be run from the Windows Command Prompt or from PowerShell, but for early Windows versions, you may need to use thebashcommand. For example:C:temp> bash -c "ls -la". The WSL commands passed intobash -care forwarded to the WSL process without modification. File paths must be specified in the WSL format and care must be taken to escape relevant characters. For example:C:temp> bash -c "ls -la /proc/cpuinfo"orC:temp> bash -c "ls -la "/mnt/c/Program Files"".- To see what commands are available for a particular distribution, run
[distro.exe] /?. For example, with Ubuntu:C:> ubuntu.exe /?. - Windows path is included in the WSL
$PATH. - When calling a Windows tool from a WSL distribution in an earlier version of Windows 10, you will need to specify the directory path. For example, to call the Windows Notepad app from your WSL command line, enter:
/mnt/c/Windows/System32/notepad.exe - To change the default user to
rootuse this command in PowerShell:C:> lxrun /setdefaultuser rootand then run Bash.exe to log in:C:> bash.exe. Reset your password using the distributions password command:$ passwd usernameand then close the Linux command line:$ exit. From Windows command prompt or Powershell, reset your default user back to your normal Linux user account:C:> lxrun.exe /setdefaultuser username.
Uninstall legacy version of WSL
If you originally installed WSL on a version of Windows 10 prior to Creators update (Oct 2017, Build 16299), we recommend that you migrate any necessary files, data, etc. from the older Linux distribution you installed, to a newer distribution installed via the Microsoft Store. To remove the legacy distribution from your machine, run the following from a Command Line or PowerShell instance: wsl --unregister Legacy. You also have the option to manually remove the older legacy distribution by deleting the %localappdata%lxss folder (and all it’s sub-contents) using Windows File Explorer or with PowerShell: rm -Recurse $env:localappdata/lxss/.
Содержание
- Вариант 1: Установка в полуавтоматическом режиме
- Шаг 1: Выбор доступных дистрибутивов Linux
- Шаг 2: Запуск инсталляции
- Вариант 2: Установка в ручном режиме
- Шаг 1: Предварительная настройка системы
- Шаг 2: Загрузка и настройка ядра WSL2
- Шаг 3: Выбор и инсталляция дистрибутива Linux
- Вопросы и ответы

Вариант 1: Установка в полуавтоматическом режиме
Установка WSL в операционной системе Windows осуществляется посредством выполнения специальных команд в консоли. Для этого потребуется предварительно определиться с дистрибутивом Linux, а затем запустить процесс его инсталляции.
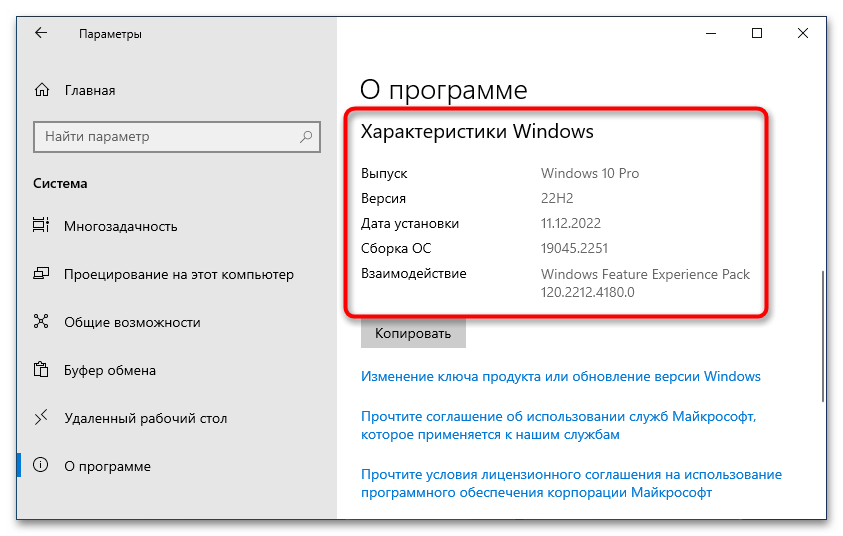
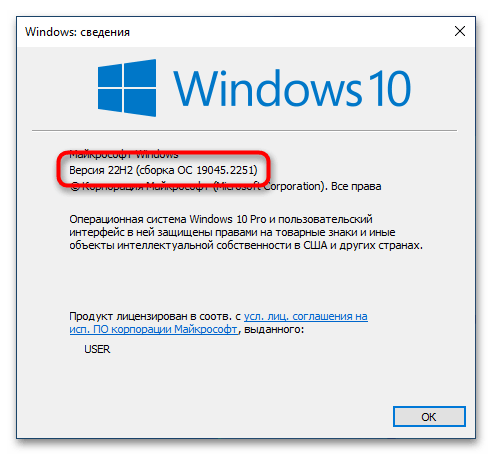
Важно! Приведенная ниже инструкция может быть выполнена только при условии использования Windows 10 версии 2004 (19041) и более новых. Узнать эту информацию можно в свойствах системы. Этой теме на нашем сайте посвящена отдельная статья, при необходимости ознакомьтесь с ней, перейдя по ссылке ниже.
Подробнее: Как узнать версию Windows 10
Шаг 1: Выбор доступных дистрибутивов Linux
Каждому пользователю актуальной версии Windows 10 предоставляется возможность вручную выбрать дистрибутив Linux, который будет использоваться в WSL2. Для просмотра списка доступных систем необходимо ввести специальную команду в консоль, поэтому предварительно запустите «Командную строку» с правами администратора. Сделать это можно множеством способов, например посредством поискового запроса, как показано на изображении ниже.
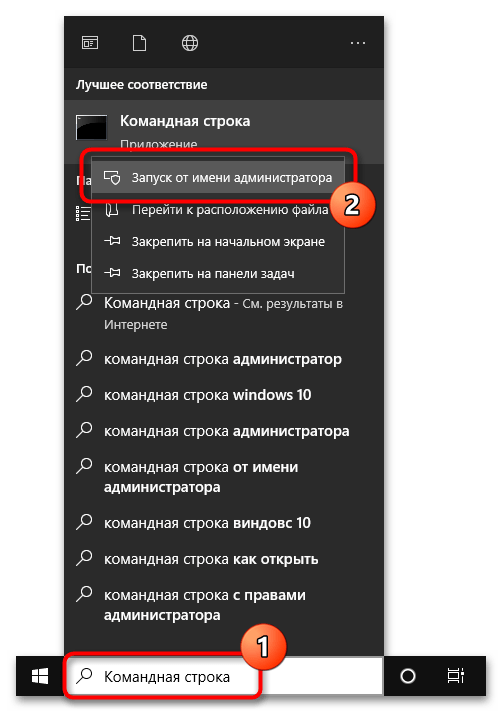
Читайте также: Как открыть «Командную строку» от имени администратора в Windows 10
Примечание! По умолчанию всегда выбрана последняя версия дистрибутива Ubuntu. Если именно его вы и хотите установить, то пропустите этот шаг и переходите сразу ко второму.
После того как окно консоли будет открыто, впишите или вставьте в него одну из нижеприведенных команд, после чего нажмите клавишу Enter:
wsl --list --online или wsl -l -o
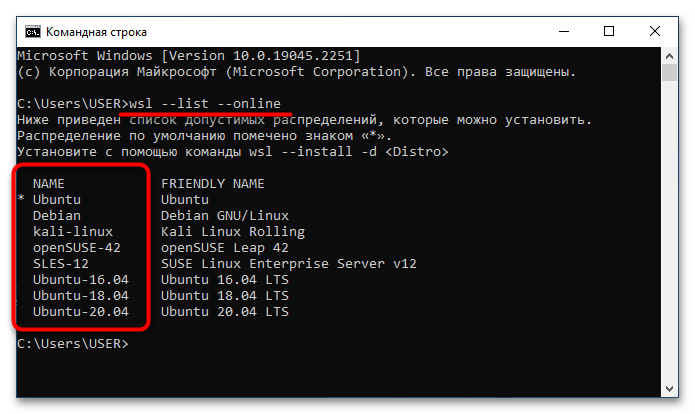
В результатах выдачи будет приведен список всех доступных дистрибутивов Linux. На этом этапе вам необходимо запомнить или скопировать в буфер обмена название, которое находится в столбце «NAME».
Обратите внимание! Если в списке доступных дистрибутивов нет желаемого, его можно импортировать в WSL2 посредством файла TAR или APPX. При необходимости есть возможность создать собственный дистрибутив на базе ядра Linux. Эти процессы описываются в официальной документации Microsoft, при необходимости ознакомиться с ними можно, воспользовавшись ссылками ниже.
Импорт любого дистрибутива Linux для использования с WSL
Создание пользовательского дистрибутива Linux для WSL

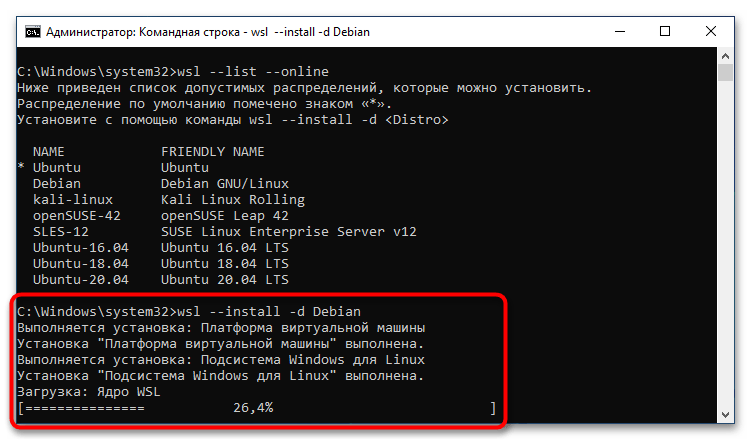
Шаг 2: Запуск инсталляции
После того как версия дистрибутива Linux для WSL2 была выбрана, можно переходить непосредственно к ее инсталляции. Делается это тоже в «Командной строке», для чего нужно воспользоваться приведенной ниже командой. Не забудьте после ее ввода нажать клавишу Enter.
wsl --install -d <НазваниеДистрибутива>
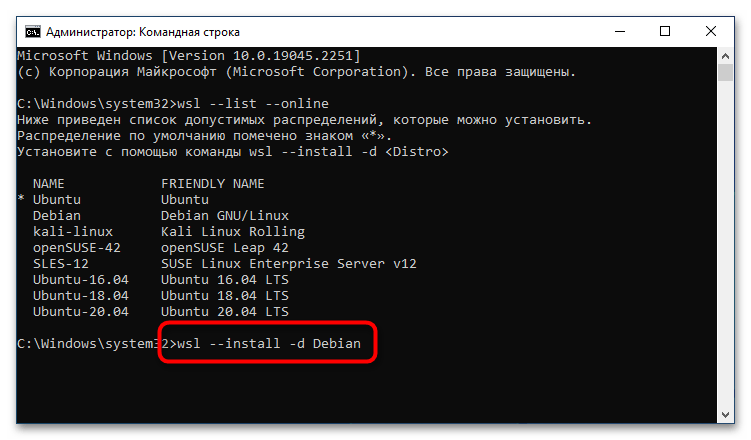
Примечание! Если вы хотите установить версию по умолчанию, тогда нет необходимости прописывать название дистрибутива вручную, можно воспользоваться следующей командой:
wsl —install
Сразу после этого начнется процесс установки платформы виртуальной машины, затем инсталлируется «Подсистема Windows для Linux», а в завершение будет выполнена загрузка ядра WSL2.
После всех этих процедур можно будет воспользоваться WSL2 для вызова подсистемы Linux. Для этого достаточно будет запустить установленный дистрибутив через меню «Пуск».
Вариант 2: Установка в ручном режиме
Если версия вашей операционной системы Windows 10 ниже 2004 (19041), тогда воспользоваться вышеприведенной инструкцией не получится и большинство действий придется выполнять вручную.
Шаг 1: Предварительная настройка системы
Первостепенно необходимо проверить, поддерживает ли установленная версия операционной системы обновление WSL до второй версии. Сделать это можно посредством вызова окна «Windows: сведения». Для этого нажмите сочетание горячих клавиш Win + R, впишите в поле запроса команду winver и нажмите клавишу Enter.

Появится соответствующее окно, в котором будет указана версия операционной системы и ее сборка. Убедитесь, что она выше 1903 (18362). Если это так, можете продолжить выполнение этой инструкции, в противном случае попробуйте прежде обновить Windows 10 до актуальной версии.
Читайте также: Как обновить Windows 10 до последней версии
Важно! Если ваш компьютер работает на процессоре с архитектурой ARM64, этот способ установки WSL2 не подойдет. Обновитесь до последней версии Windows 10 и воспользуйтесь ранее предоставляемой инструкцией.
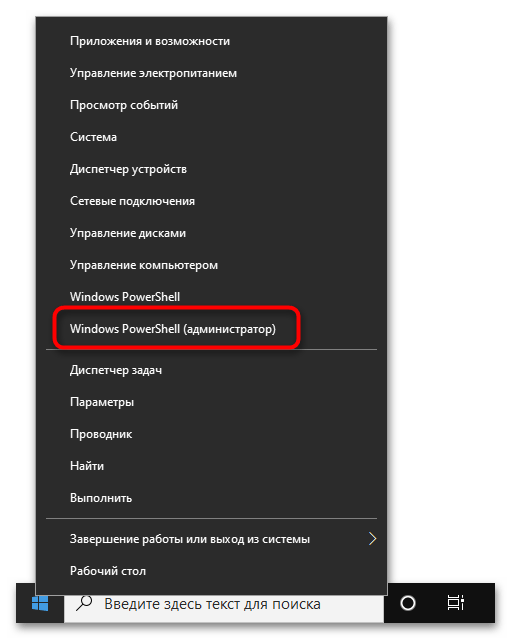
После того как вы удостоверились в актуальности версии операционной системы, необходимо произвести ее предварительную настройку, а именно — включить «Подсистему Windows для Linux» и компонент виртуальных машин. Делается это в оболочке PowerShell, поэтому предварительно запустите ее с правами администратора. Проще всего сделать это через контекстное меню кнопки «Пуск», как показано на изображении ниже. Но это не единственный способ.
Подробнее: Как открыть PowerShell в Windows 10
Теперь необходимо включить компонент «Подсистема Windows для Linux». Для этого скопируйте и вставьте в окно консоли PowerShell следующую команду, после чего нажмите Enter:
dism.exe /online /enable-feature /featurename:Microsoft-Windows-Subsystem-Linux /all /norestart
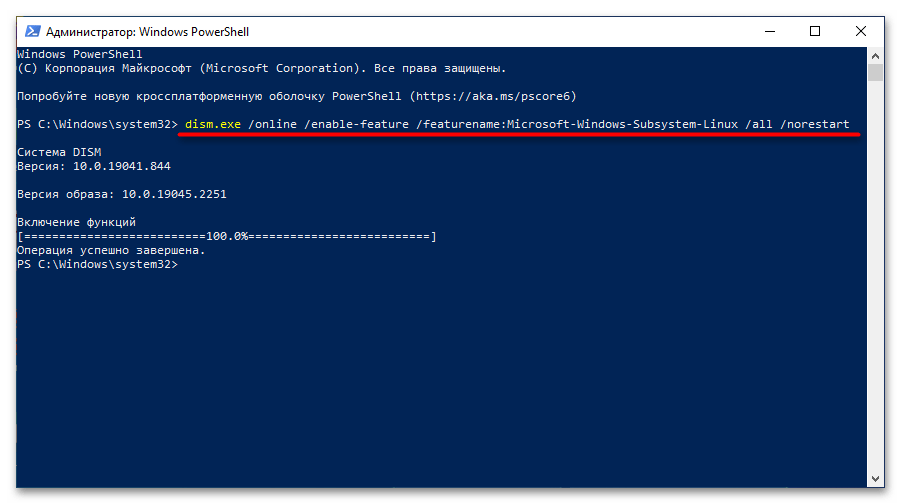
Ожидайте завершения процедуры, когда на экране появится приглашение к вводу новой команды. После этого включите компонент виртуальных машин. Это делается посредством нижепредставленной команды:
dism.exe /online /enable-feature /featurename:VirtualMachinePlatform /all /norestart
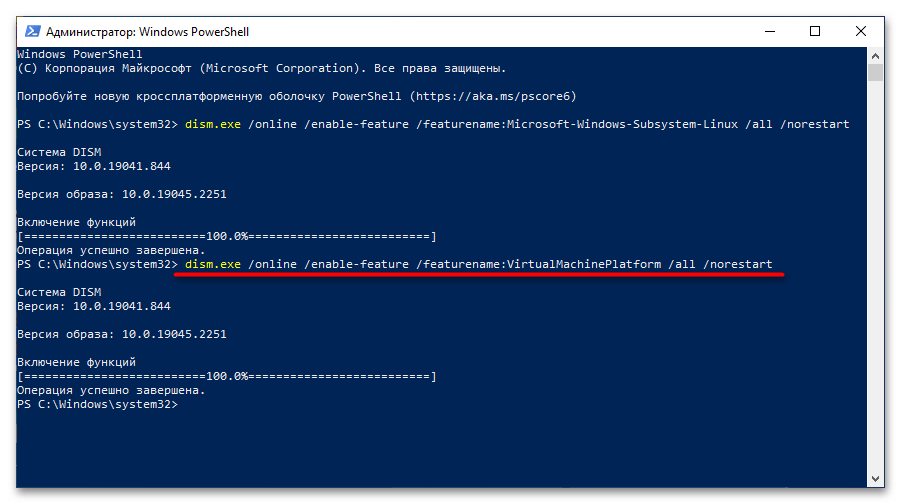
Важно! Если результатом ее выполнения является ошибка, потребуется предварительно включить виртуализацию. Делается это через BIOS, но сначала следует проверить статус этой функции в операционной системе. На нашем сайте есть отдельные статьи, посвященные этой теме.
Подробнее:
Как проверить, включена ли виртуализация в Windows 10
Как включить виртуализацию в BIOS

После того как компонент виртуальных машин будет установлен, потребуется перезагрузить компьютер.
Шаг 2: Загрузка и настройка ядра WSL2
Следующим шагом будет загрузка и установка ядра второй версии WSL, но изначально нужно определить архитектуру процессора, на которой работает операционная система. Для этого вызовите окно «Командной строки», в котором выполните следующую команду:
systeminfo | find "Тип системы"
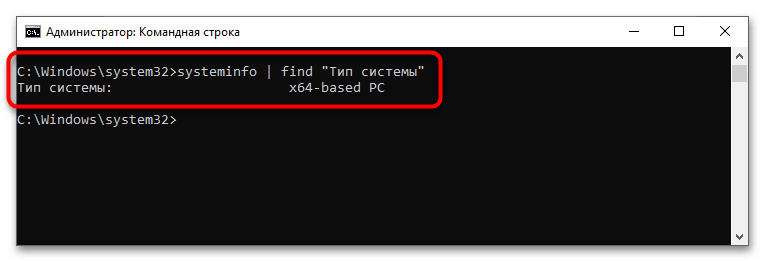
В результатах выдачи будет указана архитектура процессора. Если упоминается x64, скачайте пакет обновления ядра Linux в WSL2 для 64-разрядных компьютеров на базе процессора x86. Если в результатах выдачи есть упоминание ARM64, загрузите пакет обновлений по этой ссылке. Сохраните файл в любое удобное место, после чего запустите его, дважды кликнув по названию. Далее следуйте инструкции инсталлятора, пока не будет произведена установка.

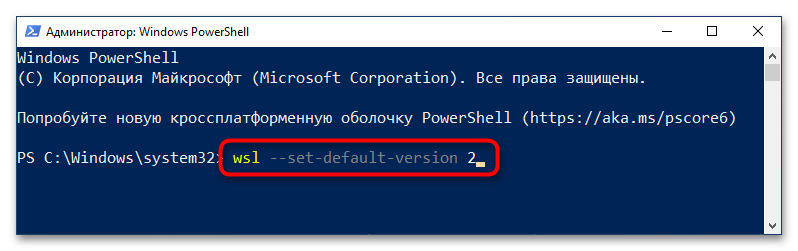
Теперь необходимо выбрать WSL2 версией по умолчанию, чтобы при установке дистрибутивов Linux они инсталлировались в этом окружении. Для этого достаточно в окне PowerShell выполнить представленную ниже команду:
wsl --set-default-version 2
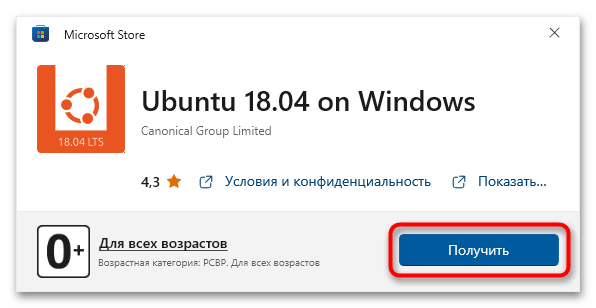
Шаг 3: Выбор и инсталляция дистрибутива Linux
Как только все необходимые компоненты будут установлены, можно переходить к выбору дистрибутива Linux для инсталляции в окружении WSL2. В отличие от первого способа, представленного в этой статье, все действия будут выполняться не в «Командной строке», а в Microsoft Store. Для удобства ниже приведен список доступных систем со ссылками на них:
- Ubuntu 18.04 LTS
- Ubuntu 20.04 LTS
- Ubuntu 22.04 LTS
- openSUSE Leap 15.1
- SUSE Linux Enterprise Server 12 SP5
- SUSE Linux Enterprise Server 15 SP1
- Kali Linux
- Debian GNU/Linux
- Fedora Remix for WSL
- Pengwin
- Pengwin Enterprise
- Alpine WSL
- Raft (пробная версия)
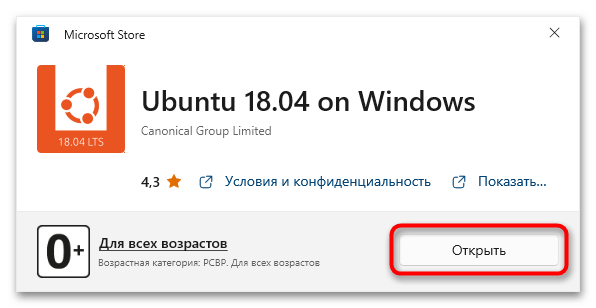
Воспользуйтесь нужной ссылкой, чтобы перейти в магазин приложений от Microsoft. Находясь на странице нужного дистрибутива, щелкните по кнопке «Получить», расположенной рядом с его названием.
Дождитесь завершения загрузки, после чего кликните по появившейся кнопке «Открыть». Запустится окно консоли, в котором будет предложено подождать несколько минут, пока идет распаковка дистрибутива. В дальнейшем процедура инициализации ядра Linux будет занимать считанные секунды.
Примечание! Представленный выше список дистрибутивов взят с официального сайта Microsoft и может со временем измениться. В случае необходимости рекомендуем обратиться за справкой непосредственно к статье-первоисточнику.
Недавно мы опубликовали пост про новый билд Windows 10 Insider Preview Build 14316, в котором говорилось про подсистему Ubuntu Linux в этой ОС. Нам написали многие пользователи, которые столкнулись с тем, что не смогли сразу обнаружить эту подсистему и запустить командный интерпретатор bash. Действительно, эта подсистема выключена по умолчанию, а ее драйверы LXss.sys и LXCore.sys не располагаются в системной директории (см. WinSxS). Для тех пользователей, которые не смогли разобраться с данной проблемой, мы укажем шаги по включению подсистемы и проверке ее активности.
Для включения подсистемы следует выполнить следующие шаги:
- Активировать режим разработчика (Developer Mode). Без него Windows 10 откажется устанавливать подсистему Ubuntu Linux.
- Включить компонент подсистемы в настройках Windows.
- Установить подсистему (выполняется автоматически.)
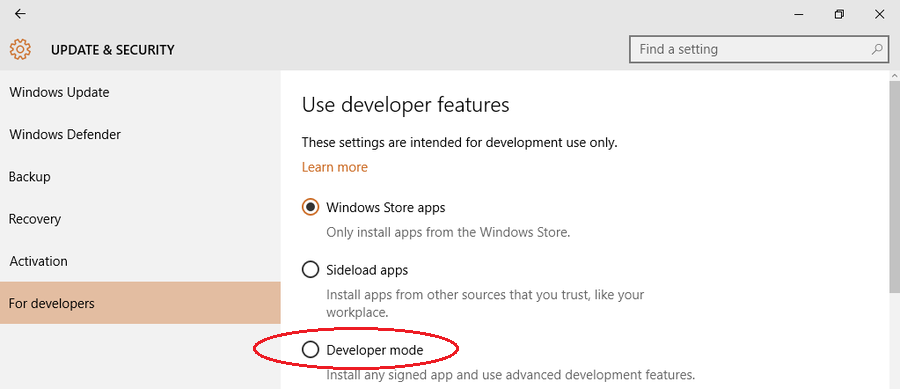
Рис. Настройка функций developer по умолчанию, нужно выбрать Developer mode (Start->Settings->Update and security).

Рис. Подтверждаем.
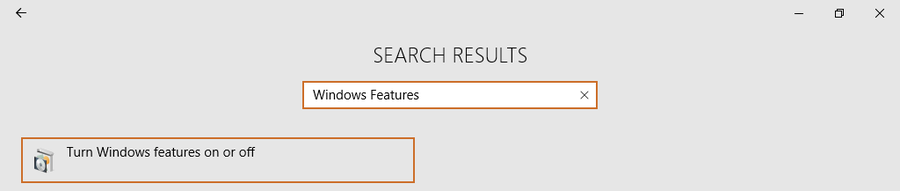
Рис. В том же окне, в поиске набираем «Windows features».
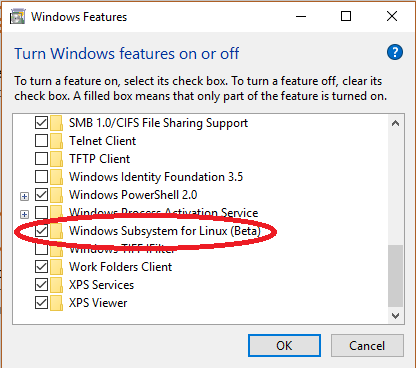
Рис. Ставим галочку напротив «Windows Subsystem for Linux (Beta)».
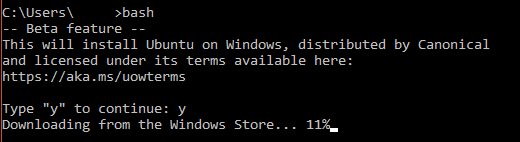
Рис. Запускаем командный интерпретатор Windows — cmd, набираем bash и дожидаемся установки Linux.

Рис. Появившиеся в системной директории драйверы Linux.
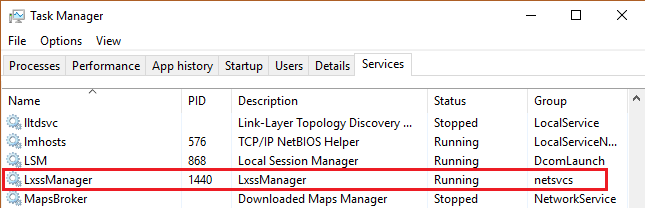
Рис. Активный сервис подсистемы Linux.
- Remove From My Forums
-
Вопрос
-
Здравствуйте, собственно не включается подсистема windows для linux. Я её включил, ребутнулся, зашел посмотреть
включился ли он, а чек бокс пустой. Ошибок никаких не выдало. Перезагрузка тоже прошла успешно.Все обновления стоят. Windows 10 pro 1709 сборка 16299.248
Ответы
-
Добрый день,
Судя по всему вам придётся либо
починить Windows, либо переустановить.-
Предложено в качестве ответа
12 марта 2018 г. 15:20
-
Помечено в качестве ответа
Kangaroo_Jack
13 марта 2018 г. 9:21
-
Предложено в качестве ответа
-
Добрый день,
Судя по всему вам придётся либо
починить Windows, либо переустановить.Данное решение мне помогло, а именно починка windows а не установка с 0. Всем спасибо.
-
Помечено в качестве ответа
Anton Sashev Ivanov
13 марта 2018 г. 10:34
-
Помечено в качестве ответа
Я постоянно использую терминал для работы с git и автоматизации сборки проектов (вёрстка/фронтенд: компиляция scss, обработка изображений, и т.д.). Раньше, для решения такого рода задач было не так много хороших и комфортных решений, либо использовать Ubuntu (либо другой linux дистрибутив) и наслаждаться комфортной работой, либо использовать Windows и устанавливать на него множество программ которые частично, или медленнее чем в linux решают задачи разработки, такие как GitBash для использования консольных команд bash для работы с git, OpenServer для создания локального сервера на вашей рабочей машине. Но в 2016г. Microsoft сделали большой шаг для разработчиков, представив подсистему Linux в Windows 10, но тогда, в 2016 году, её использование разочаровало: нельзя было запускать из bash-терминала программы Windows, подсистема не определяла изменение файла, если изменение было сделано из Windows. Сейчас эти проблемы решены.
Что такое подсистема Windows для Linux?
Microsoft Windows 10 имеет новую дополнительную функцию, которая называется «Подсистема Windows для Linux (WSL)». Данная функция была добавлена в систему, начиная с обновления «Anniversary Update» и доступна она только в 64-битных редакциях Windows 10.
WSL представляет собой подсистему для ОС Windows 10, через которую можно запускать Linux приложения. В этой статье рассмотрим, как на данной подсистеме можно настроить веб-сервер LAMP (Apache, MySQL, PHP) для локальной разработки веб-проектов.
Включение подсистемы Windows для Linux
Для включения компоненты «Подсистема Windows для Linux» в Windows 10 необходимо выполнить следующие действия:

- Открыть «Панель управления» (Пуск -> Служебные -> Windows -> Панель управления).
- Открыть окно «Компоненты Windows» (пункт «Программы» в «Панели управления» -> Включение и отключение компонентов Windows).
- Установить галочку напротив опции «Подсистема Windows для Linux» и нажать «ОК»;
- Перезагрузить операционную систему.
Установка приложения «Ubuntu»
Для установки приложения «Ubuntu» заходим в магазин приложений Microsoft Store и в поле поиска вводим Ubuntu и устанавливаем данное приложение.

Создание директории для веб-проекта
Все веб-проекты предлагаю создавать в директории C:projects. Для примера создадим в ней новый тестовый проект с названием директории test, конечный путь будет иметь следующий вид: C:projectstest.
Установка программного обеспечения в ОС Ubuntu
Запускаем установленное приложение Ubuntu.
Откроется терминал, в котором при первом запуске нужно будет ввести новое UNIX имя пользователя (username) и пароль (password).
Обновим локальный индекс apt пакетов в операционной системе Ubuntu:
Обновим установленное программное обеспечение:
Установим Apache:
Установим MySQL сервер:
sudo apt install mysql-server
Установим php и другие пакеты, необходимые для веб-разработки:
sudo apt install php libapache2-mod-php php-mysql php-xml php-curl
Включим модуль Mod rewrite в Apache:
Также есть официальная инструкция с microsoft.com, если вдруг какой-то момент покажется непонятным или не будет работать.
Изменение метода аутентификации MySQL пользователя root
Для изменения метода аутентификации MySQL пользователя root выполним следующие действия:
- Запустим службу mysql.
- Подключимся к серверу MySQL под стандартным пользователем root, который создаётся при установке MySQL на компьютер:
-
Нажмём на
Enter, т.к. по умолчанию пользователь root, созданный при установке, не имеет пароля. -
Проверим метод аутентификации, который используется для пользователя root.
SELECT user, authentication_string, plugin, host FROM mysql.user WHERE user="root";
Если пользователь использует аутентификацию с помощью плагина auth_socket, то изменим эту настройку на использование пустого пароля. Для этого введём команду:
ALTER USER 'root'@'localhost' IDENTIFIED WITH mysql_native_password BY '';
Выполним команду FLUSH PRIVILEGES, которая применит внесённые изменения:
Создание базы данных
Создадим базу данных для веб-проекта test. Для этого введем в командной строке MySQL введём следующую команду:
Если в базу данных test необходимо загрузить дамп некоторой базы, находящийся, например, в файле backup.sql, то можно воспользоваться следующими инструкциями:
use test;
source backup.sql;
Для завершения работы с командной строкой MySQL выйдем из неё:
Установка phpMyAdmin
Выполняем команду
sudo apt install phpmyadmin
Когда появится первое сообщение, нажмите пробел, Tab, а затем Enter, чтобы выбрать Apache.
Выберите Да, когда вас попросят использовать dbconfig-common для настройки базы данных.
Укажите пароль пользователя MySQL root
Выберите пароль для самого приложения phpMyAdmin
Включить необходимые расширения PHP:
sudo phpenmod mcrypt
sudo php en mod mbstring
Перезапустить Apache:
sudo service apache2 restart
Теперь вы можете получить доступ к phpMyAdmin по следующему URL: http://localhost/phpmyadmin/
Вы можете войти в систему, используя имя пользователя root и пароль root, настроенные во время установки MySQL.
Настройка виртуальных хостов в Apache
В Ubuntu файлы настроек виртуальных хостов Apache располагаются в /etc/apache2/sites-available/*.conf. По умолчанию в Apache уже настроен один виртуальный хост. Его настройки лежат в файле 000-default.conf. Данный файл будем использовать в качестве примера.
Создадим копию файла 000-default.conf:
sudo cp /etc/apache2/sites-available/000-default.conf /etc/apache2/sites-available/test.conf
Отредактируем файл test.conf, для этого можно воспользоваться, например, редактором nano:
sudo nano /etc/apache2/sites-available/test.conf
В Ubuntu все локальные диски системы Windows находятся в директории /mnt, тоесть, если наш проект находится в директории C:projectstest, то в Ubuntu к ней нужно обращаться так /mnt/c/projects/test.
Итоговое содержимое файла test.conf:
<VirtualHost *:80>
    ServerAdmin webmaster@test.loc
    ServerName test.loc
    ServerAlias www.test.loc
    DocumentRoot /mnt/c/projects/test/
    <Directory /mnt/c/projects/test/>
        Options Indexes FollowSymLinks
        AllowOverride All
        Require all granted
    </Directory>
    ErrorLog ${APACHE_LOG_DIR}/error.log
    CustomLog ${APACHE_LOG_DIR}/access.log combined
</VirtualHost>
Включим новый виртуальный хост с помощью утилиты a2ensite:
Перенаправление test.loc на локальный веб-сервер
Для того чтобы доменное имя test.loc было связано с локальным веб-сервером необходимо открыть файл hosts, расположенный по адресу C:WindowsSystem32driversetc и добавить в него строчку:
Команды для запуска и остановки веб-сервера
Для запуска Apache и MySQL необходимо ввести следующие команды:
sudo service apache2 start
sudo service mysql start
Для остановки веб-сервера:
sudo service apache2 stop
sudo service mysql stop
Упрощение добавления нового проекта
Для того, чтобы каждый раз не выполнять множество этих команд, я написал bash скрипт для автоматизации данных задач, скрипт и инструкция по его установке находится в открытом доступе тут.
!! Не забудьте разкомментировать строки в скрипте для работы в Windows.
Разработка верстки сайта
Для разработки верстки сайта я пользуюсь npm с gulp и своим настроенным окружением для разработки фронтенд части сайта. Проект можете посмотреть здесь.
Замеченные баги в WSL
Работать с буфером обмена по умолчанию не комфортно (Ctrl + V, Shift + Insert не работают, приходится кликать (!!!) ПКМ по заголовку окна и выбирать Изменить → Вставить). Решается использованием терминала не самостоятельно, а внутри например Cmder или Terminus, я выбрал для себя Terminus.
После загрузки Windows иногда (было всего дважды) отказывается работать. Помогает перезагрузка (это же Windows).
Брандмауэр Windows по умолчанию не даёт зайти на запущенный внутри WSL сервер при запросе с другого устройства (запускаем сервер разработки на рабочем компе, открываем его страницы с телефона, находящегося в той же локальной сети). Как это лечить — не разобрался, приходится временно отключать брандмауэр.
Как заходить на сервер, запущенный в WSL, со сторонних устройств в одной локальной сети
Я пишу много html-страниц. В процессе работы у меня запущен локальный сервер, собирающий разметку, стили, javascript, спрайты и т.п. Бывает удобно запустить на основном компьютере сервер и зайти на него с помощью ноутбука, телефона, планшета (сервер доступен по IP, наподобие http://192.168.1.207:8080). Однако, встроенный в Windows 10 фаервол по умолчанию блокирует такие соединения.
Чтобы попасть на такой сервер, нужно добавить правило для брандмауэра:
- Найти с помощью поиска «Брандмауэр защитника Windows», открыть, нажать слева «Дополнительные параметры».
- В открывшемся окне Монитора брандмауэра выбрать (слева) «Правила для входящих…», нажать «Создать правило» (справа).
- Выбрать «Для порта», нажать «Далее».
- Выбрать «Определенные локальные порты», ввести номер порта (мой локальный сервер работает на порту 8080, его я и ввёл), нажать «Далее».
- Выбрать «Разрешить подключение», нажать «Далее», выбрать профили (я выбрал все), «Далее».
- Ввести какое-либо имя, нажать «Готово».
После этого получится зайти с любого устройства (в одной локальной сети) на запущенный в WSL на рабочем компьютере сервер.
Также можно использовать gulp + live-server и всё будет работать без дополнительных настроек.
Если вы хотите запустить терминал Linux в Windows, проще использовать подсистему Windows для Linux. Его довольно легко настроить, и в кратчайшие сроки вы начнете выполнять команды. Но сначала вам нужно включить подсистему Windows для Linux (WSL).
В этой статье будет показано, как включить подсистему Windows для Linux, средство открытия шлюза, которое позволяет установить оболочку Linux bash в Windows. Вам не нужна виртуальная машина, не говоря уже о двойной загрузке, что может быть непросто для новичков.
Прежде чем подробно описывать, как включить подсистему Windows для Linux, следует обратить внимание на минимальные требования.
Согласно Microsoft , вы должны запустить:
- Windows 10 (64-разрядная) версии 2004 и выше со сборкой 19041 (или выше) или,
- Windows 11.
Вот как проверить, какая версия Windows 10 у вас установлена .
Некоторые старые версии Windows 10 также могут работать, но это означает, что вам придется использовать маршрут ручной установки для WSL.
Как включить подсистему Windows для Linux
Если у вас возникли проблемы с установкой оболочки Linux bash в Windows 10, одна из проблем может заключаться в том, что вы не включили подсистему Windows для Linux. В этом случае вы столкнетесь с ошибкой: «Дополнительный компонент подсистемы Windows для Linux не включен. Включите его и повторите попытку».
Вот как включить компонент Подсистема Windows для Linux в Windows 10:
- Откройте приложение » Настройки Windows 10″.
- Выберите Приложения .
- Щелкните « Программы и компоненты» в разделе « Связанные настройки » справа.
- На странице « Программы и компоненты» щелкните « Включение или отключение компонентов Windows» на левой панели.
- Прокрутите вниз и включите подсистему Windows для Linux .
- Щелкните ОК, чтобы сохранить изменения.
- Нажмите « Перезагрузить сейчас», чтобы завершить процесс.
Далее вам необходимо установить подсистему Windows для Linux . После этого вы можете установить любой поддерживаемый дистрибутив Linux прямо на свой ПК с Windows.
Кроме того, вы также можете установить рабочий стол Linux в Windows, который дает вам графический интерфейс для работы.
Установите дистрибутивы Linux в Windows правильно
Для беспроблемной установки Linux в Windows 10 сначала включите подсистему Windows для Linux. Это не займет у вас много времени и избавит от ошибок при установке.
Windows Subsystem for Linux (WSL) — подсистема ОС Windows 10, позволяющая разработчикам, тестировщикам запускать нативные приложения Linux, писать скрипты, выполнять команды непосредственно из Windows. В обновлённой Windows 10 (2004) появилась 2я версия WSL, в которой используется полноценное ядро Linux с возможностью запуска приложений и контейнеров Docker, реализована высокая скорость загрузки, небольшой объем потребляемых ресурсов, управление в фоновом режиме, обновление ядра. Таким образом вы сможете запускать ELF64 программы, которые могут получать доступ к файловой системе Windows без использования сторонних порто (таких как Cygwin).
Образ ядра Linux (версия ядра 4.19) в Windows 10 представляет собой легкую виртуальную машину, для запуска которой не нужно ставить полноценную роль Hyper-V. Системные вызовы Linux транслируются на лету в вызовы Windows без использования эмулятора (в отличии от WSL1).
Изначально компонент WSL отключен. Чтобы его включить, вам необходимо зайти в Пуск -> Панель управления -> Программы и компоненты -> Включение и отключение компонентов Windows (Control PanelAll Control Panel ItemsPrograms and FeaturesTurn Windows features on or off), активировать галочку Подсистема Windows для Linux (Windows Subsystem for Linux), нажать кнопку ОК, и перезагрузить компьютер.
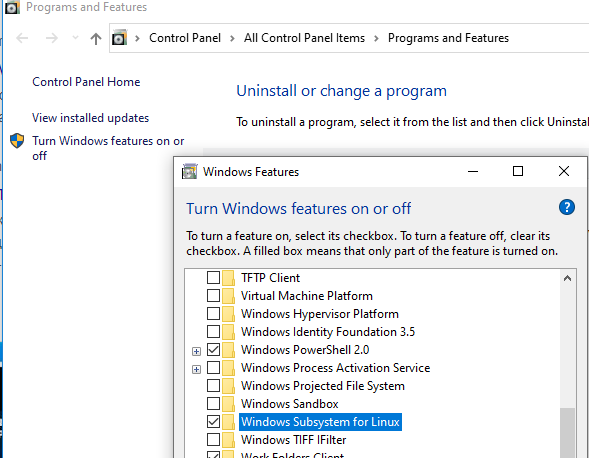
Вы можете включить компоненты WSL в Windows 10 с помощью dism:
dism.exe /online /enable-feature /featurename:VirtualMachinePlatform /all /norestart
dism.exe /online /enable-feature /featurename:Microsoft-Windows-Subsystem-Linux /all /norestart
или PowerShell
Enable-WindowsOptionalFeature -Online -FeatureName Microsoft-Windows-Subsystem-Linux
Enable-WindowsOptionalFeature -Online -FeatureName VirtualMachinePlatform
В Windows Server 2004 Semi-Annual Channel (SAC) для установки компонента WSL используется командлет Install-WindowsFeature:
Install-WindowsFeature -Name Microsoft-Windows-Subsystem-Linux
После этого также необходимо перезагрузить компьютер.
В настройка BIOS/UEFI компьютера должна быть включена поддержка аппаратной виртуализации: Intel VT (Intel Virtualization Technology) или AMD-V.
Теперь вам нужно выполнить обновление WSL до версии 2. Для этого требуется зайти на сайт https://docs.microsoft.com/ru-ru/windows/wsl/wsl2-kernel, скачать файл wsl_update_x64.msi, установить его. По завершении увидите картинку
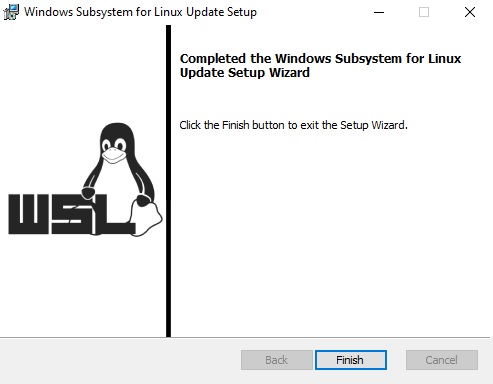
Чтобы сделать WSL2 архитектурой по умолчанию для новых дистрибутивов, в PowerShell выполните команду:
wsl --set-default-version 2
Далее вам необходимо открыть Microsoft Store, в поиске ввести слово “Linux”. В появившемся списке выберите нужный дистрибутив. Доступные Ubuntu, Debian, Kali Linux, Linux Cheatsheet, SUSE Linux Enterprise Server15, openSUSE Leap 15-1, Pengwin Enterprise, Fedora Remix for WSL или другие. В нашем примере мы будем использовать Ubuntu 20.04 LTS, нажмите кнопку Получить.
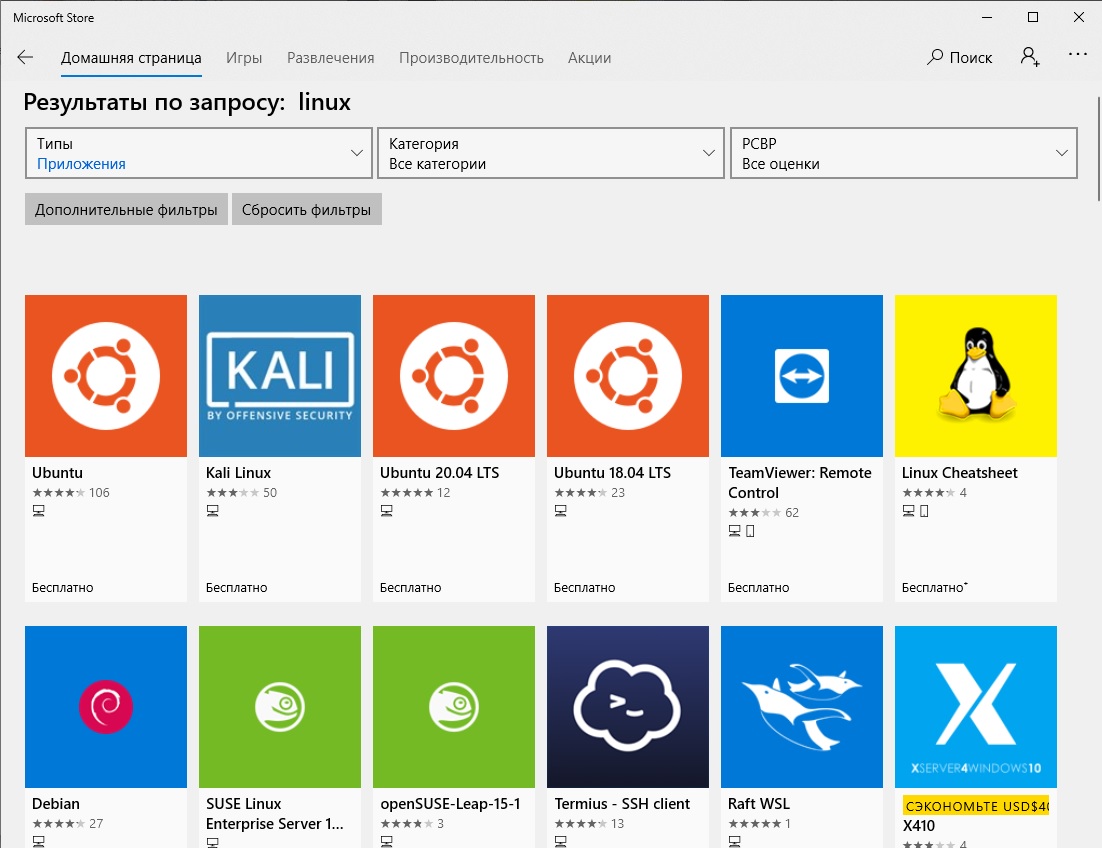
Если у вас отключен Windows Store или вы хотите установить дистрибутив WSL в Core редакции Windows Server, вы можете скачать дистрибутив Ubuntu с помощью PowerShell командлета Invoke-WebRequest:
Invoke-WebRequest https://aka.ms/wslubuntu2004 -OutFile ubuntu-2004.zip –UseBasicParsing
Распакуйте архив:
Expand-Archive -Path .ubuntu-2004.zip
Запустите установку образа Linux с помощью файла Ubuntu.exe.
Также вы можете скачать образ в виде appx файла и установить его с помощью командлета Add-AppxPackage.
После установки можно проверить используемую версию WSL с помощью команды
wsl --list –-verbose
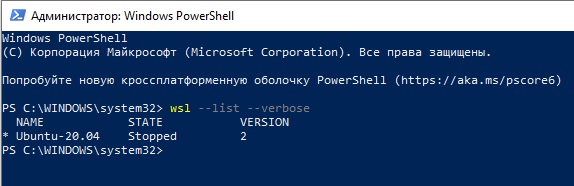
Если у вашей среды Linux указана версия 1, нужно изменить ее на WSL2 командой:
wsl --set-version Ubuntu-20.04 2
Файл жёсткого диска с образом виртуальной машины ОС Linux Ubuntu 20.04 будет располагаться в профиле пользователя: C:Users234AppDataLocalPackagesCanonicalGroupLimited.Ubuntu20.04onWindows_79rhkp1fndgscLocalState.
После установки дистрибутива в стартовом меню появляется ярлык на него. Для запуска Ubuntu зайдите в меню Пуск, нажмите на соответствующем ярлыке и получите в отдельном окне полноценную командную оболочку Bash. Запускать WSL можно и с помощью команды wsl. При первом запуске образа в командной строке Bash вам будет предложено создать пользователя и пароль (которые не должны совпадать с учётной записью Windows). Чтобы выполнять команды с правами root, необходимо использовать дополнительный ключ (префикс) sudo. В WSL есть общие команды для Bash и CMD, и тут нужно не забывать, что система Linux чувствительна к регистру.
Вы можете выполнить Linux-команды из CMD. Для этого необходимо вначале указать “WSL”. Например, для просмотра списка файлов и папок в каталоге Windows, выполните:
wsl
ls /mnt
ls/mnt/c
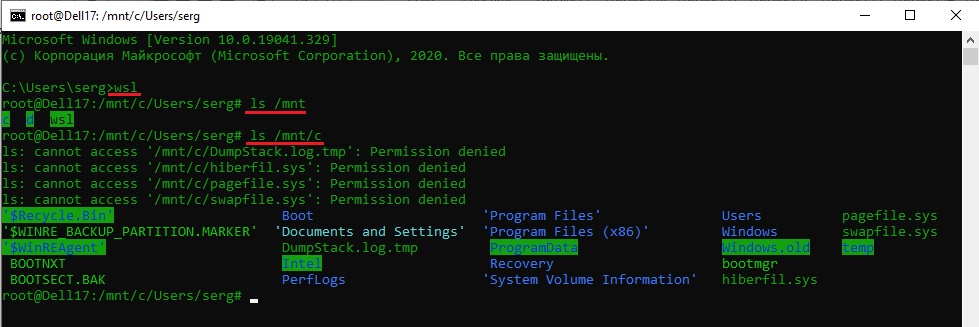
dir | wsl grep Sa
wsl ls ‑la > 123.txt
wsl ls ‑la /proc/cpuinfo
wsl ls ‑la “/mnt/c/Program Files”
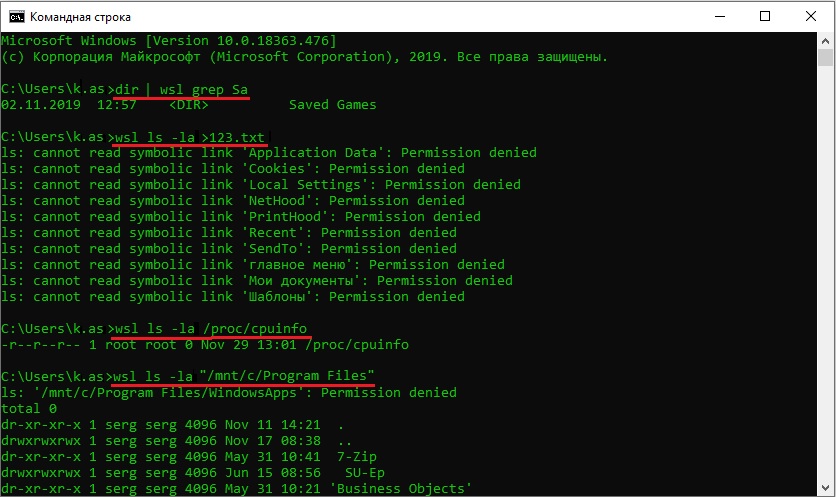
Также вы можете открыть проводник командой explorer.exe, калькулятор – calc.exe, блокнот – notepad.exe, paint – mspaint.exe, календарь – cal, погоду – curl wttr.in
Ещё один пример взаимосвязи 2х систем – вы можете открыть в Windows файл из WSL-дистрибутива по сетевому пути. Для этого в CMD наберите путь к файлу:
notepad \wsl$Ubuntu-20.04home1122.txt
Из окна консоли вы можете обновить список пакетов в Ubuntu с помощью команд:
sudo apt-get update
sudo apt-get upgrade
После обновления Ubuntu папка …/LocalState будет занимать 1.5 Гб.
Из командной строки Linux можно не только просмотреть Windows-файлы и каталоги, но и получить к ним доступ. Чтобы удобнее копировать файлы, просматривать директории и их содержимое, установите файловый менеджер Midnight Commander с помощью команды
sudo apt-get install mc
Вы можете запустить Midnight Commander как в командной оболочке Bash, так и внутри CMD. На скриншоте ниже показано, что в двух панелях MC показывается список файлов с обеих ОС.
Можно отобрахить сетевые настройки (IP адрес) IP-адрес Linux-системы:
ip addr | grep eth0
В WSL не предусмотрена работа приложений с графическим интерфейсом. Тем не менее вы можете попробовать их установить и использовать. Чтобы запускать графические приложения в Linux, нужно скачать и установить в Windows программу VcXsrv Windows X Server (https://sourceforge.net/projects/vcxsrv/).
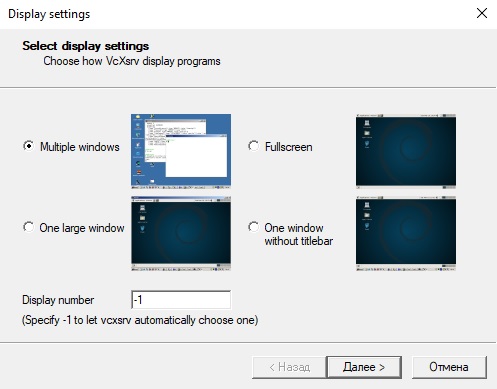
С помощью пакетного менеджера apt-get установим несколько графических программ: например, браузер, текстовый редактор или что-то ещё:
sudo apt-get install gedit
sudo apt-get install firefox
sudo apt-get install x11-app
Затем создайте файл в директории root:
cd /~
vim .bash_login
впишите строку
export DISPLAY=$(cat /etc/resolv.conf | grep nameserver | awk '{print $2}'):0
сохраните запись
Esc -> :wr -> :q
Теперь можете запустить графические программы Linux через WSL командами:
firefox
или
gedit
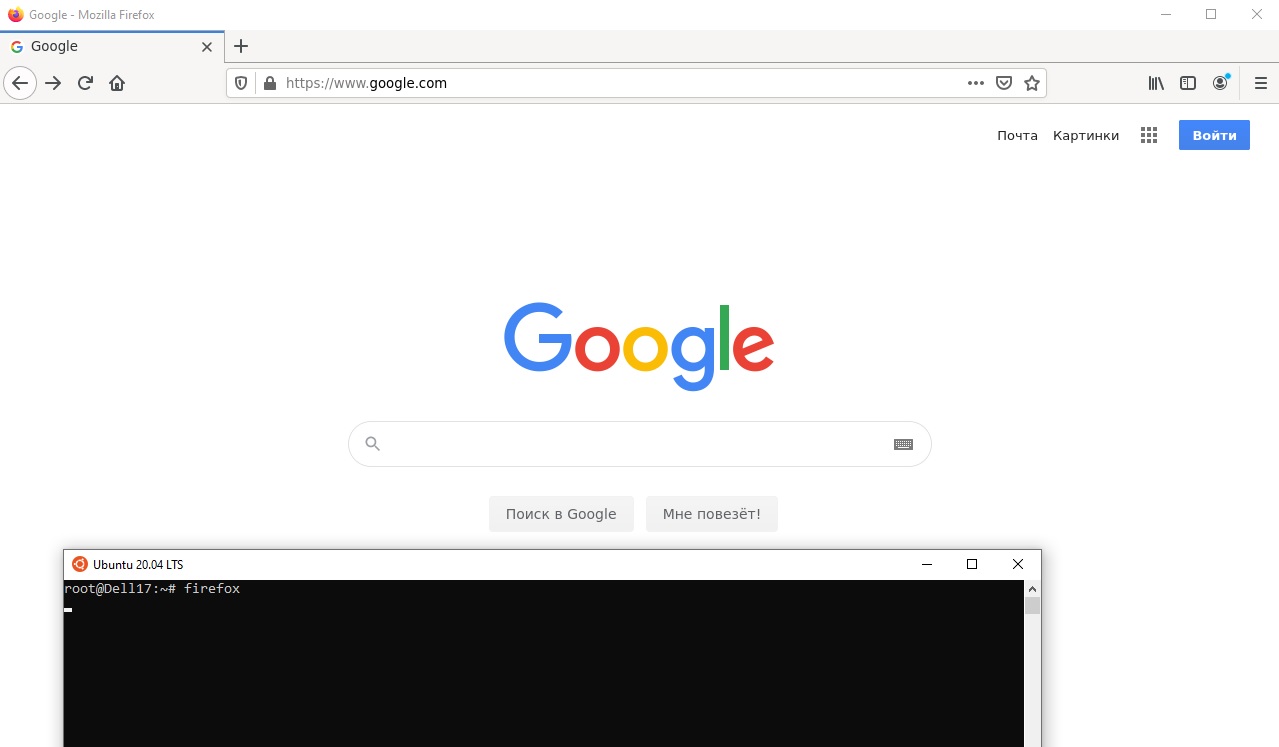
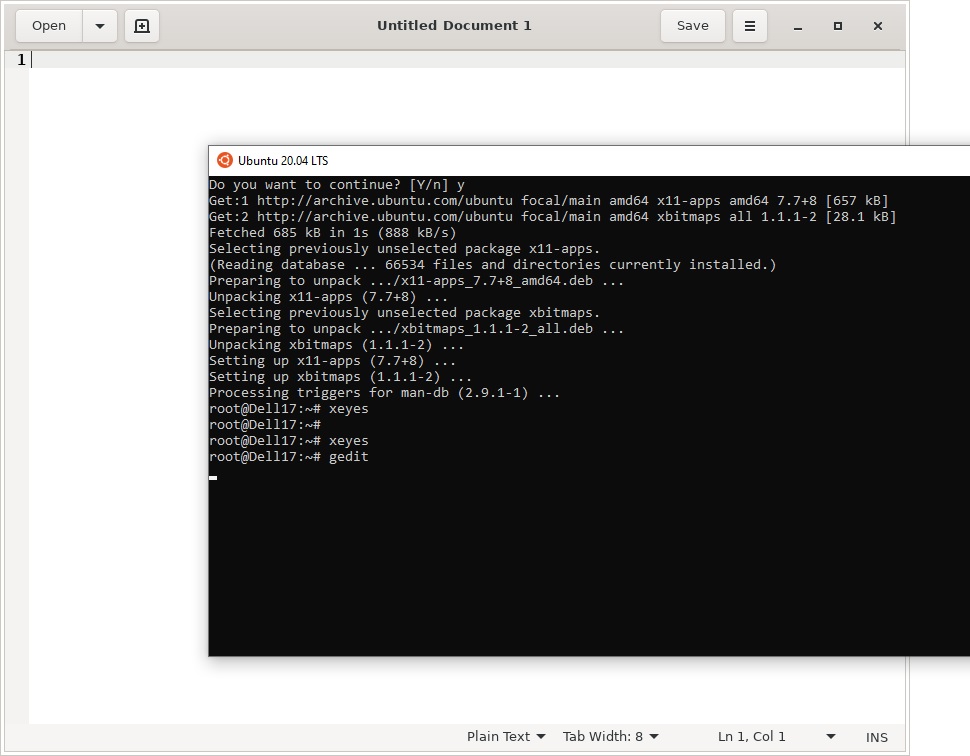
Вы можете установить в Windows 10 несколько дистрибутивов Linux и запускать одновременно в разных окнах WSL. Вывести весь перечень установленных дистрибутивов можете с помощью команды:
wsl --list –all
чтобы завершить работу всех запущенных дистрибутивов и ядра WSL 2, выполните команду:
wsl --shutdown