HyperX NGENUITY
HyperX NGENUITY is a powerful and intuitive software that will allow you to personalize your compatible HyperX products. Set button bindings, program and store macros, and customize lighting; HyperX NGENUITY gives you as much control as you want. The software also comes with a library of presets, so you can quickly choose one to install and jump straight into the action.
HyperX NGENUITY is a powerful and intuitive software that will allow you to personalize your compatible HyperX products. Set button bindings, program and store macros, and customize lighting; HyperX NGENUITY gives you as much control as you want. The software also comes with a library of presets, so you can quickly choose one to install and jump straight into the action.
HyperX NGENUITY Compatible Devices
Explore our expert’s solutions for this issue
by Milan Stanojevic
Milan has been enthusiastic about technology ever since his childhood days, and this led him to take interest in all PC-related technologies. He’s a PC enthusiast and he… read more
Published on September 7, 2022
Reviewed by
Vlad Turiceanu

Passionate about technology, Windows, and everything that has a power button, he spent most of his time developing new skills and learning more about the tech world. Coming… read more
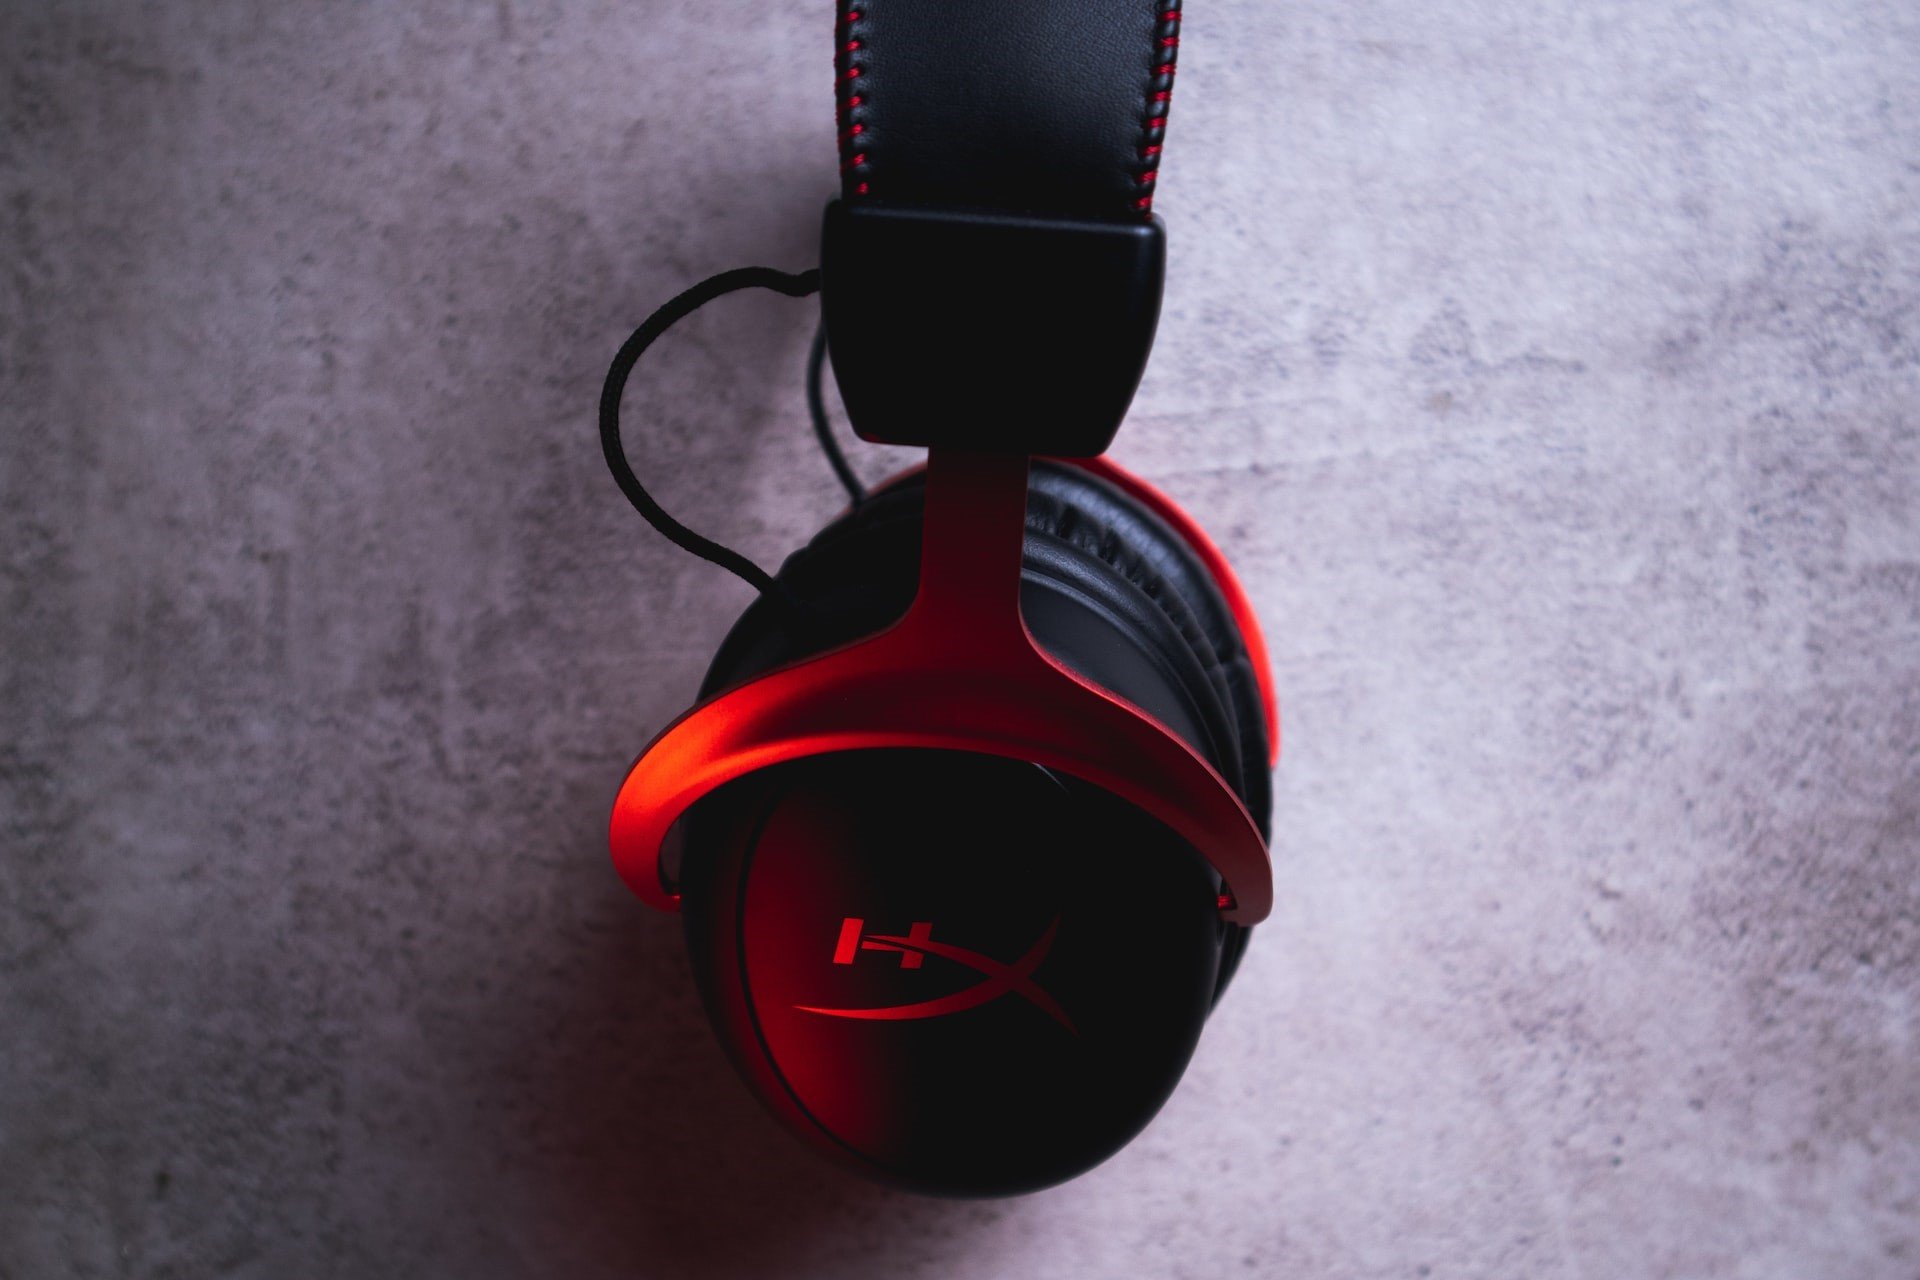
- HyperX Cloudset and HyperX Predator SSD seem to cause some trouble when used on Windows 10.
- If you’ve experienced similar issues, you will need to reinstall the headset driver to start resolving them.
- Make sure to follow the steps described in the guide in an orderly manner to ensure an efficient troubleshooting process.
XINSTALL BY CLICKING THE DOWNLOAD FILE
This software will repair common computer errors, protect you from file loss, malware, hardware failure and optimize your PC for maximum performance. Fix PC issues and remove viruses now in 3 easy steps:
- Download Restoro PC Repair Tool that comes with Patented Technologies (patent available here).
- Click Start Scan to find Windows issues that could be causing PC problems.
- Click Repair All to fix issues affecting your computer’s security and performance
- Restoro has been downloaded by 0 readers this month.
HyperX is a famous gaming hardware series that includes memories, SSDs, headsets, and peripherals. But many recently reported encountering problems with HyperX in Windows 10.
Issues with HyperX devices can arise for several reasons, and it’s generally tricky to identify the underlying cause.
So, in the following sections, we will walk you through what’s causing HyperX problems in Windows 10 and the solutions for each.
Why is my HyperX not working?
When the HyperX device is not working on the computer, it’s essential to identify the type of device you are facing issues with.
For instance, if it’s a headphone, misconfigured sound settings, outdated or corrupt drivers, or improper connections are to blame.
Several users also reported that the HyperX mic is not working, in which case, you would have to check the connections, be it a wired or wireless microphone.
Besides, certain services and processes are supposed to run on the computer to function the connected devices effectively. And in their absence, you are bound to encounter issues.
What to do if HyperX Cloud 2 mic is not working?
Many users reported that HyperX Cloud 2 mic is not working on Windows 11 and 10, but this issue can be quickly resolved. First, set the microphone as the primary device and verify if that resolves the problem.
You may update the audio driver or the ones specific to the HyperX Cloud 2 mic if it doesn’t. Besides, if you have third-party apps running that could modify the sound settings, disable or uninstall them to fix the HyperX problems in Windows 10.
If the microphone keeps resetting to 0 volume, you may run the audio troubleshooter or disable apps from taking control of the HyperX Cloud 2 mic.
Does HyperX need drivers?
Yes, HyperX needs drivers, as is the case with any device. But things are a lot more effortless and streamlined with HyperX.
Users don’t need to add the drivers manually; instead, they are automatically fetched and installed as soon as the HyperX device is connected. This is why you wouldn’t be able to find HyperX driver updates online.
Also, it’s best that you download HyperX NGENUITY software to customize compatible devices. In addition to that, it will also ensure that the devices work fine.
How do I fix HyperX issues on Windows 10?
1. Reinstall the headset driver
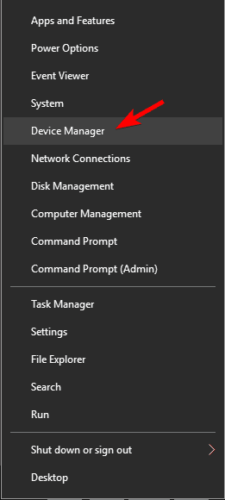
- Press Windows + X to open the Power User menu, and choose Device Manager from the list.

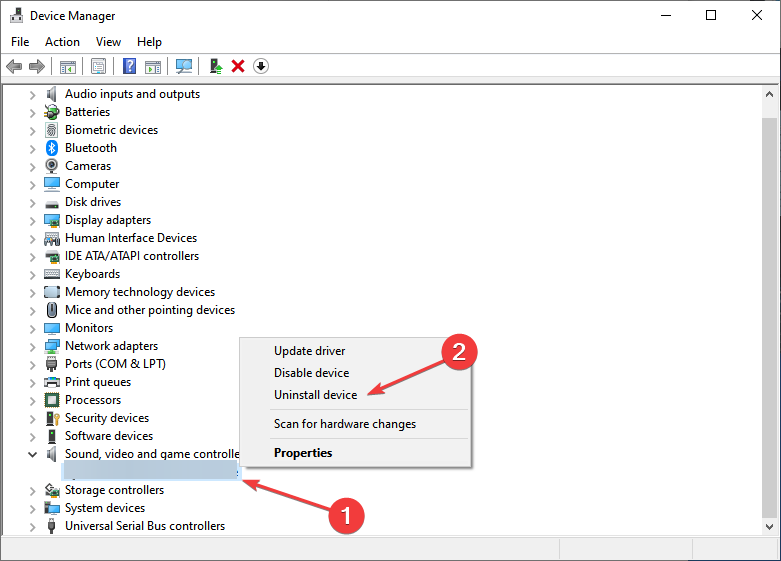
- Locate your HyperX audio device, right-click on it, and choose Uninstall device.

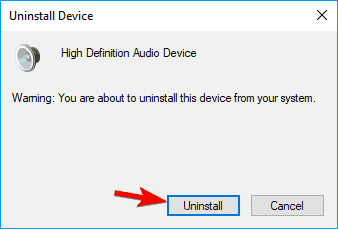
- A warning dialog will appear. Click on Uninstall to remove the device.

- Once done, unplug your headset and then restart your PC.
- After your PC restarts, reconnect the headset, and the driver for it should be installed automatically.
You might have to repeat this process several times before your headset starts working.
Drivers allow your PC to work with the hardware. Therefore, any driver-related issue will cause problems. That is why reinstalling the drivers will most likely solve the problem immediately.
Update drivers automatically (suggested)

If the previous method doesn’t fix the issue, we recommend you use a dedicated tool. Downloading and installing drivers manually is a process that carries the risk of getting the wrong driver installed, which may lead to severe malfunctions in your system.
So the safest and easiest way to update drivers on a Windows computer is by using a third-party tool. We strongly recommend DriverFix.
It scans your system, automatically identifies each device on your computer, and matches it with the latest driver versions from an extensive online database.
Drivers can then be updated in batches or one at a time without you having to make any complex decisions in the process.

DriverFix
Update all your audio outdated drivers with just a few clicks and your HyperX Cloud II heaset will work like a charm afterward.
2. Make sure that your microphone is unmuted
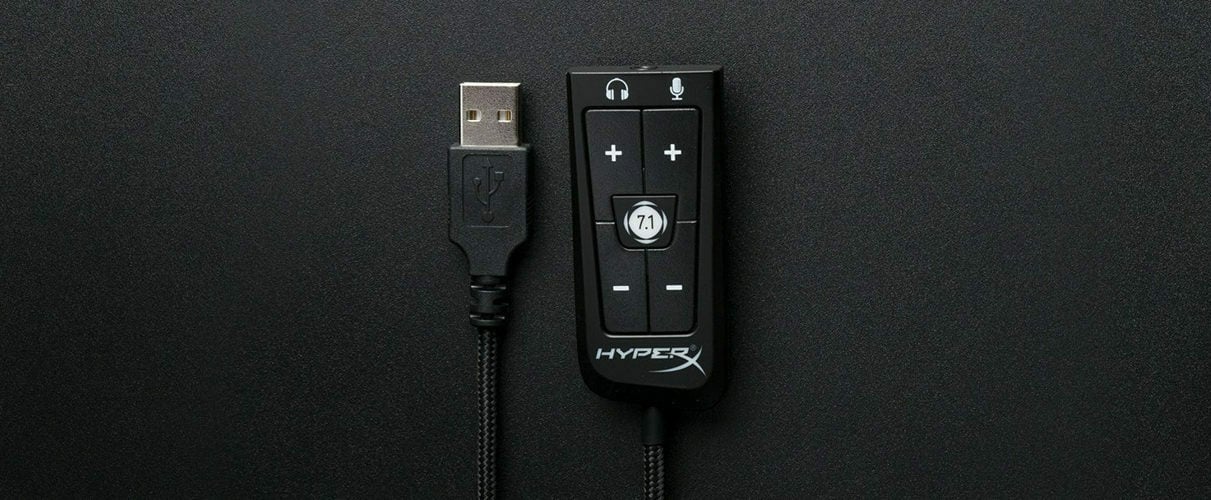
Some users mentioned that they were unable to adjust the microphone volume. The solution to this problem is relatively simple: you have to check the USB dongle that comes with the gaming headset.
There’s a small Mute switch on it, so make sure to press it to unmute the microphone. After doing that, the problem should disappear. It’s worth mentioning that the USB dongle also has its microphone control keys, so adjust the volume of your microphone from here.
Lastly, double-check if the headset is correctly connected to the USB dongle. To fix this problem, firmly connect your headset to the USB dongle and check if that solves the HyperX headset not working issue on Windows 10.
Some PC issues are hard to tackle, especially when it comes to corrupted repositories or missing Windows files. If you are having troubles fixing an error, your system may be partially broken.
We recommend installing Restoro, a tool that will scan your machine and identify what the fault is.
Click here to download and start repairing.
Also, find out what to do if other headsets are not working in Windows 10.
3. Connect your headset to a different USB port
HyperX Cloud II is a USB headset, meaning many USB-related problems can affect it. For example, although the USB 3.0 standard is gaining popularity, several users reported that this headset isn’t working correctly with this USB version.
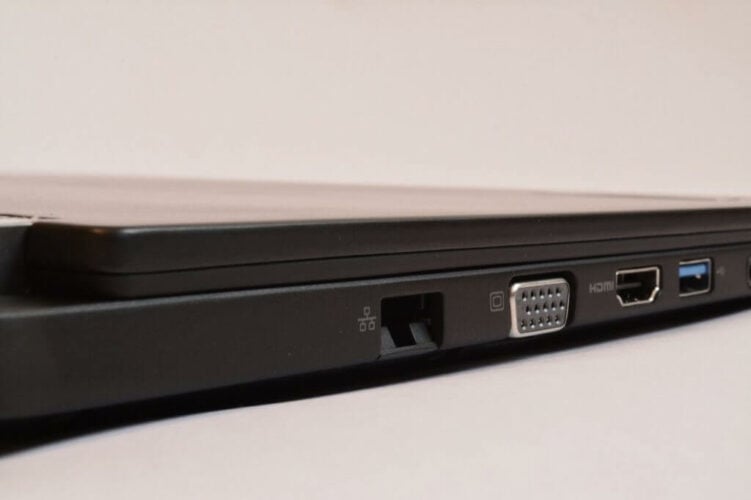
So instead of using USB 3.0, try to connect your headset to a USB 2.0 port and check if that solves the issue. In addition, some users suggest you use the ports on the back of your computer instead of the front ones, which are more likely to be faulty.
4. Check your audio device settings
- Press Windows + S, enter Change system sounds in the text field, and choose the relevant search result from the menu.

- Go to the Recording tab, right-click the empty space, and check the Show Disabled Devices and Disconnected Devices options.

- Now locate your microphone, right-click on it, and choose Enable from the menu.
- Click on OK to save changes.


Some users also suggested deactivating and reactivating the microphone to fix this problem. You can easily do it by choosing Disable and Enable from the Sound window.
5. Use the sound troubleshooter
- Press Windows + I to open the Settings app, and click on the Update & Security section.

- Choose Troubleshoot from the navigation pane on the left.
- Click on Additional troubleshooters here.
- Now select Recording Audio and click on the Run the troubleshooter button.
- Follow the on-screen instructions and choose the relevant response when prompted to complete the troubleshooting process.
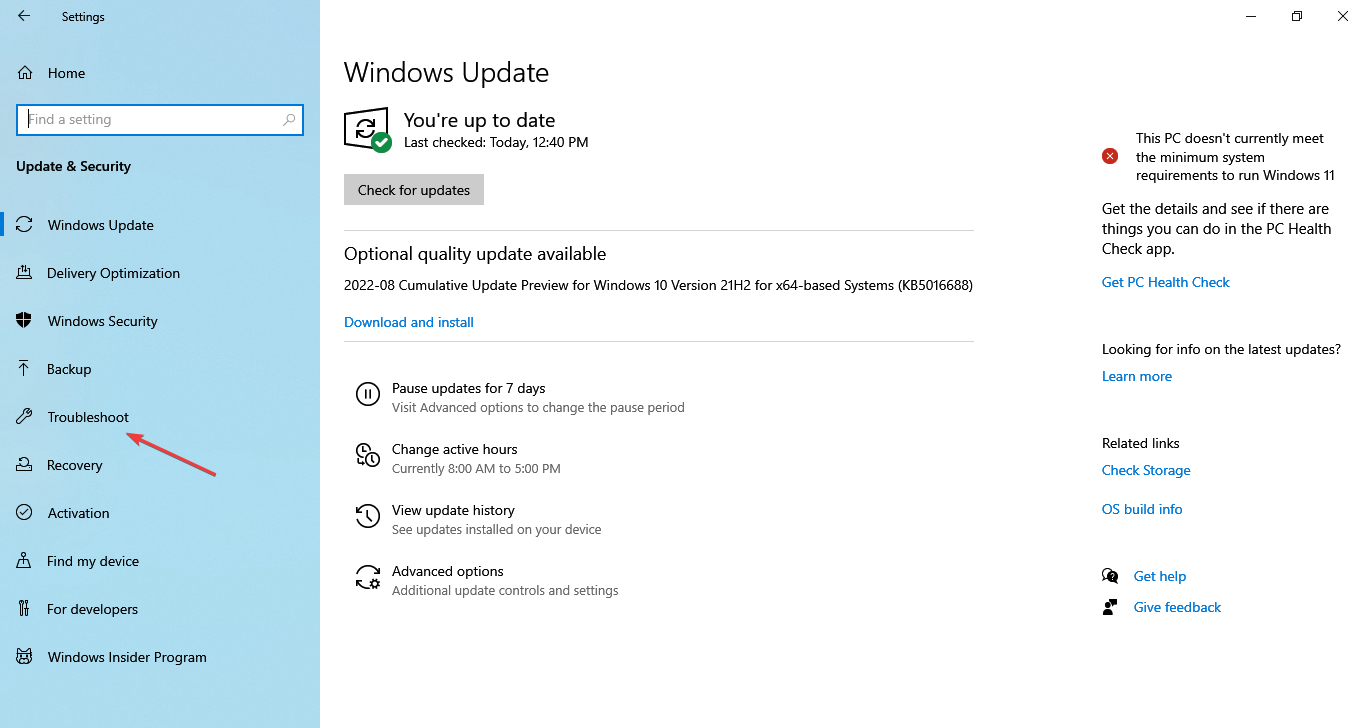
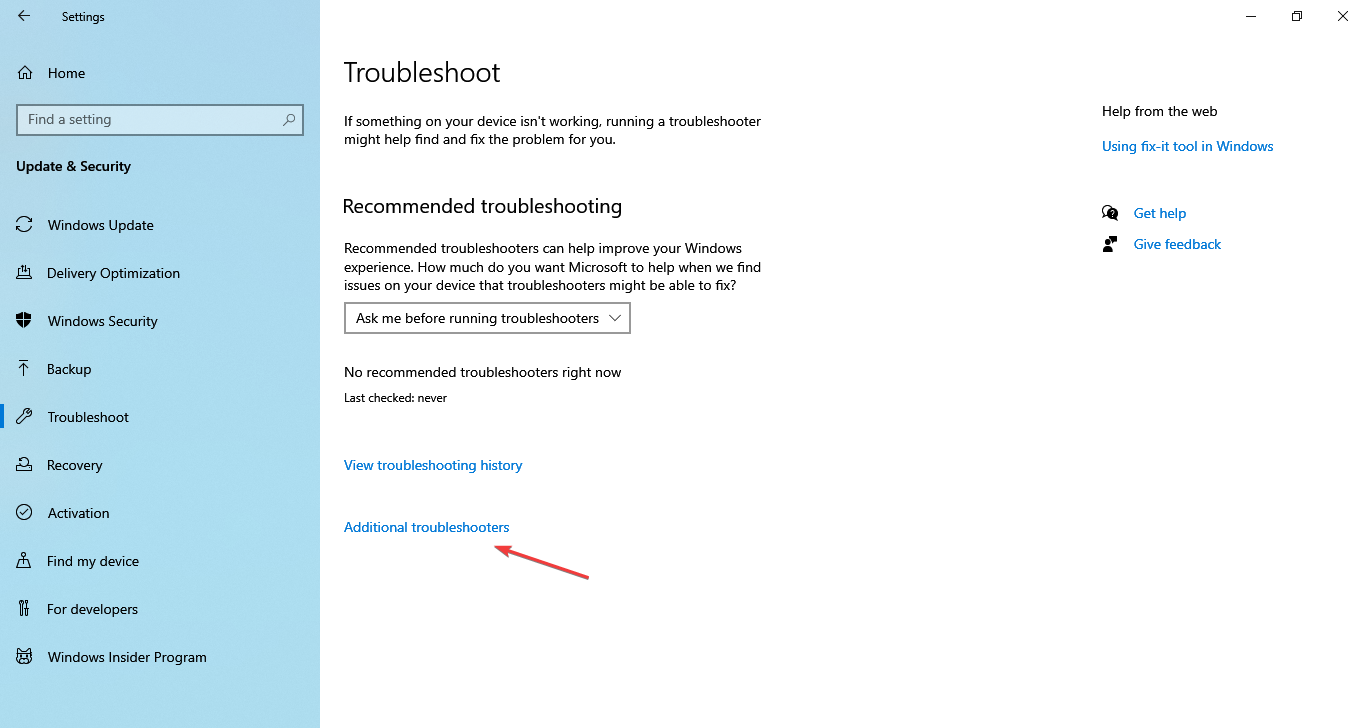
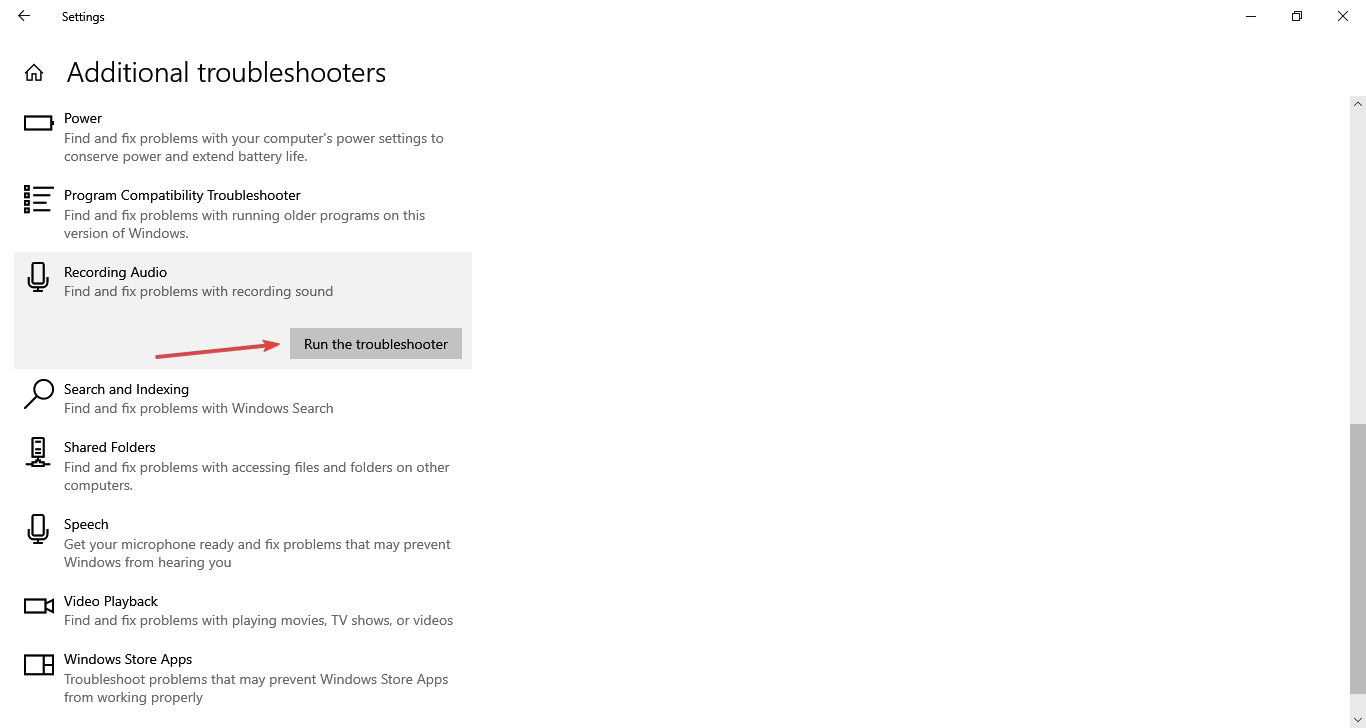
Running the built-in troubleshooter is probably one of the simplest methods to fix HyperX problems in Windows 10. But remember that it would only work if Microsoft has acknowledged the issue and a solution is available.
- Internal microphone not working in Windows 10/11 [HP]
- FIX: Microphone not working in Windows 11
- Fix: HP Support Assistant Stuck on Creating a Restore Point
- Failed to Determine Source Edition Type: 5 Ways to Fix It
- Fix: This Page Isn’t Eligible to Have a Username [Facebook]
- Why Can’t I Download Netflix on My Laptop & How to Fit It
6. Update the firmware
If you’re having microphone problems with your HyperX Cloud II headphones, you might be able to fix them by upgrading the firmware since it’s critical for the effective functioning of the device.
Note that firmware update is an advanced procedure, and it can cause irreversible damage to your headphones if not done right, so exercise caution.
If you intend to update it, download the firmware update for HyperX Cloud II from the official support website. The updates for other devices, too, can be found on the support website.
7. Try using an audio splitter
Users reported that the microphone wasn’t recognized on their HyperX Cloud Stinger headphones. They mentioned one might be able to circumvent this problem by using an audio splitter.
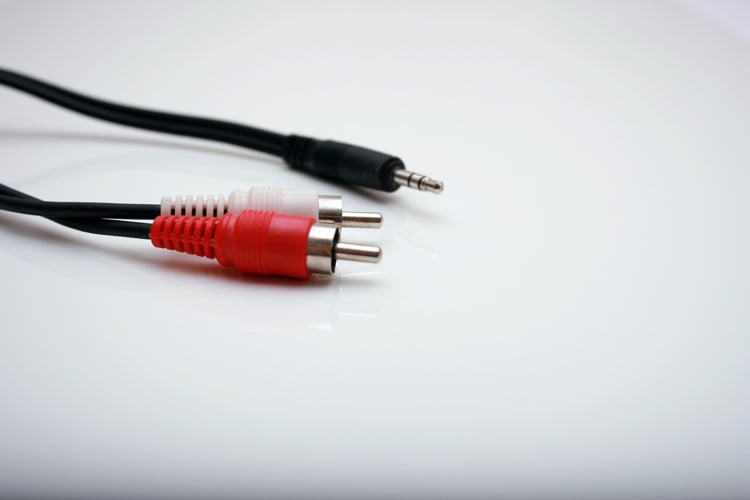
This small device comes with two 3.5mm ports, one for audio and one for the microphone. This isn’t the best solution, but it’s a decent workaround, so you might want to try it if you’re having problems with the HyperX Cloud Stinger headset in Windows 10.
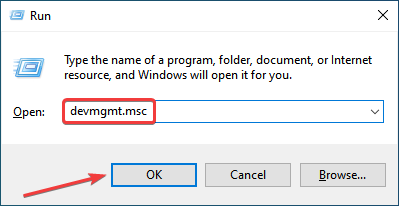
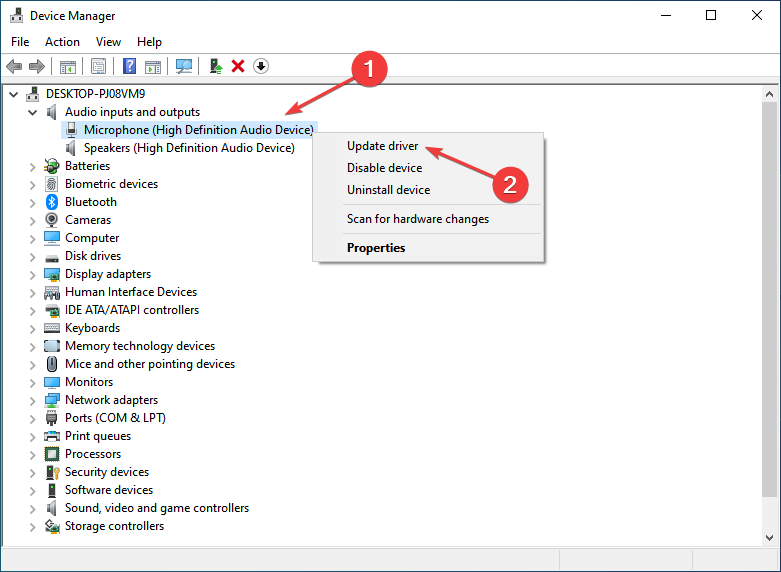
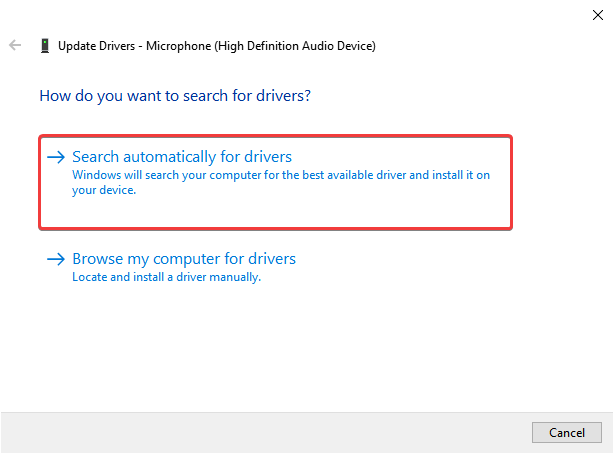
8. Update the drivers
- Press Windows + R to launch the Run command, enter devmgmt.msc in the text field, and click OK to open the Device Manager.

- Locate your audio driver, right-click it and choose Update driver.

- Select Search automatically for drivers.

- Windows will now check for driver updates and install new drivers.
- After the new driver is installed, restart your PC.
We have to mention that Device Manager is the simplest way to update your audio drivers but not necessarily the most efficient one. Usually, Device Manager doesn’t download the latest drivers, which can be a problem. And
To ensure you have the latest drivers, download these from the motherboard or sound card manufacturer’s official website.
Better yet, use the dedicated tool recommended in the first solution, DriverFix, and you’ll surely get the correct components in no time.
9. Use the remote control to adjust the microphone
Some HyperX headsets have a remote control that allows you to control your microphone or adjust your audio.
Using the remote control, you can adjust your headset’s microphone sensitivity, so be sure to do that.
Few users reported that this method solved the problem for them. If the previous ones didn’t help, try this one.
10. Check your headset wires
If you’re having any problems with the HyperX headset in Windows 10, you might be able to fix them by checking the cable. In some cases, your cable is damaged, and you might be able to fix it by taping the affected area.
To verify if the cable is the culprit, you might want to try the headset on a different PC and check if the same appears. If it does, you now know what’s causing the problem and its solution.
How can I fix HyperX problems on Windows 11?
The solutions remain the same with Windows 11 as they were for Windows 10. However, a couple of additional measures you may undertake are as follows:
- Look for applications that might control the Bluetooth functionality or the sound settings and uninstall them.
- If the problem started after updating the OS, revert to the previous version.
- Performing a system restore might do the trick.
- Disable apps from accessing the microphone.
- As a last resort, you may reset Windows 11 to factory settings.
Is there software for HyperX?
There are a series of software that allows you to customize some of HyperX’s features. A good example is the HyperX NGENUITY software that is available for download in Microsoft Store
HyperX series offers a great range of gaming hardware, but as you may have noticed, some of its products have had problems in Windows 10. Though the solutions are simple, you should have them working in no time.
Also, find out how to optimize the PC for gaming and run even the most resource-hungry games seamlessly.
If you have any other suggestions or questions, don’t hesitate to leave them in the comments section below, and we’ll be sure to take a look.
![]()
Newsletter
Explore our expert’s solutions for this issue
by Milan Stanojevic
Milan has been enthusiastic about technology ever since his childhood days, and this led him to take interest in all PC-related technologies. He’s a PC enthusiast and he… read more
Published on September 7, 2022
Reviewed by
Vlad Turiceanu
Passionate about technology, Windows, and everything that has a power button, he spent most of his time developing new skills and learning more about the tech world. Coming… read more
- HyperX Cloudset and HyperX Predator SSD seem to cause some trouble when used on Windows 10.
- If you’ve experienced similar issues, you will need to reinstall the headset driver to start resolving them.
- Make sure to follow the steps described in the guide in an orderly manner to ensure an efficient troubleshooting process.
XINSTALL BY CLICKING THE DOWNLOAD FILE
This software will repair common computer errors, protect you from file loss, malware, hardware failure and optimize your PC for maximum performance. Fix PC issues and remove viruses now in 3 easy steps:
- Download Restoro PC Repair Tool that comes with Patented Technologies (patent available here).
- Click Start Scan to find Windows issues that could be causing PC problems.
- Click Repair All to fix issues affecting your computer’s security and performance
- Restoro has been downloaded by 0 readers this month.
HyperX is a famous gaming hardware series that includes memories, SSDs, headsets, and peripherals. But many recently reported encountering problems with HyperX in Windows 10.
Issues with HyperX devices can arise for several reasons, and it’s generally tricky to identify the underlying cause.
So, in the following sections, we will walk you through what’s causing HyperX problems in Windows 10 and the solutions for each.
Why is my HyperX not working?
When the HyperX device is not working on the computer, it’s essential to identify the type of device you are facing issues with.
For instance, if it’s a headphone, misconfigured sound settings, outdated or corrupt drivers, or improper connections are to blame.
Several users also reported that the HyperX mic is not working, in which case, you would have to check the connections, be it a wired or wireless microphone.
Besides, certain services and processes are supposed to run on the computer to function the connected devices effectively. And in their absence, you are bound to encounter issues.
What to do if HyperX Cloud 2 mic is not working?
Many users reported that HyperX Cloud 2 mic is not working on Windows 11 and 10, but this issue can be quickly resolved. First, set the microphone as the primary device and verify if that resolves the problem.
You may update the audio driver or the ones specific to the HyperX Cloud 2 mic if it doesn’t. Besides, if you have third-party apps running that could modify the sound settings, disable or uninstall them to fix the HyperX problems in Windows 10.
If the microphone keeps resetting to 0 volume, you may run the audio troubleshooter or disable apps from taking control of the HyperX Cloud 2 mic.
Does HyperX need drivers?
Yes, HyperX needs drivers, as is the case with any device. But things are a lot more effortless and streamlined with HyperX.
Users don’t need to add the drivers manually; instead, they are automatically fetched and installed as soon as the HyperX device is connected. This is why you wouldn’t be able to find HyperX driver updates online.
Also, it’s best that you download HyperX NGENUITY software to customize compatible devices. In addition to that, it will also ensure that the devices work fine.
How do I fix HyperX issues on Windows 10?
1. Reinstall the headset driver
- Press Windows + X to open the Power User menu, and choose Device Manager from the list.
- Locate your HyperX audio device, right-click on it, and choose Uninstall device.
- A warning dialog will appear. Click on Uninstall to remove the device.
- Once done, unplug your headset and then restart your PC.
- After your PC restarts, reconnect the headset, and the driver for it should be installed automatically.
You might have to repeat this process several times before your headset starts working.
Drivers allow your PC to work with the hardware. Therefore, any driver-related issue will cause problems. That is why reinstalling the drivers will most likely solve the problem immediately.
Update drivers automatically (suggested)
If the previous method doesn’t fix the issue, we recommend you use a dedicated tool. Downloading and installing drivers manually is a process that carries the risk of getting the wrong driver installed, which may lead to severe malfunctions in your system.
So the safest and easiest way to update drivers on a Windows computer is by using a third-party tool. We strongly recommend DriverFix.
It scans your system, automatically identifies each device on your computer, and matches it with the latest driver versions from an extensive online database.
Drivers can then be updated in batches or one at a time without you having to make any complex decisions in the process.
DriverFix
Update all your audio outdated drivers with just a few clicks and your HyperX Cloud II heaset will work like a charm afterward.
2. Make sure that your microphone is unmuted
Some users mentioned that they were unable to adjust the microphone volume. The solution to this problem is relatively simple: you have to check the USB dongle that comes with the gaming headset.
There’s a small Mute switch on it, so make sure to press it to unmute the microphone. After doing that, the problem should disappear. It’s worth mentioning that the USB dongle also has its microphone control keys, so adjust the volume of your microphone from here.
Lastly, double-check if the headset is correctly connected to the USB dongle. To fix this problem, firmly connect your headset to the USB dongle and check if that solves the HyperX headset not working issue on Windows 10.
Some PC issues are hard to tackle, especially when it comes to corrupted repositories or missing Windows files. If you are having troubles fixing an error, your system may be partially broken.
We recommend installing Restoro, a tool that will scan your machine and identify what the fault is.
Click here to download and start repairing.
Also, find out what to do if other headsets are not working in Windows 10.
3. Connect your headset to a different USB port
HyperX Cloud II is a USB headset, meaning many USB-related problems can affect it. For example, although the USB 3.0 standard is gaining popularity, several users reported that this headset isn’t working correctly with this USB version.
So instead of using USB 3.0, try to connect your headset to a USB 2.0 port and check if that solves the issue. In addition, some users suggest you use the ports on the back of your computer instead of the front ones, which are more likely to be faulty.
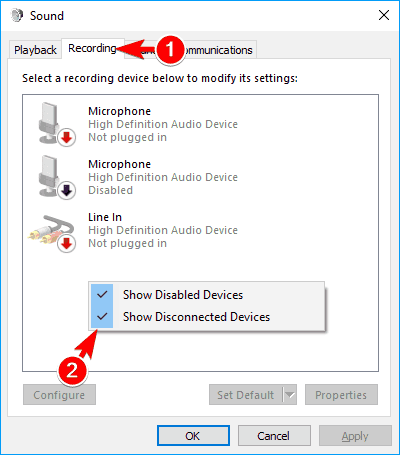
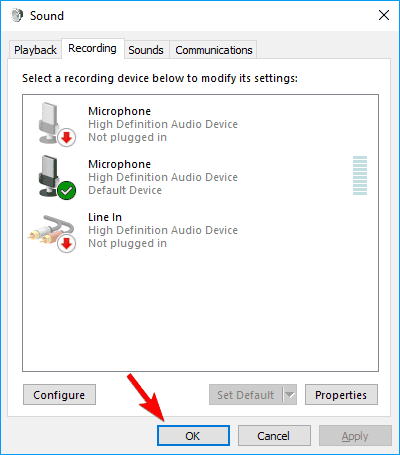
4. Check your audio device settings
- Press Windows + S, enter Change system sounds in the text field, and choose the relevant search result from the menu.
- Go to the Recording tab, right-click the empty space, and check the Show Disabled Devices and Disconnected Devices options.
- Now locate your microphone, right-click on it, and choose Enable from the menu.
- Click on OK to save changes.
Some users also suggested deactivating and reactivating the microphone to fix this problem. You can easily do it by choosing Disable and Enable from the Sound window.
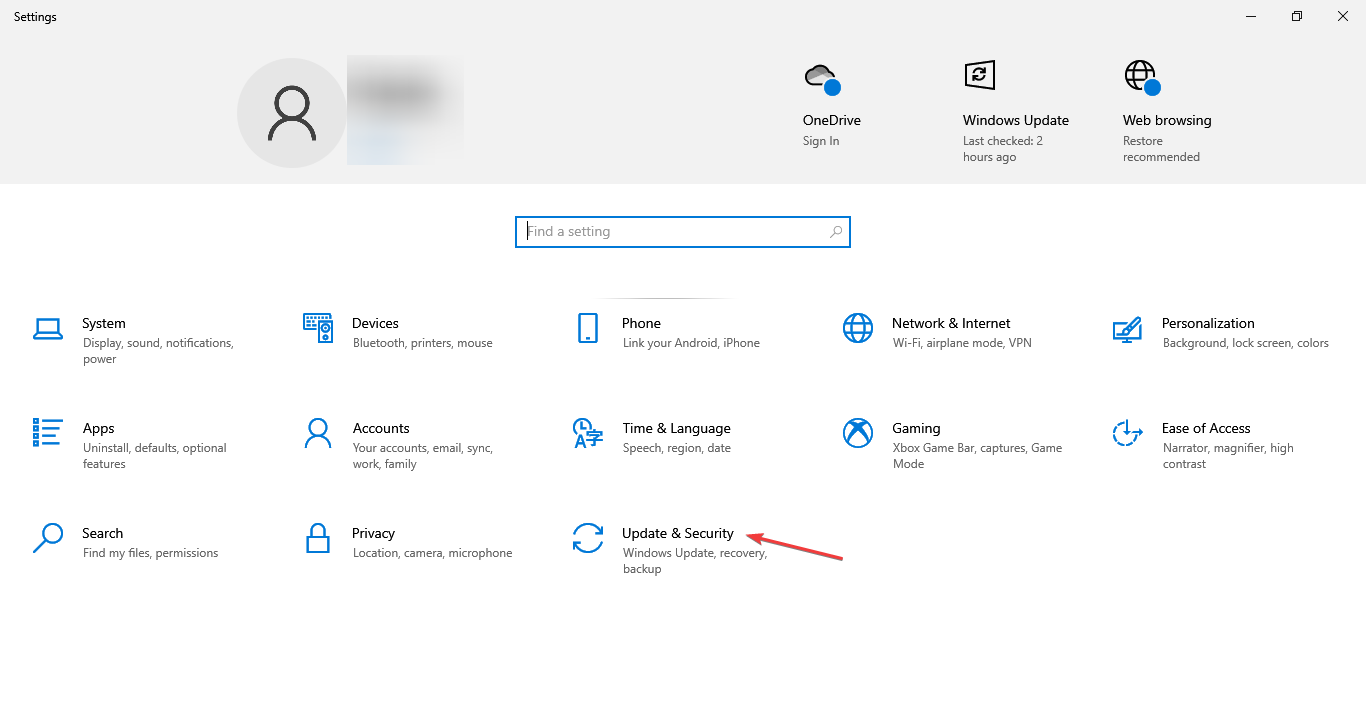
5. Use the sound troubleshooter
- Press Windows + I to open the Settings app, and click on the Update & Security section.
- Choose Troubleshoot from the navigation pane on the left.
- Click on Additional troubleshooters here.
- Now select Recording Audio and click on the Run the troubleshooter button.
- Follow the on-screen instructions and choose the relevant response when prompted to complete the troubleshooting process.
Running the built-in troubleshooter is probably one of the simplest methods to fix HyperX problems in Windows 10. But remember that it would only work if Microsoft has acknowledged the issue and a solution is available.
- Internal microphone not working in Windows 10/11 [HP]
- FIX: Microphone not working in Windows 11
- Fix: HP Support Assistant Stuck on Creating a Restore Point
- Failed to Determine Source Edition Type: 5 Ways to Fix It
- Fix: This Page Isn’t Eligible to Have a Username [Facebook]
- Why Can’t I Download Netflix on My Laptop & How to Fit It
6. Update the firmware
If you’re having microphone problems with your HyperX Cloud II headphones, you might be able to fix them by upgrading the firmware since it’s critical for the effective functioning of the device.
Note that firmware update is an advanced procedure, and it can cause irreversible damage to your headphones if not done right, so exercise caution.
If you intend to update it, download the firmware update for HyperX Cloud II from the official support website. The updates for other devices, too, can be found on the support website.
7. Try using an audio splitter
Users reported that the microphone wasn’t recognized on their HyperX Cloud Stinger headphones. They mentioned one might be able to circumvent this problem by using an audio splitter.
This small device comes with two 3.5mm ports, one for audio and one for the microphone. This isn’t the best solution, but it’s a decent workaround, so you might want to try it if you’re having problems with the HyperX Cloud Stinger headset in Windows 10.
8. Update the drivers
- Press Windows + R to launch the Run command, enter devmgmt.msc in the text field, and click OK to open the Device Manager.
- Locate your audio driver, right-click it and choose Update driver.
- Select Search automatically for drivers.
- Windows will now check for driver updates and install new drivers.
- After the new driver is installed, restart your PC.
We have to mention that Device Manager is the simplest way to update your audio drivers but not necessarily the most efficient one. Usually, Device Manager doesn’t download the latest drivers, which can be a problem. And
To ensure you have the latest drivers, download these from the motherboard or sound card manufacturer’s official website.
Better yet, use the dedicated tool recommended in the first solution, DriverFix, and you’ll surely get the correct components in no time.
9. Use the remote control to adjust the microphone
Some HyperX headsets have a remote control that allows you to control your microphone or adjust your audio.
Using the remote control, you can adjust your headset’s microphone sensitivity, so be sure to do that.
Few users reported that this method solved the problem for them. If the previous ones didn’t help, try this one.
10. Check your headset wires
If you’re having any problems with the HyperX headset in Windows 10, you might be able to fix them by checking the cable. In some cases, your cable is damaged, and you might be able to fix it by taping the affected area.
To verify if the cable is the culprit, you might want to try the headset on a different PC and check if the same appears. If it does, you now know what’s causing the problem and its solution.
How can I fix HyperX problems on Windows 11?
The solutions remain the same with Windows 11 as they were for Windows 10. However, a couple of additional measures you may undertake are as follows:
- Look for applications that might control the Bluetooth functionality or the sound settings and uninstall them.
- If the problem started after updating the OS, revert to the previous version.
- Performing a system restore might do the trick.
- Disable apps from accessing the microphone.
- As a last resort, you may reset Windows 11 to factory settings.
Is there software for HyperX?
There are a series of software that allows you to customize some of HyperX’s features. A good example is the HyperX NGENUITY software that is available for download in Microsoft Store
HyperX series offers a great range of gaming hardware, but as you may have noticed, some of its products have had problems in Windows 10. Though the solutions are simple, you should have them working in no time.
Also, find out how to optimize the PC for gaming and run even the most resource-hungry games seamlessly.
If you have any other suggestions or questions, don’t hesitate to leave them in the comments section below, and we’ll be sure to take a look.
![]()
Newsletter
-
Главная -
Драйверы
-
Звуковые карты
- Звуковые карты HyperX
Скачать DriverHub
Веб-версия DriverHub может содержать не все драверы HyperX. Установите DriverHub, чтобы получить доступ к полной базе драйверов.
| Веб-версия | DriverHub для Windows | |
|---|---|---|
| Полный каталог драйверов | ||
| Автоматическая установка драйверов |
Скачать и обновить нужные драйверы автоматически
Версия: 1.3.7.1452 для Windows 7, 8, 10 и 11
Бесплатное ПО
В комплекте идет опциональное ПО
- Yandex Browser
- Opera Browser
- Avast Free Antivirus
- World of Tanks
- World of Warships
HyperX производит в основном проводные игровые гарнитуры с низкой задержкой и хорошо сбалансированной производительностью. Соответствующий аудиодрайвер на вашем компьютере играет важную роль в поддержании идеального состояния ваших гарнитур HyperX. В этом посте вы узнаете все возможные способы обновления драйверов HyperX.
Да, чтобы обеспечить бесперебойную работу гарнитуры с компьютером, необходим специальный драйвер, специально предназначенный для гарнитуры HyperX. Однако драйвер HyperX будет автоматически установлен при подключении гарнитуры к компьютеру.
Это означает, что вам не нужно загружать драйвер с официального сайта, и он не предлагает загрузки драйверов для большинства гарнитур. Вы, конечно, можете обновить прошивку звуковой карты HyperX, если хотите.
Как обновить драйвер HyperX
Если ваша гарнитура HyperX не работает должным образом, вполне вероятно, что соответствующие аудиодрайверы повреждены или устарели. Вы можете переустановить или обновить драйвер, чтобы исправить проблемы со звуком или микрофоном:
Есть два основных способа обновить драйвер HyperX:
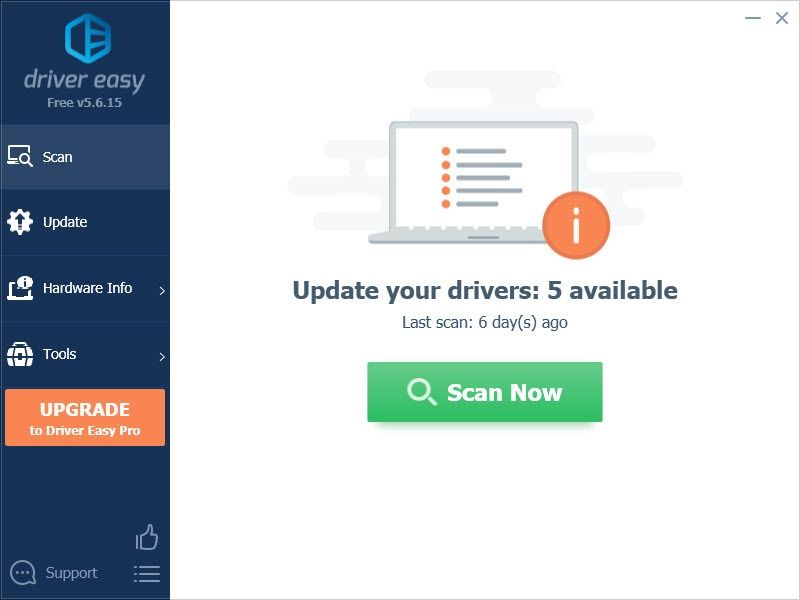
Автоматически — Если у вас нет времени, терпения или компьютерных навыков для обновления драйверов вручную, вы можете сделать это автоматически с помощью Водитель Easy . Driver Easy автоматически распознает вашу систему и найдет правильные драйверы для вашей гарнитуры HyperX и всех установленных устройств, а также вашу версию Windows, а затем загрузит и установит их правильно.
Вручную — Обновление вручную требует времени и навыков работы с компьютером. Чтобы обновить драйвер HyperX вручную, вам необходимо обновить драйвер HyperX Virtual Surround Sound через диспетчер устройств. Затем вам необходимо загрузить последнюю версию драйвера Realtech High Definition Device с сайта производителя. Официальный веб-сайт , а затем установите его вручную.
Вариант 1 — автоматически
Возможно, вам потребуется обновить драйверы для нескольких устройств, поэтому мы рекомендуем этот метод, если вам не хочется постоянно играть с драйверами самостоятельно. Более того, он может поддерживать все остальные драйверы устройств в актуальном состоянии.
1) Скачать и установите Driver Easy.
2) Запустите Driver Easy и нажмите Сканировать сейчас кнопка. Затем Driver Easy просканирует ваш компьютер и обнаружит все проблемные драйверы.
3) Щелкните значок Обновлять рядом с отмеченным графическим драйвером, чтобы автоматически загрузить правильную версию этого драйвера, затем вы можете установить ее вручную (это можно сделать в БЕСПЛАТНОЙ версии).
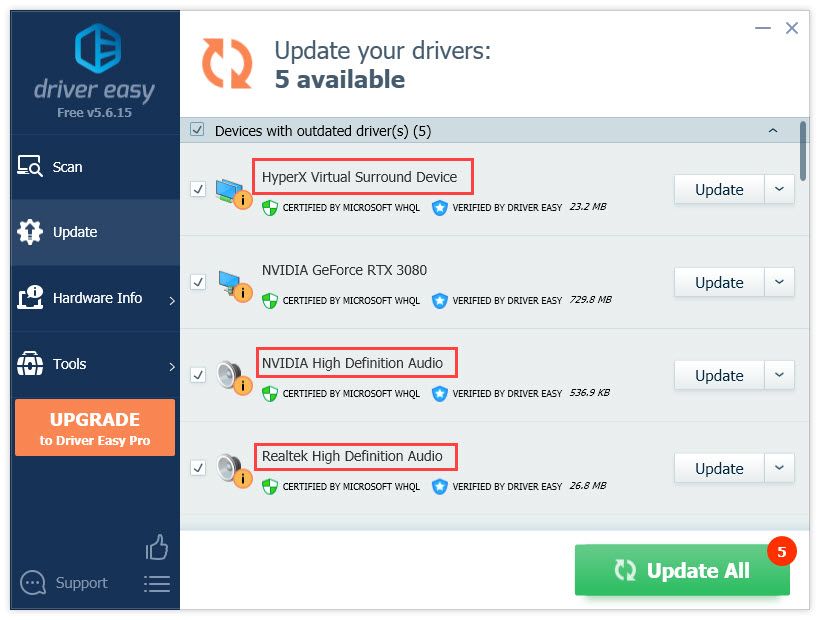
Или нажмите Обновить все для автоматической загрузки и установки правильных версий всех драйверов, которые отсутствуют или устарели в вашей системе. (Для этого требуется Pro версия который поставляется с полной поддержкой и 30-дневной гарантией возврата денег. Вам будет предложено выполнить обновление, когда вы нажмете Обновить все .)
4) После обновления драйвера перезагрузите компьютер, чтобы изменения вступили в силу.
Профессиональная версия Driver Easy поставляется с полной технической поддержкой.
Если вам нужна помощь, пожалуйста, свяжитесь с нами. Служба поддержки Driver Easy в support@letmeknow.ch .
Вариант 2 — Вручную
Проблемы со звуком могут быть связаны с обновлением Windows 10 для аудиодрайверов Realtek. Мы предлагаем вам переустановить драйверы HyperX, а затем обновить драйверы прямо с веб-сайта Realtek.
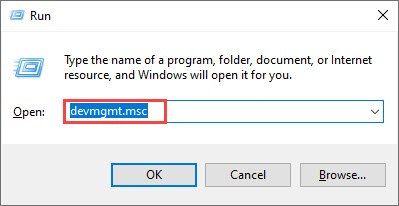
1) На клавиатуре одновременно нажмите клавишу с логотипом Windows + R.
2) Введите devmgmt.msc , чтобы открыть диспетчер устройств.
3) Разверните Звуковые, видео и игровые контроллеры категория.
4) Щелкните правой кнопкой мыши HyperX Virtual Surround Sound и выберите Удалить устройство .
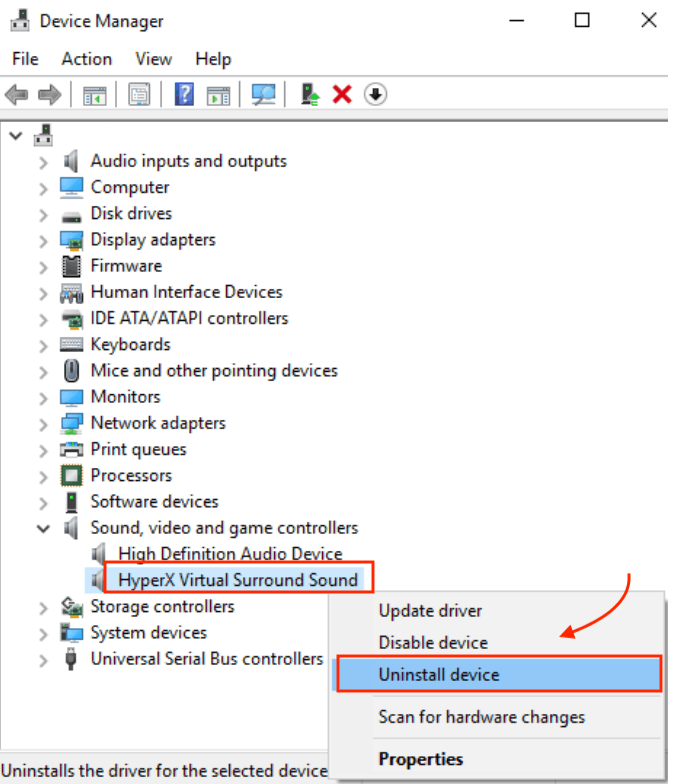
5) Нажмите хорошо для подтверждения удаления устройства.
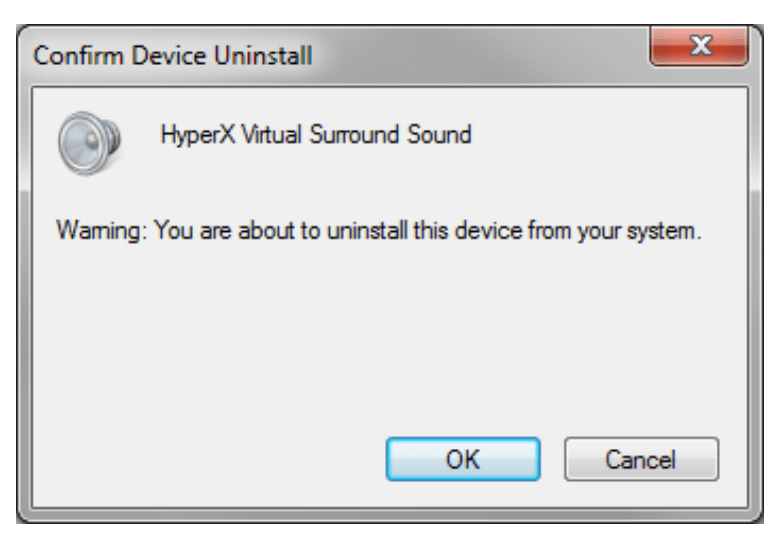
6) По завершении отключите гарнитуру HyperX и перезагрузите компьютер.
7) Переподключите гарнитуру к компьютеру. Это перезагрузит
Драйвер Windows.
 Теперь ваша гарнитура HyperX готова к использованию. Но лучше всего обновить драйверы Realtek, загрузив последнюю Аудиокодеки высокой четкости (программное обеспечение) для вашей ОС Windows.
9) Следуйте инструкциям на экране, чтобы обновить драйвер. Возможно, вам потребуется перезагрузить компьютер.
10) Как только это будет сделано, снова подключите гарнитуру HyperX и проверьте, работает ли она.
Только для HYPERX CLOUD STINGER S вы можете загрузить установщик драйвера с Официальный сайт HyperX .
Если вам нужны драйверы HyperX, вы можете обновить их автоматически, используя Водитель Easy , или вы можете обновить их в диспетчере устройств.
Однако Центр обновления Windows не всегда предоставляет последнюю версию драйвера ( Узнайте, почему .. . ), поэтому вам нужно будет перезагрузить драйвер Windows, чтобы решить связанные с этим проблемы. Если проблема со звуком не устранена, также необходимо обновить драйвер встроенной звуковой карты.
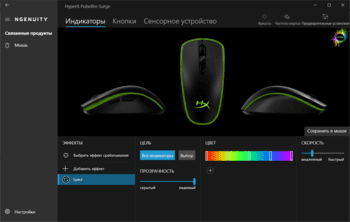
HyperX NGENUITY — программа для управления игровыми клавиатурами, мышками, наушниками, микрофонами и другими периферийными устройствами для ПК, поддерживающими технологию HyperX. Это бесплатное приложение для компьютеров под управлением Windows 10 и 11 (только 64 бит). Интерфейс имеет частичный (местами отсутствует) перевод на русский язык.
HyperX NGENUITY — узкоспециализированное приложение для настройки игровых девайсов, поддерживающих технологию HyperX. Речь идет, в первую очередь, о геймерских клавиатурах и мышках, у которых можно настроить не только подсветку, но и некоторые технические параметры.
Кроме того, при помощи утилиты HyperX NGENUITY можно управлять подсветкой и (в зависимости от модели) некоторыми рабочими параметрами периферийных устройств — наушников и микрофонов. Также в интернет-магазинах можно приобрести корпуса (кейсы) для настольных ПК или даже планки оперативной памяти (ОЗУ), поддерживающие технологию HyperX, что обычно означает лишь присутствие в их конструкции управляемой при помощи данной утилиты светодиодной подсветки. Вообще, список поддерживающих HyperX видов устройств постоянно пополняется.
Функции программы HyperX NGENUITY
Функционал приложения HyperX NGENUITY зависит от типа и модели подключенного к компьютеру геймерского устройства. В общих чертах список функциональных возможностей выглядит следующим образом:
- Управление подсветкой. Относится ко всем девайсами с поддержкой HyperX. Пользователь может не просто задать цвет свечения подсветки, но и выбрать один из доступных визуальных эффектов (плавно сменяющиеся цвета, постепенное увеличение/снижение яркости, «беглый» огонь и т.п.).
- В случае с мышками — управление DPI (количество точек на дюйм) и дополнительными кнопками. От первого параметра зависит чувствительность мыши на аппаратном уровне. Через HyperX NGENUITY можно также отключить какие-либо из дополнительных кнопок мыши, изменить их функцию или привязать к ним выполнение какого-либо действие в игре или просто на компьютере (например, запустить любую программу).
- В случае с клавиатурами, помимо настройки подсветки, программа HyperX NGENUITY позволяет переназначить клавиши или даже отключить выполнение системных комбинаций (например, «Alt + Tab», случайное нажатие которых приведет к нежелательному переключению между окнами). Конечно, к клавишам или комбинации также, как и в случае с мышками, можно привязать какие-либо действия.
- В случае с некоторыми моделями наушников программа HyperX NGENUITY, помимо регулировки звука и баланса, позволяет активировать/деактивировать и тонко настроить функцию объемного звучания.
Также геймеров должна заинтересовать функция создания макросов, позволяющая задать длинную комбинацию клавиш, которая будет выполнена при нажатии заранее заданной кнопки (или их комбинации). Кроме того, в программе также предусмотрена возможность создания профилей с настройками, автоматически активирующиеся при запуске той или иной игры (или любой программы вообще).
HyperX NGENUITY
для Windows

HyperX NGENUITY — интуитивно понятное программное обеспечение, благодаря которому можно без проблем персонализировать ваши совместимые продукты HyperX, включая клавиатуры, мыши, гарнитуру и пр. Так к примеру можно задавать привязки кнопок, создавать и сохранять макросы, выполняйте персонализированную настройку подсветки для поддерживаемых устройств. Кроме того, данное ПО поставляется с библиотекой преднастроек, с помощью которых можно быстро устанавливать их и сразу приступать к игре.
Преимущества HyperX NGENUITY:
- Настройка подсветки и эффектов.
- Создание и сохранение макросов и привязок кнопок.
- Расширенная персонализированная настройка разрешения DPI для мыши.
- Библиотека преднастроек профилей.
- Персонализированная настройка игрового режима клавиатуры.
ТОП-сегодня раздела «другое»
![]() MapKeyboard 2.1
MapKeyboard 2.1
MapKeyboard — небольшая бесплатная утилита с помощью которой можно легко переназначить или…
Отзывы о программе HyperX NGENUITY
Егор про HyperX NGENUITY 5.2.8.0 [09-10-2022]
Пишет что «Истек срок действия требуемого сертификатора при проверке по системным часам или по отмене времени в подписании файла. Ошибка 0*800B0101
2 | | Ответить
