Xiaomi Redmi 9 USB Driver allows you to connect your Xiaomi Smartphone to the Windows Computer without installing the Xiaomi PC Suite Application. The Xiaomi Redmi 9 Driver can be helpful if you’re trying to transfer your files from the Mobile to the Computer or from the Computer to the Xiaomi Device.
You can also use it during the Firmware (OS) Flashing or Installing process on the device or fixing any Software-related issues.
Xiaomi Redmi 9 Driver for Windows
Xiaomi USB Driver allows you to connect your Xiaomi Smartphone and Tablets to the Windows Computer and transfer data between the Computer and the Xiaomi device. Apart from this, it also allows you to sync data between the device and the Computer, back up your existing data on the Computer or restore the data on the Xiaomi device.
There are several circumstances when you might need to install the Xiaomi driver to connect the computer. They are:
- Transfer data from the Xiaomi device to the Computer or from the computer to the device.
- To free up the device space.
- To install the Stock Firmware (OS) on the device.
- To Write/Flash IMEI on the Device.
Download Xiaomi Redmi 9 Driver
Xiaomi Redmi 9 Smartphone is powered by Mediatek MT6769V/CU Helio G80 Chipset. Therefore, you have to install the Mediatek USB Driver and the ADB Driver to connect the Smartphone to the Computer.
| For Windows (32-64 Bit) |
||
| Driver | Size | Download |
| MediaTek Driver | 8.84 MB | Driver |
| ADB Driver | 8.27 MB | Driver |
Frequently Asked Questions
What is Xiaomi Redmi 9 USB Driver?
The Xiaomi Redmi 9 USB Driver is a free software primarily used to install the Xiaomi Drivers on the Windows Computer with a few clicks.
How do I install the Xiaomi Redmi 9 Mediatek Driver?
You can install the Xiaomi Redmi 9 Mediatek USB Driver by downloading the zip file and installing the driver on the Computer. The installation process is quite similar to the standard Windows Application. You can follow the How to install the Mediatek Driver page to install the drivers correctly.
How do I install the Xiaomi Redmi 9 ADB Driver?
You can install the Xiaomi Redmi 9 ADB Driver by downloading and extracting the driver on the Computer. Then Open the Device Manager and Locate the ADB Drivers to Install it. Finally, you can follow the How to install the ADB Driver page to install the drivers correctly.
Is Xiaomi Redmi 9 USB Driver Free?
Yes. The Xiaomi Redmi 9 USB Driver is 100% free since the Xiaomi community officially releases it for Xiaomi Mobile users.
Is Xiaomi Redmi 9 USB Driver Safe?
Yes. The Xiaomi Redmi 9 USB Driver is 100% safe for the Computer, laptop, and Xiaomi device. Furthermore, since the Xiaomi community officially releases the driver, it’s 100% safe & secure to use on the Computer.
Where Can I find Xiaomi Redmi 9 Firmware?
If you are looking for the original Xiaomi Redmi 9 Firmware (Stock ROM), then head over to the Xiaomi Redmi 9 Firmware page.
Home » Xiaomi » Xiaomi Redmi 9 USB Driver
If you are an owner of Xiaomi Redmi 9 and looking out for usb drivers to connect your Android device with the Windows computer, then you have landed in the right place. Download Xiaomi Redmi 9 USB driver from here, install it in your computer and connect your device with PC or Laptop successfully.
Here, we have provided two usb drivers for your Xiaomi Redmi 9 Android device.
USB Driver Type: Mediatek Driver
USB Driver Purpose: For flashing Stock firmware on your device.
File Size: 10 MB
Download Now
USB Driver Type: ADB Driver
USB Driver Purpose: For connecting your device to a computer.
File Size: 8.3 MB
Download Now
Steps To Install Xiaomi Redmi 9 Mediatek Driver In Computer
Video Tutorial
If you don’t like this video tutorial or if you would like to get more instructions, then continue reading.
Step 1: To get started, download MediaTek driver and extract it on your desktop.
Step 2: Now, open the driver folder and click “Install Drivers” to initiate the installation process.
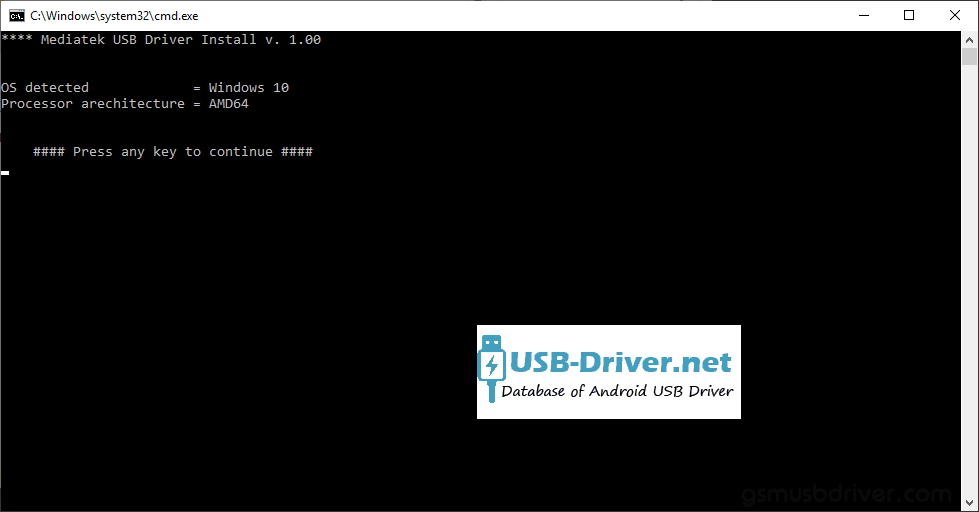
Step 3: In the Setup Command Prompt Window, press any key from the keyboard to start the installation process.
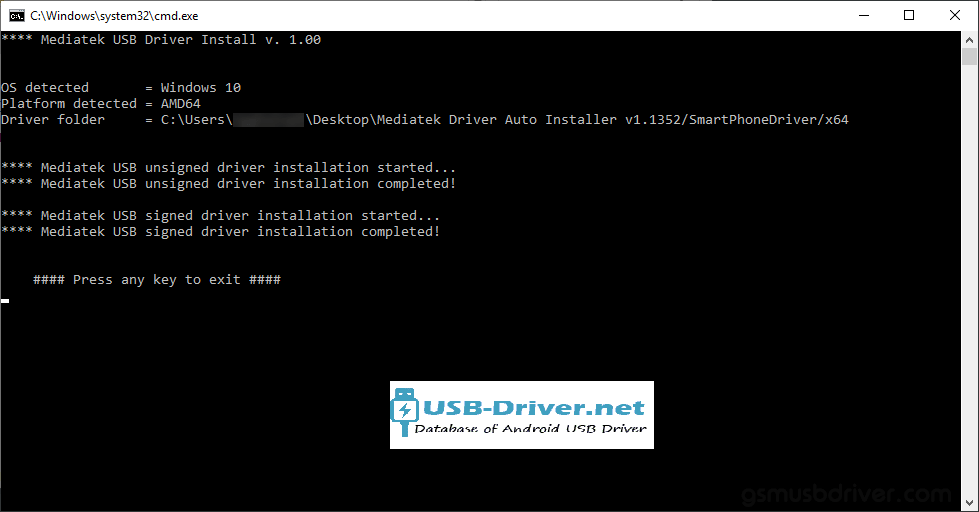
Step 4: You will see the Driver Installation Completed message, after successful installation of the MediaTek Driver on your Windows computer.
Step 5: Now, press any key from the keyboard to exit the Setup Window.
Step 6: To finish, restart your computer.
That’s it. You have successfully installed the MediaTek Driver on your Windows computer.
Steps To Install Xiaomi Redmi 9 ADB Driver In Computer
Video Tutorial
If you don’t like this video tutorial or if you would like to get more instructions, then continue reading.
Step 1: To get started, download ADB driver and extract it on your desktop.
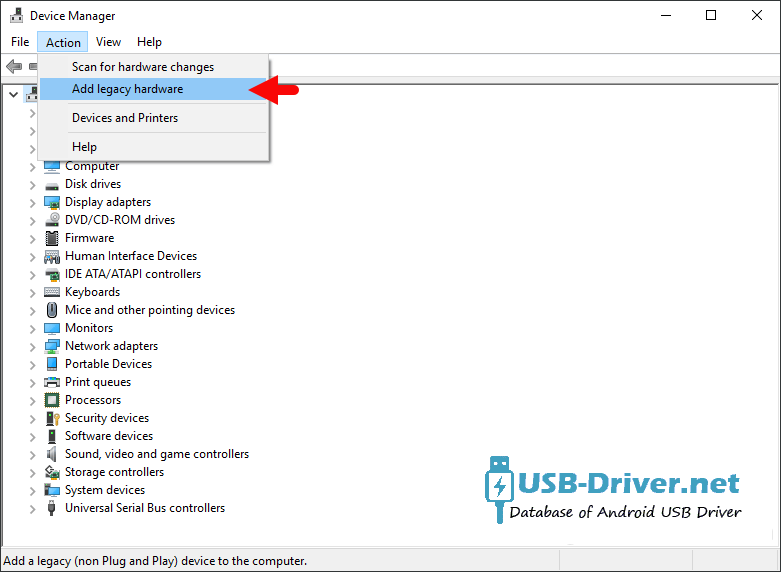
Step 2: Now, open Device Manager > Action > Add legacy hardware.
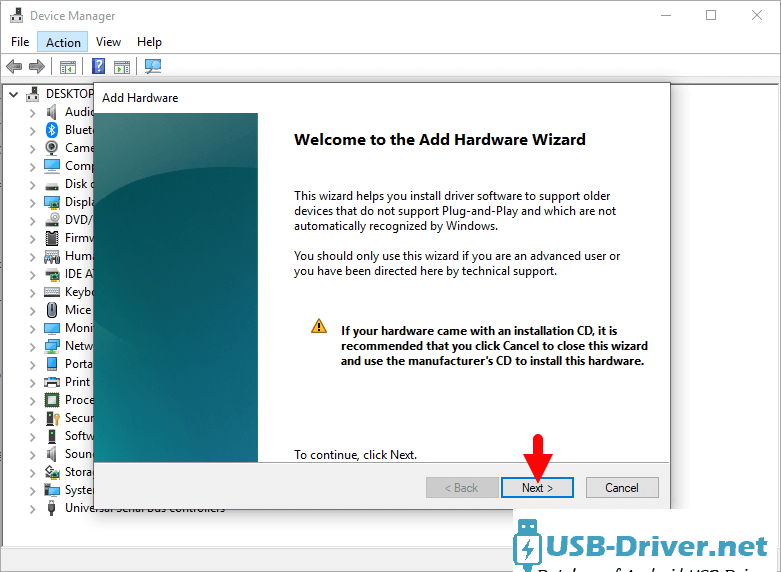
Step 3: Next, click “Next” in the Add legacy hardware wizard.
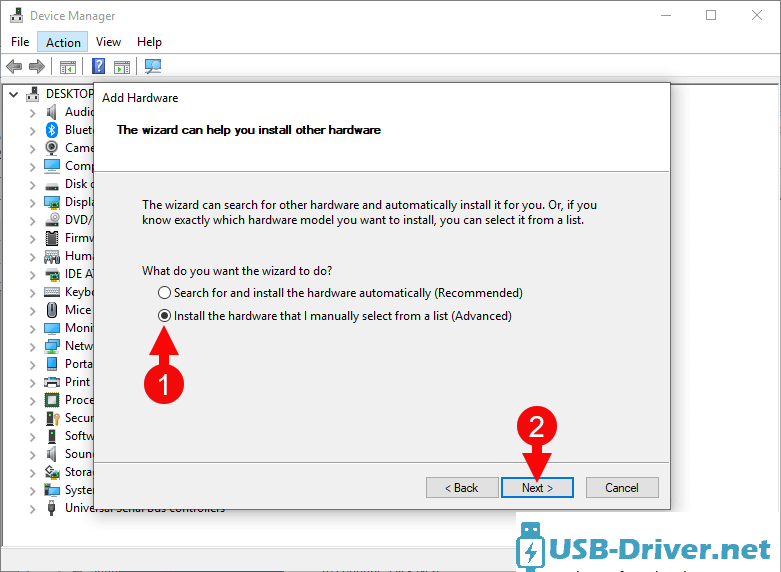
Step 4: Now choose “Install the hardware that I manually select from the list (Advanced)” and click “Next“.
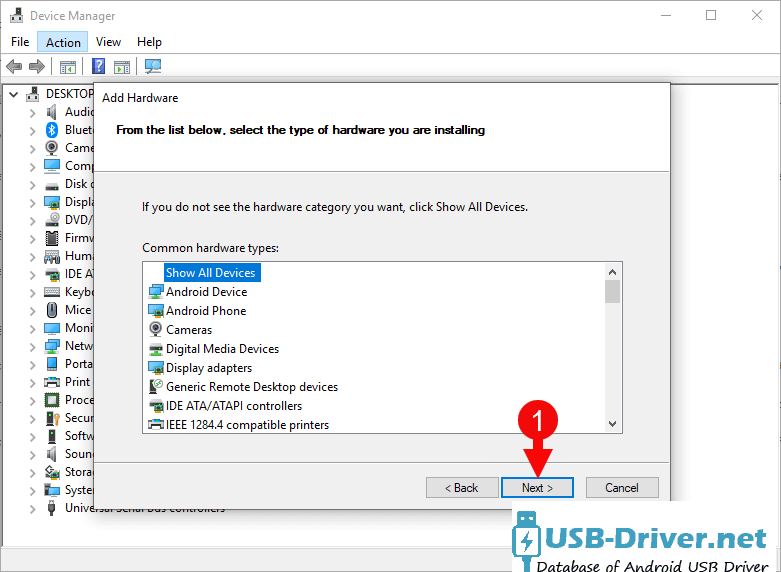
Step 5: Once done, choose “Show all devices“, click “Next” and select the extracted file manually from your computer.
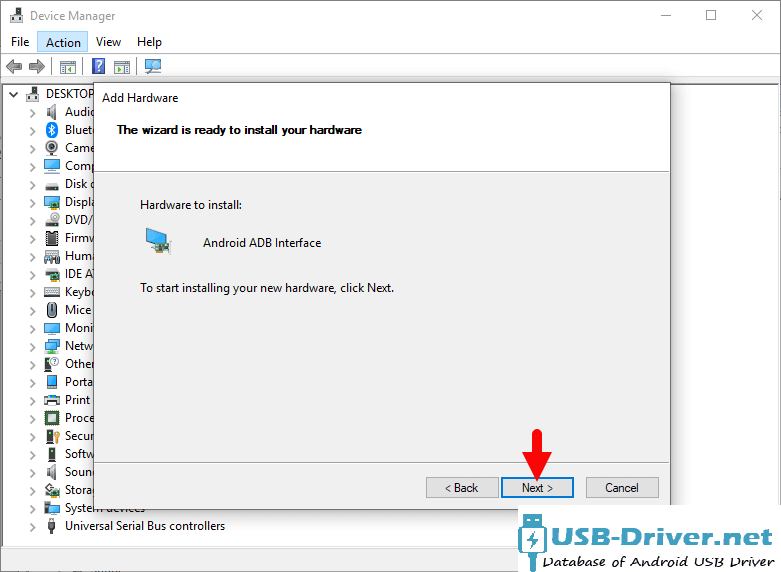
Step 6: Now to start installing your new hardware, click “Next” again.
Step 7: Click “Install” in the Windows security prompt window.
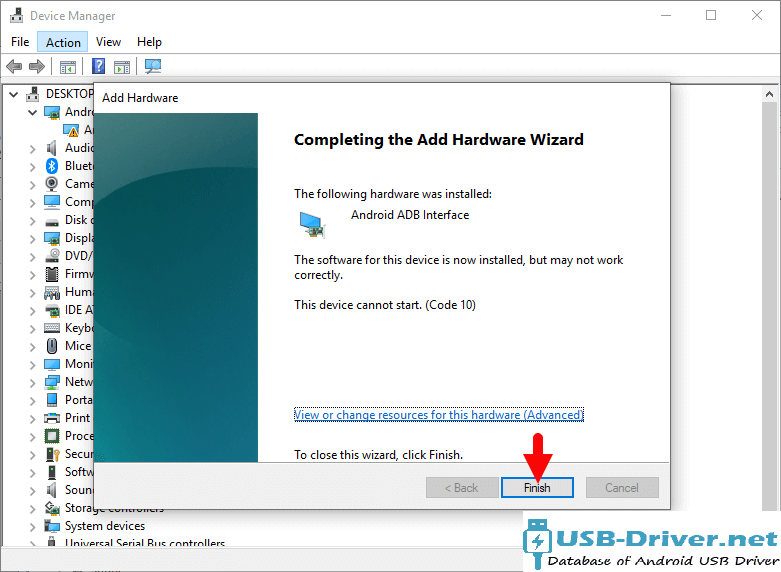
Step 8: Next, click “Finish” to complete installation.
That’s it. Now you have successfully finished installing ADB driver on your computer. If you encounter any issues while following this tutorial, do let me know via comments.
Note: If you have corrupted or bricked your Xiaomi Redmi 9, download Xiaomi Redmi 9 stock firmware and flash it on your device using an Android flash tool.
Rajarajacholan Kulothungan is a tech nerd and an Android enthusiast working for AllUSBDrivers.com from 2020. He has a knack for finding the right Windows USB driver for Android devices, and he shares his experiences here.
Reader Interactions
Xiaomi USB Drivers allow you to connect your Phone to a PC, whether it’s a smartphone or a tablet so that the computer can easily recognize the device via the USB port. In this article, We will publish links for Xiaomi Redmi 9 USB Driver to transfer files from Your Phone to your computer or you will be able to update your Xiaomi to latest Android OS.
You must download and install the Xiaomi Redmi 9 USB Driver on your computer device if you want to connect the phone with your computer for data transfer, Root Xiaomi, Install official Rom and Custom Rom, backup, or restore and retrieve data.
Read More: Download and Install Aosp 9.0 Pie on Xiaomi Mi 3
Download Xiaomi USB Driver For connecting your device to a computer:
Download Mi PC Suite:
- Driver Name: Mi PC Suite
- Driver Size: 37.3M
- Download Mi Pc Suite: Download
Download Qualcomm Driver For Flashing Firmware:
- Driver Name: Qualcomm Driver
- Driver Size: 10.9 MB
- Download Qualcomm Driver: Download
Download ADB Driver:
- Driver Name: Adb Driver
- Driver Size: 8.28 MB
- Download ADB Driver: Download
Xiaomi USB Driver was compatible with Windows 7, 8 and Windows 10.
How To Install Xiaomi ADB Driver In Computer
1- Download ADB Driver to your computer and unzip it.
2- Open Device Manager on your computer
3- Click on Action and Select to add the legacy hardware
4- To Continue, Select Next.
5- Choose to Install The Hardware That I manually select from a list (advanced) and Click Next.
6- Select Show all devices, and click on Next
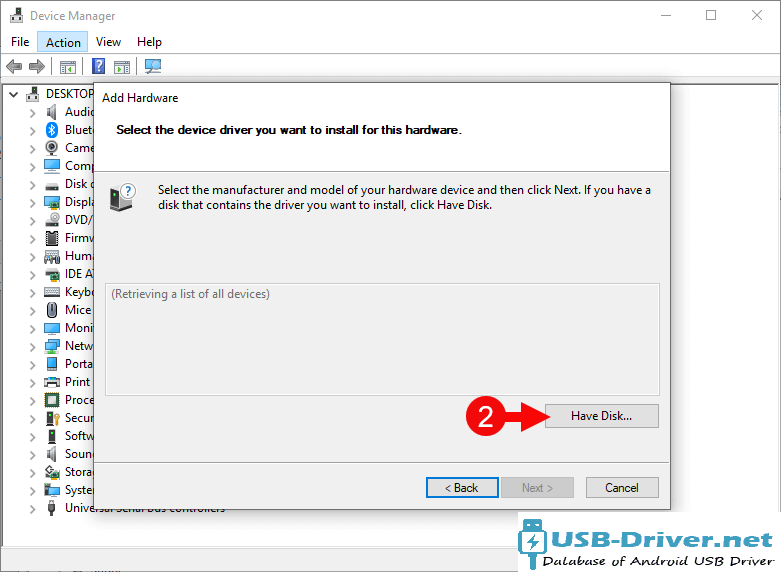
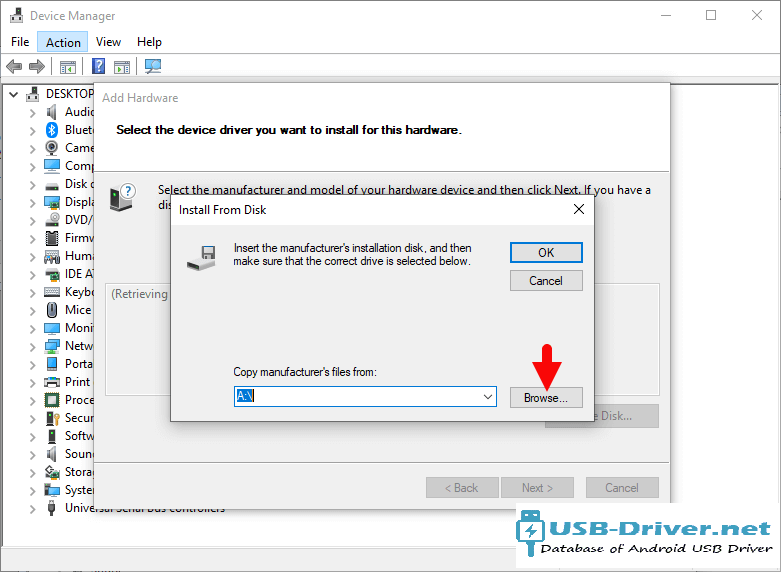
7- Select Have Disk. Then select the Browse
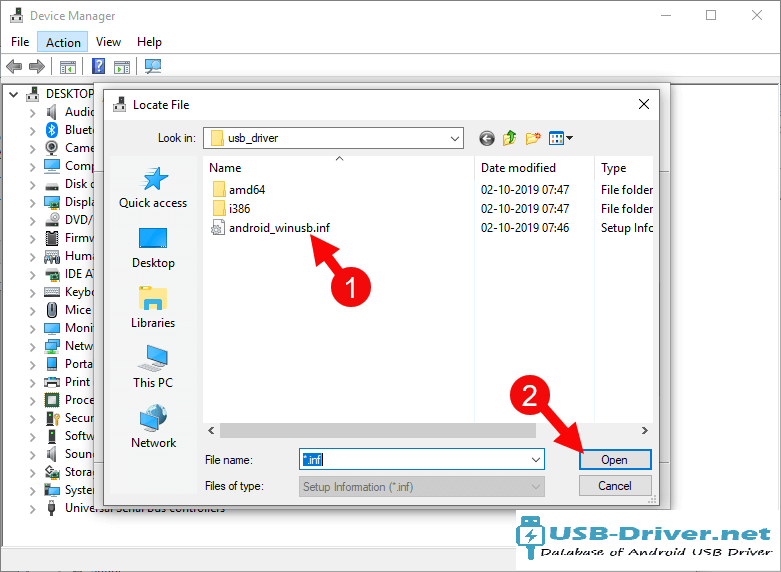
8- Choose Android_winusb And Click Open.
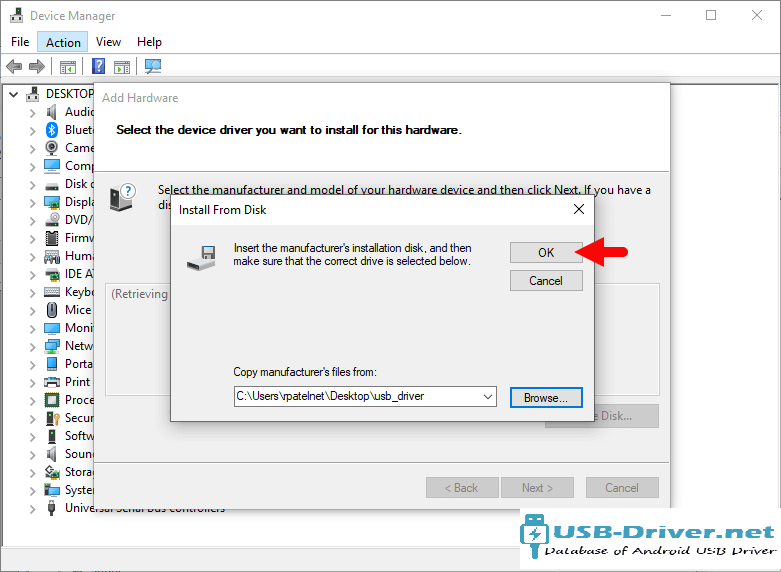
9- Click OK
10- Tap the Android ADB interface and click on Next
12- click on Next
13- click on Finish
Well done, the Xiaomi USB Driver is installed on your computer.
How To Install Xiaomi Qualcomm Driver In Computer
1- Download the Xiaomi Qualcomm Driver and Open Qualcomm USB Driver Setup File
2- After That choose, WWAN DHCP is not used to get IPAddress And select Next
3- Click Next
4- Choose Modify, After That Click on next
5- Click On Next
6- Click on Install To Begin The Installation
6- Select Finish
7- Well done, the Xiaomi Qualcomm Driver is installed on your computer.
Read More: Download and Install LineageOS 17.1 Android 10 on Xiaomi Mi Mix 2S
Из этого поста вы можете скачать последние версии USB-драйверов Xiaomi для вашей платформы Windows и Mac. Китайскому производителю удалось создать своего рода богатую базу поклонников. С момента своего создания компания придерживалась своего стандарта USP, предоставляя многофункциональные устройства по доступной цене для широких масс.
И это творило чудеса до сих пор и будет продолжаться в ближайшем будущем. Не следует заглядывать дальше его серии Redmi. Кроме того, если бы пользователь мог добавить еще несколько долларов в свой бюджет, он мог бы заполучить в свои руки, вероятно, лучшие бюджетные устройства в серии Poco.
Само устройство обладает множеством отличных функций. И его настроенная оболочка для Android, MIUI, не оставляет камня на камне. Но это только верхушка айсберга. Подключив устройство Xiaomi к ПК, вы сможете выполнять множество других задач.
Однако простое подключение вашего устройства с помощью USB-кабеля будет бесполезным. До тех пор, пока у вас не будет установлено необходимое программное обеспечение для драйверов, ваше устройство не будет распознано в первую очередь. В этом отношении мы здесь, чтобы помочь вам. Из его руководства вы можете скачать и установить последние версии USB-драйверов Xiaomi для Windows и Mac. Следуйте за мной.
USB-драйверы-это программное обеспечение, которое позволяет аппаратному устройству взаимодействовать с операционной системой. Как только у вас будут установлены необходимые драйверы, это поможет вашему компьютеру понять тип подключенного устройства.
Как вы, возможно, уже знаете, существует множество устройств, поддерживающих USB-соединение. К ним относятся клавиатуры, мышь, камеры, внешний жесткий диск и, конечно же, ваш смартфон.
Поэтому, чтобы определить, какое устройство на самом деле подключено, вашему компьютеру необходимы соответствующие драйверы USB. Затем он сможет создавать необходимые параметры и пользовательский интерфейс для выполнения желаемых задач, сохраняя подключенное устройство в фокусе.
Проще говоря, эта программа позволяет вашему компьютеру чрезвычайно легко распознавать подключенное устройство и действовать в соответствии с ним. Помимо идентификации устройств, существует множество других преимуществ этих драйверов. Давайте проверим некоторые из заслуживающих внимания.
Преимущества USB-драйверов
Сохраняя наше внимание на USB-драйверах Xiaomi, вот некоторые из замечательных преимуществ, которые приносят эти драйверы. Для начала, подключив свое устройство к ПК, вы сможете выполнять множество различных типов задач. Основная из которых включает в себя передачу файлов (любого типа и любого размера) с компьютера и на компьютер.
Аналогичным образом, вы даже можете поделиться Интернетом вашего устройства с ПК через проводное соединение, также известное как USB-модем. Затем есть опция MIDI для взаимодействия с музыкальным оборудованием и режим PTP для передачи фотографий с помощью программного обеспечения камеры.
Кроме того, ни для кого не секрет, что устройства Xiaomi, как известно, всегда имеют сильную индивидуальную разработку. От разблокировки загрузчика, прошивки пользовательских ПЗУ и восстановления, такого как TWRP, до укоренения устройства, всему этому буквально нет конца.
Но для эффективного выполнения всех этих задач вам необходимо подключить свое устройство к ПК. Опять же, если у вас не установлены необходимые драйверы USB, ваше устройство не будет распознано на вашем компьютере, и тогда эти настройки будут невозможны.
Более того, для этих модификаций точкой входа считается включение отладки по USB. Хотя вы можете включить переключатель с самого устройства Xiaomi, но он не будет полезен, пока вы не подключите его к ПК. И для этого вам снова нужно будет воспользоваться помощью USB-драйверов Xioami.
Благодаря этому наши читатели, возможно, получили представление о необходимости и важности USB-драйверов для своих устройств Xiaomi. Итак, имея это в виду, вот ссылка для загрузки, а также шаги по установке USB-драйверов Xiaomi.
Загрузите и установите USB-драйверы Xiaomi
Начнем с того, что существуют два различных метода установки вышеупомянутого программного обеспечения. Первый-это автоматическая установка, в то время как второй-ручная. Первый будет выполняться с помощью инструмента Mi Flash, в то время как второй будет использовать файл android_winusb, являющийся частью интерфейса загрузчика Android. Установка для этого будет выполнена из диспетчера устройств Windows. Инструкции для обоих этих методов приведены ниже.
| Xiaomi Mi 1/ 1S | Скачать |
| Xiaomi Mi 2/3 | Скачать |
| Xiaomi Mi 4 / 4i | Скачать |
| Xiaomi Mi 5 | Скачать |
| Xiaomi Mi 5 Pro | Скачать |
| Xiaomi Mi 5s | Скачать |
| Xiaomi Mi 5c | Скачать |
| Xiaomi Mi 5x | Скачать |
| Xiaomi Mi 6 | Скачать |
| Xiaomi Mi 6x | Скачать |
| Xiaomi Mi 8 | Скачать |
| Xiaomi Mi 8 Explorer | Скачать |
| Xiaomi Mi 8 SE | Скачать |
| Xiaomi Mi 8 Pro | Скачать |
| Xiaomi Mi 8 Lite | Скачать |
| Xiaomi Mi 9 | Скачать |
| Xiaomi Mi 9 Explorer | Скачать |
| Xiaomi Mi 9 SE | Скачать |
| Xiaomi Mi Max | Скачать |
| Xiaomi Mi Max 2 | Скачать |
| Xiaomi Mi Max 3 | Скачать |
| Xiaomi Mi Note / Pro | Скачать |
| Xiaomi Mi Note 2 | Скачать |
| Xiaomi Mi Note 3 | Скачать |
| Xiaomi Mi Mix | Скачать |
| Xiaomi Mi Mix 2 | Скачать |
| Xiaomi Mi Mix 2S | Скачать |
| Xiaomi Mi Mix 3 | Скачать |
| Xiaomi Mi Mix 3 5G | Скачать |
| Xiaomi Mi A1 | Скачать |
| Xiaomi Mi A2 | Скачать |
| Xiaomi Mi A2 lite | Скачать |
| Xiaomi Mi Pad 2 | Скачать |
| Xiaomi Mi Pad 3 | Скачать |
| Xiaomi Mi Pad 4 | Скачать |
| Xiaomi Mi Pad 4 Plus | Скачать |
| Xiaomi Mi Pad / 7,9 | Скачать |
| Xiaomi Mi Play | Скачать |
| Xiaomi Mi 9T | Скачать |
| Xiaomi Mi 9T Pro | Скачать |
| Xiaomi Mi CC9e | Скачать |
| Xiaomi Mi CC9 | Скачать |
| Xiaomi Mi A3 | Скачать |
| Xiaomi Mi 9 Lite | Скачать |
| Xiaomi Mi 9 Pro | Скачать |
| Xiaomi Mi 9 Pro 5G | Скачать |
| Xiaomi Mi Mix Alpha | Скачать |
| Mi Note 10 | Скачать |
| Mi Note 10 Pro | Скачать |
| Xiaomi Mi 10 5G | Скачать |
| Xiaomi Mi 10 Pro | Скачать |
| Xiaomi Mi 10T 5G | Скачать |
| Xiaomi Mi 10T Pro 5G | Скачать |
| Xiaomi Mi 10T Lite 5G | Скачать |
| Xiaomi Mi 10 Pro 5G | Скачать |
| Xiaomi Mi 10 Lite 5G | Скачать |
| Xiaomi Mi Note 10 Lite | Скачать |
| Xiaomi Mi 10 Youth 5G | Скачать |
| Xiaomi Mi 10 Ultra | Скачать |
| Xiaomi Mi 10i 5G | Скачать |
| Xiaomi Mi 10S | Скачать |
| Xiaomi Mi 11 | Скачать |
| Xiaomi Mi 11i | Скачать |
| Xiaomi Mi 11X Pro | Скачать |
| Xiaomi Mi 11X | Скачать |
| Xiaomi Mi Mix Fold | Скачать |
| Xiaomi Mi 11 Pro | Скачать |
| Xiaomi Mi 11 Ультра | Скачать |
| Xiaomi Mi 11 Lite | Скачать |
| Xiaomi Mi 11 Lite 5G | Скачать |
| Xiaomi Mi Pad 5 Pro | Скачать |
| Xiaomi Mi Pad 5 Pro 5G | Скачать |
| Xiaomi Mi Pad 5 | Скачать |
| Xiaomi Mi Mix 4 | Скачать |
| Xiaomi 11T | Скачать |
| Xiaomi 11T Pro | Скачать |
| Xiaomi 11T Lite 5G NE | Скачать |
USB-драйверы Xiaomi Redmi
USB-драйверы Xiaomi Pocophone
| Poco F1 | Скачать |
| Poco Х2 | Скачать |
| Poco M2 Pro | Скачать |
| Poco F2 Pro | Скачать |
| Poco М2 | Скачать |
| Poco X3 NFC | Скачать |
| Poco С3 | Скачать |
| Poco М3 | Скачать |
| Poco F3 | Скачать |
| Poco X3 Pro | Скачать |
| Poco M3 Pro 5G | Скачать |
| Poco M2 Reloaded | Скачать |
| Xiaomi Poco F3 GT | Скачать |
| Xiaomi Poco X3 GT | Скачать |
| Xiaomi Poco C31 | Скачать |
USB-драйверы Xiaomi Black Shark
USB-драйверы для смарт-часов Xiaomi
Шаги по установке USB-драйверов Xiaomi на ПК
Есть два метода, которым вы можете следовать для выполнения установки. Оба метода перечислены ниже.
Способ 1: Установите с помощью инструмента Mi Flash
- Загрузите и установите последнюю версию Mi Flash-инструмента на свой компьютер.
- После завершения установки запустите инструмент и нажмите на опцию Драйверы. Это должен быть первый вариант в верхней левой строке меню.
- Затем он покажет список из пяти различных драйверов, которые будут установлены. Один будет от Google, два от Microsoft, один от Nvidia и один от Qualcomm.
- Наконец, нажмите кнопку «Установить» и дождитесь завершения процесса.
Этого должно быть достаточно для большинства пользователей. Однако для некоторых избранных может возникнуть одна или две ошибки, в основном в виде того, что устройство не распознается ПК в режиме быстрой загрузки. В этом случае вам следует попробовать Ручной метод, приведенный ниже.
Способ 2: Ручная установка
Для этого на вашем компьютере должны быть установлены инструменты платформы Android SDK. Причина тому одна и та же-двоякая.
Во-первых, это позволит установить необходимые двоичные файлы ADB и Fastboot на ваш компьютер.
Во-вторых, это также поможет загрузить ваше устройство в режим быстрой загрузки. Говоря об этом, вам также нужно включить отладку USB. Как только оба эти требования будут выполнены, загрузите USB-драйверы для вашего устройства ниже, а затем выполните следующие действия по установке.
Шаг 1 установки: Загрузите устройство в режим быстрой загрузки
- Во-первых, загрузите и извлеките содержимое вашего устройства (Xiaomi. Poco или Redmi) USB-драйверы ZIP-пакет в любую папку на вашем ПК.
- Затем перейдите в папку «Инструменты платформы», введите CMD в адресной строке и нажмите «Ввод». Это приведет к запуску командной строки.
- Теперь подключите устройство к ПК с помощью USB-кабеля с включенной отладкой USB.
- В окне CMD введите приведенную ниже команду, чтобы загрузить устройство в режим быстрой загрузки:
-
adb reboot bootloader
-
- Затем ваше устройство будет загружено в режим быстрой загрузки, и вы также увидите знаменитый логотип Mi Bunny.
Шаг 2 Установки: Установите интерфейс загрузчика Android
- Теперь, когда ваше устройство загружено в режим быстрой загрузки, пришло время установить интерфейс загрузчика Android через файл android_winusb.
- Для этого кликните правой кнопкой мыши значок Windows на вашем компьютере и выберите Диспетчер устройств.
- Внутри этого перейдите в раздел «Другие устройства» и нажмите на него, чтобы расширить его.
- На данный момент ваше устройство будет отображаться как Неизвестное устройство или другое устройство, поскольку драйверы USB еще не установлены.
- Кликните по нему правой кнопкой мыши и выберите Обновить драйверы. В появившемся последующем диалоговом окне выберите Поиск программного обеспечения драйвера на моем компьютере.
- Затем выберите «Позвольте мне выбрать из списка драйверов устройств на моем компьютере«.
- В разделе «Общее оборудование» выберите «Показать все устройства» и нажмите «Далее«.
- Затем нажмите на кнопку «Have Disk», за которой следует «Обзор«.
- Теперь перейдите в папку, в которой вы извлекли ZIP-пакет USB-драйверов Xiaomi на первом шаге.
- Там вы найдете две папки «win 10″ и » xp-win7-win8’. Выберите тот, который соответствует вашей операционной системе, и нажмите «Открыть«.
- В следующем диалоговом окне выберите файл android_winusb и нажмите кнопку Открыть.
- Выберите интерфейс загрузчика Android в разделе Модель и нажмите кнопку Далее.
Наконец, нажмите на кнопку Установить и дождитесь завершения процесса.
Я надеюсь, что это руководство было полезно для понимания как скачать последние версии USB-драйверов Xiaomi для Windows и MAC. Если у вас есть какие-либо вопросы или отзывы, пожалуйста, оставьте комментарий ниже.
Xiaomi Redmi 9 Device comes with MediaTek (MTK) CPU, so the most compatible USB Drivers For it is MediaTek (MTK) USB Drivers and ADB Drivers.
On this page, We will share 2 Types of USB Drivers That work on Xiaomi Redmi 9 device.
First, MediaTek (MTK) USB Drivers It’s very important and required files that help PC to detect Xiaomi Redmi 9 Phone, It is important To connect, Flash and upgrades Stock ROM (Firmware) and it required for SP Flash Tool.
Second, ADB Drivers manages you to move pictures, music, and other files between Xiaomi Redmi 9 Phone and computer. (Normal connecting).
Download MediaTek (MTK) USB Drivers For Xiaomi Redmi 9.
File Name: MediaTek (MTK) Driver Auto Installer.
File Size: 10 MB
Version: Latest Version.
Compatibility: All Windows Versions.
How To Install: Follow Full Tutorial.Download MTK Driver (Gdrive)
Download MTK Driver (Direct)
Download MTK Driver (One Drive)
Download ADB USB Drivers For Xiaomi Redmi 9.
File Name: ADB USB Driver.
File Size: 9 MB
Version: Latest Version.
Compatibility: All Windows Versions.
How To Install: Follow Full Tutorial.Download ADB Driver (Gdrive)
Download ADB Driver (Direct)
Download ADB Driver (One Drive)
Quick MediaTeck Driver Installation Guide.
Step 1: Extract The Zip File
Step 2: Open MediaTek Auto Installer Folder.
Step 3: Click on Install Driver.bat File.
Step 4: Press any key to start.
Step 5: You will see Success message and you are done.
See full tutorial: How to install MediaTek Drivers.
Quick ADB Driver Installation Guide.
Step 1: Unzip the driver File.
Step 2: Open Device Manager by right click on my computer icon.
Step 3: Select Add the Legacy Hardware.
Step 4: Click on Install the hardware that I manually Select from a list
Step 5: Show all devices and click next.
Step 6: Click on have a disk button and Browse.
Step 7: Locate and select the driver you have extracted it and click on next.
Step 8: click next, next, and finish.
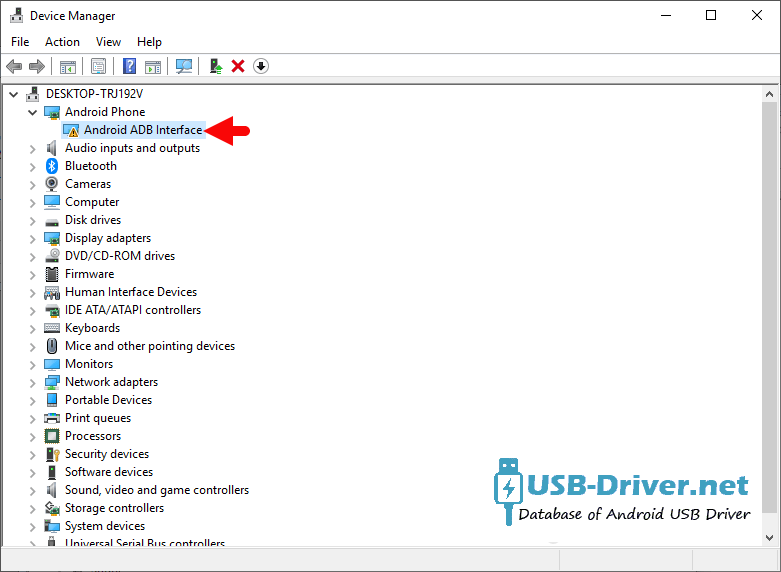
Step 9: The Driver will be listed in the Device Manager.
See full tutorial: How to install ADB Drivers.
Xiaomi Redmi 9C USB Driver for Windows Computer
Xiaomi Redmi 9C USB Driver helps you to connect your Xiaomi Device to the Windows Computer and transfer data between the device and the computer. It also allows you to Flash Xiaomi Redmi 9C Stock Firmware on your Xiaomi Device using the preloader drivers. Here on this page, we have managed to share the official Xiaomi Redmi 9C USB Driver.
It is very necessary to have Xiaomi Redmi 9C USB drivers whenever you have to connect Xiaomi Redmi 9C to the Pc for the purpose of transferring data or important files. Also, when it comes to updating your Xiaomi Redmi 9C manually, it’s necessary to have them on your PC. While you are installing or flashing Fastboot firmware on the device, then Xiaomi USB Drivers are required. Check out the download links given in this post to simply keep up the pace in this matter.
Xiaomi Redmi 9C Mediatek Driver for Windows (11,10,8,7,XP)
Driver Package Name : Mediatek Driver for windows
Package File Name: Mediatek_Driver_Auto_Installer_v1.1352_(USB-Driver.NET).zip
Driver File Size: 9.56 MB
Download Driver File Now
How to install Xiaomi Redmi 9C Mediatek Driver official on Windows
Xiaomi Redmi 9C Mediatek Driver is compatible with the SP Flash Tool, MTK Flash Tool, SP MDT Tool, and the SN Write Tool and can be useful if you are trying to install firmware (ROM) on the Xiaomi Redmi 9C.
Step 1 : Download and extract Xiaomi Redmi 9C Mediatek Driver Auto Installer package on the Computer. If in case, you have already downloaded and extracted the driver package, then SKIP this step.
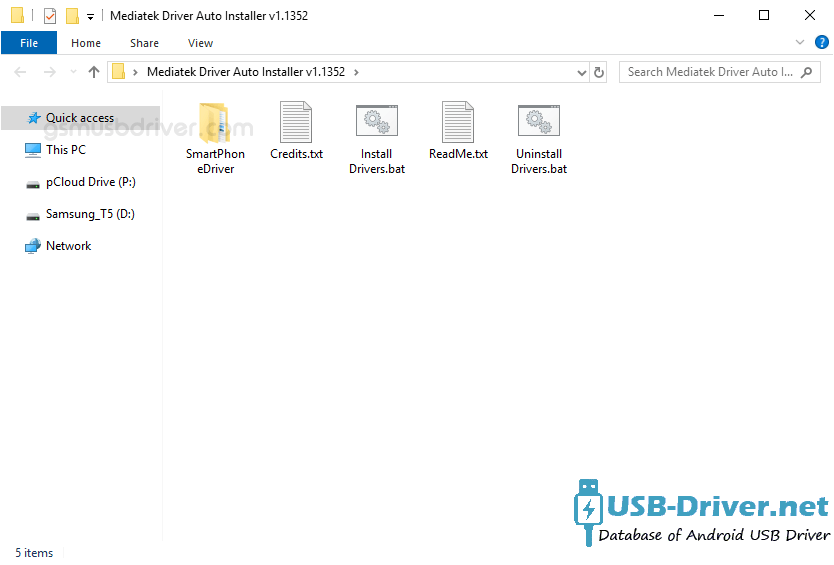
Step 2 : Once you have extracted the driver package, you will be able to see the following files:
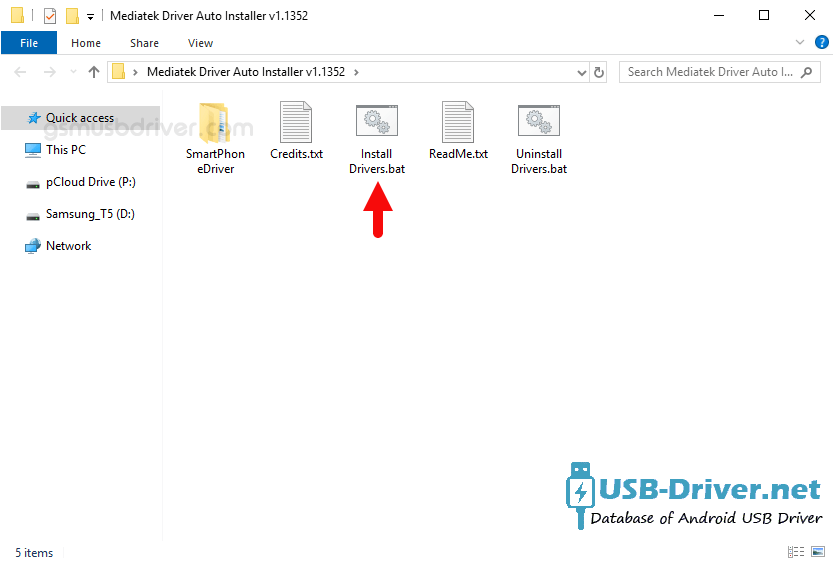
Step 3 : Open Install Drivers.bat to Launch the Setup Dialog Box:
Step 4 : Once the Driver Setup Dialog Box is Launched, you will be able to see the following window:
Step 5 : Now, Press any Key (from keyboard) to begin the installation process.
Step 6 : Once the installation process is completed, you will be able to see the Driver installation Completed Message:
Step 7 : Now, Press any Key (from keyboard) to exit the Setup Window.
Step 8 : Restart your Computer:
Step 9 : Once the Computer is restarted, you can easily connect your Xiaomi Redmi 9C MediaTek the computer without facing any issue.
Xiaomi Redmi 9C ADB Driver for Windows (11,10,8,7,XP)
Driver Package Name : Android ADB Driver for windows
Package File Name: usb_driver_r13-windows_(USB-Driver.NET).zip
Driver File Size: 8.27 MB
Download Driver File Now
[•] Download Stock Firmware: If you are looking for the Xiaomi Redmi 9C Stock Firmware, then head over to the Xiaomi Firmware page.
How4 to install Xiaomi Redmi 9C USB drivers
The Xiaomi Redmi 9C USB driver makes almost every task that needs to be performed by connecting the device to PC easier. All the files can be transferred in no time without worrying about anything. Also, there are certain benefits to having it. Before you proceed to download, it is suggested to you to remove the previously installed Xiaomi Redmi 9C from your PC in case you have installed it. Once you are done, click the below link to download Xiaomi USB Drivers on your PC.
How to install Xiaomi Redmi 9C ADB Driver on Windows
Xiaomi ADB Driver can be used to connect the Xiaomi to the computer and transfer data between the mobile and the computer.
Step 1 : Download and extract Xiaomi Redmi 9C ADB Driver (.inf based) (The link is above) on the Computer. If in case, you have already downloaded and extracted the driver, then SKIP this step.
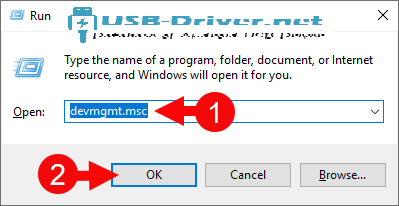
Step 2 : Open Device Manager on the Computer. Press Win + R key from the keyboard and type devmgmt.msc and Click on OK Button:
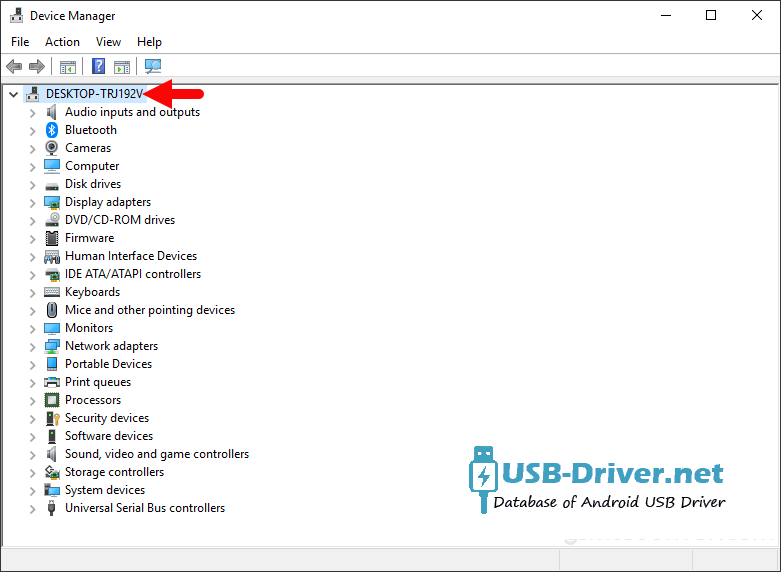
Step 3 : Once the Device Manager is Launched, Click on the Computer Name (name can vary from the image below):
Step 4 : Click on the Action Menu and Select Add Legacy Hardware option:
Step 5 : Under Add hardware Dialog Box, Click on the Next Button:
Step 6 : Tick on the Install the hardware that I manually select from a list checkbox and Click on the Next Button:
Step 7 : Click on the Next Button:
Step 8 : Then Click on the Have Disk Button:
Step 9 : Click on the Browse Button:
Step 10 : Locate the .inf file from the computer (this file can be found in the extracted driver folder).
Step 11 : Click on the OK Button:
Step 12 : Click on the Next button:
Step 13 : Again Click on the Next button:
Step 14 : Click on the Finish button to complete the installation process (ignore Code 10; it will be gone post restarting the computer).
Step 15 : Your Xiaomi Redmi 9C driver is listed in the Device Manager.
Step 16 : Now, Restart the Computer. Once the computer is restarted, you can easily connect your Xiaomi Redmi 9C device to the computer.
[•] Driver Signature Error: If you got Driver Signature Error While installing the Xiaomi Redmi 9C Driver then See this Video to fix this problem.
[•] Request Xiaomi Driver: If you are looking for any specific Xiaomi drivers that is not listed above, then you can request it through the comment box below (do not request driver from the contact page, or else it will be ignored).

