Click the panel on the right. you can download Lenovo YOGA 530 14IKB Drivers easily.
Lenovo YOGA 530 14IKB Audio Drivers
- Audio Driver V.6.0.8757.1_Classic_Update Dolby_19H1 WHQL for Windows 10 (64-bit)
Lenovo YOGA 530 14IKB BIOS/UEFI Drivers
- BIOS Update V.7QCN46WW for Windows 10 (64-bit)
- Intel Management Engine 11.8 Firmware V.13.0.32.1478 for Windows 10 (64-bit)
Lenovo YOGA 530 14IKB Bluetooth and Modem Drivers
- Bluetooth Driver (Intel, Qualcomm, Realtek) V.Intel_21.40.0.1_ibtw6668..Atheros_10.0.0.926..Realtek_1.7.1019.3005 for Windows 10 (64-bit)
Lenovo YOGA 530 14IKB Camera and Card Reader Drivers
- Card Reader Driver (Genesys, Realtek) V.Genesys_4.5.4.2 Realtek_ 10.0.18362.31253 for Windows 10 (64-bit)
- Camera Driver (Realtek, Sunplus) V.Realtek_10.0.18362.20105_Sunplus_5.0.18.52 for Windows 10 (64-bit)
Lenovo YOGA 530 14IKB Diagnostic Drivers
- Lenovo Diagnostics for Windows 64-bit V.4.41.0 for Windows 10 (64-bit) Windows 11 (64-bit)
- Lenovo Diagnostics User Guide V.4.41.0 for Windows 10 (64-bit) Windows 11 (64-bit)
Lenovo YOGA 530 14IKB Docking Station and Port Replicator Drivers
- Lenovo USB3.0 LAN Driver for Docks and Adapters V.10.48.914.2021/7.59.0308.2021 for Windows 10 (64-bit) Windows 7 (64-bit)
Lenovo YOGA 530 14IKB Fingerprint Reader Drivers
- Synaptics Fingerprint Driver V.SYN_5.5.2818.1050_19H1 for Windows 10 (64-bit)
Lenovo YOGA 530 14IKB Graphics Processing Units (GPU) and Server-AI Accelerators Drivers
- Intel VGA Driver V.27.20.100.8729 for Windows 10 (64-bit)
- NVIDIA VGA Driver V.27.21.14.5749 for Windows 10 (64-bit)
- Drivers for Windows 10 S V.V26 for Windows 10 (64-bit)
- NVIDIA VGA Application V.NV_GFE_3.20.4.14 for Windows 10 (64-bit)
Lenovo YOGA 530 14IKB Motherboard Devices (core chipset, onboard video, PCIe switches) Drivers
- Intel Sensor Hub (ISH) Driver V.3.1.0.4101_19H1_WHQL for Windows 10 (64-bit)
- Intel Serial-IO (SIO) Driver V.30.100.1914.3_19H1_WHQL for Windows 10 (64-bit)
- Intel Chipset Driver V.Intel_KBL_Chipset_10.1.10.4(DM)_ 10.1.18121.8164(package)_19H1_WHQL for Windows 10 (64-bit)
- Intel Management Engine Interface (MEI) Driver V.IntelMEI_2040.100.0.1029_11.8.82.3838(package) for Windows 10 (64-bit)
- Intel Dynamic Platform and Thermal Framework (DPTF) Driver V.8.6.10401.9906_19H1_WHQL for Windows 10 (64-bit)
Lenovo YOGA 530 14IKB Mouse, Pen and Keyboard Drivers
- Wacom Active Pen Driver V.Wacom Pen_7.6.2.34_Service_7.6.1.41.A for Windows 10 (64-bit)
Lenovo YOGA 530 14IKB Networking: Wireless LAN Drivers
- WLAN Driver (Intel, Qualcomm, Realtek) V.Intel8265_Intel3165_20.70.0.100..Atheros_12.0.0.720..Realtek_2024.0.8.113 for Windows 10 (64-bit)
Lenovo YOGA 530 14IKB Power Management Drivers
- Lenovo Energy Management V.15.11.28.188 189 MS signed for Windows 10 (64-bit)
Lenovo YOGA 530 14IKB Software and Utilities Drivers
- Lenovo Migration Assistant V.2.1.4.6 for Windows 10 (32-bit) Windows 10 (64-bit) Windows 7 (32-bit) Windows 7 (64-bit)
- Smart Display V.1.0.0.10 for Windows 10 (32-bit) Windows 10 (64-bit)
- Intel Software Guard Extensions (SGX) Driver V.Intel_SGX_2.10.100.2_PSW_2.10.100.2 for Windows 10 (64-bit)
- Drivers for Windows 10 S V.V34 for Windows 10 (64-bit)
Lenovo YOGA 530 14IKB ThinkVantage Technology Drivers
- Lenovo System Update V.5.07.0131 for Windows 10 (32-bit) Windows 10 (64-bit) Windows 11 (32-bit) Windows 11 (64-bit) Windows 7 (32-bit) Windows 7 (64-bit)
- 32bit64bitWindows 7
- 32bit64bitWindows 8
- 32bit64bitWindows 8.1
- 32bit64bitWindows 10, Windows 11
- 64bitWindows 10, Windows 11
- Intel
25.20.100.6444
2018-11-26
- Display adapters
- Extension
- SoftwareComponent
И еще 1
Version: V26
Release Date: 28 Dec 2018
- 64bitWindows 10, Windows 11
Version: NV_GFE_3.20.4.14
Release Date: 22 Jun 2021
- 64bitWindows 10, Windows 11
Version: 27.20.100.8729
Release Date: 07 Jun 2021
- 64bitWindows 10, Windows 11
Version: Intel8265_Intel3165_20.70.0.100..Atheros_12.0.0.720…..
больше
- 64bitWindows 10, Windows 11
Version: Wacom Pen_7.6.2.34_Service_7.6.1.41.A
Relea…
больше
- 64bitWindows 10, Windows 11
Version: SYN_5.5.2818.1050_19H1
Release Date: 26 Nov 2020
- 64bitWindows 10, Windows 11
Version: Genesys_4.5.4.2 Realtek_ 10…
больше
- 64bitWindows 10, Windows 11
Version: 8.6.10401.9906_19H1_WHQL
Release Date: 29…
больше
- 64bitWindows 10, Windows 11
Version: Intel_21.40.0.1_ibtw6668..Atheros_1…
больше
- 64bitWindows 10, Windows 11
Version: 6.0.8757.1_Classic_Update Dolby_19H1 WHQL
Release D…
больше
- 64bitWindows 10, Windows 11
Version: 15.11.28.188 189 MS signed
Release Date: 0…
больше
- 64bitWindows 10, Windows 11
Version: 30.100.1914.3_19H1_WHQL
Release Date: 29 N…
больше
- 64bitWindows 10, Windows 11
Version: 3.1.0.4101_19H1_WHQL
Release Date: 29 Nov…
больше
- 64bitWindows 10, Windows 11
Version: IntelMEI_2040.100.0.1029_11.8.82.3838(packa…
больше
- 64bitWindows 10, Windows 11
Version: Realtek_10.0.18362.20105_Sunplus_5.0.18.52
Release Da…
больше
- 64bitWindows 10, Windows 11
Version: 27.21.14.5749
Release Date: 07 Jun 2021
- 64bitWindows 10, Windows 11
Version: Intel_KBL_Chipset_10.1.10.4(DM)_ 10.1.18121…
больше
Lenovo Touch Screen Not Working: 5 Useful Methods [All Models]
Updating the drivers may be the fastest solution
by Ivan Jenic
Passionate about all elements related to Windows and combined with his innate curiosity, Ivan has delved deep into understanding this operating system, with a specialization in drivers and… read more
Updated on December 6, 2022
Reviewed by
Vlad Turiceanu

Passionate about technology, Windows, and everything that has a power button, he spent most of his time developing new skills and learning more about the tech world. Coming… read more
- It would be best to rule out the possibility of incompatible peripherals before jumping into other solutions.
- Installing the latest Windows updates and running the built-in troubleshooter are also recommended.
XINSTALL BY CLICKING THE DOWNLOAD FILE
This software will repair common computer errors, protect you from file loss, malware, hardware failure and optimize your PC for maximum performance. Fix PC issues and remove viruses now in 3 easy steps:
- Download Restoro PC Repair Tool that comes with Patented Technologies (patent available here).
- Click Start Scan to find Windows issues that could be causing PC problems.
- Click Repair All to fix issues affecting your computer’s security and performance
- Restoro has been downloaded by 0 readers this month.
Windows 10 is optimized for touchscreen devices, but few users have problems with Lenovo touchscreen monitors. However, if the Lenovo touchscreen is not working, you might want to check a few of these solutions.
If you own a touchscreen monitor, it’s probably a lot simpler and faster sometimes to use its touchscreen than a keyboard and mouse.
The Lenovo ThinkPad touch screen not working problems can occur, and sometimes the touchscreen monitor won’t work for some reason.
Why did my touch screen stop working on my Lenovo laptop?
This issue is not limited to ThinkPads. Lenovo Yoga touchscreen, not working problems are just as frequent, stretching from 530 to 720, covering everything in between. However, here are a few common triggers:
- Bad, corrupted, or outdated drivers – Drivers connect hardware with software; if faulty, you may experience this screen issue.
- Computer peripherals – In some cases, devices attached to the computer could trigger the issue and, as such, should be detached.
- Bad hardware – Another reality is that the screen could be damaged and need replacement.
Many users complained about Lenovo Flex 5 touchscreen driver not working as intended. Unfortunately, not even the breezy Lenovo IdeaPad can escape the unresponsive touch screen.
Fortunately, our solutions have a broad spectrum, and you can easily find the right one here. So let’s see how we can turn the touch screen around and make it work in your favor once again.
How can I fix the touch screen on a Lenovo laptop?
Before you start any of these fixes, ensure you disconnect any peripherals, they may trigger issues with the touch screen. Also, restart the device before jumping into the fixes.
- Disable and re-enable HID-compliant touchscreen
- Run an SFC scan
- Install the latest Windows updates
- Rollback drivers
- Run the Hardware troubleshooter
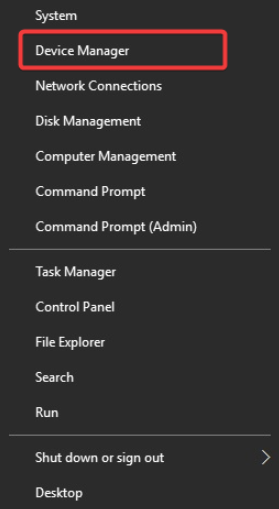
1. Disable and re-enable HID-compliant touchscreen
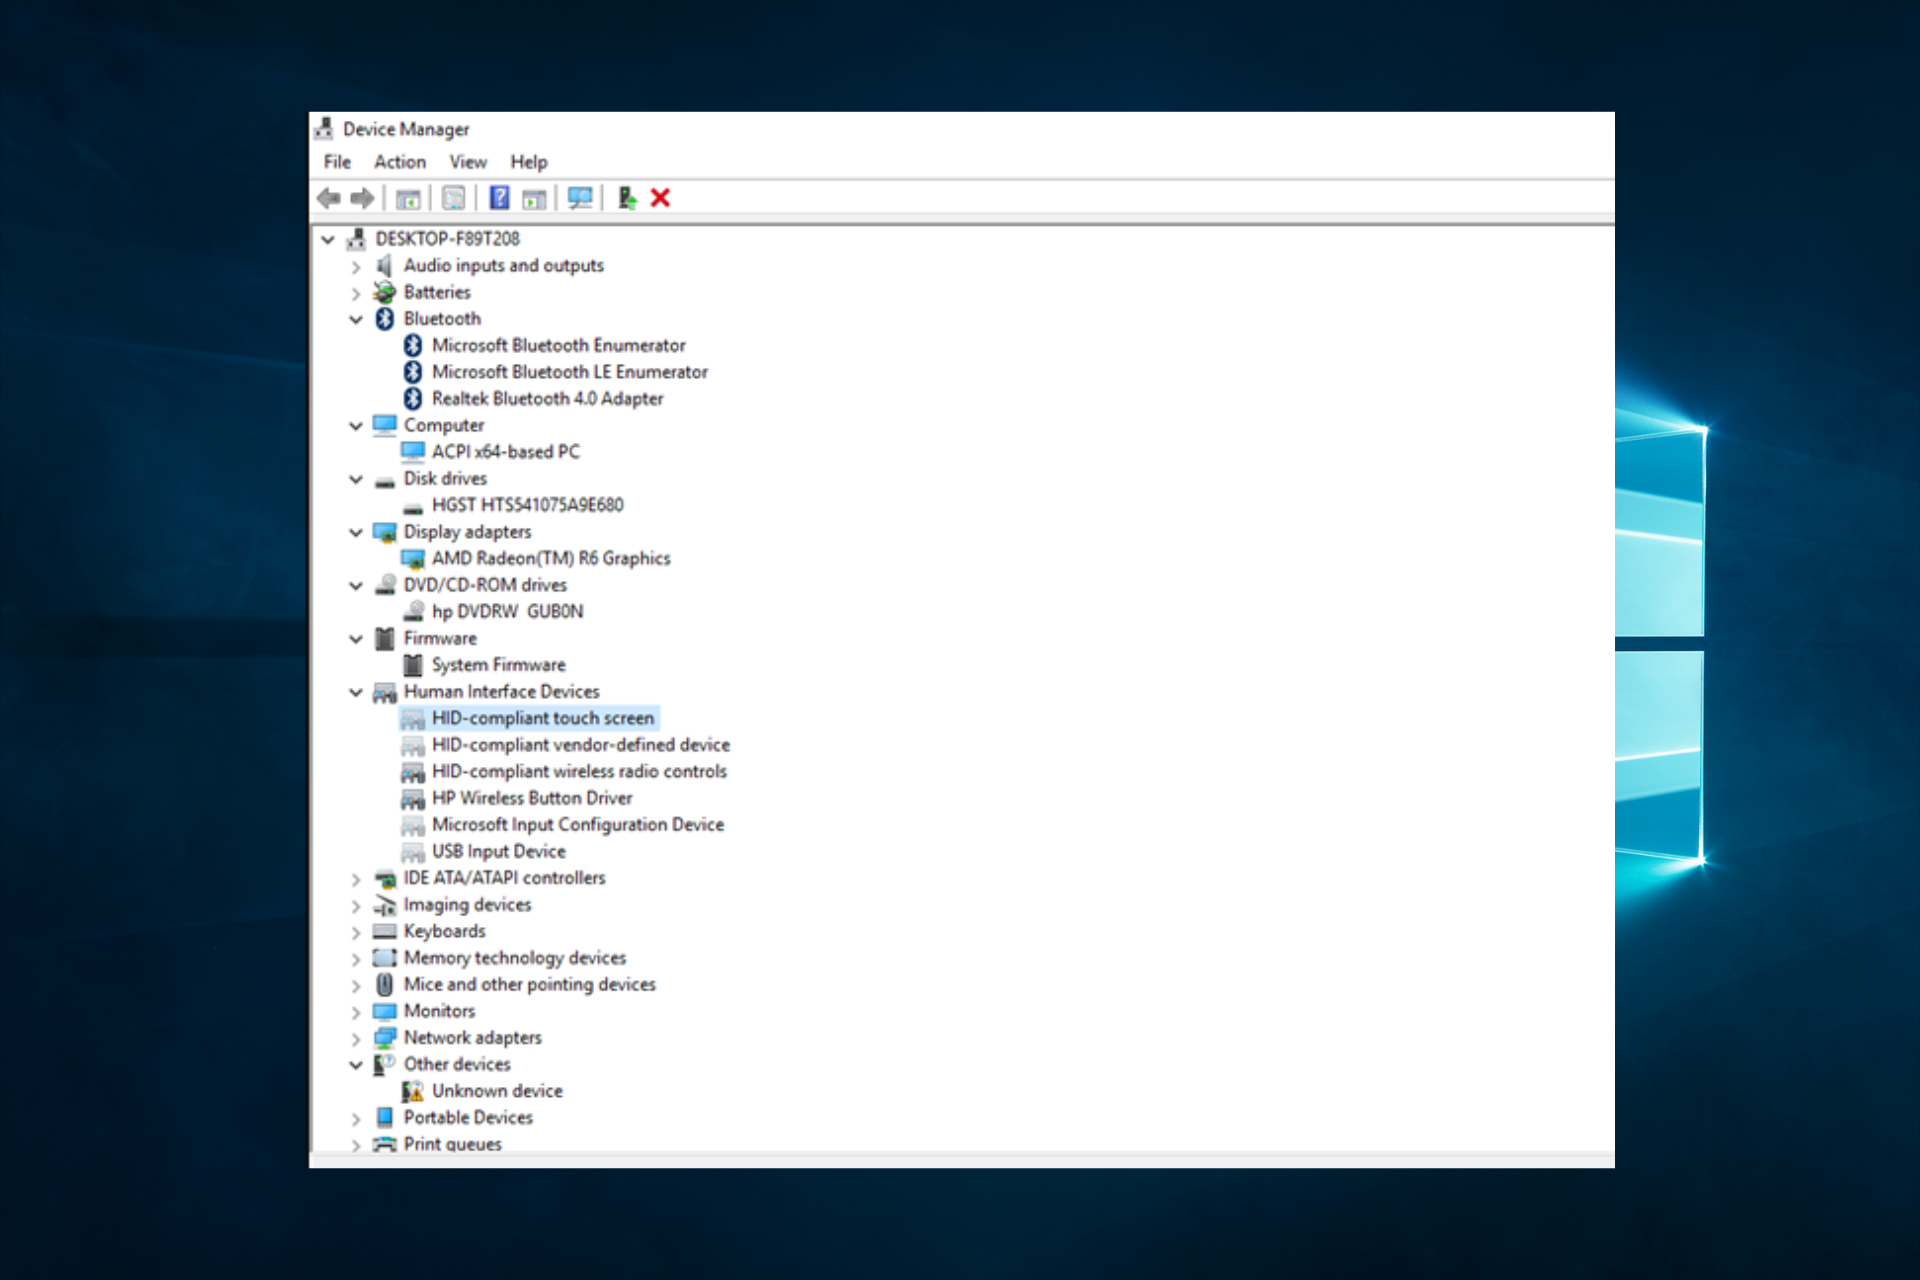
- Right-click on the Start menu and select Device Manager.

- Expand the Human Interface Devices section, find an HID-compliant touch screen, right-click it and choose Disable device.

- You might get asked if you’re sure that you wish to disable it, so click Yes.
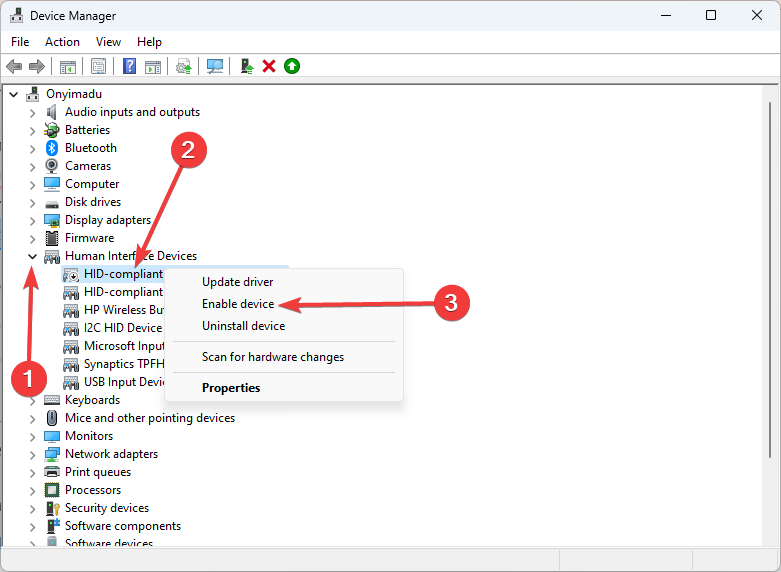
- Expand the Human Interface Devices section, find an HID-compliant touch screen, right-click, and choose Enable device.
- Your touchscreen device should start working.


Disabling your touch screen in Windows 10 is worth a shot because you can quickly re-enable it without causing permanent changes to your system.
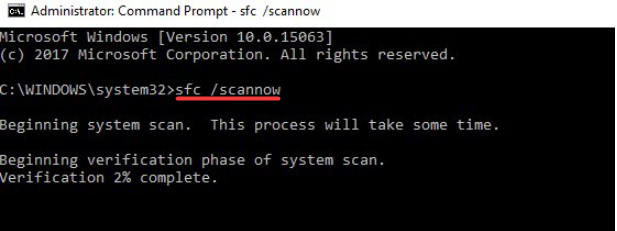
2. Run an SFC scan
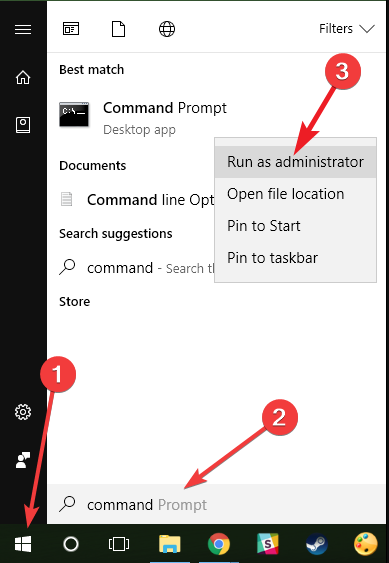
- Go to Start, type command, right-click on Command Prompt, and select Run as administrator.

- Type the script below and hit Enter.
sfc /scannow
- Wait for the scanning process to complete, and then restart your computer. All corrupted files will be replaced on reboot.
The SFC scan detects most issues, but if you need additional support, we suggest you use registry cleaner software for Windows 10. They automate the task and can detect errors more accurately.
Some PC issues are hard to tackle, especially when it comes to corrupted repositories or missing Windows files. If you are having troubles fixing an error, your system may be partially broken.
We recommend installing Restoro, a tool that will scan your machine and identify what the fault is.
Click here to download and start repairing.
You can alternatively use Restoro, a professional repairing tool that will analyze and repair corrupted files from your PC in a few moments.
With this optimizing software, you will obtain a faster computer due to all the errors it solves just from one scan. Registry errors, corrupted Windows files, and junk files stand no chance.
Hence, using this automated alternative you can solve most of your laptop’s errors fast without any effort.

Restoro
Keep your laptop in the best shape by solving most of its errors and issues.
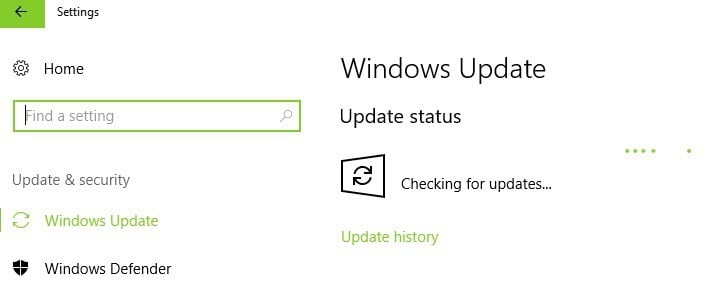
3. Install the latest Windows updates
- Use the following keyboard shortcut: Windows + I to open Windows Settings.
- Click on Update & Security.

- The computer will check for updates, and you can apply them if found.

The problem should be resolved after Windows has finished upgrading your drivers and systems. However, it is possible that it will not discover the correct drivers for your device, and you will need to visit the manufacturer’s website to manually download it.
If you are looking for an easier and faster solution: you can employ specialized driver updater software in these circumstances. Due to its shown complete error-freeness and user-friendliness, we suggest DriverFix as an automated tool.
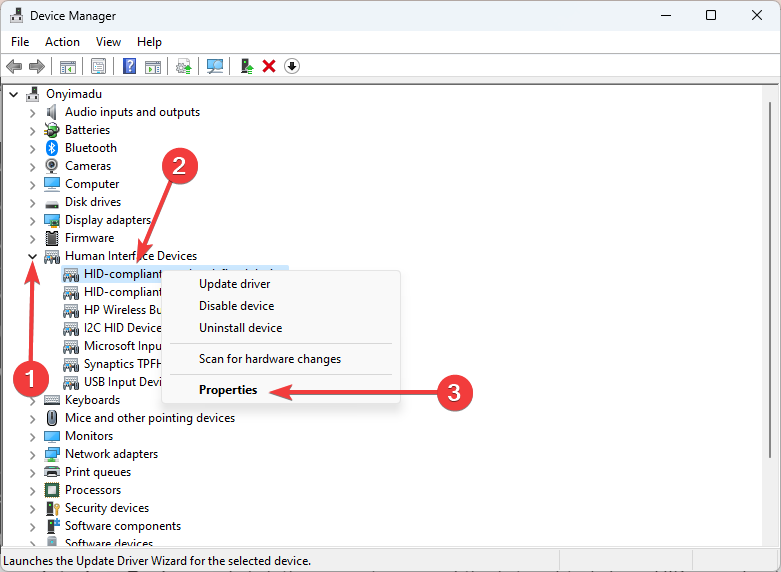
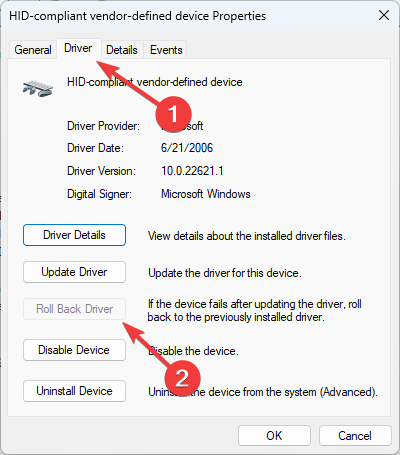
4. Rollback drivers
- Right-click Start, and select Device Manager.

- Go to Human Interface Devices and click the arrow to expand the list, right-click on the HID-compliant touch screen and choose Properties.
- Click the Driver tab and click the Roll back Driver button if it is not greyed out.

- Windows 11’s touchscreen not working
- 5+ best Lenovo deals to buy
- HID-Compliant touch screen driver is greyed out
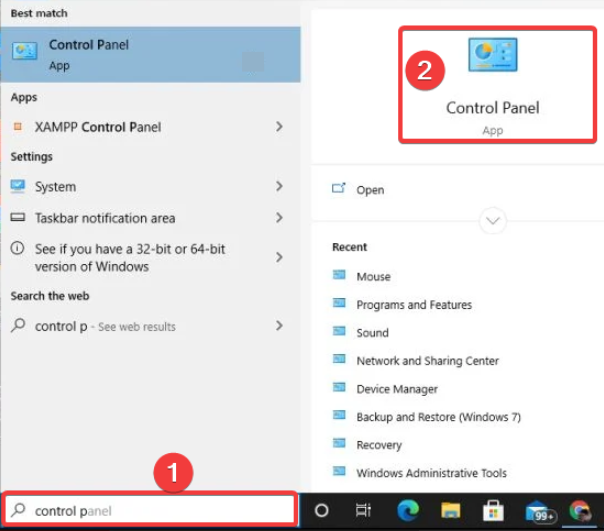
5. Run the Hardware troubleshooter
- Click on Windows search, type control, and select the Control Panel option.

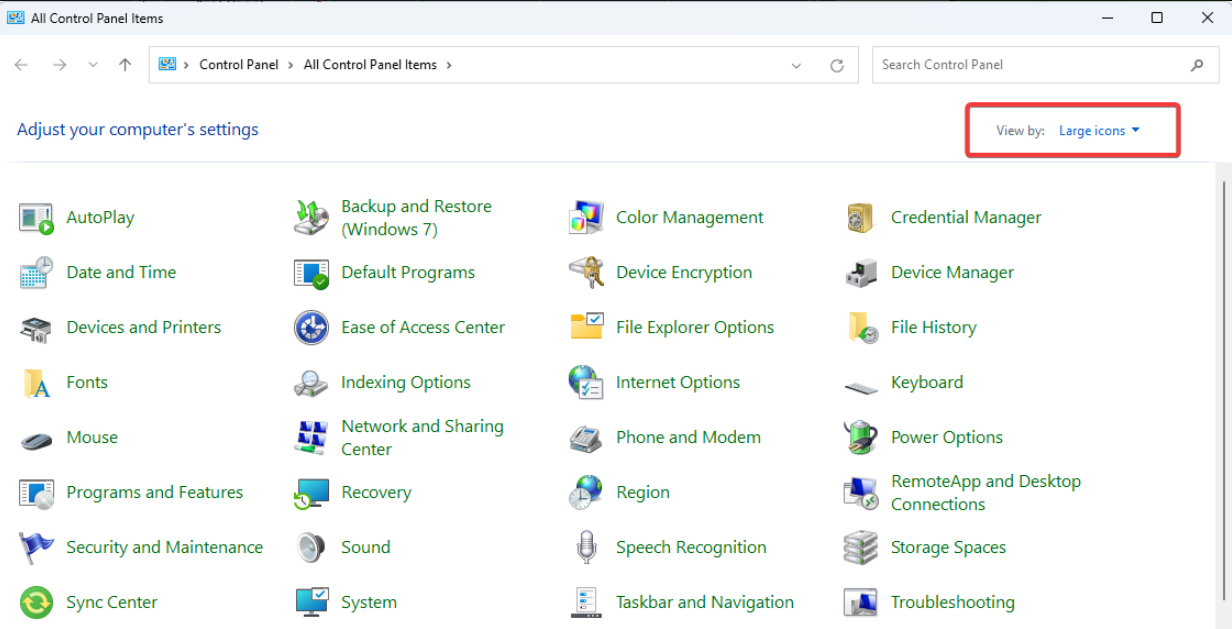
- Go to the View by option in the top right corner, click the drop-down arrow, and select Large icons.

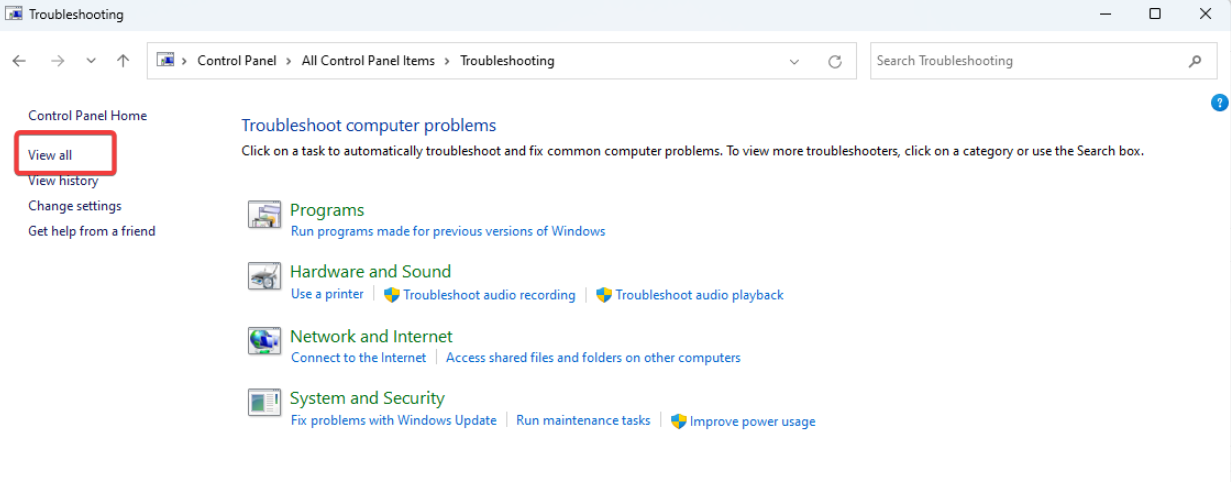
- Select Troubleshooting, and click on the View all option on the left pane.

- Choose Hardware and Devices, and click Next.

We hope that our solutions were helpful to you and that you’ve managed to resolve any touchscreen issues you had with your Lenovo touchscreen monitor.
These solutions should work if your Lenovo touch screen is not working with your finger, and in cases of Lenovo x1 carbon touch screen not working.
If you have more questions, don’t hesitate to ask them in the comments below.
Still having issues? Fix them with this tool:
SPONSORED
If the advices above haven’t solved your issue, your PC may experience deeper Windows problems. We recommend downloading this PC Repair tool (rated Great on TrustPilot.com) to easily address them. After installation, simply click the Start Scan button and then press on Repair All.
![]()
Newsletter
Lenovo Touch Screen Not Working: 5 Useful Methods [All Models]
Updating the drivers may be the fastest solution
by Ivan Jenic
Passionate about all elements related to Windows and combined with his innate curiosity, Ivan has delved deep into understanding this operating system, with a specialization in drivers and… read more
Updated on December 6, 2022
Reviewed by
Vlad Turiceanu
Passionate about technology, Windows, and everything that has a power button, he spent most of his time developing new skills and learning more about the tech world. Coming… read more
- It would be best to rule out the possibility of incompatible peripherals before jumping into other solutions.
- Installing the latest Windows updates and running the built-in troubleshooter are also recommended.
XINSTALL BY CLICKING THE DOWNLOAD FILE
This software will repair common computer errors, protect you from file loss, malware, hardware failure and optimize your PC for maximum performance. Fix PC issues and remove viruses now in 3 easy steps:
- Download Restoro PC Repair Tool that comes with Patented Technologies (patent available here).
- Click Start Scan to find Windows issues that could be causing PC problems.
- Click Repair All to fix issues affecting your computer’s security and performance
- Restoro has been downloaded by 0 readers this month.
Windows 10 is optimized for touchscreen devices, but few users have problems with Lenovo touchscreen monitors. However, if the Lenovo touchscreen is not working, you might want to check a few of these solutions.
If you own a touchscreen monitor, it’s probably a lot simpler and faster sometimes to use its touchscreen than a keyboard and mouse.
The Lenovo ThinkPad touch screen not working problems can occur, and sometimes the touchscreen monitor won’t work for some reason.
Why did my touch screen stop working on my Lenovo laptop?
This issue is not limited to ThinkPads. Lenovo Yoga touchscreen, not working problems are just as frequent, stretching from 530 to 720, covering everything in between. However, here are a few common triggers:
- Bad, corrupted, or outdated drivers – Drivers connect hardware with software; if faulty, you may experience this screen issue.
- Computer peripherals – In some cases, devices attached to the computer could trigger the issue and, as such, should be detached.
- Bad hardware – Another reality is that the screen could be damaged and need replacement.
Many users complained about Lenovo Flex 5 touchscreen driver not working as intended. Unfortunately, not even the breezy Lenovo IdeaPad can escape the unresponsive touch screen.
Fortunately, our solutions have a broad spectrum, and you can easily find the right one here. So let’s see how we can turn the touch screen around and make it work in your favor once again.
How can I fix the touch screen on a Lenovo laptop?
Before you start any of these fixes, ensure you disconnect any peripherals, they may trigger issues with the touch screen. Also, restart the device before jumping into the fixes.
- Disable and re-enable HID-compliant touchscreen
- Run an SFC scan
- Install the latest Windows updates
- Rollback drivers
- Run the Hardware troubleshooter
1. Disable and re-enable HID-compliant touchscreen
- Right-click on the Start menu and select Device Manager.
- Expand the Human Interface Devices section, find an HID-compliant touch screen, right-click it and choose Disable device.
- You might get asked if you’re sure that you wish to disable it, so click Yes.
- Expand the Human Interface Devices section, find an HID-compliant touch screen, right-click, and choose Enable device.
- Your touchscreen device should start working.
Disabling your touch screen in Windows 10 is worth a shot because you can quickly re-enable it without causing permanent changes to your system.
2. Run an SFC scan
- Go to Start, type command, right-click on Command Prompt, and select Run as administrator.
- Type the script below and hit Enter.
sfc /scannow - Wait for the scanning process to complete, and then restart your computer. All corrupted files will be replaced on reboot.
The SFC scan detects most issues, but if you need additional support, we suggest you use registry cleaner software for Windows 10. They automate the task and can detect errors more accurately.
Some PC issues are hard to tackle, especially when it comes to corrupted repositories or missing Windows files. If you are having troubles fixing an error, your system may be partially broken.
We recommend installing Restoro, a tool that will scan your machine and identify what the fault is.
Click here to download and start repairing.
You can alternatively use Restoro, a professional repairing tool that will analyze and repair corrupted files from your PC in a few moments.
With this optimizing software, you will obtain a faster computer due to all the errors it solves just from one scan. Registry errors, corrupted Windows files, and junk files stand no chance.
Hence, using this automated alternative you can solve most of your laptop’s errors fast without any effort.
Restoro
Keep your laptop in the best shape by solving most of its errors and issues.
3. Install the latest Windows updates
- Use the following keyboard shortcut: Windows + I to open Windows Settings.
- Click on Update & Security.
- The computer will check for updates, and you can apply them if found.
The problem should be resolved after Windows has finished upgrading your drivers and systems. However, it is possible that it will not discover the correct drivers for your device, and you will need to visit the manufacturer’s website to manually download it.
If you are looking for an easier and faster solution: you can employ specialized driver updater software in these circumstances. Due to its shown complete error-freeness and user-friendliness, we suggest DriverFix as an automated tool.
4. Rollback drivers
- Right-click Start, and select Device Manager.
- Go to Human Interface Devices and click the arrow to expand the list, right-click on the HID-compliant touch screen and choose Properties.
- Click the Driver tab and click the Roll back Driver button if it is not greyed out.
- Windows 11’s touchscreen not working
- 5+ best Lenovo deals to buy
- HID-Compliant touch screen driver is greyed out
5. Run the Hardware troubleshooter
- Click on Windows search, type control, and select the Control Panel option.
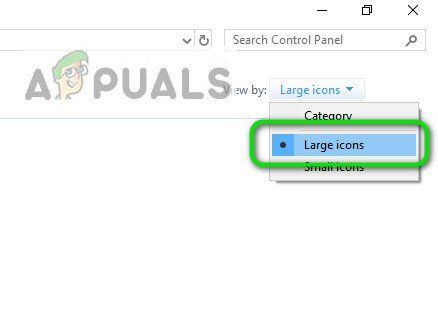
- Go to the View by option in the top right corner, click the drop-down arrow, and select Large icons.
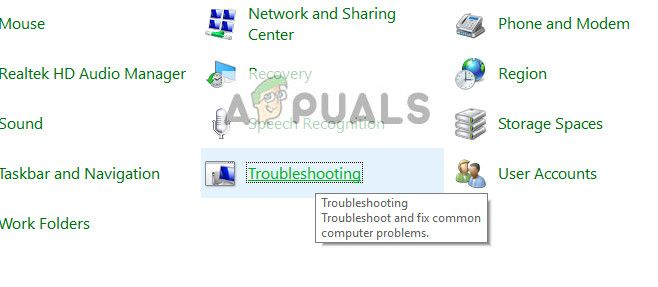
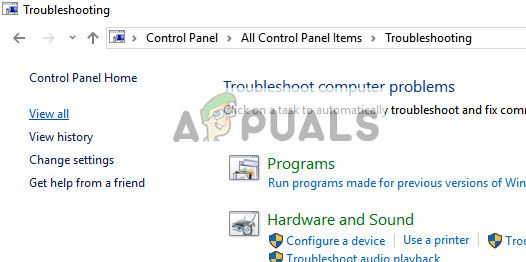
- Select Troubleshooting, and click on the View all option on the left pane.
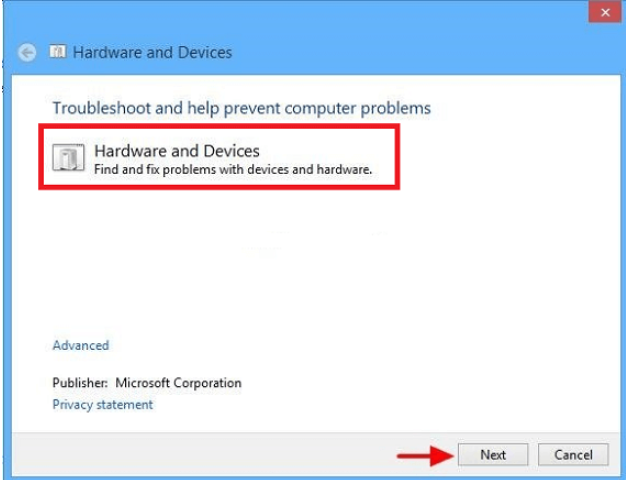
- Choose Hardware and Devices, and click Next.
We hope that our solutions were helpful to you and that you’ve managed to resolve any touchscreen issues you had with your Lenovo touchscreen monitor.
These solutions should work if your Lenovo touch screen is not working with your finger, and in cases of Lenovo x1 carbon touch screen not working.
If you have more questions, don’t hesitate to ask them in the comments below.
Still having issues? Fix them with this tool:
SPONSORED
If the advices above haven’t solved your issue, your PC may experience deeper Windows problems. We recommend downloading this PC Repair tool (rated Great on TrustPilot.com) to easily address them. After installation, simply click the Start Scan button and then press on Repair All.
![]()
Newsletter
Исправлено: Lenovo Touchscreen не работает —
Lenovo представила свою линейку ноутбуков с одним монитором и сенсорным экраном, таких как Yoga. По сравнению с другими конкурентами, такими как Surface, Microsoft выпустила эти продукты за свои деньги. Тем не менее, независимо от того, насколько крупной может быть компания, всегда возникают проблемы, возникающие каждый день, когда речь идет о технологиях.
Одна из таких проблем — сенсорный экран не работает в Lenovo. Эта проблема может возникать по многим причинам, таким как повреждение драйвера сенсорного экрана или какое-либо обновление Windows, конфликтующее с модулем и т.д. Начните с первого и пройдите вниз.
Решение 1. Запуск устранения неполадок оборудования и устройств
Средство устранения неполадок оборудования — это утилита, присутствующая в операционной системе Windows. Он обнаруживает проблемы с существующим оборудованием и пытается решить его после выполнения ряда шагов. Мы можем попробовать запустить средство устранения неполадок оборудования и проверить, справится ли это с задачей.
- Нажмите Windows + R, введите «контроль”В диалоговом окне и нажмите Enter.
- Теперь в верхней правой части экрана нажмите на Просмотр по и выберите Большие иконки из списка доступных вариантов.
- Теперь выберите вариант Поиск проблемы с панели управления.
- Теперь в левой части окна выберите «Посмотреть все», Чтобы перечислить все пакеты устранения неполадок, доступные на вашем компьютере.
- Теперь выберите «Аппаратные средства и устройства”Из списка доступных опций и щелкните по нему.
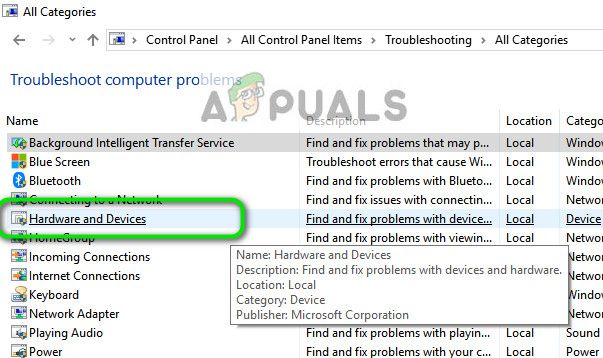
- Теперь выберите следующий в новом окне, которое появляется перед вами.
- Теперь Windows начнет поиск аппаратных проблем и исправит их, если обнаружит. Этот процесс может занять некоторое время, так как все ваше оборудование проверяется. Будьте терпеливы и дайте процессу успешно завершиться.
- Windows может предложить перезагрузить компьютер, чтобы устранить проблемы. Не откладывайте запрос, сохраните свою работу и нажмите «Применить это исправление».
Решение 2. Удаление последнего обновления Windows
Для тех, кто использует Windows, не ново знать, что обновления Windows очень часто ломают различные компоненты. Часто отмечалось, что было несколько обновлений Windows, которые конфликтовали с сенсорным модулем. Обновление Windows предназначено для исправления различных ошибок и введения новых возможностей в операционную систему. Но иногда, когда обновление выкатывается, оно конфликтует с другой вещью.
Вы можете попробовать удалить Центр обновления Windows и посмотреть, поможет ли это. Убедитесь, что вы сделали резервную копию всех ваших важных данных, прежде чем следовать этому решению.
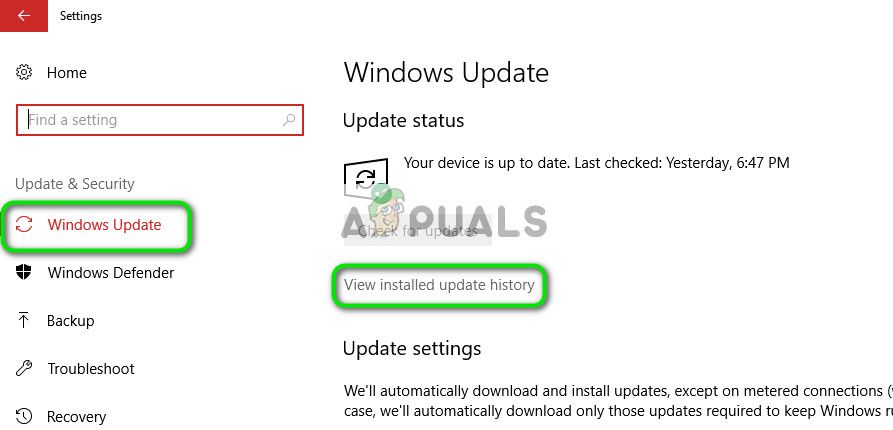
- Нажмите Windows + S, введите «настройки»И откройте приложение.
- Зайдя в «Настройки», нажмите «Обновление и безопасность». Здесь, под заголовком «Статус обновления», нажмите «Просмотр установленной истории обновлений».
- Нажмите «Удалить обновления»Присутствует в самой верхней части экрана.

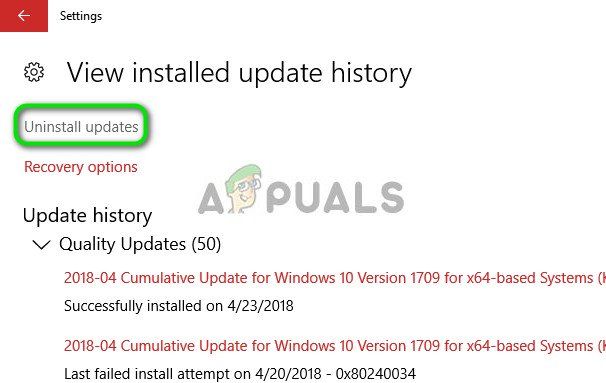
- Перед вами появится новое окно, содержащее все обновления, установленные на вашем компьютере. Нажмите правой кнопкой мыши на тот, который был недавно установлен и нажмите «Удалить».
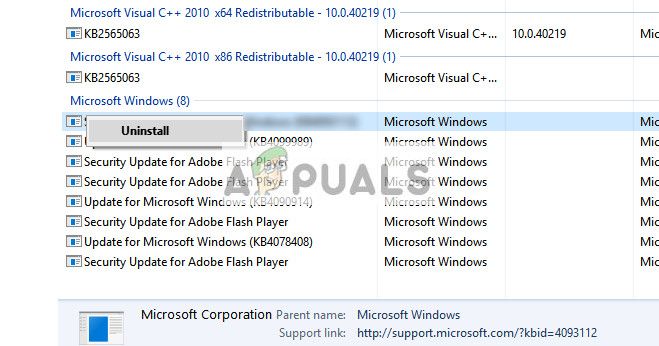
- После удаления обновления выключите и снова включите компьютер и убедитесь, что проблема под рукой не была решена.
Решение 3. Выполнение полного цикла питания
Другой обходной путь, который работает для многих пользователей, — это выключение и включение компьютера. Включение / выключение питания — это процесс полного выключения и последующего включения устройства. Причины циклического отключения питания включают в себя повторное инициализирование электронным устройством своего набора параметров конфигурации или восстановление из не отвечающего состояния или модуля. Он также используется для сброса всех сетевых конфигураций, поскольку они теряются при полном выключении устройства.
После компьютер, выньте основной кабель питания и пусть они остаются без дела пару минут (
5). По истечении необходимого времени подключите кабели и включите компьютер. Теперь проверьте, работает ли сенсорный экран снова.
Решение 4. Удаление контроллера сенсорного экрана USB и обновление драйверов
Если оба вышеуказанных метода не работают, можно с уверенностью предположить, что проблема может заключаться в ваших сенсорных драйверах. Драйверы являются основной силой работы вашего сенсорного экрана. Они являются интерфейсом между любым оборудованием и операционной системой. Вполне возможно, что последние версии драйверов, установленных в вашей системе, могут работать некорректно с вашим оборудованием или они могут быть повреждены. Мы можем попытаться удалить драйверы и перезагрузить компьютер в надежде, что это установит драйверы по умолчанию.
- Нажмите Windows + R, введите «devmgmg.ЦКМ”В диалоговом окне и нажмите Enter.
- Зайдя в диспетчер устройств, раскройте категорию «Мыши и другие указательные устройства». Если оборудование «USB-контроллер с сенсорным экраномЗдесь, вероятно, сенсорный экран будет исправлен, если мы установим драйверы по умолчанию. Щелкните правой кнопкой мыши и выберите «Удалить устройство».
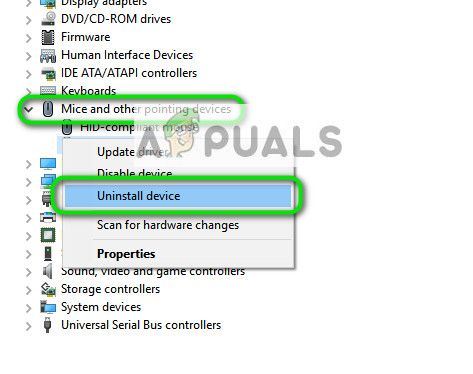
- Запустить снова твой компьютер. Теперь вернитесь к диспетчеру устройств и убедитесь, что сенсорный экран теперь указан в списке Устройства интерфейса человека. Надеюсь, проблема будет решена.
- Если запись не уходит из категории «Мыши и другие указательные устройства”, Это означает, что вы должны вручную установить драйвер. Щелкните правой кнопкой мыши и выберите «Обновить драйвер». После того, как вы решите обновить вручную, у вас будет возможность «Позвольте мне выбрать». Оттуда выберите «Устройство ввода USB» вместо «Контроллер сенсорного экрана».
Если этот метод не работает, следуйте инструкциям ниже. Это решение предназначено для случая, когда вы не можете точно определить местонахождение вашего сенсорного экрана в диспетчере устройств.
- Перейдите в диспетчер устройств и раскройте «Устройства интерфейса человека». Теперь по одному удалите все подключенные к USB устройства к вашему компьютеру. Вы заметите, что будет удалено много разных устройств.
- Теперь выберите оставшиеся, щелкните по нему правой кнопкой мыши и выберите «Отключить устройство».
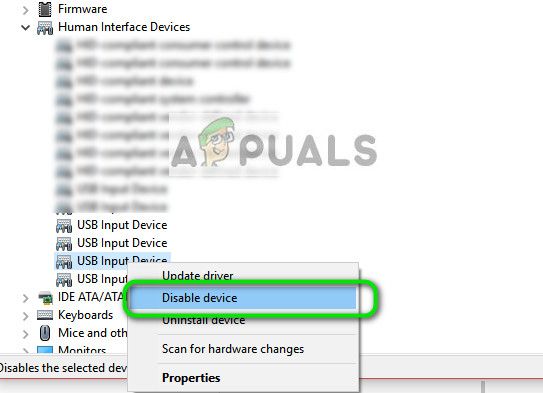
- Запустить снова компьютер и проверьте, работает ли сенсорный экран должным образом. Если это так, вы можете вставить другие USB-устройства обратно, и сенсорный экран все равно будет работать.
Если отключение или установка драйверов не работают, вы можете попробовать обновить их до последней сборки и посмотреть, как все получится. Найдя устройство в диспетчере устройств, щелкните его правой кнопкой мыши и выберите «Обновить драйвер». Вы можете выбрать «Автоматический поиск обновленного программного обеспечения драйвера«Или вы можете выбрать последний»Просмотрите мой компьютер для программного обеспечения драйвераИ перейдите туда, где вы скачали драйвер.
Подсказки: Если есть красный Крест рядом с оборудованием это означает, что устройство отключено. Вы можете включить его снова и посмотреть, решит ли это что-нибудь. Если у него есть желтый восклицательный знак, это означает, что вы должны обновить его драйверы.
Решение 5. Редактирование реестра
Если обновление драйверов также не работает, вы можете обновить некоторые параметры реестра. Редактор реестра содержит ключи, которые имеют ключевое значение для компьютера, и он обращается к этим ключам при попытке установить параметры. Тем не менее, вы также должны сделать резервную копию реестра, прежде чем пытаться изменить какие-либо значения. Appuals не несет ответственности за какой-либо ущерб.
- Нажмите Windows + R, введите «смерзаться”В диалоговом окне и нажмите Enter.
- В редакторе реестра перейдите по следующему пути.
HKEY_LOCAL_MACHINE SYSTEM CurrentControlSet Enum ACPI ATML1000 3233a31a50 Параметры устройства
- Теперь посмотрите на правую панель экрана и установите слово «EnhancedPowerManagementEnabledК значению00000000».
- Перезагрузите компьютер и убедитесь, что сенсорный экран снова начал работать.
Если после выполнения всех вышеперечисленных способов сенсорный экран по-прежнему не работает, вы можете выполнить восстановление системы, если оно работало до обновления Windows. Если сенсорный экран не работал с самого начала, это, вероятно, означает, что произошла аппаратная ошибка.
Источник
Включение тачпада на ноутбуке Lenovo

Способ 1: Горячая клавиша
В обычных условиях, когда с сенсорной панелью нет никаких проблем, управлять ей удобнее всего при помощи горячей клавиши. В зависимости от модели ноутбука она бывает разная: у офисных моделей, например, это клавиша F6:

В устройствах для геймеров — F10:

Отметим, что если при нажатии указанной клавиши ничего не произошло и тачпад по-прежнему не работает, следует попробовать воспользоваться комбинацией с Fn: Fn + F6 либо Fn + F10. Обусловлено это режимом работы клавиатуры, где в мультимедийном режиме достаточно нажатия только F-клавиши, а в функциональном F1-F12 выполняют те задачи, которые присвоены им по умолчанию операционной системой.
Способ 2: Настройки операционной системы
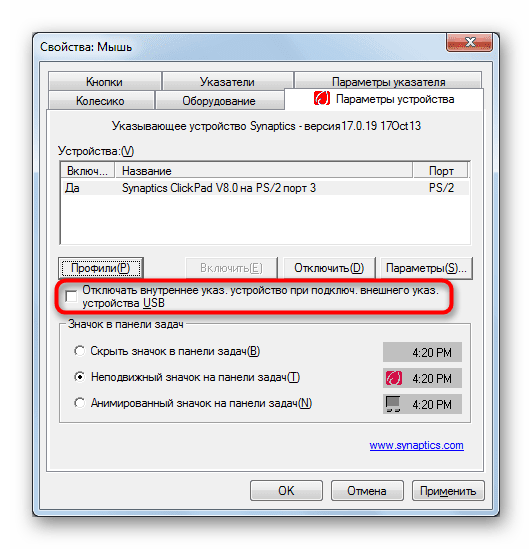
В некоторых моделях Lenovo может не быть необходимой клавиши, или же она оказывается сломана, переназначена на другое действие пользователем вручную. В такой ситуации следует воспользоваться настройками Windows. Преимущество этого варианта еще и в наличии дополнительной возможности, настраивающей поведение сенсорной панели при подключении мышки.
Приложение «Параметры»
В Windows 10 для управления указателем мыши и соответствующими устройствами возможно использование обоих рассматриваемых приложений. Обладателям Windows 8 и ниже сразу следует переходить к разделу статьи про «Панель управления», поскольку приложения «Параметры» в этих ОС нет.
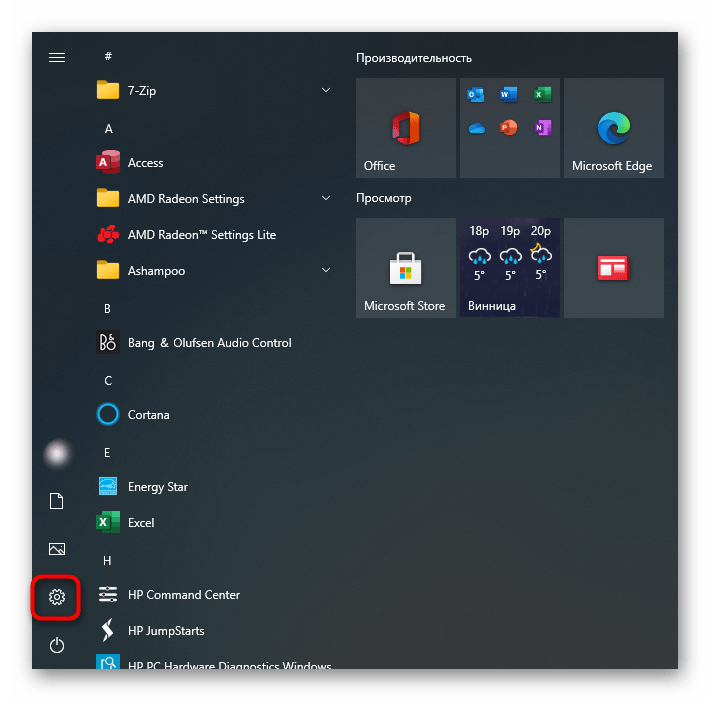
- Откройте «Пуск» и вызовите «Параметры» при помощи отведенной для этого кнопки.
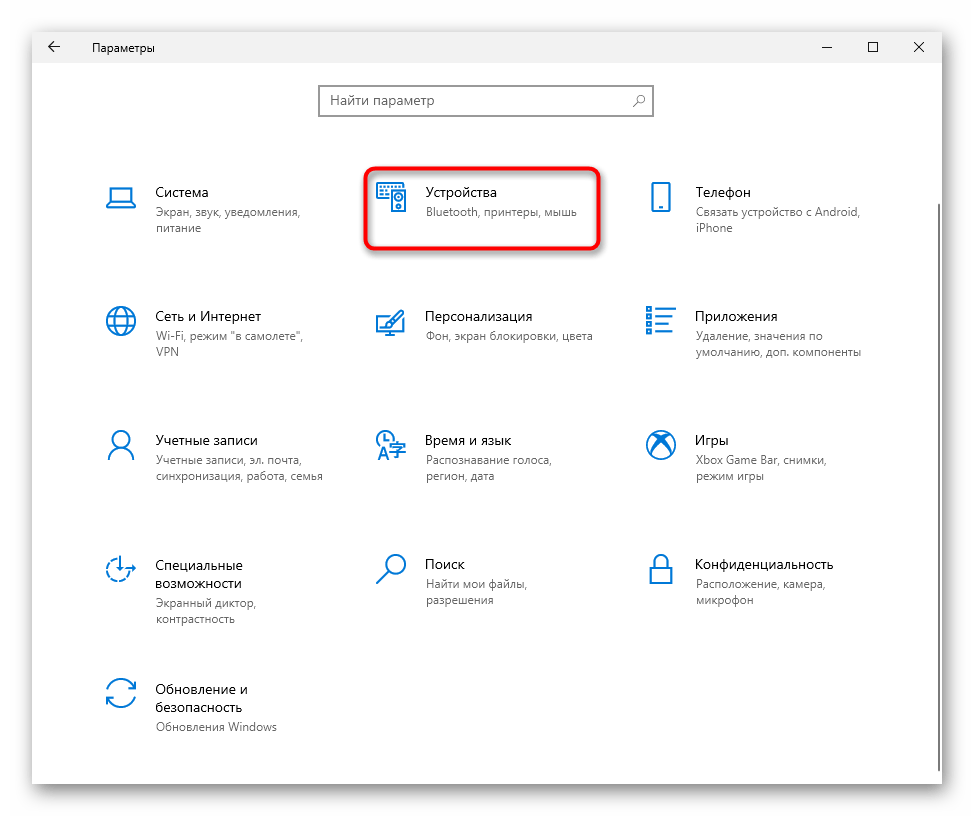
- Кликните по плитке «Устройства».
Приложение «Панель управления»
Альтернативой предыдущему методу и единственным возможным вариантом управлять тачпадом в Windows 8 и предыдущих системах является «Панель управления».
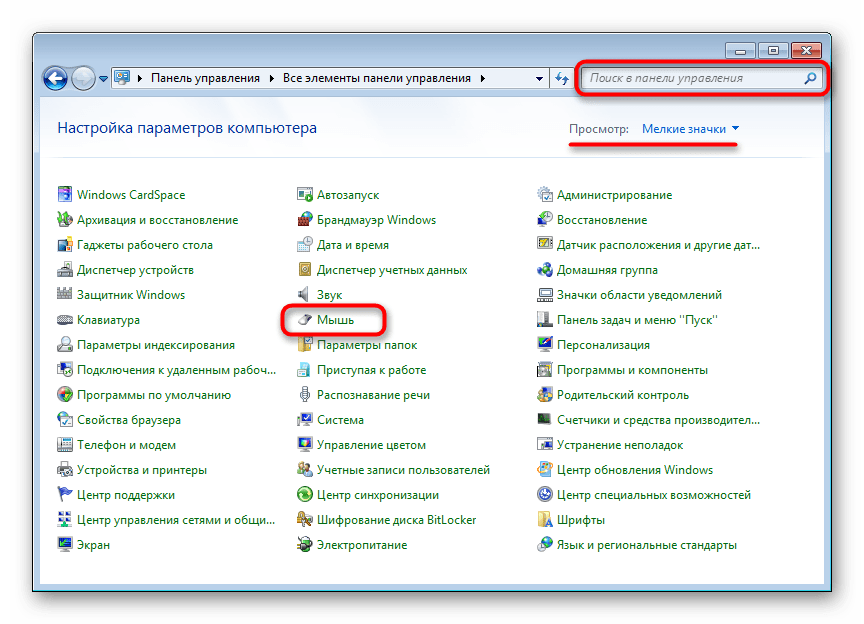
- Откройте «Пуск», найдите там «Панель управления» и перейдите в нее. Смените отображение на «значки» или через внутреннее поисковое поле найдите «Мышь».
В Lenovo искомая вкладка носит одно из следующих наименований: «Параметры устройства», «Elan», «UltraNav» или «ThinkPad». На этой вкладке нажмите по кнопке «Включить» или «Активировать устройство», затем по «ОК». 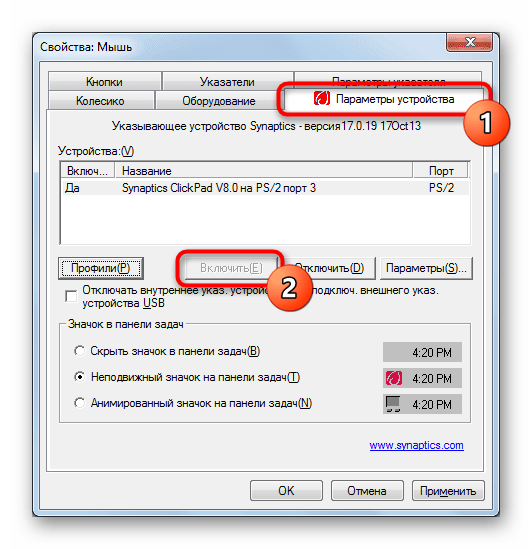

В варианте с «UltraNav» вместо этого понадобится установить галочку около пункта «Enable TouchPad», затем сохранить внесенные изменения. 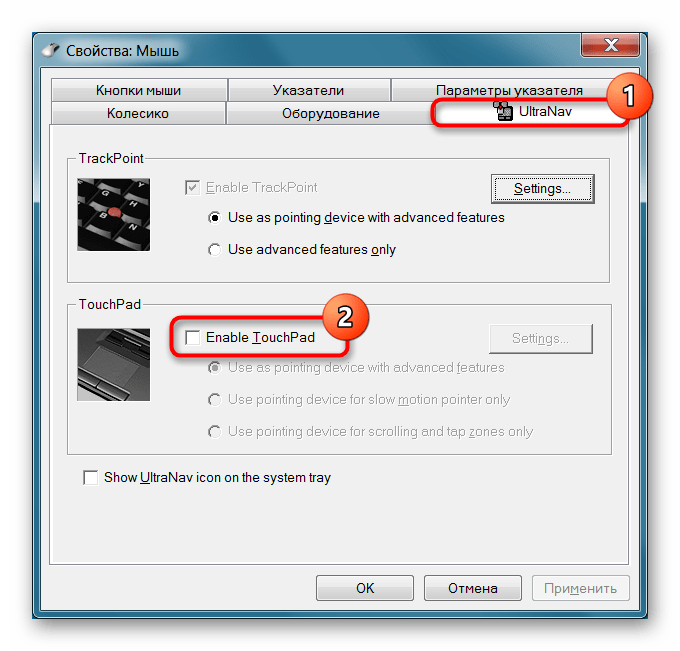
Способ 3: Включение опции в BIOS
В определенных моделях Леново сенсорная панель может быть отключена в BIOS, и тогда данное устройство не будет работать ни в установленной операционной системе, ни за ее пределами. Обязательно проверьте наличие этой опции в своем лэптопе, если предыдущие два способа не помогают возобновить работоспособность устройства.
- Перезагрузите ноутбук и войдите в BIOS клавишей, отображаемой в момент отображения логотипа производителя. Если вы не понимаете, какую клавишу нужно нажать, читайте статью по ссылке ниже.
Подробнее: Варианты входа в BIOS на ноутбуке Lenovo
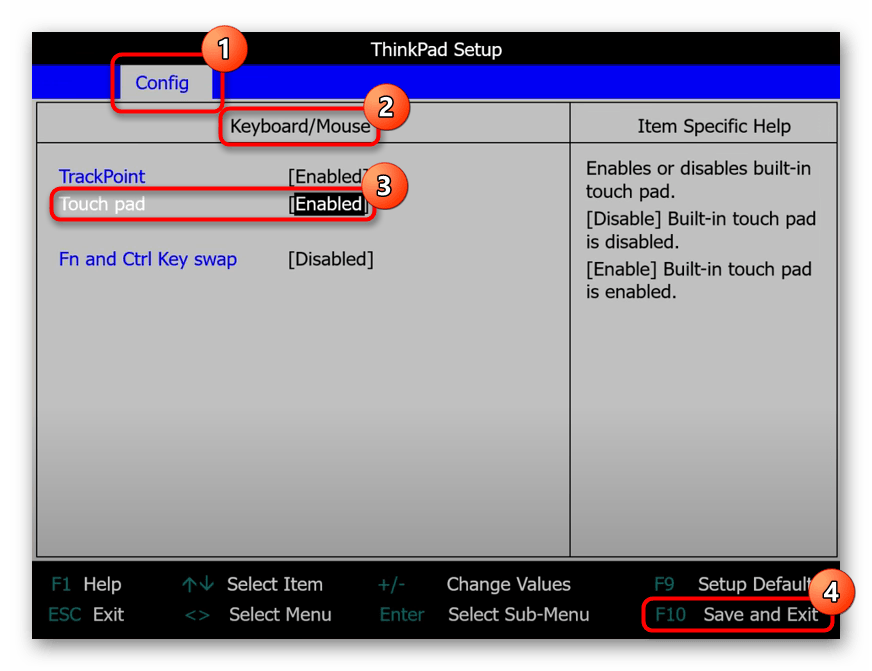
Управляя стрелками на клавиатуре, зайдите на вкладку «Config» и разверните раздел «Keyboard/Mouse». Внутри него должна быть опция с названием «Touchpad» или «Trackpad». Если вы видите, что ее статус «Disabled», выделите эту строку, нажмите Enter и смените его на «Enabled». Остается нажать клавишу F10 для сохранения настроек и выхода.
Тем, у кого рассмотренной опции в BIOS не оказалось или она и так находится в состоянии «Enabled», следует воспользоваться следующим способом.
Способ 4: Включение через «Диспетчер устройств»
Не очень часто тачпад отказывается работать из-за конфликтов в операционной системе, и решить их можно через одно из встроенных приложений Windows.
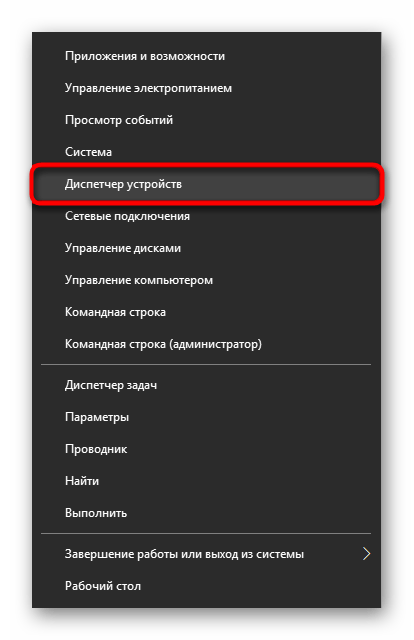
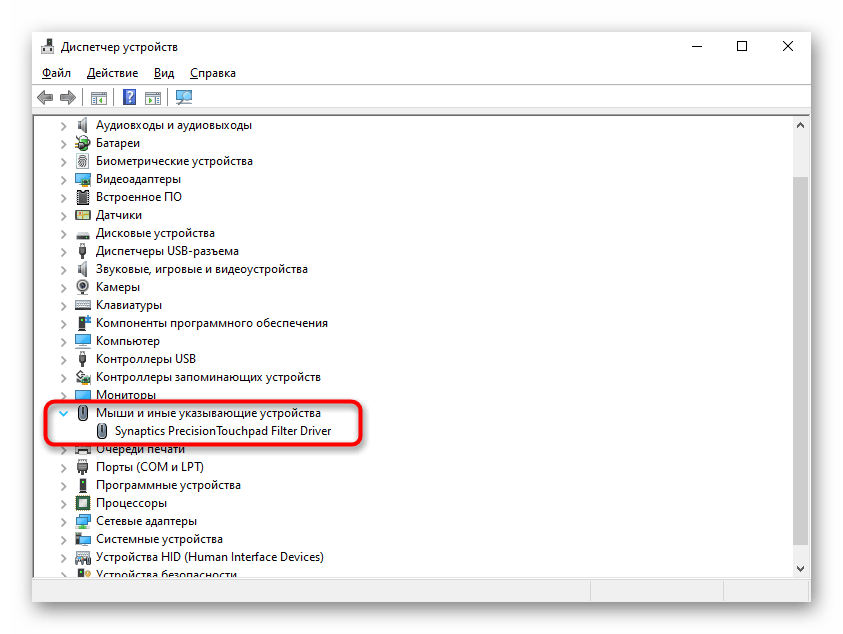
- Нажмите правой кнопкой мыши по «Пуску» и запустите «Диспетчер устройств». В «семерке» это приложение можно найти через поиск по «Пуску».
Вместо этого можете воспользоваться вариантом «Обновить драйвер» — он помогает самостоятельно установить программное обеспечение, что в некоторых случаях устраняет неполадку, связанную с автоматической инсталляцией. 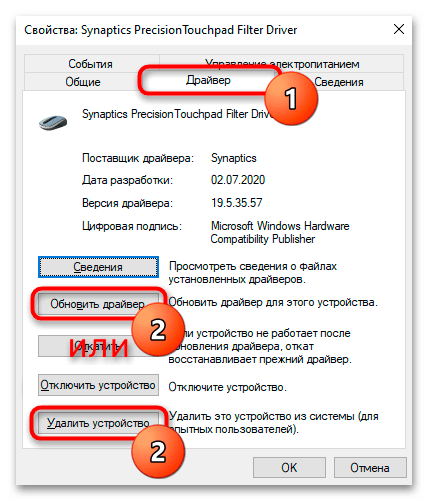
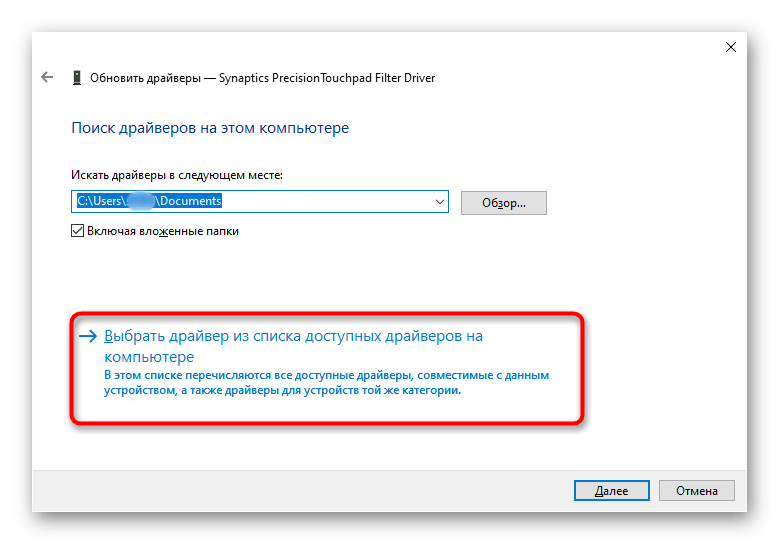
При выборе фирменного драйвера — если их несколько — смотрите на дату/номер и устанавливайте последнюю версию (если это не сработает, можете попробовать установить предыдущую версию, предварительно удалив установленную более новую версию, как показано в Шаге 3 этого способа). 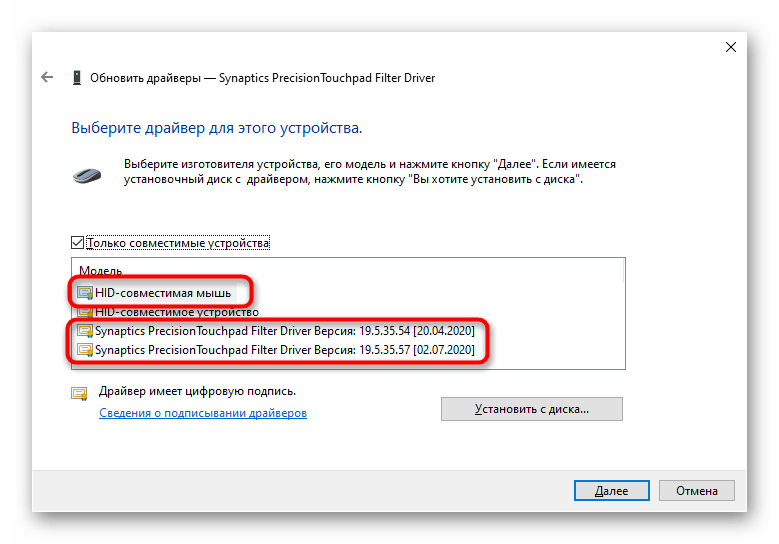
После того, как ноутбук был перезагружен, тачпад должен сразу же заработать, а если этого не произошло, дополнительно воспользуйтесь Способом 1 и Способом 2 текущей статьи.
В редких случаях никакие рекомендации не помогают, и устройство по-прежнему не работает. Рекомендуем обратиться к другой нашей статье, которая поможет понять, как поступить в сложившейся ситуации.
Источник
Download Lenovo Yoga 530-14ARR, Flex 6-14ARR Laptop Windows 10 Drivers, Applications and Updates.
Select corresponding operating system and driver type to narrow the results.
Operating System:Type:
| Type | Driver Title | OS | Released | Download |
|---|---|---|---|---|
| Audio | Audio Driver for Yoga 530-14ARR, Flex 6-14ARR | Windows 10 64-bit | 2019-08-07 | DOWNLOAD |
| BIOS/UEFI | BIOS Update for Yoga 530-14ARR, Flex 6-14ARR | Windows 10 64-bit | 2019-11-26 | DOWNLOAD |
| Bluetooth and Modem | Bluetooth Driver for Yoga 530-14ARR, Flex 6-14ARR | Windows 10 64-bit | 2019-02-15 | DOWNLOAD |
| Camera and Card Reader | Camera Driver for Yoga 530-14ARR, Flex 6-14ARR | Windows 10 64-bit | 2019-02-15 | DOWNLOAD |
| Camera and Card Reader | Card Reader Driver for Yoga 530-14ARR, Flex 6-14ARR | Windows 10 64-bit | 2018-09-26 | DOWNLOAD |
| Display and Video Graphics | AMD VGA Driver for Yoga 530-14ARR, Flex 6-14ARR | Windows 10 64-bit | 2019-08-07 | DOWNLOAD |
| Display and Video Graphics | AMD VGA UI Driver for Yoga 530-14ARR, Flex 6-14ARR | Windows 10 64-bit | 2019-02-15 | DOWNLOAD |
| Fingerprint Reader | Fingerprint Driver for Yoga 530-14ARR, Flex 6-14ARR | Windows 10 64-bit | 2018-09-26 | DOWNLOAD |
| Mouse, Pen and Keyboard | Active Pen Driver for Yoga 530-14ARR, Flex 6-14ARR | Windows 10 64-bit | 2018-09-26 | DOWNLOAD |
| Networking: Wireless LAN | WLAN Driver for Yoga 530-14ARR, Flex 6-14ARR | Windows 10 64-bit | 2019-08-07 | DOWNLOAD |
| Power Management | Lenovo Energy Management | Windows 10 64-bit | 2019-12-16 | DOWNLOAD |
| Software and Utilities | Lenovo Yoga Mode Control | Windows 10 64-bit | 2019-03-20 | DOWNLOAD |
| Software and Utilities | Lenovo Vantage Service for Windows 10 64-bit (Version 1803 or later) | Windows 10 64-bit | 2020-03-31 | DOWNLOAD |
| Software and Utilities | Lenovo Migration Assistant for Laptops, Desktops, Workstations | Windows 10 32-bit Windows 10 64-bit Windows 7 32-bit Windows 7 64-bit |
2020-05-06 | DOWNLOAD |