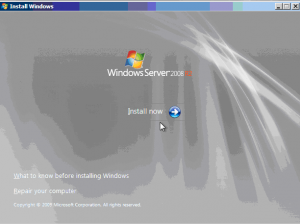
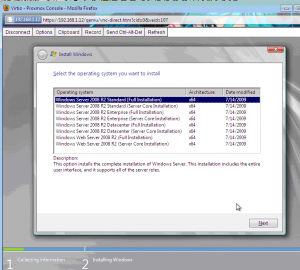
При создании VM внутри proxmox 6.4.4 с осью Windows Server 2008 R2 Ent (из образа) SW_DVD5_Windows_Svr_DC_EE_SE_Web_2008_R2_64Bit_English_w_SP1_MLF_X17-22580.ISO
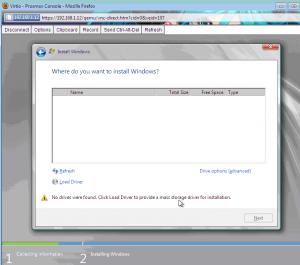
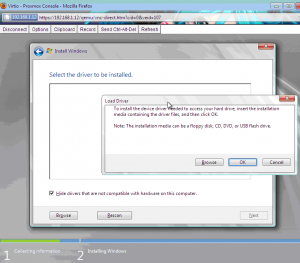
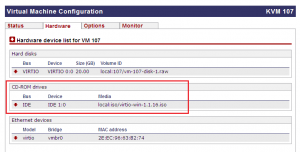
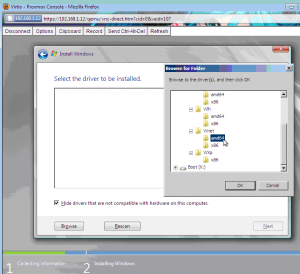
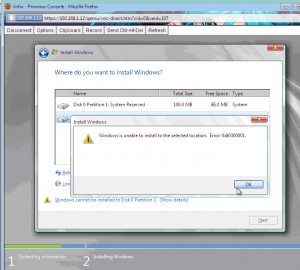
Если диск выбран Virtio SCSI, то установщик его не видит “No drives were found. Click Load Driver to provide a mass storage driver for installation” выбираю второй привод куда примонтирован образ с драйверами из пакета virtio-win-0.1.185.iso: Browse - CD Drive (EJ virtio-0.1.185.iso) - viostor - 2k8R2 - amd64 и нажимаю OK, но не все так гладко, в ответ получаю ошибку:
No signed device drivers were found. Make sure that the installation media contains the correct drivers, and then click OK.
Странно такого никогда не было, монтирую к VM образ с драйверами, которыми я пользуюсь всегда и составлял образ Windows с применением файлов ответов: virtio-win-0.1.171.iso
VM нужно перезагрузить
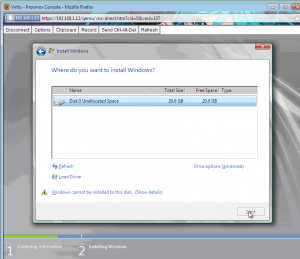
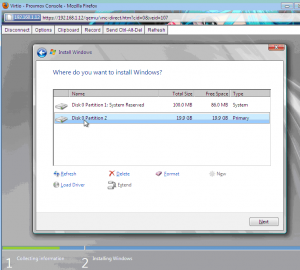
Снова дохожу до этапа разметки дисков
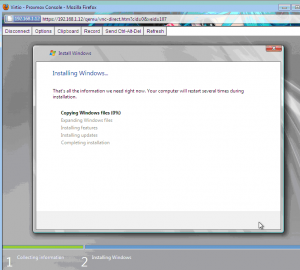
и указав путь: virtio-win-0.1.171.iso: Browse - CD Drive (EJ virtio-0.1.171.iso) - viostor - 2k8R2 - amd64 и нажимаю OK, установщик подхватывает указанные драйвера для диска и установка далее проходит успешно:
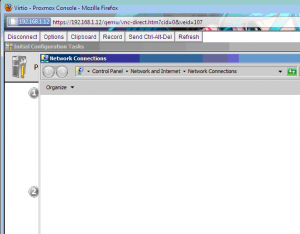
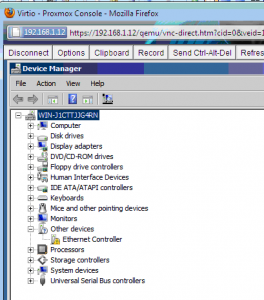
В дальнейшем установка драйверов на сетевую карту, видеодрайвер, агент успешна если образ драйверов virtio-0.1.171.iso, но если попытаться использовать virtio-0.1.185.iso
Мой компьютер: E: запускаю virtio-win-guest-tools.exe и постигает неудача, образ предназначен для VM начиная от Windows 8 и выше, а Windows Server 2008 R2 в этот список не входит.
Поэтому я использую свои наработки и действую только по ним чтобы все было стандартизировано.
На этом практическая заметка завершена, с уважением автор блога Олло Александр aka ekzorchik.
Windows VirtIO Drivers
The source for the Windows drivers is hosted in a repository on GIT hub. Anonymous users can clone the repository
git clone git://github.com/virtio-win/kvm-guest-drivers-windows.git
Browse GIT repository online
Binary Drivers
Binary drivers are provided by some Linux distributions including WHQL Certified drivers.
For example the binary drivers for Ubuntu can be found here.
64-bit versions of Windows Vista and newer (this currently includes Windows Server 2008, Windows 7, Windows 8, Windows Server 2008 R2 and Windows Server 2012) require the drivers to be digitally signed to load.
If your distribution does not provide binary drivers for Windows, you can use the package from the Fedora Project. These drivers are digitally signed, and will work on 64-bit versions of Windows:
Latest VirtIO drivers for Windows from Fedora
Code signing drivers for the Windows 64bit platforms
- Drivers should be signed for Windows 64bit platforms.
- Here are some links how to self sign and install self signed drivers:
- Installing Test-Signed Driver Packages
- How to Release-Sign File System Drivers
- 0 replies
- 6097 views
- Nutanix Employee
- 433 replies
While we the topic of VirtIO drivers has already been touched in Sarab’s post on Installing Windows VM and VirtIO drivers, we would like to bring two more KBs to your attention.
One is on AHV | How to install VirtIO drivers for Microsoft Windows Server 2008 (KB-5666) and the other one is AHV | Nutanix VirtIO drivers for Windows Server 2019 (KB-6495).
N.B! Nutanix does not release or maintain VirtIO drivers for Microsoft Windows Server 2008. However, you can still use stable VirtIO drivers available from Fedora project website.
Nutanix recommends to use the Stable VirtIO-Win drivers.
- windows server
- AHV
- VirtIO
- win2k16
- PC
- drivers
- guestos
- uvm
- PE
- web
- Like
- Quote
This topic has been closed for comments
Hello World,
Today, we will provide a quick how to guide. If you have noticed, Proxmox VE wiki provides a lot of information about how to install Windows XP/Windows 2003 operating systems and how to install virtio drivers. However, you will not see much information about installing/configuring a Windows 7/Windows 2008 (or later) operating system. As I mentioned in other posts, It’s time to move on and start to use and work with the recent operating systems version. This post is a first step in that direction.
1. Preparing your Windows 2008 R2/Windows 7 installation
We assume that you have a running Proxmox VE infrastructure in your infrastructure.
Step 1 – Get Windows 2008R2/Windows 7 and Virtio ISO images
To perform such installation , you will need to upload the following iso images
- Windows 7/windows 2008 R2 Iso image
- Virtio Drivers (can be downloaded from the Fedora project web site : http://alt.fedoraproject.org/pub/alt/virtio-win/latest/images/bin/)
Step 2 – Upload your ISO Images
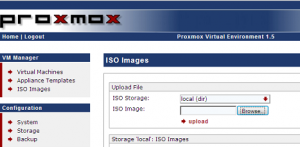
To upload the ISO images on your Proxmox VE server, you simply open the web interface. On the navigation menu, in the VM Manager Section (on the left side on your screen, you click on the ISO images. You will be presented with the following screen
Click to Enlarge
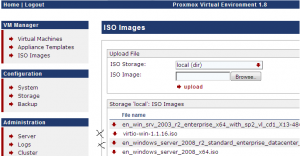
You click on the Browse button, you specify the location where you have stored you ISO images and then you click on Upload link. When the upload is completed, at the bottom of the page, you can list the ISO Files that have been loaded
Click to enlarge
Step 3 – Create you Virtual Machine
In this post, we have explained in details how to create a virtual machine. We assume that you have a working experience with the Proxmox VE software and we will simply describe the big steps of creating the virtual machine.
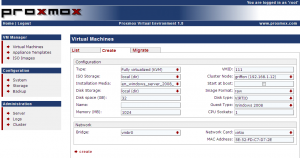
Within the Interface, you click on virtual machine in the left menu. In the virtual machine page, you have to click on the Create tab. The virtual machine creation form will be displayed as shown in the following screenshot
Click to Enlarge
In this page, be sure to select the following options :
- Disk type : Virtio
- Guest Type: Windows 2008
- Network Card: Virtio
- Installation medio : the Windows 2008 or Windows 7 ISO image
Press on the create button. Click then on the List Tab and you will see that your new virtual machine has been created. You are ready to move to the next step : Installation of the operating system
Perform your Windows 2008 R2/Windows 7 installation
We are ready to perform our standard Windows 2008/Windows 7 installation. This post will demonstrate how to install the Windows 2008 Operating System. The procedure should be the same for Windows 7 installation.
Within the Proxmox VE (PVE) web interface, you click on the Virtual machine link (on the menu on the left). Click on the virtual machine you’ve just created in the previous section. In the Virtual Machine Configuration page, click on the Start button. After a short time, you will see a link called Open VNC Console
Note : Do not close you browser, we will need to come back to this screen
Step A – Starting the Windows 2008 Setup routine
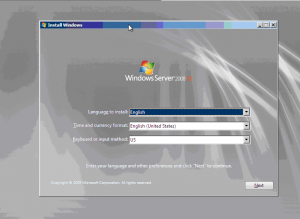
Click on the link to access the virtual machine through the console. After sometime, you will see the familiar Windows Setup Wizard starting. Select your settings accordingly and press Next
Click to Enlarge
In the Install Windows Page, Click on Install Now
Click to Enlarge
Select the Correct version of the Operating System you want to install and Press Next
Click to Enlarge
Step B – Upload Drivers
At this stage, you will be presented with the following window. As you can see, there is no disks detected by the Setup routine. We are indeed using VIRTIO drivers. The new Setup routine make it more easy (compared to windows 2003) to specify additional drivers. On this page, you can click on the Load Driver option
Click to Enlarge
You will then be presented with a screen where you will be asked to specify the location of the additional drivers to be used
Click to Enlarge
Before continuing, we will need to go back the PVE Web Interface, in the Virtual Machine Configuration Page and we will need to click on the Hardware Tab. There, we have to load the Virtio ISO image into the CD-ROM Drive. When this is done, we can go back to the Virtual machine and proceed with the installation.
Click to Enlarge
Back on the Virtual Machine, you can browse to the CD-Rom device and select the appropriate drivers
Click to Enlarge
As you can see on the screenshot below, the VIRTIO Drivers are now recognized by the Setup routine and we are ready to install them onto the system. Press Next
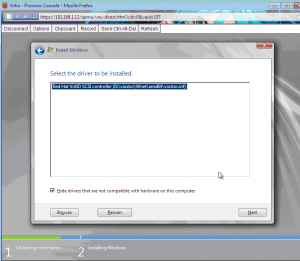
Click to Enlarge
At the end of this process, you will see that the installation wizard page is now presenting you 1 or more disks (depending on your configuration).
Click to Enlarge
Step C – Setup Routine Installation Completion
We are almost there. But you will notice that the button Next is greyed out and that a warning message is available at the bottom of the dialog box. You can click on Show details to have more information.
Click to Enlarge
What’s does that means ? Okay, no panic ! This cryptic message simply means that the Windows installation files are not available. We simply need to go back the PVE Web interface and again unload the Virtio drivers and reload the Windows installation iso image into the cdrom of the virtual machine (same procedure as above – Step B)
When the Windows CD is reload into the virtual machine, you will see that you can now indeed click on the next button and that the Windows Setup process will simply continue as it should.
Click to Enlarge
Click to Enlarge
Final Steps
The Setup routine will finalize the installation and the system will reboot automatically. When the virtual machine reboots, you will get a running Windows 2008 R2 virtual machine. However, we haven’t finished yet. If you have a look at your network connections, you will see that no network card are available within your virtual machine.
Click to Enlarge
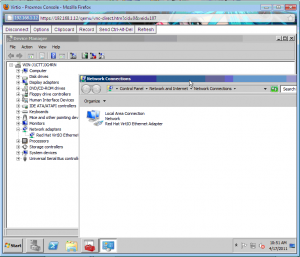
If you open the Device Manager, you will see that the ethernet controller is there but that no drivers are available for it.
Click to Enlarge
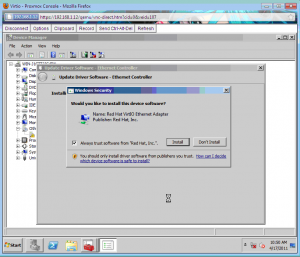
Again, we have to load the Virtio ISO in the virtual machine and install the missing drivers. Simply right-click the Ethernet controller in the device manager and click on Update Drivers. The Wizard will start. You simply specify to the wizard where to look for the needed drivers. During the wizard, you might see a warning message. Simply press Install to authorize installation of the virtio drivers and have your network card installed within Windows operating system.
Click to Enlarge
Note : You might be prompted to reboot your server after installing the driver
At the end of the process, you should see your network card (as shown below). We are done. Now simply configure your virtual machine as you need.
Click to Enlarge
Conclusion
In this post, we explained how to create a Windows 2008R2/Windows 7 Virtual machine using VIRTIO drivers when using a Proxmox VE infrastructure. As you have seen the process is quite straightforward (isn’t it !). Because we are using virtio drivers, you will need to perform some additional operations in order for windows to recognize the storage controller. The process to specify additional drivers within Windows 2008 R2/Windows 7 is far easier than with previous versions.
In the future post, we will see how we can integrate the drivers into your windows installation file
Till then, Stay Tuned
See ya
Introduction
This is a set of best practices to follow when installing a Windows Server 2008 R2 guest on a Proxmox VE server 2.x (2.3 at time of writing). Right now it’s a work in progress but hopefully soon it will be a comprehensive and reliable document. Please feel free to add to it, even if just to pose a potential best practice.
Install
Prepare
- After clicking «Create VM» enter a Name: for your vm, select your Resource Pool (if you have one) and click Next
- Select Microsoft Windows 7/2008 in the OS tab and click Next.
- Select an ISO Image: for Windows Server 2008 in the CD/DVD tab and click Next.
- Select Bus/Device: IDE, Storage: «your preferred storage» and Cache: Write back in the Hard Disk tab and click Next.
- Select number of Sockets and cores (the default of 1 is mostly sufficient) in the CPU tab and click Next.
- Select Automatically allocate memory and set the Maximum memory to a number you may require in the memory tab and click Next.
- Select Model: VirtIO (paravirtualized) in the Network tab and click Next
- Click finish and go to the Hardware tab of your newly created VM and click Add -> CD/DVD drive
- Select Storage:local and ISO image: virtio-win-x.x.iso and click create.
- To add a temporary disk for installing VirtIO block driver go to the Hardware tab of your newly created VM again and click Add -> Hard Disk
- Select Bus/Device: VIRTIO, Storage: «your preferred storage» and Cache: Write back and click Add
Launch Windows install
- start your newly created virtual machine using the «Start» link in the upper right.
- wait until the vm icon has turned white before you login using the «Console» link in the upper right. (NOTE: Sometimes the java console does not start at the first attempt. Please click refresh/reload in this case)
- Start the server install with «Install Now» and select the Operating System Flavor you like and click next and select «Custom: Install Windows only»
- Wait until Windows is installed and select a Password for the local Administrator account and login to Windows.
Install additional VirtIO drivers
- Start Explorer, Go to CDROM, copy folder WIN7AMD64 to C:Program Files and rename AMD64 to C:Program FilesVirtIO
- open Device Manager and right click on Other Devices -> Ethernet Controller and select update driver software
- select «Browse my computer» select folder «C:Program FilesVirtIO» and click «Install» for Red Hat VirtIO Ethernet Adapter.
- again in Device Manager right click on Other Devices -> PCI Device and select update driver software
- again «Browse my computer» select folder «C:Program FilesVirtIO» and click «Install» for VirtIO Ballon Driver.
- open a powershell window, cd to «C:Program FilesVirtIO» and enter: blnsvr.exe -i.
The BallonService that can help free up memory is installed. The BallonService is also responsible for displaying the correct amount of memory in the Proxmox console.
further info
raw vs qcow2
Raw file format provides better performance while qcow2 offers advanced features such as copy on write and snapshots. As of Qemu 1.4 / PVE 2.3 qcow2 is expected to provide superior performance.
virtio drivers
Use virtio dirvers for best performance. More info:
Paravirtualized Block Drivers for Windows
latest iso with virtio drivers :
https://fedorapeople.org/groups/virt/virtio-win/direct-downloads/latest-virtio/
Power settings
- In Windows Server 2008, you need to disable the ‘Shutdown Event Tracker’. This setting in Group Policy. If the server is part of a domain, you need to edit the group policy for the organizational unit with the server. If you’re not using a domain, you can edit the local group policy. This can be accessed by doing the following:
- Start -> Run -> gpedit.msc -> ok -> open «Computer Configuration» then «Policy» then «Administrative Templates» then «System». In the right pane, double click on ‘Display Shutdown Event Tracker’ and select ‘disable’ and OK. To make sure the new group policy is applied. Go to Start -> run -> cmd -> ok and type in ‘gpupdate /force’ without the quotes. Now when you select shutdown, you won’t be promoted with the box asking why you are shutting down the server.
- In order to make Windows 2008 R2 guest shutdown cleanly on the event of a shutdown (power button) on the Proxmox VE host you need make the following changes:
- Control Panel -> System and Security -> Power Options -> Edit Plan Settings -> Turn off the display: Never
See also
Windows 2003 guest best practices
Windows 2012 guest best practices
We are running a Windows Server 2008 system as a «guest» on a Linux-KVM virtual server (SLES11, with VirtIO support). We have trouble with the system performance and this is possibly due to not using the VirtIO drivers. I don’t have much experience with neither KVM nor VirtIO. Just heard it this could be the reason for our problem.
Questions:
-
The install examples I just found are describing how to install the drivers during Windows setup. Is it possible to install the VirtIO drivers later? We have running software on that system and would like to avoid reinstalling/setup of all these.
-
I already found a page describing how to sign the drivers, which seems to be needed. A good tutorial page (step by step instructions) would be nice. Is there anything like that out there?
asked Oct 9, 2012 at 9:02
SDwarfsSDwarfs
1131 gold badge1 silver badge7 bronze badges
The process is described in the article Converting a Windows Vista KVM Virtual Machine to Redhat VirtIO Drivers.
You should first download from linux-kvm.com the Windows Guest Drivers in cdrom image (iso).
The current version is at this link.
Here is an excerpt from the article (read «Windows 2008» for «Vista») :
- Make sure Vista VM is up to date on patches and the disk is error free.
- Mount the .iso file as a CD-ROM device.
Now you might think you can use the ‘Add Hardware Wizard’ here and add
the drivers, add the hardware, and be good. I did. I wound up with an
unbootable disk. Apparently Vista’s autodetection is required in this
process. So…
- Add a new network device of type ‘virtio’. Vista will do its “you’ve got hardware” routine and run you through all of its wizards.
When it asks you for drivers, point it at the i386/2008 directory on
the driver disc image. Yes, Yes, OK, Yes, Really, Continue, etc.- Shutdown the VM and remove the old ethernet controller. Boot up Vista and make sure the network works. You can conceivably skip this
step for now if you want to make troubleshooting harder.- Add a new Storage controller. Leave the existing one as-is for now. You’ll have to pick a disk image you’re not using right now, or make a
new one. Anything is fine, we’re not going to ever use it inside
Vista. Do the driver dance again.- Shutdown Windows. Remove the storage controllers, and add a new one, type ‘virtio’, with your normal hard drive image. Take care of
the old ethernet controller here too, if you ignored my previous
advice.- Boot Windows normally. It should now be coming up on VirtIO disk and network drivers. If you get a bluescreen or a plea to use the
RepairCD, something went wrong. Use the repair CD to restore to a
previous restore-point and try again.
answered Nov 8, 2012 at 19:52
harrymcharrymc
431k30 gold badges495 silver badges876 bronze badges
2
I can’t go into details, as I haven’t done it myself… But, here is what a colleague actually did:
You can actually install the drivers under a running system. Before that the devices must be changed in the configuration XML for «virtio» devices when powered down. You can’t install the drivers without the devices already present. This is especially problematic for the hard drive… as windows won’t startup, when just configuring it for virtio. The solution is to put a «dummy» virtio-harddrive into the config (or just the same harddrive twice as virtio and normal harddrive; make sure not to write access both of them!) and then install the driver and then switch the config for the primary hard drive.
He told me there was a «redhat driver pack for windows» or something like that… this is probably working without signing (is already signed)? I actually didn’t ask for details… Just note that there may exist different sources for the drivers.
Hope that helps others…
Regards,
Stefan
PS: Comments and questions are welcome…
answered Nov 7, 2012 at 12:50
SDwarfsSDwarfs
1131 gold badge1 silver badge7 bronze badges
This is a follow up to a pervious question. I have a Ubuntu host with a Win 2008 KVM. To improve performance the network and IO — @dyasny and the documentation recommends installing virtIO drivers. I did follow this :
http://www.linux-kvm.org/page/WindowsGuestDrivers/Download_Drivers
Downloaded the ISO from:
http://alt.fedoraproject.org/pub/alt/virtio-win/latest/images/
Now I am not sure how to proceed. I have the Win 2008 VM already installed with the virtual disk in RAW format with an IDE bus.
I opened the iso and have several folders. Like
E:Balloon
E:NetKVM
E:vioserial
E:viostor
I am assuming NetKVM is for the network drivers and viostor is for the disk drivers.
For the NetKVM, there is only Vista and XP sub-folders.
Similarly for the viostor: there is a folder structure like below.
E:viostorWin7
E:viostorWlh
E:viostorWnet
E:viostorWXp
So in summary, my questions:
- Which folders should we use for Win
2008 64 bit? - How do I install the NetKVM for an
existing VM? - How do I ins tall the viostor for
an existing VM? - Finally, just out of curiosity,
what is Ballon and vioserial drivers
for?
Thanks a ton for your help!
We are running a Windows Server 2008 system as a «guest» on a Linux-KVM virtual server (SLES11, with VirtIO support). We have trouble with the system performance and this is possibly due to not using the VirtIO drivers. I don’t have much experience with neither KVM nor VirtIO. Just heard it this could be the reason for our problem.
Questions:
-
The install examples I just found are describing how to install the drivers during Windows setup. Is it possible to install the VirtIO drivers later? We have running software on that system and would like to avoid reinstalling/setup of all these.
-
I already found a page describing how to sign the drivers, which seems to be needed. A good tutorial page (step by step instructions) would be nice. Is there anything like that out there?
asked Oct 9, 2012 at 9:02
SDwarfsSDwarfs
1131 gold badge1 silver badge7 bronze badges
The process is described in the article Converting a Windows Vista KVM Virtual Machine to Redhat VirtIO Drivers.
You should first download from linux-kvm.com the Windows Guest Drivers in cdrom image (iso).
The current version is at this link.
Here is an excerpt from the article (read «Windows 2008» for «Vista») :
- Make sure Vista VM is up to date on patches and the disk is error free.
- Mount the .iso file as a CD-ROM device.
Now you might think you can use the ‘Add Hardware Wizard’ here and add
the drivers, add the hardware, and be good. I did. I wound up with an
unbootable disk. Apparently Vista’s autodetection is required in this
process. So…
- Add a new network device of type ‘virtio’. Vista will do its “you’ve got hardware” routine and run you through all of its wizards.
When it asks you for drivers, point it at the i386/2008 directory on
the driver disc image. Yes, Yes, OK, Yes, Really, Continue, etc.- Shutdown the VM and remove the old ethernet controller. Boot up Vista and make sure the network works. You can conceivably skip this
step for now if you want to make troubleshooting harder.- Add a new Storage controller. Leave the existing one as-is for now. You’ll have to pick a disk image you’re not using right now, or make a
new one. Anything is fine, we’re not going to ever use it inside
Vista. Do the driver dance again.- Shutdown Windows. Remove the storage controllers, and add a new one, type ‘virtio’, with your normal hard drive image. Take care of
the old ethernet controller here too, if you ignored my previous
advice.- Boot Windows normally. It should now be coming up on VirtIO disk and network drivers. If you get a bluescreen or a plea to use the
RepairCD, something went wrong. Use the repair CD to restore to a
previous restore-point and try again.
answered Nov 8, 2012 at 19:52
harrymcharrymc
431k30 gold badges495 silver badges876 bronze badges
2
I can’t go into details, as I haven’t done it myself… But, here is what a colleague actually did:
You can actually install the drivers under a running system. Before that the devices must be changed in the configuration XML for «virtio» devices when powered down. You can’t install the drivers without the devices already present. This is especially problematic for the hard drive… as windows won’t startup, when just configuring it for virtio. The solution is to put a «dummy» virtio-harddrive into the config (or just the same harddrive twice as virtio and normal harddrive; make sure not to write access both of them!) and then install the driver and then switch the config for the primary hard drive.
He told me there was a «redhat driver pack for windows» or something like that… this is probably working without signing (is already signed)? I actually didn’t ask for details… Just note that there may exist different sources for the drivers.
Hope that helps others…
Regards,
Stefan
PS: Comments and questions are welcome…
answered Nov 7, 2012 at 12:50
SDwarfsSDwarfs
1131 gold badge1 silver badge7 bronze badges
KVM/QEMU Windows guest drivers (virtio-win)
This repository contains KVM/QEMU Windows guest drivers, for both
paravirtual and emulated hardware. The code builds and ships as part
of the virtio-win RPM on Fedora and Red Hat Enterprise Linux, and the
binaries are also available in the form of distribution-neutral ISO
and VFD images. If all you want is use virtio-win in your Windows
virtual machines, go to the
Fedora virtIO-win documentation
for information on obtaining the binaries.
If you’d like to build virtio-win from sources, clone this repo and
follow the instructions in Building the Drivers.
Note that the drivers you build will be either unsigned or test-signed
with Tools/VirtIOTestCert.cer, which means that Windows will not load
them by default. See Microsoft’s driver signing page
for more information on test-signing.
If you want to build cross-signed binaries (like the ones that ship in
the Fedora RPM), you’ll need your own code-signing certificate.
Cross-signed drivers can be used on all versions of Windows except for
the latest Windows 10 with secure boot enabled. However, systems with
cross-signed drivers will not receive Microsoft support.
If you want to produce Microsoft-signed binaries (fully supported,
like the ones that ship in the Red Hat Enterprise Linux RPM), you’ll
need to submit the drivers to Microsoft along with a set of test
results (so called WHQL process). If you decide to WHQL the drivers,
make sure to base them on commit eb2996de or newer, since the GPL
license used prior to this commit is not compatible with WHQL.
Additionally, we ask that you make a change to the Hardware IDs so
that your drivers will not match devices exposed by the upstream
versions of KVM/QEMU. This is especially important if you plan to
distribute the drivers with Windows Update, see the
Microsoft publishing restrictions for more details.


