Introduction
VirtIO Drivers are paravirtualized drivers for kvm/Linux (see http://www.linux-kvm.org/page/Virtio). In short, they enable direct (paravirtualized) access to devices and peripherals for virtual machines using them, instead of slower, emulated, ones.
A quite extended explanation about VirtIO drivers can be found here http://www.ibm.com/developerworks/library/l-virtio.
At the moment these kind of devices are supported:
- block (disks drives), see Paravirtualized Block Drivers for Windows
- network (ethernet cards), see Paravirtualized Network Drivers for Windows
- balloon (dynamic memory management), see Dynamic Memory Management
You can maximize performances by using VirtIO drivers. The availability and status of the VirtIO drivers depends on the guest OS and platform.
Windows OS Support
Windows does not have native support for VirtIO devices included.
But, there is excellent external support through opensource drivers, which are available compiled and signed for Windows:
https://fedorapeople.org/groups/virt/virtio-win/direct-downloads/archive-virtio/?C=M;O=D
Note that this repository provides not only the most recent, but also many older versions.
Those older versions can still be useful when a Windows VM shows instability or incompatibility with a newer driver version.
The binary drivers are digitally signed by Red Hat, and will work on 32-bit and 64-bit versions of Windows
Installation
Using the ISO
You can download the latest stable or you can download the most recent build of the ISO.
Normally the drivers are pretty stable, so one should try out the most recent release first.
You can access the ISO can in a VM by mounting the ISO with a virtual CD-ROM/DVD drive on that VM.
Wizard Installation
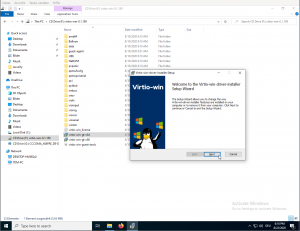
You can use an easy wizard to install all, or a selection, of VirtIO drivers.
- Open the Windows Explorer and navigate to the CD-ROM drive.
- Simply execute (double-click on) virtio-win-gt-x64
- Follow its instructions.
- (Optional) use the virtio-win-guest-tools wizard to install the QEMU Guest Agent and the SPICE agent for an improved remote-viewer experience.
- Reboot VM
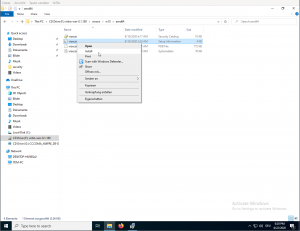
Manual Installation
- Open the Windows Explorer and navigate to the CD-ROM drive.
- There you can see that the ISO consists of several directories, each having sub-directories for supported OS version (for example, 2k19, 2k12R2, w7, w8.1, w10, …).
- Balloon
- guest-agent
- NetKVM
- qxl
- vioscsi
- …
- Navigate to the desired driver directories and respective Windows Version
- Right-click on the file with type «Setup Information»
- A context menu opens, select «Install» here.
- Repeat that process for all desired drivers
- Reboot VM.
Downloading the Wizard in the VM
You can also just download the most recent virtio-win-gt-x64.msi or virtio-win-gt-x86.msi from inside the VM, if you have already network access.
Then just execute it and follow the installation process.
Troubleshooting
Try an older version of the drivers first, if that does not helps ask in one of our support channels:
https://pve.proxmox.com/wiki/Get_support
Further Reading
https://docs.fedoraproject.org/en-US/quick-docs/creating-windows-virtual-machines-using-virtio-drivers/index.html
http://www.linux-kvm.org/page/WindowsGuestDrivers
The source code of those drivers can be found here: https://github.com/virtio-win/kvm-guest-drivers-windows
http://www.linux-kvm.org/page/WindowsGuestDrivers/Download_Drivers
See also
- Paravirtualized Block Drivers for Windows
- Paravirtualized Network Drivers for Windows
- Dynamic Memory Management
KVM/QEMU Windows guest drivers (virtio-win)
This repository contains KVM/QEMU Windows guest drivers, for both
paravirtual and emulated hardware. The code builds and ships as part
of the virtio-win RPM on Fedora and Red Hat Enterprise Linux, and the
binaries are also available in the form of distribution-neutral ISO
and VFD images. If all you want is use virtio-win in your Windows
virtual machines, go to the
Fedora virtIO-win documentation
for information on obtaining the binaries.
If you’d like to build virtio-win from sources, clone this repo and
follow the instructions in Building the Drivers.
Note that the drivers you build will be either unsigned or test-signed
with Tools/VirtIOTestCert.cer, which means that Windows will not load
them by default. See Microsoft’s driver signing page
for more information on test-signing.
If you want to build cross-signed binaries (like the ones that ship in
the Fedora RPM), you’ll need your own code-signing certificate.
Cross-signed drivers can be used on all versions of Windows except for
the latest Windows 10 with secure boot enabled. However, systems with
cross-signed drivers will not receive Microsoft support.
If you want to produce Microsoft-signed binaries (fully supported,
like the ones that ship in the Red Hat Enterprise Linux RPM), you’ll
need to submit the drivers to Microsoft along with a set of test
results (so called WHQL process). If you decide to WHQL the drivers,
make sure to base them on commit eb2996de or newer, since the GPL
license used prior to this commit is not compatible with WHQL.
Additionally, we ask that you make a change to the Hardware IDs so
that your drivers will not match devices exposed by the upstream
versions of KVM/QEMU. This is especially important if you plan to
distribute the drivers with Windows Update, see the
Microsoft publishing restrictions for more details.
Download the latest Nutanix Virtio Driver 1.1.5 for Windows 32 bit / 64 bit Windows 7, 8, 8.1, 10, Windows Server 2008R2, 2012, 2012R2, 2016 and 2019 , Nutanix AHV support Windows Server 2019 with Nutanix Virtio Driver 1.1.5. Nutanix Virtio Version 1.1.5 is released with Windows Server 2019 Compatible drivers.
Nutanix Virtio Driver version 1.1.5 is basic required driver package for Windows operating system Windows 7, 8, 10 and Windows Server 2008R2, 2012, 2016 and latest Windows Server 2019. which need to be installed in Windows OS during installation on Nutanix AHV hypervisor only.
Nutanix Virtio Driver has built-in following basic Windows OS drivers:
1. Data service bus SCSI driver
2. Network driver
3. Memory Ballooning driver
4. VM Mobility drive
Nutanix latest Virtio 1.1.5 supports following Windows OS:
- Windows server version: 2008R2, 2012, 2012R2, 2016 and 2019
- Windows client version: 7, 8, 8.1, 10
Read also: Microsoft Integrating Linux Kernel Inside Windows 10
Download Nutanix Virtio Driver 1.1.5
Download the latest Nutanix Virtio Driver version 1.1.5 though following Nutanix link:
Download ISO Image for Windows 32 bit / 64 bit operating systems – Windows 7, 8, 8.1, 10, 2008R2, 2012, 2012R2, 2016 and 2019 : Nutanix VirtIO 1.1.5 for Windows
Download MSI / Executable file for Windows 64 bit operating systems – Windows 7, 8, 8.1, 10, 2008R2, 2012, 2012R2, 2016 and 2019: Nutanix VirtIO 1.1.5 for Windows
Conclusion
Nutanix AHV supports Windows Server 2019 with latest Virtio Driver version 1.1.5.
Thanks to being with HyperHCI Tech Blog to stay tuned with techie blogs here.
Similar link:
- Download Nutanix Latest Virtio Driver 1.1.4
- Nutanix HCI Products Overview
- Nutanix Guest Tool NGT Installations in Windows and Linux VM
You wanted to install the windows 2019 server on a hypervisor and the option that you have right now is to use the QEMU KVM hypervisor. Then you are in the right place.
And when it comes to virtualization I love KVM, as it is Open-source and free too. Whenever I had to choose between hypervisors I would always prefer KVM than anything else.
I was working for Palo Alto and Checkpoint lab the other day, and I wanted to test out the LDAP integration with the firewall.
The only way I can test LDAP configuration is by installing the windows server with its services in it. So I decided to spin up the window server 2019 in KVM.
The Windows server 2016/2019 works really well with the KVM hypervisors. Since there are support virtio drivers, you get to install all the display, network, and graphics related drivers in it.
If you are new to KVM, don’t worry, I have covered some of the useful KVM commands here, I would highly recommend you check them out. It will be useful when you wanted to manage the VM’s with KVM.
In the past, I covered the installation of windows 10 on a Centos/Redhat and Ubuntu KVM hypervisors, and in this article, I am going to install windows server 2019 on a KVM hypervisor.
Prerequisite
You need to have a good configuration machine or a server with Linux installed in it, either Centos/Redhat or Ubuntu with GUI. And we can install KVM software in it.
To install kvm on Ubuntu you can enter the command below.
sudo apt update
sudo apt install qemu-kvm bridge-utils virt-manager libosinfo-bin -y
If you are using Centos then the command will be as follows.
yum install qemu-kvm libvirt virt-install virt-manager virt-install -y
Windows server 2019 ISO image.
If you have the server ISO image then great, or you can get a trail from the Microsoft site here.
Windows 2019 VirtIO drivers
You can download the VirtIO drivers here
How to install windows server 2019 in KVM?
- Creation of windows server VM.
- Setup windows resources.
- Customize configuration before install.
- Configure the CPU for the KVM windows guest properly.
- Add windows VirtIO driver.
- Change the boot order.
- Start the Windows installation.
- No windows harddisk in KVM ?, fix that now.
- Set the Administrator Password.
- Install the virtio drivers for windows server 2019.
1. Creation of windows server VM.
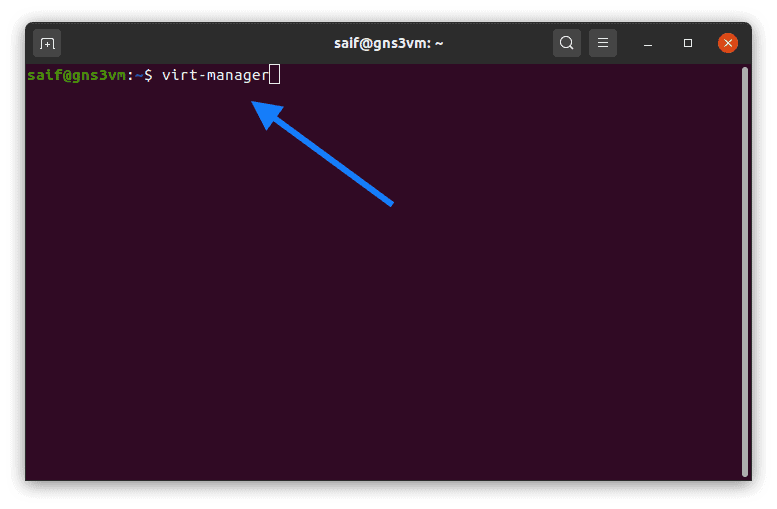
Open terminal and type virt-manager and hit enter.
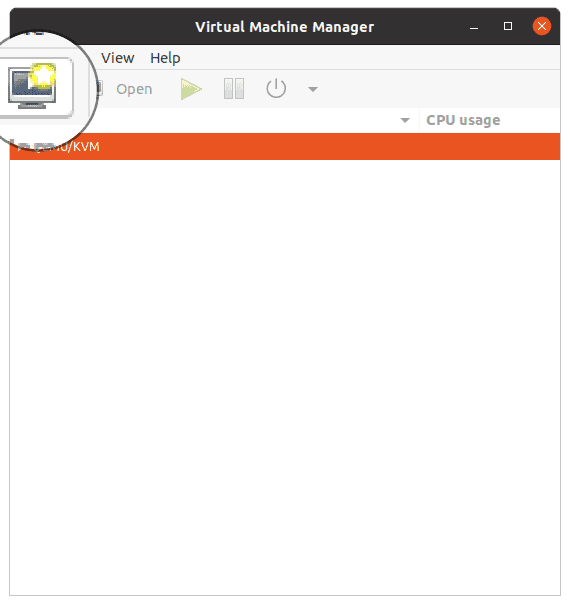
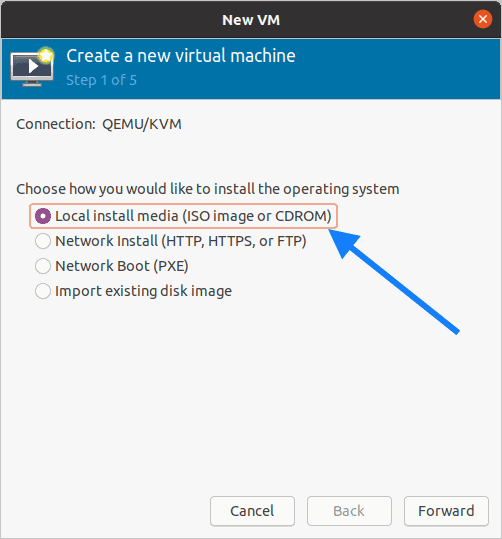
A new virtual machine manager window now pop up, click on create new virtual machine icon.
In the creation of New VM pop up, select Local install media (ISO image or CDROM), then click on Forward.
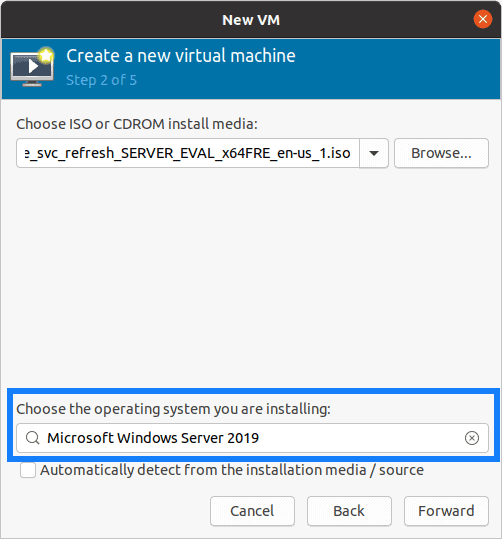
You now have to choose the Microsoft windows server 2019 as the operating system.
Uncheck the option which says Automatically detect from the installation media/source and start typing Microsoft window server 2019.
Choose the same from the list and click on Forward.
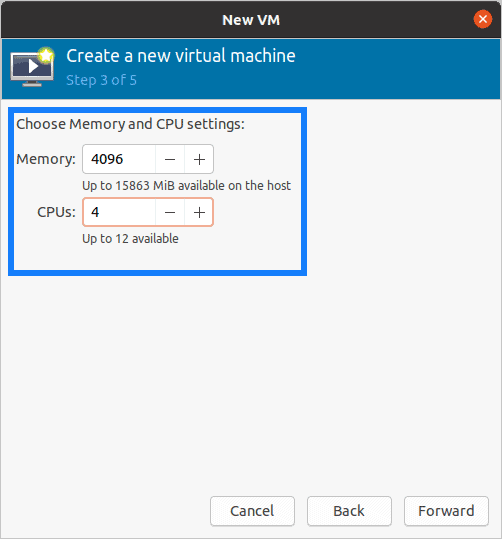
You can now configure the Memory and CPU for the machine, I am adding memory as 4GB and 4 CPU.
2. Setup windows resources.
Configure the the memory and CPU here and click on Forward.
You may add more if you require.
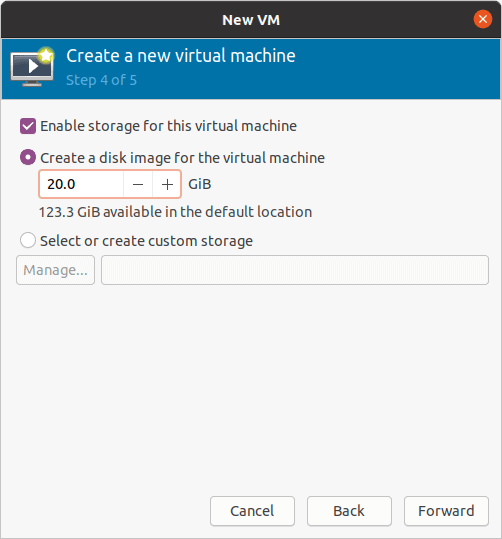
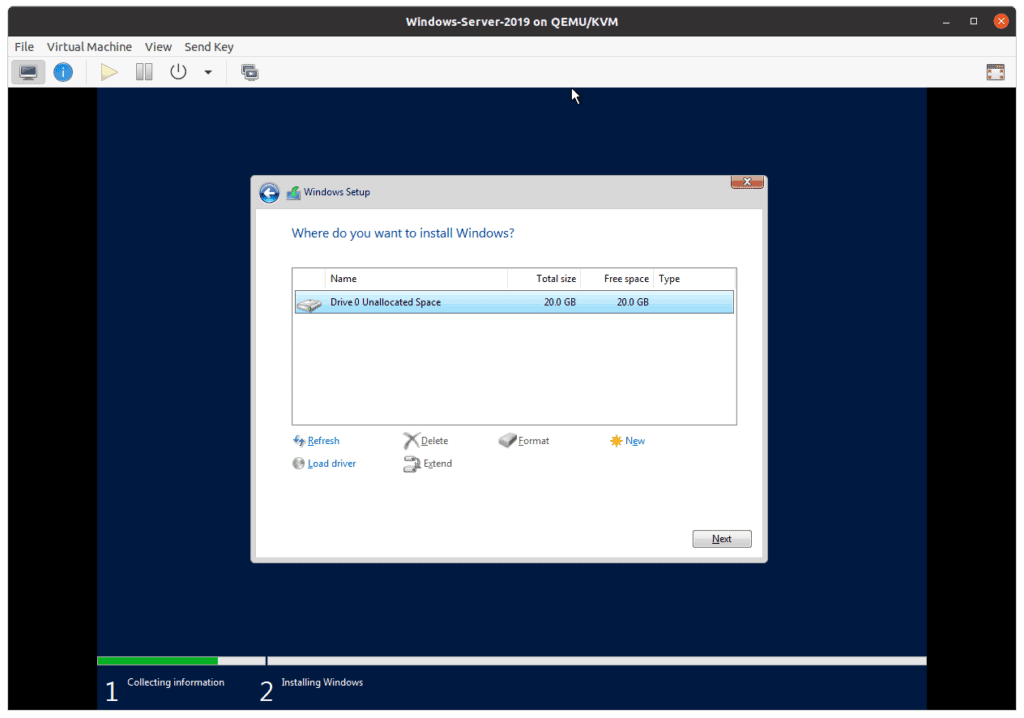
In the windows Storage, by default it would pick up the storage size as 40GB, I am changing it to 20GB.
You may select the default size or more, but don’t worry, you can change the storage size later by following the guide here.
3. Customize configuration before install.
Check the option which says Customize configuration before install and click on Finish.
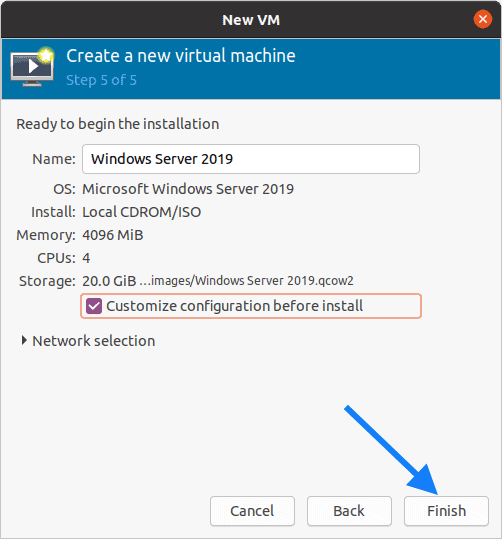
You will now be presented with QEMU KVM customization wizard.
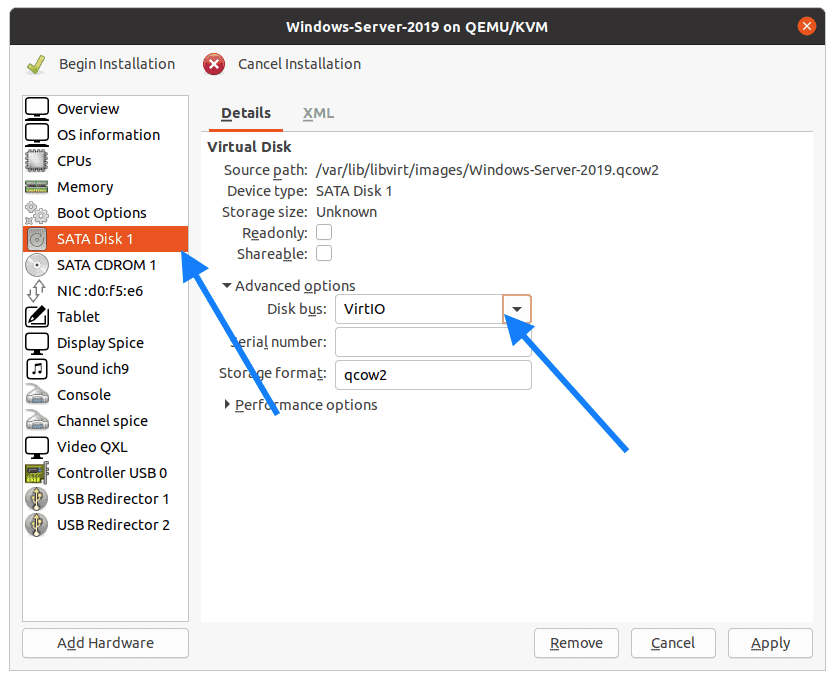
First lets go ahead and change the storage to VirtIO, click on SATA Disk 1 and in the disk bus select VirtIO and click on Apply.
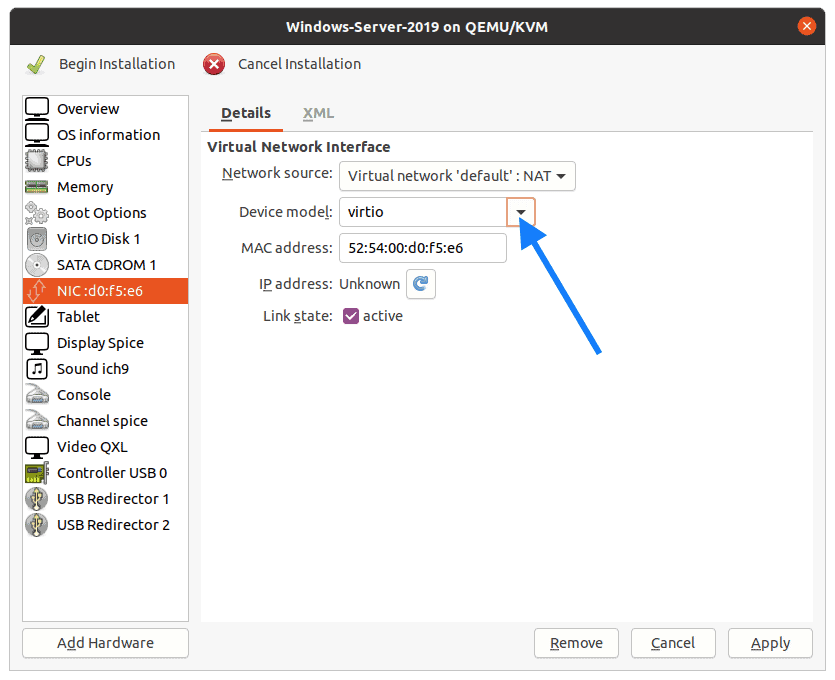
Click on the Network Interface Card and change it to Virtio here as well and click on Apply.
Notice that I have selected the NAT as the interface, this would help my server to connect the internet via the host machine.
In production, this must be different, as you might use a bridge interface that connects to the switch to get to the network.
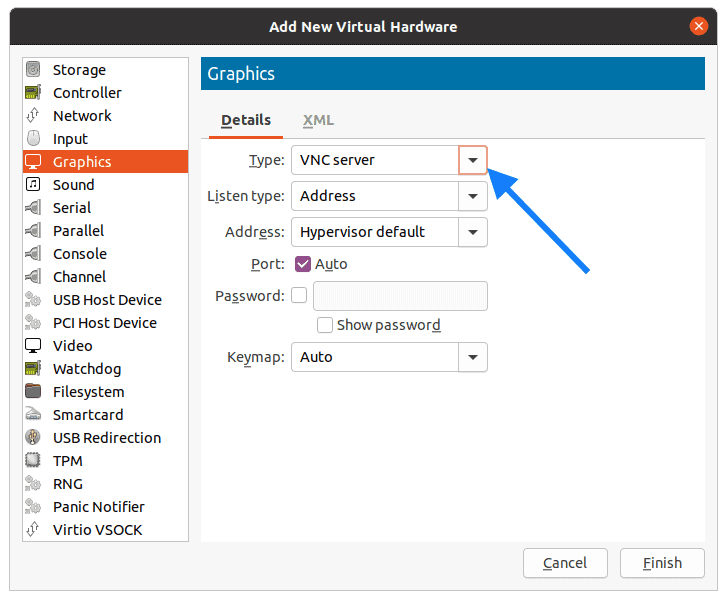
Next lets go ahead and add the VNC server as the Graphics.
Click on Add hardware again, and from the list select Graphics and in Type select VNC Server, then click on Finish.
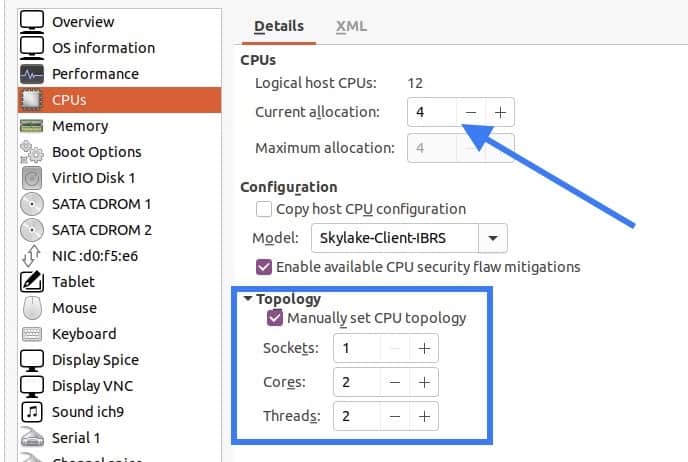
4. Configure the CPU for the KVM windows guest properly.
Though we configured the CPU as 4, it will actually not pick up all four cores until you specify in the configuration.
So make changes like below. Click on CPU’s and in the Current Allocation specify 4 CPU and in the topology check the options Manually set CPU topology and in Sockets type 1 and cores 2 and Threads 2 as well. You may change it as per your requirements.
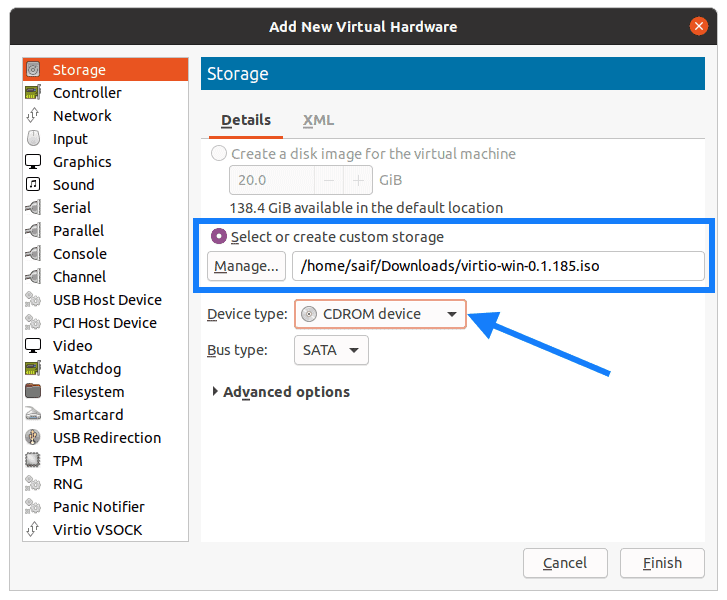
5. Add windows VirtIO driver.
Remember that we have download virtio drivers for windows server 2019 at the beginning? Lets add that now.
CLick on Add hardware and select storage.
Check the option Select or create custom storage and click on Manage to attach the windows kvm drivers to the configuration.
In the device type select CDROM device from the list then click on Finish.
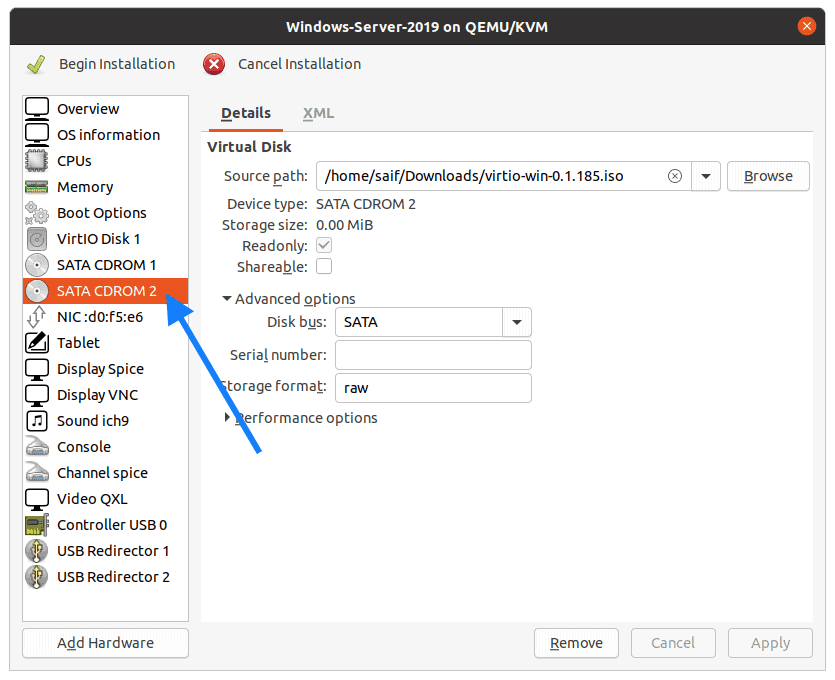
When you look VM configuration you should be able to see there are two CDROM’s.
CDROM1 is for the windows 2019 iso image.
CDROM2 is for the windows 2019 KVM Qemu drivers.
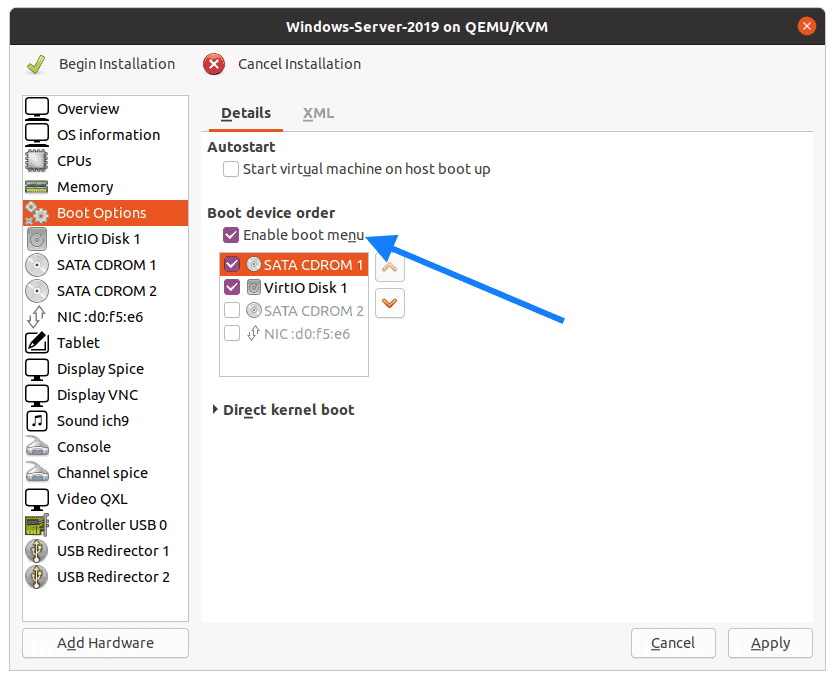
6. Change the boot order.
You need to make sure that you choose windows ISO image during the boot when you proceed with the installation.
Click on Boot options and check the options which says Enable boot menu.
And check the SATA CDROM1 and VirtIO disk 1.
Move CDROM1 to be the primary boot device.
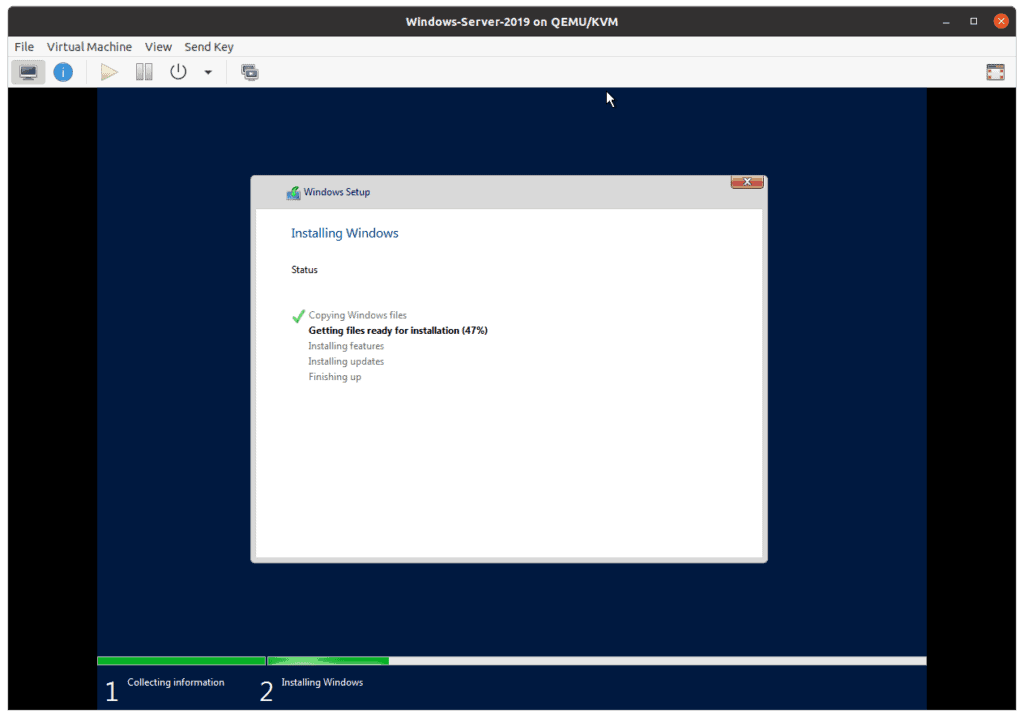
7. Start the windows installation.
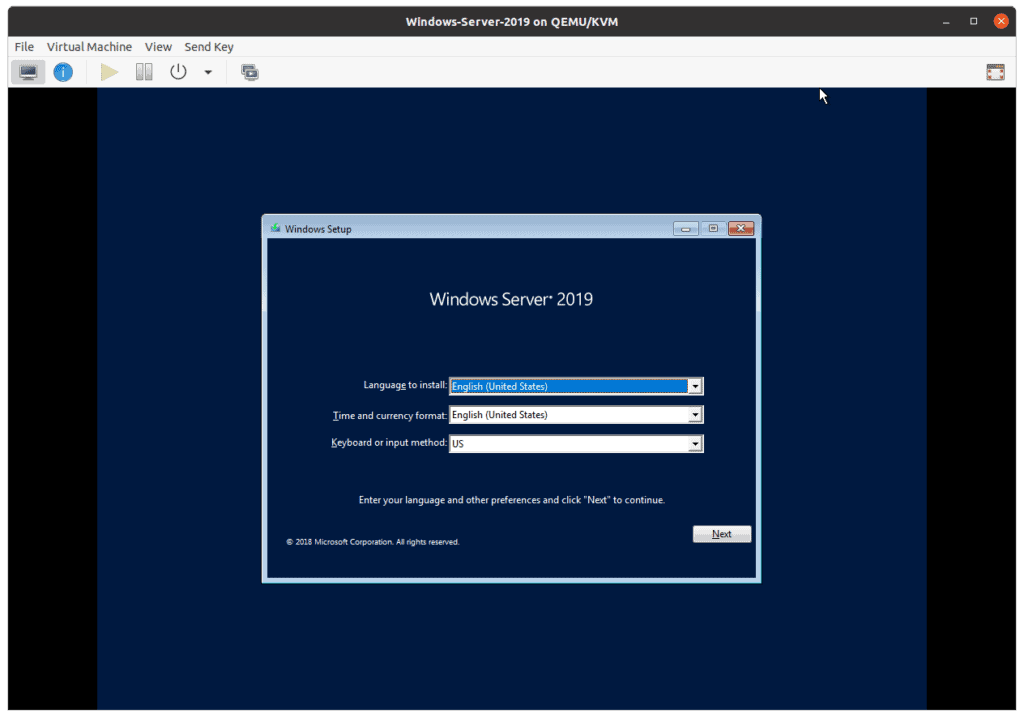
You may now click on begin installation and you should be able to see the windows 2019 installation screen appears with the windows logo.
In the setup wizard Choos the Langauge and the country then click on Next.
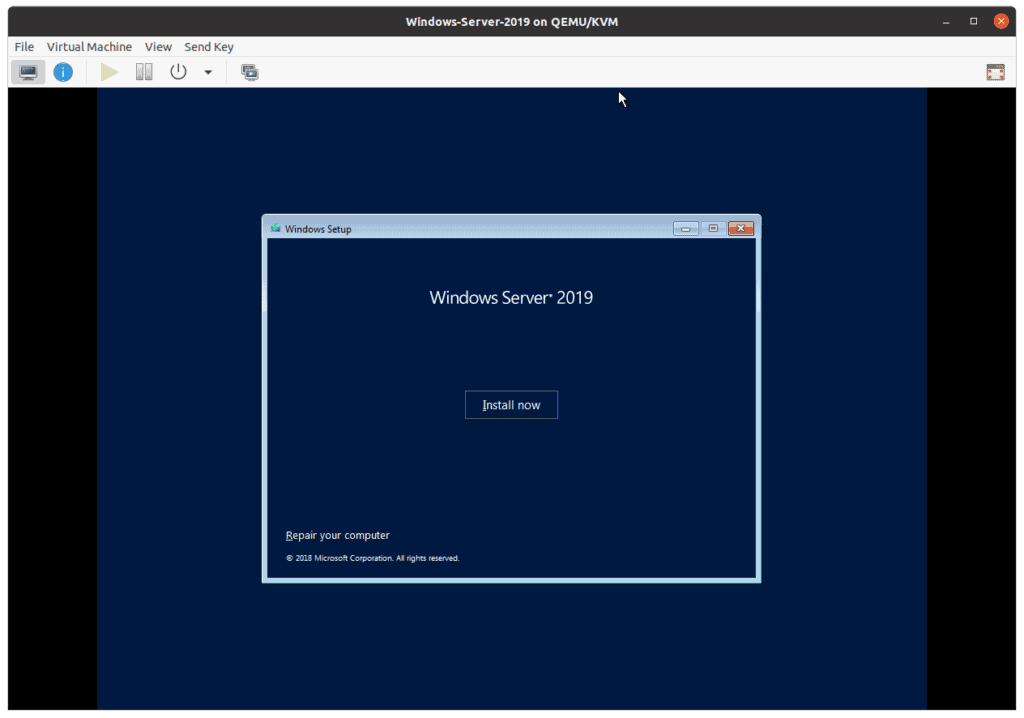
You may click on Install now on the windows Setup wizard.
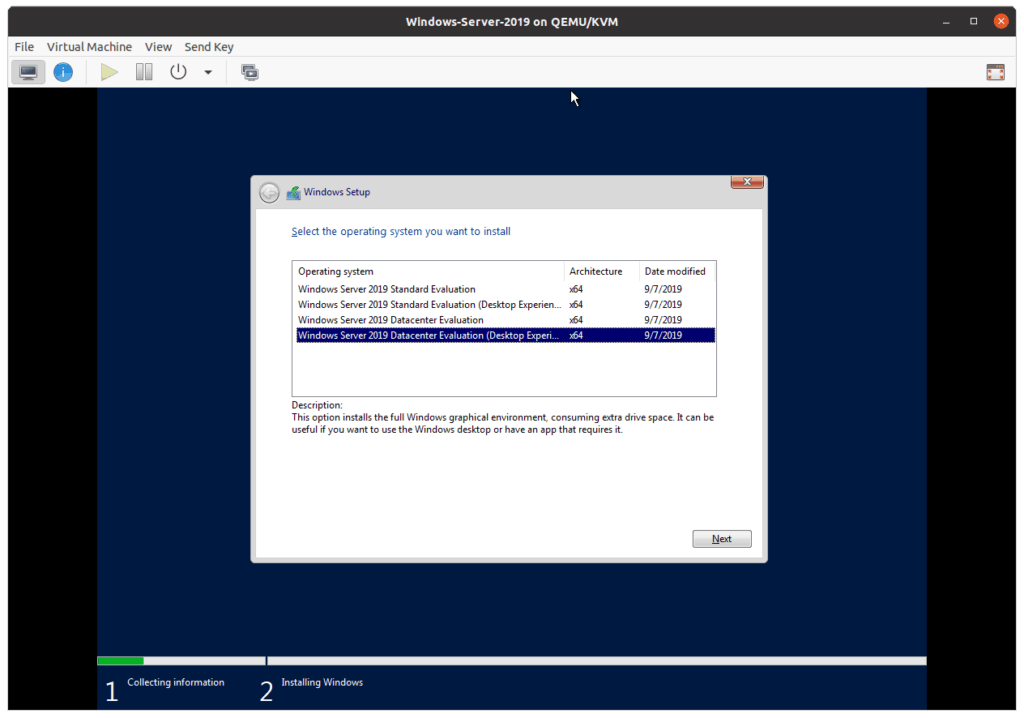
Choose the windows server version that you would like to install then click on Next.
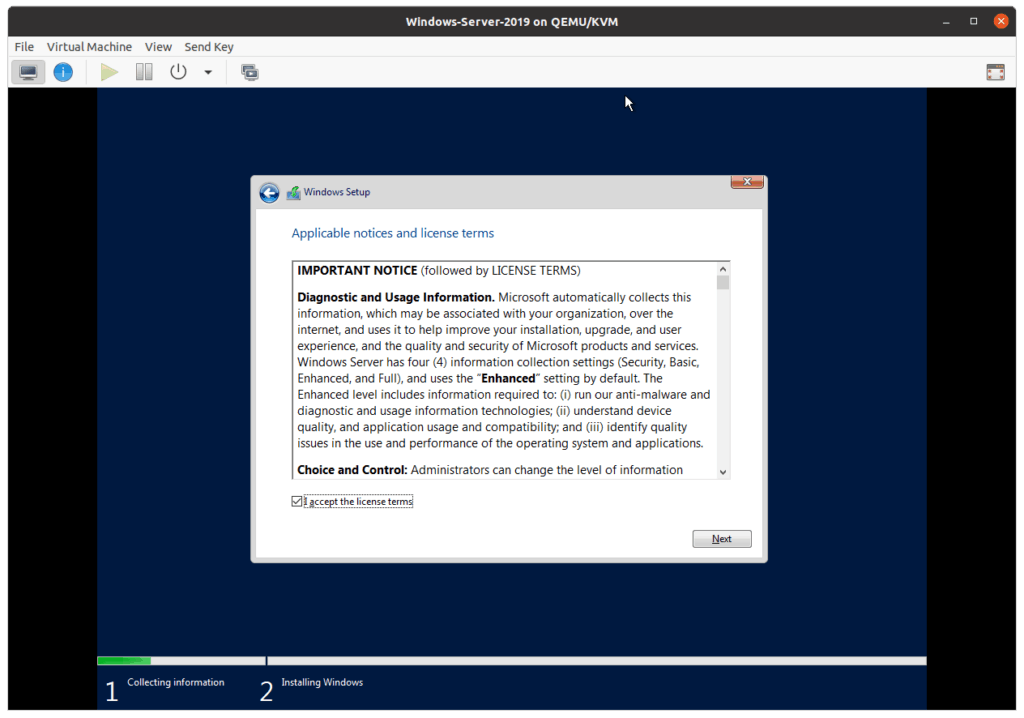
Accept the license agreement then click on next.
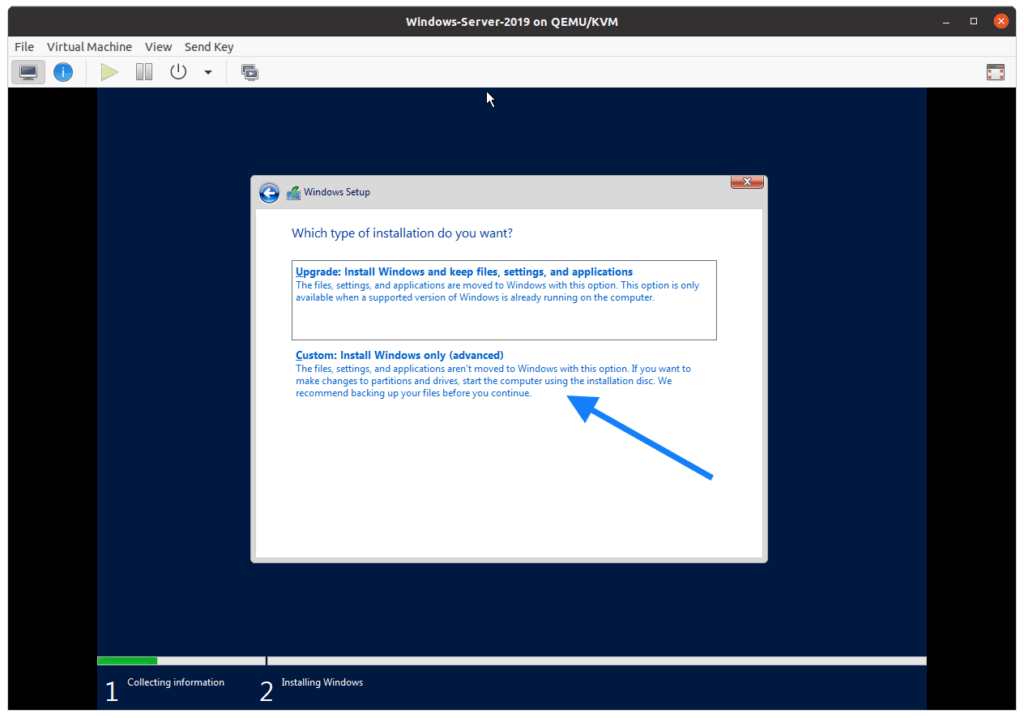
From the installation option choose Custom
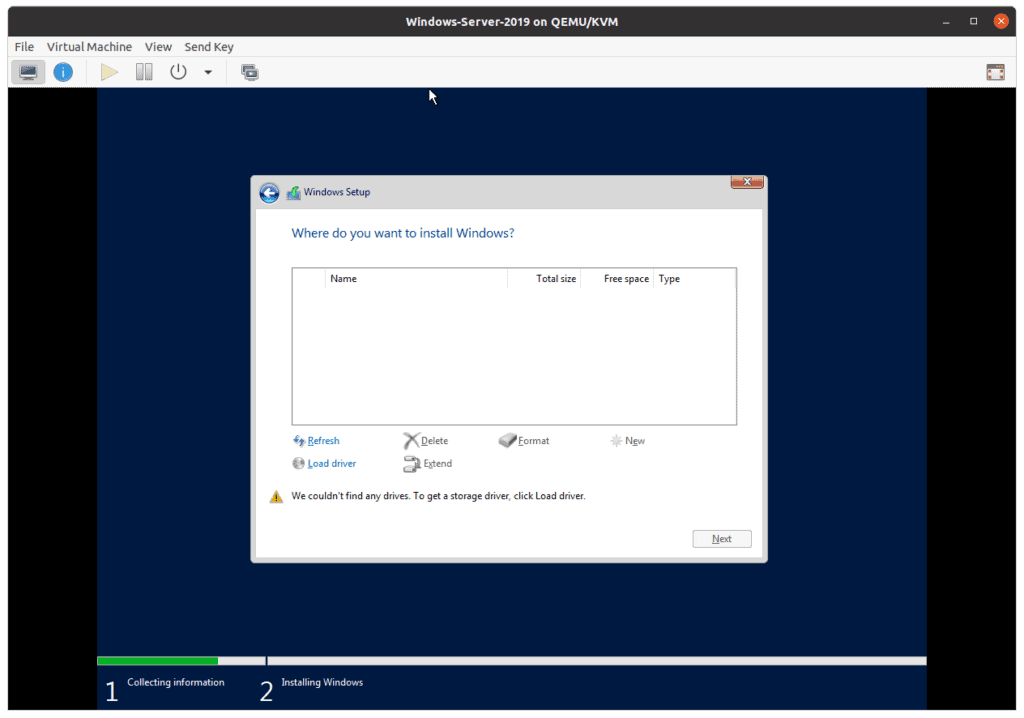
8. No windows harddisk in kvm ?, fix that now.
As you can see the we have added a hardisk of 20GB but we are not able to see them, lets go ahead and fix that by clicking Load driver.
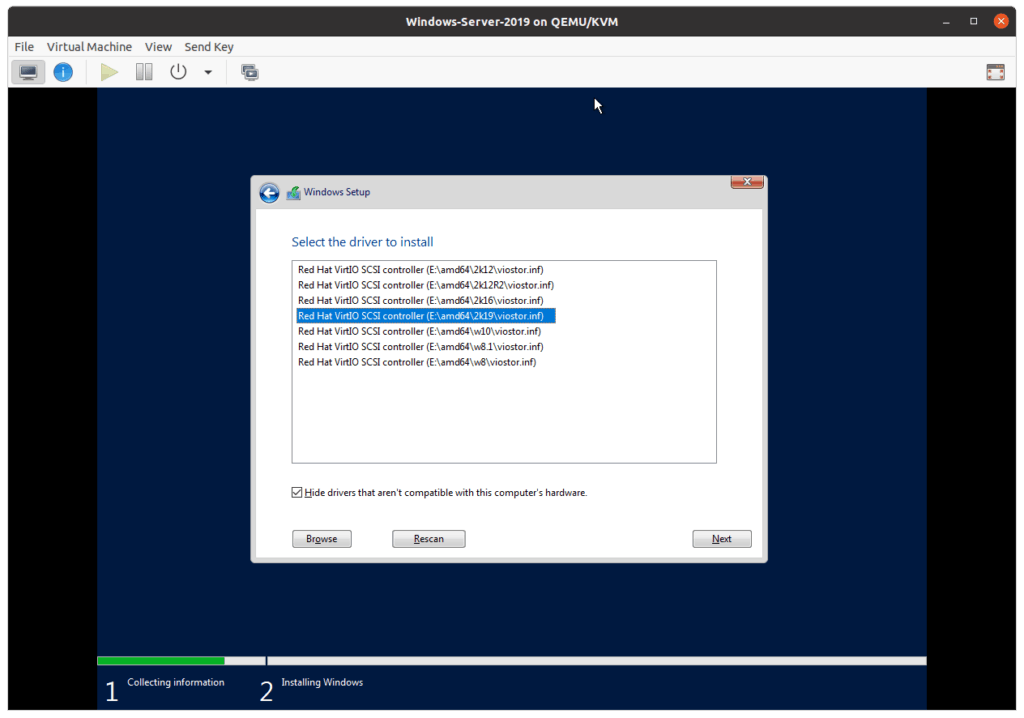
Since we already attached VirtIO driver for windows, the steup wizard will list out available drivers.
Select windows server 2019 from the list and then click on Next.
After few seconds, you should be able to see the harddisk that you have added, select the harddisk then click on Next.
The installation now begin now.
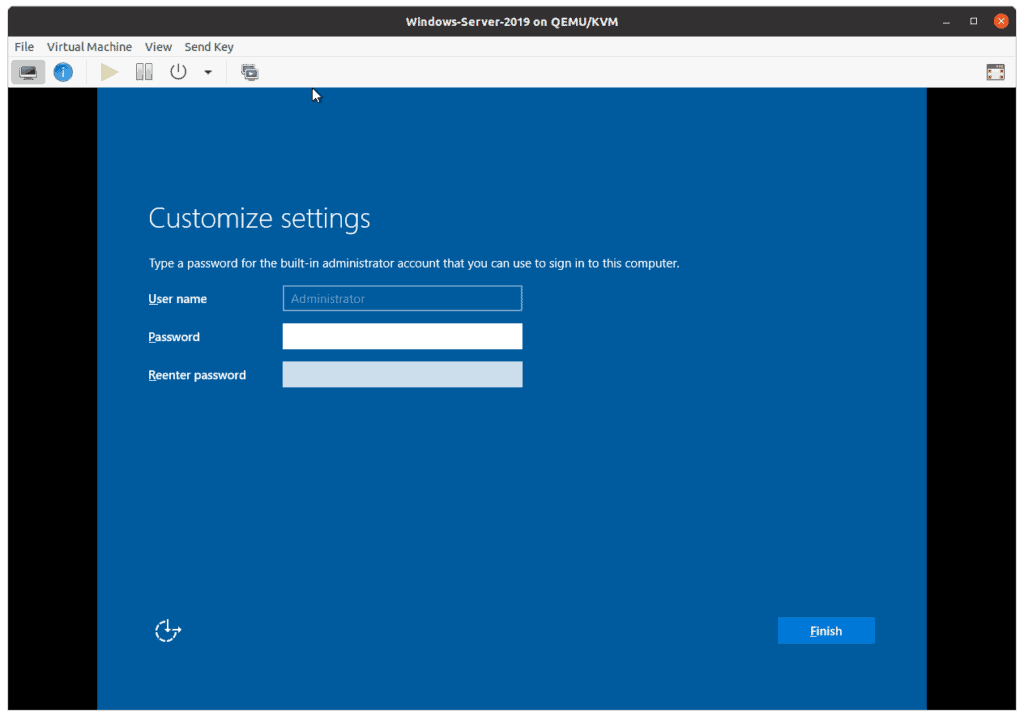
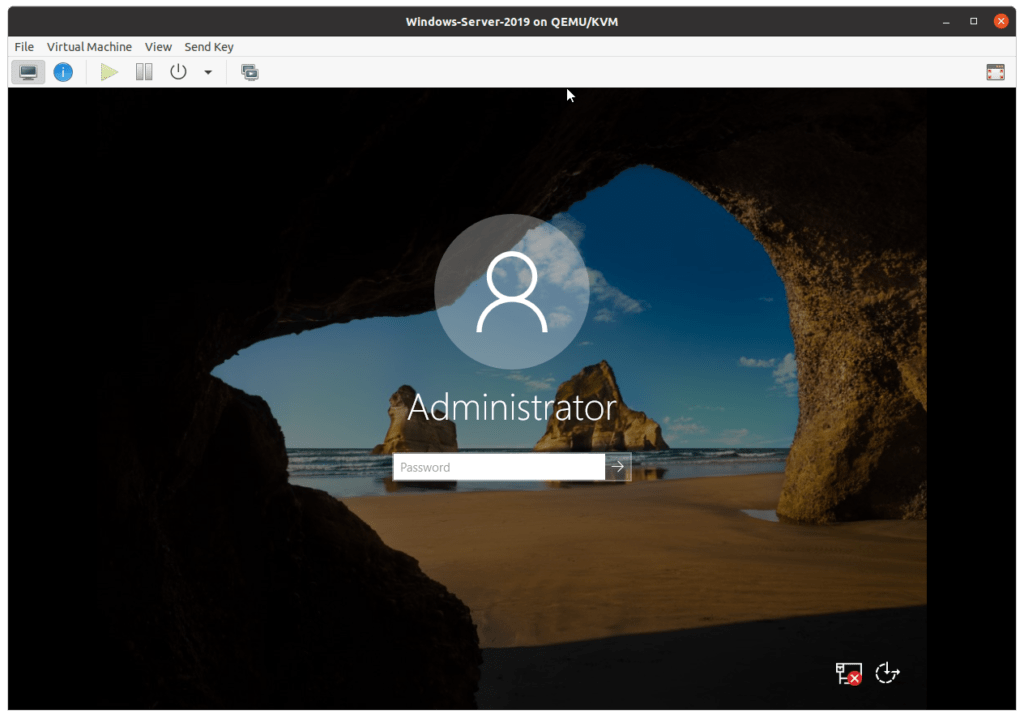
9. Set the administrator Password.
After the installation is completed, it will ask you to setup the Administrators password, type that in and then click on Finish.
You now will be presented to the windows server 2019 homescreen.
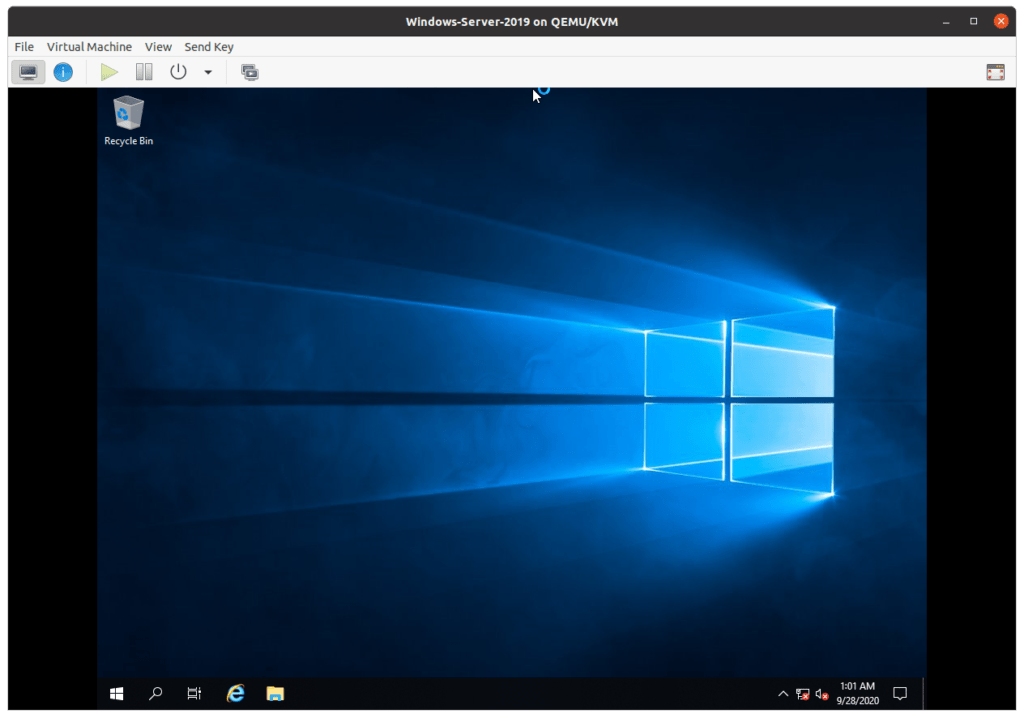
If you lock the machine, it would ask you to press CRL ALT DEL to log back in again.
Type the Administrator password then you should be able to login.
10. Install the virtio drivers for windows server 2019.
If you looked into the screen, you should be able to see that the network connection is showing x mark, which indicate there is no network confiurated.
Basically we haven’t installed the network driver in order for the windows server to communicate with the network.
In the server manager, click on Tools, then click on Computer management.
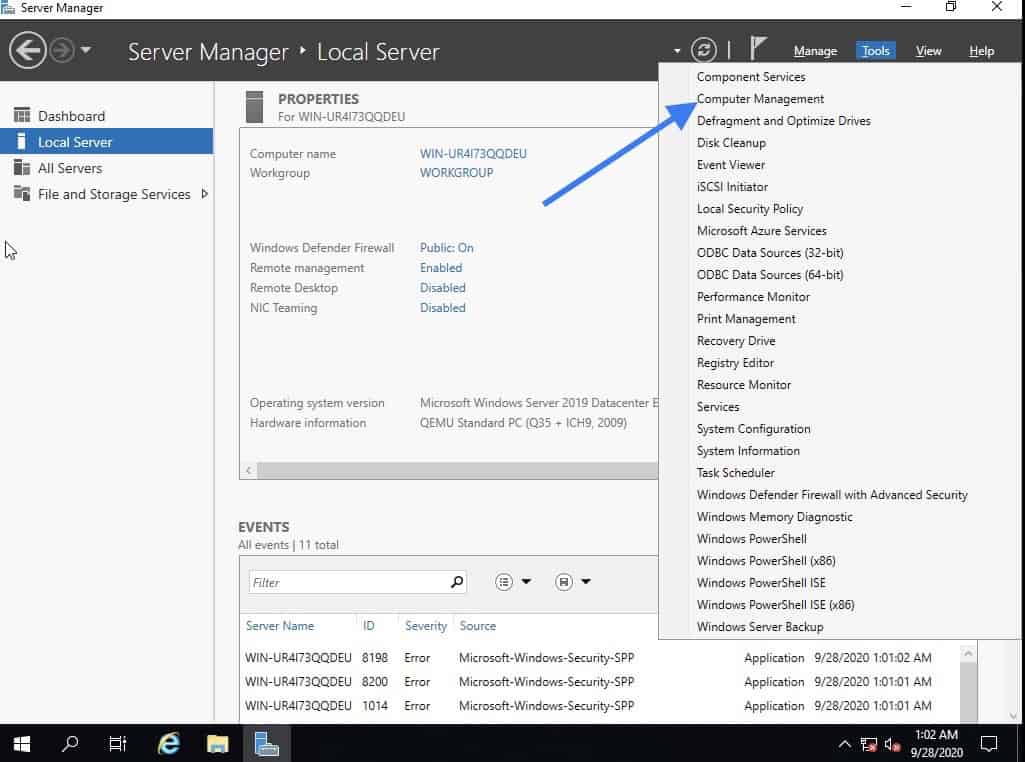
In the computer management, click on Device manager.
You can see under device manager, in Other devices list of drivers that needs to be installed.
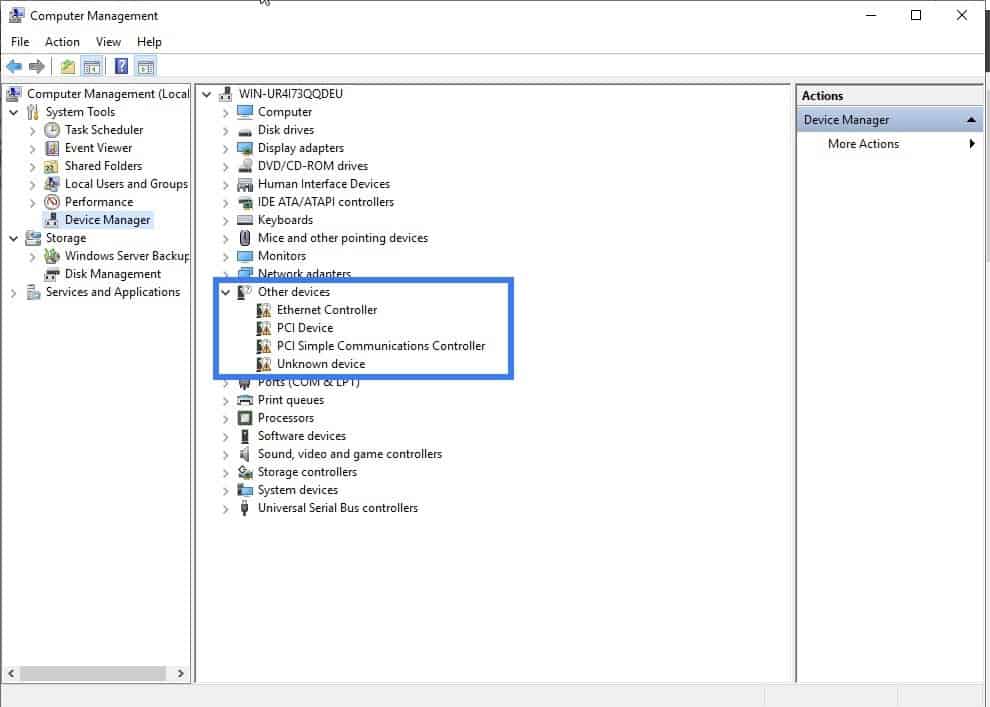
Lets go ahead and install the network driver first.
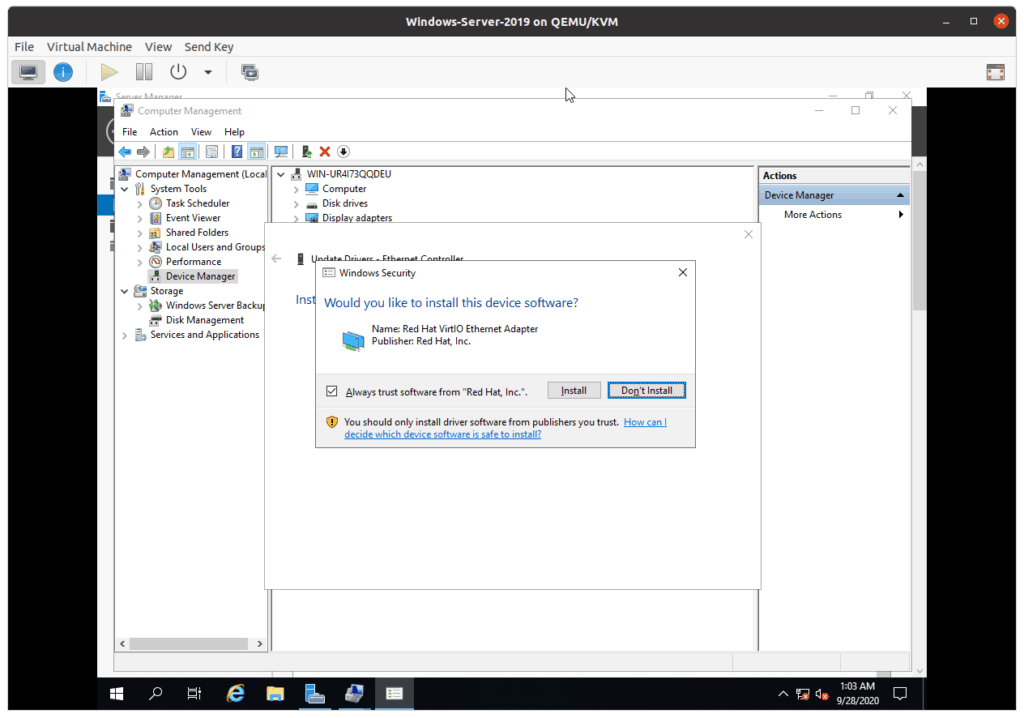
Right click on Ethernet controller and click on Update driver.

Select the option, browse for my local machine to install the driver.
In the browse attach the Windows qemu drivers that you had downloaded earlier in CDROM 2.
Click on next.
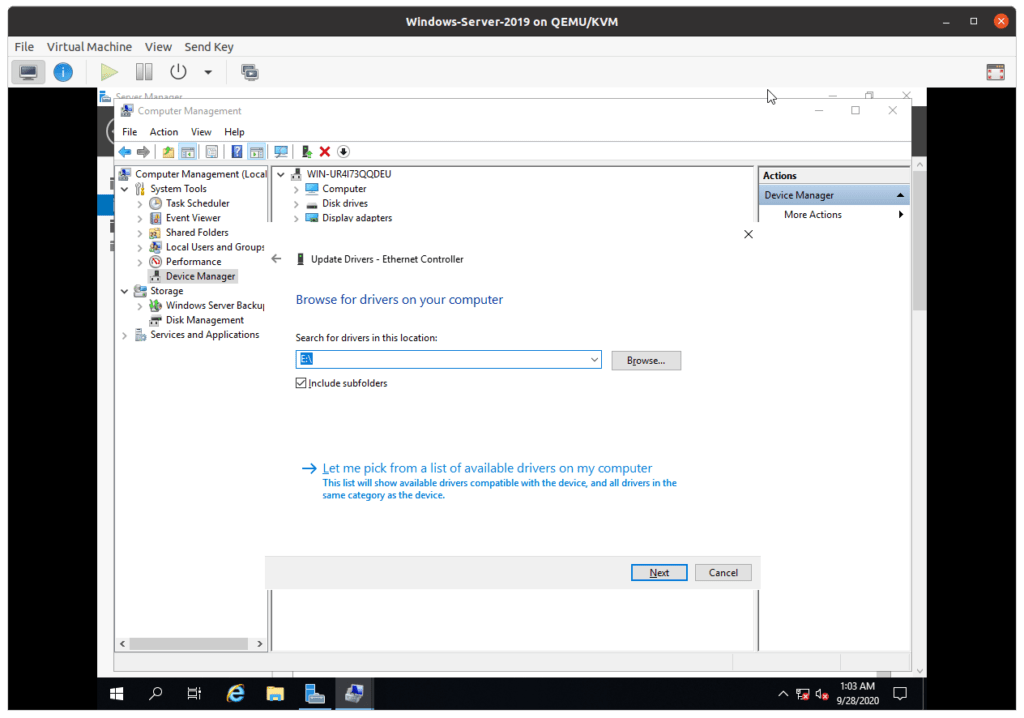
You will get a prompt to install the Redhat network driver, click install.
Once the installation is complete, you should now be able to see the netwokrs notification asking whether you want to share the network or not, which I clicked on No at the moment.
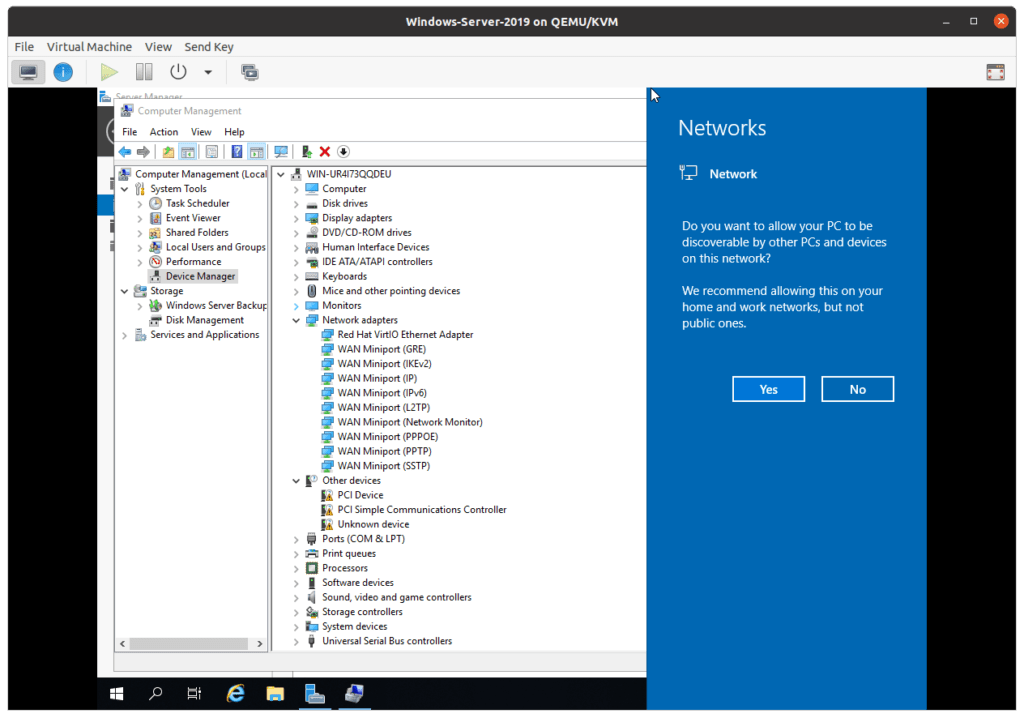
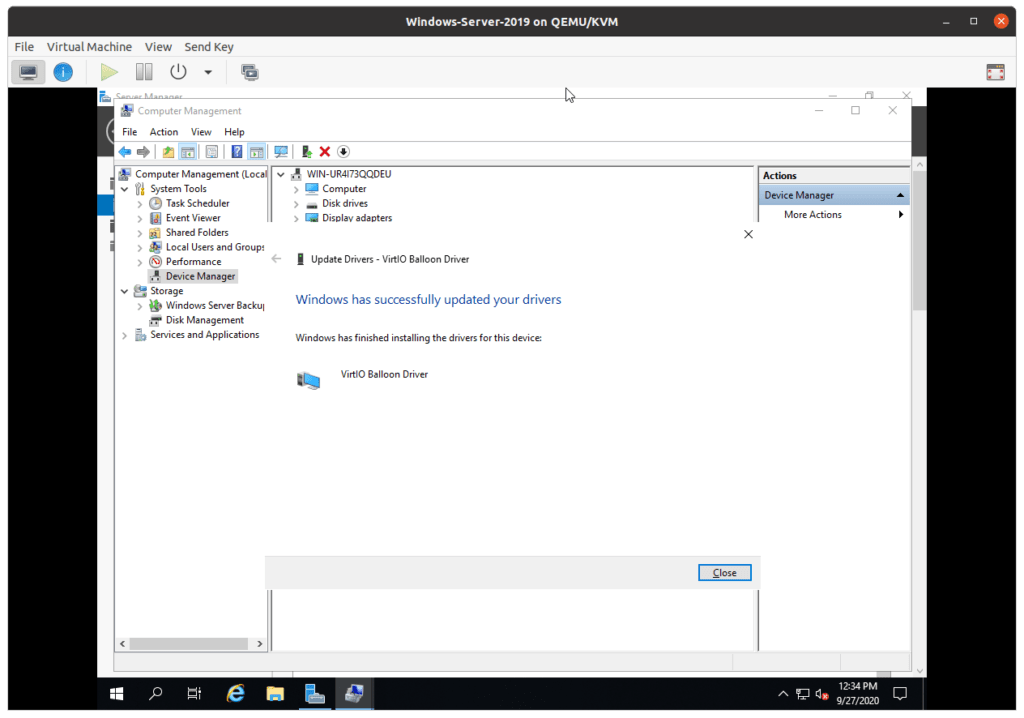
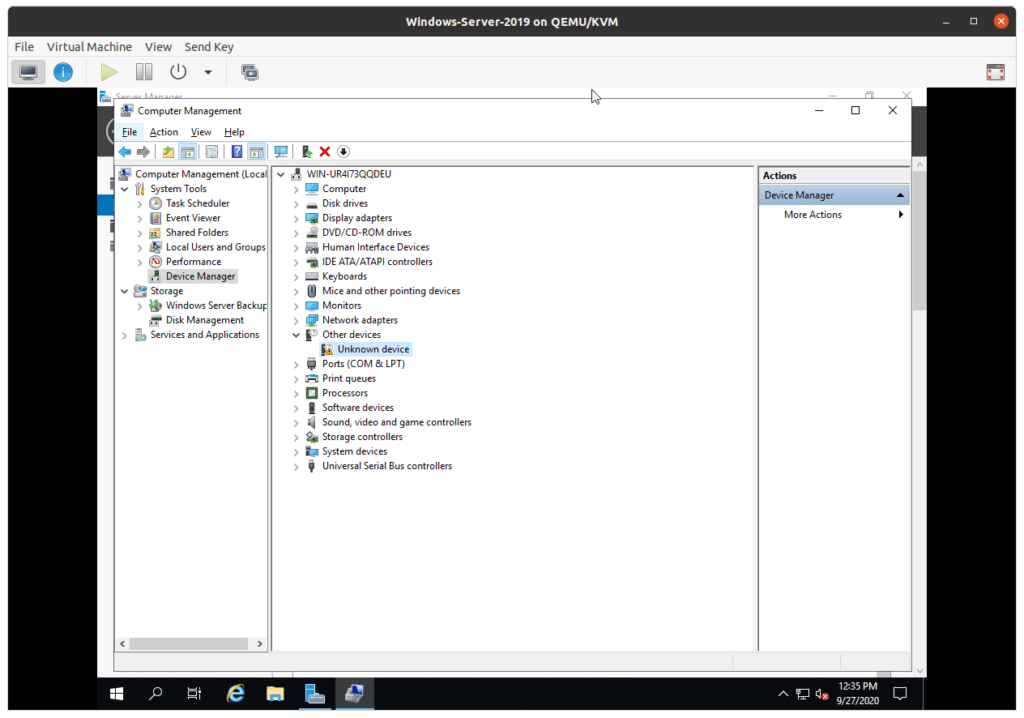
Install rest of other drivers as well.

The only driver that you now left at last is Unknown device, even if you try to update it it wont get updated.
So you should be fine at this point.
When you wanted to access this VM again, you just open the terminal and do a virt-viewer and choose the windows server as the VM.
If you have remote SSH access to the KVM host with X11 forwarding then you can open this server using the virt-viewer as well, which is cool.
- 0 replies
- 6097 views
- Nutanix Employee
- 433 replies
While we the topic of VirtIO drivers has already been touched in Sarab’s post on Installing Windows VM and VirtIO drivers, we would like to bring two more KBs to your attention.
One is on AHV | How to install VirtIO drivers for Microsoft Windows Server 2008 (KB-5666) and the other one is AHV | Nutanix VirtIO drivers for Windows Server 2019 (KB-6495).
N.B! Nutanix does not release or maintain VirtIO drivers for Microsoft Windows Server 2008. However, you can still use stable VirtIO drivers available from Fedora project website.
Nutanix recommends to use the Stable VirtIO-Win drivers.
- windows server
- AHV
- VirtIO
- win2k16
- PC
- drivers
- guestos
- uvm
- PE
- web
- Like
- Quote
This topic has been closed for comments
Пока уже переходить с Windows Server 2012 R2 на Windows Server 2019, опять переносить все сервисы, лабораторные работы, так сказать повышать свой профессиональный уровень. Но это ведь интересно я ведь вкладываю время в самого себя.
Сегодня я разберу, как на своем домашнем сервере на базе GIGABTYE C246 WU4 (купить такую можно здесь) и дисках подключенных как LVM-Thin
SSD накопитель «SSD накопитель SILICON POWER M-Series SP512GBP34A80M28 512Гб, M.2 2280, PCI-E x4, NVMe» (купить такой же можно здесь) с интерфейсом M2, но так как на моей материнской плате такие разъемы заняты, то понадобится и соответствующий разъем «Адаптер PCI-E M.2 NGFF for SSD Bulk [asia pcie m2 ngff m-key]» (купить такой же можно здесь)
В заметке участвует:
Тестовый полигон на базе Debian 10 + Proxmox 6Скачанный с Microsoft Volume License Services образ (SW_DVD9_Win_Server_STD_CORE_2019_1809.18_64Bit_English_DC_STD_MLF_X22-74330.ISO).Данный образ загружаю через Web-интерфейс в Proxmox 6
Шаг №1: Подключаемся браузером к Proxmox
https://IP&DNS:8006 - user&pass
Шаг №2: Создаю виртуальную машину
https://IP&DNS:8006 – user&pass – (Folder View) – Datacenter – Virtual Machine – Create VM
Node: srv-proxmoxVM ID: 128 (назначается мастером по порядку)Name: srv-s2019aResource Pool: ничего не указываю
Расширенные параметры Advanced не включаю (то есть пока все по дефолту)
И нажимаю Next
Storage: localISO Image: выбираю SW_DVD9_Win_Server_STD_CORE_2019_1809.18_64Bit_English_DC_STD_MLF_X22-74330.ISOType: Microsoft WindowsVersion: 10/2016/2019
Расширенные параметры Advanced не включаю (то есть пока все по дефолту)
И нажимаю Next
Graphic card: DefaultSCSI Controller: VirtIO SCSIQemu Agent: отмечаю галочкой
И нажимаю Next
Bus/Device: VirtIO Block/0Storage: disk1Disk size (GiB): 50Cache: Default (No cache)
Расширенные параметры Advanced не включаю (то есть пока все по дефолту)
И нажимаю Next
Sockets: 1Cores: 4Type: Default (kvm64)
Расширенные параметры Advanced не включаю (то есть пока все по дефолту)
И нажимаю Next
Memory (MiB): 4096
Расширенные параметры Advanced не включаю (то есть пока все по дефолту)
И нажимаю Next
No network device: галочку не ставимBridge: vmbr0Model: VirtIO (paravirtualized)
Расширенные параметры Advanced не включаю (то есть пока все по дефолту)
И нажимаю Next, Finish
Шаг №3: Добавляю в созданную VM еще одно устройство:
https://IP&DNS:8006 – user&pass – VM ID 128 (srv-s2019a) Hardware – Add – CD/DVD Drive –
Bus/Device: IDE/0Storage: localISO Image: virtio-win-0.1.171.iso
И нажимаю Create
Шаг №4: Запускаю созданную виртуальную машину:
https://IP&DNS:8006 – user&pass – VM ID 128 (srv-s2019a) – Start, после переключаюсь на >_ Console дабы видеть процесс инсталляции, происходит загрузка файлов с образа в оперативную память, после
Language to install: English (United States)Time and currency format: English (United States)Keyboard or input method: US
И нажимаю Next
И нажимаю Install Now
Select the operating system you want to install: выбираю Windows Server 2019 Standard (Desktop Experience)
И нажимаю Next
I accept the license terms: отмечаю галочкой
И нажимаю Next
Custom: Install Windows only (advanced): выбираю
Ну а дальше, установщик Windows не видит жесткий диск – это нормально, т.к. я при создании виртуальной машины указал что шина диска это VirtIO и как раз для этого я в контейнер виртуальной машины добавил еще один привод:
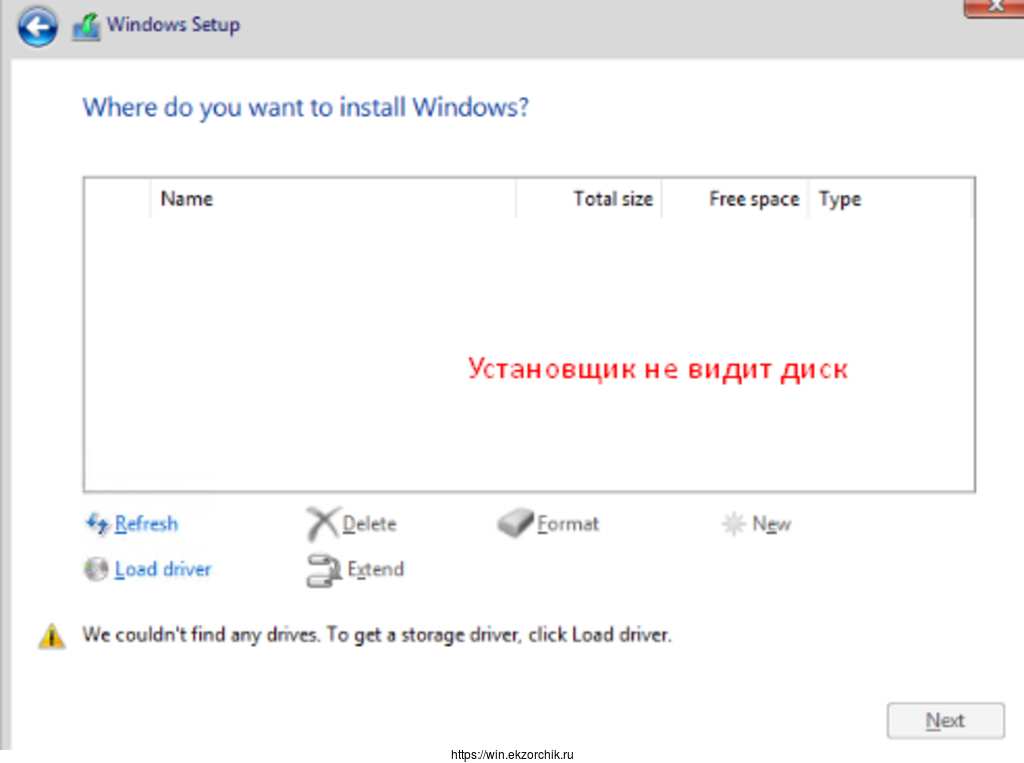
Нажимаю Load driver – Browse – выбираю CD Drive (D): virtio-win-0.1.1 (разворачиваю: viostor – 2k19 - amd64) и установщик с учетом подгруженного драйвера успешно увидел жесткий диск данной виртуальной машины:

Нажимаю Next, Next и далее привычная установка Windows. Заострять внимание на дальнейшем нет смысла.
Шаг №5: После того как система Windows Server 2019 Standard установилась, устанавливаем драйвера на устройства которые не опознались установщиком Windows все также с подмонтированного образа virtio-win-0.1.171.iso

Шаг №6: Копируем с подмонтированного образа virtio-win-0.1.171.iso папку Balloon в C:Program Files и запускаем сервис оптимизации использования оперативной памяти:
Win – Windows System – и через правый клик на Command Prompt – More – Run as administrator –
|
C:UsersAdministrator> cd /d «C:Program FilesBallon2k19amd64” C:Program FilesBalloon2k19am64>blnsvr.exe —i Service Installed Service is starting… Service RUNNING. C:Program FilesBalloon2k19am64>exit |
Также устанавливаю Guest-agent: CD Drive (D: virtio-0.1.171) – guest-agent – qemu-ga-x86_64
После отправляю систему в перезагрузку, авторизуюсь, выключаю и делаю снапшот подготовленной виртуальной машины на будущее использование для отката для новых наработок.
Итого поставленная задача выполнена, с уважением автор блога Олло Александр aka ekzorchik.
В данной статье мы проиллюстрируем пошаговую установку драйверов VirtIO на примере операционной системы Microsoft Windows Server.
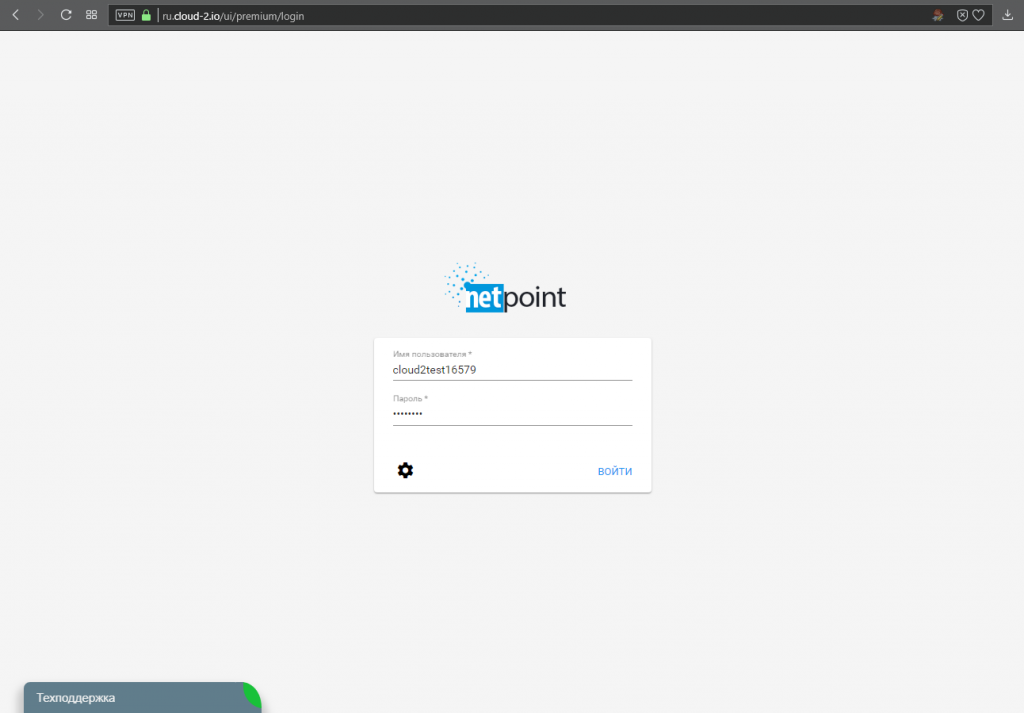
Для начала авторизуйтесь в панели управления Cloud2 для присоединения ISO-образа диска с драйверами VirtIO к существующей виртуальной машине:
1. Авторизуемся в панели управления по адресу: https://ru.cloud-2.io/ui/premium/
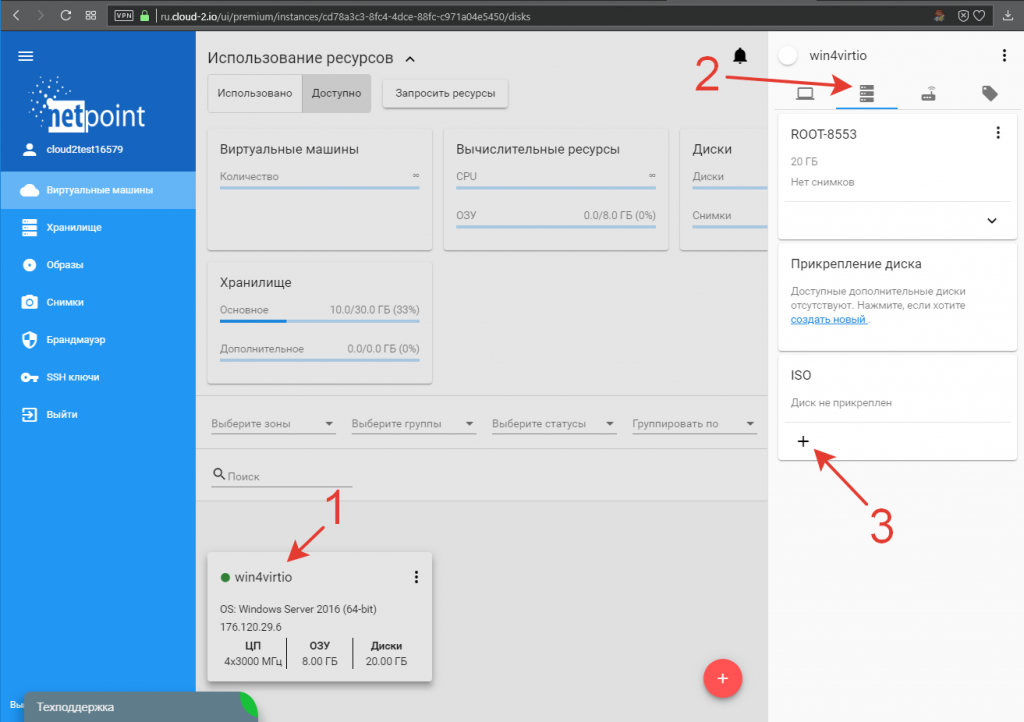
2. Выбираем нужную виртуальную машину кликая по её названию (1). В открывшейся панели управления переходим во вкладку устройств (2) и нажимаем стилизованную под плюс кнопку подключения ISO-образа (3):
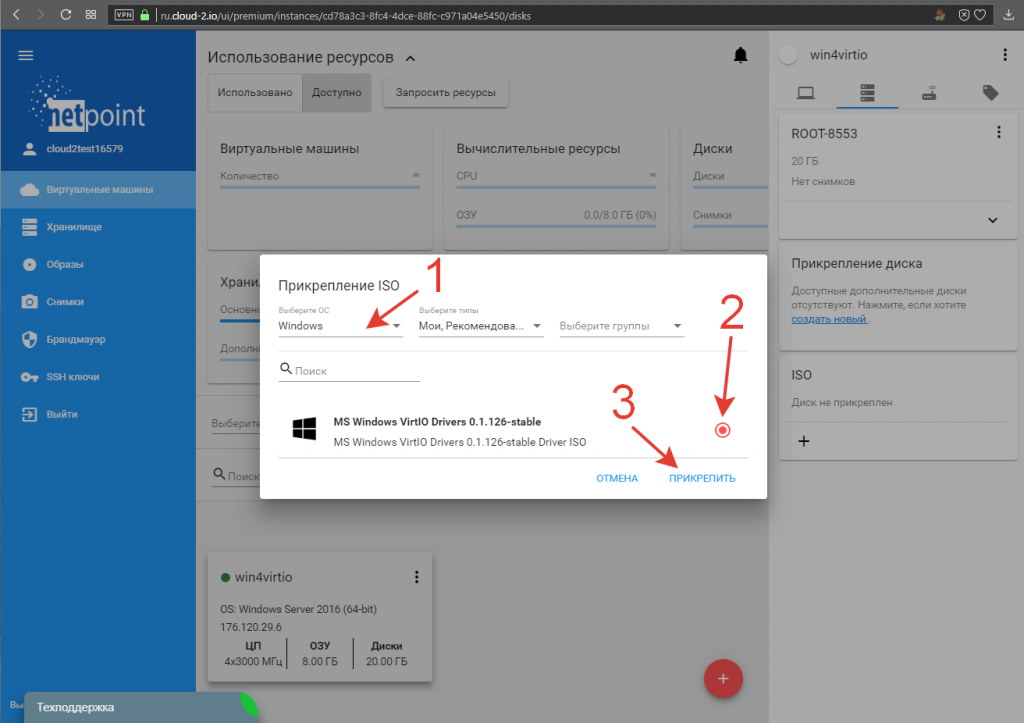
3. В открывшемся окне прикрепления ISO-образа указываем тип операционной системы Windows (1), отмечаем образ диска с драйверами VirtIO (2) и подключаем его к нашей машине (3):
4. Переходим в операционную систему. Для этого подключаемся к машине по RDP или используем встроенную консоль панели управления. Для этого кликаем по стилизованной под три точки кнопке меню виртуальной машины (1) и выбираем пункт «Доступ к ВМ» (2):
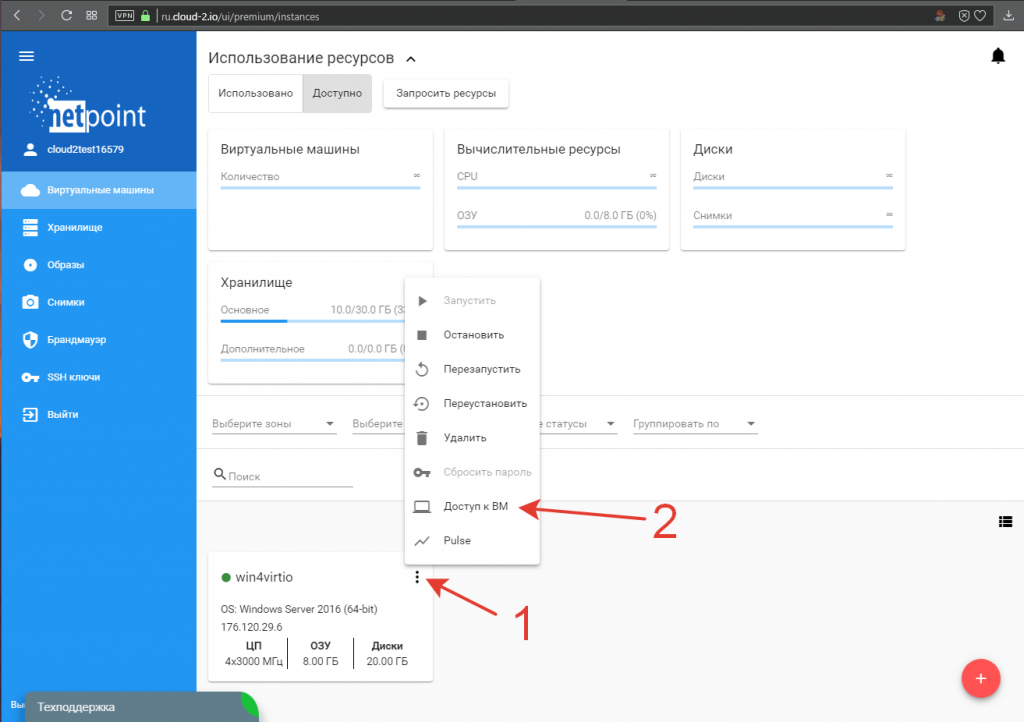
В открывшемся окне нажимаем ссылку «Открыть VNC консоль» (1):

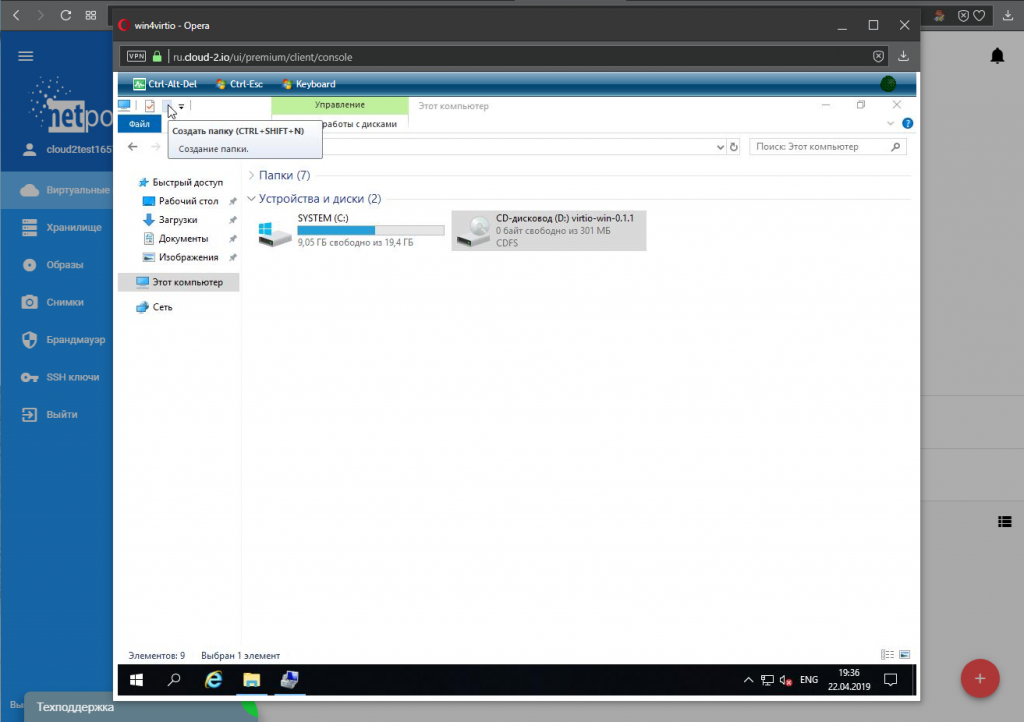
5. В операционной системе с помощью проводника Windows проверяем наличие присоединённого нужного образа с драйверами:
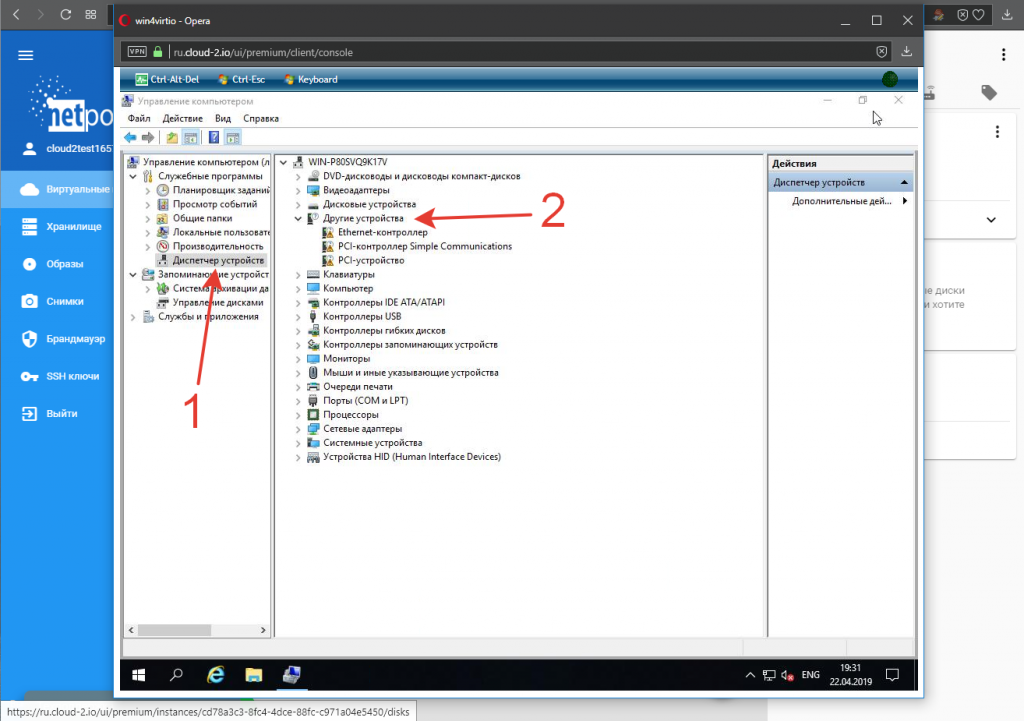
В контекстном меню (правая кнопка мыши) кнопки «Пуск» выбираем пункт «Управление компьютером»:

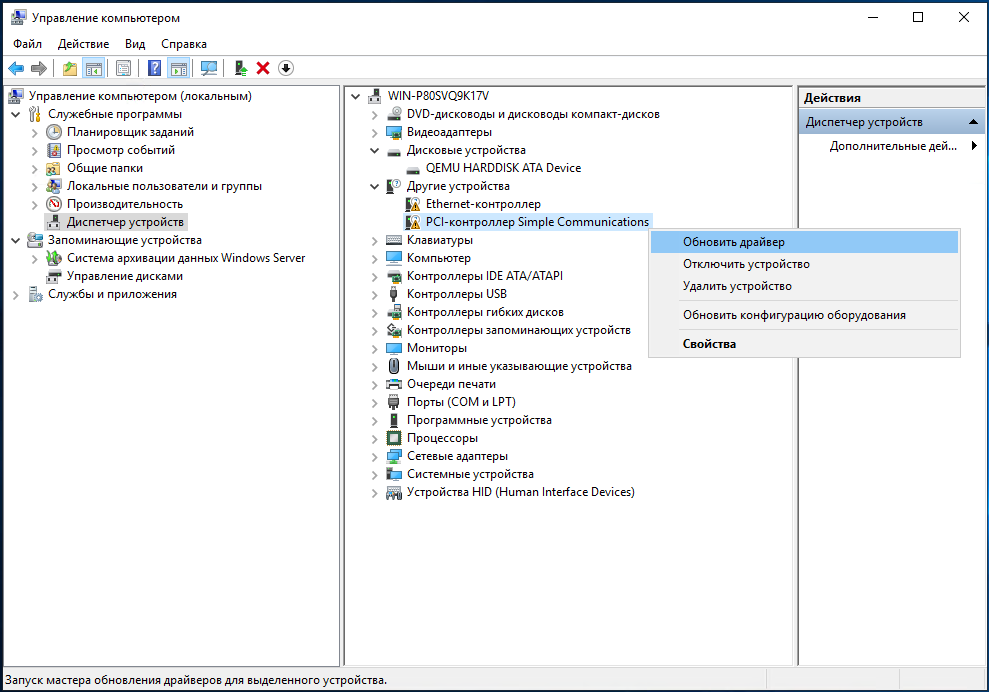
6. В открывшейся панели переходим в Диспетчер устройств (1), где наблюдаем ряд неизвестных нашей системе девайсов (2), которые нам предстоит инициализировать:
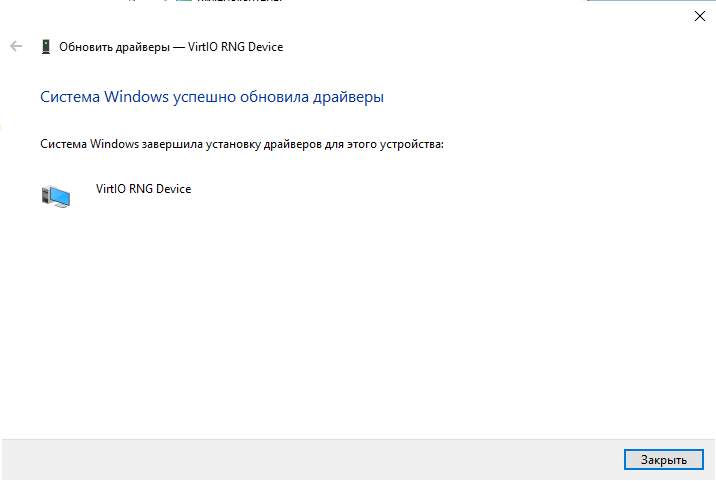
7. Поочерёдно устанавливаем драйвера на каждое устройство с подключенного диска. Устанавливаем драйвер устройства Virtio RNG Device:

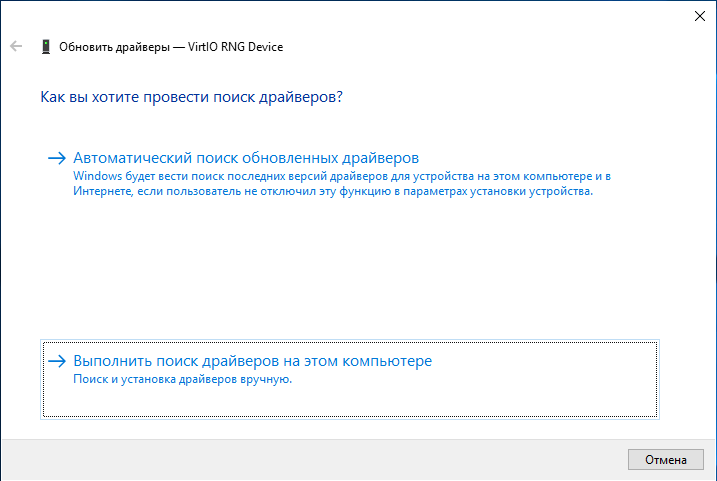

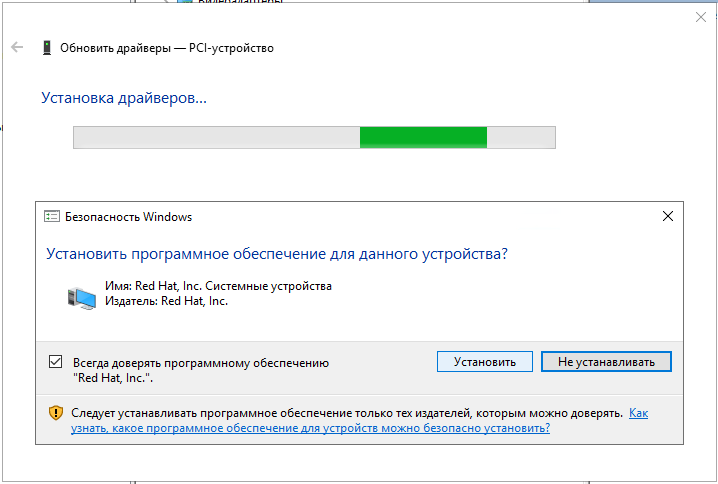

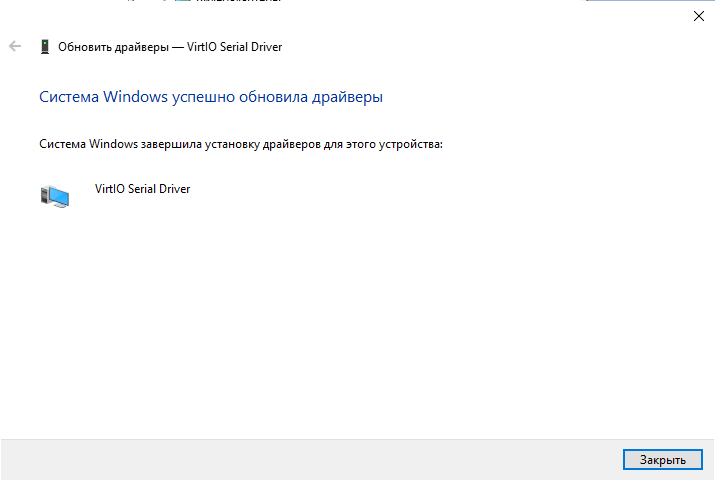
Аналогично устанавливаем последующие драйвера устройств VirtIO Serial Driver и Red Hat VirtIO Ethernet Adapter:
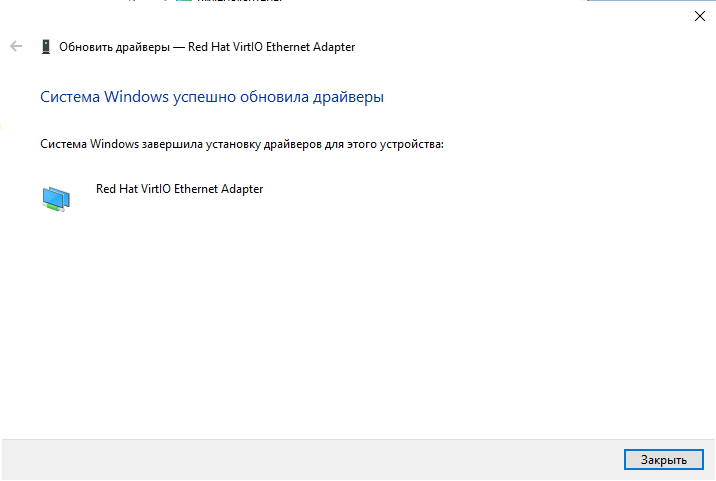
В результате проделанных манипуляций мы получаем полностью установленные VirtIO устройства в нашей системе. Не забудьте отключить ISO в самой системе или в панели управления виртуальной машиной по окончании работ.