On this page, we have managed to share the official USB driver of the Explay Hit Device. If you were already searching for the USB driver of the device, then this page will help you out.
There are 2 USB drivers available for the device, i.e., Mediatek Driver and ADB Driver. The Mediatek Driver is compatible with all the Mediatek Flash Tool, and the ADB Driver can be useful for establishing a connection between the mobile and the computer.
Explay Hit Mediatek Driver
The Mediatek Driver is compatible with the SP Flash Tool, MTK Flash Tool, SP MDT Tool, and the SN Write Tool and can be helpful if you are trying to install firmware (ROM) on the device.
Driver Name: Mediatek Driver
Package Name: Mediatek_Driver_Auto_Installer_v1.1352.zip
Driver Size: 9.56 MB
How to Install: Follow Guidelines
Get Driver
Explay Hit ADB Driver
You can use the ADB Driver to connect the mobile (powered by android) to the computer and transfer data between the mobile and the computer.
Driver Name: Android ADB Driver
Package Name: usb_driver_r13-windows.zip
Driver Size: 8.27 MB
How to Install: Follow Guidelines
Get Driver
How to Install any USB Driver Manually
- Download and extract the USB driver on the computer.
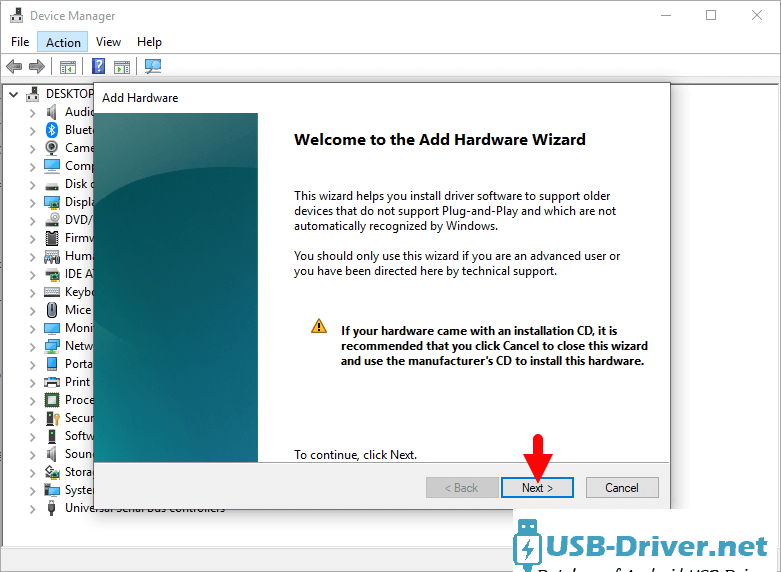
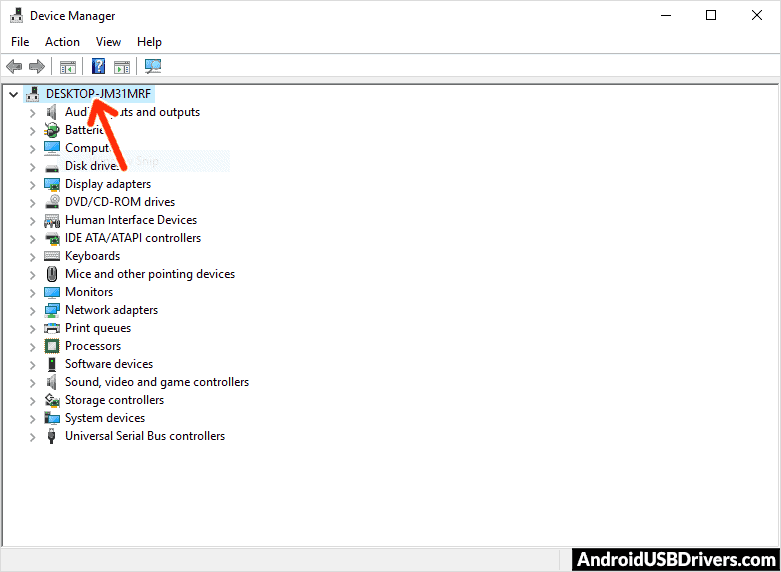
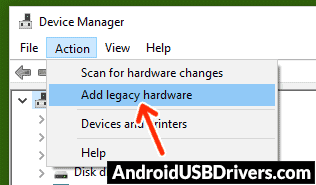
- Open Device Manager (devmgmt.msc) and Click on the Computer Name > Action Menu > Add Legacy Hardware.
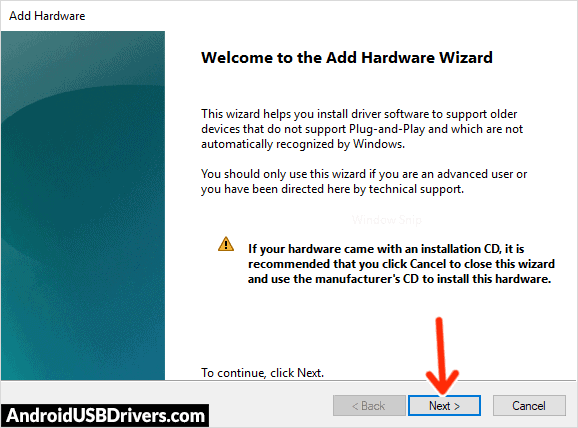
- Click on the Next button.
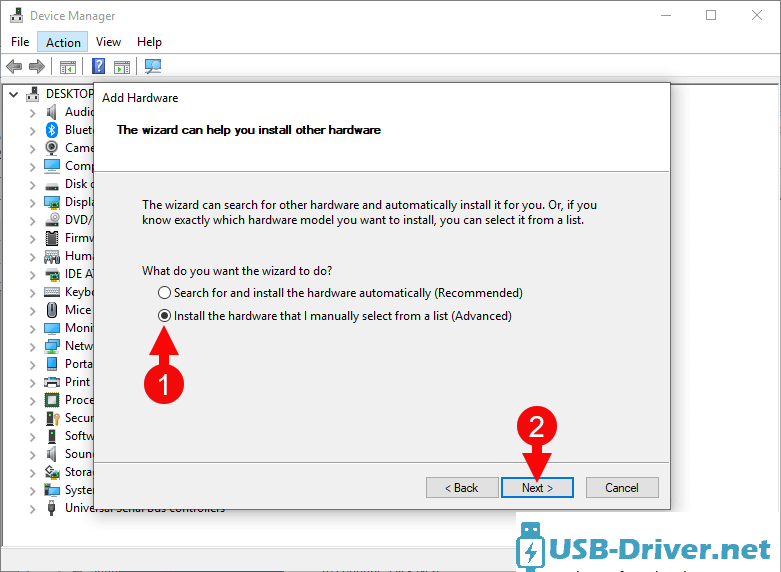
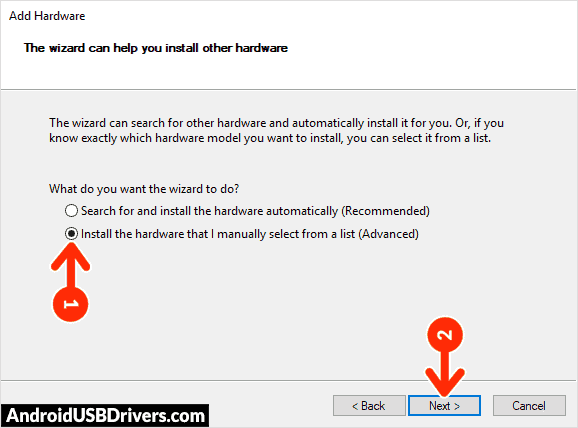
- Select the Install the hardware that I manually Select from a list checkbox and Click on the Next button.
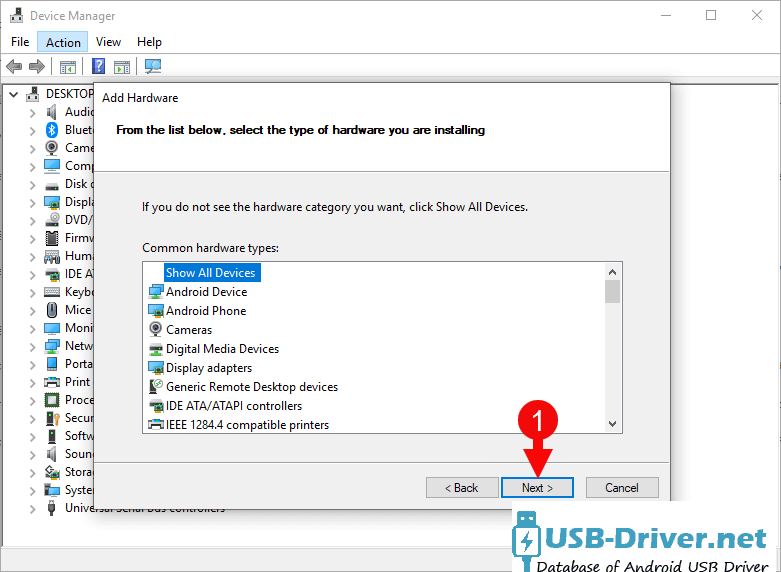
- Again, Click on the Next button.
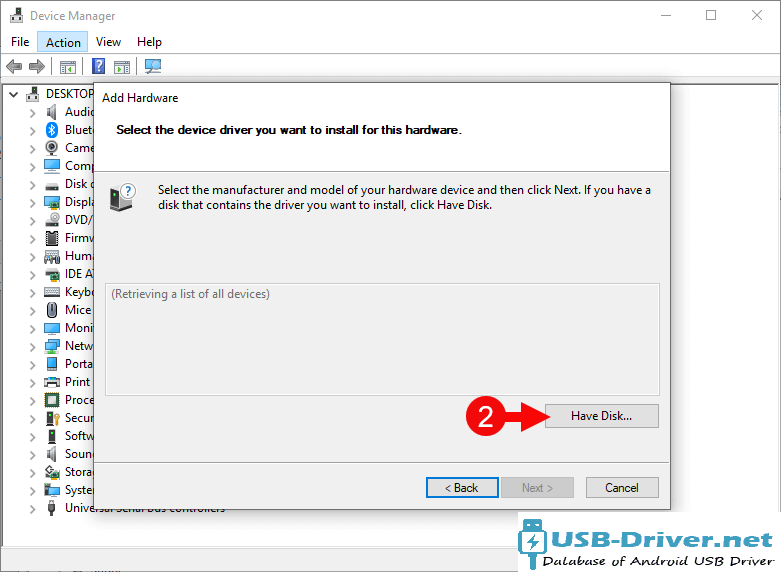
- Click on the Have Disk > Browse > Locate the .inf file (found in the extracted driver folder) and Click on Open Button.
- Click on the Finish button to complete the installation.
Follow Complete Guidelines
Readme Once:
[*] Driver Signature Error: If you are facing Driver Signature Error while installing the USB Driver, then head over to How to Fix Driver Signature Error page.
[*] Driver Easy: We recommend you to use Driver Easy application to update all the computer drivers in a Single Click.
[*] Explay Hit Stock Firmware: If you are looking for the Explay Hit Stock Firmware, then head over to the Stock Firmware page.
Explay Hit USB Driver for Windows Computer
Explay Hit USB Driver helps you to connect your Explay Device to the Windows Computer and transfer data between the device and the computer. It also allows you to Flash Explay Hit Stock Firmware on your Explay Device using the preloader drivers. Here on this page, we have managed to share the official Explay Hit USB Driver.
It is very necessary to have Explay Hit USB drivers whenever you have to connect Explay Hit to the Pc for the purpose of transferring data or important files. Also, when it comes to updating your Explay Hit manually, it’s necessary to have them on your PC. While you are installing or flashing Fastboot firmware on the device, then Explay USB Drivers are required. Check out the download links given in this post to simply keep up the pace in this matter.
Explay Hit Mediatek Driver for Windows (11,10,8,7,XP)
Driver Package Name : Mediatek Driver for windows
Package File Name: Mediatek_Driver_Auto_Installer_v1.1352_(USB-Driver.NET).zip
Driver File Size: 9.56 MB
Download Driver File Now
How to install Explay Hit Mediatek Driver official on Windows
Explay Hit Mediatek Driver is compatible with the SP Flash Tool, MTK Flash Tool, SP MDT Tool, and the SN Write Tool and can be useful if you are trying to install firmware (ROM) on the Explay Hit.
Step 1 : Download and extract Explay Hit Mediatek Driver Auto Installer package on the Computer. If in case, you have already downloaded and extracted the driver package, then SKIP this step.
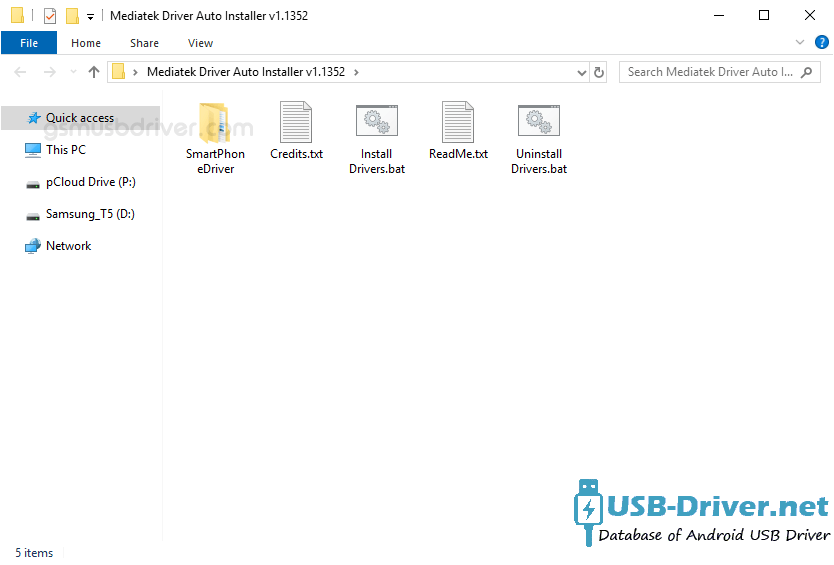
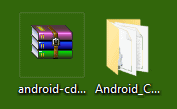
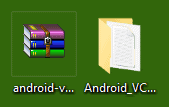
Step 2 : Once you have extracted the driver package, you will be able to see the following files:
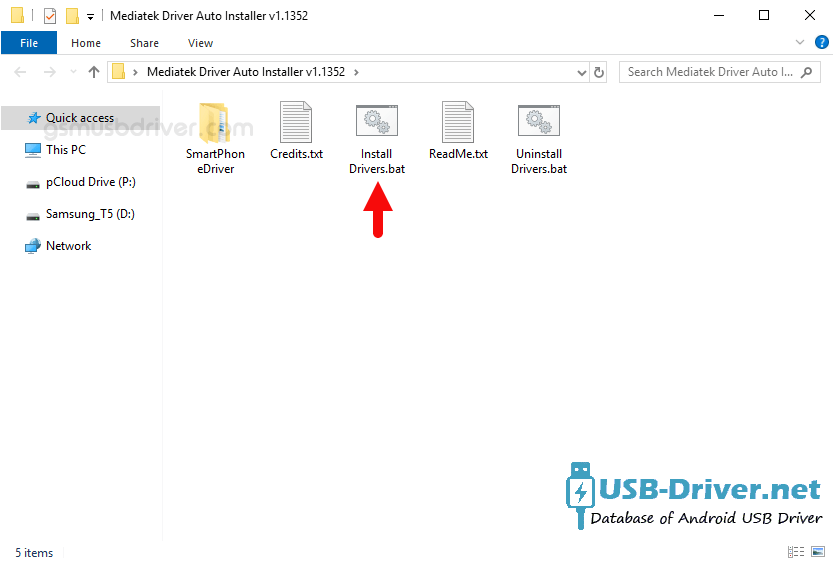
Step 3 : Open Install Drivers.bat to Launch the Setup Dialog Box:
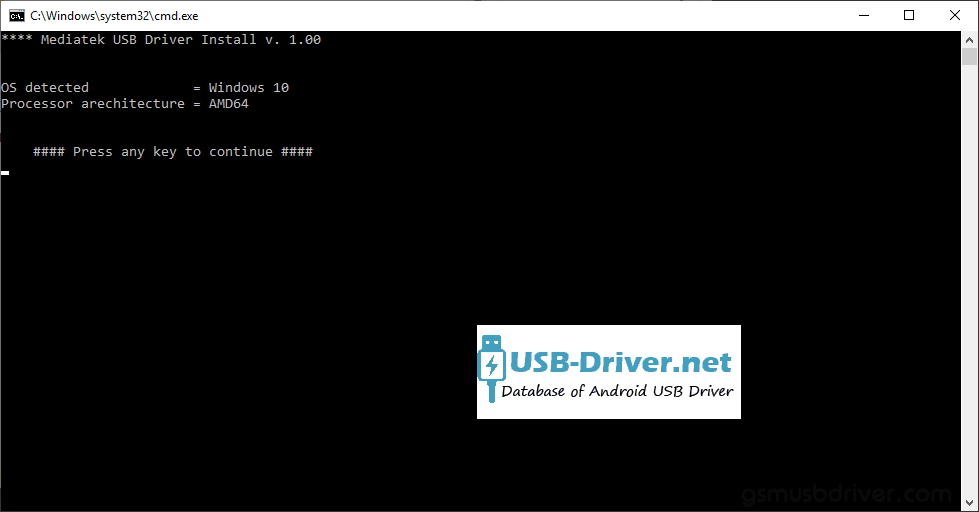
Step 4 : Once the Driver Setup Dialog Box is Launched, you will be able to see the following window:
Step 5 : Now, Press any Key (from keyboard) to begin the installation process.
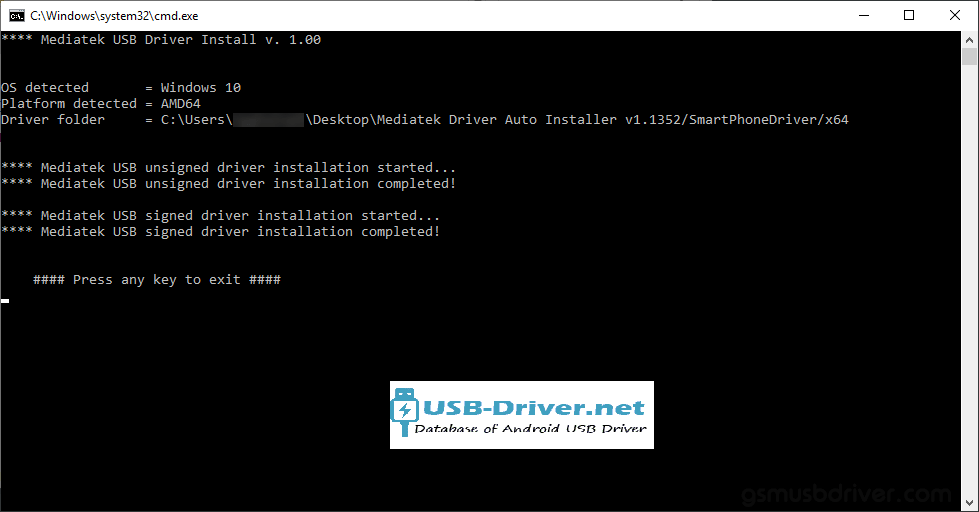
Step 6 : Once the installation process is completed, you will be able to see the Driver installation Completed Message:
Step 7 : Now, Press any Key (from keyboard) to exit the Setup Window.
Step 8 : Restart your Computer:
Step 9 : Once the Computer is restarted, you can easily connect your Explay Hit MediaTek the computer without facing any issue.
Explay Hit ADB Driver for Windows (11,10,8,7,XP)
Driver Package Name : Android ADB Driver for windows
Package File Name: usb_driver_r13-windows_(USB-Driver.NET).zip
Driver File Size: 8.27 MB
Download Driver File Now
[•] Download Explay Hit Stock Firmware: If you are looking for the Explay Hit Stock Firmware, then head over to the Stock Firmware page.
How4 to install Explay Hit USB drivers
The Explay Hit USB driver makes almost every task that needs to be performed by connecting the device to PC easier. All the files can be transferred in no time without worrying about anything. Also, there are certain benefits to having it. Before you proceed to download, it is suggested to you to remove the previously installed Explay Hit from your PC in case you have installed it. Once you are done, click the below link to download Explay USB Drivers on your PC.
How to install Explay Hit ADB Driver on Windows
Explay ADB Driver can be used to connect the Explay to the computer and transfer data between the mobile and the computer.
Step 1 : Download and extract Explay Hit ADB Driver (.inf based) (The link is above) on the Computer. If in case, you have already downloaded and extracted the driver, then SKIP this step.
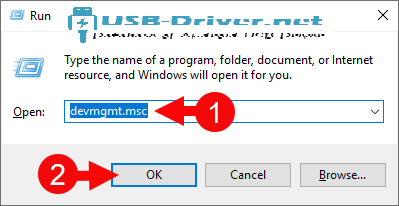
Step 2 : Open Device Manager on the Computer. Press Win + R key from the keyboard and type devmgmt.msc and Click on OK Button:
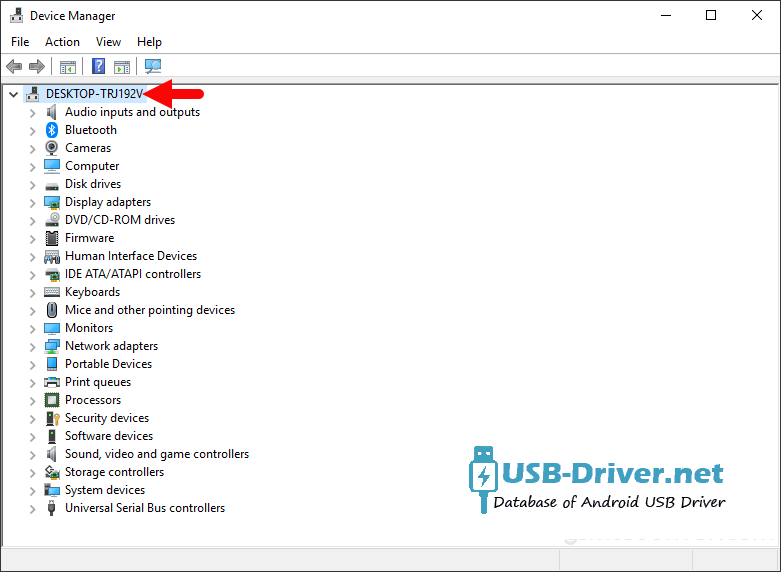
Step 3 : Once the Device Manager is Launched, Click on the Computer Name (name can vary from the image below):
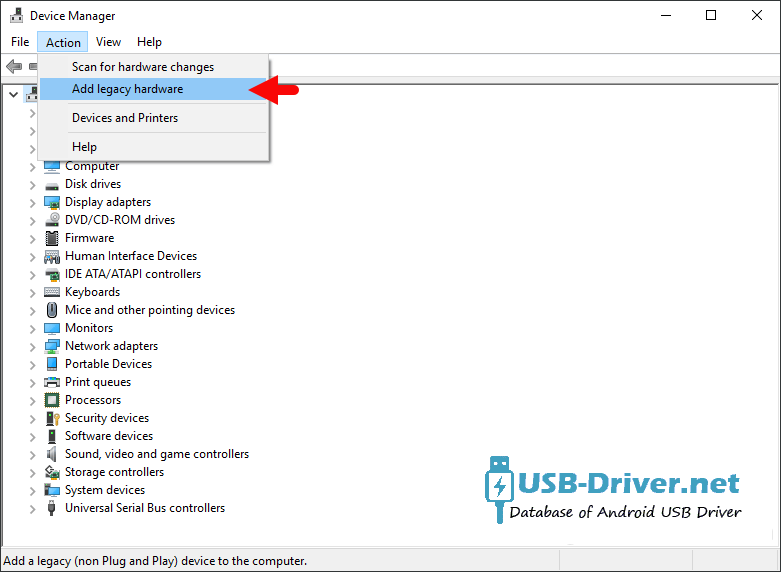
Step 4 : Click on the Action Menu and Select Add Legacy Hardware option:
Step 5 : Under Add hardware Dialog Box, Click on the Next Button:
Step 6 : Tick on the Install the hardware that I manually select from a list checkbox and Click on the Next Button:
Step 7 : Click on the Next Button:
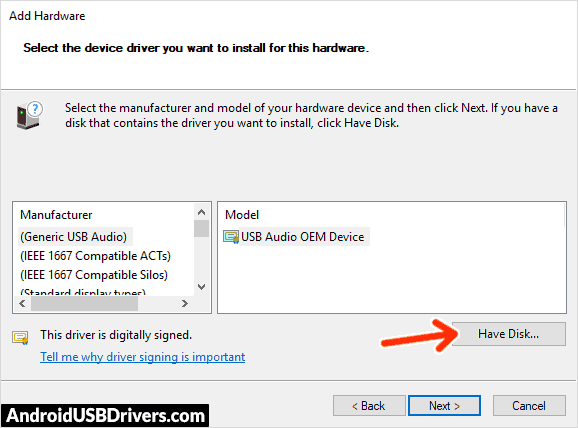
Step 8 : Then Click on the Have Disk Button:
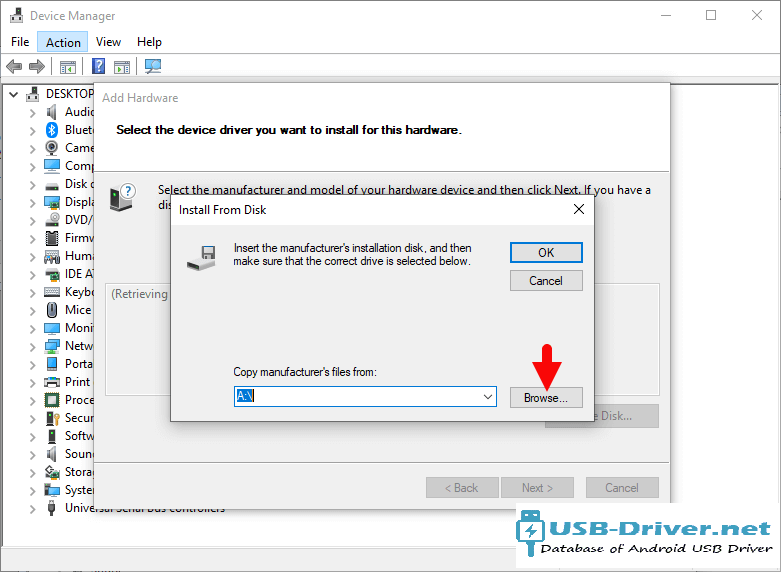
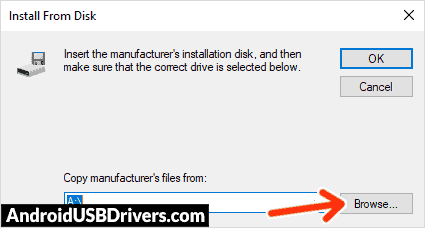
Step 9 : Click on the Browse Button:
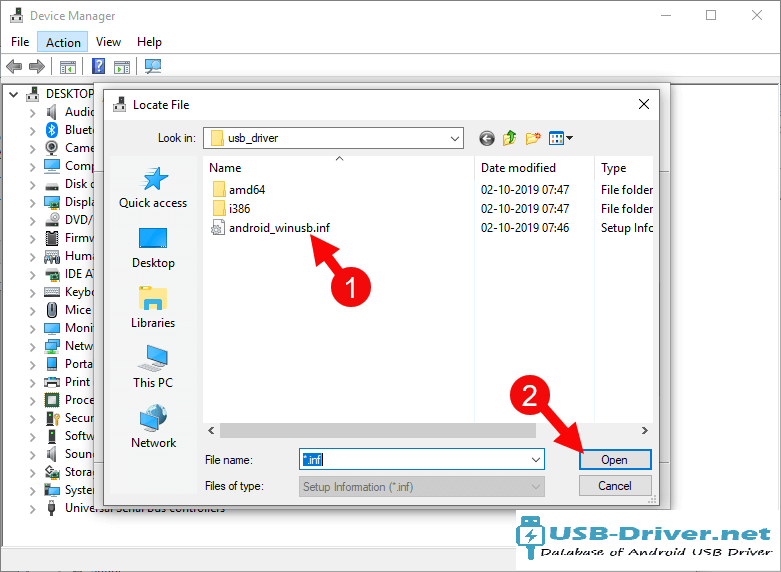
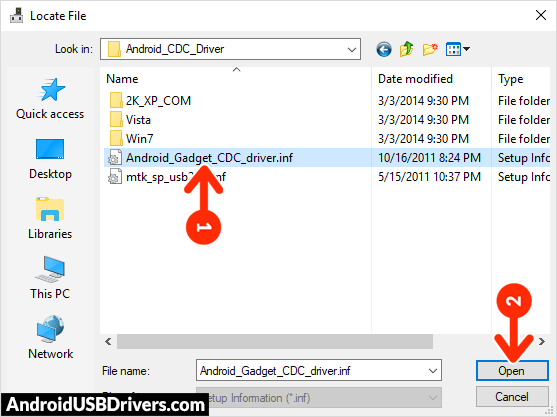
Step 10 : Locate the .inf file from the computer (this file can be found in the extracted driver folder).
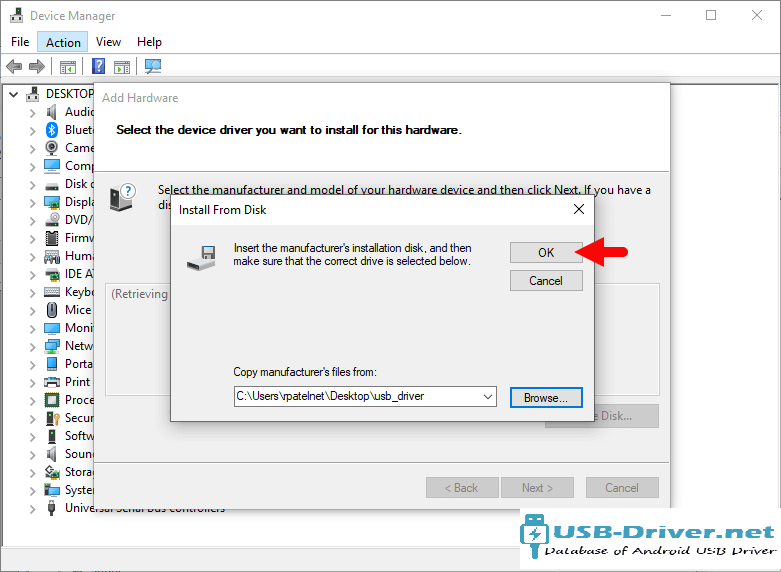
Step 11 : Click on the OK Button:
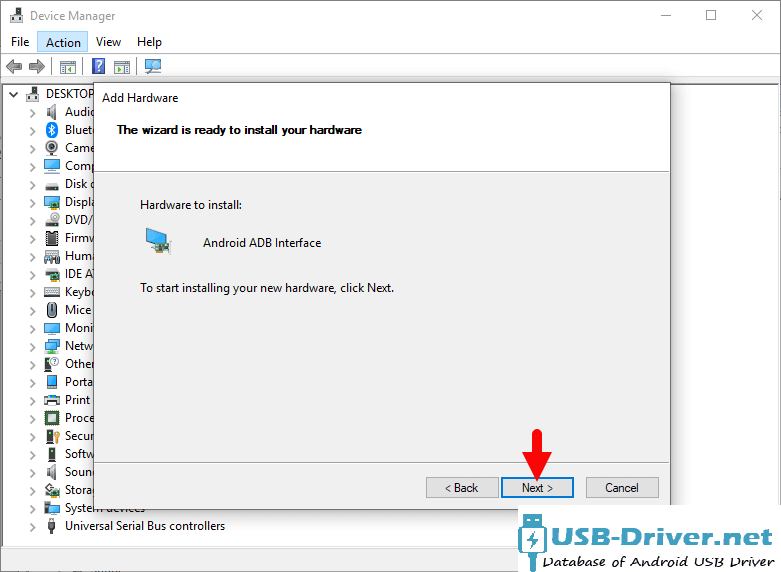
Step 12 : Click on the Next button:
Step 13 : Again Click on the Next button:
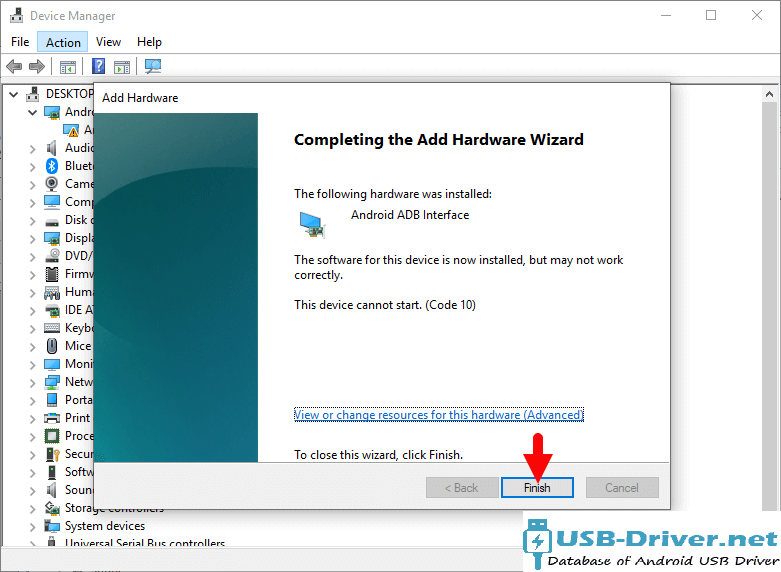
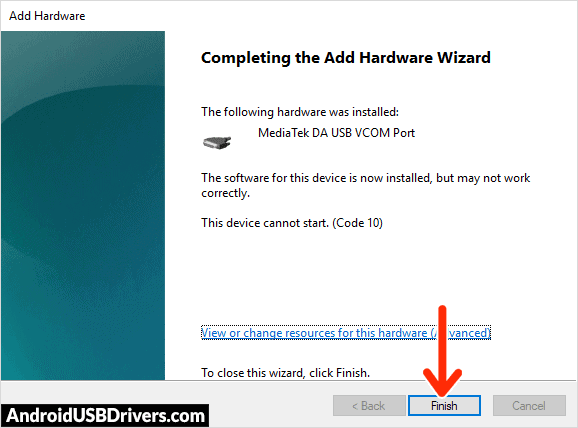
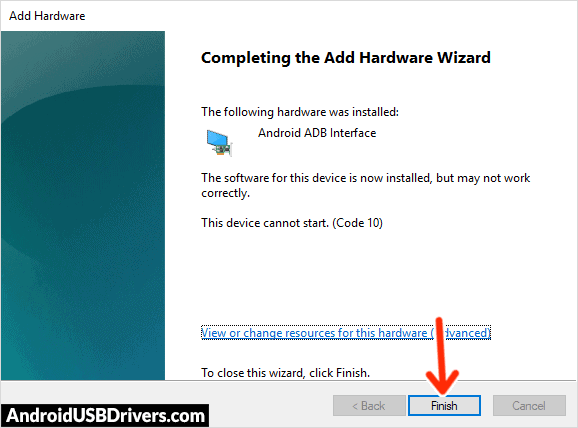
Step 14 : Click on the Finish button to complete the installation process (ignore Code 10; it will be gone post restarting the computer).
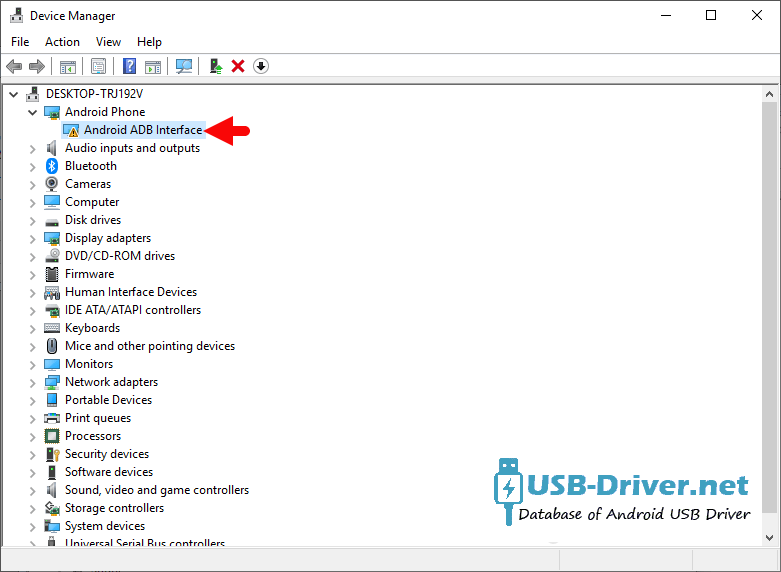
Step 15 : Your Explay Hit driver is listed in the Device Manager.
Step 16 : Now, Restart the Computer. Once the computer is restarted, you can easily connect your Explay Hit device to the computer.
[•] Driver Signature Error: If you got Driver Signature Error While installing the Explay Hit Driver then See this Video to fix this problem.
[•] Request Explay Driver: If you are looking for any specific Explay drivers that is not listed above, then you can request it through the comment box below (do not request driver from the contact page, or else it will be ignored).
If you are an owner of Explay Hit and looking out for USB drivers to connect your device to the computer, then you have landed on the right page. Download Explay Hit USB driver from here, install it on your computer and connect your device with PC or Laptop successfully.
Here, we have provided a USB driver for your Explay Hit.
Download Explay Hit USB Driver
USB Driver Type: ADB Driver
USB Driver Purpose: For connecting your device to a computer.
File Size: 8.3 MB
Download Now
Steps To Install Explay Hit ADB Driver In your computer
Video Tutorial
If you don’t like this video tutorial or if you would like to get more instructions, then continue reading.
Step 1: To get started, download the driver and extract it on your desktop.
Step 2: Now, open Device Manager > Action > Add legacy hardware.
Step 3: Next, click “Next” in the Add legacy hardware wizard.
Step 4: Now choose “Install the hardware that I manually select from the list (Advanced)” and click “Next“.
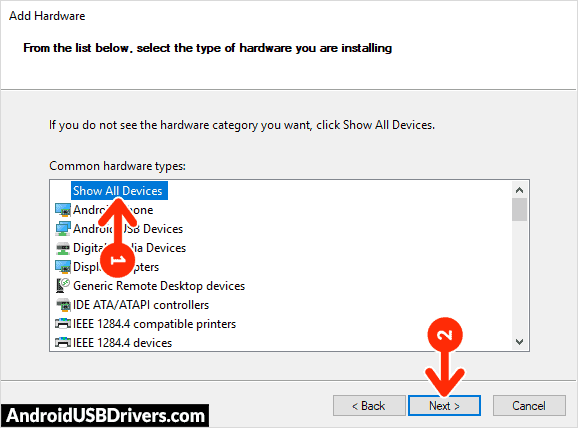
Step 5: Once done choose “Show all devices“, click “Next” and select the extracted file manually from your computer.
Step 6: Now to start installing your new hardware, click “Next” again.
Step 7: Click “Install” in the Windows security prompt window.
Step 8: Next, click “Finish” to complete installation.
That’s it. Now you have successfully finished installed ADB driver in your Computer. If you encounter any issues while following this tutorial, do let me know via comments.
Note: Download Explay Hit stock ROM, flash it on your corrupted device and get it back to a working condition easily.
Boopathy Sundaramoorthy is a tech and Android enthusiast working for AllUSBDrivers.com from 2018. He loves helping Android users to find the right USB drivers for their devices so that they can connect their smartphone or tablet to a computer.
Reader Interactions
Explay Hit phone having difficulty connecting to a computer? Windows computer not recognizing Explay Hit Android Phone? It may be because of the missing or the corrupted drivers on your computer. To fix Explay Hit not showing up on PC, download Explay Hit USB Drivers and install them on your computer.
Explay USB Drivers are a must to establish a stable connection between your computer and phone over USB. If you’re looking for Explay Hit USB drivers for Windows 11, Windows 10, Windows 7, Windows 8.1, and Windows 8, then you can download them from the downloads section below. On this page, we have shared official OEM USB Drivers for Explay Hit along with ADB interface drivers and Fastboot drivers.
Explay Hit Android USB Drivers help securely connect your phone as an MTP USB device (Media Transfer Protocol) and transfer files and data like images, videos, and documents to and from phone to computer or laptop. If you’re facing an Android file transfer not working issue, then it is recommended to install Explay Hit drivers on your computer.
The Explay Hit ADB driver and Fastboot driver allows you to pass ADB commands and Fastboot commands from your computer and perform certain operations on your phone.
Table of Contents
- 1 Download Explay Hit USB Driver
- 1.1 Explay Hit CDC Driver for Flashing Firmware
- 1.2 Explay Hit VCOM Driver for Flashing Firmware
- 1.3 Explay Hit USB Driver for normal connecting to PC
- 1.4 Explay Hit ADB and Fastboot Drivers
- 2 How to Install Explay Hit CDC Drivers
- 3 How to Install Explay Hit VCOM Drivers
- 4 How to Install Explay Hit USB Drivers Manually
- 5 How to Install Explay Hit ADB and Fastboot Drivers
The Explay Phone drivers offered here allow you to flash stock firmware, stock recovery, TWRP recovery, CWM recovery, unlock the bootloader, etc. It also allows you to transfer media, documents, and other files between your phone and computer.
Explay Hit CDC Driver for Flashing Firmware
Download Now
How to install: Follow Tutorial
Explay Hit VCOM Driver for Flashing Firmware
Download Now
How to install: Follow Tutorial
Explay Hit USB Driver for normal connecting to PC
Download Now
How to install: Follow Tutorial
The Explay Hit Fastboot and ADB drivers can be downloaded below.
Explay Hit ADB and Fastboot Drivers
Download Now
How to install: Follow Tutorial
[!] Note: If you face Driver Signature Error while installing the USB Driver, then watch this video to fix the problem.
Also Download: Explay Blaze USB Drivers
How to Install Explay Hit CDC Drivers
- Download and extract the latest Android CDC Driver (android-cdc-driver.zip) file to Desktop on your computer.
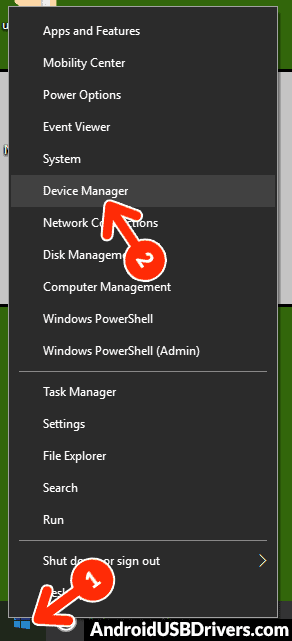
- Now open the Device Manager on your computer by right-clicking Windows Start Button and selecting Device Manager.
- Now click on your Computer name in the Device Manager window.
- Now click on Action and then click on Add legacy hardware.
- Now Add Hardware Wizard window should open. Click on Next to continue.
- Select Install the hardware that I manually select from a list (Advanced) option and click on Next.
- Select Show All Devices from the list and click on Next.
- In the next screen, click on Have Disk… to open the Install From Disk window.
- In the Install From Disk window, click on Browse… and navigate to the folder where you have extracted the drivers in Step #1.
- Now select Android_Gadget_CDC_driver.inf driver file and click on Open and then on OK.
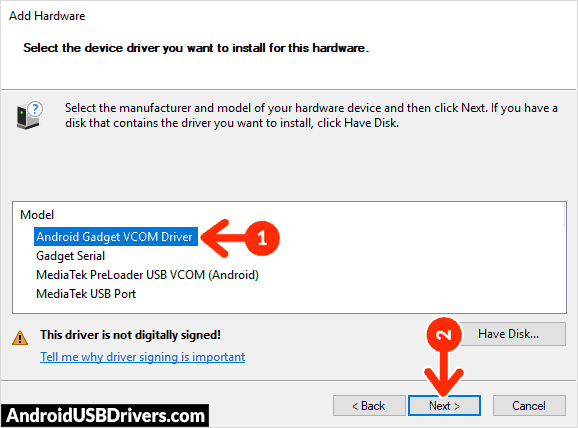
- Now select the Android Gadget VCOM Driver from the list and click on Next.
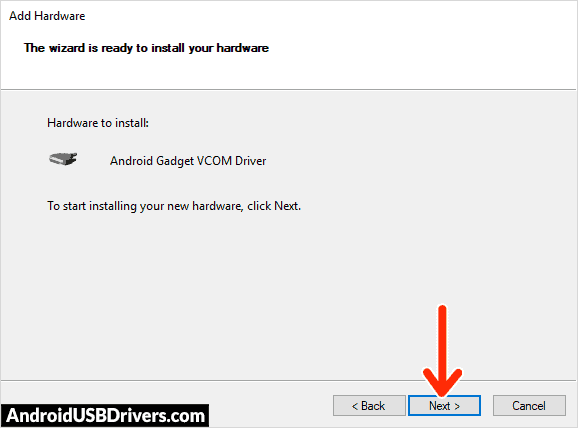
- Confirm the Hardware driver to install and click on Next to begin the installation process.
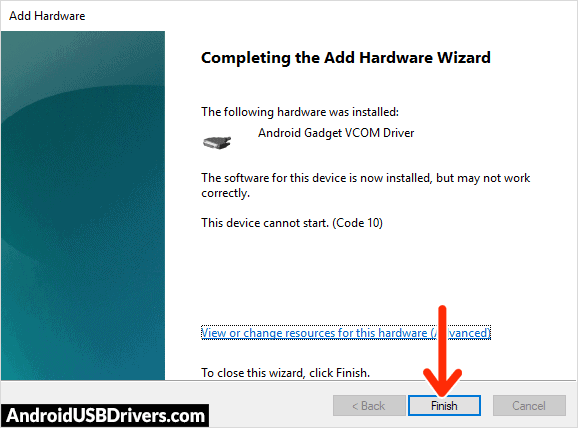
- Once installed, click on Finish.
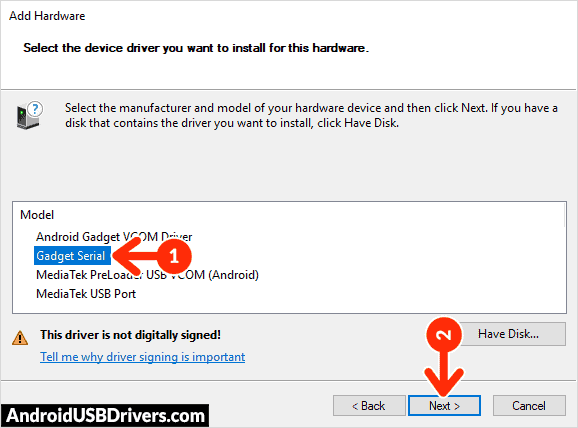
- Follow Steps #3 to #13 again and install the Gadget Serial, MediaTek PreLoader USB VCOM (Android), and MediaTek USB Port drivers.
- Once all the listed drivers are installed, restart your computer.
How to Install Explay Hit VCOM Drivers
- Download and extract the latest Google Android VCOM Driver (android-vcom-driver.zip) on your computer.
- Launch Device Manager on your computer by right-clicking Windows Start Button and selecting Device Manager.
- Once the Device Manager window loads, click on your Computer name.
- Now click on Action and then select Add legacy hardware.
- Now Add Hardware Wizard window should open. Click on Next to continue.
- Select Install the hardware that I manually select from a list (Advanced) option and click on Next.
- Now select Show All Devices and click on Next.
- Now click on Have Disk… to launch the Install From Disk window.
- Now click on Browse… from the Install From Disk window and navigate to the folder where you have extracted the drivers in Step #1.
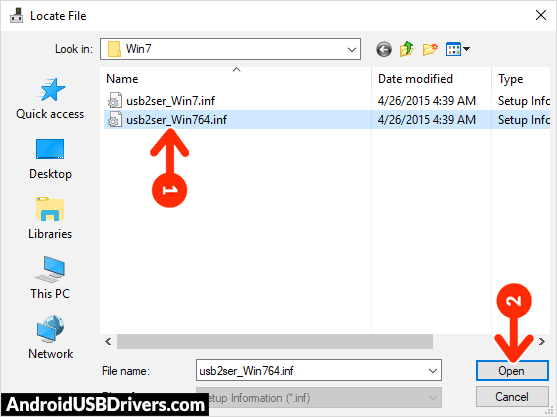
- Now open Win 7 folder and select usb2ser_Win764.inf driver file if you have the 64-bit version of Windows, otherwise choose usb2ser_Win7.inf file if you have the 32-bit version of Windows. Once selected, click on Open and then on OK.
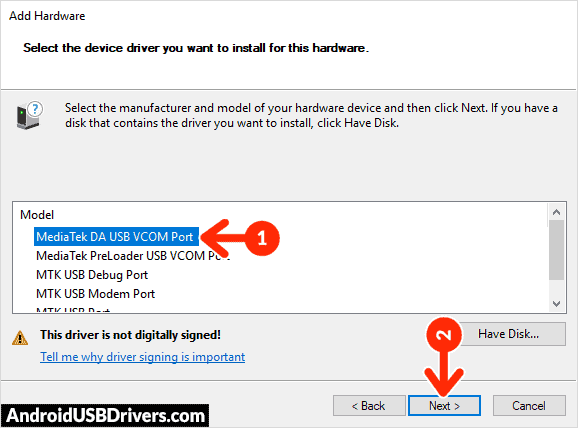
- Select the MediaTek DA USB VCOM Port driver from the list and click on Next.
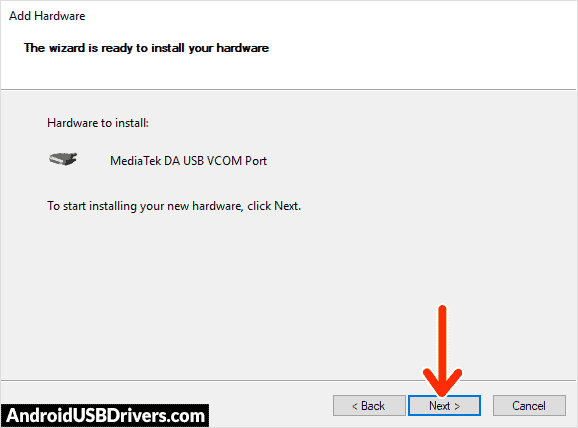
- Confirm the Hardware driver to install and click on Next to begin the installation process.
- Once installed, click on Finish.
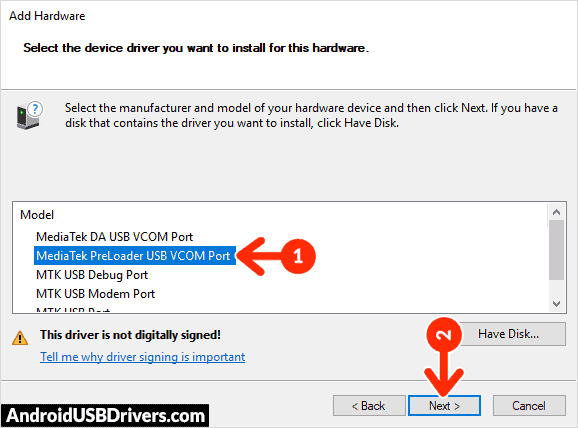
- Follow Steps #3 to #13 again and install the MediaTek PreLoader USB VCOM Port, MTK USB Debug Port, MTK USB Modem Port, and MTK USB Port drivers.
- Once all the listed drivers are installed, reboot your computer.
How to Install Explay Hit USB Drivers Manually
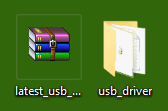
- Download and extract the latest_usb_driver_windows.zip package on your computer.
- Open the Device Manager on your computer by right-clicking Windows Start Button and selecting Device Manager.
- Once the Device Manager window opens, click on your Computer name.
- Now click on Action and then on Add legacy hardware.
- Now Add Hardware Wizard window should pop-up. Click on Next to continue.
- In the next screen, select Install the hardware that I manually select from a list (Advanced) option and click on Next.
- Now select Show All Devices and click on Next.
- Now click on Have Disk… to open the Install From Disk window.
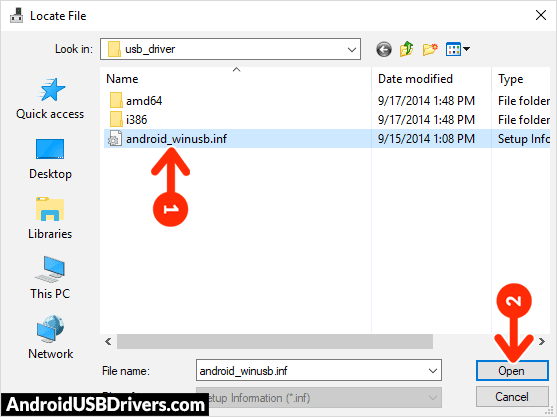
- Click on Browse… and navigate to the folder where you have extracted the drivers in Step #1.
- Now select android_winusb.inf file and click on Open and then on OK.
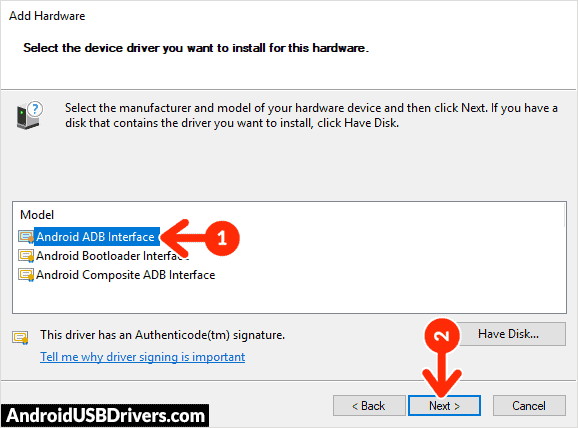
- Select the Android ADB Interface driver from the list and click on Next.
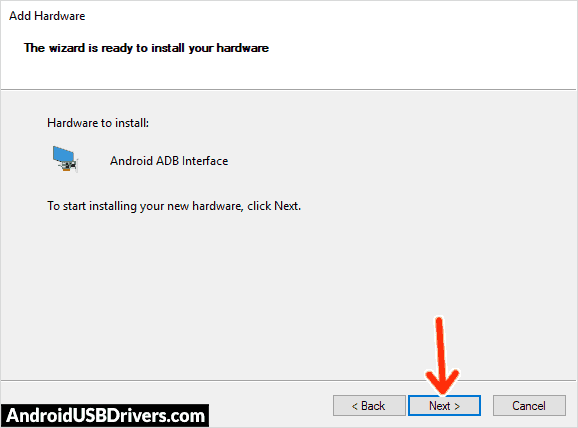
- Confirm the Hardware driver to install and click on Next to begin the installation process.
- Once installed, click on Finish.
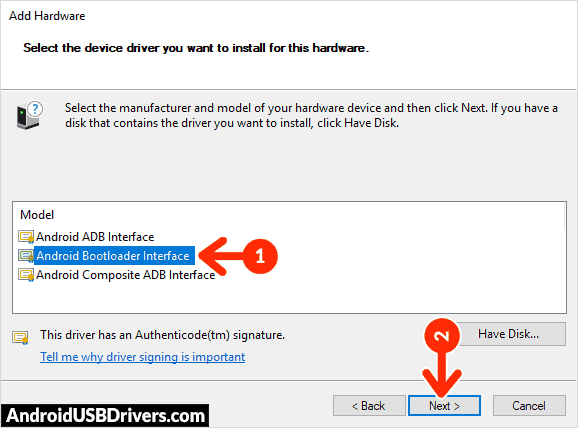
- Follow Steps #3 to #13 again and install the Android Bootloader Interface driver and Android Composite ADB Interface driver.
- Once all the listed drivers are installed, reboot your computer.
How to Install Explay Hit ADB and Fastboot Drivers
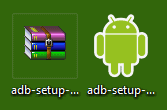
- Download and extract 15 seconds ADB installer on your computer to obtain the adb-setup.exe file.
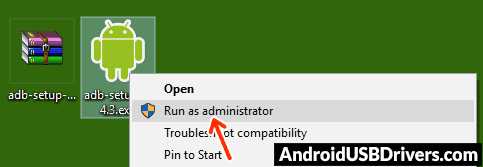
- Now right click on the adb driver installer setup file and click on Run as administrator.
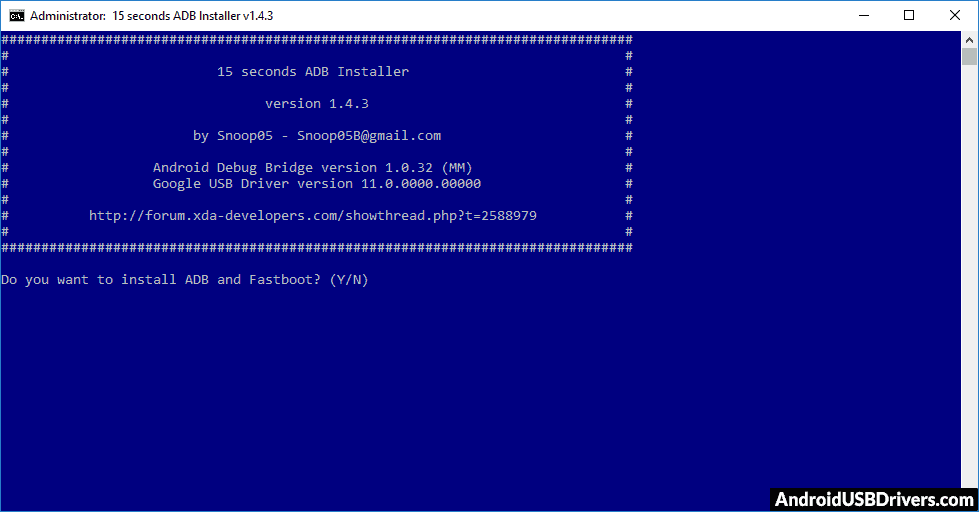
- Now you’ll see a command prompt window with a blue background and white text.
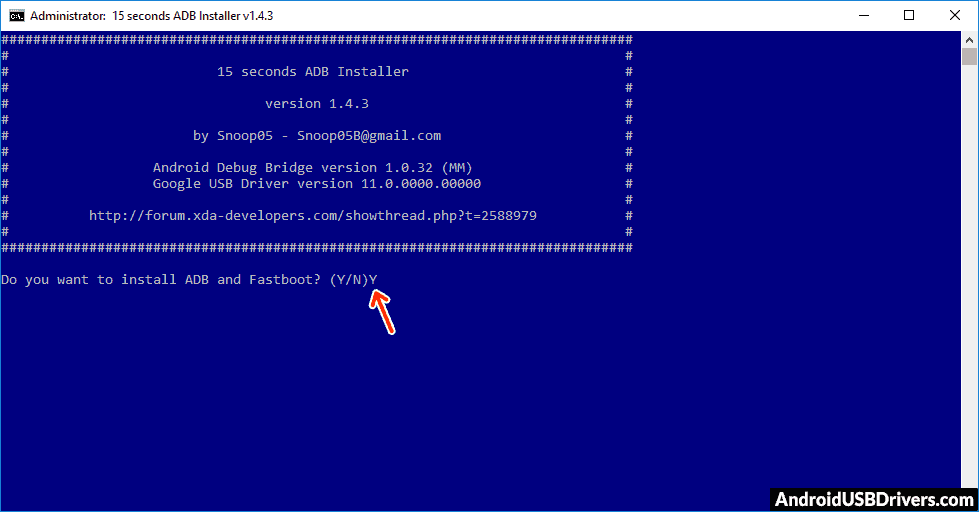
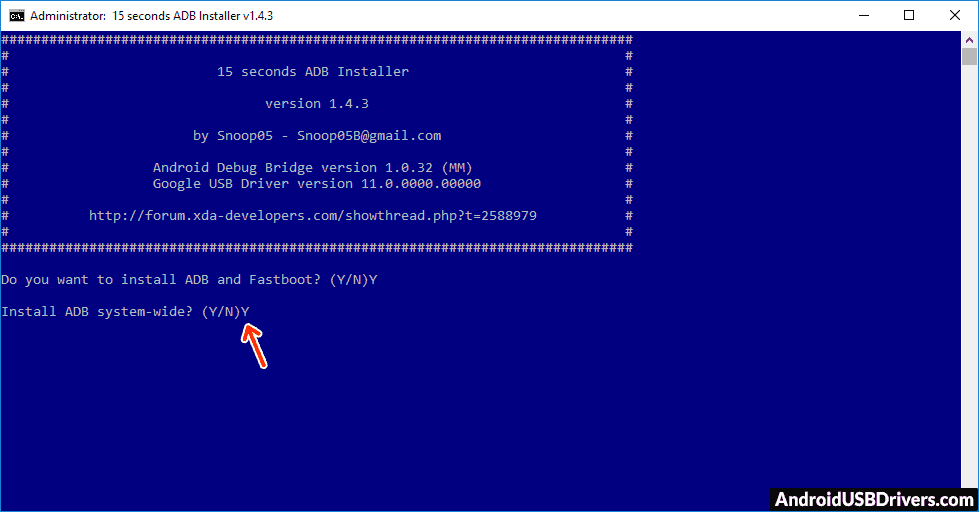
- It should say, Do you want to install ADB and Fastboot? Press the Y key on your keyboard and hit Enter.
- Now, it should ask whether you want to install ADB system-wide? Again press the Y key and hit Enter.
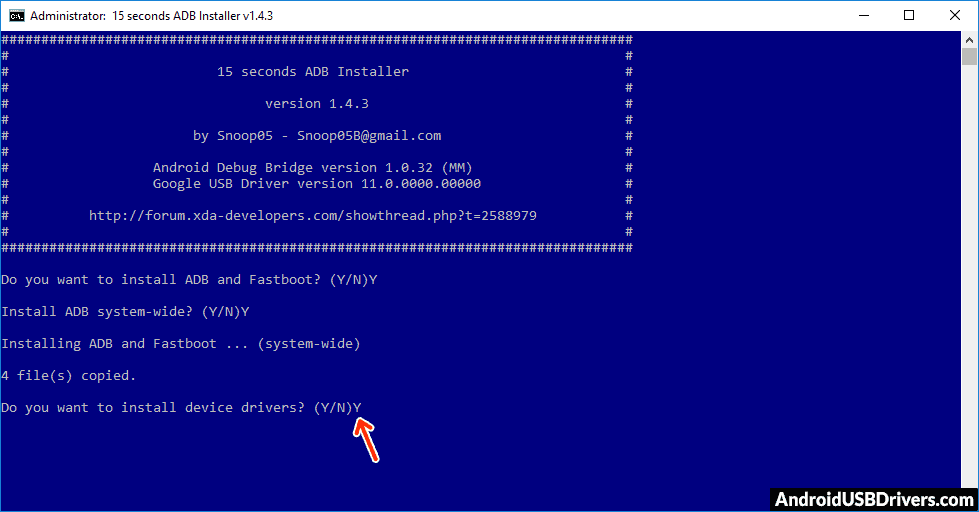
- Now, the ADB and Fastboot installation process should begin.
- When finished, it should say, Do you want to install device drivers? Press the Y key and hit Enter.
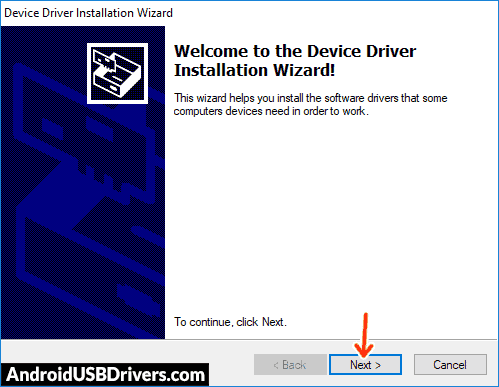
- Now the «Device Driver Installation Wizard» window should open.
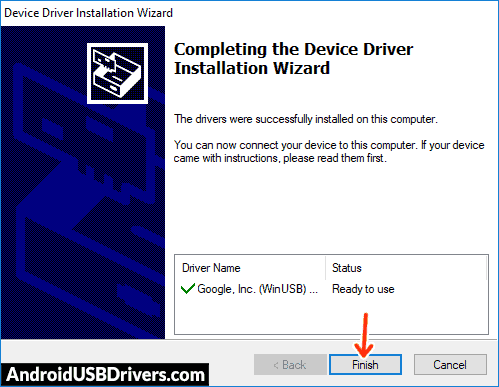
- Click on Next to continue installing the Google USB Drivers (WinUSB).
- Once installed, click on Finish and restart your computer.
Important Notes:
[*] Driver Signature Error: If you got Driver Signature Error While installing the Driver then See this Video to fix this problem.
[*] Broken link: Report here.
[*] Have we missed any device model? Let us know by contacting us via Contact Us page.
Reader Interactions
In this article, you will find out the Explay Hit USB Drivers? Don’t worry about it, we are here to give you the latest officially released drivers for your Explay Hit smartphone or tablet and check for the USB driver for your device? If yes are you checking out an easy way to connect your device to a PC or Laptop? You’ve come to the right place! Here we’ve provided free download Explay Hit USB drivers for all models supported their model numbers, just check below.
Here, we have provided 4 USB drivers for your Explay Hit Android device on this page.
Download Explay Hit USB Driver
Driver Type: ADB
Driver Purpose: Secure your device to a computer
File Size: 8.3 MB
How to Install: Tutorial Guide
ADB Driver Installer: Free Download for Windows
Download Explay Hit Qualcomm Driver
Driver Type: Qualcomm
Driver Purpose: Flashing stock firmware on your device
File Size: 11 MB
How to Install: Tutorial Guide
Qualcomm Driver Installer: Free Download for Windows
Download Explay Hit CDC Driver
Driver Type: CDC
Driver Purpose: Scan your system for out-of-date and missing drivers
File Size: 8.5 MB
How to Install: Tutorial Guide
CDC Driver Installer: Free Download for Windows
Download Explay Hit VCOM Driver
Driver Type: VCOM
Developer: MediaTek
File Size: 401.63 KB
How to Install: Tutorial Guide
VCOM Driver Installer: Free Download for Windows
Watch video tutorial about ADB USB Drivers
If you don’t like this video tutorial or if you would like to get more command, then continue reading.
How to Install Android USB Drivers for Windows?
- Let’s get started, download the USB driver, and extract it on your desktop.
- Currently, open Device Manager > Action > Add legacy hardware.
- Click “Next” in the Add legacy hardware wizard.
- NOW, select“Install the hardware that I manually select from the list (Proceed)” and click “Next“.
- When done choose “Show all devices“, click “Next” and select the extracted file manually from your PC.
- Now to start installing your new hardware, click “Next” once again.
- Click “Install” in the Windows security prompt window.
- Click “Finish” to complete the installation.
Supported Operating Systems 32-bit / 64-bit
Need USB driver to download for Windows 10, Windows 8.1, Windows 7? Just in case you are having problems at the part of your USB is not operating, see the article below to settle your USB problems.
That’s it. Now you have successfully finished installing Android ADB Driver on your Windows computer. From now on, you will be able to connect your Android smartphone or tablet with the PC successfully.
In the event that you might want to connect with us for many reasons, utilize the contact page.

Пошаговая инструкция по прошивке планшета Explay Hit 3G.
Внимание!
Все действия вы совершаете на свой страх и риск! Все персональные настройки и личные данные могут быть утеряны! За возможное нарушение работоспособности аппарата администрация сайта и автор статьи ответственности не несут!
Внезапный обрыв прошивки, например в момент отключения электроэнергии, может привести к полной потере работоспособности планшета без возможности его восстановления. Поэтому прошивать лучше на ноутбуке с полностью заряженным аккумулятором, а также иметь хороший USB кабель и не расшатанное гнездо.
Зарядите планшет не менее чем на 80%.
Эта модель планшета бывает трёх версий (V1, V2 и V3) с разными ревизиями системных плат и соответственно с разными, НЕ совместимыми прошивками.
Для того чтобы узнать какая ревизия на вашем планшете, нужно зайти в Настройки ⇒ О планшетном ПК ⇒ Номер сборки. В “Номер сборки” могут быть следующие числа:
- v1.00, v1.02, v1.03, v1.04 – это 1 ревизия планшета (V1), следовательно прошивать ТОЛЬКО v1.04.
- Если в номере сборки v2.0 или v2.10 – это 2 ревизия, прошивать версию прошивки v2.10.
- Если в номере сборки вы увидели v3.0 – это 3 ревизия, прошивать версию v3.00.
Версию прошивки также можно узнать сняв заднюю крышку и найти наклейку на системной плате, на ней должно быть V1, V2 или V3, соответственно прошивки к ним v1.04, v2.10 и v3.00.
Если вы всё же прошились не своей версией и теперь планшет даже не определяется компьютером, то для прошивки пробуйте подключать планшет удерживая кнопку громкость “+”.
- Извлекаем содержимое архивов в корень диска “С:” (путь к прошивке не должен содержать русских букв) и запускаем установку драйверов: файл “Driver_Auto_Installer-v5.1632.00.exe“.
Установка стандарта: нажимаем “Instal“, соглашаемся на установку нажимаем “Да“, по завершении нажимаем “Ok“, “Finish” и перезагружаем компьютер.
- После перезагрузки компьютера открываем «Диспетчер устройств» и подключаем выключенный планшет кабелем USB к компьютеру. Начнётся установка драйвера и после успешной установки в «Диспетчере устройств» в разделе «Порты (COM и LPT)» появится подключенный планшет под названием «MediaTek PreLoader USB VCOM (Android)».
Если драйвер не успел установиться, то выдерните и снова подключите шнур USB.

- Переходим в папку «SP_Flash_Tool_exe_Windows_v5.1444.00.000» и запускаем файл «flash_tool.exe»:
- В открывшейся программе нажимаем кнопку «Scatter-loading»:
- В папке с прошивкой выбираем файл “MT6582_Android_scatter.txt” и нажимаем кнопку “Открыть“:
- Если нужно чтобы после прошивки в планшете всё сохранилось режим работы оставляем «Download Only» и убираем галочки с пунктов “CACHE” и “USRDATA“.
Должно быть так:
- Если нужно очистить память планшета от пользовательских настроек и файлов выбираем «Firmware Upgrade», галочки на “CACHE” и “USRDATA” встанут автоматически.
В этом режиме память планшета будет полностью отформатирована, поэтому использовать его нужно в крайнем случае, если режим «Download Only» не дал результатов.
Должно быть так:
НЕ ИСПОЛЬЗУЙТЕ РЕЖИМ “Format All + Download“, это может привести к стиранию IMEI и калибровочных данных аппарата, необходимых для его корректной работы.
- Нажимаем кнопку «Download»:
- Подключаем выключенный планшет к компьютеру.
В процессе прошивки в нижней части окна утилиты (в области статуса) будут
отображаться стадии прошивки – двигаться цветовой индикатор прогресса и
изменяться числовые значения (несколько раз, для каждой стадии).
- Об успешном окончании прошивки будет свидетельствовать окошко с надписью «Download OK»:
Отключаем USB кабель и включаем планшет.
Первичная загрузка после перепрошивки включает процесс инициализации устройства, и занимает более продолжительное время, чем обычно.
После загрузки проходим стандартную процедуру настройки с выбором языка, принятия условий и включения или отключения дополнительных опций.
Восстановление IMEI Explay Hit 3G через инженерное меню
Восстановление IMEI (International Mobile Equipment Identity — международный идентификатор мобильного оборудования) может потребоваться в том случае если в телефоне нет сети, но при этом сим карту он видит. Такое может случиться если прошить телефон с полным форматированием памяти.
IMEI как правило написан на шильдике под аккумулятором или задней крышке.
Чтобы проверить IMEI нужно набрать команду *#06#, сколько SIM-карт столько будет и IMEI.
- Для начала переписываем IMEI с коробки или задней крышки.
- Чтобы попасть в инженерное меню нужно набрать номер *#*#29305652#*#*.
- Далее идём по пунктам “Connectivity” ⇒ “CDS infomation” ⇒ “Radio Information“.
- Нажимаем “Phone1” и в поле вводим команду AT+ EGMR=1,7,”Ваш имей” (между AT+ и EGMR должен быть пробел), затем нажимаем “OK“.
- Возвращаемся к “Phone2” и в поле вводим команду AT+ EGMR=1,10,”Ваш имей” (между AT+ и EGMR также должен быть пробел), затем нажимаем “OK”.
- Перезагружаем планшет, набираем *#06# и проверяем imei, теперь он должен быть на месте.
Do you own an Explay smartphone or tablet? Are you searching for a simple way to connect your Explay device to a computer? If yes is your answer to both of these queries, then you are on the right page. Download Explay USB drivers from here (based on device model number), install it on the computer and connect your device to PC or Laptop successfully.
Since Explay doesn’t offer a PC suite application for its customers, downloading and installing the USB drivers given here on your computer is the only way to connect your Explay smartphone or tablet to PC or Laptop computer.
| Explay Models | Download USB Driver |
|---|---|
| Explay Surfer 7.02 | Download Driver |
| Explay Surfer 7.04 | Download Driver |
| Explay Sky | Download Driver |
| Explay Surfer 7.31 3G | Download Driver |
| Explay Surfer 8.31 3G | Download Driver |
| Explay Surfer 8.02 | Download Driver |
| Explay Fresh | Download Driver |
| Explay Bit | Download Driver |
| Explay Rio Play | Download Driver |
| Explay Style Tablet | Download Driver |
| Explay Hit | Download Driver |
| Explay Light | Download Driver |
| Explay Planet | Download Driver |
| Explay Discovery | Download Driver |
| Explay Fog | Download Driver |
| Explay Oxide | Download Driver |
| Explay Mini TV | Download Driver |
| Explay Leader | Download Driver |
| Explay Atv | Download Driver |
| Explay Indigo | Download Driver |
| Explay Craft | Download Driver |
| Explay Tornado | Download Driver |
| Explay Pulsar | Download Driver |
| Explay Air | Download Driver |
| Explay Phantom | Download Driver |
| Explay 4Game | Download Driver |
| Explay Diamond | Download Driver |
| Explay Neo | Download Driver |
| Explay Rio | Download Driver |
| Explay X-Tremer | Download Driver |
| Explay Slim | Download Driver |
| Explay Vision | Download Driver |
| Explay X5 | Download Driver |
| Explay N1 | Download Driver |
| Explay Polo | Download Driver |
| Explay HD Quad | Download Driver |
| Explay Navigator | Download Driver |
| Explay Surf | Download Driver |
| Explay Infinity 2 | Download Driver |
| Explay StarTV | Download Driver |
| Explay A350 | Download Driver |
| Explay Star | Download Driver |
| Explay Advance | Download Driver |
| Explay Infinity | Download Driver |
| Explay Scream 3G | Download Driver |
| Explay D7.2 3G | Download Driver |
| Explay Q230 | Download Driver |
| Explay Onliner 4 | Download Driver |
| Explay Blaze | Download Driver |
| Explay Vega | Download Driver |
| Explay Art 3G | Download Driver |
| Explay Atlant | Download Driver |
| Explay Flame | Download Driver |
| Explay X-Tremer | Download Driver |
Points To Remember
1) Explay Mobiles officially provides all the USB drivers given on this page. So, if you encounter any errors while installing these USB drivers on your computer, contact their support team.
2) The Explay USB drivers given here are for Windows-based computers. So, if you are using Mac or Linux based computers, these drivers will not work.
3) If you can’t find the USB driver for your Explay device on this page, leave a comment below.
4) If you own another brand’s smartphone or tablet, you can download USB drivers for the same by visiting our USB drivers page.
Boopathy Sundaramoorthy is a tech and Android enthusiast working for RootMyDevice.com from 2018. He specializes in testing new Android rooting methods, and he shares his experiences here. He also provides stock ROM installation tutorials and custom recovery installation tutorials here.
Reader Interactions
- Home
- chevron_right
- Задай вопрос о Android!
- chevron_right
- Обновления и прошивки для Android устройств
- chevron_right
- Обновление телефонов Explay
- chevron_right
- Explay Hit 3G — обновление и прошивка
Как обновить Explay Hit 3G?
Процесс обновления Explay Hit 3G заключается в установке на него альтернативной прошивки (ROM) после того, как производитель перестал обновлять устройство по «воздуху». Проще говоря, если телефон перестал обновляться сам, то пора устанавливать на него альтернативную прошивку.
Обновляться нужно и в том случае, если у вас начались проблемы с устройством, которые вы не смогли решить никаким иным способом. Если вы не уверены, что сможете без проблем самостоятельно накатить прошивку, то лучше воспользоваться услугами более опытных пользователей, чтобы не навредить гаджету. Или задуматься о замене устройства на более новое.
Выбрать желаемую прошивку и инструкцию к ней, можно по ссылкам, из списка в следующем абзаце, если возникнут трудности с выбором, пишите в комментариях, поможем.
- Explay Hit 3G v1.04 — Официальная прошивка для 1-ой ревизии (OS 4.2)
- Explay Hit 3G v3.0 — Официальная прошивка для 3-й ревизии(OS 4.4)
- Драйвера для Explay Hit 3G
More Related
Результатов не найдено.
Ask your question in the comments and get the author’s answer!

