
On this page, we have managed to share the official USB driver of the LG Magna Device. If you were already searching for the USB driver of the device, then this page will help you out.
There are 2 USB drivers available for the device, i.e., LG Driver and ADB Driver. The LG Driver is compatible with all the Flash Tool, and the ADB Driver can be useful for establishing a connection between the mobile and the computer.
LG Magna Driver (official)
The LG Driver is compatible with the LG Flash Tool and the IMEI Tool and can be helpful if you are trying to install firmware (ROM) on the device.
Driver Name: LG Mobile Driver
Package Name: LG_Mobile_Driver_v4.4.2.zip
Driver Size: 13.8 MB
How to Install: Follow Guidelines
Get Driver
LG Magna ADB Driver
You can use the ADB Driver to connect the mobile (powered by android) to the computer and transfer data between the mobile and the computer.
Driver Name: Android ADB Driver
Package Name: usb_driver_r13-windows.zip
Driver Size: 8.27 MB
How to Install: Follow Guidelines
Get Driver
How to Install any USB Driver Manually
- Download and extract the USB driver on the computer.
- Open Device Manager (devmgmt.msc) and Click on the Computer Name > Action Menu > Add Legacy Hardware.
- Click on the Next button.
- Select the Install the hardware that I manually Select from a list checkbox and Click on the Next button.
- Again, Click on the Next button.
- Click on the Have Disk > Browse > Locate the .inf file (found in the extracted driver folder) and Click on Open Button.
- Click on the Finish button to complete the installation.
Follow Complete Guidelines
Readme Once:
[*] Driver Signature Error: If you are facing Driver Signature Error while installing the USB Driver, then head over to How to Fix Driver Signature Error page.
[*] Driver Easy: We recommend you to use Driver Easy application to update all the computer drivers in a Single Click.
[*] LG Magna Stock Firmware: If you are looking for the LG Magna Stock Firmware, then head over to the LG Firmware page.
Having trouble connecting LG Magna H502F to PC? It might be a driver problem, so download LG Magna H502F Android USB Drivers and install them on Windows 11, Windows 10, Windows 7, 8, 8.1, or XP PC. The LG Magna H502F USB Drivers provided here are official and are virus-free. Based on your need, download USB Driver for LG Magna H502F from the downloads section and install it on Windows PC by following the instructions provided below.
With LG Magna H502F USB Driver installed on the PC, we can establish a secure connection between Computer and Mobile. It helps transfer data like images, video, documents, and other files from Mobile to PC.
We have also provided LG Magna H502F ADB and Fastboot drivers, which help pass ADB commands and Fastboot commands to the Phone via Command Prompt (CMD) from the computer.
Table of Contents
- 1 Download LG Magna H502F USB Driver
- 1.1 LG Magna H502F Driver for Flashing Firmware
- 1.2 LG Magna H502F Driver for Mac OS
- 1.3 LG Magna H502F USB Driver for normal connecting to PC
- 1.4 LG Magna H502F ADB and Fastboot Drivers
- 2 How to Install LG Magna H502F USB Drivers
- 3 How to Install LG Magna H502F USB Drivers Manually
- 4 How to Install LG Magna H502F ADB and Fastboot Drivers
The LG mobile drivers offered here can be used to flash stock firmware, stock recovery, TWRP recovery, CWM Recovery, Unlocking Bootloader, etc. It can also be used for general purposes, like transferring data and files.
LG Magna H502F Driver for Flashing Firmware
Download Now
How to install: Follow Tutorial
LG Magna H502F Driver for Mac OS
Download Now
LG Magna H502F USB Driver for normal connecting to PC
Download Now
How to install: Follow Tutorial
The LG Magna H502F Fastboot and ADB drivers can be downloaded below.
LG Magna H502F ADB and Fastboot Drivers
Download Now
How to install: Follow Tutorial
[!] Note: If you face Driver Signature Error while installing the USB Driver, then watch this video to fix the problem.
Also Download: LG K4 K130 USB Drivers
How to Install LG Magna H502F USB Drivers
- Download and extract the LG Mobile Driver (LG-Mobile-Driver_WHQL_Ver_4.5.0.zip) package to Desktop on your computer.

- Once extracted, you’ll find the LG USB Driver setup (LG-Mobile-Driver_WHQL_Ver_4.5.0.exe) file.
- Right-click on the LG Drivers setup file and select Run as administrator.

- Now, the LG Mobile Driver InstallShield Wizard window should open on your computer.
- Click on Next to continue with the LG United Mobile Driver installation.

- Now, the LG Phone Drivers installation process should begin.
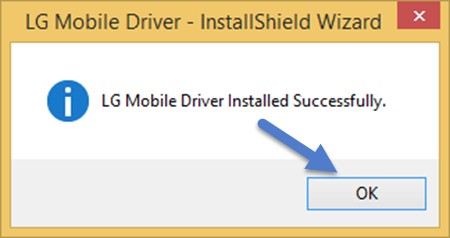
- Once the LG Drivers are installed, you’ll see a message saying, «LG Mobile Driver Installed Successfully!«.
- Click on OK.

- Now, reboot your computer.
- Now, you’ll be able to connect your LG Mobile Phone to your computer through USB and use any LG software like LG Mobile Support Tool, LGUP Tool, etc.


How to Install LG Magna H502F USB Drivers Manually
- Download and extract the latest_usb_driver_windows.zip package on your computer.

- Open the Device Manager on your computer by right-clicking Windows Start Button and selecting Device Manager.

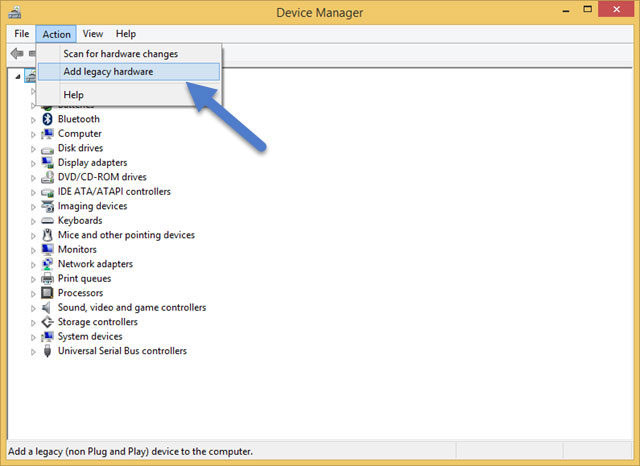
- Once the Device Manager window opens, click on your Computer name.

- Now click on Action and then on Add legacy hardware.

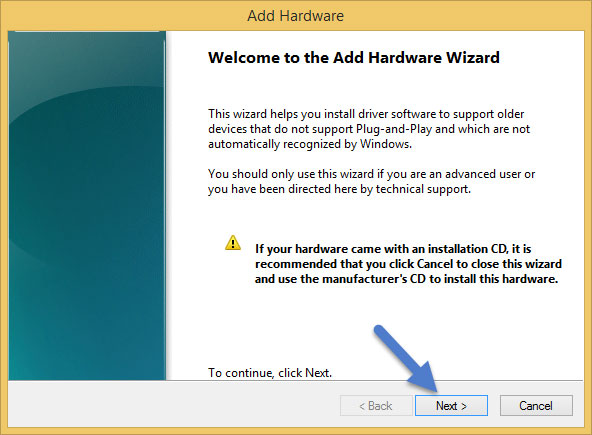
- Now Add Hardware Wizard window should pop-up. Click on Next to continue.

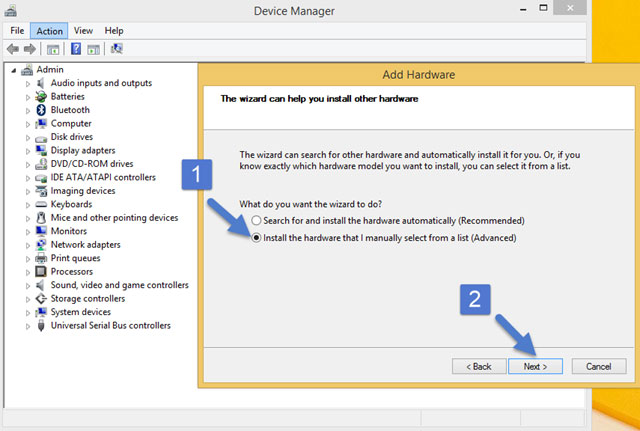
- In the next screen, select Install the hardware that I manually select from a list (Advanced) option and click on Next.
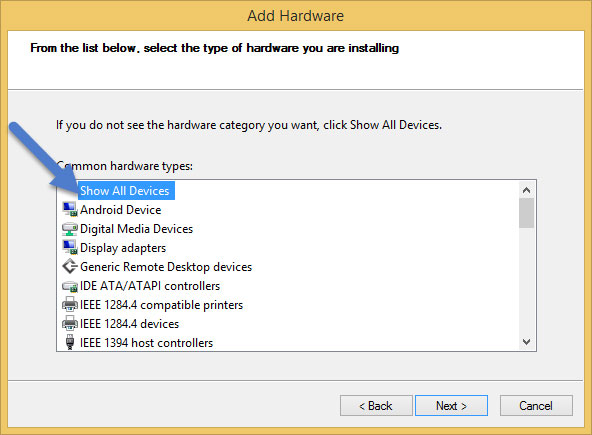
- Now select Show All Devices and click on Next.
- Now click on Have Disk… to open the Install From Disk window.
- Click on Browse… and navigate to the folder where you have extracted the drivers in Step #1.

- Now select android_winusb.inf file and click on Open and then on OK.

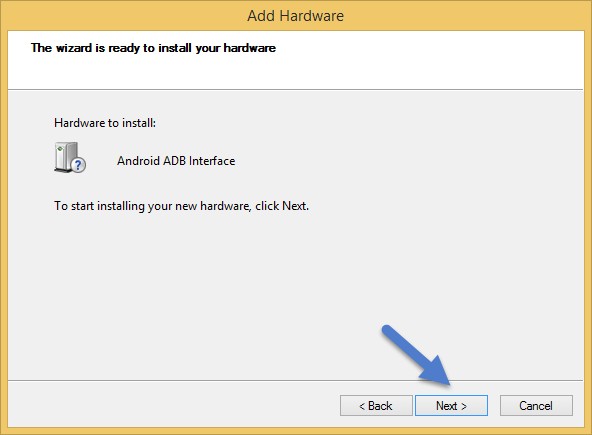
- Select the Android ADB Interface driver from the list and click on Next.
- Confirm the Hardware driver to install and click on Next to begin the installation process.
- Once installed, click on Finish.
- Follow Steps #3 to #13 again and install the Android Bootloader Interface driver and Android Composite ADB Interface driver.
- Once all the listed drivers are installed, reboot your computer.


How to Install LG Magna H502F ADB and Fastboot Drivers
- Download and extract 15 seconds ADB installer on your computer to obtain the adb-setup.exe file.
- Now right click on the adb driver installer setup file and click on Run as administrator.

- Now you’ll see a command prompt window with a blue background and white text.

- It should say, Do you want to install ADB and Fastboot? Press the Y key on your keyboard and hit Enter.
- Now, it should ask whether you want to install ADB system-wide? Again press the Y key and hit Enter.
- Now, the ADB and Fastboot installation process should begin.
- When finished, it should say, Do you want to install device drivers? Press the Y key and hit Enter.
- Now the «Device Driver Installation Wizard» window should open.
- Click on Next to continue installing the Google USB Drivers (WinUSB).

- Once installed, click on Finish and restart your computer.


Important Notes:
[*] Driver Signature Error: If you got Driver Signature Error While installing the Driver then See this Video to fix this problem.
[*] Broken link: Report here.
[*] Have we missed any device model? Let us know by contacting us via Contact Us page.
Reader Interactions
Home » LG Magna H502F USB Driver
If you are an owner of LG Magna H502F and searching for the USB drivers for your device, then you have landed on the right page. Download LG Magna H502F USB driver from here, install it on your computer and connect your device with PC or Laptop successfully.
Here, we have provided two USB drivers for your LG Magna H502F.
USB Driver Type: LG Driver
USB Driver Purpose: For flashing Stock firmware on your device
File Size: 13.81 MB
Download Now
USB Driver Type: ADB Driver
USB Driver Purpose: For connecting your device to a computer
File Size: 8.3 MB
Download Now
Steps To Install LG Magna H502F Driver On Your Computer
Video Tutorial
If you don’t like this video tutorial or if you would like to get more instructions, then continue reading.
Step 1: To get started, download LG driver from the link given above and extract it on your desktop.
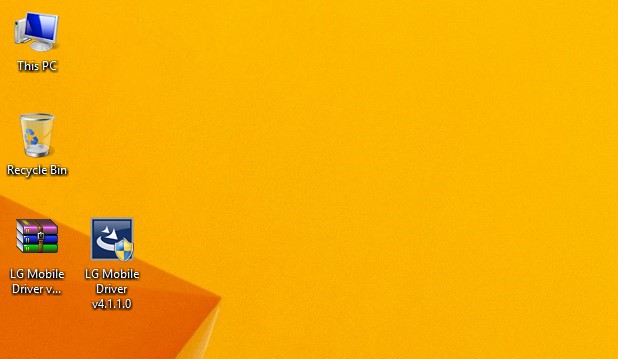
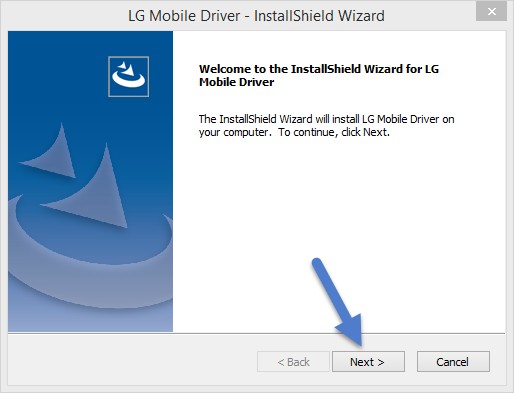
Step 2: Once extracted, you will see LG driver setup file. Click on it to launch the Installation Wizard window. Once done, click «Next» in the InstallShield Wizard.
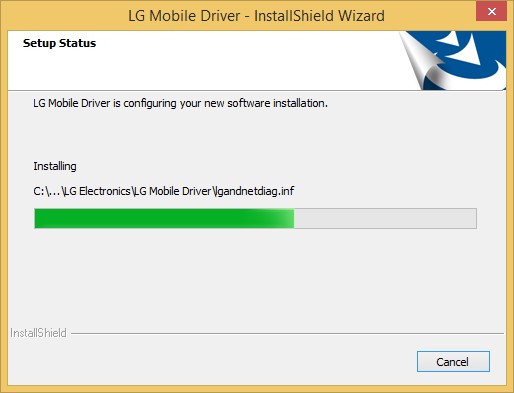
Step 3: Next, you will see the Installation Status Window. Now you will have to wait until the Window closes.
Step 4: Once the installation is finished, click “Ok” to close the installation wizard.
That’s it. Your LG device driver is now successfully installed on your computer.
Steps To Install LG Magna H502F ADB Driver In Computer
If you don’t like this video tutorial or if you would like to get more instructions, then continue reading.
Step 1: To get started, download the driver and extract it on your desktop.

Step 2: Now, open Device Manager > Action > Add legacy hardware.
Step 3: Next, click «Next» in the Add legacy hardware wizard.
Step 4: Now choose «Install the hardware that I manually select from the list (Advanced)» and click «Next«.
Step 5: Once done choose «Show all devices«, click «Next» and select the extracted file manually from your computer.
Step 6: Now to start installing your new hardware, click «Next» again.
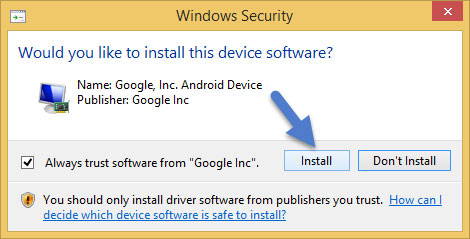
Step 7: Click «Install» in the Windows security prompt window.
Step 8: Next, click «Finish» to complete installation.

That’s it. Now you have successfully finished installing ADB driver in your computer. If you encounter any issues while following this tutorial, do let me know via comments.

Rajarajacholan Kulothungan is a tech nerd and an Android enthusiast working for AllUSBDrivers.com from 2020. He has a knack for finding the right Windows USB driver for Android devices, and he shares his experiences here.
Reader Interactions
Содержание
- Драйвера lg h502f для windows 10
- Драйвера lg h502f для windows 10
- Драйвера lg h502f для windows 10
- Драйвера lg h502f для windows 10
- Драйвера lg h502f для windows 10
Драйвера lg h502f для windows 10
В теме нет куратора. По вопросам наполнения шапки обращайтесь к модераторам раздела через кнопку «Жалоба» под сообщениями, на которые необходимо добавить ссылки.
Если в теме есть пользователь, желающий стать Куратором и соответствующий Требованиям для кандидатов, он может подать заявку в теме Хочу стать Куратором (предварительно изучив шапку темы и все материалы для кураторов).
Сообщение отредактировал esleer — 25.02.21, 14:55


6. Теперь нажимаем кнопку Старт «Стрелка вправо» и через несколько секунд программа потребует отсоединить и обратно подключить кабель (делаем) и пойдет прошивка. Во время прошивка телефон перезагрузится (кабель не трогаем) и через пару минут включиться. Все можно пользоваться.
Если во время прошивки после перезагрузки на дисплее телефона появилась надпись MiniOS и Factory Reset Status , ничего страшного, просто телефон автоматический не сделал Хард ресет, ждем пока в LGFlashtool’е не закончиться прошивка, и не появиться надпись PASS , а на телефоне Factory Reset Status 3 (также, у кого прошивка остановилась на Factory Reset Status 2 , а на компе вылезла ошибка, тоже ничего страшного) . После этого отсоединяем кабель, вынимаем АКБ через пару секунд обратно вставляем и зажимаем одновременно кнопку включения и громкость вниз, и держим пока не появиться надпись LG отпускаем кнопки и сразу же обратно нажимаем и заходим в Factory Reset и выбираем Yes, потом еще раз Yes, телефон перезагрузится и ждем пока не включиться. Все
Сообщение отредактировал king.leguha — 18.12.15, 14:06
Только что получил рут по этому методу VRoot До этого пробовал способы из шапки, неоднократно- безрезультатно.
Сообщение отредактировал deroctober — 18.07.15, 19:44
Драйвера lg h502f для windows 10
В теме нет куратора. По вопросам наполнения шапки обращайтесь к модераторам раздела через кнопку «Жалоба» под сообщениями, на которые необходимо добавить ссылки.
Если в теме есть пользователь, желающий стать Куратором и соответствующий Требованиям для кандидатов, он может подать заявку в теме Хочу стать Куратором (предварительно изучив шапку темы и все материалы для кураторов).
Сообщение отредактировал esleer — 25.02.21, 14:55
6. Теперь нажимаем кнопку Старт «Стрелка вправо» и через несколько секунд программа потребует отсоединить и обратно подключить кабель (делаем) и пойдет прошивка. Во время прошивка телефон перезагрузится (кабель не трогаем) и через пару минут включиться. Все можно пользоваться.
Если во время прошивки после перезагрузки на дисплее телефона появилась надпись MiniOS и Factory Reset Status , ничего страшного, просто телефон автоматический не сделал Хард ресет, ждем пока в LGFlashtool’е не закончиться прошивка, и не появиться надпись PASS , а на телефоне Factory Reset Status 3 (также, у кого прошивка остановилась на Factory Reset Status 2 , а на компе вылезла ошибка, тоже ничего страшного) . После этого отсоединяем кабель, вынимаем АКБ через пару секунд обратно вставляем и зажимаем одновременно кнопку включения и громкость вниз, и держим пока не появиться надпись LG отпускаем кнопки и сразу же обратно нажимаем и заходим в Factory Reset и выбираем Yes, потом еще раз Yes, телефон перезагрузится и ждем пока не включиться. Все
Сообщение отредактировал king.leguha — 18.12.15, 14:06
Только что получил рут по этому методу VRoot До этого пробовал способы из шапки, неоднократно- безрезультатно.
Сообщение отредактировал deroctober — 18.07.15, 19:44