
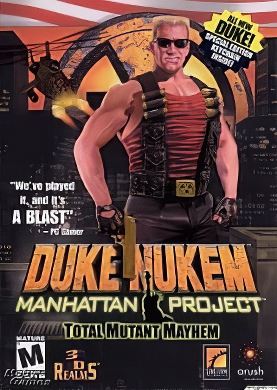
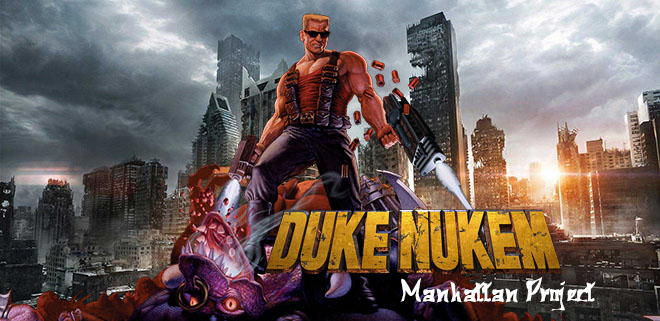
Duke Nukem: Manhattan Project – это уникальная по своей сути смесь легендарного боевика, платформера и приключенческого экшена. Вас ждет знаменитый Дюк Нюкем, море сражений, интересный сюжет и безумный экшен…
События игры происходят в Нью-Йорке, где внезапно начало происходить невероятное. Люди под воздействием некоей субстанции начинают превращаться в монстров, кровожадных мутантов, и с каждым разом, с каждой новой ночью, таких становится все больше и больше. Шпионам удалось узнать, кто может за этим стоять, и теперь вам в роли Дюка придется сделать все возможное для того, чтоб остановить это. В общем, отправляйтесь в путь и помните – от вас зависят судьбы всех жителей Нью-Йорка без исключения.
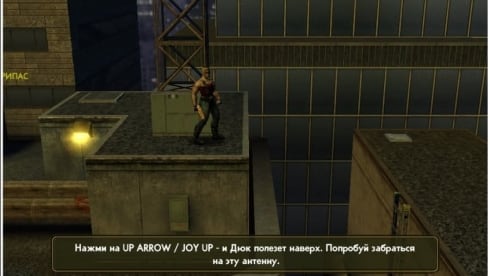
Что касается игрового процесса, так в данном вопросе все очень неоднозначно, ведь игра сама по себе сильно отличается от других игр серии. Теперь это полноценный платформер с двухмерными локациями и передвижением персонажа лишь влево и вправо. Хотя в остальном это все тот же безумный боевик. Вы будете бегать по многочисленным локациям, сражаться с ордами мутантов и монстров, собирать предметы, искать оружие, биться с огромными боссами, выполнять задания и делать многое другое. Иными словами, скучать вам не придется…
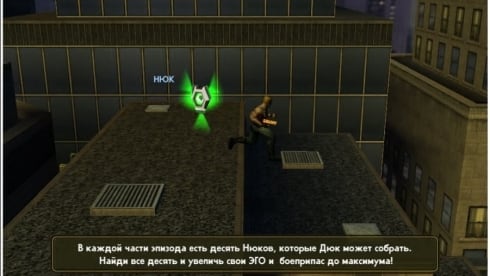
Самое же главное достоинство Duke Nukem: Manhattan Project заключается в разнообразии всего того, что есть вообще в игре. Взять, к примеру, монстров и мутантов. Всего вы повстречаете по ходу прохождения игры более двадцати пяти разновидностей мутантов, и к каждому нужно будет найти уникальный подход. У всех имеются свои слабые и сильные стороны. Еще вас ждет почти десяток разнообразных уровней, на каждом из которых вас будет ждать море геймплейных сюрпризов. Ну и конечно же не обошлось без широкого ассортимента вооружений, ловушек, акробатических трюков, и многого другого.
У нас вы можете скачать Duke Nukem: Manhattan Project торрент последнюю версию бесплатно на компьютер.
Системные требования
В избранное
Убрать
Без регистрации!
- Год: 2002
-
Интерфейс:
Русский -
Озвучка:
Английская - Разработчик: 3D Realms Entertainment
- Жанр: Экшен
Показать все метки
5-02-2019
31 448
Описание игры
Duke Nukem: Manhattan Project
Duke Nukem: Manhattan Project – полностью трехмерный аркадный платфомер, выполненный в лучших традиционном для жанра стиле. Главным действующим лицом здесь выступает небезызвестный уничтожитель пришельцев в лице самого Дюка Нюкема, который умело обращается со всевозможным оружием, включая инопланетные прототипы. На этот раз местом действия выступает район Манхэттен, что в Нью-Йорке. Дюк в очередной раз должен спасти человечество от, казалось бы, неминуемой гибели.
В качестве антагониста, согласно местной лайн-стори, выступает некий Мех Морфикс – безумный ученый, специализирующийся на генной инженерии. Доктор экспериментирует с превращением живых существ в монстров и мутантов, что у него получается очень даже неплохо. А все благодаря его инновационной разработке в виде зеленой слизи, известной как Глюоновая Жидкая Омега ПротоПлазма или ГЖОПП сокращенно.
Полная версия Duke Nukem: Manhattan Project включает в себя 24 уровня, разделенных на 8 игровых зон, каждая из которых имеет ряд характерных отличии в визуальном стиле и врагах. На каждом уровне спрятан гигантский взрывоопасный агрегат, в который заключена красавица. Собственно, девушки – слабое место Дюка Нюкема, и об этом известно хорошо Меху Морфиксу. Все уровни отделены друг от друга так называемым силовым полем, деактивировать которое можно при помощи специального ключа, который спрятан где-то в рамках локации.
Горячие новинки
Трейлер / Геймплей:

Торрент файлы взяты из проверенных источников и являются самыми актуальными на текущий момент.
Мы ежедневно обновляем раздачи до последних версий. Игру можно скачать бесплатно с помощью: μTorrent®
- 86
- 1
- 2
- 3
- 4
- 5
Голосов: 65Рейтинг 4.3
Лицензия (Таблетка в комплекте) 167.02 МБ
Версия игры: 1.0.1
Требования к железу:
Поддержка Windows:
7 / 8 / 10
Процессор:
Pentium III 400 MHz
Оперативная память:
128 МБ
Графический ускоритель:
Nvidia Geforce 6600 / Radeon Х1300
- Page
- Discussion
- View
- View source
- History
From PCGamingWiki, the wiki about fixing PC games
 |
|
| Developers | |
|---|---|
| Developed by | Sunstorm Interactive |
| Produced by | 3D Realms |
| Digital version | Interceptor Entertainment |
| Publishers | |
| Published by WW | ARUSH Entertainment |
| Distributed by NA | Hip Games |
| Distributed by EU | HD Interactive |
| United Kingdom, Germany | Ubisoft |
| Russia, CIS | 1C Company |
| Apogee Software | |
| Engines | |
| Prism3D | |
| Release dates | |
| Windows | May 14, 2002 |
| macOS (OS X) | April 23, 2013[1] |
| Reception | |
| Metacritic | 78 |
| Taxonomy | |
| Monetization | One-time game purchase |
| Modes | Singleplayer |
| Pacing | Real-time |
| Perspectives | Third-person |
| Controls | Direct control |
| Genres | Platform, Shooter, TPS |
| Series | Duke Nukem |
|
|
| Duke Nukem | |
|---|---|
| Duke Nukem | 1991 |
| Duke Nukem II | 1993 |
| Duke Nukem 3D | 1996 |
| Duke Nukem: Manhattan Project | 2002 |
| Duke Nukem Forever | 2011 |
| Duke Nukem 3D: Megaton Edition | 2013 |
| Duke Nukem 3D: 20th Anniversary World Tour | 2016 |
| Duke Nukem Forever (2001) | 2022 |
General information
- 3D Realms forums for game series
- GOG.com Community Discussions for game series
- GOG.com Support Page
- Steam Community Discussions
Availability
- SafeDisc retail DRM does not work on Windows Vista and later (see above for affected versions).
Game data
Configuration file(s) location
Save game data location
Save game cloud syncing
Video
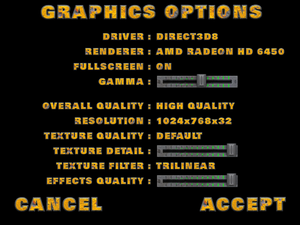
Video settings.
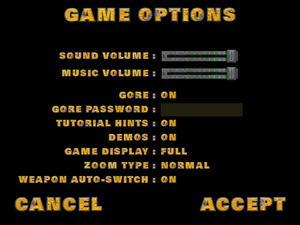
General settings.
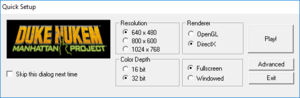
Launcher settings (non-Steam versions).
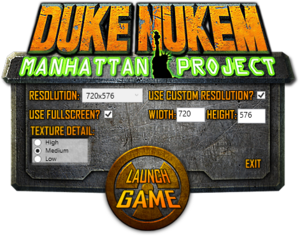
Launcher settings (Steam version).
Widescreen resolution
- The Steam version supports custom resolutions in the launcher. Use these steps for non-Steam versions.
| Set resolution and FOV in config.cfg[5] |
|---|
Notes
|
Input
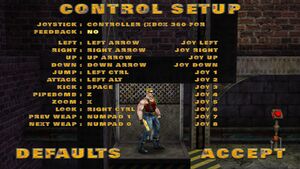
Controls settings.
Audio
Localizations
| Language | UI | Audio | Sub | Notes |
|---|---|---|---|---|
| English | ||||
| Hungarian | Fan translation, download. | |||
| Italian | Retail only. Patch for digital release here. | |||
| Polish | Retail only. | |||
| Brazilian Portuguese | Fan translation, download. | |||
| Russian | Fan translation, here or download. | |||
| Spanish | Fan translation, download. |
- For Hungarian language, add the line
mount -o ro,p1 "$GAME"/base/magyar_valtozat.zipfs /toinit.cfgat the end of# Mount game data
VR support
| 3D modes | Native | Notes |
|---|---|---|
| vorpX | G3D User created game profile (OpenGL), see vorpx forum profile introduction. |
Issues fixed
Can’t double jump
- When running above 60 FPS double jumping doesn’t work and Duke can get stuck when intending to climb up ledges, landing on downward-moving platforms in the final episode leaves Duke stuck in a jumping animation until the platform starts moving up again, making some sequences difficult to complete
- The game uses Vsync (enable by default) both in Direct3D to OpenGL mode .but in Windows 10 in Direct3D mode it doesn’t work because the game uses DirectX 8 and Vsync of DirectX 8 in Windows 10 is broken.
| Change driver from Direct3D8 to OpenGL or vice versa and set monitor on 60hz[8] |
|---|
| Cap the framerate to 60[citation needed] |
|---|
|
See Frame rate capping |
| Use (d3d8to9 only windows 10) and set monitor on 60hz[citation needed] |
|---|
Vsync (Always on) not working on Windows10 (Direct3D8 mode)
| Download d3d8to9 file. |
|---|
|
Other information
API
| Technical specs | Supported | Notes |
|---|---|---|
| Direct3D | 8 | |
| OpenGL |
| Executable | 32-bit | 64-bit | Notes |
|---|---|---|---|
| Windows | |||
| macOS (OS X) |
System requirements
| Windows | ||
|---|---|---|
| Minimum | Recommended | |
| Operating system (OS) | 98, ME, 2000, XP | |
| Processor (CPU) | Intel Pentium II 350 MHz AMD K6-2 400 MHz |
Intel Pentium III 500 MHz AMD K7 500 MHz |
| System memory (RAM) | 64 MB | 128 MB |
| Hard disk drive (HDD) | 300 MB | |
| Video card (GPU) | 8 MB of VRAM DirectX 8.0 compatible |
32 MB of VRAM DirectX 8.1 compatible |
| macOS (OS X) | |
|---|---|
| Minimum | |
| Operating system (OS) | 10.6.8 |
| Processor (CPU) | Intel Core Duo 2 GHz |
| System memory (RAM) | 1 GB |
| Hard disk drive (HDD) | 235 MB |
| Video card (GPU) | 64 MB of VRAM |
Notes
- ↑ SafeDisc retail DRM does not work on Windows 10[2] or Windows 11 and is disabled by default on Windows Vista, Windows 7, Windows 8, and Windows 8.1 when the KB3086255 update is installed.[3]
- ↑ 2.0 2.1 When running this game without elevated privileges (Run as administrator option), write operations against a location below
%PROGRAMFILES%,%PROGRAMDATA%, or%WINDIR%might be redirected to%LOCALAPPDATA%VirtualStoreon Windows Vista and later (more details). - ↑ 3.0 3.1 File/folder structure within this directory reflects the path(s) listed for Windows and/or Steam game data (use Wine regedit to access Windows registry paths). Games with Steam Cloud support may store data in
~/.steam/steam/userdata/<user-id>/240200/in addition to or instead of this directory. The app ID (240200) may differ in some cases. Treat backslashes as forward slashes. See the glossary page for details.
References
- ↑ Mac Game Update: 22 New Additions — GOG.com
- ↑ Not Loading in Windows 10; this will break thousands of — Microsoft Community — last accessed on 2017-01-16
- ↑ Microsoft — MS15-097: Description of the security update for the graphics component in Windows: September 8, 2015 — last accessed on 2018-02-16
- ↑ Is there a difference between this version and the one on GOG? :: Duke Nukem: Manhattan Project General Discussions
- ↑ Duke Nukem: Manhattan Project | WSGF
- ↑ Verified by User:Genesisbr on 2021-10-20
- ↑ Duke Nukem: Manhattan Project w/ 3D spatial sound 🎧 (OpenAL Soft HRTF audio)
- ↑ Duke Nukem: Manhattan Project — Can’t double-jump or game is skipping frames — GOG support center — last accessed on 2021-04-11
Categories:
- Windows
- OS X
- One-time game purchase
- Singleplayer
- Real-time
- Third-person
- Direct control
- Platform
- Shooter
- TPS
- Games
- Pages needing references

v 1.0.1 [Новая Версия] на Русском
-
Год выхода:
2002 год - Разработчик: 3D Realms Entertainment
- Жанр: Экшены, Аркады
Размер:580.7 МБ
Обновлено — 11-09-2022, 15:00.
подробности обновления
Duke Nukem: Manhattan Project – гора стероидных мышц, брутальность и хардкор. Сумасшедший доктор Морфикс захватывает Манхэттен, превращая живые организмы в агрессивных мутантов. Начинается хаос и паника, кто как не Дюк, сможет взять вверх и «надавать по шарам», остановив эту вакханалию.
Злобный ученый Мех знает слабости Дюка. Что б его задержать, берет когорту привлекательных девушек, цепляет к ним взрывчатки и прячет по разным местам. Попутно оставляя своих генетических монстров, устанавливает системы безопасности возле малышек, что б к ним было трудней добраться. Но для Короля Дюка это не проблема. Опустошив очередную баночку пива, взяв ствол побольше, он отправляется спасать крошек, хорошенько раздавая пинки всем, кто станет на его пути.
Duke Nukem Manhattan Project открывает мир из 8 локаций, разделенных на уровни. В каждом спрятана ключ-карта, которую нужно отобрать у плохих мальчиков, что б добраться до желанного. Предстоит прогулка по улицам, офисным зданиям, спуститься под землю и пробежаться по крышам. Обстановка не дружелюбна, местами разбросаны ловушки и смертельная опасность. Мощный арсенал продемонстрирует огневую способность. На крайний случай, Пустынный Орел всегда под рукой. Если нет времени на перезарядку, можно врезать пару пинков. Город большой, так что ускорить передвижение поможет реактивный ранец. Как говорит Дюк: «На вершину восходит Король».
Скачать торрент
Скриншоты из игры


Видео из игры
![]()
Лицензия 1С (Таблетка: Не требуется)
Версия: v 1.0.1 (Полная) Последняя
Установка:
- Размер: 580.7 МБ
-
Интерфейс:
Русский -
Озвучка:
Английская
- ОС: 7, 8, 10
- Процессор: Pentium III 400 MHz
- Оперативная память: 128 МБ
- Видеокарта: Nvidia Geforce 6600 / Radeon Х1300
Системные требования
Дополнительные раздачи:
Ознакомьтесь с особенностями релиза — НАЖМИТЕ на
Лицензия GOG (Таблетка: Не требуется)
Версия: v 1.0 (21132)
Обновлено: 11-09-2022, 15:00


Video gaming and digital games are very prevalent nowadays, age groups from kids to adults; everyone is getting attracted with these gaming activities. Its emerging popularity is attracting different age group’s people as these games are more fun and enjoyable. One of the popular video games Duke Nukem: Manhattan Project, which is getting very famous among youngster, has been considered one of the best at his time.
The action
You are the hero located in New York and you must walk or run through the city. You will face different enemies and you have to climb obstacles and buildings. The design reminds you by the classic age or computer games.
It is part from adventure category and is licensed as shareware for Windows 32-bit and 64-bit platform and can be used as a free trial until the trial period will end. The Duke Nukem: Manhattan Project demo is available to all software users as a free download with potential restrictions compared with the full version.
| Share |
| Give a rating |
|
|
| Author |
|
Duke Nukem
|
| Last Updated On |
| July 19, 2018 |
| Runs on |
| Windows 10 / Windows 8 / Windows 7 / Windows Vista / XP |
| Total downloads |
| 1,128 |
| License |
|
Free to try (Shareware) |
| File size |
| 50,34 MB |
| Filename |
|
Duke-Nukem-Manhattan-Project.exe |

09.01.2015
Duke Nukem: Manhattan Project – это продолжение легендарной игры Duke Nukem, которая вышла еще в 1991 году. Проект Манхеттен вышел в 2002 году и, хотя был выполнен на трёхмерном графическом движке, играете вы в двухмерном варианте, то есть, вы можете двигаться вперед, назад и прыгать. По сюжету играете вы за уже хорошо знакомого по прошлым частям супергероя — Дюка Нюкема. На этот раз вы должны спасти Манхеттен от злобного ученного Меха Морфикса, который создает различных мутантов при помощи специальной радиоактивной жидкости. Конечно же, какой герой без спасения сексапильных девушек? Вот и в этой игре на каждом уровне вам нужно найти и обезвредить бомбу, к которой привязана девушка, после этого вы ищете ключ от силового поля и проходите на новый уровень. Всего вас ждет 25 уровней на 8 локациях.
Duke Nukem: Manhattan Project – это то, каким должен быть хороший платформер. Игра завоевала симпатии миллионов игроков по всему миру и по сей день является настоящей легендой. Если вам еще не довелось поиграть в этот игровой шедевр, то настоятельно рекомендуем скачать. Вас ждет множество различных врагов, интересные боссы и своеобразный юмор, неверно, самого известного игрового персонажа — Дюка Нюкема. Постепенно вы сможете открыть 9 видов оружия, которые по-разному эффективны против 25 видов мутантов.
Системные требования:
Операционная система: Windows XP, Windows 7, Windows 8
Процессор: 1,2 ГГц
Оперативная память: 512 Мб
Видеокарта: 128 Мб
Свободного места на жестком диске: 300 Мб
Год выпуска: 2002
Жанр: платформер
Разработчик: Sunstorm Interactive
Платформа: PC
Версия: 1.0.1
Язык интерфейса: русский
Активация не нужна
Размер: 175 Мб
Скачать Duke Nukem: Manhattan Project v1.0.1 – на русском

Пароль к архиву: ogotop.com
Похожие новости
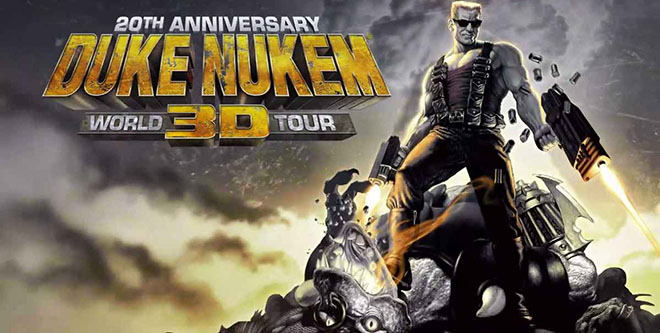
Возрадуйтесь истинные фанаты Duke Nukem! В честь 20-летия легендарной игры вышло издание «Duke Nukem 3D: 20th Anniversary World Tour», которое позволит снова спасти человечество от ужасных монстров.
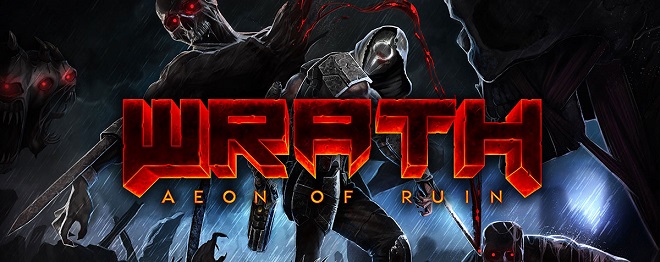
3D Realms, создатели Duke Nukem 3D, Prey и Max Payne, представляют шутер с видом от первого лица на легендарном движке Quake 1. Игра WRATH – испытание для сильных духом. Вы – Чужеземец. Раньше вы
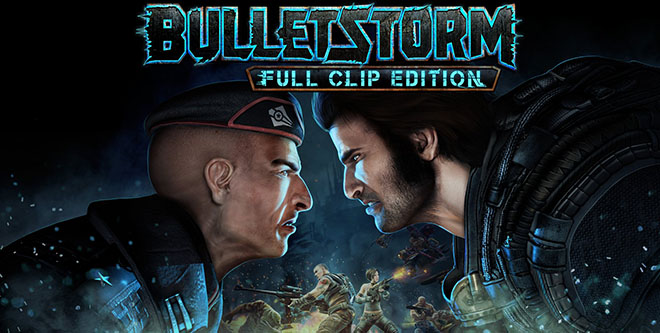
Update 2 + 1 DLC Bulletstorm: Full Clip Edition – это переиздание Bulletstorm + контент Full Clip. Вас ждет новый режим Overkill, в котором уже в начале игры вам доступно все оружие. Также была
Duke Nukem Manhattan Project – это компьютерная игра с механикой двухмерного платформера, однако невзирая на это, данный проект имеет все три измерения. Полная версия представленного проекта увидела свет 21 мая 2002 года, благодаря кропотливому труду разработчиков из студии Sunstorm Interactive. Duke Nukem Manhattan Project относится к ряду игр того времени, когда секретные уровни и бонусные предметы были неотъемлемой частью игрового процесса, поэтому игрокам частенько приходилось попотеть над нахождением ранее упомянутых элементов. Любителям хардкора и олдскульных проектов рекомендуется скачать на компьютер Duke Nukem Manhattan Project и познакомиться с прекрасным представителем экшен-платформеров .
Примечательным здесь является геймплей, который в свою очередь динамичный и пестрящий буйством ярких красок. К затертой до дыр игровой механике разработчики добавили подкат и двойной прыжок, что внесло еще больше динамики и разнообразия в Duke Nukem Manhattan Project на пк. Происходящему на экране действу также добавляют красок язвительные фразочки самого Дюка Найкема, который, как известно, любит испустить матерое словечко в адрес недругов. На русский язык игра была переведена Дмитрием Пучковым, им же и озвучена, от чего эмоций при прохождении еще больше.

GOG
-
Год выхода:
2002 год -
Разработчик:
3D Realms Entertainment -
Жанр:
Экшены, Аркады -
Интерфейс:
Русский -
Озвучка:
Английская -
Размер:
580.7 МБ
v 1.0.1 [Новая Версия] на Русском
Информация обновлена — 7 сентября 2022, 14:34.
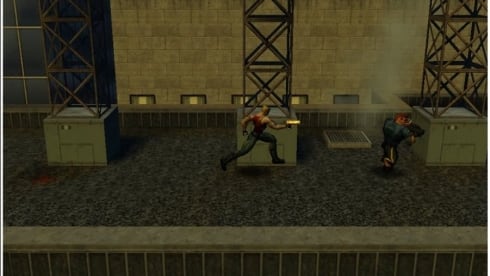
Игра Duke Nukem: Manhattan Project состоит из 8 глав, каждая из которых в свою очередь делится на 3 части; в каждой главе Дюку предстоит спасать «детку», привязанную к GLOPP-бомбе. В некоторых частях уровней игроку предстоит ползти сквозь небольшие проходы, а также бороться с большим количеством мутантов в ограниченных пространствах, уничтожая их то ли в ближнем бою, то ли используя его личный арсенал оружия. Передвигаясь от платформы к платформе, игрок будет постоянно натыкаться на новых врагов, а также боссов. В этом двухмерном платформере игрок должен будет двигаться через всю карту, собирая бонусы и находя секреты, чтобы получить большее количество жизней и патронов для новых видов оружия. В конце же игры протагонисту серии предстоит сразиться с Мех Морфиксом и остановить его коварные планы по захвату Нью-Йорка с помощью армии мутантов.
Скриншоты
Видео из игры
![]()
Информация об игре
-
Разработчик:
3D Realms Entertainment -
Жанр:
Экшены, Аркады -
Интерфейс:
Русский
-
Озвучка:
Английская
Скачать Duke Nukem: Manhattan Project
Лицензия 1С (Таблетка: Не требуется)
Размер: 580.7 МБ
Версия: v 1.0.1 (Полная) Последняя
Установка:
Дополнительные раздачи:
Лицензия GOG (Таблетка: Не требуется)
Версия: v 1.0 (21132)
Системные требования
- ОС: 7, 8, 10
- Процессор: Pentium III 400 MHz
- Оперативная память: 128 МБ
- Видеокарта: Nvidia Geforce 6600 / Radeon Х1300
This is a tutorial for Duke Nukem Manhattan Project’s level editor. Created by SCS soft the developer of the game’s engine. It has been mirrored here because it has been removed from the developer’s website.
Prism3D editor & Duke Nukem: Manhattan Project
Disclaimer:
This is unsupported barebones tutorial on Prism3D level editor usage. Use at your own risk. It’s compiled from several pieces of old documentation and is far from complete, there may be gaping holes in it or incosistencies because the material was pulled out of the original context, but it’s still better to have something to start with than to have nothing at all.
1. Seting stuff up
- IMPORTANT: Make sure you read the first FAQ question towards the end of this page before you continue!
- Install the game from the CD (remember, no spaces in the path if you want to use the dev tools)
- Download and install the game patch to version 1.0.1 from here
- Download the editor patch that will replace the executable to be compatible with version 1.0.1, again from here
- Copy this file (named dnmp_editor_101.zip) into the folder where DNMP was installed (you are not using the default «C:/Program Files/Duke Nukem — Manhattan Project» right? Those darn spaces remember….) and unzip the contents into this folder
- You should be set up!
- To verify this, launch the prismed.exe file in your DNMP folder, this is the editor executable.
- Select File->Open, and locate the folder duke/map_src in your DNMP directory.
- Choose a map, let’s say demo_area_teleport.vex, and open it.
- wireframe view of the map will appear in the 4 view panes, as well as list of brushes and entities the map is constructed of in the «group manager» bar on the right.
- Select the File->Build Map (or press the «globe» button on the toolbar).
- Leave the default settings intact, and press the «Build & Run» in the middle of the herd of buttons at the bottom of the dialog.
- the map should be quickly converted (compiled) into the binary form that the engine understands, and immediately after that the engine will be started and the map will be launched.
- take a look at the map.
- quit the engine, you will be sent back to the editor.
2. General Prism3D level editor concepts
Introduction to PrismEd
This document tries to explain some basic concepts behind level creation in Prism3D and things to keep in mind while doing so. The intended audience is primarily level designers, though it may contain useful bits of info that both programmers and texture artists could find useful.
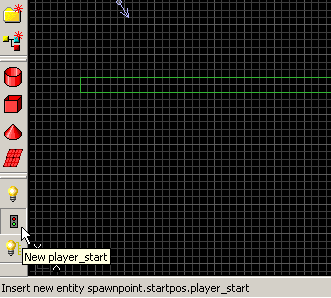
PrismEd is the level design editor component of the Prism3D engine suite. Other components include (in addition the the engine itself) several additional tools — model tweak tools PSM Lab and PMD Lab for working with models exported from 3DSMAX, Shader Lab for working with and previewing shaders, UI Builder for designing game interfaces, and the level compilation tool — Builder. Prism3D engine uses proprietary binary format to store the maps that represent game levels. The level designer works with PrismEd, and to run the map he created, first it must be compiled into the binary format using the builder. This is done by using the File -> Build map command, or by pressing the F9 hotkey, or by clicking on the Build Map icon.
![]()
Build Map Icon
But before we get as far as compiling and running the level in the engine, first we need to construct a level in the editor, which is covered in this document.
When you launch the editor, you will be confronted with several interface elements that you need to get comfortable with. The largest area is occupied by the top, front, side and 3D view panes. Around the view panes, there are several button toolbars and so called «manager bar».
Note that toolbars can be undocked and docked to places you prefer or hidden if you prefer to work with menu commands (all buttons are basically shortcuts that are accessible through the menus too). The Entity toolbar look is just an example look, it’s possible to reconfigure what entities are displayed there using the Options -> Entity toolbar command. You may find this quite handy later in level design when you add a lot of entities of the same type.
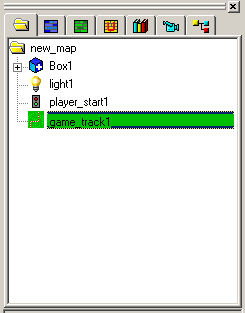
top part of the Manager Bar with Groupman tab active on the left, top part of Selection Properties Box on the right
On the right side of the screen (though it can be dragged elsewhere if desired) there is a big area called the Manager Bar
In the upper half of the Manger Bar, there are several tabs that give you access to tree-view of the map hierarchy (this tab, the «groupman» tab, is active in the picture above), and the other useful tabs that are worth mentioning now are tabs allowing you to browse through shaders. In the lower half of the Manager bar, there is always a bunch of tabs listing properties of currently selected items. Note that the selected item(s) is(are) highlighted in groupman by the green color stripe.

Modes toolbar on the left, 3D look toolbar on the right
The editor can be switched to several operation modes (see picture above on the left for reference):
- camera mode — will show the 3D views camera position and orientation in the other 2D views, you can drag it elsewhere; usefull for changing the 3D view camera position by vast distances
- Universal selection mode — you will spend a lot of time in this mode, basically doing tasks like moving things around or resizing them etc.
- Face mode — allows you to select individual faces of brushes and triangle patches for setting their properties like shader, scale, rotation, collision properties etc. etc.
- Vertex mode — lets you select individual vertices of elements and drag them around
- Axis lock — «dropdown» control where you can select the axis along which movement will happen in 3D view when manipulating vertices and shaping tripatches
- «fly mode» — when switched on, the controls of the 3D view (must be active) will switch to «smooth fly» operation, however many editor shortcuts keys won’t work!
- Select-by-center mode — decides whether elements like brushes can be selected by clicking anywhere in their area, or only by clicking their center point
3D view look styles (see picture above on the right for reference):
- plain wireframe view
- textured view, can take a while to update if you change any of the geometry
- textured and lit preview (without shadows), can take a longer while to update during changes. You need lights in the scene to see anything!
- textured and lit preview including shadows, can take even longer to update. You need lights in the scene to see anything!
Level creation concepts
Prism3D engine and the associated editing tools offer similar features and functionality to other competing 3D engine suites available. Prism3D engine can deal with both in-door and outdoor type scenes, and even combine the two types together. When creating the two types of levels, two rather different approaches are typically used. The traditional contruction tool in the recent mostly indoor games like Quake1/2/3 and Unreal/Unreal Tournament is the brush — a 3D shape, for example a square box. In case of PrismEd, brushes are used in combination with CSG to construct the levels with as few brushes as possible. For outdoor scenes on the other hand, the basic construction element is typically a triangle patch. In fact, a perfectly fine outdoor level will do without a single brush, though you will see that they can be handy for adding many detail things like buildings or bridges etc.
The editor and Virtual File System
- Note that when you add any resource (shader, texture, new folder, whatever), while the editor is running, it won’t notice this. You will need to either restart it, or preferably just use the ”Refresh VFS” command for the editor to notice. Several dialogs where resources are browsed, like shader manager, also have a Refresh VFS button included so that if you have for instance PhotoShop open along with the editor, and save a picture with it, you can make the editor refresh the panel and show the resource to you immediately.
Checking map for potential problems
- File -> Check map for errors command or the F12 key are your friends.. this can spot issues that the engine would either complain about or either crash or not display something properly
- There is a brand new feature in the editor — note to programmers: in the project’s edit folder, you should create a file named «entity.chk». In this plain text file, you can list class names of entities that are supposed to be a part of your typical game level. The editor will warn the level designers if it cannot find at least one instance of such entities in their levels. For instance every HU level had to have an «environment» entity in it and some starting positions (note that you are free to create your own version of an entity that would spawn the players into the world instead of the default one) etc. Just make sure that the VFS mounting priority of your game «edit» folder in tools.cfg is higher than that of the global prism3d «edit» folder.
3D camera
- if your map is really huge, you might want to increase the distance of the far clipping plane in the 3D view camera properties. Switch to the ”camera” tab in the ”manager bar”, double click the 3D view camera, and increase the ”Distance” in the z-clip group.
- The default value is suitable for indoor games full of corridors, but of an outdoor level, an increase to tens of thousands of units is not an unreasonable value. Though of course it might cost you some performance in the editor, so do not push too hard.
3. Designing a simple DNMP level
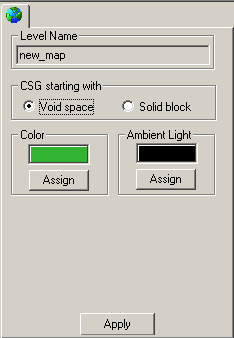
1. As the first thing after you start the editor select the topmost node in the group manager representing the whole level and its properties, and pick the «void space» option.
2. We will create a very primitive map consisting of just one «brush», a slab that Duke would be able to walk a short distance left and right. This is the button to press to start creating box brush.
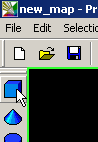
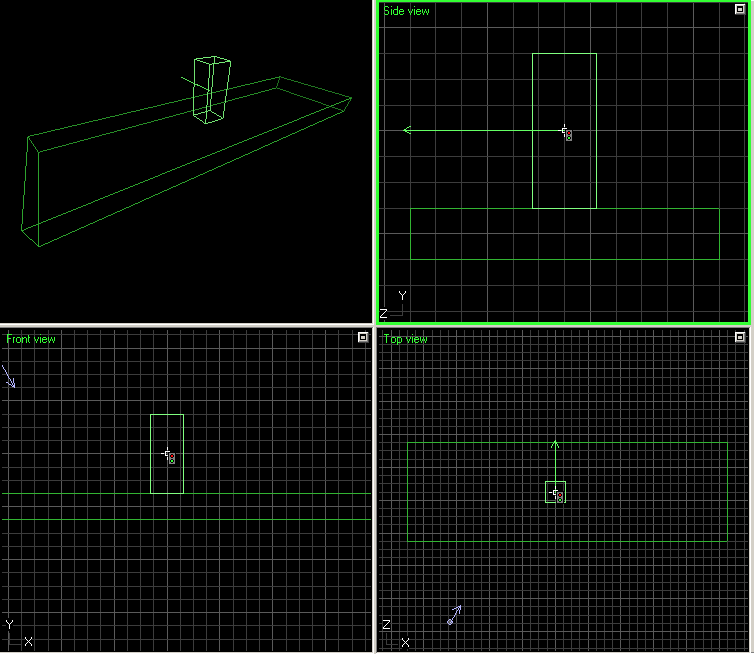
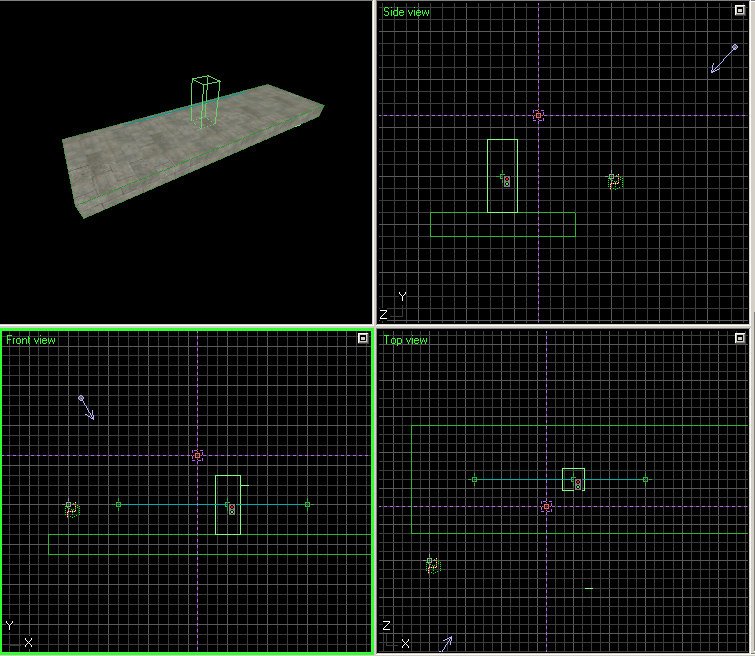
3. After you press the «box» brush button, click (with left mouse button) anywhere inside the 2D wireframe views (either of the Front, Side or Top windows), and drag the mouse cursor before releasing the left mouse button. You should see an outline of the new brush to be constructed. It’s not placed into the world yet, this is still just a blueprint you can manipulate with. As we want to create a platform that Duke would walk on, click on the «corner handles» of this bluebrint in the views, and drag them around to form a shape depicted in the picture below. Note that by clicking and dragging with the right mouse button you can manipulate the camera in the views.
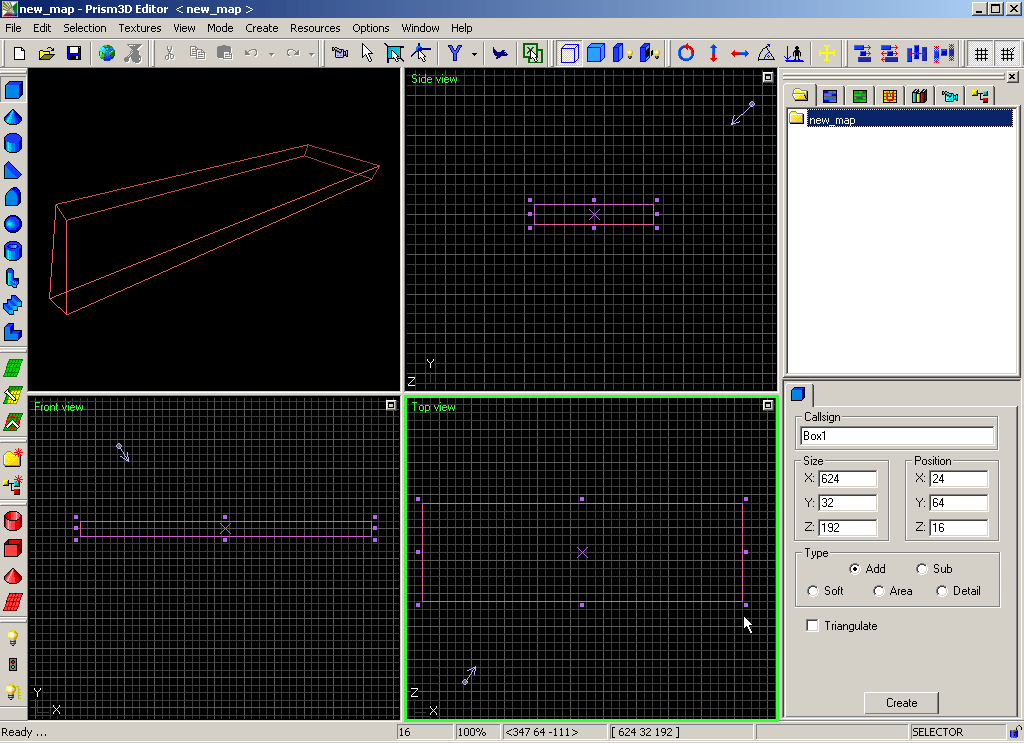
4. Press the «Create» button in the brush properties box, and your blueprint will turn into a real brush placed into the world.
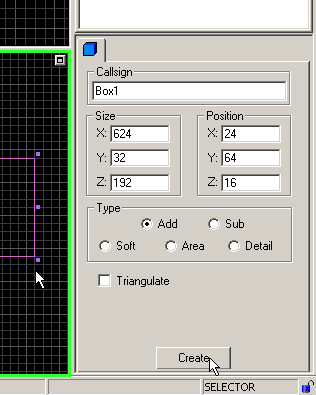
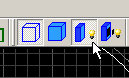
5. Now we’ll add a starting position — a place where Duke will appear after the level is started. Press the button looking like a simplified semaphore down left.
6. Click inside the 2D views to position the cross hair above the platform we have created before. It’s still just a blueprint, a «ghost» of things to come at this point, until you press the «Create» button again.
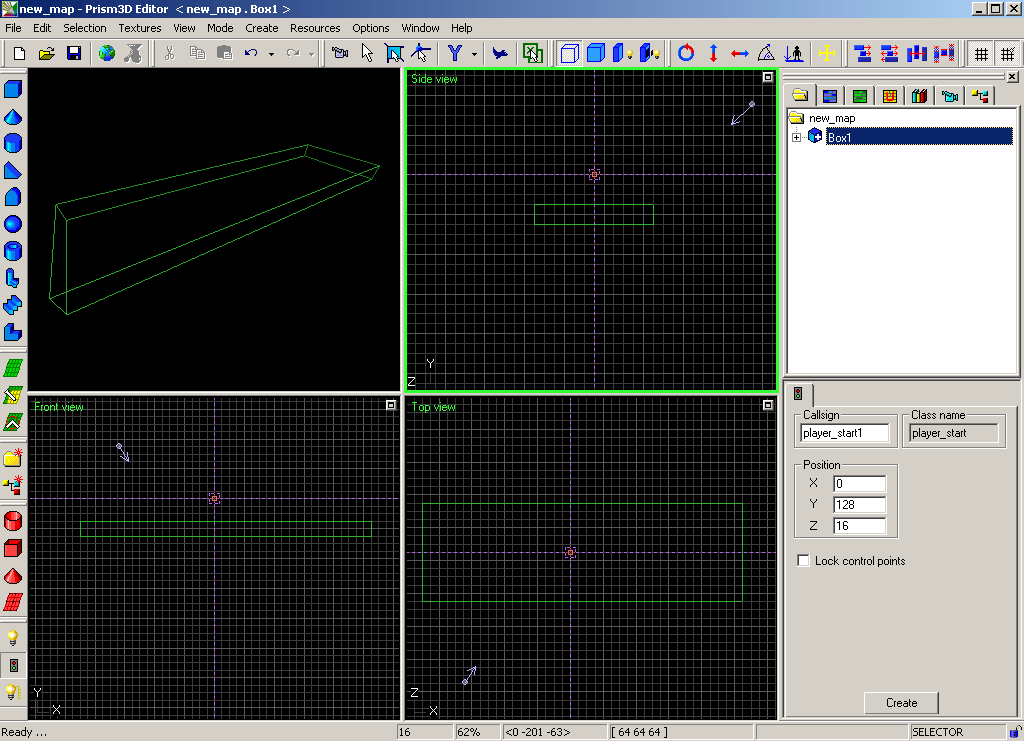
7. After you have pressed Create, the start position entity will be placed into the world, and all of its properties will become accessible. So at this point you will also see the expected bounding box that Duke’s character would occupy, and will be able to tell whether you have placed his feet below the ground, or whether you left him hanging in the air. You can fix that by either dragging the entity around in the 2D views with mouse, or by making sure it’s selected, and using arrow keys to move it around. You should end up with the bottom of the bounding box neatly aligned with the «floor».
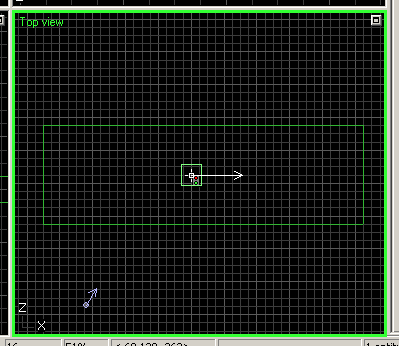
8. However, Duke is looking the wrong direction, at least when compared to the platform we have prepared for him. Click the end of the arrow representing Duke’s orientation in the Top View, and rotate it around until he is facing the right direction.
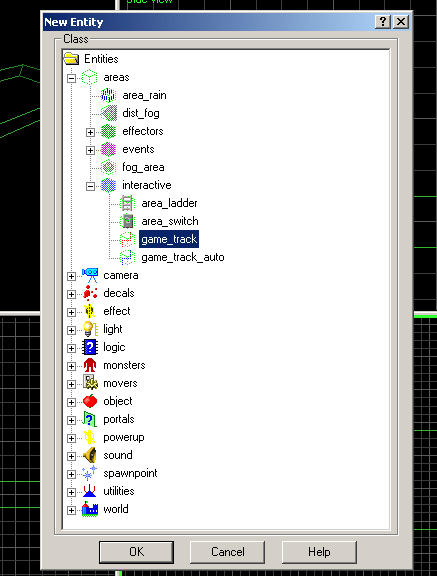
9. Now comes the tricky part. In DNMP, the cameras following Duke are controlled by special entities. No matter where Duke is in the level, there should always be this special entity nearby defining where a camera looking at him is supposed to be. To place this entity into the world, we’ll need to open entity browser by clicking the button on the picture below.
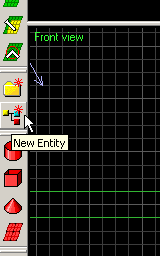
10. This is the entity class browser. There is a bunch of stuff that you will hopefully become familiar over time, for now all we need to do is locate the entity class highlighted in the picture below, and press OK.
11. As with the starting position above, when you click somewhere inside the 2D views now, you will be positioning a «ghost» of the entity that will be created. When you are happy with its position, press Create as usual. It’s not that important where this entity will end up really. The position of the entity itself does not in any way affect the placement of the camera, we’ll take care of that below, for now we can just place the entity a little distance away from the other things so that it will not get in the way in the future.
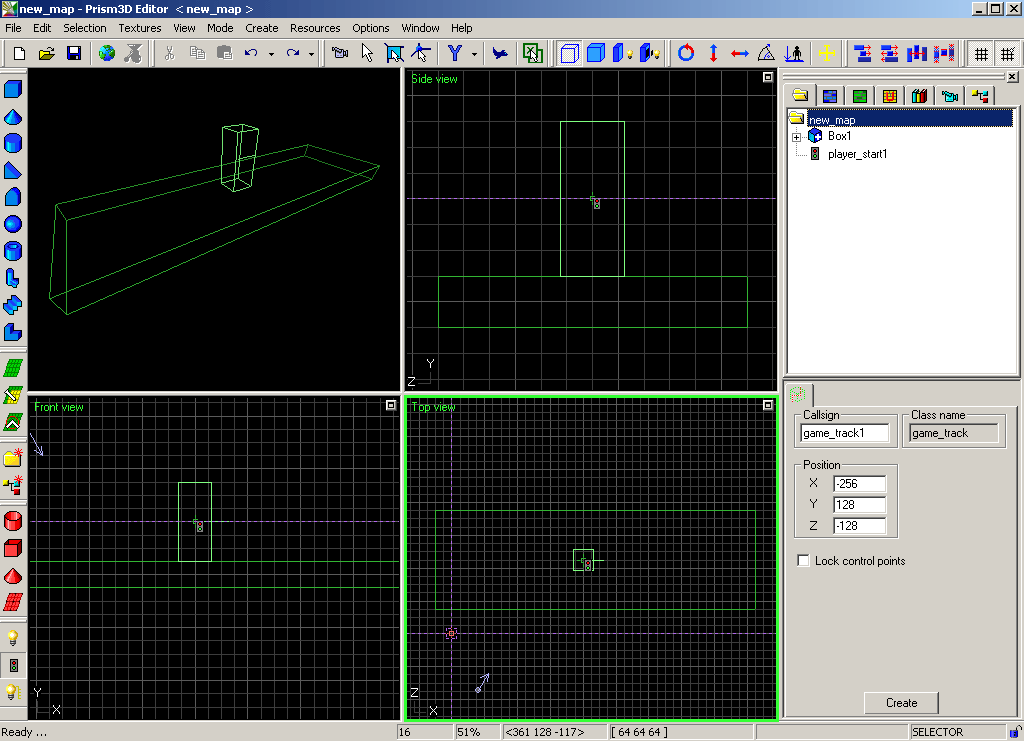
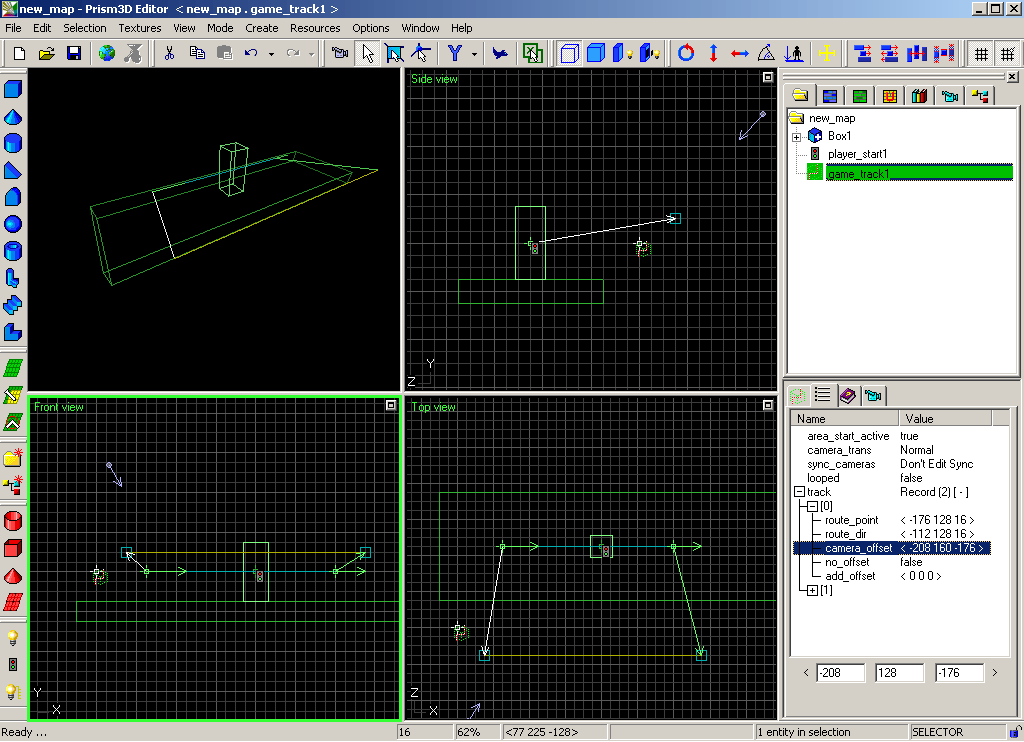
12. Make sure the game_track entity is selected (either click it in the views, or click it in the «group manager». Notice the properties tabs in the bottom right corner of the screen. When you swich to the second tab, there will be a list of entity properties. Select the one named «Track». This is a list of «control points» for the future camera, but so far this list is empty.
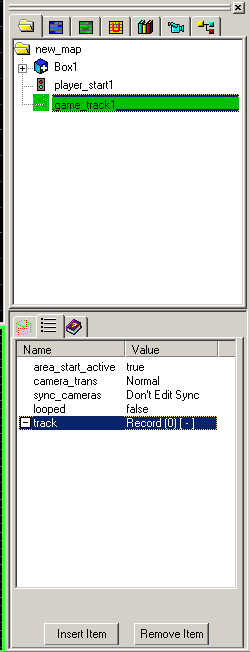
13. Press «Insert Item» twice, and notice that something happens in the views — a bunch of arrows and lines and curves will appear.
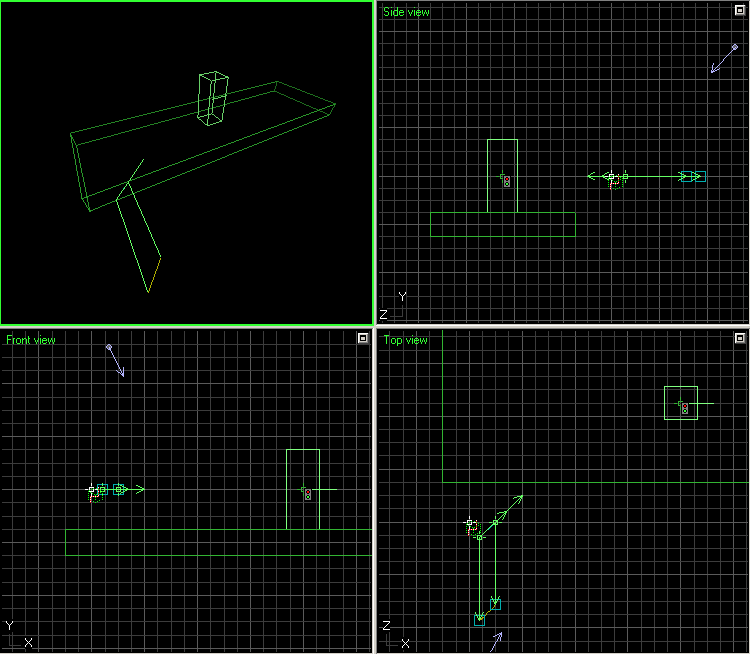
14. These new arrows and handles connected by lines can all be clicked and dragged around in the 2D views. As you do so, notice that various curves will change shape whenever you move a positional handle or direction «arrow» handle. Try to manipulate the handles into the shape pictured below, so that the curves will straighten up. One curve, ochre in color, represents the positions through which the camera should follow Duke along. The teal color curve definies respective position where the camera will aim. By mixing these up, weird things can be done, but right now we only want the simple thing possible to achieve, and that is to stay somewhat focused on Duke, moving along a straight line.
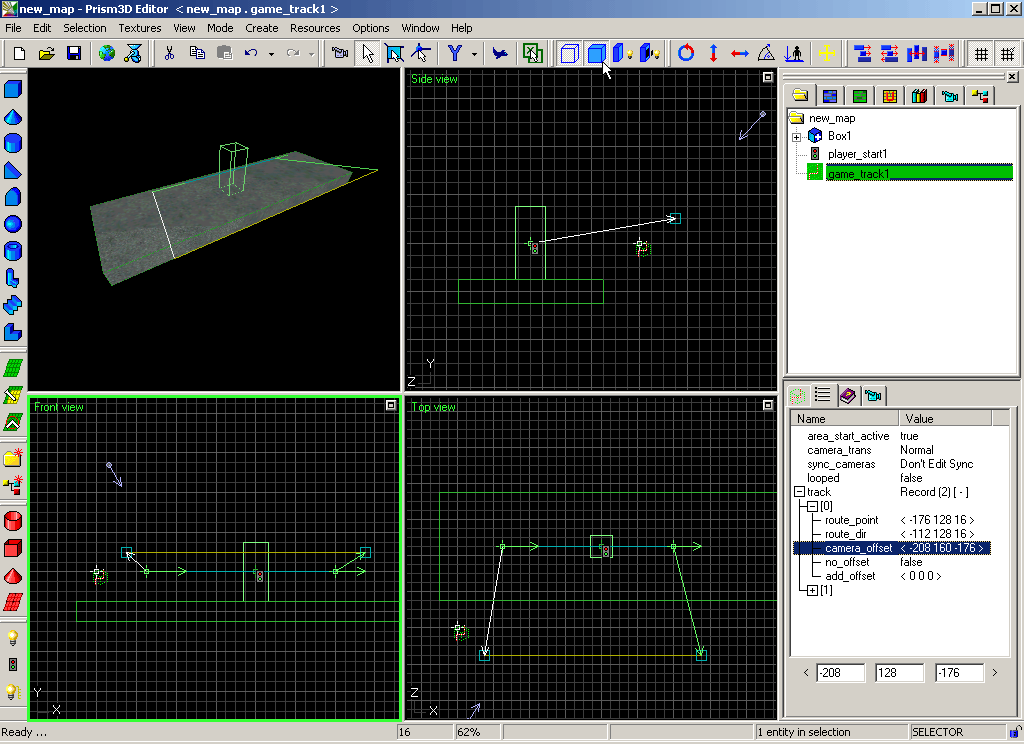
15. Things are coming along well, but we are still working with the wireframe view, maybe it’s time to spend some time thinking about what our level will look like, and preview it. Press the «textured preview» button, and see how the brush geometry is now showing the shaders on the surface of the polygons.
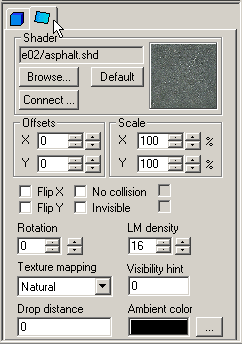
16. The default brush texture is not very nice, is it? Let’s change it. Select the brush.

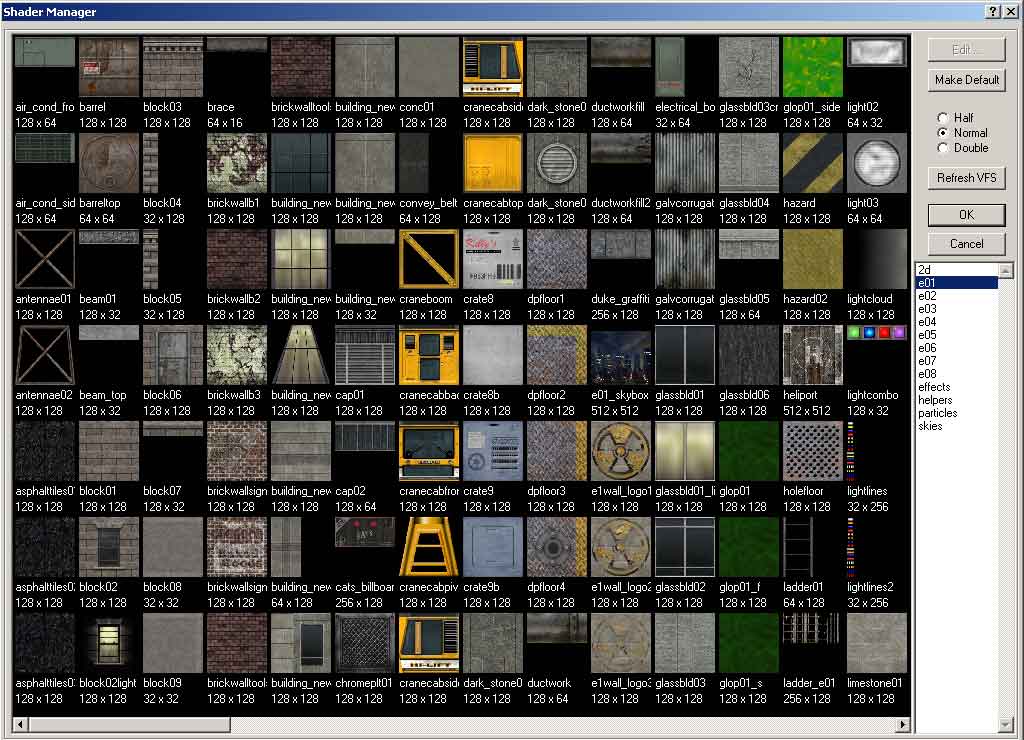
17. Switch to the surface properties tab for the brush, and click «Browse».
18. Shader browser window will appear. You’ll be able to choose from all shaders in the game now. Choose on of the categories on the right (the e01 through e08 are most usefull at this moment, they contain level shaders from the respective episodes), and select a shader. Press OK. You will be back in the editor, and the brush will changed its appearance.
19. It’s time to add light into the scene. Click the light bulb button as on the picture below.

20. Once again, you are going to be positioning the «ghost» of the light to be created, and after you have found a suitable position, somewhere near Duke’s starting position and above his head, you can press «Create»
21. After you press create, additional properties of the freshly placed entity will become accessible. On of the light properties is it’s intensity. This can be changed by manipulating the «reference distance» circle in the 2D views. Click on the green circle around the light and drag it further away from the light — this is making the light stronger.
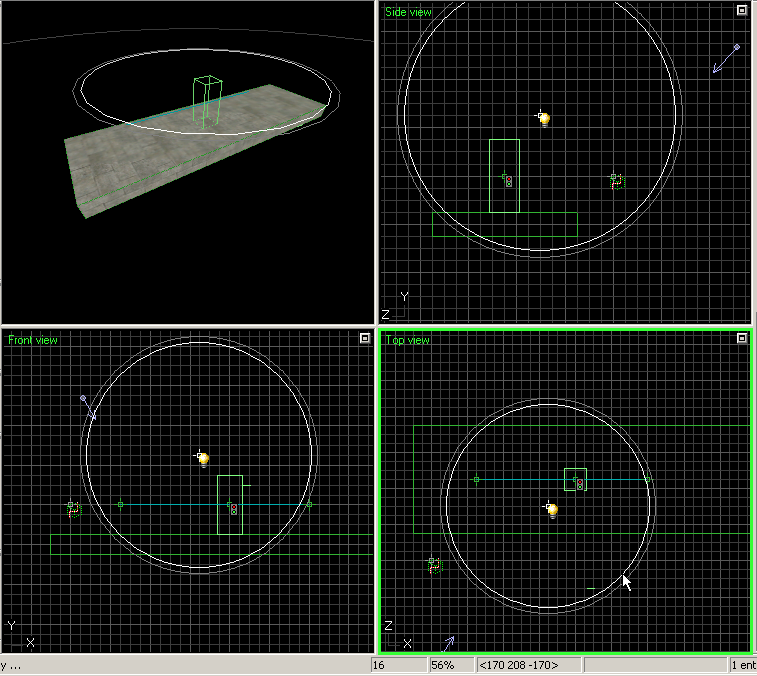
22. But changing light intensity without visual feedback is no fun. You will want to switch to lit preview of the level to see how the light affects the surfaces.
23. There we have it. Is the light strong enough? You decide… whenever you select the light, the circle around it will apear again, and you can change its intensity.
24. We are almost done. But we have forgotten something important in the steps above, and because I am a lazy bastard I won’t redo what I have written of the tutorial so far, and just fix it here. This is a typical newbie mistake anyway, so at least this will bring it to your attention to it and you won’t make it yourself as well on your next own map.
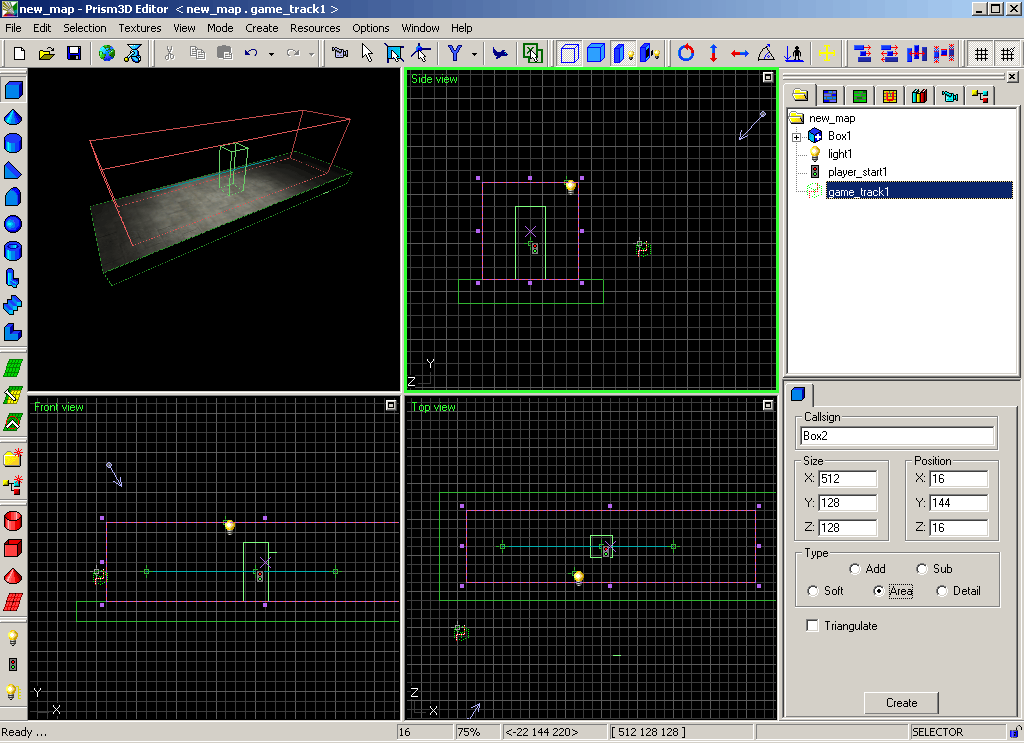
We’ll need to go back to the game_track entity. Select it in the group manager again.
25. With the entity selected, press the «box» brush button. We’ll need to create a special area-type brush, and have this brush a «child» of the game_track entity in the group manager. This brush defines the space where its camera should handle Duke, so whenever Duke will be in inside this invisible area brush, this one camera will be the one that’s looking at it. In our map we only have one camera, but with more complex levels, things can get complicated, and you will want have very clearly defined which camera is used and where. Don’t forget to select the «Area» radio button before pressing Create.
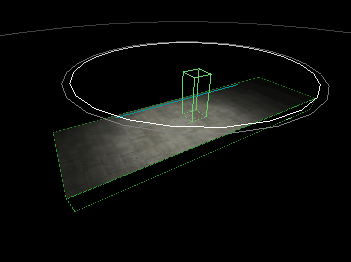
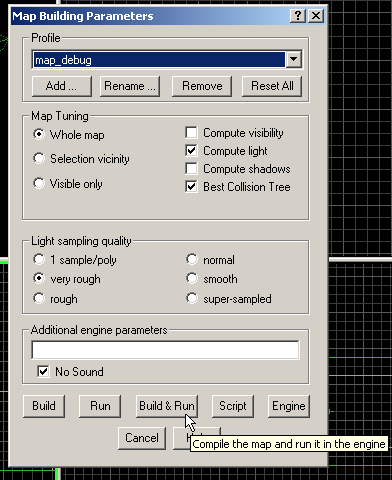
26. Now finally we can take a look at our map in the engine — it contains all the elements in needs to be the simplest DNMP map you can possibly build. Press this button to bring up the Build dialog.

28. This is the build dialog. Press the «Build & Run» button.
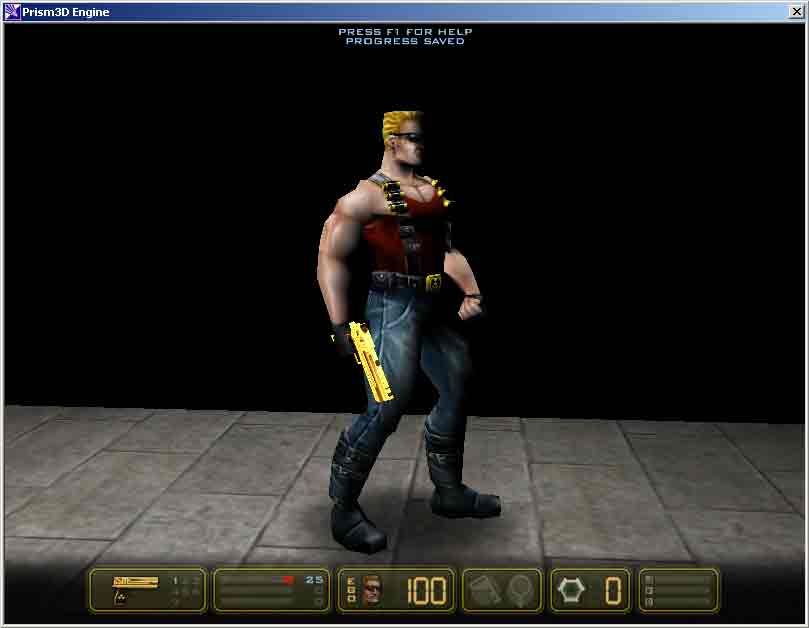
29. And here it is, our very first working level. Congratulations.
4. Frequently Asked Questions
Q: I can’t save map source files from the editor, what the hell is going on?
A: The editor & builder suite does not like space characters in the complete path containing the map filename, including map name. This is a legacy problem, a limitation that came to exist due to use of the tools in heterogenous environment over the network, but the important thing for you is to realize that you need to install the engine and of course the editor to a different path than the standard one. For instance «C:DNMP» is a good one. But the space in «Program Files», or the many spaces in «Duke Nukem — Manhattan Project» are not acceptable for the editor, as well as would be naming a map «My First Map.vex». Stay away from spaces in filenames and paths, and you will be fine. The engine is not limited this way, so the game itself and any user maps can be installed into any folder, but the developments tools have their quirks.
Q: The tutorial was too simple to figure out how to make a more complex map. Could you give us a more detailed overview?
A: Nope. Open one of the many tutorial maps that you will find in the dnmpdukemap_src folder. There are many examples of how to use and connect entities to create complex behavior in your maps, you should be able to figure it all out. In fact, this tutorial author’s knowledge about the intricacies of DNMP entities and proper DNMP map construction are very limited, and probably on the level of most newbies. While the editor was created at SCS Software, the game code, game entities and their logic was all written at Sunstorm, who have heavily customized the engine
Q: When I put my second brush into the map, I can’t see it in the textured preview mode. Why?
A: You need to select the topmost, «level» node in the group hierarchy of the map, and change the «CSG starting with» property to «void space». The default property is suitable for indoor maps with lots of corridors and using «sub» brushes to cut those corridords, but this is not the case in many DNMP maps.
Q: Any further tips?
A: When you open the file named DNMP Prism Help.chm that’s a part of the editor download package, you will find quite a lot of usefull info there about the editor. The document is worth reading in its entirety, but specifically for the editor usage the sections Technical Info — Key Command Listing and Tips and Tricks are very good. You should also pay attention to the Tip of the Day popups in the editor.
5. Appendix A — terms (very incomplete)
- CSG stands for Constructive Solid geometry — a process to build solid objects from other solid objects using CSG operations. In the case of Prism3D, these operations are addition and subtraction, and are inseparably tied to the solids themselves — the brushes. Other types of geometry — triangle patches and bezier curves — are not solids, so CSG operations do not take them into account, but for brushes, you need to keep the CSG limitations in mind. The most important thing to keep in mind when using CSG in PrismEd is that the ordering of the brushes matters in the map group hierarchy.
- entity — anything «dynamic» or game specific in the map is usually an entity. Entities can mark spots where player and monsters will be spawned, contain information and game logic needed for the level to operatate properly, or be containers for geometry (for example moving platforms), even lights are entities.
- height map — a gray scale image with pixels colors representing the desired height of terrain on a range from minimum (total black) to maximum (total white) height.
- triangle patch — a level construction element suitable for constructing open terrain scenes. Basically a regular grid of triangles at user specified size, each vertex can be positioned independently, but mesh connectivity cannot be changed. Coupled with heightmap import tools can be a very productive tool for open terrain maps, as proved by Hunting Unlimited.
- tripatch see triangle patch
- VFS see Virtual File System
- Virtual File System — in the context of Prism3D, VFS is an abstraction of folder structures and file system that the engine and the tools work with. This allows for the game resources to be stored either in their «normal» state on the local disk or on a network disk, or in compressed form in «zipfs» packages. For VFS to work correctly, you need to set everything right in init.cfg (engine) and tools.cfg (the editor) — the mount points, and the priorities.