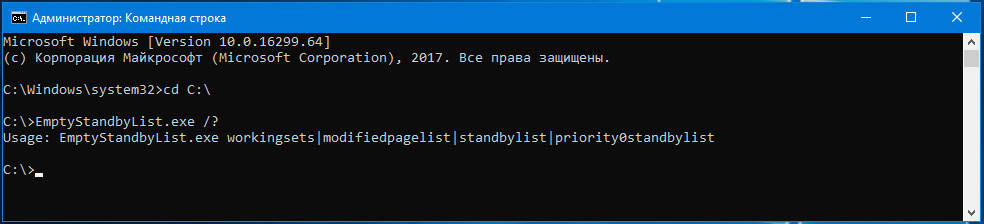
Empty Standby List is a command line tool — from the developer of Process Hacker — which provides various ways to free up RAM.
Tell it to free up process working sets (EmptyStandbyList.exe workingsets) and the program tells Windows and applications to cut memory use by all user and system processes. This may help, or it might cut performance as processes immediately swap back data from the paging file.
Emptying the modified page list (EmptyStandbyList.exe modifiedpagelist) flushes modified pages, writing unsaved data to disk, and freeing up that RAM. This can involve a lot of disk activity, which may slow you down, but if you want to get it out of the way — have Windows write this data to disk now, rather than at some random point later — then it might be useful.
Freeing up the standby list (EmptyStandbyList.exe standbylist) discards RAM associated with a process, but not currently in the working set, and moves it to the Free list. Depending on your situation, this may be relatively penalty-free, and it’s perhaps the best option to try first.
Emptying the priority 0 standby list (EmptyStandbyList.exe priority0standbylist) frees up RAM on the lowest priority standby list. This command is the least likely to cause performance issues later, but may not recover much memory.
You can run the program from a command line, a shortcut or a script, but keep in mind that it needs administrator rights. (Fortunately it warns you if there’s a problem.)
Verdict:
Memory «optimizers» generally don’t do very much, but there are situations where you might see benefits, and Empty Standby List gives you more control over the process than most tools. If your RAM usage seems high — particularly standby pages — then give it a try.
В последних инсайдерских сборках Windows 10 есть маленький баг, который при определенных обстоятельствах может привести к заполнению резервной памяти, в результате чего наблюдается резкое снижение производительности системы. Чаще всего такое внезапное заполнение памяти наблюдается во время игр и работы некоторых приложений, причем последние совсем необязательно должны предъявлять к системе высокие требования.
В Microsoft о проблеме знают и в следующих версиях, вероятно, устранят ее причины, а пока что можно воспользоваться альтернативой — сторонними утилитами для работы с оперативной памятью. Суть временного исправление заключается в следующем — время от времени во время игры нужно запускать функцию, которая будет очищать память. Такой запуск лучше всего реализовать с помощью встроенного планировщика задач, так вам не придется отвлекаться во время работы или игры.
Для дела вам понадобится маленькая консольная тулза Empty Standby List.
Она служит для одной единственной цели — очистке памяти, не нуждается в установке и настройке. Чтобы очистить с помощью тулзы память, достаточно через равные промежутки времени запускать ее исполняемый файл. Посему создаем в планировщике заданий новую задачу.
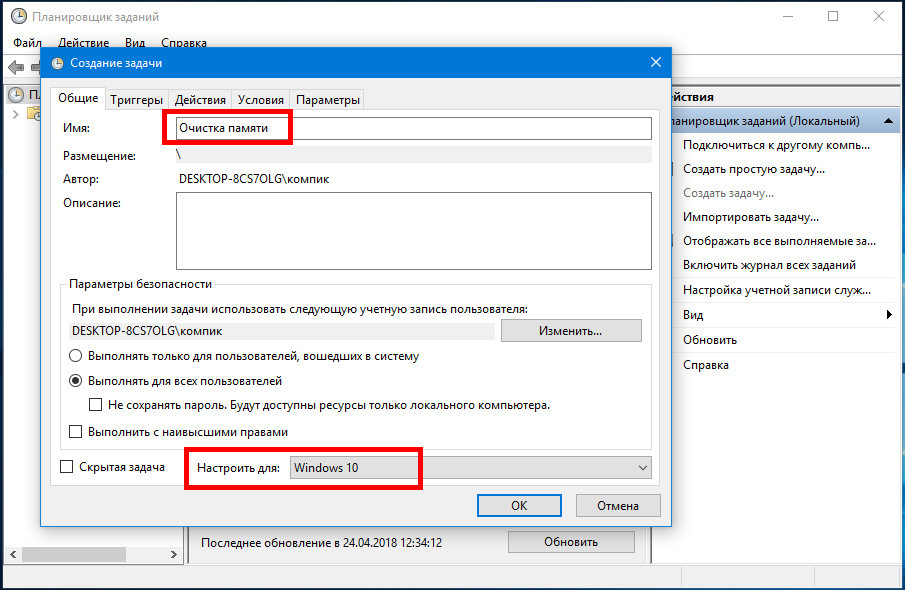
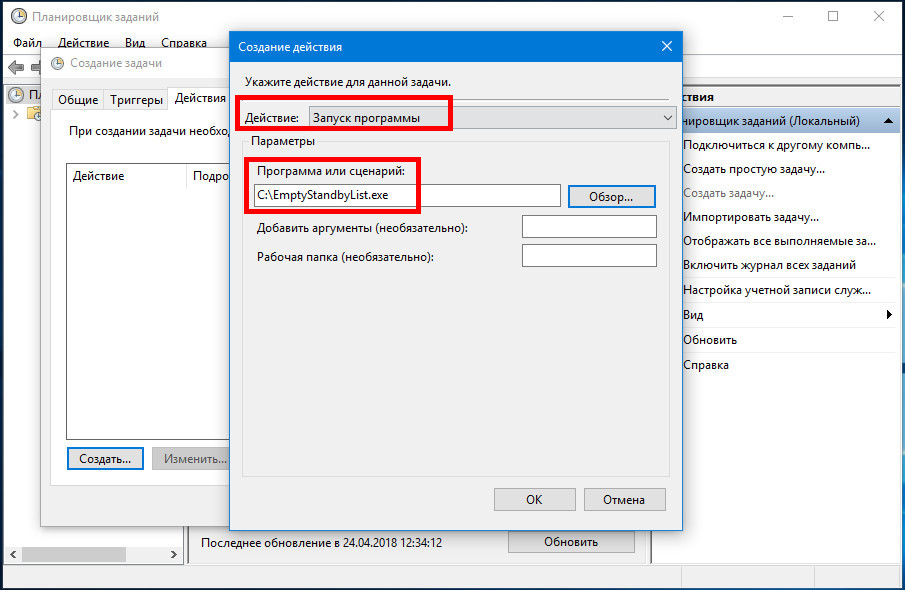
Тип действия выбираем «Запуск программы», указываем путь к исполняемому файлу утилиты.
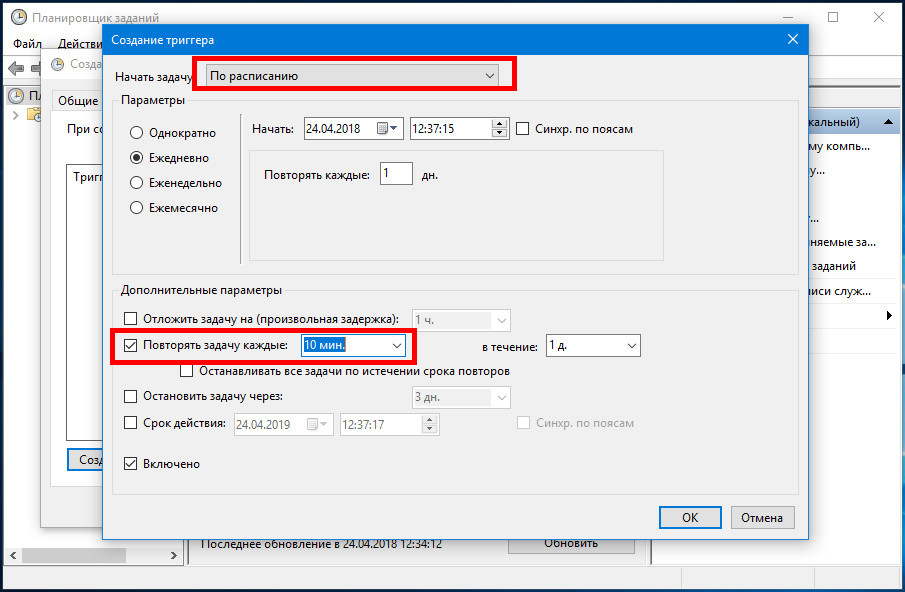
В параметрах триггера выбираем «По расписанию», включаем и задаем повтор выполнения задачи через нужный отрезок времени.
Вместо Empty Standby List для очистки памяти в ручном режиме вы также можете использовать утилиту RamMap, входящую в состав пакета Sysinternals Suite. Запустив утилиту, выберите в меню «Emrty» нужные вам опции.
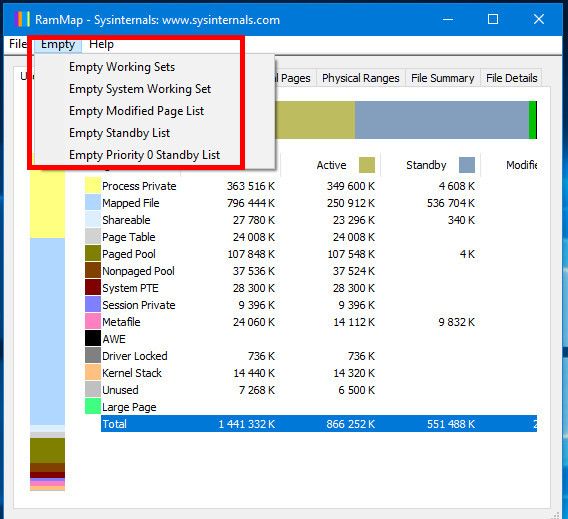
Функция Empty Working Sets выгружает все запущенные приложения и процессы, Empty Modified Page List очищает только модифицированные страницы, Empty Priority 0 Standby List выгружает из памяти процессы с низким приоритетом, функция Empty Standby List очищает всю ОЗУ независимо от приоритетов процессов.
Примечание: старайтесь по возможности не использовать опцию Empty Working Sets, так как в этом случае система предпримет попытку восстановить данные из файла подкачки. В результате количество обращений к HDD/SSD резко возрастет, что в свою очередь в моменте может сказаться не лучшим образом на производительности Windows.
Тулза: wj32.org/wp/software/empty-standby-list
![]() Загрузка…
Загрузка…


1C сервер не хочет очищать за собой оперативную память. Автоматизируем процесс очистки.
Господин Wen Jia по фамилии Liu из Сиднея нам сильно помог, написав консольную утилиту EmptyStandbyList.exe, которую мы используем для автоматизации процесса ежедневной очистки оперативной памяти. Утилита работает в ОС Windows Vista и выше. Я проверял на Windows Server 2012 R2.
Утилита может очищать:
- process working sets
- the modified page list
- the standby lists (priorities 0 to 7)
- the priority 0 standby list only
Использование:
EmptyStandbyList.exe workingsets|modifiedpagelist|standbylist|priority0standbylistСкачиваем EmptyStandbyList.exe:
https://wj32.org/wp/software/empty-standby-list/
Или у меня: EmptyStandbyList.exe
Сохраняем утилиту в папку, я сохраняю по адресу:
C:RAMEmptyStandbyList.exe
Пишем батник emptylist.bat:
echo off
cd C:RAM
EmptyStandbyList.exe workingsets
EmptyStandbyList.exe standbylist
exit
Сохраняем батник по адресу:
C:RAMemptylist.bat
![]()
Если запустить батник под администратором, то память очистится:
![]()
У меня эффект очистки слабо виден, но когда 1С забивает всю память, то ступенька круче.
Теперь создаём в Планировщике (Task Scheduler) новую задачу, которая каждый день в 7 утра будет запускать наш батник от имени локального администратора сервера.
![]()
и как эта костыль ушатает жд? Чтение данных с диска не перезапись.
» если хит в кэш и очистка будут произведены одновременно, то потенциально возможен бсод. Потому что в этом случае работа с памятью производится на разных уровнях доступа и плохо синхронизируется. Явление нечастое, но риск вполне есть.
Кроме того — в этой части памяти постоянно сидят всякие куски проводника, миниатюры медиа файлов и т.д., которые постоянно туда будут снова загружаться, и переписывать оставшиеся части в файле подкачке. Это дико дрочит диск. Неважно — ссд или хдд.
Кроме того, все эти фризы легко решаются невероятно простым способом — не [автоцензор3.14] муму, а просто оставить дефолтные настройки винды с файлом подкачки и всяческими фетчерами.
Минусы — первый день после установки система реально будет подтормаживать. Ну и нужны действительно быстрые диски, чтоб вся эта схема работала. Желательно — ссд.
Остальным, да, остаётся только пользоваться костылями и всегда жить в страхе бсода. Ну и диск насиловать. «
из комментариев к видосу
AnotherMe
This tutorial is based on this tutorial by marts_sum, I wrote it to make the steps easier to follow and to hopefully explain better what’s happening and why. I have Windows 10 so if you use older OS or newer one things might look a little bit different but I believe the steps should still be about the same.
Quick links for jumping between chapters:
– Intro
– Step 1: Downloading the EmptyStandbyList
– Step 2: Creating the repeating task
Long post so I put the rest under the read more.
Intro:
Windows has this neat feature that as you use your computer it saves things in its Standby Memory so that it can faster access them if you need it again. For example if you opened Photoshop and then turned it off but realized later that you need it again it should open up a little bit faster. This should be a good thing right? Well it would be if it worked as supposed. When things build in the memory they should clear out if you need that memory for something else, say you for example open up Sims 2 with your 50GB Downloads folder – you’re gonna need all that RAM for it to run smoothly. But instead of clearing out the data Windows stashed in the standby memory it gets never released which then causes programs stuttering and in the case of Sims 2, flashing pink since it can’t access the memory it needs.
You can check your standby memory by opening the task manager and then going into the Performance tab and under there to the Memory part:

Since I already have the fix installed and only just started this computer up a moment ago my standby memory isn’t that big. But if I stress it a little, in this case opened bodyshop and then quickly went through my whole male hair catalogue and then shut it off it already looks like this:

From bit under 472 MB we jumped to 1,9 GB in the cache. Meanwhile the used RAM correctly released itself for use again as you can see from the drop in the Memory Usage Graph. Now imagine just using your computer for few hours doing whatever, that standby memory will build up quickly and it will then cause stuttering and pink flashing in Sims since it can’t access that memory.
So what this fix does is set a simple Windows task to automatically empty the Standby Memory every 5 minutes. (you can set it for longer intervals too if you feel that’s a bit too excessive but 5 minutes seems to work fine for me and I haven’t noticed any ill effects about it, au contraire, my computer works better now that there’s not all that junk stuck in its memory!)
NOTE: if you don’t know how to open the task manager the fastest way is to right click on the Task bar of your Windows (the same thing where opened folders and programs pile up in a line/icons depending on your settings) and from the list that shows up click on Task Manager for it to pop up:

Step 1: Downloading the EmptyStandbyList
So the first thing we need is this file. (if this file ever disappears from this site I have it backed up) It’s an exe file, and while normally you should be very wary of downloading any unknown exe files we need this one so download it, it’s perfectly save. It’s a small program that just tells windows “empty the standby memory” and then Windows will do just that.
Put that file somewhere where you won’t accidentally delete or move it, I have special folder for all my programs so I tossed mine there. You can’t move or delete the file later so choose the place carefully. Once you’ve placed your file in a save place, right click on it and choose “Properties”

And then under Compatibility tab tick the “Run this program as an administrator” and hit Apply.

That’s all the set up we need for this one but don’t close the folder you saved it yet since it’s easier to copy file paths from folders you have open.
Step 2: Creating the repeating task
The next step is the tricky part, we need to create a new task for Windows to repeat. Tasks are basically little commands that tell Windows to do certain things, usually to run something every X hours/minutes/days. So in this case we’re creating a task that tells Windows to “Run the empty standby list file every 5 minutes”
So firstly, click on the Windows button and just start writing “task scheduler” it’ll likely find it by sche- but if not you can also fully type it out.

Hit the suggested App at the top to open the Task Scheduler up:

As you can see I already have the Empty standby there and some other tasks but since you don’t have yours set up yet the way to do it is to hit the “Create task” on the right side:

A new window will pop up, give your task a name, I used “tutorial empty standby” but you can just name it as Empty Standby List or whatever you want:

The next thing we do is hit the “Change Users or Group…” button which again will open a new menu:

Hit on the “Advanced…” button and another new window will pop up:

In here click on the highlighted “Find Now” button and the bottom Search results: will fill up, down there find the one called SYSTEM and choose it and then hit OK. If you skip this step you’ll be having annoying pop up every 5 minutes, this should keep it running silently in the background.
We’ll end up back to the previous pop up window and you can see there that the SYSTEM is now chosen for it:

Just hit OK again and we’re back in the Create Task window again. Tick the “Run with highest privileges” and “Hidden” tick boxes.

Then we move to the next tab, Triggers:

There’s nothing yet so hit on the “New…” Button and a new pop up will appear:

Here for “Begin the task” you should leave the setting to “on a schedule“
Settings: One time (start: time will show whatever your time happens to be, no need to touch it)
Under Advanced settings tick the “Repeat task every“: and choose 5 minutes from the dropdown menu
for a duration of: choose “Indefinitely” from the dropdown. This tells it to run it every five minutes until your computer eventually breaks by some stupid Windows update or you upgrade it to a new one. If you feel 5 minutes is too often you can choose 10 or 15 minutes too but 5 works fine and I’ve literally never seen flashing pink after I installed this since my memory never manages to get filled before this empties it. Hit OK.
Next we move on to the Actions tab, this is now where we need the emptystandbylist file and the reason it needs to stay in one place. In the actions tab hit on New…

And a pop up for New Action will show up.
For the Action set it to “Start a program” and under the settings hit Browse… and navigate to wherever you saved your EmptyStandbyList file (if you still have the folder open you can simply copy the path from the folder path by clicking it when it’ll show up like this:

and you can then paste the path to the pop up that shows when you hit the browse button. Fast and efficient! It should then look like this:

And the only thing left to do is hit OK here and OK on the Create Task Window and tadah:

There it is, your new task. You can immediately test it if you want, just open your task manager and the Memory section of it to see how bloated the Standby memory section is and then in the task scheduler choose your new task and then on the right side under “Selected Item” hit the “Run” button (or with right mouse click over the task hit > run). If you did everything correctly nothing should pop up but your cached memory should drop to 0 (and then it immediately starts filling up again because that’s just how it works)
This should hopefully keep your game from flashing pink, at least until your computer really runs out of RAM to use but now half of it is no longer being hogged by Windows keeping things in memory just in case and never releasing it.
Notes: if you see a quick window flashing you most likely didn’t set the emptystandbylist to “run as admin” and/or messed up this step (needs to be ran as SYSTEM and run at highest privileges & be hidden). You can go back and edit your task by choosing it and hitting “Properties” button on the right side bit under the Run button under the Selected Item section (or right click the task and choose properties there)
If for whatever reason this task stops running automatically, you can get it running again by simply opening the Task Scheduler and then choosing it from the list and hitting run, then it should run again smoothly.