This is a complete guide about how to enable Remote Desktop Connection in Windows 8. We will discuss 3 different ways to enable the RDC settings in Windows 8.
Remote Desktop Connection is one of the most important components of Windows in a networked world. Remote Desktop Connection or simply RDC enables us to login to Windows remotely with a graphical user interface. RDC enables the users to take control of multiple computers simultaneously by using only one computer.
Remote Desktop Connection is not enabled in Windows 8 by default. We have to enable it manually. If you are using an Active Directory setup in your network, you can easily enable RDC on all computers at once by using Active Directory group policy. For a complete guide on how to manage Remote Desktop Management Server in Windows Server 2008 and Windows Server 2012, you may follow the steps outlined in this blog post.
1- Using Command Line
To turn on Remote Desktop using command line, follow the steps below:
- Go to Run (WinKey + R) –> SystemPropertiesRemote
- This will open the System Properties window.

- Select “Allow remote connections to this computer” under Remote Desktop.

2- Using Windows Registry
The benefit of using Windows Registry hack to enable Remote Desktop Connection is that it can be done remotely. Yes! you can enable RDC remotely using Windows Registry. All you have to do is add a registry key on the remote system.
If you want to enable Remote Desktop Connection on your local computer using Windows Registry, just open the Registry Editor (Run –> regedit) and go to the following registry key:
HKEY_LOCAL_MACHINESYSTEMCurrentControlSetControlTerminal Server
In the right hand pane, change the value of fDenyTSConnections to 0.
If you are uncomfortable working with the Windows Registry, simply download the following registry file and run it.
[download id=”55″]
If you want to enable Remote Desktop Connection on a remote machine, you will need to connect to the remote registry. To connect to the remote registry, open the Registry Editor (Run –> regedit). Go to File menu and select “Connect to Network Registry”.

You will need to change the same registry key as mentioned above.
3- Using Control Panel
This is basically the same as no. 1. We just have to take a visual path through control panel to open the same dialog as we opened before.
- Go to Control Panel (WinKey + X + P)
- Click on System and Security group and select “Allow remote access” under System.

- This will open the same dialog as in no. 1. You may select “Allow remote connections to this computer” under Remote Desktop to enable Remote Desktop Connection on your Windows 8 computer.

Using Remote Desktop App in Windows 8
One way to open Remote Desktop connection is to go to Run –> mstsc. Microsoft has also provided a Remote Desktop Metro App for Windows 8 which will run in full screen mode and can be used on any Windows 8 device including tablets and smartphones.

The Remote Desktop App for Windows 8 is not installed by default. You can download it from Windows Store and access it from the Start Screen.
Маша и Медведь (Masha and The Bear) — Подкидыш (23 Серия)
Оглавление:
- Включение удаленного рабочего стола в Windows 8
- Заключение
Удаленный рабочий стол был одной из основных функций Windows со времен Windows XP, которая была усовершенствована с помощью более новых версий. Хотя эта функция не так популярна среди обычных пользователей и считается более профессиональной функцией, она является хорошим инструментом для тех, кто должен управлять несколькими компьютерами в сети одновременно, или даже для кого-то, кто должен предоставлять техническую поддержку удаленному друг или семья и должен взять под контроль свой компьютер.
Теперь с поддержкой планшетов в Windows 8 использование удаленного рабочего стола, вероятно, увеличится. Любой владелец планшета Windows может подключиться к своему домашнему или офисному компьютеру из любого места, если у него есть подключение к Интернету.
Итак, прежде чем мы углубимся в то, как мы можем создать подключение к удаленному рабочему столу в Windows 8, давайте сначала посмотрим, как мы можем включить функцию, чтобы разрешить входящее подключение.
Шаг 1. Откройте панель управления Windows 8 на рабочем столе и нажмите « Система и безопасность» во время просмотра панели управления в режиме «Категория». В разделе «Система и безопасность» нажмите « Разрешить удаленный доступ» в разделе «Система», чтобы открыть «Свойства системы».


Если вам удобно использовать окно «Выполнить», вы можете запустить команду SystemPropertiesRemote.exe, чтобы открыть Свойства системы напрямую.

Шаг 2. Перейдите на вкладку «Удаленный» в «Свойствах системы», установите переключатель « Разрешить удаленные подключения к этому компьютеру» и нажмите кнопку «Применить».

Шаг 3. Если вы используете компьютер в режиме энергосбережения, а компьютер переходит в спящий режим или режим гибернации, когда он не используется, Windows попросит вас изменить конфигурацию в параметрах питания Windows. Это обеспечит бесперебойную связь во время удаленного соединения.

Вот и все, теперь вы можете использовать удаленный рабочий стол с любого компьютера для подключения к устройству Windows 8.
Заключение
Таким образом вы можете активировать удаленный рабочий стол на устройствах Windows 8, чтобы разрешить входящий запрос на удаленное подключение. Теперь, посмотрите наш следующий пост, где мы покажем вам, как использовать Windows 8 для запуска подключения к удаленному рабочему столу с помощью приложения Windows 8 Metro. Надеемся, что эти два сообщения помогут вам комфортно работать с удаленным рабочим столом в Windows 8.
Протокол Remote Desktop Protocol (RDP) позволяет удаленно подключиться к рабочему столу компьютера с Windows и работать с ним, как будто это ваш локальный компьютер. По умолчанию RDP доступ в Windows запрещен. В этой статье, мы покажем, как включить и настроить RDP доступ в Windows 10 и Windows Server 2016/2019.
Содержание:
- Включаем удаленный рабочий стол в Windows 10
- Как включить RDP доступ с помощью PowerShell?
- RDP доступ к Windows Server 2016/2019
- Включение RDP с групповых политик в домене Active Direcrtory
- Как удаленно включить RDP на компьютере Windows?
Включаем удаленный рабочий стол в Windows 10
Самый простой способ включить RDP доступ в Windows – воспользоваться графическим интерфейсом.
Откройте свойства системы через панель управления, или выполнив команду SystemPropertiesRemote.

Перейдите на вкладку Remote Settings (Удаленный доступ), включите опцию Allow remote connection to this computer (Разрешить удалённые подключения к этому компьютеру).
В целях безопасности желательно разрешить подключение только с клиентов RDP с поддержкой протокола NLA (Allow connections only from computers running Remote Desktop with Network Level Authentication/ Разрешить подключение только с компьютеров, на которых работает удаленный рабочий стол с проверкой подлинности на уровне сети).

Сохраните изменения, нажав ОК.
По умолчанию право на подключение к компьютеру через RDP есть только у членов группы локальных администраторов. Если вам нужно разрешить RDP доступ другим пользователям, нажмите кнопку Select Users.
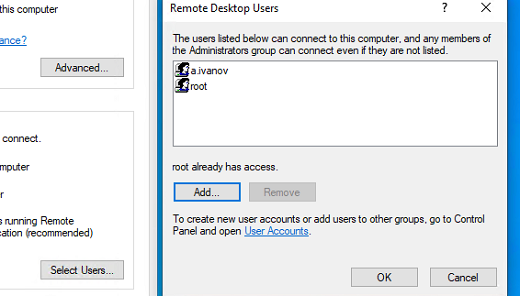
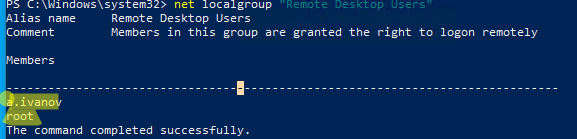
Все пользователи, которых вы укажете здесь будет добавлены в локальную группу Remote Desktop Users. Вы можете в командной строке вывести список пользователей в этой группе:
net localgroup "Remote Desktop Users"
или
net localgroup “Пользователи удаленного рабочего стола”
Чтобы добавить нового пользователя в группу доступа RDP, выполните:
net localgroup "Remote Desktop Users" /add publicuser
В русской версии Windows измените название группы на “Пользователи удаленного рабочего стола”.
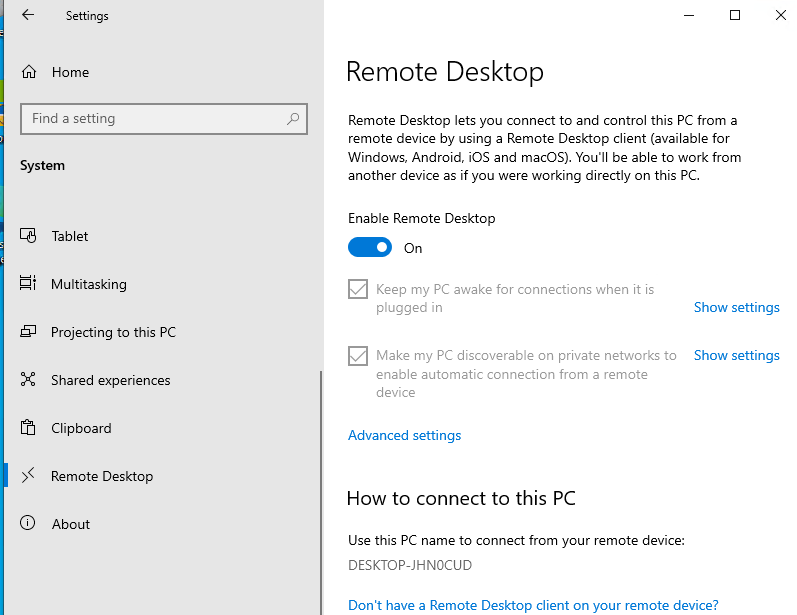
В новых билдах Windows 10 классическая панель для включения RDP доступа теперь спрятана и Microsoft рекомендует пользоваться новой панелью Setting.
- Перейдите в Settings -> System —> Remote Desktop;
- Включите опцию Enable Remote Desktop;

- Подтвердите включение RDP на компьютере.
Обратите внимание, что вы не можете включить RDP доступ к редакции Windows 10 Home. RDP сервер работает только на Windows 10 Pro и Enterprise. Впрочем, есть обходное решение.
Обратите внимание, что по умолчанию при включении Remote Desktop, включаются две опции:
- Keep my PC awake for connection when it is plugged in ;
- Make my PC discoverable on private networks to enable automatic connection from a remote device
На жмите на ссылку “Advanced settings”. Здесь можно включить использование протокола “Network Level Authentication” для RDP подключений (рекомендуется).
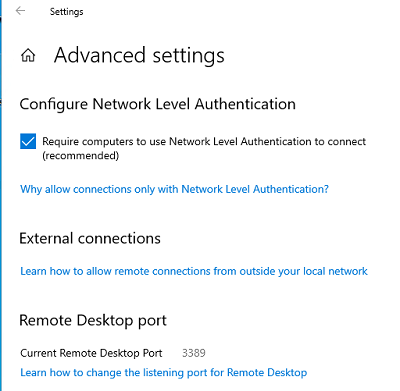
Если на компьютере включен Windows Defender Firewall (брандмауэр), то нужно проверить, что в нем разрешены входящие RDP подключения. По умолчанию для RDP подключений используется порт TCP
3389
, а в последних билдах Windows также используется
UDP 3389
( см. статью про кейс с черным экраном вместо рабочего стола при RDP доступе).
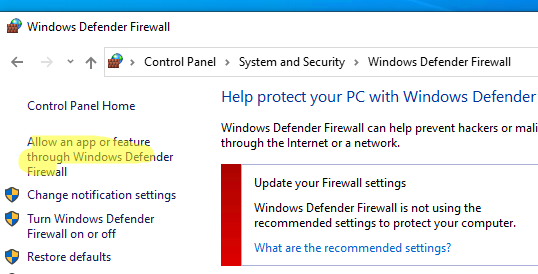
Перейдите в панель управления и выберите элемент Windows Defender Firewall. Откройте список стандартных правил брандмауэра Windows, щелкнув в левом столбце по ссылке Allow an app or feature through Windows Firewall.
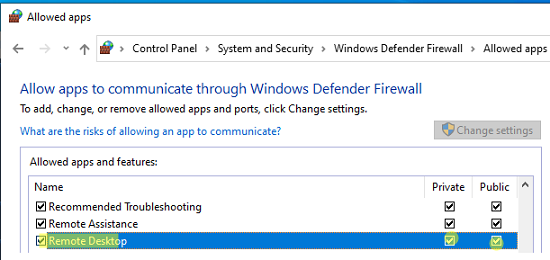
Проверьте, что правило Remote Desktop включено для профиля Private (домашняя или рабочая сеть) и, если необходимо, для профиля Public (общедоступные сети).
Подробнее про типы сетей и профили брандмауэра Windows здесь.
Если нужно, вы можете дополнительно ограничить длительность RDP сессий с помощью GPO.
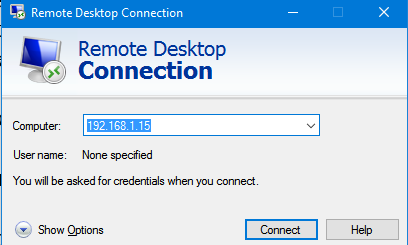
Теперь к данному компьютеру можно подключится с помощью RDP клиента. Встроенный RDP клиент Windows –
mstsc.exe
. Он сохраняет всю историю RDP подключений с компьютера. Поддерживается копирование файлов между локальным и удаленным компьютером прямо через буфер обмена RDP.
Также вы можете использовать менеджеры RDP подключений, такие как RDCMan или mRemoteNG, или альтернативные клиенты.
Для удобства пользователей пароль для RDP подключения можно сохранить в Windows Credential Manager.
Как включить RDP доступ с помощью PowerShell?
Вы можете включить RDP доступ в Windows с помощью пары PowerShell команд. Это гораздо быстрее:
- Запустите консоль PowerShell.exe с правами администратора;
- Включите RDP доступ в реестре с помощью командлета Set-ItemProperty:
Set-ItemProperty -Path 'HKLM:SystemCurrentControlSetControlTerminal Server' -name "fDenyTSConnections" -value 0Чтобы закрыть RDP доступ, измените значение fDenyTSConnections на 1.
- Разрешите RDP подключения к компьютеру в Windows Defender Firewall. Для этого включите предустановленное правило :
Enable-NetFirewallRule -DisplayGroup "Remote Desktop"
- Если нужно добавить пользователя в группу в локальную группу RDP доступа, выполните:
Add-LocalGroupMember -Group "Remote Desktop Users" -Member 'a.petrov'

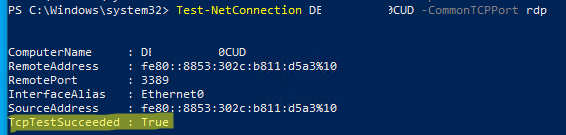
Чтобы проверить, что на компьютере открыт RDP порт, воспользуйтесь командлетом Test-NetConnection:
Test-NetConnection -ComputerName deskcomp323 -CommonTCPPort rdp
RDP доступ к Windows Server 2016/2019
В отличии от десктопной редакции Windows 10, в Windows Server по умолчанию поддерживается два одновременных RDP подключения. Эти подключения используются администраторами для управления сервером.
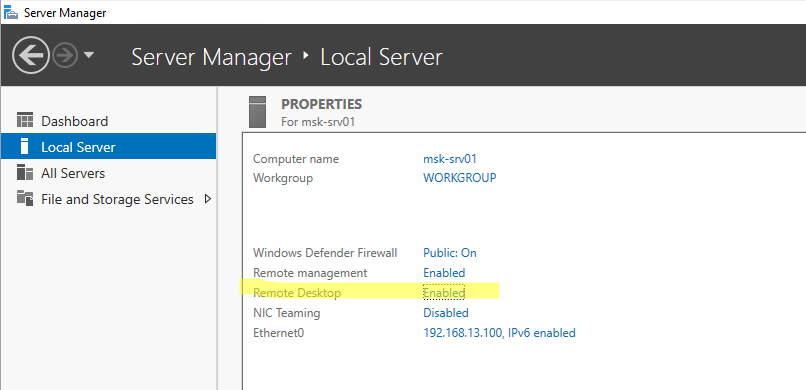
Включается RDP в Windows Server аналогично. Через SystemPropertiesRemote, через Server Manager или командами PowerShell, рассмотренными выше.
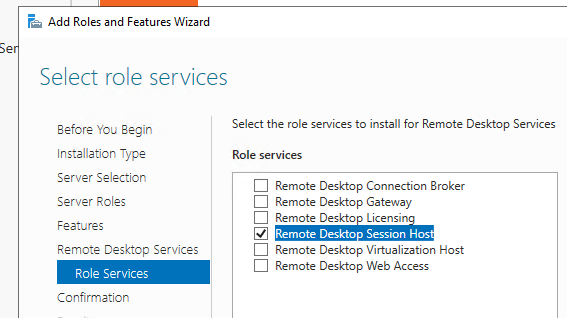
Вы можете использовать Windows Server в качестве терминального сервера. В этом случае множество пользователей могут одновременно подключаться к собственному рабочему столу на сервере. Для этого нужно установить и настроить на сервере роль Remote Desktop Session Host. Это требует приобретения специальных RDS лицензии (CAL). Подробнее о RDS лицензировании здесь.
Для дополнительно защиты RDP сессий можно использовать SSL/TLS сертификаты.
Включение RDP с групповых политик в домене Active Direcrtory
Если вам нужно включить RDP доступ сразу на большом количестве компьютеров, можно воспользоваться групповыми политиками (GPO). Мы подразумеваем, что все компьютеры включены в домен Windows.
- Запустите консоль управления доменными GPO
gpmc.msc
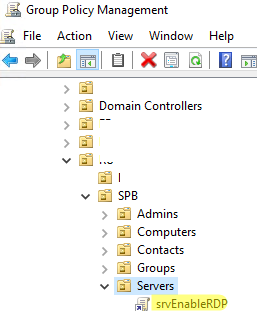
; - Создайте новую (или отредактируйте уже существующую) групповую политику и привяжите ее к целевой OU с компьютерами или серверами;
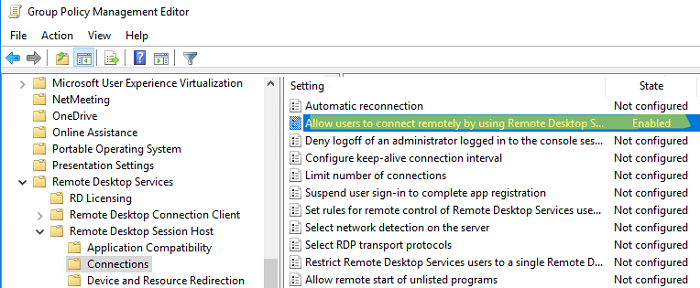
- Переключитесь в режим редактирования политики и перейдите в секцию GPO Computer Configuration -> Administrative Templates -> Windows Components -> Remote Desktop Services -> Remote Desktop Session Host -> Connections;
- Найдите и включите политику Allow Users to connect remotely by using Remote Desktop Services, установив ее в Enable;
- Обновите параметры групповых политик на клиентах;
- После применения данной политики вы сможете подключится ко всем компьютерам по RDP (политика применится как к десктопным клиентам с Windows 10, так и к Windows Server). Если нужно, вы можете более тонко нацелить политики на компьютеры с помощью WMI фильтров GPO.
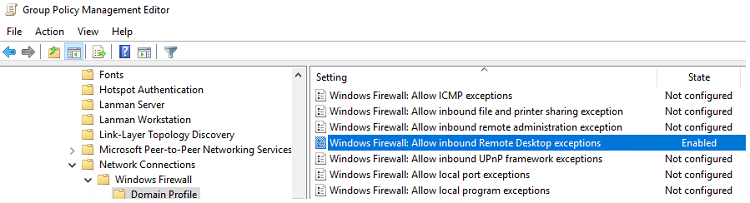
- Если на компьютерах включен Windows Defender Firewall, нужно в этой же GPO разрешить RDP-трафик для доменного профиля. Для этого нужно активировать правило Windows Firewall: Allow inbound Remote Desktop Exceptions (находится в разделе Computer Configuration -> Administrative Templates -> Network -> Network Connections -> Windows Firewall -> Domain Profile).
Подробнее о настройке правил брандмаура Windows через GPO рассказано здесь.
Как удаленно включить RDP на компьютере Windows?
Также вы можете удаленно включить RDP на любом компьютере Windows. Для этого у вас должен быть удаленный доступ к этому компьютеру (через PowerShell или WMI) и ваша учетная запись состоять в группе локальных администраторов на этом компьютере.
Вы можете удаленно включить RDP через реестр. Для этого на удаленном компьютере должна быть включена служба Remote Registry (по умолчанию она отключена). Чтобы запустить службу:
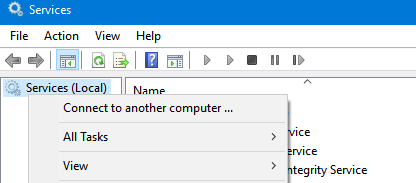
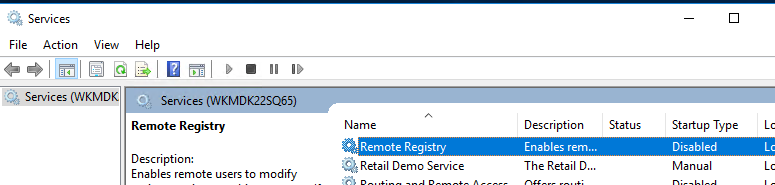
- Запустите консоль управления службами (
services.msc
); - Выберите Connect to another computer и укажите имя удаленного компьютера;
- Найдите в списке службу Remote Registry, измените тип запуска на Manual (ручной) и затем запустите службу – Start.
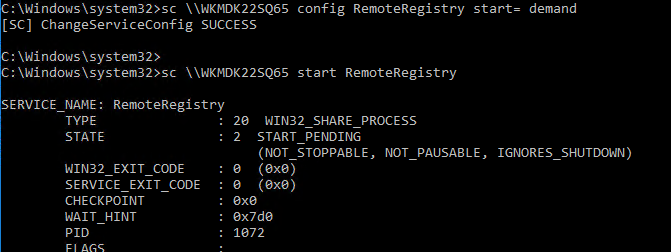
Тоже самое можно выполнить удаленно из командной строки с помощью встроенной утилиты
sc
(позволяет создавать, управлять или удалять службы Windows):
sc \WKMDK22SQ65 config RemoteRegistry start= demand
sc \WKMDK22SQ65 start RemoteRegistry
Затем на локальном компьютере
- Запустите редактор реестра
regedit.exe - Выберите в меню Файл пункт Connect Network Registry (Подключить сетевой реестр)
- Укажите имя или IP адрес удаленного компьютера, на котором нужно включить службу RDP;
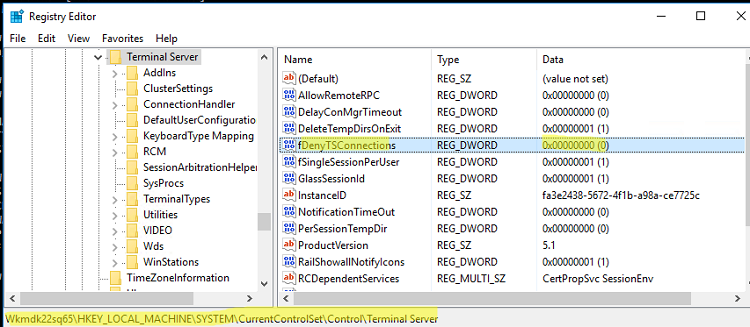
- Перейдите в раздел
HKEY_LOCAL_MACHINESYSTEMCurrentControlSetControlTerminal Server
; - Найдите параметр fDenyTSConnections (тип REG_DWORD). Если данный ключ отсутствует – создайте его. Измените его значение на 0, чтобы включить RDP.
Для отключения RDP доступа нужно изменить значение fDenyTSConnections на 1.
Сразу после этого без перезагрузки удаленный компьютер должен стать доступным по RDP.
Но гораздо быстрее можно включить RDP в реестре удаленого компьютера через командную строку:
REG ADD "\WKMDK22SQ65HKLMSYSTEMCurrentControlSetControlTerminal Server" /v fDenyTSConnections /t REG_DWORD /d 0 /f
Если на удаленном компьютере настроен PowerShell remoting, вы можете выполнить на нем удаленную команду через Invoke-Command:
Invoke-Command -Computername WKMDK22SQ65 -ScriptBlock {Set-ItemProperty -Path "HKLM:SystemCurrentControlSetControlTerminal Server" -Name "fDenyTSConnections" –Value 0}
Если в Windows установлен OpenSSH сервер, вы можете подключиться к нему любым ssh клиентом и внести изменения в реестр в локальной ssh сессии.
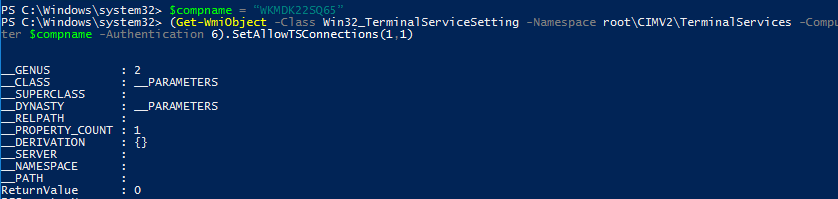
Также вы можете подключиться к удаленному компьютеру и включить RDP через WMI:
$compname = “WKMDK22SQ65”
(Get-WmiObject -Class Win32_TerminalServiceSetting -Namespace rootCIMV2TerminalServices -Computer $compname -Authentication 6).SetAllowTSConnections(1,1)
RDP Wrapper Library by Stas’M
The goal of this project is to enable Remote Desktop Host support and concurrent RDP sessions on reduced functionality systems for home usage.
RDP Wrapper works as a layer between Service Control Manager and Terminal Services, so the original termsrv.dll file remains untouched. Also this method is very strong against Windows Update.
| NT Version | Screenshots |
|---|---|
| Windows Vista | |
| Windows 7 | |
| Windows 8 | |
| Windows 8.1 | |
| Windows 10 | |
This solution was inspired by Windows Product Policy Editor, big thanks to kost 
— binarymaster
Attention:
It’s recommended to have original termsrv.dll file with the RDP Wrapper installation. If you have modified it before with other patchers, it may become unstable and crash in any moment.
Information:
- Source code is available, so you can build it on your own
- RDP Wrapper does not patch termsrv.dll, it loads termsrv with different parameters
- RDPWInst and RDPChecker can be redistributed without development folder and batch files
- RDPWInst can be used for unattended installation / deployment
- Windows 2000, XP and Server 2003 will not be supported
Key features:
- RDP host server on any Windows edition beginning from Vista
- Console and remote sessions at the same time
- Using the same user simultaneously for local and remote logon (see configuration app)
- Up to 15 concurrent sessions (the actual limitation depends on your hardware and OS version)
- Console and RDP session shadowing (using Task Manager in Windows 7 and lower, and Remote Desktop Connection in Windows 8 and higher)
- Full multi-monitor support for RDP host
- …and if you find a new feature not listed here, tell us

Porting to other platforms:
- ARM for Windows RT (see links below)
- IA-64 for Itanium-based Windows Server? Well, I have no idea
Building the binaries:
- x86 Delphi version can be built with Embarcadero RAD Studio 2010
- x86/x64 C++ version can be built with Microsoft Visual Studio 2013
Links:
- Official GitHub repository:
https://github.com/stascorp/rdpwrap/ - Official Telegram chat:
https://t.me/rdpwrap - Active discussion in the comments here:
Enable remote desktop on Windows 8 core / basic — Andrew Block .net - MDL Projects and Applications thread here:
RDP Wrapper Library (works with Windows 8.1 Basic) - Some ideas about porting to ARM for Windows RT (post #23):
[Q] Mod Windows RT to enable Remote Desktop - Adding «Remote Desktop Users» group:
http://superuser.com/questions/680572/
Tutorial videos:
- Updating RDP Wrapper INI file manually (now use installer to update INI file)
- How to find offsets for new termsrv.dll versions
Files in release package:
| File name | Description |
|---|---|
RDPWInst.exe |
RDP Wrapper Library installer/uninstaller |
RDPCheck.exe |
Local RDP Checker (you can check the RDP is working) |
RDPConf.exe |
RDP Wrapper Configuration |
install.bat |
Quick install batch file |
uninstall.bat |
Quick uninstall batch file |
update.bat |
Quick update batch file |
Frequently Asked Questions
Where can I download the installer or binaries?
In the GitHub Releases section.
Is it legal to use this application?
There is no definitive answer, see this discussion.
The installer tries to access the Internet, is it normal behaviour?
Yes, it works in online mode by default. You may disable it by removing -o flag in the install.bat file.
What is online install mode?
Online install mode introduced in version 1.6.1. When you installing RDP Wrapper first time using this mode, it will download latest INI file from GitHub. See this discussion.
What is INI file and why we need it?
INI file was introduced in version 1.5. It stores system configuration for RDP Wrapper — general wrapping settings, binary patch codes, and per build specific data. When new termsrv.dll build comes out, developer adds support for it by updating INI file in repository.
Config Tool reports version 1.5, but I installed higher version. What’s the matter?
Beginning with version 1.5 the rdpwrap.dll is not updated anymore, since all settings are stored in INI file. Deal with it.
Config Tool shows
[not supported]and RDP doesn’t work. What can I do?
Make sure you’re connected to the Internet and run update.bat.
Update doesn’t help, it still shows
[not supported].
Visit issues section, and check whether your termsrv.dll build is listed here. If you can’t find such issue, create a new — specify your build version for adding to support.
Why
RDPCheckdoesn’t allow to change resolution and other settings?
RDPCheck is a very simple application and only for testing purposes. You need to use Microsoft Remote Desktop Client (mstsc.exe) if you want to customize the settings. You can use 127.0.0.1 or 127.0.0.2 address for loopback connection.
Known issues:
- Beginning with Windows 8 on tablet PCs inactive sessions will be logged out by system — more info
- Beginning with Windows 10 you can accidentally lock yourself from PC — more info
- Beginning with the Creators Update for Windows 10 Home, RDP Wrapper will no longer work, claiming that the listener is
[not listening]because ofrfxvmt.dllis missing — more info, download links - Terminal Service does not start after installing some updates or «Access Denied» issue — #215, #101
- RDP Wrapper does not work with RemoteFX enabled hosts — #127, #208, #216
- RDP works, but termsrv.dll crashes on logon attempt — Windows Vista Starter RTM x86 (termsrv.dll
6.0.6000.16386) - If Terminal Services hangs at startup, try to add
rdpwrap.dllto antivirus exclusions. Also try to isolate RDP Wrapper from other shared services by the command:
sc config TermService type= own - RDP Wrapper can be removed by AVG Free Antivirus and Norton Antivirus — first make sure you downloaded official release from GitHub, then add it to exclusions.
Change log:
2017.12.27
- Version 1.6.2
- Installer updated
- Include updated INI file for latest Windows builds
- Added check for supported Windows versions (#155)
- Added feature to take INI file from current directory (#300)
- Added feature to restore rfxvmt.dll (missing in Windows 10 Home #194)
- RDP Config updated
- Added feature to allow custom start programs (#13 (comment))
- MSI installation package added (#14)
2016.08.01
- Version 1.6.1
- Include updated INI file for latest Windows builds
- Installer updated
- Added online install mode
- Added feature to keep settings on uninstall
- RDP Config updated
- Fixed update firewall rule on RDP port change
- Added feature to hide users on logon
2015.08.12
- Version 1.6
- Added support for Windows 10
- INI file has smaller size now — all comments are moved to KB file
- Installer updated
- Added workaround for 1056 error (although it isn’t an error)
- Added update support to installer
- Newest RDPClip versions are included with installer
- RDP Checker updated
- Changed connect IP to 127.0.0.2
- Updated some text messages
- RDP Config updated
- Added all possible shadowing modes
- Also it will write settings to the group policy
2014.12.11
- Version 1.5
- Added INI config support
- Configuration is stored in INI file now
- We can extend version support without building new binaries
- Added support for Windows 8.1 with KB3000850
- Added support for Windows 10 Technical Preview Update 2
- Installer updated
- RDP Config updated
- Diagnostics feature added to RDP Config
2014.11.14
- Version 1.4
- Added support for Windows 10 Technical Preview Update 1
- Added support for Windows Vista SP2 with KB3003743
- Added support for Windows 7 SP1 with KB3003743
- Added new RDP Configuration Program
2014.10.21
- Installer updated
- Added feature to install RDP Wrapper to System32 directory
- Fixed issue in the installer — NLA setting now remains unchanged
- Local RDP Checker updated
- SecurityLayer and UserAuthentification values changed on check start
- RDP Checker restores values on exit
2014.10.20
- Version 1.3
- Added support for Windows 10 Technical Preview
- Added support for Windows 7 with KB2984972
- Added support for Windows 8 with KB2973501
- Added extended support for Windows Vista (SP0, SP1 and SP2)
- Added extended support for Windows 7 (SP0 and SP1)
- Some improvements in the source code
- Installer updated to v2.2
- Fixed installation bug in Vista x64 (wrong expand path)
- Local RDP Checker updated
- Added description to error 0x708
2014.07.26
- Version 1.2
- Added support for Windows 8 Developer Preview
- Added support for Windows 8 Consumer Preview
- Added support for Windows 8 Release Preview
- Added support for Windows 8.1 Preview
- Added support for Windows 8.1
- More details you will see in the source code
- Installer updated to v2.1
2013.12.09
- C++ port of RDP Wrapper was made by Fusix
- x64 architecture is supported now
- Added new command line installer v2.0
- Added local RDP checker
- Source code (C++ port, installer 2.0, local RDP checker) is also included
2013.10.25
- Version 1.1 source code is available
2013.10.22
- Version 1.1
- Stable release
- Improved wrapper (now it can wrap internal unexported termsrv.dll SL Policy function)
- Added support for Windows 8 Single Language (tested on Acer Tablet PC with Intel Atom Z2760)
2013.10.19
- Version 1.0
- First [beta] version
- Basic SL Policy wrapper
Supported Terminal Services versions:
- 6.0.X.X (Windows Vista / Server 2008)
- 6.0.6000.16386 (Windows Vista)
- 6.0.6001.18000 (Windows Vista SP1)
- 6.0.6002.18005 (Windows Vista SP2)
- 6.0.6002.19214 (Windows Vista SP2 with KB3003743 GDR)
- 6.0.6002.23521 (Windows Vista SP2 with KB3003743 LDR)
- 6.1.X.X (Windows 7 / Server 2008 R2)
- 6.1.7600.16385 (Windows 7)
- 6.1.7600.20890 (Windows 7 with KB2479710)
- 6.1.7600.21316 (Windows 7 with KB2750090)
- 6.1.7601.17514 (Windows 7 SP1)
- 6.1.7601.21650 (Windows 7 SP1 with KB2479710)
- 6.1.7601.21866 (Windows 7 SP1 with KB2647409)
- 6.1.7601.22104 (Windows 7 SP1 with KB2750090)
- 6.1.7601.18540 (Windows 7 SP1 with KB2984972 GDR)
- 6.1.7601.22750 (Windows 7 SP1 with KB2984972 LDR)
- 6.1.7601.18637 (Windows 7 SP1 with KB3003743 GDR)
- 6.1.7601.22843 (Windows 7 SP1 with KB3003743 LDR)
- 6.1.7601.23403 (Windows 7 SP1 with KB3125574)
- 6.1.7601.24234 (Windows 7 SP1 with KB4462923)
- 6.2.8102.0 (Windows 8 Developer Preview)
- 6.2.8250.0 (Windows 8 Consumer Preview)
- 6.2.8400.0 (Windows 8 Release Preview)
- 6.2.9200.16384 (Windows 8 / Server 2012)
- 6.2.9200.17048 (Windows 8 with KB2973501 GDR)
- 6.2.9200.21166 (Windows 8 with KB2973501 LDR)
- 6.3.9431.0 (Windows 8.1 Preview)
- 6.3.9600.16384 (Windows 8.1 / Server 2012 R2)
- 6.3.9600.17095 (Windows 8.1 with KB2959626)
- 6.3.9600.17415 (Windows 8.1 with KB3000850)
- 6.3.9600.18692 (Windows 8.1 with KB4022720)
- 6.3.9600.18708 (Windows 8.1 with KB4025335)
- 6.3.9600.18928 (Windows 8.1 with KB4088876)
- 6.3.9600.19093 (Windows 8.1 with KB4343891)
- 6.4.9841.0 (Windows 10 Technical Preview)
- 6.4.9860.0 (Windows 10 Technical Preview Update 1)
- 6.4.9879.0 (Windows 10 Technical Preview Update 2)
- 10.0.9926.0 (Windows 10 Pro Technical Preview)
- 10.0.10041.0 (Windows 10 Pro Technical Preview Update 1)
- 10.0.10240.16384 (Windows 10 RTM)
- 10.0.10586.0 (Windows 10 TH2 Release 151029-1700)
- 10.0.10586.589 (Windows 10 TH2 Release 160906-1759 with KB3185614)
- 10.0.11082.1000 (Windows 10 RS1 Release 151210-2021)
- 10.0.11102.1000 (Windows 10 RS1 Release 160113-1800)
- 10.0.14251.1000 (Windows 10 RS1 Release 160124-1059)
- 10.0.14271.1000 (Windows 10 RS1 Release 160218-2310)
- 10.0.14279.1000 (Windows 10 RS1 Release 160229-1700)
- 10.0.14295.1000 (Windows 10 RS1 Release 160318-1628)
- 10.0.14300.1000 (Windows Server 2016 Technical Preview 5)
- 10.0.14316.1000 (Windows 10 RS1 Release 160402-2227)
- 10.0.14328.1000 (Windows 10 RS1 Release 160418-1609)
- 10.0.14332.1001 (Windows 10 RS1 Release 160422-1940)
- 10.0.14342.1000 (Windows 10 RS1 Release 160506-1708)
- 10.0.14352.1002 (Windows 10 RS1 Release 160522-1930)
- 10.0.14366.0 (Windows 10 RS1 Release 160610-1700)
- 10.0.14367.0 (Windows 10 RS1 Release 160613-1700)
- 10.0.14372.0 (Windows 10 RS1 Release 160620-2342)
- 10.0.14379.0 (Windows 10 RS1 Release 160627-1607)
- 10.0.14383.0 (Windows 10 RS1 Release 160701-1839)
- 10.0.14385.0 (Windows 10 RS1 Release 160706-1700)
- 10.0.14388.0 (Windows 10 RS1 Release 160709-1635)
- 10.0.14393.0 (Windows 10 RS1 Release 160715-1616)
- 10.0.14393.1198 (Windows 10 RS1 Release Sec 170427-1353 with KB4019472)
- 10.0.14393.1737 (Windows 10 RS1 Release Inmarket 170914-1249 with KB4041691)
- 10.0.14393.2457 (Windows 10 RS1 Release Inmarket 180822-1743 with KB4343884)
- 10.0.14901.1000 (Windows 10 RS Pre-Release 160805-1700)
- 10.0.14905.1000 (Windows 10 RS Pre-Release 160811-1739)
- 10.0.14915.1000 (Windows 10 RS Pre-Release 160826-1902)
- 10.0.14926.1000 (Windows 10 RS Pre-Release 160910-1529)
- 10.0.14931.1000 (Windows 10 RS Pre-Release 160916-1700)
- 10.0.14936.1000 (Windows 10 RS Pre-Release 160923-1700)
- 10.0.14942.1000 (Windows 10 RS Pre-Release 161003-1929)
- 10.0.14946.1000 (Windows 10 RS Pre-Release 161007-1700)
- 10.0.14951.1000 (Windows 10 RS Pre-Release 161014-1700)
- 10.0.14955.1000 (Windows 10 RS Pre-Release 161020-1700)
- 10.0.14959.1000 (Windows 10 RS Pre-Release 161026-1700)
- 10.0.14965.1001 (Windows 10 RS Pre-Release 161104-1700)
- 10.0.14971.1000 (Windows 10 RS Pre-Release 161111-1700)
- 10.0.14986.1000 (Windows 10 Build 160101.0800)
- 10.0.14997.1001 (Windows 10 Build 160101.0800)
- 10.0.15002.1001 (Windows 10 Build 160101.0800)
- 10.0.15007.1000 (Windows 10 Build 160101.0800)
- 10.0.15014.1000 (Windows 10 Build 160101.0800)
- 10.0.15019.1000 (Windows 10 RS Pre-Release 170121-1513)
- 10.0.15025.1000 (Windows 10 RS Pre-Release 170127-1750)
- 10.0.15031.0 (Windows 10 RS2 Release 170204-1546)
- 10.0.15042.0 (Windows 10 RS2 Release 170219-2329)
- 10.0.15046.0 (Windows 10 Build 160101.0800)
- 10.0.15048.0 (Windows 10 Build 160101.0800)
- 10.0.15055.0 (Windows 10 Build 160101.0800)
- 10.0.15058.0 (Windows 10 Build 160101.0800)
- 10.0.15061.0 (Windows 10 Build 160101.0800)
- 10.0.15063.0 (Windows 10 Build 160101.0800)
- 10.0.15063.296 (Windows 10 Build 160101.0800)
- 10.0.15063.994 (Windows 10 Build 160101.0800)
- 10.0.15063.1155 (Windows 10 Build 160101.0800)
- 10.0.16179.1000 (Windows 10 Build 160101.0800)
- 10.0.16184.1001 (Windows 10 Build 160101.0800)
- 10.0.16199.1000 (Windows 10 Build 160101.0800)
- 10.0.16215.1000 (Windows 10 Build 160101.0800)
- 10.0.16232.1000 (Windows 10 Build 160101.0800)
- 10.0.16237.1001 (Windows 10 Build 160101.0800)
- 10.0.16241.1001 (Windows 10 Build 160101.0800)
- 10.0.16251.0 (Windows 10 Build 160101.0800)
- 10.0.16251.1000 (Windows 10 Build 160101.0800)
- 10.0.16257.1 (Windows 10 Build 160101.0800)
- 10.0.16257.1000 (Windows 10 Build 160101.0800)
- 10.0.16273.1000 (Windows 10 Build 160101.0800)
- 10.0.16275.1000 (Windows 10 Build 160101.0800)
- 10.0.16278.1000 (Windows 10 Build 160101.0800)
- 10.0.16281.1000 (Windows 10 Build 160101.0800)
- 10.0.16288.1 (Windows 10 Build 160101.0800)
- 10.0.16291.0 (Windows 10 Build 160101.0800)
- 10.0.16294.1 (Windows 10 Build 160101.0800)
- 10.0.16296.0 (Windows 10 Build 160101.0800)
- 10.0.16299.0 (Windows 10 Build 160101.0800)
- 10.0.16299.15 (Windows 10 Build 160101.0800)
- 10.0.16353.1000 (Windows 10 Build 160101.0800)
- 10.0.16362.1000 (Windows 10 Build 160101.0800)
- 10.0.17004.1000 (Windows 10 Build 160101.0800)
- 10.0.17017.1000 (Windows 10 Build 160101.0800)
- 10.0.17025.1000 (Windows 10 Build 160101.0800)
- 10.0.17035.1000 (Windows 10 Build 160101.0800)
- 10.0.17046.1000 (Windows 10 Build 160101.0800)
- 10.0.17063.1000 (Windows 10 Build 160101.0800)
- 10.0.17115.1 (Windows 10 Build 160101.0800)
- 10.0.17128.1 (Windows 10 Build 160101.0800)
- 10.0.17133.1 (Windows 10 Build 160101.0800)
- 10.0.17134.1 (Windows 10 Build 160101.0800)
- 10.0.17723.1000 (Windows 10 Build 160101.0800)
- 10.0.17763.1 (Windows 10 Build 160101.0800)
Confirmed working on:
- Windows Vista Starter (x86 — Service Pack 1 and higher)
- Windows Vista Home Basic
- Windows Vista Home Premium
- Windows Vista Business
- Windows Vista Enterprise
- Windows Vista Ultimate
- Windows Server 2008
- Windows 7 Starter
- Windows 7 Home Basic
- Windows 7 Home Premium
- Windows 7 Professional
- Windows 7 Enterprise
- Windows 7 Ultimate
- Windows Server 2008 R2
- Windows 8 Developer Preview
- Windows 8 Consumer Preview
- Windows 8 Release Preview
- Windows 8
- Windows 8 Single Language
- Windows 8 Pro
- Windows 8 Enterprise
- Windows Server 2012
- Windows 8.1 Preview
- Windows 8.1
- Windows 8.1 Connected (with Bing)
- Windows 8.1 Single Language
- Windows 8.1 Connected Single Language (with Bing)
- Windows 8.1 Pro
- Windows 8.1 Enterprise
- Windows Server 2012 R2
- Windows 10 Technical Preview
- Windows 10 Pro Technical Preview
- Windows 10 Home
- Windows 10 Home Single Language
- Windows 10 Pro
- Windows 10 Enterprise
- Windows Server 2016 Technical Preview
Installation instructions:
- Download latest release binaries and unpack files
- Right-click on
install.batand select Run as Administrator - See command output for details
To update INI file:
- Right-click on
update.batand select Run as Administrator - See command output for details
To uninstall:
- Go to the directory where you extracted the files
- Right-click on
uninstall.batand select Run as Administrator - See command output for details