| title | description | keywords | ms.date | ms.topic | adobe-target |
|---|---|---|---|---|---|
|
Manual installation steps for older versions of WSL |
Step by step instructions to manually install WSL on older versions of Windows, rather than using the wsl install command. |
wsl, install, BashOnWindows, bash, windows subsystem for linux, install ubuntu on windows, enable WSL2, linux on windows |
11/12/2021 |
article |
true |
Manual installation steps for older versions of WSL
For simplicity, we generally recommend using the wsl --install to install Windows Subsystem for Linux, but if you’re running an older build of Windows, that may not be supported. We have included the manual installation steps below. If you run into an issue during the install process, check the installation section of the troubleshooting guide.
Step 1 — Enable the Windows Subsystem for Linux
You must first enable the «Windows Subsystem for Linux» optional feature before installing any Linux distributions on Windows.
Open PowerShell as Administrator (Start menu > PowerShell > right-click > Run as Administrator) and enter this command:
dism.exe /online /enable-feature /featurename:Microsoft-Windows-Subsystem-Linux /all /norestart
We recommend now moving on to step #2, updating to WSL 2, but if you wish to only install WSL 1, you can now restart your machine and move on to Step 6 — Install your Linux distribution of choice. To update to WSL 2, wait to restart your machine and move on to the next step.
Step 2 — Check requirements for running WSL 2
To update to WSL 2, you must be running Windows 10…
- For x64 systems: Version 1903 or later, with Build 18362 or later.
- For ARM64 systems: Version 2004 or later, with Build 19041 or later.
or Windows 11.
[!NOTE]
Builds lower than 18362 do not support WSL 2. Use the Windows Update Assistant to update your version of Windows.
To check your version and build number, select Windows logo key + R, type winver, select OK. Update to the latest Windows version in the Settings menu.
[!NOTE]
If you are running Windows 10 version 1903 or 1909, open «Settings» from your Windows menu, navigate to «Update & Security» and select «Check for Updates». Your Build number must be 18362.1049+ or 18363.1049+, with the minor build # over .1049. Read more: WSL 2 Support is coming to Windows 10 Versions 1903 and 1909.
Step 3 — Enable Virtual Machine feature
Before installing WSL 2, you must enable the Virtual Machine Platform optional feature. Your machine will require virtualization capabilities to use this feature.
Open PowerShell as Administrator and run:
dism.exe /online /enable-feature /featurename:VirtualMachinePlatform /all /norestart
Restart your machine to complete the WSL install and update to WSL 2.
Step 4 — Download the Linux kernel update package
-
Download the latest package:
- WSL2 Linux kernel update package for x64 machines
[!NOTE]
If you’re using an ARM64 machine, please download the ARM64 package instead. If you’re not sure what kind of machine you have, open Command Prompt or PowerShell and enter:systeminfo | find "System Type". Caveat: On non-English Windows versions, you might have to modify the search text, translating the «System Type» string. You may also need to escape the quotations for the find command. For example, in Germansysteminfo | find '"Systemtyp"'. -
Run the update package downloaded in the previous step. (Double-click to run — you will be prompted for elevated permissions, select ‘yes’ to approve this installation.)
Once the installation is complete, move on to the next step — setting WSL 2 as your default version when installing new Linux distributions. (Skip this step if you want your new Linux installs to be set to WSL 1).
[!NOTE]
For more information, read the article changes to updating the WSL2 Linux kernel, available on the Windows Command Line Blog.
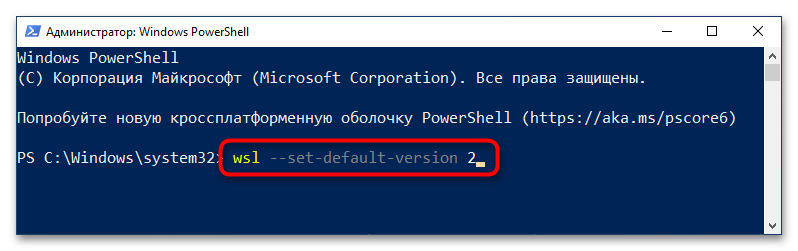
Step 5 — Set WSL 2 as your default version
Open PowerShell and run this command to set WSL 2 as the default version when installing a new Linux distribution:
wsl --set-default-version 2
Step 6 — Install your Linux distribution of choice
-
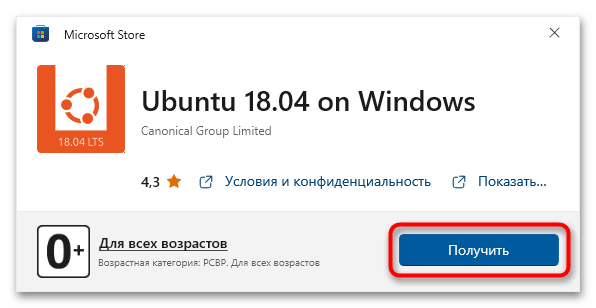
Open the Microsoft Store and select your favorite Linux distribution.

The following links will open the Microsoft store page for each distribution:
- Ubuntu 18.04 LTS
- Ubuntu 20.04 LTS
- Ubuntu 22.04 LTS
- openSUSE Leap 15.1
- SUSE Linux Enterprise Server 12 SP5
- SUSE Linux Enterprise Server 15 SP1
- Kali Linux
- Debian GNU/Linux
- Fedora Remix for WSL
- Pengwin
- Pengwin Enterprise
- Alpine WSL
- Raft(Free Trial)
-
From the distribution’s page, select «Get».


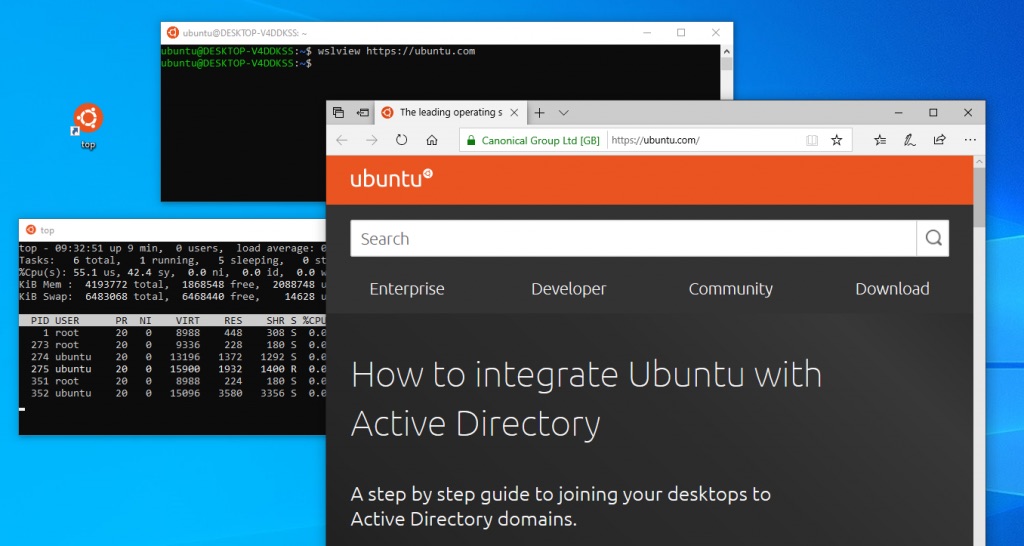
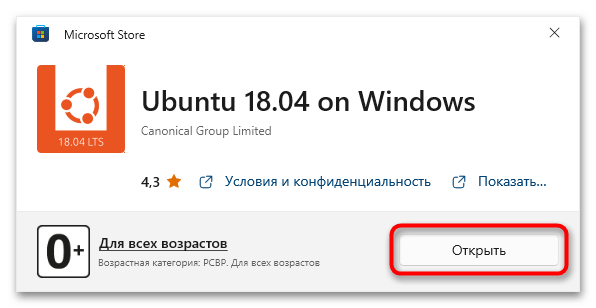
The first time you launch a newly installed Linux distribution, a console window will open and you’ll be asked to wait for a minute or two for files to de-compress and be stored on your PC. All future launches should take less than a second.
You will then need to create a user account and password for your new Linux distribution.

CONGRATULATIONS! You’ve successfully installed and set up a Linux distribution that is completely integrated with your Windows operating system!
Troubleshooting installation
If you run into an issue during the install process, check the installation section of the troubleshooting guide.
Downloading distributions
There are some scenarios in which you may not be able (or want) to, install WSL Linux distributions using the Microsoft Store. You may be running a Windows Server or Long-Term Servicing (LTSC) desktop OS SKU that doesn’t support Microsoft Store, or your corporate network policies and/or admins do not permit Microsoft Store usage in your environment. In these cases, while WSL itself is available, you may need to download Linux distributions directly.
If the Microsoft Store app is not available, you can download and manually install Linux distributions using these links:
- Ubuntu
- Ubuntu 22.04 LTS
- Ubuntu 20.04
- Ubuntu 20.04 ARM
- Ubuntu 18.04
- Ubuntu 18.04 ARM
- Ubuntu 16.04
- Debian GNU/Linux
- Kali Linux
- SUSE Linux Enterprise Server 12
- SUSE Linux Enterprise Server 15 SP2
- SUSE Linux Enterprise Server 15 SP3
- openSUSE Tumbleweed
- openSUSE Leap 15.3
- openSUSE Leap 15.2
- Oracle Linux 8.5
- Oracle Linux 7.9
- Fedora Remix for WSL
This will cause the <distro>.appx packages to download to a folder of your choosing.
If you prefer, you can also download your preferred distribution(s) via the command line, you can use PowerShell with the Invoke-WebRequest cmdlet. For example, to download Ubuntu 20.04:
Invoke-WebRequest -Uri https://aka.ms/wslubuntu2004 -OutFile Ubuntu.appx -UseBasicParsing
[!TIP]
If the download is taking a long time, turn off the progress bar by setting$ProgressPreference = 'SilentlyContinue'
You also have the option to use the curl command-line utility for downloading. To download Ubuntu 20.04 with curl:
curl.exe -L -o ubuntu-2004.appx https://aka.ms/wslubuntu2004
In this example, curl.exe is executed (not just curl) to ensure that, in PowerShell, the real curl executable is invoked, not the PowerShell curl alias for Invoke-WebRequest.
Once the distribution has been downloaded, navigate to the folder containing the download and run the following command in that directory, where app-name is the name of the Linux distribution .appx file.
Add-AppxPackage .app_name.appx
Once the Appx package has finished downloading, you can start running the new distribution by double-clicking the appx file. (The command wsl -l will not show that the distribution is installed until this step is complete).
If you are using Windows server, or run into problems running the command above you can find the alternate install instructions on the Windows Server documentation page to install the .appx file by changing it to a zip file.
Once your distribution is installed, follow the instructions to create a user account and password for your new Linux distribution.
Install Windows Terminal (optional)
Using Windows Terminal enables you to open multiple tabs or window panes to display and quickly switch between multiple Linux distributions or other command lines (PowerShell, Command Prompt, Azure CLI, etc). You can fully customize your terminal with unique color schemes, font styles, sizes, background images, and custom keyboard shortcuts. Learn more.
Install Windows Terminal.


If you want to try out the improved Windows Subsystem for Linux 2 (aka WSL 2) in the latest Windows versions here’s how — I cover everything you need to do to install it, in this post.
WSL 2 is a big upgrade to the original WSL Microsoft introduced in 2017. More than a simple version bump, WSL 2 is faster, more versatile, and uses a real Linux kernel for the first time.
Plus, new Linux kernel updates will be released as Windows 10 software updates — which is kinda crazy when you think about it!
Improved performance was Microsoft’s motivation for created the souped-up WSL2. And it figured the best way to do that was to add full system call compatibility, i.e. put a real Linux kernel right at the heart of things.
“[This] new architecture presents a better platform for the WSL team to deliver features that make WSL an amazing way to run a Linux environment in Windows,” say Microsoft of the tech.
The crazy shows no sign of abating either as Microsoft plans to let users run desktop Linux apps on Windows 10 and leverage GPU-intensive tasks.
And the best news is that it is much easier to install WSL on Windows 10, as this updated guide shows.
Requirements
To install WSL 2 on Windows 10 you need the minimum:
- Windows 10 May 2020 (2004), Windows 10 May 2019 (1903), or Windows 10 November 2019 (1909)
- A computer with Hyper-V Virtualization support
I’d be mighty surprised if anyone who’s reading this guide doesn’t meet those requirements but, if you don’t you can use WSL 1 rather than WSL 2.
What’s awesome is that if you use Windows 10 May 2020 (2004) update or later you can install WSL2 with a single command, or a single click — no hassle.
Installing WSL 2 on OS Build 2004 (or later)
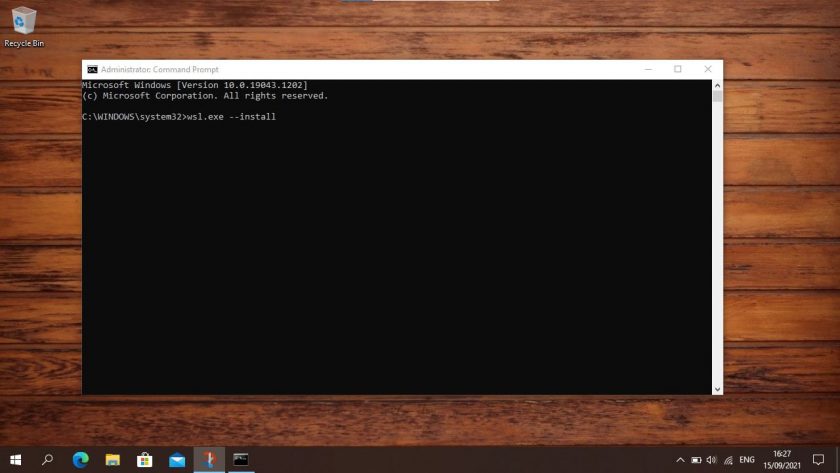
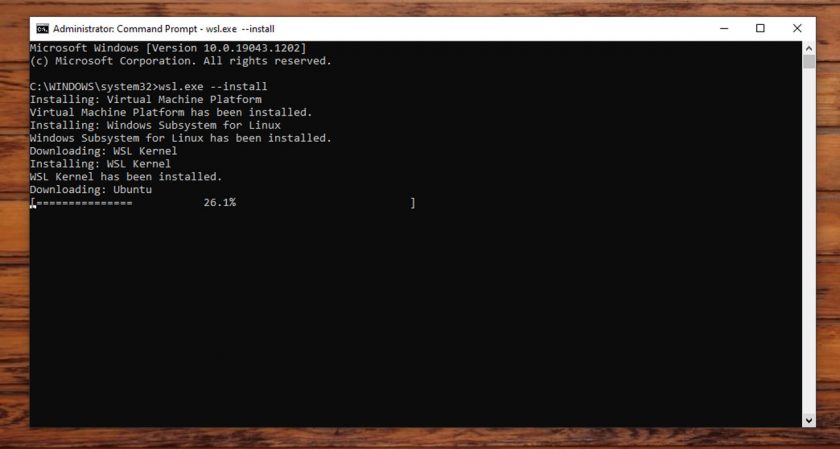
To install WSL 2 on Windows 10 OS Build 2004 or later you can open a command prompt (with Administrator permissions) and type in the following command:
wsl.exe --install
As soon as you hit enter the process gets to work enabling WSL, any optional features required, fetches the latest WSL Linux kernel version, and installs Ubuntu as the default distro:
Once done, reboot your computer. Log in to Windows 10 and the command prompt will open again. This time you’ll be walked through setting up Ubuntu with a username and password (these don’t need to be the same as your Windows username and password).
Once done you can you can launch the ‘Ubuntu’ app from the Start Menu to get started, or install the Microsoft Terminal app to start exploring your newly-installed Ubuntu install — don’t forget to run an apt update && apt upgrade though — this is a REAL Ubuntu system, after all!
Install WSL 2 (Old Method)
If you use an older version of Windows 10 you can still install WSL 2 (Microsoft backported WSL 2 to older versions of Windows 10 in Windows Update KB4566116) but the process isn’t as simple as in the 2004 update.
To install WSL 2 on Windows 10 (OS Build 1909 or 1903) you need to follow 4 steps:
- Enable WSL 2
- Enable ‘Virtual Machine Platform’
- Set WSL 2 as default
- Install a Linux distro
I walk through each step in turn below. I recommend using the PowerShell app, which you need to run as an administrator. You can find PowerShell in the Windows Start Menu.
Note: it is possible to install WSL 1 using a GUI too but it’s much faster to use the command line, and since WSL is a CLI tool it kinda makes sense too!
Step 1. Enable WSL
Regardless of which version of WSL you want to use you first need to enable it. To do this open the PowerShell tool as an Administrator and run the command below. Be careful not to mistype or leave out any character in the command:
dism.exe /online /enable-feature /featurename:Microsoft-Windows-Subsystem-Linux /all /norestart
Only want to use WSL 1? You can skip to step 4.
Step 2. Enable ‘Virtual Machine Platform’
WSL 2 requires Windows 10’s “Virtual Machine Platform” feature to be enabled. This is separate from Hyper-V and hands some of the more interesting platform integrations available in the new version of the Windows Subsystem for Linux.
To enable Virtual Machine Platform on Windows 10 (2004) open PowerShell as Administrator and run:
dism.exe /online /enable-feature /featurename:VirtualMachinePlatform /all /norestart
To enable Virtual Machine Platform on Windows 10 (1903, 1909) open PowerShell as Administrator and run:
Enable-WindowsOptionalFeature -Online -FeatureName VirtualMachinePlatform -NoRestart
To ensure all of the relevant bits and pieces fall neatly in to place you should restart your system at this point or you may find that things don’t work as intended.
Step 3. Set WSL 2 as default
Open PowerShell as Administrator and run this command to set WSL 2 as the default version of WSL:
wsl --set-default-version 2
You can (at any time) configure a distro to run in WSL 1 mode if you need to.
Step 4. Install a distro
With WSL and the necessary virtualisation tech all in place all that is left for you to do is pick and install a Linux distro from the Microsoft Store.
Several different distros are available, including OpenSUSE, Pengwin, Fedora Remix, and Alpine Linux. But my personal recommendation is (naturally) Ubuntu 20.04 LTS (though 18.04 LTS and 16.04 LTS are also available).
To install Ubuntu on Windows 10 open the Microsoft Store app, search for “Ubuntu 20.04”, and hit the “Get” button:
Ubuntu 20.04 LTS on the Microsoft Store
Whilst you in the Microsoft Store I highly recommend that you also install the open source Windows Terminal app. This tool is designed to give you the best possible WSL experience:
Windows Terminal on the Microsoft Store
5. Use WSL 2
When you installed Ubuntu (or a different Linux distro) a shortcut was added to the Start Menu. Use this to “open” Ubuntu (or whichever distro you chose). The first time you run the distro things will seem a little slow. This is expected; the distro has to unpack and decompress all of its contents — just don’t interrupt the process.
You will also be promoted to set a username and password for use on the distro. Try to pick something you won’t forget.
Convert Ubuntu on WSL 1 to WSL 2
If you use WSL 1 you can upgrade an existing WSL 1 installation to WSL 2. To convert an existing WSL 1 distro to WSL 2 run the following in PowerShell, e..g,:
wsl.exe --set-version Ubuntu 2
You should replace ‘Ubuntu’ with the name of whichever distro your WSL 1 install runs.
Let me know if this guide worked for you in the comments!
- To install WSL2 on Windows 10, open Command Prompt as admin and run “wsl –install.”
- The command will install all the WSL2 components and the Ubuntu Linux distro.
- To install a specific distro, run “wsl –install -d DISTRO-NAME.”
- To update the WSL2 kernel, run the “wsl –update” command.
WSL2 (Windows Subsystem for Linux version 2) is a new version of the architecture that allows you to use Linux on top of Windows 10 natively (using a lightweight virtual machine) and replaces WSL.
The feature runs an actual Linux kernel in a virtual machine, which improves performance and app compatibility over the previous version while maintaining the same experience as the first release.
This guide will teach you the steps to install the Windows Subsystem for Linux 2 on Windows 10.
- Install WSL2 on Windows 10
- Install WSL2 on Windows 10 (older versions)
Microsoft has simplified the installation process of the WSL on Windows 10 to only one command that downloads and installs all the required components, including the virtual machine platform and Ubuntu Linux by default.
To install Windows Subsystem for Linux on Windows 10, use these steps:
-
Open Start on Windows 10.
-
Search for Command Prompt, right-click the top result, and select the Run as administrator option.
-
Type the following command to install the WSL on Windows 10 and press Enter:
wsl --install

-
Restart your computer to finish the WSL installation on Windows 10.
-
Continue with the Linux distro setup as necessary.

Once you complete the steps, the required Linux components will automatically install the latest version of the Ubuntu Linux distribution.
Install WSL with specific distro
To install WSL with a specific distro on Windows 10, use these steps:
-
Open Start.
-
Search for Command Prompt, right-click the top result, and select the Run as administrator option.
-
Type the following command to view a list of available WSL distros to install on Windows 10 and press Enter:
wsl --list --online
Quick note: At the time of this writing, you can install Ubuntu, Debian, Kali Linux, openSUSE, and SUSE Linux Enterprise Server.
-
Type the following command to install the WSL with a specific distro on Windows 10 and press Enter:
wsl --install -d DISTRO-NAME

Remember to replace “DISTRO-NAME” in the command with the distro’s name to install, such as Debian.
-
Restart your computer.
-
Continue with the Linux distro setup as necessary.

After you complete the steps, the Windows Subsystem for Linux 2 components will install with the distro of Linux you specified.
Update WSL kernel
To update the WSL kernel to the latest version on Windows 10, use these steps:
-
Open Start.
-
Search for Command Prompt, right-click the top result, and select the Run as administrator option.
-
Type the following command to update the WSL kernel and press Enter:
wsl --update


Once you complete the steps, if an update is available, it will download and install on the device.
If the update command doesn’t work, open Settings > Update & Security > Windows Update > Advanced options, and turn on the “Receive updates for other Microsoft products when you update Windows” toggle switch.
Install WSL2 on Windows 10 (older versions)
Alternatively, you can still install WSL on Windows 10 version 1909 and older versions using the legacy processes. The process requires enabling WSL1, the Virtual Machine Platform, converting existing distros (if applicable), and configuring the Windows Subsystem for Linux 2 as the new default for future distro installations.
If you have an ARM64 system, the Linux integration is supported on version 2004 and higher.
Enable Windows Subsystem for Linux
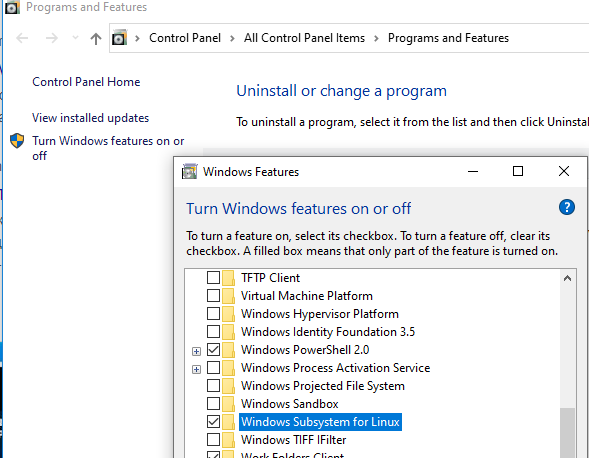
If you are not already using Linux on Windows 10, you must enable the Windows Subsystem for Linux (version 1) with these steps:
-
Open Start on Windows 10.
-
Search for Turn Windows features on or off and click the top result to open the app.
-
Check the “Windows Subsystem for Linux” option.

-
Click the OK button.
-
Click the Restart button.

Once you complete the steps, you must enable the Virtual Machine Platform feature.
Enable Virtual Machine Platform
To enable the Virtual Machine Platform on Windows 10, use these steps:
Important: The motherboard and processor must support virtualization, and the option has to be enabled on the Basic Input/Output System (BIOS) or Unified Extensible Firmware Interface (UEFI).
-
Open Start.
-
Search for PowerShell, right-click the top result, and select the Run as administrator option.
-
Type the following command to enable the Virtual Machine Platform feature and press Enter:
Enable-WindowsOptionalFeature -Online -FeatureName VirtualMachinePlatform

-
Restart your computer.

After you complete the steps, you can set the Windows Subsystem for Linux version 2 as the new default architecture and convert existing distros.
Enable Windows Subsystem for Linux 2
To start using WSL2 or covert WSL distros to WSL2, use these steps:
-
Download this WSL 2 kernel update (required).
-
Double-click the wsl_update_x64.msi file and apply the update.
-
Open Start.
-
Search for PowerShell, right-click the top result, and select the Run as administrator option.
-
Type the following command to set Windows Subsystem for Linux 2 your default architecture for new distros that you install, and press Enter:
wsl --set-default-version 2

-
(Optional) Type the following command to convert the distro from WSL to WSL 2 and press Enter:
wsl --set-version Ubuntu 2
In the command, change “Ubuntu” for the distro’s name you want to convert. If you do not know the distro’s name, use the
wsl -l -vcommand.


Once you complete the steps, your device will start using the new version of Windows Subsystem for Linux as the default architecture. (See video tutorial on the Pureinfotech YouTube channel.)
Confirm distro platform
To confirm distros are using the Windows Subsystem for Linux 2, use these steps:
-
Open Start.
-
Search for PowerShell, right-click the top result, and select the Run as administrator option.
-
Type the following command to verify the version of the distro and press Enter:
wsl --list --verbose
-
Confirm the distro version is 2.

After you complete the steps, you will know if the process was successful or if you need to troubleshoot any of the steps.
Windows Subsystem for Linux (WSL) — подсистема ОС Windows 10, позволяющая разработчикам, тестировщикам запускать нативные приложения Linux, писать скрипты, выполнять команды непосредственно из Windows. В обновлённой Windows 10 (2004) появилась 2я версия WSL, в которой используется полноценное ядро Linux с возможностью запуска приложений и контейнеров Docker, реализована высокая скорость загрузки, небольшой объем потребляемых ресурсов, управление в фоновом режиме, обновление ядра. Таким образом вы сможете запускать ELF64 программы, которые могут получать доступ к файловой системе Windows без использования сторонних порто (таких как Cygwin).
Образ ядра Linux (версия ядра 4.19) в Windows 10 представляет собой легкую виртуальную машину, для запуска которой не нужно ставить полноценную роль Hyper-V. Системные вызовы Linux транслируются на лету в вызовы Windows без использования эмулятора (в отличии от WSL1).
Изначально компонент WSL отключен. Чтобы его включить, вам необходимо зайти в Пуск -> Панель управления -> Программы и компоненты -> Включение и отключение компонентов Windows (Control PanelAll Control Panel ItemsPrograms and FeaturesTurn Windows features on or off), активировать галочку Подсистема Windows для Linux (Windows Subsystem for Linux), нажать кнопку ОК, и перезагрузить компьютер.
Вы можете включить компоненты WSL в Windows 10 с помощью dism:
dism.exe /online /enable-feature /featurename:VirtualMachinePlatform /all /norestart
dism.exe /online /enable-feature /featurename:Microsoft-Windows-Subsystem-Linux /all /norestart
или PowerShell
Enable-WindowsOptionalFeature -Online -FeatureName Microsoft-Windows-Subsystem-Linux
Enable-WindowsOptionalFeature -Online -FeatureName VirtualMachinePlatform
В Windows Server 2004 Semi-Annual Channel (SAC) для установки компонента WSL используется командлет Install-WindowsFeature:
Install-WindowsFeature -Name Microsoft-Windows-Subsystem-Linux
После этого также необходимо перезагрузить компьютер.
В настройка BIOS/UEFI компьютера должна быть включена поддержка аппаратной виртуализации: Intel VT (Intel Virtualization Technology) или AMD-V.
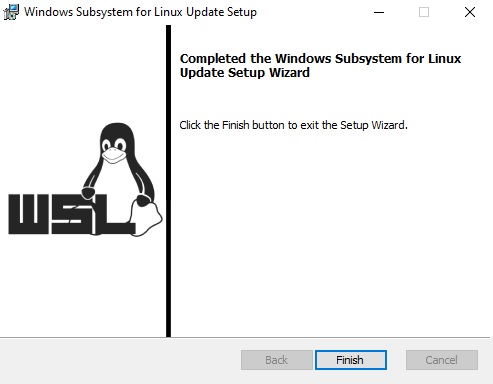
Теперь вам нужно выполнить обновление WSL до версии 2. Для этого требуется зайти на сайт https://docs.microsoft.com/ru-ru/windows/wsl/wsl2-kernel, скачать файл wsl_update_x64.msi, установить его. По завершении увидите картинку
Чтобы сделать WSL2 архитектурой по умолчанию для новых дистрибутивов, в PowerShell выполните команду:
wsl --set-default-version 2
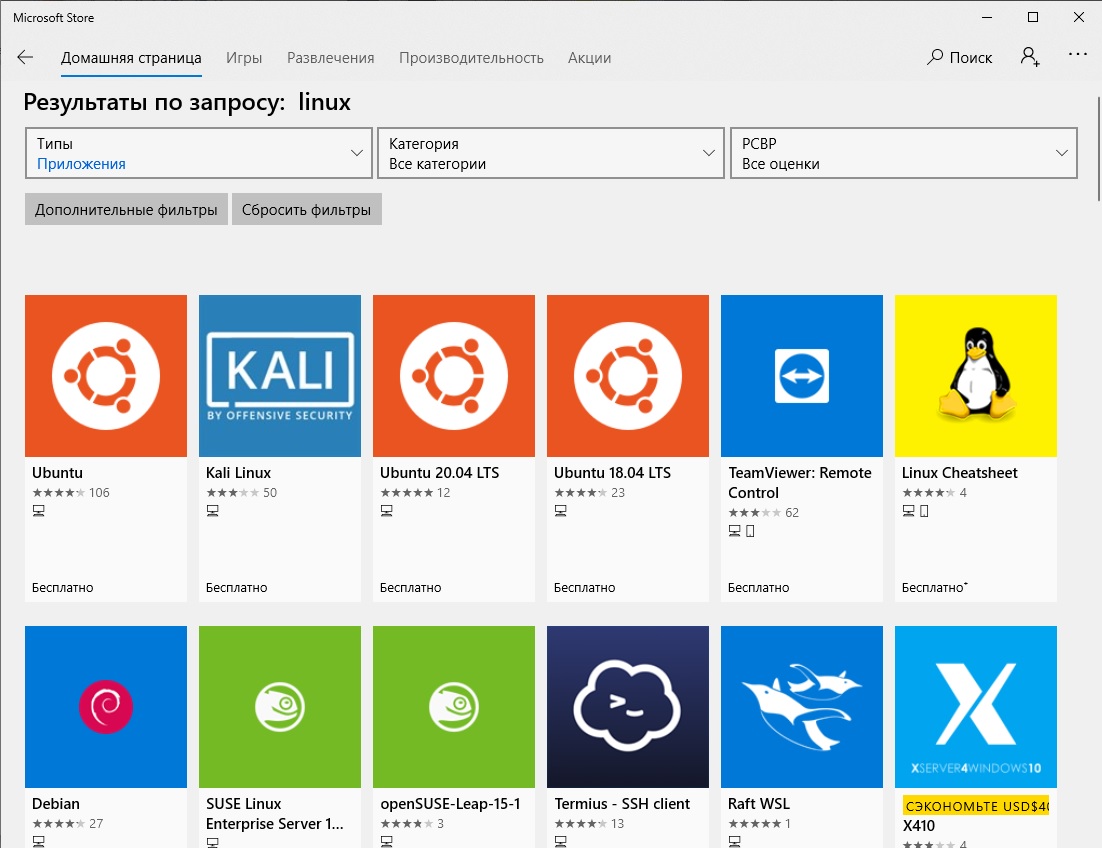
Далее вам необходимо открыть Microsoft Store, в поиске ввести слово “Linux”. В появившемся списке выберите нужный дистрибутив. Доступные Ubuntu, Debian, Kali Linux, Linux Cheatsheet, SUSE Linux Enterprise Server15, openSUSE Leap 15-1, Pengwin Enterprise, Fedora Remix for WSL или другие. В нашем примере мы будем использовать Ubuntu 20.04 LTS, нажмите кнопку Получить.
Если у вас отключен Windows Store или вы хотите установить дистрибутив WSL в Core редакции Windows Server, вы можете скачать дистрибутив Ubuntu с помощью PowerShell командлета Invoke-WebRequest:
Invoke-WebRequest https://aka.ms/wslubuntu2004 -OutFile ubuntu-2004.zip –UseBasicParsing
Распакуйте архив:
Expand-Archive -Path .ubuntu-2004.zip
Запустите установку образа Linux с помощью файла Ubuntu.exe.
Также вы можете скачать образ в виде appx файла и установить его с помощью командлета Add-AppxPackage.
После установки можно проверить используемую версию WSL с помощью команды
wsl --list –-verbose
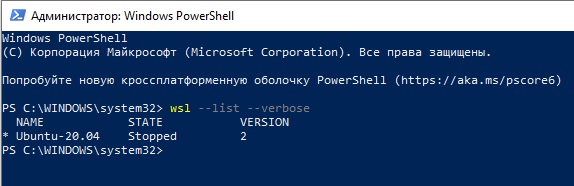
Если у вашей среды Linux указана версия 1, нужно изменить ее на WSL2 командой:
wsl --set-version Ubuntu-20.04 2
Файл жёсткого диска с образом виртуальной машины ОС Linux Ubuntu 20.04 будет располагаться в профиле пользователя: C:Users234AppDataLocalPackagesCanonicalGroupLimited.Ubuntu20.04onWindows_79rhkp1fndgscLocalState.
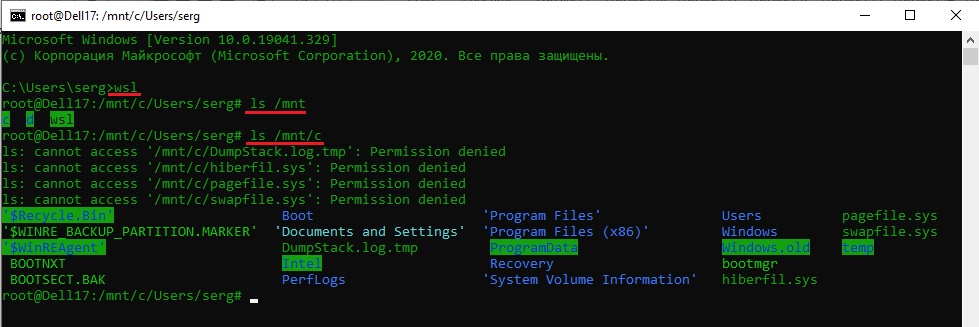
После установки дистрибутива в стартовом меню появляется ярлык на него. Для запуска Ubuntu зайдите в меню Пуск, нажмите на соответствующем ярлыке и получите в отдельном окне полноценную командную оболочку Bash. Запускать WSL можно и с помощью команды wsl. При первом запуске образа в командной строке Bash вам будет предложено создать пользователя и пароль (которые не должны совпадать с учётной записью Windows). Чтобы выполнять команды с правами root, необходимо использовать дополнительный ключ (префикс) sudo. В WSL есть общие команды для Bash и CMD, и тут нужно не забывать, что система Linux чувствительна к регистру.
Вы можете выполнить Linux-команды из CMD. Для этого необходимо вначале указать “WSL”. Например, для просмотра списка файлов и папок в каталоге Windows, выполните:
wsl
ls /mnt
ls/mnt/c
dir | wsl grep Sa
wsl ls ‑la > 123.txt
wsl ls ‑la /proc/cpuinfo
wsl ls ‑la “/mnt/c/Program Files”
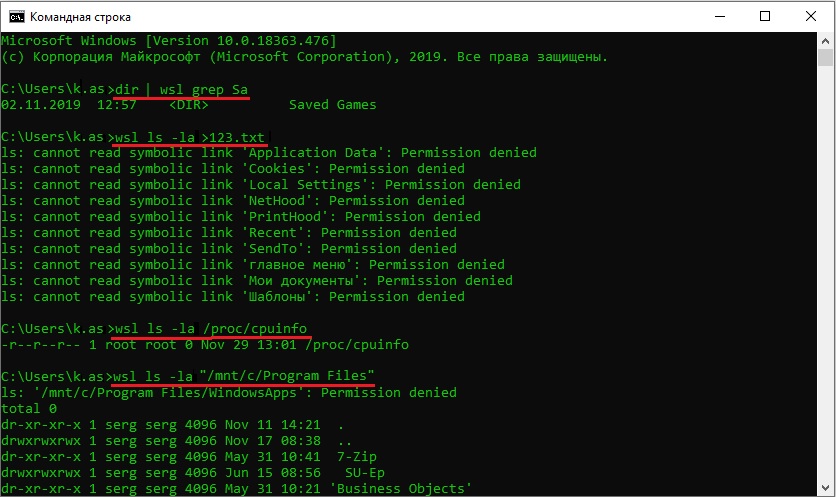
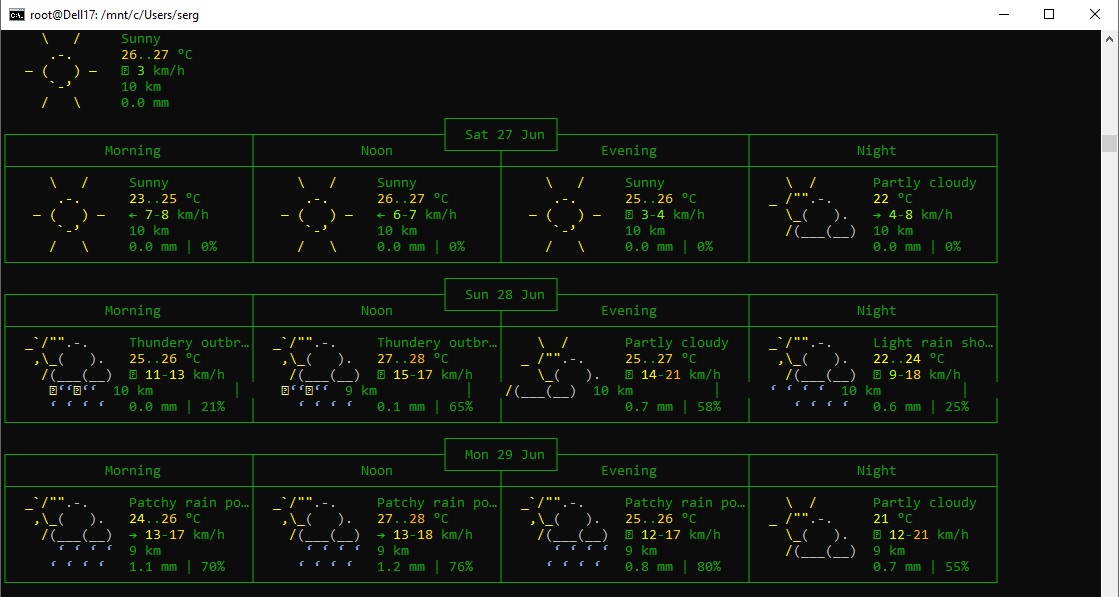
Также вы можете открыть проводник командой explorer.exe, калькулятор – calc.exe, блокнот – notepad.exe, paint – mspaint.exe, календарь – cal, погоду – curl wttr.in
Ещё один пример взаимосвязи 2х систем – вы можете открыть в Windows файл из WSL-дистрибутива по сетевому пути. Для этого в CMD наберите путь к файлу:
notepad \wsl$Ubuntu-20.04home1122.txt
Из окна консоли вы можете обновить список пакетов в Ubuntu с помощью команд:
sudo apt-get update
sudo apt-get upgrade
После обновления Ubuntu папка …/LocalState будет занимать 1.5 Гб.
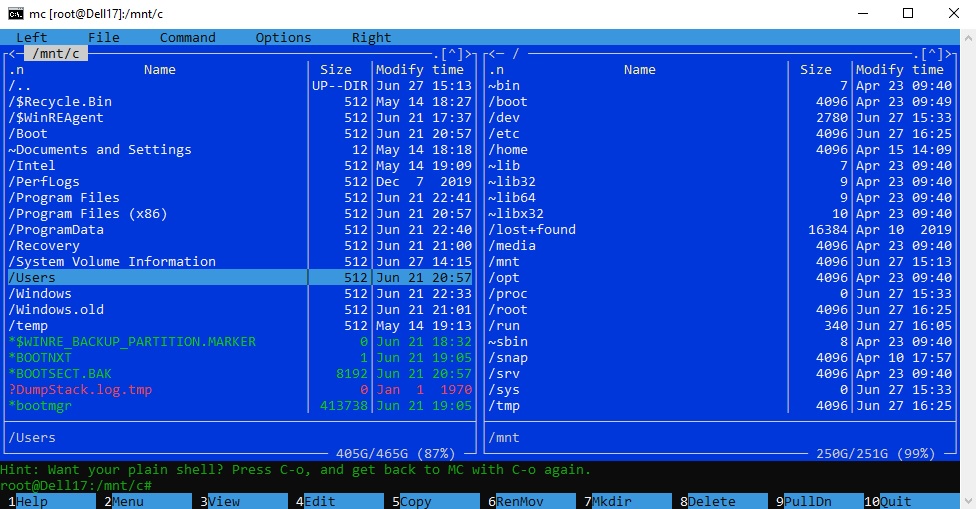
Из командной строки Linux можно не только просмотреть Windows-файлы и каталоги, но и получить к ним доступ. Чтобы удобнее копировать файлы, просматривать директории и их содержимое, установите файловый менеджер Midnight Commander с помощью команды
sudo apt-get install mc
Вы можете запустить Midnight Commander как в командной оболочке Bash, так и внутри CMD. На скриншоте ниже показано, что в двух панелях MC показывается список файлов с обеих ОС.
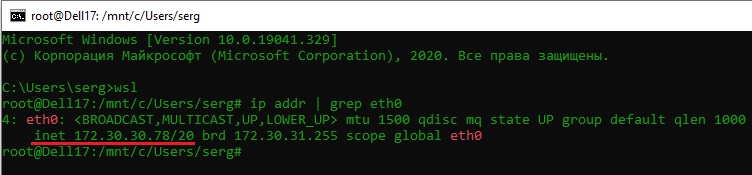
Можно отобрахить сетевые настройки (IP адрес) IP-адрес Linux-системы:
ip addr | grep eth0
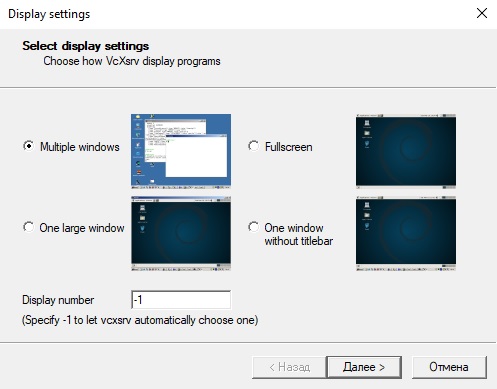
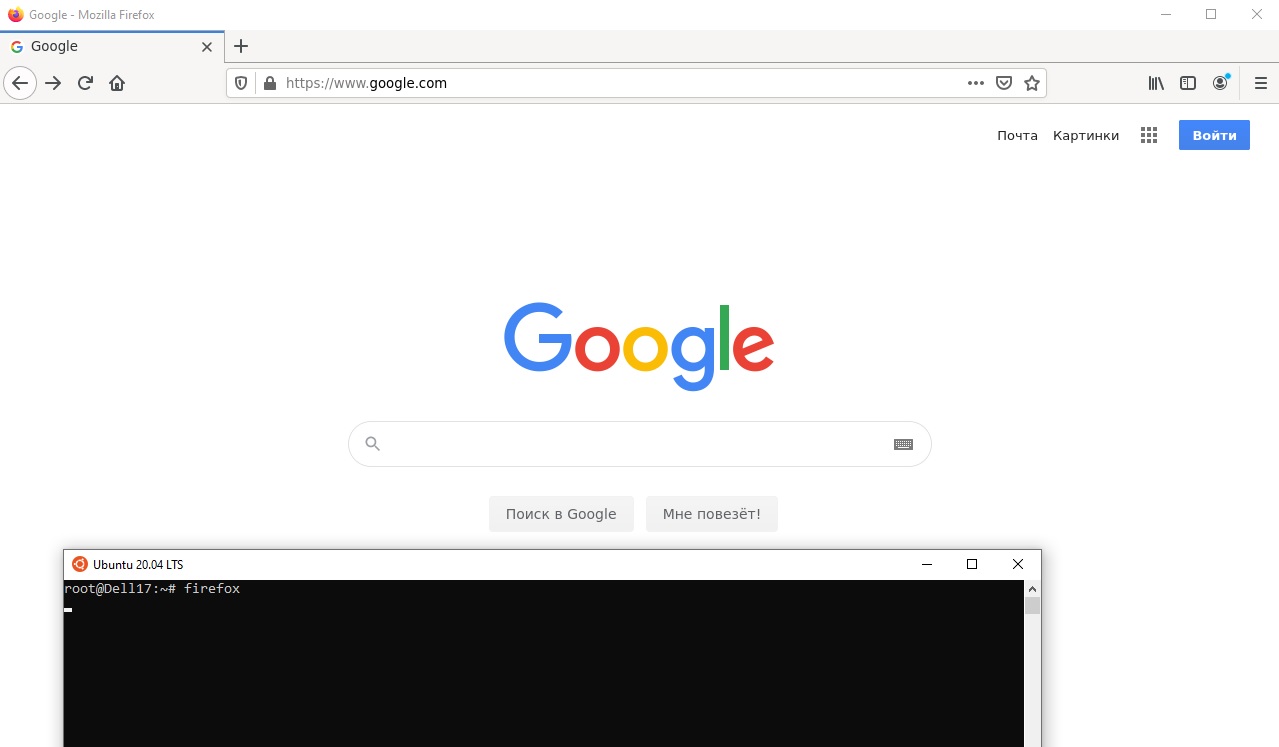
В WSL не предусмотрена работа приложений с графическим интерфейсом. Тем не менее вы можете попробовать их установить и использовать. Чтобы запускать графические приложения в Linux, нужно скачать и установить в Windows программу VcXsrv Windows X Server (https://sourceforge.net/projects/vcxsrv/).
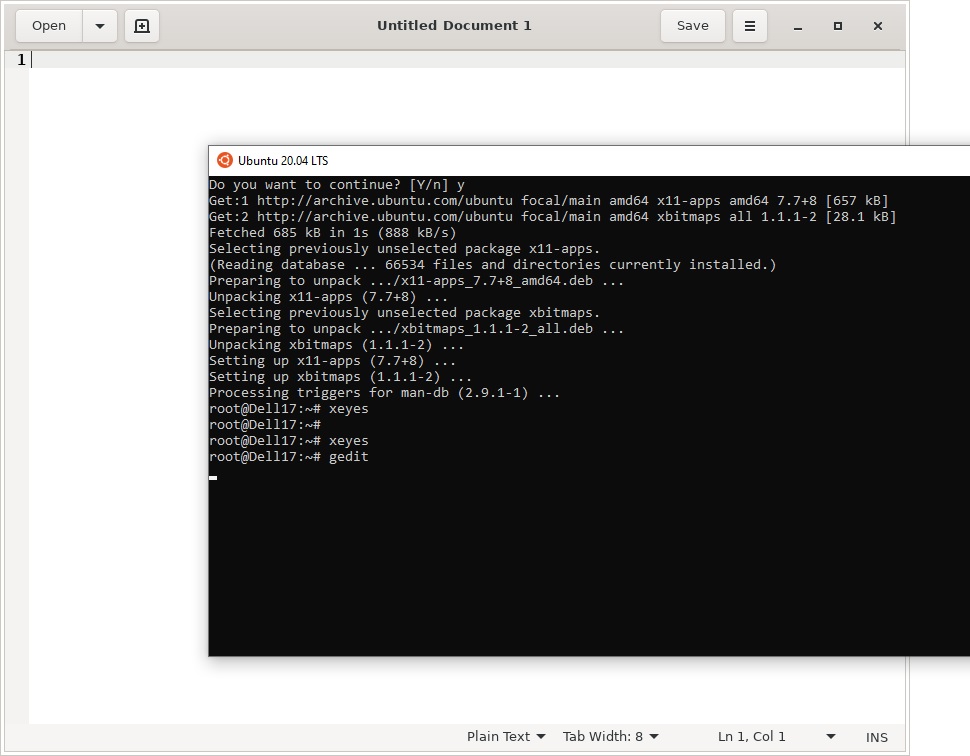
С помощью пакетного менеджера apt-get установим несколько графических программ: например, браузер, текстовый редактор или что-то ещё:
sudo apt-get install gedit
sudo apt-get install firefox
sudo apt-get install x11-app
Затем создайте файл в директории root:
cd /~
vim .bash_login
впишите строку
export DISPLAY=$(cat /etc/resolv.conf | grep nameserver | awk '{print $2}'):0
сохраните запись
Esc -> :wr -> :q
Теперь можете запустить графические программы Linux через WSL командами:
firefox
или
gedit
Вы можете установить в Windows 10 несколько дистрибутивов Linux и запускать одновременно в разных окнах WSL. Вывести весь перечень установленных дистрибутивов можете с помощью команды:
wsl --list –all
чтобы завершить работу всех запущенных дистрибутивов и ядра WSL 2, выполните команду:
wsl --shutdown
Содержание
- Вариант 1: Установка в полуавтоматическом режиме
- Шаг 1: Выбор доступных дистрибутивов Linux
- Шаг 2: Запуск инсталляции
- Вариант 2: Установка в ручном режиме
- Шаг 1: Предварительная настройка системы
- Шаг 2: Загрузка и настройка ядра WSL2
- Шаг 3: Выбор и инсталляция дистрибутива Linux
- Вопросы и ответы

Вариант 1: Установка в полуавтоматическом режиме
Установка WSL в операционной системе Windows осуществляется посредством выполнения специальных команд в консоли. Для этого потребуется предварительно определиться с дистрибутивом Linux, а затем запустить процесс его инсталляции.
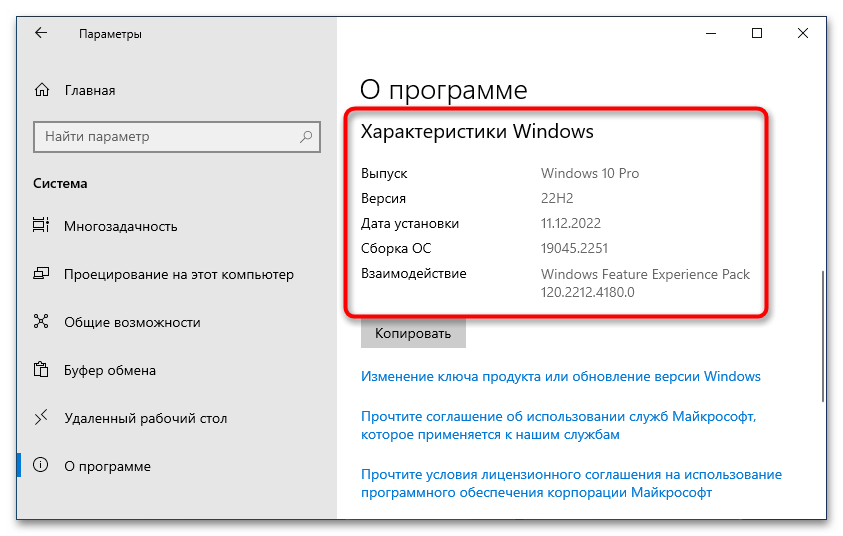
Важно! Приведенная ниже инструкция может быть выполнена только при условии использования Windows 10 версии 2004 (19041) и более новых. Узнать эту информацию можно в свойствах системы. Этой теме на нашем сайте посвящена отдельная статья, при необходимости ознакомьтесь с ней, перейдя по ссылке ниже.
Подробнее: Как узнать версию Windows 10
Шаг 1: Выбор доступных дистрибутивов Linux
Каждому пользователю актуальной версии Windows 10 предоставляется возможность вручную выбрать дистрибутив Linux, который будет использоваться в WSL2. Для просмотра списка доступных систем необходимо ввести специальную команду в консоль, поэтому предварительно запустите «Командную строку» с правами администратора. Сделать это можно множеством способов, например посредством поискового запроса, как показано на изображении ниже.
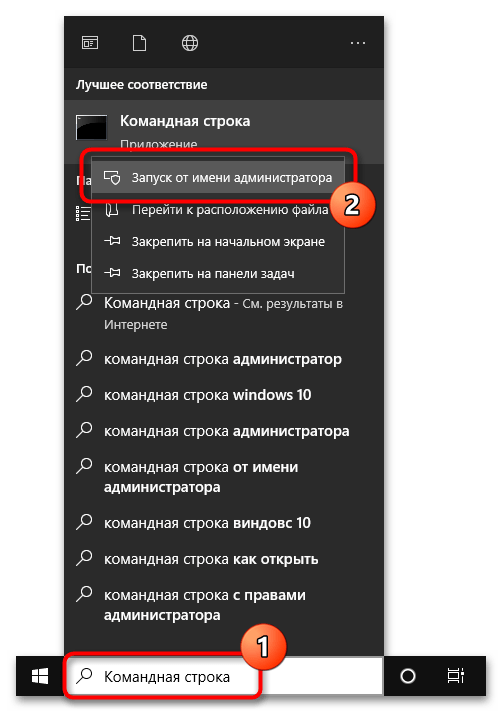
Читайте также: Как открыть «Командную строку» от имени администратора в Windows 10
Примечание! По умолчанию всегда выбрана последняя версия дистрибутива Ubuntu. Если именно его вы и хотите установить, то пропустите этот шаг и переходите сразу ко второму.
После того как окно консоли будет открыто, впишите или вставьте в него одну из нижеприведенных команд, после чего нажмите клавишу Enter:
wsl --list --online или wsl -l -o
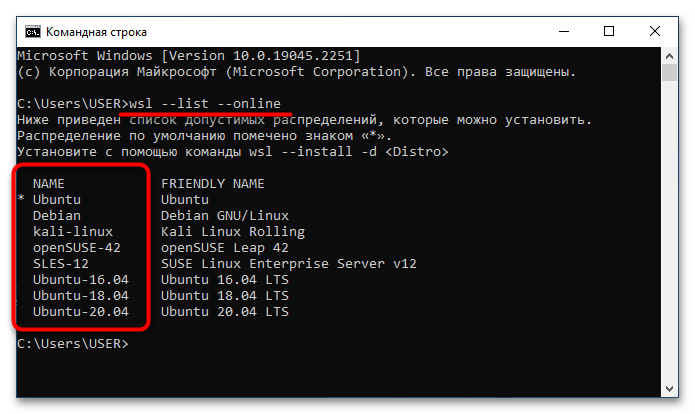
В результатах выдачи будет приведен список всех доступных дистрибутивов Linux. На этом этапе вам необходимо запомнить или скопировать в буфер обмена название, которое находится в столбце «NAME».
Обратите внимание! Если в списке доступных дистрибутивов нет желаемого, его можно импортировать в WSL2 посредством файла TAR или APPX. При необходимости есть возможность создать собственный дистрибутив на базе ядра Linux. Эти процессы описываются в официальной документации Microsoft, при необходимости ознакомиться с ними можно, воспользовавшись ссылками ниже.
Импорт любого дистрибутива Linux для использования с WSL
Создание пользовательского дистрибутива Linux для WSL

Шаг 2: Запуск инсталляции
После того как версия дистрибутива Linux для WSL2 была выбрана, можно переходить непосредственно к ее инсталляции. Делается это тоже в «Командной строке», для чего нужно воспользоваться приведенной ниже командой. Не забудьте после ее ввода нажать клавишу Enter.
wsl --install -d <НазваниеДистрибутива>
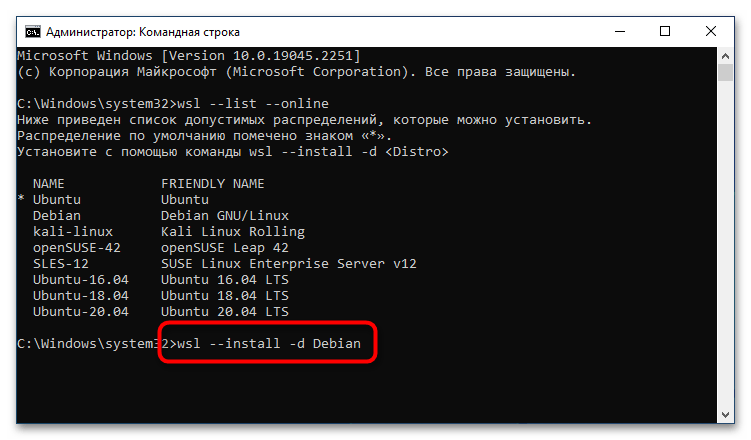
Примечание! Если вы хотите установить версию по умолчанию, тогда нет необходимости прописывать название дистрибутива вручную, можно воспользоваться следующей командой:
wsl —install
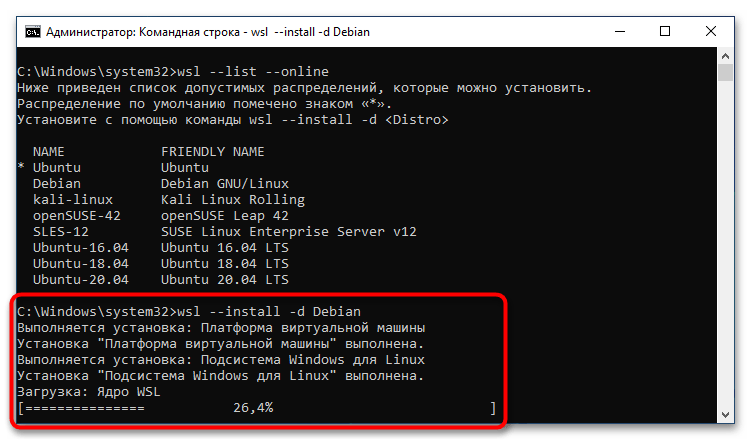
Сразу после этого начнется процесс установки платформы виртуальной машины, затем инсталлируется «Подсистема Windows для Linux», а в завершение будет выполнена загрузка ядра WSL2.
После всех этих процедур можно будет воспользоваться WSL2 для вызова подсистемы Linux. Для этого достаточно будет запустить установленный дистрибутив через меню «Пуск».
Вариант 2: Установка в ручном режиме
Если версия вашей операционной системы Windows 10 ниже 2004 (19041), тогда воспользоваться вышеприведенной инструкцией не получится и большинство действий придется выполнять вручную.
Шаг 1: Предварительная настройка системы
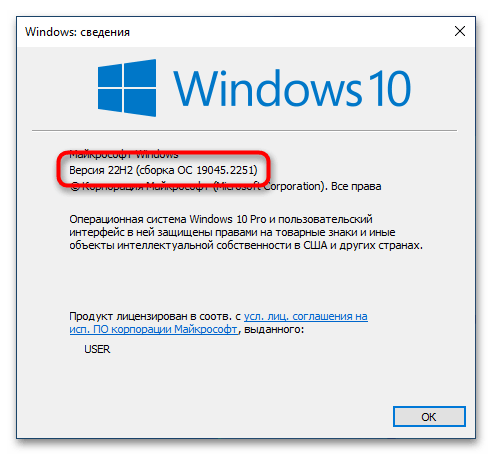
Первостепенно необходимо проверить, поддерживает ли установленная версия операционной системы обновление WSL до второй версии. Сделать это можно посредством вызова окна «Windows: сведения». Для этого нажмите сочетание горячих клавиш Win + R, впишите в поле запроса команду winver и нажмите клавишу Enter.

Появится соответствующее окно, в котором будет указана версия операционной системы и ее сборка. Убедитесь, что она выше 1903 (18362). Если это так, можете продолжить выполнение этой инструкции, в противном случае попробуйте прежде обновить Windows 10 до актуальной версии.
Читайте также: Как обновить Windows 10 до последней версии
Важно! Если ваш компьютер работает на процессоре с архитектурой ARM64, этот способ установки WSL2 не подойдет. Обновитесь до последней версии Windows 10 и воспользуйтесь ранее предоставляемой инструкцией.
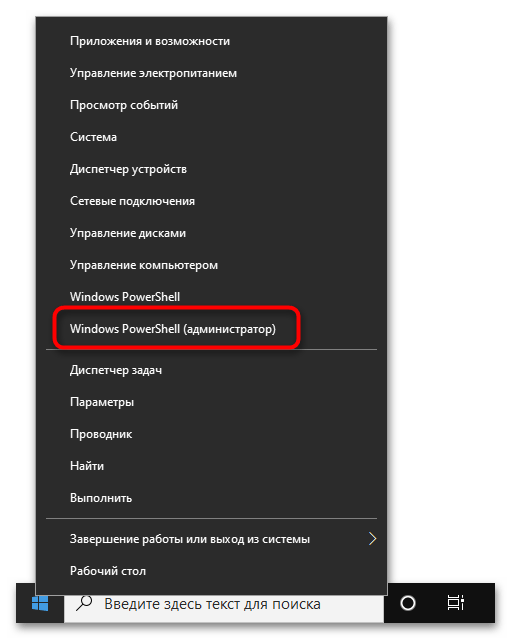
После того как вы удостоверились в актуальности версии операционной системы, необходимо произвести ее предварительную настройку, а именно — включить «Подсистему Windows для Linux» и компонент виртуальных машин. Делается это в оболочке PowerShell, поэтому предварительно запустите ее с правами администратора. Проще всего сделать это через контекстное меню кнопки «Пуск», как показано на изображении ниже. Но это не единственный способ.
Подробнее: Как открыть PowerShell в Windows 10
Теперь необходимо включить компонент «Подсистема Windows для Linux». Для этого скопируйте и вставьте в окно консоли PowerShell следующую команду, после чего нажмите Enter:
dism.exe /online /enable-feature /featurename:Microsoft-Windows-Subsystem-Linux /all /norestart
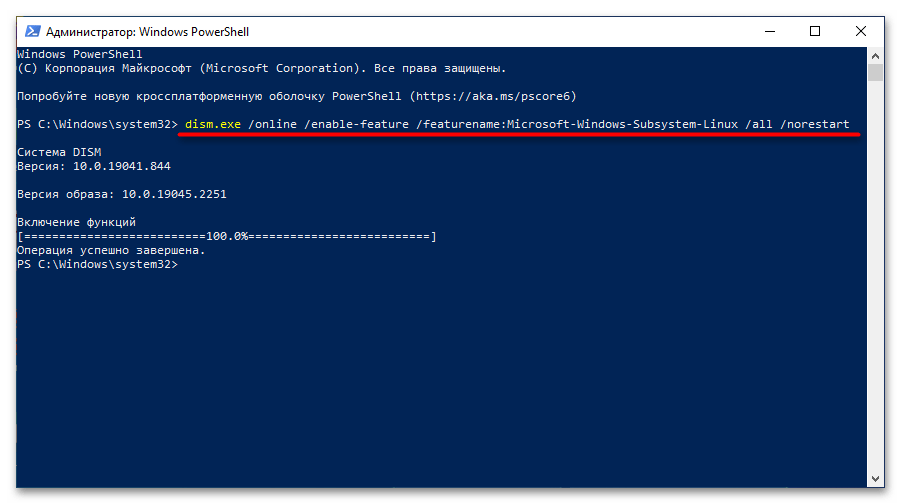
Ожидайте завершения процедуры, когда на экране появится приглашение к вводу новой команды. После этого включите компонент виртуальных машин. Это делается посредством нижепредставленной команды:
dism.exe /online /enable-feature /featurename:VirtualMachinePlatform /all /norestart
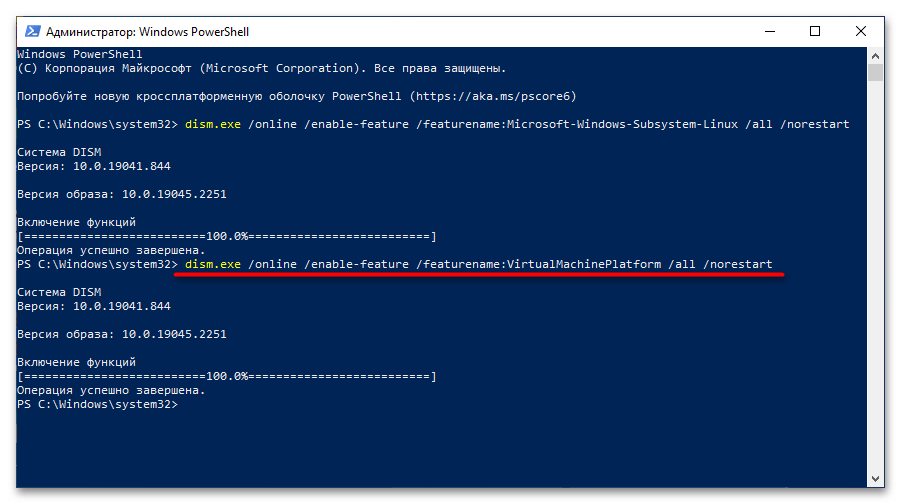
Важно! Если результатом ее выполнения является ошибка, потребуется предварительно включить виртуализацию. Делается это через BIOS, но сначала следует проверить статус этой функции в операционной системе. На нашем сайте есть отдельные статьи, посвященные этой теме.
Подробнее:
Как проверить, включена ли виртуализация в Windows 10
Как включить виртуализацию в BIOS

После того как компонент виртуальных машин будет установлен, потребуется перезагрузить компьютер.
Шаг 2: Загрузка и настройка ядра WSL2
Следующим шагом будет загрузка и установка ядра второй версии WSL, но изначально нужно определить архитектуру процессора, на которой работает операционная система. Для этого вызовите окно «Командной строки», в котором выполните следующую команду:
systeminfo | find "Тип системы"
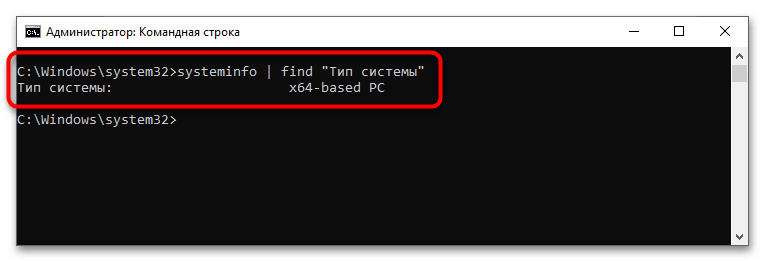
В результатах выдачи будет указана архитектура процессора. Если упоминается x64, скачайте пакет обновления ядра Linux в WSL2 для 64-разрядных компьютеров на базе процессора x86. Если в результатах выдачи есть упоминание ARM64, загрузите пакет обновлений по этой ссылке. Сохраните файл в любое удобное место, после чего запустите его, дважды кликнув по названию. Далее следуйте инструкции инсталлятора, пока не будет произведена установка.

Теперь необходимо выбрать WSL2 версией по умолчанию, чтобы при установке дистрибутивов Linux они инсталлировались в этом окружении. Для этого достаточно в окне PowerShell выполнить представленную ниже команду:
wsl --set-default-version 2
Шаг 3: Выбор и инсталляция дистрибутива Linux
Как только все необходимые компоненты будут установлены, можно переходить к выбору дистрибутива Linux для инсталляции в окружении WSL2. В отличие от первого способа, представленного в этой статье, все действия будут выполняться не в «Командной строке», а в Microsoft Store. Для удобства ниже приведен список доступных систем со ссылками на них:
- Ubuntu 18.04 LTS
- Ubuntu 20.04 LTS
- Ubuntu 22.04 LTS
- openSUSE Leap 15.1
- SUSE Linux Enterprise Server 12 SP5
- SUSE Linux Enterprise Server 15 SP1
- Kali Linux
- Debian GNU/Linux
- Fedora Remix for WSL
- Pengwin
- Pengwin Enterprise
- Alpine WSL
- Raft (пробная версия)
Воспользуйтесь нужной ссылкой, чтобы перейти в магазин приложений от Microsoft. Находясь на странице нужного дистрибутива, щелкните по кнопке «Получить», расположенной рядом с его названием.
Дождитесь завершения загрузки, после чего кликните по появившейся кнопке «Открыть». Запустится окно консоли, в котором будет предложено подождать несколько минут, пока идет распаковка дистрибутива. В дальнейшем процедура инициализации ядра Linux будет занимать считанные секунды.
Примечание! Представленный выше список дистрибутивов взят с официального сайта Microsoft и может со временем измениться. В случае необходимости рекомендуем обратиться за справкой непосредственно к статье-первоисточнику.
If you are like me and you love working with Linux, but you also want to be able to use Windows for gaming and other Windows-exclusive applications – there is a solution for you – it’s called WSL2, or Windows Subsystem (for) Linux. In this tutorial, I show you exactly how to install WSL2 on Windows, and I show you a couple of my favorite tips & tricks to make your WSL2 experience even better.
Table of Contents
- What is WSL2 used for?
- Is WSL2 better than VirtualBox?
- Is WSL2 Real Linux?
- How do I install WSL2 on Windows? Two Different Ways
- Install WSL2 on Windows – The Easiest Way
- Step 1 – Open PowerShell in Admin Mode
- Step 2 – Install WSL2 using PowerShell
- Step 3 – Initial Ubuntu Setup
- Install WSL2 on Windows – The Manual Way
- Step 1 – Enabling the WSL Feature
- Step 2 – WSL2 Requirements
- Step 3 – Enabling the Virtual Machine Feature of Windows
- Step 4 – Updating the Linux Kernel
- Step 5 – Setting WSL2 as our Default WSL Version
- Install Windows Terminal for WSL2
- Configure Windows Terminal for WSL2
- Conclusion
What is WSL2 used for?
I had been playing around with WSL1 back when it came originally came out, and I already liked it, but it was missing some essential features that I needed to use as a daily driver (like the capability of running network-based things like Nmap).
That way, I was still required to use Linux for my Ethical Hacking endeavors, but all of that changed once WSL2 came out. WSL2 was not only capable of running everything that you could run on a bare-metal Linux distribution, but it was also much, much faster than WSL1.
As soon as I started using WSL2 for both Penetration Testing and Programming, I never booted up an actual Linux Distribution (apart from creating tutorials for certain distributions for this blog) anymore. I fully switched over to WSL2 instead of using Virtual Machines or Bare-Metal.
The seamless integration to something like Visual Studio Code makes it an awesome tool for developing software or web applications on your Windows PC while at the same time utilizing blazing-fast development environments on WSL2. You can even run the WSL2 terminal directly out of Visual Studio Code, a feature that I learned to love a lot.
Now you probably got a grasp of why I really like WSL2. I know that a lot of people still struggle to wrap their heads around how WSL2 works and if it is a good solution for your programming or penetration testing needs (Spoiler Alert: It is!).
This is the reason why I decided to create this tutorial where I will show you how to install WSL2 on Windows. We’ll take it step-by-step as always. This is just the first article of what is probably going to be a mini-series in which I will show you my favorite WSL2 tips & tricks.
Is WSL2 better than VirtualBox?
WSL2 is a new version of the Windows Subsystem for Linux that brings significant performance improvements and is now available on all editions of Windows. WSL2 is based on a new architecture that uses a real Linux kernel and provides better compatibility with Linux applications than WSL1.
WSL2 also supports GPU acceleration for better performance and can be used to run Docker containers natively. In terms of raw performance, WSL2 is significantly faster than VirtualBox and offers better compatibility with Linux applications. WSL2 is the recommended option for running Linux on Windows and is available on all editions of Windows 10 and 11.
Is WSL2 Real Linux?
Recently, there were some discussions about whether Windows Subsystem for Linux 2 is “real” Linux. While it is true that WSL2 is not a traditional Linux system, it is also not simply a compatibility layer. Instead, WSL2 provides a full Linux kernel that is integrated into the Windows operating system. This kernel is used to run Linux binaries, and it provides all of the standard Linux system calls.
In addition, WSL2 supports many of the same features as a traditional Linux system, including file permissions and networking. As a result, WSL2 can be considered a real Linux system.
⚠️This is a Tutorial Series⚠️
Part 1 – How to install WSL 2 with Windows Terminal – Complete Guide
Part 2 – Windows Terminal Customization for WSL 2
Part 3 – In-Depth Windows Terminal Customization for WSL2
How do I install WSL2 on Windows? Two Different Ways
There are two ways to go about this. There is an easy way, and there is a long way.
If you are running Windows 10 version 2004 Build 19041 or higher, or Windows 11 for that matter, things are really easy.
To find out which Windows version you are running, simply press the Windows Key + R and type in winver and select OK.
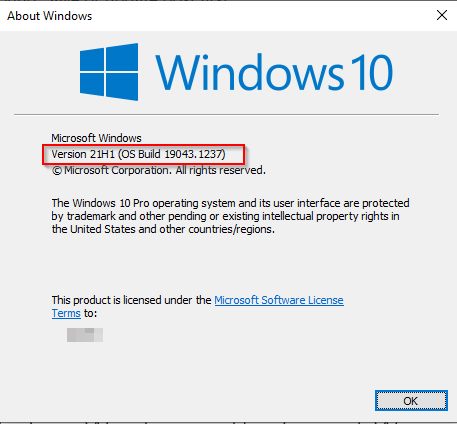
If you do run a lower version of Windows and can’t upgrade out for some reason, there are alternative steps below for you. Either way, I recommend you keep your Windows version Up-To-Date and simply follow along the easy way. Also, your system will be more secure!
Install WSL2 on Windows – The Easiest Way
As mentioned above, this is the easy way.
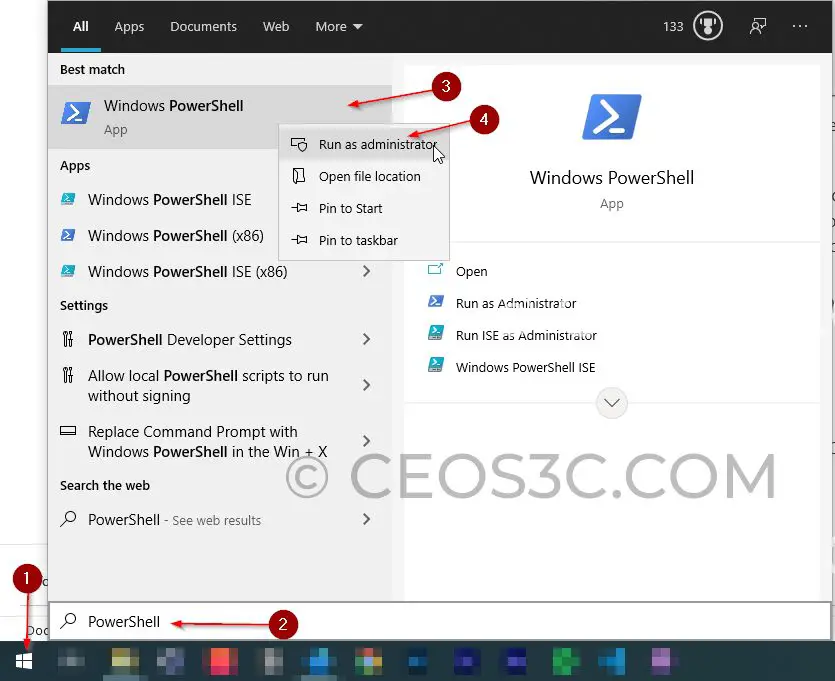
Step 1 – Open PowerShell in Admin Mode
Press your Windows Key and type “PowerShell” -> Right-Click PowerShell and select Open As Administrator.
Step 2 – Install WSL2 using PowerShell
This way of doing it will automatically install and set up everything you need to run WSL2. It will automatically enable the required components on Windows, download the latest Linux kernel for you, and it will also set WSL2 as your default version.
The official Microsoft documentation states that running:
Code language: PowerShell (powershell)
wsl --install
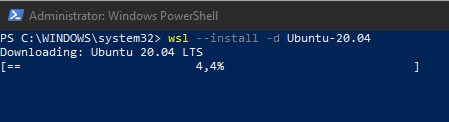
It would be enough to get the process started and, at the same time, install Ubuntu as the default WSL2 distribution. However, this did not work for me. I needed to choose which distribution I wanted to install manually.
To do this, type:
Code language: PowerShell (powershell)
wsl --list --online
And choose the flavor of your choice. In my case, I want to install Ubuntu-20.04, so I run the following command:
Code language: PowerShell (powershell)
wsl --install -d Ubuntu-20.04
Which starts the whole process.
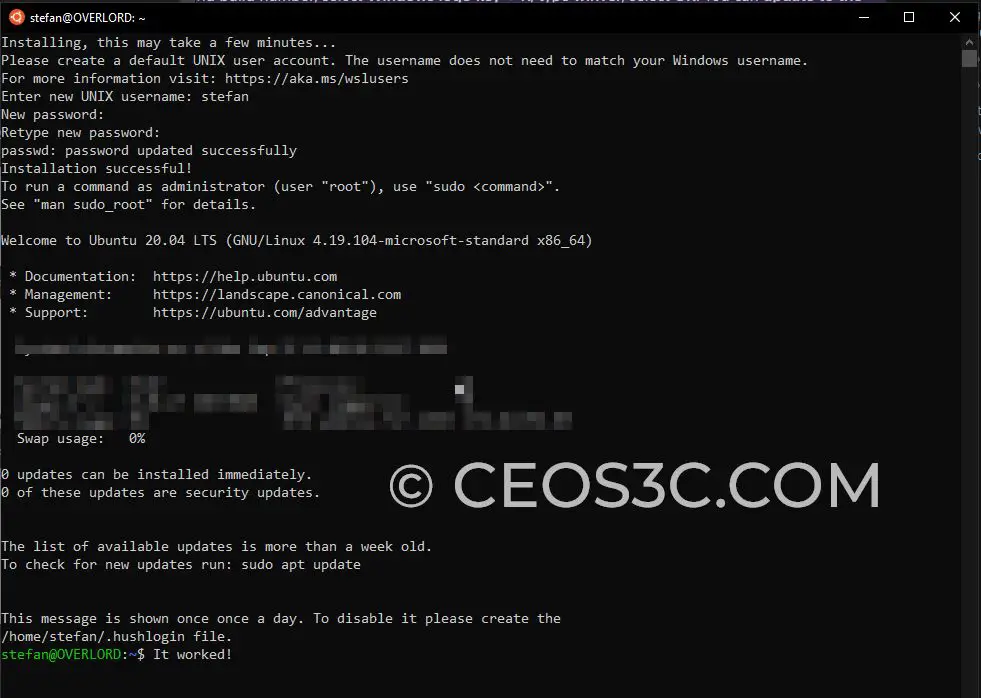
Step 3 – Initial Ubuntu Setup
Now, there is a chance that you will be prompted to restart your computer first so that all WSL2 features can be activated.
After that (or before, depending on the case), you will be required to set up your Ubuntu installation with a Username and Password, and once you set that up, your Ubuntu is ready to be used on WSL2.
To check if your Ubuntu is really running on WSL2, simply switch back to PowerShell and type:
Code language: PowerShell (powershell)
wsl --list --verbose
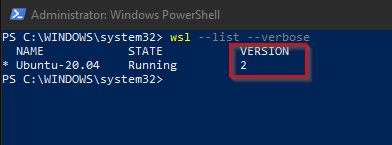
As you can see, everything went as expected! And that is how easy it is to install WSL2 with the latest versions of Windows!
Install WSL2 on Windows – The Manual Way
As I had previously stated, this is the more laborious way of doing things, but if you can’t upgrade Windows to the latest version for some reason, this is the way to go.
Step 1 – Enabling the WSL Feature
To Install WSL2 the manual way, we need to do a bunch of steps that are automatically done for us in the method above but don’t worry. I’ll guide you through.
Same as above, open PowerShell by pressing the Windows key and typing PowerShell, then right-clicking PowerShell and selecting Run as administrator.
Now we need to enable the WSL feature by typing
Code language: PowerShell (powershell)
dism.exe /online /enable-feature /featurename:Microsoft-Windows-Subsystem-Linux /all /norestart
Step 2 – WSL2 Requirements
There are a bunch of requirements you need to meet to be able to install WSL2. Some of them are:
- Windows version 1903 or higher with build version 18362 or higher.
- Builds below build version 18362 will not support WSL2.
Step 3 – Enabling the Virtual Machine Feature of Windows
To be able to install WSL2 on Windows, we first need to enable the Virtual Machine Platform feature, which we can achieve by typing another command into PowerShell:
Code language: PowerShell (powershell)
dism.exe /online /enable-feature /featurename:VirtualMachinePlatform /all /norestart
Once you are done with this, go ahead and restart your computer now.
Step 4 – Updating the Linux Kernel
Next up, we need to download an updated version of the Linux Kernel. You can do this directly from Microsoft’s Official Source. After downloading it, just run the installer.
Step 5 – Setting WSL2 as our Default WSL Version
Now we want to type another final command into PowerShell to make sure that we default to WSL2 whenever we are going to install a new Linux distribution from the Microsoft Store (or manually via PowerShell).
Simply type:
Code language: PowerShell (powershell)
wsl --set-default-version 2
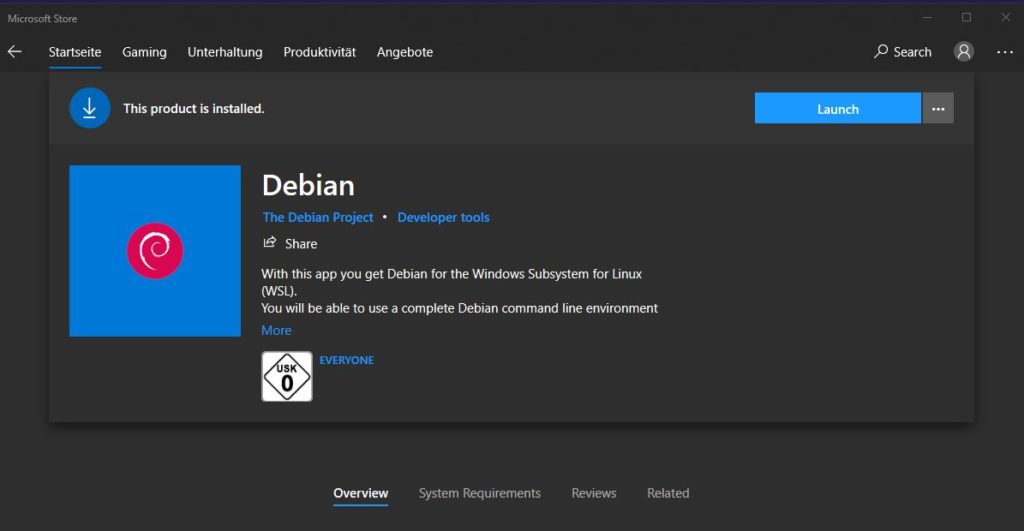
For good measure, we are going to open the Microsoft Store, and we are going to try to download Debian, and then we will check if it, in fact, defaults to WSL2.
Simply press the Windows key and type Store to find and open the Microsoft Store.
Here, search for Debian (or whatever distribution you want to install) and press Get and then Install.
Once the installation is finished, we can use PowerShell once again to check the WSL version of our freshly installed Debian by typing:
Code language: PowerShell (powershell)
wsl --list --verbose
And we can confirm that Debian was installed using WSL2 per default.

That completes the manual way of installing WSL2.
Install Windows Terminal for WSL2
Let’s be frank here, the default terminal that ships with WSL2 and all of its distributions simply sucks. It just comes with the bare minimum when it comes to features, and it also really likes to play this annoying beeping sound every time you enter a wrong command.
Gladly, Microsoft gave us a better tool for that: Windows Terminal.
It’s completely free, and it’s awesome. It’s been my daily driver for the past two years, and they kept developing it, and new features come out all the time.
If you are serious about using WSL2, I highly recommend installing Windows Terminal as well.
To do that, just go to the Microsoft Store once again and search for Windows Terminal.
Click on Get and then on Install to install Windows Terminal.
Once installed, simply launch it by clicking on Launch directly in the Windows Store, or press your Windows key and search for Windows Terminal (Pro-tip: Right-click Windows Terminal and select “Pin to Taskbar” for Quick Access).
Configure Windows Terminal for WSL2
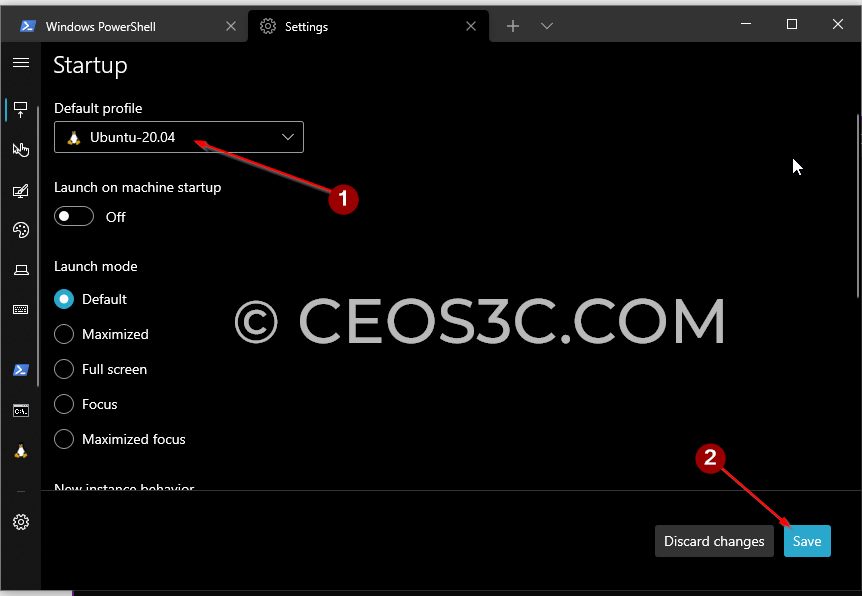
Windows Terminal launches PowerShell by default. Since we want to use Windows Terminal with WSL2, we need to change the default settings and tell Windows Terminal to automatically start up our Linux distribution.
You can also change distributions on the fly by clicking on the drop-down arrow:

Through that same menu, you are able to access the Windows Terminal Settings, which we are going to do next.
Click on the arrow-dropdown menu and then select Settings.
Once in there, change the Default profile from Windows PowerShell to the Linux flavor of your choice and click on Save.
The next time you start Windows Terminal that is what you will get:
I encourage you to click through the other options of Windows Terminal to check if you see something interesting, like increasing the font size or something along those lines.
There are a ton of customization options already implemented that are worthwhile to check out.
I will create a separate article that will cover Windows Terminal customization in-depth. (If you want to get my slick, transparent-background terminal stay tuned for that!).
Conclusion
If you came here to just install WSL2, you should have gotten a few extras on top if you made it until here.
In all seriousness, I really learned to love WSL2, especially in combination with Windows Terminal. It’s my daily driver for programming, web development, and penetration testing. I love this combination.
Stay tuned for the next article (bookmark this blog or sign up for the newsletter to get informed when that drops) where we will talk more about Windows Terminal Customization. We will make the terminal super beautiful and learn how to install new fonts and also ZSH.
Let me know in the comments below if this tutorial was clear enough and, of course, if it worked out for you!
⚠️Related Articles
Part 1 – How to install WSL 2 with Windows Terminal – Complete Guide
Part 2 – Windows Terminal Customization for WSL 2
Part 3 – In-Depth Windows Terminal Customization for WSL2
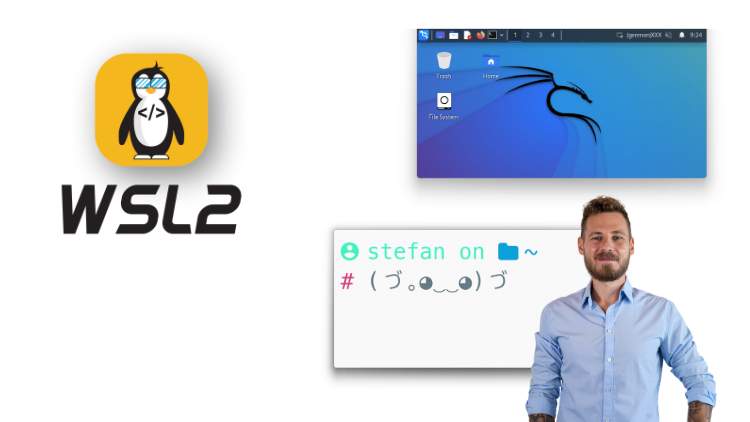
Stefan
Stefan is the founder & creative head behind Ceos3c.
Stefan is a self-taught Software Engineer & Cyber Security professional and he helps other people to learn complicated topics.