In this guide, we will show you the steps to fix the Unable to start Windows Subsystem for Android error. The ability to run Android apps on the PC was always among the most requested features by the tech enthusiast. So when the Redmond giants announced that they were adding the Windows Subsystem for Android in the latest OS build, it managed to receive quite a few positive receptions.
While its release got slightly delayed, it’s now finally available for the beta testers (yes, for the beta tester and not for the developer preview users!). As a result, you could now easily install your preferred Android games, sideload the desired APKs, or even install the Play Store onto your Windows 11 PC. But since the feature is currently in the beta stage, a few bugs and issues are imminent.
Among them, “Unable to start Windows Subsystem for Android” is one of the most common errors that users are currently facing. If you are also getting bugged with this issue, then fret not. In this guide, we will make show you the steps to rectify this issue once and for all. So without further ado, let’s get started.
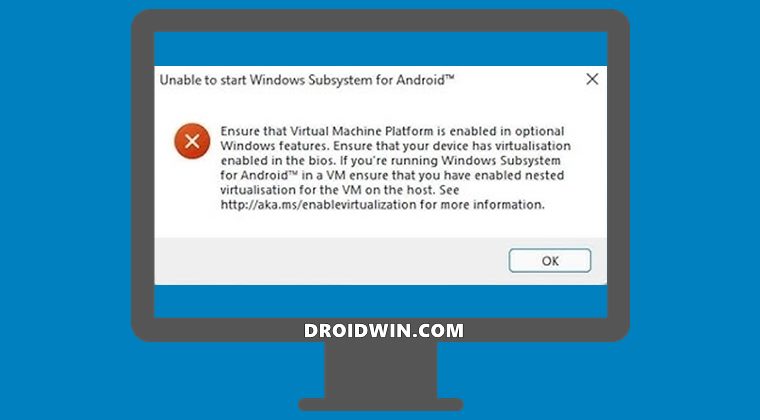
The aforementioned error accompanies the following error message: Ensure that Virtual Machine Platform is enabled in optional Windows features. This message is popping up as and when users are trying to launch Windows Subsystem for Android. So what is the plausible explanation for this error? Well, it is happening because Virtualisation stands disabled on your Windows 11 PC. In simpler words, Virtualisation is needed to run non-native Windows apps inside the Windows ecosystem.

Since Android apps are also part of the non-native app environment, you will need to enable the Virtualisation on your PC. If you don’t do so, then you wouldn’t be able to install and run Android apps in Windows 11. With that in mind, this guide will show you three different methods to enable Virtualisation in Windows 11 that shall help you fix the Unable to start Windows Subsystem for Android error. This should also fix the “Ensure that Virtual Machine Platform is enabled in optional Windows features” error.
Method 1: Enable Virtualization in Windows 11 via Control Panel
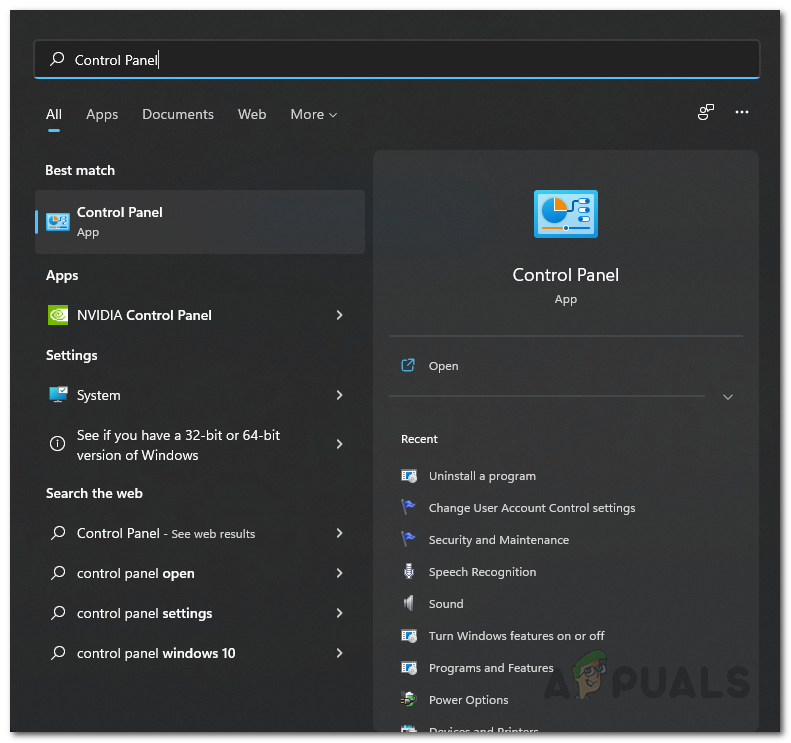
- Open Control Panel from the Start Menu and click on Programs and Features.

- Then click on ‘Turn Windows features on or off’ from the left menu bar.
- Now, checkmark ‘Virtual Machine Platform’ and ‘Windows Hypervisor Platform’ and click OK.

- Finally, restart your PC for the changes to take place. Once it boots up, the Unable to start Windows Subsystem for Android error should be fixed.


Method 2: Enable Virtualization in Windows 11 from BIOS
- To begin with, power off your PC. Then turn it back on. As soon as it is booting up, continuously press the Esc key. This shall bring up the Start menu. Now just press the key that corresponds to BIOS (which is usually F10).
- Your PC shall now boot to the BIOS. Go to its Advanced tab and you should see the Intel Virtualization Technology, enable it.

- On the other hand, AMD users would see the SVM Mode (Secure Virtual Machine). Make sure to enable it.

- Now save the changes and reboot your PC to the OS. Once it boots up, the Unable to start Windows Subsystem for Android error should be fixed.


Method 3: Enable Nested Virtualization in Virtual Machine
If you are running Windows 11 inside a Virtual Machine, then you should consider enabling the Nested Virtualization. This will then allow you to run virtual machine instances inside the Virtual Machine itself!
With this, we round off the guide on how you could fix the Unable to start Windows Subsystem for Android error. This shall also fix the Ensure that Virtual Machine Platform is enabled in optional Windows features error message. If you have any queries concerning the aforementioned steps, do let us know in the comments. We will get back to you with a solution at the earliest. Moroever, given below are some other WSA guides that deserve your attention:
- How to Install and Run Android Apps on Windows 11
- How to Install Windows Subsystem for Android on Unsupported PC
- Fix: IP Address Unavailable in Windows Subsystem for Android
- Sideload Android Apps on Windows 11 [Without Amazon App Store]
- Install Google Play Store in Windows 11 via Windows Subsystem for Android
- How to Install Windows 11 on any PC using Virtual Machine
About Chief Editor

Sadique Hassan
administrator
A technical geek by birth, he always has a keen interest in the Android platform right since the birth of the HTC Dream. The open-source environment always seems to intrigue him with the plethora of options available at his fingertips. “MBA by profession, blogger by choice!”
With the release of Windows Subsystem for Android, users have been encountering the “Unable to start Windows Subsystem for Android” error message while trying to start the environment. The reason that this problem occurs is very well explained in the error message as well which essentially is virtualization. If you do not have virtualization enabled on your Windows 11 operating system, the Windows Subsystem for Android environment will not be able to initialize and thus the error message occurs. You can fix this problem pretty simply by enabling virtualization on your computer which is what we are going to show you in this article so just follow through.

As it turns out, Microsoft recently made the Windows Subsystem for Android available to the Insider Preview users which, much like the working of the Windows Subsystem for Linux, allows you to run Android apps natively on your computer. This means that you do not have to install a third party emulator on your system in order to play an Android game or use any other Android app on your computer.
However, since the feature is just available in the Insiders Preview Beta channel, there also are not many options to choose from when it comes down to installing the applications. This is because Microsoft has limited the apps, for now, and only a selected group of applications are allowed to be installed via the Amazon Appstore. Luckily, you can sideload Android apps which allows you to essentially run any Android application on your computer using Windows Subsystem for Android. In addition to that, since this is based on the Windows Subsystem for Android, you are going to enable virtualization on your computer otherwise the error message mentioned above will appear. This can be pretty easily fixed, so let us get started with that without further delay.
Turn on Windows Virtual Machine Platform
As it turns out, the first thing that you should do when you encounter the error message in question is to make sure that you have the Virtual Machine Platform feature enabled on your computer. Windows has a bunch of optional features that come built-in that you can choose to install or turn on via the Windows Features window.
While some of these features are enabled by default when you install Windows, most of them are not which is quite obvious because not everyone is going to need them. Thus, if you do need a specific feature, you will have to turn it on manually which is pretty convenient and easy to do. To do this, follow the instructions given down below:
- First of all, open up the Control Panel by searching for it in the Start Menu.

Opening up Control Panel - Then, in the Control Panel window, click on the Programs option.

Control Panel - There, click on the Turn Windows Features on or off option.
Opening up Windows Features Window - This will bring up another window called Windows Features.
- Inside that window, from the list of features, look for Virtual Machine Platform and click on the checkbox to tick it.

Enabling Virtual Machine Platform - Then, click the OK button.
- Once you have done that, go ahead and restart your computer for the feature to be installed.
- After your system boots up, try using the Windows Subsystem for Android again to see if the error message still appears.


Enable Virtualization from BIOS
In addition to turning on the Virtual Machine Platform feature on your computer, you will also have to enable virtualization from BIOS. Since you are going to run Android applications, virtualization is pretty important as it allows programs to emulate hardware which then enables it to run other operating systems like Android.
If this case is applicable, you can enable virtualization pretty easily from the BIOS menu. The exact steps may vary a little depending on the manufacturer of your motherboard but the overall procedure remains the same. Follow the instructions down below to enable virtualization:
- First of all, go ahead and restart your computer.
- As your computer is booting up, you will have to boot into the BIOS menu. To do that, press the respective key for your motherboard which usually is DEL, F2, F10 or ESC.
- Once you have booted into BIOS, you will have to go to Advanced Mode. For that, press the F7 button on your keyboard to switch from EZ Mode.

Switching to Advanced Mode - After you are in Advanced Mode, switch to the Advanced tab given at the top.

Navigating to Advanced TAB - There, click on the CPU Configuration option.

Navigating to CPU Configuration - Now, if you are using an Intel CPU, you need to look for Intel Virtualization Technology. Once located, go ahead and switch it to Enabled.
- In case of AMD processors, you should be looking for SVM Mode which stands for Secure Virtual Machine. Once you have found it, switch it to Enabled.

Enabling SVM Mode - After that, press the F10 key on your keyboard to save the changes and restart your computer.
- Once your computer boots up, you should no longer be getting the error message in question.


Enable Nested Virtualization
Finally, if you have installed Windows 11 in a virtual machine to use the Windows Subsystem for Android, you will need to enable nested virtualization for the virtual machine on the host. As apparent from the name itself, nested virtualization essentially allows you to run virtual machine instances inside a virtual machine. It is basically a virtualception.
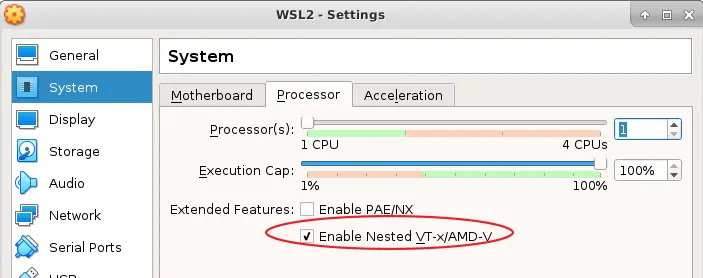
Now, the process of enabling nested virtualization may differ depending on the hypervisor that you are using. For VirtualBox and VMware, the procedure is pretty simple as you can find the option in the virtual machine settings. In case of VirtualBox, the option is called Nested VT-x/AMD-V while in case of VMware, you will be looking for nested virtualization. If you are using Hyper-V, you will have to take a command line approach but it is rather simple to do and you can find various guides on the internet. Once you have enabled nested virtualization, the error message should just go away.

Kamil Anwar
Kamil is a certified MCITP, CCNA (W), CCNA (S) and a former British Computer Society Member with over 9 years of experience Configuring, Deploying and Managing Switches, Firewalls and Domain Controllers also an old-school still active on FreeNode.
Environment
C:UsersLiu.D.H>ver

Microsoft Windows [Version 10.0.19041.264]

C:UsersLiu.D.H>bcdedit

Windows Boot Manager
--------------------
identifier              {bootmgr}
device                  partition=DeviceHarddiskVolume1
description             Windows Boot Manager
locale                  en-US
inherit                 {globalsettings}
default                 {current}
resumeobject            {8c132511-806f-11e9-8860-f798d1b7a8f1}
displayorder            {current}
                        {89f269f4-cc9f-11e6-8727-64006a16df31}
                        {8c132516-806f-11e9-8860-f798d1b7a8f1}
toolsdisplayorder       {memdiag}
timeout                 5

Windows Boot Loader
-------------------
identifier              {current}
device                  partition=C:
path                    WINDOWSsystem32winload.exe
description             Windows 10
locale                  en-US
inherit                 {bootloadersettings}
recoverysequence        {8c132514-806f-11e9-8860-f798d1b7a8f1}
displaymessageoverride  Recovery
recoveryenabled         Yes
allowedinmemorysettings 0x15000075
osdevice                partition=C:
systemroot              WINDOWS
resumeobject            {8c132511-806f-11e9-8860-f798d1b7a8f1}
nx                      OptIn
bootmenupolicy          Legacy
hypervisorlaunchtype    Off

Windows Boot Loader
-------------------
identifier              {89f269f4-cc9f-11e6-8727-64006a16df31}
device                  partition=DeviceHarddiskVolume1
path                    Windowssystem32winload.exe
description             Windows 7
locale                  zh-CN
inherit                 {bootloadersettings}
osdevice                partition=DeviceHarddiskVolume1
systemroot              Windows
resumeobject            {89f269f3-cc9f-11e6-8727-64006a16df31}
nx                      OptIn
detecthal               Yes

Windows Boot Loader
-------------------
identifier              {8c132516-806f-11e9-8860-f798d1b7a8f1}
device                  partition=C:
path                    WINDOWSsystem32winload.exe
description             Windows10 with Hyper-V
locale                  en-US
inherit                 {bootloadersettings}
recoverysequence        {8c132514-806f-11e9-8860-f798d1b7a8f1}
displaymessageoverride  Recovery
recoveryenabled         Yes
allowedinmemorysettings 0x15000075
osdevice                partition=C:
systemroot              WINDOWS
resumeobject            {8c132511-806f-11e9-8860-f798d1b7a8f1}
nx                      OptIn
bootmenupolicy          Legacy
hypervisorlaunchtype    Auto

C:UsersLiu.D.H>systeminfo

Host Name:                 DESKTOP-LDH
OS Name:                   Microsoft Windows 10 Education
OS Version:                10.0.19041 N/A Build 19041
OS Manufacturer:           Microsoft Corporation
OS Configuration:          Standalone Workstation
OS Build Type:             Multiprocessor Free
Registered Owner:          Windows User
Registered Organization:
Product ID:                00328-10000-00001-AA635
Original Install Date:     2020-05-11, 22:13:14
System Boot Time:          2020-06-08, 10:12:11
System Manufacturer:       Dell Inc.
System Model:              Vostro 3900
System Type:               x64-based PC
Processor(s):              1 Processor(s) Installed.
                           [01]: Intel64 Family 6 Model 60 Stepping 3 GenuineIntel ~3601 Mhz
BIOS Version:              Dell Inc. A10, 2015-07-30
Windows Directory:         C:WINDOWS
System Directory:          C:WINDOWSsystem32
Boot Device:               DeviceHarddiskVolume1
System Locale:             zh-cn;Chinese (China)
Input Locale:              zh-cn;Chinese (China)
Time Zone:                 (UTC+08:00) Beijing, Chongqing, Hong Kong, Urumqi
Total Physical Memory:     16,301 MB
Available Physical Memory: 9,703 MB
Virtual Memory: Max Size:  33,709 MB
Virtual Memory: Available: 26,300 MB
Virtual Memory: In Use:    7,409 MB
Page File Location(s):     C:pagefile.sys
Domain:                    WORKGROUP
Logon Server:              \DESKTOP-LDH
Hotfix(s):                 6 Hotfix(s) Installed.
                           [01]: KB4552925
                           [02]: KB4534170
                           [03]: KB4537759
                           [04]: KB4545706
                           [05]: KB4557968
                           [06]: KB4556803
Network Card(s):           4 NIC(s) Installed.
                           [01]: TAP-Windows Adapter V9
                                 Connection Name: 以太网
                                 Status:          Media disconnected
                           [02]: Realtek PCIe GBE Family Controller
                                 Connection Name: Ethernet_Realtek
                                 DHCP Enabled:    Yes
                                 DHCP Server:     113.55.112.1
                                 IP address(es)
                                 [01]: 113.55.127.140
                                 [02]: fe80::3d0a:ecde:2178:d77c
                                 [03]: 2001:250:2800:cc09:6600:6aff:fe16:df31
                           [03]: Realtek RTL8188CU Wireless LAN 802.11n USB 2.0 Network Adapter
                                 Connection Name: Wi-Fi 2
                                 Status:          Media disconnected
                           [04]: Microsoft KM-TEST Loopback Adapter
                                 Connection Name: Npcap Loopback Adapter
                                 DHCP Enabled:    Yes
                                 DHCP Server:     255.255.255.255
                                 IP address(es)
                                 [01]: 169.254.104.11
                                 [02]: fe80::d8bf:11ab:7b05:680b
Hyper-V Requirements:      VM Monitor Mode Extensions: Yes
                           Virtualization Enabled In Firmware: Yes
                           Second Level Address Translation: Yes
                           Data Execution Prevention Available: Yes

C:UsersLiu.D.H>
Steps to reproduce
Open Ubuntu 18.04 or 20.04.
Expected behavior
Works as expected.
Actual behavior
I can confirm that I have enabled
Virtual Machine PlatformandVT-x. But the errors when I started Ubuntu is confused. And for some reasons I do not want to enable Hyper-V features. From the doc (https://docs.microsoft.com/en-us/windows/wsl/), it is not a requirement for WSL2.
How did you get all the environment info of your machine?
You need to enable the Virtual Machine Platform Windows feature to use WSL 2. If this is not done, then you will get the following error:
wsl --set-version kali-linux 2
Conversion in progress, this may take a few minutes...
For information on key differences with WSL 2 please visit https://aka.ms/wsl2
Please enable the Virtual Machine Platform Windows feature and ensure virtualization is enabled in the BIOS.
To enable WSL 2, Open the Windows Features window by navigating to Control Panel | Programs | Turn Windows feature on or off.

Ensure that the Virtual Machine Platform and Windows Subsystem for Linux features are selected.
After clicking on the OK button, Windows will enable WSL 2.
If you want to install WSL 2 on a Windows 10 virtual machine, the virtual machine should support nested virtualization.
With VirtualBox, right-click the VM and choose Settings. In the System section, under the Processor tab, check the box: Enable Nested VT-x/AMD-V.
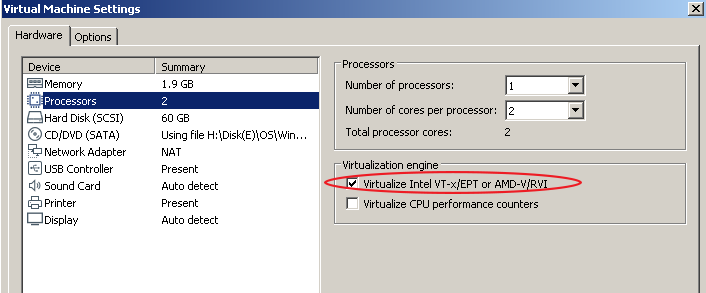
On VMware Workstation, right-click the VM and choose Settings. In the Hardware section, under the Processor, make sure the Virtualize Intel VT-x/EPT or AMD-V/RVI checkbox is enabled.
You also have to make sure virtualization is enabled in the BIOS (Intel Virtualization Technology or SVM Mode in AMD).
Hi,
I’m trying to install WSL 2 (in order to be able to use docker). I think I have followed all the steps described here but it’s not working. When I run
wsl --set-version Ubuntu 2
or
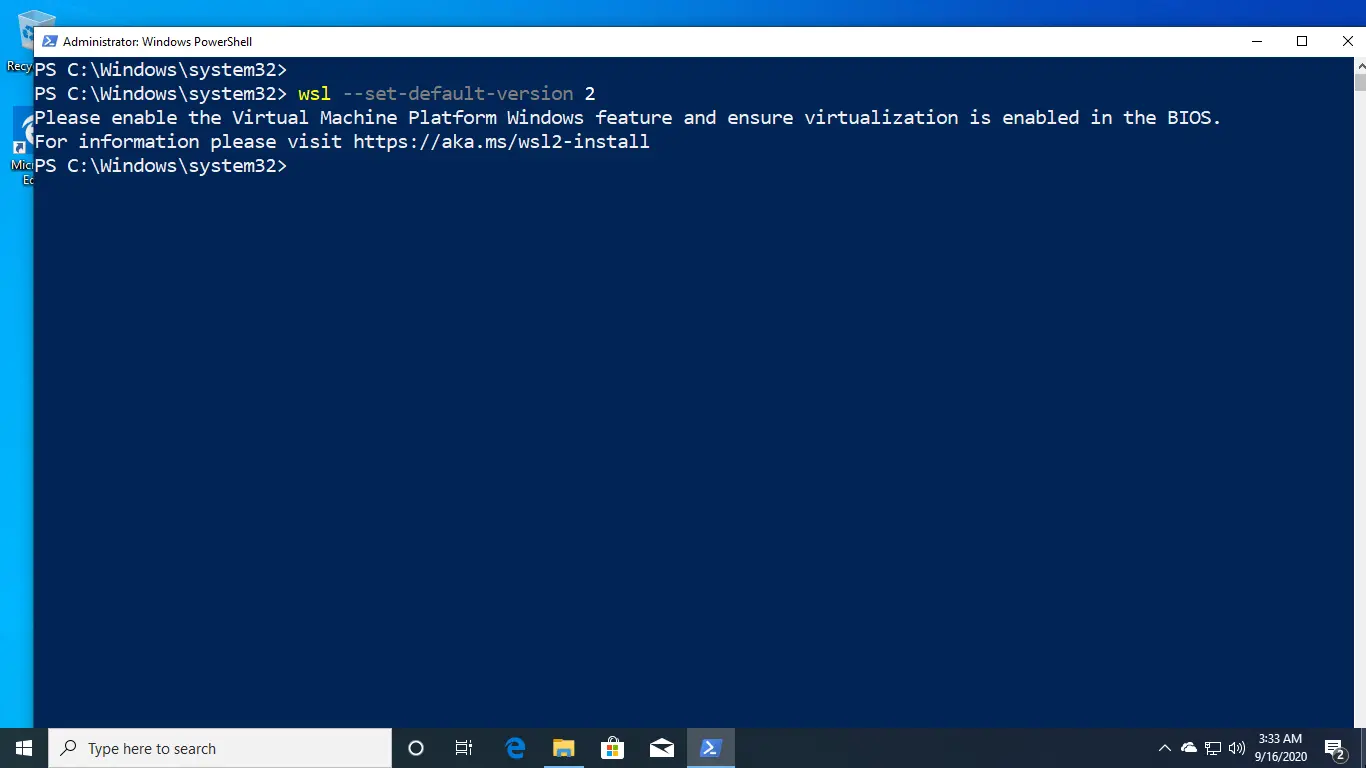
wsl --set-default-version 2
I get this message:
Please enable the Virtual Machine Platform Windows feature and ensure virtualization is enabled in the BIOS.
I’ve done the previous steps, including running these commands in an elevated Powershell:
dism.exe /online /enable-feature /featurename:Microsoft-Windows-Subsystem-Linux /all /norestart
dism.exe /online /enable-feature /featurename:VirtualMachinePlatform /all /norestart
Edit: After running these commands my computer refused to boot. Startup repair fixed it but I believe it in doing so it has rolled back the effects of these commands.
I have confirmed I have virtualisation enabled (I checked the performance tab of the task manager and it says Virtualization: Enabled)
I am running Microsoft Windows [Version 10.0.19536.1000].
Googling the problem, it turns out someone has posted on github with a seemingly identical issue. Unfortunately, he last posted 16 days ago that he did all the troubleshooting steps without success and no one has replied anything since.
Any help or advice would be greatly appreciated. I’m particularly interested in your opinion on whether i should persist in fixing this issue or attempt to run docker with WSL 1.
EDIT: Seems to be working now after I updated to the just-released Windows build 19551. I converted from WSL1 to WSL2 with no issues using the normal procedure.