- Remove From My Forums
-
Question
-
Afternoon, I have inherited some Policies and I’m currently stuck with an issue reported by a User which has left me scratching my head.
The user is trying to access a secure website which prompts for a user name and password , this worked on their old XP machine but the users new Win7 machine has new policies is presenting the issue each and every time.
When the URL is entered the user gets a Windows Security Prompt asking «I want to complete this action by entering my credentials on the authentic Windows logon screen» or «I don’t want to complete this action»
User selects «I want to complete this action by entering my credentials on the authentic Windows logon screen» and is then asked to «CTRL ALT DEL to enter your details» , User has tried doing this and results in failure to connect to the website.
We have tried disabling UAC completely and this made no difference.
Any Idea’s out there?
Thanks
Answers
-
Hi,
I found you enabled this Group policy setting:
Computer Configuration—>Administrative Templates—>Windows Components—>Credential User Interface—>Require trusted path for credential entry
This policy setting require the user to enter Microsoft Windows credentials using a trusted path, to prevent a Trojan horse or other types of malicious code from stealing the user’s Windows credentials. If you enable this policy setting,
user will be required to enter Windows credentials on the Secure Desktop by means of the trusted path mechanism.So disable or reset the policy to “Not Configured” status.
For more information please refer to following MS articles:
Using Smart Cards in Windows Virtual PC
http://blogs.technet.com/b/windows_vpc/archive/2009/10/26/using-smart-cards-in-windows-virtual-pc.aspx
Inside Windows Vista User Account Control
http://technet.microsoft.com/en-us/magazine/2007.06.uac.aspx
Lawrence
TechNet Community Support
-
Marked as answer by
Monday, May 21, 2012 1:09 AM
-
Marked as answer by
-
Hi Lawrence,
Thanks so much for your help. I really appreciate your prompt help.
I changed the policy setting «Require trusted path for credential entry» to «Not configured» and issue got fixed.
Hats off to your prompt support. I approached microsoft via different channels(blogs, via technical accounts manager, calling support directly) for support. I don’t mind to say, I recieved very good response every time via all the channels.
This is a good example of it.Thanks again.
-
Marked as answer by
Lawrence,Lu
Monday, May 21, 2012 1:09 AM
-
Marked as answer by
Содержание
- How to fix missing User and Password Prompt on Windows login screen?
- Enter Safe Mode to troubleshoot and fix Missing User and Password Prompt
- Fix 1. Enable Automatic Login Using netplwiz
- Fix 2. Run Command Prompt at boot
- Fix 3. Set Credential Manager service to automatic
- Fix 4. Use Bootable Windows 10 USB
- How to use Credential Manager on Windows 10
- Edit existing sign-in information using Credential Manager
- Delete sign-in information using Credential Manager
- Add new sign-in information using Credential Manager
- Backup sign-in information using Credential Manager
- Restore sign-in information using Credential Manager
- Credentials Processes in Windows Authentication
- Credential input for user logon
- Credential input for application and service logon
- Local Security Authority
- Cached credentials and validation
- Credential storage and validation
- Remote logon credential processes
- Automatic restart sign-on credential process
- Stored user names and passwords in Windows Vista and Windows XP
- Windows Vault and Credential Manager
- Security Accounts Manager database
- Local domains and trusted domains
- Certificates in Windows authentication
How to fix missing User and Password Prompt on Windows login screen?
Issue: How to fix missing User and Password Prompt on Windows login screen?
Hello, all. I’m having a problem with my Windows 10 PC for the last couple of weeks. Each time when I boot the system, it gets stuck at the login screen, but by stuck I don’t mean that it freezes. My mouse pointer works, but no user and password prompt is provided. When I reboot the system one more time, the user prompt shows up again, so I can access the desktop. Nevertheless, this problem gets extremely annoying. Can someone please help me?
Countless users reported [1] that they are not able to log into the Windows OS, or that they need to restart the system multiple times for the missing User and Password Prompt to go away. That’s an old problem that has been encountered by thousands of Windows users. In those cases, the log-in screen simply gets stuck with the boot loop, or the entered user and password are not identified.
Recently, few people reported a new problem related to the Windows login screen. When the system boots up, the user and password prompt do not appear, so there’s no way to access the desktop. It doesn’t matter how many different accounts are signed using the affected device, none of them are loaded.
Sadly, the culprit of the problem is not clear yet, so it has been difficult for the IT specialists to figure it out. Nevertheless, there are several things that you can try to fix missing user login at boot. It includes temporary bypassing the problem by enabling automated login, using command prompt on boot, launching the Credential Manager service, etc.
Missing User and Password Prompt fix
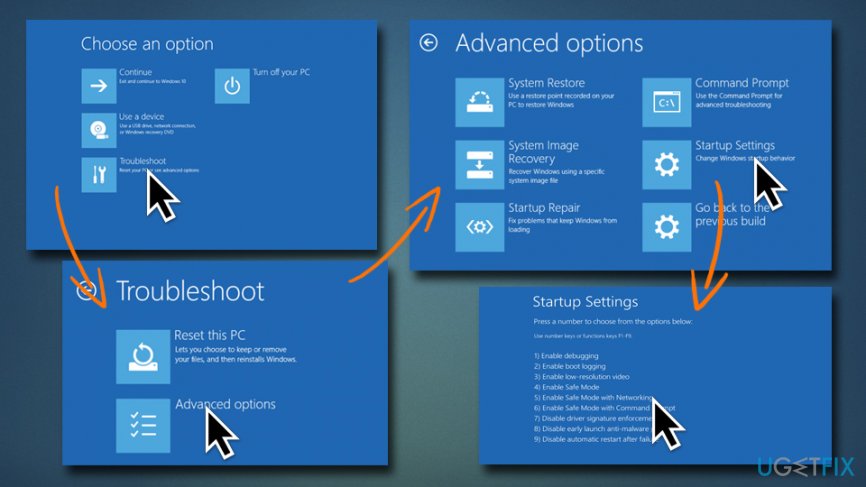
Enter Safe Mode to troubleshoot and fix Missing User and Password Prompt
Safe Mode [3] is the best Windows environment to perform various troubleshooting in, including getting rid of malware. To enter Safe Mode, please follow these steps:
Enter Safe Mode with Networking by performing the following steps
If the Shift-restart does not work, you can hard-restart the PC three times (interrupting the boot with the power button), and Windows will load Automatic Repair. Click on Advanced options, and you will be able to enter Safe Mode.
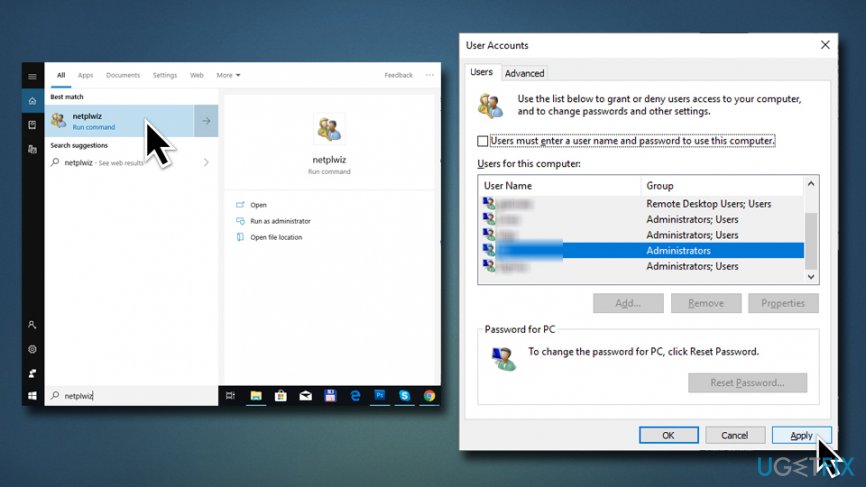
Fix 1. Enable Automatic Login Using netplwiz
If you are encountering a missing user account prompt on the welcome screen, you can fix this issue temporarily by enabling the automatic login. However, this solution is not permanent, so sooner or later you’ll have to perform one of the fixes provided below. To enable automatic login, please perform the following steps:
This solution is only temporary, as it stops users from needing to use passwords to enter the PC
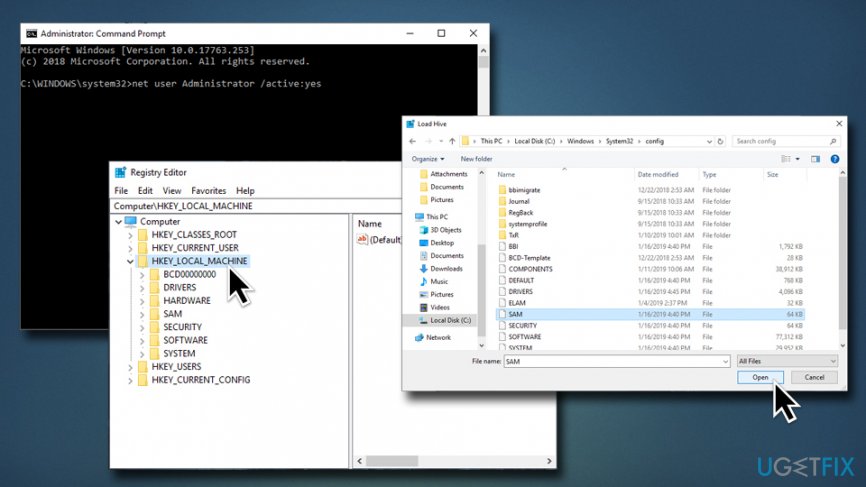
Fix 2. Run Command Prompt at boot
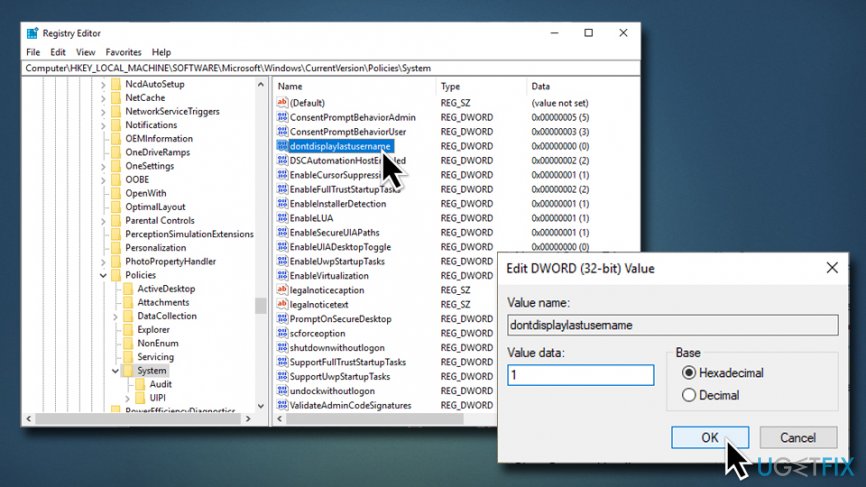
If you cannot sign into Windows 10 because the user prompt is missing, you should fix that by using a bootable Windows 10 USB. If, however, you don’t have it, open Command Prompt at boot (WARNING: modifying Windows Registry can be dangerous, as incorrect actions might corrupt Windows system. Proceed at your own risk):
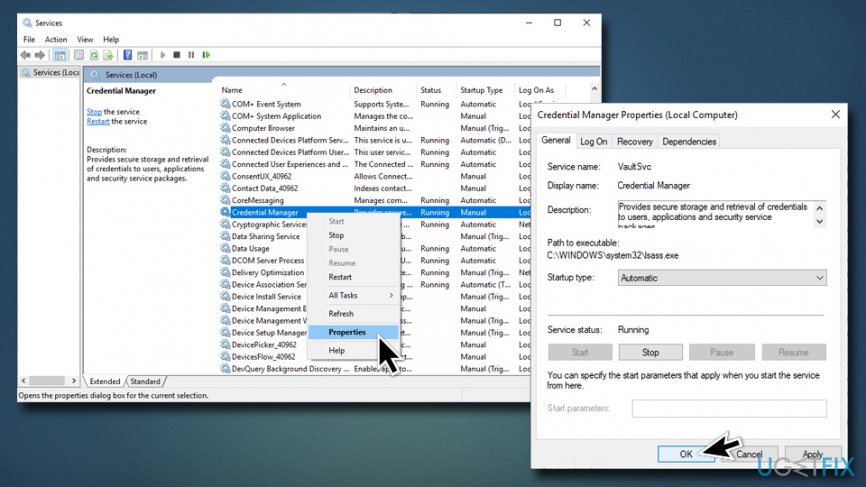
Fix 3. Set Credential Manager service to automatic
If the Credential Manager service is set to manual users might face the Missing User and Password Prompt issue. Turning it to automatic mode can help you fix Missing User and Password Prompt:
Open Credential Manager service and set it to Automatic
Fix 4. Use Bootable Windows 10 USB
If you don’t have a Windows 10 USB, create it. After that, perform these steps:
Источник
How to use Credential Manager on Windows 10
Did you save the wrong sign-in info for a network drive? Do you need to transfer your web and Windows 10 credentials to a new installation? Then you need to use Credential Manager, and here’s how.
On Windows 10, Credential Manager is the feature that stores your sign-in information for websites (using Microsoft Edge), apps, and networks (such as, mapped drivers or shared folders) when you check the option to save your credentials for future logins.
Credential Manager isn’t new, it’s been around for a long time, and it not only allows you to save your login usernames and passwords, but it also allows you to view, delete, add, backup and restore logon credentials.
In this guide, you’ll learn the steps to use the Credential Manager on Windows 10 to manage all your logon information.
Edit existing sign-in information using Credential Manager
To update a password or username already stored on Windows 10, use these steps:
Open Control Panel on Windows 10.
Click on User Accounts.
Click on Credential Manager.
Click the Windows Credentials tab (or Web Credentials).
Select the account.
Click the Edit button.

Update the username and password as necessary.
Click the Save button.

Once you complete the steps, the information will be updated with the new credentials, which means no more login prompts if you originally saved the wrong username or password or the sign-in information has changed.
Delete sign-in information using Credential Manager
Delete an account credential already stored on Windows 10, use these steps:
Open Control Panel.
Click on User Accounts.
Click on Credential Manager.
Click the Windows Credentials tab (or Web Credentials).
Select the account.
Click the Remove button.

Click the Yes button.
After you complete the steps, the account credentials will no longer be available on the device, meaning that future logins will require you to enter a username and password.
Add new sign-in information using Credential Manager
To add an app or network credential on Windows 10, use these steps:
Open Control Panel.
Click on User Accounts.
Click on Credential Manager.
Click the Windows Credentials tab.
Click the Add a Windows credential (or Add a certificate- based credential) option.

Specify the internet or network address that corresponds to the app or network resource.
Specify the username and password to authenticate.

Click the OK button.
Once you complete the steps, the new account information will be added to your device to sign-in automatically the next time you access the apps or network shared.
Backup sign-in information using Credential Manager
To export and backup all your credentials for apps and networks, use these steps:
Open Control Panel.
Click on User Accounts.
Click on Credential Manager.
Click the Windows Credentials tab.
Click the Back up Credentials option.

Click the Browse button to specify a destination for the backup.
Specify a name for the .crd backup file.
Click the Save button.
Click the Next button.
Use the Ctrl + Alt + Delete keyboard shortcut to continue.
Specify a password to protect the Credential Manager file on Windows 10.
Click the Next button.
Click the Finish button.
Restore sign-in information using Credential Manager
To restore your sign-in information from backup on Windows 10, use these steps:
Open Control Panel.
Click on User Accounts.
Click on Credential Manager.
Click the Windows Credentials tab.
Click the Restore Credentials option.

Click the Browse button.
Select the .crd files with the backup information.
Click the Open button.
Click the Next button.
Use the Ctrl + Alt + Delete keyboard shortcut to continue.
Type the password to unlock the Credential Manager backup.
Click the Next button.
Click the Finish button.
Once you complete the step, all your web, app, and network credentials will be restored on your device.
While this guide focuses on Windows 10, Credential Manager has been available for a long time, which means that the steps will also work on Windows 8.1 and Windows 7.
We may earn commission for purchases using our links to help keep offering the free content. Privacy policy info.
All content on this site is provided with no warranties, express or implied. Use any information at your own risk. Always backup of your device and files before making any changes. Privacy policy info.
Источник
Credentials Processes in Windows Authentication
Applies to: Windows Server 2022, Windows Server 2019, Windows Server 2016
This reference topic for the IT professional describes how Windows authentication processes credentials.
Windows credentials management is the process by which the operating system receives the credentials from the service or user and secures that information for future presentation to the authenticating target. In the case of a domain-joined computer, the authenticating target is the domain controller. The credentials used in authentication are digital documents that associate the user’s identity to some form of proof of authenticity, such as a certificate, a password, or a PIN.
By default, Windows credentials are validated against the Security Accounts Manager (SAM) database on the local computer, or against Active Directory on a domain-joined computer, through the Winlogon service. Credentials are collected through user input on the logon user interface or programmatically via the application programming interface (API) to be presented to the authenticating target.
Local security information is stored in the registry under HKEY_LOCAL_MACHINESECURITY. Stored information includes policy settings, default security values, and account information, such as cached logon credentials. A copy of the SAM database is also stored here, although it is write-protected.
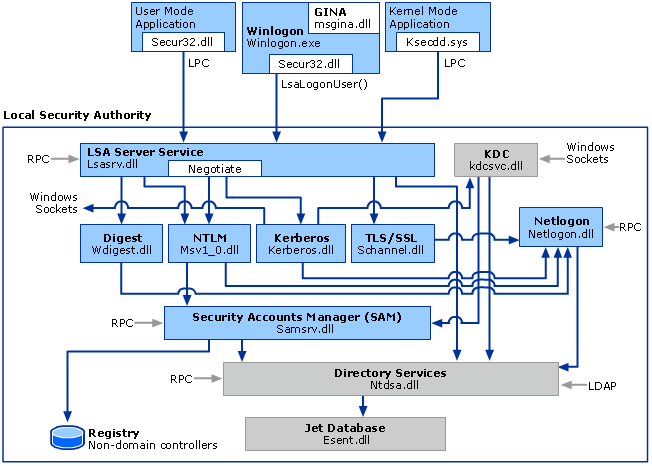
The following diagram shows the components that are required and the paths that credentials take through the system to authenticate the user or process for a successful logon.
The following table describes each component that manages credentials in the authentication process at the point of logon.
Authentication components for all systems
| Component | Description |
|---|---|
| User logon | Winlogon.exe is the executable file responsible for managing secure user interactions. The Winlogon service initiates the logon process for Windows operating systems by passing the credentials collected by user action on the secure desktop (Logon UI) to the Local Security Authority (LSA) through Secur32.dll. |
| Application logon | Application or service logons that do not require interactive logon. Most processes initiated by the user run in user mode by using Secur32.dll whereas processes initiated at startup, such as services, run in kernel mode by using Ksecdd.sys.
For more information about user mode and kernel mode, see Applications and User Mode or Services and Kernel Mode in this topic. |
| Secur32.dll | The multiple authentication providers that form the foundation of the authentication process. |
| Lsasrv.dll | The LSA Server service, which both enforces security policies and acts as the security package manager for the LSA. The LSA contains the Negotiate function, which selects either the NTLM or Kerberos protocol after determining which protocol is to be successful. |
| Security Support Providers | A set of providers that can individually invoke one or more authentication protocols. The default set of providers can change with each version of the Windows operating system, and custom providers can be written. |
| Netlogon.dll | The services that the Net Logon service performs are as follows:
— Maintains the computer’s secure channel (not to be confused with Schannel) to a domain controller. |
| Samsrv.dll | The Security Accounts Manager (SAM), which stores local security accounts, enforces locally stored policies and supports APIs. |
| Registry | The Registry contains a copy of the SAM database, local security policy settings, default security values, and account information that is only accessible to the system. |
This topic contains the following sections:
Credential input for user logon
In Windows Server 2008 and Windows Vista, the Graphical Identification and Authentication (GINA) architecture was replaced with a credential provider model, which made it possible to enumerate different logon types through the use of logon tiles. Both models are described below.
Graphical Identification and Authentication architecture
The Graphical Identification and Authentication (GINA) architecture applies to the Windows Server 2003, Microsoft Windows 2000 Server, Windows XP, and Windows 2000 Professional operating systems. In these systems, every interactive logon session creates a separate instance of the Winlogon service. The GINA architecture is loaded into the process space used by Winlogon, receives and processes the credentials, and makes the calls to the authentication interfaces through LSALogonUser.
The instances of Winlogon for an interactive logon run in Session 0. Session 0 hosts system services and other critical processes, including the Local Security Authority (LSA) process.
The following diagram shows the credential process for Windows Server 2003, Microsoft Windows 2000 Server, Windows XP, and Microsoft Windows 2000 Professional.
Credential provider architecture
With the credential provider architecture, Winlogon always starts Logon UI after it receives a secure attention sequence event. Logon UI queries each credential provider for the number of different credential types the provider is configured to enumerate. Credential providers have the option of specifying one of these tiles as the default. After all providers have enumerated their tiles, Logon UI displays them to the user. The user interacts with a tile to supply their credentials. Logon UI submits these credentials for authentication.
Credential providers are not enforcement mechanisms. They are used to gather and serialize credentials. The Local Security Authority and authentication packages enforce security.
Credential providers are registered on the computer and are responsible for the following:
Describing the credential information required for authentication.
Handling communication and logic with external authentication authorities.
Packaging credentials for interactive and network logon.
Single sign-on (SSO) providers can be developed as a standard credential provider or as a Pre-Logon-Access Provider.
Each version of Windows contains one default credential provider and one default Pre-Logon-Access Provider (PLAP), also known as the SSO provider. The SSO provider permits users to make a connection to a network before logging on to the local computer. When this provider is implemented, the provider does not enumerate tiles on Logon UI.
A SSO provider is intended to be used in the following scenarios:
Network authentication and computer logon are handled by different credential providers. Variations to this scenario include:
A user has the option of connecting to a network, such as connecting to a virtual private network (VPN), before logging on to the computer but is not required to make this connection.
Network authentication is required to retrieve information used during interactive authentication on the local computer.
Multiple network authentications are followed by one of the other scenarios. For example, a user authenticates to an Internet service provider (ISP), authenticates to a VPN, and then uses their user account credentials to log on locally.
Cached credentials are disabled, and a Remote Access Services connection through VPN is required before local logon to authenticate the user.
A domain user does not have a local account set up on a domain-joined computer and must establish a Remote Access Services connection through VPN connection before completing interactive logon.
Network authentication and computer logon are handled by the same credential provider. In this scenario, the user is required to connect to the network before logging on to the computer.
Logon tile enumeration
The credential provider enumerates logon tiles in the following instances:
For those operating systems designated in the Applies to list at the beginning of this topic.
The credential provider enumerates the tiles for workstation logon. The credential provider typically serializes credentials for authentication to the local security authority. This process displays tiles specific for each user and specific to each user’s target systems.
The logon and authentication architecture lets a user use tiles enumerated by the credential provider to unlock a workstation. Typically, the currently logged-on user is the default tile, but if more than one user is logged on, numerous tiles are displayed.
The credential provider enumerates tiles in response to a user request to change their password or other private information, such as a PIN. Typically, the currently logged-on user is the default tile; however, if more than one user is logged on, numerous tiles are displayed.
The credential provider enumerates tiles based on the serialized credentials to be used for authentication on remote computers. Credential UI does not use the same instance of the provider as the Logon UI, Unlock Workstation, or Change Password. Therefore, state information cannot be maintained in the provider between instances of Credential UI. This structure results in one tile for each remote computer logon, assuming the credentials have been correctly serialized. This scenario is also used in User Account Control (UAC), which can help prevent unauthorized changes to a computer by prompting the user for permission or an administrator password before permitting actions that could potentially affect the computer’s operation or that could change settings that affect other users of the computer.
The following diagram shows the credential process for the operating systems designated in the Applies To list at the beginning of this topic.
Credential input for application and service logon
Windows authentication is designed to manage credentials for applications or services that do not require user interaction. Applications in user mode are limited in terms of what system resources they have access to, while services can have unrestricted access to the system memory and external devices.
System services and transport-level applications access an Security Support Provider (SSP) through the Security Support Provider Interface (SSPI) in Windows, which provides functions for enumerating the security packages available on a system, selecting a package, and using that package to obtain an authenticated connection.
When a client/server connection is authenticated:
The SSPI functions InitializeSecurityContext (General) and AcceptSecurityContext (General) are repeated until all the necessary authentication messages have been exchanged to either succeed or fail authentication.
After the connection has been authenticated, the LSA on the server uses information from the client to build the security context, which contains an access token.
The server can then call the SSPI function ImpersonateSecurityContext to attach the access token to an impersonation thread for the service.
Applications and user mode
User mode in Windows is composed of two systems capable of passing I/O requests to the appropriate kernel-mode drivers: the environment system, which runs applications written for many different types of operating systems, and the integral system, which operates system-specific functions on behalf of the environment system.
The integral system manages operating system’specific functions on behalf of the environment system and consists of a security system process (the LSA), a workstation service, and a server service. The security system process deals with security tokens, grants or denies permissions to access user accounts based on resource permissions, handles logon requests and initiates logon authentication, and determines which system resources the operating system needs to audit.
Applications can run in user mode where the application can run as any principal, including in the security context of Local System (SYSTEM). Applications can also run in kernel mode where the application can run in the security context of Local System (SYSTEM).
SSPI is available through the Secur32.dll module, which is an API used for obtaining integrated security services for authentication, message integrity, and message privacy. It provides an abstraction layer between application-level protocols and security protocols. Because different applications require different ways of identifying or authenticating users and different ways of encrypting data as it travels across a network, SSPI provides a way to access dynamic-link libraries (DLLs) that contain different authentication and cryptographic functions. These DLLs are called Security Support Providers (SSPs).
Managed service accounts and virtual accounts were introduced in Windows Server 2008 R2 and Windows 7 to provide crucial applications, such as Microsoft SQL Server and Internet Information Services (IIS), with the isolation of their own domain accounts, while eliminating the need for an administrator to manually administer the service principal name (SPN) and credentials for these accounts. For more information about these features and their role in authentication, see Managed Service Accounts Documentation for Windows 7 and Windows Server 2008 R2 and Group Managed Service Accounts Overview.
Services and kernel mode
Even though most Windows applications run in the security context of the user who starts them, this is not true of services. Many Windows services, such as network and printing services, are started by the service controller when the user starts the computer. These services might run as Local Service or Local System and might continue to run after the last human user logs off.
Services normally run in security contexts known as Local System (SYSTEM), Network Service, or Local Service. Windows Server 2008 R2 introduced services that run under a managed service account, which are domain principals.
Before starting a service, the service controller logs on by using the account that is designated for the service, and then presents the service’s credentials for authentication by the LSA. The Windows service implements a programmatic interface that the service controller manager can use to control the service. A Windows service can be started automatically when the system is started or manually with a service control program. For example, when a Windows client computer joins a domain, the messenger service on the computer connects to a domain controller and opens a secure channel to it. To obtain an authenticated connection, the service must have credentials that the remote computer’s Local Security Authority (LSA) trusts. When communicating with other computers in the network, LSA uses the credentials for the local computer’s domain account, as do all other services running in the security context of the Local System and Network Service. Services on the local computer run as SYSTEM so credentials do not need to be presented to the LSA.
The file Ksecdd.sys manages and encrypts these credentials and uses a local procedure call into the LSA. The file type is DRV (driver) and is known as the kernel-mode Security Support Provider (SSP) and, in those versions designated in the Applies To list at the beginning of this topic, is FIPS 140-2 Level 1-compliant.
Kernel mode has full access to the hardware and system resources of the computer. The kernel mode stops user-mode services and applications from accessing critical areas of the operating system that they should not have access to.
The Local Security Authority (LSA) is a protected system process that authenticates and logs users on to the local computer. In addition, LSA maintains information about all aspects of local security on a computer (these aspects are collectively known as the local security policy), and it provides various services for translation between names and security identifiers (SIDs). The security system process, Local Security Authority Server Service (LSASS), keeps track of the security policies and the accounts that are in effect on a computer system.
The LSA validates a user’s identity based on which of the following two entities issued the user’s account:
Local Security Authority. The LSA can validate user information by checking the Security Accounts Manager (SAM) database located on the same computer. Any workstation or member server can store local user accounts and information about local groups. However, these accounts can be used for accessing only that workstation or computer.
Security authority for the local domain or for a trusted domain. The LSA contacts the entity that issued the account and requests verification that the account is valid and that the request originated from the account holder.
The Local Security Authority Subsystem Service (LSASS) stores credentials in memory on behalf of users with active Windows sessions. The stored credentials let users seamlessly access network resources, such as file shares, Exchange Server mailboxes, and SharePoint sites, without re-entering their credentials for each remote service.
LSASS can store credentials in multiple forms, including:
Reversibly encrypted plaintext
Kerberos tickets (ticket-granting tickets (TGTs), service tickets)
LAN Manager (LM) hash
If the user logs on to Windows by using a smart card, LSASS does not store a plaintext password, but it stores the corresponding NT hash value for the account and the plaintext PIN for the smart card. If the account attribute is enabled for a smart card that is required for interactive logon, a random NT hash value is automatically generated for the account instead of the original password hash. The password hash that is automatically generated when the attribute is set does not change.
If a user logs on to a Windows-based computer with a password that is compatible with LAN Manager (LM) hashes, this authenticator is present in memory.
The storage of plaintext credentials in memory cannot be disabled, even if the credential providers that require them are disabled.
The stored credentials are directly associated with the Local Security Authority Subsystem Service (LSASS) logon sessions that have been started after the last restart and have not been closed. For example, LSA sessions with stored LSA credentials are created when a user does any of the following:
Logs on to a local session or Remote Desktop Protocol (RDP) session on the computer
Runs a task by using the RunAs option
Runs an active Windows service on the computer
Runs a scheduled task or batch job
Runs a task on the local computer by using a remote administration tool
In some circumstances, the LSA secrets, which are secret pieces of data that are accessible only to SYSTEM account processes, are stored on the hard disk drive. Some of these secrets are credentials that must persist after reboot, and they are stored in encrypted form on the hard disk drive. Credentials stored as LSA secrets might include:
Account password for the computer’s Active Directory Domain Services (AD DS) account
Account passwords for Windows services that are configured on the computer
Account passwords for configured scheduled tasks
Account passwords for IIS application pools and websites
Passwords for Microsoft accounts
Introduced in Windows 8.1, the client operating system provides additional protection for the LSA to prevent reading memory and code injection by non-protected processes. This protection increases security for the credentials that the LSA stores and manages.
For more information about these additional protections, see Configuring Additional LSA Protection.
Cached credentials and validation
Validation mechanisms rely on the presentation of credentials at the time of logon. However, when the computer is disconnected from a domain controller, and the user is presenting domain credentials, Windows uses the process of cached credentials in the validation mechanism.
Each time a user logs on to a domain, Windows caches the credentials supplied and stores them in the security hive in the registry of the operation system.
With cached credentials, the user can log on to a domain member without being connected to a domain controller within that domain.
Credential storage and validation
It is not always desirable to use one set of credentials for access to different resources. For example, an administrator might want to use administrative rather than user credentials when accessing a remote server. Similarly, if a user accesses external resources, such as a bank account, he or she can only use credentials that are different than their domain credentials. The following sections describe the differences in credential management between current versions of Windows operating systems and the Windows Vista and Windows XP operating systems.
Remote logon credential processes
The Remote Desktop Protocol (RDP) manages the credentials of the user who connects to a remote computer by using the Remote Desktop Client, which was introduced in Windows 8. The credentials in plaintext form are sent to the target host where the host attempts to perform the authentication process, and, if successful, connects the user to allowed resources. RDP does not store the credentials on the client, but the user’s domain credentials are stored in the LSASS.
Introduced in Windows Server 2012 R2 and Windows 8.1, Restricted Admin mode provides additional security to remote logon scenarios. This mode of Remote Desktop causes the client application to perform a network logon challenge-response with the NT one-way function (NTOWF) or use a Kerberos service ticket when authenticating to the remote host. After the administrator is authenticated, the administrator does not have the respective account credentials in LSASS because they were not supplied to the remote host. Instead, the administrator has the computer account credentials for the session. Administrator credentials are not supplied to the remote host, so actions are performed as the computer account. Resources are also limited to the computer account, and the administrator cannot access resources with his own account.
Automatic restart sign-on credential process
When a user signs in on a Windows 8.1 device, LSA saves the user credentials in encrypted memory that are accessible only by LSASS.exe. When Windows Update initiates an automatic restart without user presence, these credentials are used to configure Autologon for the user.
On restart, the user is automatically signed in via the Autologon mechanism, and then the computer is additionally locked to protect the user’s session. The locking is initiated through Winlogon whereas the credential management is done by LSA. By automatically signing in and locking the user’s session on the console, the user’s lock screen applications is restarted and available.
Stored user names and passwords in Windows Vista and Windows XP
After a user logs on and attempts to access additional password-protected resources, such as a share on a server, and if the user’s default logon credentials are not sufficient to gain access, Stored User Names and Passwords is queried. If alternate credentials with the correct logon information have been saved in Stored User Names and Passwords, these credentials are used to gain access. Otherwise, the user is prompted to supply new credentials, which can then be saved for reuse, either later in the logon session or during a subsequent session.
The following restrictions apply:
If Stored User Names and Passwords contains invalid or incorrect credentials for a specific resource, access to the resource is denied, and the Stored User Names and Passwords dialog box does not appear.
Stored User Names and Passwords stores credentials only for NTLM, Kerberos protocol, Microsoft account (formerly Windows Live ID), and Secure Sockets Layer (SSL) authentication. Some versions of Internet Explorer maintain their own cache for basic authentication.
These credentials become an encrypted part of a user’s local profile in the Documents and SettingsUsernameApplication DataMicrosoftCredentials directory. As a result, these credentials can roam with the user if the user’s network policy supports Roaming User Profiles. However, if the user has copies of Stored User Names and Passwords on two different computers and changes the credentials that are associated with the resource on one of these computers, the change is not propagated to Stored User Names and Passwords on the second computer.
Windows Vault and Credential Manager
Credential Manager was introduced in Windows Server 2008 R2 and Windows 7 as a Control Panel feature to store and manage user names and passwords. Credential Manager lets users store credentials relevant to other systems and websites in the secure Windows Vault. Some versions of Internet Explorer use this feature for authentication to websites.
Credential management by using Credential Manager is controlled by the user on the local computer. Users can save and store credentials from supported browsers and Windows applications to make it convenient when they need to sign in to these resources. Credentials are saved in special encrypted folders on the computer under the user’s profile. Applications that support this feature (through the use of the Credential Manager APIs), such as web browsers and apps, can present the correct credentials to other computers and websites during the logon process.
When a website, an application, or another computer requests authentication through NTLM or the Kerberos protocol, a dialog box appears in which you select the Update Default Credentials or Save Password check box. This dialog box that lets a user save credentials locally is generated by an application that supports the Credential Manager APIs. If the user selects the Save Password check box, Credential Manager keeps track of the user’s user name, password, and related information for the authentication service that is in use.
The next time the service is used, Credential Manager automatically supplies the credential that is stored in the Windows Vault. If it is not accepted, the user is prompted for the correct access information. If access is granted with the new credentials, Credential Manager overwrites the previous credential with the new one and then stores the new credential in the Windows Vault.
Security Accounts Manager database
The Security Accounts Manager (SAM) is a database that stores local user accounts and groups. It is present in every Windows operating system; however, when a computer is joined to a domain, Active Directory manages domain accounts in Active Directory domains.
The security context of a user or computer can vary from one computer to another, such as when a user logs on to a server or a workstation other than the user’s own primary workstation. It can also vary from one session to another, such as when an administrator modifies the user’s rights and permissions. In addition, the security context is usually different when a user or computer is operating on a stand-alone basis, in a network, or as part of an Active Directory domain.
Local domains and trusted domains
When a trust exists between two domains, the authentication mechanisms for each domain rely on the validity of the authentications coming from the other domain. Trusts help to provide controlled access to shared resources in a resource domain (the trusting domain) by verifying that incoming authentication requests come from a trusted authority (the trusted domain). In this way, trusts act as bridges that let only validated authentication requests travel between domains.
How a specific trust passes authentication requests depends on how it is configured. Trust relationships can be one-way, by providing access from the trusted domain to resources in the trusting domain, or two-way, by providing access from each domain to resources in the other domain. Trusts are also either nontransitive, in which case a trust exists only between the two trust partner domains, or transitive, in which case a trust automatically extends to any other domains that either of the partners trusts.
For information about domain and forest trust relationships regarding authentication, see Delegated Authentication and Trust Relationships.
Certificates in Windows authentication
A public key infrastructure (PKI) is the combination of software, encryption technologies, processes, and services that enable an organization to secure its communications and business transactions. The ability of a PKI to secure communications and business transactions is based on the exchange of digital certificates between authenticated users and trusted resources.
A digital certificate is an electronic document that contains information about the entity it belongs to, the entity it was issued by, a unique serial number or some other unique identification, issuance and expiration dates, and a digital fingerprint.
Authentication is the process of determining if a remote host can be trusted. To establish its trustworthiness, the remote host must provide an acceptable authentication certificate.
Remote hosts establish their trustworthiness by obtaining a certificate from a certification authority (CA). The CA can, in turn, have certification from a higher authority, which creates a chain of trust. To determine whether a certificate is trustworthy, an application must determine the identity of the root CA, and then determine if it is trustworthy.
Similarly, the remote host or local computer must determine if the certificate presented by the user or application is authentic. The certificate presented by the user through the LSA and SSPI is evaluated for authenticity on the local computer for local logon, on the network, or on the domain through the certificate stores in Active Directory.
To produce a certificate, authentication data passes through hash algorithms, such as Secure Hash Algorithm 1 (SHA1), to produce a message digest. The message digest is then digitally signed by using the sender’s private key to prove that the message digest was produced by the sender.
SHA1 is the default in Windows 7 and Windows Vista, but was changed to SHA2 in Windows 8.
Smart card authentication
Smart card technology is an example of certificate-based authentication. Logging on to a network with a smart card provides a strong form of authentication because it uses cryptography-based identification and proof of possession when authenticating a user to a domain. Active Directory Certificate Services (AD CS) provides the cryptographic-based identification through the issuance of a logon certificate for each smart card.
For information about smart card authentication, see the Windows Smart Card Technical Reference.
Virtual smart card technology was introduced in Windows 8. It stores the smart card’s certificate in the PC, and then protects it by using the device’s tamper-proof Trusted Platform Module (TPM) security chip. In this way, the PC actually becomes the smart card which must receive the user’s PIN in order to be authenticated.
Remote and wireless authentication
Remote and wireless network authentication is another technology that uses certificates for authentication. The Internet Authentication Service (IAS) and virtual private network servers use Extensible Authentication Protocol-Transport Level Security (EAP-TLS), Protected Extensible Authentication Protocol (PEAP), or Internet Protocol security (IPsec) to perform certificate-based authentication for many types of network access, including virtual private network (VPN) and wireless connections.
For information about certificate-based authentication in networking, see Network access authentication and certificates.
Источник
Problem
User launches Controller client. User chooses database.
User receives a ‘Windows Security’ message.
Symptom

- Windows Security
I want to complete this action by entering my credentials on the authentic Windows logon screen
I don’t want to complete this action
If the end user clicks ‘I want to complete this action by entering my credentials…’ then they will then receive a message similar to this:
- Press ‘CTRL — ALT — DEL’ and enter your Windows credentials.
[TIP: If working inside a remote session, type ‘CTRL — ALT — END’ instead].
Cause
Both of the following are true:
(1) The Controller website has been configured to use Windows authentication (not ‘anonymous’)
- This means that all users are required to logon (to the IIS website) using their Windows username/password
(2) The client device is been configured to have the following Microsoft Windows policy enabled:
- Computer Configuration –> Administrative Templates –> Windows Components –> Credential User Interface –> Require trusted path for credential entry
More Information
There are several possible methods to cause the client device to have ‘Require trusted path for credential entry‘ enabled:
- Scenario #1 (most likely): Microsoft Windows Active Directory Group Policy Object (‘GPO’) has been applied to the PC (or the end user) which has this option enabled
- Scenario #2: (less likely): There is a local policy (acting directly on the client device only)
The following printscreen shows Scenario #2, where the client device has a ‘local‘ policy applied:

However (as mentioned above) it is much more likely that this setting has (instead) been enabled inside a Microsoft Windows Active Directory Group Policy Object (GPO).
=> Ask your I.T. department’s security policy administrator for assistance in locating the reason why this has been enabled.
Environment
At least one of the sites ‘Default Web Site’, ‘ibmcognos’ or ‘cgi-bin’ have ‘Windows Authentication‘ enabled.
- For example:
Diagnosing The Problem
To prove that the message is coming from the website’s authentication settings, perform the following:
1. Launch Cognos Connection (for example: https://myserver.company.com/ibmcognos)
- Notice how the same message appears:
2. Click «I want to complete this action…»
- Notice how a logon screen appears, relating to logging onto Internet Explorer (iexplore.exe) with a Windows user:
=> Clearly the root cause is that the website is prompting the user to logon (using a Windows user), and the security policy is forcing the user to press ‘CTRL — ALT — DEL’ before it will allow users to type in Windows usernames/passwords.
Resolving The Problem
Either:
(1) Modify your Controller IIS website to use anonymous authentication (so that users are not prompted to put their Windows username/password when they launch Controller)
or (2) Disable the setting ‘Computer Configuration –> Administrative Templates –> Windows Components –> Credential User Interface –> Require trusted path for credential entry‘.
- In other words, modify it from ‘Enabled’ to ‘Not Configured’.
- TIP: Ask your I.T. department’s security policy administrator for assistance in locating where to change this setting.
Steps:
(1) To modify your Controller website to use anonymous authentication:
1. Logon to the Controller application server
2. Launch ‘Internet Information Services (IIS) Manager’
3. Expand ‘Sites’ and highlight ‘Default Web Site‘
4. Double-click on ‘Authentication‘
5. Right-click on ‘Windows Authentication‘ and choose ‘Disable‘
6. Right-click on ‘Anonymous Authentication‘ and choose ‘Enable‘
7. Expand ‘Default web site’ and highlight ‘ibmcognos‘
8. Repeat steps 4, 5 and 6
9. Expand ‘ibmcognos’ and highlight ‘cgi-bin‘
10. Repeat steps 4, 5 and 6
11. Test.
(2) To Disable ‘Require trusted path for credential entry‘.
Ask your I.T. department’s security administrator to modify their security policy.
[{«Product»:{«code»:»SS9S6B»,»label»:»IBM Cognos Controller»},»Business Unit»:{«code»:»BU059″,»label»:»IBM Software w/o TPS»},»Component»:»Controller»,»Platform»:[{«code»:»PF033″,»label»:»Windows»}],»Version»:»10.2.1″,»Edition»:»»,»Line of Business»:{«code»:»LOB10″,»label»:»Data and AI»}}]
Update on 13 March 2013: A recent blog entry on The Old New Thing mentions a talk, during which Aaron Margosis, in addition to stating that the policy isn’t very effective because people forget having to press Ctrl+Alt+Del and will just enter their password when the prompt shows up, confirms that usability is indeed a problem.
In Windows NT, Ctrl+Alt+Delete is known as the secure attention sequence or SAS. If you ever tried installing Windows Server 2003, you will be prompted to ‘Press CTRL+ALT+DELETE to log on’. The procedure makes logging on more secure. How’s that more secure? For an uninfected copy of Windows, the sequence is handled exclusively by Windows. Once Windows intercepts SAS, it brings the user to the Secure Desktop, which consists of authentic Windows UI. The user can be confident that whatever he or she enters will not be handled by some bogus software.
Depict a scenario where you typically use Windows+L to lock your computer, some trojan might set HKCUSoftwareMicrosoftWindowsCurrentVersionPoliciesSystemDisableLockWorkstation to 1 and handle Windows+L itself. It presents a fake Lock Screen, as if the computer were locked. When you swipe up the fake Lock Screen, it presents you with a fake Welcome Screen, asking for your credential. It validates your credential with LogonUser function and hides itself if the validation succeeds. The problem? You’ve just entered your credential into a trojan! If you require yourself to press SAS before logging on, and if you do that before entering your credential to the fake Welcome Screen, Windows will take control and you will realise that a trojan was trying to fool you.
When Windows 8 came out, tablet PCs without a keyboard become more common (actually there has always been the problem since at least Windows XP). How do you perform SAS without a keyboard? Windows handles at least 2 more SAS, one Power+Volume Down, the other a dedicated hardware button called ‘Windows Security’. I actually tried enabling the requirement of SAS before logging on on my Surface RT, and it worked pretty well — you’ll be prompted to press SAS on Lock Screen, after which you will see Welcome Screen.
Okay, so much for background knowledge. What’s wrong with SAS? In yesterday’s entry, I mentioned Mark Russinovich’s TechNet Magazine article, where you could find a suggestion to require trusted path for credential entry to thwart trojans mimicking UAC credential dialog.
If you open Group Policy Editor, enable the policy ‘Require trusted path for credential entry’ under Computer Configuration | Administrative Templates | Windows Components | Credential User Interface, you will see it in effect. The policy also affects other places where Credential UI is involved. Whenever an elevation is required, a dialog pops up, saying ‘Enter my credentials on the authentic Windows sign-in screen’ with two choices, OK and Cancel. If you press OK, you will be prompted to ‘Press Ctrl+Alt+Delete or press and hold the power button, and then press the volume down button to enter your credentials’ (the prompt might vary by the availability of input hardware). Then you can press SAS, and do the normal elevation procedure.
What’s the problem here? There are many:
- Even if you are an administrator and are using Admin Approval Mode, you still have to go through the complicated procedure. However, the SAS is redundant because you don’t actually enter your sensitive credential. As mentioned in the TechNet Magazine article, a faked AAM dialog is not harmful. This problem itself does not kill the feature, but when combined with the next problem, I wonder how many users actually stand such mumbo-jumbo.
- The procedure is over complicated for efficient usage. The flow can be simplified for UAC scenario. Windows could switch to the Secure Desktop, ask the user to press SAS before continuing, just like the logging-on scenario. This saves the user a mouse click or two keyboard hits (first Tab away from Cancel, then hit Enter; and sometimes even more, see the next problem). Switching directly to the Secure Desktop and asking for SAS and then the consent is much more fluent than the current flow for AAM elevation. For other scenarios (non-UAC scenarios), whether letting the user to acknowledge before prompting for credentials or going directly to the Secure Desktop remains to be discussed. I would say going there directly is better. Most of the time when a Credential UI dialog comes up, the user indeed knows he or she needs to enter a credential.
- If you start a program with
"runas"verb in PowerShell, the prompt dialog does not automatically get focused. (If the policy is disabled, the UAC consent dialog automatically gets focused, and of course you expect that to happen!) - If the policy is enabled, you don’t get the desktop background when approving UAC elevation, and the icon shown in the consent dialog will always be the generic executable file icon. While it’s not the most important thing, it does make the dialog less stylish.
The most significant problem is the usability. The secure flow is designed to be so difficult to use! I wish Microsoft could rectify this problem in near future.
Диспетчер учетных данных не новинка. Он существует уже давно и позволяет не только сохранять имя пользователя и пароль, но также позволяет просматривать, удалять, добавлять, создавать резервные копии и восстанавливать информацию для входа в систему.
В этом руководстве вы узнаете, как использовать диспетчер учетных данных в Windows 10 для управления всей вашей регистрационной информацией.
Редактировать существующую информацию для входа в систему с помощью диспетчера учетных данных
Чтобы обновить пароль или имя пользователя, хранящиеся в Windows 10, выполните следующие действия:
Шаг 1. Откройте Панель управления в Windows 10.
Шаг 2. Щелкните Учетные записи пользователей.
Шаг 3. Щелкните Диспетчер учетных данных.
Шаг 4 Щелкните вкладку Учетные данные Windows (или Учетные данные для Интернета).
Шаг 5. Выберите учетную запись.
Шаг 6. Щелкните кнопку Edit.
Нажмите кнопку "Изменить".
Шаг 7. При необходимости обновите свое имя пользователя и пароль.
Шаг 8. Нажмите кнопку «Сохранить».
Нажмите кнопку Сохранить.
Когда вы выполните эти шаги, новая информация для входа будет обновлена, что означает, что больше не будет запросов на вход, если вы изначально сохранили неправильное имя пользователя или пароль или информация для входа изменилась.
Удалить учетные данные для входа с помощью диспетчера учетных данных
Удалите учетные данные, хранящиеся в Windows 10, выполните следующие действия:
1. Откройте Панель управления.
2. Щелкните Учетные записи пользователей.
3. Щелкните Диспетчер учетных данных.
4. Щелкните вкладку Учетные данные Windows (или Учетные данные для Интернета).
5. Выберите учетную запись.
6. Щелкните кнопку Удалить.
Нажмите кнопку "Удалить".
7. Щелкните кнопку Да.
После того, как вы выполните эти шаги, информация для входа в учетную запись больше не будет доступна на устройстве, а это означает, что вам будет предложено ввести свое имя пользователя и пароль при входе в систему в будущем.
Чтобы добавить приложения или информацию о сети в Windows 10, выполните следующие действия:
1. Откройте Панель управления.
2. Щелкните Учетные записи пользователей.
3. Щелкните Диспетчер учетных данных.
4. Щелкните вкладку Учетные данные Windows.
5. Щелкните параметр Добавить учетные данные Windows (или Добавить учетные данные на основе сертификата).
Щелкните параметр Добавить учетные данные Windows.
6. Укажите Интернет или сетевой адрес, соответствующий ресурсу приложения или сети.
7. Укажите имя пользователя и пароль для аутентификации.
Укажите имя пользователя и пароль для аутентификации
8. Щелкните кнопку ОК.
Когда вы выполните эти шаги, новая информация об учетной записи будет добавлена на устройство для автоматического входа в систему при следующем доступе к общим приложениям или сетям.
Резервное копирование информации для входа с помощью Credential Manager
Чтобы экспортировать и создать резервную копию всех учетных данных для приложений и сетей, выполните следующие действия:
1. Откройте Панель управления.
2. Щелкните Учетные записи пользователей.
3. Щелкните Диспетчер учетных данных.
4. Щелкните вкладку Учетные данные Windows.
5. Щелкните параметр «Резервное копирование учетных данных».
Выберите параметр «Резервное копирование учетных данных».
6. Нажмите кнопку «Обзор», чтобы указать место назначения для резервной копии.
Нажмите кнопку Обзор, чтобы указать место назначения для резервной копии.
7. Укажите имя файла резервной копии .crd.
8. Щелкните кнопку Сохранить.
9. Щелкните кнопку Далее.
10. Для продолжения используйте сочетания клавиш Ctrl + Alt + Delete.
11. Укажите пароль для защиты файла диспетчера учетных данных в Windows 10.
12. Щелкните кнопку Далее.
13. Щелкните кнопку Готово.
После выполнения этих шагов вы получите файл .crd, содержащий всю информацию из Интернета и Windows 10, которую вы можете ввести на другой компьютер или на то же устройство после «чистой» установки.
Восстановите данные для входа с помощью Credential Manager
Чтобы восстановить данные для входа из резервной копии в Windows 10, выполните следующие действия:
1. Откройте Панель управления.
2. Щелкните Учетные записи пользователей.
3. Щелкните Диспетчер учетных данных.
4. Щелкните вкладку Учетные данные Windows.
5. Щелкните параметр Восстановить учетные данные.
Нажмите на опцию Восстановить учетные данные
6. Щелкните кнопку Обзор.
Нажмите кнопку "Обзор".
7. Выберите файл .crd с информацией о резервной копии.
8. Щелкните кнопку Открыть.
9. Щелкните кнопку Далее.
10. Для продолжения используйте сочетания клавиш Ctrl + Alt + Delete.
11. Введите пароль, чтобы разблокировать резервное копирование Credential Manager.
12. Щелкните кнопку Далее.
13. Щелкните кнопку Готово.
Когда вы выполните этот шаг, вся ваша веб-информация, информация о приложениях и сети будет восстановлена на устройстве.
Хотя в этом руководстве основное внимание уделяется Windows 10, Credential Manager доступен уже давно, что означает, что эти шаги также могут быть применены в Windows 8.1 и Windows 7.
Some Windows users are reporting they can’t access other Windows computer on their network because they can’t enter the credentials to connect to another computer because the login fails with the Enter network credentials error message The user name or password is incorrect. This post provides the most adequate solutions to this issue.

What does Enter Network credentials mean?
Network Credentials simply means a user ID and password created by the end-user in the case of a Home network or an IT administrator in the case of a domain environment, which is required to be entered into the computer you’re trying to connect to. This credential can be a Microsoft Account or a Local Account ID.
How do I stop asking for Network credentials?
PC users that want to stop receiving network credentials prompt can turn off password protected sharing by following these steps: Type Network and Sharing Center in the search bar on the Windows taskbar, select Advanced Sharing Setting, select Turn off password protected sharing for all networks.
If you’re constantly faced with this Enter network credentials error on your Windows 11/10, you can try our recommended solutions below in no particular order and see if that helps to resolve the issue.
- Clear all credentials from Credential Manager
- Disable Credential Manager Service automatic Startup
- Turn off password-protected sharing
- Modify Local Security Policy
- Add the credentials in Credentials Manager
- Set IP address to automatic
- Change Network Profile to Private
Let’s take a look at the description of the process involved concerning each of the listed solutions.
Before you try any of the solutions below, try to use the username and password for your Microsoft account instead of that of your local account for your Windows computer and see if you can log on without issues. Also, you can try using the Computer Name and Account Name as the Username. Assuming you want to access another computer named as TWC7, and suppose the account name on that computer is Obinna, you can input the username as TWC7Obinna without spaces, and then input your password.
1] Clear all credentials from Credential Manager
The first thing you can try is to clear all credentials from Credentials Manager on your Windows 11/10 PC and see if the Enter network credentials error is resolved. Otherwise, try the next solution.
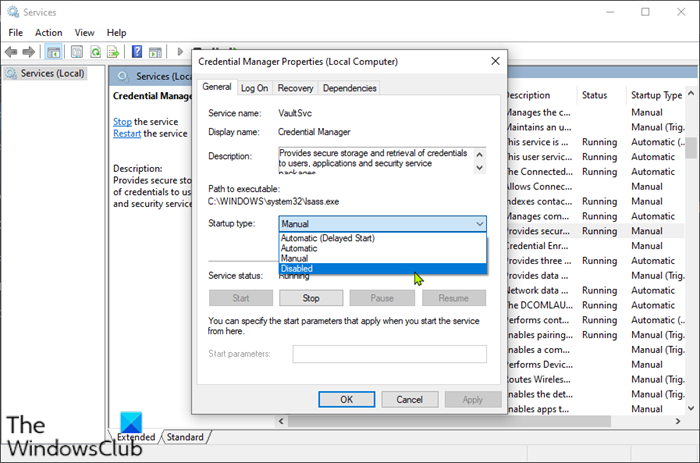
2] Disable Credential Manager Service automatic Startup
To disable Credential Manager Service automatic Startup on your Windows PC, do the following:
- Press Windows key + R to invoke the Run dialog.
- In the Run dialog box, type services.msc and hit Enter to open Services.
- In the Services window, scroll and locate the Credential Manager service.
- Double-click on the entry to edit its properties.
- In the properties window, click the drop-down on the Startup type and select Disabled.
- Click Apply > OK to save changes.
- Exit Services console.
- Restart PC.
Try connecting and if the issue isn’t resolved, try the next solution.
3] Turn off password-protected sharing
To turn off password protected sharing on your Windows PC, do the following:
- Right-click the network status icon on the notification area on the taskbar.
- Select Open Network and Internet settings.
- On the Network and Internet settings page, click Network and Sharing Center on the right pane.
- On the Network and Sharing Center Control Panel, click the Change advanced sharing settings link on the left navigation pane.
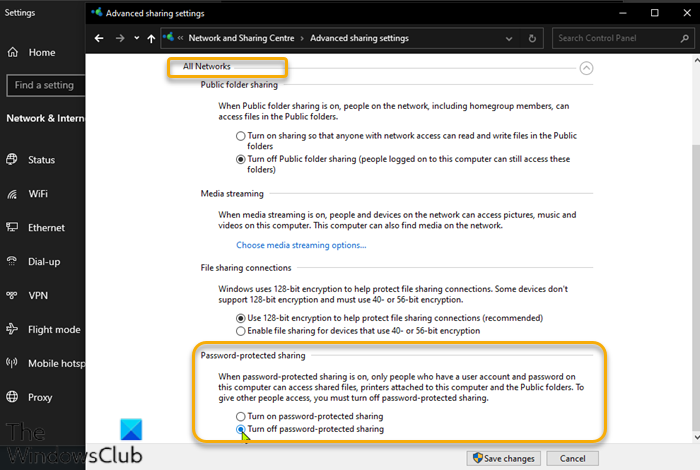
- In the Advanced sharing settings window, click on All Networks.
- Under Password-protected sharing section, select the radio button for Turn off password-protected sharing.
- Click on Save Changes.
- Exit Control Panel.
- Restart PC.
On boot, see if the issue is resolved. If not, proceed with the next solution.
4] Modify Local Security Policy
Do the following:
- Press Windows key + R to invoke the Run dialog.
- In the Run dialog box, type secpol.msc and hit Enter to open Local Security Policy console.
- In the console, on the left navigation pane, click Local Policies > Security Options.
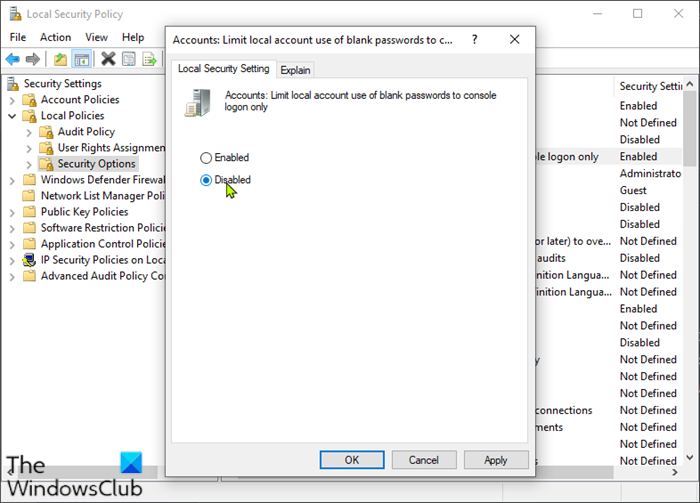
- On the right pane, double-click the Accounts: Limit local account use of blank passwords to console logon only policy to edit its properties.
- In the properties page, select the radio button for Disabled.
- Click Apply > OK.
- Exit Local Security Policy manager.
- Restart PC.
Try the next solution if the issue is unresolved.
5] Add the credentials in Credentials Manager
It could be the credentials you’re trying to use to logon to the computer on the network is not stored in the Credential Manager. If this is the case, you can add the credentials in Credential Manager.
To add the credentials in Credential Manager on your Windows PC, do the following:
- Type credentials in the search box.
- Choose Credential Manager from the list of results.
- Click the Windows Credentials bar.
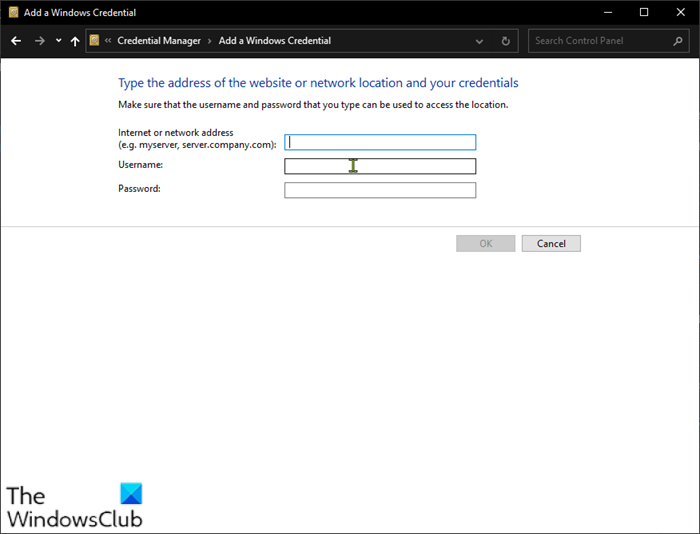
- Click Add a Windows Credential.
- In the Add a Windows Credential page, fill in the network address, user name and password related to the computer that you want to access.
- Click OK when done.
- Exit Credential Manager.
- Restart PC.
Now, try logging into the computer; if unsuccessful with the same issue, you can try the next solution.
6] Set IP address to automatic
If the IP address for your Windows PC is not configured properly you’ll encounter this error when you are trying to access other computers on the same network. To rule out the possibility of incorrect IP address as a culprit to this issue, do the following:
- Press Windows key + R to invoke the Run dialog.
- In the Run dialog box, type ncpa.cpl and hit Enter to open Network Connections control panel.
- Next, right-click on the network connection you are using and click on Properties.
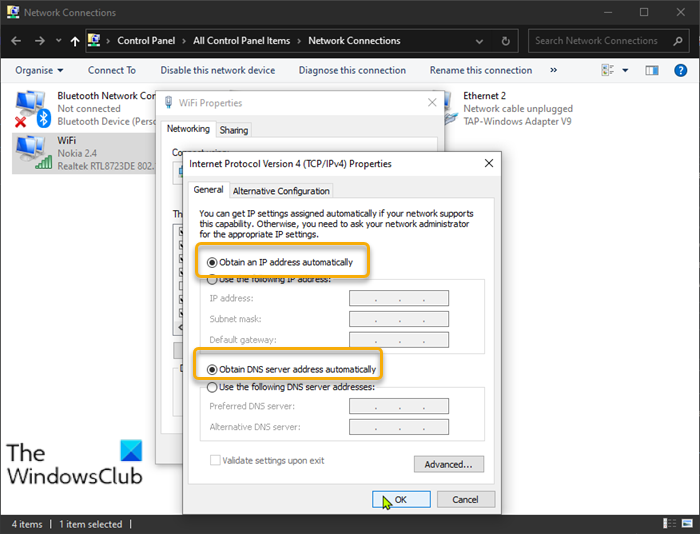
- Select and double-click the Internet Protocol Version 4 (TCP/IPv4) option to edit its properties.
- In the General tab, make sure the radio button is set to Obtain an IP address automatically and Obtain DNS server address automatically.
- Click OK to save the changes.
- Click OK again to exit Network Connections properties.
- Exit Control Panel.
- Restart PC.
See if you can now logon successfully, otherwise try the next solution.
8] Change Network Profile to Private
If your network profile is set as Public, you may encounter this issue. In this case, you can set your network profile to Private – this will help as Windows will allow access to the network.
Any of these solutions should work for you!
Related post: Your Credentials did not work in Remote Desktop on Windows.
Credential Manager on Windows 11 is a feature designed to store sign-in information for websites you browse in Microsoft Edge, apps, and networks (for example, shared folders and mapped drives) when you select the save credentials options.
The application has been around for many years and in addition to saving your login usernames and passwords, it also provides options to view, add, remove, and back up all of your credentials.
In this guide, you will learn the steps to get started with the Credential Manager on Windows 11.
- Edit sign-in info using Credential Manager
- Delete sign-in info using Credential Manager
- Add new sign-in info using Credential Manager
- Export sign-in info using Credential Manager
- Import sign-in info using Credential Manager
Edit sign-in info using Credential Manager
To change a password or username already stored on Windows 11, use these steps:
-
Open Control Panel on Windows 11.
-
Click on User Accounts.
-
Click on Credential Manager.
-
Click the Windows Credentials tab (or Web Credentials).
-
Select the account.
-
Click the Edit button.
-
Update the username and password as needed.
-
Click the Save button.
Once you complete the steps, the new information will automatically sign in to network or internet services.
Delete sign-in info using Credential Manager
To delete an account stored in Credential Manager, use these steps:
-
Open Control Panel.
-
Click on User Accounts.
-
Click on Credential Manager.
-
Click the Windows Credentials tab (or Web Credentials).
-
Select the account.
-
Click the Remove button.
-
Click the Yes button.
After you complete the steps, the account credentials will be removed from the computer, and you will be required to enter a username and password in future logins.
Add new sign-in info using Credential Manager
To add an app or network credential on Windows 11 with Credential Manager, use these steps:
-
Open Control Panel.
-
Click on User Accounts.
-
Click on Credential Manager.
-
Click the Windows Credentials tab.
-
Click the Add a Windows credential (or Add a certificate-based credential) option.
-
Specify the internet or network address for the app or network service.
-
Specify the username and password to authenticate.
-
Click the OK button.
Once you complete the steps, the new account information will be added to the computer to sign in automatically the next time you access the apps or network shared folder.
Export sign-in info using Credential Manager
To export and backup all credentials from Credential Manager, use these steps:
-
Open Control Panel.
-
Click on User Accounts.
-
Click on Credential Manager.
-
Click the Windows Credentials tab.
-
Click the Back up Credentials option.
-
Click the Browse button to specify a destination for the backup.
-
Specify a name for the .crd backup file.
-
Click the Save button.
-
Click the Next button.
-
Use the Ctrl + Alt + Delete keyboard shortcut to continue.
-
Specify a password to protect the Credential Manager file on Windows 11.
-
Click the Next button.
-
Click the Finish button.
After you complete the steps, the process will result in a “.crd” file containing all your Windows 11 and web credentials, which you can then import to another computer or the same device after a clean installation.
Import sign-in info using Credential Manager
To restore your sign-in information from backup on Windows 11, use these steps:
-
Open Control Panel.
-
Click on User Accounts.
-
Click on Credential Manager.
-
Click the Windows Credentials tab.
-
Click the Restore Credentials option.
-
Click the Browse button.
-
Select the .crd files with the backup information.
-
Click the Open button.
-
Click the Next button.
-
Use the Ctrl + Alt + Delete keyboard shortcut to continue.
-
Type the password to unlock the Credential Manager backup.
-
Click the Next button.
-
Click the Finish button.
Once you complete the step, the file will import to restore your web, app, and network credentials on Window 11.
We may earn commission for purchases using our links to help keep offering the free content. Privacy policy info.
All content on this site is provided with no warranties, express or implied. Use any information at your own risk. Always backup of your device and files before making any changes. Privacy policy info.
How do I find my Windows 10 UserName and password?
Where are passwords stored in Windows 10?
- Go to the Windows Control Panel.
- Click on User Accounts.
- Click on Credential Manager.
- Here you can see two sections: Web Credentials and Windows Credentials.
16 июл. 2020 г.
If you need to see the list of your credentials, you may go to Control Panel > User Accounts > Credential Manager. You may click the dropdown arrow then click Show on Password field.
How do I find my network credentials password and UserName?
Open Control Panel in the Start Menu. b. Open Network and Sharing Center in the Control Panel. Note: If Network and Sharing Center is not available, change View by to Large icons at the top right of the Control Panel.
How do I find my Microsoft username and password?
Look up your username using your security contact phone number or email address. Request a security code to be sent to the phone number or email you used. Enter the code and select Next. When you see the account you’re looking for, select Sign in.
How can I know my username?
To find your username and reset your password:
- Go to the Forgot Password or Username page.
- Enter your account email address, but leave the username box blank!
- Click Continue.
- Check your email inbox—you’ll get an email with a list of any usernames associated with your account email address.
Where do I find my saved passwords on my computer?
Check your saved passwords
- On your computer, open Chrome.
- At the top, click More Settings.
- Select Passwords Check passwords.
Where do I find my saved passwords?
See, delete, or export passwords
- On your Android phone or tablet, open the Chrome app .
- To the right of the address bar, tap More .
- Tap Settings. Passwords.
- See, delete, or export a password: See: Tap View and manage saved passwords at passwords.google.com. Delete: Tap the password you want to remove.
What is credential username and password?
Login credentials authenticate a user when logging into an online account over the Internet. At the very least, the credentials are username and password; however, a physical or human biometric element may also be required. See username, password and two-factor authentication.
What are my credentials?
“Credentials” often refer to academic or educational qualifications, such as degrees or diplomas that you have completed or partially-completed. “Credentials” can also refer to occupational qualifications, such as professional certificates or work experience.
How do I remove username and password from network sharing?
Resolution
- On your keyboard hit the WINDOWS KEY+R.
- Type Control Panel, then click OK.
- Select Network and Sharing Center.
- Select Change advanced sharing settings.
- At the bottom of the screen, select the All Networks.
- Select Turn off password protected sharing.
- Select Save Changes.
10 нояб. 2013 г.
Why can’t I log into my Microsoft account?
When you can’t sign in to your Microsoft account (also called as Windows Live ID), that means the system is not accepting your log in credentials because you may be entering the wrong account name, the wrong password, or both. Here’s the info to get you back in to your account as quickly as possible.
How do I log into my Microsoft account?
For Office apps installed on an Android or Chromebooks:
- Open the Office app. On the Recent screen, tap Sign In.
- On the Sign In screen, type the email address and password you use with Office.
What is an example of a user ID?
If the system or network is connected to the Internet, the username typically is the leftmost portion of the e-mail address, which is the portion preceding the @ sign. In the e-mail address ray@contextcorporation.com, for example, ray is the username. User ID is synonymous with username. See also password.

