Если у вас есть локальная сеть, вы, вероятно, делитесь файлами между компьютерами. Чтобы защитить ваш компьютер от несанкционированного доступа, Windows 10 использует сетевые учетные данные. Это достойная защита, но несколько пользователей сообщали об определенных проблемах, когда их просили ввести сетевые учетные данные в Windows 10.
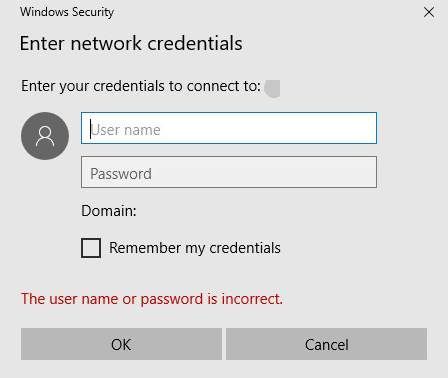
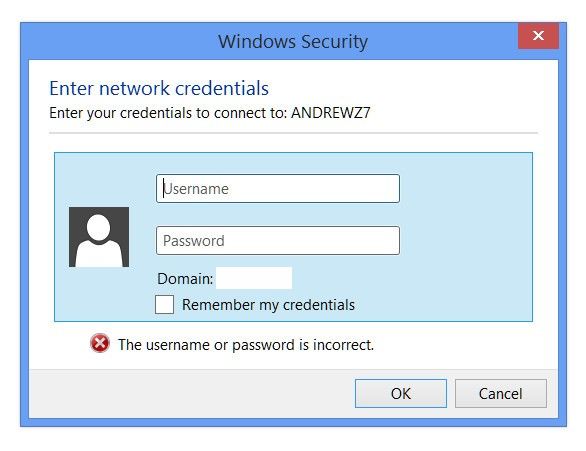
Сообщение « Введите сетевые учетные данные» может появиться при попытке доступа к общим дискам или каталогам и запретить вам доступ к вашим файлам. Говоря об этом сообщении, вот некоторые похожие проблемы, о которых сообщили пользователи:
- Введите сетевые учетные данные, имя пользователя или пароль неверны — эта ошибка может появиться, если ваш пароль неверен . Чтобы устранить эту проблему, попробуйте ввести учетные данные для входа в учетную запись Microsoft.
- Введите сетевые учетные данные Windows 8, 7 — это сообщение может появиться практически в любой версии Windows. Если у вас возникла эта проблема в Windows 8 или 7, вы должны знать, что большинство наших решений могут быть применены к обеим этим системам.
- Сетевые учетные данные Windows 10 неверны. Иногда может появиться сообщение о том, что ваши учетные данные неверны. Чтобы решить эту проблему, вам, возможно, придется изменить свои политики безопасности.
- Ввод сетевых учетных данных. Отказано в доступе. Иногда может появиться сообщение «Отказано в доступе» вместе с запросом сетевых учетных данных. Чтобы решить эту проблему, попробуйте отключить определенные службы и проверьте, помогает ли это.
- Ввести сетевую папку с учетными данными сети — эта ошибка обычно возникает при попытке доступа к общей папке. Тем не менее, вы должны быть в состоянии решить проблему с помощью одного из наших решений.
- Сетевые учетные данные, запрашивающие пароль. Если вас продолжают спрашивать о сетевых учетных данных, возможно, проблема связана с вашей учетной записью. Просто создайте новую учетную запись пользователя и проверьте, решает ли это вашу проблему.
Решение 1. Проверьте, правильно ли назначены ваши IP-адреса.
В локальной сети вы, вероятно, назначаете всем компьютерам статические IP-адреса, чтобы получить к ним более легкий доступ. По словам пользователей, ваш IP-адрес может быть установлен на автоматический, и это может иногда вызывать проблемы с сетевыми учетными данными, поэтому обязательно проверьте, установлены ли статические IP-адреса ваших сетевых устройств. Для установки статических IP-адресов вы всегда можете использовать встроенное программное обеспечение вашего маршрутизатора.
Решение 2. Введите имя пользователя и пароль своей учетной записи Microsoft
Windows 10 в значительной степени зависит от вашей учетной записи Microsoft, и, поскольку вы можете использовать свою учетную запись Microsoft для входа в Windows 10, вы также можете использовать ее для доступа к другим сетевым устройствам в вашей локальной сети. Пользователи сообщили, что вы можете исправить проблемы с сетевыми учетными данными, просто введя имя пользователя и пароль своей учетной записи Microsoft вместо имени пользователя и пароля своей локальной учетной записи.
Важно отметить, что многие проблемы в сети вызваны вредоносными программами, различными скриптами и ботами. Вы можете обезопасить себя, установив Cyberghost (77% флэш-продаж), лидера на рынке VPN. Он защищает ваш компьютер от атак во время просмотра, маскирует и управляет вашим IP-адресом и блокирует любой нежелательный доступ.
Решение 3. Введите имя компьютера в поле имени пользователя
По словам пользователей, вы можете исправить проблемы с сетевыми учетными данными, введя имя компьютера, к которому вы пытаетесь получить доступ, а затем имя пользователя.
Например, если компьютер, к которому вы пытаетесь получить доступ, называется « Компьютер1», и у вас есть пользователь с именем « Майк», вам необходимо ввести как имя компьютера, так и имя пользователя в поле ввода пользователя. В нашем примере поле имени пользователя будет Computer1 Mike . Имейте в виду, чтобы не вводить косые черты перед именем компьютера.
Решение 4. Используйте имя пользователя и пароль для входа в Windows 10
Пользователи сообщили, что вы не можете подключиться к другим сетевым компьютерам, если вы не используете имя пользователя и пароль для входа в систему. Это ограничение в основном затрагивает пользователей, которые входят в Windows 10 с помощью PIN-кода, поэтому, если вам нужно получить доступ и поделиться файлы с другими, вы можете временно прекратить использование PIN-кода для входа в систему.
Решение 5. Добавьте сетевые учетные данные другого ПК в Credentials Manager
Одним из способов решения проблем с сетевыми учетными данными является добавление учетных данных другого компьютера в диспетчер учетных данных. Для этого вам нужно знать имя компьютера, к которому вы хотите получить доступ, имя учетной записи пользователя и пароль, связанный с этой учетной записью. После получения всей этой информации вы можете добавить ее в диспетчер учетных данных, выполнив следующие действия:
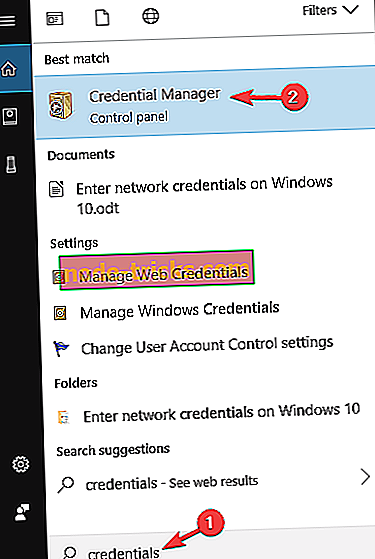
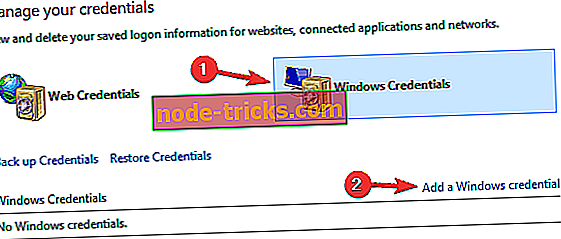
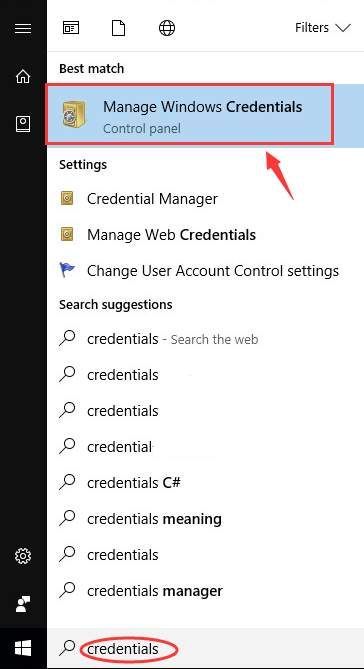
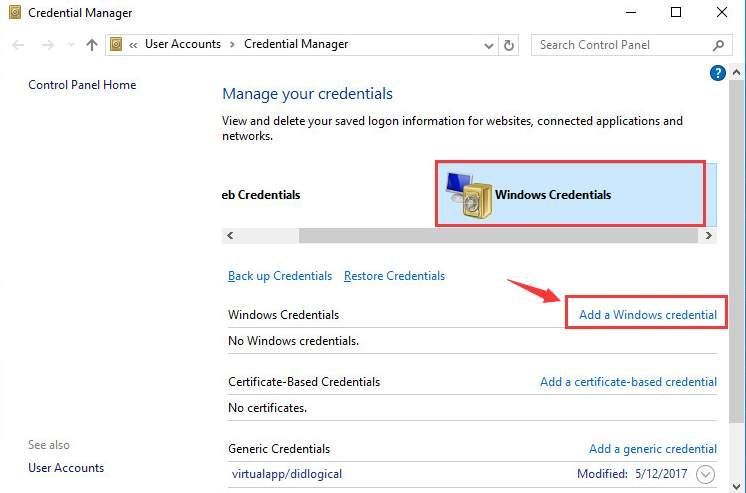
- Нажмите Windows Key + S и введите учетные данные . Выберите Диспетчер учетных данных из меню.

- Убедитесь, что выбраны учетные данные Windows . Нажмите Добавить учетные данные Windows .
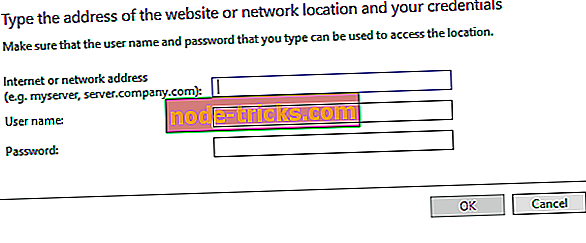
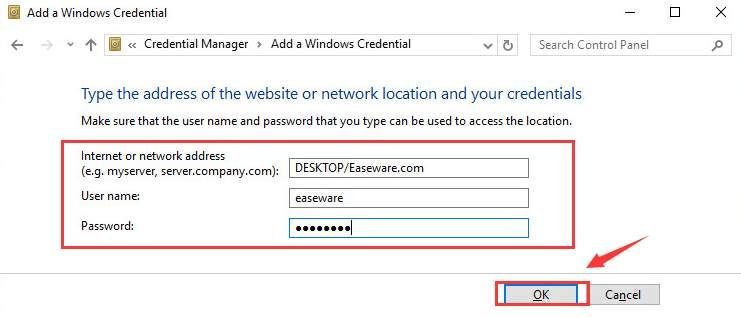
- Введите имя компьютера, к которому вы хотите получить доступ, имя пользователя и пароль, связанный с этим именем пользователя.
- Как только вы закончите, нажмите ОК .
После добавления информации о другом компьютере в диспетчер учетных данных вы сможете получить к нему доступ без каких-либо проблем.
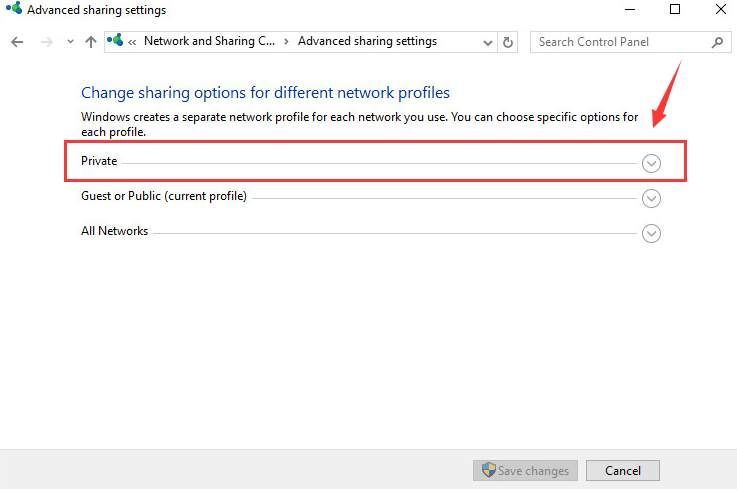
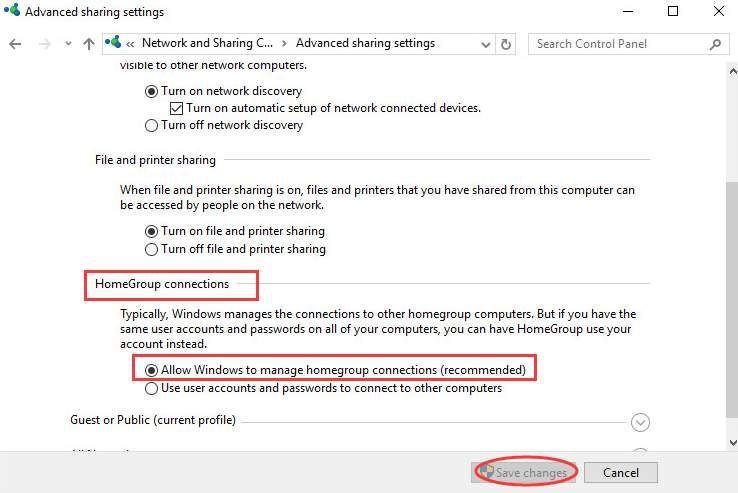
Решение 6 — Изменить расширенные настройки общего доступа
Немногие пользователи сообщили, что вы можете исправить проблемы с сетевыми учетными данными, изменив расширенные настройки общего доступа. Для этого выполните следующие действия:
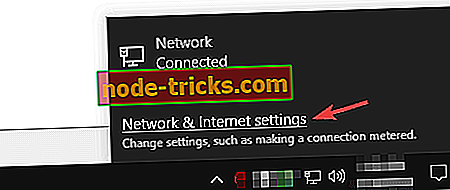
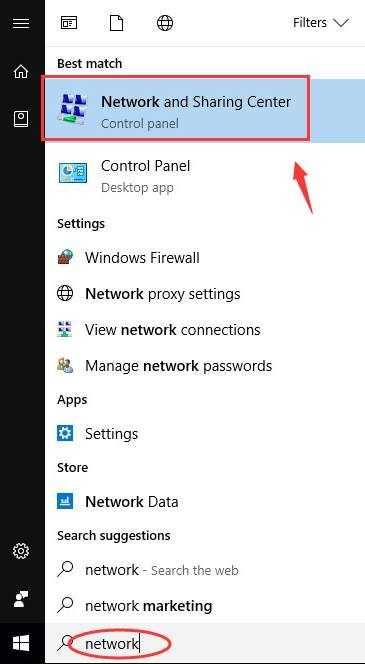
- Нажмите значок сети на панели задач и выберите « Настройки сети и Интернета» .
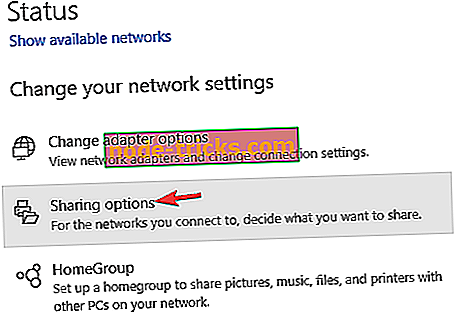
- Нажмите на параметры общего доступа .
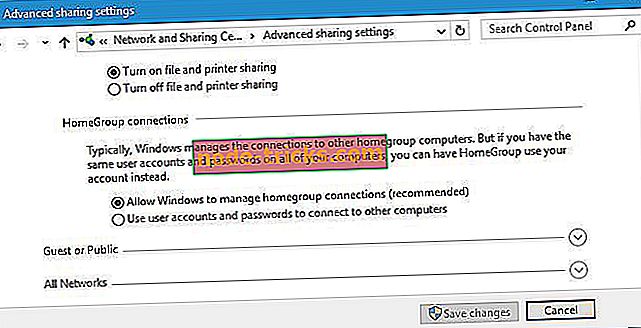
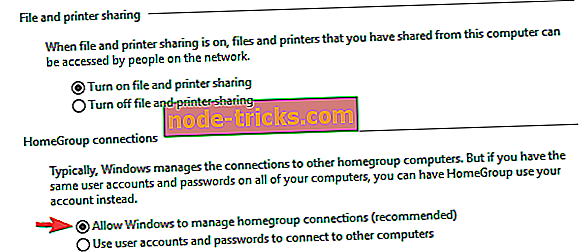
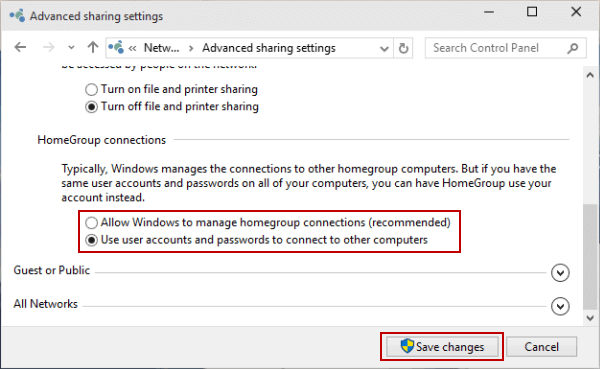
- Найдите свой сетевой профиль и перейдите в раздел подключений HomeGroup . Убедитесь, что выбран параметр Разрешить Windows для управления соединениями домашней группы (рекомендуется) .
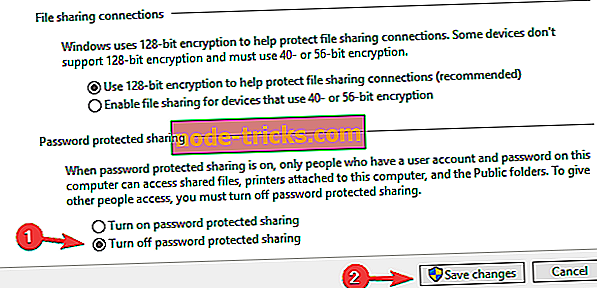
- Нажмите Сохранить изменения .
Несколько пользователей сообщили, что вы можете решить эту проблему, просто изменив следующие дополнительные параметры общего доступа:
- Откройте окно « Дополнительные настройки общего доступа» .
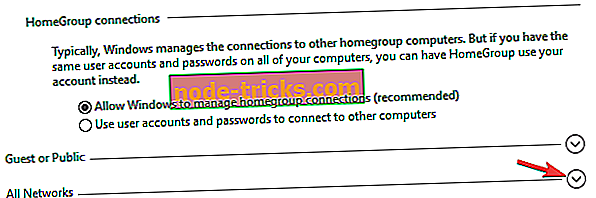
- Теперь разверните раздел Все сети .
- В разделе общего доступа, защищенного паролем, выберите Отключить общий доступ, защищенный паролем . Нажмите кнопку Сохранить изменения .
После внесения этих изменений проблема должна быть полностью решена.
Если проблема не устранена, мы также рекомендуем вам загрузить этот инструмент (на 100% безопасный и протестированный нами) для сканирования и устранения различных проблем с ПК, таких как потеря файлов, вредоносное ПО и отказ оборудования.
Решение 7 — Измените ваши политики безопасности
Иногда сообщение « Введите учетные данные сети» может появиться на вашем компьютере из-за политик безопасности. Однако вы можете легко изменить эти политики, если вы являетесь администратором на своем ПК. Чтобы изменить политики безопасности, вам нужно сделать следующее:
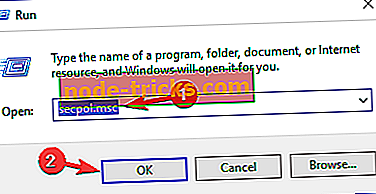
- Нажмите Windows Key + R и введите secpol.msc . Теперь нажмите Enter или нажмите ОК .
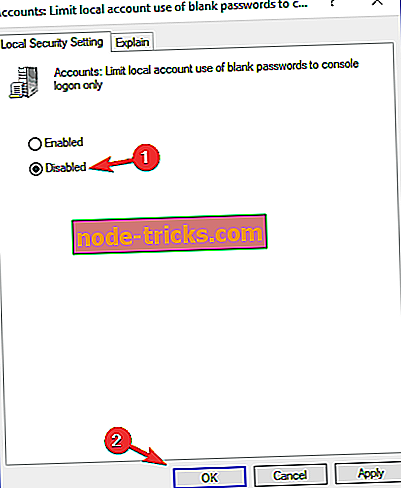
- Когда откроется окно локальной политики безопасности, на левой панели перейдите к Локальные политики> Параметры безопасности . На правой панели дважды щелкните Учетные записи: ограничить использование пустыми паролями локальной учетной записи только для входа в консоль .
- Теперь выберите Disabled из меню и нажмите Apply и OK .

После внесения этих изменений проблема с этим сообщением должна быть полностью решена, и все снова начнет работать.
Решение 8 — Изменить ваши услуги
По словам пользователей, иногда вы можете исправить сообщение Введите сетевые учетные данные, просто отключив определенные службы. Это довольно просто, и вы можете сделать это, выполнив следующие действия:
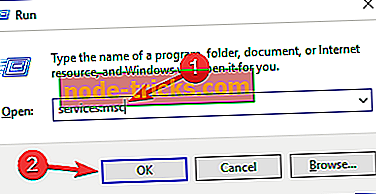
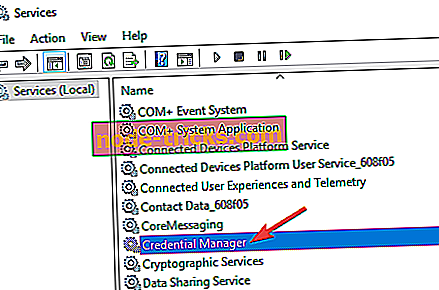
- Нажмите Windows Key + R и введите services.msc . Теперь нажмите Enter или нажмите ОК .
- Когда откроется окно « Службы», найдите диспетчер учетных данных в списке и дважды щелкните его.
- Откроется окно свойств. Установите для параметра « Тип запуска» значение « Отключено» и нажмите кнопку « Стоп», чтобы остановить службу. Теперь нажмите Применить и ОК .
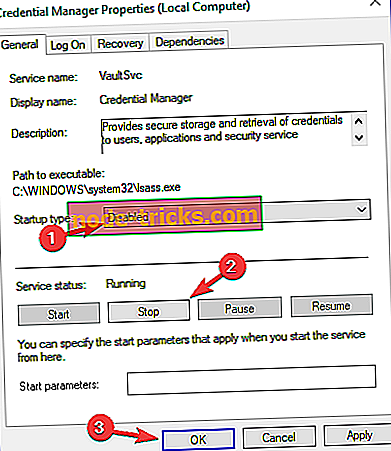
Как только вы остановите службу, проверьте, решена ли проблема.
Решение 9 — Установите частную связь
Если вы не знакомы, есть два типа подключений, Public и Private, и при каждом подключении к новой сети вас попросят настроить сеть как Public или Private. Эти две сети используют разные политики безопасности, и иногда эти политики могут приводить к появлению сообщения Введите сетевые учетные данные .
Вместо того чтобы изменять отдельные политики, вы сможете быстро решить эту проблему, изменив тип подключения с общего на частное. Это довольно просто, и вы можете сделать это, выполнив следующие действия:
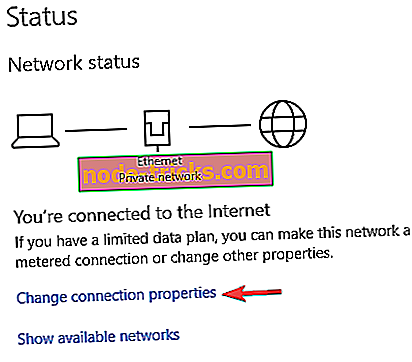
- На панели задач щелкните значок сети и выберите « Настройки сети и Интернета» .
- Теперь выберите Изменить свойства соединения .
- Теперь установите профиль сети на частный .
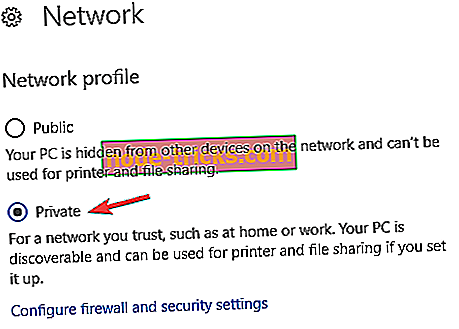
После этого проблема должна быть полностью решена. Имейте в виду, что вы должны использовать этот шаг только в защищенных сетях. Если вы находитесь в сети общего пользования, изменение этих настроек может снизить вашу безопасность, так что имейте это в виду.
Решение 10 — Создать новую учетную запись пользователя
Если у вас возникли проблемы с сообщением Введите сетевые учетные данные, вы можете решить проблему, просто создав новую учетную запись пользователя. Это довольно просто, и вы можете сделать это, выполнив следующие действия:
- Откройте приложение «Настройки» . Вы можете сделать это быстро с помощью сочетания клавиш Windows + I.
- Когда откроется приложение «Настройки», перейдите в раздел « Учетные записи ».
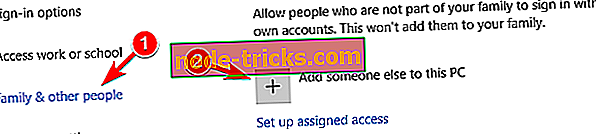
- Выберите Семья и другие люди на левой панели. Теперь нажмите Добавить кого-то еще на этот компьютер .
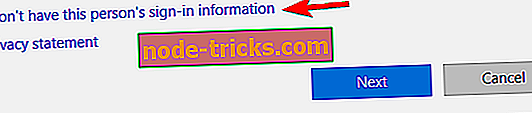
- Выберите У меня нет информации для входа этого человека .
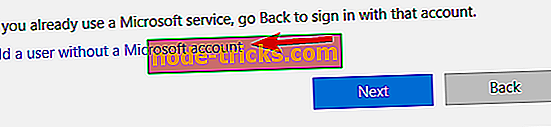
- Выберите Добавить пользователя без учетной записи Microsoft .
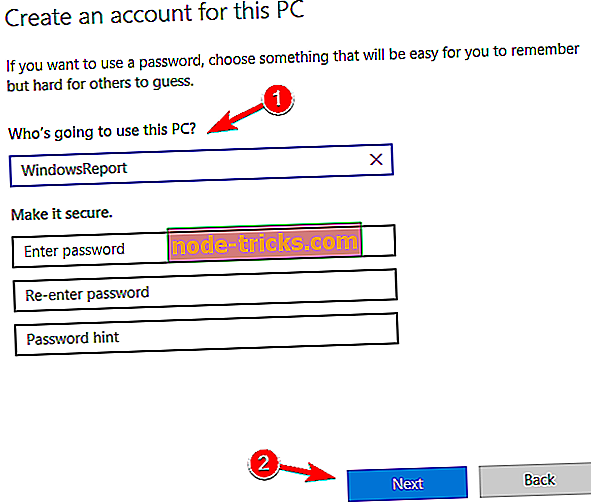
- Введите желаемое имя пользователя и нажмите кнопку Далее, чтобы продолжить.

После этого у вас будет новая учетная запись на вашем ПК. Переключитесь на новую учетную запись пользователя и проверьте, сохраняется ли проблема. Если проблема не появляется в новой учетной записи, вы можете рассмотреть возможность использования новой учетной записи вместо основной.
Решение 11. Изменение параметров учетной записи пользователя
По словам пользователей, вы можете исправить сообщение Введите сетевые учетные данные, просто изменив параметры своей учетной записи. Для этого просто выполните следующие действия:
- Нажмите Windows Key + R и введите netplwiz . Теперь нажмите Enter или нажмите ОК .
- Снимите флажок Пользователи должны ввести имя пользователя и пароль для использования этого компьютера . Теперь нажмите OK и Применить, чтобы сохранить изменения.
- Перезагрузите компьютер, чтобы изменения вступили в силу.
- После того, как вы снова войдете в систему, повторите те же шаги, но на этот раз включите Пользователи должны ввести опцию имени пользователя и пароля и сохранить изменения.
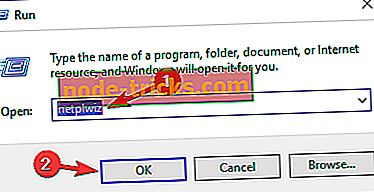
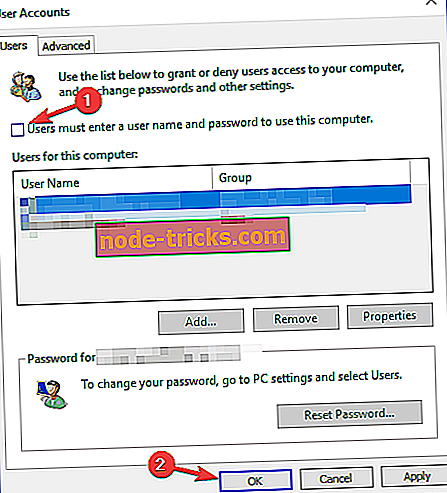
После этого проблема должна быть полностью решена, и настройка защиты паролем будет работать как надо.
Проблемы с сетевыми учетными данными иногда трудно исправить, но мы надеемся, что вам удалось их исправить после использования одного из наших решений.
Some Windows users are reporting they can’t access other Windows computer on their network because they can’t enter the credentials to connect to another computer because the login fails with the Enter network credentials error message The user name or password is incorrect. This post provides the most adequate solutions to this issue.

What does Enter Network credentials mean?
Network Credentials simply means a user ID and password created by the end-user in the case of a Home network or an IT administrator in the case of a domain environment, which is required to be entered into the computer you’re trying to connect to. This credential can be a Microsoft Account or a Local Account ID.
How do I stop asking for Network credentials?
PC users that want to stop receiving network credentials prompt can turn off password protected sharing by following these steps: Type Network and Sharing Center in the search bar on the Windows taskbar, select Advanced Sharing Setting, select Turn off password protected sharing for all networks.
If you’re constantly faced with this Enter network credentials error on your Windows 11/10, you can try our recommended solutions below in no particular order and see if that helps to resolve the issue.
- Clear all credentials from Credential Manager
- Disable Credential Manager Service automatic Startup
- Turn off password-protected sharing
- Modify Local Security Policy
- Add the credentials in Credentials Manager
- Set IP address to automatic
- Change Network Profile to Private
Let’s take a look at the description of the process involved concerning each of the listed solutions.
Before you try any of the solutions below, try to use the username and password for your Microsoft account instead of that of your local account for your Windows computer and see if you can log on without issues. Also, you can try using the Computer Name and Account Name as the Username. Assuming you want to access another computer named as TWC7, and suppose the account name on that computer is Obinna, you can input the username as TWC7Obinna without spaces, and then input your password.
1] Clear all credentials from Credential Manager
The first thing you can try is to clear all credentials from Credentials Manager on your Windows 11/10 PC and see if the Enter network credentials error is resolved. Otherwise, try the next solution.
2] Disable Credential Manager Service automatic Startup

To disable Credential Manager Service automatic Startup on your Windows PC, do the following:
- Press Windows key + R to invoke the Run dialog.
- In the Run dialog box, type services.msc and hit Enter to open Services.
- In the Services window, scroll and locate the Credential Manager service.
- Double-click on the entry to edit its properties.
- In the properties window, click the drop-down on the Startup type and select Disabled.
- Click Apply > OK to save changes.
- Exit Services console.
- Restart PC.
Try connecting and if the issue isn’t resolved, try the next solution.
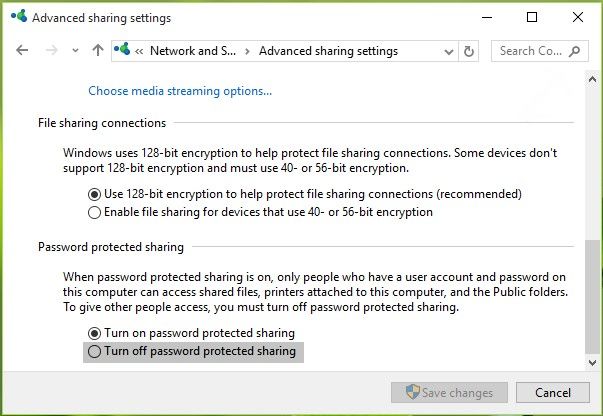
3] Turn off password-protected sharing

To turn off password protected sharing on your Windows PC, do the following:
- Right-click the network status icon on the notification area on the taskbar.
- Select Open Network and Internet settings.
- On the Network and Internet settings page, click Network and Sharing Center on the right pane.
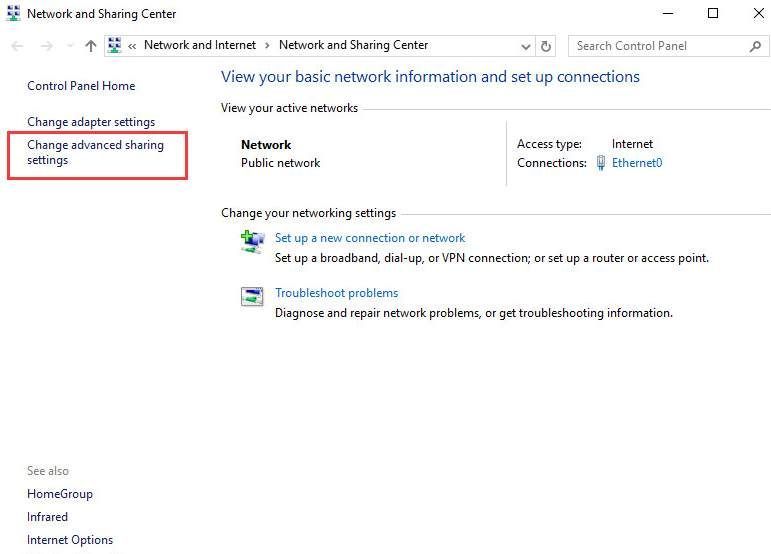
- On the Network and Sharing Center Control Panel, click the Change advanced sharing settings link on the left navigation pane.
- In the Advanced sharing settings window, click on All Networks.
- Under Password-protected sharing section, select the radio button for Turn off password-protected sharing.
- Click on Save Changes.
- Exit Control Panel.
- Restart PC.
On boot, see if the issue is resolved. If not, proceed with the next solution.
4] Modify Local Security Policy

Do the following:
- Press Windows key + R to invoke the Run dialog.
- In the Run dialog box, type secpol.msc and hit Enter to open Local Security Policy console.
- In the console, on the left navigation pane, click Local Policies > Security Options.
- On the right pane, double-click the Accounts: Limit local account use of blank passwords to console logon only policy to edit its properties.
- In the properties page, select the radio button for Disabled.
- Click Apply > OK.
- Exit Local Security Policy manager.
- Restart PC.
Try the next solution if the issue is unresolved.
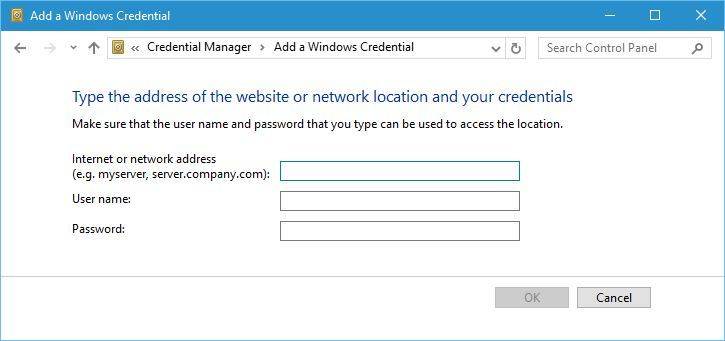
5] Add the credentials in Credentials Manager

It could be the credentials you’re trying to use to logon to the computer on the network is not stored in the Credential Manager. If this is the case, you can add the credentials in Credential Manager.
To add the credentials in Credential Manager on your Windows PC, do the following:
- Type credentials in the search box.
- Choose Credential Manager from the list of results.
- Click the Windows Credentials bar.
- Click Add a Windows Credential.
- In the Add a Windows Credential page, fill in the network address, user name and password related to the computer that you want to access.
- Click OK when done.
- Exit Credential Manager.
- Restart PC.
Now, try logging into the computer; if unsuccessful with the same issue, you can try the next solution.
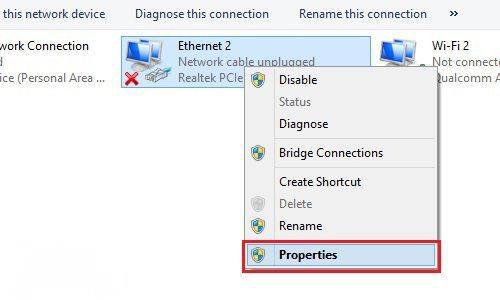
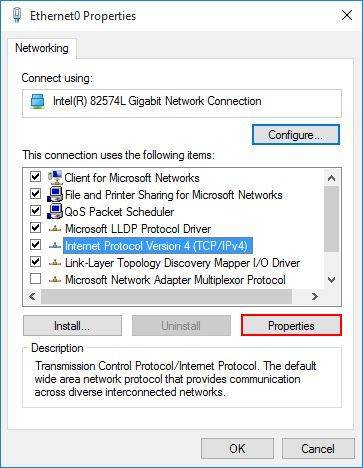
6] Set IP address to automatic

If the IP address for your Windows PC is not configured properly you’ll encounter this error when you are trying to access other computers on the same network. To rule out the possibility of incorrect IP address as a culprit to this issue, do the following:
- Press Windows key + R to invoke the Run dialog.
- In the Run dialog box, type ncpa.cpl and hit Enter to open Network Connections control panel.
- Next, right-click on the network connection you are using and click on Properties.
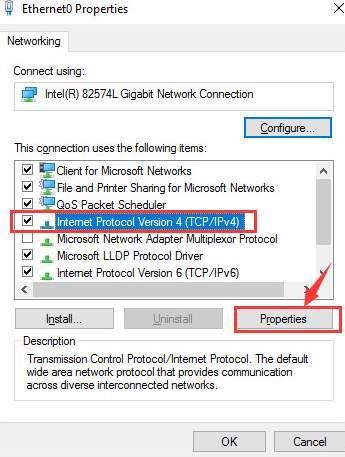
- Select and double-click the Internet Protocol Version 4 (TCP/IPv4) option to edit its properties.
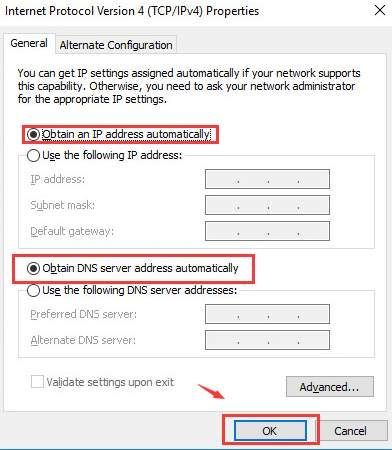
- In the General tab, make sure the radio button is set to Obtain an IP address automatically and Obtain DNS server address automatically.
- Click OK to save the changes.
- Click OK again to exit Network Connections properties.
- Exit Control Panel.
- Restart PC.
See if you can now logon successfully, otherwise try the next solution.
8] Change Network Profile to Private
If your network profile is set as Public, you may encounter this issue. In this case, you can set your network profile to Private – this will help as Windows will allow access to the network.
Any of these solutions should work for you!
Related post: Your Credentials did not work in Remote Desktop on Windows.
Some Windows users are reporting they can’t access other Windows computer on their network because they can’t enter the credentials to connect to another computer because the login fails with the Enter network credentials error message The user name or password is incorrect. This post provides the most adequate solutions to this issue.
What does Enter Network credentials mean?
Network Credentials simply means a user ID and password created by the end-user in the case of a Home network or an IT administrator in the case of a domain environment, which is required to be entered into the computer you’re trying to connect to. This credential can be a Microsoft Account or a Local Account ID.
How do I stop asking for Network credentials?
PC users that want to stop receiving network credentials prompt can turn off password protected sharing by following these steps: Type Network and Sharing Center in the search bar on the Windows taskbar, select Advanced Sharing Setting, select Turn off password protected sharing for all networks.
If you’re constantly faced with this Enter network credentials error on your Windows 11/10, you can try our recommended solutions below in no particular order and see if that helps to resolve the issue.
- Clear all credentials from Credential Manager
- Disable Credential Manager Service automatic Startup
- Turn off password-protected sharing
- Modify Local Security Policy
- Add the credentials in Credentials Manager
- Set IP address to automatic
- Change Network Profile to Private
Let’s take a look at the description of the process involved concerning each of the listed solutions.
Before you try any of the solutions below, try to use the username and password for your Microsoft account instead of that of your local account for your Windows computer and see if you can log on without issues. Also, you can try using the Computer Name and Account Name as the Username. Assuming you want to access another computer named as TWC7, and suppose the account name on that computer is Obinna, you can input the username as TWC7Obinna without spaces, and then input your password.
1] Clear all credentials from Credential Manager
The first thing you can try is to clear all credentials from Credentials Manager on your Windows 11/10 PC and see if the Enter network credentials error is resolved. Otherwise, try the next solution.
2] Disable Credential Manager Service automatic Startup
To disable Credential Manager Service automatic Startup on your Windows PC, do the following:
- Press Windows key + R to invoke the Run dialog.
- In the Run dialog box, type services.msc and hit Enter to open Services.
- In the Services window, scroll and locate the Credential Manager service.
- Double-click on the entry to edit its properties.
- In the properties window, click the drop-down on the Startup type and select Disabled.
- Click Apply > OK to save changes.
- Exit Services console.
- Restart PC.
Try connecting and if the issue isn’t resolved, try the next solution.
3] Turn off password-protected sharing
To turn off password protected sharing on your Windows PC, do the following:
- Right-click the network status icon on the notification area on the taskbar.
- Select Open Network and Internet settings.
- On the Network and Internet settings page, click Network and Sharing Center on the right pane.
- On the Network and Sharing Center Control Panel, click the Change advanced sharing settings link on the left navigation pane.
- In the Advanced sharing settings window, click on All Networks.
- Under Password-protected sharing section, select the radio button for Turn off password-protected sharing.
- Click on Save Changes.
- Exit Control Panel.
- Restart PC.
On boot, see if the issue is resolved. If not, proceed with the next solution.
4] Modify Local Security Policy
Do the following:
- Press Windows key + R to invoke the Run dialog.
- In the Run dialog box, type secpol.msc and hit Enter to open Local Security Policy console.
- In the console, on the left navigation pane, click Local Policies > Security Options.
- On the right pane, double-click the Accounts: Limit local account use of blank passwords to console logon only policy to edit its properties.
- In the properties page, select the radio button for Disabled.
- Click Apply > OK.
- Exit Local Security Policy manager.
- Restart PC.
Try the next solution if the issue is unresolved.
5] Add the credentials in Credentials Manager
It could be the credentials you’re trying to use to logon to the computer on the network is not stored in the Credential Manager. If this is the case, you can add the credentials in Credential Manager.
To add the credentials in Credential Manager on your Windows PC, do the following:
- Type credentials in the search box.
- Choose Credential Manager from the list of results.
- Click the Windows Credentials bar.
- Click Add a Windows Credential.
- In the Add a Windows Credential page, fill in the network address, user name and password related to the computer that you want to access.
- Click OK when done.
- Exit Credential Manager.
- Restart PC.
Now, try logging into the computer; if unsuccessful with the same issue, you can try the next solution.
6] Set IP address to automatic
If the IP address for your Windows PC is not configured properly you’ll encounter this error when you are trying to access other computers on the same network. To rule out the possibility of incorrect IP address as a culprit to this issue, do the following:
- Press Windows key + R to invoke the Run dialog.
- In the Run dialog box, type ncpa.cpl and hit Enter to open Network Connections control panel.
- Next, right-click on the network connection you are using and click on Properties.
- Select and double-click the Internet Protocol Version 4 (TCP/IPv4) option to edit its properties.
- In the General tab, make sure the radio button is set to Obtain an IP address automatically and Obtain DNS server address automatically.
- Click OK to save the changes.
- Click OK again to exit Network Connections properties.
- Exit Control Panel.
- Restart PC.
See if you can now logon successfully, otherwise try the next solution.
8] Change Network Profile to Private
If your network profile is set as Public, you may encounter this issue. In this case, you can set your network profile to Private – this will help as Windows will allow access to the network.
Any of these solutions should work for you!
Related post: Your Credentials did not work in Remote Desktop on Windows.
Пользователи с более чем одним ПК обычно находят удобным доступ к файлам на других ПК с операционной системой Windows. Им просто нужно присоединиться к домашней группе, чтобы делиться файлами на других компьютерах. Но мы получили жалобы от пользователей, в которых говорилось, что Windows Security предложит им ввести свои сетевые учетные данные, когда они будут подключаться к другим ПК.
Для некоторых это скорее головная боль. Поскольку это сообщение также появляется, когда пользователи должны использовать определенные программы или приложения, установленные на их компьютере, и многие из них не уверены, к какому имени пользователя и паролю оно относится, или в уведомлении постоянно говорится, что имя пользователя или пароль неверно.
Пожалуйста, не волнуйтесь, это совсем не сложный вопрос, и решения действительно существуют. Приведенные ниже варианты помогут вам быстро и легко решить эту проблему.
Вариант 1. Изменение настроек расширенного доступа
Вариант 2. Измените настройки в диспетчере учетных данных
Вариант 3. Используйте свою учетную запись Microsoft
Вариант 4. Проверьте, правильно ли назначены ваши IP-адреса.
Вариант 1. Изменение настроек расширенного доступа
1) Нажмите Клавиша Windows и S в то же время, затем введите сеть в поле поиска и выберите Центр коммуникаций и передачи данных вариант из списка выбора.
2) В левой части панели выберите Изменить расширенные настройки общего доступа .
3) Щелкните стрелку вниз справа и разверните Частный раздел.
4) Прокрутите немного вниз и найдите Подключения к домашней группе раздел. Убедитесь, что вы выбрали вариант для Разрешить Windows управлять подключениями к домашней группе (рекомендуется) . Затем нажмите Сохранить изменения кнопку, чтобы сохранить изменения.
Вариант 2. Измените настройки в диспетчере учетных данных
1) На клавиатуре нажмите Клавиша Windows и S в то же время, затем введите полномочия в поле поиска и выберите Управление учетными данными Windows из списка вариантов.
2) Убедитесь, что Учетные данные Windows выделен, и щелкните Добавить учетные данные Windows .
3) Введите сетевой адрес, имя пользователя и пароль, относящиеся к компьютеру, к которому вы хотите получить доступ. Убедитесь, что нет опечаток и нажмите Хорошо .
4) Теперь вы сможете войти в систему без проблем.
Вариант 3. Используйте свою учетную запись Microsoft
Некоторые пользователи прокомментировали, что они могут решить эту проблему, введя свое имя пользователя и пароль Microsoft, что нетрудно понять, поскольку Windows 10 в значительной степени зависит от учетной записи Microsoft.
Попробуйте использовать имя пользователя и пароль для своей учетной записи Microsoft вместо пароля локальной учетной записи и посмотрите, поможет ли это вам.
Вариант 4: проверьте, правильно ли назначены ваши IP-адреса
Если у вас ранее НЕ назначил вашим ПК статические IP-адреса, чтобы упростить доступ, тогда вам нужно проверить, не является ли это виновником.
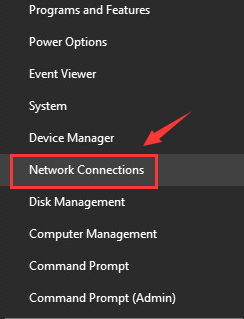
1) На ПК, к которому вы хотите подключиться, нажмите Клавиша Windows и Икс в то же время, затем выберите Сетевые соединения .
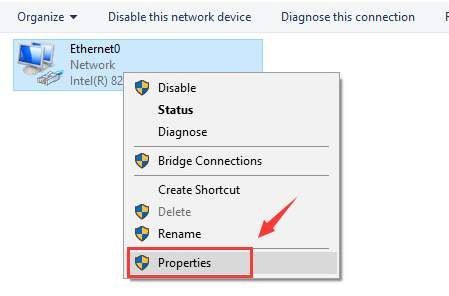
2) Щелкните правой кнопкой мыши сетевое подключение и выберите Свойства .
3) Выделите Интернет-протокол версии 4 (TCP / IPv4) а затем выберите Свойства .
4) Убедитесь, что параметры Получить IP-адрес автоматически и Получить адрес DNS-сервера автоматически выбраны. Затем нажмите Хорошо чтобы сохранить изменение.
5) Попробуйте снова подключиться еще раз.
Windows Security will ask you to enter network credentials when access network drives to share files between computers or connect to remote desktop. This is because of Microsoft’s policy to protect Windows 10 computers, but we’ve heard from users that when they enter network credentials the username or password is incorrect, or saying the credentials used to connect server IP does not work. If you are in this case, don’t freak out. Here we will provide you with 4 ways available to fix Windows 10 keeps asking for network credentials.
Solution 1: Change Advanced Sharing Settings
The problem you can’t enter network credentials on Windows 10 may result from the fact that some sharing settings are not enabled on your PC. So let’s do a simple check before taking further steps.
1. Type Network and Sharing Center in the search box to view your network information and connection settings.
2. Choose Change advanced sharing settings from the left side of the panel. Scroll down Private section to change sharing options.
3. Locate HomeGroup connections to see if you have enabled the option to Allow Windows to Manage homegroup connections. If not, please kindly select it.
4. Now move to All Networks section and find Password protected sharing from the sub menu. Make sure you Turn off password protected sharing. Then click Save changes to execute what you have changed for network connection.
Note: This method should only be implemented to the Server PC rather that the client PC, so make sure which one you are.
Solution 2: Add a Windows Credential in Credentials Manager
If you still have enter network credentials access error on Windows 10, you can manually add a credential of the computer you want to access. To do this:
1. Type Manage Windows Credentials on search box and hit it to open Credential Manager. Make sure that Windows Credentials is highlighted on the interface and then choose Add a Windows credential below.

2. Enter to Server IP address you would like to access to. Fill in the User name and Password with the same as other computer’s local username and password.
Tip: Some Windows 10 users also replied that you can use Microsoft account username and password instead of local accounts when enter network credentials to connect to another PC. It sometimes doesn’t work, but there is no harm to try it. If you have your Windows 10 computer locked and forgot the password of either the Microsoft account or the local account, you are recommend to try the Windows Password Key to remove or reset your password.
How to Reset Windows 10/8/7 Password Easily
Solution 3: Check Whether the IP Address are Properly Assigned
If you have not set your computer IP address to static, it can works fine in a local network but sometimes may cause issues when the network server changes, such as Windows 10 network credentials access is denied, so you are suggested to use a fixed IP.
1. Press Windows + X at the same time and choose Network Connections. Right click network connect and choose select Properties.
2. Make sure the Internet Protocol Version 4 (TCP/IPv4) is selected and then click Properties below.
3. Choose Obtain an IP address automatically and Obtain DNS server address automatically both to get IP address assigned.

Solution 4: Modify Local Group Policy
One last choice to solve Windows 10 network credentials not working or Windows 10 doesn’t remember network credentials even if you have preserved the password is to edit the Local Group policy.
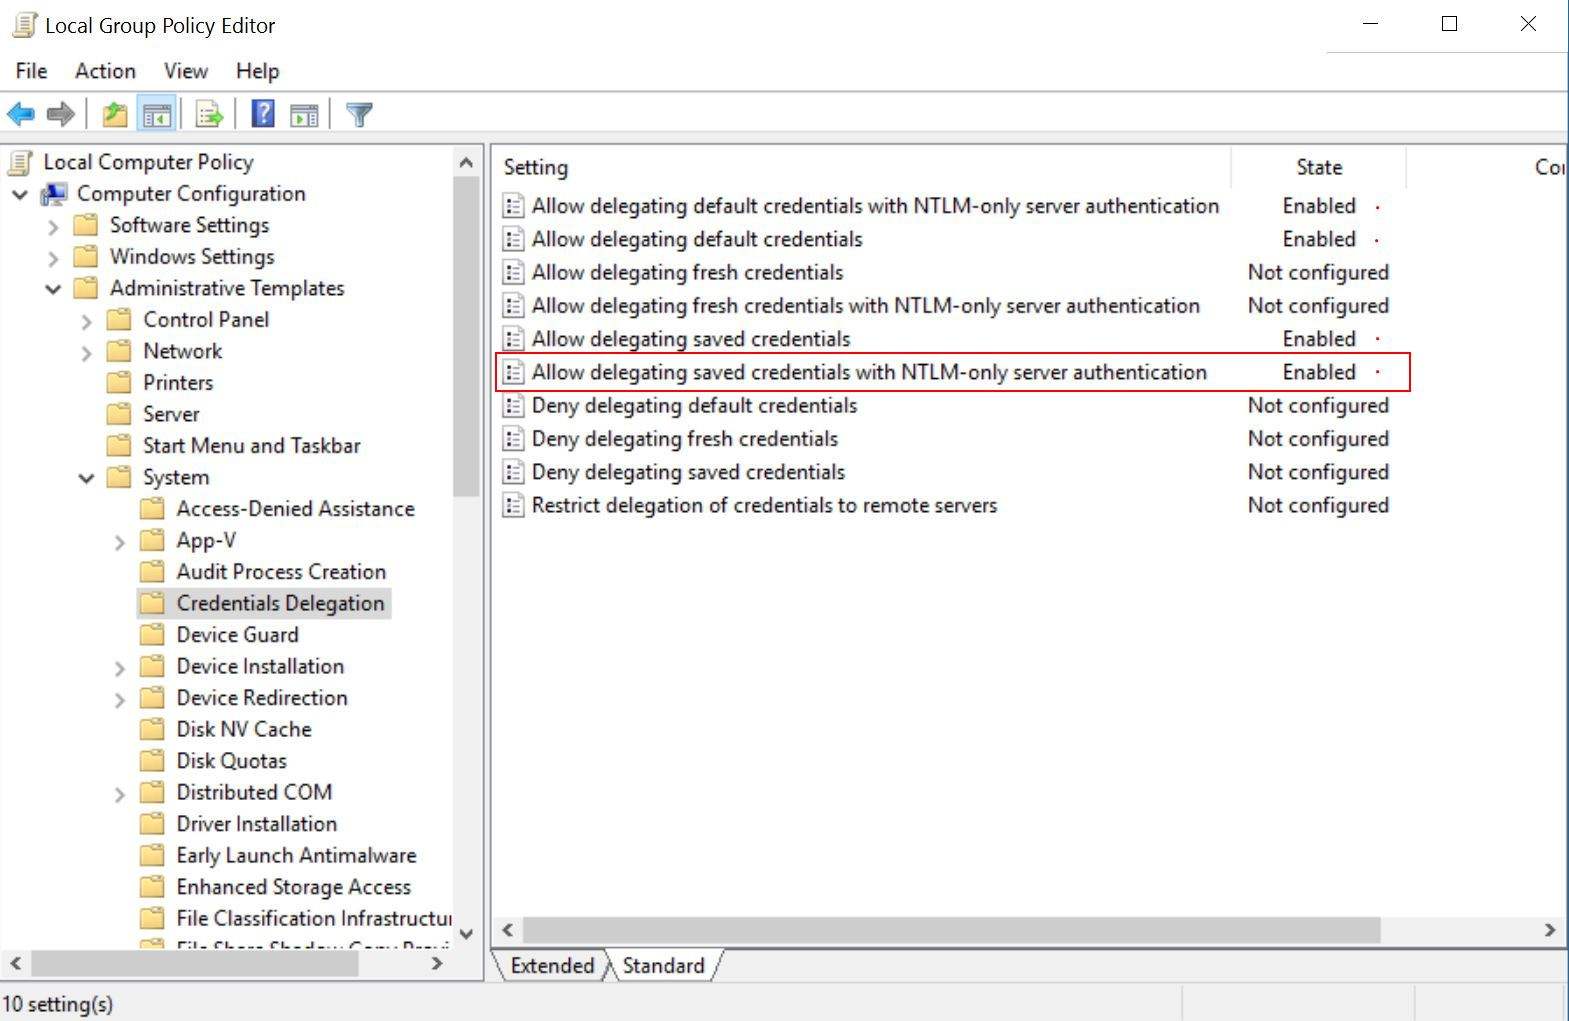
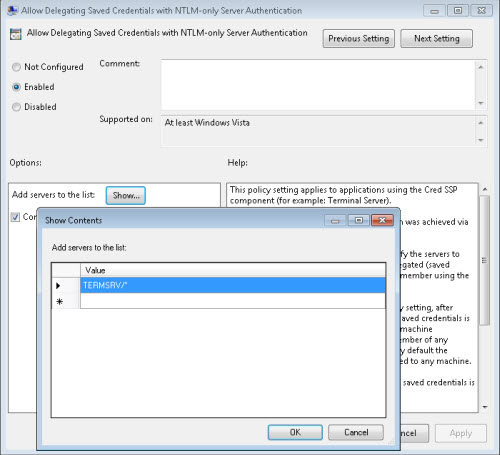
1. Press Win + R and enter gpedit.msc. Go to Computer Configuration > Administrative Templates > System > Credentials Delegation and choose Allow delegating saved credentials with NTLM-only server authentication.
2. Click Enabled and Show and enter TERMSRV/*. Then exit Local Group Policy.
3. Now press Win + R again and enter gpupdate /force to force update policy.
That’s all about how to deal with enter network credentials not working when Windows 10 accessing network drive. You may need to try one or even more until this issue gets solved. Share with your friends or families with similar problems if this post is helpful.
Free Download
Buy Now($19.95)
- Related Articles
- How to Fix We Can’t Sign into Your Account Error on Windows 10
- Top 2 Ways to Fix Windows 10 Can’t Login with Password after Upgrade
- How to Reset Windows 10 PIN Password
comments powered by
Содержание
- Enter network credentials on Windows 10 [Best solutions]
- Dashlane
- How do I fix network credentials problems on Windows 10
- 1. Check that your IP addresses are properly assigned
- 2. Enter your Microsoft credentials
- 3. Enter computer name in the username field
- Best Three Ways to Fix «Enter Network Credentials» Error Windows 10
- Way 1: Fix «Enter network credentials» error by turning off password protected sharing
- Way 2: Disable «Enter network credential» via managing windows credentials windows 10
- Way 3: Repair «Enter network credentials» error through changing network properties Windows 10
- Fix Enter Network Credentials Access Error in Windows 10
- Fix-1 Changing Windows Credentials
- Fix-2 Changing your IP configuration
- Fix-3 Turning off Password Protected sharing-
- Fix-4 Disable particular Security policy from Local Security Policy-
- Fix 5- Disable Credential Manager automatic Startup
- Fix 6 – Use your Windows 10 Credentials
- Fix 7 – Try Computer Name and account name as the Username-
- Fix 8 – Change your Network Profile to Private-
- Top 4 Ways to Fix Enter Network Credentials Problems on Windows 10
- Solution 1: Change Advanced Sharing Settings
- Solution 2: Add a Windows Credential in Credentials Manager
- How to Reset Windows 10/8/7 Password Easily
- Solution 3: Check Whether the IP Address are Properly Assigned
- Solution 4: Modify Local Group Policy
Enter network credentials on Windows 10 [Best solutions]


If you have a local network, you’re probably sharing files between computers. In order to protect your PC from unauthorized access Windows 10 uses network credentials.
This is a decent protection, but several users reported certain issues when asked to enter network credentials on Windows 10.
Enter network credentials message can appear while trying to access shared drives or directories and prevent you from accessing your files.
Similar issues that users reported are the following:
Quick Tip:
Windows network credentials are an important security measure, but sometimes they lead to time-consuming errors that prevent you from accessing your files.
Using a secure password manager will save you time and keep your passwords and other sensitive data safe from any type of threats and data theft.

Dashlane
Keep your personal data safe while you browse online with this professional password manager!
How do I fix network credentials problems on Windows 10
1. Check that your IP addresses are properly assigned

In a local network, you probably assign all computers static IP addresses in order to access them easier.
According to users, your IP address might be set to automatic, and that can sometimes cause issues with network credentials, therefore be sure to check if IP addresses of your network devices are set to static.
To set your IP addresses to static you can always use your router’s built-in software.
If you’re facing trouble with the static IP address, this guide should help out.
2. Enter your Microsoft credentials

Windows 10 relies heavily on your Microsoft account, and since you can use your Microsoft account to sign in to Windows 10, you can also use it to access other network devices in your local network.
Users reported that you can fix problems with network credentials simply by entering your Microsoft account username and password instead of your local account’s username and password.
It is important to mention that many network issues are caused by malware, various scripts, and bots. You can secure yourself by installing a Virtual Private Network tool.
3. Enter computer name in the username field
According to users, you can fix problems with network credentials by entering the name of the computer that you’re trying to access followed by the username.
For example, if the computer you’re trying to access is named Computer1 and you have a user named Mike, you need to enter both computer name and the user name in the user input field.
Источник
Best Three Ways to Fix «Enter Network Credentials» Error Windows 10
In general, USB flash drive is a great tool to transfer files from one PC to another; however, when two or more computers are on the same LAN, it is convenient to share folders through Home Group. You may have encountered «Enter network credentials» error while connecting to the target computer. Worry not, that’s not a big problem.
Way 1: Fix «Enter network credentials» error by turning off password protected sharing
By default, you should enter the target username and Windows password in Windows Security dialog. Nonetheless, some PC requires network credentials. It is not only annoying but affects work efficiency serious. Let’s open the target computer and change some settings.
Step 1: Right-click on the network icon in the taskbar and select Open Network & Internet settings.
Step 2: Scroll down and click on Network and Sharing Center

Step 3: In the left pane, click Change advanced sharing settings.

Step 4: Under Private section, select Turn on network discovery.

Step 5: Expand Network section and then choose Turn off password protected sharing. Tap on the Save changes and close the window.

Step 6: Right-click on the sharing folder and select Properties. Click on Share under Sharing section as the image below.

Step 7: Click the down arrow and select Everyone then tap on Add and then Share. You can also change the permission level for it.

Step 8: Click on Advanced Sharing button then check the box of Share this folder.


Way 2: Disable «Enter network credential» via managing windows credentials windows 10
When the method above doesn’t work, you can try the following steps to fix the «Enter network credential» error in Windows 10.
Step 1: Enter Manage Windows Credentials in the search bar and hit Enter to open it directly.

Step 2: Highlight Windows Credentials and click on Add a Windows credential.

Step 3: Type the IP of computer that you want to access. If the target computer account is local user, input IP address and user name in the User name box.
NOTE: Make sure that you have turned off the Firewall.

Way 3: Repair «Enter network credentials» error through changing network properties Windows 10
Open the target computer you want to connect and follow the steps to fix the «Enter network credentials» problem.
Step 1: Right-click on Start in Windows 10 and choose Network Connections.

Step 2: Under the Status tab, click on Change adapter options.

Step 3: In the Network Connections windows, right-click on the local connection and select Properties.

Step 4: Tick on the checkbox of Internet Protocol Version 4 (TCP/IPv4) and click Properties.

Step 5: Select Obtain an IP address automatically and Obtain DNS server address automatically.
Источник
Fix Enter Network Credentials Access Error in Windows 10
If you have more than one personal computer on same network, file sharing between computers is very easy for you. Now, if you want to use this feature you have to enter certain Network credentials (which protects the files of the computer from falling in wrong hand). But some of the Windows 10 users are reporting to have an issue as they are facing ‘Enter Network Credentials Access Error‘ when they are trying to access the files on another computer on the same network.
Now, the reason behind this error can be simply wrong username or wrong password or it may be an ip mismatch. Here are working solutions to fix this problem straightaway.
Fix-1 Changing Windows Credentials
Credential Manager is a control panel utility that manages your logon information for websites, networks. Adding the Network name/address, username and password can solve the problem. Follow these steps to add network name/address, username, and password-
1. Click on the search box just beside the ‘Windows button‘, and type “Credential Manager” and click on Credential Manager.

Credential Manager window will open.
2. Click on “Windows Credentials” and then click on “Add a Windows credential“.

3. Now, type the Network address you want to connect to in the box beside the “Internet or network address (e.g. myserver, server.company.com):“.
4. Just under that option, type the Username of the network you are trying to access in the box beside “Username:”.
5. Type the password of the network address in the box beside “Password:“.
6. Don’t forget to click on “OK“.

Close the Credential Manager window.
Restart your computer. Now try to access the network again. If the error is still there go for the next fix.
Fix-2 Changing your IP configuration
IP or Internet Protocol is a set of instructions which is followed by interconnected network devices. Now, if the IP is not configured properly then you can face ‘Network Credential Access Error’ when you are trying to access other computers on the same network. Follow these steps to configure your IP setting-
1. Press Windows Key+R to launch the Run window. Then, type “ncpa.cpl” in that Run window and press Enter.
Network Connections window will open.

2. In the Network Connections window, right-click on the network connection you are using and click on “Properties“.

3. Look for the option “Internet Protocol Version 4 (TCP/IPv4)“.
4. Double click on that option which will open the “Internet Protocol Version 4 (TCP/IPv4) Properties” tab.
5. Now, click on “Obtain an IP address automatically” and then click on “Obtain DNS server address automatically“.
6. Finally, click on “OK” to save the changes.

Restart your computer. After rebooting your computer try to reconnect with the network. If you are still having the same problem go for the next fix.
Fix-3 Turning off Password Protected sharing-
Sharing, accessing, or transferring the files from another computer to your computer on the same network requires a password. Turning “Password protected sharing” OFF can solve the ‘Network Credential Access Error’. But before moving ahead to the steps of the process, let’s be clear that Password protected sharing is the safest way to transfer your files or to access the network. Removing password protection can make your computer vulnerable to other users on the same network. Follow these steps to turn off “Password protected sharing” –
1. Press Windows key +R to open Run.
2. Then, copy-paste this line “control.exe /name Microsoft.NetworkAndSharingCenter /page Advanced” and hit Enter. Advanced Sharing settings window will open.

3. In the Advanced Sharing settings window, click on “All Networks“.
4. Under “Password Protected Sharing” option, select “Turn off password protected sharing“.
5. Click on “Save Changes“.

Close Advanced Sharing settings tab. Restart your computer and try to reconnect. If the issue still persists go for the next fix.
Fix-4 Disable particular Security policy from Local Security Policy-
Sometimes some security policies can affect your access to the network which can cause the error ‘Network Credential Access Error’. You can disable the particular policy which you are hampering access. Follow these next steps-
1. Click on the search box just beside the ‘Windows button‘, and type “Local Security Policy” and click on Local Security Policy.
It will open the Local Security Policy window.

2. Click on “Local Policies” and then expand “Security Options” on the left pane.
3. After that double click on “Accounts: Limit local account use of blank passwords to console logon only” on the right pane.

5. Select “Disabled” and then click on “Apply” and “OK“. Close ‘Local Security Policy‘.

Restart the computer. Try to connect with the network again. If the error is still there, go for the next fix.
Fix 5- Disable Credential Manager automatic Startup
You can disable Credential Manager Service from Services window. It may solve the error. To disable Credential Manager Service follow these steps-
1. To open Run instance, press Windows key+ R from the keyboard.
2. Then, type “services.msc” and hit Enter from your keyboard.

2. Now, look for the “Credential Manager” service. Double click on “Credential Manager“.

3. Click on “Startup type:” and select “Disabled” from the drop-down and then you have to click on “Stop“.
4. After that, click on “Apply” and “OK“.

Close the ‘Services‘ window.
Restart your computer. Try to connect with the network again, you will be able to connect with the network. If you can’t then go for the next fix.
Fix 6 – Use your Windows 10 Credentials
Try to use your username and password (which you use at the time of login) to access the network. It may solve the problem. Though if you are using PIN or Windows Hello to log in to the computer, you have to have a password with which you have logged in to the system. Type the account name you are using as the Username, and type your password in the Password box. This will solve your problem.
If the problem is still present, go for the next fix.
Fix 7 – Try Computer Name and account name as the Username-
Use the Computer name and account name in the same field of Username. This process can help you to remove ‘ ‘Enter Network Credentials Access Error‘. Let’s take an example to understand the point.
Suppose you want to access another computer with a computer name– Comp7, and suppose the account name on that computer is ‘Sam81‘. So, you have to write the Computer name and account name without any space in the middle as the Username. Then you have the type the password of that computer.
So, the Username- Comp7Sam81
Try to access the network again. If the problem is still there then go for the next fix.
Fix 8 – Change your Network Profile to Private-
Windows prevents the access of another network from your computer or vice-versa if your network profile is set as ‘Public.’ Setting it to the ‘Private‘ will help as Windows will allow access to the network. Before going for these steps make sure you are not using any “Public” internet connection such as Hotel or Airport WiFi, which can make your files vulnerable.
Follow these steps to change your network profile to ‘Private‘
1. Click on Windows Icon in the Taskbar, and click on ‘Settings‘ in the lower-left corner.

2. In the Windows Settings, click on the “Network & Internet” option.

3. In this window, click on “Change connection properties“.

4. Now in this window, under Network profile, click on “Private“. This will set your network profile as “Private“. Close Settings window.

Try to reconnect your computer again with the network. Your problem should be solved.

Sambit is a Mechanical Engineer By qualification who loves to write about Windows 10 and solutions to weirdest possible problems.
Источник
Top 4 Ways to Fix Enter Network Credentials Problems on Windows 10

Windows Security will ask you to enter network credentials when access network drives to share files between computers or connect to remote desktop. This is because of Microsoft’s policy to protect Windows 10 computers, but we’ve heard from users that when they enter network credentials the username or password is incorrect, or saying the credentials used to connect server IP does not work. If you are in this case, don’t freak out. Here we will provide you with 4 ways available to fix Windows 10 keeps asking for network credentials.
Solution 1: Change Advanced Sharing Settings
The problem you can’t enter network credentials on Windows 10 may result from the fact that some sharing settings are not enabled on your PC. So let’s do a simple check before taking further steps.
1. Type Network and Sharing Center in the search box to view your network information and connection settings.
2. Choose Change advanced sharing settings from the left side of the panel. Scroll down Private section to change sharing options.
3. Locate HomeGroup connections to see if you have enabled the option to Allow Windows to Manage homegroup connections. If not, please kindly select it.

4. Now move to All Networks section and find Password protected sharing from the sub menu. Make sure you Turn off password protected sharing. Then click Save changes to execute what you have changed for network connection.

Solution 2: Add a Windows Credential in Credentials Manager
If you still have enter network credentials access error on Windows 10, you can manually add a credential of the computer you want to access. To do this:
1. Type Manage Windows Credentials on search box and hit it to open Credential Manager. Make sure that Windows Credentials is highlighted on the interface and then choose Add a Windows credential below.

2. Enter to Server IP address you would like to access to. Fill in the User name and Password with the same as other computer’s local username and password.

Tip: Some Windows 10 users also replied that you can use Microsoft account username and password instead of local accounts when enter network credentials to connect to another PC. It sometimes doesn’t work, but there is no harm to try it. If you have your Windows 10 computer locked and forgot the password of either the Microsoft account or the local account, you are recommend to try the Windows Password Key to remove or reset your password.
How to Reset Windows 10/8/7 Password Easily
Solution 3: Check Whether the IP Address are Properly Assigned
If you have not set your computer IP address to static, it can works fine in a local network but sometimes may cause issues when the network server changes, such as Windows 10 network credentials access is denied, so you are suggested to use a fixed IP.
1. Press Windows + X at the same time and choose Network Connections. Right click network connect and choose select Properties.

2. Make sure the Internet Protocol Version 4 (TCP/IPv4) is selected and then click Properties below.

3. Choose Obtain an IP address automatically and Obtain DNS server address automatically both to get IP address assigned.

Solution 4: Modify Local Group Policy
One last choice to solve Windows 10 network credentials not working or Windows 10 doesn’t remember network credentials even if you have preserved the password is to edit the Local Group policy.
1. Press Win + R and enter gpedit.msc. Go to Computer Configuration > Administrative Templates > System > Credentials Delegation and choose Allow delegating saved credentials with NTLM-only server authentication.

2. Click Enabled and Show and enter TERMSRV/*. Then exit Local Group Policy.

3. Now press Win + R again and enter gpupdate /force to force update policy.
That’s all about how to deal with enter network credentials not working when Windows 10 accessing network drive. You may need to try one or even more until this issue gets solved. Share with your friends or families with similar problems if this post is helpful.
Источник