Microsoft releases system updates from time to time and by default To fix bugs on the current system and improve features. And Windows 10 operating system has been set to check and install those updates automatically provided that the computer is connected to the Internet. Most of the time, Users face error 0x80070643 failed to install MSI package during Install updates, definition updates of windows defender or installing MSI packages. This problem is seen more in Windows 10 than Windows 8 or 7. Most of the time this Error show during these updates: KB4457128, KB4457142 installation. The update or installation process may stop by showing an error code like 0x80070643.
Sometimes you may saw an Error message like “Unable to install Windows Update: 0x80070643” or error 0x80070643 failed to install the MSI package. This error message can be seen when the .NET framework on your computer has a problem, or the update related to MS 2003 components fails.
This issue may occur if the MSI software update registration has become corrupted, or if the .NET Framework installation on the computer has become corrupted. Also if the System files or registry gets damaged or corrupted, the Windows Update feature fails to access certain user data or MSI software update registration or the .NET Framework installation is corrupted this will result in error 0x80070643 failed to install MSI package
Most of the time, This error is related to windows defender or .NET Framework. So, While describing the solutions, I will focus more on this security solution of Microsoft. Here is the method that can help you to fix error 0x80070643.
Repair or update Windows .NET Framework
This framework is an important part of windows, .NET Framework plays an important part in software installation and system updates on all versions of the Windows system. And it should be well installed and updated to the latest version in order that other programs can be built, deployed, or ran normally. If it becomes corrupted, Windows update, Software installations, etc. may be problematic. So, You can download this .net framework repair tool from Microsoft and run it on your PC.
Manually Repair .NET Framework
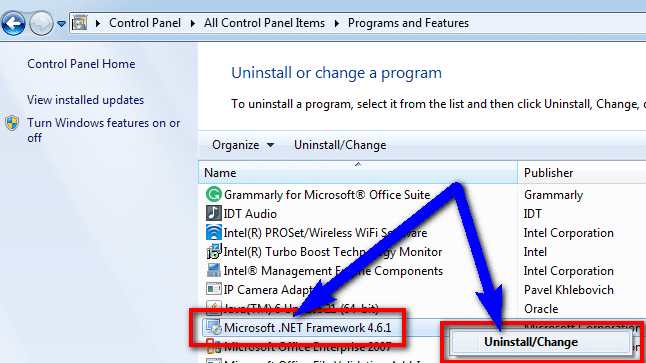
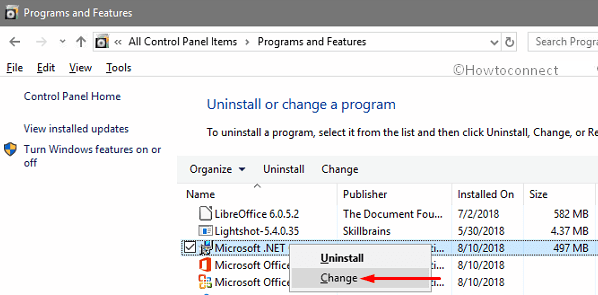
Close all currently running software and click “Start” to select Control Panel. Next click Programs and “Program and Features”. Locate Microsoft .NET Framework 4 Client Profile from these listed programs. Select it and click the tab Uninstall/Change
Note: If there is no Microsoft .NET Framework 4 Client Profile on your computer, download it online and install it to update your PC.
On the pop-up window select Repair .NET Framework 4 Client Profile to its original state and click the Next button.
Uninstall and reinstall the .NET Framework
Use the .NET Framework Cleanup Tool to uninstall multiple versions of the .NET Framework, and then reinstall the components.
Download the .NET Framework cleanup tool.
When you are prompted, click Open, and then click Extract Now. In the files that you extracted, double-click cleanup_tool.exe. Do you want to run the .NET Framework Setup Cleanup Utility? the message, click Yes.
Click Yes to accept the license agreement.
In the Product to the cleanup window, click the list, select .NET Framework – All Versions, and then click Cleanup Now.
Note The cleanup tool does not let you remove the .NET Framework 2.0 in Windows Vista or later versions of Windows because the .NET Framework is installed as an operating system component. After the .NET Framework is removed, restart the computer. Visit Windows Update again, and then check for and install updates.
Also, Try to reinstall the .NET Framework update. Hope you will not face any error. if the problem continues try the next steps.
Use Windows Update Troubleshooter
Your PC has a built-in troubleshooter to solve common problems. Before trying any additional ways to resolve your issue, You can run the troubleshooter and see if it repair the errors.
Open Start Menu and type troubleshooting and then open the Troubleshooting app. Now, Click on Fix problems with windows update.
When windows update Troubleshoot tool opens click on Advanced and tick on Apply repairs automatically. Now, Go ahead and click next following the on-screen instructions. this will take some moment to find problems and this will fix itself.
After doing it, Check if the problem still exists or not.
Restart Windows Update Components
You can restart several windows update components including the security center to fix this Error At first, You have to stop these services, and then you have to rename two system folders. After doing it, Start these service components again.
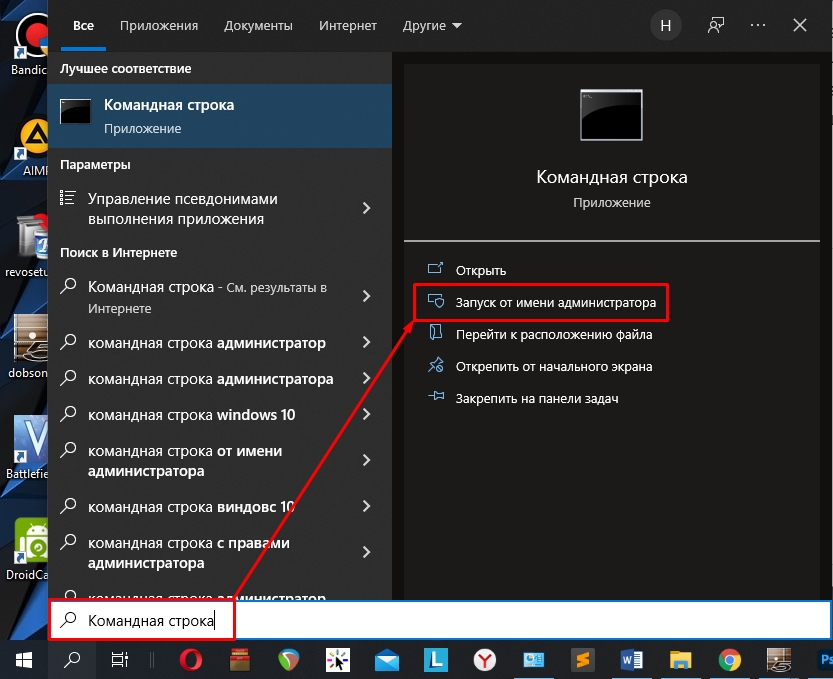
Open Command Prompt as administrator. To do it, Just right-click on the Start button (Windows logo) and choose Command Prompt (Admin).
Now, You can stop these services by running these commands. I recommend you hit enter for each command.
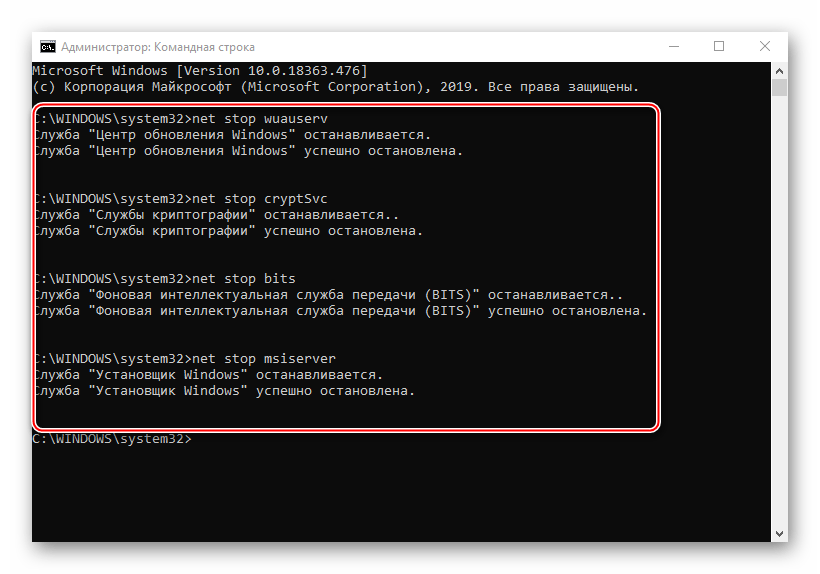
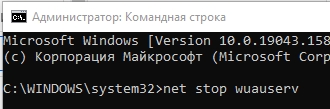
First type net stop wuauserv to stop the windows update service.
Next Type net stop cryptSvc to Stop the Cryptographic Services.
Type net stop bits to Stop the background intelligence Service.
Now Type net stop msiserver To stop the MSI server.
At last type net stop wscsvc to stop the Windows Security Center service.
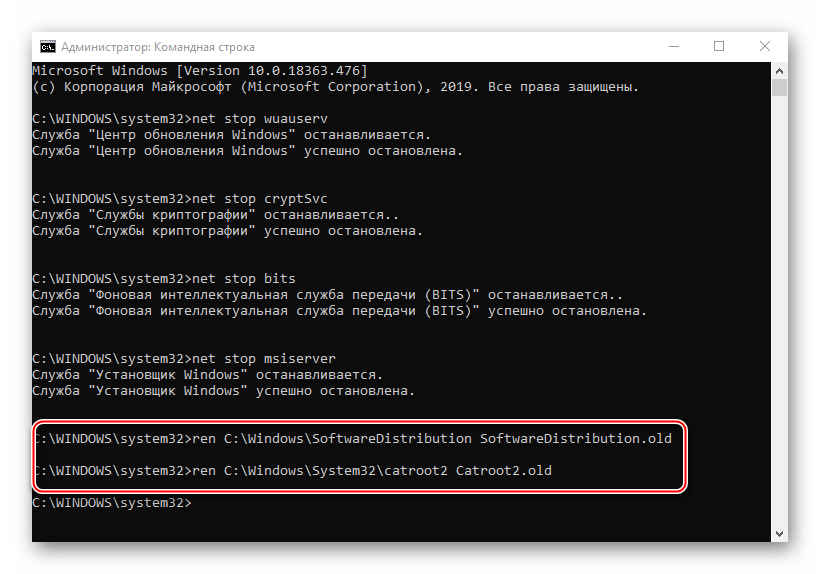
After doing it, You will need to rename SoftwareDistribution and catroot2 folders. You may do it from C > Windows and System 32 folders. You also can do it from the command prompt which is much easier. Here are the commands to do it –
ren C:WindowsSoftwareDistribution SoftwareDistribution.old
ren C:WindowsSystem32catroot2 Catroot2.old
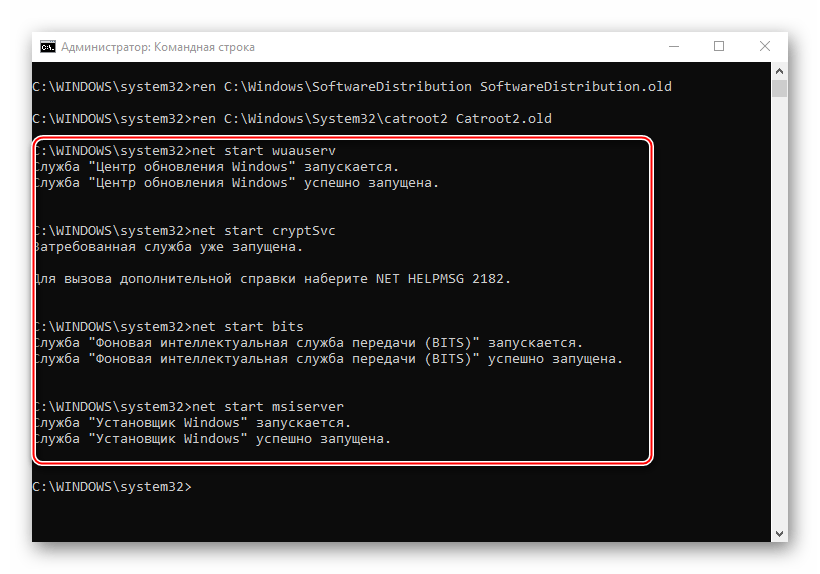
- Now, After renaming the folders, Start those services again. To do it, run these commands –
First type net start wuauserv to start the windows update service. - Next Type net start cryptSvc to Start the Cryptographic Services.
- Type net start bits to Start the background intelligence Service.
- Now Type net start msiserver To start the MSI server.
- At last type net start wscsvc to start the Windows Security Center service.
Now, Restart your PC and try to update windows and windows defender. I hope, This time you won’t encounter any problem like update error 0x80070643.>
Check and Repair System Files
Running SFC and DISM commands are very common ways to check and repair corrupted windows system files. Sometimes, For internal windows errors, Any update installations may be stopped by showing a failure message with an error code. These commands will help you to fix these internal problems.
Repair corrupted system files with SFC /scannow
System file checker comes in handy, as it’s capable of scanning and finding out corrupted files and replace them with correct ones.
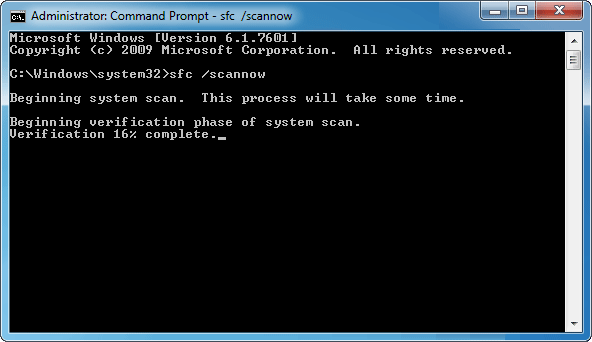
Open Command Prompt. Click the Start button and All Programs to locate Accessories where you can find Command Prompt. Right-click it and Run as administrator. Type sfc/scannow in the Command Prompt and press Enter. Then it starts to scan and repair corrupted system files. You just need to wait for this process to complete.
Uninstall Antivirus Completely
If you have uninstalled your antivirus recently and have started using windows defender, You can follow this method. When we uninstall our security software, It may not be removed completely from our PC. Later, The files which remain even after uninstalling may cause several problems, especially to windows defender. So, First, you have to remove your anti-malware program completely. All antivirus company has special tools to do this job easily. You can check out this list of these tools. After completely wipe out the antivirus from your PC, Try to update again.
These are some best working solutions to fix Windows 10 update installation error 0x80070643 failed to install MSI package. Have any Query suggestion feel free to comment below.
Содержание
- Исправляем ошибку 0x80070643 в Windows 10
- Способ 1: Устранение проблем в системе обновления
- Способ 2: Загрузка обновлений вручную
- Способ 3: Восстановление поврежденных файлов системы
- Способ 4: Устранение проблем с НЕТ Фреймворк
- Способ 5: Очистка компонентов обновлений Виндовс 10
- Способ 6: Удаление вирусов, отключение антивируса
- Вопросы и ответы

При обновлении операционной системы довольно часто происходят сбои. Один из самых распространенных – ошибка 0x80070643. О ней известно было еще до выхода «десятки», поэтому уже выработано несколько рабочих методов, с помощью которых ее можно исправить.
Ошибка не сопровождает какой-то определенный компонент и может относится к обновлениям разной степени важности, а значит, нет конкретной причины ее появления. Способов решения проблемы, следовательно, тоже много — начиная с устранения неполадок в службе, которая обеспечивает обновление Виндовс 10, и заканчивая предотвращением конфликтов с уже установленным на устройстве ПО. Рассмотрим каждый из них по порядку.
Способ 1: Устранение проблем в системе обновления
У Microsoft есть свой инструмент устранения подобных ошибок, поэтому в первую очередь воспользуемся им.
Скачать средство устранения неполадок Центра обновления Windows с официального сайта
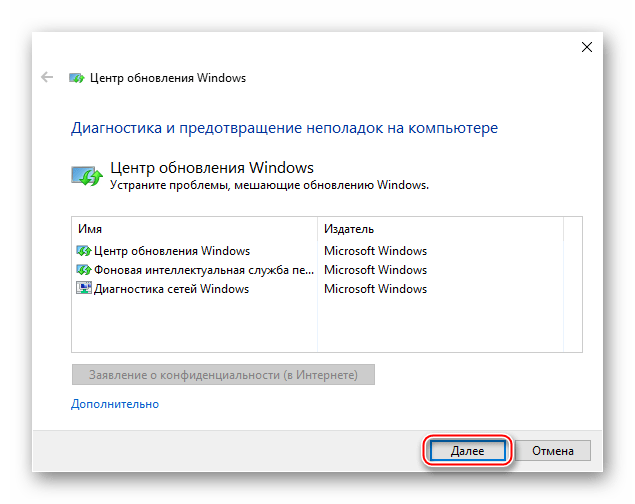
- Скачиваем, запускаем утилиту и нажимаем «Далее».
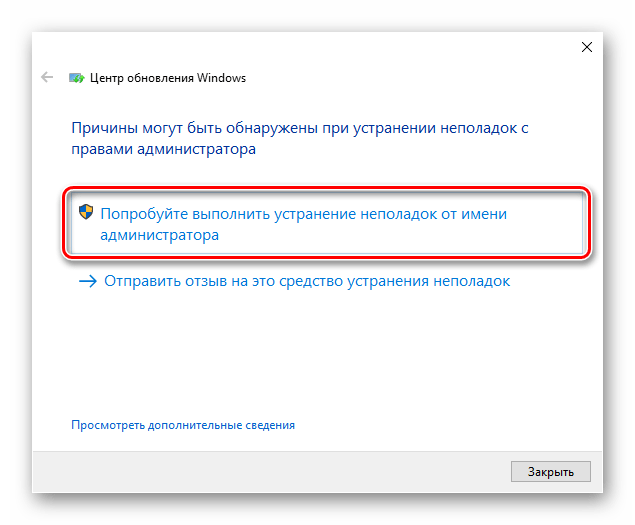
- После анализа системы выбираем вариант «Попробуйте выполнить устранение неполадок от имени администратора». Утилита перезапустится и повторит диагностику, чтобы найти и устранить дополнительные ошибки.
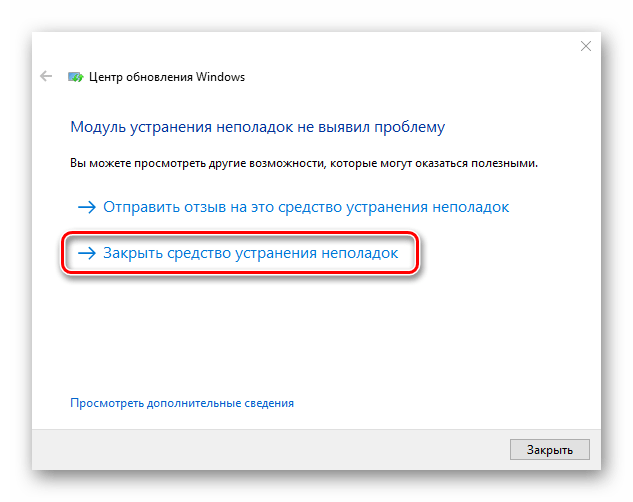
- Когда процесс завершится, закрываем средство устранения неполадок.
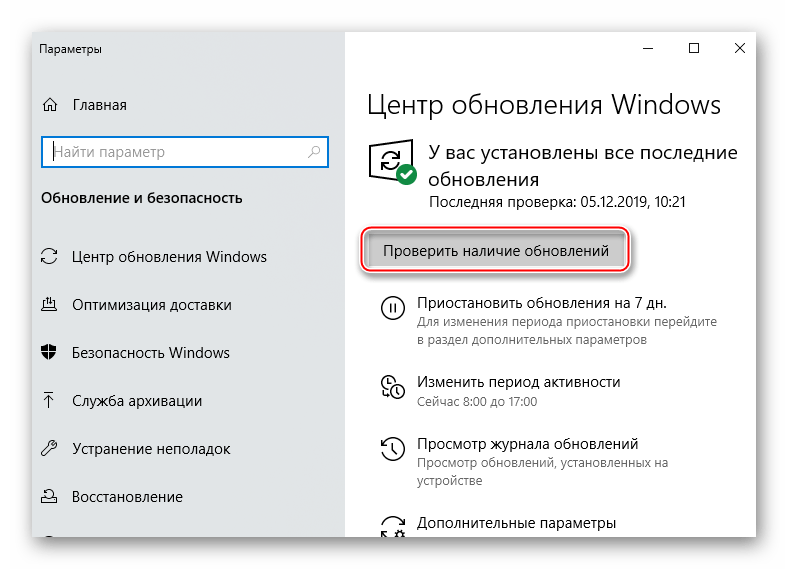
- Перезагружаем устройство и повторно запускаем проверку обновлений.
Способ 2: Загрузка обновлений вручную
Корпорацией Microsoft также разработан «Каталог Центра обновления Виндовс», в котором можно найти актуальные драйвера, обновления и исправления. Например, если какой-нибудь файл некорректно загрузился на компьютер, то он вряд ли установится. В этом случае можно загрузить его повторно.
Подробнее: Устанавливаем обновления для Windows 10 вручную
Способ 3: Восстановление поврежденных файлов системы
В OS Windows 10 есть два инструмента – dism.exe и sfc.exe, благодаря которым можно проверить и восстановить целостность системных файлов. С помощью первой утилиты восстанавливается хранилище системных компонентов. С помощью второй сканируются все системные защищенные файлы, а поврежденные меняются кэшированной копией.

Подробнее: Проверка и восстановление целостности системных файлов в Windows 10
Способ 4: Устранение проблем с НЕТ Фреймворк
NET Framework – это программная платформа, предназначенная для запуска приложений и игр. Когда она повреждена, есть высокий риск, что при обновлении произойдет сбой. Для начала воспользуемся специальным средством, которое проверит программную платформу и, если найдет ошибки, исправит их.

Скачать NET Framework Repair Tool с официального сайта
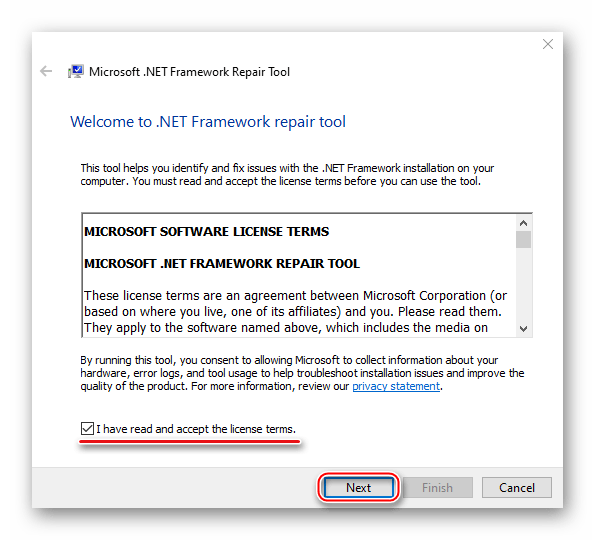
- Запускаем утилиту, принимаем условия разработчиков и нажимаем «Next».
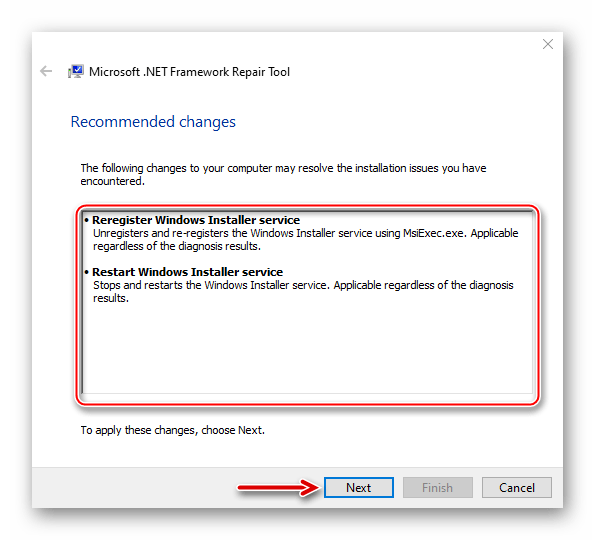
- Если инструмент найдет неполадки, связанные с функционированием платформы, то предложит их исправить. Щелкаем «Next».
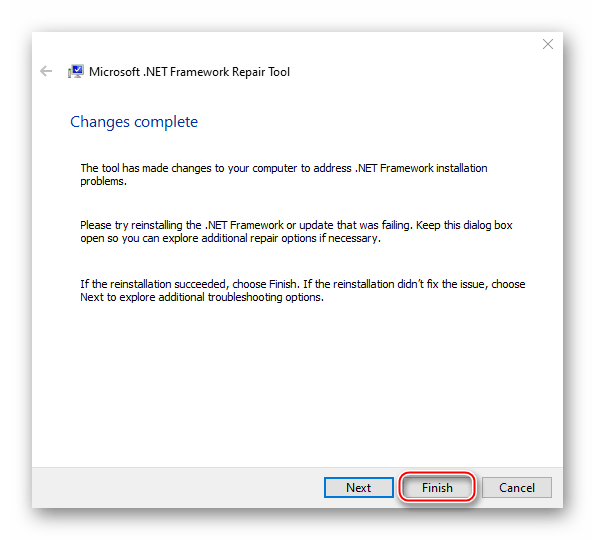
- Когда утилита внесет необходимые изменения, жмем «Finish».
Если проблема осталась, пробуем обновить НЭТ Фреймворк. Другой вариант — переустанавливаем ПО, предварительно удалив его старую версию.
Подробнее:
Как обновить .NET Framework
Удаление программного компонента Microsoft .NET Framework
Способ 5: Очистка компонентов обновлений Виндовс 10
В системе есть две важные служебные директории – «SoftwareDistribution» и «Catroot2». Первый каталог используется для загрузки обновлений перед их установкой. Они хранятся там какое-то время, а затем система автоматически удаляет некоторые из них. В папке «Catroot2» лежат файлы, которые также используются во время обновления. Сбросить компоненты можно очисткой или переименованием этих каталогов.
- Открываем консоль с правами администратора.
- Последовательно вписываем указанные ниже команды и выполняем их нажатием «Enter». Это отключит службы, которые могут помешать выполнять дальнейшие действия.
net stop msiserver
net stop wuauserv
net stop bits
net stop cryptsvc - Делаем резервные копии указанных выше папок. Для этого прописываем сначала
ren C:WindowsSoftwareDistribution SoftwareDistribution.oldа затем
ren C:WindowsSystem32catroot2 Catroot2.oldПо этим путям потом можно будет найти созданные каталоги.
- Снова по очереди запускаем остановленные службы с помощью кодов:
net start msiserver
net start wuauserv
net start bits
net start cryptsvc. - Вписываем в строку
Exitи закрываем консоль.
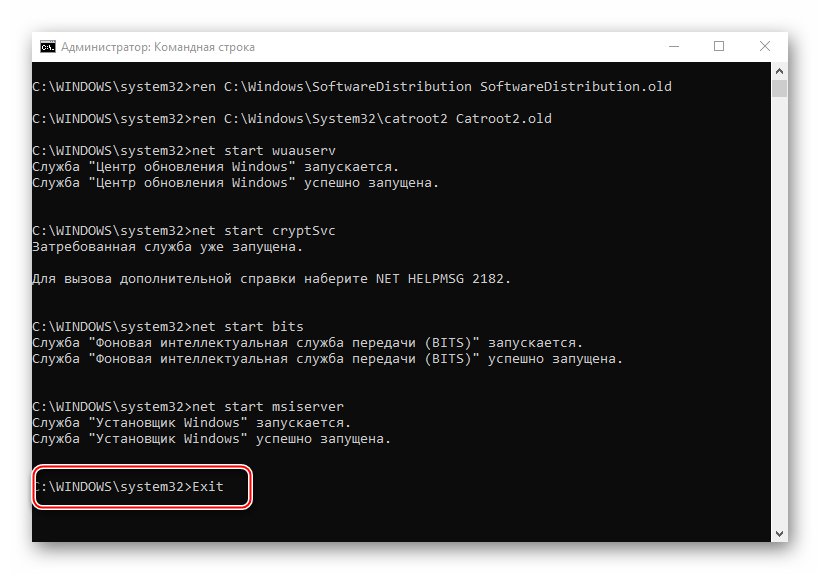
Читайте также: Запуск «Командной строки» от имени администратора в Windows 10
В принципе, после остановки служб эти папки можно просто удалить. При следующей загрузке обновлений система все равно создаст новые. В данном случае были сохранены резервные копии, чтобы если что-то пойдет не так, можно было бы их восстановить.
Способ 6: Удаление вирусов, отключение антивируса
Вирусы негативно влияют на работу системы в целом, поэтому глубокое сканирование ее антивирусом может устранить ошибку. В свою очередь антивирусное ПО и Защитник Виндовс могут блокировать установку программ, и файлы обновления системы часто не являются исключением. Чтобы проверить этот вариант, можно на время отключить брандмауэр и антивирус. Главное, помнить, что в этот момент Виндовс будет уязвима для вирусов, поэтому независимо от результата защитное ПО следует снова запустить.
Подробнее:
Отключение антивируса
Отключение Защитника в Windows 10
Другой вариант – по очереди удалить недавно установленное программное обеспечение и игры, так как именно они могут вызывать ошибку. Иногда есть смысл подождать, когда придут очередные обновления, особенно если проблема возникает при установке двух-трех компонентов, которые не являются критическими. Бывали случаи, когда последующий апдейт завершился успешно.
Выше нами были рассмотрены наиболее распространенные способы устранения ошибки 0x80070643. Если вы знаете иные методы решения проблемы, напишите об этом. Возможно, эта информация поможет другим пользователям, которые уже задумались о переустановке системы.
Обновление KB4048955 для Windows 10 предоставило некоторые улучшения качества и другие элементы безопасности. Микро-патч вызывал ошибку 0x80070643, когда пользователи пытались установить обновление. Ошибка 0x80070643 — это общий код ошибки установки Windows Update, который может отображаться на экране вашего компьютера во время установки любых обновлений. Это связано с регистрацией обновлений программного обеспечения MSI, компонентами MS 2003, а также .NET Framework. В основном это происходит, если какой-либо из них поврежден или системные файлы каким-то образом повреждены. В таких сценариях обновление Windows не позволяет получить доступ к определенным пользовательским данным и приводит к этой проблеме на вашем ПК. В этой статье разберем несколько решений, чтобы исправить ошибку 0x80070643 в Windows 10.
1. Ремонт или обновление Windows .NET Framework
Устаревший или поврежденный файл может нести ответственность за появление кода ошибки 0x80070643. Поэтому, если вы встречаете ошибку «Не удалось установить пакет MSI в Windows 10» вы должны обновить их все. «Net Framework» — это приложение для установки программного обеспечения и обновления системы.
- Скачайте с официального сайта microsoft специальное средство для устранения неполадок Net Framework и запустите его.
- Если ничего не помогла, то можно попробовать переустановить его вручную. Для этого откройте «панель управления» > «установка и удаление программ» > найдите в списке Net Framework 4. Далее нажмите на нем правой кнопкой мыши и «Изменить«. Следуйте инструкциям на экране, чтобы переустановить его.
- Этот метод заключается в обновлении Net Framework через центр обновления. Откройте «Параметры» > «Обновления и безопасность» > и нажмите на «Проверка наличия обновлений«.
Важно: Так как версии 4.x платформы .NET Framework являются обновлениями на месте, невозможно установить более раннюю версию платформы .NET Framework 4.x в системе, где уже установлена более поздняя версия. Например, в системе с обновлением Windows 10 Fall Creators Update невозможно установить .NET Framework 4.6.2, так как в ОС предустановлена платформа .NET Framework 4.7.1.
2. Перезапуск службы Office Source Engine
Если вы пользуйтесь MS Office 2003/2007, вам может понадобиться иногда устанавливать его компоненты. Если вы столкнулись с кодом ошибки 0x80070643, в том числе с ошибкой установки пакета MSI в Windows 10, ose.exe-файл Office может быть виновником. В этом случае вам необходимо перезапустить Office Source Engine (OSE), чтобы решить проблему.
- Нажмите сочетание кнопок Win+R и введите services.msc
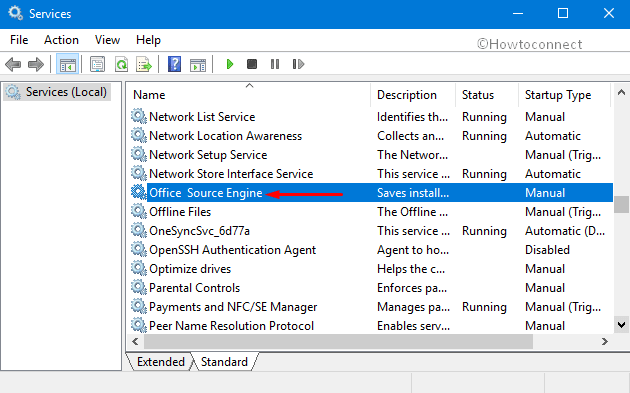
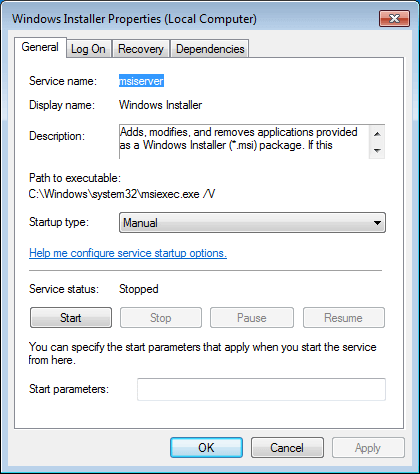
- Найдите службу в списке Office Source Engine, нажмите на ней правой кнопкой мыши и выберите «Свойства«.
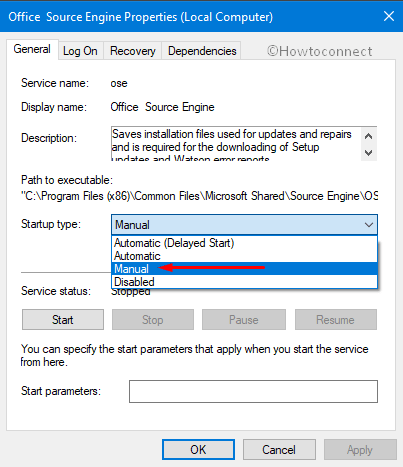
- В новом окне выберите тип запуска «Вручную» и нажмите OK. Перезагрузите ПК и проверьте устранена ли ошибка.
3. Проверка и восстановления системных файлов
Повреждение системных файлов могут выдавать различные ошибки в Windows 10, в том числе и 0x80070643. Я не буду описывать подробный процесс, так как вы можете ознакомится с полным руководством, как правильно восстановить системные файлы в Windows 10.
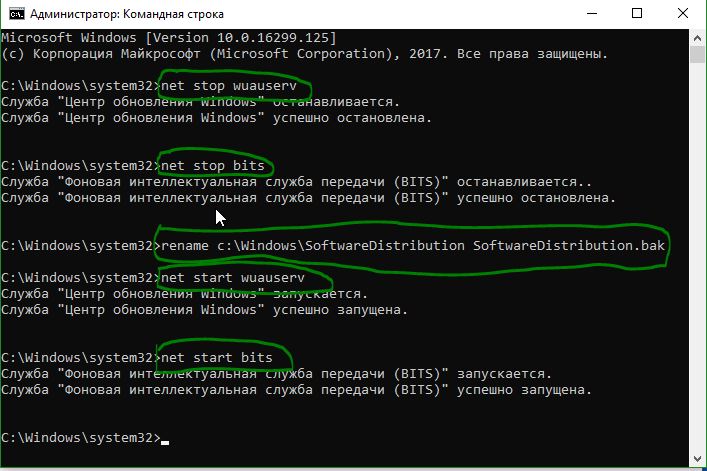
4. Переименуйте папку SoftwareDistribution
Эта проблема может возникнуть из-за повреждения регистрации обновления программного обеспечения MSI, либо из-за того, что установка .NET Framework на компьютере повреждена. Чтобы решить эту проблему, рекомендуется переименовать папку SoftwareDistribution.
Запустите командную строку от имени администратора и введите:
net stop wuauservnet stop bitsrename c:windowsSoftwareDistribution SoftwareDistribution.baknet start wuauservnet start bits
Далее нужно очистить содержимое папки Catroot2, см. ниже.
Catroot2 — это важная папка ОС Windows, которая требуются во время процесса обновления Windows. Итак, если вы столкнулись с проблемой при обновлении Windows и получении сообщения об ошибке — 0x80070643, то нужно сбросить эту папку.
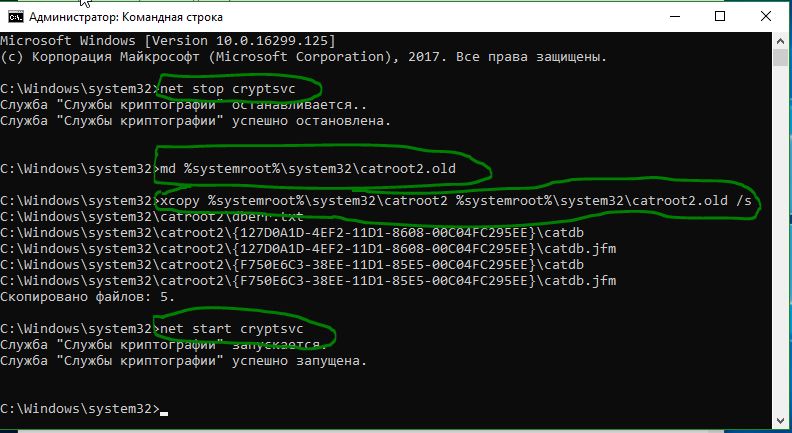
Запустите командную строку от имени администратора и введите:
net stop cryptsvcmd %systemroot%system32catroot2.oldxcopy %systemroot%system32catroot2 %systemroot%system32catroot2.old /s- Удалите теперь все содержимое папки catroot2 по пути C:WindowsSystem32catroot2
- После удаления, введите команду
net start cryptsvc
Если вы снова запустите Центр обновления Windows, папка с каталогом будет сброшена.

5. Запустить средство устранения неполадок Windows Update
Когда пользователи сталкиваются с различными ошибками при обновлении Windows 10, то утилита «средство устранение неполадок» от microsof устраняет большинство проблем. Перейдите на сайт https://support.microsoft.com/ru-ru/help/10164, ответе на пару вопрос и скачайте утилиту, чтобы попытаться устранить ошибку 0x80070643.
6. Установка обновлений windows в состоянии чистой загрузки
Рекомендуется установить обновления Windows в состоянии чистой загрузки, поскольку все процессы и службы, отличные от Microsoft, не запускаются в этом состоянии, и поэтому не может быть никаких сторонних вмешательств вызывающих сбои Windows Update.
Смотрите еще:
- Ошибка 0x8000ffff при восстановлении системы Windows 10
- Ошибка DistributedCOM Код события 10016 Windows 10
- Не найден сетевой путь ошибка 0x80070035
- Ошибка 0x80242006 обновления в Windows 10
- Как сделать скриншот экрана на компьютере или ноутбуке Windows 10
[ Telegram | Поддержать ]
So, here this is all about Error 0x80070643 Windows PC Failed to install MSI package code problem & here we are giving some fresh, easy tips and tricky solutions and the methods guides too. All you have to do one thing is that check and read this Error Code 0x80070643 issue once only and grab the best solutions whichever fits your PC or your device.
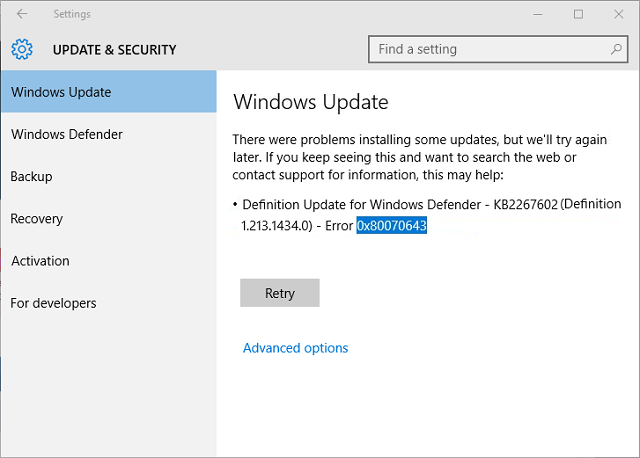
Problems were installing some updates, but you will try again later If you keep seeing this & want to search the web or contact support for information Update for Windows 10 version 1511 for X64-based systems (kb3122947) – Error 0x80070643 Failed to Install MSI Package
This Error 0x80070643 Windows may occur due to various reasons. This runtime error is usually a result of Windows firewall settings & registry entries. This Error happens when you are trying to update your Windows 10 on PC. This error includes some PC system crashes, virus infection & freezes. You may get this error 0x80070643 Windows when you are trying to install Microsoft Security Essentials on your PC which is running the Windows OS (Operating System). It occurs when a file that is related to the installation becomes damaged or corrupted. This Error 0x80070643 Windows may also happen during installing MSI package or be updating your windows update.
Causes of Error 0x80070643 Windows Code Problem:
- Update for Microsoft Visual Studio 2010 tools for offline
- PC Error 0x80070643 Windows problem
- Failed to Install MSI Package error
How to Fix & Solve Error 0x80070643 Windows Code Issue
So, here are some quick tips and tricks for efficiently fixing and solving this type of Error 0x80070643 Windows PC Code problem from you permanently.
1. Disable or Uninstall your Windows Antivirus Software on your PC –
By Disabling or uninstalling your antivirus software can quickly fix and solve this Update for Windows 10 version 1511 for x64-based Systems Error 0x80070643 Windows 7 problem.
2. Fix by Cleaning Temporary Unwanted Files from your Windows –

- Go to the start menu
- Search or go to the Disk Cleanup there
- Click on it and opens it there
- Tick the boxes which you want to clear it
- After that, click on the OK tab & select Yes to Delete
- After that, wait for some time to remove it
- After, close the tab
- Restart your PC
- That’s it, done
Fixing by cleaning your temporary and the junk files can quickly solve this Update for Windows 10 Version 1511 for X64-based systems kb4023057 Error 0x80070643: Failed to install MSI package. The problem with your PC.
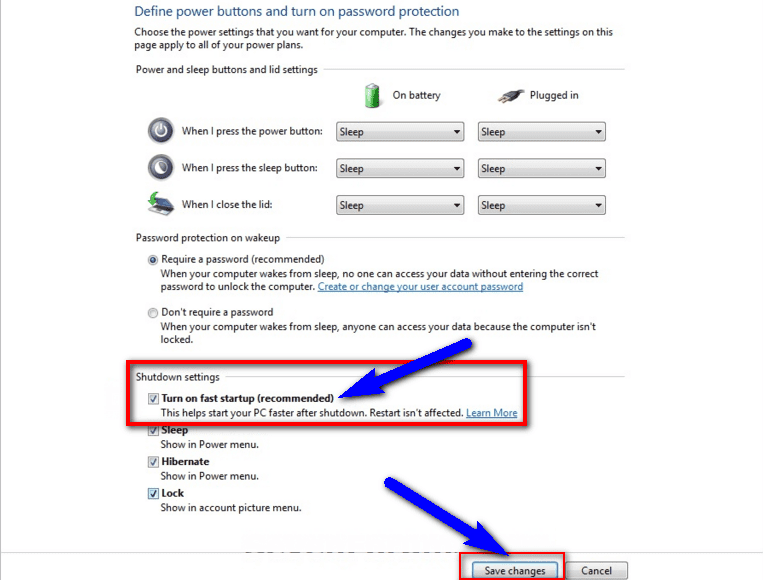
3. Turn OFF the Fast Startup on your Windows PC –
- Go to the start menu
- Search or go to the Control Panel
- Click on it and opens it there
- After that, go to the Power option there
- & click on the ‘Choose what the power buttons do‘ there
- Now, click on the “Changes settings that are currently unavailable” option there
- After that, there untick the “Turn on fast startup” options
- After finished, close the tab
- That’s it, done
By turning off, the fast startup option can fix and solve this kb4336999 Error 0x80070643: Failed to Install MSI Package Windows 10 defender problem from your PC.
4. Fix by Cleaning Boot on your Windows PC –

- Go to the start menu
- Search for ‘MSConfig‘ in the search box and press Enter there
- Click on the User Account Control permission
- & click on the Continue option there
- On the General tab there,
- Click on the ‘Selective Startup‘ option there
- Under the Selective Startup tab, click on ‘Clear the Load Startup‘ items checkbox
- Click on the services tab there,
- Click to select the “Hide All Microsoft Services” checkbox
- Then, click on the ‘Disable All‘ & press Ok button there
- After that, close the tab
- & restart your PC
- That’s it, done
By cleaning the boot, you can quickly get back from this Error 0x80070643 failed to install msi package Windows 10 problem.
5. Update your Windows Drivers on your PC –

- Go to the start menu
- Search or go to the Control Panel
- Click on it and opens it there
- After that, scroll down and go to the “Windows Update” section there
- Click on it & Check if any newly latest driver update is available or not
- If any, Update it fast
- Or, you can set it as ‘automatically update.’
- For that, go to the left side
- & click on the “Changes Settings” option there
- After open, click on the drop-down menu there
- Select the “Install Updates Automatically” option there
- & click on the OK button to save this configuration
- After completing, close the tab
- That’s it, done
So by this above method, you can quickly get back from this Update for Windows 10 version 1511 for X64-based systems (kb3122947) – sccm Error 0x80070643 PC problem issue on your Windows PC forever.
” OR “
- Go to the start menu
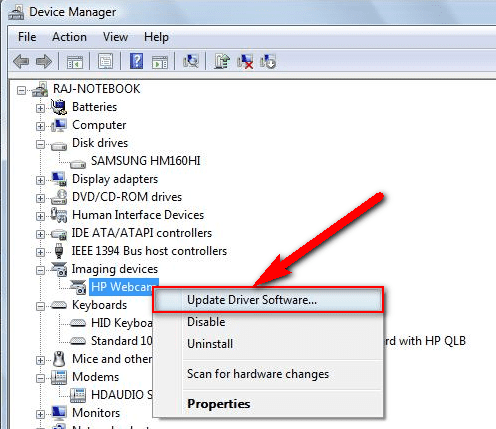
- Search or go to the Control Panel or direct go to Device Manager
- Click on it and opens it there
- After going to device Manager there,
- check if any driver has error sign there
- If any, then right-click on it
- & Click on the “Update driver software” there
- Wait for some minutes to update it
- After updating, close the tab
- That’s it, done
Updating your driver by any of these two methods can quickly fix and solve this Error 0x80070643 windows defender: Failed to install MSI package problem from your PC.
6. Uninstall the Microsoft .NET Framework & Reinstall it again on your PC –
- Go to the start menu
- Search or go to the Control Panel
- Click on the ‘Programs and Features‘ option there
- Select the “.NET framework” Software there &
- Right-click on it & select Uninstall to uninstall it
- After that, close the tab
- Now, again reinstall it again
- That’s it, done
By uninstalling and reinstalling the .NET framework can also fix and solve this Windows Update kb4336986 Error 0x80070643 code problem from you.
7. Run the sfc /scannow command in the CMD (Command Prompt) –

- Go to the start menu
- Search or go to the Command Prompt
- Click on that and opens it
- A Pop-up will open there
- Type this below the following command
” sfc/scannow “ - After that, press Enter there
- Wait for some seconds there
- After complete, close the tab
- That’s it, done
Run an sfc/scannow command in the command prompt can quickly fix and solve this Update for Microsoft Visual Studio 2010 Tools for Office Runtime 2018 11 update for windows 10 version 1803 for x64 based systems kb4023057 Error 0x80070643 Windows 10 code problem from your PC.
8. Repair the Registry Errors from your Windows PC –
Registry errors may be a cause of Windows Update Error 0x80070643 Windows 7. This error code problem can only be fixed by repairing errors in your Windows registry. So that it will fix and solve your this error problem.
9. Run a Full Scan of your Windows PC for Malware or Virus –
- Go to the start menu
- Search or go to the “Microsoft Security Essentials” there
- Click on it and opens it there
- A Pop-up will open there
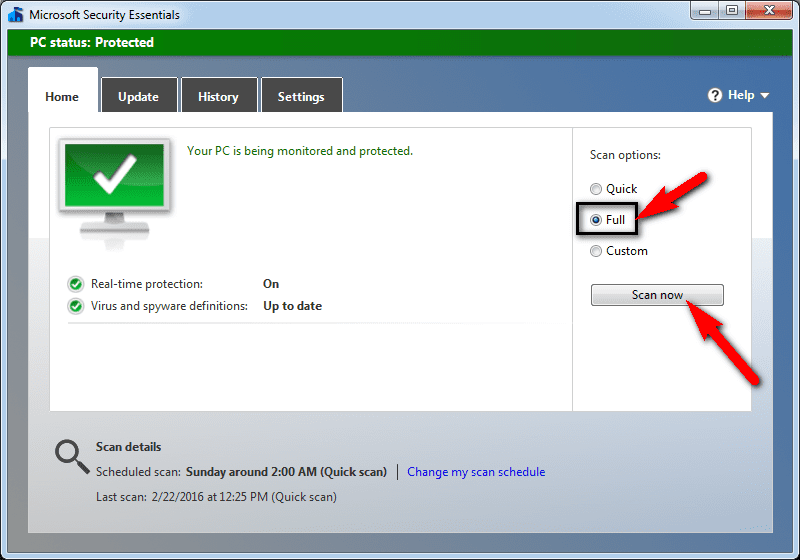
- Check the ‘Full‘ option there to scan thoroughly
- After, click on the ‘Scan Now‘ option to scan carefully
- After scanning, close the tab
- That’s it, done
By running a full scan of your PC can get rid out of these Windows Update Error 0x80070643 sccm problems from your PC completely.
10. Allow Google Chrome Browser through Windows Firewall on your PC –
- Go to the start menu
- Search or go to the Control Panel
- Go to the ‘Internet and Network‘ option
- Click on “Configure” at the right
- In the section titled ‘Firewall Protection is enabled.’
- Click on the Advanced tab there
- Select the ‘Program Permissions‘ from the home list in the left
- Click on the “Add Allowed Program” button there on the right
- Use the ‘Windows Explorer‘ to browse & locate your application “.Exe“
- Click on OK button and close the Security Center
- After finishing, close the tab
- That’s it, done
By allowing Google Chrome browser through the Windows, Firewall can also fix this Error 0x80070643 msi Windows 10 code problem quickly.
11. Check for Corrupted Hard Drive by CHKDSK /F Command on your PC –
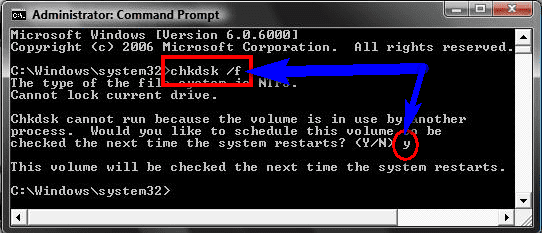
- Go to the start menu
- Search or go to the CMD (Command Prompt) there
- A Pop-up will open there
- Type this following command there
” CHKDSK /F “ - & Press enter there
- After that, close the tab
- That’s it, done
By checking the corrupted hard drive error and fixing it can solve this Windows Update Error 0x80070643 python: Failed to install MSI package problem.
12. Reinstall the Drivers for the Device on your PC –

By Reinstalling the drivers for the device will fix your kb4023057 Error 0x80070643 Failed to install MSI package problem.
13. Create a System Restore Point on your Windows PC –

- Go to the start menu
- Search or go to the ‘System Restore.’
- Clicks on it and open it there
- After that, tick on the “Recommended settings” or ‘Select a restore point‘ there
- After selecting, click on the Next option there
- Now, follow the wizard
- After completing, close the tab
- That’s it, done
So by this method, you may get back from this Error 0x80070643 SQL Windows PC problem completely.
“ OR “

- Go to the start menu
- Search or go to the ‘System Properties.’
- Click on it and opens it
- After that, go to the “System Protection” option there
- Now, click on the “System Restore” option there
- & Create a Restore point there
- After completing, close the tab
- That’s it, done
Run a system restore and creating a new restore point by any of these two methods can solve this Error 0x80070643 defender Windows 10 PC problem from your PC completely.
14. Remove or Reconfigure the newly Installed Windows Device on your PC –
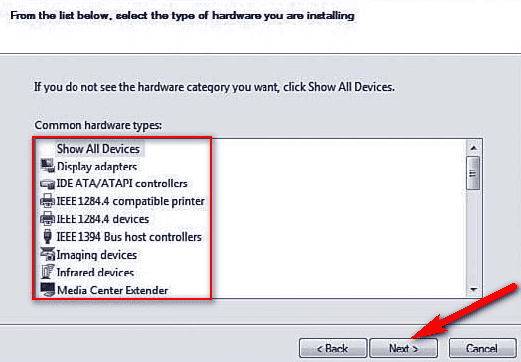
By Removing or reconfiguring the newly installed device will fix your Windows Update 2018 11 updates for windows 10 version 1803 for x64 based systems kb4023057 Error 0x80070643 problem.
15. Troubleshoot & Run an Automatic Windows Repair on your PC –
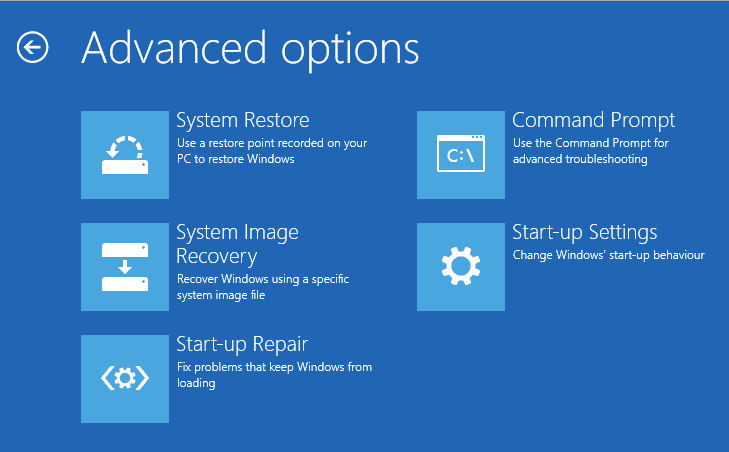
- Go to the start menu
- Search or go to the PC settings there
- Click on the ‘Troubleshoot‘ option there
- After opening, click on the ‘Advanced options‘ there
- Then, click on the “Automatic Repair” option there
- After troubleshooting, close the tab
- That’s it, done
By running an automatic repair of your PC can get rid out of this update for windows 10 version 1709 for x64 based systems kb4041994 Error 0x80070643 Windows 10 problem from your PC.
16. Restart your Windows PC [OPTIONAL] –

- Go to the Start menu
- Click on the right side of ‘Shutdown.’
- Click on Restart option there to restart
- That’s it, done
If this is your first time you have seen this stop error screen then by restarting your PC again will quickly fix this Install Error 0x80070643 Windows 10 problem.
These are the quick and the best way methods to get quickly rid out of this Error 0x80070643 Failed to Install MSI Package Windows PC Code issue from you entirely. Hope these solutions will surely help you to get back from this Error 0x80070643 Windows problem.
If you are facing or falling in this Error 0x80070643 Failed to Install MSI Package Windows PC Code problem or any error problem, then comment down the error problem below so that we can fix and solve it too by our top best quick methods guides.
Do you encounter Error Code 0x80070643 along with a warning message Failed to Install MSI Package in Windows 10 PC? If yes, then don’t worry as this article provides a decent range of solutions to fix this issue. Microsoft releases system updates to rectify the already present bugs and problems on your current operating system. If connected to the internet, Windows 10 based device automatically looks for updates to make the system more efficient and smoother as well.
Failed to Install MSI Package in Windows 10 is one of the more frequent error messages as compared to its previous versions. In general, this problem pops up while performing KB3106246, KB2267602 installation. Update or its installation often fails with the presence of stop code 0x80070643. This is associated with MSI software update registration, MS 2003 Components moreover .NET Framework. It mostly occurs if any of them is corrupted or if the system files get damaged somehow. In such scenarios, Windows update fails to access certain user data and thus leading to this issue on your PC. Here in this article, we will discuss several promising solutions such as Configuring .NET Framework, repairing Windows Updates Components, checking and system files to fix this bug entirely.
Here is how to fix Error Code 0x80070643 Failed to Install MSI Package in Windows 10 –
Repair or Update Windows .NET Framework
The outdated or corrupt file might be responsible for occurring of Error Code 0x80070643. Therefore you must update all of them. The “.Net Framework” is an application for software installation or system update. Now, if .NET Framework is active on your device, always make an attempt to keep it up to date. Therefore, the most feasible way to get rid of Error Code 0x80070643 Failed to Install MSI Package in Windows 10 is to either update or troubleshoot .NET Framework.
Downloading the .Net Framework Repair Tool from Microsoft and running it in your PC may resolve this trouble.
Manually Repair .NET Framework
If the above solution doesn’t work efficiently on your PC, try to manually repair this tool by going through these easy series of steps.
At first, click on the Cortana box and type Control Panel. Hit on the result to open Control Panel.
Make the icons into smaller view and then choose Programs and Features.
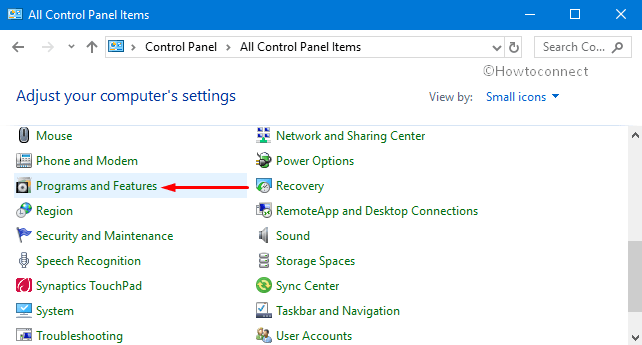
Move to the right pane and right-click Microsoft .NET Framework 4 Client Profile from the visible list of programs. Now, hit the Change option.
Mark the first option from pop-up window namely Repair .NET Framework 4 Client Profile and click the Next button.
Now go through the onscreen instructions and wait for a few seconds to repair this tool.
Note: If you cannot locate the “Microsoft .NET Framework 4 Client Profile” then download as well as install it to bypass the error.
Check Office Source Engine Service
If you occupy MS Office 2003, you may need to every now and then install its components. So, if you are confronting Error Code 0x80070643 including Failed to Install MSI Package in Windows 10, ose.exe file of Office 2003 might be the culprit. In that case, you need to restart Office Source Engine (OSE) to solve the problem.
Access Run dialog box and type services.msc on the available space. Click OK to open Services.
On the console, locate and double-click the service namely Office Source Engine (see snapshot).
Click the Startup type drop-down and pick Manual. Click OK to save the changes of the service and check for the error code.
Use Windows Update Troubleshooter
Windows 10 has yet another useful inbuilt troubleshooter to resolve the common issues that occur. After running, it will make an attempt to solve this problem automatically and let your system run error free.
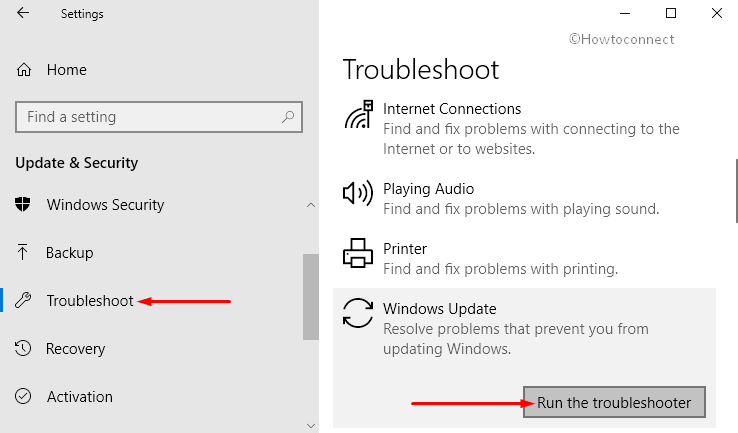
Open Windows Settings program by jointly hitting Win + I shortcut keys. From the main interface, click the Update & security category, the last one.
On the left sidebar, choose the Troubleshoot option.
Now, jump to the right pane, locate Windows Update. Select it and click Run the troubleshooter button from the detail pane.
When the wizard will come, it will start detecting the issues related to Windows Update. Follow the on-screen instructions to choose the problematic area and wait for some time until it tries to fix.
Finally, check whether this resolves the Error Code 0x80070643 Failed to Install MSI Package in Windows 10.
Restart Windows Update Components
There is a possibility that several Windows Update components are basically the reason behind the occurrence of ‘Failed to Install MSI Package in Windows 10’ Error message. You need to restart these components and the security center of your system to fix the issue. You should first stop all these services and rename the SoftwareDistribution and cartoon2 folder, then start these components again.
Open Run dialog box by hitting “Win + R” shortcut keys altogether. Here, type CMD in the blank text field of Run. Now, to access it with admin rights, jointly press “Ctrl + Shift + Enter” hotkeys.
See our article on How to Open Command Prompt as Admin From Run Dialog in Windows 10.
If UAC prompts up on the computer screen, go ahead with the Yes option. Type the given below commands to stop these services and hit Enter after each command.
net stop wuauserv
net stop cryptSvc
net stop bits
net stop msiserver
net stop wscsvc
Rename SoftwareDistribution and catroot2 folders just by running the underneath commands.
ren C:WindowsSoftwareDistribution SoftwareDistribution.old
ren C:WindowsSystem32catroot2 Catroot2.old
If you are not comfortable with Command Prompt you should access ‘File Explorer‘, navigate to this path and right click on it.
C:WindowsSoftwareDistribution
Here, perform a right-click on it, select Rename option. Change it as SoftwareDistribution.old.
Repeat these steps for the catroot2 folder as well.
Once the renaming process is completed start again those services. Just type or copy/paste the below-given commands and hit Enter at the last of each.
net start wuauserv
net start cryptSvc
net start bits
net start wscsvc
Once you successfully execute the above commands, restart Windows 10 PC. Hopefully, after going through this workaround, the system will no more encounter issues like Error code 0x80070643.
Perform Windows Update
For many, performing Windows Update helped in resolving Error Code 0x80070643.
Click the Start icon on the left of the taskbar and select Settings. Choose Update & Security tab on the homepage of the application.
On the right-hand side of Windows Update, make a click on the Check for updates button.
If they are available, grab and install them right away.
Check and Repair System Files
SFC /Scannow and DISM.exe are impactful commands that use to detect moreover repair corrupted Windows system files. In multiple cases, when internal Windows error occurs on your device, Windows updates will just stop functioning and display failure messages with various stop codes. Just execute these commands on elevated Command Prompt and you are done.
Open the taskbar search box and type cmd. Command Prompt icon will appear as the Best match. Right click on its icon and select ‘Run as Administrator‘ option from the context menu.
When this prompts up UAC dialog on your display screen, hit Yes.
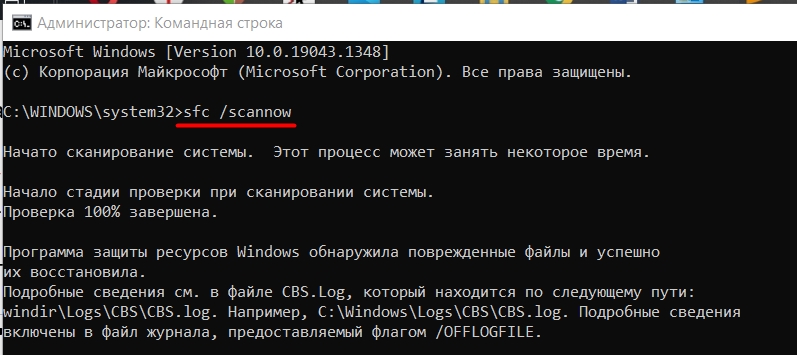
Now type sfc /scannow and press Enter. This will take some time to search corrupt files present on your PC. You have to be patient and wait till the built-in tool repairs the faulty system files automatically.
Proceeding forward, execute this given list of DISM commands to bypass Error Code 0x80070643 Failed to Install MSI Package in Windows 10.
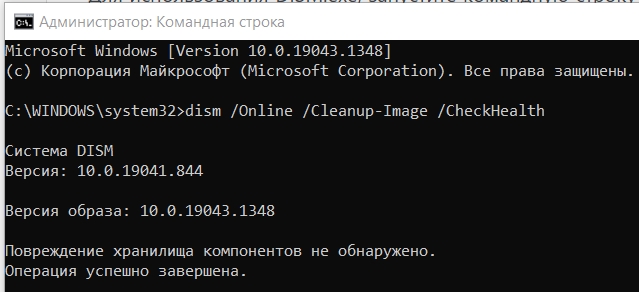
DISM /Online /Cleanup-Image /CheckHealth
DISM /Online /Cleanup-Image /ScanHealth
DISM /Online /Cleanup-Image /RestoreHealth
For reference, see SFC /Scannow, DISM.Exe, CHKDSK Windows 10.
Uninstall Antivirus Completely
Most of the time, the presence of third-party antivirus solutions can also lead to the Error Code 0x80070643. Their installation or configuration method may interrupt certain areas of your system which results in this specific issue.
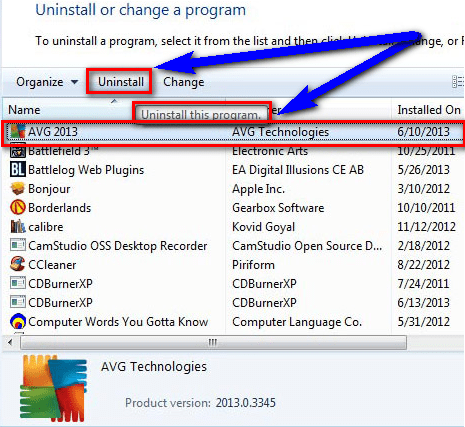
Perform a right-click on Start icon and from the WinX menu, choose Apps and Features option.
Apps Settings page will appear. Switch to the right pane and select the 3rd party antivirus from the list of installed applications. Finally, make a hit on the “Uninstall” button and remove the software from your PC.
However, the remnants of the program may also cause issues on your system. So, you can Use Revo Uninstaller On Windows 10 to Force Uninstall Stubborn Programs.
Wrapping Up
The above-mentioned are the best workarounds to bypass Error Code 0x80070643 Failed to Install MSI Package in Windows 10.
Repair any Windows problems such as Blue/Black Screen, DLL, Exe, application, Regisrty error and quickly recover system from issues using Reimage.
При работе центра обновления Windows часто возникает ошибка — 0x80070643 в процессе установки произошла неисправимая ошибка.
В данной статье мы объясним причины возникновения этой ошибки и действия, которые позволят ее устранить.

Ошибка 0x80070643 очень распространена и может возникать в следующих случаях:
- Ошибка при установке компонента NET.Framework
- Ошибка при установке любого обновления Windows
Так какие основные причины возникновения ошибки 0x80070643 при обновлении windows 10,8.1 или7?
Основные причины возникновения ошибки 0x80070643:
- Повреждение регистрации обновления установщика MSI или повреждение установки .NET Framework на Вашем устройстве
- Повреждена база данных Windows Update
- Фоновая интеллектуальная служба передачи (BITS) некорректно работает
- Необходимый для работы системный файл неверно зарегистрирован
- При работе установщика Windows возникает ошибка, говорящая о его повреждении
- Манифест модели CBS нарушен
- Служба Windows Update прекращает свою работу
- Агент Windows Update конфликтует с версиями устанавливаемых обновлений
После рассмотрения основных причин возникновения ошибки, мы переходим к главному — когда возникла ошибка 0x80070643 на windows 10,8.1 или 7, как ее исправить?
Ошибка установки обновления .NET Framework: «0x80070643»
Происходит только на Windows 7 и более ранних версиях, варианты решения вопроса:
Восстановление компонентов .NET Framework:
Если проблема остается, нам поможет полное удаление из системы NET.Framework и установка данных компонентов снова. Тут также все просто.
Снова попробуйте установить обновления. Тут уже проблема должна быть решена.
Если и после этих действий проблема остается, необходимо выполнить установку системы с сохранением ваших файлов и программ.
Для этого понадобится установочный диск или образ Windows 7
Распакуйте образ любым архиватором или запустите диск, найдите в корне образа или диска файл Setup и запустите его. Следуйте инструкциям установщика и Ваша система будет обновлена. После этого необходимые обновления установятся корректно.
Таким образом Вы сможете решить ошибку 0x80070643 windows 7 ошибка обновления .NET Framework.
Переходим ко второму варианту, когда может возникать ошибка при установке обновлений.
При установке любого обновления Windows ошибка 0x80070643
Также данная ошибка может появиться в виде сообщения — installation failed with error code 0x80070643 windows update.
Далее необходимо провести действия, которые ошибку 0x80070643 в большинстве случаев исправят. Действия несложные и сейчас я вам по порядку о них расскажу.
Запустите автоматическое средство – самый простой вариант для пользователя.
Загрузите средство по ссылке , запустите его
Нажмите «Далее», если проблемы будут обнаружены, средство их исправит и напишет об этом в своем окне, также оно сразу предложит скачать и установить обновления, если они в данный момент найдены. Соглашайтесь с данным предложением и проводите их установку.
Очистка кэша обновлений
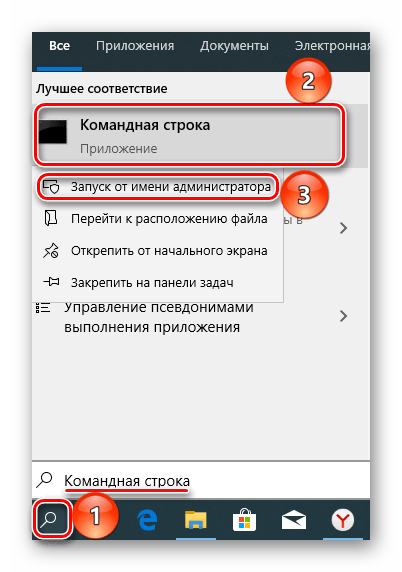
Очень действенный способ при возникновении любых проблем с обновлениями, часто уже скачанные файлы обновлений могут мешать установке новых, сам кэш может быть поврежден. Поэтому Вам необходимо открыть командную строку с правами администратора, для этого щелкните Пуск и начните вводить Командная строка, у Вас появится программа «Командная строка», правая кнопка мыши на найденной программе — «Запустить от имени администратора».
В открывшейся командной строке введите
Net stop wuauserv
И нажмите ввод.
В командной строке должно появиться сообщение, что служба центра обновления остановлена. После этого переходите к удалению папки SoftwareDistribution с кэшем.
Если возникнет ошибка 0x80070643, или служба не остановится, перезагрузите систему и сразу переходите к следующему шагу:
Откройте Локальный диск С, перейдите в папку Windows и найти в ней папку SoftwareDistribution, удалите эту папку.
Вы можете спокойно ее удалять, она пересоздаётся снова, уже без повреждений и готовой к работе без ошибок.
Попробуйте снова запустить поиск и установку обновлений.
Перезапуск служб
Щелкните поиск и введите «Управление компьютером», откроется окно консоли. Слева найдите пункт «Службы» и выберите его.
В открывшемся списке служб нам нужно найти следующие службы
Удостоверение приложения, службы криптографии, фоновую интеллектуальную службу и центр обновления Windows. Выбрать каждую по очереди и перезапустить.
Пробуем устанавливать обновления и проверяем, возникает ли ошибка 0x80070643.
Скачайте и проведите установку средства подготовки системы к обновлению.
Для Windows 8.1 и 10 – в командной строке от имени админа и выполните следующую команду:
DISM /online /cleanup-image /restorehealth
 Для Windows 7 скачайте и запустите соответствующую версию программы CHEKSUR, скачать данную программу обновление можно по ссылке . После скачивания проведите установку.
Выполнив данные действия перезагрузите ваше устройство запустите установку обновлений
Проведите полную проверку системных файлов и их исправление
В командной строке введите sfc /scannow и нажмите клавишу Enter. Дождитесь выполнения команды и снова проведите установку найденных обновлений.
Попробуйте скачать обновление и установить его вручную. Как Вам такой вариант?
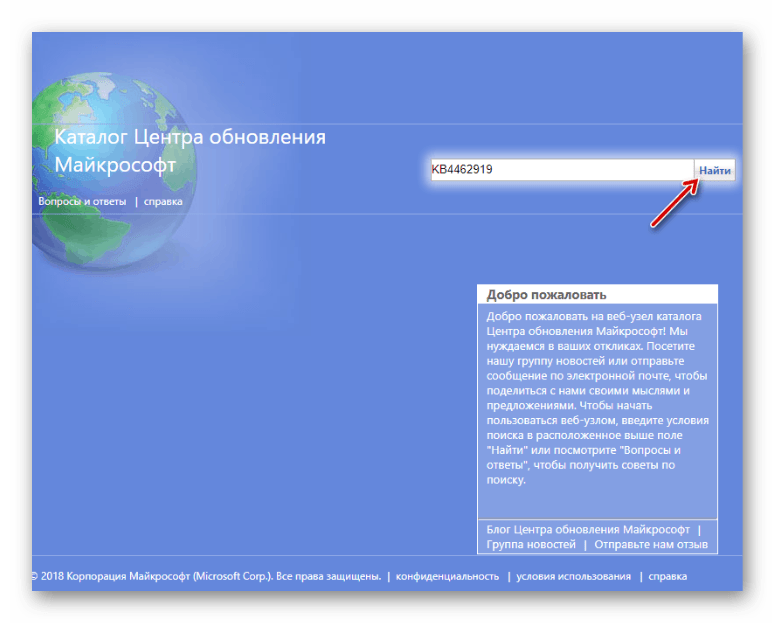
Для этого перейдите на сайт
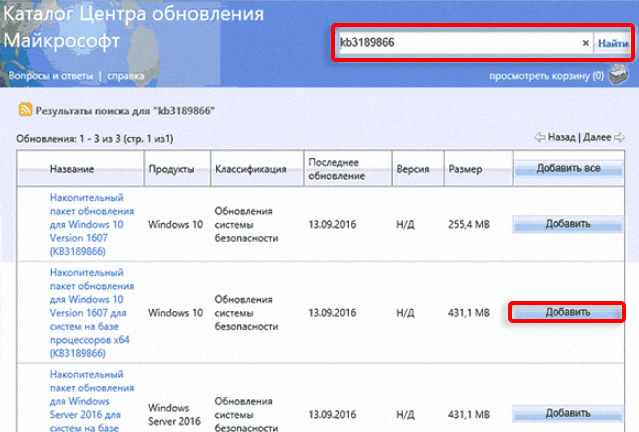
 В окне поиска введите номер обновления, которое не устанавливается в виде KBXXXXXX, где XXXXX-номер обновления и нажмите «Найти.
Вам нужно будет скачать версию нужной разрядности -x64 или x86(для 32-битной Windows).
После скачивания запустите установку данного обновления, для этого просто щелкните на нем два раза левой клавишей мыши и подтвердите его запуск.
И мы чуть не забыли про антивирус!
Да, как это не прискорбно, но он может вызывать проблемы с работой центра обновления и ошибки, так может блокировать доступ к серверам обновлений и их установку. И что же делать в этом случае?
Если Вы разбираетесь в настройках Вашего антивируса, то конечно лучше всего их проверить, чтобы убедиться, что серверы Майкрософт не указаны в антивирусе как заблокированные.
Но, если Вы антивирус один раз установили и больше его ни разу не использовали, с этим могут возникнуть сложности.
Поэтому, чтобы исключить его влияние, удалите его.
В будущем всегда можно установить его обратно, это занимает немного времени, но при его полном удалении мы исключим его влияние на центр обновления и всем будет спокойнее.
Поэтому открывайте сайт производителя Вашего антивируса, находите там программу для его удаления и удалите полностью антивирус с Вашего устройства. Если такой программы Вы найти не сможете, удалите его просто через «Программы и компоненты Windows».
Проблема остается?
Мы исключили многие проблемы, но не исключили сторонние приложения и службы, установленные у Вас в системе. А вдруг они вызывают проблему?
Программы-оптимизаторы, программы для чистки реестра, любые программы, которые в автоматическом режиме могут работать на Вашем устройстве, могут повредить систему или заблокировать установку обновлений, поэтому проводим так называемую «Чистую загрузку системы».
В поиске Вашей системы пишем msconfig и запускаем найденную программу «Конфигурация системы». Звучит и выглядит пугающе? Ничего, сейчас все настроим.
На вкладке «Общие» установите пункт «Выборочный запуск» и уберите флажок с «Загружать элементы автозагрузки»
Перейдите на вкладку Службы, щелкните «Не отображать службы Майкрософт» и снимите галочки со всех служб в окне.
Нажмите «Применить» — «Ок» и система попросит перезагрузку.
Смело перезагружайте и запускайте установку обновлений. Если какая-то сторонняя служба или программ вызывали проблему, теперь все будет в порядке.
После перезагрузки мы снова столкнулись с ошибкой 0x80070643?
Вспоминаем, что мы еще не проверили?
Так, жесткий диск, давно у Вас он установлен? Не замечали ранее с ним никаких проблем? А давайте проверим!
Открываем нашу уже любимую командную строку и вводим команду
chkdsk C: /f /r
Появится сообщение, что не удается проверить текущий диск. Все верно – мы же сейчас в системе
Не беда! Нажимаем на клавиатуре букву «Y» и Ввод и теперь при следующей перезагрузке, проверка диска запустится автоматически. Это будет полная поверка диска и исправление проблем, которые можно исправить. После этого пробуем установить обновления снова.
Последний вариант
Если после всех проведенных действий проблема остается, в решении вопроса нам поможет установка системы с сохранением Ваших личных файлов и программ.
Перейдите на страницу
И нажмите «Скачать средство сейчас»
Сохраните и запустите скачанную программу MediaCreationTool.
Примите условия лицензионного соглашения
Выбираем «Обновить этот компьютер сейчас» и нажимаем «Далее»
После скачивания необходимых файлов, программа предложит запустить установку с сохранением Ваших файлов и программ.
Мы провели с Вами все действия, которые помогут Вам решить проблему с работой центра обновления и установкой обновлений.
Но, что делать, если проблема так и не решилась?
Если не решилась – остается 100% решение вопроса – чистая установка системы, после нее все обновления системы будут устанавливаться как нужно и Ваши вновь установленные программы будут функционировать как часы!
Отличного Вам дня!
ВОПРОС! Здравствуйте! На моем ноутбуке с Windows в процессе установки произошла неисправимая ошибка с кодом 0x80070643. Как её можно исправить, пожалуйста, помогите.
ОТВЕТ СВЕЦИАЛИСТА! Ошибка принадлежит модулю встроенного защитника и брандмауэра – Windows Defender. Тут может быть очень много причин. Или система не может скачать обновление, или идет проблема с инсталляцией самого пакета. Есть вероятность, что в Виндовс не работают две службы: центра обновления и BITS. В статье ниже я описал все возможные решения, которые должны помочь, поэтому начните с первого варианта. Если в процессе возникнут какие-то вопросы – пишите в комментариях.
Содержание
- Способ 1: Средства устранения неполадок
- Способ 2: Очистка кэша обновлений
- Способ 3: Целостность системных файлов
- Способ 4: NET Framework Repair Tool
- Способ 5: Ручная установка
- Способ 6: Скачивание обновления
- Способ 7: Сторонняя программа
- Способ 8: Отключение защиты
- Способ 9: Настройка DNS
- Способ 10: Ничего не помогло, что мне делать?
- Видео
- Задать вопрос автору статьи
Способ 1: Средства устранения неполадок

Ранее в Microsoft была утилита, которая автоматически решала проблемы с обновлениями. Так как ошибок было много, а сама утилита висела на сайте Microsoft, разработчики решили вписать функцию в саму систему. Поэтому давайте ею воспользуемся.
- Откройте меню «Пуск» и нажмите по значку шестеренки.
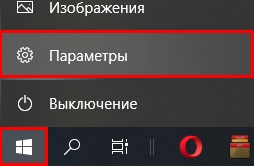
- В параметрах Виндовс 10 найдите раздел «Обновление и безопасность».
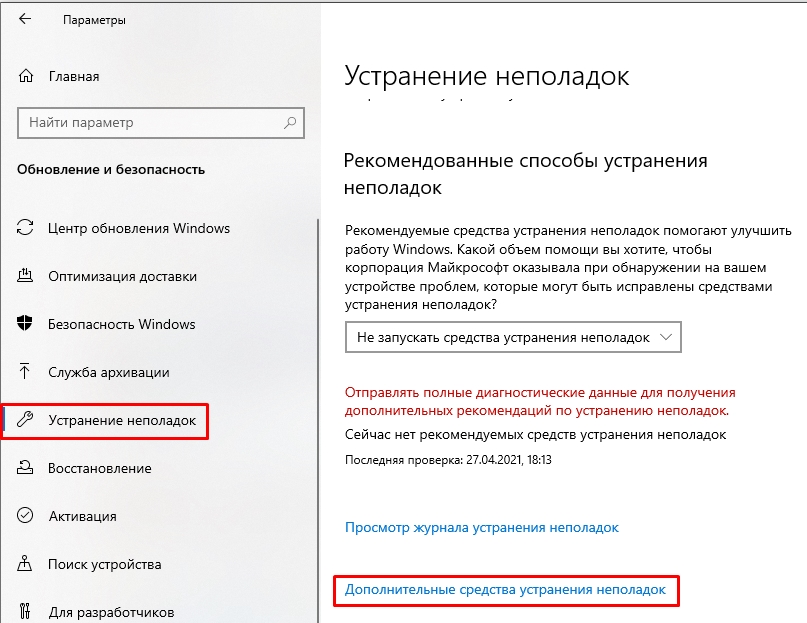
- Слева выбираем пункт «Устранение неполадок» и жмем по ссылке «Дополнительные средства устранения неполадок».
- Раскройте пункт «Центра обновления Windows» и запустите средства устранения неполадок.
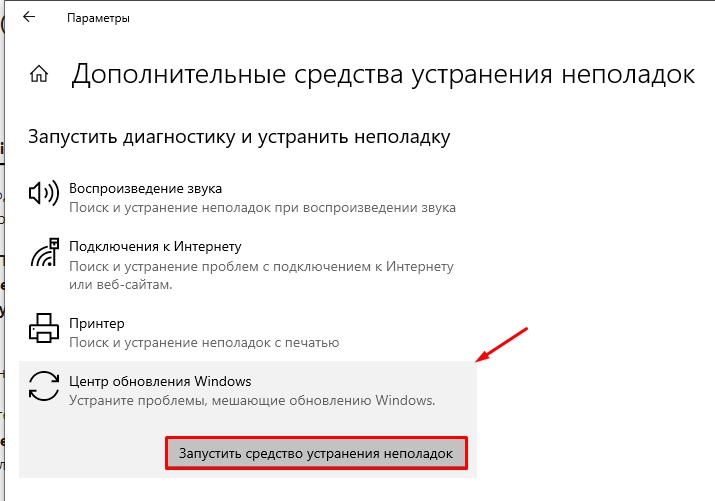
- Система автоматически начнет проверку служб, а также функций и программ, которые отвечают за обновление. Если будут обнаружены какие-то проблемы – жмем по кнопке «Применить эти исправления».
- В конце я все же советую перезагрузить саму систему, а потом попробовать обновить ОС.
Способ 2: Очистка кэша обновлений
Сам центр обновления использует определенный кеш, из-за него тоже может возникать ошибка скачивания в Windows 10 с номером 0x80070643. Попробуем этот кеш удалить.
- Отключите комп от интернета.
- Запускаем консоль с правами админа.
- Вводим команду, чтобы остановить службу:
net stop wuauserv
- Если предыдущая команда не работает, или вылезает ошибка, то попробуйте перезагрузить систему.
- Теперь вводим:
net stop bits
- Открываем папку:
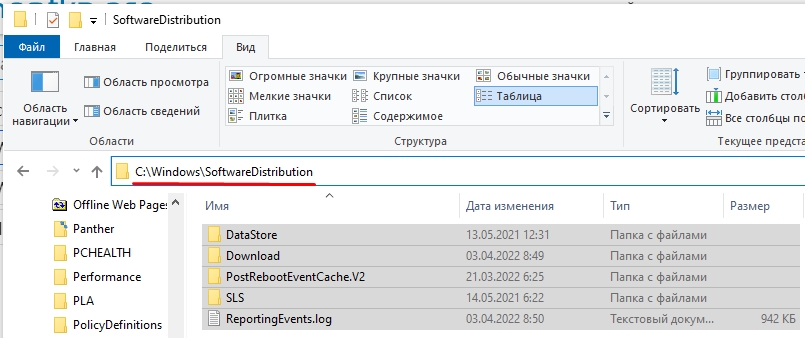
C:WindowsSoftwareDistribution
- Все из неё удаляем.
- Теперь запускаем службы:
net start bits
net start wuauserv
- Не забываем обратно подключиться к интернету.
Способ 3: Целостность системных файлов
Возможно, какие-то системные файлы, отвечающие за загрузку обновлений, просто побиты. Их можно попробовать восстановить с помощью системной функции:
- Открываем командную строку с правами администратора.

- Вводим команду:
sfc /scannow
- Если при данной процедуре возникла ошибка или что-то пошло не так, то значит повреждено стоковое хранилище. Нам нужно его восстановить с помощью другой команды:
dism /Online /Cleanup-Image /CheckHealth
При обновлении некоторые компоненты используют NET Framework, если сам пакет в системе поврежден, то могут вылезать различного рода ошибки.
- Заходим на сайт.
- Скачиваем и запускаем программу – «Microsoft .NET Framework Repair Tool».
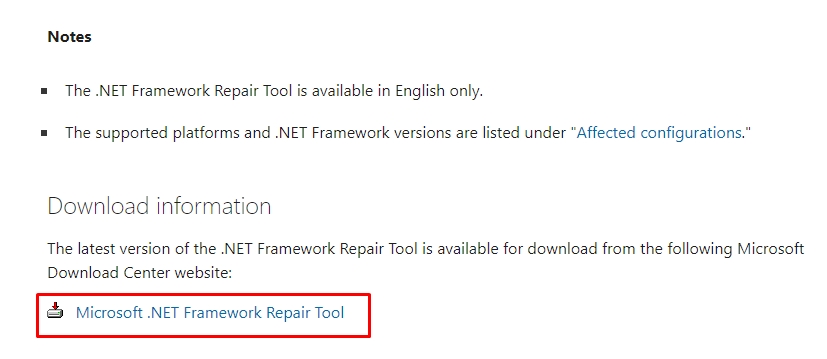
- После запуска просто со всем соглашаемся и идем от шага к шагу до самого конца. Программа перезагрузит NET Framework и попытается решить некоторые проблемы.
- Если программа не решит проблему, то попробуйте с той же страницы скачать последнюю версию NET Framework и установить её к себе на компьютер.
Способ 5: Ручная установка
Как мы и говорили в самом начале, ошибка 0х80070643 при установке обновлений в Windows возникает из-за того, что система не может установить компонент, который относится к встроенному защитнику (Windows Defender). Поэтому его можно скачать и поставить вручную:
- Заходим на официальную страничку.
- Пролистайте до таблицы модулей и найдите там:
Microsoft Defender Antivirus for Windows 10 and Windows 8.1
- Выберите свою разрядность 32 или 64 бита и скачайте обновление.
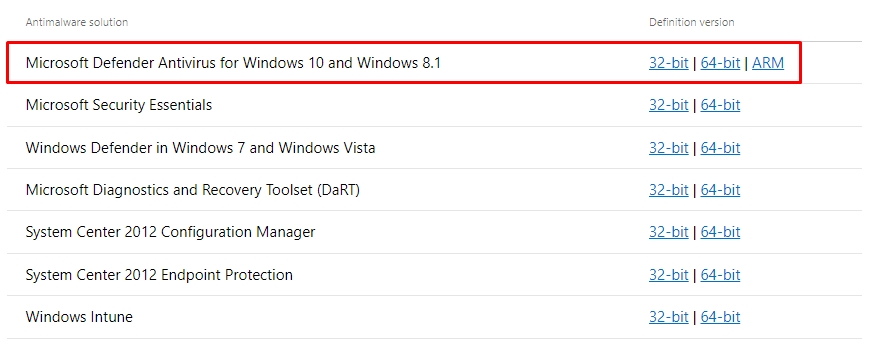
- Просто запускаем установщик. При установке вы можете не заметить появления ни одного окна, так как в данном случае будет идти тихая (скрытая) установка. Подождите примерно минут 5.
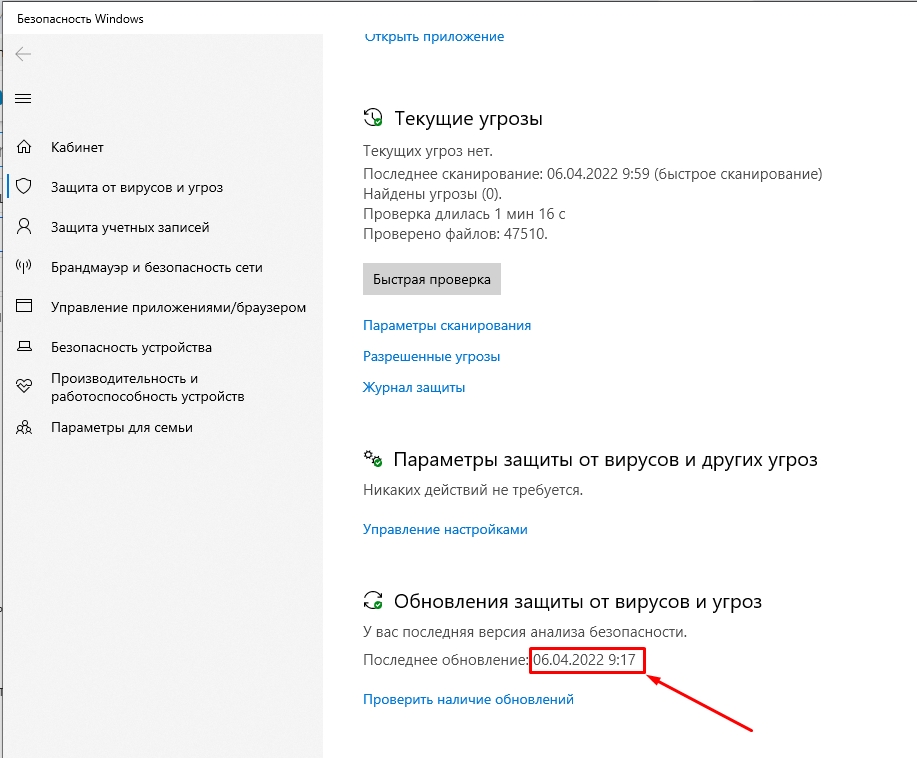
- Чтобы проверить, что обновления были установлены. Зайдите в «Пуск» – «Параметры» – найдите там раздел «Обновление и безопасность». Далее открываем подраздел «Безопасность Windows» и справа тыкаем по надписи «Защита от вирусов и угроз». Пролистайте чуть ниже до пункта «Обновления защиты от вирусов и угроз» и посмотрите дату обновы. Кстати, можно попробовать обновить защитник и отсюда, нажав по ссылке ниже.
Способ 6: Скачивание обновления
У Microsoft есть официальный сайт, где вы можете скачать обновление по номеру. Все достаточно просто, заходим на этот сайт (ссылка). Далее вводим номер обновления в поиск, скачиваем и устанавливаем его. Можно скачать одновременно несколько обнов – смотрим в корзину. И еще, не забудьте про разрядность системы (32 или 64 бита) – если в названии нет никакой информации по данному поводу, то значит это 32-х битная версия.
Способ 7: Сторонняя программа
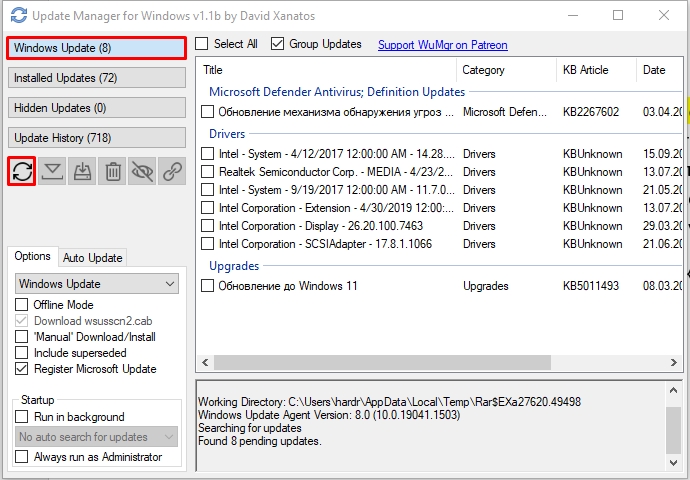
Если есть какие-то проблемы с обновлением, то можно воспользоваться сторонней утилитой. Возможно, с неё получится скачать и установить недостающий компонент. Мы будем использовать программу с открытом кодом – Windows Update Minitool.
- Скачиваем программу с Github.
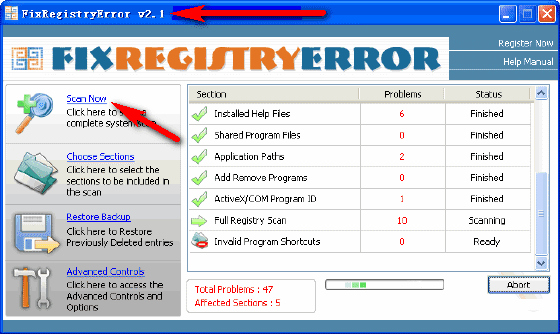
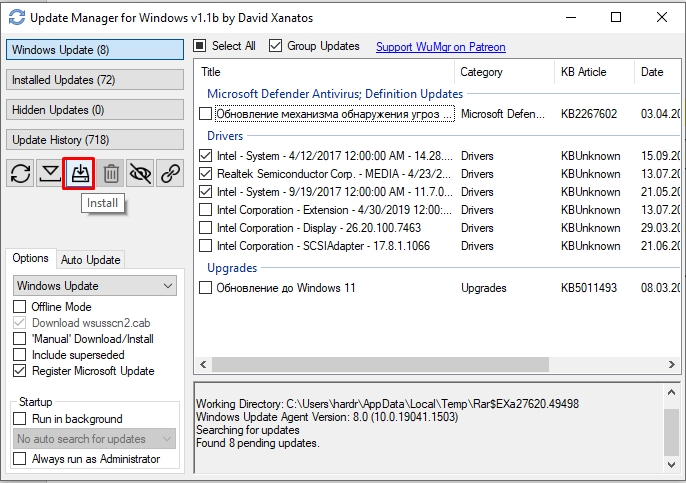
- Перейдите на самую первую вкладку и нажмите по кнопке поиска обновления. Подождите пока процедура закончится. В правом блоке увидите все пакеты, которые можно установить к вам на компьютер.
- Выделите нужные пакеты и нажмите по кнопке инсталлирования.
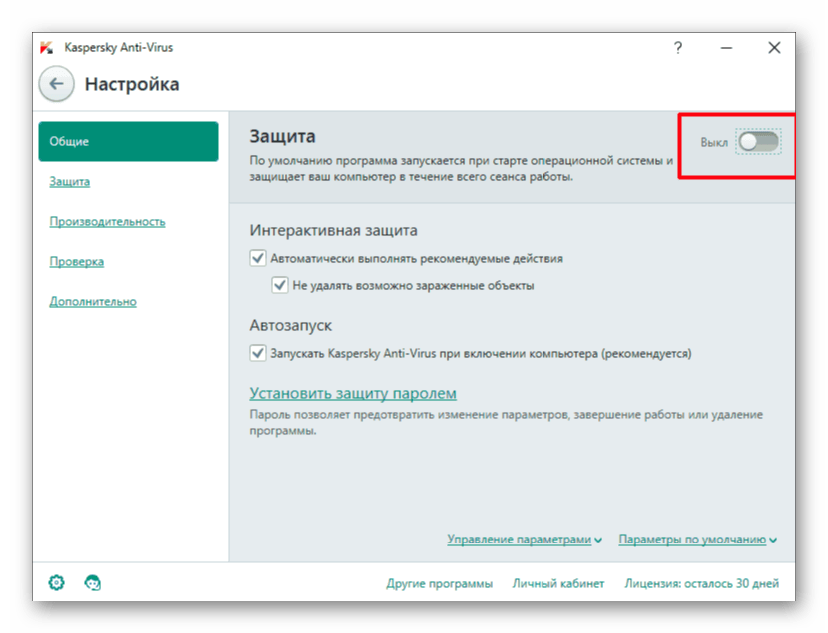
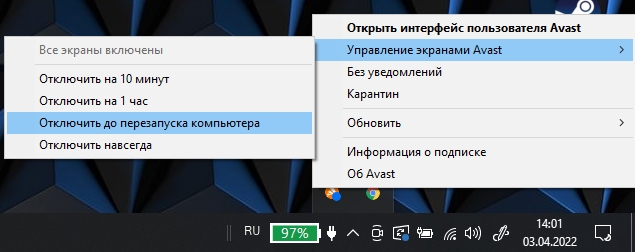
Способ 8: Отключение защиты
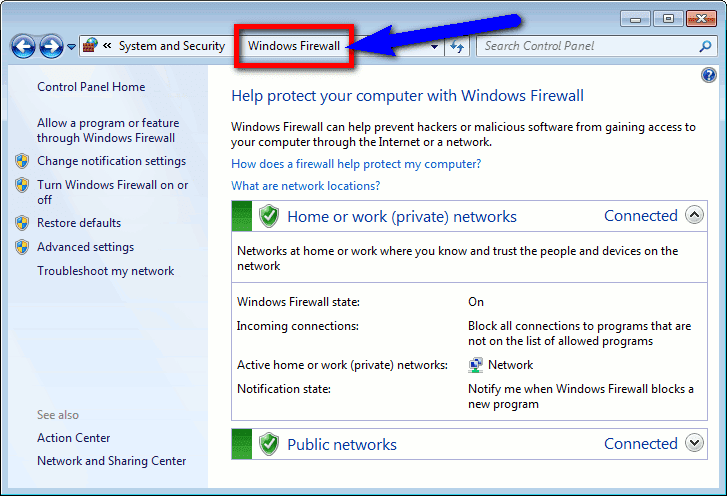
Как ни странно, но частенько проблемой скачивания обновления является антивирусная программа, или даже встроенный брандмауэр. По сути, защита системы блокирует подключение к серверам Microsoft. Бывает такое достаточно редко, но все же бывает. Второй вариант встречается гораздо чаще – в таком случае, если в системе выключен брандмауэр, то она отказывается скачивать обновления. Чтобы активировать встроенную защиту Виндовс 10, отключите встроенный антивирусник.
Если 80070643 ошибка обновления Windows 10 возникает вновь – проверьте, чтобы брандмауэр был включен. Самое главное, чтобы была активна сама служба:
- Зайдите в службы.
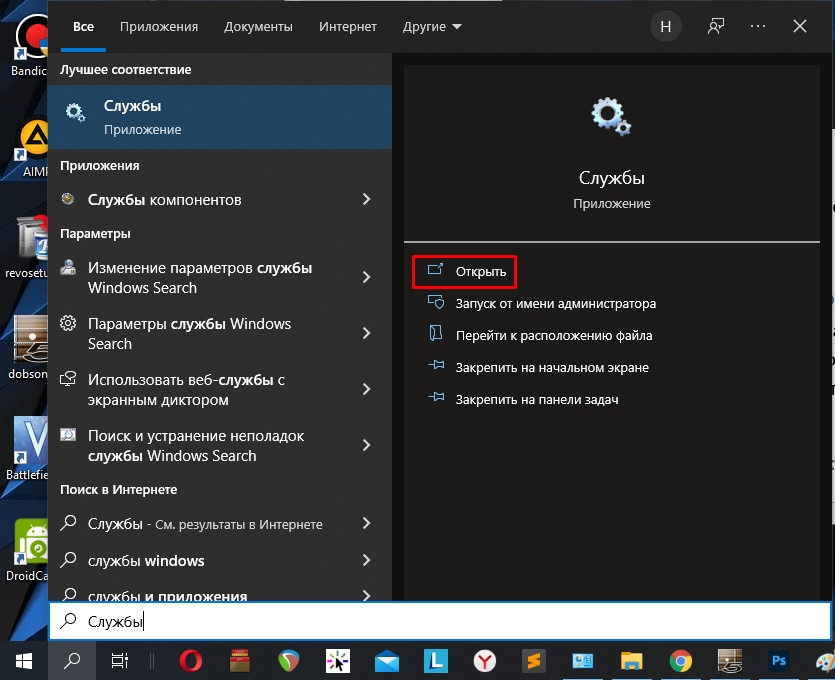
- Найдите службу брандмауэра и откройте её.
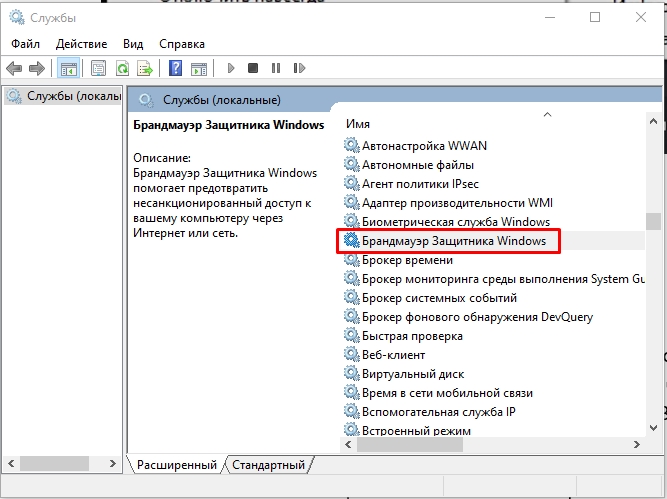
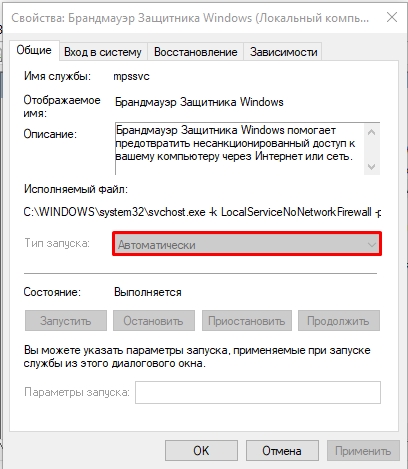
- Установите тип запуска в автоматическом режиме.
Способ 9: Настройка DNS
Если есть какие-то проблемы с подключением, то можно попробовать установить ДНС от Google. Если они установлены не вами, то DNS-сервера подхватываются от вашего провайдера. А они, как правило, обновляются не так часто.
- Жмем:
+ R
- Вводим команду:
ncpa.cpl
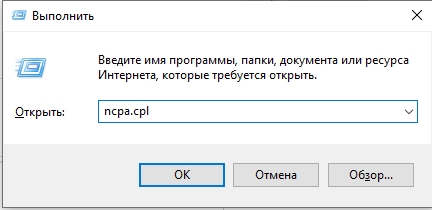
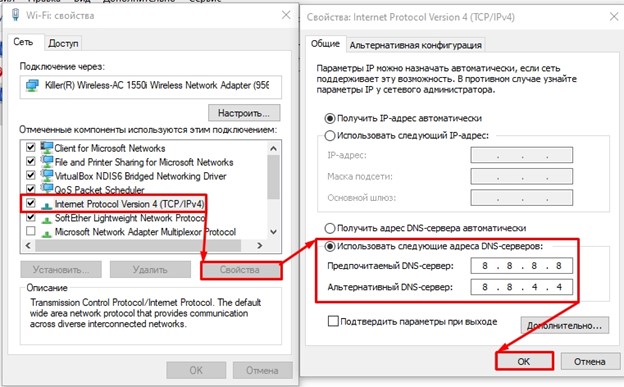
- Зайдите в свойства того подключения, которое вы используете – для этого используем правую кнопку мыши.
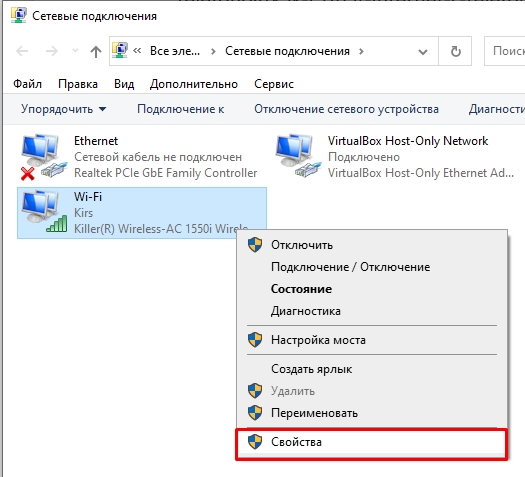
- Один раз нажмите по протоколу версии 4 и зайдите в свойства. Теперь установите ДНС, так же как у меня на скриншоте ниже. В конце жмем «ОК».
Если ничего из вышеперечисленного не помогло, а в процессе установки опять произошла неисправная ошибка с кодом 0х80070643, то нам нужно копнуть куда глубже. Возможно, проблема лежит не со стороны службы обновления, а есть проблемы с самой системой. Или, возможно, с подключением к интернету. Причем вы можете без проблем заходить на сайты или даже смотреть видео на том же самом YouTube. Поэтому я решил написать ряд советов, которые должны вам помочь. Также я буду оставлять ссылки на дополнительные статьи с более подробными инструкциями.
- Попробуйте использовать другое подключение к интернету. Если есть возможность, то можно попробовать раздать вай-фай с телефона.
- Отключите все программы, которые работают с прокси или VPN – смотрим в правый нижней угол экрана и отключаем все лишнее.
- Если вы ранее устанавливали какие-то программы, утилиты или сторонние драйвера, то можно попробовать выполнить восстановление ОС.
- Проверьте ОС антивирусной программой со свежими базами. Я бы даже воспользоваться встроенным антивирусом – он с этим справляется на ура. «Пуск» – «Параметры» – «Обновление и безопасность» – «Безопасность Windows» – «Защита от вирусов и угроз» – «Параметры сканирования» – ставим галочку «Полное сканирование» и жмем по кнопке ниже.
- Проверьте ваш носитель на наличие битых секторов. Лучше всего использовать ту же программу Victoria. Видео можете глянуть ниже.
- Советую выполнить комплексную чистку системы от разного рода мусора, лишних программ, кеша и т.д. Об этом подробно можно почитать тут.
- Попробуйте выполнить чистую установку операционной системы. Используем только официальную утилиту от Microsoft.
На этом все, наши многоуважаемые и любимые читатели портала WiFiGiD.RU. Если ошибка осталась, то можете описать свою проблему и вопрос в комментариях. Но надеюсь, статья для вас была полезной. Если я что-то упустил, или вы увидели ошибку, то можете писать там же. Всем добра и пока!
Видео
This page explains symptoms, causes and step-by-step solutions to error code 0x80070643 which happens to Windows update, Microsoft Security essentials and MSI. Besides, this article introduces how to get back lost data from desktop after computer undergoing 0x80070643 error. As Windows user, you may often encounter this error; if you feel uncomfortable with it, you can read through methods in this article to fix it as soon as possible.
Overview on error code 0x80070643
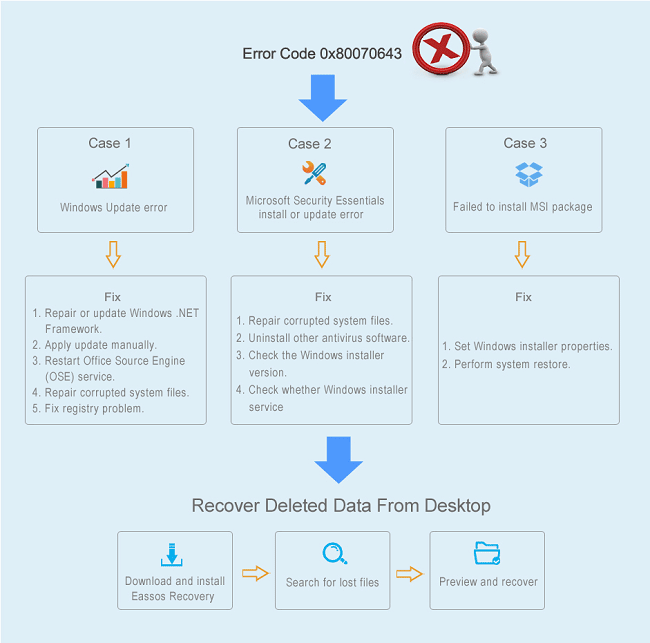
0x80070643 is a generic error that is likely to happen to many operations, such as Windows update installation, update or installation of Microsoft Security Essentials and other programs, Microsoft Office error, etc. The error code 0x80070643 is also the error format of containing number and letter, which is similar to other Windows errors such as 0x80070002. It comes with error message produced by programs or system, through which we can identify the specific problem. Though many cases report the same error code, causes and solutions to the specific issue vary widely and are case-by-case. This article guides you through several cases on this error code and you can follow outlined solutions to fix the error. These headlines below are quick links to detailed content:
Case 1: Windows update error code 0x80070643
Symptoms
Windows is very user-friendly operating system used by millions of users across the world and it has to install updates to keep it up to date and repair system vulnerabilities. Microsoft releases system updates from time to times and by default, our operating system has been set to check and install those updates automatically provided that computer is connected to the Internet. Updates fix bugs on current system and improve features. In addition, system updates can be downloaded directly from Microsoft website and installed manually.
If you are a Windows user, you will never skip updating Windows to assure your PC safe and good environment. However, Window update can’t go well all the time and there are several messages that you may run into during system update, for instance, «Unable to install Windows Update: 0x80070643». This error message can be seen when the .NET framework on your computer has problem, or the update related to MS 2003 components fails.
Besides, if your PC is running Windows 10 and you tried to apply KB3122947 update you might also see the same error code «Update for Windows 10 Version 1511 for x64-based Systems (KB3122947) — Error 0x80070643».
Main causes of this update error
- Unable to install the latest system update
- System files or registry gets damaged or corrupted due to some reason
- Windows Update feature fails to access certain user data
- Virus or malware infection
- MSI software update registration or the .NET Framework installation is corrupted
- Microsoft Office Source Engine (Ose.exe) has been disabled or corrupted
Solutions
Solutions to this error vary from person to person on account that it happens to multiple circumstances. Hence, not all solutions listed here will work for your problem, and you need to select one or two of them in line with actual condition.
Method 1: Repair or update Windows .NET Framework
.NET Framework plays an important part in software installation and system updates on all versions of Windows system. And it should be well installed and updated to the latest version in order that other programs can be built, deployed or ran normally.
Step 1
Close all currently running software and click «Start» to select Control Panel. Next click Programs and «Program and Features».
Step 2
Locate Microsoft .NET Framework 4 Client Profile from these listed programs. Select it and click the tab Uninstall/Change which is called Change/Remove in Windows XP.
Note: If there is not Microsoft .NET Framework 4 Client Profile on your computer, download it online and install it to update your PC.
Step 3
On the pop-up window select Repair .NET Framework 4 Client Profile to its original state and click Next button.
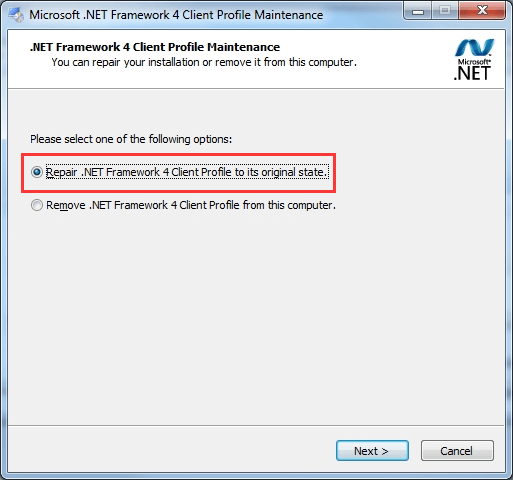
Step 4
Click Finish when repairing process is done and click Restart Now to restart computer.
Now you can try to install Windows updates again and see whether the error is eliminated. If the error continues to appear, follow steps in following solutions.
Method 2: Apply update for your computer manually
Since this means works for many people, it’s worth your while to give it a shot. If you are not skilled in computer operations, you can finish the task with ease:
Step 1
Open Control Panel by clicking Start button. Click System and Security and select Windows Update.
Step 2
Click Check for Updates on the left part of the panel to search for available updates for your computer.
Step 3
When Updated are listed, please click «Install updates» to reinstall updates.
Method 3: Restart Office Source Engine (OSE) service
If your computer installs Microsoft Office 2003 and you have to update some components for it, you might get the error due to the Ose.exe file problem. Here is the remedy.
Step 1
Click Windows + R keys to open Run box. Type services.msc in the searching box and press Enter.
Step 2
Find out and double-click Office Source Engine in the list.
Step 3
Change the Startup type. If the startup type has been disabled, change it to manual. To do this, double-click it and set startup type as Manual and click OK.
Step 4
Try to install Office update once again.
If the above steps still don’t work, you may have to repair Ose.exe file by copying the original file from Office 2003 CD. The last resort of fix this issue is removing and reinstalling Office 2003. If the error doesn’t relate to Office 2003 and these actions will be meaningless.
Method 4: Repair corrupted system files with SFC /scannow
After installing Windows, users starts to install, uninstall or update programs and applications on computer. Besides, various actions and tasks will be done by computer users and system. During the process, there will be corrupted or damaged files appearing in system and causing problem. It is, therefore, suggested to scan and check whether your system contains these files. System file checker comes in handy, as it’s capable of scanning and finding out corrupted files and replace them with correct ones.
Step 1
Open Command Prompt. Click Start button and All Programs to locate Accessories where you can find Command Prompt. Right-click it and Run as administrator.
Step 2
Type sfc/scannow in the Command Prompt and press Enter. Then it starts to scan and repair corrupted system files. You just need to wait for this process to complete.
Step 3
When the repairing is done without reporting any error you can try to run Windows update again. If he process reports that some corrupted files can’t be repaired, you’ll have to consider a system restore.
Method 5: Fix registry problem
For some Windows 10 users, this error may appear in this way «Update for Windows 10 for x64-based Systems (KB3081704) — Error 0x80070643», the effective solution to this situation is going to registry and carrying out some simple operations.
Step 1
Open Registry Editor. Click Start button and type regedit in the search box and press Enter key. If you are prompted by UAC (User Account Control), click YES.
Step 2
Browse the registry by following the path: HKEY_LOCAL_MACHINESYSTEMCurrentControlSetControlBackupRestoreFilesNotToBackup. If FilesNotToBackup exists, then close the editor.
Note: If there is not «FilesNotToBackup» under the path, you need to add it manually. Right-click Backup Restore to select New and click «Key». Next type FilesNotToBackup and press Enter key.
Step 3
Click Start button to type services.msc and press Enter. Scroll down and find out background Intelligent Transfer Service.
Step 4
Double click the service just found and click Start under the General tab. Click Ok to make the setting take effect. If it has been set as Start already, click Stop and then again click Start.
Case 2: Microsoft Security Essentials install or update error 0x80070643
Problem Description
«I encountered the error code 0x80070643 when I tried to install Microsoft Security Essentials. Though I had had it installed in my computer before that, it failed to work after I used .net cleanup tool. Then I uninstalled it and wanted to reinstall it. Now, whenever I run the installer of Security Essentials I get the error message ‘An error has prevented Microsoft Security Essentials Installations Wizard from continuing. Please restart your computer and try again. The Microsoft Security Essentials Installation Wizard has returned your computer to its original state. Error Code: 0x80070643′»
The installation and updating of MSE is an easy task, but sometimes you get the error and fail to complete the operation. This section explains how to get rid of the error. Before that I’ll list several possible causes of the issue.
- You might have installed other antivirus software on your computer while you are installing MSE. The error might be the result of leftover files, registry entries and firewall settings from third-partition antivirus software.
- The Windows installer you are using is not up-to-date.
- The Windows installer service is not turned on.
Solution
Step 1
Run system file checker to repair corrupted system files. Open Command Prompt and execute command sfc/scannow. Wait for the scan to complete and restart computer.
Step 2
Uninstall other antivirus software. If you have any third-party antivirus software installed on your PC, then remove and uninstall it. Go Control Panel and select Program and Feature, next select Uninstalled a Program. Scroll down to browse the list of programs installed on your PC, locate antivirus such as McAfee, Morton, AVG, etc., and uninstall all of them and reboot computer.
Step 3
Check the Windows installer version if you are Windows XP user. View the path C:WindowsSystem32 and right click MSIEXEC.EXE to view Properties. The version number should be at least 3.1 or higher. Windows 7 or Vista users do no need to do this operation, as the default version is 3.1.
Step 4
Check whether Windows installer service is running. Press Windows + R keys and type services.msc in the Run box to open Services panel. Find out Windows Installer service and get it started.
Case 3: Error 0x80070643: Failed to install MSI package
MSI is an installation package whose function is distributing software throughout Windows during an installation. MSI installer is used by many software distributors as it is easy to use and has good compatibility. However, it may report errors when you use it, for example «Error 0x80070643: Failed to install MSI package.» «Error 0x80070643: Failed to configure per-user MSI package.» Let’s see how to fix the issue. To fix the error, please try these steps:
Step 1
Start the service. Open Services window by typing service.msc in Run box which can be opened by pressing Windows key and R key from keyboard. Look for Windows installer and view its properties so as to set the Startup type as Start.
It’s recommended to check whether this service is started or not, because it is the main cause behind the error and the easiest solution.
Step 2
System restore. If there is no effective means, you’ll have to perform system restore. This step requires your system have a system backup, otherwise you can’t carry out system restore. Hence, it’s very helpful to create a system backup when system is in its great status.
How to recover deleted data from desktop?
If you are facing Windows error 0x80070643 on your computer, your system is no longer in a good condition and might contain potential serious problem such as data loss, system breakdown. Therefore, you should fix it as soon as possible. In addition, you should know how to recover lost data from system partition or exactly desktop. Many people have the habit of placing files they often edit on desktop, which actually is not a wise action. Desktop belongs to system partition, and any system problem may lead to file loss. If you are troubled by same issue, keep reading to find out resolution.
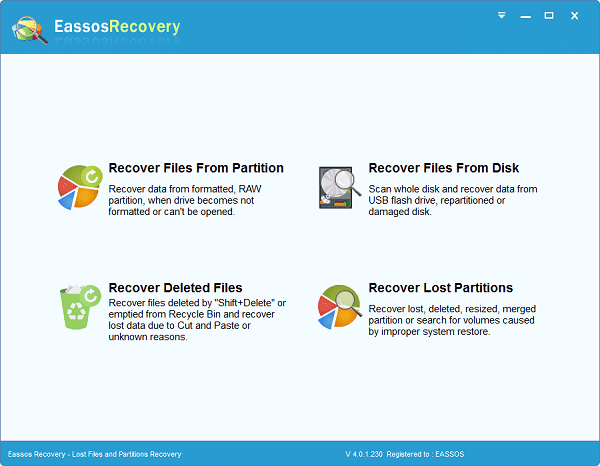
Eassos Recovery Free is free data recovery software and it provides a special recovery mode for deleted files: recover files deleted by «Shift + Delete» or emptied from Recycle Bin and recover lost data due to Cut & Paste or other unknown reasons. Here is the recovery process:
Step 1
Install Eassos Recovery Free and start it. Click «Recover Deleted Files»
Step 2
Select system partition which is usually drive C: and click Next to search for deleted data.
Step 3
Preview listed files and found out files you want to recovery. Select files by checking them and click «Recover» button to save them to a secure location.
🔥 В данной статье я расскажу из-за чего случается неисправимая ошибка 0x80070643 ✅ которая происходит в процессе установки программного обеспечения на windows 10
✅Сегодня в процессе установки Microsoft SQL Management Studio практически сразу вылетела ошибка:
⭐️Сбой установки В процессе установки произошла неисправимая ошибка (0x80070643)

Мой опыт как я исправил ошибку (0x80070643)
🔥 Для исправления данной ошибки как написано на сайте микрософта необходимо запустить проверку диска командой chkdsk
- Открываем командную строку от Администратора
- Вводим команду chkdsk c: /f /r
- ⭐️ т.к. это системный диск он может запустить проверку только после перезагрузки с чем мы и соглашаемся

- перезагружаем компьютер и ждем пока пройдет проверка диска, у меня это заняло порядка 30 минут
- запускаем установку и вуаля) все работает!


![]()
nibbl
Я отец двух сыновей, ITишник, предприниматель и просто человек который любит делиться полезной информацией с другими людьми на такие темы как: Windows, Unix, Linux, Web, SEO и многое другое!