Как установить ОС на новый компьютер без ОС?
 Приветствую друзья!
Вы купили компьютер или ноутбук без операционной системы? И не знаете как ее установить? ВНИМАНИЕ, я здесь НЕ БУДУ писать инструкцию как это сделать. Я просто напишу в общих чертах, чтобы вы смогли для себя решить — сможете ли вы самостоятельно поставить ОС или нет. А теперь поехали разбираться!))
Сразу могу гарантировать одно: если вы самостоятельно установите ОС, то после установки вы скажите — да это реально просто! а казалось намного сложнее! то, что у вас появится такое мнение — это 200%))
Помните одно: чудес не бывает, и рыбку без труда не выловить из пруда, у вас все получится, если вы наберетесь терпения, не будете спешить, делать все поэтапно, а если что-то не знаете — поискать в интернете со смартфона, не спеша. Если хотите быстро и уже — лучше доверить дело установки Windows 10 мастеру, который еще может запросить больше денег, чем стоит на самом деле такая работа.
Разбираемся
Если вы желаете установить ОС самостоятельно, то есть три момента, самых главных, которых нужно понять уже сейчас:
- Вам нужна флешка с установочным образом Windows. Флешка нужна чтобы была не меньше 4 гигабайта. Любой, кто более-менее разбирается в ПК сможет это сделать легко и быстро. И на самом деле, даже не все понимают, то достаточно просто отформатировать флешку (очистить содержание) и скопировать туда все содержимое образа Windows, и все! Да, этого достаточно, чтобы с флешки загрузиться и ставить ОС. Это если нужно установить Windows XP, то там стоит немного повозиться. И еще — ставить нужно только Windows 10, никаких Линуксов, Убунт и прочего, Windows 10 это самая популярная ОС и под нее заточен 95% всех программ.
- Нужен смартфон с доступом в интернет, при помощи которого вы сможете получить инструкции как и что делать. А их, поверьте — огромное количество.
- Терпение и время. Может не получится с первого раза. Но важно понять — ничего сложного на самом деле нет! Это все придумано не для программистов, а для обычных людей, существует куча инструкций в интернете, также при установке есть подсказки и прочее. Просто нужно набраться терпения и делать все неспеша, то что у вас получится — сомнений нет, поверьте))
Если получилось сделать флешку с установочным образом, то я вас поздравляю! Алгоритм следующих действий такой:
- Вам нужно вставить флешку в ПК или ноутбук. Если есть USB синего цвета — не вставляйте в этот порт, если есть другие.
- Далее зайти в биос и выставить загрузку с флешки. Как это сделать — есть много инструкций в интернете, просто пишите в поиск: asus как зайти в биос или Lenovo как зайти в биос. Это если у вас материнская плата Асус или ноутбук Леново. БИОС — это просто меню настроек ПК, там есть опция загрузочного меню, где нужно выбрать USB, потом нажать F10 для сохранения настроек и все. Поверьте, сложного особо нет, но конечно в первый раз нужно набраться терпения и не спешить никуда))
- Как выставили флешку загрузочной в биосе — включаем ПК. Он сразу начнет загружаться с флешки. А далее — еще легче! Выбираем русский, страну, удаляем все разделы дисков, выбираем незанятое пространство и ставим туда.. дальше просто следуем инструкциям на экране, все для обычных людей, не для программистов.
- Длительность процесса установки ОС зависит от типа накопителя, если это жесткий диск, то может занять 15-30 минут, если SSD то будет максимально быстро.
После установки — можно подключать ПК к интернету, устанавливать программы, или просто изучать Windows 10, здесь уже от вас зависит. Сразу не стоит ставить драйвера — при наличии интернета Windows 10 сама поставит драйвера, сперва просто освойтесь, поймите как что работает, а потом уже можете пробовать ставить драйвера, скачивая их только с официального сайта. Еще важный момент — если вдруг что, вы сможете удалить текущую Windows и поставить новую — просто при установке нужно будет удалить существующие разделы и установить в незанятое пространство, также, как это делается при первой установке ОС (но на новом компьютере могут и отсутствовать разделы диска, а сразу быть незанятое пространство).
Немного картинок
Вот например как выбирается загрузочная флешка в биосе Асус (однако внешний вид опции/меню может тоже отличаться от версии биоса):

Важно: будет предоставлен список, где нужно выбрать флешку. Однако на может не называться флешка Самсунг (как пример), может быть другое название, внутреннее, чтобы точно проверить — можно его вбить в Гугл со смартфона и проверить флешка это или нет.
После успешной загрузки с загрузочной флешки вы увидите окно, где нужно будет нажать Установить:

Выбрать русский, затем нажать Далее:

Потом нужно будет ввести лицензионный ключ, если его у вас нет, тогда просто нажмите У меня нет ключа продукта, Windows 10 спокойно работает и без лицензии (только будет почти незаметная надпись Активация Windows в правом нижем углу):

Потом нужно будет выбрать версию — особо нет смысла какая, выбирайте для рабочих станций по возможности (или Домашняя), а вот что важно, чтобы в колонке Архитектура было x64:

Но даже если будет 32 или 86 — Windows 10 все равно установится. Просто будет видно меньше памяти. Но для тренировки установочного процесса можно и такую ставить)))
Нужно будет еще принять лицензионное соглашение:

Тип установки нужно выбирать выборочная:

Если компьютер новый и вы видите здесь такие разделы — выбираем каждый и нажимаем Удалить, пока не будут удалены все:

Должно остаться только незанятое пространство, именно его выбираем и нажимаем Далее:

Создавать разделы не нужно! Если только вы осознаете, что вам нужно несколько разделов и для чего. А потом нужно просто ждать, пока Windows 10 установится:

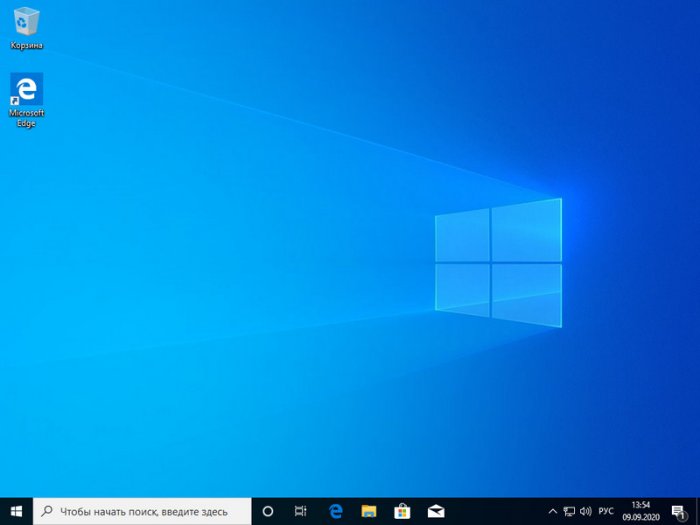
После этого — будут некоторые простые настройки, вы с ними справитесь без проблем, например указать регион, имя учетной записи, пароль.. ну и финиш всего — вы увидите такой рабочий стол:

Надеюсь данная информация оказалась полезной. Удачи и добра, до новых встреч друзья! 
На главную!
06.01.2022
Привет, друзья. В этой статье затронем такой вопрос: купил ноутбук без операционной системы, что дальше? Что нужно предпринять в случае покупки ноутбука без предустановленной операционной системы? Если вы новичок в компьютерном деле и, возможно, сомневаетесь, покупать вам ноутбук с предустановленной операционной системой или без неё, и если вы хотите купить устройство не для коммерции, а для личных дел, без раздумий берите его без системы, либо с предустановленными DOS, Linux или другими бесплатными. Такие ноутбуки стоят дешевле за счёт того, что в их стоимость не включена лицензия на Windows. Ну а с ней самой и с её лицензией мы сейчас разберёмся. Давайте поговорим о том, какую выбрать операционную систему для ноутбука, как её установить, как активировать, и что нужно сделать после установки системы.
Итак, друзья, новый ноутбук без операционной системы. Для начала необходимо определиться с операционной системой, которую мы будем устанавливать на него. Есть только две полноценные десктопные системы, которые мы законно и без танцев с бубном можем устанавливать на ПК и ноутбуки – Linux и Windows. Если Linux вам не нужна для определённых целей, ставьте, конечно же, Windows. На сегодняшний день существует две поддерживаемые разработчиком версии Windows – Windows 8.1 и 10, так что в плане версий выбор невелик. Но в 2023 году поддержка Windows 8.1 прекратится. Тогда как Windows 10 – это постоянно поддерживаемая, обновляемая и развиваемая операционная система. Поэтому массовый вариант выбора системы для ноутбука – это Windows 10. Более того, в большинстве случаев это вариант гарантировано нормальной работы операционной системы. Друзья, если вы купили ноутбук без операционной системы, зайдите на его страничку спецификаций на сайте производителя и посмотрите для какой операционной системы производитель поставляет драйверы комплектующих.
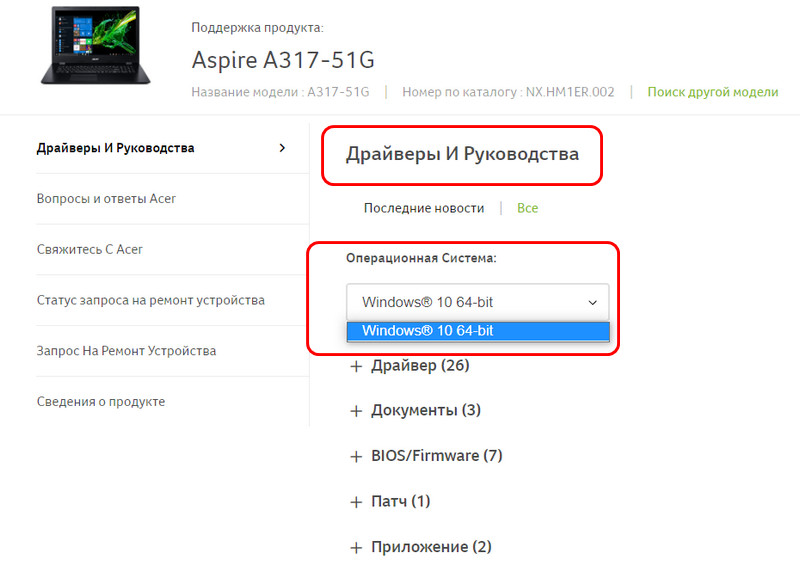 Если у вашего ноутбука нет такой странички, поищите его характеристики на сайтах типа НИКС.
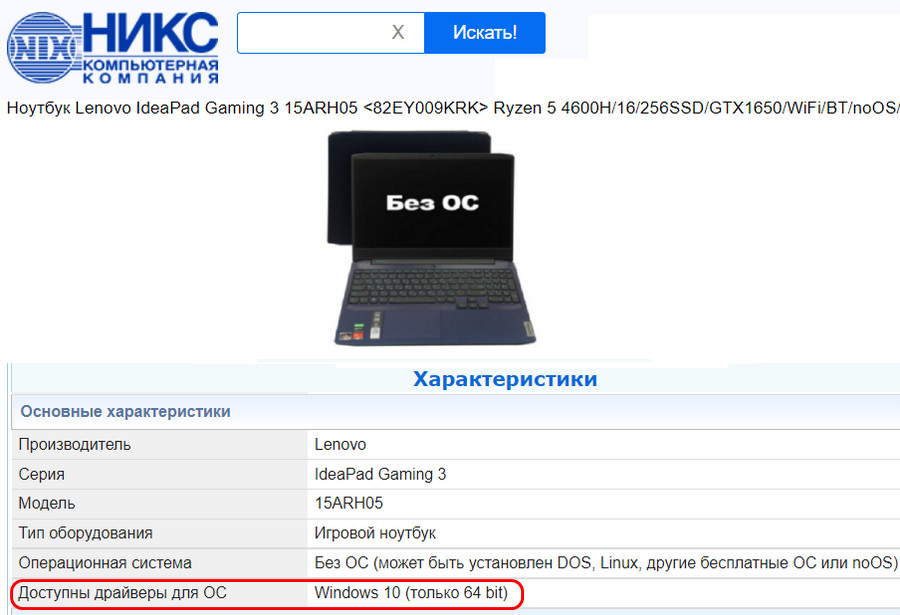 Это не значит, что ваш ноутбук не будет работать с Linux, Windows 8.1 или даже Windows 7. Это значит, что производитель не гарантирует нормальную работу ноутбука в этих операционных системах. А для большинства современных ноутбуков производителем будет заявлена поддержка только Windows 10.
Теперь давайте разберёмся с разновидностями самой Windows 10. Есть 2 вида Windows 10 в зависимости от архитектуры – 32-битная и 64-битная. Первую нужно устанавливать на ноутбуки с оперативной памятью до 3 Гб включительно, вторую – с оперативной памятью 4 Гб и более. Современные ноутбуки поставляются в основном с «оперативкой» 4 Гб и более, так что в большей части случаев выбирать нужно Windows 10 64 бита.
И есть разные редакции Windows 10, для обычного пользователя это Pro и Home. Также обычные пользователи при необходимости могут использовать специфическую корпоративную редакцию LTSC. Какая разница между этими редакциями, и какую лучше выбрать в вашем конкретно случае, смотрите в статье сайта «Какую Windows 10 лучше установить».
Итак, мы разобрались, что в ситуации типа «купил ноутбук без операционной системы, что дальше» выбор системы устройства в большинстве случаев будет Windows 10. Теперь необходимо, собственно, её установить. Этот процесс одинаков для всех разновидностей «Десятки», нам нужно создать её установочный носитель и выполнить процесс установки. Всё это пошагово и в деталях расписано в статье сайта «Как установить Windows 10».
Друзья, примечательность Windows 10 заключается ещё и в том, что, поскольку это обновляемая операционная система, её база может предусматривать драйверы даже для новейших компьютерных комплектующих, которыми может быть укомплектован приобретённый вами ноутбук. «Десятка» сама может установить драйверы на сеть, видео, звук, камеру и прочие устройства. Но в любом случае вам необходимо сразу же после установки Windows 10 отправиться в системный диспетчер устройств, посмотреть, на все ли устройства ноутбука установлены драйверы, и, если на какие-то не установлены, то нужно установить их нам самим. В подробностях об этом процессе читайте в статье «Как установить драйвера».
Теперь давайте разберёмся с активацией Windows 10. Выше упоминалось о том, что идея купить ноутбук без предустановленной операционной системы хороша, если только вы покупаете устройство с целью использования в личной некоммерческой деятельности. Под коммерческой деятельностью имеется в виду таковая, что предусматривает нахождение ноутбука в помещении, где вы официально ведёте предпринимательскую или любую иную самозанятую деятельность. И куда могут прийти с проверкой компетентные органы по защите лицензирования продуктов. Почему так? Друзья, вы можете купить для коммерции ноутбук без Windows, но тогда вам придётся приобретать на него Retail-лицензию, которая у компании Microsoft стоит, к примеру, для Windows 10 Home $199, а для Windows 10 Pro — $289. Гораздо дешевле вам обойдётся покупка ноутбука с OEM-лицензией на предустановленную Windows 10. И OEM-ноутбук с предустановленной лицензионной Windows 10 вы сможете использовать в коммерции, поскольку это предусмотрено условиями лицензирования Microsoft. Но ещё дешевле купить OEM-лицензию на Windows 10 вы сможете отдельно от ноутбука. Однако в этом случае в коммерции ноутбук использовать нежелательно, ведь это противоречит воле Microsoft.
OEM-лицензия на Windows ограничена привязкой только к одному компьютеру, тогда как Retail-лицензию можно убрать с одного компьютера и перенести на другой. Однако ключ OEM-лицензии на любые редакции Windows 10 в разгар скидок в интернет-магазинах цифровых лицензий можно купить как минимум в 20 раз дешевле, чем ключ Retail-лицензии — по цене до $10. Так что если вы купили ноутбук без операционной системы, и не будете использовать его в коммерции, можете смело покупать дешёвый OEM-ключ к Windows 10 и активировать им систему. В перечне статей сайта о лицензировании программных продуктов вы найдёте выгодные промо от различных интернет-магазинов, и по актуальным из них сможете купить OEM-ключ на Windows 10 по акционным ценам.
 Ещё один плюс покупки ноутбука без операционной системы – вы в принципе у себя дома можете пользоваться Windows какое-то время без активации. И приобрести лицензионный ключ позднее. В Windows 10 вы лишь будете ограничены невозможностью использовать настройки персонализации. Подробнее о работе с «Десяткой» без активации читайте в статье «Как долго можно пользоваться Windows 10 без активации».
Купив лицензионный ключ Windows 10, активируйте им систему. Детали смотрим в статье «Как активировать Windows 10».
И ещё один, друзья, плюс Windows 10 – на борту этой операционной системы есть свой антивирус Защитник Windows, значительно улучшенный по сравнению со своей реализацией в ранних версиях Windows. Тем не менее даже Защитник Windows 10 обеспечивает лишь базовую защиту компьютера. Если вы хотите большую степень защиты, используйте сторонние антивирусы с эффективными антивирусными технологиями и функционалом, которого нет в Защитнике, и который, возможно, вам пригодится. Какой эффективный сторонний антивирус использовать? Лучшие решения будут в числе платного софта, их обзор смотрите в статье сайта «Какой антивирус самый лучший». Если вы хотите антивирус из числа бесплатного софта, можете присмотреть себе какой-то из подборки в статье «10 лучших бесплатных антивирусов». А если вы хотите эффективный платный антивирус бесплатно, юзайте лайфхаки по бесплатному использованию Eset Nod32.
Браузер – важнейшая программа любой операционной системы, это наше окно в Интернет, он должен быть быстрым, обновляемым разработчиками, с технологиями веб-защиты, с функционалом синхронизации пользовательских данных. Присутствующий в составе Windows 10 штатный браузер Microsoft Edge в принципе соответствует этим требованиям, но в числе сторонних браузеров есть гораздо лучше него — Google Chrome, Opera, Яндекс.Браузер. Если с выбором браузера вы ещё не определились, возможно, вам в этом деле поможет статья сайта «Какой браузер быстрее для Windows 10».
Вот это, друзья, основное из того, что необходимо сделать при покупке ноутбука без операционной системы. Далее уже вам самим нужно разобраться, какие установить пользовательские программы.
![]()
Download Article
![]()
Download Article
- Installing Windows 10
- Setting up Windows 10
- Installing macOS
- Setting up macOS
- Q&A
- Tips
|
|
|
|
|
This wikiHow teaches you how to install a computer operating system on a new, blank computer. You can do this on a Windows computer using a Windows Installation media. Brand new Mac computers will always come with an operating system installed, but you can reinstall your Mac’s default operating system using the macOS recovery feature.
-

1
Create Windows Installation media. If you order Windows 10 for a new PC build, they may send you an installation media. If you don’t have a Windows installation media, you can make one. You’ll need a computer with internet access and an 8 GB USB flash drive (16 GB recommended). You also need to know if the computer you want to install Windows 10 on has 32-bit or 64-bit architecture. You will also need to purchase Windows to get a product key. This can be done before or after the installation. Use the following steps to create a Windows Installation Media:
- Insert a USB drive with at least 8 GB of space into any computer with internet access. This will wipe any existing data on the USB drive, so be sure to back up any data you want to keep.
- Go to https://www.microsoft.com/en-us/software-download/windows10 in a web browser.
- Click Download Tool Now.
- Open the «MediaCreationTool.exe» file in your web browser or Downloads folder.
- Click Accept.
- Select «Create Installation Media (USB drive, DVD, ISO file) for another PC» and click Next.
- Select your language, Windows edition, and PC architecture and click Next.
- Select «USB flash drive» and click Next.
- Select your USB drive and click Next.
-
2
Back up your files (optional). If you already have a Windows installation on your computer, a new Windows installation may overwrite your files. Back up any data you want to keep before beginning a new Windows installation. You can back up your files to OneDrive, Google Drive, Dropbox, or an external hard drive or USB flash drive.
Advertisement
-
3
Insert the Windows Installation Media in the computer you want to install Windows on. You can insert the Windows Installation media into any free USB port.
-
4
Boot the computer. If the PC is already powered on, restart it using the normal restart procedures of the operating system that is installed on the PC. If it is not yet powered on, press the power button to boot it up.
-
5
Enter the Boot menu. Most newer computers have a boot menu you can enter while booting up. The way you enter it is different, depending on your motherboard. The most common way to enter the Boot menu is to press F10, F11, F12, F2, or Esc as the PC boots up. This Boot menu will display a list of drives you can boot from.[1]
- If you are using an older PC that does not have a Boot menu, you will need to Enter the BIOS while booting up. The buttons you press to enter the BIOS is different from one PC manufacturer to another. It will usually say what buttons you need to press while your computer boots up. You typically need to press F1 F2, F3, Esc or Delete to enter the BIOS.[2]
You may need to be quick about it. You can also reboot your PC into the BIOS from inside the Windows Settings menu.
- If you are using an older PC that does not have a Boot menu, you will need to Enter the BIOS while booting up. The buttons you press to enter the BIOS is different from one PC manufacturer to another. It will usually say what buttons you need to press while your computer boots up. You typically need to press F1 F2, F3, Esc or Delete to enter the BIOS.[2]
-
6
Select the USB drive. This is the drive that has the Windows Installation Media. This will boot the PC from the Windows Installation Media. Once the computer boots from the USB drive, press any key to start the Windows installation process.
- If you are inside the BIOS settings. Locate the option that says «Boot», «Boot order», «Priorities» or something similar. Change the boot order so that your PC boots from the USB drive first. Then select the option to save and exit. This will reboot your PC from the USB drive.
-
7
Select your language, time and currency, and keyboard input and click Next. Use the drop-down menus to first select your language. Then select your country or region, and your keyboard input method. Then click Next.
-
8
Click Install Now. It’s the button in the center of the screen.
-
9
Enter your Windows product key and click Next. If you’ve already purchased Windows, you can find your license key in your confirmation email. If you have not purchased Windows, click I don’t have a product key. You’ll need to purchase Windows and activate it later on.
-
10
Select which edition of Windows you want to install and click Next. If you’ve already purchased Windows, check which version of Windows you purchased and make sure you click the right version. If you have not yet purchased Windows, check which version you want to install. Different versions of Windows have a different price.
- If you are not sure which version of Windows to install, Windows Home Edition is the most common version of Windows.
-
11
Click the checkbox next to «I accept the license terms» and click Next. You can read the license terms in the window in the center. Click next when you are ready to continue.
-
12
Click Custom: Install Windows only or Upgrade: Install Windows and keep files, settings, and applications. If your computer already has a Windows installation on it, click Upgrade: Install Windows and keep files, settings, and applications. If your computer does not have a Windows installation or you need to reinstall Windows, click Custom: Install Windows only.
-
13
Select a drive or partition you want to install Windows on and click Delete. If you have multiple hard drives or a hard drive with multiple partitions, select the partition you want to install Windows on and click Delete. Be aware that this will erase all data on the drive. Make sure you have backed up all data you want to keep before continuing. This will leave the drive with unallocated space.
-
14
Select a drive with unallocated space and click Next. This will start installing Windows on the drive you selected. The amount of time it takes will depend on the hardware of your computer.
-
15
Remove the USB flash drive and restart your computer. Once Windows is finished installing, your computer will restart automatically. Remove the USB flash drive so that it does not try to boot from the Flash drive again. The first time Windows boots up, you will need to go through the Setup process.


Advertisement
-
1
Verify your region and keyboard input. When Windows restarts, it will ask you to verify your region and keyboard input. If these are correct, click Yes in the lower-right corner. Otherwise, select the correct region and keyboard input.
- You will also have the option to select another keyboard input. If you want to select another keyboard input, click Add Input and select another input. Otherwise, click Skip.[3]
- You will also have the option to select another keyboard input. If you want to select another keyboard input, click Add Input and select another input. Otherwise, click Skip.[3]
-
2
Connect to your Wireless network. Select your wireless network and click Connect. Then enter your wireless password and click Next.
- If you have a wired internet connection, make sure you are connected to your modem via an Ethernet cable. Windows will automatically detect your wired connection.
-
3
Select Set up for personal use and click Next. This option allows you to sign in with a Microsoft account and use your computer for personal use.
- If you are setting your computer for a business or organization, select Set up for an organization and click Next. You may need the aide of your IT department in order to set up Windows with a company email.
-
4
Sign in to Windows. If you already have a Microsoft account, you can sign in with your Microsoft account to import the digital license from a previous Windows computer. Enter the email address, phone number, or Skype number and password to sign in to your Microsoft account.
- If you do not have a Microsoft account, click Create account and follow the instructions to create a new Microsoft account.
- Alternatively, you can click Offline account in the lower-right corner to create a new local user account for Windows that doesn’t have a Microsoft account associated with it.
-
5
Click Accept to set up Cortana. Cortana is the built-in voice assistant for Windows. If you want to set up Cortana, click Accept and follow the instructions. If you don’t want to do it right now, click Decline.
-
6
Click Yes and follow the instructions to set up the Windows timeline. This feature allows you to continue what you are doing on other Windows devices. If you want to set up this feature click Yes and follow the instructions. If you don’t want to set this feature up, click No to move on to the next step.
-
7
Choose your privacy settings and click Accept. By default, Windows turn on GPS location tracking, Speech recognition, diagnostics, find my device, inking and typing to help Microsoft improve language recognition, and relevant ads. Click the toggle switch to turn off any of these features you don’t want to use. Then click Accept. Windows will do a little more set up and then open your desktop.[4]


Advertisement
-
1
Back up your files. It’s recommended that you back up all files and data you want to keep before installing or reinstalling macOS on a Mac. You can back up your data to iCloud, Google Drive, Dropbox, or an external hard drive or USB drive.
-
2
Restart your Mac. To restart your Mac, click the Apple icon in the upper-right corner and click Restart.
- If your Mac is already off, just press the Power button to turn it on.
- You will need Internet access to reinstall macOS on your Mac.
-
3
Press and hold ⌘ Command+R immediately. You’ll need to start doing this before the Mac start-up sound plays. Continue to hold these buttons until the Mac recovery screen appears.
-
4
Connect to your wireless network
. To connect to your wireless network, click the icon with a dot and three arching lines in the upper-right corner. Click your wireless network. Then enter your wireless password and click Join.
- If you are using a wired connection, make sure you are connected to your modem using an Ethernet cable.
-
5
Reformat the hard drive (optional). Depending on what your needs are, you may want to completely erase the hard drive with macOS on it and start with a new fresh install. Once your hard drive is erased, you cannot recover the data on it. Make sure you back up any data you want to keep before erasing your hard drive. If you don’t want to erase your hard drive, skip this step to reinstall macOS with all your data present on the drive. Use the following steps to reformat the hard drive:
- Click Disk Utility and click Continue.
- Click the hard drive you want to erase in the panel to the right. Make sure it is the correct drive.
- Click Erase at the top.
- Type a new name for the drive (optional).
- Select «Mac OS Extended (Journaled)» or «APFS» as the format.
- Click Erase.
- Close the Disk Utility window.
-
6
Select Reinstall macOS and click Continue. This will start the process of reinstalling macOS.
-
7
Click Continue. It’s the icon with the arrow at the bottom center of the screen.
-
8
Agree to the terms and license agreement. To agree to the terms and license agreement, read the text and click Agree at the bottom. Then click Agree again in the pop-up alert.
-
9
Select the hard drive you want to install macOS on and click Install. This will begin the process of installing macOS on the hard drive. This process may take a while depending on the hardware of your Mac and your internet connection speed. Your Mac will restart when it is finished.


Advertisement
-
1
Select your country and click Continue. Use the menu to select your language and click Continue at the bottom of the screen.
-
2
Sign in to your wi-fi. To sign in to your Wi-fi, select your wireless network, and enter your password. Then click Continue at the bottom of the screen.
-
3
Click Continue. This screen explains a little about privacy and data. You can read the text to learn more or click Continue to move on to the next step.
-
4
Select a method for transferring data to your Mac and click Continue. If you have important data you want to transfer to your mac on another Mac or Time Machine back, or a Windows PC, select the appropriate option and click Continue. Otherwise, select «Don’t transfer any information now» and click Continue.
-
5
Sign in with your Apple ID. To sign in with your Apple ID, enter the email address associated with your Apple ID and click Continue. Then enter your password and click Continue.
- If you don’t have an Apple ID, you can click Create New Apple ID and follow the instructions to create a new Apple ID.
- Alternatively, you can click Set up later and then click Skip to skip this step for now.
-
6
Agree to the terms and conditions. To agree to the terms and conditions, read the text on the page and click Agree at the bottom. Then click Agree again in the pop-up alert window.
-
7
Create a new user account. You’ll need to create a user account in order to sign in to your Mac. Use the following steps to create a new user account.
- Enter your full name in the first two bars at the top.
- Enter your user account name.
- Enter your password in the next two bars.
- Enter a hint for your password.
- Click Continue.
-
8
Confirm your setup and click Continue. Check the information on the Express Setup screen to make sure it sounds good and click Continue to move on to the next step.
- If you want to do a custom setup, click Custom setup at the bottom of the screen.
-
9
Decide if you want to share your analytics with app developers and click Continue. If you want to share your analytics with app developers to help them improve their products, click the checkbox next to «Share crash and usage data with app developers». If you’d rather protect your privacy, leave the checkbox blank. Click Continue to move on to the next step.
-
10
Set up your screen time settings (optional). Your screen time settings allow you to set limits on the amount of time computer users are allowed to use the computer, set up content restrictions, and receive usage reports. If you want to set up these features, click on the options on the screen, and follow the instructions to set up your screen time settings. Click Continue when you are ready to move on to the next step.
-
11
Enable Siri. Siri is Apple’s voice assistant. If you want to set up Siri, click the checkbox next to «Enable Ask Siri» and click Continue.
-
12
Help improve Siri (optional). If you have audio records that you can use to help improve Siri, select the option that says «Share audio recordings». Otherwise, click the option that says «Not now». Click Continue to move on to the next step.
-
13
Choose a look and click Continue. Click one fo the three options to choose a look. Then click Continue to move on to the next step. macOS will take a few minutes to set up and then you will be logged into your Mac. [5]


Advertisement
Add New Question
-
Question
How do I use a computer without a HDD?

You’ll have to use either an SSD or USB drive to load your OS. Be sure to set your BIOS to the proper boot priority.
-
Question
How do I install an operating system onto my new, non-pre built PC without a disk tray?
You have to use an external disc reader, or put your boot media on a flash drive.
-
Question
How do I boot a new desktop that has built-in Windows?
You have to insert the Windows CD or Windows USB Drive into the PC before booting the Computer. If the computer detects the CD Drive or USB Stick automatically before it boots, then it will run the Windows Installation. If this isn’t the case, then the computer boots before it checks the DVD or USB Drive. There are countless tutorials and step by step guides with pictures online.
See more answers
Ask a Question
200 characters left
Include your email address to get a message when this question is answered.
Submit
Advertisement
-
If you don’t like Windows or Mac, you can install Linux based operating systems like Ubuntu or Debian.
Advertisement
References
About This Article
Article SummaryX
1. Create a new Windows Installation Media from the tool at https://www.microsoft.com/en-us/software-download/windows10.
2. Insert the USB Windows installation media and boot up your PC.
3. Press the stated button combination on-screen to boot into the BIOS or Boot menu.
4. Use the Boot order option or Boot menu to boot from the USB drive.
5. Select your language, country, and keyboard input and click Next.
6. Click Install Now.
7. Enter your Windows product key and click Next.
8. Select your Windows Edition and click Next.
9. Agree to the license terms and click Next.
10. Select «Custom Install» and click Next.
11. Select a drive with unallocated space and click Next.
12. Remove the USB drive when Windows is finished installing.
13. Reboot your PC and follow the instructions to complete the setup process.
Did this summary help you?
Thanks to all authors for creating a page that has been read 707,039 times.
Reader Success Stories
-

«All step by step of installing OS, very helpful.»
Is this article up to date?
![]()
Download Article
![]()
Download Article
- Installing Windows 10
- Setting up Windows 10
- Installing macOS
- Setting up macOS
- Q&A
- Tips
|
|
|
|
|
This wikiHow teaches you how to install a computer operating system on a new, blank computer. You can do this on a Windows computer using a Windows Installation media. Brand new Mac computers will always come with an operating system installed, but you can reinstall your Mac’s default operating system using the macOS recovery feature.
-
1
Create Windows Installation media. If you order Windows 10 for a new PC build, they may send you an installation media. If you don’t have a Windows installation media, you can make one. You’ll need a computer with internet access and an 8 GB USB flash drive (16 GB recommended). You also need to know if the computer you want to install Windows 10 on has 32-bit or 64-bit architecture. You will also need to purchase Windows to get a product key. This can be done before or after the installation. Use the following steps to create a Windows Installation Media:
- Insert a USB drive with at least 8 GB of space into any computer with internet access. This will wipe any existing data on the USB drive, so be sure to back up any data you want to keep.
- Go to https://www.microsoft.com/en-us/software-download/windows10 in a web browser.
- Click Download Tool Now.
- Open the «MediaCreationTool.exe» file in your web browser or Downloads folder.
- Click Accept.
- Select «Create Installation Media (USB drive, DVD, ISO file) for another PC» and click Next.
- Select your language, Windows edition, and PC architecture and click Next.
- Select «USB flash drive» and click Next.
- Select your USB drive and click Next.
-
2
Back up your files (optional). If you already have a Windows installation on your computer, a new Windows installation may overwrite your files. Back up any data you want to keep before beginning a new Windows installation. You can back up your files to OneDrive, Google Drive, Dropbox, or an external hard drive or USB flash drive.
Advertisement
-
3
Insert the Windows Installation Media in the computer you want to install Windows on. You can insert the Windows Installation media into any free USB port.
-
4
Boot the computer. If the PC is already powered on, restart it using the normal restart procedures of the operating system that is installed on the PC. If it is not yet powered on, press the power button to boot it up.
-
5
Enter the Boot menu. Most newer computers have a boot menu you can enter while booting up. The way you enter it is different, depending on your motherboard. The most common way to enter the Boot menu is to press F10, F11, F12, F2, or Esc as the PC boots up. This Boot menu will display a list of drives you can boot from.[1]
- If you are using an older PC that does not have a Boot menu, you will need to Enter the BIOS while booting up. The buttons you press to enter the BIOS is different from one PC manufacturer to another. It will usually say what buttons you need to press while your computer boots up. You typically need to press F1 F2, F3, Esc or Delete to enter the BIOS.[2]
You may need to be quick about it. You can also reboot your PC into the BIOS from inside the Windows Settings menu.
- If you are using an older PC that does not have a Boot menu, you will need to Enter the BIOS while booting up. The buttons you press to enter the BIOS is different from one PC manufacturer to another. It will usually say what buttons you need to press while your computer boots up. You typically need to press F1 F2, F3, Esc or Delete to enter the BIOS.[2]
-
6
Select the USB drive. This is the drive that has the Windows Installation Media. This will boot the PC from the Windows Installation Media. Once the computer boots from the USB drive, press any key to start the Windows installation process.
- If you are inside the BIOS settings. Locate the option that says «Boot», «Boot order», «Priorities» or something similar. Change the boot order so that your PC boots from the USB drive first. Then select the option to save and exit. This will reboot your PC from the USB drive.
-
7
Select your language, time and currency, and keyboard input and click Next. Use the drop-down menus to first select your language. Then select your country or region, and your keyboard input method. Then click Next.
-
8
Click Install Now. It’s the button in the center of the screen.
-
9
Enter your Windows product key and click Next. If you’ve already purchased Windows, you can find your license key in your confirmation email. If you have not purchased Windows, click I don’t have a product key. You’ll need to purchase Windows and activate it later on.
-
10
Select which edition of Windows you want to install and click Next. If you’ve already purchased Windows, check which version of Windows you purchased and make sure you click the right version. If you have not yet purchased Windows, check which version you want to install. Different versions of Windows have a different price.
- If you are not sure which version of Windows to install, Windows Home Edition is the most common version of Windows.
-
11
Click the checkbox next to «I accept the license terms» and click Next. You can read the license terms in the window in the center. Click next when you are ready to continue.
-
12
Click Custom: Install Windows only or Upgrade: Install Windows and keep files, settings, and applications. If your computer already has a Windows installation on it, click Upgrade: Install Windows and keep files, settings, and applications. If your computer does not have a Windows installation or you need to reinstall Windows, click Custom: Install Windows only.
-
13
Select a drive or partition you want to install Windows on and click Delete. If you have multiple hard drives or a hard drive with multiple partitions, select the partition you want to install Windows on and click Delete. Be aware that this will erase all data on the drive. Make sure you have backed up all data you want to keep before continuing. This will leave the drive with unallocated space.
-
14
Select a drive with unallocated space and click Next. This will start installing Windows on the drive you selected. The amount of time it takes will depend on the hardware of your computer.
-
15
Remove the USB flash drive and restart your computer. Once Windows is finished installing, your computer will restart automatically. Remove the USB flash drive so that it does not try to boot from the Flash drive again. The first time Windows boots up, you will need to go through the Setup process.
Advertisement
-
1
Verify your region and keyboard input. When Windows restarts, it will ask you to verify your region and keyboard input. If these are correct, click Yes in the lower-right corner. Otherwise, select the correct region and keyboard input.
- You will also have the option to select another keyboard input. If you want to select another keyboard input, click Add Input and select another input. Otherwise, click Skip.[3]
- You will also have the option to select another keyboard input. If you want to select another keyboard input, click Add Input and select another input. Otherwise, click Skip.[3]
-
2
Connect to your Wireless network. Select your wireless network and click Connect. Then enter your wireless password and click Next.
- If you have a wired internet connection, make sure you are connected to your modem via an Ethernet cable. Windows will automatically detect your wired connection.
-
3
Select Set up for personal use and click Next. This option allows you to sign in with a Microsoft account and use your computer for personal use.
- If you are setting your computer for a business or organization, select Set up for an organization and click Next. You may need the aide of your IT department in order to set up Windows with a company email.
-
4
Sign in to Windows. If you already have a Microsoft account, you can sign in with your Microsoft account to import the digital license from a previous Windows computer. Enter the email address, phone number, or Skype number and password to sign in to your Microsoft account.
- If you do not have a Microsoft account, click Create account and follow the instructions to create a new Microsoft account.
- Alternatively, you can click Offline account in the lower-right corner to create a new local user account for Windows that doesn’t have a Microsoft account associated with it.
-
5
Click Accept to set up Cortana. Cortana is the built-in voice assistant for Windows. If you want to set up Cortana, click Accept and follow the instructions. If you don’t want to do it right now, click Decline.
-
6
Click Yes and follow the instructions to set up the Windows timeline. This feature allows you to continue what you are doing on other Windows devices. If you want to set up this feature click Yes and follow the instructions. If you don’t want to set this feature up, click No to move on to the next step.
-
7
Choose your privacy settings and click Accept. By default, Windows turn on GPS location tracking, Speech recognition, diagnostics, find my device, inking and typing to help Microsoft improve language recognition, and relevant ads. Click the toggle switch to turn off any of these features you don’t want to use. Then click Accept. Windows will do a little more set up and then open your desktop.[4]
Advertisement
-
1
Back up your files. It’s recommended that you back up all files and data you want to keep before installing or reinstalling macOS on a Mac. You can back up your data to iCloud, Google Drive, Dropbox, or an external hard drive or USB drive.
-
2
Restart your Mac. To restart your Mac, click the Apple icon in the upper-right corner and click Restart.
- If your Mac is already off, just press the Power button to turn it on.
- You will need Internet access to reinstall macOS on your Mac.
-
3
Press and hold ⌘ Command+R immediately. You’ll need to start doing this before the Mac start-up sound plays. Continue to hold these buttons until the Mac recovery screen appears.
-
4
Connect to your wireless network
. To connect to your wireless network, click the icon with a dot and three arching lines in the upper-right corner. Click your wireless network. Then enter your wireless password and click Join.
- If you are using a wired connection, make sure you are connected to your modem using an Ethernet cable.
-
5
Reformat the hard drive (optional). Depending on what your needs are, you may want to completely erase the hard drive with macOS on it and start with a new fresh install. Once your hard drive is erased, you cannot recover the data on it. Make sure you back up any data you want to keep before erasing your hard drive. If you don’t want to erase your hard drive, skip this step to reinstall macOS with all your data present on the drive. Use the following steps to reformat the hard drive:
- Click Disk Utility and click Continue.
- Click the hard drive you want to erase in the panel to the right. Make sure it is the correct drive.
- Click Erase at the top.
- Type a new name for the drive (optional).
- Select «Mac OS Extended (Journaled)» or «APFS» as the format.
- Click Erase.
- Close the Disk Utility window.
-
6
Select Reinstall macOS and click Continue. This will start the process of reinstalling macOS.
-
7
Click Continue. It’s the icon with the arrow at the bottom center of the screen.
-
8
Agree to the terms and license agreement. To agree to the terms and license agreement, read the text and click Agree at the bottom. Then click Agree again in the pop-up alert.
-
9
Select the hard drive you want to install macOS on and click Install. This will begin the process of installing macOS on the hard drive. This process may take a while depending on the hardware of your Mac and your internet connection speed. Your Mac will restart when it is finished.
Advertisement
-
1
Select your country and click Continue. Use the menu to select your language and click Continue at the bottom of the screen.
-
2
Sign in to your wi-fi. To sign in to your Wi-fi, select your wireless network, and enter your password. Then click Continue at the bottom of the screen.
-
3
Click Continue. This screen explains a little about privacy and data. You can read the text to learn more or click Continue to move on to the next step.
-
4
Select a method for transferring data to your Mac and click Continue. If you have important data you want to transfer to your mac on another Mac or Time Machine back, or a Windows PC, select the appropriate option and click Continue. Otherwise, select «Don’t transfer any information now» and click Continue.
-
5
Sign in with your Apple ID. To sign in with your Apple ID, enter the email address associated with your Apple ID and click Continue. Then enter your password and click Continue.
- If you don’t have an Apple ID, you can click Create New Apple ID and follow the instructions to create a new Apple ID.
- Alternatively, you can click Set up later and then click Skip to skip this step for now.
-
6
Agree to the terms and conditions. To agree to the terms and conditions, read the text on the page and click Agree at the bottom. Then click Agree again in the pop-up alert window.
-
7
Create a new user account. You’ll need to create a user account in order to sign in to your Mac. Use the following steps to create a new user account.
- Enter your full name in the first two bars at the top.
- Enter your user account name.
- Enter your password in the next two bars.
- Enter a hint for your password.
- Click Continue.
-
8
Confirm your setup and click Continue. Check the information on the Express Setup screen to make sure it sounds good and click Continue to move on to the next step.
- If you want to do a custom setup, click Custom setup at the bottom of the screen.
-
9
Decide if you want to share your analytics with app developers and click Continue. If you want to share your analytics with app developers to help them improve their products, click the checkbox next to «Share crash and usage data with app developers». If you’d rather protect your privacy, leave the checkbox blank. Click Continue to move on to the next step.
-
10
Set up your screen time settings (optional). Your screen time settings allow you to set limits on the amount of time computer users are allowed to use the computer, set up content restrictions, and receive usage reports. If you want to set up these features, click on the options on the screen, and follow the instructions to set up your screen time settings. Click Continue when you are ready to move on to the next step.
-
11
Enable Siri. Siri is Apple’s voice assistant. If you want to set up Siri, click the checkbox next to «Enable Ask Siri» and click Continue.
-
12
Help improve Siri (optional). If you have audio records that you can use to help improve Siri, select the option that says «Share audio recordings». Otherwise, click the option that says «Not now». Click Continue to move on to the next step.
-
13
Choose a look and click Continue. Click one fo the three options to choose a look. Then click Continue to move on to the next step. macOS will take a few minutes to set up and then you will be logged into your Mac. [5]
Advertisement
Add New Question
-
Question
How do I use a computer without a HDD?
You’ll have to use either an SSD or USB drive to load your OS. Be sure to set your BIOS to the proper boot priority.
-
Question
How do I install an operating system onto my new, non-pre built PC without a disk tray?
You have to use an external disc reader, or put your boot media on a flash drive.
-
Question
How do I boot a new desktop that has built-in Windows?
You have to insert the Windows CD or Windows USB Drive into the PC before booting the Computer. If the computer detects the CD Drive or USB Stick automatically before it boots, then it will run the Windows Installation. If this isn’t the case, then the computer boots before it checks the DVD or USB Drive. There are countless tutorials and step by step guides with pictures online.
See more answers
Ask a Question
200 characters left
Include your email address to get a message when this question is answered.
Submit
Advertisement
-
If you don’t like Windows or Mac, you can install Linux based operating systems like Ubuntu or Debian.
Advertisement
References
About This Article
Article SummaryX
1. Create a new Windows Installation Media from the tool at https://www.microsoft.com/en-us/software-download/windows10.
2. Insert the USB Windows installation media and boot up your PC.
3. Press the stated button combination on-screen to boot into the BIOS or Boot menu.
4. Use the Boot order option or Boot menu to boot from the USB drive.
5. Select your language, country, and keyboard input and click Next.
6. Click Install Now.
7. Enter your Windows product key and click Next.
8. Select your Windows Edition and click Next.
9. Agree to the license terms and click Next.
10. Select «Custom Install» and click Next.
11. Select a drive with unallocated space and click Next.
12. Remove the USB drive when Windows is finished installing.
13. Reboot your PC and follow the instructions to complete the setup process.
Did this summary help you?
Thanks to all authors for creating a page that has been read 707,039 times.
Reader Success Stories
-
«All step by step of installing OS, very helpful.»
Is this article up to date?
Запускаем компьютер без операционной системы с CD
Компьютеры без предустановленной операционной системы, как правило, дешевле. Но проблема в том, что вы не сможете просто включить ПК и начать работу. Для запуска ему потребуется операционная система.
Вы можете запустить компьютер с помощью установочного компакт-диска или загрузочного USB-накопителя. Как сделать загрузочную флешку, мы рассказывали в отдельных статьях: инструкция для Windows 7 и Windows 10.
- Подключите USB-накопитель либо вставьте установочный диск в дисковод и перезагрузите компьютер.
- Возможно, вам сначала придется изменить порядок загрузки в BIOS. Для этого нажмите клавишу F2 в стартовом окне. Другая клавиша, например F8 или F10, может вывести к Bios. На некоторых компьютерах для этого часто необходимо нажать кнопку DEL.
- Соответствующий параметр для порядка загрузки можно найти в BIOS на вкладке «Загрузка» (Boot).
- Когда вы сохраните изменения в BIOS и выйдите из него, компьютер перезагрузится.
Устанавливаем операционную систему
После того, как вы прошли упомянутые шаги на вашем компьютере, должна начаться процедура установки операционной системы. Мастер проведет вас через необходимые шаги: процесс довольно простой и понятный за счет четких инструкций. Возможно, вам придется отформатировать жесткий диск для установки ОС и разбить его на разделы.
Установка операционной системы может занять некоторое время. Компьютер сообщит, когда процесс будет завершен, а затем запустится как обычно.
Подробнее об установке Windows читайте здесь:
- Как переустановить Windows: инструкция для чайников
- Как бесплатно установить Windows 10