
Увы, но в практике периодически возникает необходимость оставить уже привычную, но устаревшую ОС Windows в прошлом и обновиться до более современной версии. Чаще всего столь неприятный переход может быть связан с окончанием срока поддержки и несовместимостью новых версий программ с установленной Виндой. Чаще всего при обновлении до Windows 10 пользователей пугает один вопрос: удалятся ли файлы при установке. Попробуем разобраться.

Какие файлы удаляются при установке системы Windows 10 с нуля
На деле существует три метода установки свежей операционки. К ним относятся:
- чистая установка на диск с данными;
- установка второй ОС на один «хард»;
- обновление через «Центр Обновлений».
Допустим, пользователь выбрал первый метод из списка. Вставил флешку с образом в компьютер, настроил BIOS и начал процесс. Первое, что он увидит, это выбор места, куда распакуется образ ОС. Для корректной работы пользователь будет вынужден отформатировать виртуальное пространство, на котором находилась прошлая система. Примечательно, что форматируется весь логический носитель информации, а не только системные папки.
Следственно, при «чистой» установке будут отформатированы и потеряны файлы, находящиеся на диске с папкой Windows, то есть системной. Зато файлы с других разделов (например, несистемный D:) сохранятся в полной целостности.
Рассмотрим другой случай, когда пользователь идет на хитрость и ставит «десятку» на другой диск. В итоге страдают и форматируются уже другие файлы. Да и две ОС из одного семейства на одном компьютере – это неразумная идея. Они будут постоянно конфликтовать между собой, что приведет к краху всей работоспособности. Если и ставить вторую ОС, то выбирать ее нужно из семейства Linux, чтобы не было программных конфликтов.
Третий способ, пожалуй, самый выгодный, ведь он позволяет юзеру поэтапно контролировать взаимодействие ОС, установщика и пользовательских файлов. Правда, не всегда есть возможность обновиться с уже существующей ОС. Нередко бывают случаи, когда Windows полностью перестает функционировать. Впрочем, не стоит беспокоиться. Даже в таком случае есть несколько способов сохранить файлы.
Сохранение важных файлов
Даже на компьютере с данными, но без ОС, можно работать. Предлагаем несколько универсальных способов.
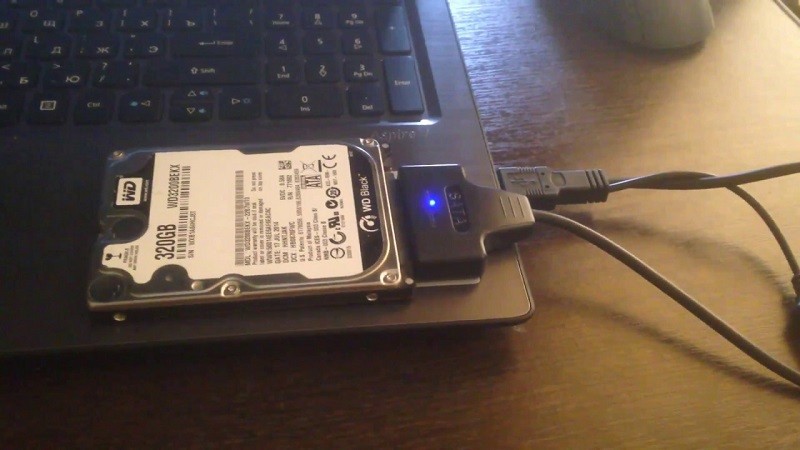
Подключение жесткого диска к другому компьютеру:
- Отключите питание компьютера и откройте крышку системного блока.
- Найдите ЖД внутри корпуса. Его провод должен напрямую соединяться с материнской платой.
- Отсоедините ЖД. Для этого отщелкните SATA (или IDE) кабель. Сам диск, скорее всего, прикручен.
- Подсоедините его вторым диском к другому компьютеру.
Готово. Когда вы включите компьютер, то он не увидит новый диск. Для этого необходимо настроить его через утилиту «compmgmt.msc». Откройте ее и найдите диск с отличающимся названием. Кликните по нему ПКМ и выберите «Изменить букву диска». Выберите новую букву и нажмите «ОК». Готово. Скопируйте нужные данные и верните диск в «родной» компьютер.
Открытие проводника с помощью EaseUS:
- Создайте загрузочный диск с программой. Алгоритм ничем не отличается от установки Винды. Найдите дистрибутив на официальном сайте и установите его через ultraISO или Rufus.
- Настройте приоритет на флешку с дистрибутивом в BIOS. Для этого откройте BIOS (для каждой модели свой способ открытия) и найдите раздел «Boot menu». В нем задайте приоритет для нужного устройства. Нажмите «F10» для сохранения настроек.
- Запустите программу и начните сканирование системы.
- С помощью программы «Мастер восстановления» скопируйте информацию в безопасное место.
Пожалуй, это один из самых универсальных методов, который способен восстанавливать даже удаленные файлы.
Можно ли переустановить ОС без удаления файлов?
Как мы говорили выше, есть один способ сохранить практически все файлы. Для этого необходимо иметь уже установленную Windows, а на ней через центр обновления установить Windows 10. Правда, такая возможность доступна не всем, увы. В таком случае единственным вариантом будет ручное копирование.
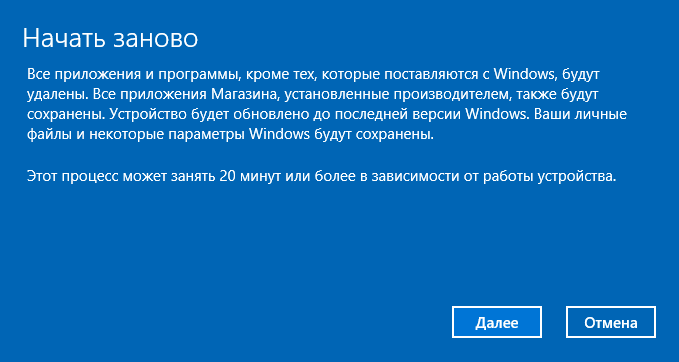
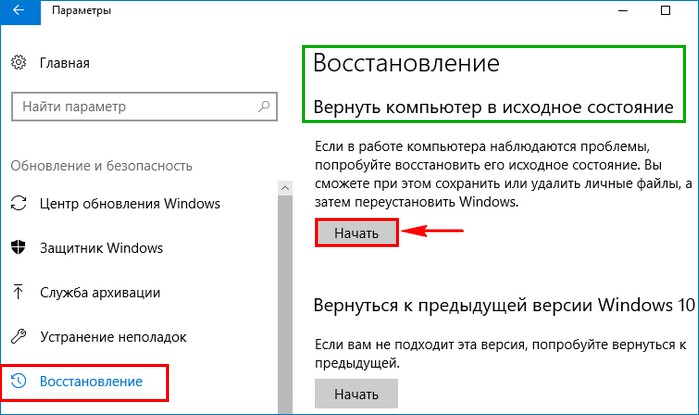
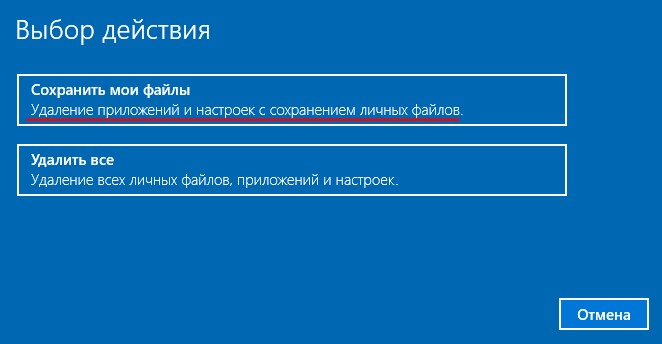
Привет друзья! Уверен, что все вы знакомы со встроенной в Windows 10 опцией возвращения операционной системы к исходному состоянию с сохранением личных файлов и не раз к ней прибегали. В результате мы получаем практически новую ОС без установленных приложений и большей части файлов. Простыми словами, данная операция равна по эффекту чистой переустановке Windows, с той лишь разницей, что в новую систему не нужно устанавливать драйвера на устройства.
Но в Windows 10 возможно также обновление с сохранением установленных программ и личных файлов, и о нём мы вам ещё не рассказывали.
Обновление Windows 10 с сохранением установленных программ и личных файлов
Итак, имеем захламлённую различным софтом и вирусами Windows 10, которая периодически выводит разные системный ошибки и перезагружается без причины.
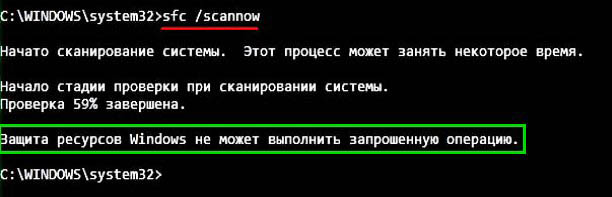
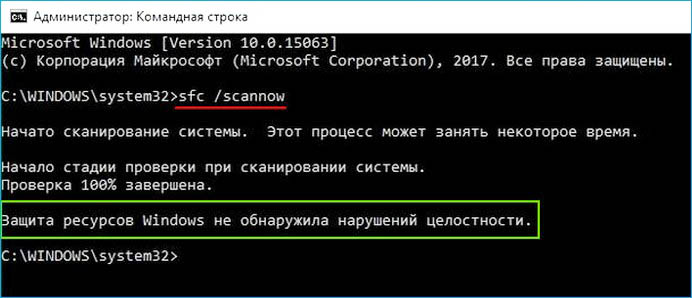
Восстановить целостность системных файлов при помощи sfc /scannow у нас не получилось, вышла ошибка: «Защита ресурсов Windows не может выполнить запрошенную операцию»
Для работы нам понадобится оригинальный ISO-образ Windows 10, скачать его можно на сайте Майкрософт.
На всякий случай перед работой создайте резервную копию Windows 10 по этой статье, так как, если система сильно «больная», то при обновлении данным способом можно получить критическую ошибку и не загрузиться в ОС.
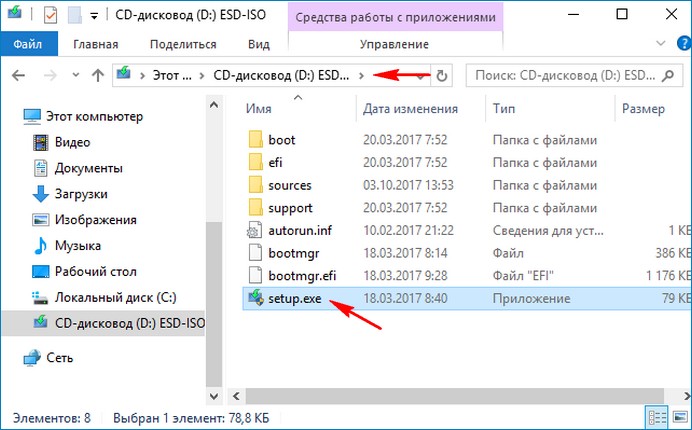
Щёлкаем двойным щелчком левой кнопки мыши на скачанном ISO-образе системы.

Образ подсоединяется к виртуальному дисководу, заходим в него и запускаем файл установщик setup.exe.
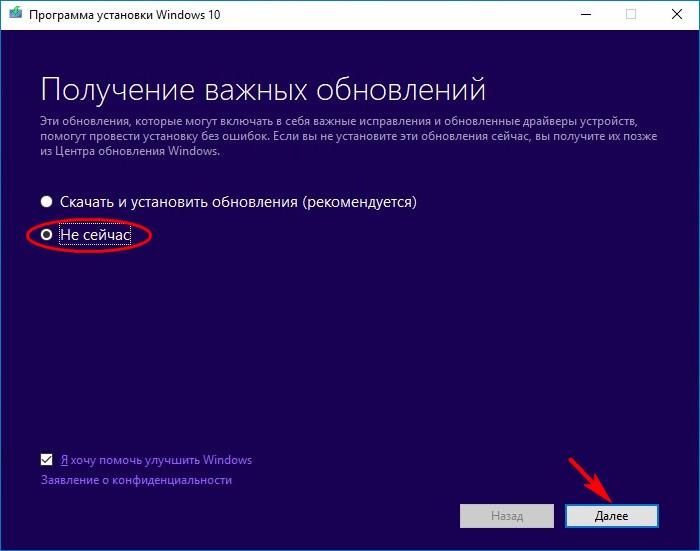
Начинается подготовка обновления Windows 10.

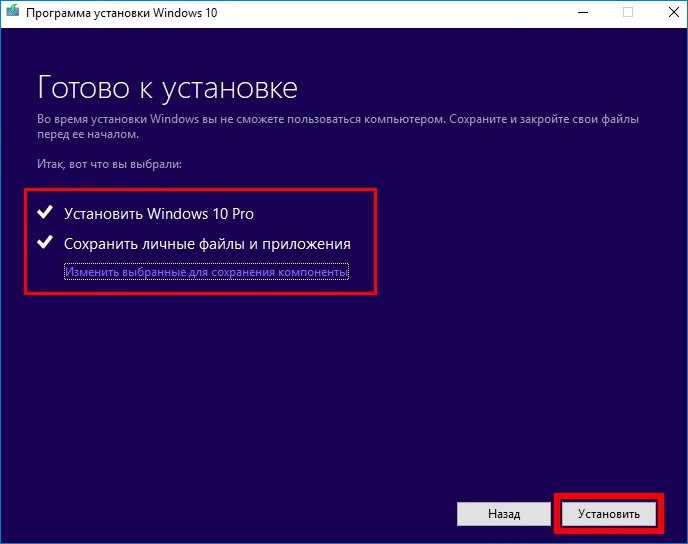
Отмечаем пункт «Не сейчас» и жмём «Далее».

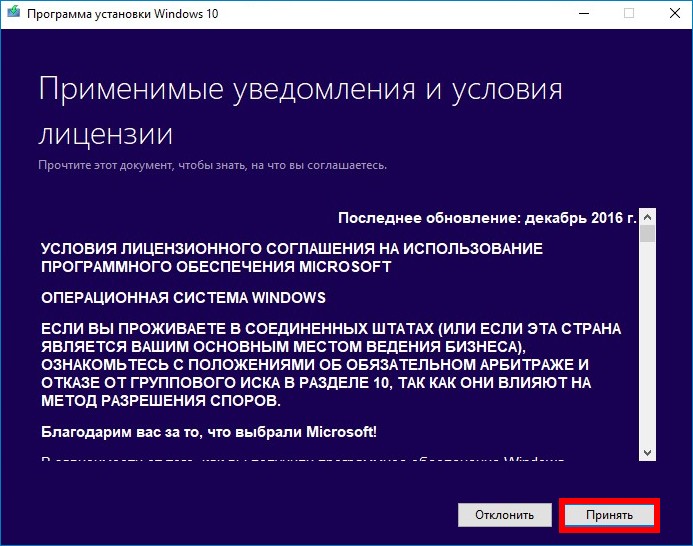
Принимаем лицензию.


Жмём «Установить».
Начинается процесс обновления, не требующий вмешательства пользователя.


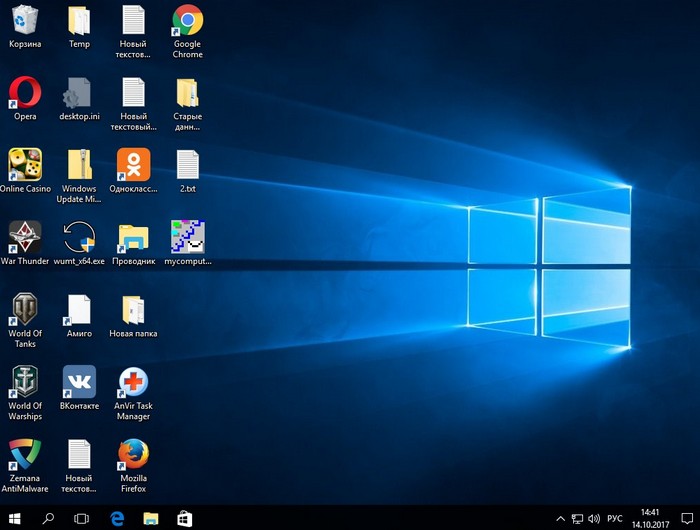
Загружается обновлённая Windows 10. Все программы и личные файлы на месте.
Проверяем целостность системных файлов и защита ресурсов не обнаруживает нарушений.
Categories
- Transfer Programs from C Drive to D Drive
- Transfer Installed Software to New PC
- Transfer Files from Old PC to New PC
- Transfer Microsoft Office
- Find Office Product Key
- Move User Folder
- Move Google Chrome Bookmarks
Introduction
Windows offers an Upgrade Assistant program that helps in easy migration from an older version of Windows to Windows 10. This upgrade program makes sure that your files and programs are not deleted but instead backed up and placed back once the upgrade process is complete. All files are backed up in Windows. old folder, which is still available after the process is complete.
There is an additional hiccup. It is possible that some of the third-party programs, files, settings will be removed. It is primarily because of compatibility, and after upgrading, all those need to be restored manually. It usually happens with Windows 8/7/XP/Vista.
Windows 10 Upgrade will not delete your files and programs, but there are specific scenarios where there can be data loss, and if that happens, there is no way to bring it back. It usually occurs when the upgrade fails abruptly, a BSOD, or any sudden crash.
So, upgrading is usually successful, but it is equally vital to backup your data before doing it. You can manually copy files to an external drive or use professional software to backup or create an image to restore later.
PAGE CONTENT:
Preparation Before Upgrading to Windows 10
How to Backup Your Programs, Files, and Settings
How to Upgrade to Windows 10
Preparation Before Upgrading to Windows 10
The two most important things you need to do before upgrading are—taking backup of your programs, files, settings via the third-party software and making sure you have enough space on the installation drive.
Taking a backup of the first part will need software or a program that can create an image of the system drive. Make sure to have a flash drive or an external drive with enough space. You can calculate based on how much space is occupied on your system drive and make sure you have the same amount of space.
Windows Upgrade needs to copy the file to the system drive before upgrading. Ideally, you need to have at least 30 GB of free storage space free for an upgrade to start. If you are already short of space, it’s time to find out what is occupying space on your computer by looking at the download folder, large-size applications that are not needed, and more.
How to Backup Your Programs, Files, and Settings
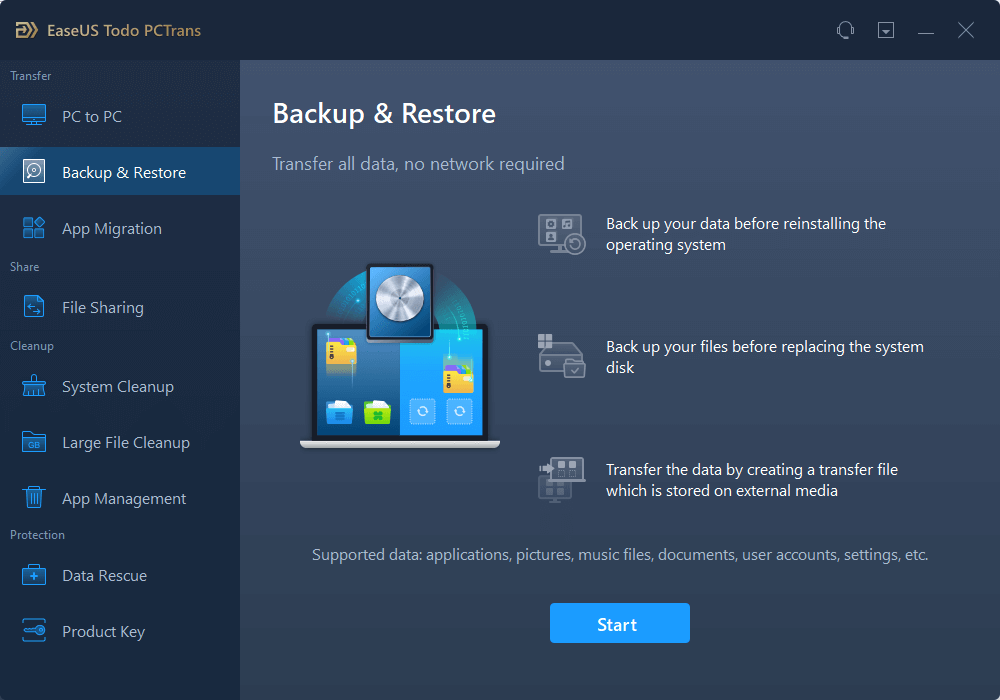
Taking backup of your programs, file, and settings is essential both after the upgrade and in case you need to roll back and restore to the old OS. It would be best to use professional software like the EaseUS Todo PCTrans for his purpose.
EaseUS Todo PCTrans offers a lot of features around file transfer and Backup/Restore. It can also perform system cleanup, extensive file cleanup, app management, and product key scanning.
Along with everything else, the Backup and Restore feature can come in handy when you need to make a copy of your data and later restore it to the same PC or another one. Here is the list of features:
- Restore application of old PC to new PC.
- Supports applications, pictures, music, document, user account, and settings.
- Compression technique to save space usage.
- Create a System image that makes the restore process a breeze.
Step 1. Connect your USB (flash) drive/external hard drive to your source computer.
Launch Todo PCTrans, click «Backup & Restore > Start» on the main screen.
Step 2. Select «Data Backup» and click «Next». Click «Confirm» to move on.
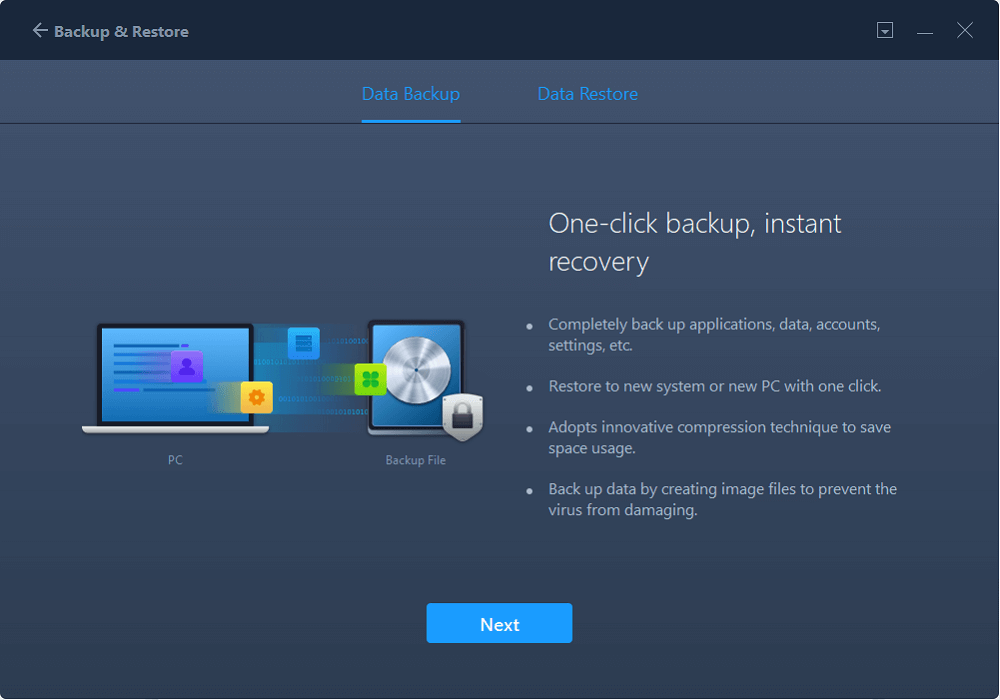
Step 3. Choose the specific data, applications, and accounts in the Applications, User Accounts, and Files columns to choose the specific data, applications, etc. to create a backup file.

Few things to note that when upgrading from 32-bit to 64-bit, a reinstallation is needed, applications that are not compatible might need to be downloaded and installed again during file transfer. If the destination file already exists, then the folder will be named accordingly.
How to Upgrade to Windows 10
Step 1. Take a backup of all your files and applications using backup software or create a system image that you can use to restore in case of any failure. Ensure you have enough storage space in the system drive. A warning message will be displayed if the storage space is not adequate.
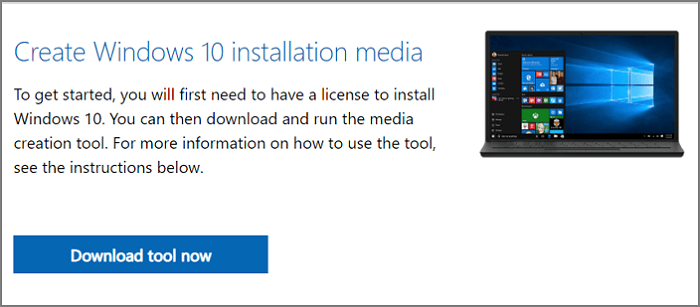
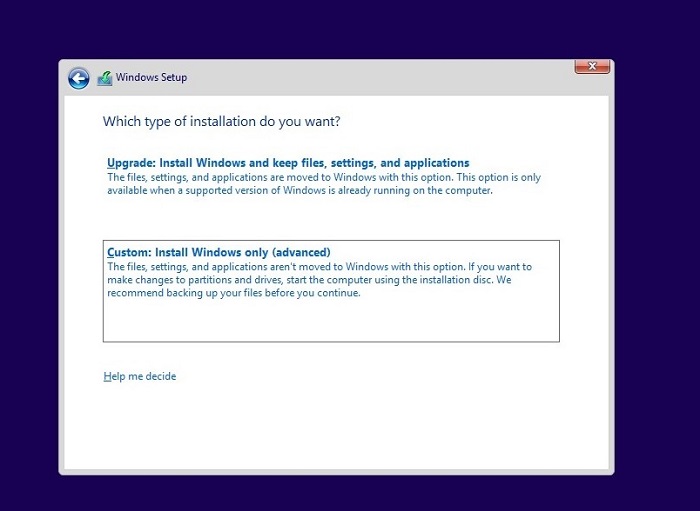
Step 2. Download the Upgrade Assistant or Media Creation Tool from the Microsoft website. You can then start the upgrade wizard, which will check for system compatibility and take the backup of existing files and folders. You can also choose to clean install. However, in this case, the wizard will not take any backup of the existing files.
Step 3. Once the check is complete and everything is compatible with the upgraded OS, the wizard will restart the PC, followed by the upgrade. The progress will be visible on the screen as the overall process completes. Once done, you will be able to log in using the same account credentials.
Make a final check if everything is all right, including files and programs. If you feel anything is missing, explore the Windows.OLD folder in the system drive for those files.
Bottom Line
Upgrading to Windows 10 is not rocket science anymore. The process has been streamlined for years, and for most of the part, it just works fine. However, there are specific scenarios where it fails because of hardware issues, driver problems resulting in rollback, BSOD, and sudden crashes. That’s where data backup and system image are essential. EaseUS Todo PCTrans offers easy and effective.
Categories
- Transfer Programs from C Drive to D Drive
- Transfer Installed Software to New PC
- Transfer Files from Old PC to New PC
- Transfer Microsoft Office
- Find Office Product Key
- Move User Folder
- Move Google Chrome Bookmarks
Introduction
Windows offers an Upgrade Assistant program that helps in easy migration from an older version of Windows to Windows 10. This upgrade program makes sure that your files and programs are not deleted but instead backed up and placed back once the upgrade process is complete. All files are backed up in Windows. old folder, which is still available after the process is complete.
There is an additional hiccup. It is possible that some of the third-party programs, files, settings will be removed. It is primarily because of compatibility, and after upgrading, all those need to be restored manually. It usually happens with Windows 8/7/XP/Vista.
Windows 10 Upgrade will not delete your files and programs, but there are specific scenarios where there can be data loss, and if that happens, there is no way to bring it back. It usually occurs when the upgrade fails abruptly, a BSOD, or any sudden crash.
So, upgrading is usually successful, but it is equally vital to backup your data before doing it. You can manually copy files to an external drive or use professional software to backup or create an image to restore later.
PAGE CONTENT:
Preparation Before Upgrading to Windows 10
How to Backup Your Programs, Files, and Settings
How to Upgrade to Windows 10
Preparation Before Upgrading to Windows 10
The two most important things you need to do before upgrading are—taking backup of your programs, files, settings via the third-party software and making sure you have enough space on the installation drive.
Taking a backup of the first part will need software or a program that can create an image of the system drive. Make sure to have a flash drive or an external drive with enough space. You can calculate based on how much space is occupied on your system drive and make sure you have the same amount of space.
Windows Upgrade needs to copy the file to the system drive before upgrading. Ideally, you need to have at least 30 GB of free storage space free for an upgrade to start. If you are already short of space, it’s time to find out what is occupying space on your computer by looking at the download folder, large-size applications that are not needed, and more.
How to Backup Your Programs, Files, and Settings
Taking backup of your programs, file, and settings is essential both after the upgrade and in case you need to roll back and restore to the old OS. It would be best to use professional software like the EaseUS Todo PCTrans for his purpose.
EaseUS Todo PCTrans offers a lot of features around file transfer and Backup/Restore. It can also perform system cleanup, extensive file cleanup, app management, and product key scanning.
Along with everything else, the Backup and Restore feature can come in handy when you need to make a copy of your data and later restore it to the same PC or another one. Here is the list of features:
- Restore application of old PC to new PC.
- Supports applications, pictures, music, document, user account, and settings.
- Compression technique to save space usage.
- Create a System image that makes the restore process a breeze.
Step 1. Connect your USB (flash) drive/external hard drive to your source computer.
Launch Todo PCTrans, click «Backup & Restore > Start» on the main screen.
Step 2. Select «Data Backup» and click «Next». Click «Confirm» to move on.
Step 3. Choose the specific data, applications, and accounts in the Applications, User Accounts, and Files columns to choose the specific data, applications, etc. to create a backup file.
Few things to note that when upgrading from 32-bit to 64-bit, a reinstallation is needed, applications that are not compatible might need to be downloaded and installed again during file transfer. If the destination file already exists, then the folder will be named accordingly.
How to Upgrade to Windows 10
Step 1. Take a backup of all your files and applications using backup software or create a system image that you can use to restore in case of any failure. Ensure you have enough storage space in the system drive. A warning message will be displayed if the storage space is not adequate.
Step 2. Download the Upgrade Assistant or Media Creation Tool from the Microsoft website. You can then start the upgrade wizard, which will check for system compatibility and take the backup of existing files and folders. You can also choose to clean install. However, in this case, the wizard will not take any backup of the existing files.
Step 3. Once the check is complete and everything is compatible with the upgraded OS, the wizard will restart the PC, followed by the upgrade. The progress will be visible on the screen as the overall process completes. Once done, you will be able to log in using the same account credentials.
Make a final check if everything is all right, including files and programs. If you feel anything is missing, explore the Windows.OLD folder in the system drive for those files.
Bottom Line
Upgrading to Windows 10 is not rocket science anymore. The process has been streamlined for years, and for most of the part, it just works fine. However, there are specific scenarios where it fails because of hardware issues, driver problems resulting in rollback, BSOD, and sudden crashes. That’s where data backup and system image are essential. EaseUS Todo PCTrans offers easy and effective.