FAST_RESOURCE_PRECONDITION_VIOLATION – это ошибка типа BSOD (синий экран), которая может возникнуть в любой момент при работе на компьютере с Windows. Как правило, она появляется при интенсивном использовании ресурсов, например?в играх или просмотре/редактировании HD-видео. Помимо того, что проблема может вызвать потерю данных, она также указывает на то, что с операционной системой что-то не так.
FAST_RESOURCE_PRECONDITION_VIOLATION имеет код проверки 0x000001C6. Ошибка может быть вызвана различными системными файлами, включая volmgr.sys и ntoskrnl.exe. И хотя причин её появления достаточно много, чаще всего она связана с изменениями, внесёнными в ОС, такими как установка несовместимого программного обеспечения или изменением аппаратных компонентов (неправильная их загрузка), а также несовместимые/повреждённые драйверы. Ниже представлены несколько способов решения, каждый из которых будет полезен в разных ситуациях.
Содержание
- Решение 1. Проверьте драйверы на ошибки
- Решение 2. Запустите сканирование SFC и DISM
- Решение 3. Проверьте память компьютера с помощью диагностики Windows
- Решение 4. Запустите команду chkdsk
- Решение 5. Выполните чистую загрузку
- Решение 6. Используйте восстановление системы
- Решение 7. Сбросить Windows к первоначальным настройкам
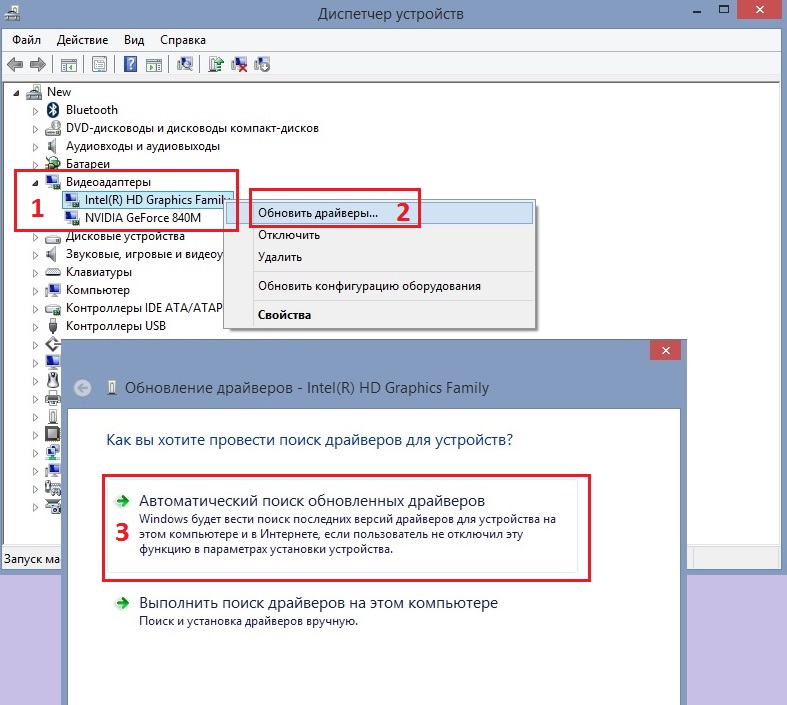
Решение 1. Проверьте драйверы на ошибки
Поскольку BSOD может быть связан с драйверами, первым шагом рекомендуется проверить их состояние на предмет ошибок и доступных обновлений.
- Нажмите правой кнопкой мыши на значок Windows, и выберите Диспетчер устройств.
- Разверните раздел Видеоадаптеры, а затем обновите каждый из драйверов, щёлкнув по ним ПКМ, и соответствующий пункт.
- В следующем окне выберите Автоматический поиск обновлённых программных обеспечений.
- Дождитесь установки и перезагрузите систему.
Помимо этого, можно зайти на официальный сайт разработчика установленного у вас драйвера, и скачать оттуда актуальное программное обеспечение. Чтобы обновиться таким образом, необходимо указать марку и модель вашего оборудования.
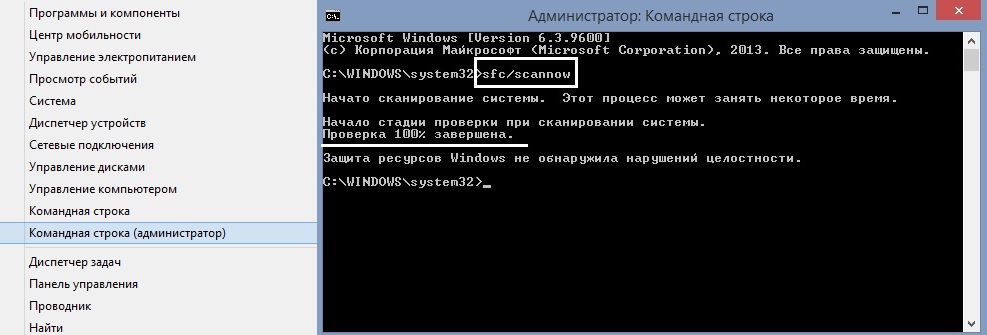
Решение 2. Запустите сканирование SFC и DISM
Как запустить:
- Нажмите ПКМ по значку Windows, и выберите Командная строка (Администратор).
- В открывшемся системном окне введите команду sfc/scannow, и нажмите Enter.
- Дождитесь окончания сканирования.
- Перезагрузите систему, если были внесены какие-либо исправления.
- Если SFC сообщает, что не может исправить найденные ошибки, вставьте следующие команды, нажимая Enter после каждой:
Dism/Online/Cleanup-Image/CheckHealth;
Dism/Online/Cleanup-Image/ScanHealth;
Dism/Online/Cleanup-Image/RestoreHealth.
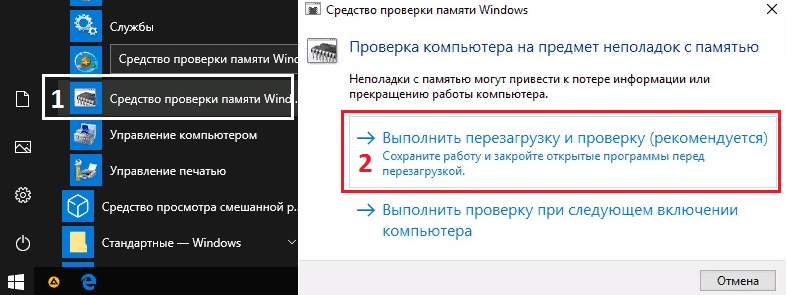
Решение 3. Проверьте память компьютера с помощью диагностики Windows
Инструкция по запуску:
- Введите в поиске Windows: Средство проверки памяти, и выберите соответствующий пункт.
- Когда появится новое окно, щелкните Выполнить перезагрузку и проверку.
- Это автоматически перезагрузит систему и выполнит проверку памяти.
- Предварительно стоит сохранить все документы и процессы, запущенные на компьютере.
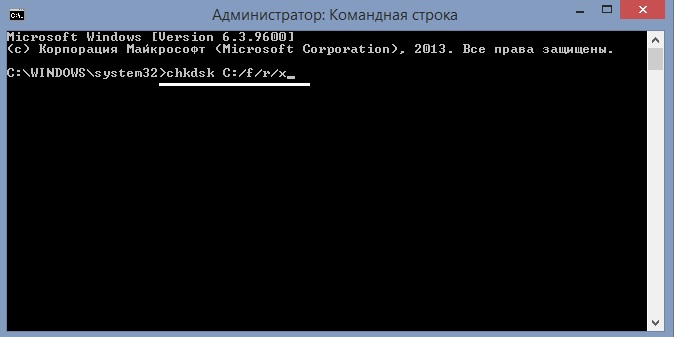
Решение 4. Запустите команду chkdsk
Ошибки жёсткого диска могут быть одной из основных причин появления синего экрана. Поэтому необходимо проверить его на наличие ошибок. Делается это следующим образом:
- Откройте командную строку от имени администратора, как указано во втором решении.
- В системном окне введите следующее: chkdsk C:/f/r/x
- Нажмите Enter и дождитесь завершения сканирования, а затем перезапустите систему.
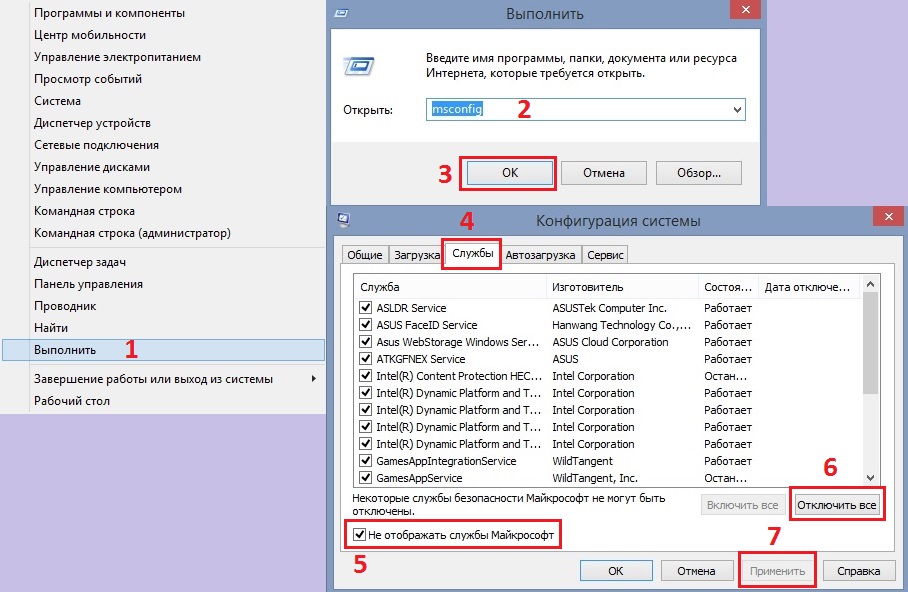
Решение 5. Выполните чистую загрузку
Руководство:
- Нажмите ПКМ по значку Windows, и выберите пункт Выполнить.
- В открывшемся окне введите msconfig и нажмите Ок.
- В окне Конфигурация системы откройте вкладку Службы.
- Установите флажок Не отображать службы Microsoft.
- Затем отключите все оставшиеся службы, нажав Отключить все и Применить;

- Далее перейдите на вкладку Автозагрузка и выберите Открыть диспетчер задач.
- Отключите все элементы автозагрузки, не относящиеся к Windows.

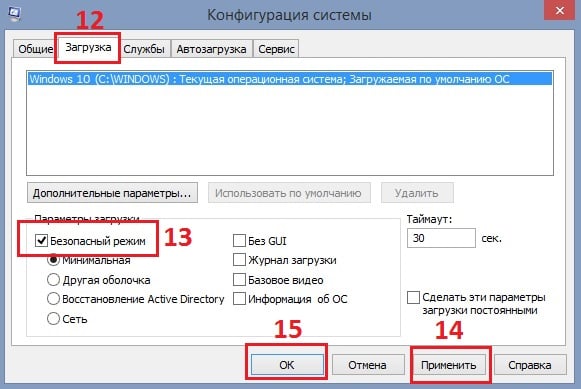
- Вернитесь в окно Конфигурация системы, и откройте вкладку Загрузка.
- Отметьте опцию Безопасный режим, нажмите Применить и Ок.
- После этого произойдёт перезапуск Windows.

Если ошибка в данном режиме устранена, это означает, что проблема заключается в каком-то программном обеспечении или драйвере. Следует удалить недавно установленные приложения, и проверить работоспособность системы, вычислив таким образом несовместимое ПО.
Решение 6. Используйте восстановление системы
Альтернативным вариантом предыдущего решения является Восстановление системы. Этот способ откатывает настройки Windows до предыдущего сохранённого состояния, когда всё работало нормально. Стоит иметь в виду, что все компоненты, установленные позже точки возвращения, будут удалены. Однако файлы сохранений останутся и после повторной загрузки удалённых программ и игр с ними можно продолжить работу.
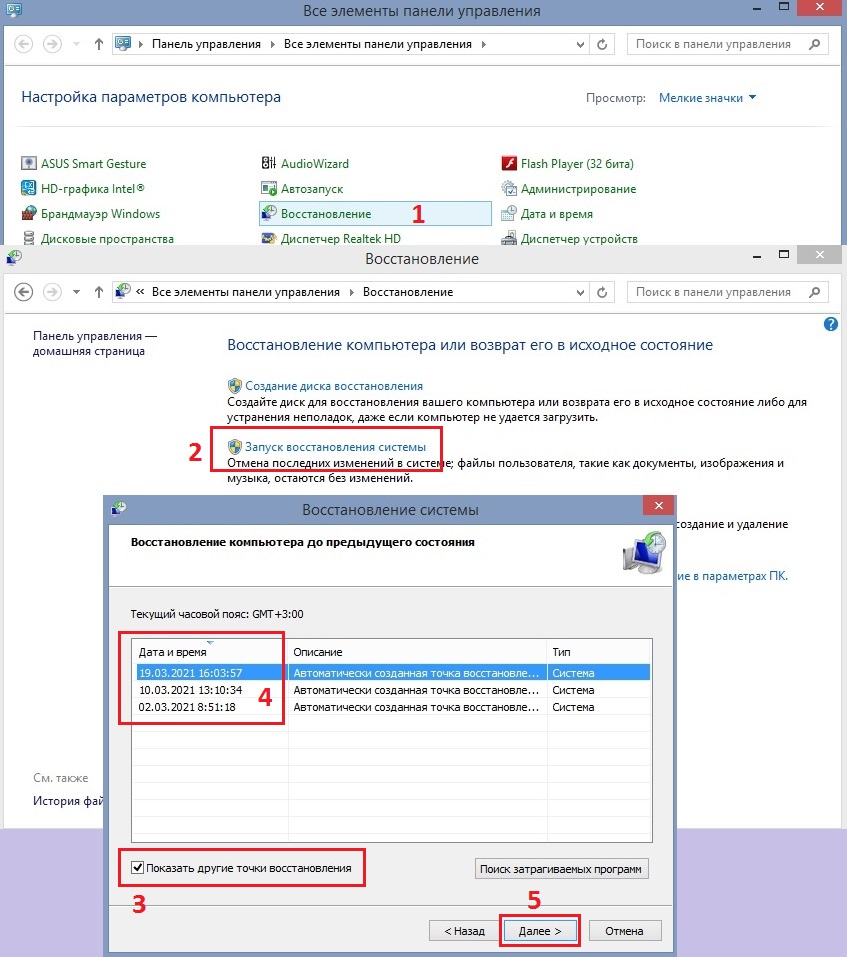
- Зайдите в Панель управления, нажав ПКМ по значку Windows.
- Перейдите в раздел Восстановление, и запустите восстановление системы.
- В следующем окне нажмите Далее.
- Установите галочку Показать другие точки восстановления, и выберите дату, когда компьютер работал стабильно.
- Нажмите Далее и следуйте подсказкам системы.
В процессе устройство будет перезагружено, поэтому предварительно сохраните все открытые документы.
Решение 7. Сбросить Windows к первоначальным настройкам
Если ни одно из вышеперечисленных решений не помогло, остаётся крайний метод – сброс Windows к первоначальным настройкам. Этот процесс не удалит личные файлы, но придётся переустановить некоторые программы и приложения. В частности, браузеры будут деинсталированы, поэтому предварительно экспортируйте свои закладки в облачное хранилище, или просто сохраните в отдельном файле.
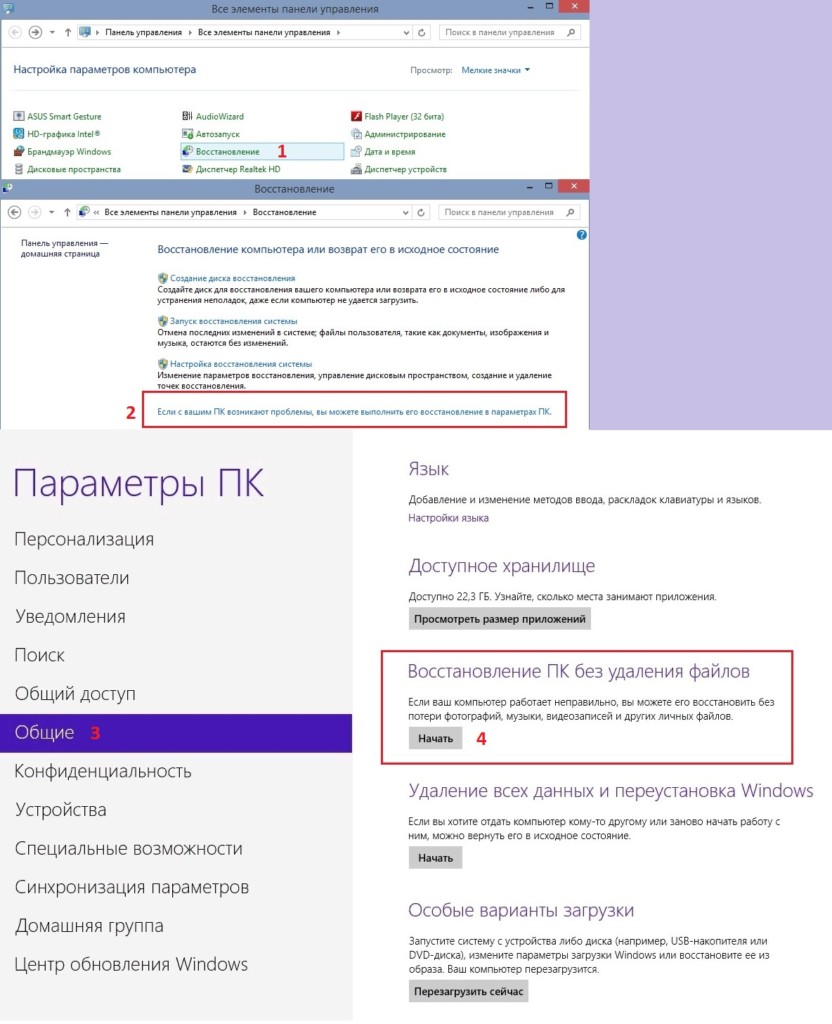
- Снова зайдите в Панель управления как описано в предыдущем варианте.
- Перейдите в раздел Восстановления, и выберите пункт Параметры ПК.
- Откройте вкладку Общие и выберите Восстановление ПК без удаления файлов.
- Следуйте дальнейшим указаниям системы.
- Затем дождитесь, пока Windows установит необходимые файлы, и завершите процесс.
После сброса системы необходимо проверить, включена ли автоматическая установка обновлений Windows, или выполнить загрузку обновлений вручную.
Вопрос
Проблема: как исправить ошибку FAST_ERESOURCE_PRECONDITION_VIOLATION в Windows 10?
Здравствуйте, вчера я играл в игру, и внезапно мой компьютер начал гудеть, что привело к синему экрану с ошибкой FAST_ERESOURCE_PRECONDITION_VIOLATION. К сожалению, это повторилось позже. Что я могу сделать, чтобы это исправить?
Решенный ответ
FAST_ERESOURCE_PRECONDITION_VIOLATION — синий экран смерти[1] ошибка, которая может возникнуть в любой момент при работе на компьютере с Windows, хотя пользователи сообщают, что она чаще встречается при интенсивном использовании ресурсов, например в играх или просмотре / редактировании HD-видео. Без сомнения, BSOD очень раздражают и могут не только вызвать потерю данных, но и указать на то, что с операционной системой что-то не так.
FAST_ERESOURCE_PRECONDITION_VIOLATION имеет проверку ошибок 0x000001C6 и может быть вызвано различными системными файлами, включая volmgr.sys или ntoskrnl.exe. Хотя у этой проблемы может быть много причин, чаще всего она вызвана изменениями, внесенными в ОС, такими как установка несовместимого программного обеспечения или изменение аппаратных компонентов (неправильная их установка) или несовместимых / поврежденных драйверы.[2]
Однако ошибка синего экрана мало что объясняет, когда она возникает, и показывает только стандартное сообщение об ошибке Windows 10:
На вашем устройстве возникла проблема, и его необходимо перезагрузить. Мы просто собираем информацию об ошибках, а затем перезапустим для вас.
0% завершено
Если вы звоните в службу поддержки, сообщите ему эту информацию:
Код остановки: FAST_ERESOURCE_PRECONDITION_VIOLATION
Если вы столкнулись с этим сообщением только один раз, не беспокойтесь и продолжайте работу в Windows в обычном режиме. Однако, если BSOD появляется несколько раз, это означает, что что-то определенно не так, и вам следует как можно скорее исправить ошибку FAST_ERESOURCE_PRECONDITION_VIOLATION.
Ниже вы найдете несколько методов, которые могут помочь вам найти решение проблемы. Имейте в виду, что существует несколько разных причин возникновения ошибки, поэтому не все исправления, указанные ниже, подойдут для всех. Таким образом, просто проверьте каждый из методов один за другим.

Если вы хотите быстро исправить FAST_ERESOURCE_PRECONDITION_VIOLATION, мы рекомендуем вам пропустить утомительную работу по устранению неполадок и использовать ReimageСтиральная машина Mac X9 инструмент для ремонта. Он может автоматически находить и решать проблемы Windows, особенно те, которые связаны с BSOD, отсутствующими DLL, реестром.[3] ошибки и т. д.
Исправить 1. Проверьте свои драйверы
Исправить это сейчас!Исправить это сейчас!
Для восстановления поврежденной системы необходимо приобрести лицензионную версию Reimage Reimage.
Поскольку BSOD может быть связан с драйверами, мы настоятельно рекомендуем вам обновить все они. Это можно сделать тремя способами:
Обновление через диспетчер устройств
- Щелкните правой кнопкой мыши на Начинать и выберите Диспетчер устройств
- Расширять раздел, который вы хотите обновить, например, Видеоадаптеры
- Щелкните правой кнопкой мыши видеокарту и выберите Обновить драйвер
- В новом окне выберите Автоматический поиск программного обеспечения драйвера

- Перезагрузить ваш компьютер.

Получите драйверы с сайта производителя
Диспетчер устройств — далеко не лучший способ загрузки последних версий драйверов. Если вы столкнулись с проблемами с драйверами, настоятельно не рекомендуется полагаться на этот инструмент. Чтобы обновить драйверы, вам необходимо указать марку и модель вашего оборудования, а затем посетить веб-сайт производителя. Там загрузите драйвер, совместимый с вашим оборудованием, установите его и перезагрузите устройство.
Используйте автоматический инструмент для загрузки и установки последних версий драйверов
Описанные выше методы могут быть чрезвычайно трудоемкими и довольно напряженными. Всегда существует риск установки неправильных драйверов, особенно для тех, кто не разбирается в компьютерах. Если вы один из таких людей и хотите получить быстрое решение для ваших драйверов, загрузите и установите DriverFix. Это программное обеспечение загрузит и установит последние совместимые драйверы всего за несколько минут.
Исправить 2. Запустите сканирование SFC и DISM
Исправить это сейчас!Исправить это сейчас!
Для восстановления поврежденной системы необходимо приобрести лицензионную версию Reimage Reimage.
- Введите cmd в поиске Windows
- Щелкните правой кнопкой мыши на Командная строка результат поиска и нажмите Запустить от имени администратора
- В новом окне введите sfc / scannow и нажмите Входить
- Как только сканирование завершится, Windows сообщит, были ли обнаружены нарушения целостности и можно ли их исправить. Если SFC сообщает, что не может исправить найденные ошибки, вставьте следующие команды, нажав Входить после каждого:
Dism / Online / Cleanup-Image / CheckHealth
Dism / Online / Cleanup-Image / ScanHealth
Dism / Online / Cleanup-Image / RestoreHealth

Исправить 3. Проверьте свою память с помощью диагностики памяти Windows
Исправить это сейчас!Исправить это сейчас!
Для восстановления поврежденной системы необходимо приобрести лицензионную версию Reimage Reimage.
- Введите объем памяти в поиске Windows и нажмите Входить
- Когда появится новое окно, выберите Перезагрузите сейчас и проверьте наличие проблем (рекомендуется)
- Это автоматически перезагрузит ваш компьютер и выполнит проверку памяти.

Исправить 4. Запустите команду chkdsk в командной строке
Исправить это сейчас!Исправить это сейчас!
Для восстановления поврежденной системы необходимо приобрести лицензионную версию Reimage Reimage.
Ошибки жесткого диска могут быть одной из основных причин ошибок BSOD. Таким образом, вы должны проверить свой диск на наличие ошибок следующим образом:
- Откройте командную строку от имени администратора, как описано выше.
- В новом окне введите следующую команду и нажмите Входить:
chkdsk С: / f / r / x - Подождите, пока сканирование завершится, а затем начать сначала твой компьютер.
Исправить 5. Выполните чистую загрузку
Исправить это сейчас!Исправить это сейчас!
Для восстановления поврежденной системы необходимо приобрести лицензионную версию Reimage Reimage.
Если проблема устраняется при чистой загрузке, это означает, что проблема заключается в каком-то программном обеспечении или программном драйвере. Затем вы можете удалить недавно установленные приложения. В качестве альтернативы вы можете использовать восстановление системы — мы расскажем, как это сделать на следующем шаге.
Исправить 6. Использовать восстановление системы
Исправить это сейчас!Исправить это сейчас!
Для восстановления поврежденной системы необходимо приобрести лицензионную версию Reimage Reimage.
Если чистая загрузка помогла вам избавиться от проблемы, вы можете использовать Восстановление системы, чтобы вернуть ваш компьютер к более раннему состоянию, когда ошибка не возникала. Вот как:
- Введите rstrui.exe в поиске Windows и нажмите Входить
- Выбирать Выберите другую точку восстановления и нажмите Следующий
- Отметьте Показать больше точек восстановления если такая опция доступна
- Выберите подходящую точку восстановления, нажмите Следующий и Заканчивать
- Ваш компьютер перезагрузится и вернется к более ранней дате.

Исправить 7. Сбросить Windows
Исправить это сейчас!Исправить это сейчас!
Для восстановления поврежденной системы необходимо приобрести лицензионную версию Reimage Reimage.
Если ни одно из вышеперечисленных решений вам не помогло, вы можете сбросить Windows. Вы не потеряете свои личные файлы, но, возможно, вам придется переустановить некоторые приложения.
- Щелкните правой кнопкой мыши на Начинать и выбрать Настройки
- Перейти к Обновление и безопасность и выбрать Восстановление
- Находить Сбросить этот компьютер раздел и щелкните Начать
- Выбирать Храните мои файлы и выбрать Загрузка в облако
- Подождите, пока Windows установит необходимые файлы, и завершите процесс.

Исправляйте ошибки автоматически
Команда ugetfix.com делает все возможное, чтобы помочь пользователям найти лучшие решения для устранения их ошибок. Если вы не хотите бороться с методами ручного ремонта, используйте автоматическое программное обеспечение. Все рекомендованные продукты были протестированы и одобрены нашими профессионалами. Инструменты, которые можно использовать для исправления ошибки, перечислены ниже:
Предложение
сделай это сейчас!
Скачать Fix
Счастье
Гарантия
сделай это сейчас!
Скачать Fix
Счастье
Гарантия
Совместим с Майкрософт ВиндоусСовместим с OS X По-прежнему возникают проблемы?
Если вам не удалось исправить ошибку с помощью Reimage, обратитесь за помощью в нашу службу поддержки. Сообщите нам все подробности, которые, по вашему мнению, нам следует знать о вашей проблеме.
Reimage — запатентованная специализированная программа восстановления Windows. Он диагностирует ваш поврежденный компьютер. Он просканирует все системные файлы, библиотеки DLL и ключи реестра, которые были повреждены угрозами безопасности.Reimage — запатентованная специализированная программа восстановления Mac OS X. Он диагностирует ваш поврежденный компьютер. Он просканирует все системные файлы и ключи реестра, которые были повреждены угрозами безопасности.
Этот запатентованный процесс восстановления использует базу данных из 25 миллионов компонентов, которые могут заменить любой поврежденный или отсутствующий файл на компьютере пользователя.
Для восстановления поврежденной системы необходимо приобрести лицензионную версию Reimage инструмент для удаления вредоносных программ.

Нажмите
Условия использования Reimage | Политика конфиденциальности Reimage | Политика возврата денег за товар | Нажмите
VPN имеет решающее значение, когда дело доходит до конфиденциальность пользователя. Онлайн-трекеры, такие как файлы cookie, могут использоваться не только платформами социальных сетей и другими веб-сайтами, но также вашим интернет-провайдером и правительством. Даже если вы примените самые безопасные настройки через веб-браузер, вас все равно можно будет отслеживать через приложения, подключенные к Интернету. Кроме того, браузеры, ориентированные на конфиденциальность, такие как Tor, не являются оптимальным выбором из-за пониженной скорости соединения. Лучшее решение для вашей максимальной конфиденциальности — это Частный доступ в Интернет — быть анонимным и безопасным в сети.
Программное обеспечение для восстановления данных — один из вариантов, который может вам помочь восстановить ваши файлы. После удаления файла он не исчезает в воздухе — он остается в вашей системе до тех пор, пока поверх него не записываются новые данные. Восстановление данных Pro это программа для восстановления, которая ищет рабочие копии удаленных файлов на вашем жестком диске. Используя этот инструмент, вы можете предотвратить потерю ценных документов, школьных заданий, личных фотографий и других важных файлов.
Windows 10 users often found to struggle with blue screen errors that keep coming on randomly without any prior notice or warning. Some of these errors get resolved with a simple restart where some are difficult to deal with. FAST_ERESOURCE_PRECONDITION_VIOLATION is one nagging at the same time rare BSOD that makes the system inoperable and sometimes inaccessible. This particular bug check has a value of 0x000001C6. The fatal code points out that the current thread is performing an invalid call to a fast resource routine.
FAST ERESOURCE PRECONDITION VIOLATION mostly shows up after a critical system crash. Besides, corrupted system components, wrongly coded software programs, outdated OS, and the existence of malware are highly responsible to cause the blue screen of death. There might be other reasons too such as damaged registry, buggy Windows update, software conflict, and incompatible BIOS version. As this particular BSOD is hard to recover, you might need to try out all probable workarounds listed below.
Here is how to fix FAST_ERESOURCE_PRECONDITION_VIOLATION in Windows 10 –
1] Boot to Safe Mode with Networking
If FAST ERESOURCE PRECONDITION VIOLATION BSOD prevents you from accessing the system, enter into Safe mode to get entry first. This special startup lets Windows start with basic software and services moreover make the troubleshooting process easier. Even if you have access, Safe mode is highly recommended as it provides an environment where deploying workarounds is comparatively easy going. To boot into Safe mode –
- Press – Windows + S.
- Type – advanced startup.
- Hit – Enter.
- From the right pane, click – Restart now.
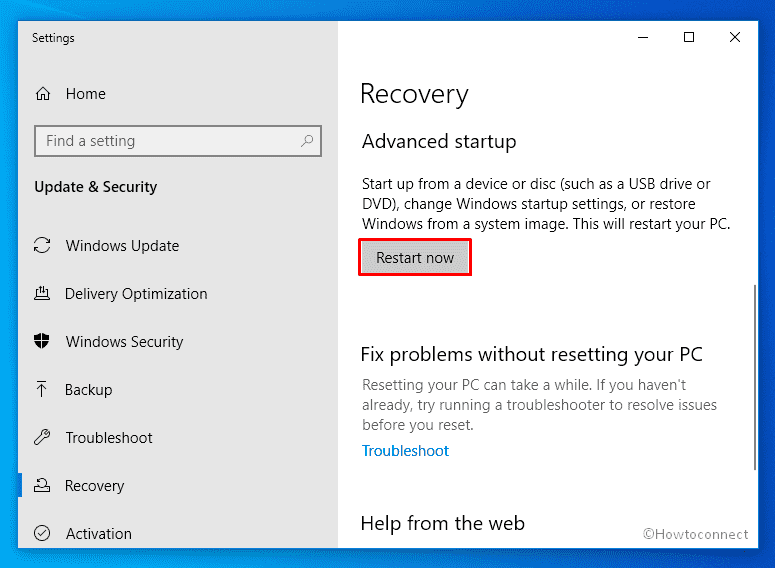
- Once on the next screen, select Troubleshoot => Advanced options => Startup Settings sequentially.
- Click – Restart.
- When the system starts, press 5 or f5 to enable Safe Mode with Networking.
Safe Mode with Networking is more convenient to troubleshoot critical issues as it let the system access Internet which is a must for some workarounds. After booting into this startup, perform the task or re-create the situation that was giving rise to blue screen error. If the system brings forth the BSOD, you can be sure that there is something wrong with Windows itself. After forcing the system if it still runs error-free, there is a high chance that third-party programs or services are responsible. Once you know what actually caused the BSOD, try out further workarounds accordingly.
2] Disable random shutdown
FAST_ERESOURCE_PRECONDITION_VIOLATION is the result of critical system crashes and causes severe damage to the Windows 10 device. To minimize the aftereffect of such crashes, Windows reboot itself time and again. Due to these random restarts, the system becomes completely inoperable and unworkable. As a result, you fail to carry out any workaround that works to fix the blue screen error.
Automatic Restart is a built-in Windows feature and it comes pre-enabled in the system. You are allowed to tweak this default setting and toggle the feature off to prevent Windows from restarting. Though disabling automatic restart won’t work as a hotfix, doing so will make the system more stable and let you deploy probable resolutions without any hitch. Here are the steps to follow –
- Press – Windows key.
- Type – advanced system settings.
- Hit – Enter.
- From the newly appeared wizard, click Settings present under Startup and Recovery.
- Deselect the checkbox placed before Automatically restart.
- Click – OK.
- Close System Properties.
3] Check for malware to resolve FAST_ERESOURCE_PRECONDITION_VIOLATION
Windows 10 generally doesn’t get affected by malware when Windows security remains active. If you are using any reliable third-party antimalware program, that will keep your system safe too. In case of not using either the built-in or third-party software, the system becomes easy prey to get affected by viruses. Once the malware manages entrance, they affect essential system components and oftentimes result in blue screen error.
Malware can be anywhere from online to offline but not all of them are detrimental. Some viruses start replicating themselves right after entering into the system and keep doing the same until you stop them from spreading more. In most cases, we don’t notice them initially as they remain in disguise. When some of the essential Windows elements go missing or stops functioning because of such threats, the system gives rise to errors like FAST_ERESOURCE_PRECONDITION_VIOLATION. Therefore, cleaning the existing threats is a must. To do so –
- Press – Windows + Q.
- Type in – Virus & threat protection.
- Hit – Enter.
- When Windows Security turns up, move to its right pane.
- Click the link – Scan options.
- Select the radio button set before Full scan.
- Click – Scan now.
- If the utility traces out any malware, hit – Clean Threat.
- After that, click Remove subsequently Start actions.
- Reboot Windows device.
4] Rollback driver update
Besides major updates, Microsoft keeps delivering cumulative and feature updates for Windows 10 quite regularly. These updates generally include new features, improvements, security patches, and bug fixes. In addition to that, device drivers receive the latest version too. Due to poor internet connection, often the system gets broken update files for drivers or Microsoft itself provides buggy updates. You may also get the wrong or faulty driver update while installing it manually. As a result, device drivers don’t perform the way they must be.
Broken and incompatible device drivers are one of the main reasons that cause blue screen errors on Windows 10. Though it’s always beneficial to keep your drivers updated, what matters most is compatibility. So, if you started conflicting FAST_ERESOURCE_PRECONDITION_VIOLATION BSOD after updating any driver, either roll back to the previous state or uninstall the same. In case you don’t know which driver got update recently, check the driver list first and then go for rolling back. Here’s how –
- Press – Windows + I.
- Choose – Update & Security.
- Move to the right pane and click – View update history.
- Expand Driver Updates section present under Update history.
- Note down the drivers that received updates.
- Later on, press – Windows + X.
- Select – Device Manager.
- Double-click the hardware that has received an update lately.
- Right-click the driver you want to roll back and choose – Properties.
- Shift to Driver tab.
- Click – Roll back Driver.
- Provide a reason for what you want to restore and hit – Yes.
- After rolling back successfully, close Device Manager.
- Restart Windows when the system asks for it.
5] Uninstall Windows 10 update
Microsoft releases every Windows patch with the intention to make the system steady, stable, and not to mention error-free. Unfortunately, some of the patches come along with bugs and broken installation files. Also, the system many times ends up installing broken setup files due to a bad internet connection or some other reason.
No matter how, if the latest update turns out to be a buggy one, the system may give rise to FAST ERESOURCE PRECONDITION VIOLATION error. In such a case, uninstalling the recent update usually solves the issue. Follow the way to get rid of buggy Windows update –
- Press – Windows key.
- Insert – view update history.
- Hit – Enter.
- Click the link – Uninstall updates.
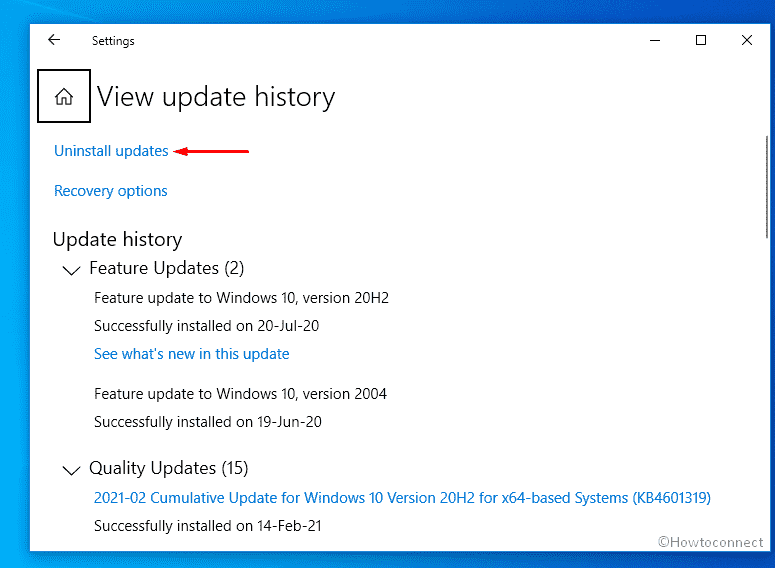
- Scroll down to reach the Microsoft Windows section.
- Select the KB version you received for the last time.
- From the top ribbon, click – Uninstall.
- Comply with further instructions that come on screen.
- After completion of the removal process, reboot the device.
6] Resolve corrupted system elements to fix FAST_ERESOURCE_PRECONDITION_VIOLATION
System components are a crucial part of any OS and if they go missing or become corrupted, FAST_ERESOURCE_PRECONDITION_VIOLATION BSOD may evolve. To deal with such issues, Windows offers a tool named System File Checker. When you run its dedicated command line, the utility immediately starts scanning system components and then lets you know if there is corruption or any other changes. Not just that, Windows will then go on to replace any wrongly modified and corrupted files with the default ones.
Oftentimes, System File Checker fails to resolve the existing corruption. In such a case, DISM comes as a rescue. When you will run its command-line in elevated Command Prompt, the utility will scan the system and correct the problem that was preventing System File Checker from working properly. As issues associated with System File Checker are also related to DISM, you might need to run both of them. Here are the steps in detail –
- Click – Start button.
- Type – cmd.
- Press – Ctrl + Shift + Enter.
- To allow User Account Control, click – Yes.
- In elevated Command Prompt, insert –
Sfc /scannow. - Hit – Enter.
- Let the scanning process hit 100%.
- If the utility fixed found corruption, close Command Prompt and then restart Windows 10.
- In case System File Checker fails to fix the issue, execute
DISM /Online /Cleanup-Image /RestoreHealthin the same elevated Command Prompt.
The progress may seem slow in the beginning, but hold your patience and don’t cancel the ongoing process. Once the process ends, a message will appear pointing out if a change has been made. After viewing the message, restart your computer and run the System File Checker command again. Hopefully, the utility will this time replace found corrupt files.
7] Fix hard disk error
When you encounter any blue screen error, there is a high probability that the hard disk drive is either corrupted or damaged. When a disk incurs soft or logical errors, the system fails to read some parts of the drive. These unreadable parts of the hard disk drive are called bad sectors. A bad hard disk doesn’t necessarily mean that the disk drive is physically damaged. Sometimes bad sector refers to software problems and sometimes external damage.
Software-related issues usually take place due to accidental power failure, overheat, and forcibly pulled-out cable. On the other hand, physical damage that refers to a hard bad sector can be a result of production faults, accidental fall down, water damage, etc. To deal with the logical hard disk error, chkdsk command-line utility comes handy. When you execute it in elevated Command Prompt, the tool scans the whole disk volume and fixes found errors automatically. In case of physical damage, you might need to change the hardware.
- Open Command Prompt as admin.
- Copy
chkdsk C: /f /r /xand paste it in the black pane. - Hit – Enter.
- Don’t interrupt the process in between and wait patiently.
- Analyze the outcome the utility shows up.
- If the found issue is resolved, reboot the device. Otherwise, do what the report suggests.
8] Install available Windows update to get rid of FAST_ERESOURCE_PRECONDITION_VIOLATION
Oftentimes users come across FAST_ERESOURCE_PRECONDITION_VIOLATION after installing a recent update. Microsoft after getting reports about the same releases a newer patch that fixes the BSOD automatically. Though the process sometimes takes time, it’s worth waiting as the issue will be resolved all by itself.
If your PC is set to receive the latest Windows update automatically, you don’t need to do anything to get the upcoming patch. Since the bug fix comes through a cumulative update, you also don’t need to apply any previous updates before you install the latest version. To get the update immediately, you can manually check whether it’s available or not. Before you jump into the process, make sure to include drivers in the Windows update. Here are the steps –
- Press – Windows + R.
- In the dialog box, insert – gpedit.msc.
- Click – OK.
- Navigate to – Computer Configuration/Administrative Templates/Windows Components/Windows Update.
- Move to the right pane.
- Double-click – Do not include drivers with Windows Updates.
- Select the radio button set before Disabled.
- Click Apply and then OK.
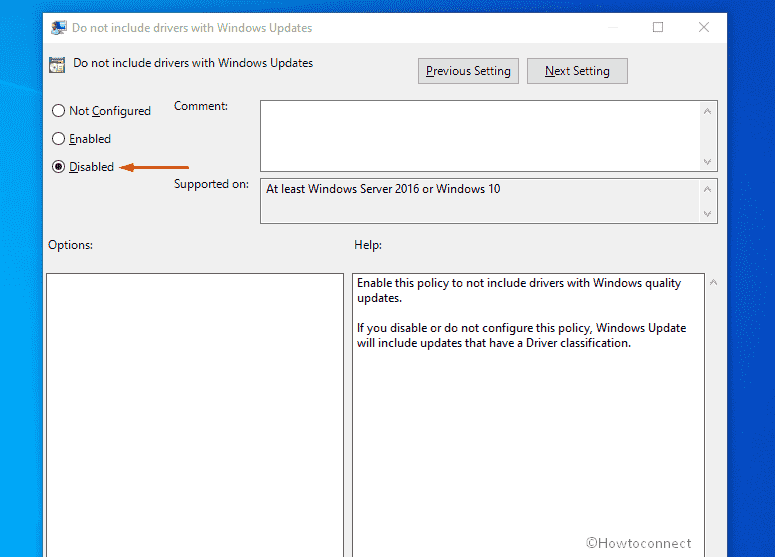
After doing so, you will receive available updates for device drivers every time the system installs a newer Windows patch. Now, let’s see how you can get Windows update manually –
- Press – Windows + I.
- Choose – Update & Security.
- From the right-hand side, click – Check for updates.
- If any newer patch is available, hit – Download
- When the downloading process ends, click – Install now.
- After completion of the installation, hit the button – Restart now.
9] Reinstall faulty Device Driver
If FAST_ERESOURCE_PRECONDITION_VIOLATION continues to occur after rolling back and updating device drivers, check if a faulty driver still exists. For this purpose, Windows 10 has a built-in tool named Driver Verifier. The main work of this utility is to replace the default operating system subroutines with ones that are specifically developed to catch device driver bugs.
When Driver Verifier is active on your system, it monitors and stresses drivers to track down any unusual activity that is giving rise to BSOD. To make use of the utility so that it can detect the troublesome driver, follow the below steps –
- Press – Windows key.
- Write down – verifier.
- Hit – Enter.
- Give permission to User Account Control by clicking – Yes.
- Select the radio button set before Create custom settings (for code developers).
- Click – Next.

- Check all boxes except DDI compliance checking and Randomized low resources simulation.
- Hit – Next.
- Choose the radio button set alongside Select driver names from a list.
- Click – Next.
- Select non-Microsoft drivers.
- Click – Finish.
- To make sure Driver Verifier is running, open Command Prompt first.
- Insert verifier /querysettings in the black pane.
- Hit – Enter.
- If Verifier is running, the system will return a list of drivers.
- In case it doesn’t, perform the below steps once again.
- After being sure, restart the Windows device.
- Use the Windows 10 machine normally.
- When FAST_ERESOURCE_PRECONDITION_VIOLATION shows up this time, Driver Verifier will display the faulty drivers’ name.
Note – This process may take a maximum of 36 hours, but you can force the system by re-creating the scenario that was bringing forth the blue screen error.
- Once you know which driver is the culprit, reinstall the same.
10] Reconnect USB devices
FAST ERESOURCE PRECONDITION VIOLATION BSOD often gets generated by connected peripherals like printers, external hard drives, scanners, and Bluetooth devices. This might happen due to incompatible USB adapters. If this is the real case, disconnect all attached peripherals from the USB ports. After that, restart the PC and see if the blue screen error still exists. If no error shows up, connect all accessories again and while doing so, check if any particular item is triggering the BSOD.
If any specific item is causing the blue screen error, you might need to change the peripheral with a new one. Before doing so, run the hardware troubleshooter first and see if it helps. This utility reviews as well as diagnoses operational or technical problems within a hardware device or peripherals. To run the tool –
- Click – Start icon.
- Type – cmd.
- Press – Ctrl + Shift + Enter.
- To allow User Account Control, click – Yes.
- On Command Prompt, insert the following and hit Enter –
msdt.exe -id DeviceDiagnostic
- When Hardware and Devices Troubleshooter becomes visible, click – Next.
- After analyzing the system, the utility will reveal devices that have problems.
- Opt for the device you want to troubleshoot and click – Next.
- If the tool offers an automatic repair, hit – Apply this fix.
- In the end, click Next to allow the system to restart.
11] Free up disk space to fix FAST_ERESOURCE_PRECONDITION_VIOLATION
If the disk where Windows is installed doesn’t have enough free space, FAST_ERESOURCE_PRECONDITION_VIOLATION may evolve. Besides system failures, low disk space makes the machine laggy and you may fail to use the PC systematically. Each day after every single use, the system stores a considerable number of temporary files. These files mainly include shader cache, browsing data, and downloaded contents, old update files, etc. All of these items are saved in the (C:) drive. After being full, it affects the Windows operation and gives rise to several error codes.
Temporary files are almost useless moreover end up occupying a huge hard disk space if not cleaned regularly. By making enough free space, you can improve PC performance furthermore eradicate some of the unexpected issues. Disk Cleanup is a built-in Windows utility that helps to wipe out unwanted files in bulk amount without affecting the device performance. On top of that, this tool offers free hand to delete any data from categorized sections. To use the utility, here are the steps to follow
- Click the search icon from the taskbar.
- Type in – cleanmgr.
- Hit – Enter.
- When Driver selection pop-up emerges, click – OK.
- From the bottom left, hit – Clean up system files.
- Click – OK.
- Check all the boxes lying under Files to delete segment.
- To start the cleaning up process, click – OK.
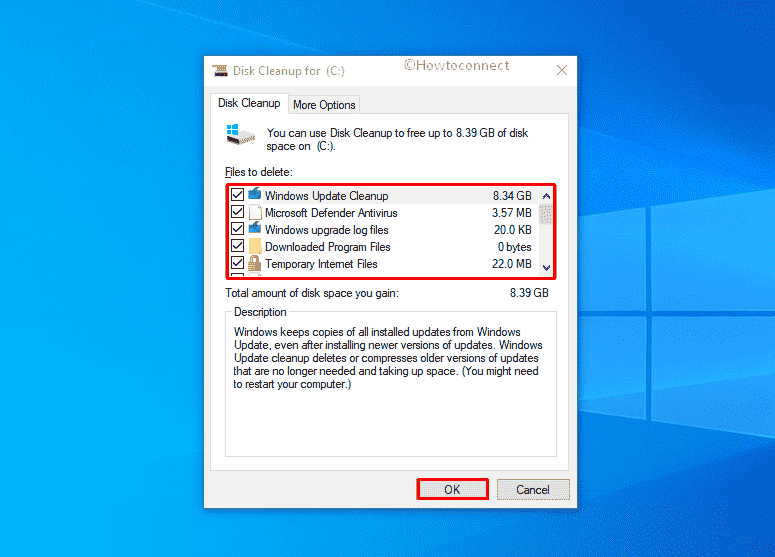
- When the process ends, reboot the Windows device.
12] Uninstall software that causes conflict
When your system has multiple software that is used to accomplish the same task, both can conflict with each other and results in system crashes. Such collisions cause instabilities in your operating system and often lead to component misplacement. When the system fails to get an essential element while carrying out an operation, errors like FAST_ERESOURCE_PRECONDITION_VIOLATION may show up.
Even so, Windows 10 includes a great number of pre-installed software; some advanced apps are needed for specialized tasks. As these programs are easily accessible either from the web or Microsoft store, you may end up installing so many. Some of the applications you get from unauthorized vendors often carry bugs in themselves and cause blue screen errors. Therefore, download software from a trusted source only and also avoid installing apps that you will hardly use. To uninstall unwanted apps, follow the below steps –
- Press – Windows + X.
- Choose – Apps and Features.
- Move to the right pane of the dedicated settings page.
- Look for the applications that have similar congruence.
- When you get any, select the one.
- Click – Uninstall.
- To give final consent, hit – Uninstall.
- Keep following further instructions if any.
- Uninstall all unnecessary applications similarly.
- In the end, restart the device.
13] Test RAM to detect bad sector
RAM is not the main memory module of a device but it plays a significant role to ensure smooth functioning. This memory unit basically stores temporary data while the CPU is executing other tasks. When bad sectors form in it, you will notice unpredictable behavior in your Windows 10 device. In some cases, dreadful blue screen of deaths evolves too.
Bad sectors in RAM usually form due to overheating, sudden power surges, and unexpected restarts. RAM can be faulty because of production fault and accidental fall too. If the issue is non-physical, it gets fixed with few diagnoses in most cases. In case of external damage, you will have to replace the unit with a new one. Before changing the same, run Memory diagnostic tool to know if you have a bad memory module. Follow the way –
- Click – Windows + S.
- In the search bar, insert – mdsched.exe.
- Click – Enter.
- Pick – Restart now and check for problems (Recommended) option.
- Don’t interrupt the process in between and let the utility detect RAM issues.
- Windows 10 will restart normally after the test is completely over.
- You will get the diagnosis report in the notification area.
- In case the utility didn’t find out any issue that means that the RAM is not faulty.
- If there is an error, research the issue and see if it can be fixed.
By default, Memory Diagnostic opts for Standard Mode. This mode is ample for most issues but if you think your RAM needs an advanced test, run the tool again. Press F1 on your keyboard as soon as your computer starts up to see advanced options. Opt for the Extended test for an in-depth examination.
14] Do a Clean Boot to get rid of FAST_ERESOURCE_PRECONDITION_VIOLATION
Oftentimes, third-party programs or services running background conflict with the default ones which later lead to FAST_ERESOURCE_PRECONDITION_VIOLATION. In such a situation, a clean boot can help in troubleshooting. This startup is quite similar to Safe Boot but differs in the action of carrying out tests and diagnoses. The system will also boot with a minimal number of startup applications to make the troubleshooting easier.
When you will clean boot Windows 10, the OS will start with default drivers and startup programs only. Therefore, you can be sure if the blue screen error is originated from any Microsoft or non-Microsoft service. Furthermore, you will also get to know whether a background program is interfering with the system. To start Windows 10 with Clean Boot, imitate the below steps –
- Press – Windows + R.
- In the Run box, put – msconfig.
- Click – OK.
- Doing so will bring forth System Configuration wizard.
- Click the radio button set before Selective startup.
- Uncheck the option – Load startup items.
- Shift to Services tab.
- Check the box present alongside Hide all Microsoft services.
- Click – Disable all.
- Move to Startup tab.
- Click the link – Open Task Manager.
- Select any enabled program and click – Disable.
- Disable all startup applications in this way.
- Close Task Manager.
- When back to System Configuration wizard, click Apply and then OK.
- Reboot Windows.
15] Check Event Viewer to diagnose FAST_ERESOURCE_PRECONDITION_VIOLATION
In most cases, we don’t know what actually caused the blue screen error on Windows 10 PC. As a result, we start deploying all plausible resolutions that usually fix such issues. Some BSODs are pretty hard to recover and the process of troubleshooting may seem disappointing at a point.
In such situations, you might want to find more details about the problem so that the diagnosis process becomes easier. Windows includes a built-in tool named Event Viewer that records details of system crashes, hardware failures, software conflicts, and every other issue. To make use of the tool use these steps –
- Right-click the Start button.
- Select – Event Viewer.
- From left column, double-click – Windows Logs.
- Right-click System and select – Filter Current Log.
- Hit the drop-down menu located beside Logged.
- Opt for a time range when FAST_ERESOURCE_PRECONDITION_VIOLATION appeared.
- Reach to Event level section.
- Click the checkboxes set for Critical and Error options.
- Hit – OK.
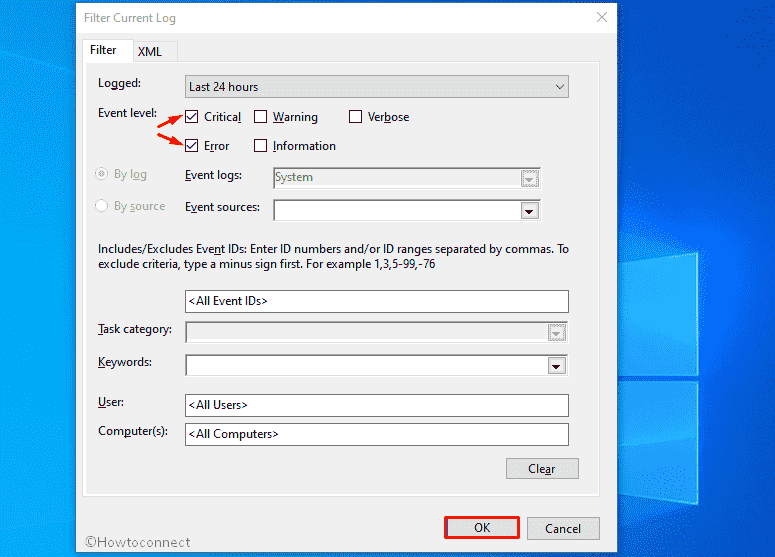
- Open each log to learn more details about the blue screen of death.
- Review event log details and take further steps accordingly.
16] Install the latest and compatible BIOS version
BIOS is one of the main at the same time most delicate components of a Windows 10 machine. Though it’s a software component, many hardware items largely depend on this. The main work of this firmware is to control the data flow between Windows OS and the attached peripherals. When it becomes outdated, various issues may take place including FAST_ERESOURCE_PRECONDITION_VIOLATION. Therefore, it’s necessary to keep the BIOS up-to-date. For that –
- Press – Windows + S.
- Write down – msinfo32.
- Hit – Enter.
- Check the info of BIOS Version/Date.
- Note down the same.
- Close System Information window.
- Open a web browser you prefer.
- Visit the makers’ website of your BIOS.
- Look for the current and most importantly compatible version of BIOS using the previous info got.
- Download the setup file.
- Go to the directory where the system saves downloaded items.
- Double-click the exe file you got.
- Follow on-screen instructions to complete the installation process.
- Lastly, reboot the device.
17] Disable Fast startup to fix FAST_ERESOURCE_PRECONDITION_VIOLATION
Fast Boot is a combination of the computer’s usual shutting down process and Hibernate. When this feature remains active, the system carries over every single process to the next session. To be more specific, this special boot stores the internal information of your system in its memory by the time you switch it off so that Windows starts faster. In order to stop Windows 10 from carrying over any info about FAST_ERESOURCE_PRECONDITION_VIOLATION, disabling fast startup is necessary. To do so –
- Right-click the battery icon from the system tray.
- Choose – Power Options.
- From the left overlay, click – What the power buttons do.
- Hit the link that says – Change settings that are currently unavailable.
- Uncheck the box set before Turn on fast startup (recommended).
- Click – Save Changes.
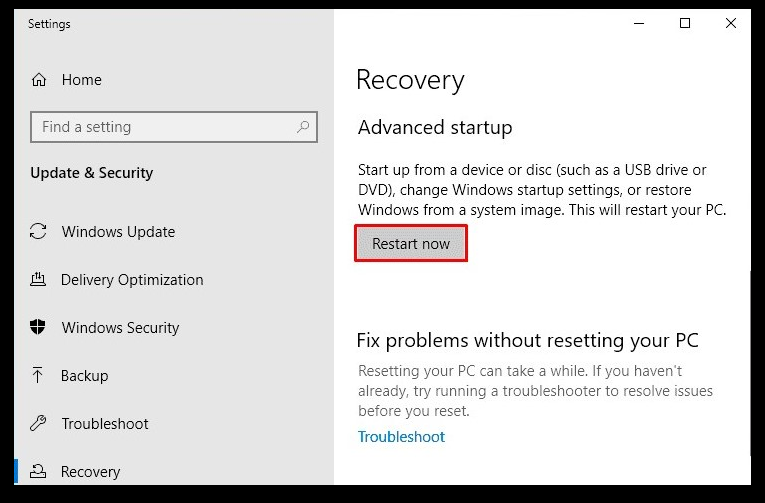
18] Diagnose Windows 10 with automatic repair
When Windows fails to boot due to a blue screen error or any other startup issue, try out the Automatic repair that the OS offers. This startup repair comes into action at the third boot and immediately starts diagnosing the issue. Once activated, the utility scans system files, registry settings, configuration settings and runs other diagnosis tools too.
This startup repair is set to run automatically but some of you prefer to keep it disabled as it often leads to an unexpected repair loop. If you also turned it off earlier, enable the repair mode manually so that the tool starts working again. Here are the steps to follow –
- Open Windows Settings app.
- Select – Update & Security.
- From the left column, select – Recovery.
- Click Restart now located beneath Advanced startup.
- Select Troubleshoot =>Advanced options => Startup Repair each in turn.
- When Automatic Repair page shows up, provide credentials of your account.
- Click – Continue.
- After completion of the diagnosis process, check if the issue still persists.
19] Load previous error-free state
Sometimes FAST_ERESOURCE_PRECONDITION_VIOLATION arises after installing new software or making changes in the settings or services. This mainly happens if the new changes don’t go with the system configuration or these modifications tweaked the registry wrongly. If you can’t be sure which change actually causing BSOD, go back to an earlier state where the OS was working error-free. To accomplish this process, follow the below process –
- Press – Windows key.
- Write down – rstrui.
- Press – Enter.
- When System Restore wizard appears, click – Next.
- Pick a restore point available there.
- Click – Scan for affected programs.
- Select the applications you want to wipe out.
- Go back to System Restore wizard.
- Click – Next.
- To start restoring process, hit – Finish.
20] Reinstall Windows 10
Clean install is the last resort to try out right now. Once you install the system afresh, all content related to user files will be removed from the local disk. Doing so oftentimes fixes errors like FAST_ERESOURCE_PRECONDITION_VIOLATION too. Here is how to proceed –
- Visit Software Download webpage that Microsoft offers.
- Click – Download tool now.
- Double-click the setup file you just got.
- To approve appeared User Account Control, click – Yes.
- When setup wizard turns up, click – Accept.
- Select – Create installation media (USB flash drive, DVD, or ISO file) for another PC.
- Hit – Next.
- Check whether the Language, Edition, and Architecture are set correctly.
- Click – Next.
- Choose – ISO file.
- Hit – Next.
- Select a location where you want to save the setup file.
- Click – Save.
- After that, hit – Finish.
- Visit the directory where you saved the file.
- Double-click the setup file.
- Follow on-screen guidelines to complete the installation process.
Methods list
1] Boot to Safe Mode with Networking
2] Disable random shutdown
3] Check for malware
4] Rollback driver update
5] Uninstall Windows 10 update
6] Resolve corrupted system elements
7] Fix hard disk error
8] Install available Windows update
9] Reinstall faulty Device Driver
10] Reconnect USB devices
11] Free up disk space
12] Uninstall software that causes conflict
13] Test RAM to detect bad sector
14] Do a Clean Boot
15] Check Event Viewer to diagnose FAST_ERESOURCE_PRECONDITION_VIOLATION
16] Install the latest and compatible BIOS version
17] Disable Fast startup
18] Diagnose Windows 10 with automatic repair
19] Load previous error-free state
20] Reinstall Windows 10
That’s all!!!
Repair any Windows problems such as Blue/Black Screen, DLL, Exe, application, Regisrty error and quickly recover system from issues using Reimage.
by Vladimir Popescu
Being an artist his entire life while also playing handball at a professional level, Vladimir has also developed a passion for all things computer-related. With an innate fascination… read more
Updated on February 11, 2022
- With the proper guidance, the fast_eresource_precondition_violation error in Windows 10 can be solved in just a few steps.
- Using specialized and reliable software is one of the most recommended ways of solving this BSOD error.
- Fixing the existing hard disk errors is another quick way of solving the error.
- Another quick way of solving this BSOD error is by freeing up some of the disk space following the steps presented here.

XINSTALL BY CLICKING THE DOWNLOAD FILE
This software will repair common computer errors, protect you from file loss, malware, hardware failure and optimize your PC for maximum performance. Fix PC issues and remove viruses now in 3 easy steps:
- Download Restoro PC Repair Tool that comes with Patented Technologies (patent available here).
- Click Start Scan to find Windows issues that could be causing PC problems.
- Click Repair All to fix issues affecting your computer’s security and performance
- Restoro has been downloaded by 0 readers this month.
The Fast_eresource_precondition_violation error in Windows 10 error, usually comes with a Blue Screen of death and can occur suddenly.
The Windows 10 BSOD errors can be addressed easily with the right tool and usually, the most common cause has to do with outdated drivers.
We will show you in this article the exact steps you need to make in order to solve this BSOD error quickly.
How can I fix the blue screen error fast eresource precondition violation?
1. Boot in safe mode
- in the search box, type advanced startup and hit Enter,
- In the right pane, locate and click on Restart now.

- Next, select Troubleshoot and click on Advanced options.
- Here, select Startup Settings and click on Restart.
- When the system starts, press 5 or F5 to enable the Safe Mode.
2. Disable random shutdown
- Press the Windows key and type in advanced system settings.
- Under the Startup and recovery, click on the Setting option.
- Deselect the checkbox placed before Automatically restart.
- Click Ok and close the System Properties window.
3. Use a specialized software
Considering that the BSOD errors are rather complex, using software that will help you scan the entire device and fix the cause of the Blue Screen error is indicated.
To repair this kind of error you should best use automated support capable of scanning the PC and replacing damaged files accordingly.
This solution comes with a repository containing millions of files which you can use to replace malfunctioning software files and clean up your system efficiently.
⇒ Get Restoro
4. Uninstall Windows 10 update
- Press the Windows key and type in view update history.
- Click on the Uninstall updates option.
- Locate the Microsoft Windows section and click Uninstall.
- Follow the instructions on the screen and reboot the device once finished.
5. Fix hard disk error
- Open the command prompt as an administrator.
- Enter the following command:
chkdsk C: /f /r /x - Wait for the process to finish and follow the instructions.
- Reboot once the scan is completed.
6. Free up disk space
- In the search bar, type in cleanmgr.
- Click OK in the next window and go to Clean up system files.
- In the Files to delete segment check all boxes and hit OK.

- Wait for the process to end, and reboot your device.

One of the presented solutions above will help you successfully solve the fast_eresource_precondition_violation error in Windows 10.
Please share with us in the comments section below, which of the presented solutions helped you fix the error.
Still having issues? Fix them with this tool:
SPONSORED
If the advices above haven’t solved your issue, your PC may experience deeper Windows problems. We recommend downloading this PC Repair tool (rated Great on TrustPilot.com) to easily address them. After installation, simply click the Start Scan button and then press on Repair All.
![]()
Newsletter
Question
Issue: How to fix FAST_ERESOURCE_PRECONDITION_VIOLATION error in Windows 10?
Hello, yesterday I was playing a game and, suddenly, my PC started buzzing, which then resulted in a Blue Screen with an error FAST_ERESOURCE_PRECONDITION_VIOLATION. Sadly, this repeated again later. Is there anything I can do to fix this?
Solved Answer
FAST_ERESOURCE_PRECONDITION_VIOLATION is a Blue Screen of Death[1] error that can occur at any time when operating a Windows machine, although users have reported that it is more common during intensive resource usages such as gaming or watching/editing HD videos. Without a doubt, BSODs are very annoying and might not only cause the loss of data but also indicate that something is wrong with the operating system.
FAST_ERESOURCE_PRECONDITION_VIOLATION has a bug check of 0x000001C6 and can be caused by various system files, including volmgr.sys or ntoskrnl.exe. While there could be many causes to this issue to arise, most commonly, it is caused by changes made within the OS, such as installing incompatible software or changing hardware components (incorrectly installing them) or incompatible/corrupted drivers.[2]
The Blue Screen error does not explain much when it occurs, however, and only shows the standard Windows 10 error message:
Your device ran into a problem and needs to restart. We’re just collecting some error info, and then we’ll restart for you.
0% complete
If you call a support person, give them this info:
Stop code: FAST_ERESOURCE_PRECONDITION_VIOLATION
If you have encountered this message just once, you shouldn’t be worried and continue your work on Windows as per usual. However, if the BSOD shows up multiple times, that means that something is definitely wrong, and you should fix FAST_ERESOURCE_PRECONDITION_VIOLATION error as soon as possible.
Below you will find several methods that could help you find the solution to the problem. Keep in mind that there are several different causes for the error to occur, so not all fixes below will work for everyone. Thus, simply check each of the methods one-by-one.

If you want a quick FAST_ERESOURCE_PRECONDITION_VIOLATION fix, we recommend you skip the tedious job of troubleshooting and employ the ReimageMac Washing Machine X9 repair tool instead. It can find and solve Windows issues automatically, especially those that are related to BSODs, missing DLLs, registry[3] errors, etc.
Fix 1. Check your drivers
Fix it now!
Fix it now!
To repair damaged system, you have to purchase the licensed version of Reimage Reimage.
Since the BSOD can be related to drivers, we highly recommend you update all of them. There are three methods you can do that:
Update via the device manager
- Right-click on Start and select Device Manager
- Expand the section you want to update, e.g., Display adapters
- Right-click on your graphics card and select Update driver
- In the new window, pick Search automatically for driver software
- Reboot your PC.

Get drivers from manufacturer’s website
Device Manager is by far not an optimal way to download the latest drivers. If you are dealing with driver problems, it is highly recommended not to rely on this tool. In order to update your drivers, you need to make the make and the model of your hardware and then visit the manufacturer’s website. There, download the driver that is compatible with your hardware, install it, and reboot the device.
Use and automatic tool to download and install the latest drivers
The methods described above can be extremely time-consuming and rather stressful. There is always a risk of installing the wrong drivers, especially for those who are not that computer savvy. If you are one of those people and want a quick solution for your drivers, download and install DriverFix. This software will download and install the latest compatible drivers for you within just a few minutes.
Fix 2. Run SFC and DISM scans
Fix it now!
Fix it now!
To repair damaged system, you have to purchase the licensed version of Reimage Reimage.
- Type in cmd in Windows search
- Right-click on Command Prompt search result and click Run as administrator
- In the new window type in sfc /scannow and press Enter
- As soon as the scan finishes, Windows will report whether integrity violations were found and if they could be fixed. If SFC says that it can’t repair found errors, paste the following commands, pressing Enter after each:
Dism /Online /Cleanup-Image /CheckHealth
Dism /Online /Cleanup-Image /ScanHealth
Dism /Online /Cleanup-Image /RestoreHealth

Fix 3. Check your memory with Windows Memory Diagnostic
Fix it now!
Fix it now!
To repair damaged system, you have to purchase the licensed version of Reimage Reimage.
- Type in Memory in Windows search and press Enter
- Once the new window pops up, select Restart now and check for problems (recommended)
- This will automatically restart your computer and perform a memory check.

Fix 4. Run chkdsk command in Command Prompt
Fix it now!
Fix it now!
To repair damaged system, you have to purchase the licensed version of Reimage Reimage.
Hard disk errors can be one of the main causes of BSOD errors. Thus, you should check your disk for errors as follows:
- Open Command Prompt as administrator as described above
- In the new window, type in the following command and press Enter:
chkdsk C: /f /r /x - Wait for the scan to finished and then restart your computer.
Fix 5. Perform a clean boot
Fix it now!
Fix it now!
To repair damaged system, you have to purchase the licensed version of Reimage Reimage.
If the problem stops in clean boot, it means that the problem lies within some software or software driver. You can then uninstall recently installed applications. Alternatively, you can use a System Restore – we describe how to do it in the next step
Fix 6. Use System Restore
Fix it now!
Fix it now!
To repair damaged system, you have to purchase the licensed version of Reimage Reimage.
If clean boot helped you to get rid of the problem, you could use System Restore to bring your computer to an earlier date, where error did not occur. Here’s how:
- Type in rstrui.exe in Windows search and press Enter
- Select Choose a different restore point and click Next
- Tick the Show more restore points if such option is available
- Pick an adequate restore point, click Next and Finish
- Your computer will reboot and be brought back to an earlier date.

Fix 7. Reset Windows
Fix it now!
Fix it now!
To repair damaged system, you have to purchase the licensed version of Reimage Reimage.
If none of the above solutions helped you, you could reset Windows. You will not lose your personal files, but you might have to reinstall some apps.
- Right-click on Start and pick Settings
- Go to Update & Security and pick Recovery
- Find Reset this PC section and click Get Started
- Select Keep my files and pick Cloud download
- Wait till Windows installs the required files and finalize the process.

Repair your Errors automatically
ugetfix.com team is trying to do its best to help users find the best solutions for eliminating their errors. If you don’t want to struggle with manual repair techniques, please use the automatic software. All recommended products have been tested and approved by our professionals. Tools that you can use to fix your error are listed bellow:
do it now!
Download Fix
Happiness
Guarantee
do it now!
Download Fix
Happiness
Guarantee
Compatible with Microsoft Windows
Compatible with OS X
Still having problems?
If you failed to fix your error using Reimage, reach our support team for help. Please, let us know all details that you think we should know about your problem.
Reimage — a patented specialized Windows repair program. It will diagnose your damaged PC. It will scan all System Files, DLLs and Registry Keys that have been damaged by security threats.Reimage — a patented specialized Mac OS X repair program. It will diagnose your damaged computer. It will scan all System Files and Registry Keys that have been damaged by security threats.
This patented repair process uses a database of 25 million components that can replace any damaged or missing file on user’s computer.
To repair damaged system, you have to purchase the licensed version of Reimage malware removal tool.

A VPN is crucial when it comes to user privacy. Online trackers such as cookies can not only be used by social media platforms and other websites but also your Internet Service Provider and the government. Even if you apply the most secure settings via your web browser, you can still be tracked via apps that are connected to the internet. Besides, privacy-focused browsers like Tor is are not an optimal choice due to diminished connection speeds. The best solution for your ultimate privacy is Private Internet Access – be anonymous and secure online.
Data recovery software is one of the options that could help you recover your files. Once you delete a file, it does not vanish into thin air – it remains on your system as long as no new data is written on top of it. Data Recovery Pro is recovery software that searchers for working copies of deleted files within your hard drive. By using the tool, you can prevent loss of valuable documents, school work, personal pictures, and other crucial files.
In this blog post, let’s learn about the Windows BSOD (Blue Screen of Death) error “0x000001C6 – FAST_ERESOURCE_
PRECONDITION_VIOLATION” with the details on why this error appears on your Windows 10 or Windows 11 PC
What is the Blue Screen of Death (BSOD) error in Windows?
Before you wanted to know about this specific BSOD Error 0x000001C6 – FAST_ERESOURCE_
PRECONDITION_VIOLATION, it is important to first understand what exactly is this Blue Screen of Death error.
Officially referred to as a Stop error or Blue Screen error, the Blue Screen of Death (BSoD) is an error screen in Windows 10 or Windows 11 that usually displays the fatal system error. It usually means a system crash and is an indication of an serious problem on your PC.
Every BSOD error includes a STOP Code which can help you to troubleshoot your PC to fix this error.
Error Message
0x000001C6 – FAST_ERESOURCE_
PRECONDITION_VIOLATION
Reason for the Error
A current thread is carrying out an invalid call to a fast resource routine.
Permalink
Cannot retrieve contributors at this time
| title | description | keywords | ms.date | topic_type | api_name | api_type | ||
|---|---|---|---|---|---|---|---|---|
|
Bug Check 0x1C6 FAST_ERESOURCE_PRECONDITION_VIOLATION |
The FAST_ERESOURCE_PRECONDITION_VIOLATION bug check has a value of 0x000001C6. It indicates that the current thread is performing an invalid call to a fast resource routine. |
|
01/11/2019 |
apiref |
FAST_ERESOURCE_PRECONDITION_VIOLATION |
NA |
Bug Check 0x1C6: FAST_ERESOURCE_PRECONDITION_VIOLATION
The FAST_ERESOURCE_PRECONDITION_VIOLATION bug check has a value of 0x000001C6. It indicates that a current thread is performing an invalid call to a fast resource routine.
[!IMPORTANT]
This topic is for programmers. If you are a customer who has received a blue screen error code while using your computer, see Troubleshoot blue screen errors.
FAST_ERESOURCE_PRECONDITION_VIOLATION Parameters
| Parameter | Description |
|---|---|
| 1 | Violation type. See values below. |
| 2 | See values below. |
| 3 | See values below. |
| 4 | See values below. |
Violation type
            0x0 : The Irql of the caller was greater than the maximum allowed
                  Irql for the routine.
                2 - Irql of the caller.
                3 - Maximum allowed Irql of the routine.
            0x1 : The caller specified an invalid (i.e. uninitialized) owner
                  entry.
                2 - Pointer to the owner entry.
            0x2 : The caller specified an owner entry that was already
                  associated with a lock acquisition.
                2 - Pointer to the owner entry.
                3 - Pointer to the resource to which the owner entry is already
                    associated.
            0x3 : The caller passed a legacy resource to a fast resource
                  routine.
                2 - Pointer to the resource.
            0x4 : The caller specified a resource that has outstanding lock
                  acquisitions.
                2 - Pointer to the resource.
            0x5 : The caller was executing inside of a DPC.
            0x6 : The caller was executing inside of a Special Kernel APC.
            0x7 : The caller did not ensure Normal Kernel APCs were disabled.
            0x8 : The caller specified an owner entry that was not associated
                  with a lock acquisition of the specified resource.
                2 - Pointer to the resource specified.
                3 - Pointer to the owner entry.
                4 - Pointer to the resource with which the owner entry is
                    associated.
            0x9 : The caller specified an owner entry that was not associated
                  with the calling thread.
                2 - Pointer to the owner entry.
                3 - Pointer to the thread with which the owner entry is
                    associated.
            0xa : The caller specified an owner entry which has been disowned.
                2 - Pointer to the owner entry.
            0xb : The caller specified an owner entry with a different
                  acquisition type than the caller indicated.
                2 - Pointer to the owner entry.
                3 - High-16 bits indicate the acquisition type of the owner
                    entry. Bottom-16 bits indicate the acquisition type
                    specified. 1 = Shared, 0 = Exclusive.
            0xc : The caller specified an owner entry that was not associated
                  with a lock acquisition of the specified resource.
                2 - Pointer to the resource specified.
                3 - Pointer to the owner entry.
                4 - Pointer to the resource with which the owner entry is
                    associated.
            0xd : The caller specified an owner entry that has not been
                  disowned.
                2 - Pointer to the owner entry.
            0xe : The caller passed a fast resource to a legacy routine that
                  does not support fast resources.
                2 - Pointer to the resource.
            0xf : The caller passed a fast resource to a legacy routine that
                  supports fast resources, but the fast resource was not
                  initialized with EX_FAST_RESOURCE_ENABLE_LEGACY_APIS.
                2 - Pointer to the resource.
            0x10 : The caller passed invalid flags to ExInitializeFastResource.
                2 - Pointer to the resource specified.
                3 - The flags specified.
            0x11 : The caller passed a thread other than the current thread to
                   ExReleaseResourceForThreadLite.
                2 - Pointer to the resource specified.
                3 - The thread specified.
            0x12 : The caller attempted to disown a resource that had been
                   recursively acquired exclusive by the current thread.
                2 - Pointer to the resource specified.
            0x13 : The caller attempted to convert a resource acquisition while
                   the calling thread had outstanding recursive acquisitions of
                   the resource.
                2 - Pointer to the resource specified.
            0x14 : A thread exited with outstanding lock acquisitions.
                2 - The thread.
                3 - Pointer to one of the outstanding owner entries.
            0x15 : A thread exited with outstanding disowned lock acquisitions.
                2 - The thread.
                3 - Pointer to one of the outstanding owner entries.
            0x16 : A call to ExConvertExclusiveToSharedLite was made by a thread
                   that did not hold the specified resource exclusive.
                2 - Pointer to the resource.
                3 - Pointer to the thread.
Cause
The current thread is performing an invalid call to a fast resource routine.
Resolution
The !analyze debug extension displays information about the bug check and can be helpful in determining the root cause.
See Also
Bug Check Code Reference
FAST_RESOURCE_PRECONDITION_VIOLATION is a BSOD (Blue Screen) error that can occur at any time while working on a Windows computer. As a rule, it appears with heavy use of resources, for example, when playing games or watching / editing HD video. In addition to the fact that the problem can cause data loss, it also indicates that something is wrong with the operating system.
FAST_RESOURCE_PRECONDITION_VIOLATION has verification code 0x000001C6. The error can be caused by various system files including volmgr.sys and ntoskrnl.exe. And although there are many reasons for its appearance, most often it is associated with changes made to the OS, such as installing incompatible software or changing hardware components (loading them incorrectly), as well as incompatible / damaged drivers. Below are several solutions, each of which will be useful in different situations.
Solution 1: Check drivers for errors
Since BSODs can be associated with drivers, the first step is to check their status for errors and available updates.
- Right click on the Windows icon and select Device Manager.
- Expand the Video adapters section, and then update each of the drivers by right-clicking on them and the corresponding item.
- In the next window, select Search automatically for updated software.
- Wait for the installation and reboot the system.
In addition, you can go to the official website of the developer of the driver you have installed, and download the current software from there. To upgrade in this way, you must specify the make and model of your equipment.
Solution 2. Run SFC and DISM scan
How to start:
- Right-click on the Windows icon and select Command Prompt (Admin).
- In the system window that opens, enter the sfc / scannow command, and press Enter.
- Wait for the scan to finish.
- Reboot the system if any fixes have been made.
- If the SFC says it cannot fix the errors it finds, paste the following commands, pressing Enter after each one:
Dism / Online / Cleanup-Image / CheckHealth;
Dism / Online / Cleanup-Image / ScanHealth;
Dism / Online / Cleanup-Image / RestoreHealth.
Solution 3: Check your computer memory using Windows diagnostics
Start-up instructions:
- Search Windows: Memory Checker and select the appropriate option.
- When a new window appears, click Reboot and Verify.
- This will automatically reboot the system and perform a memory check.
- Beforehand, it is worth saving all documents and processes running on the computer.
Solution 4. Run chkdsk command
Hard disk errors can be one of the main causes of blue screens. Therefore, you need to check it for errors. This is done as follows:
- Open Command Prompt as Administrator as mentioned in the second solution.
- In the system window, enter the following: chkdsk C: / f / r / x
- Press Enter and wait for the scan to complete and then restart the system.
Solution 5: Perform a clean boot
Manual:
- Right-click on the Windows icon and select Run.
- In the window that opens, enter msconfig and click OK.
- In the System Configuration window, click the Services tab.
- Select the Do not display Microsoft services check box.
- Then disable all remaining services by clicking Disable All and Apply;
- Next, go to the Startup tab and select Open Task Manager.
- Disable all non-Windows startup items.
- Return to the System Configuration window and click the Boot tab.
- Check the Safe Mode option, click Apply and Ok.
- After that, Windows will restart.
If the error in this mode is resolved, it means that the problem is with some software or driver. You should remove recently installed applications, and check the system performance, thus calculating incompatible software.
Solution 6. Use system restore
An alternative to the previous solution is System Restore. This method rolls back Windows settings to the previous saved state when everything was working fine. It should be borne in mind that all components installed later than the return point will be removed. However, the save files will remain and after reloading the deleted programs and games, you can continue to work with them.
- Go to the Control Panel by right-clicking on the Windows icon.
- Go to the Recovery section and start the system recovery.
- In the next window, click Next.
- Check the Show other restore points checkbox, and select the date when the computer was stable.
- Click Next and follow the system prompts.
The device will reboot in the process, so save any open documents first.
Solution 7. Reset Windows to original settings
If none of the above solutions helped, the last resort is to reset Windows to its original settings. This process will not remove your personal files, but you will need to reinstall some programs and applications. In particular, browsers will be uninstalled, so first export your bookmarks to the cloud storage, or simply save them in a separate file.
- Go to the Control Panel again as described in the previous option.
- Go to the Recovery section and select PC Settings.
- Click the General tab and select Recover your PC without deleting files.
- Follow the further instructions of the system.
- Then wait for Windows to install the required files and complete the process.
After resetting the system, you need to check if the automatic installation of Windows updates is enabled, or to download the updates manually.
Earn points and exchange them for valuable prizes – details