![]()
Загрузить PDF
![]()
Загрузить PDF
Из этой статьи вы узнаете, как установить программу FFmpeg на компьютере под управлением Windows 10. FFmpeg — это программа, которая управляется из командной строки и которая конвертирует видео- и аудио-файлы в разные форматы, а также позволяет создавать аудио- и видео-файлы.
-

1
Откройте сайт, на котором можно скачать программу FFmpeg. Перейдите на страницу https://ffmpeg.zeranoe.com/builds/ в веб-браузере компьютера.
- Установочный файл можно скачать и с официального сайта FFmpeg, но этот файл не поддерживает Windows 10.
-
2
Нажмите Download Build (Скачать сборку). Это синяя кнопка в правой части страницы. Будет скачан архив с программой FFmpeg.
- Возможно, сначала вам придется указать папку для загрузок или подтвердить загрузку.
-
3
Распакуйте скачанный архив. Для этого дважды щелкните по скачанному ZIP-файлу.
-
4
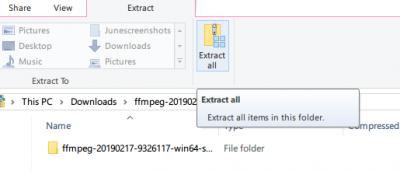
Извлеките папку с программой FFmpeg. Для этого воспользуйтесь встроенным в Windows архиватором:
- перейдите на вкладку «Извлечь» в верхней части окна;
- нажмите «Извлечь все»;
- нажмите «Извлечь» в нижней части окна;
- дождитесь, когда откроется окно.
-
5
Переименуйте извлеченную папку. Переименуйте извлеченную папку «ffmpeg-20180424-d9706f7-win64-static» в «FFmpeg». Для этого:
- щелкните по папке один раз, чтобы выбрать ее;
- перейдите на вкладку «Главная» в верхней части окна;
- нажмите «Переименовать» в разделе «Упорядочить» на панели инструментов;
- введите FFmpeg, а затем нажмите ↵ Enter.
-
6
Скопируйте папку «FFmpeg». Выделите эту папку и нажмите Ctrl+C.
- Чтобы вырезать (а не скопировать) папку, нажмите Ctrl+X.
-
7
Щелкните по Этот компьютер. Эта опция находится на левой панели окна; если вы не видите ее, прокрутите панель вверх. Откроется окно «Этот компьютер».
-
8
Откройте жесткий диск. Для этого дважды щелкните по имени жесткого диска (например, C:) в разделе «Устройства и диски» посередине окна.
- Если в разделе «Устройства и диски» ничего нет, нажмите «Устройства и диски» один раз, чтобы отобразить имена дисков.
-
9
Вставьте папку «FFmpeg». Щелкните по пустому пространству открытого окна с содержимым жесткого диска, а затем нажмите Ctrl+C. Папка «FFmpeg» будет добавлена на жесткий диск компьютера. Теперь можно активировать FFmpeg в командной строке.
Реклама


-
1
Щелкните по Этот компьютер. Эта опция находится на левой панели окна; если вы не видите ее, прокрутите панель вверх. Откроется окно «Этот компьютер».
- Если вы закрыли окно Проводника, нажмите «Пуск»
, введите этот компьютер и нажмите «Этот компьютер» в верхней части меню «Пуск».
- Если вы закрыли окно Проводника, нажмите «Пуск»
-
2
Щелкните по Компьютер. Эта вкладка находится в верхней левой части окна «Этот компьютер».
-
3
Нажмите Параметры. Эту красную галочку на белом фоне вы найдете в верхней левой части окна. Откроется окно «Параметры».
-
4
Щелкните по Дополнительные параметры системы. Эта ссылка находится в верхней левой части окна «Параметры». Откроется новое окно.
-
5
Нажмите Переменные среды. Вы найдете эту кнопку в нижней части окна. Откроется еще одно окно.
- Если вы не видите эту опцию, сначала нажмите на вкладку «Дополнительно» в верхней части окна.
-
6
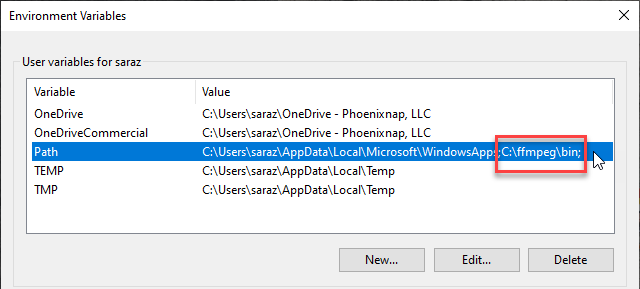
Дважды щелкните по переменной Path. Вы найдете ее в разделе «Переменные среды пользователя для [имя]» в верхней части окна. Откроется окно переменной «Path».
- Если вы не видите переменную «Path», прокрутить указанный раздел вверх или вниз.
- Если вы хотите активировать FFmpeg для всех пользователей на этом компьютере, дважды щелкните по переменной «Path» в разделе «Системные переменные» в нижней части окна.
-
7
Нажмите Создать. Эта кнопка находится в правой части окна. В окне будет создано новое текстовое поле.
-
8
Введите путь к папке «FFmpeg». Введите C:FFmpegbin в текстовом поле, а затем нажмите «OK».[1]
-
9
Щелкните по OK в обоих открытых окнах. Теперь программа FFmpeg активирована. Если хотите, проверьте, правильно ли установлена программа FFmpeg.
Реклама


-
1
Откройте меню «Пуск»
. Нажмите на логотип Windows в нижнем левом углу экрана.
-
2
Найдите командную строку. Введите command prompt в меню «Пуск». Значок командной строки отобразится в верхней части меню «Пуск».
-
3
Откройте командную строку в качестве администратора. Щелкните правой кнопкой мыши по «Командная строка»
в верхней части меню «Пуск», нажмите «Запуск от имени администратора», а затем нажмите «Да», когда появится запрос.
-
4
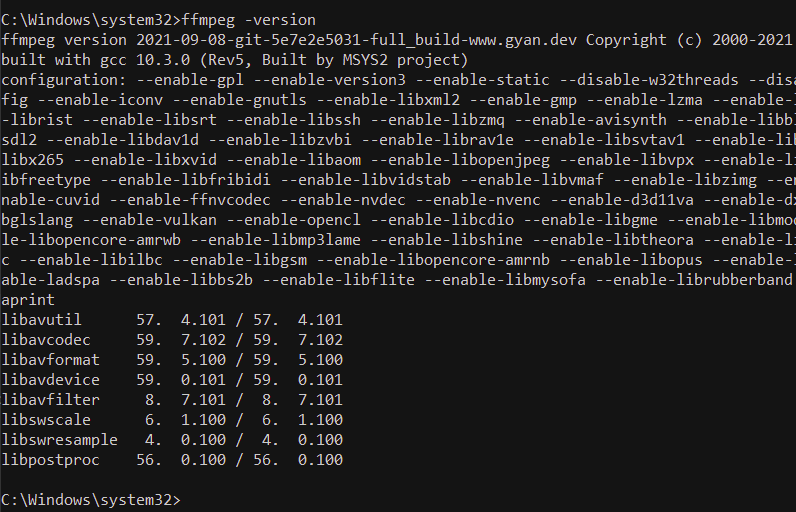
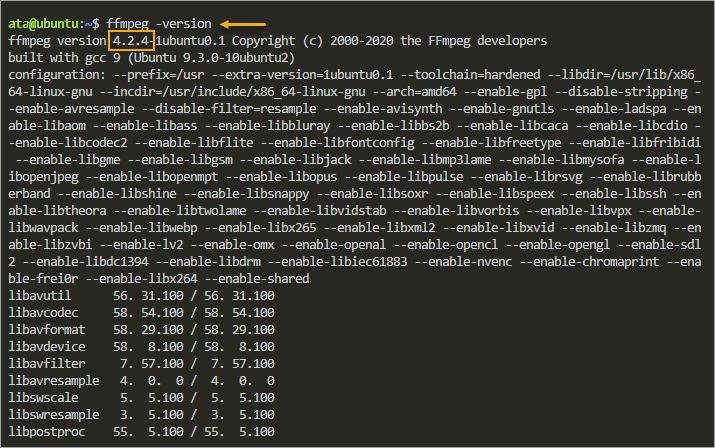
Узнайте версию FFmpeg. Введите ffmpeg -version и нажмите ↵ Enter. На экране отобразится информация о FFmpeg.
- Если команда «ffmpeg» не распознается как внутренняя или внешняя команда, открывается исполняемая программа или командный файл, возможно, вы ошиблись, когда вводили путь к папке с программой.
Реклама


Советы
- Те, кто умеет пользоваться командной строкой, с помощью FFmpeg быстро преобразуют проприетарные видеоформаты (например, .WMA) в обычные видеофайлы (например, .MP4).
- В Windows 10 есть и командная строка, и программа PowerShell. Обе программы схожи, но для FFmpeg лучше пользоваться командной строкой.
Реклама
Предупреждения
- Программа FFmpeg работает исключительно из-под командной строки (то есть команды вводятся в командной строке). Это довольно сложно для неопытных пользователей.
- Чтобы установить FFmpeg, войдите в систему как администратор.
Реклама
Об этой статье
Эту страницу просматривали 126 823 раза.
Была ли эта статья полезной?
Introduction
FFmpeg is a command-line audio and video converter available for Linux, macOS, and Windows. This open-source tool helps users manipulate multimedia content and offers free access to several audio and video libraries.
Even though FFmpeg doesn’t have a clickable GUI, the installation process is straightforward.
In this guide, you will learn how to install FFmpeg on Windows in four simple steps.
Prerequisites
- A system running Windows (This tutorial uses Windows 10).
- A file archiver (This guide uses 7-Zip).
- Command Prompt or Windows PowerShell access.
- Administrator privileges.
How To Install FFmpeg on Windows
Installing FFmpeg on Windows requires adding the utility to the Windows PATH. Additionally, users can manually navigate to the folder containing the executable and run the program. However, the process is time-consuming and impractical.
A straightforward way to work with FFmpeg is to add it to PATH by editing Windows environment variables. Therefore, Windows knows where to look for the executable. Users can run FFmpeg directly from the command line without typing in the full path to the app’s folder.
Step 1: Download FFmpeg for Windows
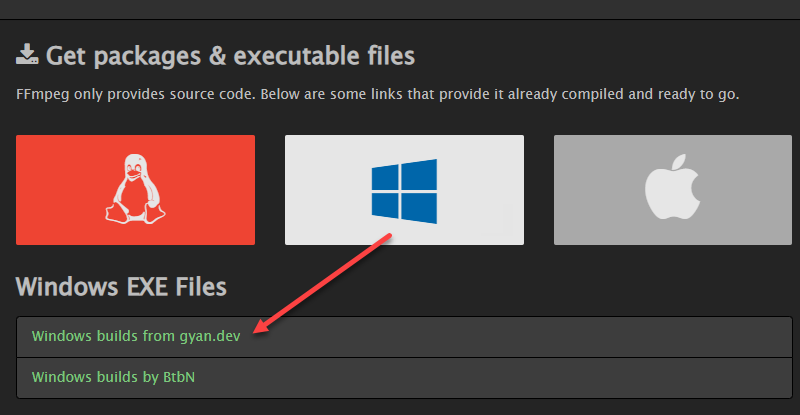
Visit the FFmpeg download page. The More downloading options section has FFmpeg packages and executable files for Linux, Windows, and Mac. To get the Windows version:
1. Hover over the Windows logo and click the Windows builds from gyan.dev link. A new page opens.
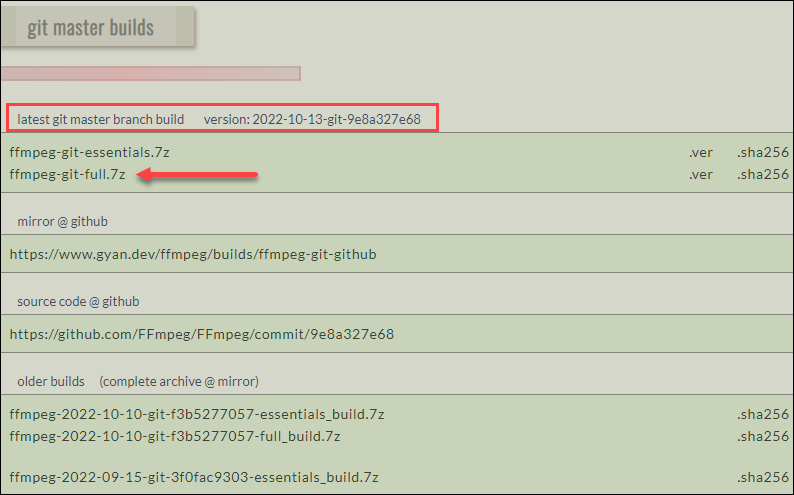
2. In the git master builds section, look for the latest version of the FFmpeg build. Click the ffmpeg-git-full-7z link to download the full build since that version has the most up-to-date libraries.
3. Choose the download location and save the file if the download does not start automatically.
Note: This guide uses the Windows build from gyan.dev. Other builds are available for download, like the one by BtbN. No official documentation confirms any significant differences between different builds.
Step 2: Extract the Downloaded Files
Once downloaded, extract the contents:
1. Locate the downloaded file. The default location is the Downloads folder.
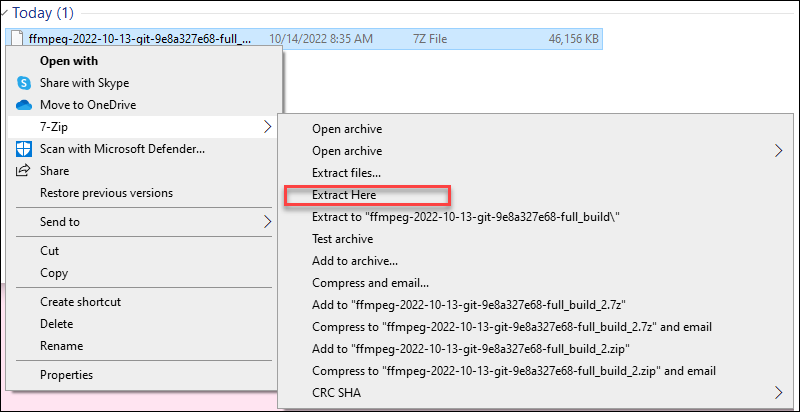
2. Right-click the file and hover over 7-Zip (or another file archiver of choice).
3. From the archiver submenu, choose Extract here. Wait for a few seconds for the extracting process to complete.
5. Rename the extracted folder to ffmpeg.

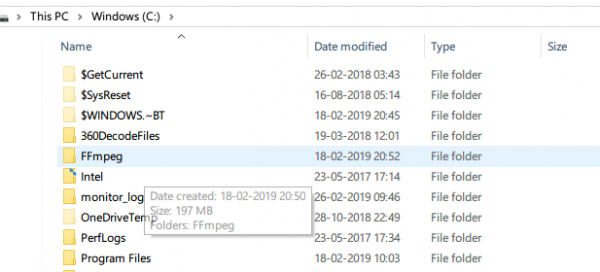
6. Move the folder to the root of the C drive or the folder of your choice.

Step 3: Add FFmpeg to PATH
Set Windows environment variables to add FFmpeg to the PATH. Follow these steps:
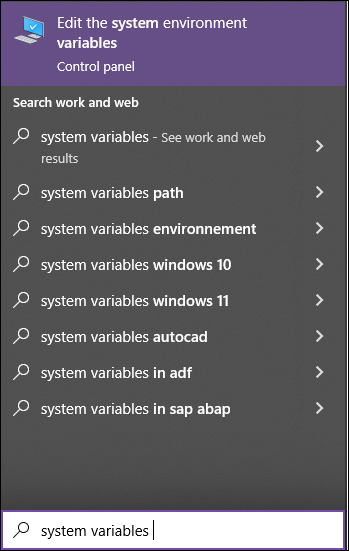
1. Type system variables into the search bar and click the Edit the system environment variables option.
2. Under the User variables section, select Path and click the Edit button.

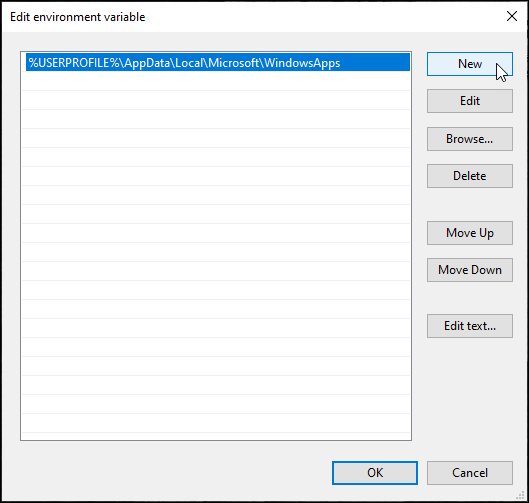
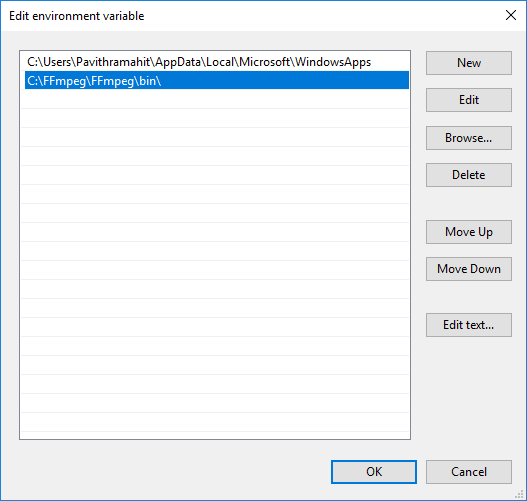
3. Choose New from the side menu.
4. Add C:ffmpegbin to the empty field and confirm changes with OK.
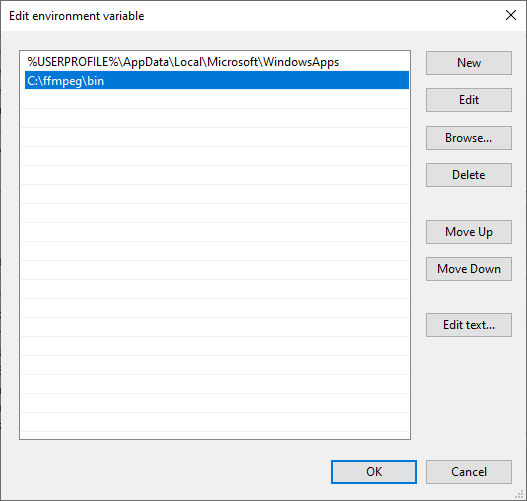
The change in the Path variable line confirms the FFmpeg is added to PATH.
Note: If you stored FFmpeg in a folder other than the C drive, use that path accordingly.
Step 4: Verify FFmpeg PATH
To verify the FFmpeg is correctly added to the Windows PATH, open the Command Prompt or PowerShell and run:
ffmpegThe output confirms the installation:

Conclusion
This article provided an easy step-by-step guide on installing FFmpeg on Windows.
For more tutorials refer to our article and learn how to install FFmpeg on MacOS.
Next, learn how to change or reset the administrator password on the Windows server.
FFmpeg is a popular software for processing, converting, or manipulating video and audio files. The program is used for endless things like rotating videos, scaling videos, extracting information about videos, and many others. It is an open-source program that is simply awesome for video scaling, format transcoding, decoding, encoding, demuxing, streaming, filtering, converting audio files, recording live audio/video, handling video and other multimedia files. This multimedia framework is designed for command-line-based processing of multimedia files, and you can make basic edits with single-line commands.
While the program is simple to use, accessing FFmpeg to execute commands is a little confusing. Installing and using FFmpeg can take a lot of time as you need to manually open the FFmpeg folder within the command prompt or Power Shell terminal to access the FFmpeg executive file to execute relevant commands for basic editing. If you are stuck with installing and using FFmpeg on your machine, you are in the right place.
To make things simple, all you have to do is install FFmpeg and add the FFmpeg program to the Windows path using Environment variables. This way you can directly access FFmpeg from a Command prompt or Power Shell in any directory. In this article, we explain how to install FFmpeg on Windows in order to access FFmpeg directly from Command Prompt or PowerShell
Get the latest FFmpeg build from the official website here. You can either download the 32-bit version or the 64-bit version that suits your system. Click the Download Build button to start downloading.
The program doesn’t work directly on Windows 10. You need to add a program to the system path using Environment Variables.
So navigate to the downloaded folder where the FFmpeg zip file is a store. Right-click on the Zip folder and click extract from the drop-down menu.
Select the folder or drive where you want to extract.
Next, rename the extracted folder. To rename the folder, right-click on a folder and click Rename from the drop-down menu with title FFmpeg-20180424-d9706f7-win64-static to FFmpeg.
Copy the FFmpeg folder and navigate to C drive. Paste the folder to the root of C drive.
Once done, the next step is to enable FFmpeg using Command Prompt.
Add FFmpeg to Windows path using Environment variables
To use FFmpeg in Command Prompt, you need first to add the bin folder containing the FFmpeg executable file to your Windows path
In the Windows search menu, type Edit the system environment variables and click Enter. This will open the system properties window.
Navigate to Advanced button and click Environment Variables at the bottom of the window.
In the Environment Variables window, Select the variable Path and click Edit to change the Path variable.
Click New and type the path of FFmpeg folder “C:ffmpegbin” and click OK.
Type the path directory according to the drive or folder where you have placed FFmpeg folder.
Once done, the path gets added to the Environment variables. Click OK to apply changes.
Verify FFmpeg path in Command Prompt
Launch Command Prompt and type the command FFmpeg in the command prompt terminal and hit Enter.
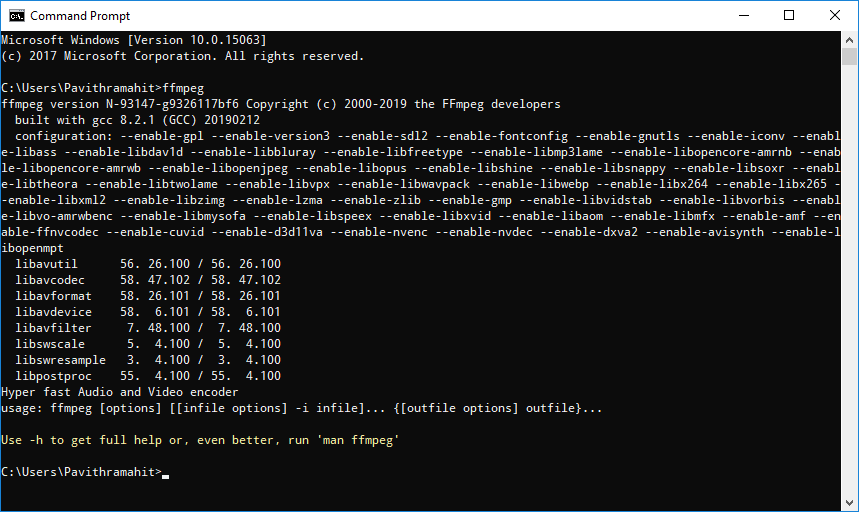
If the FFmpeg is added properly to Windows Path, the command prompt will display the details about FFmpeg like its version number, configuration, etc.

If you weren’t successful, it only means that your command prompt did not recognize the commands. Cross-check to see if you have added the FFmpeg folder to the system path properly.
Read: Fix Audacity FFmpeg error on Windows PC.
That’s all!
FFmpeg is a popular software for processing, converting, or manipulating video and audio files. The program is used for endless things like rotating videos, scaling videos, extracting information about videos, and many others. It is an open-source program that is simply awesome for video scaling, format transcoding, decoding, encoding, demuxing, streaming, filtering, converting audio files, recording live audio/video, handling video and other multimedia files. This multimedia framework is designed for command-line-based processing of multimedia files, and you can make basic edits with single-line commands.
While the program is simple to use, accessing FFmpeg to execute commands is a little confusing. Installing and using FFmpeg can take a lot of time as you need to manually open the FFmpeg folder within the command prompt or Power Shell terminal to access the FFmpeg executive file to execute relevant commands for basic editing. If you are stuck with installing and using FFmpeg on your machine, you are in the right place.
To make things simple, all you have to do is install FFmpeg and add the FFmpeg program to the Windows path using Environment variables. This way you can directly access FFmpeg from a Command prompt or Power Shell in any directory. In this article, we explain how to install FFmpeg on Windows in order to access FFmpeg directly from Command Prompt or PowerShell
Get the latest FFmpeg build from the official website here. You can either download the 32-bit version or the 64-bit version that suits your system. Click the Download Build button to start downloading.
The program doesn’t work directly on Windows 10. You need to add a program to the system path using Environment Variables.
So navigate to the downloaded folder where the FFmpeg zip file is a store. Right-click on the Zip folder and click extract from the drop-down menu.
Select the folder or drive where you want to extract.
Next, rename the extracted folder. To rename the folder, right-click on a folder and click Rename from the drop-down menu with title FFmpeg-20180424-d9706f7-win64-static to FFmpeg.
Copy the FFmpeg folder and navigate to C drive. Paste the folder to the root of C drive.
Once done, the next step is to enable FFmpeg using Command Prompt.
Add FFmpeg to Windows path using Environment variables
To use FFmpeg in Command Prompt, you need first to add the bin folder containing the FFmpeg executable file to your Windows path
In the Windows search menu, type Edit the system environment variables and click Enter. This will open the system properties window.
Navigate to Advanced button and click Environment Variables at the bottom of the window.
In the Environment Variables window, Select the variable Path and click Edit to change the Path variable.
Click New and type the path of FFmpeg folder “C:ffmpegbin” and click OK.
Type the path directory according to the drive or folder where you have placed FFmpeg folder.
Once done, the path gets added to the Environment variables. Click OK to apply changes.
Verify FFmpeg path in Command Prompt
Launch Command Prompt and type the command FFmpeg in the command prompt terminal and hit Enter.
If the FFmpeg is added properly to Windows Path, the command prompt will display the details about FFmpeg like its version number, configuration, etc.
If you weren’t successful, it only means that your command prompt did not recognize the commands. Cross-check to see if you have added the FFmpeg folder to the system path properly.
Read: Fix Audacity FFmpeg error on Windows PC.
That’s all!
Did you receive a video with those annoying black bars on the side? Do you wonder how you could change the orientation and remove those black bars? Or maybe you want to create a montage of your favorite pictures and make a music video. You can do all that for free when you install FFmpeg.
Not a reader? Watch this related video tutorial!
Not seeing the video? Make sure your ad blocker is disabled.
In this guide, you will learn to install FFmpeg and how to use it by following many examples. By the end, you’ll have acquired the foundation to start converting and altering media files!
Prerequisites
This tutorial will be a hands-on demonstration. If you’d like to follow along, be sure you have the following.
- You’ll need a computer running on a compatible operating system, such as Windows, Linux (RHEL-based, Debian-based, or Ubuntu-based), and macOS. This tutorial will be using Ubuntu 20.04, Windows 10, and macOS Big Sur for the installation.
While the installation method varies, FFmpeg usage should be the same across different operating systems.
- Your computer must have at least 4GB of RAM and a two-core CPU. Multimedia processing is generally a resource-intensive task. As such, your computer must have decent hardware capacity.
Installing FFmpeg on Ubuntu
FFmpeg is available in the default repositories of most Linux distributions. Conveniently, you can install FFmpeg through your distro’s package manager, such as apt in Ubuntu.
To install FFmpeg on Ubuntu, follow these steps:
1. SSH into your Ubuntu server and update the apt package index.
2. Next, install FFmpeg and all the necessary libraries.
3. Finally, check the FFmpeg version you installed.
You will see an output similar to the following screenshot. Your version may be different.
Installing FFmpeg on Windows 10
So far, you have learned how to install FFmpeg on Ubuntu. Now, know two ways to install FFmpeg on Windows 10 in this section.
Method 1: Install FFmpeg via PowerShell
This method gives you more control over where to download and install FFmpeg on your computer. Best of all, you’ll perform everything within PowerShell.
To install FFmpeg on Windows 10, follow these steps.
1. Open a PowerShell as administrator on your computer.
2. Create the folder where you’ll download and install FFmpeg. This command creates the folder C:ffmpeg.
New-Item -Type Directory -Path C:ffmpeg ; Set-Location C:ffmpeg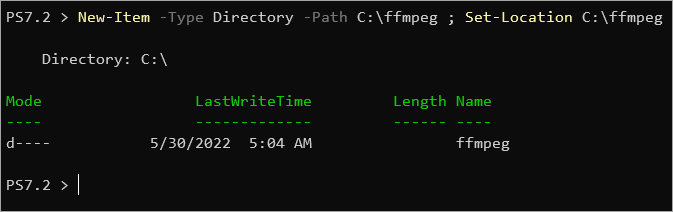
3. Run the below command to download the latest FFmpeg release for Windows. This command saves the file as ffmpeg.zip.
curl.exe -L 'https://www.gyan.dev/ffmpeg/builds/ffmpeg-release-essentials.zip' -o 'ffmpeg.zip'
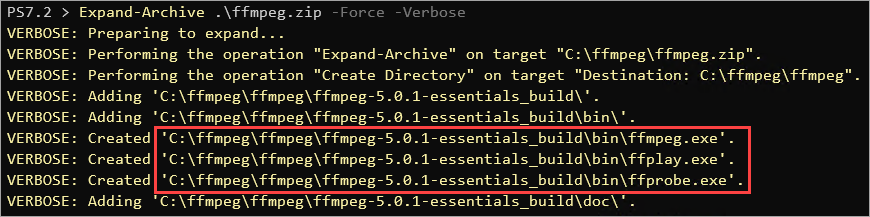
4. After downloading, extract the ffmpeg.zip file to the current directory. To do so, run the Expand-Archive command below.
# Expand the Zip
Expand-Archive .ffmpeg.zip -Force -Verbose
As you can see, the command extracted all files from the zip file. The only files you’ll need are the executable files.
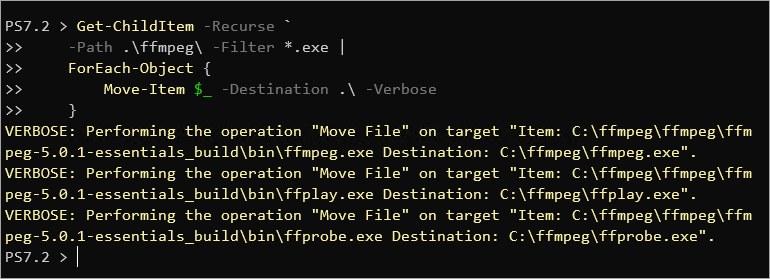
5. Move the executable files to the top folder for simplicity and quick access.
# Move the executable (*.exe) files to the top folder
Get-ChildItem -Recurse `
    -Path .ffmpeg -Filter *.exe |
    ForEach-Object {
        Move-Item $_ -Destination . -Verbose
    }
6. Now, clean up the FFmpeg directory by deleting the unnecessary files and folder.
# Clean up
Remove-Item .ffmpeg -Recurse
Remove-Item .ffmpeg.zip
# List the directory contents
Get-ChildItem
At this point, only the executable files remain

7. Now, prepend the C:ffmpeg folder to the system path environment variable. This step ensures that you can run the ffmpeg.exe command from any directory without specifying the full path.
# Prepend the FFmpeg folder path to the system path variable
[System.Environment]::SetEnvironmentVariable(
    "PATH",
    "C:ffmpeg;$([System.Environment]::GetEnvironmentVariable('PATH','MACHINE'))",
    "Machine"
)
8. For the new system variables to take effect, perform either one of the two options below.
Note: You only need to do either option once. Every subsequent PowerShell or CMD session will pick up the environment variables automatically.
Option 1: Close your current PowerShell session and open a new one.
Option 2: Run the below command in the current PowerShell session to import the machine’s PATH variable into the current session.
$env:Path = [System.Environment]::GetEnvironmentVariable("Path","Machine")9. Finally, check the FFmpeg version by running the below command.
As you can see, you don’t need to specify the full path of the ffmpeg.exe executable file due to what you did in steps 5 and 6.

Method 2: Install FFmpeg via Chocolatey
Since Windows 10 does not have a default package manager like Ubuntu’s apt, an excellent alternative is to use Chocolatey.
Follow the steps below to install FFmpeg via Chocolatey.
1. If you don’t have Chocolatey yet, open an elevated PowerShell terminal and run the following code to install.
Set-ExecutionPolicy Bypass -Scope Process -Force; [System.Net.ServicePointManager]::SecurityProtocol = [System.Net.ServicePointManager]::SecurityProtocol -bor 3072; iex ((New-Object System.Net.WebClient).DownloadString('https://community.chocolatey.org/install.ps1'))2. After installing Chocolatey, close your current PowerShell window and reopen a new one. On your new PowerShell window, run the following command to install FFmpeg.
Type Y and press Enter at the confirmation prompt.
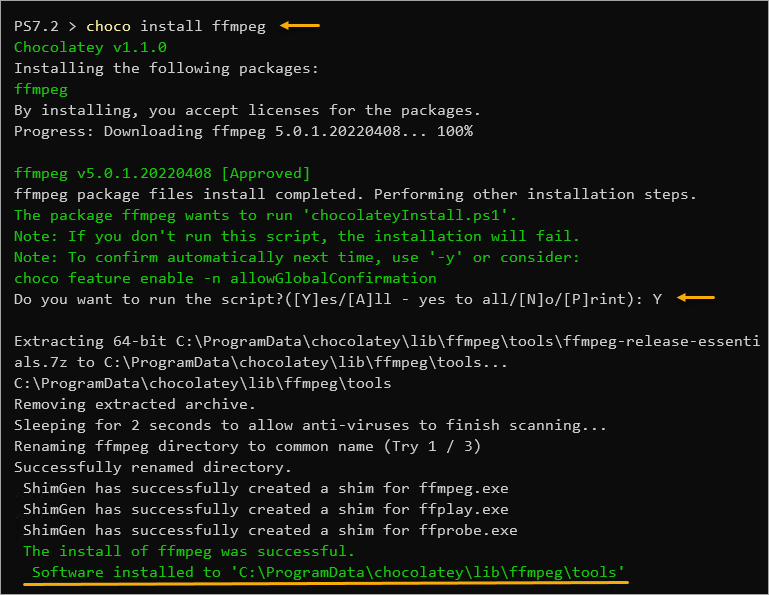
3. Finally, check the FFmpeg version you installed.

Installing FFmpeg on macOS
If you’re using a macOS computer, the most convenient way to install FFmpeg is through Homebrew. Homebrew is a package manager for macOS but does not come out of the box.
1. Open a terminal window on your macOS computer.
2. If you don’t have Homebrew yet, run the below command to install it on your computer.
/bin/bash -c "$(curl -fsSL https://raw.githubusercontent.com/Homebrew/install/HEAD/install.sh)"3. Once you’ve installed Homebrew, run the below command in the terminal to install FFmpeg.
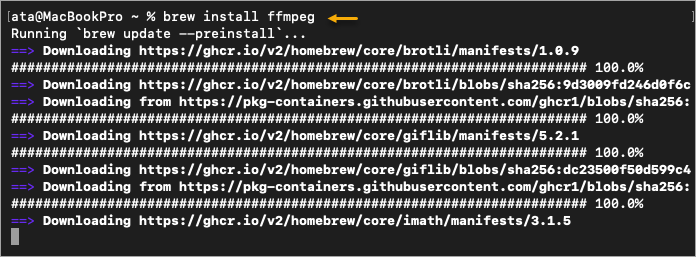
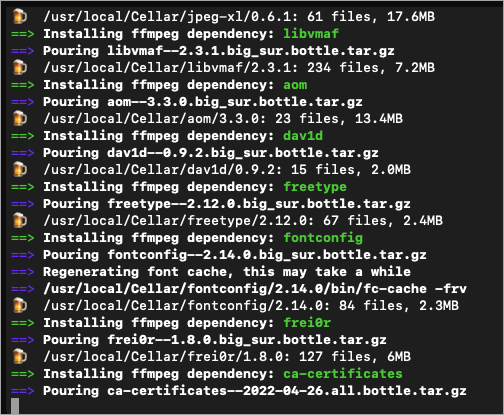
As you can see below, Homebrew automatically detects and installs every FFmpeg dependency.
Installing FFmpeg on macOS could take several minutes, especially when many dependencies are missing. Be patient.
4. Finally, check your version of FFmpeg by running the below command.

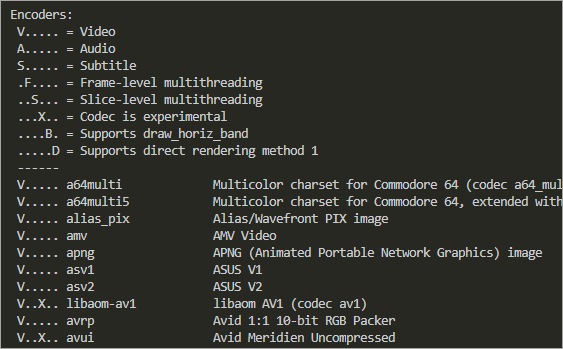
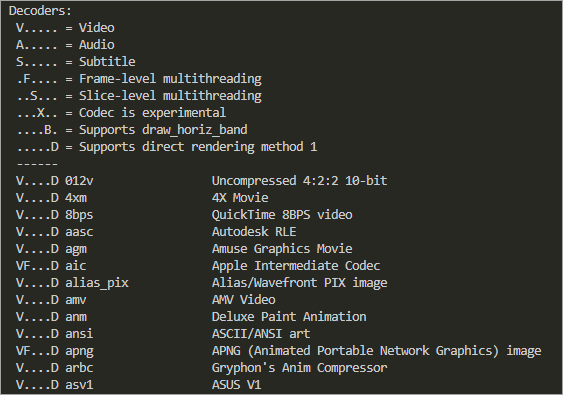
Listing Available Encoders and Decoders
FFmpeg is known for its media processing capabilities, especially in converting media formats. Converting media files between different formats involves encoding and decoding. What enables FFmpeg to convert media files are the encoders and decoders.
These encoders and decoders determine which media file formats FFmpeg can process. How do you know which encoders and decoders come with FFmpeg?
To display the list of encoders or decoders, run the commands below.
# Show encoders
ffmpeg -encoders
# Show decoders
ffmpeg -decoders
The below screenshots show only a portion of the available encoders and decoders. The legend at the beginning indicates whether the encoder supports video, audio, subtitles, etc.
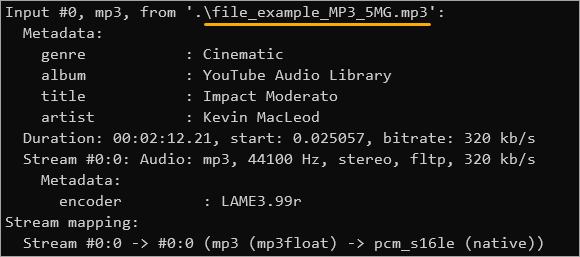
Extracting Media File Information
After installing FFmpeg, the first thing you will want to do is to get the essential information about a media file. This information includes the duration of a video or which codecs were used during an audio file encoding.
To get a file’s media information, run the below command. Ensure to provide the correct filename after the -i option. The -f null – flag prevents FFmpeg from encoding the output to a file, where null means no file format and – means no filename.
This example uses a sample MP3 file named file_example_MP3_5MG.mp3 downloaded from this link.
ffmpeg -i .\file_example_MP3_5MG.mp3 -f null -
As you can see, the input file information shows the metadata, bitrate, duration, and container format, among others.
Converting Media Files with FFmpeg (Examples)
Suppose you have a WEBM video file that you want to watch on your smart TV. But your TV does not support the WEBM format. You can use FFmpeg to convert the WEBM file to a format that your TV supports, such as MP4.
This example uses a sample video file called file_example_WEBM_1920_3_7MB.webm downloaded from this link.
Example 1: Basic Conversion with Automatic Codec Selection
The command is as follows to perform a basic conversion of a video format. This command takes file_example_WEBM_1920_3_7MB.webm as the input, converts it, and saves the output file file_example_MP4_1920_3_7MB.mp4.
ffmpeg -i file_example_WEBM_1920_3_7MB.webm file_example_MP4_1920_3_7MB.mp4
Notice that you didn’t have to specify the output format? Because FFmpeg recognized the format since MP4 is well-known and uses the correct codecs and encoders.
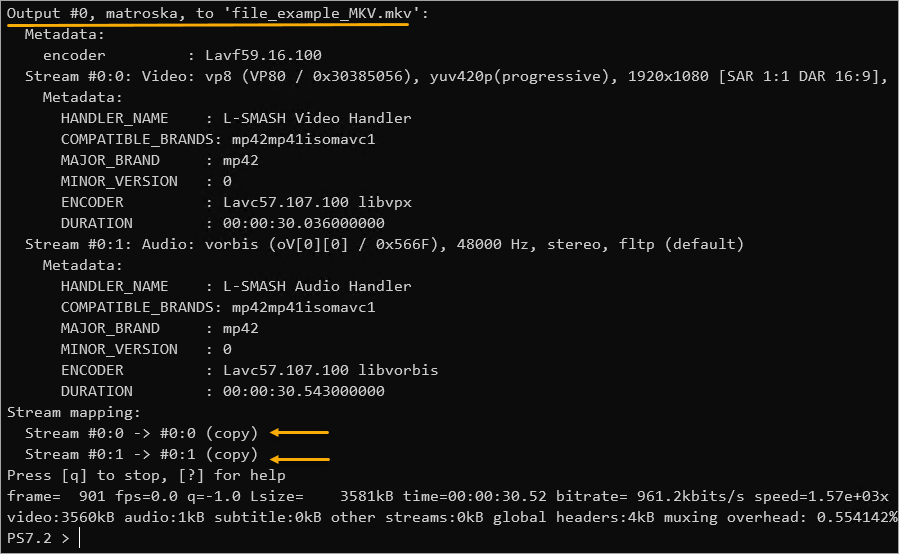
Example 2: Changing the Container without Encoding
In some cases, you may want to change a file container into another without re-encoding the video or audio streams. One reason could be that you’ve already encoded the streams correctly but chose the wrong container in the first place.
To change contains without transcoding, run the below command. This command uses the -c:a copy and -c:v copy options to copy the audio and video streams from a WEBM into an MKV container.
ffmpeg -i file_example_WEBM_1920_3_7MB.webm -c:v copy -c:a copy file_example_MKV.mkv
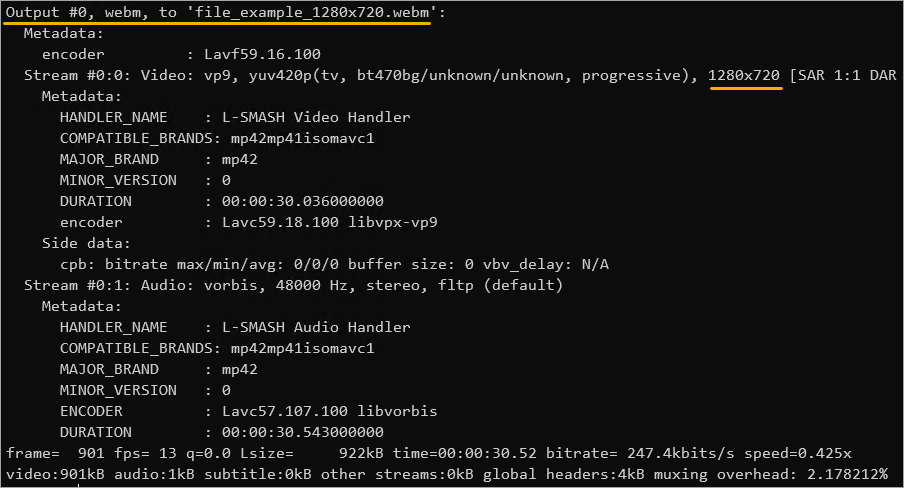
Example 3: Changing the Video Resolution
What you are mainly playing videos on a small screen, perhaps on a mobile phone. Smaller screens may have fewer benefits with higher video resolutions, such as 1920×1080, and bigger file sizes.
In such cases, FFmpeg can resize a video to a smaller resolution, like 1280×720. To do so, run the following command. This command uses the -c:a copy option to copy the audio stream (without conversion), and the -s 1280×720 option specifies the output video resolution.
ffmpeg -i file_example_WEBM_1920_3_7MB.webm -c:a copy -s 1280x720 file_example_1280x720.webm
Example 4: Extracting Audio from a Video File
You can also use FFmpeg to extract the audio from a video file. This FFmpeg usage is widespread for converting music videos or instructional videos to audio files like MP3 and OGG.
To extract the audio from a video file, run the below command. This command uses the -vn option to disable the video stream and save the output to an MP3 file.
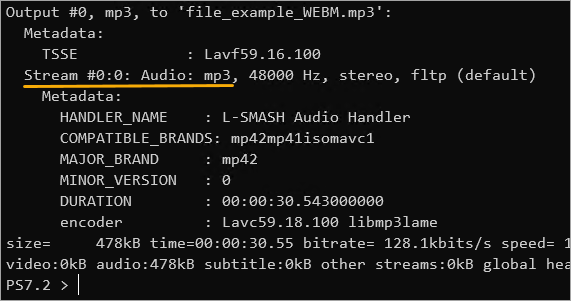
ffmpeg -i file_example_WEBM_1920_3_7MB.webm -vn file_example_WEBM.mp3
As you can see below, the input file had two streams; Stream#0:0 for video and Stream#0:1 for audio.
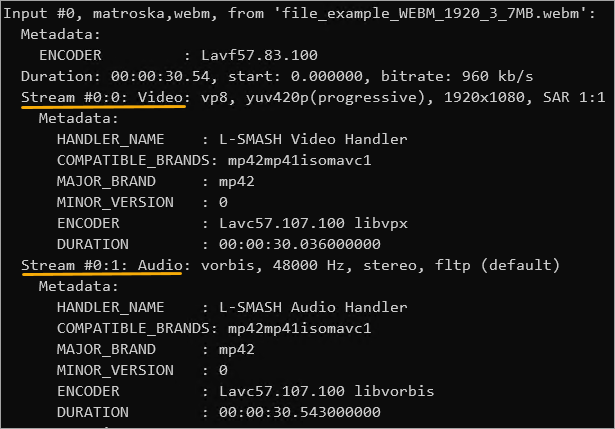
But the output only contains one stream, which is the audio-only since you’ve disabled the video stream.
Conclusion
FFmpeg is a powerful multimedia tool for converting media files between different formats and extracting audio from video files. This guide taught you how to install FFmpeg and used its command with several real-life examples.
With FFmpeg, you can make your media files work on any device or platform. So don’t be afraid to give it a try. Don’t stop here! There’s a lot more you can do with FFmpeg, like how to compress a large video file to save space or extract all the images from a movie to create a photo gallery.
For more ideas, check out the FFmpeg documentation. Thanks for reading, and happy learning!
Key Takeaways:
- FFmpeg is a free and open-source software library for processing and manipulating audio and video files. It is widely used by professionals and enthusiasts alike for a variety of purposes, including transcoding, basic editing, and more advanced tasks such as filtering and streaming.
- Installing FFmpeg on Windows is a simple process that can be completed in just a few steps. However, it is important to follow the instructions carefully to avoid any issues.
- To use FFmpeg from the command prompt, you must add it to the Windows path. This allows you to access FFmpeg from any location on your computer, rather than just from the installation directory.
Need FFmpeg to process audio or video on your Windows system? This article shows how to install FFmpeg on Windows in four simple steps.
Installing FFmpeg on your Windows machine is a simple process that can open up a world of possibilities for audio and video processing. With its powerful suite of tools, FFmpeg allows you to perform a wide range of tasks, from basic editing to complex transcoding.
Whether you’re a beginner or an advanced user, FFmpeg is a valuable tool to have in your arsenal.
In this tutorial, I’ll show you how to easily install FFmpeg on your Windows machine and start using its full potential. By following this step-by-step guide, you’ll be up and running with FFmpeg in no time!
Table of contents:
- What is FFmpeg, and why is it useful?
- Prerequisites to install FFmpeg
- How to install FFmpeg on Windows
- Download FFmpeg on Windows
- Extract FFmpeg to a folder
- Add FFmpeg to Windows path
- Verify FFmpeg installation
- FFmpeg installation on Windows video guide
- Frequently asked questions (FAQ)
1. What is FFmpeg, and why is it useful?
FFmpeg is a free, open-source software library for processing and manipulating audio and video files. It is widely used by beginners, professionals, and enthusiasts alike for a variety of purposes, including transcoding, basic editing, downloading, and more advanced tasks such as filtering and streaming.
One of the major advantages of FFmpeg is its versatility. It supports a wide range of audio and video formats and can perform a variety of tasks on these files, including transcoding, cutting, merging, and more. For example, I’ve already written detailed guides on using FFmpeg to convert video and audio files, split audio files, download HLS streaming videos, and more. This makes it a valuable tool for anyone working with audio and video, as it allows you to process and manipulate your media files in a flexible and powerful way.
Another advantage of FFmpeg is its speed. It is known for performing tasks quickly and efficiently, making it a great choice for time-sensitive projects. Additionally, FFmpeg is constantly being updated and improved by a dedicated community of developers, ensuring that it stays current and relevant.
Overall, FFmpeg is a valuable tool for anyone working with audio and video files. Its versatility, speed, and ongoing development make it a powerful and reliable choice for a wide range of tasks.
The steps below work the same in Windows 10 and 11.
2. Prerequisites to install FFmpeg
To install FFmpeg on Windows, you need the following.
- Archiving software like 7-zip or WinRAR.
- Access to Command Prompt, PowerShell, or Terminal.
- Administrative privileges to add FFmpeg to Windows path.
Installing FFmpeg is a bit different from installing general software. This is because FFmpeg is a portable command-line tool. That being said, it is still just as easy.
You can install FFmpeg in four simple steps. i.e., download FFmpeg, extract FFmpeg files to a folder, add FFmpeg to Windows path, and verify FFmpeg installation. Let me show you how to do it.
3.1 Download FFmpeg on Windows
First, use the below link to go to the FFmpeg developer website. Once you are here, click the “Windows” icon under the “Get packages” heading and then click the “gyan.dev” link.
FFmpeg download link: https://ffmpeg.org/download.html

In the gyan.dev page, click on the “ffmpeg-git-full.7z” package link.

This action downloads FFmpeg in 7z archive format.
After downloading the FFmpeg archive file, you must extract the archive to a folder.
To extract FFmpeg, find the downloaded file, right-click on it, and choose the “7-Zip -> Extract here” option.
As soon as you do that, 7-Zip should extract the archive contents to a new folder.
Generally, the extract folder’s name may contain the current FFmpeg version and build number. For ease of use, I recommend renaming the extracted folder to “ffmpeg.” Though not necessary, renaming the folder makes adding it to the Windows path easy.
After that, move the folder to the root of the C drive. Just like renaming, this step is entirely optional. However, this makes it easy to add the folder to the Windows path.

3.3 Add FFmpeg to Windows path
To complete the installation process, we must add FFmpeg to the Windows Path environment variable. Adding FFmpeg to the path allows you to execute FFmpeg commands directly from any folder. i.e., without having to navigate to the FFmpeg folder first. Here’s how to do it.
In Windows 11 & 10:
First, press the “Start” button on the taskbar, search for “View advanced system settings,” and open it. It will open the “System Properties” window.
Go to the “Advanced” tab in the System Properties window and click on the “Environment Variables” button at the bottom.

As you’d assume, the above action opens the Environment Variables window. Here, Select the “Path” variable under the “User variables” section and click “Edit.”
Note: If you want to add FFmpeg to the path for all users, select the “Path” variable under the “System Variables” section.

Once you are in the “Edit environment variable” window, click on the “New” button.

Type “C:ffmpegbin” in the blank field and click on the “Ok” button.
Note: If you’ve placed the FFmpeg folder in some other folder or drive, change the directory path accordingly.

Once FFmpeg is added to the Windows Path variable, this is how it looks in the main Environment Variables window. Click on the “Ok” button to save changes.

That’s it. Close the main window, and you are good to go.
In Windows 7 and 8:
Adding FFmpeg to Windows 7 path is similar to Windows 10 and 11, but the user interface is slightly different. Let me show you how to do it.
Open the Start menu by pressing the “Start” key on your keyboard. Next, search for “Edit System Environment Variables” and click on the result.
After opening it, go to the “Advanced” tab and click on the “Environment Variables” button. Find and select the “Path” variable under “System Variables,” and click on the “Edit” button.

Go to the end of the line in the “Variable Value” field and add ;C:ffmpegbin. Click on the “Ok” button to save changes. Each path you add to the value field should be separated by ;.

Note: If the FFmpeg folder is in some other folder or drive, change the path accordingly.
3.4 Verify FFmpeg installation
After installing FFmpeg on Windows, it is prudent that you verify the installation. That way, you can be sure that you can execute FFmpeg commands, and third-party applications that rely on FFmpeg can recognize and use FFmpeg.
To check if FFmpeg is installed and added to the Windows path, do the following:
First, right-click the “Start” icon on the taskbar and choose “Terminal.” You can also open PowerShell or Command Prompt by searching for it in the Start menu.
After opening the terminal or Command Prompt window, type ffmpeg, and press Enter. If FFmpeg is installed and added to the Windows path properly, you will see a list of options and commands you can use with FFmpeg.

With that, you’ve successfully installed FFmpeg in Windows operating system.
FFmpeg installation on Windows video guide
If you’re interested in learning how to install FFmpeg on your Windows machine, be sure to check out the video guide below. In the video, I’ll walk you through the entire process step by step, highlighting important points and providing helpful tips along the way.
Frequently asked questions (FAQ)
Here are a few frequently asked questions on FFmpeg, its installation process, common errors, and other issues:
Where to download FFmpeg?
FFmpeg is free and open-source software. You can download FFmpeg directly from the developer’s website. You don’t have to pay to download, install, or use FFmpeg on Windows.
How do I install FFmpeg on Windows?
You can install FFmpeg in three steps. First, download FFmpeg, extract the archive file to a folder, and add the folder to the Windows path. For detailed steps, follow the steps above.
How do I know if FFmpeg is installed on Windows?
To check if FFmpeg is installed on your Windows machine, open Command Prompt, type “ffmpeg,” and press “Enter.” If FFmpeg is installed, you will see a list of options and commands that you can use with FFmpeg. If FFmpeg is not installed, you will see an error message indicating that the program could not be found.
What to do if FFmpeg dll is missing?
If you are seeing a “FFmpeg dll is missing” error, it means that the FFmpeg library file, which is required for the program to run, is not present on your system. To fix this error, you will need to remove the old installation and reinstall FFmpeg on Windows.
How to fix FFmpeg not found error?
This error usually means that FFmpeg is either not installed or not added to the Windows path. Simply reinstall FFmpeg and add it to the Windows path to fix the “FFmpeg not found” error.
That is all. It is that simple to install FFmpeg on Windows and add FFmpeg to the path in Windows.
I hope this simple and easy Windows how-to guide helped you.
If you are stuck or need help, send an email, and I will try to help as much as possible.
FFmpeg — это популярное программное обеспечение для обработки, конвертации или обработки видео и аудио файлов. Программа используется для бесконечных вещей, таких как вращение видео, масштабирование видео, извлечение информации о видео и многое другое. Это программа с открытым исходным кодом, которая просто великолепна для масштабирования видео, транскодирования форматов, декодирования, кодирования, демультиплексирования, потоковой передачи, фильтрации, преобразования аудиофайлов, записи живого аудио/видео, обработки видео и других мультимедийных файлов. Этот мультимедийный каркас предназначен для обработки мультимедийных файлов на основе командной строки, и вы можете вносить базовые изменения с помощью однострочных команд.
Хотя программа проста в использовании, доступ к FFmpeg для выполнения команд немного сбивает с толку. Установка и использование FFmpeg может занять много времени, так как вам нужно вручную открыть папку FFmpeg в командной строке или в терминале Power Shell для доступа к исполнительному файлу FFmpeg для выполнения соответствующих команд для базового редактирования. Если вы застряли с установкой и использованием FFmpeg на вашем компьютере, вы находитесь в правильном месте.
Чтобы упростить задачу, все, что вам нужно сделать, это установить FFmpeg и добавить программу FFmpeg в путь Windows 10 с помощью переменных среды. Таким образом, вы можете получить прямой доступ к FFmpeg из командной строки или Power Shell в любом каталоге. В этой статье мы расскажем, как установить FFmpeg в Windows 10, чтобы получить доступ к FFmpeg напрямую из командной строки или PowerShell.
Получить последнюю сборку FFmpeg можно с официального сайта. Вы можете скачать 32-битную или 64-битную версию, подходящую для вашей системы. Нажмите кнопку Download Build , чтобы начать загрузку.
Программа не работает напрямую в Windows 10. Вам необходимо добавить программу в системный путь, используя переменные среды.
Перейдите в загруженную папку, где находится файл FFmpeg.zip. Щелкните правой кнопкой мыши папку Zip и в раскрывающемся меню выберите извлечь.

Выберите папку или диск, куда вы хотите извлечь.
Далее переименуйте извлеченную папку. Чтобы переименовать папку, щелкните правой кнопкой мыши папку и выберите «Переименовать» в раскрывающемся меню с заголовком FFmpeg-20180424-d9706f7-win64-static в FFmpeg.
Скопируйте папку FFmpeg и перейдите на диск C. Вставьте папку в корень диска C.

После этого следующим шагом будет включение FFmpeg с помощью командной строки.
Чтобы использовать FFmpeg в командной строке, сначала необходимо добавить папку bin, содержащую исполняемый файл FFmpeg, в path Windows.
В меню поиска Windows введите Изменить системные переменные среды и нажмите Enter. Откроется окно свойств системы.
Перейдите к кнопке «Дополнительно» и нажмите «Переменные среды» в нижней части окна.
В окне Переменные среды выберите переменную Path и нажмите «Изменить», чтобы изменить переменную Path.
Нажмите Новый и введите путь к папке FFmpeg «C:ffmpegbin» и нажмите OK.
Введите каталог пути в соответствии с диском или папкой, в которую вы поместили папку FFmpeg.

После этого путь добавляется к переменным окружения. Нажмите кнопку ОК, чтобы применить изменения.
Проверьте доступность FFmpeg в командной строке
Запустите командную строку, введите команду ffmpeg в терминале командной строки и нажмите Enter.
Если FFmpeg правильно добавлен в путь к Windows, в командной строке отобразятся сведения о FFmpeg, такие как номер версии, конфигурация и т.д.
Если вы не добились успеха, это означает, что ваша командная строка не распознала команду. Перепроверьте, правильно ли вы добавили папку FFmpeg в системный путь.
Improve Article
Save Article
Improve Article
Save Article
The ffmpeg is a cross-platform & open-source software utility to record, convert and stream video/audio files. It can be used to:
- Change the format of a video/audio file
- Extract audio from video file
- Merge audio and video streams
- Change the bitrate of a video/audio file
- Create GIF from a video file
- Extract still images from a video file
- To embed subtitles into a video file
- To compress or resize a video/audio file
- Record a live stream
In this article, we will show you how to install ffmpeg in Windows.
Installing FFmpeg on windows:
Follow the below steps to install FFmpeg on windows:
Step 1: Click here to download the zip file of the latest version. (As of September 2021, version 4.4 is the latest)

Step 2: Unzip this file by using any file archiver such as Winrar or 7z.
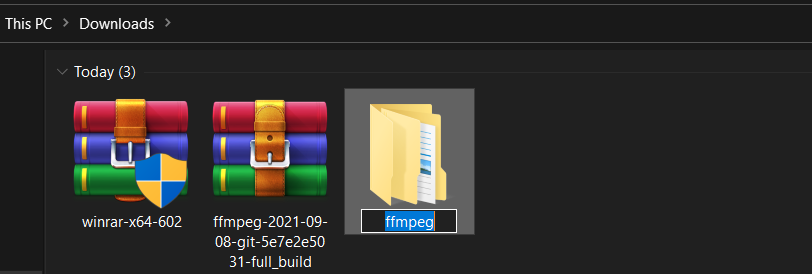
Step 3: Rename the extracted folder to ffmpeg and move it into the root of C: drive.
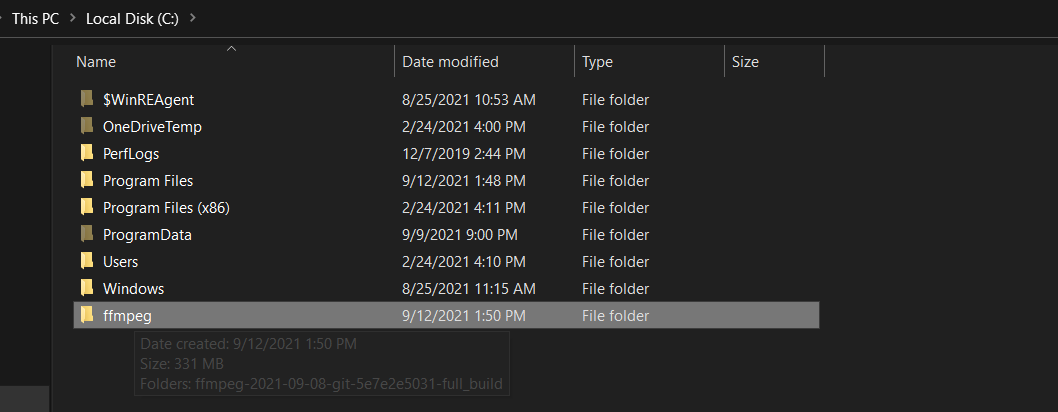
Step 4: Now, run cmd as an administrator and set the environment path variable for ffmpeg by running the following command:
setx /m PATH "C:ffmpegbin;%PATH%"
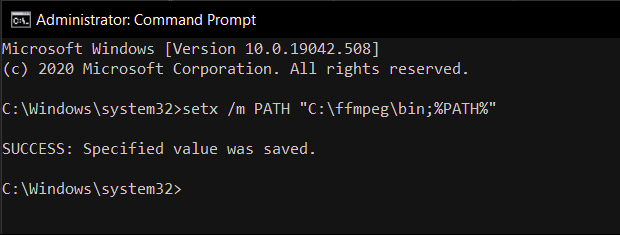
Step 5: Restart your computer and verify the installation by running:
ffmpeg -version